


Languages
Pages
Legal


Adding Electronics to 3D Printed
Action Heroes
Anna Gerber
Anna Gerber
3D Action Heroes

Outline
• Previously: 3D Sculpting Action Heroes
– Generating base models
– Slicing into parts & adding joints
– Customizing via 3D sculpting tools
• Last week: 3D Printing Action Heroes
– Recap Meshmixer & finish models
– Preparing parts for 3D printing
– 3D printing
– Cleaning up 3D printed parts
• Today: Adding electronics to 3D printed Action Heroes
– Make them interactive
– Electronics & coding
– Assembly
Anna Gerber
3D Action Heroes
Outline
• Clean up 3D printed parts
• Soldering
• Micro-controller programming
• Design & test the circuits
• Assemble the action hero
• Decoration
• Discussion of painting / finishing techniques
Anna Gerber
3D Action Heroes

Clean up parts
• Remove raft
• Remove support using pliers and cutters
• Test that parts fit together
• Optional : use hobby knife or fine sandpaper to
tidy up / adjust fit
Anna Gerber
3D Action Heroes
Breadboard
Anna Gerber
3D Action Heroes
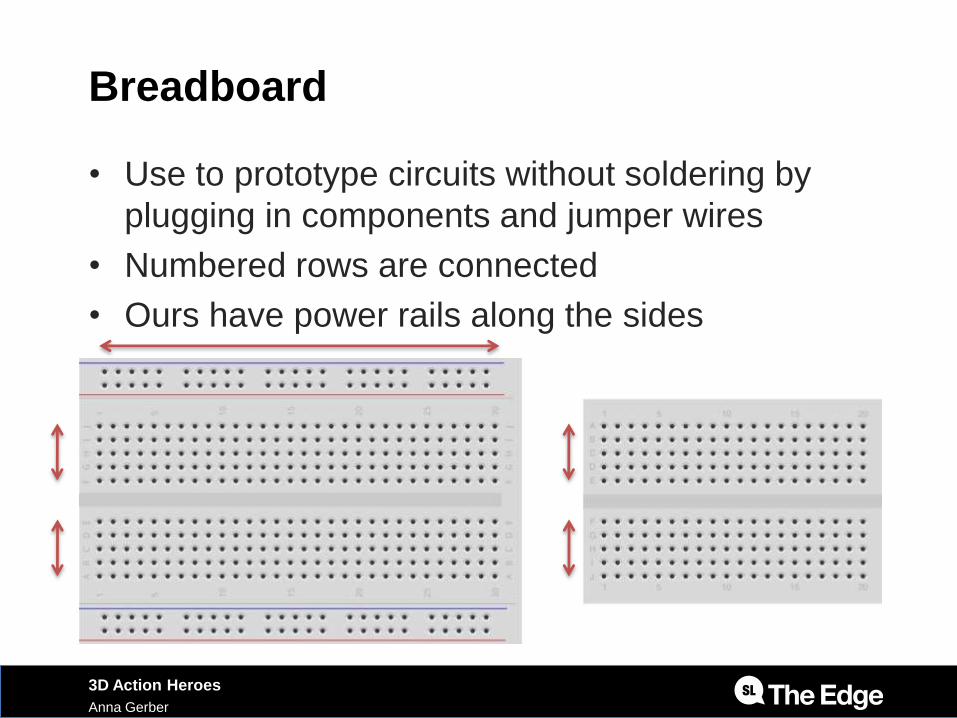
• Use to prototype circuits without soldering by
plugging in components and jumper wires
• Numbered rows are connected
• Ours have power rails along the sides
IC test hooks
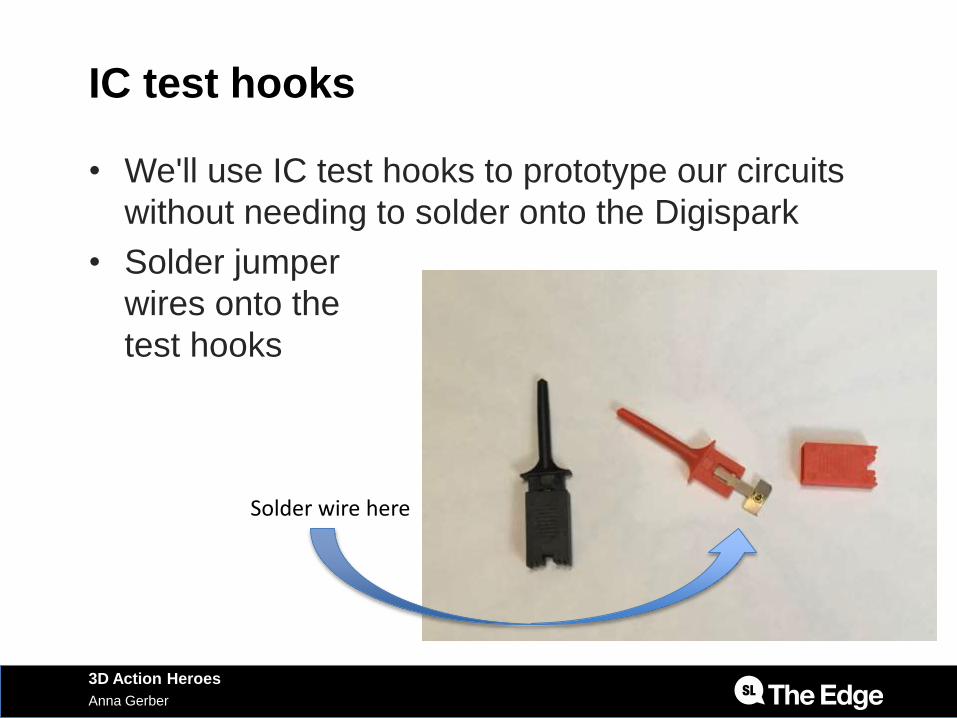
• We'll use IC test hooks to prototype our circuits
without needing to solder onto the Digispark
• Solder jumper
wires onto the
test hooks
Anna Gerber
3D Action Heroes
Solder wire here

Soldering
Anna Gerber
3D Action Heroes
From Soldering is easy by Mitch Altman, Andie Nordren and Jeff Keyzer
Electricity
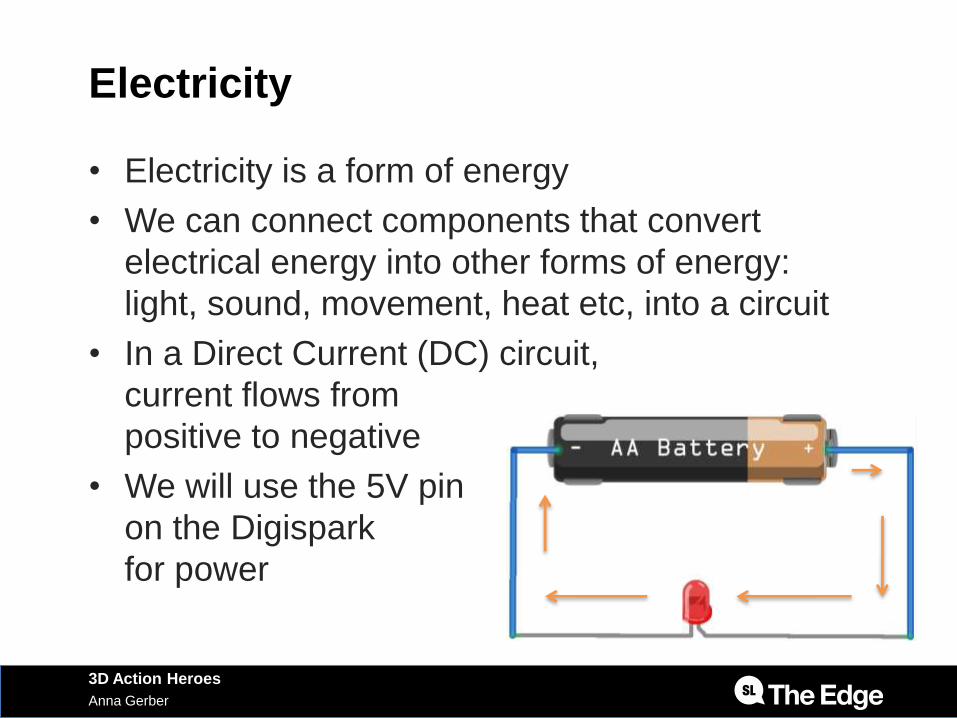
• Electricity is a form of energy
• We can connect components that convert
electrical energy into other forms of energy:
light, sound, movement, heat etc, into a circuit
• In a Direct Current (DC) circuit,
current flows from
positive to negative
• We will use the 5V pin
on the Digispark
for power
Anna Gerber
3D Action Heroes
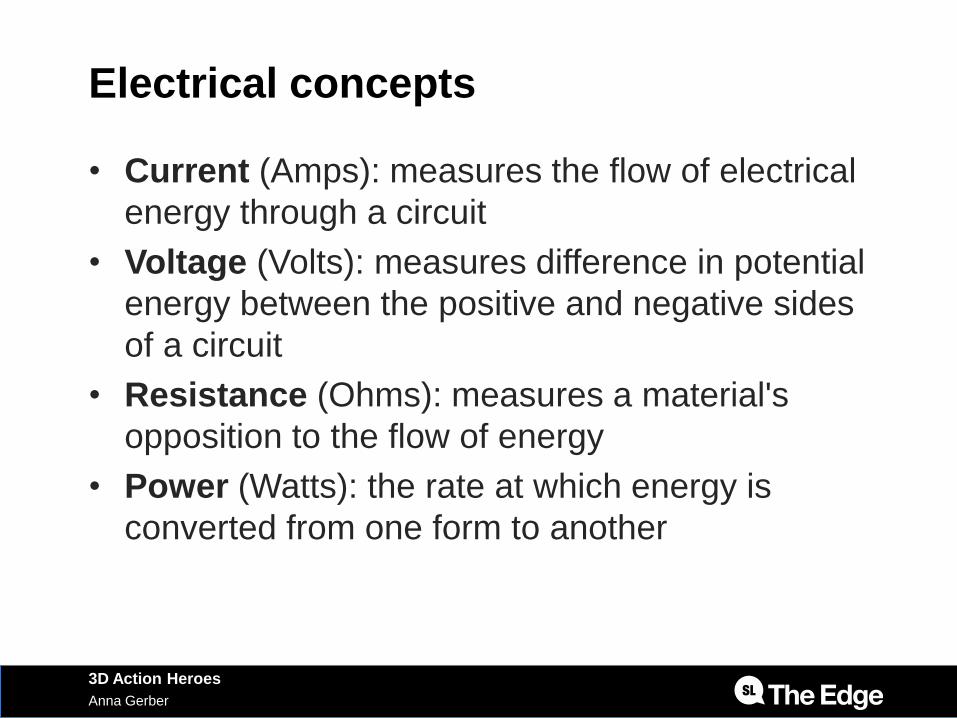
Electrical concepts
• Current (Amps): measures the flow of electrical
energy through a circuit
• Voltage (Volts): measures difference in potential
energy between the positive and negative sides
of a circuit
• Resistance (Ohms): measures a material's
opposition to the flow of energy
• Power (Watts): the rate at which energy is
converted from one form to another
Anna Gerber
3D Action Heroes

Digital vs Analog
• Digital
– discrete values (0 or 1)
– Examples: tilt sensor, push button
• Analog
– continuous values
– typically values for analog sensors are
constrained within a range e.g. 0 – 255, 0 – 1023
– Example: photo resistor
• Some sensors and actuators support both digital
and analog modes
Anna Gerber
3D Action Heroes

LEDs
• Light Emitting Diode
• Polarized: diodes act like one way valves so
must be connected in a certain direction
• Emits light when a current passes through
Anna Gerber
3D Action Heroes
Anode (+) longer leadconnects to power
Cathode (-) connects to ground

Resistors
• Introduces resistance, so restricts the amount of
current that can flow through a circuit
• Can be connected in either direction
• Bend and trim the leads to approx 1cm each
make it easier to use with the breadboard
Anna Gerber
3D Action Heroes

Anna Gerber
3D Action Heroes
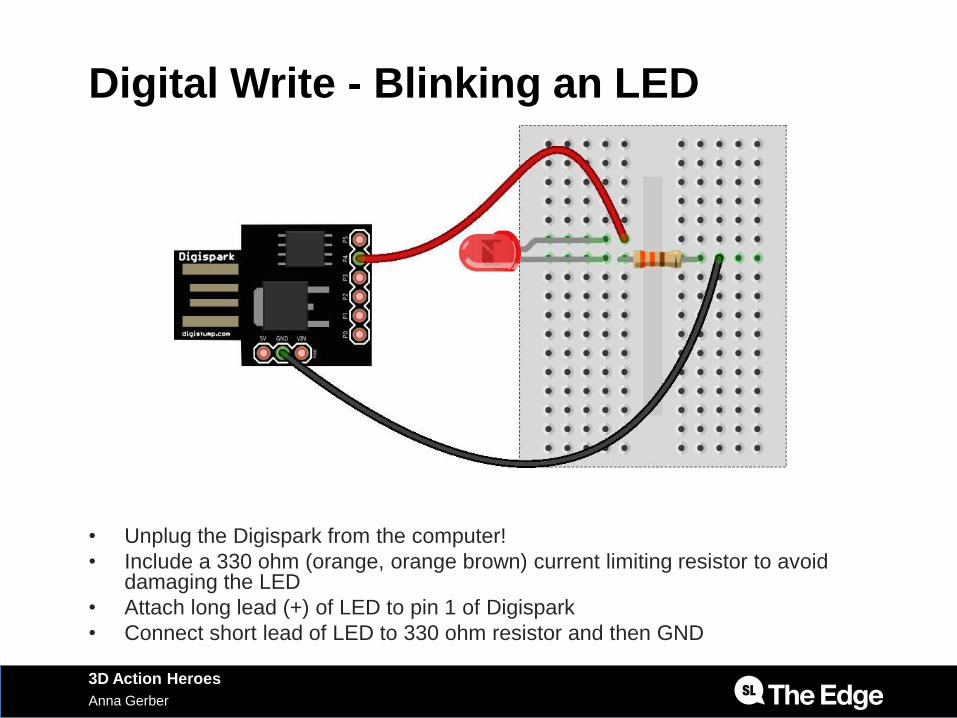
Digital Write - Blinking an LED
• Unplug the Digispark from the computer!
• Include a 330 ohm (orange, orange brown) current limiting resistor to avoid damaging the LED
• Attach long lead (+) of LED to pin 1 of Digispark
• Connect short lead of LED to 330 ohm resistor and then GND
Anna Gerber
3D Action Heroes

Loading programs onto the Digispark
• Use ArduinoIntegrated Development Environment (IDE) to write and send programs
• The programming language is C++
• Open File > Examples > 01.Basics > Blink and change pin to 1
Anna Gerber
3D Action Heroes

Uploading to Digispark
• Plug in Digispark and select board (Digispark
Default 16.5 Mhz) & port from the Tools menu
• Unplug Digispark
• Click on upload
• Plug in the Digispark when prompted (watch the
messages at the bottom of the editor window)
Anna Gerber
3D Action Heroes
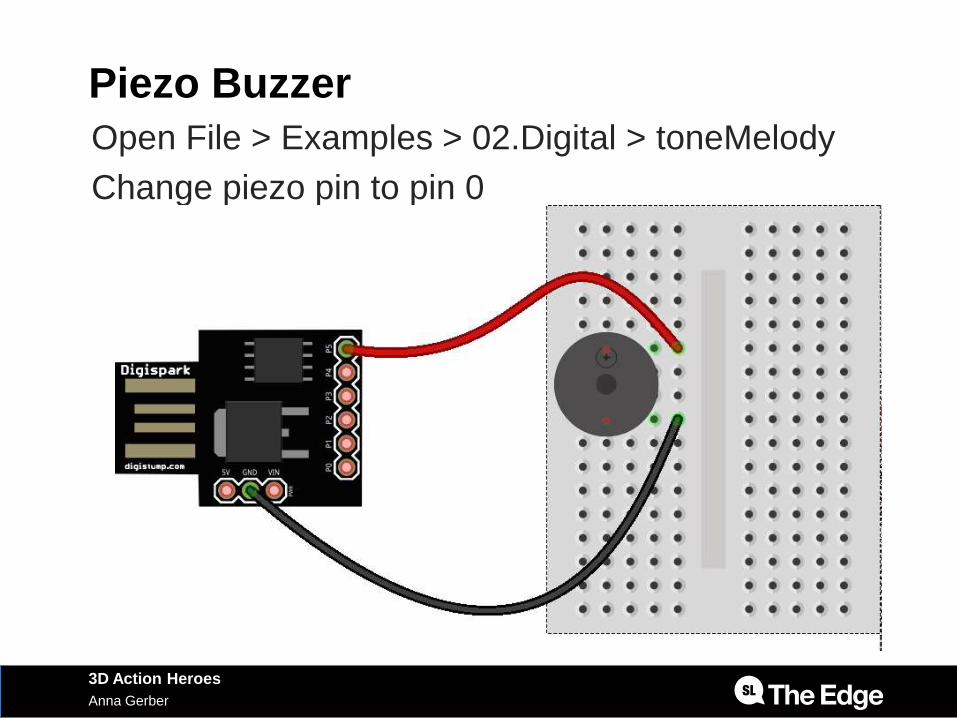
Piezo Buzzer
Anna Gerber
3D Action Heroes
Open File > Examples > 02.Digital > toneMelody
Change piezo pin to pin 0

Neopixels
• WS2812B light source
– Chainable, individually addressable RGB LEDs
– Many formfactors (pixel, ring, bar, strip etc)
– Each unit is connected via 5V, GND and data pin
– Use external power if working with more than a
few LEDs
• See https://learn.adafruit.com/adafruit-neopixel-
uberguide/overview
Anna Gerber
3D Action Heroes

Install the Neopixel library
• Download library files from:
– https://github.com/adafruit/Adafruit_NeoPixel
• Copy files into your Arduino Libraries folder
• Open
File > Examples > AdaFruit Neopixel >
buttoncycler and change pin to pin 2 and
number of pixels to 2
Anna Gerber
3D Action Heroes
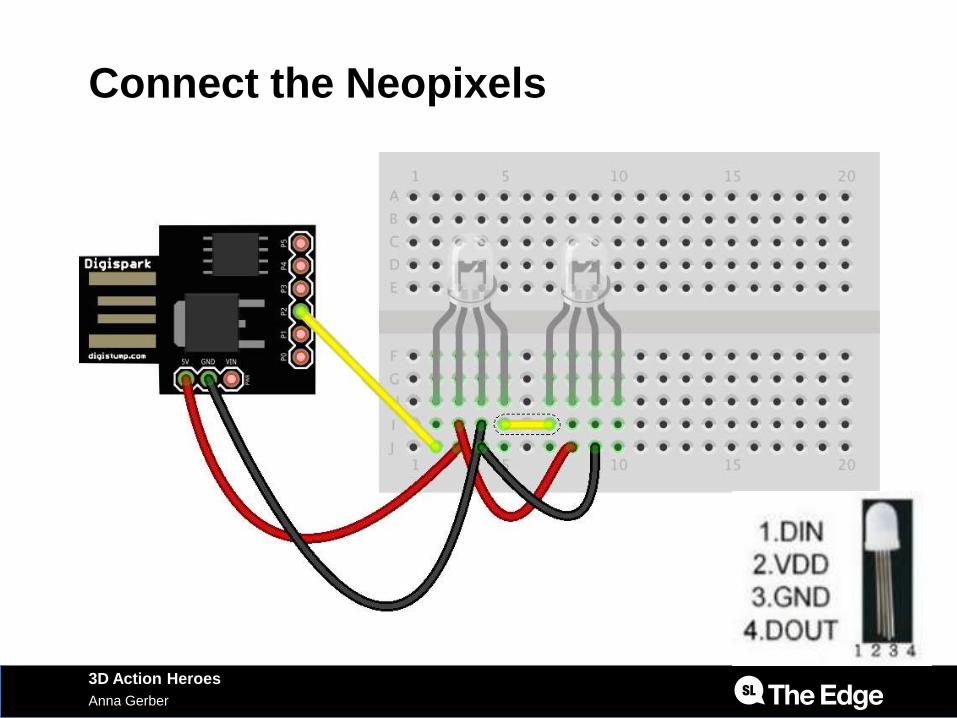
Connect the Neopixels
Anna Gerber
3D Action Heroes

Push Buttons
• Add a button to the circuit with a 10K resistor
Anna Gerber
3D Action Heroes

Action Hero Base
• Base holds the batteries and includes a switch
and power indicator light
• Metal pads connect to wires on bottom of feet to
power electronics inside figure
Anna Gerber
3D Action Heroes

Base circuit
Anna Gerber
3D Action Heroes

Solder the base circuit
Anna Gerber
3D Action Heroes
680ohm resistorgoes here

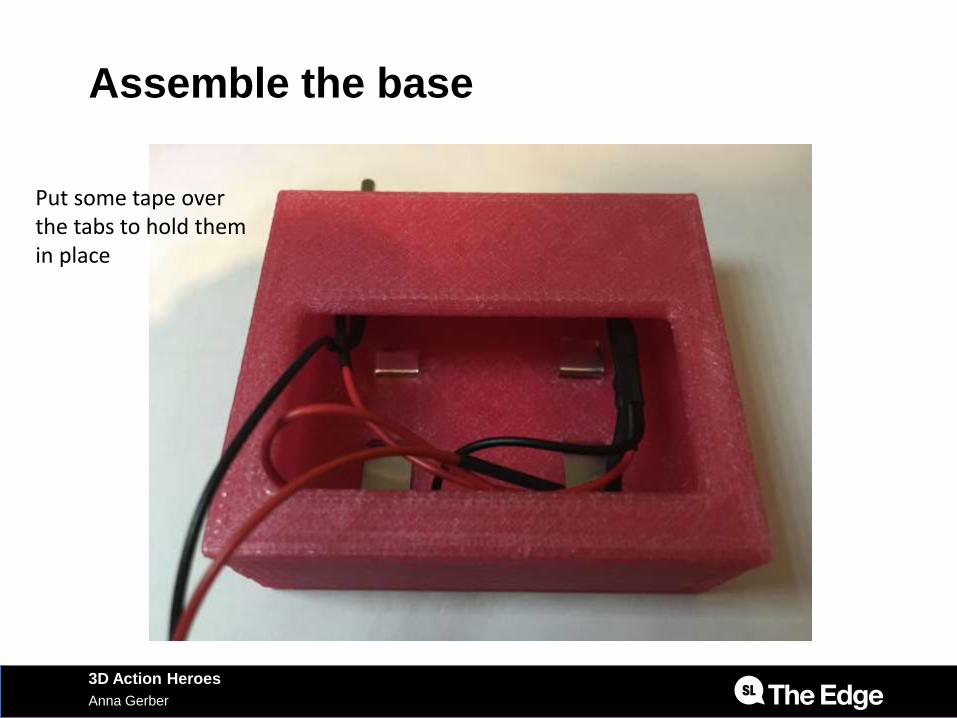
Assemble the base
Anna Gerber
3D Action Heroes
Attach LED mount& switch to case
Assemble the base
Anna Gerber
3D Action Heroes
Put some tape over the tabs to hold themin place
Assemble the figure
• Solder leg wires (thicker wire to go through legs, thinner wire through torso)
• Solder wires onto button for back
• Solder neopixels for eyes together & attach short wires
• Legs: – Run wires up through leg parts
– Run elastic down through each leg across cross-beam inside torso)
– Use fishing line to attach feet
– Tighten and tie off elastic
• Thread button wires through back (don't push button in yet)
Anna Gerber
3D Action Heroes

Assembly (continued)
• Use sticky tape to gather four wires (from legs and button) and make a pointed end. Thread up through neck
• Thread fishing line down around cross-beam in head and through neck, use pliers to grab through arm hole to bring to the side
• If you can manage it, tie fishing line around body cross-beam (use pliers through button hole) – this is tricky. Alternative is to tie off fishing line around arm elastic
• Thread elastic through arms – fishing line for hands
• See https://youtu.be/6QIx_XImcxc for how joints are threaded with elastic
Anna Gerber
3D Action Heroes

Assembly (continued)
• Use putty to secure neopixels
• Solder power leads, neopixels and button to digispark
• Optional: solder leads to piezo and secure inside head with putty
• Upload your program to digispark & unplug USB cable
• Secure digispark under headcap with putty – to make it easy to remove for updating the program
• Place figure on stand and test!
Anna Gerber
3D Action Heroes

Hair
• Use faux fur to create
wild hair
• Hot glue onto head cap
or sew together for
changeable wig
Anna Gerber
3D Action Heroes

Clothes
• Hero tunic:
– Cut a rectangle of lycra about 2 cm wider than torso on each side, and twice as long as desired tunic length
– Fold in half longwise and cut out a hole in the middle for the neck
– Staple, safety pin or sew along the sides around body
– Take off and trim off excess fabric from sides (leave at least 0.5cm for seams)
– Turn inside out
– Use a ribbon for a belt
Anna Gerber
3D Action Heroes
Finishing
• "Lines" in print will be obvious under paint, smooth your print by:
– Using fine grit sandpaper (the slow way)
– Use acetone vapour smoothing (very shiny surface)
• See https://youtu.be/9qByAGrbmS8
– Use XTC-3D epoxy to smooth out surface (easiest way)
• Prime the surface with brush on acrylic primer (used for gaming miniatures) or spray on undercoat
• Use acrylic paints, water colour pencils, pastels, sharpies etc to draw face and decorate.
• Use a thin coat of matte clear spray to waterproof
Anna Gerber
3D Action Heroes

License
• This slide desk was authored by Anna Gerber,
April 2016 and may be shared or adapted under
a Creative Commons Attribution Share Alike (4.0
CC-BY-SA) license:
https://creativecommons.org/licenses/by-sa/4.0/
Anna Gerber
3D Action Heroes
Top Related