


Languages
Pages
Legal


SCAN GUN RETURNS NRFI
4/27/2011
• Log into the scan gun and from the main menu choose NRFI Returns

Scan gun Main Menu
4/27/2011

NRFI Return Header
4/27/2011
Enter Year and Incident Number. Click on “Add
return Lines.”Note: After tabbing out or clicking in the “Notes” text box, the screen will update
with the incident information.
A system generated Return Number will default into the
Return Number text Box

NRFI Return Lines
4/27/2011
Scan or enter the NFES Item ID and enter the Quantity
returned NRFI. Click on “Add To List,” if there are more
lines to add. If this is the only line, click on “Process
Return.”
There isn’t a limit on the number of returned items
you can “Add to List.”

NRFI Return List
4/27/2011
If you make a mistake and want to delete an entered line, click on “View List”
seen in the previous screen. The Item List
screen appears. Double click on the line that you want to delete, and it is deleted from the list. In this case we’re going to
delete the 000022, Sleeping bags

NRFI Return Item List
4/27/2011
You have deleted the returned line item
(000022), as seen on this screen. Click on “Add New Item” to get to the next
screen and continue with the return.

NRFI Return Lines
4/27/2011
On the previous screen, you clicked on “Add New Item,” which brought you to the “NRFI Return Lines”
screen.
On this screen you can continue adding to the list or you can “Process Return” if there are no further lines to add.
Notice that we’ve entered 000148 into the
Item ID text box

NRFI Return Lines TID
4/27/2011
Whenever you scan or enter an NFES number for a Trackable item in the Item ID text box (000148
in the previous screen), the screen will automatically refresh to the screen shown and prompt
you to enter or scan the Trackable Number into the Trackable ID text
box.
If you have more RFI Trackable items or more
non trackable items to add, click on “Add New Item”
and continue adding to the list. If there are no more
items to add, click on “Process Return.”

NRFI Return Lines
4/27/2011
You’ll notice that there are 3 Total Lines added to this NRFI Return. If you are
finished adding return lines, you have a choice to
“Process Return” or “Add List To LPN.”
LPN (LPN stands for License Plate Number) is
used here to consolidate all return items.

LPN Number screen
4/27/2011
If your choice, in the previous screen was “Add List to LPN,” the
LPN number screen will show. You can see that
the LPN number is IDGBKLPN000005. Click
on “Add.”
The LPN number can be system generated or the user can enter
their own LPN number which can be reused once the
LPN is cleared.
IDGBKLPN000005

Last LPN Screen
4/27/2011
IDGBKLPN000005On this LPN screen you can
continue adding more items to the LPN, or you can “Process
Return.” We’re going to “Process Return”
IDGBKLPN000005IDGBKLPN000005

Process Return Success
4/27/2011
Again, you are presented with some options. You can either “Create Another Return” or you can return to the main
scan gun menu. We’re going to go back to the Main Menu.
If you choose to “Create Another Return,” you will be taken to the “Return Header
Screen” seen previously

Benefit of LPN
For a NRFI return, there is really no benefits in using an LPN over the standard return process. When using a standard return process, the move tasks are automatically created, to move the NRFI supplies from NRFI-1 to the respective refurbishment zones
Should you use the LPN function on a NRFI return, then the items are consolidated, and to move them to the targeted refurbishment location, the user chooses the Ad-Hoc Move option from the main scan gun menu.
4/27/2011

Benefit of LPN cont.
When creating the Ad hoc move request, there is no need to scan all items again. Instead the user enters or scans the LPN number and then proceeds, in completing the move tasks.
In the next few slides we’ll show you how to complete move tasks by using LPN for both RRP and Non RRP Nodes.
Remember that in a RRP node, if LPN is used, each LPN will need to be moved individually, thus negating physically consolidating like items to be moved all at once.
4/27/2011

Scan Gun Main Menu
4/27/2011
For the RRP Node, LPN is at NRFI-1
For the Non-RRP Node, the LPN is at NRFI-1
The move task process for the RRP and Non RRP mode
is virtually identical!
If using a LPN on an NRFI return, you can access
the move tasks by choosing the Ad-Hoc
Move function

RRP NODE LPN Process
4/27/2011
In the Location/Pallet/Case text box scan or enter NRFI-1. The screen will refresh.
Next, enter the LPN number into the
Item/Case/Pallet/Trackable ID text box and choose “Go.”
IDGBKLPN000005
NRFI-1

Deposit Screen
4/27/2011
The 1st item in the deposit sequence, and all subsequent
items will auto populate as you work through each move task. Scan the item location
and continue the process until all items have been moved to their respective refurbishment
locations..

Deposit Screen
4/27/2011
The previous screen shows NFES 000231 being
deposited to GENERAL REFURB-1. The screen shot viewed here, shows NFES
002802 being deposited to the Laundry Zone. The
000148 we added to the LPN earlier will be
deposited to “Small Engine-1”
On the last item click on “Deposit All” and you are
done!

Standard NRFI Return
4/27/2011
The process we covered in the previous screens are the same for both a Standard Return and
a LPN Return. The only difference is, after entering all the NRFI returned supplies, the
user will choose “Process Return”
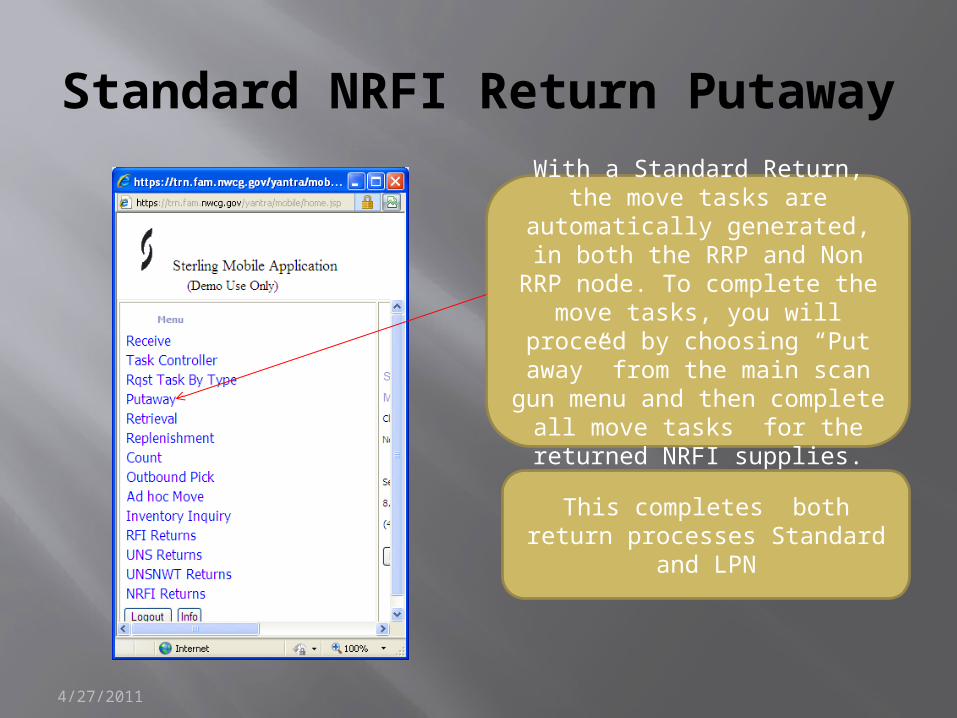
Standard NRFI Return Putaway
4/27/2011
With a Standard Return, the move tasks are automatically generated, in both the RRP
and Non RRP node. To complete the move tasks, you will proceed by choosing “Put
away” from the main scan gun menu and then complete all move tasks for the returned
NRFI supplies.
This completes both return processes Standard and LPN
Top Related