
ZOMBIE™ WINDSHIELD FOR VICTORY CROSS COUNTRY 1265 · ZOMBIE™ WINDSHIELD FOR VICTORY CROSS...
2
ZOMBIE™ WINDSHIELD FOR VICTORY CROSS COUNTRY 1265 Page 1 This indication alerts you to the fact that ignoring the contents described herein may negatively affect product per- formance and functionality or damage the product itself or the product to which it is being attached. STEP 1 Read and understand all steps in the instructions before starting the installation. Park the motorcycle on a hard, level surface and turn IGN OFF. STEP 2 Use warm, soapy water and a clean rag to remove all dirt and debris from the installation area; allow the area to dry completely. STEP 3 ALL MODELS EXCEPT CROSS COUNTRY TOUR: Remove the four (4) screws securing the existing windshield; save the screws for later use. CROSS COUNTRY TOUR: Refer to PIC 1,2, and 3. Remove the six (6) screws securing the windshield; save four (4) of them for later. Remove the hex head screws and t-nuts securing the windshield support brackets; remove the brackets; set them aside, they will not be reused. ENSURE THAT THE FOLLOWING PARTS HAVE BEEN INCLUDED IN THE KIT: 1 10” Dark Smoke Windshield 1 Hardware Kit containing: 4 Windshield Spacers 1 Installation Instructions YOU WILL ALSO NEED: Warm, soapy water and a clean rag, Metric hex wrenches, socket set and a ratchet These installation instructions contain important information. Ensure that the end user receives this copy and is aware of its importance for future use. 1265-11MC-0715 Thank You For Choosing Küryakyn! Protect yourself and others from potential injury and property damage or loss. Pay close attention to all instructions, warnings, cautions, and notices regarding the installation, use, and care of this product. PIC 2 PIC 3 REMOVE SUPPORT BRACKETS T-NUT PIC 1 CROSS COUNTRY TOUR SHOWN REMOVE THE SIX SCREWS AND T-NUTS CROSS COUNTRY TOUR SHOWN CROSS COUNTRY TOUR SHOWN
Transcript of ZOMBIE™ WINDSHIELD FOR VICTORY CROSS COUNTRY 1265 · ZOMBIE™ WINDSHIELD FOR VICTORY CROSS...
ZOMBIE™ WINDSHIELD FOR VICTORY CROSS COUNTRY 1265
Page 1
This indication alerts you to the fact that ignoring the contents described herein may negatively affect product per-formance and functionality or damage the product itself or the product to which it is being attached.
STEP 1 Read and understand all steps in the instructions before starting the installation. Park the motorcycle on a hard, level surface and turn IGN OFF.
STEP 2 Use warm, soapy water and a clean rag to remove all dirt and debris from the installation area; allow the area to dry completely.
STEP 3 ALL MODELS EXCEPT CROSS COUNTRY TOUR: Remove the four (4) screws securing the existing windshield; save the screws for later use.
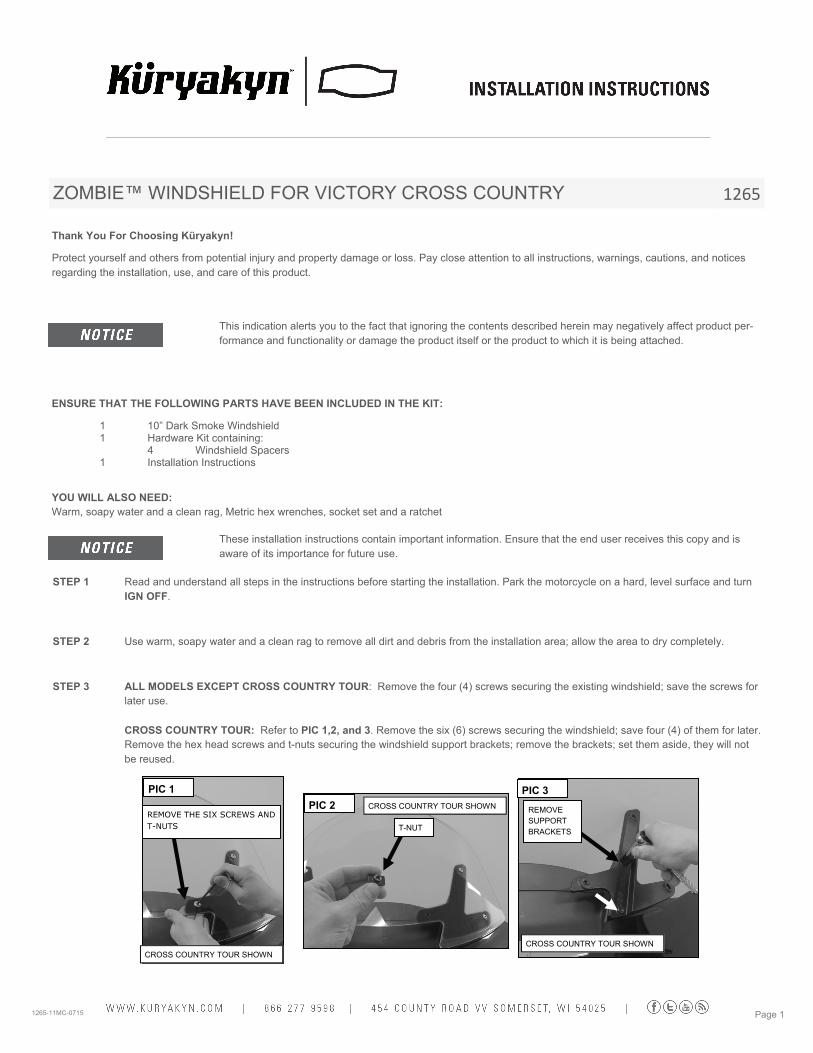
CROSS COUNTRY TOUR: Refer to PIC 1,2, and 3. Remove the six (6) screws securing the windshield; save four (4) of them for later. Remove the hex head screws and t-nuts securing the windshield support brackets; remove the brackets; set them aside, they will not be reused.
ENSURE THAT THE FOLLOWING PARTS HAVE BEEN INCLUDED IN THE KIT:
1 10” Dark Smoke Windshield 1 Hardware Kit containing: 4 Windshield Spacers 1 Installation Instructions
YOU WILL ALSO NEED: Warm, soapy water and a clean rag, Metric hex wrenches, socket set and a ratchet
These installation instructions contain important information. Ensure that the end user receives this copy and is aware of its importance for future use.
1265-11MC-0715
Thank You For Choosing Küryakyn!
Protect yourself and others from potential injury and property damage or loss. Pay close attention to all instructions, warnings, cautions, and notices regarding the installation, use, and care of this product.
PIC 2
PIC 3
REMOVE SUPPORT BRACKETS T-NUT
PIC 1
CROSS COUNTRY TOUR SHOWN
REMOVE THE SIX SCREWS AND T-NUTS
CROSS COUNTRY TOUR SHOWN
CROSS COUNTRY TOUR SHOWN
Page 2
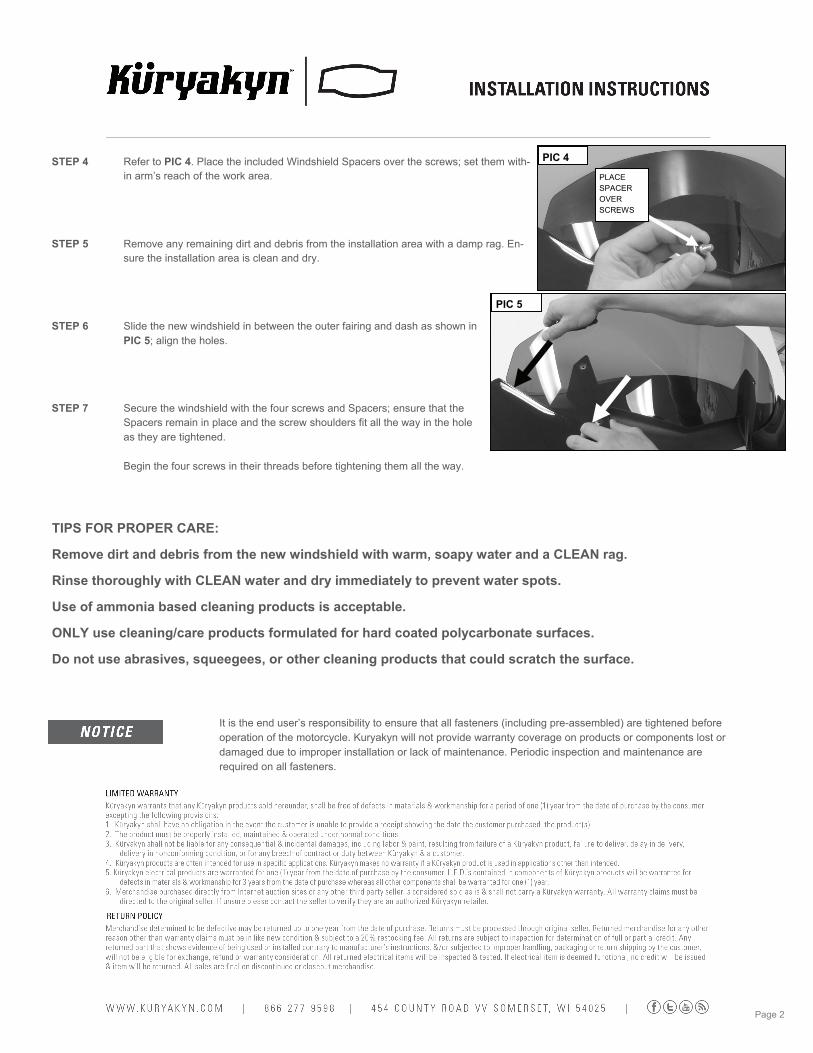
STEP 4 Refer to PIC 4. Place the included Windshield Spacers over the screws; set them with-in arm’s reach of the work area.
STEP 5 Remove any remaining dirt and debris from the installation area with a damp rag. En-sure the installation area is clean and dry.
STEP 6 Slide the new windshield in between the outer fairing and dash as shown in PIC 5; align the holes.
STEP 7 Secure the windshield with the four screws and Spacers; ensure that the Spacers remain in place and the screw shoulders fit all the way in the hole as they are tightened. Begin the four screws in their threads before tightening them all the way.
It is the end user’s responsibility to ensure that all fasteners (including pre-assembled) are tightened before operation of the motorcycle. Kuryakyn will not provide warranty coverage on products or components lost or damaged due to improper installation or lack of maintenance. Periodic inspection and maintenance are required on all fasteners.
TIPS FOR PROPER CARE:
Remove dirt and debris from the new windshield with warm, soapy water and a CLEAN rag.
Rinse thoroughly with CLEAN water and dry immediately to prevent water spots.
Use of ammonia based cleaning products is acceptable.
ONLY use cleaning/care products formulated for hard coated polycarbonate surfaces.
Do not use abrasives, squeegees, or other cleaning products that could scratch the surface.
PIC 5
PIC 4
PLACE SPACER OVER SCREWS