
Zerto Virtual Replication Installation Guides3.amazonaws.com › zertodownload_docs › 5.0U4 ›...
44
ZVR-INV-5.0U4 Rev 01 July2017 Zerto Virtual Replication Installation Guide VMware vSphere Environment Version 5.0 Update 4
Transcript of Zerto Virtual Replication Installation Guides3.amazonaws.com › zertodownload_docs › 5.0U4 ›...

ZVR-INV-5.0U4 Rev 01 July2017
Zerto Virtual Replication Installation GuideVMware vSphere Environment
Version 5.0 Update 4

2
Copyright © 2017, Zerto Ltd. All rights reserved.Information in this document is subject to change without notice and does not represent a commitment on the part of Zerto Ltd. Zerto Ltd. does not assume responsibility for any printing errors that may appear in this document. No part of this document may be reproduced or transmitted in any form or by any means, electronic or mechanical, including photocopying, recording, or information storage and retrieval systems, for any purpose other than the purchaser's personal use, without the prior written permission of Zerto Ltd.
All other marks and names mentioned herein may be trademarks of their respective companies.
ZVR-INV-5.0U4 Rev 01 July2017

TABLE OF CONTENTS
3
CHAPTER 1: INSTALLING ZERTO VIRTUAL REPLICATION . . . . . . . . . . . . . . . . . . . . . . . . . . . . . . . . . . . . . . . 5Zerto Virtual Replication Architecture . . . . . . . . . . . . . . . . . . . . . . . . . . . . . . . . . . . . . . . . . . . . . . . . . . . . . . . . . . . . . . . . . . . . . . . . . . . . . . . . 5Zerto Virtual Replication Interoperability Matrix . . . . . . . . . . . . . . . . . . . . . . . . . . . . . . . . . . . . . . . . . . . . . . . . . . . . . . . . . . . . . . . . . . . . . . . 8Requirements . . . . . . . . . . . . . . . . . . . . . . . . . . . . . . . . . . . . . . . . . . . . . . . . . . . . . . . . . . . . . . . . . . . . . . . . . . . . . . . . . . . . . . . . . . . . . . . . . . . . . . 8
Routable Networks. . . . . . . . . . . . . . . . . . . . . . . . . . . . . . . . . . . . . . . . . . . . . . . . . . . . . . . . . . . . . . . . . . . . . . . . . . . . . . . . . . . . . . . . . . . . . . 9Minimum Bandwidth . . . . . . . . . . . . . . . . . . . . . . . . . . . . . . . . . . . . . . . . . . . . . . . . . . . . . . . . . . . . . . . . . . . . . . . . . . . . . . . . . . . . . . . . . . . . 9The Zerto Virtual Manager Web Client . . . . . . . . . . . . . . . . . . . . . . . . . . . . . . . . . . . . . . . . . . . . . . . . . . . . . . . . . . . . . . . . . . . . . . . . . . . 9
Performing an Installation . . . . . . . . . . . . . . . . . . . . . . . . . . . . . . . . . . . . . . . . . . . . . . . . . . . . . . . . . . . . . . . . . . . . . . . . . . . . . . . . . . . . . . . . . . .13Performing an Express Installation. . . . . . . . . . . . . . . . . . . . . . . . . . . . . . . . . . . . . . . . . . . . . . . . . . . . . . . . . . . . . . . . . . . . . . . . . . . . . . . .13Performing a Custom Installation. . . . . . . . . . . . . . . . . . . . . . . . . . . . . . . . . . . . . . . . . . . . . . . . . . . . . . . . . . . . . . . . . . . . . . . . . . . . . . . . 14
Performing a Silent Installation . . . . . . . . . . . . . . . . . . . . . . . . . . . . . . . . . . . . . . . . . . . . . . . . . . . . . . . . . . . . . . . . . . . . . . . . . . . . . . . . . . . . . . 20Installing Zerto Virtual Replication Cmdlets . . . . . . . . . . . . . . . . . . . . . . . . . . . . . . . . . . . . . . . . . . . . . . . . . . . . . . . . . . . . . . . . . . . . . . . . . . 21Installing the VSS Agent . . . . . . . . . . . . . . . . . . . . . . . . . . . . . . . . . . . . . . . . . . . . . . . . . . . . . . . . . . . . . . . . . . . . . . . . . . . . . . . . . . . . . . . . . . . . 22Repairing the Current Installation . . . . . . . . . . . . . . . . . . . . . . . . . . . . . . . . . . . . . . . . . . . . . . . . . . . . . . . . . . . . . . . . . . . . . . . . . . . . . . . . . . . 24
CHAPTER 2: ACCESSING THE ZERTO USER INTERFACE . . . . . . . . . . . . . . . . . . . . . . . . . . . . . . . . . . . . . . . . 25Using the Zerto User Interface From a Browser . . . . . . . . . . . . . . . . . . . . . . . . . . . . . . . . . . . . . . . . . . . . . . . . . . . . . . . . . . . . . . . . . . . . . . . 25Using the Zerto User Interface Within vSphere . . . . . . . . . . . . . . . . . . . . . . . . . . . . . . . . . . . . . . . . . . . . . . . . . . . . . . . . . . . . . . . . . . . . . . . 25
Using the vSphere Web Client . . . . . . . . . . . . . . . . . . . . . . . . . . . . . . . . . . . . . . . . . . . . . . . . . . . . . . . . . . . . . . . . . . . . . . . . . . . . . . . . . . 26Using the vSphere Client Console . . . . . . . . . . . . . . . . . . . . . . . . . . . . . . . . . . . . . . . . . . . . . . . . . . . . . . . . . . . . . . . . . . . . . . . . . . . . . . . 27
Adding a Security Certificate. . . . . . . . . . . . . . . . . . . . . . . . . . . . . . . . . . . . . . . . . . . . . . . . . . . . . . . . . . . . . . . . . . . . . . . . . . . . . . . . . . . . . . . . 27
CHAPTER 3: INITIAL CONFIGURATION . . . . . . . . . . . . . . . . . . . . . . . . . . . . . . . . . . . . . . . . . . . . . . . . . . . . . . . 29Registering the Zerto Virtual Replication License . . . . . . . . . . . . . . . . . . . . . . . . . . . . . . . . . . . . . . . . . . . . . . . . . . . . . . . . . . . . . . . . . . . . . 29Installing Virtual Replication Appliances . . . . . . . . . . . . . . . . . . . . . . . . . . . . . . . . . . . . . . . . . . . . . . . . . . . . . . . . . . . . . . . . . . . . . . . . . . . . . 29Pairing Sites . . . . . . . . . . . . . . . . . . . . . . . . . . . . . . . . . . . . . . . . . . . . . . . . . . . . . . . . . . . . . . . . . . . . . . . . . . . . . . . . . . . . . . . . . . . . . . . . . . . . . . . 33Setting Up a Remote Site . . . . . . . . . . . . . . . . . . . . . . . . . . . . . . . . . . . . . . . . . . . . . . . . . . . . . . . . . . . . . . . . . . . . . . . . . . . . . . . . . . . . . . . . . . . 33
CHAPTER 4: UNINSTALLING ZERTO VIRTUAL REPLICATION . . . . . . . . . . . . . . . . . . . . . . . . . . . . . . . . . . . 34
CHAPTER 5: UPGRADING ZERTO VIRTUAL REPLICATION. . . . . . . . . . . . . . . . . . . . . . . . . . . . . . . . . . . . . . 35Guidelines to Upgrading Zerto Virtual Replication . . . . . . . . . . . . . . . . . . . . . . . . . . . . . . . . . . . . . . . . . . . . . . . . . . . . . . . . . . . . . . . . . . . . 35
Upgrading Environments Using the Zerto Cloud Manager . . . . . . . . . . . . . . . . . . . . . . . . . . . . . . . . . . . . . . . . . . . . . . . . . . . . . . . . . 36Before Upgrading Zerto Virtual Replication. . . . . . . . . . . . . . . . . . . . . . . . . . . . . . . . . . . . . . . . . . . . . . . . . . . . . . . . . . . . . . . . . . . . . . . 36Upgrading the Current Installation . . . . . . . . . . . . . . . . . . . . . . . . . . . . . . . . . . . . . . . . . . . . . . . . . . . . . . . . . . . . . . . . . . . . . . . . . . . . . . 36
Upgrading Multiple Sites Running Different Versions. . . . . . . . . . . . . . . . . . . . . . . . . . . . . . . . . . . . . . . . . . . . . . . . . . . . . . . . . . . . . . . . . . 37Upgrading To More Than One Version Higher . . . . . . . . . . . . . . . . . . . . . . . . . . . . . . . . . . . . . . . . . . . . . . . . . . . . . . . . . . . . . . . . . . . . . . . . 37Re-installing the Current Installation. . . . . . . . . . . . . . . . . . . . . . . . . . . . . . . . . . . . . . . . . . . . . . . . . . . . . . . . . . . . . . . . . . . . . . . . . . . . . . . . . 40Upgrading VRAs . . . . . . . . . . . . . . . . . . . . . . . . . . . . . . . . . . . . . . . . . . . . . . . . . . . . . . . . . . . . . . . . . . . . . . . . . . . . . . . . . . . . . . . . . . . . . . . . . . . 40
Site Specific Considerations when Upgrading VRAs . . . . . . . . . . . . . . . . . . . . . . . . . . . . . . . . . . . . . . . . . . . . . . . . . . . . . . . . . . . . . . . 40Procedure: Upgrading VRAs . . . . . . . . . . . . . . . . . . . . . . . . . . . . . . . . . . . . . . . . . . . . . . . . . . . . . . . . . . . . . . . . . . . . . . . . . . . . . . . . . . . . 41
Upgrading Zerto Virtual Replication PowerShell Cmdlets . . . . . . . . . . . . . . . . . . . . . . . . . . . . . . . . . . . . . . . . . . . . . . . . . . . . . . . . . . . . . . 41Upgrading or Reinstalling VMware Components (VMware Environments Only) . . . . . . . . . . . . . . . . . . . . . . . . . . . . . . . . . . . . . . . . . 41
Upgrading a vCenter Server. . . . . . . . . . . . . . . . . . . . . . . . . . . . . . . . . . . . . . . . . . . . . . . . . . . . . . . . . . . . . . . . . . . . . . . . . . . . . . . . . . . . . 42Reinstalling a vCenter Server. . . . . . . . . . . . . . . . . . . . . . . . . . . . . . . . . . . . . . . . . . . . . . . . . . . . . . . . . . . . . . . . . . . . . . . . . . . . . . . . . . . . 42Upgrading vCloud Director . . . . . . . . . . . . . . . . . . . . . . . . . . . . . . . . . . . . . . . . . . . . . . . . . . . . . . . . . . . . . . . . . . . . . . . . . . . . . . . . . . . . . 42Upgrading VMware Tools . . . . . . . . . . . . . . . . . . . . . . . . . . . . . . . . . . . . . . . . . . . . . . . . . . . . . . . . . . . . . . . . . . . . . . . . . . . . . . . . . . . . . . 42Upgrading or Reinstalling a Host . . . . . . . . . . . . . . . . . . . . . . . . . . . . . . . . . . . . . . . . . . . . . . . . . . . . . . . . . . . . . . . . . . . . . . . . . . . . . . . . 42
Upgrading Zerto Cloud Manager . . . . . . . . . . . . . . . . . . . . . . . . . . . . . . . . . . . . . . . . . . . . . . . . . . . . . . . . . . . . . . . . . . . . . . . . . . . . . . . . . . . . 44

4
Upgrading Zerto Cloud Connectors. . . . . . . . . . . . . . . . . . . . . . . . . . . . . . . . . . . . . . . . . . . . . . . . . . . . . . . . . . . . . . . . . . . . . . . . . . . . . . . . . . 44

5Zerto Virtual Replication Installation Guide for VMware vSphere - Version 5.0 Update 4Installing Zerto Virtual Replication
CHAPTER 1: INSTALLING ZERTO VIRTUAL REPLICATION
Zerto Virtual Replication provides a business continuity (BC) and disaster recovery (DR) solution in a virtual environment, enabling the replication of mission-critical applications and data as quickly as possible, with minimal data loss. When devising a recovery plan, these two objectives, minimum time to recover and maximum data to recover, are assigned target values: the recovery time objective (RTO) and the recovery point objective (RPO). Zerto Virtual Replication enables a virtual-aware recovery with low values for both the RTO and RPO. In addition, Zerto Virtual Replication enables protecting virtual machines for extended, longer term recovery from an offsite backup.
Zerto Virtual Replication is installed in every Zerto Virtual Replication Installation Guide for Amazon Web Services (AWS)site with virtual machines to be protected and recovered. The installation includes the following:
Zerto Virtual Manager (ZVM) – A Windows service that manages the replication at the site level. The ZVM monitors the vCenter Server to get the inventory of VMs, disks, networks, hosts, etc. For example, a VMware vMotion operation of a protected VM from one host to another is monitored by the ZVM and the protection and recovery is updated accordingly. Each Zerto Virtual Manager can manage up to 5000 virtual machines, either being protected or recovered to that site.
OVF to enable installing Virtual Replication Appliances (VRAs) – A virtual machine installed on each ESX/ESXi hosting virtual machines to be protected or recovered, to manage the replication of data from protected virtual machines to the recovery site. A VRA can manage a maximum of 1500 volumes, whether these are volumes being protected or recovered.
Virtual Backup Appliance (VBA) – A Windows service that manages back-ups within Zerto Virtual Replication. The VBA service runs on the same machine as the Zerto Virtual Manager service and manages the repositories where offsite backups are stored. These repositories can be local or on a shared network.
Zerto User Interface – Recovery using Zerto Virtual Replication is managed in a browser or in the VMware Web Client or Client console.
The following topics are described in this chapter:■ “Zerto Virtual Replication Architecture”, below■ “Zerto Virtual Replication Interoperability Matrix”, on page 8■ “Requirements”, on page 8■ “Performing an Installation”, on page 13■ “Performing a Silent Installation”, on page 20■ “Installing Zerto Virtual Replication Cmdlets”, on page 21■ “Installing the VSS Agent”, on page 22■ “Repairing the Current Installation”, on page 24
Zerto Virtual Replication ArchitectureThe following diagram shows how the main components of Zerto Virtual Replication are deployed across sites to provide disaster recovery across these sites.
Note: For cloud-based architecture diagrams, see Zerto Cloud Manager Installation Guide.

6Zerto Virtual Replication Architecture
Zerto Virtual Replication Installation Guide for VMware vSphere - Version 5.0 Update 4Installing Zerto Virtual Replication
The following diagram shows Zerto Virtual Replication components deployed on one site and the ports and communication protocols used between the components.
Zerto Virtual Replication can be installed at multiple sites and each of these sites can be paired to another site enabling protection across sites. Zerto Virtual Replication also supports protection and recovery on a site being managed by a single vCenter Server. The following scenarios are examples of protection and recovery with a single vCenter Server.■ From one datacenter, a branch office, to another datacenter, the main office, both managed by the same vCenter Server.
Zerto recommends installing Zerto Virtual Replication in the main office site where protected machines will be recovered.■ From one host to a second host, both managed by the same vCenter Server.■ To the same host but using a different datastore for recovery.
When a single vCenter Server is used, port 9081 shown in the above diagram is not used.

7Zerto Virtual Replication Architecture
Zerto Virtual Replication Installation Guide for VMware vSphere - Version 5.0 Update 4Installing Zerto Virtual Replication
The following table provides basic information, shown in the above diagram, about the ports used by Zerto Virtual Replication. For a more detailed description, refer to “Firewall Considerations”, on page 10.
Note: For details of the architecture and ports used in a cloud-based architecture environment, see Zerto Cloud Manager Installation Guide.
REF. # PORT PURPOSE
1, 13, 15, 20
9080 Communication between the Zerto Virtual Manager and Zerto internal APIs, Zerto cmdlets, Zerto VSS Agents and the Zerto Cloud Manager.
This is the default port which is provided during the Zerto Virtual Replication installation, and which can be changed during the installation.
2 443 Required between the Zerto Virtual Manager and the vCenter Server.
3, 4, 5, 14
9669 Communication between a machine running the Zerto User Interface, vSphere Web Client or Client console and the Zerto Virtual Manager for the relevant vCenter Server and between the Zerto Virtual Manager and Zerto REST APIs.
This is the default port which is provided during the Zerto Virtual Replication installation, and which can be changed during the installation.
6 22 Required between an ESXi host and the Zerto Virtual Manager during installation of a Virtual Replication Appliance (VRA).
7 9081 Communication between paired Zerto Virtual Managers.
This is the default port which is provided during the Zerto Virtual Replication installation, and which can be changed during the installation.
When the same vCenter Server is used for both the protected and recovery sites, Zerto Virtual Replication is installed on one site only and this port can be ignored.
8 443 Required between an ESXi hosts and the Zerto Virtual Manager during installation of a VRA.
10 4005 Log collection between the Zerto Virtual Manager and site VRAs.
11, 18 4006 Communication between the Zerto Virtual Manager and site VRAs and the site Virtual Backup Appliance.
12 4009 Communication between the Zerto Virtual Manager and site VRAs to handle checkpoints.
16 4007 Control communication between protecting and recovering VRAs.
17 4008 Communication between VRAs to pass data from protected virtual machines to a VRA on a recovery site.
19 9180 Communication between the Virtual Backup Appliance and VRA.
This is the default port which is provided during the Zerto Virtual Replication installation, and which can be changed during the installation.
21 9989 HTTPS communication between the browser and the Zerto Cloud Manager.

8Zerto Virtual Replication Interoperability Matrix
Zerto Virtual Replication Installation Guide for VMware vSphere - Version 5.0 Update 4Installing Zerto Virtual Replication
Zerto Virtual Replication Interoperability MatrixFor details about what is supported, refer to the Zerto Virtual Replication Interoperability Matrix.
RequirementsZerto Virtual Manager is installed on each site managed by a vCenter Server. The installation must be on a machine running a Windows operating system with the following requirements:■ Windows Server 2008 R2 SP1 with KB3033929 and KB2864202, Windows Server 2012 base, Windows Server 2012 R2, or
Windows Server 2016.Reserve at least 2 CPUs and 4GB RAM for the machine. The following CPU and RAM are recommended by Zerto for the machine running Zerto Virtual Replication, dependent on the size of the site:Sites protecting up to 750 virtual machines and up to 5 peer sites: 2 CPUs and 4GB RAM.Sites protecting 751-2000 virtual machines and up to 15 peer sites: 4 CPUs or 2 Dual Core CPUs and 4GB RAM.Sites protecting over 2000 virtual machines and over 15 peer sites: 8 CPUs or 4 Dual Core CPUs and 8GB RAM.The clocks on the machines where Zerto Virtual Replication is installed must be synchronized with UTC and with each other (the timezones can be different). Zerto recommends synchronizing the clocks using NTP.Note: The following restriction applies to recovering individual files and folders and not to recovering the whole virtual machine: The operating system of the machine on which the recovery site Zerto Virtual Manager is installed determines the types of file systems from which individual files and folders can be recovered. When the recovery site Zerto Virtual Manager virtual machine operating system supports a file system, files and folders can be recovered from this file system in virtual machines that this Zerto Virtual Manager will manage the recovery of. For example, if a protected virtual machine running Windows 2012 has files using the ReFS file system and requires one or more of these files to be recovered and the recovery site Zerto Virtual Manager is on a machine with Windows 2008, which does not support ReFS, the protected virtual machine files and folders cannot be recovered, but the whole virtual machine can be recovered.
■ At least 4GB of free disk space.■ Microsoft .NET Framework 4.5.2. The 4.5.2 installation executable is included as part of the Zerto Virtual Replication
installation kit and it needs an additional 1.8GB of free disk space. Note that recent Windows operating systems include .NET as part of the operating system. Make sure that you have the latest Windows updates, unless Zerto support warns against a specific update.Note: If the required version of Microsoft .NET Framework is not installed, you are prompted to install the required version of .NET Framework as part of the Zerto Virtual Replication installation procedure.
You must have VMware vCenter Server version 4.0U1 or higher with at least one ESX/ESXi host installed on each site where Zerto Virtual Manager is to be used. The Zerto Virtual Manager must have access to the vCenter Server via a user with administrator level privileges to the vCenter Server. When recovery is managed by the same vCenter Server as the protection, Zerto Virtual Manager is required to be installed once only. When the protected and recovery sites are managed by different vCenter Servers Zerto Virtual Manager is installed once per vCenter Server. If Zerto Cloud Manager is used, vSphere Standard edition cannot be used. For details about Zerto Cloud Manager, see Zerto Cloud Manager Administration Guide.
Note: When the vCenter Server is installed on a Linux machine via the vCenter Server Linux Virtual Appliance (vCSA), the Zerto Virtual Manager must still be installed on a Windows machine.
Zerto recommends installing the Zerto Virtual Manager with the following profile:■ On a dedicated virtual machine.■ With a dedicated administrator account.■ No other applications installed on this machine. If additional applications are installed, the Zerto Virtual Manager service
must receive enough resources and HA remain enabled.■ With VMware vSphere High Availability (HA) enabled.■ With the VM Restart Policy set to High.
Note: If a proxy server is used at the site, specify the IP address of the Zerto Virtual Manager in the exception list in the Proxy Server settings.

9Minimum Bandwidth
Zerto Virtual Replication Installation Guide for VMware vSphere - Version 5.0 Update 4Installing Zerto Virtual Replication
You cannot take snapshots of the Zerto Virtual Manager as snapshots cause operational problems for the Zerto Virtual Manager, such as creating inconsistencies with peer site Zerto Virtual Managers.
The Zerto Virtual Replication architecture supports the following network configurations:■ Flat LAN networks■ VLAN networks, including private VLANs and stretched VLANs■ WAN emulation■ VPN IPsec
The Zerto Virtual Replication architecture does not support NAT (Network Address Translation) firewalls.
Minimum Bandwidth■ The connectivity between sites must have the bandwidth capacity to handle the data to be replicated between the sites.
The minimum bandwidth must be at least 5 Mb/sec.
The Zerto Virtual Manager Web Client■ Microsoft Internet Explorer 9 and all versions below, are not supported. ■ Internet Explorer version 10 does not work well with the user interface. ■ Zerto recommends using Chrome, Firefox, Microsoft Edge, or later versions of Internet Explorer. ■ The minimum recommended screen resolution is 1024*768.
The Zerto User Interface in a vSphere ClientWhen using either the vSphere Web Client or Client console, you must use Internet Explorer version 10 or higher. Zerto recommends using an Internet Explorer version later than version 10.
Database Requirements
By default, an embedded SQL-based database is used but it is possible to use an externally managed database, Microsoft SQL Server. To use an externally managed database, during the installation choose the Custom Installation option.
The following Microsoft SQL Server versions are supported: 2008, 2008R2, 2012, 2014.
You must have the following permissions set:■ Public and dbcreator server roles.■ Permission to connect to the database engine.■ Login enabled.■ In User Mapping choose the master database under which to create the Zerto Virtual Replication database and set both
db_owner and public for database role membership.
Zerto recommends using SQL Server Enterprise Edition if you have 4 or more sites, or 40 or more hosts with virtual machines being protected or recovered, or more than 400 virtual machines to be protected.
Using an externally managed database requires the following configuration for the machine running SQL Server:■ 4 CPUs or 2 Dual Core CPUs and 16GB RAM.■ 20GB to accommodate the database and the logs generated by the Zerto Virtual Manager.
10
Zerto Virtual Replication Installation Guide for VMware vSphere - Version 5.0 Update 4Installing Zerto Virtual Replication
Note: If SQL Server is used, it is your responsibility to make sure that database downtime is planned in coordination with your disaster recovery and business continuity requirements. During database downtime, there will be inconsistencies between Zerto Virtual Managers, such as the management of checkpoints, resulting in problems if a recovery is required.
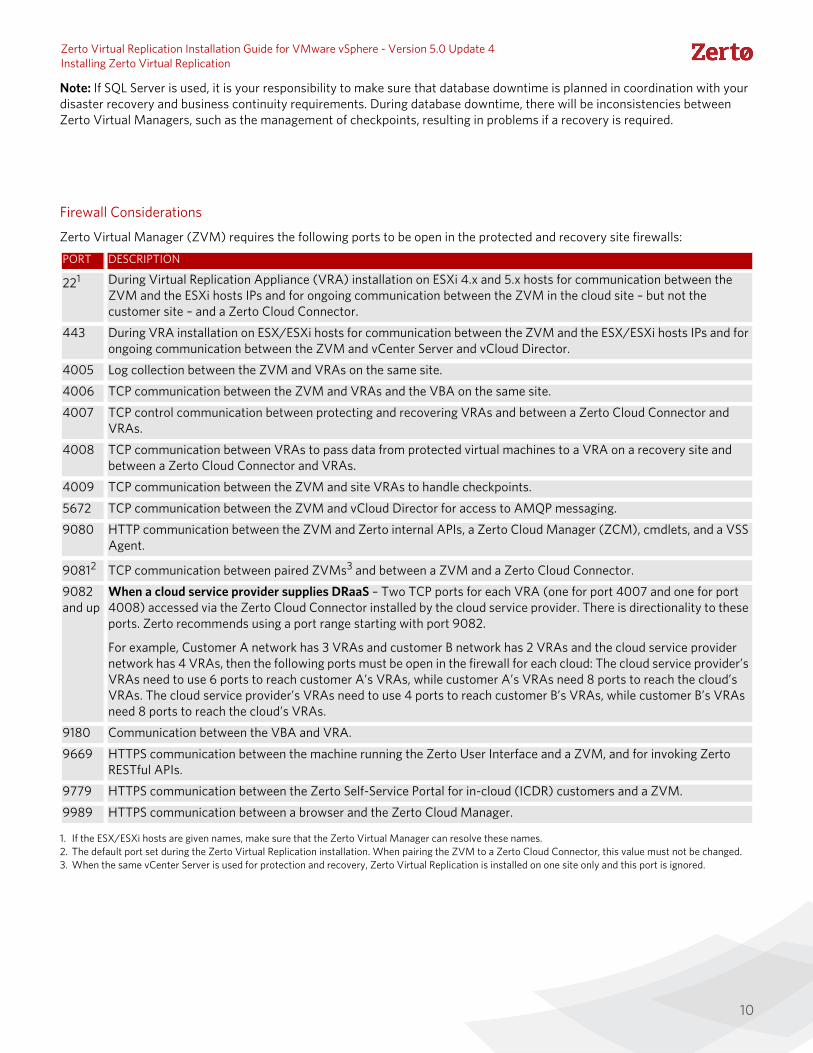
Firewall Considerations
Zerto Virtual Manager (ZVM) requires the following ports to be open in the protected and recovery site firewalls:
PORT DESCRIPTION
221
1. If the ESX/ESXi hosts are given names, make sure that the Zerto Virtual Manager can resolve these names.
During Virtual Replication Appliance (VRA) installation on ESXi 4.x and 5.x hosts for communication between the ZVM and the ESXi hosts IPs and for ongoing communication between the ZVM in the cloud site – but not the customer site – and a Zerto Cloud Connector.
443 During VRA installation on ESX/ESXi hosts for communication between the ZVM and the ESX/ESXi hosts IPs and for ongoing communication between the ZVM and vCenter Server and vCloud Director.
4005 Log collection between the ZVM and VRAs on the same site.
4006 TCP communication between the ZVM and VRAs and the VBA on the same site.
4007 TCP control communication between protecting and recovering VRAs and between a Zerto Cloud Connector and VRAs.
4008 TCP communication between VRAs to pass data from protected virtual machines to a VRA on a recovery site and between a Zerto Cloud Connector and VRAs.
4009 TCP communication between the ZVM and site VRAs to handle checkpoints.
5672 TCP communication between the ZVM and vCloud Director for access to AMQP messaging.
9080 HTTP communication between the ZVM and Zerto internal APIs, a Zerto Cloud Manager (ZCM), cmdlets, and a VSS Agent.
90812
2. The default port set during the Zerto Virtual Replication installation. When pairing the ZVM to a Zerto Cloud Connector, this value must not be changed.
TCP communication between paired ZVMs3 and between a ZVM and a Zerto Cloud Connector.
3. When the same vCenter Server is used for protection and recovery, Zerto Virtual Replication is installed on one site only and this port is ignored.
9082 and up
When a cloud service provider supplies DRaaS – Two TCP ports for each VRA (one for port 4007 and one for port 4008) accessed via the Zerto Cloud Connector installed by the cloud service provider. There is directionality to these ports. Zerto recommends using a port range starting with port 9082.
For example, Customer A network has 3 VRAs and customer B network has 2 VRAs and the cloud service provider network has 4 VRAs, then the following ports must be open in the firewall for each cloud: The cloud service provider’s VRAs need to use 6 ports to reach customer A’s VRAs, while customer A’s VRAs need 8 ports to reach the cloud’s VRAs. The cloud service provider’s VRAs need to use 4 ports to reach customer B’s VRAs, while customer B’s VRAs need 8 ports to reach the cloud’s VRAs.
9180 Communication between the VBA and VRA.
9669 HTTPS communication between the machine running the Zerto User Interface and a ZVM, and for invoking Zerto RESTful APIs.
9779 HTTPS communication between the Zerto Self-Service Portal for in-cloud (ICDR) customers and a ZVM.
9989 HTTPS communication between a browser and the Zerto Cloud Manager.

11
Zerto Virtual Replication Installation Guide for VMware vSphere - Version 5.0 Update 4Installing Zerto Virtual Replication
VMware Privileges Required by Zerto Virtual Replication
When Zerto Virtual Replication accesses the vCenter Server, it requires the vSphere privileges assigned to Administrator roles, which includes the following privileges.
CATEGORY PRIVILEGE NOTES
Alarms Create alarm Only during install and uninstall
Remove alarm
Authorization Modify permission Only during install and uninstall
Modify role
Reassign role permissions
Datastore Allocate space For source/target replication of datastoresBrowse datastore
Low level file operations
Move datastore
Remove file
Update virtual machine files
Datastore cluster Configure a datastore cluster For installation of VRAs
Extension Register extension Only during install and uninstall
Unregister extension
Update extension
Folder Create folder
Delete folder
Move folder
Global Cancel task
Diagnostics
Disable methods
Enable methods
Global tag
Log event
Manage custom attributes
Script action
Set custom attribute
Host > Configuration Advanced settings
Change settings
Security profile and firewall
Virtual machine autostart configuration
Host > Inventory Modify cluster
Network Assign network
Resource Assign vApp to resource pool
Assign virtual machine to resource pool
Sessions Validate session
Tasks Create task
Update task

12
Zerto Virtual Replication Installation Guide for VMware vSphere - Version 5.0 Update 4Installing Zerto Virtual Replication
Note: The Zerto role must also be available. This role is added to the Administrator user during the Zerto Virtual Replication installation.
vApp Add virtual machine
Assign resource pool
Create
Delete
Import
Power off
Power on
Rename
Unregister
vApp application configuration
vApp instance configuration
vApp managedBy configuration
vApp resource configuration
Virtual Machine > Configuration Add existing disk TempDatafile placement is required to restore an offsite backup.Add new disk
Add or remove device
Advanced
Change CPU count
Change resource
Configure managedBy
Extend virtual disk
Memory
Modify device settings
Raw device
Remove disk
Rename
Set annotation
Settings
Swapfile placement
Upgrade virtual machine compatibility
Virtual machine > Interaction Power off
Power on
Virtual machine > Inventory Create from existing
Create new
Move
Register
Remove
Unregister
CATEGORY PRIVILEGE NOTES
13Performing an Installation
Zerto Virtual Replication Installation Guide for VMware vSphere - Version 5.0 Update 4Installing Zerto Virtual Replication
Performing an InstallationThe Zerto Virtual Replication installation deploys the Zerto Virtual Manager (ZVM) and copies the installation software for the Virtual Replication Appliance (VRA).
A complete installation includes installing Zerto Virtual Replication on the protected and peer, recovery, sites. When both these sites are managed by a single vCenter Server, Zerto Virtual Replication is installed on only one site. In this case, Zerto recommends the following:■ Install Zerto Virtual Replication in the site where protected machines will be recovered.■ Make sure that the machine running the vCenter Server is also in the datacenter used for the recovery and not protection.
In all cases, Zerto recommends that you do not install Zerto Virtual Replication on the machine running the vCenter Server service.
You can install Zerto Virtual Replication using the defaults provided by Zerto or perform a custom install, in which you can determine the ports that will be used by Zerto Virtual Replication.■ “Performing an Express Installation”, below■ “Performing a Custom Installation”, on page 14
Performing an Express InstallationYou can install Zerto Virtual Replication using the defaults provided by Zerto. Site information and information to connect to vCloud Director can be provided, if required, after the installation in the Zerto User Interface.
Note: You cannot install Zerto Virtual Replication on the same machine where another version of Zerto Virtual Replication has been installed, for example, if the Zerto Virtual Replication for Microsoft Hyper-V version has been installed on the machine.
To perform an express install of Zerto Virtual Replication:1. Run the Zerto Virtual Replication installer for VMware.
Note: If the required version of Microsoft .NET Framework is not installed, you are prompted to install the required version of .NET Framework, which is included as part of the Zerto Virtual Replication installation package. After .NET is installed the machine automatically restarts and the Zerto Virtual Replication installation begins.
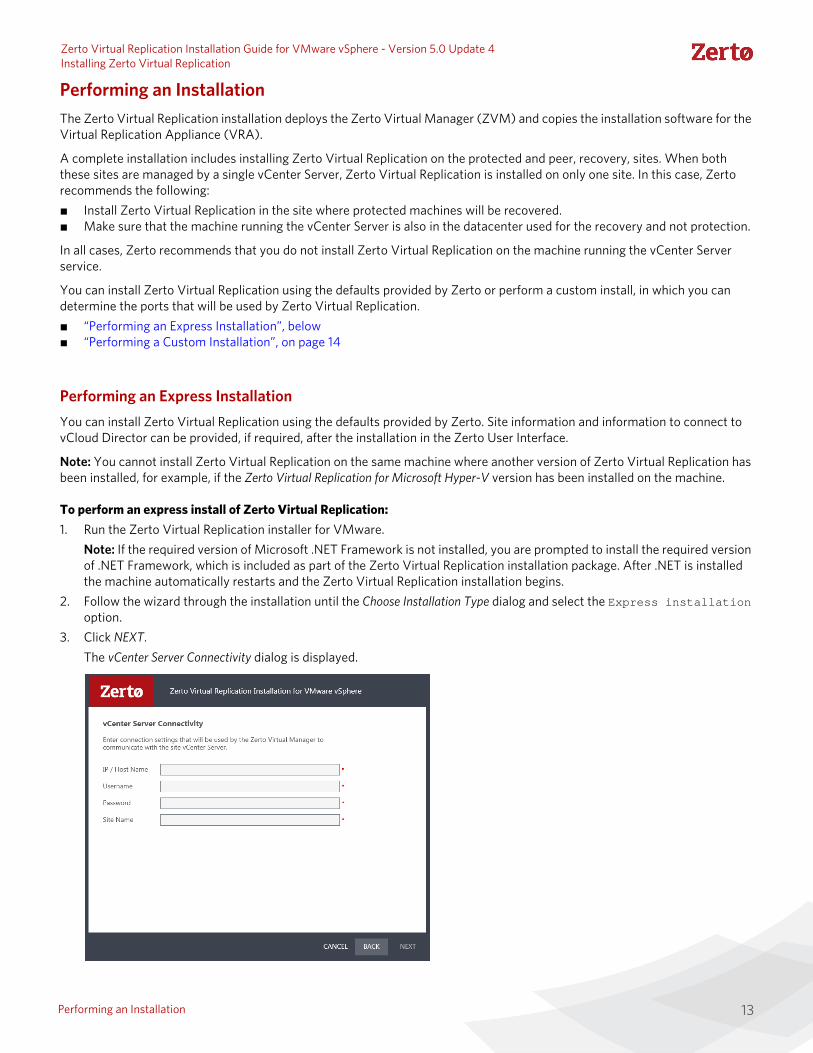
2. Follow the wizard through the installation until the Choose Installation Type dialog and select the Express installation option.
3. Click NEXT.The vCenter Server Connectivity dialog is displayed.

14Performing an Installation
Zerto Virtual Replication Installation Guide for VMware vSphere - Version 5.0 Update 4Installing Zerto Virtual Replication
4. Specify the following:IP / Host Name – The IP address or host name of the machine where the vCenter Server runs.Username – The user name of a user with administrator level privileges in the vCenter Server. The name can be entered using either of the following formats:username
domain\username
Password – A valid password for the given user name.Site Name – A name to identify the site.
5. Click NEXT.The Validation dialog is displayed. The installation performs checks to make sure that the installation can proceed successfully.
6. After the checks complete successfully, click RUN and continue to the end of the installation.7. If you intend managing your disaster recovery from this machine, you can select to open the Zerto Virtual Manager (ZVM)
Interface at the end of the installation, logging in with the user name and password for the vCenter Server connected to the Zerto Virtual Manager. In this user interface you set up Zerto Virtual Replication, as described in “Initial Configuration”, on page 29.
8. It is required to exclude the Zerto Virtual Replication folder from antivirus scanning. Failure to do so may lead to the ZVR folder being incorrectly identified as a threat and in some circumstances corrupt the ZVR folder.
Install Zerto Virtual Replication on the peer sites.
Performing a Custom InstallationYou can install Zerto Virtual Replication providing specific details including the ports that will be used by Zerto Virtual Replication and full contact details. In addition, when performing a custom install, you can provide information to connect to vCloud Director.
To perform a custom install of Zerto Virtual Replication:1. Run the Zerto Virtual Replication installer for VMware.
Note: If the required version of Microsoft .NET Framework is not installed, you are prompted to install the required version of .NET Framework, which is included as part of the Zerto Virtual Replication installation package. After .NET is installed the machine automatically restarts and the Zerto Virtual Replication installation begins.
2. Follow the wizard through the installation until the dialog for the Installation Type and select the Custom Installation option.
3. Click NEXT.
15Performing an Installation
Zerto Virtual Replication Installation Guide for VMware vSphere - Version 5.0 Update 4Installing Zerto Virtual Replication
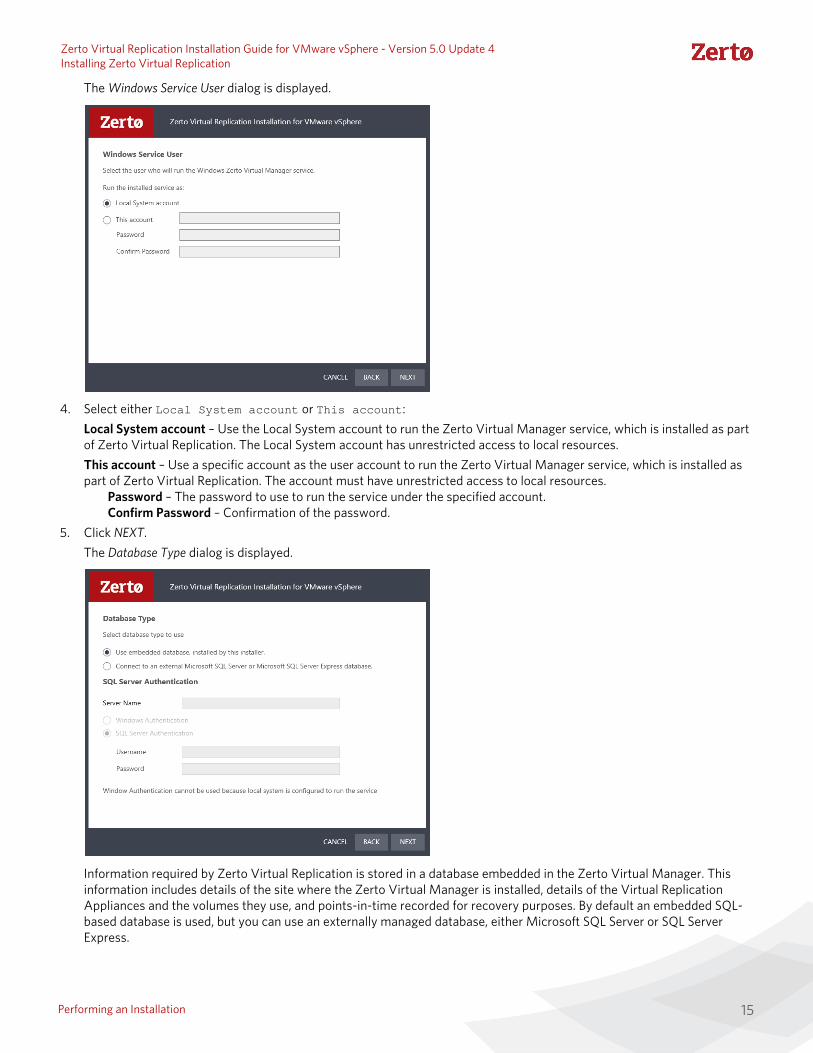
The Windows Service User dialog is displayed.
4. Select either Local System account or This account:Local System account – Use the Local System account to run the Zerto Virtual Manager service, which is installed as part of Zerto Virtual Replication. The Local System account has unrestricted access to local resources.This account – Use a specific account as the user account to run the Zerto Virtual Manager service, which is installed as part of Zerto Virtual Replication. The account must have unrestricted access to local resources.
Password – The password to use to run the service under the specified account.Confirm Password – Confirmation of the password.
5. Click NEXT.The Database Type dialog is displayed.
Information required by Zerto Virtual Replication is stored in a database embedded in the Zerto Virtual Manager. This information includes details of the site where the Zerto Virtual Manager is installed, details of the Virtual Replication Appliances and the volumes they use, and points-in-time recorded for recovery purposes. By default an embedded SQL-based database is used, but you can use an externally managed database, either Microsoft SQL Server or SQL Server Express.

16Performing an Installation
Zerto Virtual Replication Installation Guide for VMware vSphere - Version 5.0 Update 4Installing Zerto Virtual Replication
Note: Protection and recovery can only be performed when the database is running. If you use an external database and it is down for any reason, protection ceases.
6. To use the embedded database, leave the default, or select the option to connect to an external Microsoft SQL Server database.Zerto recommends using SQL Server when a site has more than 40 hosts that have virtual machines that need protecting, and the site has more than 400 virtual machines that need protecting.If you select the external database option, the SQL Server Authentication section is enabled.a) Enter the following details to enable access to the SQL Server database:
Server Name – The domain name and server instance to connect to, with the format <server_name>\<instance_name> or <Server_IP>\<instance_name>.Specify one of the following authentication options:Windows Authentication – Use Windows authentication. This option is only enabled if a specific service user account was specified in the previous Windows Service User dialog, in which case the service account name and password are used.SQL Server Authentication – Use SQL Server authentication.
Username – The user name for the SQL Server database.Password – A valid password for the given user name.
b) When you select SQL Server authentication and enter a user name and password, click TEST AUTHENTICATION, which is displayed. The installer checks whether it can connect to the specified database with the specified username and password. You can only continue when the authentication is successful.
7. Click NEXT.The vCenter Server Connectivity dialog is displayed.
8. Enter connection settings that the Zerto Virtual Manager uses to communicate with the vCenter Server:IP / Host name – The IP address or host name of the machine where the vCenter Server runs.Username – The user name of a user with administrator level privileges in the vCenter Server. The name can be entered using either of the following formats:usernamedomain\username
Password – A valid password for the user name.9. Click NEXT.

17Performing an Installation
Zerto Virtual Replication Installation Guide for VMware vSphere - Version 5.0 Update 4Installing Zerto Virtual Replication
The vCloud Director Connectivity dialog is displayed.
10. When using vCloud Director and you have installed an AMQP server, click the Enable vCD BC/DR checkbox and enter the VMware vCloud Director access details:IP / Host name – The IP address or host name of the machine where vCD runs. When connecting to vCD with multiple cells, enter the virtual IP for the network load balancing used by the cells.Username – The user name for an administrator to vCD.Password – A valid password for the given user name.AMQP Username – The user name for the AMQP server.AMQP Password – A valid password for the given AMQP user name.If the vCD connection settings are not specified, for example, when you do not have an AMQP server installed, they can be set in the Advanced Settings dialog in the Site Configuration panel, in the Zerto User Interface after installation, as described in the Zerto Cloud Manager Administration Guide.Zerto provides an AMQP installation kit if you do not have one installed for vCD. Run ZertoAMQPInstallWizard.exe as described in the Zerto Cloud Manager Administration Guide, with the following credentials:Username – The AMQP user account Zerto will use. RabbitMQ prior to version 3.3 installs with a default administrator user: guest. In RabbitMQ version 3.3 and higher, specify a user with administrator privileges.Password – The password for the user. RabbitMQ prior to version 3.3 installs with a default password of guest.
11. Click NEXT.

18Performing an Installation
Zerto Virtual Replication Installation Guide for VMware vSphere - Version 5.0 Update 4Installing Zerto Virtual Replication
The Zerto Virtual Manager Site Details dialog is displayed.
12. Enter the site details:Site Name – A name to identify the site. This name is displayed in the Zerto User Interface. This field is mandatory.Location – Information such as the address or name of the site to identify it. Optional.Contact Information – The name of the person to contact if a need arises. Optional.Contact Email – The email address to contact if a need arises. Optional.Contact Phone – The phone number to contact if a need arises. Optional.
13. Click NEXT.

19Performing an Installation
Zerto Virtual Replication Installation Guide for VMware vSphere - Version 5.0 Update 4Installing Zerto Virtual Replication
The Online Services and Zerto Mobile Application dialog is displayed.
The Online Services and Zerto Mobile Application are enabled by default. These services can be disabled by unchecking Enable Online Services and Zerto Mobile Application.
14. Click NEXT.The Zerto Virtual Manager Communication dialog is displayed.
IP/Host Name Used by the Zerto User Interface – The IP to access the Zerto Virtual Manager from the Zerto User Interface. If the machine has more than one NIC, select the appropriate IP from the list, otherwise the IP that is displayed is the only option.HTTPS Port (ZVM) – The port used for inbound communication between the Zerto Virtual Manager and Zerto internal APIs, Cmdlets and a VSS Agent.HTTPS Port (clients <->ZVM) – The port used for inbound communication between the Zerto User Interface and the Zerto Virtual Manager.TCP Port (ZVM <-> ZVMs) – The port used for communication between Zerto Virtual Managers.
Both the protected and recovery sites belong to the same enterprise – If you change the value, when pairing sites, use the TCP port value you specify here. Pairing the sites is described in “Pairing Sites”, on page 33.An enterprise using a cloud service provider to supply disaster recovery services – You must not change this value.

20Performing a Silent Installation
Zerto Virtual Replication Installation Guide for VMware vSphere - Version 5.0 Update 4Installing Zerto Virtual Replication
TCP Port (ZVM -> VBA) – The port used for communication between the Zerto Virtual Manager and the Virtual Backup Appliance.
15. Click NEXT.The Validation dialog is displayed. The installation performs checks to make sure that the installation can proceed successfully.
16. After the checks complete successfully, click RUN to perform the installation.If you intend managing your disaster recovery from this machine, you can select to open the Zerto Virtual Manager (ZVM) Interface at the end of the installation, logging in with the user name and password for the vCenter Server connected to the Zerto Virtual Manager. In this user interface you set up Zerto Virtual Replication, as described in “Initial Configuration”, on page 29.
17. It is required to exclude the Zerto Virtual Replication folder from antivirus scanning. Failure to do so may lead to the ZVR folder being incorrectly identified as a threat and in some circumstances corrupt the ZVR folder.
18. Add the machine to the relevant host boot configuration, so that on starting up the host, this machine, running the Zerto Virtual Manager, is also powered on automatically.
Install Zerto Virtual Replication on the peer sites.
Note: If the vSphere Client console was open during the installation, close it and reopen it to ensure you have the Zerto Virtual Replication user interface loaded.
The installation creates the Zerto Virtual Manager and Virtual Backup Appliance as services and the installation package to enable installing Virtual Replication Appliances on hosts.
Performing a Silent InstallationYou can perform a silent installation of Zerto Virtual Replication, by running the installation executable in a script with the -s option.
where:
uninstall – runs the uninstall procedure.l <logfile> – writes log entries to the specified file.s – runs the installation, uninstall, repair or upgrade silently. If Zerto Virtual Replication does not exist on the machine, an installation is performed. If the same version of Zerto Virtual Replication exists on the machine, a repair is performed. If a previous version of Zerto Virtual Replication exists on the machine, an upgrade is performed.PROPERY=VALUE – sets the property PROPERTY to VALUE. The PROPERTY can be any of the following:
<installation>.exe [-s] [-uninstall] [-l <logfile>] [[PROPERTY=VALUE] ...]
PROPERTY DESCRIPTION MANDATORY
VCenterHostName The host name of the machine on which Zerto Virtual Replication is installed. Yes
VCenterPassword A valid password for the given user name. Yes
VCenterUserName The user name for an administrator to vCD. Yes
AmqpPassword The password to access AMQP. No
AmqpUserName The username to access AMQP. No
AutoRestart When running on Windows 2012 platforms a restart to the computer might be required to complete the installation. Set this value to 1 to automatically restart the computer after the installation, if it is required.
No
DBType Either the default internal database, DBType=ssce, or a Microsoft SQL Server, DBType=sqlserver. Default is to use the internal database.
No
IsWindowsAuthentication Use Windows authentication. No
ServiceAccount The user account to run the Zerto Virtual Manager service. Default = '.\LocalSystem'
No
21Installing Zerto Virtual Replication Cmdlets
Zerto Virtual Replication Installation Guide for VMware vSphere - Version 5.0 Update 4Installing Zerto Virtual Replication
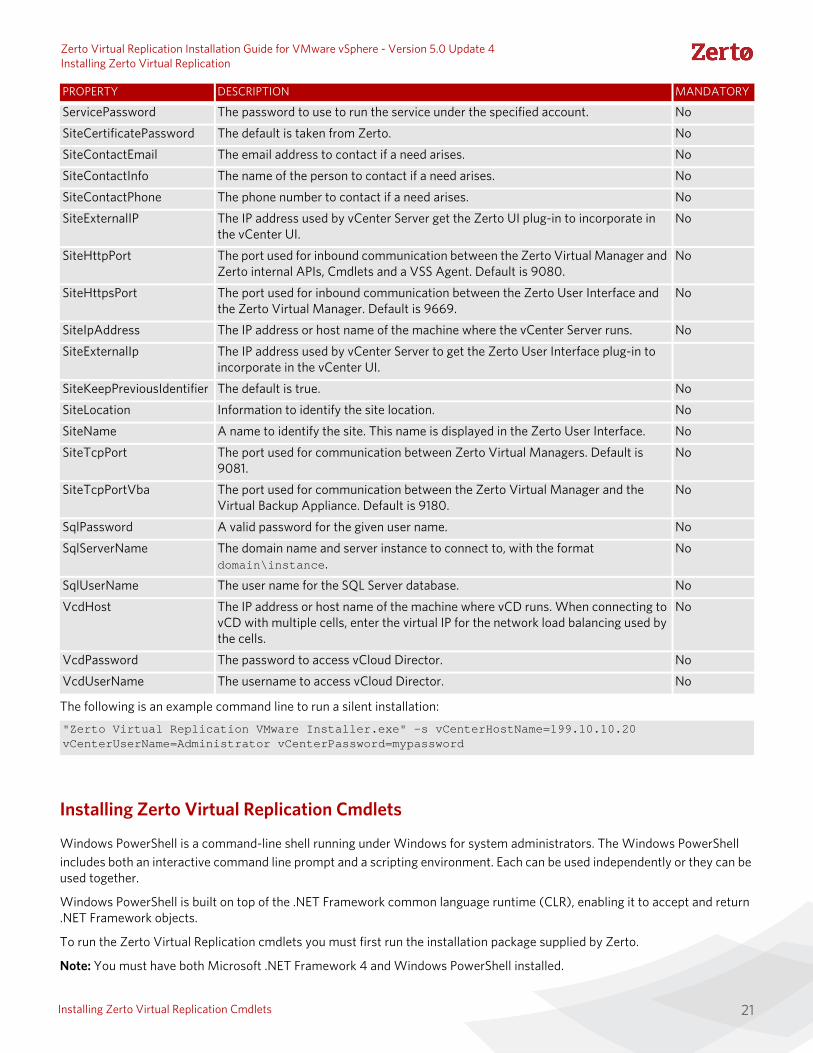
The following is an example command line to run a silent installation:
Installing Zerto Virtual Replication Cmdlets
Windows PowerShell is a command-line shell running under Windows for system administrators. The Windows PowerShell includes both an interactive command line prompt and a scripting environment. Each can be used independently or they can be used together.
Windows PowerShell is built on top of the .NET Framework common language runtime (CLR), enabling it to accept and return .NET Framework objects.
To run the Zerto Virtual Replication cmdlets you must first run the installation package supplied by Zerto.
Note: You must have both Microsoft .NET Framework 4 and Windows PowerShell installed.
ServicePassword The password to use to run the service under the specified account. No
SiteCertificatePassword The default is taken from Zerto. No
SiteContactEmail The email address to contact if a need arises. No
SiteContactInfo The name of the person to contact if a need arises. No
SiteContactPhone The phone number to contact if a need arises. No
SiteExternalIP The IP address used by vCenter Server get the Zerto UI plug-in to incorporate in the vCenter UI.
No
SiteHttpPort The port used for inbound communication between the Zerto Virtual Manager and Zerto internal APIs, Cmdlets and a VSS Agent. Default is 9080.
No
SiteHttpsPort The port used for inbound communication between the Zerto User Interface and the Zerto Virtual Manager. Default is 9669.
No
SiteIpAddress The IP address or host name of the machine where the vCenter Server runs. No
SiteExternalIp The IP address used by vCenter Server to get the Zerto User Interface plug-in to incorporate in the vCenter UI.
SiteKeepPreviousIdentifier The default is true. No
SiteLocation Information to identify the site location. No
SiteName A name to identify the site. This name is displayed in the Zerto User Interface. No
SiteTcpPort The port used for communication between Zerto Virtual Managers. Default is 9081.
No
SiteTcpPortVba The port used for communication between the Zerto Virtual Manager and the Virtual Backup Appliance. Default is 9180.
No
SqlPassword A valid password for the given user name. No
SqlServerName The domain name and server instance to connect to, with the format domain\instance.
No
SqlUserName The user name for the SQL Server database. No
VcdHost The IP address or host name of the machine where vCD runs. When connecting to vCD with multiple cells, enter the virtual IP for the network load balancing used by the cells.
No
VcdPassword The password to access vCloud Director. No
VcdUserName The username to access vCloud Director. No
"Zerto Virtual Replication VMware Installer.exe" -s vCenterHostName=199.10.10.20 vCenterUserName=Administrator vCenterPassword=mypassword
PROPERTY DESCRIPTION MANDATORY

22Installing the VSS Agent
Zerto Virtual Replication Installation Guide for VMware vSphere - Version 5.0 Update 4Installing Zerto Virtual Replication
To install the Zerto Virtual Replication cmdlets:1. Make sure that Windows PowerShell is closed.2. Run the installation file.
After installing the Zerto Virtual Replication cmdlets, either add the cmdlets each time you open the Windows PowerShell or create a Windows PowerShell profile. The following procedure describes how to add the Zerto Virtual Replication cmdlets to every Windows PowerShell session.
To add the Zerto Virtual Replication cmdlets to the current session:■ Open Windows PowerShell with the following arguments:
The Add-PSSnapin cmdlet adds registered Windows PowerShell snap-ins to the current session.
To add the Zerto Virtual Replication cmdlets to every session, in the Properties dialog for a PowerShell shortcut specify a Target value similar to the following:
Note: You can create a Windows PowerShell profile, as described in the Windows PowerShell Help, to add the snap-in to all future Windows PowerShell sessions.
For more details, see Zerto Virtual Replication PowerShell Cmdlets Guide.
Installing the VSS Agent
The Microsoft Volume Shadow Copy Service (VSS) enables taking manual or automatic backup copies or snapshots of data, even if it has a lock, on a specific volume at a specific point-in-time over regular intervals. This ensures not just that the data is crash consistent but also application consistency if recovery is needed.
Zerto Virtual Replication enables adding checkpoints to the journal that are synchronized with VSS snapshots.
To use Zerto Virtual Replication with VSS to ensure application consistency you must install the ZertoVssAgent on every virtual machine that uses VSS and that you want to protect with Zerto Virtual Replication.
You can install the ZertoVssAgent on the following supported Windows operating systems:
To install the ZertoVssAgent:1. Download the ZertoVssAgent, ZertoVss64Agent.msi, from the Zerto Support Portal downloads page, on the virtual
machines that use VSS and that you want to protect with Zerto Virtual Replication.2. Run the ZertoVssAgent on the virtual machines that use VSS and that you want to protect.
Note: Only a single virtual machine in a VPG can have application consistent checkpoints and the VSS checkpoint is only applied to the virtual machine where the ZertoVssAgent is installed. Thus, even if more than one virtual machine runs VSS, you only install the Zerto VssAgent on one of the virtual machines in the VPG. Also, the virtual machine where the ZertoVssAgent is installed must have network connectivity to the local Zerto Virtual Manager in order to be able to add VSS checkpoints successfully.
3. Enter the license key and click Validate.
-NoExit -Command Add-PSSnapIn Zerto.PS.Commands
C:\Windows\SysWOW64\WindowsPowerShell\v1.0\powershell.exe -NoExit-Command Add-PSSnapIn Zerto.PS.Commands
OPERATING SYSTEMS
Windows Server 2008, all versions (SPs and R2)
Windows Server 2012, all versions (SPs and R2)

23Installing the VSS Agent
Zerto Virtual Replication Installation Guide for VMware vSphere - Version 5.0 Update 4Installing Zerto Virtual Replication
4. Follow the wizard through the installation.The Zerto Virtual Manager Connections Settings dialog is displayed.
5. Specify the IP address and HTTP port number for the Zerto Virtual Managers managing the protection of the virtual machines, both for the local site and optionally, for the paired, remote site. If the same hypervisor manager is used both for protecting and recovering virtual machines, specify the IP address and HTTP port number for the single Zerto Virtual Manager installed.Note: The default HTTP port number when Zerto Virtual Replication is installed is 9080.If you enter a wrong IP address or port you can correct the address or port after the installation completes by editing the ZertoVssAgentGUI.exe.conf file in the ZertoVssAgent folder under the folder where the ZertoVssAgent is installed, for example, C:\Program Files\Zerto.
6. Click OK.
The ZertoVssAgent is installed and the Add VSS Checkpoint icon is placed on the desktop. The agent runs as a Windows service, ZertoVssprovider.
For more details about the ZertoVssAgent, see the Zerto Virtual Manager Administration Guide.

24Repairing the Current Installation
Zerto Virtual Replication Installation Guide for VMware vSphere - Version 5.0 Update 4Installing Zerto Virtual Replication
Repairing the Current InstallationIf a new installation is the same version as the installed version, the Repair the Zerto Virtual Replication Installation dialog is displayed.
When repairing the version, all pairing, VRAs and VPGs defined for the site are removed. Use the Zerto Diagnostics utility options Export and Import options, as described in “Upgrading To More Than One Version Higher”, on page 38 to save the settings.
If the vSphere Client console was open during the repair, close it and reopen it to ensure you use the upgraded Zerto User Interface.

25Zerto Virtual Replication Installation Guide for VMware vSphere - Version 5.0 Update 4Accessing the Zerto User Interface
CHAPTER 2: ACCESSING THE ZERTO USER INTERFACE
You manage the protection and replication of virtual machines in vSphere, between the protected and recovery sites, using the Zerto User Interface. On first access to the user interface, you might have to add a security certificate to set up secure communication. Zerto also provides a set of RESTful APIs and PowerShell cmdlets to enable incorporating some of the disaster recovery functionality within scripts or programs.
You manage the protection and replication of virtual machines between the protected and recovery sites, using one of the following:■ The Zerto Virtual Manager Web Client.■ The vSphere Web Client.■ The vSphere Client console.
Note: Microsoft Windows Explorer 9 is not supported and version 10 does not work well with the user interface. Zerto recommends using Chrome, Firefox, or later versions of Internet Explorer.
Note: It is required to exclude the Zerto Virtual Replication folder from antivirus scanning. Failure to do so may lead to the ZVR folder being incorrectly identified as a threat and in some circumstances corrupt the ZVR folder.
The following topics are described in this chapter:
■ “Using the Zerto User Interface From a Browser”, below■ “Using the Zerto User Interface Within vSphere”, on page 25■ “Adding a Security Certificate”, on page 27
Using the Zerto User Interface From a Browser
1. In a browser, enter the following URL:https://zvm_IP:9669
where zvm_IP is the IP address of the Zerto Virtual Manager for the site you want to manage.
2. Login using the user name and password for the vCenter Server connected to the Zerto Virtual Manager.
Using the Zerto User Interface Within vSphereThe Zerto User Interface is embedded in both the vSphere Web Client and Client console as a plug-in. When accessing the Zerto User Interface from within vSphere the interface is available via a tab in the vSphere user interface. When using the Zerto User Interface via vSphere you have the following additional features:■ You can protect a vApp as a single entity in a VPG for any vApp defined under an ESX/ESXi host. All the virtual machines
defined in the vApp VPG are protected and you can migrate or recover the whole vApp as a single entity to the recovery site.Note: The recovery site cannot be Microsoft Hyper-V nor Amazon Web Services (AWS).
■ You can protect a virtual machine, that is not already included in a VPG, directly via the Zerto tab for the virtual machine in vSphere Client console.

26Using the Zerto User Interface Within vSphere
Zerto Virtual Replication Installation Guide for VMware vSphere - Version 5.0 Update 4Accessing the Zerto User Interface
Using the vSphere Web ClientYou can use the VMware Web Client to manage Zerto Virtual Replication.
The vSphere Web Client is a service that when installed enables a browser-based interface for configuring and administering virtual machines enabling you to connect to a vCenter Server system to manage an ESXi host through a browser. The following procedure describes how to configure the vSphere Web Client to display Zerto Virtual Replication dialogs.
This procedure is valid for vSphere Web Client version 5.1 communicating with vCenter Server from version 5.0 and higher.
Note: The following procedure assumes that the vSphere Web Client version 5.1 has been installed. Although you can run the vSphere Web Client version 5.1 with vSphere Server 5.0 and 5.1, when installing the vSphere Web Client you need access to a vSphere Server version 5.1 which includes an option for single sign on, required by the vSphere Web Client installation.
Note: Setting up Zerto Virtual Replication to be used via the vSphere Web Client disables the use of other VMware plug-ins, such as VDP and VSA, causing them to disappear from the web client. This is a known VMware problem, see http://kb.vmware.com/selfservice/microsites/search.do?language=en_US&cmd=displayKC&externalId=2042455. To resolve this issue, set up two web clients, on different servers. On one run Zerto Virtual Replication and on the other run the VMware plug-ins.
To set up the vSphere Web Client to work with Zerto Virtual Replication:1. When the vSphere Web Client service is installed on a Microsoft Windows platform:
a) Copy and run VsphereWebClientPluginEnabler.exe to the machine where you run the web client service. This file is located in the Zerto Virtual Replication folder under the folder where Zerto Virtual Replication was installed. You can copy VsphereWebClientPluginEnabler.exe to any folder on the relevant machine.
b) Run VsphereWebClientPluginEnabler.exe as an administrator.2. When the vSphere Web Client is installed on a Linux platform, via the vCenter Server Linux Virtual Appliance (vCSA):
a) Depending on your vCenter Server version, navigate to:■ Up to vCenter Server 5.5.x, navigate to: /var/lib/vmware/vsphere-client■ From vCenter Server 6.0.x, navigate to: /etc/vmware/vsphere-client/
b) Open the webclient.properties file in a text editor and add the following to the file:.
3. Restart the vSphere Web Client service.After the service has started you might have to wait a few minutes before you can open the vSphere Web Client in your browser.
To use the vSphere Web Client:1. Log in using the vCenter Server access credentials (user name and password) for the vCenter Server connected to the
Zerto Virtual Manager.2. In the browser, navigate to a vSphere node supported by Zerto Virtual Replication, such as the root node or a virtual
machine, and choose the Classic Solutions tab, which is now displayed after the Related Objects tab.Note: With Chrome and Firefox browsers, you must load the script plug-in page in an external tab at least once before it appears inside the vSphere Web Client. The Classic Solutions tab is displayed when there is a plug-in installed, in this case the Zerto Virtual Replication user interface plug-in.
3. If prompted, allow blocked content to be displayed.
scriptPlugin.enabled = true

27Adding a Security Certificate
Zerto Virtual Replication Installation Guide for VMware vSphere - Version 5.0 Update 4Accessing the Zerto User Interface
4. If more than one plug-in is installed, click Zerto to display the Zerto Virtual Replication user interface.
Using the vSphere Client Console
To use the vSphere Client console:1. Login using the user name and password for the vCenter Server connected to the Zerto Virtual Manager.2. Access the Zerto tab, displayed for the root node.
Note: The Zerto tab is also displayed for a datacenter node showing the same information as for the root node. For a virtual machine or vApp node the Zerto tab displays information specific to the virtual machine or vApp.
Adding a Security Certificate
Communication between the Zerto Virtual Manager and the user interface uses HTTPS. On the first login to the Zerto User Interface, you must install a security certificate in order to be able to continue working without each login requiring acceptance of the security.
To install a security certificate for the Zerto User Interface:On first access to the Zerto User Interface, if you haven’t installed the security certificate, a security alert is issued.
Note the following:■ To run this procedure run Microsoft Internet Explorer as administrator. The procedure is similar for Google Chrome and for
Mozilla Firefox.■ Access the Zerto User Interface using the IP and not the name of the machine where Zerto Virtual Replication is installed.
1. Click View Certificate.The Certificate dialog is displayed.
2. Click Install Certificate.The Certificate Import wizard dialog is displayed.
3. Follow the wizard: Place all the certificates in the Trusted Root Certification Authorities store: Select the Place all certificates in the following store option and browse to select the Trusted Root Certification Authorities store.

28Adding a Security Certificate
Zerto Virtual Replication Installation Guide for VMware vSphere - Version 5.0 Update 4Accessing the Zerto User Interface
4. Continue to the end of the wizard. Click Yes when the Security Warning is displayed.
5. Click OK that the installation was successful.6. Click OK when prompted and then Yes in the Security Alert dialog to continue.

29Zerto Virtual Replication Installation Guide for VMware vSphere - Version 5.0 Update 4Initial Configuration
CHAPTER 3: INITIAL CONFIGURATION
After installing Zerto Virtual Replication, you configure the site. Zerto Virtual Replication is configured and managed from within the Zerto User Interface. This chapter describes the initial configuration required after installing Zerto Virtual Replication.
The following topics are described in this chapter:■ “Registering the Zerto Virtual Replication License”, below■ “Installing Virtual Replication Appliances”, on page 29■ “Pairing Sites”, on page 33■ “Setting Up a Remote Site”, on page 33
Cloud service providers must configure both Zerto Virtual Manager and a Zerto Cloud Manager as described in Zerto Cloud Manager Installation Guide and Zerto Cloud Manager Administration Guide.
Registering the Zerto Virtual Replication LicenseOn the very first access to the Zerto User Interface, you must either register your use of Zerto Virtual Replication, by entering the license key supplied by Zerto or pair to a site where a license has already been entered.
Note: A customer using a Cloud Service Provider (CSP) to manage the disaster recovery, pairs to the CSP using the IP address supplied by the CSP and does not enter a license key. A CSP with more than one cloud site must enter a license at each cloud site instead of pairing to a licensed cloud site. The license can be the same license used in another cloud site. The CSP can then pair the sites as described in “Pairing Sites”, on page 33. If the CSP registers Zerto Virtual Replication by pairing to another site with a license, instead of registering by entering a license, the registration works and the CSP can use both sites but customers cannot successfully pair to the site without a license.
After entering a valid license, the DASHBOARD tab is displayed with a summary of the site. Before you can start protecting virtual machines in this site, you must install Virtual Replication Appliances on the hosts in the site and pair the protected and recovery sites, as described in the following sections.
Installing Virtual Replication AppliancesThe Zerto Virtual Replication installation includes the OVF template for Virtual Replication Appliances (VRAs). A VRA is a Zerto Virtual Replication virtual machine that manages the replication of virtual machines across sites. A VRA must be installed on every host that manages virtual machines that require protecting in the protected site and on every host that
30Installing Virtual Replication Appliances
Zerto Virtual Replication Installation Guide for VMware vSphere - Version 5.0 Update 4Initial Configuration
manages virtual machines in the recovery site. The VRA compresses the data that is passed across the WAN from the protected site to the recovery site. The VRA automatically adjusts the compression level according to CPU usage, including totally disabling it if needed.
A VRA can manage a maximum of 1500 volumes, whether these volumes are being protected or recovered.
The VRA is a custom, very thin, Linux-based virtual machine with a small footprint, disk – memory and CPU – and increased security since there are a minimum number of services installed.
Zerto recommends installing a VRA on every hypervisor host so that if protected virtual machines are moved from one host in the cluster to another host in the cluster there is always a VRA to protect the moved virtual machines.
With VMware vApps, if you want to protect a vApp, you must install a VRA on every ESX/ESXi host in the cluster on both the protected and recovery sites and ensure that DRS is enabled for these clusters.
VRA Installation Requirements
To install a VRA you require the following:■ 12.5GB datastore space.■ At least 1GB of reserved memory.■ The ESX/ESXi version must be 4.0U1 or higher and Ports 22 and 443 must be enabled on the host during the installation.
You must also know the following information to install a VRA:■ If the ESXi version is 5.5 or higher and the VRA should connect to the host with user credentials, or if the ESXi version is
lower than 5.5 (4.x or 5.x), the password to access the host root account.Note: For ESXi versions 5.5 or higher, by default the VRA connects to the host with a vSphere Installation Bundle, VIB. Therefore, it is not necessary to enter the password used to access the host root account.
■ The storage the VRA will use and the local network used by the host.■ The network settings to access the peer site; either the default gateway or the IP address, subnet mask, and gateway.■ If a static IP is used, which is the Zerto recommendation, instead of DHCP, the IP address, subnet mask, and default
gateway to be used by the VRA.Note: In a non-production environment it is often convenient to use DHCP to allocate an IP to the VRA. In a production environment this is not recommended. For example, if the DHCP server changes the IP allocation on a reboot, the VRA does not handle the change.
Note: For the duration of the installation of the VRA, the Zerto Virtual Manager enables SSH in the vCenter Server.
If the peer site VRAs are not on the default gateway, you must set up routing to enable the VRAs on this site to communicate with the peer site VRAs before defining the VRAs. Setting up routing after defining VRAs only applies to VRAs installed after the routing is set. Any existing VRA is not affected and access to these VRAs continues via the default gateway. If the default gateway stops being used, you must reinstall the VRAs that were installed before setting up paired site routing.
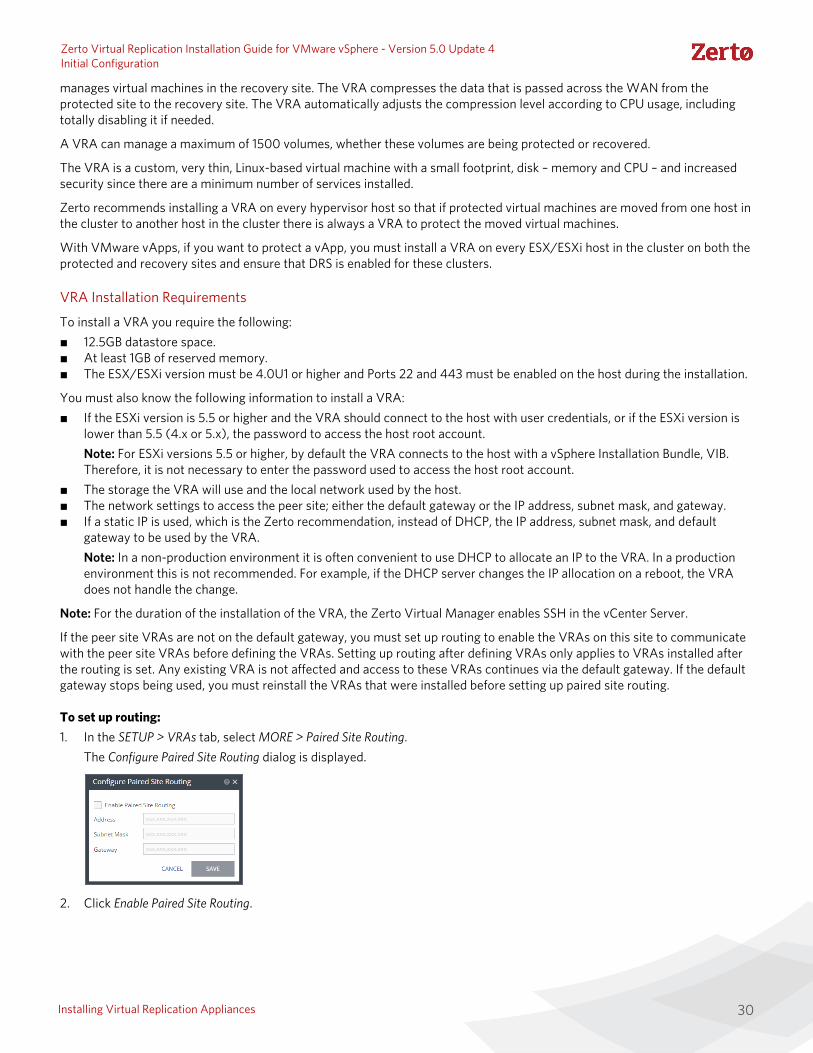
To set up routing:1. In the SETUP > VRAs tab, select MORE > Paired Site Routing.
The Configure Paired Site Routing dialog is displayed.
2. Click Enable Paired Site Routing.

31Installing Virtual Replication Appliances
Zerto Virtual Replication Installation Guide for VMware vSphere - Version 5.0 Update 4Initial Configuration
3. Specify the following and then click SAVE:Address – The IP address of the next hop at the local site, the router or gateway address, that is used to access the peer site network.Subnet Mask – The subnet mask for the peer site network.Gateway – The gateway for the peer site network.
These access details are used to access all VRAs installed on the peer site after the information is saved.
To install Zerto Virtual Replication Appliances (VRAs) on ESX/ESXi hosts:1. In the Zerto User Interface, click SETUP > VRAs.2. Select a host which requires a VRA and click NEW VRA.
The Configure and Install VRA dialog is displayed. The dialog displayed depends on the ESX/i version:
Note: If you selected a cluster or multiple hosts, the VRA is installed on the first host in the displayed list.Specify the following Host Details:Host – The host on which the VRA is installed. The drop-down displays the hosts that do not have a VRA installed, with the selected host displayed by default.From ESXi 5.5, by default, Zerto Virtual Manager uses a vSphere Installation Bundle, VIB, to connect to the host. When using VIB:■ The user does not enter a password.■ Once a day, Zerto Virtual Manager checks that the VRA and host can connect. If the connection fails, Zerto Virtual
Manager re-initiates the connection automatically and logs it.For ESX/i versions earlier than 5.5, when using a password, root access is required. Once a day, Zerto Virtual Manager checks that the password is valid. If the password was changed, an alert is issued, requesting the user enter the new password.
Use credentials to connect to host – When unchecked, the Zerto Virtual Manager uses VIB to connect to the host. This field is only relevant for ESXi 5.5 and later.Host Root Password – When the VRA should connect to the host with a password, check Use credential to connect to host and enter the root user password used to access the host. When the box on the right side is checked, the password is displayed in plain text.This field is only relevant for ESXi 4.x and 5.x hosts. This field is disabled for ESX 4.x hosts.
ESXi versions from 5.5 ESXi versions before version 5.5

32Installing Virtual Replication Appliances
Zerto Virtual Replication Installation Guide for VMware vSphere - Version 5.0 Update 4Initial Configuration
Datastore – The datastore that the VRA will use for protected virtual machine data on the recovery site, including the journals. You can install more than one VRA on the same datastore.Network – The network used to access the VRA.VRA RAM – The amount of memory to allocate to the VRA. The amount determines the maximum buffer size for the VRA for buffering IOs written by the protected virtual machines, before the writes are sent over the network to the recovery VRA. The recovery VRA also buffers the incoming IOs until they are written to the journal. If a buffer becomes full, a Bitmap Sync is performed after space is freed up in the buffer.
The protecting VRA can use 90% of the buffer for IOs to send over the network and the recovery VRA can use 75% of the buffer. That is, for example, a protecting VRA defined with 2GB of RAM can buffer approximately 1305MB before the buffer is full and a Bitmap Sync is required.Note: The number of virtual machines that a VRA can support is not dependent on the amount of VRA RAM.VRA Group – Choose the VRA Group from the dropdown list. If you want to create a new VRA group, type in the name of the new group and click CREATE. You can then choose the new group from the dropdown list.You group VRAs together when VRAs use different networks so they can be grouped by network, for example when the protected and recovery sites are managed by the same vCenter Server and you want to replicate from the branch site to the main site. Within a group the priority assigned to a VPG dictates the bandwidth used and is applicable within a group and not between groups. Thus, a VPG with a high priority is allocated bandwidth before VPGs with lower priorities. VPGs that are on VRAs with different VRA groups, for example, VPG1 on VRA1 in group1 and VPG2 on VRA2 in group2, do not affect each other, as the priority is relevant only within each group.
3. Specify the following VRA Network Details:Configuration – Either have the IP address allocated via a static IP address or a DHCP server. If you select the Static option, which is the recommended option, enter the following:
Address – The IP address for the VRA. Subnet Mask – The subnet mask for the network. The default value is 255.255.255.0.Default Gateway – The default gateway for the network.
4. Click INSTALL.The VRA installation starts and the status is displayed in the TASKS popup dialog in the status bar and under MONITORING > TASKS.The VRA displayed name and DNS name is Z-VRA-hostname. If a virtual machine with this name exists, for example when a previous VRA was not deleted, the VRA name has a number appended to it.
AMOUNT OF VRA RAM VRA BUFFER POOL SIZE
1GB 450MB
2GB 1450MB
3GB 2300MB
4GB 3,300MB
5GB 4,300MB
6GB 5,300MB
7GB 6,300MB
8GB 7,300MB
9GB 8,300MB
10GB 9,300MB
11GB 10,300MB
12GB 11,300MB
13GB 12,300MB
14GB 13,300MB
15GB 14,300MB
16GB 15,300MB
33Pairing Sites
Zerto Virtual Replication Installation Guide for VMware vSphere - Version 5.0 Update 4Initial Configuration
Add a VRA to every host that hosts virtual machines that you want replicated. Zerto recommends installing a VRA on every listed host. An alert is issued after the first VRA is installed in a cluster that tells you to install a VRA on the other hosts in the cluster. The alert is automatically removed when all the hosts in the cluster have VRAs installed.
A VRA can manage a maximum of 1500 volumes, whether these are volumes being protected or recovered.
Note: VRAs are configured and managed by the Zerto Virtual Manager. You cannot take snapshots of VRAs as snapshots cause operational problems for the VRAs.
Pairing SitesZerto Virtual Replication can be installed at multiple sites and each of these sites can be paired to any other site on which Zerto Virtual Replication has been installed. Virtual machines that are protected on one site can be recovered to any paired site.
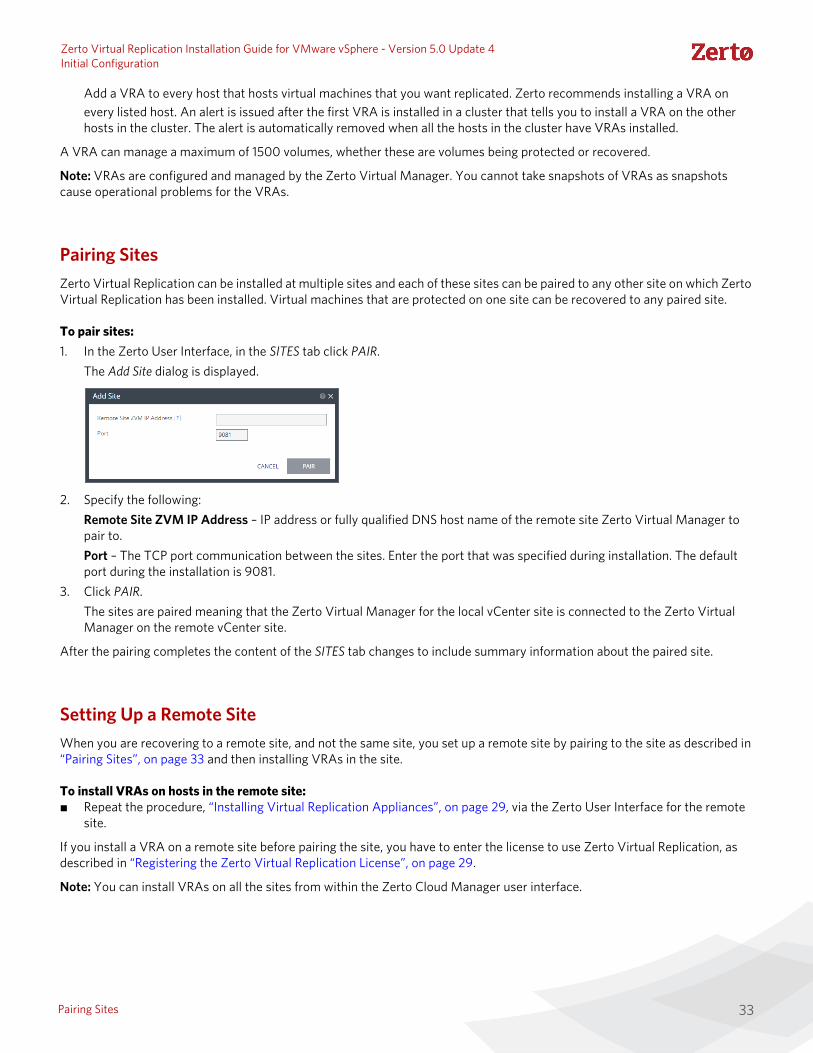
To pair sites:1. In the Zerto User Interface, in the SITES tab click PAIR.
The Add Site dialog is displayed.
2. Specify the following:Remote Site ZVM IP Address – IP address or fully qualified DNS host name of the remote site Zerto Virtual Manager to pair to.Port – The TCP port communication between the sites. Enter the port that was specified during installation. The default port during the installation is 9081.
3. Click PAIR.The sites are paired meaning that the Zerto Virtual Manager for the local vCenter site is connected to the Zerto Virtual Manager on the remote vCenter site.
After the pairing completes the content of the SITES tab changes to include summary information about the paired site.
Setting Up a Remote SiteWhen you are recovering to a remote site, and not the same site, you set up a remote site by pairing to the site as described in “Pairing Sites”, on page 33 and then installing VRAs in the site.
To install VRAs on hosts in the remote site:■ Repeat the procedure, “Installing Virtual Replication Appliances”, on page 29, via the Zerto User Interface for the remote
site.
If you install a VRA on a remote site before pairing the site, you have to enter the license to use Zerto Virtual Replication, as described in “Registering the Zerto Virtual Replication License”, on page 29.
Note: You can install VRAs on all the sites from within the Zerto Cloud Manager user interface.

34Zerto Virtual Replication Installation Guide for VMware vSphere - Version 5.0 Update 4Uninstalling Zerto Virtual Replication
CHAPTER 4: UNINSTALLING ZERTO VIRTUAL REPLICATION
This chapter describes how to uninstall Zerto Virtual Replication.
You uninstall Zerto Virtual Replication via the Uninstall a program in the Windows Control Panel.
When you uninstall Zerto Virtual Replication the following are also removed:■ The Virtual Replication Appliances.■ All the virtual protection groups defined to protect virtual machines, including all the target disks managed by the VRA for
the virtual machines that were being protected.■ The Zerto Virtual Backup Appliance.■ Any Zerto Cloud Connectors.
If, for any reason, a Virtual Replication Appliance cannot be removed, for example, in a VMware vSphere environment, when the vCenter Server is down or when the Virtual Replication Appliance was installed on an ESXi host and the password to the host was changed, you can continue with the uninstall and later remove the Virtual Replication Appliance manually from within the vSphere Web client or Client console. If this does not work, contact Zerto support.
Note: You can uninstall Zerto Virtual Replication silently, by running the silent installation with the -uninstall switch, as described in “Performing a Silent Installation”, on page 20.
35Zerto Virtual Replication Installation Guide for VMware vSphere - Version 5.0 Update 4Upgrading Zerto Virtual Replication
CHAPTER 5: UPGRADING ZERTO VIRTUAL REPLICATION
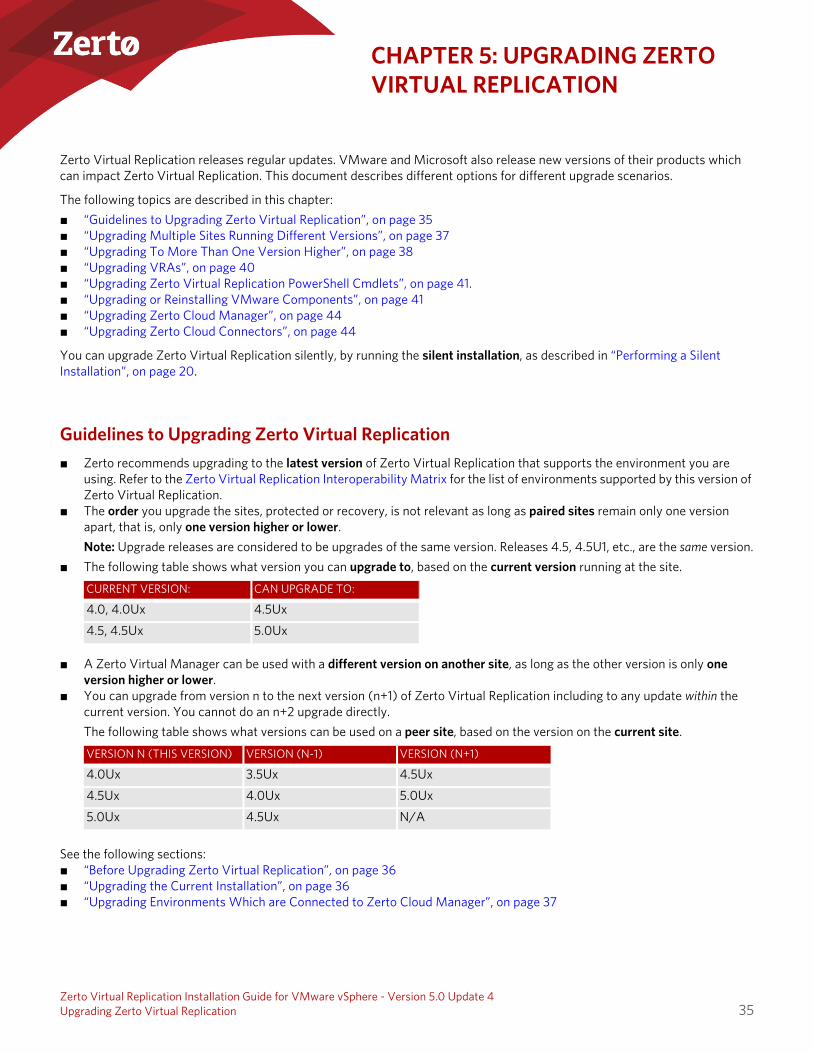
Zerto Virtual Replication releases regular updates. VMware and Microsoft also release new versions of their products which can impact Zerto Virtual Replication. This document describes different options for different upgrade scenarios.
The following topics are described in this chapter:■ “Guidelines to Upgrading Zerto Virtual Replication”, on page 35■ “Upgrading Multiple Sites Running Different Versions”, on page 37■ “Upgrading To More Than One Version Higher”, on page 38■ “Upgrading VRAs”, on page 40■ “Upgrading Zerto Virtual Replication PowerShell Cmdlets”, on page 41.■ “Upgrading or Reinstalling VMware Components”, on page 41■ “Upgrading Zerto Cloud Manager”, on page 44■ “Upgrading Zerto Cloud Connectors”, on page 44
You can upgrade Zerto Virtual Replication silently, by running the silent installation, as described in “Performing a Silent Installation”, on page 20.
Guidelines to Upgrading Zerto Virtual Replication■ Zerto recommends upgrading to the latest version of Zerto Virtual Replication that supports the environment you are
using. Refer to the Zerto Virtual Replication Interoperability Matrix for the list of environments supported by this version of Zerto Virtual Replication.
■ The order you upgrade the sites, protected or recovery, is not relevant as long as paired sites remain only one version apart, that is, only one version higher or lower.Note: Upgrade releases are considered to be upgrades of the same version. Releases 4.5, 4.5U1, etc., are the same version.
■ The following table shows what version you can upgrade to, based on the current version running at the site.
■ A Zerto Virtual Manager can be used with a different version on another site, as long as the other version is only one version higher or lower.
■ You can upgrade from version n to the next version (n+1) of Zerto Virtual Replication including to any update within the current version. You cannot do an n+2 upgrade directly.The following table shows what versions can be used on a peer site, based on the version on the current site.
See the following sections:■ “Before Upgrading Zerto Virtual Replication”, on page 36■ “Upgrading the Current Installation”, on page 36■ “Upgrading Environments Which are Connected to Zerto Cloud Manager”, on page 37
CURRENT VERSION: CAN UPGRADE TO:
4.0, 4.0Ux 4.5Ux
4.5, 4.5Ux 5.0Ux
VERSION N (THIS VERSION) VERSION (N-1) VERSION (N+1)
4.0Ux 3.5Ux 4.5Ux
4.5Ux 4.0Ux 5.0Ux
5.0Ux 4.5Ux N/A

36Guidelines to Upgrading Zerto Virtual Replication
Zerto Virtual Replication Installation Guide for VMware vSphere - Version 5.0 Update 4Upgrading Zerto Virtual Replication
Before Upgrading Zerto Virtual ReplicationBefore upgrading to a new version, either by installing the new version over the existing version or by uninstalling the existing version and then installing the new version, Zerto recommends doing the following:■ Clear the Microsoft Internet Explorer cache of temporary Internet files. Not clearing the cache of temporary files can
result in problems when accessing the Zerto Virtual Manager.■ Make sure that all VPGs are in the state Protecting, and not in a sync state, such as Delta Sync, or in an error state, such
as Needs Configuration.■ Complete any recovery operation before starting the upgrade.■ Stop the Zerto Virtual Manager service.■ Create a backup of the machine where the Zerto Virtual Manager runs, which you will use if the upgrade fails. Zerto
recommends taking a snapshot of the machine after stopping the Zerto Virtual Manager service.Note: The snapshot should only be used to rollback to the pre-upgrade state immediately after the upgrade has completed. The snapshot should not be used after the protection of virtual machines has restarted.
The installation procedure checks for an existing installation that is either one version lower than the new version or is the same version. If an installation is found you can upgrade the installation.
Upgrading the Current Installation
The existing Virtual Replication Appliances and protected virtual machines, together with all other information, such as checkpoints, journals, sites, and pairing details, are retained and are available in the upgraded installation.
The upgrade is performed without disrupting the protection, but no new checkpoints are written to the journal during the actual upgrade.
This may temporarily cause alerts to be issued, even if only a single site was affected, stating that the journal history and RPO do not meet their specified target settings.
Note: ■ VRAs from the existing installation are not automatically upgraded when upgrading Zerto Virtual Replication. ■ Zerto recommends that you always upgrade the VRAs on your site to the latest version.■ If a newer version of the installed VRAs exists, you can continue to use the current VRAs with the new version of Zerto
Virtual Replication, or upgrade these VRAs from within the Zerto User Interface.
To upgrade the version:1. Run the Zerto Virtual Replication installation executable for vSphere.
The Zerto Replication Installation Wizard is displayed.2. Select Upgrade and click Next.
The upgrade proceeds automatically.3. Proceed to completion.
Note: If the vSphere Client console was open during the upgrade, close it and reopen it.
To upgrade existing VRAs see “Upgrading VRAs”, on page 40.

37Upgrading Multiple Sites Running Different Versions
Zerto Virtual Replication Installation Guide for VMware vSphere - Version 5.0 Update 4Upgrading Zerto Virtual Replication
Upgrading Environments Which are Connected to Zerto Cloud ManagerFor environments using the Zerto Cloud Manager you must:■ Upgrade the Zerto Cloud Manager to be consistent with the latest version of Zerto Virtual Replication run by the CSP.■ Upgrade the version of Zerto Virtual Replication run by the CSP before Zerto Cloud Manager, so that they are never more
than one version separated from each other.
In other words, the Zerto Cloud Manager version should be: N or N+1, where N is the ZVM version.
For details about upgrading Zerto Cloud Manager, see Zerto Cloud Manager Installation Guide.
Note: Zerto no longer supports vCenter Server vApps. Any VPG protecting a vAPP should be recreated using the virtual machines in the vApp. When upgrading to 5.0Ux, if there is a VPG protecting a vCenter Server vApp, the following error appears, and the upgrade is stopped: Zerto no longer supports protection of vCenter Server vApps. Create a new VPG with the virtual machines from the vApp added separately to the VPG.
Upgrading Multiple Sites Running Different VersionsA Zerto Virtual Manager can be installed on a site running a different version, as long as each version is only one version higher or lower than the other.
When you have multiple sites, make sure that the version of Zerto Virtual Manager is never more than one version higher or lower than any of the versions running on the paired sites.
To upgrade Zerto Virtual Replication installed on multiple sites:1. Upgrade a site whose version is lower than the required version. Start the upgrades with the site whose version is lowest.
Make sure, at all times, that no site is more or less than one version higher or lower than any of the paired sites.2. If the VRAs on the site need upgrading, upgrade these VRAs to ensure that they are no less than one version higher or
lower than any of the VRAs on any of the paired sites.3. Repeat the above step for all sites.
For Example:■ You have sites running versions 4.0U3, which are paired to a site running 4.5U4.■ You are planning to upgrade to 5.0U2.■ Upgrade first, the 4.0U3 site to a 4.5U4 version, and then both of the sites to 5.0U2.

38Upgrading To More Than One Version Higher
Zerto Virtual Replication Installation Guide for VMware vSphere - Version 5.0 Update 4Upgrading Zerto Virtual Replication
Upgrading To More Than One Version Higher
Before upgrading to a new version, make sure that all VPGs are in Protecting state and not in a sync state, such as Delta Sync, or an error state, such as Needs Configuration.
If you need to upgrade more than one version higher, do one of the following:
1. Upgrade versions stepwise, one version at a time, as described above in Upgrading Multiple Sites Running Different Versions, until you reach the required version.
2. Then, use the Zerto Diagnostics utility’s export option to export the existing VPG definitions, then uninstall the old version of Zerto Virtual Replication. Install the new version, then use the Zerto Diagnostics utility’s import option to re-create the VPGs. Use the following procedure.
To upgrade Zerto Virtual Replication using the Zerto Diagnostics utility:1. Click Start > Programs > Zerto Virtual Replication > Zerto Diagnostics.
The Zerto Virtual Replication Diagnostics menu dialog is displayed.
2. Select the Export Virtual Protection Group (VPG) settings option and click Next.Note: Zerto Virtual Replication regularly exports settings to the Zerto_Installation_Folder\Zerto Virtual Replication\ExportedSettings folder. You can use the last exported file. The default location of Zerto_Installation_Folder is C:\Program Files\Zerto.

39Upgrading To More Than One Version Higher
Zerto Virtual Replication Installation Guide for VMware vSphere - Version 5.0 Update 4Upgrading Zerto Virtual Replication
3. Select the destination for the file that will contain the exported settings and enter the Zerto Virtual Manager IP address and port for the protected site.
4. Click Next.The list of exported VPGs is displayed.
5. Click Done.6. In the Zerto User Interface delete the VPGs, and keep their target disks.
Note: If you did not export the settings, Zerto Virtual Replication regularly exports settings to the Zerto_Installation_Folder\Zerto Virtual Replication\ExportedSettings folder. You can use the last exported file as input to recreate the VPGs to this point in time. The default location of Zerto_Installation_Folder is C:\Program Files\Zerto.
7. Uninstall the existing Zerto Virtual Replication version.8. Install the new Zerto Virtual Replication version, as described in the Zerto Virtual Replication Installation Guide.9. Install the VRAs on the hosts in the site and pair the sites, as described in Zerto Virtual Replication Installation Guide.
Note: If the protected site and recovery site are the same for any of the VPGs that were exported, set Enable replication to self in the Advanced Settings dialog, as described in Zerto Virtual Manager Administration Guide for the VMware vSphere Environment.
10. Click Start > Programs > Zerto Virtual Replication > Zerto Diagnostics.The Zerto Virtual Replication Diagnostics menu dialog is displayed.
11. Select Import Virtual Protection Group (VPG) settings.12. Click Next.
13. Select the file previously exported and enter the Zerto Virtual Manager IP address and port for the protected site.14. Click Next.

40Upgrading VRAs
Zerto Virtual Replication Installation Guide for VMware vSphere - Version 5.0 Update 4Upgrading Zerto Virtual Replication
The list of exported VPGs is displayed.
15. Select the VPGs to import. You cannot import VPGs that have the same name as a VPG that is already defined in current installation. If a VPG in the import file has the same name as an existing VPG, it is disabled and is grayed-out.
16. Click Next.The list of imported VPGs is displayed. If the VPG cannot not be imported, the reason is specified.
17. Click Done.
Upgrading VRAs
■ VRAs from the existing installation are not automatically upgraded when upgrading Zerto Virtual Replication. ■ If a newer version of the installed VRAs exists, you can continue to use the current VRAs with the new version of Zerto
Virtual Replication, or you can upgrade these VRAs from within the Zerto User Interface.■ VRAs installed with the previous version of Zerto Virtual Replication can work with VRAs installed with the current version
of Zerto Virtual Replication in any combination (all from one version or a mix of VRA versions) as long as the VRAs are only one version lower than the version of Zerto Virtual Replication installed on the site.
■ Zerto recommends that you always upgrade the VRAs on your site to the latest version. ■ Not all new installations of Zerto Virtual Replication require upgrading VRAs. If your VRA is outdated relative to your
current version of Zerto Virtual Replication and an upgrade is available, the VRA version will be reported in the column as outdated. In addition, an alert is issued on the site using the old VRA and on any site that is paired with it.Note: You can move the mouse over the Outdated value to display the VRA version as a tooltip.
See the following sections:■ “Site Specific Considerations when Upgrading VRAs”, on page 40■ “Procedure: Upgrading VRAs”, on page 41
Site Specific Considerations when Upgrading VRAs■ For VRAs managing protected virtual machines, do one of the following:
■ vMotion the protected virtual machines and datastores managed by the VRA to another host with a VRA, or ■ Upgrade the VRA without vMotioning the virtual machines and a bitmap sync will be performed following the
upgrade.■ Upgrading a VRA that manages the recovery of virtual machines results in a bitmap sync being performed after the
upgrade. Note that the time to upgrade a VRA is short so the bitmap sync should also be quick.

41Upgrading Zerto Virtual Replication PowerShell Cmdlets
Zerto Virtual Replication Installation Guide for VMware vSphere - Version 5.0 Update 4Upgrading Zerto Virtual Replication
Procedure: Upgrading VRAsUse the following procedure to upgrade your VRAs.
To upgrade VRAs:1. For a VRA protecting virtual machines, if vMotioning the protected virtual machines:
a) Remove affinity rules for protected virtual machines on the host with the VRA to be upgraded.b) vMotion these protected machines from the host to another host with a VRA.
2. In the Zerto User Interface, click SETUP > VRAs, then select the VRAs to upgrade, and then click MORE > Upgrade.The Upgrade VRAs dialog is displayed, listing the selected VRAs, and whether an upgrade is available.
3. Review the list for the VRAs that you want to upgrade. Deselect any VRAs that you decide not to upgrade. 4. Click Upgrade Selected VRAs.5. The upgrade progress is displayed in the VRAs tab.
■ For version upgrades, for VRAs at the protected site and recovery sites, a delta sync is performed following the upgrade.
■ For updates within a version:■ For VRAs at the protected site, a bitmap sync is performed following the upgrade.
Note: The time needed to upgrade a VRA is short so the bitmap sync should be quick.■ For VRAs at the recovery site, a delta sync is performed following the upgrade.
Note: The VRA name does not change, even if the naming convention in the latest version is different.
Upgrading Zerto Virtual Replication PowerShell CmdletsWhen upgrading Zerto Virtual Replication PowerShell cmdlets, make sure that Windows PowerShell is closed before installing the new version.
Upgrading or Reinstalling VMware Components
Prior to installation or upgrade, see VMware documentation for complete information regarding installation and upgrading of VMware products.
Before beginning the installation or upgrade, verify that your version of Zerto Virtual Replication supports the new VMware version.
See the Zerto Virtual Replication Interoperability Matrix for the list of VMware environments supported by this version of Zerto Virtual Replication.
See the following sections:■ “Upgrading a vCenter Server”, on page 42■ “Reinstalling a vCenter Server”, on page 42■ “Upgrading vCloud Director”, on page 42■ “Upgrading VMware Tools”, on page 42■ “Upgrading or Reinstalling a Host”, on page 42

42Upgrading or Reinstalling VMware Components
Zerto Virtual Replication Installation Guide for VMware vSphere - Version 5.0 Update 4Upgrading Zerto Virtual Replication
Upgrading a vCenter Server■ Zerto recommends that you upgrade a vCenter Server rather than reinstalling it. ■ When upgrading both vCenter and an ESX/ESXi, you must first upgrade the vCenter.■ Zerto Virtual Replication components are not affected by a vCenter Server upgrade. Protection continues and no
additional procedures are required. ■ When upgrading a vCenter Server, make sure that you preserve the vCenter database. Preserving the existing database is
required in order to continue using the existing Zerto Virtual Replication installation.Note: If the recovery vCenter Server service is stopped, recovery operations are not possible until the service is restarted.
■ Migration from VC to vCSA 6.5 was tested in Zerto and is supported.
Reinstalling a vCenter ServerIf you need to reinstall the vCenter Server, including rebuilding the database, contact Zerto support for help throughout the re-installation.
Upgrading vCloud Director■ Zerto recommends that you upgrade vCD rather than reinstalling it. ■ Zerto Virtual Replication components are not affected by a vCD upgrade. Protection continues, and no additional
procedures are required.■ If you need to reinstall vCloud Director, contact Zerto support for help throughout the re-installation.
Upgrading VMware ToolsYou do not need to upgrade VMware Tools on a VRA.
Upgrading or Reinstalling a HostWhen upgrading both vCenter and an ESX/ESXi, you must first upgrade the vCenter.
When upgrading, including applying patches, or reinstalling a host with an active VRA, in order to avoid any impact on protection:
1. For hosts that are protecting VMs: vMotion these protected virtual machines to another host in the cluster with a VRA installed.
2. For recovery hosts: Change the host for all virtual machines in VPGs recovering to this host, to another host as described inZerto Virtual Manager Administration Guide for the VMware vSphere Environment, in the section Changing a Recovery VRA. A bitmap sync occurs to synchronize the VPGs with the new host.
Note: VRAs installed using a password to access the host, that require the password to be updated, (for example, when the host is upgraded) must be updated with the new password. For details, see the following procedure.
To change the host password required by a VRA:
1. In the Zerto User Interface, click SETUP > VRAs.
2. Select the VRAs that need to be updated and click MORE > Change Host Password.

43Upgrading or Reinstalling VMware Components
Zerto Virtual Replication Installation Guide for VMware vSphere - Version 5.0 Update 4Upgrading Zerto Virtual Replication
The Change Host Password VRA dialog is displayed.
3. To change the connection method or host password, do one of the following:■ If the VRA is using a password to connect to the host and should use vSphere Installation Bundle, VIB, uncheck Use
credentials to connect to host.■ If the VRA is using VIB to connect to the host and should use a password, check Use credentials to connect to host and
enter the password. To display the password in plain text, click in the box next to the field.■ If the VRA is connecting to the host with a password and the password for the host has changed, enter the new
password. To display the password in plain text, click in the box next to the field.4. Click SAVE.

Copyright © 2017, Zerto Ltd. All rights reserved.
ABOUT ZERTO
Zerto is committed to keeping enterprise and cloud IT running 24/7 by providing scalable business continuity software solutions. Through the Zerto Cloud Continuity Platform, organizations seamlessly move and protect virtualized workloads between public, private and hybrid clouds. The company’s flagship product, Zerto Virtual Replication, is the standard for protection of applications in cloud and virtualized datacenters.
www.zerto.com
For further assistance using Zerto Virtual Replication, contact @Zerto Support.
Upgrading Zerto Cloud Manager
Zerto Virtual Replication Installation Guide for VMware vSphere - Version 5.0 Update 4Upgrading Zerto Virtual Replication
Upgrading Zerto Cloud ManagerAn upgrade of the Zerto Cloud Manager moves all configuration definitions from the old version to the new version.
The installation checks for an existing installation and if an existing installation is identified, that is one version lower than the new version, you can upgrade or uninstall the existing version.
You must upgrade Zerto Virtual Replication and Zerto Cloud Manager in parallel, making sure that you upgrade the version of Zerto Virtual Replication which is run by the CSP, before you upgrade the version of Zerto Cloud Manager. This is done so that they are never more than one version apart.
To upgrade the version:1. Run Zerto Cloud Manager Installer.exe.
The Zerto Cloud Manager Installation Wizard is displayed.2. Select Upgrade and click Next.
The upgrade proceeds automatically.
Upgrading Zerto Cloud ConnectorsZerto Cloud Connectors do not require upgrading when a new Zerto Virtual Replication version is released.


![Welcome! [] · 2019-08-05 · Zerto Virtual Replication 5.5. PRIVATE AND CONFIDENTIAL 18 Zerto is a software based replication tool for virtual infrastructure which is storage, hypervisor](https://static.fdocuments.net/doc/165x107/5f330c47c65afa37b30524b6/welcome-2019-08-05-zerto-virtual-replication-55-private-and-confidential.jpg)
