Zentangle patterns, called tangles, and can be continuous ... Motion... · Zentangle patterns,...
9
Free Motion Zentangle Quilting These are not my patterns. They are freely shared Zentangle patterns, called tangles, and can be found, with a lot of others at www.zentangle.com. This is a drawing method using repeated patterns. I’m only showing you how to adapt the patterns for continuous line quilting. Phyllis Maddox General Free Motion Tips Use a Free Motion Quilting foot or Darning foot and put the feed dogs down, or if that’s not possible, cover them. Use a Super slider if you have one Fabrics should read as solid so your quilting shows. Cut your fabric so there is a one inch margin around your patterns to grab onto to guide the sewing. It’s very hard to control the stitching at the edge of the piece. Always pull the bobbin thread up to the top before you start stitching to avoid a rat’s nest on the back. Take a stitch with the presser foot down. Then lift the presser foot to give the top thread a tug. This pulls the bobbin thread up through the fabric where you can pull the end of it free. Hold both threads to the back and take a few very small stitches to secure the threads. Set your machine for Needle Down if you have it. There should be a one inch margin around your patterns to hang on to. It’s very hard to control the stitching at the edge of the piece. Use thin batting for dense quilting like Zentangles, not more than ¼” thick unless it’s wool batting. Thicker batting makes for more distortion and is harder to work with. Quilt small pieces and put them together, quilt as you go style. The largest piece I’ve handled without problems is 40 inches. A long narrow strip, 60 x 15 works well too. About 12 to 14 inches is my favored size. I like a size that doesn’t require rolling the quilt up under the machine arm. Marking Marking pen: either blue washout ink or purple disappearing ink. Don’t iron these, it can make the marks permanent. Friction pens also wash out. The ink disappears when ironed, but that requires cotton batting. Marking powder: For blue powder, starch the fabric first so the starch absorbs the color and it washes out easily. After you apply the powder, spray it lightly with either starch or hair spray so it doesn’t rub off before you finish quilting. White powder washes out with less of a problem. But it does rub off easily when quilting. Some white powders also disappear when they are ironed, but ironing is not possible when you use polyester batting. I’ve used spray marking chalk successfully. It comes in aerosol cans in white and charcoal. It works with stencils and doesn’t rub off but does wash out. Starch is your friend. It reduces the number of pleats on the back of the quilting. I use spray glue to baste. Some brands say they are safer to use indoors, but I always use mine outside. Since it’s hard to find a clean surface outside I have a clothespin tied on a string loop. The loop goes over a hammock hook on the front porch and clips to one corner
Transcript of Zentangle patterns, called tangles, and can be continuous ... Motion... · Zentangle patterns,...
Free Motion Zentangle Quilting
These are not my patterns. They are freely shared
Zentangle patterns, called tangles, and can be
found, with a lot of others at www.zentangle.com.
This is a drawing method using repeated patterns.
I’m only showing you how to adapt the patterns for
continuous line quilting. Phyllis Maddox
General Free Motion Tips
Use a Free Motion Quilting foot or Darning foot
and put the feed dogs down, or if that’s not
possible, cover them.
Use a Super slider if you have one
Fabrics should read as solid so your quilting
shows.
Cut your fabric so there is a one inch margin
around your patterns to grab onto to guide the
sewing. It’s very hard to control the stitching at
the edge of the piece.
Always pull the bobbin thread up to the top
before you start stitching to avoid a rat’s nest
on the back. Take a stitch with the presser foot
down. Then lift the presser foot to give the top
thread a tug. This pulls the bobbin thread up
through the fabric where you can pull the end
of it free. Hold both threads to the back and
take a few very small stitches to secure the
threads.
Set your machine for Needle Down if you have
it.
There should be a one inch margin around your
patterns to hang on to. It’s very hard to control
the stitching at the edge of the piece.
Use thin batting for dense quilting like
Zentangles, not more than ¼” thick unless it’s
wool batting. Thicker batting makes for more
distortion and is harder to work with.
Quilt small pieces and put them together, quilt
as you go style. The largest piece I’ve handled
without problems is 40 inches. A long narrow
strip, 60 x 15 works well too. About 12 to 14
inches is my favored size. I like a size that
doesn’t require rolling the quilt up under the
machine arm.
Marking
Marking pen: either blue washout ink or purple
disappearing ink. Don’t iron these, it can make
the marks permanent. Friction pens also wash
out. The ink disappears when ironed, but that
requires cotton batting.
Marking powder: For blue powder, starch the
fabric first so the starch absorbs the color and it
washes out easily. After you apply the powder,
spray it lightly with either starch or hair spray
so it doesn’t rub off before you finish quilting.
White powder washes out with less of a
problem. But it does rub off easily when
quilting. Some white powders also disappear
when they are ironed, but ironing is not
possible when you use polyester batting.
I’ve used spray marking chalk successfully. It
comes in aerosol cans in white and charcoal. It
works with stencils and doesn’t rub off but
does wash out.
Starch is your friend. It reduces the number of
pleats on the back of the quilting.
I use spray glue to baste. Some brands say
they are safer to use indoors, but I always use
mine outside. Since it’s hard to find a clean
surface outside I have a clothespin tied on a
string loop. The loop goes over a hammock
hook on the front porch and clips to one corner

of the fabric. I use another clothespin to hold
the other corner so I don’t spray my fingers
while I’m spraying. It involves a lot of walking
to and from the porch and sewing machine. I
keep the clothes pins in a bag along with the
spray glue so I don’t lose them.
Even stitches come with practice. You can get
a better feel for it by sewing a straight line with
your regular foot and the feed dogs up. Place
your hands lightly on both sides of the fabric
and sew at a comfortable speed. Pay attention
to how fast your hands are moving as the feed
dogs pull the fabric along. Also listen to the
sound of your machine. That tells you how fast
it’s going. Then try to match this hand moving
speed and sound of the machine when you are
free motion quilting.
Stop and stretch every 20 minutes. A timer is
useful. Get up and walk around every hour at
least. Drinking lots of coffee is useful for this.

Grid patterns
Huggins
Starting at the upper left
dot, pull the bobbin
thread up to the top.
Stitch a small, about 1/8th inch,
clockwise circle around the dot.
Stitch over the first couple of
stitches to lock them in place.
Stop at the right side and reverse
direction.
Stitch back just above the top of
the circle to start a tall thin letter S
circling the dot to make a larger
circle toward the left and curving
down to make an 1/8” circle
around the dot, approaching from
the right, on the line below.
Reverse direction and make
another S to the next dot below.
You will be reusing the circle from
the end of the previous S. Start
each S with a larger circle and end
with an 1/8 inch circle.
Repeat until you finish the
last dot in that line.
Stop. Rotate the piece to the right.
Reverse direction and make an S reaching to
the next dot on that line. (To make the curves
come out right, remember to reverse direction
after you finish each circle. The last circle was
clockwise, so reverse direction, start this S with
a counter-clockwise curve.)
At the next dot, rotate the
piece to the right again,
reverse direction and make
the next S.
Continue making the row of
Ss The parallel lines should
all curve in the same
direction
for this
pattern.
Rotate the piece to the left.
Reverse direction. Make
another S to the dot of the next row.
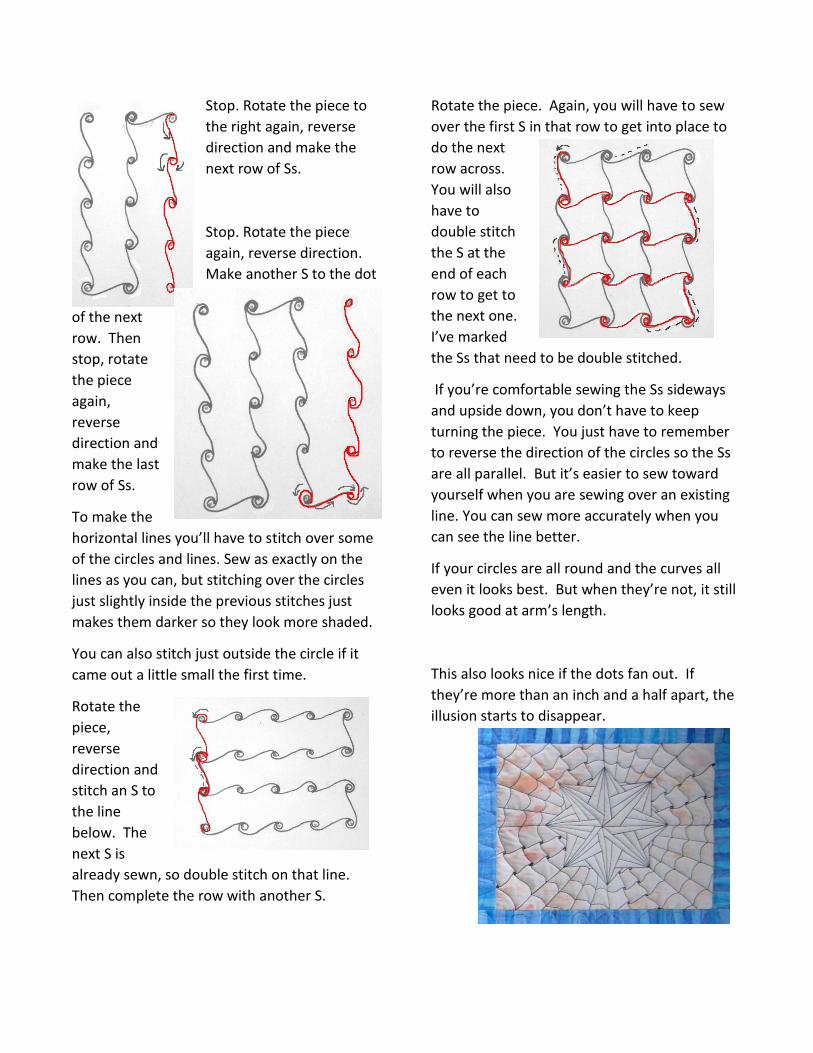
Stop. Rotate the piece to
the right again, reverse
direction and make the
next row of Ss.
Stop. Rotate the piece
again, reverse direction.
Make another S to the dot
of the next
row. Then
stop, rotate
the piece
again,
reverse
direction and
make the last
row of Ss.
To make the
horizontal lines you’ll have to stitch over some
of the circles and lines. Sew as exactly on the
lines as you can, but stitching over the circles
just slightly inside the previous stitches just
makes them darker so they look more shaded.
You can also stitch just outside the circle if it
came out a little small the first time.
Rotate the
piece,
reverse
direction and
stitch an S to
the line
below. The
next S is
already sewn, so double stitch on that line.
Then complete the row with another S.
Rotate the piece. Again, you will have to sew
over the first S in that row to get into place to
do the next
row across.
You will also
have to
double stitch
the S at the
end of each
row to get to
the next one.
I’ve marked
the Ss that need to be double stitched.
If you’re comfortable sewing the Ss sideways
and upside down, you don’t have to keep
turning the piece. You just have to remember
to reverse the direction of the circles so the Ss
are all parallel. But it’s easier to sew toward
yourself when you are sewing over an existing
line. You can sew more accurately when you
can see the line better.
If your circles are all round and the curves all
even it looks best. But when they’re not, it still
looks good at arm’s length.
This also looks nice if the dots fan out. If
they’re more than an inch and a half apart, the
illusion starts to disappear.

Weaving Scroll Pattern
This uses the letter C instead of the S. The C’s
can be as fat or skinny as you like.
The curves are reflections of the adjacent row.
This makes alternating Outies and Innies
shapes.
Start with a small, counter
clockwise circle around the first
dot.
Spiral into a C that extends to the dot
below. End the C with another small
counter clockwise circle.
Reverse direction. Circle around
over the top of the circle and
make a backwards C that
extends down to the next dot
below. End that C with a
clockwise circle.
Reverse direction and do it again
using a proper C followed by another
backwards one.
When you reach the bottom dot of
that column, stop, turn the fabric
and reverse direction. If your last C was
backwards, the C at the bottom of the column
should face in the proper direction.
Stop, rotate the piece and
reverse direction. This will be
a backwards C and will create
an innie.
Continue making
Cs. The next one will be a proper C
and will make an outie. Alternate
innies and outies down the row.
Stop, rotate
the fabric to
the left.
Reverse
direction
and make
one
backward C to go to the next row.
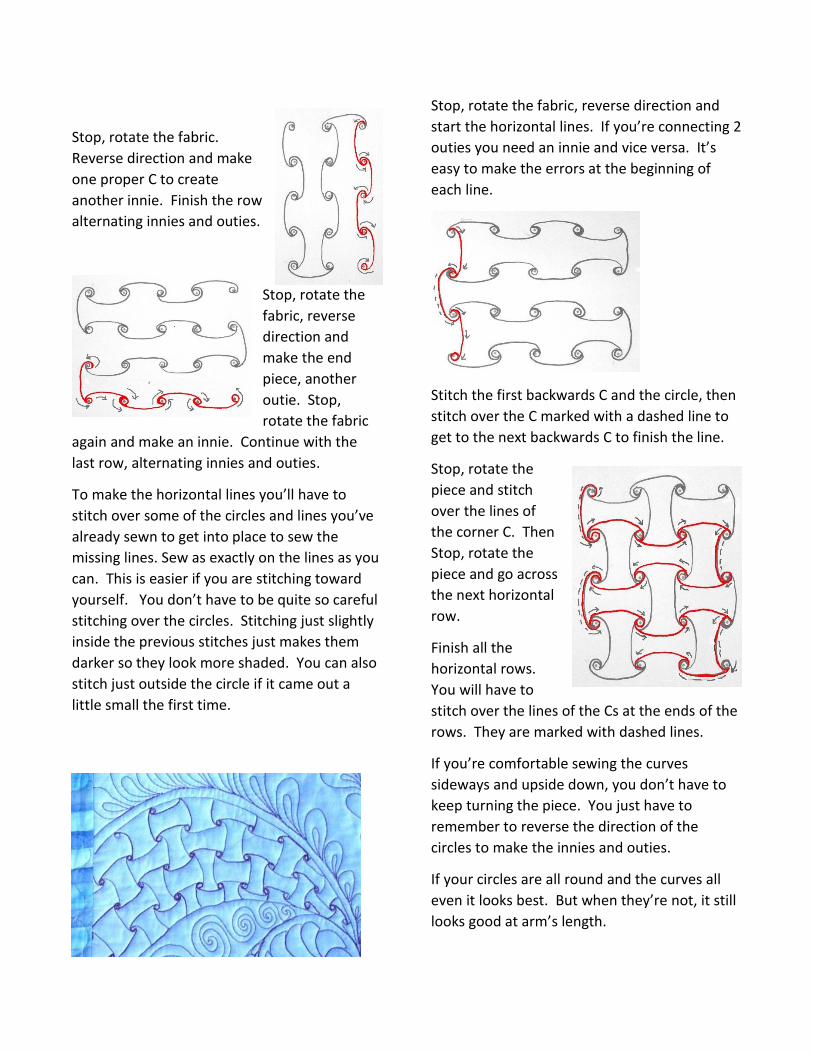
Stop, rotate the fabric.
Reverse direction and make
one proper C to create
another innie. Finish the row
alternating innies and outies.
Stop, rotate the
fabric, reverse
direction and
make the end
piece, another
outie. Stop,
rotate the fabric
again and make an innie. Continue with the
last row, alternating innies and outies.
To make the horizontal lines you’ll have to
stitch over some of the circles and lines you’ve
already sewn to get into place to sew the
missing lines. Sew as exactly on the lines as you
can. This is easier if you are stitching toward
yourself. You don’t have to be quite so careful
stitching over the circles. Stitching just slightly
inside the previous stitches just makes them
darker so they look more shaded. You can also
stitch just outside the circle if it came out a
little small the first time.
Stop, rotate the fabric, reverse direction and
start the horizontal lines. If you’re connecting 2
outies you need an innie and vice versa. It’s
easy to make the errors at the beginning of
each line.
Stitch the first backwards C and the circle, then
stitch over the C marked with a dashed line to
get to the next backwards C to finish the line.
Stop, rotate the
piece and stitch
over the lines of
the corner C. Then
Stop, rotate the
piece and go across
the next horizontal
row.
Finish all the
horizontal rows.
You will have to
stitch over the lines of the Cs at the ends of the
rows. They are marked with dashed lines.
If you’re comfortable sewing the curves
sideways and upside down, you don’t have to
keep turning the piece. You just have to
remember to reverse the direction of the
circles to make the innies and outies.
If your circles are all round and the curves all
even it looks best. But when they’re not, it still
looks good at arm’s length.
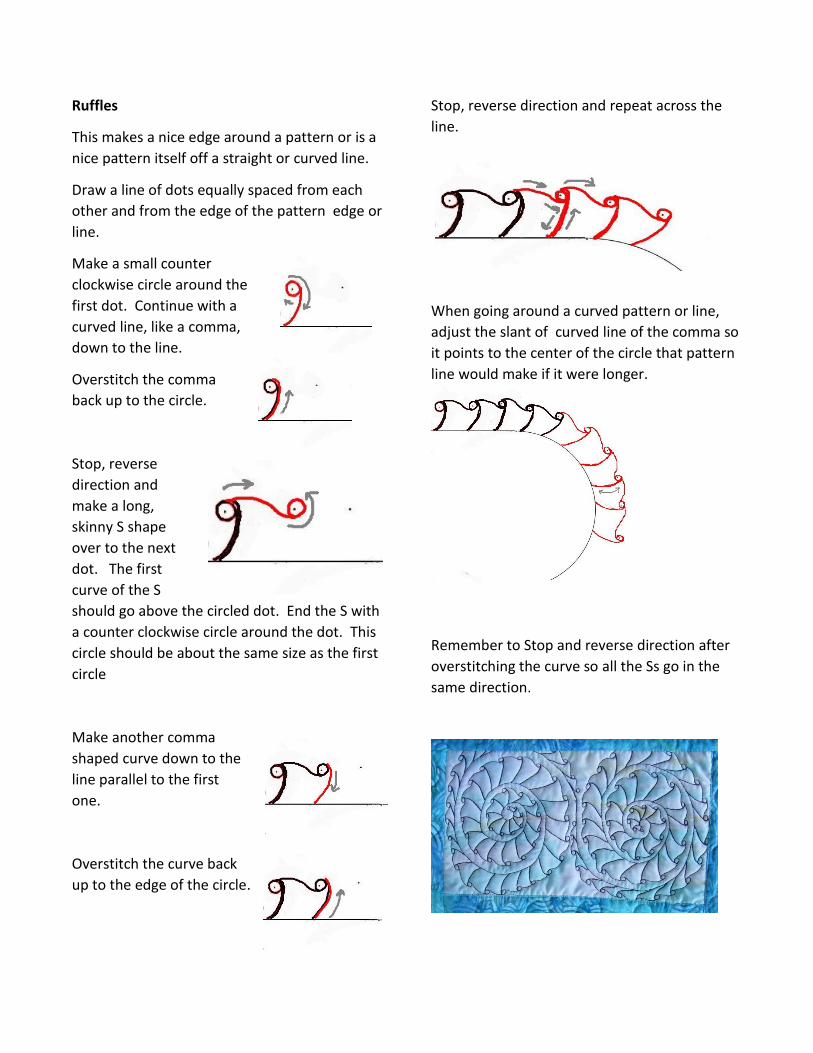
Ruffles
This makes a nice edge around a pattern or is a
nice pattern itself off a straight or curved line.
Draw a line of dots equally spaced from each
other and from the edge of the pattern edge or
line.
Make a small counter
clockwise circle around the
first dot. Continue with a
curved line, like a comma,
down to the line.
Overstitch the comma
back up to the circle.
Stop, reverse
direction and
make a long,
skinny S shape
over to the next
dot. The first
curve of the S
should go above the circled dot. End the S with
a counter clockwise circle around the dot. This
circle should be about the same size as the first
circle
Make another comma
shaped curve down to the
line parallel to the first
one.
Overstitch the curve back
up to the edge of the circle.
Stop, reverse direction and repeat across the
line.
When going around a curved pattern or line,
adjust the slant of curved line of the comma so
it points to the center of the circle that pattern
line would make if it were longer.
Remember to Stop and reverse direction after
overstitching the curve so all the Ss go in the
same direction.
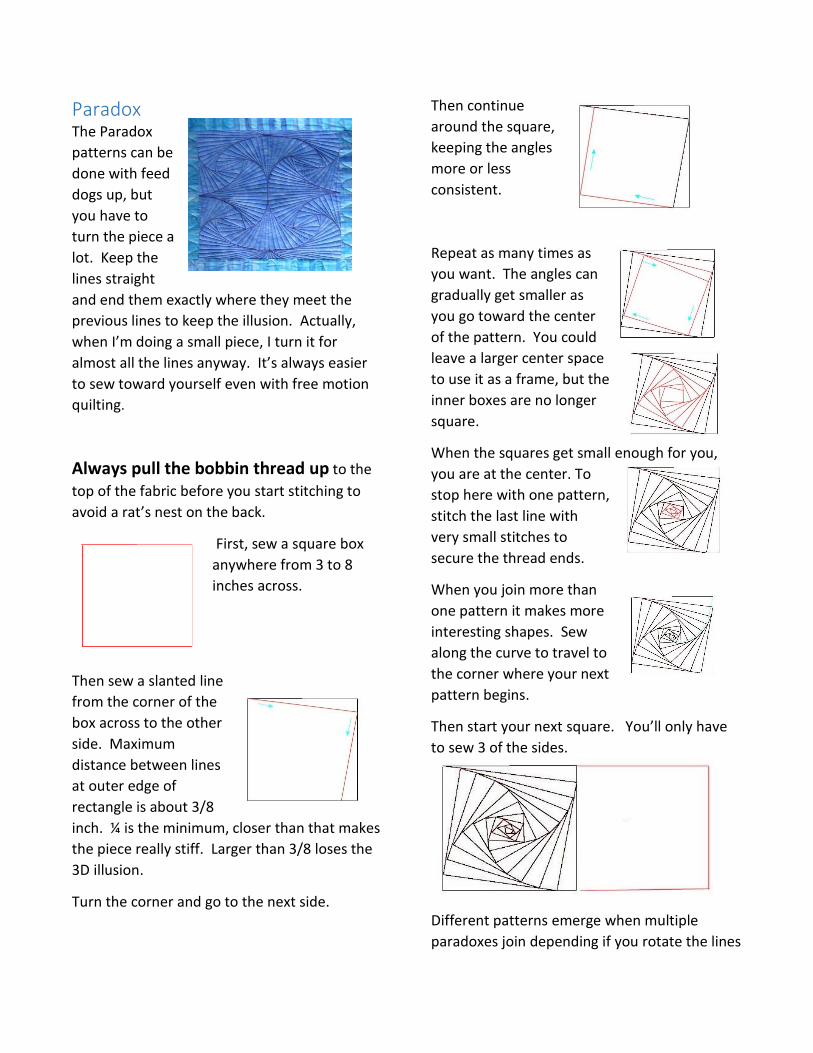
Paradox The Paradox
patterns can be
done with feed
dogs up, but
you have to
turn the piece a
lot. Keep the
lines straight
and end them exactly where they meet the
previous lines to keep the illusion. Actually,
when I’m doing a small piece, I turn it for
almost all the lines anyway. It’s always easier
to sew toward yourself even with free motion
quilting.
Always pull the bobbin thread up to the
top of the fabric before you start stitching to
avoid a rat’s nest on the back.
First, sew a square box
anywhere from 3 to 8
inches across.
Then sew a slanted line
from the corner of the
box across to the other
side. Maximum
distance between lines
at outer edge of
rectangle is about 3/8
inch. ¼ is the minimum, closer than that makes
the piece really stiff. Larger than 3/8 loses the
3D illusion.
Turn the corner and go to the next side.
Then continue
around the square,
keeping the angles
more or less
consistent.
Repeat as many times as
you want. The angles can
gradually get smaller as
you go toward the center
of the pattern. You could
leave a larger center space
to use it as a frame, but the
inner boxes are no longer
square.
When the squares get small enough for you,
you are at the center. To
stop here with one pattern,
stitch the last line with
very small stitches to
secure the thread ends.
When you join more than
one pattern it makes more
interesting shapes. Sew
along the curve to travel to
the corner where your next
pattern begins.
Then start your next square. You’ll only have
to sew 3 of the sides.
Different patterns emerge when multiple
paradoxes join depending if you rotate the lines
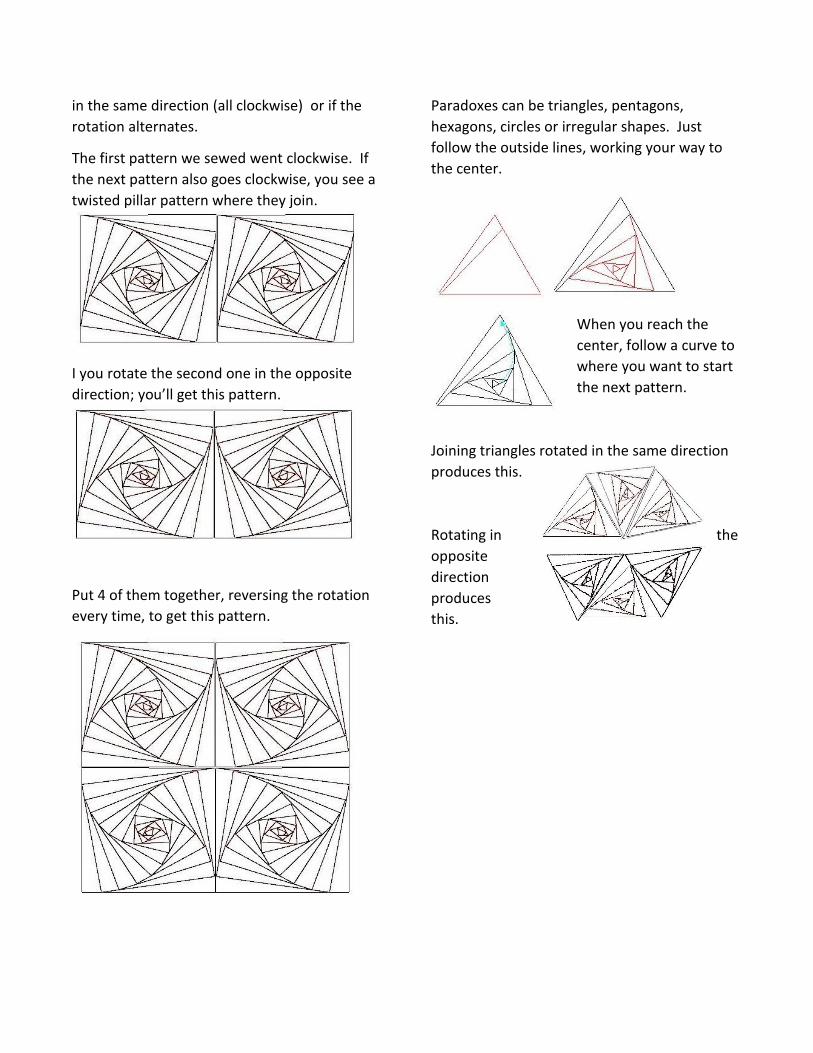
in the same direction (all clockwise) or if the
rotation alternates.
The first pattern we sewed went clockwise. If
the next pattern also goes clockwise, you see a
twisted pillar pattern where they join.
I you rotate the second one in the opposite
direction; you’ll get this pattern.
Put 4 of them together, reversing the rotation
every time, to get this pattern.
Paradoxes can be triangles, pentagons,
hexagons, circles or irregular shapes. Just
follow the outside lines, working your way to
the center.
When you reach the
center, follow a curve to
where you want to start
the next pattern.
Joining triangles rotated in the same direction
produces this.
Rotating in the
opposite
direction
produces
this.