
Zeiss LSM 880 Protocolicahn.mssm.edu/files/ISMMS/Assets/Research/Dean's CoREs...One Gustave Levy...
14
One Gustave Levy Place|Annenberg 18-250|New York, New York 10029 [email protected]| 212-241-0400 Page 1 of 14 Zeiss LSM 880 Protocol 1) System Startup F Please note put sign-up policy. You must inform the facility at least 24 hours beforehand if you can’t come; otherwise, you will receive a charge for unused time. The facility will allow for extenuating circumstances (cells dying, sick day, etc.) if you inform us in a timely fashion. F Follow each step of the startup poster F Log into the computer with you user account. F Open Zen black . Press to continue and wait for the microscope software to fully load. You should see the Locate tab when the software has successfully started. 2) Lens Cleaning F Please clean all of the lenses (used and unused) before and after your session. Refer to the lens cleaning poster if you need any help recalling the rules and steps. Gently push the condenser assembly back using ONLY the solid center points as shown below. (Lenses: 10x, 20x, 40xW, 40x Oil, 63x Oil, and 100x Oil) F Gently pull incubation box sliders and gently push the condenser assembly back using ONLY the following support points:
Transcript of Zeiss LSM 880 Protocolicahn.mssm.edu/files/ISMMS/Assets/Research/Dean's CoREs...One Gustave Levy...
OneGustaveLevyPlace|Annenberg18-250|NewYork,[email protected]|212-241-0400
Page1of14
Zeiss LSM 880 Protocol
1) System Startup
F Please note put sign-up policy. You must inform the facility at least 24 hours beforehand if you
can’t come; otherwise, you will receive a charge for unused time. The facility will allow for
extenuating circumstances (cells dying, sick day, etc.) if you inform us in a timely fashion.
F Follow each step of the startup poster
F Log into the computer with you user account.
F Open Zen black . Press to continue and wait for the microscope software to
fully load. You should see the Locate tab when the software has successfully started.
2) Lens Cleaning
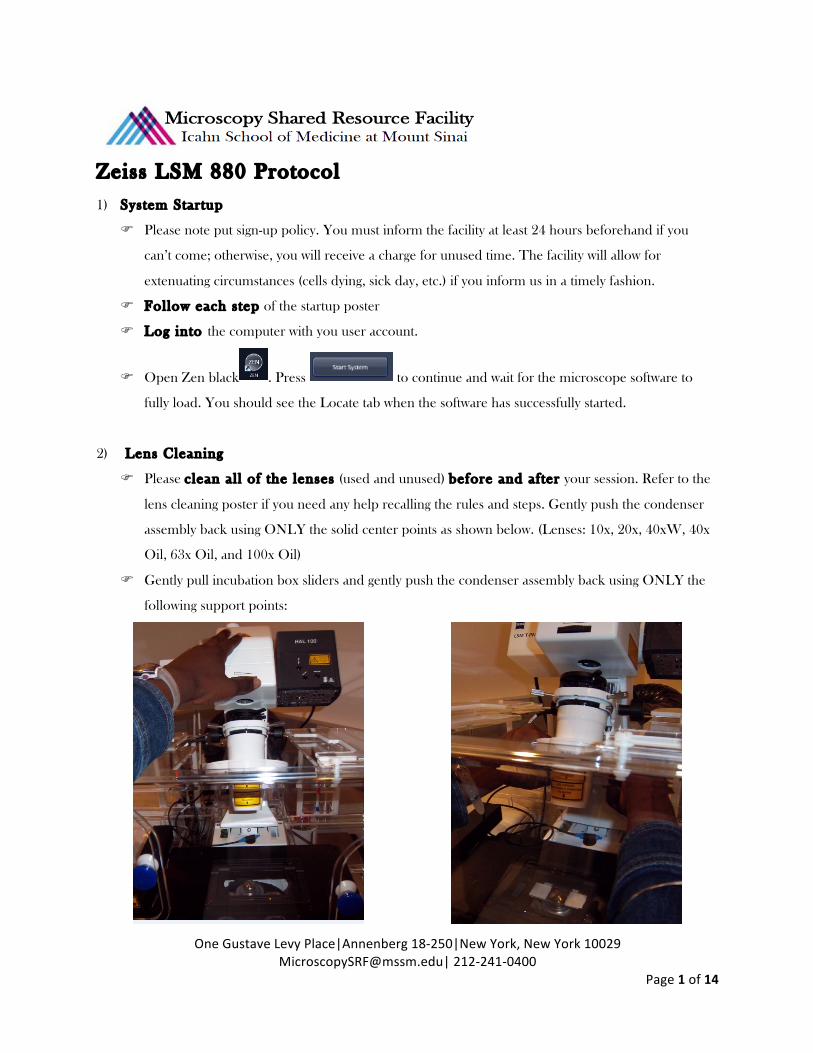
F Please c lean al l of the lenses (used and unused) before and af ter your session. Refer to the
lens cleaning poster if you need any help recalling the rules and steps. Gently push the condenser
assembly back using ONLY the solid center points as shown below. (Lenses: 10x, 20x, 40xW, 40x
Oil, 63x Oil, and 100x Oil)
F Gently pull incubation box sliders and gently push the condenser assembly back using ONLY the
following support points:

OneGustaveLevyPlace|Annenberg18-250|NewYork,[email protected]|212-241-0400
Page2of14
Microscope Control
F Take note of the microscope light path: [insert image and letters]
A. Excitation laser lines
B. Main beam splitter
C. Galvo scanning mirrors
D. Objective lens
E. Pinhole
F. Secondary beam splitter
G. Detection unit
H. Emission filters
F Touch pad control
� Within the “Home” menu, select “Microscope.” The “Microscope” window turns into
“Turret” (Stay within this window for the entire sess ion and ignore other tabs)
§ Objective Menu: always begin focusing using the 10x lens.
(a) Take care to properly set your focal posi t ion with the lower power lens
before going to a higher power lens. Proper focusing from low power to high
power will help prevent the microscope from breaking your slide.
§ Reflector Menu: select your first filter channel
§ To open the shutter, turn the RL illumination on the far right of the screen “On”
(a) Remember to c lose the shutter as often as you open it to prevent rapid bleaching of
your sample. Note: The active option is always white.

OneGustaveLevyPlace|Annenberg18-250|NewYork,[email protected]|212-241-0400
Page3of14
F Always begin imaging with the 10x objective and take care for the following issues:
� Select and inspect each s l ide
§ If it is dirty, gently clean with a Kim Wipes and/or cotton swab. You should do this with all
your slides before you come.
� Load the s l ide securely into the s tage c l ip using “Load posi t ion.”
§ The stage will drop allowing you to insert your slide.
§ Once your slide is secure, press the top left arrow to reestablish your z-position.
§
§ .
§ Focusing will become difficult when the slide is uneven
F Joystick Control
� Use the joystick to find your region of interest
� Use the F1 button in the upper right to toggle between course and fine x and y control

OneGustaveLevyPlace|Annenberg18-250|NewYork,[email protected]|212-241-0400
Page4of14
F Focus Control
� Course and fine focus control are located on both sides of the microscope.
� If you are focusing on the left side of the microscope, the fine focus is located INSIDE the
coarse focus. You can adjust by using the finger positions within the coarse.
� Focus your sample and check all the channels before imaging.
3) Software Control
F Start Zen 2 Black
� Click Start System
� During the System Startup, the incubation system may produce an error message in the lower
left hand corner.
F Upon Zen’s completed startup, please note the 4 quadrants of the interface:
FINE

OneGustaveLevyPlace|Annenberg18-250|NewYork,[email protected]|212-241-0400
Page5of14
� Left: control panel
� Middle Top: image preview and acquired image
� Middle Bottom: display options
� Right: image gallery
4) Your f irs t image
While on the Microscope:
F Use the touchpad or the locate tab to:
F Select the 10x lens in the objective menu Locate
tab control
� Within the Locate tab, use the preconfigured filter
cubes to activate light. Open and close filter using
the following [insert configuration]
� [icon] Change objectives using the light path
� Select your f irs t f i l ter channel and open
the shutter in the reflector menu
F Use the stage movement wand and focus knob to
focus and center your specimen on a region of
interest.
F Be sure to check al l f luorophores in your
specimen. You need to have an idea of what to expect

OneGustaveLevyPlace|Annenberg18-250|NewYork,[email protected]|212-241-0400
Page6of14
before imaging with the camera.
F Use the touchpad RL illumination option or the
locate tab “Off” icon to c lose the shutter.
Within the Zen software:
F Setup your experiment in the Acquis i t ion Tab
� Click Smart Setup
§ Click “+” to add the number of channels
you are imaging
§ Click drop down on each channel and
select the appropriate fluorophore
§ Select Smart Setup imaging option
(a) Fastest: simultaneous
(b) Best s ignal : sequentia l (choose
this option)
(c) Smartest: fastest speed with some
sequential
§ Click Apply. Program will ask you if you
want to turn on the Argon laser if green is
active. Click Yes.
� Open the following control windows:
§ Laser Window
(a) Make sure the appropriate lasers are
on.
(b) You do not need to activate the Argon laser.
It will automatically change from Standby to
ON
§ Acquisition Mode Window
(a) Set the parameters for imaging here:
(i) Frame Size: 1024 x 1024
(ii) Speed: 6
(iii) Averaging: 2
(iv) Bit Depth: 12

OneGustaveLevyPlace|Annenberg18-250|NewYork,[email protected]|212-241-0400
Page7of14
(v) Zoom: 1
(vi) *Optimal option adjusts laser wavelength to the numerical aperture, and zoom
factors
(vii) Don’t change objective here
§ Image Setup Window
(a) If necessary, adjust bandwidths or change from
frame to line scanning in this window.
§ Channels Window
(a) Adjust gain settings for each channel
(i) First, decide which channel you’ll set first and
disable the other channels in the List of
Tracks. Deselect the channels you do not
want to visualize in the live view
(ii) Make sure the channel you want to visualize is
highlighted in gray
(b) Gain adjustments
(i) Manual gain adjustment
1. Click to start your live preview
scan
2. Click “Range indicator” at the bottom of
the display menu
a. Red pixels: saturation
b. Green pixels: black
3. Adjust the Detector Gain slider until you
see your image appear. Use the fine focus
to locate the brightest focal plane. Readjust the gain until you see only a few
red pixels.
4. Click the remaining channels and set exposure times.
(ii) Automatic gain adjustment
1. Click instead of (this option will set the software
recommended exposure time)
OneGustaveLevyPlace|Annenberg18-250|NewYork,[email protected]|212-241-0400
Page8of14
2. Click the remaining channels and set exposure times.
(c) Pinhole adjustments (important for colocalization)
(i) Click the 1AU button while the longest wavelength channel is selected.
(ii) Record the AU size and adjust the lower wavelengths to match the same value.
§ Click “Stop” (the same icon as “Live”)
§ When all exposure times are set, Click to acquire the image.
F Take note of the following viewing options:
� Click to see all of your channels and an overlay channel
� Click to find all image information
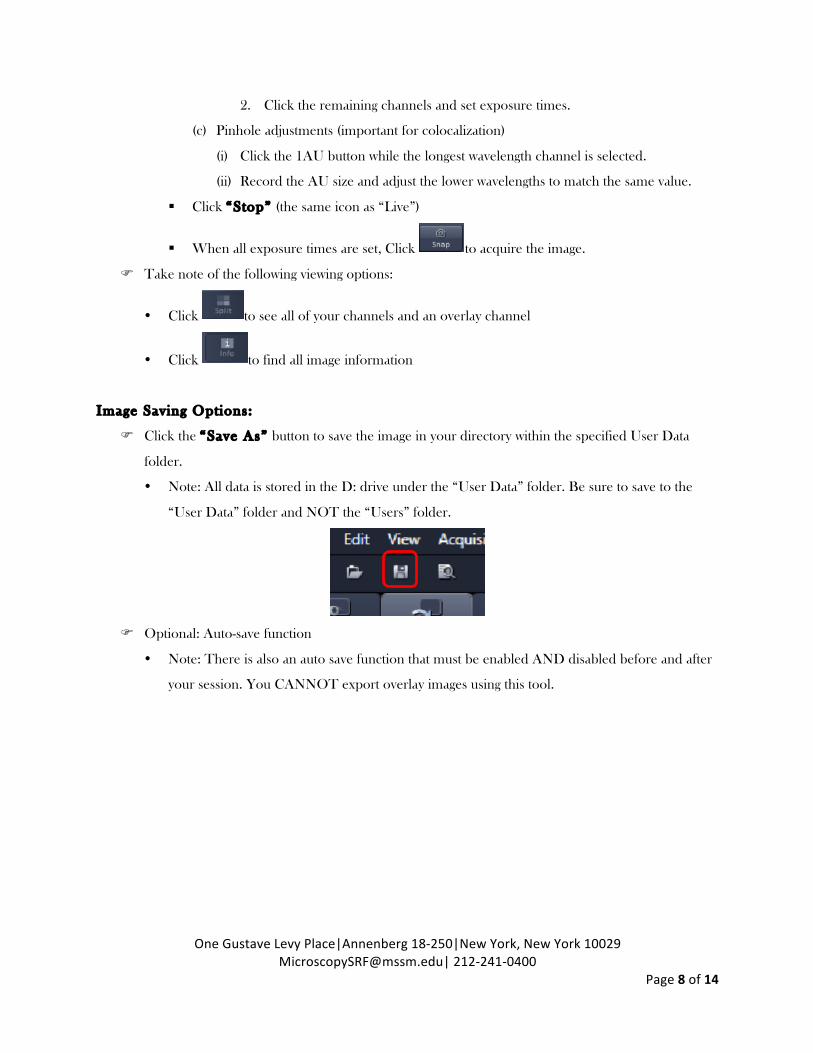
Image Saving Options:
F Click the “Save As” button to save the image in your directory within the specified User Data
folder.
� Note: All data is stored in the D: drive under the “User Data” folder. Be sure to save to the
“User Data” folder and NOT the “Users” folder.
F Optional: Auto-save function
� Note: There is also an auto save function that must be enabled AND disabled before and after
your session. You CANNOT export overlay images using this tool.

OneGustaveLevyPlace|Annenberg18-250|NewYork,[email protected]|212-241-0400
Page9of14
� Use the same parameters from the batch protocol to export your single channel images.
5) Higher magnif icat ion and switching s l ides
F If you switch to the higher magnification oil immersion lenses from a dry immersion lens, go back
to the microscope and enter the objective menu on the touchpad.
� Press the high power lens you want to use.
� The lens will then move to the correct objective and the stage will drop.
� The touchpad will prompt you to put immersion on the specimen.
� At this point, apply one drop of oi l and click “Done” to raise the stage back up.
F If you switch from an oil lenses to a dry lens, after the touchpad prompts you to remove the
immersion, take the slide out, wipe off the oil with a cotton swab. Replace the slide into the stage
clip and click “Done” to raise the stage back up.
F It is also wise at the beginning of your session to put a drop of oil on the objective you think you
will use.
F When you need to switch slides,
Saveraw.czifile
Savetiff

OneGustaveLevyPlace|Annenberg18-250|NewYork,[email protected]|212-241-0400
Page10of14
� Go back to the 10x and refocus the new sample
� If you are imaging a similar sample using the same objective lens, click the “Load Posi t ion”
button located in the upper right hand corner of the touchpad. This will allow you to lower the
stage, replace your slide with a new one, and
restore the same focal plane.
6) Data
Export
F Single Image
� File
� Image Export
� Choose a Directory
� As Tiff
F Multiple Image
� Enter to Batch Export your data
F Go to the “Processing” tab (located to the right of the
“Acquisition” tab)
� Click “Batch”
� Under “Batch Method” select “Image Export”
� In the middle of the screen under “Batch Processing,”
click “Add” and then select all the images you want to
export.
� Highlight one image
� Under parameters, make the following selections
§ File type: Tagged Image File (.tiff)
§ Compression: None
§ Unclick convert to 8 bit
§ Check “Use Full Set of Dimensions”

OneGustaveLevyPlace|Annenberg18-250|NewYork,[email protected]|212-241-0400
Page11of14
§ Unclick “Create project folder” unless you would like all images in separate folders
� Exporting options: also within the parameters tab, you can choose the display of your images
§ Select “Orignal Data” to export the raw data in gray
§ Select “Individual Channel Images” to export the individual channels with pseudocolor
§ Select “ Merge Channels Images” to export the overlay
(a) Note: All image display types CAN be exported at the same time.
(b) Note: You can batch several groups of images differently and run them simultaneously.
F Underneath Batch Processing,
� Click “Copy Parameters”
� Select all images. (Ctrl +Shift A)
� Click “Paste Parameters”
� Click “Run Selected”
7) System Shutdown
F Back up all your data.
F Clean all the lenses.
F Check the microscope calendar to see when the next user has an appointment
F If the user comes within 2 hours, log off your account
� Otherwise, follow shutdown poster steps.
SECOND SESSION 8) Your 2 nd sess ion and beyond: Taking a Z-stack & adding a DIC channel
F Taking a Z-stack
� When you come in for your second session,
proceed with the system startup and cleaning
the lenses. Load your specimen and
remember to focus from low to high power.
� Turn on your relevant lasers and load your
scan settings.
1 2 3

OneGustaveLevyPlace|Annenberg18-250|NewYork,[email protected]|212-241-0400
Page12of14
� Set you gain for the brightest focal plane of each channel and click STOP in the Acquisition
tab.
� In the Multidimensional functions options, check Z-series. A new window will open in the
control panel under the Multidimensional function windows.
� Enable only the channel that has the signal which will determine your stack limits.
� Click “Live” to preview your scan.
� There are 2 ways to setup your z-stack:
§ Centered:
(a) Find the brightest plane of your signal
(b) Set the number of slices in your stack (for example, if you desire 6 slices, 2 slices will
be taken above your center, and 2 will be taken below and 1 will be at the designated
center.)
(c) Set the interval in between each slice.
§ First and last:
(a) Focus toward the top (towards
yourself) and click [first icon]
(b) Focus towards the bottom (away from
yourself) and click [last icon]
(c) Set the interval in between each slice.
§ * Note: If you need to perform post
processing techniques like deconvolution
or 3D reconstruction, click “Optimal
Interval”
� Click Stop
� Enable all channels.
� Click to start acquiring your stack. Since this process is vibration
sensitive, please remember to keep your hands off the microscope table. While the system
scan your stack, you can click gallery to see all your acquiring slices. After acquisition, you can
use the [play icon] button to scroll through your sections. To retake a single image, user must
unclick “Z-series” to disable stack acquisition.
F Adding a DIC channel
OneGustaveLevyPlace|Annenberg18-250|NewYork,[email protected]|212-241-0400
Page13of14
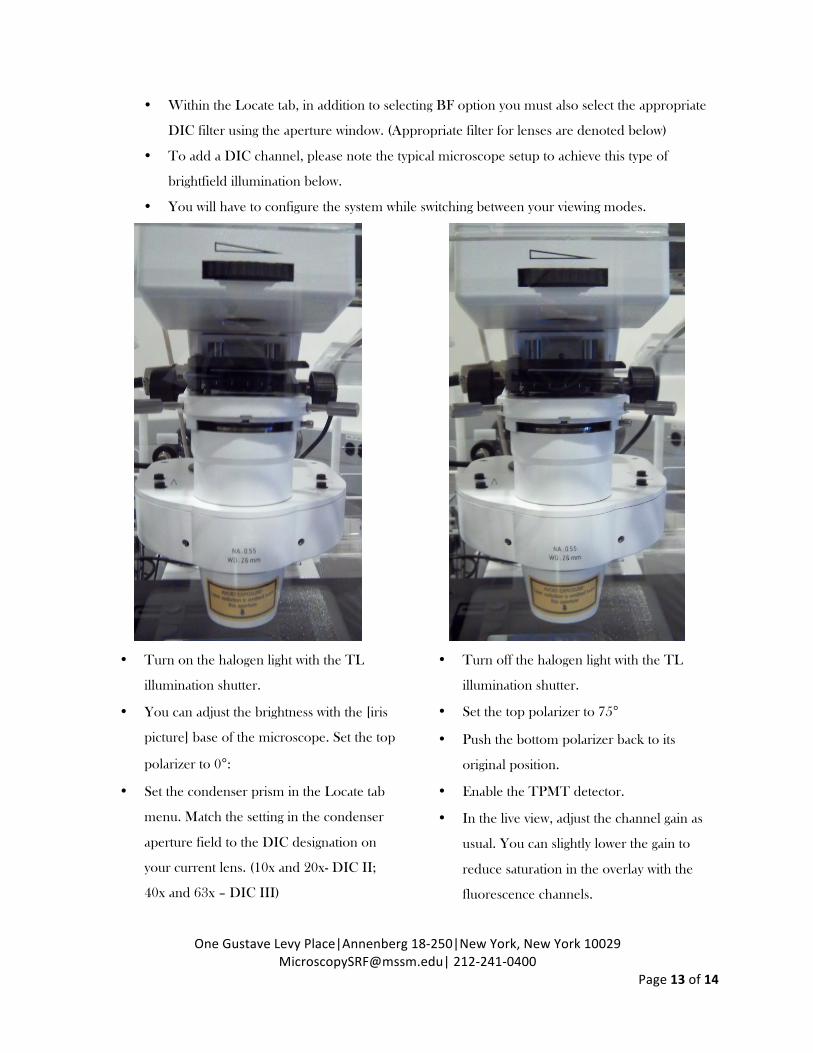
� Within the Locate tab, in addition to selecting BF option you must also select the appropriate
DIC filter using the aperture window. (Appropriate filter for lenses are denoted below)
� To add a DIC channel, please note the typical microscope setup to achieve this type of
brightfield illumination below.
� You will have to configure the system while switching between your viewing modes.
• Turn on the halogen light with the TL
illumination shutter.
• You can adjust the brightness with the [iris
picture] base of the microscope. Set the top
polarizer to 0°:
• Set the condenser prism in the Locate tab
menu. Match the setting in the condenser
aperture field to the DIC designation on
your current lens. (10x and 20x- DIC II;
40x and 63x – DIC III)
• Turn off the halogen light with the TL
illumination shutter.
• Set the top polarizer to 75°
• Push the bottom polarizer back to its
original position.
• Enable the TPMT detector.
• In the live view, adjust the channel gain as
usual. You can slightly lower the gain to
reduce saturation in the overlay with the
fluorescence channels.

OneGustaveLevyPlace|Annenberg18-250|NewYork,[email protected]|212-241-0400
Page14of14
• If desired, adjust the lens prism located at
the base of your lens.
• Pull the bottom polarizer out one click.
• Focus your sample and set up Kohler
illumination; refer to the poster if necessary.
• Proceed with your session as normal.


