
your new Dynamic Heddle - · PDF filecould be achieved with a traditional rigid heddle loom....
44
1 majacraft all you need to weave your dreams... your new Dynamic Heddle Using weaving loom
Transcript of your new Dynamic Heddle - · PDF filecould be achieved with a traditional rigid heddle loom....

1
majacraft
majacraftall you need to weave your dreams...
your new
DynamicHeddle
Using
weaving loom

2
majacraft
Table of ContentsWelcome to the Majacraft family 3Let’s get started weaving 4
Warping 4Weaving 5Finishing 6
Dynamic Heddle weaving loom description 7The jargon 9
Opening the loom 12Attaching the Warp Stick Cords 13
Useful knots 14Overhand knot 14Surgeons knot 14Sliding knot 14Non-slip Loop knot 15
Warping the Dynamic Heddle loom 16Direct warping 16Loading the warp on to the warping frame 21Indirect warping using the Easy Warp tool 23Indirect warping traditional 27
How to weave 31Finishing the cloth 32Folding the loom 34Double heddle weaving 35Helpful hints 38
Using the shuttle 38Warping 38Who wants to count? 38Really long Indirect Warp 38Weaving on a table 39Working with different warp yarn thicknesses 39
Loom accessories 40Recommended Resources 41
Final words 41Credits 41Notes 42Contact 44

3
majacraft
Welcome to the Majacraft familyCongratulations on purchasing your new Majacraft Dynamic Heddle weaving loom.
The innovative reed segments in this loom have opened up new possibilities for weaving beyond what could be achieved with a traditional rigid heddle loom. To describe the flexibility and motion of this, a new description was required and so Dynamic Heddle weaving was created.
We are very proud of this loom and hope that it allows you to express your creativity in new and exciting ways. Take time to read through the instructions before beginning weaving, it really is worth it.
One of our goals is to make our looms as easy and simple to use as possible, so they become almost invisible as you express your creativity.
If you were not already aware, we have designed our craft tools and accessories to be compatible with each other and have interchangeable components. If you have an interest in a specific technique, we are likely to have specialist accessories that will fit straight on to this loom or tools to make creating easy. Talk to your dealer, visit our web site or email us directly and we will do what we can to help.
Thank you for choosing Majacraft, it is your belief in us that motivates the innovation and creativity to building captivating tools for you.
From the team at Majacraft, Good weaving!
Testing - Donyale Grant from Moggy & Me

4
majacraft
Let’s get started weavingWithout a doubt, you are simply bursting to get started weaving. This is the place to start reading!
However - and there is always a however - if you haven’t had any experience with weaving before, you may need to familiarise yourself with the different terminology for a weaving loom or how to take advantage of some of the unique features of the Majacraft Dynamic Heddle loom. In case you need to review this information, here is a brief list of useful pages in this manual:
The Jargon - page 9Weaving Loom Description - page 7
Opening the loom - page 12
What you will need
WarpingHere is the description for a simple and quick method of warping the loom called Direct Warping. For a thorough description of warping techniques, turn to page 4.
Before you start, you will need to fold your loom out into the weaving position. Lock the pawls against the ratchets to stop the beams rotating when warping up.
Open the loom and secure it to the edge of a table by folding down the edge stops and overhanging the table edge.
Decide on the length of your warp. Clamp the Direct Warping Block the warp length distance away from the cloth beam.
Place the yarn on the floor underneath the warp beam of the loom.
Put the heddle into the neutral position.
Mark the centre of the heddle (with something removable like a pencil) and measure out half the desired width of the cloth and mark this too.
Make sure the warp stick is attached to the warp beam and is fully unwound. Pull the yarn end from the source and tie it to the warp beam warp stick in line with the warp edge marked on the heddle.
From the cloth beam side of the loom, slip the flat hook through the slot in the heddle in line with the warp edge. Put the warp yarn on to the hook and draw it through the heddle.
Slip the loop over the nearest peg on the direct warping block.
1
2
3
45
6
7
8
To make a piece of cloth or some other weaving project, there are three steps to complete; warping, weaving and finishing. Here goes...
Scissors, ruler/tape measure, pencil
Dark yarn for the warp. For a 1.5m scarf and 4dpi reed that is 125mm (5”) wide. Add 400mm to the length of the warp for waste
5” wide x 4 dpi = 20 ends -> 20 ends x 1.9m = 38m of yarn
A bright yarn for the weft
5
majacraft
Weaving
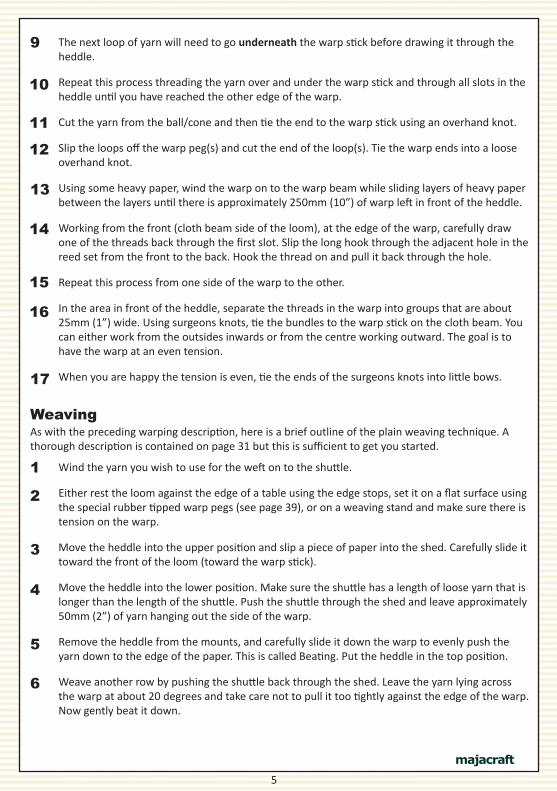
9 The next loop of yarn will need to go underneath the warp stick before drawing it through the heddle.
Repeat this process threading the yarn over and under the warp stick and through all slots in the heddle until you have reached the other edge of the warp.
Cut the yarn from the ball/cone and then tie the end to the warp stick using an overhand knot.
Slip the loops off the warp peg(s) and cut the end of the loop(s). Tie the warp ends into a loose overhand knot.
Using some heavy paper, wind the warp on to the warp beam while sliding layers of heavy paper between the layers until there is approximately 250mm (10”) of warp left in front of the heddle.
Working from the front (cloth beam side of the loom), at the edge of the warp, carefully draw one of the threads back through the first slot. Slip the long hook through the adjacent hole in the reed set from the front to the back. Hook the thread on and pull it back through the hole.
Repeat this process from one side of the warp to the other.
In the area in front of the heddle, separate the threads in the warp into groups that are about 25mm (1”) wide. Using surgeons knots, tie the bundles to the warp stick on the cloth beam. You can either work from the outsides inwards or from the centre working outward. The goal is to have the warp at an even tension.
When you are happy the tension is even, tie the ends of the surgeons knots into little bows.
10
11
12
13
14
15
16
17
As with the preceding warping description, here is a brief outline of the plain weaving technique. A thorough description is contained on page 31 but this is sufficient to get you started.
Wind the yarn you wish to use for the weft on to the shuttle.
Either rest the loom against the edge of a table using the edge stops, set it on a flat surface using the special rubber tipped warp pegs (see page 39), or on a weaving stand and make sure there is tension on the warp.
Move the heddle into the upper position and slip a piece of paper into the shed. Carefully slide it toward the front of the loom (toward the warp stick).
Move the heddle into the lower position. Make sure the shuttle has a length of loose yarn that is longer than the length of the shuttle. Push the shuttle through the shed and leave approximately 50mm (2”) of yarn hanging out the side of the warp.
Remove the heddle from the mounts, and carefully slide it down the warp to evenly push the yarn down to the edge of the paper. This is called Beating. Put the heddle in the top position.
Weave another row by pushing the shuttle back through the shed. Leave the yarn lying across the warp at about 20 degrees and take care not to pull it too tightly against the edge of the warp. Now gently beat it down.
1
2
3
4
5
6

6
majacraft
Repeat the weaving back and forth until the cloth is about 100mm (4”) from the heddle. Put the heddle into the neutral position. Release the pawl on the warp beam and turn the cloth beam to wind the cloth on until the edge of the weaving is near the front shed brace. Lock the warp beam again and wind the tension on the warp.
Continue weaving and winding the cloth on to the cloth beam until you are about 150mm (6”) from the end of the warp.
Finishing
7
8
Cut the weft yarn leaving some extra hanging out the side of the cloth.
Cut the warp yarns along the edge of the warp beam warp stick. Take care not to cut the warp stick cords.
Release the pawl on the cloth beam and unwind your weaving from the cloth beam. You will need to undo the surgeons knots holding the warp yarns to the cloth beam warp stick.
Remove the paper.
Separate the yarns in the warp into even groups about 25mm (1”) wide. Using overhand knots, tie the groups off against the weft. Trim the warp ends to an appealing length - around 50mm (2”) should be nice and finally darn the weft thread into the cloth.
Wash your cloth by hand in warm water with a little detergent. Rinse in warm water and then dry. Use something like a towel to hang it over so there is no fold line in your cloth as it dries. Wait until it is thoroughly dry and then your work is complete.
The more complete section on finishing is on page 32.
1
2
3
45
6
L.2.2 - Donyale Grant from Moggy & Me
7
majacraft
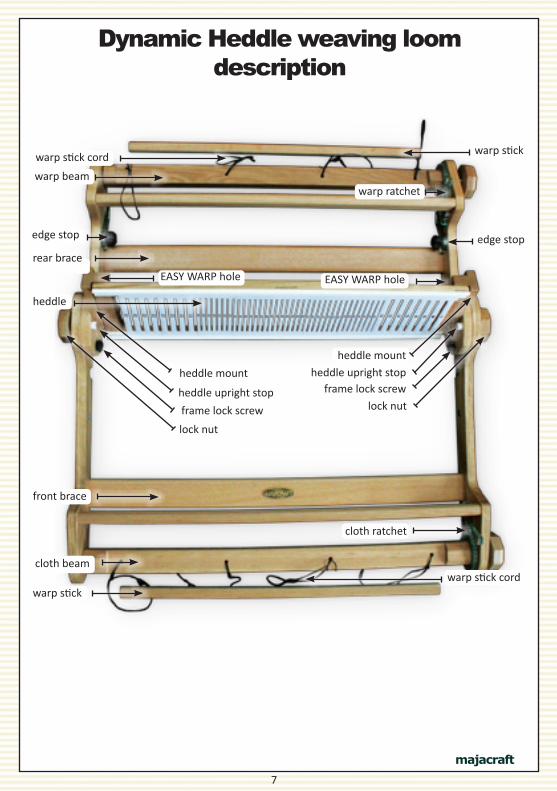
Dynamic Heddle weaving loom description
warp stick cord
warp beam
warp stick
edge stop
rear braceEASY WARP hole
heddle mount
heddle
lock nut
heddle upright stop
front brace
cloth beam
warp stickwarp stick cord
lock nut
EASY WARP hole
edge stop
heddle mount
warp ratchet
cloth ratchet
frame lock screw
heddle upright stopframe lock screw

8
majacraft
WARP - the vertical yarns
the CLOTH is the completed item(the weft woven into the warp).
WEFT - the horizontal yarns

9
majacraft
The jargonThe heddle in the NEUTRAL position.
The heddle in the UPPER position. This moves the threads in the holes above the threads in the slots.
The heddle in the LOWER position. This moves the threads in the holes below the threads in the slots.
The REED SEGMENTS are slipped into the heddle to make up the reed set. A heddle holds up to nine segments and these can be all the same dent size or you can mix and match different Reed Segment sizes to create unique weaving.
The WARP PEGS screw into the back of the weaving loom when using the loom as a warping frame. The Warp Pegs are identical to those used on Majacraft Skeiners. If you already have a Majacraft skeiner the you can use the pegs to create a longer warp when using the warping frame.

10
majacraft
The EASY WARP tool and 6mm lock bolt to hold it in position
The LONG HOOK is used for threading the the warp through the holes of the reeds (top tool in photo).
The FLAT HOOK is used for threading the the warp through the slots of the reeds (bottom tool in photo).
The SHUTTLE is the tool that contains the yarn for the weft. You pass it back and forth through the warp as the heddle is moved up down to achieve your woven cloth. You can use multiple shuttles to create unique variations in your cloth.
The DIRECT WARPING BLOCK clamps to a flat surface such as a table when directly warping the loom. The Majacraft Direct Warping Block has three warp pegs to help create a more even warp.
The EDGE STOPS have multiple uses. If you wish to work against the side of a table then these can be folded down and rested aganst the table edge to stop the loom sliding away. They are also used during the Direct Warping process described in Section 1 on Page 16.
The RATCHET is the gear that is attached to the beams.

11
majacraft
The PAWL is the locking arm that binds against the RATCHET. When locked, it keeps the warp tensioned.
The SHED is the opening between the layers in the warp when the heddle is in the UPPER or LOWER position.
Attach the cords to the beams using a sliding knot. Note how the knot is arranged to ensure the warp sticks align into the beams when winding on the warp or cloth.
BEATING is the action of using the reeds to push the last threaded weft yarn into place in the warp. Typically the weft yarns run parallel with one another so beating gently pushes the weft yarns into line.
Attach the warp sticks to the beams using a sliding knot.
The FRAME LOCK SCREW is used both to limit the loom from opening too far and also to lock it into the correct position once open. This ensures that even if there is quite a bit of tension on the warp, the loom will not fold up again. When the loom is to be folded, the Frame Lock Screw should be out approximately 5mm (1/4”) and when the loom is opened, the Frame Lock Screw should be screwed right in.

12
majacraft
Opening the loom
Before you start, you will need to fold your loom out into the weaving position.Loosen the two wooden lock nuts and fold your loom out flat until it hits the slide stop.
Rotate the two heddle mounts upright until they touch the nylon heddle upright stops. Retighten the lock nuts.
Place the heddle into place on the heddle mount in the neutral (middle) position.
The Majacraft loom has a unique heddle attachment design using magnets. It is possible when you are double heddle weaving (more about that later!) the second heddle may not attach to the heddle mounts.
Your loom is now open and you are ready to go.
When the loom is opened out flat, screw the little black lock screws beside the heddle mounts fully in. This locks the loom flat so if you put quite a bit of tension on the warp, the loom will not be able to close up.Conversely, when you come to fold the loom again, you will need to unscrew the little black headed screws by about 5mm (1/4”) to release them. They should not be undone completely as they prevent the loom from folding too far.
This is easily resolved by rotating the heddle 180 degrees to attach the heddle magnet to the other heddle mount. What you are doing is aligning the polarities of the magnets.

13
majacraft
Attaching the Warp Stick Cords
Firstly, the loom will need to be opened as described on page 12
The warp stick cords have been carefully measured to ensure that when you turn the beams and wind on the warp, the warp sticks will locate in the pocket on the beams. There are two lengths of cords and the longer cords are used on the Warp Beam. The shorter cords are used on the Cloth Beam.
The direction the cord is looped is important - if the beams are orientated so the pocket is facing upward when the loom is open, the sliding knot should be around the OUTSIDE of the beam, not the inside. This stops the knot sliding when the warp is wound on and the warp stick locating incorrectly.
Start with the Cloth Beam and turn it until the pocket is facing upward. Face the loom toward you and slip the first cord straight down through the hole in the beam.
The Warp Beam also has the cord looped around the outside of the beam exactly the same as the Cloth Beam.
The Warp Sticks are also attached to the cords with a Sliding Knot and the orientation is not important.
When the loop comes out the bottom of the beam, bring the loop around the side of the beam CLOSEST TO YOU. Bring the loop up to the top of the beam and then thread the other end of the cord through the loop you have bought up. This creates a Sliding Knot as described on page 14.
While of course we recommend you use the original Majacraft Warp Stick Cords, if you misplace one, you can tie your own. The Warp Beam cord overlength is 680mm (26.8”) and the Cloth Beam cord is 450mm (17.7”).

14
majacraft
Useful knotsOverhand knot
Surgeons knot
Used for tying yarn to warp pegs and when first connecting the threads in the warp to the warp stick.
Used for tying threads in the warp to the warp stick. This knot is easy to adjust and so is good for correcting the tension in the warp
Sliding knot
For tying the warp stick cords to the warp sticks. Is very quick and easy and slips up tight. It also makes a wider connection to the warp stick.

15
majacraft
Non-slip Loop knot
If you replace your Warp Stick Cords, this knot is very good for making non slipping ties.
STEP 1 - make an Overhand Knot (as demonstrated above and then slip the end of the cord back through the loop.
STEP 2 - Loop around the cord four times and then bring the end down and through the loop made by the Overhand Knot. Pull the knot up tight.
Habu - Donyale Grant from Moggy & Me

16
majacraft
Direct warpingRotate the perspex Edge Stops downward and lock them in place with the wing nuts.
Before you start, you will need to fold your loom out into the weaving position. Lock the pawls against the ratchets to stop the beams rotating when warping up.
Overhang the Warp Beam off the edge of a table and place the Edge Stops against the table edge to hold the loom in place.
Use the supplied clamp to secure the Direct Warping Block to the opposite end of the table. The distance between the Direct Warping Block and the Warp Stick (attached to the Warp Beam) is the length of your warp. Approximately 1.5m (60”) is a fairly typical length.
Positioning your yarn on the floor directly beneath the warp beam on the loom.
You can use two tables (the same height is best) and then you can alter the separation between them to change the length of your warp. Alternatively (and much cheaper and a good use of space) is to use a table and a bar stool for the Direct Warping Block. One consideration is that if the warp is too long, the weight of the thread may cause the loom to move and require it to be clamped down.
Yarn for the warp
These instructions demonstrate how to warp the Majacraft Dynamic Heddle weaving loom using Indirect Warping with the integrated warping frame and Easy Warp Tool.
Direct Warping is best for short warps, single-color warps, or striped warps of even numbers. Indirect Warping is more versatile and can accommodate longer warps and any coluor order. The warp is measured on the integrated warping frame (or your own warping board) and then threaded on to your weaving loom.
Direct Warping is a quick and easy way to warp if you have never used a rigid heddle style loom before.
Warping the Dynamic Heddle loom

17
majacraft
Draw the yarn from beneath the warp beam and thread it OVER the top of the warp stick.
Position the warp stick close enough to the Rear Shed Brace that you can get your fingers between the warp stick and brace. You will need to turn the warp beam a little to shorten the length of the Warp Stick Cord.
Use the Flat Hook to draw the yarn through the starting slot you have marked on the reeds.
Now tie the thread on to the first peg of the Direct Warping Block using an Overhand Knot (see Page 14)
The centre of the heddle needs to be marked with something removable such as a pencil. If a full set of Reed Segments is in place then the heddle centre will be half way across the fifth Reed Segment.
From this centre mark, count out half the warp width toward a side of the loom. Mark this point also with your pencil. This is where you will begin threading in the Direct Warping process.
Now pull the yarn from the source on the floor UNDER the warp stick (on the Warp Beam side of the loom) and thread this through the next slot on the reeds.

18
majacraft
Cut the yarn and tie the end to the Warp Stick. Leave enough yarn that it is easy to tie the knot.
Pull the yarn until you can loop it over the Table Warping Block. It is ideal to have the warp threads running as straight as possible so as you work from one side of the heddle to the other you will need to start using the next warp peg on the direct warping block.
You will have decided early on how many threads you want in your warp. Divide this number by two (2) and continue the UNDER/OVER process until you have made the divided number of loops of yarn over the Direct Warping Block pegs.
Using a short length of yarn (about 150mm and a different colour to the warp), tie a loop around warp close to the Table Warping Block.
Now cut all the threads on the peg on the Table Warping Block.
Tie the end of the warp in an Overhand Knot (see Page 14).

19
majacraft
Hold the cut warp ends while you turn the nut on the Warp Beam to wind the yarn on to the beam. The nut is turned clockwise so the ratchet mechanism will stop the warp unwinding as tension is applied.
As you wind, lay the strong paper spacer on to the warp beam to keep the yarns separated and the tension even on the warp. A packer should be added after slightly more than one rotation. You can also use thin wood as a spacer.
When the warp ends line up with the Cloth Beam, stop winding and untie the piece of yarn.
Turn the loom around on the table so the Cloth Beam is at the table edge and you are sitting directly in front of the loom. You will clearly be able to see the two pieces of yarn going through each slot.
Each reed slot has two pieces of yarn going through it. Starting on the left hand side of the heddle, from the back (Warp Beam side), carefully pull one strand of the yarn out of the slot. Then use the heddle hook to draw it back through the adjacent small hole.
Continue this process from left to right until all the warp has been threaded through the reeds.

20
majacraft
Divide the loose threads on the Cloth side of the loom into groups that are approximately 25mm (1”) wide.
On the left hand side of the Cloth Stick, tie the left-most group of threads using a Surgeons Knot (see Page 14). You divide the 25mm (1”) group in half to create the two parts necessary to tie the Surgeons Knot.
Now check the tension of each of the groups of yarn in the warp. If any are too tight or loose, adjust until the warp tension is even.
Next tie the right-most group of threads on to the cloth stick, again using a Surgeons Knot. Repeat this back and forth tying of knots until all groups are secured.
Weave in a short header into the warp to help set the spacing of the warp up correctly.
You are now ready to commence weaving.
1
2

21
majacraft
Decide how long you want your warp to be and then cut a length of surplus piece of string that is a little longer. Attach one end of the string to one of the two warping pegs screwed into the side of the frame, wind it around the second peg in the side of the frame and finally on to the nearest peg on the front (or rear brace).
Loading the warp on to the warping frame
Fold the loom out flat and tighten the nuts to lock the loom open. Turn it upside down and then rest it on a flat surface such as a table.
Screw the warping pegs into the 6mm threaded holes for the warping frame. There are five and six on the front and rear braces respectively and another four on the sides of the frame. It is important that you have two pegs screwed on at least one of the frame sides. These are required for the ‘cross’ that will be described later. The loom comes with enough pegs to create a 1.5m (60”) long warp.
Now that the pegs are screwed in, the warping frame is ready for your warp
On the Majacraft weaving loom, the shortest distance between adjacent pegs on the front and rear braces is very close to 400mm (15.5”). You can use this figure to calculate how many times you need to cross back and forth between the frame braces to achieve the warp length you desire.
Now wind the remainder of the measuring string back and forth onto the pegs until it runs out. This will map out the path you use when you wind the yarn on to the warping frame.
To make the ‘cross’, the yarn starts on one side of the warping peg like this.
It is then threaded on the other side of the next peg. On the return journey, the yarn must pass around the other side of this peg.
Once you have a route for the yarn selected, tie the end of your yarn to the starting peg (the opposite end to where you plan to make the cross. Following the guide string, wind the yarn onto the Warping Frame until you reach the final two pegs on the frame sides.

22
majacraft
Follow the path back to the start of the warp and then repeat this process until you have the required number of threads for your warp. Every time you loop around the warp path, you must follow the path exactly. It is also wise to keep a count of the number of times you have completed the warp path.
When the warp has been wound, tie the crossover. Use a loose knot and it is helpful to use a contrasting yarn colour. Tie an overhand knot directly over the crossover and then tie each half of the warp on both sides of the crossover. There should be five ties in total to secure the crossover. Make sure the knot on the crossover goes through the two loops.
Tie the warp with extra pieces of yarn at approximately 300mm (12”) separations to prevent the warp from tangling when you remove it from the warping frame. Half way between the pegs on the warping frame will be very close to this separation.
Once the warp has been tied off, you can remove it from the warping frame.
It is important to wind a figure 8 around these two pegs to create the cross as it will keep your warp ends in order.

23
majacraft
Indirect warping using the Easy Warp tool
Attach the Easy Warp tool to the side of the loom (there is a 6mm hole between the Rear Brace and the Heddle Mount on the Rear Frame).
Place the heddle in the middle ‘neutral’ position
You will need the Easy Warp tool and the securing bolt from your weaving loom accessories.
Remove the Warp Stick from the Warp Stick Cords on the Warp Beam. Slip the Warp Stick through the hole in the Easy Warp tool until it protrudes about 100mm (4”) toward the centre of the loom.
You will need to use a warp previously created. The instructions on page 21 describe how to make a warp.
Tie the first loop of the Warp Stick Cords on to the Warp Stick.

24
majacraft
The centre of the heddle needs to be marked with something removable such as a pencil. If a full set of Reed Segments is in place then the heddle centre will be half way across the fifth Reed Segment. Count out half the number of threads in the warp from this centre mark toward the side of the loom that has the Easy Warp tool mounted on it. Mark this point with your pencil. This is where you will begin threading.
Hold the cross in one hand and give the warp a gentle tug to make sure it is tight. If you are right handed then holding in the left hand is likely to be the easiest. Remove the cross tie from the warp.
You are going to need the Flat Reed Hook for the indirect warping.
Progressively peel loops of the warp off your hand and thread the loops through the slots in the reeds. You will need to slowly slide the warp stick through the Easy Warp tool. As you move the warp stick across the loom, you will need to slip the warp stick cords from the cloth beam around the warp stick. This makes sure the warp stick is strongly supported when you come to tension the warp.
You send the loop FROM THE CLOTH SIDE THROUGH THE HEDDLE SLOT TO THE WARP SIDE. Put the loop over the warp stick.
Lift the first loop of the warp off your left hand and, using the Flat Reed Hook, thread the yarn through the slot corresponding to the marked start point.

25
majacraft
When the warp is fully threaded, put the final warp string cord on to the warp stick and remove the Easy Warp tool.
You now need to wind the warp on to the warp beam. Keep the tension on the warp with one hand while the other needs to turn the warp beam.
As you wind, the separator paper need to be slid into the warp to keep the layers separate.
The ties will need to be removed as they approach the heddle. Ensure the tension is kept on the warp so it is nice and firm on the warp beam.
When there is about 500mm (20”) of warp left on the heddle side, stop winding. At this point you will need to cut the loops at the end of the warp.
Return your attention to the first slot, there are two threads through the slot. Draw one through the slot to the warp side. Now get the fine Heddle Hook, slip it through the adjacent hole in the heddle (from the cloth side to the warp side) and use the hook to pull the yarn back through the slot on to the cloth side of the loop.
Repeat this process for the remaining threads in the warp.

26
majacraft
Divide the warp into evenly sized groups. Having each group about 25mm (1”) wide works well as if there are too many threads from the warp in the group it will start affecting the tension of the warp. Starting on the left hand side, tie the first group to the cloth stick using an Surgeons Knot (see Page 14).
Wind the tension on to the warp with the warp ratchet. Check the tension on the groups. It should be even. If it is not, then you will need to loosen and retighten the appropriate group.
You are now ready to weave!
Switch to the right hand side and then tie the right group to the cloth stick. Continue by tying left, right, left and so on.
1
2

27
majacraft
Indirect warping traditional
Place the heddle in the middle ‘neutral’ position.
The crossover end of the warp is going to be threaded through the heddle. The first step is to secure the non-crossover end to the warp stick at the cloth end of the loom.
Tie the non-crossover end around the warp stick at the cloth end with an Overhand Knot (see Page 14). This knot is just temporary so we can keep the warp tidy while we work at the other end.
The centre of the heddle needs to be marked with something removable such as a pencil. If a full set of Reed Segments is in place then the heddle centre will be half way across the fifth Reed Segment.
From this centre mark, count out half the warp width toward a side of the loom (this is why you kept a count of the number of threads in the warp during winding on to the Warping Frame). Mark this point with your pencil. This is where you will begin the threading process.
Wind it on to the cloth beam until the warp extends about 300mm (12”) past the heddle.
You will need to use a warp previously created. “Loading the warp on to the warping frame“ on page 21 describes how to make a warp.

28
majacraft
Lift the top thread off the warp in your hand. Take the Reed Hook and slip it through marked slot on the heddle from the warp side to the cloth side. Use the hook to draw the first thread through the slot.
Hold the cross in one hand and make sure all the sections are separated. If you are right handed then holding in the left hand is likely to be the easiest.
Now cut through the loops at the warp end. Be very careful not to jumble up the threads. They are going to be systematically removed and threaded.
You will need the flat reed hook and the long hook to thread the warp through the heddle.
Lift the second thread off the warp in your hand and using the long hook, thread this through the adjacent hole to the previously threaded slot.
Continue this process threading slot, hole, slot, hole and so on until all the warp is threaded.

29
majacraft
The yarn threaded through the heddle will look like this
At this point wind the warp on to the warp beam. Keep tension on the warp with one hand and the other hand needs to turn the warp beam. As you wind, the strong separator paper needs to be slid into the warp to keep the layers separate. The ties will need to be removed as they approach the heddle. Ensure the tension is kept on the warp so it is nice and firm on the warp beam.
When the groups have all been tied, it will look like this.
When there is about 300mm (12”) of warp left on the cloth beam side of the heddle, side, stop winding.
On the warp side of the heddle, divide the warp into evenly sized groups. Having each group about 25mm (1”) wide works well as if there are too many threads from the warp in the group it will start affecting the tension of the warp.
Tie each of the groups to the warp stick using an Overhand Knot (see Page 14). Keep the threads in the warp running as straight and parallel as possible. Don’t spread them wide or bunch them up.

30
majacraft
At this point you will need to cut the loops at the end of the warp. Undo the overhand knot now and cut through the loops at the end of the warp.
Starting on the left hand side, tie the first group to the cloth stick using a Surgeons Knot (see Page 14). Switch to the right hand side and then tie the right group to the cloth stick. Continue by tying left, right left and so on.
Wind the tension on to the warp with the warp ratchet. Check the tension on the groups. It should be even. If it is not, then you will need to loosen and retighten the appropriate group. You are now ready to weave!
Use some waste yarn to weave three to four rows as a header that will hold the warp in place ready for starting to weave.
Divide the warp into evenly sized groups. Having each group about 25mm (1”) wide works well as if there are too many threads from the warp in the group it will start affecting the tension of the warp.
1
2

31
majacraft
How to weaveMove the heddle into the upper position.
This action creates the shed
Pass the shuttle through the shed. On the first pass, leave about 50mm (2”) hanging outside the warp. On the following passes, carefully pull the yarn up against the outside thread in the warp. If you pull too tight, you will distort the warp. Too loose and there will be loops on the edge.
The edge of your cloth is called the SELVEDGE and you will want to create a nice even and straight edge here (unless there is a particular creative effect you are working toward).
Pull the heddle from the Heddle Mounts and use it to push the yarn down into the cloth. This is called BEATING. DO NOT BEAT TOO HARD. There must be a small gap between the threads - these will tighten after you remove the cloth and wash it.
Move the heddle into the lower position.
Draw the weft yarn down so it makes an angle of about 20 to 30 degrees relative to the cloth.
Pass the shuttle through the shed on the return journey. If the shuttle went from right to left on the first pass, then the return will be left to right (or vice versa). Now beat it down.

32
majacraft
Repeat this process : Move the Heddle, Shuttle through the shed, Beat down the weft. In time, the cloth will slowly get closer to the heddle and it will become harder to get the shuttle through the shed. At this point, you will need to wind the cloth onward.
Finishing the cloth
First lift the rear pawl to allow the Warp Beam to turn in the anti-clockwise direction. You need to hold the nut on the Warp Beam as well so you can control how much it turns.
Now turn the Cloth Beam in the clockwise direction to wind the cloth onto the Cloth Beam. When you have the edge of the cloth near the Cloth Shed Brace, lock the rear pawl on the Warp Beam. Adjust the tension of the warp so it is fairly tight by clicking the Cloth Beam as much as is necessary.
You can now continue the weaving process as described above. Wind on the cloth again when it approaches the heddle. Continue weaving until you are approximately 300mm (12”) from the end of the warp.
When you are approximately 300mm (12”) from the end of the warp, stop weaving.
Cut the weft yarn so you leave about 50mm (2”) free.
Release the pawl locking the Cloth Beam into place and unwind the cloth from the Cloth Beam
Cut the warp yarns off the warp stick.
Undo the knots holding the warp into the Cloth Beam Warp Stick.

33
majacraft
Remove the header yarn from the woven cloth that you added when you started weaving.
You can darn the end thread of the weft into your weaving. Repeat this at the other end of the woven cloth.
Wash the weaving gently with warm water and a little detergent. Rinse in warm water and then hang it out to dry.
Use Overhand Knots (see Page 14) to tie the thread groups close to the weft yarn.
Divide the threads in the warp into even groups of about four to six.
Trim the ends of the cloth so they are even.
Ratchet and pawl detail

34
majacraft
Retighten the lock nuts and the loom is ready to travel!
Loosen the two Lock Nuts and fold the loom in half.
Folding the loomIf you are wanting to take your weaving with you, simply fold up the loom and away you go.
Start with the heddle in the upper or lower position. Slip the shuttle into the shed and leave it sitting in the middle.
Move the heddle into the neutral travel position. This will hold the shuttle in place
Guessing - Donyale Grant from Moggy & Me

35
majacraft
Double heddle weavingDouble heddle weaving allows you to create a wider variety of patterns in your warp. Obviously you will require a second heddle and set of Reed Segments.
Start off by creating a warp using the warping frame as described in section 2.0 (see Page 21).
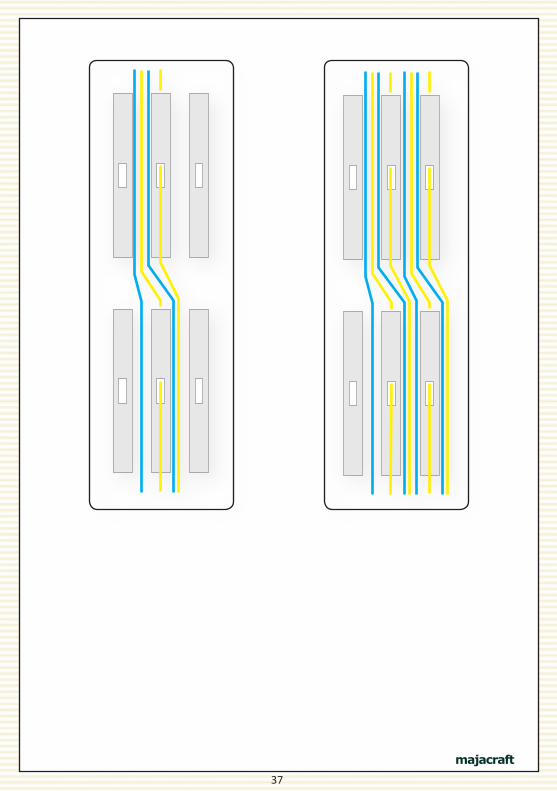
You need to thread three (3) strands through each slot and one (1) strand through each hole. Continue threading in this way across the entire warp.
Place one heddle on the BACK of the Heddle Mount in the neutral position.
Threading the heddles is going to be based on the Traditional Indirect Warping Method. If at any stage you need to refresh your memory on how to do this, see Page 27.
Now wind the warp onto the Warp Beam adding separator sheets of paper between the warp as you go.
Now put the second heddle in the neutral position on the FRONT of the heddle mount. It will make the threading easier if you remove the Rear Heddle and place it close to the Rear Shed Brace.
YOU MUST PLACE BOTH HEDDLES IN THE NEUTRAL POSITION WHEN ADDING THE SECOND HEDDLE AND MAKE SURE THEY STICK TEGETHER. IF THE MAGNET POLARITIES ARE NOT ALIGNED THEN YOU ARE NOT GOING TO BE ABLE TO WEAVE.

36
majacraft
When the front heddle has been threaded completely, tie the threads to the Cloth Warp Stick and tension it up.
Select the second group of three (3) threads going through the second slot on the Rear Heddle.
The first thread in this group goes through the same slot on the front heddle that you put the previous two threads through. You will now have three threads going through this slot.
Continue on the threading the remainder of the threads as described above.
Select the first group of three (3) threads going through the first slot on the Rear Heddle.
The first thread goes through the first slot on the front heddle.
The second thread goes through the first hole on the front heddle.
The third thread goes through the next slot on the front heddle.
Now grab the thread from the first hole on the Rear Heddle. This thread goes through the same slot on the Front Heddle that you just put the third thread through.
37
majacraft

38
majacraft
Helpful hints
When weaving, glide your shuttle gently along the face of the reeds. At the reed face, the shed separation is at its greatest so the chance of accidentally hooking a thread incorrectly is reduced.
Using the shuttle
WarpingWhen Direct Warping or using the Warping Frame, ALWAYS follow the same path with your yarn. It is easy to get the threads crossed over which can create tangles and inconsistencies in your warp.
If you don’t want to bother with counting reed slots when warping up your loom, simply remove the reed segments you are not going to need. The heddle will be lighter to work with and there is no need to spend time trying to work out where the outside of your warp is going to be.
Who wants to count?
You will need to hold the shuttle off the reed face when using lower dent reeds (bigger holes and slots).
Something you may want to consider to get more length in your warp is to use the Direct Warping Block included with your weaving loom for the Direct Warping process. Secure the block to a table, place the loom parallel to the block and you can use the three pegs on the block to create the cross. Be aware that you should not bump or move the loom as it will change the length or your warp and you will lose the tension in your Indirect Warp.
Really long Indirect Warp

39
majacraft
Due to the unique design on the heddle mounts on the Majacraft Dynamic Heddle loom, it is not possible to weave with the loom sitting flat on a table.
Weaving on a table
You will notice that there are two pegs in your set of warp pegs that are shorter than the others. Find these two pegs and screw them into the threaded holes on the underside of the CLOTH brace closest to each side of the loom.
There are also two standard length warp pegs that have rubber buttons on the ends. Find these two pegs and screw them into the threaded holes on the underside of the WARP brace closest to each side of the loom.
You can now flip the loom over and weave on a table top.
If you are experimenting with a warp that contains different thicknesses of yarns, when you come to tension the warp up you may notice that the tension is not even in the warp.
Working with different warp yarn thicknesses
Instead of using plain paper to separate the warp, we have tried adding lengths of thin foam into the warp as well. Because the foam can compress, it works as a tensioning device to keep the tension even across the entire warp.
So far it seems to be very successful but at the moment it is still an experimental technique. Try it and see for yourself or perhaps you may come up with your own ingenious solution!

40
majacraft
Loom accessories
If you require a custom made bag with pockets for all your loom equipment then this may meet your needs.
Shoulder bag
A weaving stand makes it easy to leave your work between sessions and also sets your project at an optimal height for comfortable weaving. Another benefit of the stand is you can choose where you set up your weaving.
Weaving stand
If you are struggling to find the perfect yarn to use in your warp or your weft, then why not make it yourself. In case you did not know, Majacraft build spinning wheels. Spinning your own yarn is simple and fun. Using your own yarns in your weaving allows you even more control over your creativity than what you can generate from machine spin yarns. Visit www.majacraft.co.nz or speak to your local dealer to learn more.
Custom Reed SegmentsThe are several Reed Segment sizes available as standard. Because we cut them at Majacraft with our laser engraving tool, we have the ability to build almost anything. If you have a specific Reed Segment design you want to create then contact us and we may be able to build it for you.
Write to [email protected] if you wish to discuss this further with us.
Creating your own yarns for weaving
Extra reed segments give your loom and your weaving greater versatility. The reed segments are available either individually or as a set.
Reed segments

41
majacraft
Recommended ResourcesWeavers Idea Book - Jane PatrickRavelry - www.ravelry.comWeavin’ Place - Cheryl Dunworth - www.weavinplace.com
CreditsMany people both inside and outside of Majacraft have been instrumental in the creation of the Majacraft Loom. The following people require a special mention and I am particularly grateful for their valuable input.
Sincerely Andrew Poad
Majacraft
Spinners and Weavers
Lance Hemmingway Bas Cane Andrea O’Brien Scott Boardman Amanda Howard Owen Poad Glynis Poad Rob Edwards-Poad Toni Poad
Flore Kedemos - www.tricotin.com Cheryl Dunworth - www.weavinplace.com Heather Dunn - www.valleyfibres.com.au Mandie Chandler - www.ewegivemetheknits.com (plus invented the phrase “Dynamic Heddle Loom”)Dineke de With - www.despinners.eu Donyale Grant - www.moggyandme.com Barbara Wilson - www.barbarawilson.co.nz
Thank you for choosing and supporting Majacraft, we do what we do for you. So for now, go forth and create!
Final wordsThe blessing - and challenge - of creating something new is that there are always many things to learn. During the development of the loom, new discoveries on ways to be creative were made on a regular basis and they still are now. This is the long way of saying we don’t have all the answers yet! If you think you have discovered something new or suggestions, tips, constructive criticism or things we could make to expand your weaving experience then please let us know. We want to make for you the best weaving loom we can.
EverwoodRichard, Allan and the team
Majacraft - www.majacraft.co.nz

42
majacraft
Notes

43
majacraft
44
majacraft
For further information and for a complete range of accessories and products, contact your Majacraft dealer or:
MAJACRAFT LTD
R586 Oropi RoadRD.3Tauranga 3173New Zealand
Phone +64 (7) 543-3618Fax +64 (7) 543-3718Email [email protected] www.majacraft.co.nz
DEALER
Contact
weaving_manual_1.05_03-08-2012


