Yo-Yo Projects - Sew Mama Sew | Outstanding sewing ... · PDF fileYo-Yo Projects Yo-yo...
8
© 2009 by Elizabeth Hartman for Sew, Mama, Sew! Page 1 www.ohfransson.com / www.sewmamasew.com Not intended for commercial use. Yo-Yo Projects Yo-yo rosettes are a simple hand sewing project that can be used in a variety of ways. Make one or two to embellish a bag, or make a whole bunch for a fun pillow!
Transcript of Yo-Yo Projects - Sew Mama Sew | Outstanding sewing ... · PDF fileYo-Yo Projects Yo-yo...

© 2009 by Elizabeth Hartman for Sew, Mama, Sew! Page 1www.ohfransson.com / www.sewmamasew.comNot intended for commercial use.
Yo-Yo Projects
Yo-yo rosettes are a simple hand sewing project that can be used in a variety of ways. Make one or two to
embellish a bag, or make a whole bunch for a fun pillow!

© 2009 by Elizabeth Hartman for Sew, Mama, Sew! Page 2www.ohfransson.com / www.sewmamasew.comNot intended for commercial use.
Making a Yo-Yo:
All you need to make a yo-yo is a fabric circle and a handsewing needle and thread. Although fancy circle cuttingtools are available, plates, glasses and bowls from thekitchen all make great templates. Also useful are simplecompasses from the school supply aisle at the grocerystore. Trace circles onto fabric with the marking tool ofyour choice and cut them out with sharp scissors.
Keep in mind that your finished yo-yo will be a little smaller than half the size of the circle you started with. (I startedwith a 5” circle and ended up with a 2.25” yo-yo.) Your stitch length will also affect the final size of your yo-yo. If youuse a tiny stitch, you’ll end up with too many gathers and a gaping hole at the center. If you use a giant stitch, you’ll endup with bulky gathers that create a pyramid-like shape rather than a flat rosette. If you’ve never made yo-yo rosettesbefore, I suggest practicing a few with scrap fabric – just to get a feel for the process.
I find that using a knotless start is the best way to sewgathers without fear of the knot popping out. Begin byfolding a length of thread in half and threading the fold
through the eye of your needle, as shown above.
Turn the edge of your fabric circle toward the insideabout 1/4", as shown above. Pull your needle through
both layers and then back to the front again, threading itthrough the loop and pulling tight to create an anchor.
Continue around the edge of the circle, folding the edgeof the fabric circle over about 1/4" and making even
stitches about 1/4" apart.
I find that it’s quicker to feed the fabric onto my needleas shown above, pulling the needle through once it’s full.
This technique also makes it easy to tell whether yourstitches are the same size. If they are, the pleats on your
needle will be the same size!

© 2009 by Elizabeth Hartman for Sew, Mama, Sew! Page 3www.ohfransson.com / www.sewmamasew.comNot intended for commercial use.
Once you’ve sewn all the way around to the pointwhere you started, pull your thread, gathering the
fabric and closing up the center.
Use your fingers to flatten out the rosette,manipulating the pleats to make them even. Giveyour thread one last tug to make sure the center istight and tie off your thread, hiding the knot among
the pleats.
Yo-Yo Embellishments:
Yo-yo rosettes can make fun embellishments for allkinds of sewing projects. Here, I’ve used them todecorate some wristlet bags.
In the example above, a vintage button is pairedwith a matching yo-yo. Both the button and yo-yoare sewed to the bag through the center of the yo-yo.
In the example on the left, I hand-sewed two yo-yorosettes to the bag using a a blind stitch. (This isalso a good way to attach yo-yo rosettes to quilts.)

© 2009 by Elizabeth Hartman for Sew, Mama, Sew! Page 4www.ohfransson.com / www.sewmamasew.comNot intended for commercial use.
Yo-Yo BroochWith a couple of simple modifications, you can turn a yo-yo rosette into a removable brooch.
Supplies:Fabric Circle for Yo-Yo in desired sizeCovered Button Blank in desired size
Fabric for Covered ButtonLightweight Fusible Interfacing Scraps
Brooch BackHand Sewing Needles
ThreadEmbroidery Floss
Follow package directions to Iron a small piece of fusibleinterfacing to the center of the wrong side of your fabric
circle.
Follow package directions to make fabric-coveredbutton, ironing a small piece of fusible interfacing to the
wrong side of fabric to prevent the mettallic buttonblank from showing through. Set button aside.
Hand stitch brooch back to the center of the right side ofyour fabric circle.
Follow the previous “Making a Yo-Yo” directions to turnyour circle into a yo-yo rosette. The back of the
completed yo-yo should look like the above photo, withthe brooch back centered.

© 2009 by Elizabeth Hartman for Sew, Mama, Sew! Page 5www.ohfransson.com / www.sewmamasew.comNot intended for commercial use.
Thread a needle with embroidery floss, as shown above. Starting just to one side of the center of the brooch back,pull your needle through to the front, bringing it throughthe covered button and back through to the back, on the
opposite side of the brooch back.
Cut the needle free and tie the floss in a sturdy knot,securing the button on the brooch front to the brooch
back.
If desired, the brooch can also be made using a regularbutton (rather than a fabric-covered one).
Yo-Yo Panels:
Multiple yo-yo rosettes can be joined to form panelsthat can be used as coverlets, table runners . . . orwhatever you want!
Start with two yo-yo rosettes, matching right sides,as shown.
© 2009 by Elizabeth Hartman for Sew, Mama, Sew! Page 6www.ohfransson.com / www.sewmamasew.comNot intended for commercial use.
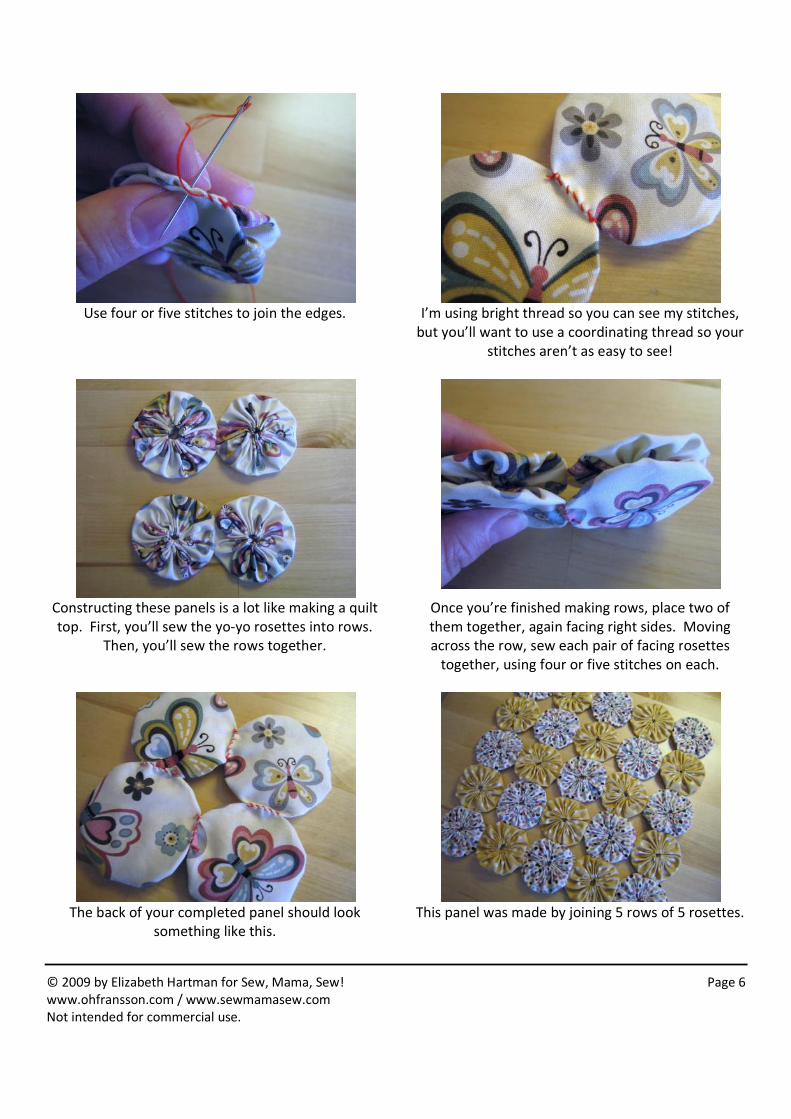
Use four or five stitches to join the edges. I’m using bright thread so you can see my stitches,but you’ll want to use a coordinating thread so your
stitches aren’t as easy to see!
Constructing these panels is a lot like making a quilttop. First, you’ll sew the yo-yo rosettes into rows.
Then, you’ll sew the rows together.
Once you’re finished making rows, place two ofthem together, again facing right sides. Movingacross the row, sew each pair of facing rosettes
together, using four or five stitches on each.
The back of your completed panel should looksomething like this.
This panel was made by joining 5 rows of 5 rosettes.

© 2009 by Elizabeth Hartman for Sew, Mama, Sew! Page 7www.ohfransson.com / www.sewmamasew.comNot intended for commercial use.
Yo-Yo Pillow:To make this simple 10” pillow, you’ll need 25 yo-yo rosettes made from 5” circles (approximately 2.25”
finished) and two 12” fabric squares backed with lightweight fusible interfacing. I used a contrasting solid for
the front and a coordinating print for the back.
Start by joining your 25 yo-yo rosettes into a 5 x 5panel. Center your yo-yo panel on your pillow front
square.
Using a hand sewing needle and thread, tack theedge of each exterior yo-yo to the fabric behind it.These stitches are just to keep the panel in place
during sewing, so a couple of stitches on eachshould be plenty.
Trim the pillow front 1/4" from the edge of your yo-yo panel.
Center the pillow front on top of the pillow backand trim pillow back to the same size as the front.

© 2009 by Elizabeth Hartman for Sew, Mama, Sew! Page 8www.ohfransson.com / www.sewmamasew.comNot intended for commercial use.
Place right sides of pillow front and back together.Pin and sew around all sides, using a 1/2” seamallowance and leaving a 3” opening for turning.
Trim corners and carefully turn pillow right-side out.If necessary, carefully press pillow back to remove
any wrinkles.
Stuff pillow with polyester fiberfill, making sure to fillcorners first and distribute fill evenly throughout
pillow.
Hand stitch closed the opening you left for turningand enjoy your finished pillow!