
Nutrition Foundations & Clinical Applications A Nursing Approach.

School of Medicine and DentistryCollege of Life Sciences and Medicine
YEAR I MBChB
Foundations of Clinical Method Workbook
2013 / 2014

1
CONTENTS
Contacts ......................................................................................................................2
Introduction to Clinical Method...........................................................................................2
Clinical Communication ....................................................................................................3
Session 1: Introduction to History Taking ...............................................................................5
Session 2: Introduction to Clinical Examination ........................................................................9
Worksheet for General Examination ................................................................................... 17
Session 3: Introduction to Clinical Method ............................................................................ 19
FCM Session 3 Worksheet (Term 1, Year 1) ............................................................................ 20
Introduction to Term 2 .................................................................................................. 21
Clincal Communication .................................................................................................. 21
Clinical Examination ...................................................................................................... 34
Moving and Handling ..................................................................................................... 35
Visits to Clinical Areas .................................................................................................... 35
Examination of the Respiratory System ............................................................................... 36
Worksheet for Examination of the Respiratory System ............................................................. 42
Peak Expiratory Flow Rate measurement & Inhalers
(Part of Respiratory but taught in Cardiovascular block) ........................................................... 44
Cardiovascular System: Clinical Examination ......................................................................... 50
Worksheet for Examination of Blood Pressure ........................................................................ 55
Worksheet for Cardiovascular System ................................................................................. 57
ECG (Part of Cardiovascular but taught in Third Term) ............................................................. 61
Hand Washing Procedure ................................................................................................. 66
Hand Rub Procedure ...................................................................................................... 67
Dress Guidance ............................................................................................................ 68
Colour printing of certain pages:
It has not been feasible to print this workbook in colour. We recommend that students consider printing certain pages in colour and fixing
these into their workbooks. The pages concerned are: 46, 61, 62 and 63

2
CONTACTS
• Absences - students must contact immediately: Mrs Diane Gerrie, Year 1 Secretary, MBChB Office, Suttie Centre Tel (43 or 76) 7777, Email [email protected] In addition for Clinical Attachment absences students must contact: Ms Pat MacLennan, Room 131, Clinical Skills Centre (1st Floor) Suttie Centre. Tel (43 or 76) 77803 • Clinical Communication Course content queries: Dr Fiona Stewart. Tel (43 or 76) 7732, Email [email protected], Year 1 Lead Clinical Communication Dr Rebecca Riddell, Tel (43 or 76) 7242, Email: [email protected], MB ChB Lead for Clinical Communication • Clinical Examination course content queries: Dr Fiona Parker, Tel (43 or 76) 7728, Email [email protected], Year 1 Lead for the General Examination Dr Ambreen Shakil, Tel (43 or 76) 7726, Email [email protected], Year 1 Foundations of Clinical Method Link Tutor.
INTrOduCTION TO ClINICAl METhOd Clinical Method is the term used to describe the skills and the way in which these skills are used to obtain information from a patient in order to make a diagnosis. The skills are often divided into clinical communication, clinical examination and procedural skills. They are usually learned separately and then integrated together according to the particular situation and the type of problem that a patient presents with.
Good clinical communication will enable you to develop good rapport with patients so that they share information with you about their condition. This is important when learning history taking skills and the learning opportunities available for these. Communication skills in Year One are detailed in the learning guide and this workbook.
The second part of clinical method is clinical examination. This involves the use of all your senses and knowledge of normal and abnormal anatomy and physiology. Clinical examination usually follows history taking and will enable medical students and doctors’ to generate a list of possible diagnoses (differential diagnosis).
Some patients require procedures to be performed, either to provide further information or to help support them during treatment. One example is taking blood (performing venepuncture) for investigations or inserting a venous cannulae to administer intravenous drugs or fluids. Such procedural skills also require you to use your senses and to have knowledge of normal and abnormal anatomy and physiology.
Throughout your medical student training, you will be taught the clinical communication, clinical examination and the procedural skills components of clinical method. Sessions may focus on one or the other but you will practise integrating them because this is how they are performed in real clinical situations. This term we will begin the communication and examination skills teaching. Procedural skills will assume increasing importance later in the course.
Medical technology (laboratory testing, imaging, etc) is well developed and now adds to the accuracy of diagnosis. However, a good clinical differential diagnosis is helpful and may influence your choice of investigations. Thus the skills you will learn in clinical method are the basis of good medical practice. Patient centred care, focused on the individual and their needs, and the best use of resources for all patients are both important. Good performance of clinical skills have an important role in the provision of good quality care, by targeting care to the individual and their wishes, minimising errors and by developing timely and appropriate differential diagnoses. Good performance of clinical skills therefore also helps to maintain and ensure appropriate use of resources in the health service for the benefit of all patients.
The first part of this workbook deals with clinical communication while the second part explores clinical examination. You should bring this workbook to all the Foundations of Clinical Method (FoCM) sessions this term. It will provide you with an outline of the teaching, some background information for the teaching sessions and some worksheets which will be useful during the sessions. This is the layout for the first term. The same pattern is repeated for the second term.
PlEASE NOTE: You must remember to clean your hands before and after every patient contact. Please refer to the ‘hand wash’ and ‘hand rub’ procedures found at the end of this workbook. As you will be interviewing and examining volunteer/simulated patients in the Clinical Skills Centre you are also expected to:
• haveshortcleanfingernails• removeallnailvarnish• Dressappropriately–pleaserefertothe‘DressGuidanceforMedical&PhysicianAssistantStudents’foundattheendofthis
workbook on page 68.

3
ClINICAl COMMuNICATION
Introduction
The Foundations of the Clinical Method course aims to provide you with a strong platform for the communication skills needed to interact with both patients and healthcare colleagues, and the patient examination skills which will be required of you in any clinical area when you start work. Good communication skills are essential for taking an accurate, thorough and patient-centred history, giving information to patients and relatives and for working safely and effectively with colleagues. There is abundant evidence that communication is a critical skill for doctors. Some of this is summarised in the box.
Communication is central to clinical practice:• Doctors perform around 200,000 consultations in a professional lifetime so it is worth striving to get right. • Effective communication is essential to the practice of high quality medicine: it improves patient satisfaction, recall, understanding,
concordance and disease outcome.
Communication is a core clinical skill, an essential component of clinical competence:• Knowledge base, communication skills, clinical examination and clinical reasoning are the four essential components of clinical
competence, the very essence of good clinical practice. • Communication turns theory into how to practise. How we communicate is just as important as what we say.
Communication skills need to be taught and learned:• Communication is a series of skills that can be both learned and retained: it is not just a personality trait. • Experiential learning methods incorporating observation, well-intentioned feedback and rehearsal are required.
Communication skills training improves clinical performance:• Communication is not just “being nice” but produces a more effective consultation for both patient and doctor. • Effective communication improves accuracy, efficiency and supportiveness in the consultation. • Effective communication significantly improves health outcomes for patients.• Communication bridges the gap between evidence-based medicine and patients’ perspective, including their ideas, concerns and
expectations.
During term 1 you will be introduced to three strands of Clinical Communication: history taking, understanding the patients’ perspective and working with colleagues.
Learning opportunities for Clinical Communication in term 1 are as follows:
lecture: An introduction to doctor-Patient Clinical Communication
Aim: To introduce students to history taking content and process skills.
Objectives: Students should be able to – • Introduce history taking and why is it important. • Explain how history taking integrates with patient observation and clinical examination. • Describe different types of history taking and when they are used. • Explain the “full clerk in” (called a ‘clerking’ later in the workbook - you will find both terms are used) in detail, with attention given
to both what must be asked and how to ask it. This will be illustrated with examples and evidence of effectiveness.• Describe the basic Calgary – Cambridge framework for medical interviews
Tutorial: The patient experience
In this first tutorial in clinical communication, you will explore the skills required in the medical interview and have opportunities to explore your own views of what it may be like to be a patient, whether you have yet been a patient or not. You will consider what you believe patients want and do not want from their doctor.
In the second section of the tutorial, you will have the opportunity to meet and ask questions of one or two patients who will join the tutorial to share their experiences with you.
You should consider:“What do patients want from a consultation with their doctor?” “What do patients not want from a consultation with their doctor?”
Responding to these questions does not depend on your having been a patient. Everyone has their own background experience and can use this to inform their response. The development of partnership between patient and doctor is a key component in effective clinical interviewing and in patient care. Implicit in partnership is the concept of active participation of those involved, with opportunities for discussion, disagreement, choice, negotiation and a working concordance (agreement) which the parties involved can support. The value of partnership is by no means unique to the practice of medicine. As your course progresses, you will examine ways in which this partnership with patients may be forged.

4
Aims: • To increase your awareness of the skills required in the medical interview and how these skills may be used, with emphasis on the
patient’s perspective of doctor-patient communication. • Provide the opportunity to talk with one or two simulated patient(s) about the qualities related to communication and the doctor-
patient relationship that patients value in a doctor.
Objectives: Students should develop an awareness of:• the generic communication skills that can be adapted to the clinical environment.• the patient perspective and patients’ perceptions of healthcare and consultations• real-life patient perspectives and perceptions with volunteer patients, as well as reflecting on those from students’ own or observed
experiences.• Doctor (or student) appreciation of patient perception and perspective are central and vital to effective consultation.• The importance of consciously seeking and addressing the patient perspective and the needs of the patient.• The doctor may facilitate or obstruct effective clinical communication; this behaviour may be an active process and is open to
change.• The concept of the patient agenda and of the doctor agenda and the realisation that the two are not necessarily the same.• Recognition of the concept of a partnership between patient and doctor
lecture: Working with colleagues in teams
Aim: To encourage students to reflect on the different roles people have within teams, and to think about how they work in a team.
Objectives: Students should be able to – • Define team working. • Discuss the need for teamwork within healthcare including different types of team likely to encounter and multidisciplinary team
members. • Explain the impact of poor team working on patient outcomes. • Identify the skills needed for good team work. • Reflect on their own skills in team working. • Describe the process of team development. • Explain the influences on individual behaviour within a group. • Describe different roles within the team and reflect on their own role. • Consider how to provide effective feedback to colleagues (both peers and seniors)
5
SeSSion1:introDuctiontoHiStorytAkinGThis session will last for 3 hours
Aim:Introduction to the content, process and structure skills needed to elicit a full patient history.
Objectives:By the end of the session, students will be able to:• describe why a medical history is obtained• list the sections in a standard history• identify the importance of addressing both the medical and patient agendas• explain factors which are important about how questions are asked• identify useful questions for each section of the history• list general symptom enquiry questions• begin to develop history taking skills in practice
Notes for Session 1: Introduction to history Taking
History taking is an essential skill for doctors in all areas of practice. In this course, you will begin to learn and practice history taking, but you are likely to be honing this skill throughout your career. Why is history taking so fundamental? Firstly, about 75% of diagnoses are made with information from the patient’s history (Ramani 2004). Secondly, the history provides valuable information not only about the objective disease the patient has but about their subjective experience of the illness. A good history will include relevant information for making the diagnosis and will also reveal details about the patient’s perspective which may be critical in determining how the patient should be managed.
Taking a full and holistic history: • Allows insight into situations where there is no underlying pathology but the patient is “ill” (eg, a child who is being bullied at school
suffering from abdominal pain, tension headaches, palpitations). • Takes into account the variation between each patient’s reaction to similar symptoms. • Helps understand the patient’s perspective so as to understand the meaning of the illness for the patient. • Supports the doctor’s perspective so as to obtain an adequate “medical” history. • Ensures that information gathered about illness and disease is accurate, complete and mutually understood. • Ensures that patients feel listened to and valued • Develops a supportive environment and collaborative relationship. • Structures the consultation so enough information is gathered as well as the patient understanding where the interview is going and
why.
History taking requires good communication skills. You will need to think about both the content of the history and the process of taking it
history Taking - Content
different models of history taking
Different clinical situations necessitate different models of history taking. This may be due to the severity of illness (the patient is critically ill and there is not time to explore many aspects of the history), the situation (the consultation is in a busy general practice where the patient is well known to the doctor and only a short amount of time is available) or the patient’s ability to communicate (for example in the case of confusion).
You will be introduced initially to the basic model from which other models can be extrapolated. This is known as a patient clerking, and is the form of comprehensive history which is used when a stable patient is admitted to a hospital ward (often by the most junior doctor on the team). This consultation provides a wide range of information about the patient.
What does a clerking include?
The clerking has a set structure:• Presenting Complaint • History of Presenting Complaint• Patient’s perspective• Past Medical History • Drug and Allergy History • Family History • Social History • Systematic Enquiry
We will consider each area in turn.
6
Presenting Complaint
The first task of history taking is to identify the main problem. Usually the patient is able to select one symptom which has prompted them to seek medical help. It is conventional at this point to establish the duration of this symptom.
Hint: If the patient lists several symptoms, it is helpful to ask them to tell you which is the most important and to explain that you will deal with them one at a time.
history of Presenting Complaint
The presenting symptom should be explored in more detail. In particular, the following pieces of information should be gathered: • Site • Severity • Radiation • Character • Onset • Duration • Pattern, recurrence, progression • Exacerbating / relieving factors • Associated symptoms • Functional consequences
Note that not all questions are relevant to all symptoms. (Also see SOCRATES for pain assessment Pg 12 of McLeod’s 13th Edition)
You should also ask the patient about other relevant symptoms from the same body system as the presenting complaint, eg if they have a cough, you should ask about other respiratory symptoms.
Patient’s Perspective
Information on the patient’s ideas, concerns and expectations (ICE) may emerge anywhere in the clerking process. Listen out for these from the presenting complaint until the end of you systematic enquiry as they are often volunteered by the patient. At the end, ask appropriate questions, summarise what you think the patients ICE are and see if they agree with you.
Past Medical history
In this section of the clerking, you should try to find out about relevant past medical and surgical problems. These may be related to the current illness (for example, a history of appendicectomy will help to exclude the appendix as the source of current abdominal pain), or may provide helpful information (for example, to judge organ reserve if an operation is likely to be needed).
You should make a list of operations and illnesses requiring hospitalisation as well as any chronic illnesses in chronological order. You should also note any problems during the management of any previous illness (for example, a reaction to an anaesthetic).
drug and Allergy history
You should ask about current prescribed medicines which the patient is taking. For each one, find out the name, dose, method of delivery how often they are taking it (frequency), what it’s for (indication), how long they have been taking it and any problems it may be causing. You should also ask whether patients are taking any non-prescribed medicines or remedies. These may be simple things like painkillers bought in a pharmacy or alternative medicines such as homoeopathic or herbal remedies. Patients may also be taking vitamin or mineral supplements.
Hint: Patients often do not think of the contraceptive pill as a medicine so it is worth asking about this specifically. In older women, ask about hormone replacement therapy instead.
Half of all patients do not take medicines as prescribed. While this is something they may not wish to admit to, it is important to try and estimate whether a patient is taking their medicines or not. You will learn more about this further on in the course.
You also need to find out about any drug allergies at this point. You should always clarify with the patient what the adverse reaction was as many patients perceive intolerance to be the same as allergy. It is worth finding out about any significant side effects caused by medicines that have now been stopped. Allergies to other substances may also be important.
Hint: Patients often have difficulties recalling information about their medicines and you may need to consult other sources. On the other hand, many patients carry a list of their medicines with them, which is very helpful.

7
Family history
The family history will be helpful in identifying possible genetic diseases, but may also provide insights into patient’s worries. Asking if there is any illness which runs in the family is a good way to start.
You are primarily interested in illness affecting first degree relatives (parents, siblings, children), but it may be useful to ask about others if you suspect an inherited disorder.
Social History
The social history serves several functions. It helps the doctor to form an understanding of the patient’s lifestyle which may suggest the cause of an illness (e.g. smoking). It also begins to reveal something about how the illness affects the patient.
You should ask about: • Habits (including duration and amount)
- Smoking - Alcohol - Substance misuse (recreational drug use)
• Exercise - time spent exercising every week• Social circumstances • Household members • Work circumstances • Hobbies • Pets • Overseas travel
Hint: In some patients, you may decide that some of these areas are less important and could be left out. You would want to ask an elderly patient about housing, but it may not be necessary in a young, otherwise fit adult. Likewise, you may not always wish to ask about substance misuse.
In some instance, you may wish to discuss alcohol or drugs in more detail. You will learn more about how to do this later in the course.
Sexual history is not asked routinely, and will be taught later in the course.
Systematic Enquiry
The purpose of the last part of the clerking is to highlight any important symptoms that may have been missed. This is done by checking through a list of symptoms with the patient. While this is a reasonable strategy for a novice, more experienced doctors will often cover each system with one or two screening questions.
The following is a list of symptoms and signs to be covered in the Systematic Enquiry is shown in your Pocket Patient Clerking Guide. In term 1 you will learn the General questions to ask and the systems - based enquiry will be covered alongside each system starting in Term 2, so don’t worry about memorising them all right away.
GeneralFatigue/malaise Fever/rigors Weight/appetite Skin: rashes/bruising/bleeding Sleep disturbance Thirst Pruritus Night sweats
Cardiovascular System Chest pain Dyspnoea (Shortness of Breath) - on rest/exercise/orthopnoea/paroxysmal nocturnal dyspnoea Palpitations Ankle oedema Varicose veins Claudication
respiratory System Cough Sputum Haemoptysis Dyspnoea (Shortness of Breath) Wheeze sinusitis or earache Chest pain (pleuritic)

8
GastrointestinalSystemAppetite/weight change Mouth / teeth / tongue Dysphagia Nausea/vomiting Haematemesis Dyspepsia Fat intolerance Jaundice Abdominal pain Bowel habit: change/constipation/diarrhoea/blood/mucus/melaena Peri-anal symptoms e.g. pain / itching
GenitourinarySystemFrequency/dysuria/nocturia/polyuria/oliguria Haematuria Incontinence/urgency
Males–• Prostatic symptoms – difficulty in passing urine/poor stream/dribblingFemales– • Last menstrual period • Cycle regularity, duration & occurrence of bleeding • Dysmenorrhoea, menorrhagia • Postcoital bleeding, intermenstrual bleeding • Menopause, post menopausal bleeding • Pelvic pain, dyspareunia • Vaginal discharge
Neurological System Headache Fits/faints/loss of consciousnessDizziness, vertigo Balance Vision – acuity, diplopia Hearing Speech disturbance Weakness Numbness/tingling/paraesthesia
Musculoskeletal System Do you have any pain or stiffness in your muscles joints or back? Can you go up and down stairs without any difficulty? Can you dress yourself completely without any difficulty?
Psychiatric (Taught in Year 3)Mood – depressed, euthymic, elated Anxiety/panic symptoms Memory problems/confusion Abnormal thought content – odd ideas, paranoia, obsessions, and hypochondriacal concerns Perceptual abnormalities - hallucinations Risk to self or others
Historytaking–Skillsneeded
Good communication skills will enable you to take a good history which includes all the important information. We will think about two simple elements in term 1 – how to introduce yourself to a patient and what factors may be important in encouraging a patient to talk. We will consider further skills in term 2.
Initiating the consultation
The first task in the consultation is the opening. This can be broken down into a number of steps. Firstly, introductions are needed. You should greet the patient and confirm you are talking to the correct person. You should also introduce yourself and clarify your role.
“Good morning, my name is Stuart McDonald. I’m a first year medical student. Could you tell me your full name and date of birth please?”
From the beginning you need to be aware of the relationship you are building with the patient. This requires that you demonstrate respect and interest, and attend to the patient’s physical comfort and needs.
“Please come in and have a seat.”
9
There are many simple factors which will impact on how successfully you initiate the interview. Points to consider are: • The position of the patient’s chair. Sideways to desk is better than the across-the-desk position, like a visitor to the bank manager,
and avoids confrontational barriers. • Ensuring that any documentation tasks from the previous consultation are completed prior to calling the next patient. • Adopting a professional greeting and introduction. This is largely a matter of personal style but it is better to keep it natural. •
Conveying an impression of attentiveness and interest. • Maintaining eye contact and adopting a suitable posture – relaxed but not too laid back, hands away from the face, no fiddling or
doodling.
Bear in mind that non-verbal communication differs between different cultures. For example, in some cultures a lack of eye contact signifies respect.
You should also think about other environmental factors. In an ideal world you should talk with the patient in a comfortable, quiet room. In real life, this may not be possible.
There are a number of factors which can influence the patient and encourage or discourage them to disclose information. Three important factors are: • Verbal language: e.g., use of language, choice of terms, slang/vernacular, jargon. • Paralinguistic features: e.g., volume of speech, pace, length of pause before asking follow up questions, intonation, sighs, grunts,
ah-ahs, mmhms, tuts• Non-verbal language: e.g., eye contact, movements, posture.
SESSION 2: INTrOduCTION TO ClINICAl ExAMINATION Following the first Foundations of Clinical Method session on history-taking, there will be a session which will focus on clinical examination and will further develop your understanding and practice of clinical method. You will be introduced to the key aspects of professional behaviour expected of medical students when dealing with patients in a simulated setting. The principles of documenting clinical findings will also be introduced. The third session will allow you to integrate some elements of history-taking, clinical examination and documentation for the first time.
In Term 1 the clinical examination teaching will focus on General Examination. Most patient examinations begin with this type of general examination, which requires a wide assessment of the patient’s peripheries (hands, arms, face, neck and lower limbs). You will be looking for information to help you decide whether aspects of the patient examination are normal or abnormal. Abnormal findings are termed clinical signs).
In Term two you will begin the Systems Course. During this part of the course each system of the body will be covered in detail. You will learn how to examine each system at the same time as learning about the associated anatomy, physiology, pathology etc. The general examination will also be revisited during each system, to highlight the particular signs associated with pathology of that part of the body.
Preparation for Examination sessions
Beingprepared–withtherightknowledge‘Macleod’s Clinical Examination’ is your core text for these tutorials and also for the whole clinical examination part of the MBChB course. (13th edition is the most up to date version). You will find it very helpful to read the appropriate chapter before you come to any clinical examination session. For sessions in Term 1, Chapter 3 is particularly useful and has numerous helpful illustrations. You will also find a small section on the mouth in Chapter 8.
To further help you learn about clinical examination a number of videos and power point presentations have been produced; these each focus on a different body system or method of examination. In first term we will focus on what can be seen or heard as you approach a patient (sometimes called ‘end of the bed’ examination) and on general examination of the patient. The video for General Examination (located on the MyMBChB website) should be viewed before you attend the Clinical Examination session.
Beingprepared–withtherightequipmentYou will not need to bring any specific equipment with you for examination sessions in the Clinical Skills Centre in Term 1. Term 2 teaching will cover both the Respiratory and Cardiovascular systems and will involve learning to use a stethoscope. Stethoscopes are available for you to use during teaching sessions in the Clinical Skills Centre but, if you have your own, please bring it with you to all clinical examination sessions.
It is advisable to purchase a stethoscope of your own at some point so that you can practise your auscultation skills frequently. Your stethoscope should have both a ‘diaphragm’ and ‘bell’ facility e.g. the Littmann Classic II S.E.

10
Notes for Session 2: Introduction to Clinical Examination
Aim: To introduce you to a general clinical examination.
Objectives: After this session students should be able to: • Engage appropriately with the correct patient • Perform a quick initial assessment to establish the suitability of the patient for a full general examination • Practise the clinical skills of taking a temperature and taking the radial pulse.• Perform a general examination on a volunteer patient with appropriate use of inspection and palpation • Demonstrate the use of good communication skills (verbal and non-verbal) during a clinical examination
Session Outline
This is the first opportunity for you to practise clinical examination skills on volunteer patients.
Learning about the clinical examination in term 1 will involve watching a video on general examination and then practising the skills. The video should be viewed on your MyMBChB prior to the session.
This session will last 3 hours. The priority is for you to develop your examination skills and so half this time will be available for you to practise examining volunteer patients.
1. Introduction /overview of session 2. General Examination video 3. Practise of the General Examination on volunteer patients 4. Information on clinical documentation with discussion of learning points and a summary of the session
The initial assessment
A medical history will usually have been taken prior to clinical examination. Often whilst taking the history, a doctor will observe the patient to determine broadly their health status. In a few situations clinical examination will be undertaken without taking a history from the patient: • When the patient is unconscious (you will already have discussed this during your first aid teaching) • When patient illness causes difficulty with communication (e.g. confusion or speech difficulties). However it would be important to
obtain the history from relatives or carers if possible in these circumstances. • When pain or severe illness prioritises immediate treatment.
For these reasons an initial assessment is undertaken before the commencement of any full clinical examination. This involves a quick visual assessment of all patients in order to classify them into one of two categories:
1. Severely ill patients requiring immediate assessment and management according to findings using the ABCD framework to improve their condition (which may be life-threatening) - you will be taught about the ABCD framework and be able to practise this during your first aid teaching.
2. Patients who are well enough to give a detailed history and for a full clinical examination to be carried out on them.
Note that, mostly in the first three years of your course, patients will have been selected for you to examine in both the Clinical Skills Centre and in ward settings who can tolerate a detailed examination.
Clean hands
While making this initial assessment and before you first touch the patient (even to greet them with a handshake) you must clean your hands. Cleaning hands is thought to be the most important single measure in reducing spread of infection. Details of the NHS Grampian Hand Washing and Hand Rub Procedures are included at the end of this workbook.
identification
It is essential that the identity of both the patient and the person performing the clinical examination is clearly established. Introduce yourself using your name and status. (e.g. “Hello, I am John Smith a first year medical student”).
Correct identification of the patient requires more than one source of information. Ask the patient for their full name and date of birth and then check this information against any patient documentation. For a patient in hospital you could check the patient identification band which may be situated on their wrist or ankle or both. It is usually white but may be a red colour for patients with known allergies.
Another useful source of information is the CHI number (Community Health Index number – the date of birth dd/mm/yy plus 4 random digits). Every patient has a unique CHI number. This will be found on both the identification band and the patient documentation.

11
Consent
Touching a patient to examine them is only appropriate after gaining the patient’s consent. This involves explaining to the patient which parts of their body you would like to examine and why, and then asking them if this is alright.
Moving and handling:
Although patient safety and comfort is your prime concern it is equally important that you give as much attention to your own safety and comfort while performing a clinical examination. Best evidence indicates that giving due regard to this, even at this early stage of your career will encourage healthy habits that will minimise your risks of personal injury, both in the short and long term e.g. back pain and injury are common problems for healthcare workers. Good moving and handling technique from the beginning of your career will minimise your risks of developing such problems.
‘Moving and Handling’ is a term of which you will become more and more aware especially when you gain access to clinical areas from Term 2. Such is its importance that you will discover specific reference given to it at various points in your practical workbooks throughout your MBChB course. Additionally, clinical tutors may at any point of your teaching with real, simulated or volunteer patients give specific advice on very simple ways to adjust the bed height and position yourself prior to, during and following clinical examination which will enable you to begin to practise healthy ‘Moving and handling’ habits right from the start.
The sequence of the general examination
A common sequence for the general examination is now described with some examples of signs (which may indicate some kind of disease process i.e. ‘pathology’) which you may find in each area. Although each part of the examination process is described separately, you will find that you may do some of them simultaneously. Also sometimes the order will change depending on the way that the patient presents. For example if a patient walks into the room you may observe their gait at this time, whereas if they were already sitting in the room when you arrived you may not do this until later.
Generalinspectionoftheenvironmentaroundthepatient
As well as observing the patient you should observe the immediate environment for information. This is important in both hospital and community settings, where you might see evidence of the patient’s medication or equipment used in their care. Some examples of clinical equipment you may notice around a patient’s bed or in their house: • Oxygen cylinder or mask • Nebuliser • Vomit bowl
In a hospital setting look at the patients charts for information such as: • Temperature • Pulse rate • Weight and Body Mass Index (BMI) = Weight (Kg) Height (metres)2
In the clinical skills centre you will see a SEWS (Scottish Early Warning System) Chart at the end of the patient’s bed. Serial documentation of a patient’s vital signs has been shown to improve patient safety and outcomes by earlier identification of clinical deterioration. You will learn more about the SEWS chart later on in the MBChB curriculum. In this session you could note which vital signs are recorded on a SEWS chart. You will be measuring two vital signs during this teaching session:
1. Pulse rate2. Temperature
You can record your readings on the laminated SEWS chart with a washable ink pen.
Temperature taking is a core clinical skill and as a medical student you will learn how to perform this skill.
The body temperature is regulated by the hypothalamus in the brain and can be measured orally, per axilla, per rectum or via the ear canal (tympanic) Core temperature is the temperature below the subcutaneous tissue. Infrared tympanic thermometry is an extremely safe, accurate and common technique to obtain core body temperature. You will get the opportunity to take the tympanic temperature of one of your peers during the general examination, session 2.
The normal range of body temperature is 36°C to 37.5°C. It is good practice when assessing a patient to record the temperature as it is a vital sign and sequential recording may show a pattern which can be helpful in diagnosing clinical conditions. A high temperature may be caused by infection or lymphoma. A low temperature <35°C is known as hypothermia and can be caused by cold exposure (e.g. in a near drowning incident).
The other chart you will see is the Nutrition Screening Chart and this is where the patient’s weight in kg would be documented and the BMI. You will learn more about the MUST(Malnutrition Universal Screening Tool)Score in your lectures.

12
Generalinspectionofthepatient
using your senses Sometimes you will find that you are assessing information even before you see the patient e.g. if you smell or hear something abnormal. Some basic tools are required during the general examination, such as a pen torch and a wooden spatula to look in the mouth. There is a standard order used in clinical practice for examination: • Inspection (looking) • Palpation (feeling) • Percussion (tapping to assess the resonance of underlying tissues) • Auscultation (listening with a stethoscope)
In first term we will be concentrating on inspection and palpation when performing general examination. You will learn about both percussion and auscultation next term, when there will be numerous opportunities for practising these skills with patients during the respiratory system and cardiovascular systems teaching.
Inspection Inspection begins when you first encounter the patient. You will develop a habit of carefully seeking and observing features which may be of clinical importance. Even your initial handshake can convey information about a tremor, hand temperature or the emotional state of the patient.
The general clinical examination starts with an overview of the whole patient and then proceeds to the hands, the arms, the head, the neck, the anterior chest (necklace area) and finally the lower limbs. This inspection is described in detail below.
It is worth noting that although inspection mainly refers to things that are seen, it may also include smell and hearing. You will hear doctors say that they “observed” that the patient smelled of alcohol or urine or had halitosis. Later you will learn about some specific conditions that give characteristic smells. You may also say that you “observed” that the patient had noisy breathing (e.g. stridor or wheeze) or had a clicking knee.
Continuing from your initial assessment of the patient and any informal observations you may have already made, combined with inspection of the patient’s environment (see above) you should consider the following:
• Patient’s behaviour e.g. facial expressions may reflect mood, pain or anxiety • The patient’s conscious level (you will learn a basic assessment of this using the AVPU scale during the First Aid course) • Any obvious pain or discomfort • Any signs of distress e.g. fast respiratory rate or distressing cough • Nutritional status - Extremes of cachexia or obesity • Build - Obvious body proportion abnormalities (very short/tall or other obvious abnormalities)
Skin abnormalities Look at the exposed skin for: • Excessive sweating • Pallor • Jaundice • Abnormal pigmentation • Rashes • Hydration (or dehydration) you will gather more information on this later in the examination.
Support devices You may notice that any of these are attached to or around the patient: • Oxygen mask • Nasal tube • Intravenous infusion (a drip) • Monitoring devices e.g. cardiac rhythm monitoring • Evidence of vomiting or coughing up sputum – Vomit bowl or sputum pot • Medication devices e.g. inhaler, nebuliser The following are some important principles to learn and apply when performing a clinical
examination of a patient

13
Patient positioningAfter you have finished with your initial inspection, and it seems that there is no problem with moving the patient (e.g. due to pain) there is a correct position that will allow optimal examination of the patient and usually provides best patient comfort. This position places the patient semi-reclined at an angle of 45°. Later in the course you will be examining other systems of the body which will require different positioning of the patient.
Patient exposure You will need to expose the necessary parts of the body required for your examination whilst maintaining modesty. It is professional to only expose the body areas that you are currently examining. The rest of the patient’s body should be kept covered to avoid embarrassment and to keep the patient warm. Ideally the patient should undress themselves to retain their dignity, but if they are having difficulty or are unable to do so, you should offer to help as required.
Your position for performing a clinical examinationGenerally, you should examine patients from the right side of the bed if this is possible. This is mainly a convention but it is a strong one and to date is an expectation during most professional clinical examinations. However, if you are unable to perform a competent examination from the right side of the bed (e.g. because of patient obesity or it may cause harm to your back) it is acceptable to perform the examination from the left side. Students who are left handed should learn how to examine from the patient’s right side if at all possible. This may seem strange to begin with but will become second-nature in time.
Comparing sides Always compare both sides of the body, where there are paired organs or paired parts e.g. hands or arms. This will help you identify unilateral abnormalities e.g. a patient who complains of pain in their right wrist after a fall and on examination you find that wrist is swollen and deformed in comparison with the left side.
You may now proceed with your general examination of the patient as follows. For each area you should examine we have provided some examples of conditions which may produce changes in this area. We will return to many of these during the systems course, but they are listed here to allow you to understand the potential value of general examination.
Examination of the hands
This involves both inspection and palpation. As hands are very visible parts of the body, you may already have noticed people in the community with hand abnormalities. Hands may reveal signs of disease and provide information about the patient e.g.) tar-staining of the fingers (from cigarette smoking) or calluses on the hands of someone who performs a manual job.
During your examination of the hands, look for: • tremors: although tremors can be seen elsewhere, they are often most obvious in the hands. • the shape and contours of the hand – muscle-wasting or arthritis can change the shape of the hands. inspectionofthefingersCapillary beds are visible beneath the finger (and toe) nails - the nail bed. Look at your own nail bed and assess what is normal. Subtle changes in nail colour can be more easily seen by comparing them with your own nails in the same ambient temperature and light. • Where the nail bed is excessively pale this may be due to the blood vessels being vasoconstricted as occurs in shock (this is what you
are checking when you assess capillary refill as described in the First Aid course). Excessive pallor may also be noticed in an anaemic patient.
• In some patients the nail beds can have a blueish tinge. This is called cyanosis and indicates that the blood is inadequately oxygenated. You will hear more about this during the Respiratory and Cardiovascular system next term.
• leuconychia is a condition which causes the nails themselves to go white. This can result from an injury to the base of the nail (this is the most common reason) but occasionally this can be a sign of an underlying medical condition and so it should be noted.
• Splinter haemorrhages are small areas of bleeding under the finger nail and look like narrow red or reddish brown lines under the nail – just like a splinter. They may be due to trauma but can be a sign of a condition of the heart called infective endocarditis or problems with the body’s blood vessels.
• Nail shape and texture can be altered in certain conditions. For example the spoon shaped nails (koilonychia) of iron deficiency anaemia. The surface of the nail may be pitted in psoriasis.
• Clubbing of fingers is indicative of a number of respiratory, cardiovascular and other system conditions which will be covered in more detail in those clinical blocks.
• You may notice swelling over the different joints of the fingers. Depending on where these are they may point towards certain specific diagnoses. Heberden’s nodes for instance occur at the distal interphalangeal joints (joints between the bones of the fingers) and suggest osteoarthritis.
• Deformities of hand joints also tend to be specific. For example, ulnar deviation particularly of the metacar-pophalangeal joints (joints between the bones of the palm of the hand and the fingers) indicates rheumatoid arthritis.
Inspection of the palms • You may see signs of illness on inspection of a patient’s palms. Normally due to the blood flow through the superficial capillaries
of the palms, they appear pink and usually the palm is quite dry. Look at your own palms and the palms of others to learn what the normal shape, range of colour, temperature and dryness is. This is important so that you can recognise when you have found a sign of an abnormality.

14
Colour• Very bright red warm palms (known as palmar erythema) can indicate a number of different clinical problems. Generally the increase
in colour and temperature is due to increased blood flowing through the palms. This can be due to retention of carbon dioxide (found in a number of respiratory disorders which you will learn about next term), hyperthyroidism or even normally in pregnancy.
• Abnormally pale palms may be present if there is a very reduced blood supply to this area or where there is anaemia. Such reduced blood supply could be due to a local problem with the blood vessels to the hand, but this would result in only one palm being pale. It is more common to find that both are pale due to constriction of the blood vessels (known as vasoconstriction) to the body peripheries in general. The body may do this to preserve blood supply for vital organs in shock or to maintain body temperature in very cold conditions.
• Where you have noted cyanosis (the blue tinge) at the nail beds you may also notice this in the palms. • Palmar creases are usually pink in fair-skinned people but may darken with certain hormonal conditions such as Addison’s disease.
Dark-skinned people may have very dark palmar creases in normality. Compare these with your own if you have the same skin colouring as the patient. N.B. you may only really be able to do this when you palpate the palms as the creases are best seen by stretching the skin. They may be pale in anaemia or hyperpigmented in Addison’s disease
Sweating Some people have increased sweating of their palms all the time and this may be visible.
Shape• A thickening and shortening (of the palmar fascia) may cause a ‘contracture’ e.g. Dupuytren’s contracture • Muscle wasting of the thenar & hypothenar eminences may be visible when you compare the two hands.
Where you have noted any changes in shape during your inspection, palpation will help you confirm this and help you describe your findings accurately.
Tremor Before moving on from hand examination to the arms you should check for tremor. Although you may have already noticed a tremor at rest during your initial inspection, there are some tremors which will not be obvious without formal testing. If a tremor is present it will usually be most exaggerated and therefore most visible if the hands and arms are outstretched. You should consider how to describe the tremor. Is it fine or coarse? One particular type of tremor is the flapping tremor. This is tested by asking the patient to extend the arms and to extend the wrists (bend the hands backwards at the wrists). The arms must be kept extended for at least 15 seconds for this type of tremor to become evident.
Palpationofthepalmsandfingers
• Feel the temperature of the skin of the palms – can you think why someone’s hands might be cold or why they might be very warm? • Palpate and move the patient’s fingers. Consider whether the joints move normally – note any pain on movement or restriction of
range of movement? Note any areas of temperature difference e.g.) over swollen joints. • If there are any swellings on the fingers, palpate carefully and gently to discern the shape and consistency of any swelling/any pain
or tenderness • Assesses the capillary refill time as described in your First Aid handbook.
Assessing the pulse rate
The pulse rate is the number of beats of the heart per minute. Often this is measured following examination of the hands. You will find it on the radial (thumb) side of the wrist about a centimetre superior (proximal) to the wrist flexion crease. It is acceptable to save time by carefully counting for 15 seconds and multiplying by 4.
Examination of the arms
The arms are easily accessible and their normal shape and range of movement will be familiar to you. This will help you evaluate for abnormalities. As with the hands, careful inspection of the arms can lead to the observation of important signs of pathology both due to a problem in the arm itself or a problem which might affect the whole body. Comparing the right and left arms will help you decide if the shape is abnormal or not. Some examples of where careful examination of the arms may provide the first clue that the patient has a general health problem are listed below:
• Self-harming is most often seen on the arms, most commonly of the non-dominant arm. • “Tracking” or vein damage due to intravenous drug abuse. • You may have already considered that the patient is dehydrated from your initial assessment but is worth formally confirming or
refuting this by pinching up the skin on the forearm to see how long it takes to return to normal. This is a measure of skin turgor. Be careful not to hurt the patient or damage fragile skin in an elderly patient.
Examination of the Face
Again, the face is easily accessible and we are all familiar with the range of normal shapes and the ways that the face will normally move. Sometimes you will notice abnormalities in the face during your first initial assessment. When you are describing an abnormal feature of the face in medical practice the term facies is often used. We have provided some examples below: • Look for excessive hair (in females) or scalp hair loss. These may be signs of hormonal disorders. • Look for changes of shape, particularly swelling or puffiness of the whole or part of the face.

15
Specific facies are suggestive of certain conditions. For example, a face dominated by protrusion of the eyes from their sockets (orbits) is suggestive of a thyroid disorder called Graves’ disease. Very coarse thickened and enlarged features in an adult may suggest a disease known as acromegaly. These conditions will be taught in more detail in the Year 2-Diabetes/Endocrine block. Mitral stenosis, a heart valve condition, can give a characteristic reddening to the cheeks known as a malar flush or malar facies. There are some pictures in Macleod’s Clinical Examination, Chapter 3 of some of these disorders.
Ears Abnormalities of the ears can provide helpful signs of disease. Perhaps the most common abnormality of shape of the ears is when they are thought to be markedly protruding. This is known as ‘bat ears’. Gout can cause hard nodules called tophi in various part of the body and may occasionally be seen on the ear.
Eyes The eyes have a number of features which lend themselves to revealing clinical signs of general disease rather than just problems with the eye itself. Some examples are provided below: • Jaundice is often seen as a yellow discolouration of the normally clear white area (sclera) of the eye. • Myasthenia Gravis, a condition which leads to problems with muscle contraction, may lead to drooping of the eyelids (ptosis). You may
have noticed adverts in the community about this condition showing the signs in the eyes and face which can occur in this condition. • Any lack of symmetry in the shape or size of pupils is important and should be noted. You may have discovered the first sign of a lesion
on one side of the brain or of the nerves to the eye itself.
The conjunctivae of the eye have a profusion of capillaries in a transparent tissue background and so this may become noticeably pale in anaemia. Viewing the conjunctivae requires palpation to allow inspection of the (usually lower) eyelids.
Mouth Examination of the mouth involves both inspection and palpation. To clearly examine the mouth you will need to use your pen torch to give you a good light. You will also need to learn to use the wooden spatula (tongue depressor) to help you see the back of the tongue and the throat (pharynx). It is important to learn to do this effectively without hurting the patient. Asking the patient to keep their tongue in their mouth and to say ‘Ah’ often helps you see the back of the throat without using the spatula. Some examples of classic problems which may be noted when looking at the mouth are given below: • Central cyanosis because of the excellent blood supply to the lips and tongue, if cyanosis is present, it may be seen here. • Fissuring at the angles of the mouth is commonly referred to as angular stomatitis and may indicate an iron deficiency. This may
result in anaemia and so would prompt you to look for other signs of anaemia. • Looking inside the mouth you may see enlargement or ulceration of the tonsils (these are the palatine tonsils - there are other
tonsils you will learn about in your anatomy teaching later) on the sides the back the mouth. • Many medical conditions have manifestations inside the mouth, such as thrush (Candida infection) in patients who are immunosup-
pressed, abnormal pigmentation or ulceration. The state of dentition (teeth and gums) is also a useful sign of general health or disease. Gum margin swelling may indicate disease or be a side-effect of certain drugs.
• The tongue may appear very dry in dehydration, but may also be dry in a patient who is mouth breathing due to blocked nasal pas-sages. Ask the patient if they feel thirsty, as well as having a dry mouth to help you clarify this.
• The texture of the tongue may be altered in some medical conditions with fissuring or furring, while it may be abnormally smooth in others.
Examination of the mouth will be covered again in Year 2 of your course during The Head and Neck teaching block.
Examination of the lymph nodes
Lymph nodes are normally small, non-tender and mobile in most healthy patients, but they may become enlarged due to infection or malignancy. The infection or malignancy may be in the lymph nodes themselves but may also be situated at a distance from the lymph node and for this reason you will learn about the lymphatic drainage through different groups of lymph nodes for each of the major organs of the body when you study anatomy in more depth. Here we will only provide an introduction to the examination of the lymph nodes in the neck and under the chin. These nodes are most easily examined from behind the patient. The names of the groups of lymph nodes we will teach you to feel for this term are the: • Supraclavicular including the scalene nodes • Deep cervical chain including the tonsillar node • Submandibular lymph nodes • Post auricular lymph nodes • Lymph nodes of the posterior triangle of the neck
You will have further opportunities to perform clinical examination of the cervical lymph nodes in Term 2, during the Respiratory System and then again in Year 2, during the Alimentary and Head and Neck teaching blocks.
Examination of the anterior area of the chest
It is convenient to include examination of the upper part of the chest wall (the necklace area) in a general examination. N.B. some textbooks refer to examination of the breasts in a general examination but you will learn about this much later in your course.
Inspection of the skin on the anterior chest may reveal skin lesions which may cause the patient no concern but can indicate underlying disease. Signs such as spider naevi and benign haemangiomas referred to as Campbell de Morgan spots may be seen. Gynaecomastia may be visible on inspection of some males even without exposure of the chest. This may be present in obesity or indicate hormonal conditions or drug side effects.

16
Examination of the lower limbs and ankles
The legs will show some of the same features as the arms, but may also reveal some different signs of pathology. Some of these are due to the increased effect that gravity has on the legs. A good example of this is a particular type of swelling called oedema (due to excess fluid in the tissues) which is noticeable in the most dependent parts of the body. Other signs are due to the longer blood vessels that can become compromised in certain conditions e.g. varicose veins are most commonly found in the legs and occur due to failure of the valves in the (long) leg veins.
Inspection of the legs
On inspecting the legs compare the two sides for the health of the skin (including colour) as you may find signs of chronically poor circulation. This is often seen in the legs rather than the hands. The signs may include: • Smooth skin & loss of hair • Ulceration • Gangrene or infection
Palpation of the legs
Palpation of the legs, again comparing sides, may help confirm some of the features suggested by your inspection. An ischaemic leg (ischaemic = inadequate blood supply) may be colder than normal and you may become aware of hair loss by feeling as well as looking.
If you suspect that there is oedema, you can test this by pressing the skin firmly for a few seconds (not so firmly that you hurt the patient) and then removing your finger or thumb and seeing if there is an indentation left. This is known as pitting oedema and may indicate inadequate lymphatic drainage, fluid retention or cardiac failure. As the oedema collects mainly in the most dependent part of the body, this will be seen in the ankles in ambulant patients but in the lower back (sacral oedema) in patients who have spent considerable time in bed.
Examination of the Feet
It is important to compare both sides and look at the overall shape of the feet for deformities. Club foot (talipes) is a congenital deformity, whilst some other deformities develop during life, perhaps due to poor footwear e.g. bunions or corns. Look for joint swelling as you did in the hands. Infection or inflammation will be suggested by warmer reddened areas which may also be swollen and tender. Capillary refill time can be checked on the nail-beds of the toes as well as on the fingers (but this is less commonly done in adults as there may be problems due to chronic poor vascular disease in older patients).
Finishing your examination
After finishing your examination, indicate clearly to the patient that you have finished. Thank the patient for their co-operation and inform them that they may get dressed. Allow them to re-dress in private and only offer to help if they are having difficulty.

17
WorkSHeetForSeSSion2-tHeGenerAlexAMinAtion
Generalintroduction
• Clean your hands • Introduce yourself to the patient by name and status • Ask for the patient’s name and date of birth • Check these details with the patients ID band(s) or charts • Explain to the patient that you would like to examine them and explain what the examination will entail • Obtain verbal consent from the patient that it is alright to continue • Ask the patient to remove the necessary clothes to expose the relevant parts of their body • Position the patient correctly
Initial Assessment
Is this patient requiring immediate intervention or are they well enough to continue with a general examination?
• Conscious level – alert or drowsy? • Is this patient distressed e.g. with breathing difficulty or pain? • Assess the nutritional status of the patient (may check charts) • Inspect the environment around the patient for evidence of medical equipment e.g. oxygen mask and tubing, vomit bowl or inhalers
Generalinspection
• Check the patient’s charts for temperature, pulse rate, respiratory rate • Behaviour - does the patient appear e.g. relaxed, anxious, withdrawn or confused? • Build - overweight, obese, muscular, thin, underweight • Skin - sweating, pale, jaundiced, rashes, hydration status
Examination: hands
Palpate the right radial pulse and measure the pulse rate by counting for 15 seconds (multiply by 4 for rate/min).
Inspect the palms and dorsal aspects of both hands, comparing right with left• Colour – e.g. tar staining of fingers • Palms – colour of palmar creases & evidence of palmar erythema • Shape of joints – are there deformities or swollen areas? • Nails – look for splinter haemorrhages, koilonychia, leuconychia (compare the nailbed colour with your own), signs of finger clubbing • Contractures (e.g. Dupuytren’s) • Muscle wasting • Tremor – fine, coarse, flapping
Palpate the hands • Temperature • Consistency of any swelling(s)• Stretch the palmar creases • Are the joints mobile? • Check capillary refill time
Examination: Arms
Inspect both arms for evidence of: • Joint deformity • Tattoos or bruising • Self – harming scars or wounds • Venous damage due to intravenous drug use or medical intervention • Assess skin turgor on forearm

18
Examination: Face
Inspect for: • Overall appearance including facial symmetry, colour and hair distribution • Specificfacies e.g. malar flush (of mitral stenosis) or the coarse facial features (of acromegaly) • Ears – inspect both for shape and localised swelling • Eyes – inspect for unequal pupils and yellow jaundiced sclerae Note eyelid position & asymmetry. Examine both conjunctivae • lips – note the colour and note presence/absence of angular stomatitis • Buccal mucosa – use a pen torch to visualise any ulceration or pigmentation • Fauces – you may need a wooden spatula to examine the tonsils • Gummargins – note any swelling and general state of dentition • Tongue – note any abnormal colour (as in central cyanosis), surface texture and degree of moistness.
Examination of Neck lymph Nodes
• Remember to examine the cervical nodes from behind the patient • Start with the supraclavicular (including scalene) nodes, then the deep cervical chain, submandibular, post auricular and finally the
posterior triangle of neck
Examination of Anterior Chest Area
• Inspect and palpate any skin lesions to see if they blanche e.g. spider naevi • Check for gynaecomastia (in male patients)
Examination: lower limbs
Inspect both lower legs for: • Skin – colour, hair distribution, evidence of ulceration or varicose veins • Palpate the temperature of both lower legs • Swelling – examine for pitting oedema
Inspect and palpate the feet for: • Deformities e.g. talipes or hallux valgus (remember to look at the soles of feet as well) • Note any joint swelling, skin thickening and inspect movement of the toes
Closure
• Let the patient know you have finished the examination • Thank the patient and give them privacy to re dress • cleanyourhands
Taking a Tympanic Temperature
You can practise taking the temperature of one of your peers in this session as there is only a limited supply of tympanic thermometers.
1. Clean your hands2. Introduce yourself to the patient and check patient identity.3. Explain to the patient that you are going to take their temperature by placing a thermometer in their ear canal.4. Ask the patient if they have any pain in their ears and obtain patient consent.5. Inspect the ear canal for obvious wax.6. Switch the thermometer on and check the screen displays °C and ORL next to person icon7. Press the probe tip into a probe cover and twist.8. Insert the probe gently into the ear canal.9. Press the button and wait for the thermometer to bleep.10. Remove thermometer from the ear and record the thermometer 11. Dispose of thermometer disposable tip in an orange coloured clinical waste bag.12. Clean your hands if moving on to see another patient.

19
SeSSion3:introDuctiontoclinicAlMetHoD(HiStory-tAkinG,exAMinAtionANd dOCuMENTATION) Aim: The aim of this session is to introduce you to combining some of the clinical skills you have developed into a basic clinical method framework.
Objectives: After this session students should be able to: • Understand and be able to describe how simple elements of history and examination can be combined in a framework to assess a
patient• Combine simple elements of history-taking and examination in a clinical consultation with a simulated / volunteer patient • Document their findings to allow another healthcare professional to share awareness of the student’s findings during the consultation.
Session Outline
This is the first opportunity you will have to combine some elements of history-taking and examination and then to document your findings. You will find it helpful to review all the materials that you have worked on during Session 1 and Session 2 this term. Remember to bring your copy of this workbook to this session so that you can refer to the examination worksheet.
The session will last one hour and the practical work will be carried out in pairs with the help of a simulated patient.
The session will commence with an introductory power point presentation. You will be asked to focus your history taking on the Presenting Complaint, the Family History and the Social History. You will then perform a general examination on the simulated patient and document your history and examination findings. You will be provided with documentation sheets at the start of the session.
1. Introduction / overview of the session 2. The first student of each pair will take a brief history from a simulated patient and then perform a general examination on the
same patient. The student should then document their clinical findings. They will be observed and prompted if necessary by their colleague.
3. The second student from each pair will then do the same on a different simulated patient. 4. Students will feedback to each other.5. Whole group feedback.

20
WorkSHeetForGenerAlexAMinAtion-FocMSeSSionWorkSHeet(TErM 1, YEAr 1)
Patient’s details:
history Taking:
Presenting Complaint:
Patient’s perspective
Family history:
Social history:
Generalexamination:
environment&charts:
Generalinspection:
Examination:
Your details:

21
INTrOduCTION TO TErM 2 In term one of your course we introduced you to the concept of clinical method. Clinical method is the term used to describe the skills and the way in which these skills are used to obtain information from a patient in order to make a diagnosis. The skills are often divided into clinical communication, clinical examination and procedural skills. During term one you began to learn these communication and examination skills and in the final foundations of clinical method session you put these together and took a short history and performed a general examination on a patient for the first time. You also documented your findings for the first time on a worksheet which was designed for that purpose. You also attended a course in First Aid where you learned about the ABCD approach to assessment and management of patients with emergency conditions and you made your first diagnosis and instituted management (diagnosed a cardiac arrest and started basic life support).
All of this learning took place in a simulated environment in the Suttie Centre with the help of simulated and volunteer patients. This term sees the beginning of the systems course, during which you will learn about each of the systems of the body. This term will focus on the respiratory and cardiovascular systems. The foundations of clinical method course will also focus on these systems with clinical communication and examination sessions for each of these systems.
During this term you will start seeing real patients in acute clinical settings. In this setting you will be given the opportunity to practise integrating your clinical communication and examination skills. Often students are unsure of what is expected of them when they first go into a clinical setting so there will be a lecture and a tutorial session specifically designed to help you with this.
The first part of the Term 2 part of this handbook deals with clinical communication while the second part explores clinical examination.
FOuNdATIONS OF ClINICAl METhOd: ClINICAl COMMuNICATION Introduction
The tutorial ground rules include confidentiality, constructive feedback and everyone having the right to speak and be heard. There is the expectation that students - • are punctual • contribute to the tutorials • come prepared for the tutorials • read the Clinical Method handbook • bring their handbook to all tutorials. The course teaching methods include students generating ideas, observation and analysis of material, written exercises and skills practice with fellow students, simulated patients and real patients.
respiratory Block - 4 Tutorials
AimsRespiratory blockThe aims of this block of 4 tutorials are for students to develop –• practical history taking interview skills • a working knowledge of respiratory systems based questions• an appreciation of the importance of a structured patient-centred style of information gathering taking interview
ObjectivesOn completion of this block of tutorials students should be able to –• take a respiratory history• demonstrate the use of key process skills in a patient centred history taking interview• use appropriate questioning techniques• identify skills for taking ward based histories• consider the need to document patient cases
CVS block
AimsThe aims of this block of 3 tutorials are for students to develop –• practical history taking interview skills • an appreciation of the importance of a structured patient-centred style of history taking interview • a working knowledge of cardiovascular systems based questions• skills in forming a differential diagnosis• an appreciation of the skills needed to document a case
ObjectivesOn completion of this block of tutorials students should be able to –• take a cardiovascular history• develop more advanced questioning techniques• elicit patient concerns and perspectives• consider how to construct a differential diagnosis• develop skills in documenting and presenting patient case histories
22
Introduction
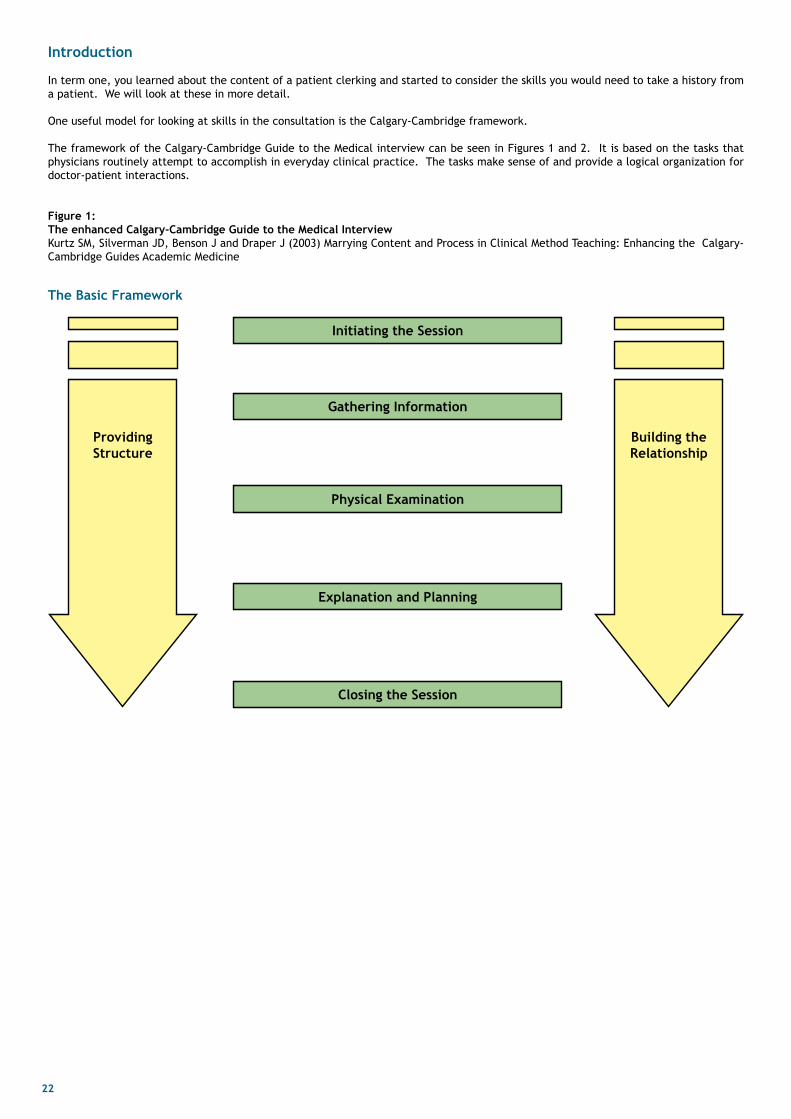
In term one, you learned about the content of a patient clerking and started to consider the skills you would need to take a history from a patient. We will look at these in more detail.
One useful model for looking at skills in the consultation is the Calgary-Cambridge framework.
The framework of the Calgary-Cambridge Guide to the Medical interview can be seen in Figures 1 and 2. It is based on the tasks that physicians routinely attempt to accomplish in everyday clinical practice. The tasks make sense of and provide a logical organization for doctor-patient interactions.
Figure 1: theenhancedcalgary-cambridgeGuidetotheMedicalinterviewKurtz SM, Silverman JD, Benson J and Draper J (2003) Marrying Content and Process in Clinical Method Teaching: Enhancing the Calgary-Cambridge Guides Academic Medicine
Initiating the Session
Closing the Session
Explanation and Planning
Physical Examination
Gatheringinformation
Providing Structure
Building the relationship
The Basic Framework

23
Figure 2:If we line up the Calgary-Cambridge model alongside the traditional clerking model, we can see that history taking equates with gathering information. In particular, the presenting complaint and history of presenting complaint look at the biomedical and patient’s perspective, with the context containing the past medical history, drug and allergy history, family history and social history.
Initiating the Session
Closing the Session
Explanation and Planning
Physical Examination
GatheringinformationProviding Structure
• making organisation overt
• attending to flow
Building the relationship
• using appropriate non-verbal behaviour
• developing
rapport
• involving the patient
The Expanded Framework
• preperation• establishing initial rapprt• identifying the reason(s) for the consultation
• exploration of the patient’s problems to discover the:□ biomedical perspective □ the patient’s perspective
□ background information - context
• providing the correct amount and type of information• aiding accurate recall and understanding• achieving a shared understanding: incorporating the
patient’s illness framework• planning: shared decision making
• ensuring appropriate point of closure• forward planning
Process
Initiating the session
GatheringinformationBiomedical perspectivePatient’s perspective
Background information
Content
Introduction
historyHistory of presenting
complaintPast medical history
Drug and allergy

24
Initiating the consultation/building the relationship
Remind yourself about how to introduce yourself and the important factors in making the patient comfortable in talking to you. This is important for patient safety.
Building the relationship - rapport Rapport is a term which encompasses the following: • Accepting and acknowledging the patient’s views and feelings. • Demonstrating empathy and support by expressing concern, understanding and a willingness to help. • Understanding the patient’s predicament or feelings by listening to the patient’s ideas, concerns and expectations. • Creating an environment which facilitates disclosure of vital details, and the identification of non-verbal cues and messages. • Communicating that understanding back to the patient in a supportive way, by use of non-verbal skills and dealing sensitively with
any embarrassing or disturbing topics.
Creating rapport, or building a relationship, is not a stage in the consultation per se, rather it runs throughout the whole process. It depends on not just which consultation skills are used, but how they are used. If you are grumpy, half-hearted or “switched-off”, then a relationship will be difficult to establish even if you use all the recommended consultation skills. Sometimes it will just not work, you will not gel with a patient no matter how hard you try! However, if you listen carefully, question sensitively, negotiate co-operatively and show understanding, you should have done enough to lay the foundations of rapport. If rapport does not develop for whatever reason, don’t get too hung up on it, try to develop it with the patient over a series of consulta-tions (where possible).
There is good evidence that creating rapport / building a relationship makes a difference to the medical interview. Some examples are given in the box.
Korsch, Gozzi and Francis (1968) – found that both satisfaction and compliance with the consultation were reduced if the doctor demonstrated lack of warmth and friendliness, failed to take parents concerns and expectations into account, used jargon and didn’t clearly explain diagnosis and causation.
Little et al. (1997) - found that patient satisfaction with the consultation predicted the duration of the illness and was strongly related to how well the doctor dealt with the patients concerns.
Buller and Buller (1987) - described two differing styles of doctor behaviour; one demonstrating friendliness, empathy, interest, attentiveness, being non-judgmental etc; the other demonstrating more doctor power, authority, status. Patient satisfaction ratings were significantly higher in the former.
Bertakis, Roter and Putman (1991) – found that patients were much more satisfied and found it easier to disclose information, particularly of a psychosocial nature when there was an absence of doctor dominance and the presence of friendliness and interest.
Gatheringtheinformation-theopeningquestionYou should identify the problems or issues that the patient wishes to address using an opening question.
In general practice or an outpatient clinic this may be: “How can I help you today?” In hospital practice, this may be “Can you tell me what has brought you to see me today?” or “What seems to be the problem?”
After asking the opening question you should listen to the patient’s opening statement without interrupting or directing the patient’s response. This is a critical point as research shows that you may miss vital information by interrupting the patient too early. Hint: In the majority of cases, patients will tell you what they want to within the first minute.
Questioning How you question patients is the key to collecting information from them on clinical matters, what they want from you, what type of management would be acceptable to them, what their concerns may be? As mentioned above (and demonstrated later), some types of questions are generally not effective, while others are better. You need to remember, however, that different types of questions may be appropriate at different times in the consultation.
Closed questions are those that tend to limit the patient’s range of responses while open questions tend to allow the patient more scope in choosing their answer. The “open-to-closed” cone (Goldberg et al., 1983), suggests that starting with open questions and moving to closed ones, is a good method. The doctor uses open questioning techniques first to obtain a picture of the problem from the patient’s perspective. Later, questioning becomes more focused with more specific questions to elicit details. A common mistake is to move to closed questioning too soon. However, there is loss of significant (often negative) information without the use of closed questions.
In other words, most research has indicated that the best way to carry out a consultation is to allow patients to express their concerns in their own words initially, then move towards systematic and detailed probing and questioning as the consultation progresses.
Open questioning methods: • Encourage the patient to tell their story in a more complete fashion. • Prevent the stab-in-the-dark approach of closed questioning. • Allow the doctor more time and space to listen and think and not just ask the next question. • Contribute to more effective diagnostic reasoning. • Help in the exploration of both the disease and illness frameworks. • Set a pattern of patient participation rather than physician domination.

25
Closed questioning methods: • Allow investigation of specific areas which may not emerge from the patient’s account. • Allow analysis of symptoms in detail. • Allow functional enquiry related to parts of the patient’s account. • Allows clarification or checking if you are uncertain or unclear as to what the patient may be referring. Some evidence for the value of open and closed questioning methods are noted in the box.
Roter & Hall (1987) - found that open questions prompted the revelation of substantially more relevant information than closed ones.
Stiles et al. (1979) - showed that patients were more satisfied with the information gathering phase of the interview if they were allowed to express themselves in their own words rather than provide yes/no or one-word answers to closed questions.
Goldberg et al. (1983) – found that family practice resident’s ability to detect emotional and psychiatric problems was related to open-closed cone and open directive questions rather than closed questions.
Maguire et al. (1996) – showed that cancer patients disclose more of their significant concerns if their doctors use open rather than leading questions.
leading questions Leading questions are those which guide the other person’s answer. A leading question is a question which subtly prompts the respondent to answer in a particular way. Leading questions are generally undesirable as they result in false or slanted information. For example:
Do you get on well with your boss? This question prompts the person to question their employment relationship. In a very subtle way it raises the prospect that maybe they don’t get on with their boss.
Tell me about your relationship with your boss. This question does not seek any judgment and there is less implication that there might be something wrong with the relationship.
Leading questions include the answer, point the listener in the right direction or include some form or carrot or stick to send them to the ‘right’ answer.
The term comes from law, where the courts insist that questions that suggest answers are not asked because they restrict the right of witnesses to speak freely.
Assumptive questions Leading questions can be assumptive, for example by moving the subject of the sentence:
“How bad is the pain?”
This assumes that the patient is in pain - the subject of the question is about pain. This question would be perfectly acceptable if you had first asked the patient if they had any pain, and they had answered yes, but not if you just assumed they were in pain without checking first.
Leading questions can also be presumptive – where you presume you know how the patient will respond:
“I’m sure you would prefer x treatment, wouldn’t you?”
It is a very brave and alert patient who would not automatically respond to being led, and who would say
“Actually, Dr, no, I would prefer y.”
linked statements You can lead questions by association, by what you said previously and are still in the mind of the person being questioned. For example:
“Would you prefer a general anaesthetic or a spinal, which has fewer side effects?”
Note that the advantages of a general anaesthetic are not mentioned (and there must be some or it would not be offered), but the link of fewer side effects with a spinal make it more desirable.
Ask for agreement A very direct leading question is where they are closed questions that clearly ask for agreement, making it easier for the other person to say ‘yes’ than ‘no’.
“Do you agree that this is the best way forward with treatment?” “Are you feeling better now?”
There is some evidence that children are particularly susceptible to leading questions. Studies have shown that children are very attuned to taking cues from adults and tailoring their answers based on the way questions are worded – so if you are working in Paediatrics, be especially careful with how you phrase questions!

26
exercise–unhelpfulquestions
What makes a question unhelpful? Q1) You didn’t really think you had cancer did you? If UNHELPFUL, why? Alternative
Q2) Is she being a good baby? If UNHELPFUL, why? Alternative
Q3) Is the pain sharp or does it come and go from time to time? If UNHELPFUL, why? Alternative
Q4) Are you promiscuous? If UNHELPFUL, why? Alternative
Q5) As an intelligent person I would assume that you didn’t have trouble following the instructions. Did you? If UNHELPFUL, why? Alternative
Q6) I am pleased to tell you, you are pregnant! If UNHELPFUL, why? Alternative
Q7) I’m sure you weren’t stupid enough to drink alcohol when you were taking the tablets, were you? If UNHELPFUL, why? Alternative

27
Q8) There, that didn’t hurt too much, did it? If UNHELPFUL, why? Alternative
Q9) Have you been losing weight or appetite and have you had the cough long? If UNHELPFUL, why? Alternative
Non-verbal communication Another important skill is the appropriate use of non-verbal communication.
Non-verbal communication has a number of facets: • Posture: sitting, standing, relaxed, erect • Proximity: use of space, physical distance between communicators • Touch: Handshake, pat, physical contact during physical examinations • Body movements: fidgeting, nodding head and leg movements, gestures. • Eyes: eye contact, gazing, staring • Vocal cues: pitch, rate, volume, rhythm, silence, pause, tone, affect, responsiveness • Use of time: overtime, later, early, rushed, relaxed, etc • Physical features: race, gender, clothes, grooming • Environmental cues: location, furniture, lighting, temperature
Non-verbal communication is the channel most effective for communicating our attitudes and emotions. Therefore it can strengthen verbal messages or contradict them. Although non-verbal communication operates at the edge of conscious awareness, it can be controlled. It can be used to help patients relax and become more attentive. We can affect others positively through our non-verbal communication but negative non-verbal communication can adversely impact on communication. Research has shown that non-verbal messages tend to override verbal ones when the two are inconsistent or contradictory (Koch, 1971).
You need to be aware of the patient’s non-verbal behaviour and you need to verify your interpretations of the patient’s non-verbal behaviour verbally (e.g. “You seem upset - would you like to talk about it?”). Be aware of your own non-verbal behaviour and control it if necessary.
A selection of research evidence showing that non-verbal communication makes a difference to the consultation is in the box.
Wasserman et al. (1984) - Having analysed the effect of supportive statements given to mothers during paediatric interviews, found that empathic statements e.g., encouragement such as acknowledging coping efforts, etc, resulted in a reduction in maternal concerns and an increase in the opinions mothers held of the clinicians.
Hall, Roter & Katz (1988) - described a meta-analysis of 41 independent studies which reported that patient satisfaction was related to such issues as the amount of information given by the doctor, more positive non-verbal behaviour, more social conversation and more partnership building.
Bertakis, Roter & Puttman (1991) - demonstrated that patients were much more satisfied and found it easier to disclose information, particularly of a psychosocial nature, when there was an absence of doctor dominance and the presence of friendliness and interest.
Active listening Obviously listening to the patient is critical in gathering information, but we need to make it clear to the patient that we are listening. Non-verbal communication – eye contact, facing the patient, leaning slightly towards the patient, nodding encouragement for them to continue to speak - can signal that we are listening, as can what is called “paralinguistic” communication - the “uh-huhs” and “mhms”. Using the patient’s own words, or repeating the last words they said (“…so that’s two weeks of poor sleep…”) also clearly shows the patient that you are listening, as does probing for more information about a particular point they have raised. Active listening is key to good history taking. It is a skill we will revisit as the course progresses through Years 1-3. Patient’s perspective As well as gathering information on the biomedical problem, it is important to gain an understanding of the patient’s perspective. This is important for several reasons. Firstly, being interested in what the patient thinks is part of building a relationship with the patient. Secondly, it provides vital information about the diagnosis and why the patient has consulted. Thirdly, it provides a good starting point for an explanation to the patient. The patient’s illness framework includes: • Ideas or beliefs (about causation or effect of illness, of health, etc). • Concerns (worries about what symptoms might mean). • Expectations (hopes of how the doctor might help). • Thoughts and feelings (emotions and cognitions that the illness induces). • Effects on life (the effect the illness has on day-to-day living).

28
Research has indicated that exploring the patient’s perspective effects outcome, satisfaction and compliance – this is summarised in the box.
Orth et al. (1987) - reduction of blood pressure was significantly greater in hypertensive patients who, during visits to the doctor, were allowed to express their health concerns in their own words without interruptions, as opposed to answering yes/no questions.
Roter et al. (1995) - RCT, training physicians in primary care in “problem-defining and emotion-handling skills” improved the detection and management of psychosocial problems and led to a reduction in the patients’ emotional distress for up to six months.
Brody & Miller (1986) looked at recovery from upper respiratory infectionsin patients attending a hospital walk-in clinic. Recovery was related to reduction in concerns after the visit and to patient satisfaction with the helpfulness of time spent discussing concerns.
Kravitz et al. (1994) - patients were significantly more satisfied if their prior expectations of help were fulfilled in the interview.
Eisenthal et al., (1979) - showed that if physicians did ask for patients’ expectations (how the patient hoped the doctor might help them) patients were more likely to feel satisfied and helped and they were also more likely to adhere to a negotiated treatment plan.
Using open questions, demonstrating empathy and summarising may lead to patient’s expressing their perspective. This may be all that is needed for you to gain this information. However, you may need to elicit the patient’s perspective in two further ways. It can be directly asked about:
“What do you think might be happening?” “Have you any ideas about this yourself?” “Is there anything specific you are worried about?” “What were you hoping we might be able to do for this?”
Alternatively, you can pick up on cues from the patient. This may be more comfortable for both doctor and patient. Cues may be verbal or non-verbal.
“You said you were worried that the pain might be something serious” “Did you have any particular concerns about what it might be?” “Am I right in thinking that you are upset about this?”
hidden agendaLevenstein et al (1986) introduced the concept of agendas as the key to understanding patients. They found that doctors failed to elicit 54% of patients’ reasons for consulting and 45% of their worries. Campion et al (1992) showed that social and emotional agendas are the most likely issues to be under-represented in the consultation. The patient’s agenda includes all the reasons for the encounter and encompasses patients’ ideas, concerns and expectations. Expectations include specific behaviour that patients would like to occur in the consultation and more general aspects concerning the interaction with the doctor.
What doctors both believe and do influences the expression of patients’ agendas. Doctors may overestimate the extent to which patients are primarily concerned with medical treatment rather than gaining information and support. Not only patients who present as overtly distressed are seeking support! Patients have many needs and when these are not voiced they cannot be addressed. It is up to you as the doctor to encourage the patient to give you information on both the overt reason for their visit and the more complex reasons. Keep in mind that research indicates that partial voicing of agendas can produce less effective consultations (Barry et al., 2000).
The classic scenario is for a patient to attend the doctor with a “ticket of admission”, a benign and possibly trivial complaint, which paves the way to introduce a more difficult and important item. The circumstances in which hidden agendas often arise are: • Areas of material gain - a sick note, a letter for Disabled Living Allowance. If you suspect this is happening, asking directly is often
simplest. • Embarrassing symptoms - anything to do with sexual matters. • Emotional matters - this may be difficult for the patient to put into words and there may be understandable reticence to talk about
strong feelings.• The patient may be worried about what the doctor might say – this centres on a wish not to be thought of as neurotic or time-wasting.
Be alert to the possibility of a hidden agenda when:• The presenting complaint appears particularly vague or trivial. • There are non-verbal cues such as poor eye contact, irritability, hesitation or emotional distress. • The patient is an infrequent attendee but presents with a trivial complaint which you might normally expect him or her to self- treat. • The patient seems reluctant to depart when you have dealt with the presenting issue.
All the skills needed to take a full and accurate history are useful in eliciting the patient’s worries and real reasons for consulting. Picking up on the patient’s non-verbal messages, listening, probing and giving the patient permission are extremely useful ways of getting their “hidden” or “unvoiced” agendas.
Hint: Remember that not all patients have a hidden agenda - probe where appropriate but back off if it is clear that, whether or not the patient has any unvoiced issues, they are not going to divulge them!

29
Internal summarising Let us assume that you have started the consultation well, and have used appropriate questioning techniques, you have listened to the patient and encouraged them to talk openly by using facilitative non-verbal and verbal behaviour. You are likely to have collected quite a lot of information on the clinical problem, the patient’s perspective on it, any concerns they might have about, for example, how their difficulties may impact on their work, and so on. Now is the time to summarise this information and feed it back to the patient.
There are advantages of doing this for the patient and the doctor:
For the patient: • It clearly demonstrates that you have been listening • Demonstrates that you are interested and care about getting things right. • Offers a collaborative approach to problem-solving. • Allows the patient to check your understanding and thoughts. • Gives the patients a chance to confirm or correct your interpretation. • Invites the patient to go further in explaining their thoughts. • Demonstrates your interest in the illness as well as the disease aspects of the story.
For the doctor: • Maximises accurate information gathering by allowing you to check and correct misconceptions. • Provides a space for you to review what you have already covered. • Allows you to order your thoughts and decide what to explore next. • Allows you to separate and consider both illness and disease. • Tells you whether you have “got it right” (by the patient’s response). • Giving and receiving feedback about the information gathered is crucial and allows the sender and receiver to establish mutually
common ground and progress.
You might do this in the following way: “Can I just check if I have understood you...Let me know if I have missed something.”
Signposting Signposting is used to make the progression from one section to another and explain the rationale for the next section. It makes explicit to the patient where the consultation is going and what to expect. It can be used to signal that you are interested in a all areas but cannot deal with them simultaneously – “You’ve mentioned three problems. If it’s alright with you, I’ll concentrate on each one in turn.” Levison et al (1997) showed that primary care physicians who used more signposting were less likely to have suffered malpractice claims.
using signposting ensures that: • The patient knows where the interview is going and why. • You can share your thoughts with the patient. • You can ask permission.
When to signpost? When moving from: • The introduction to the information collecting stage. • From open to closed questions, or into specifics about the patients concerns, etc. • Into different parts of the history. • Into the physical examination. • Into explanation and planning.
Accepting the patient’s perspective How we deal with the patient’s ideas, concerns and feelings is also critical. This should be with acceptance – a response which is non-judgemental and recognises that the patient’s perspective is legitimate. You are not saying that the patient is right, but that they have the right to their own view. The skills here are acknowledging the patient’s comments by restating or summarising them, acknowledging the patient’s right to feel that way, and allowing the patient to expand.
“So you are concerned that this might be cancer. I can understand that that is worrying for you. (pause)”
Closing/Introduction to the Physical Examination Once you have elicited the full history, you will be moving on to examination. This is a good point to signpost the rest of the consultation for the patient. It may also be an appropriate time for a short summary.
You should regard the examination as time where you can continue to build a relationship with the patient. Good rapport is as important as in taking the patient’s history. An introduction to the examination should explain what you are going to do.
“Let me just summarise my understanding so far… You’ve experienced pains in the centre of your chest, on and off, for about a month. These feel like something pressing on your chest and you feel out of breath with them. You’ve never had anything like this before and are concerned it may be your heart. Is that correct?
The next thing I’d like to do is have a listen to your heart and lungs. Then we can discuss what the problem might be and what we should do next. Is that alright with you?”
Clear communication with the patient is important in undertaking an examination. For many aspects of the examination you will be asking the patient to help you by performing various movements, etc. It is important that you describe what you want them to do clearly and concisely. For example:
“I’m going to listen to your chest now. Could you take some deep breaths, in and out through your mouth, please?”

30
While this is relatively straight-forward in the respiratory and cardiovascular systems, other systems require more complex instructions. You should take care with the words that you use, avoiding medical jargon and using appropriate professional language to describe body parts. With practice, you will find phrases which suit you.
It may be helpful to explain why you are undertaking aspects of examination. For instance, patients may wonder why you are examining their legs when they came with chest pain. By telling them that this is to check for pulses and any leg swelling, they will feel more involved in the consultation and more comfortable with what you are doing. This is particularly true for more intimate examinations, which will be dealt with specifically later in the course.
how to document a patient clerking
It is important that your clerking and subsequent notes are clearly, concisely and accurately documented in the medical notes. The clerking should include the history and examination findings as well as your differential diagnosis, plan of investigations and treatment. You are not expected to include these at this stage in the course.
You may wish to write things down while talking to the patient but you will find that you cannot concentrate on the patient and write the full clerking at the same time. You can take some notes, but you should not let this distract from active listening and should write up the patient notes after seeing the patient. Many hospital departments have set forms, but you should be able to document the clerking without using these (eventually). There is a balance to be struck between being concise and leaving out relevant (particularly negative) findings.
Below is a stylised hospital clerking and you should also look at those used locally. A template and example clerking sheet will be provided as a guide when you are asked to write up your findings during the tutorials.
Patient Clerking useful Tips
Patientidentification
Patient details
Name
dOB
date CONFIDENTIALITY - in student clerkings, patients should not be identifiable in case your notes/clerkings should become lost/mis-placed
history
Presenting Complaint A short sentence or two explaining why patient required hospital admission. Note whether emergency or elective admission.
history of Presenting Complaint A short, concise description of details of the presenting complaint. It can be useful to include actual language used by the patient - put this in quotation marks. Remember to also note relevant NEGATIVE history i.e. questions from the appropriate system.
Patient’s Perspective This is inserted here to remind you that collecting information on the patient’s perspective starts at the presenting complaint and continues throughout the history taking. At the end, check that as much as possible has been revealed about this
Previous Medical history A list of operations and illnesses requiring hospitalisation as well as any chronic illnesses in chronological order - most recent last. Any problems during the management of any previous illness.There may be NEGATIVE findings which are relevant and should be documented (e.g. no previous respiratory disease).
drug history and Allergies Current prescribed medicines - name, dose, how often they are taking (frequency), what it’s for (indication), how long they have been taking and any problems it is causing. You should also ask whether patients are taking any non-prescribed/over the counter (OTC) medicines or remedies. Remember the contraceptive pill and hormone replacement therapy. Illicit/recreational drugs as appropriate. Advisable to use CAPITAL letters for all medication to avoid any chance of misinterpretation. Accurate spelling is ESSENTIAL. Allergy documentation should include the drug/allergen and what happens

31
Family history Enquire about first-degree relatives and extended family if a strong history (is expected or revealed). Note whether family members are alive and well, or age and cause of death if deceased. Details of notable illnesses. Document NEGATIVE as well as positive family history of specific named disorders.
Social history SmokingAlcoholExerciseSocial circumstancesHousehold membersWork circumstancesHobbiesPetsOverseas travel
Check on Patient’s perspective If nothing yet revealed ask (for example):“Do you have any ideas on what could be the cause of the problem?” “Do you have any other worries/concerns about your condition? “What do you expect me to do/the outcome will be.
If some ICE have been revealed, summarise these and ask if that is correct.” You may add:“Is there anything more to add from your point of view?”
Systematic Enquiry:• General• Respiratory System• Cardiovascular System• Gastrointestinal System• Neurological System• Musculoskeletal System• Psychiatric
Document positive AND negative findings
Physical Examination
General Document positive and negative findings.If you don’t take the patient’s temperature yourself, look at the bedside chart and document the patient’s most recent tempera-ture.
respiratory System:Respiratory Rate – Cervical lymphadenopathy -Cyanosis, clubbing, tremor, sputumChest shape – Trachea – Expansion – Tactile vocal fremitus – Percussion note – Breath Sounds – Vocal resonance -
Mark zones containing clinical findings on Anterior and Posterior lung diagrams. Percussion note can be described as resonant, hyper-resonant, dull or stony dull. Breath sounds may be vesicular (normal) or bronchial. Note added sounds e.g. crackles, wheezes or rubs (e.g. pleural friction rub).
Cardiovascular System:Pulse – rate, rhythm, volume & characterJVP – BP –
Apex Beat –Heart sounds –Veins –Peripheral oedema -Peripheral pulses -
If you don’t measure the patient’s BP yourself, then look at the bedside chart and note down the most recent BP measurement.N.B. If the apex beat is not palpable - document this.
Useful to construct a simple table or diagram for peripheral pulses.
GastrointestinalSystem:Mouth/tongue/fauces/teeth
AbdomenOrgans –Masses -Bowel sounds –
Hernial orifices –External genitalia –PR -
You may wish to draw a diagram of the abdomen to show scars, masses or tender areas.You should note:DistensionScarsTenderness/guarding/reboundLiver/kidneys/spleen/bladder – palpation & percussionMassesAscitesBowel sounds

32
Neurological System:Conscious levelMini Mental Function Test (MMFT) (See this test below)Cranial nerves - I – XIIFundi - Upper and Lower Limbs Tone - Power - Co-ordination – ReflexesTendon reflexes of upper and lower limbs –Plantar responses -Sensation if appropriate
You may wish to show the limb examination as a table
Musculoskeletal–GAlSscreenGait Arms - Hands - Wrists - Elbows - Shoulders
Legs - Hips - Knees - Ankles - Feet
Spine - Neck - Back
Mini Mental Function Test (MMFT)
Question Score
1. How old are you? 0 points – Incorrect; 1 point - Correct
2. What is the time? 0 points – Incorrect; 1 point - Correct
3. Remember the following address (e.g. 42 West Street) - see end of this table for when to ask if address remembered
4. What year is this? 0 points – Incorrect; 1 point - Correct
5. What is the name of the place where we are now? 0 points – Incorrect; 1 point - Correct
6. Identification of two persons (doctor, nurse etc.)? 0 points – Incorrect; 1 point - Correct
7. What is your date of birth 0 points – Incorrect; 1 point - Correct
8. What year was the start of the First World War ? 0 points – Incorrect; 1 point - Correct
9. What is the name of present monarch? 0 points – Incorrect; 1 point - Correct
10. Count backwards from 20 to 1 0 points – Any errors; 1 point - Correct
3. Repeat the address I asked you to remember 0 points – Incorrect; 1 point - Correct
Normal score 8+Mild to moderate cognitive dysfunction 4-7
Moderate to severe cognitive dysfunction <4
differential diagnosisThe list of possible diagnoses would be documented here.
Plan The management plan would be documented here.
Signature date:
Sign, time and date ALL entries in patient’s notes.
Time of day:
Date:
Name in capitals:Status:
Scenarios for respiratory Tutorial 1
You are an 18 year old law student. You have come to accident and emergency because you feel breathless. For the last few days you have had a cold – sore throat, cough with green spit, runny nose/blocked sinuses, slight headache and have felt a little feverish. Today while walking to university you suddenly felt unable to get a breath and had to stop. Your chest felt a little tight, as if you couldn’t get a proper breath. Your breathing was fast and made an odd wheezing noise. You feel a bit better now but found it a frightening experience. Someone called an ambulance for you and the crew gave you something through a mask which helped. You have not had any blood in your spit or chest pain.
If asked about your expectations, you just want a doctor’s certificate because you are going to be late handing in a class assignment. If asked if you have any concerns, you are very worried that if it turns out to be asthma that it will interfere with your studies in the longer term.
You are normally fit and healthy. You vaguely remember this type of thing happening as a child once or twice and some discussion about whether you had asthma. Nothing has happened for years though

33
Scenarios for respiratory Tutorial 2
Patient one You are a 21 year old maths student. You have had asthma since you were a baby, but it rarely gives you any trouble now. Over the last 2 days you have been fevered and tired. You are quite wheezy and breathless after catching a cold (sore throat, congested sinuses). This is worse at night time (you are waking up wheezing in the early hours of the night). You have a cough with some yellow/green spit, but no blood. You have had a fever and feel tired. You haven’t had any chest pain, but your chest feels tight, like a band being pulled.If asked about your expectations, you just hope that the doctor can give you something to help. If asked if you have any concerns, you are worried that your cold flat may be aggravating your asthma. If asked if you have any other concerns, you are worried that your smoking may be worsening your asthma.
You have a blue (salbutamol) inhaler which is relieving your symptoms, but they are coming back. You also have a brown (beclomethasone) inhaler which you use twice a day.
You are allergic to cats/dogs and pollen, but not to any medicines that you know about. You are not taking any other medicines.You live with other students in a flat. You occasionally smoke in social situations and drink a moderate amount.
Patient two You are a 42 year old taxi driver. You have come to the doctor with an irritating cough that won’t go away. This time it started after a cold about 3 weeks ago, but you have had it on and off for a few months. You have always had a tendency to cough during the winter months. You are bringing up yellow spit, but there has never been any blood. You are quite wheezy and breathless at times, particularly on climbing stairs. You haven’t had any chest pain.
If asked about your expectations, you hope that you can be sorted but you are not sure if you can be sorted. If asked if you have any concerns, you are worried about taking time off work. If asked if you have any other concerns you have a mortgage to pay and need to work to cover the repayments for your family and if this were to turn out to be something serious where would that leave your family?Your health is otherwise reasonable with only having your children (if female) and an appendicectomy aged 18 in the past.
You smoke 40 cigarettes a day and have done for many years (you started smoking aged 14). You live with your partner who also smokes. You have 2 adult children who still live with you and no pets.
You do not take any medication and are not allergic to anything you are aware of. You are now limited in what exercise you can undertake due to breathlessness, although you never really did much anyway.
Scenarios for Cardiovascular Tutorial 1
Patient one You are a 49 year old joiner. You have gone to see your GP as you are worried about pains you have been getting in your chest. These have been happening over the last couple of months when you are out walking your dog. You feel a pain in the centre of your chest which you would describe more as a pressure than anything else. You can feel it spread up to your lower jaw on the left side and also to your left shoulder. It goes away over about 5 minutes if you stop and rest. You feel a bit out of breath with it but nothing else. It never lasts for more than a few minutes and you had been inclined to ignore it. You have felt tired and restless at night but this might be down to worrying.
If asked about your expectations, you have no idea what to expect but you would like to join a group to help you stop smoking. If asked if you have any concerns, you are very worried because you know there is some heart trouble in your family. Your Dad had a heart attack aged 50 and your older brother aged 46. Both of them smoked. To be honest, that’s what is bothering you. You live with your partner and 3 children. You are self-employed and don’t want to miss any time at work as you won’t be paid.
You have no medical history and take no medicines. You have no allergies. You smoke 20 cigarettes a day and drink moderately (mostly weekends).
Patient two You are a 28 year old geography teacher. You have come to your GP as you had some “palpitations” yesterday which rather frightened you. Nothing like this has ever happened before. It came on at school yesterday and lasted about half an hour. It eventually went away by itself, just as you were beginning to think you should tell someone. You can’t think why it started but it just came on suddenly. It felt like your heart was racing very fast (but regularly) and you felt a little chest discomfort with it. You had no other symptoms. You have lost a bit of weight (4 kilos) over 1 month but this has been because you are on a bit of a diet for your running. If asked about your expectations, you are hoping that the doctor will tell you that it’s due to anxiety. If asked if you have any concerns, you are worried that you may be developing a heart problemYou are usually very fit and active (you are a keen runner and cyclist). No one in the family has any heart problems. You’ve never been ill and don’t take any medicines or any illicit drugs. You are allergic to penicillin (you get a rash). You don’t smoke, take a little alcohol and usually take vitamin supplements. You also take the occasional herbal remedy if you have a cold or something.

34
FOuNdATIONS OF ClINICAl METhOd: ClINICAl ExAMINATION
Introduction
In both the respiratory system and the cardiovascular systems after the relevant communications sessions there will be a series of sessions which will focus on clinical examination and will further develop your understanding and practice of clinical method. Initially these sessions will focus on examining the specific system under consideration. The later sessions in each system will give you the opportunity to revisit and integrate the clinical method knowledge and skills you already have. Therefore towards the end of the respiratory system sessions you will be asked to integrate your clinical method knowledge and skills from term one to that learned during the respiratory system. In term three you will integrate all the clinical method knowledge and skills from term one, respiratory and cardiovascular system and as in term one work on documentation of your findings. You will find it helpful to revise your foundations of clinical method from term one. Also in term three further topics in the respiratory and cardiovascular systems will be covered.
Aims and Objectives of the respiratory and Cardiovascular System Clinical Examination Teaching
Aim To provide students with the opportunities to develop the clinical examination skills required for the diagnosis and management of respiratory and cardiovascular system conditions
Objectives By the end of the Foundations of Clinical Method teaching this term you should be able to: • Take a full general, respiratory and cardiovascular system history from a patient which is sensitive to their needs • Undertake clinical examination of the respiratory and cardiovascular systems integrated with a general examination of the patient • Demonstrate the personal and professional attitudes appropriate to a medical student in both a simulated and clinical setting
Organisation of the teaching There will be sessions introducing you to the examination of the respiratory and cardiovascular systems held in the Clinical Skills Centre. There will also be four visits to clinical areas. On the first visit, after an interactive lecture informing you of what is expected of you as a medical student in clinical areas, you will meet the staff and be given a tour of the clinical area you are attached to for this year. During subsequent visits you will work in pairs and meet patients who have agreed to allow you take a history and perform an examination. A debriefing session will take place in the Clinical Skills Centre after each of these visits.
Preparation for Clinical Examination teaching
Beingprepared–withtherightknowledge‘Macleod’s Clinical Examination’ is your core text for these tutorials. You will find it very helpful to read the appropriate chapter before you come to any clinical examination session. For sessions in Term 2, Chapter 6 and 7 (in the 13th edition of this text) are particularly useful.
To further help you learn about clinical examination a number of videos and power point presentations have been produced. The videos for the examination of the respiratory system and the cardiovascular system (located on the MyMBChB website) should be viewed before you attend the Clinical Examination sessions. There are exercises you should complete before you come to each teaching session. These are detailed with the information provided in this workbook for each session. In addition you should review your FoCM teaching and learning materials from Term 1.
Beingprepared–withtherighttoolsYear 1, Term 2 teaching will cover both the Respiratory and Cardiovascular systems and will involve learning to use a stethoscope. Stethoscopes are available for you to use during teaching sessions in the Clinical Skills Centre but, if you have your own stethoscope, please bring it with you to all clinical examination sessions. It is advisable to purchase a stethoscope of your own so that you can practise your auscultation skills frequently. Your stethoscope should have both a ‘diaphragm’ and ‘bell’ facility e.g., the Littmann Classic II S.E.
You are encouraged throughout your course to use the facilities offered by the Clinical Skills Centre for self-directed learning and revision, which may prove to be more difficult in busy clinical areas. The Clinical Skills Centre website at: www.abdn.ac.uk/clinicalskills/ gives information about the equipment which is available. You will also find the drop in rules on this website, which will tell you how to book a session and what your responsibilities are.
Facilitated drop-in sessions may be offered from time to time for revision and these will be advertised on MyMBChB. If you have any questions about using the Clinical Skills Centre you can contact the technicians (Mrs Frances Sutherland, Mrs Kelly Deans or Mr Tamas Papp).there by phoning Ext: 7713 (or 767713 if calling from the Polwarth Building or an NHS facility) Tel 01224 437713 or by email: [email protected].
Any student with problems in developing their clinical examination skills can discuss this with any Clinical Tutor or can contact Dr Ambreen Shakil for help clarifying the problem and solutions ([email protected]).
Students are expected to attend ALL of the Foundations of Clinical Method Sessions. For general administration queries and reporting of any absences, students should contact: Diane Gerrie, Year 1 Administrator in the MBChB Office on the 3rd floor of the Suttie Centre Tel (01224) 437777, Ext 7777 (or 767777 if calling from the Polwarth Building or an NHS facility). See pp16-17 of the Year 1 Student Handbook: Attendance. Absence and Illness.
Please note: As you will be interviewing and examining Simulated and Volunteer Patients in the Clinical Skills Centre and real patients in clinical areas, you are expected to: • haveshort,cleanfingernails• removeallnailvarnish• dressappropriately–pleasereferto‘DressGuidanceforMedicalStudents’onMyMBchBandattheendofthisworkbook.
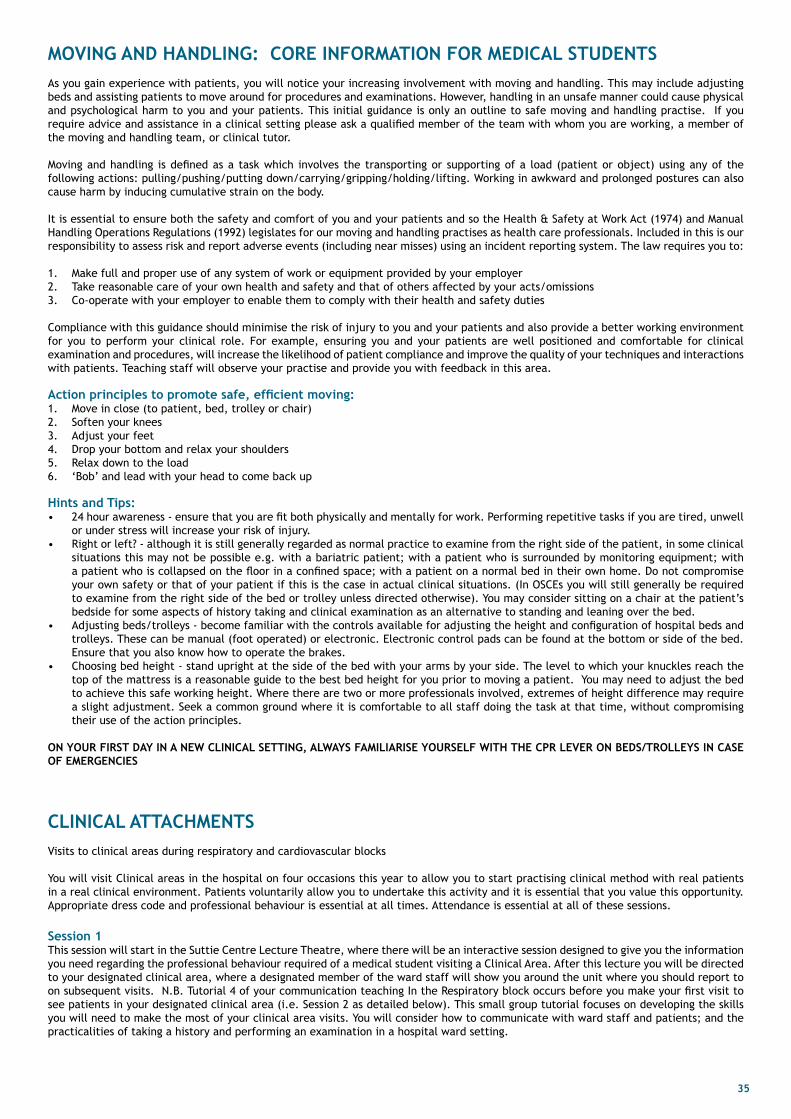
35
MoVinGAnDHAnDlinG:coreinForMAtionForMeDicAlStuDentSAs you gain experience with patients, you will notice your increasing involvement with moving and handling. This may include adjusting beds and assisting patients to move around for procedures and examinations. However, handling in an unsafe manner could cause physical and psychological harm to you and your patients. This initial guidance is only an outline to safe moving and handling practise. If you require advice and assistance in a clinical setting please ask a qualified member of the team with whom you are working, a member of the moving and handling team, or clinical tutor.
Moving and handling is defined as a task which involves the transporting or supporting of a load (patient or object) using any of the following actions: pulling/pushing/putting down/carrying/gripping/holding/lifting. Working in awkward and prolonged postures can also cause harm by inducing cumulative strain on the body. It is essential to ensure both the safety and comfort of you and your patients and so the Health & Safety at Work Act (1974) and Manual Handling Operations Regulations (1992) legislates for our moving and handling practises as health care professionals. Included in this is our responsibility to assess risk and report adverse events (including near misses) using an incident reporting system. The law requires you to:
1. Make full and proper use of any system of work or equipment provided by your employer2. Take reasonable care of your own health and safety and that of others affected by your acts/omissions3. Co-operate with your employer to enable them to comply with their health and safety duties
Compliance with this guidance should minimise the risk of injury to you and your patients and also provide a better working environment for you to perform your clinical role. For example, ensuring you and your patients are well positioned and comfortable for clinical examination and procedures, will increase the likelihood of patient compliance and improve the quality of your techniques and interactions with patients. Teaching staff will observe your practise and provide you with feedback in this area.
Actionprinciplestopromotesafe,efficientmoving:1. Move in close (to patient, bed, trolley or chair)2. Soften your knees3. Adjust your feet 4. Drop your bottom and relax your shoulders5. Relax down to the load6. ‘Bob’ and lead with your head to come back up
hints and Tips:• 24 hour awareness - ensure that you are fit both physically and mentally for work. Performing repetitive tasks if you are tired, unwell
or under stress will increase your risk of injury.• Right or left? - although it is still generally regarded as normal practice to examine from the right side of the patient, in some clinical
situations this may not be possible e.g. with a bariatric patient; with a patient who is surrounded by monitoring equipment; with a patient who is collapsed on the floor in a confined space; with a patient on a normal bed in their own home. Do not compromise your own safety or that of your patient if this is the case in actual clinical situations. (In OSCEs you will still generally be required to examine from the right side of the bed or trolley unless directed otherwise). You may consider sitting on a chair at the patient’s bedside for some aspects of history taking and clinical examination as an alternative to standing and leaning over the bed.
• Adjusting beds/trolleys - become familiar with the controls available for adjusting the height and configuration of hospital beds and trolleys. These can be manual (foot operated) or electronic. Electronic control pads can be found at the bottom or side of the bed. Ensure that you also know how to operate the brakes.
• Choosing bed height - stand upright at the side of the bed with your arms by your side. The level to which your knuckles reach the top of the mattress is a reasonable guide to the best bed height for you prior to moving a patient. You may need to adjust the bed to achieve this safe working height. Where there are two or more professionals involved, extremes of height difference may require a slight adjustment. Seek a common ground where it is comfortable to all staff doing the task at that time, without compromising their use of the action principles.
onyourFirStDAyinAneWclinicAlSettinG,AlWAySFAMiliAriSeyourSelFWitHtHecPrleVeronBeDS/trolleySincASeoFeMerGencieS
ClINICAl ATTAChMENTSVisits to clinical areas during respiratory and cardiovascular blocks
You will visit Clinical areas in the hospital on four occasions this year to allow you to start practising clinical method with real patients in a real clinical environment. Patients voluntarily allow you to undertake this activity and it is essential that you value this opportunity. Appropriate dress code and professional behaviour is essential at all times. Attendance is essential at all of these sessions.
Session 1 This session will start in the Suttie Centre Lecture Theatre, where there will be an interactive session designed to give you the information you need regarding the professional behaviour required of a medical student visiting a Clinical Area. After this lecture you will be directed to your designated clinical area, where a designated member of the ward staff will show you around the unit where you should report to on subsequent visits. N.B. Tutorial 4 of your communication teaching In the Respiratory block occurs before you make your first visit to see patients in your designated clinical area (i.e. Session 2 as detailed below). This small group tutorial focuses on developing the skills you will need to make the most of your clinical area visits. You will consider how to communicate with ward staff and patients; and the practicalities of taking a history and performing an examination in a hospital ward setting.

36
Session 2 For the first part of the session you will be expected arrive at your Clinical Area and be ready to start by 10am. In pairs you will meet a patient to take a history and perform general and respiratory system examination. You will have approximately 45 minutes to do this. For the second part of the session you will be expected to be in the Clinical Skills Centre in the Suttie Centre ready to start by 11am. In small groups with a clinical tutor you will review and discuss this first experience of taking and history and examining a patient and the plans for the next ward visit will be reviewed.
Session 3 You will again be expected to arrive at your designated clinical area and be ready to start by 10am. In pairs you will meet a patient, and on this occasion you will be expected to perform a general, respiratory and cardiovascular history and examination. You should also document your findings. For the second part of the session you should attend the Clinical Skills Centre, ready to start by 11am. You should be prepared to present your findings from your patient assessment to your group.
Session 4 This session will be a repeat of Session 3. You should find that you are more efficient in your history, examination, documentation and presentation as you proceed through these sessions
rESPIrATOrY SYSTEM During the 4 week respiratory system block of teaching there will be 3 Clinical Skills Centre sessions which focus on clinical examination. Feedback will be given during each session.
Session 1 This session will include a demonstration of percussion and auscultation skills, with tutor facilitated opportunities to practise these skills with Volunteer patients.
Session 2 Introduction to the full respiratory examination. You will watch the Respiratory Examination Video then practise examination of this system with Volunteer patients, incorporating the skills you learned in Session 1.
Session 3Perform an integrated general and respiratory examination Review Respiratory clinical signs and practise listening to normal and abnormal respiratory sounds
Session 1
This session will focus on teaching the skills of percussion and auscultation. You should bring your stethoscopes to this session. If you do not yet have a stethoscope there will be some provided in the Clinical Skills Centre, and you will be provided with further information on how to purchase a stethoscope.
reViSionexerciSe–PleaserevisethefollowingareasBeForeyouattendthissession
respiratory Anatomy
Airways Vessels
• Trachea• Main Bronchi• Further subdivisions
• Pulmonary arteries and veins• Further subdivisions
lungs Pleura
• Right lung has 3 lobes• Left lung has 2 lobes• Hilum (plural = hila)Main Contents of each hilum:
- Pulmonary artery- Pulmonary vein- Main bronchi- Lymph nodes
• 2 layers- Visceral layer closely applied to lung- Parietal layer lines thoracic cavity - tiny amount of pleural fluid in pleural space between these
two layers providing lubrication
divisions of the Thoracic Cavity
Right Pleural cavity MEdIASTINuMSuperior Mediastinum (thymus, great vessels bifurcation of trachea & oesophagus)Anterior Mediastinum (thymus & adipose tissue)Middle mediastinum (heart) Posterior Mediastinum (oesophagus & thoracic aorta)
Left Pleural Cavity

37
Percussion: Percussion of the chest wall sets the wall and the underlying tissues in motion which produces an audible sound and a palpable vibration. This can be used to assess whether the underlying tissue (up to a depth of 5-7cm) is air filled, fluid filled or solid.
how to perform percussion Hyperextend the middle finger of one hand (non-dominant hand) and press the distal interphalangeal (DIP) joint against surface to be percussed. Avoid contact with the other fingers or thumb of this hand. Hold the middle finger of the dominant hand flexed and relaxed above the DIP joint. With a quick sharp motion of your hand at the wrist (not your forearm), strike the middle finger with the tip of the middle finger (short nails needed!) and then immediately withdraw it. Aim directly at the DIP joint of the middle finger.
N.B. Use the lightest tapping that produces a clear note. Thick chest walls need heavier percussion. If a louder note is needed use heavier pressure with the middle finger which is pressed against the surface. Percuss similar areas on the right and left sides of the chest. Record whether you find the percussion note to be resonant, hyperresonant, dull or stony dull.
Auscultation: Auscultation of the chest using the stethoscope allows clinicians to identify and describe the following respiratory features: • Breath Sounds
- Vesicular - Bronchial
• Speech/Voice Sounds - Vocal resonance
• Added Sounds - Wheezes (rhonchi) - Crackles (crepitations) - Pleural friction rub
how to auscultate the chest during examination of the respiratory system Starting with the front of the chest insert the stethoscope ear pieces pointing forwards & select the diaphragm facility. Apply the diaphragm to locations across the chest wall making good contact with the skin and ask the patient to breathe in & out deeply through their mouth. Progress in one direction (apex to base or vice versa), listening over the same areas you have percussed, always comparing sides.
Assess the breath sounds for the following: • whether breathing is vesicular or bronchial • intensity i.e. loudness of sounds • any added sounds (crackles, wheezes, rubs) • whether abnormalities occur during inspiration or expiration
Assess vocal resonance by asking the patient to say ‘ninety-nine’ or ‘one-one-one’ as you listen again over the whole chest. Compare both sides and consider if the sound is normal or abnormal.
Repeat this process across the back of the chest.
Breath Sounds • On inspiration, air is drawn into the lung alveoli via the oral & nasal airways, through the larynx & vocal cords, the trachea, the
bronchi and the bronchioles. • On expiration, air is expelled in reverse order. • Turbulence of air flow through the airways during breathing produces sound which is transmitted through the lungs to the chest wall.
This is what you hear during auscultation.
Types of Breath Sounds: Vesicular sounds: Normal lung tissue muffles the transmitted noises and so normal breath sounds auscultated over the lung fields have a ‘rumbling’ or ‘murmuring’ quality and are described as ‘vesicular’.
Bronchial sounds: On auscultating within 2-3cms of the midline you may pick up sounds which are transmitted directly from the trachea & main bronchi to the chest wall (not through the lung tissue as well). These sounds are described as ‘bronchial’ and have a harsher, blowing quality with a gap of relative silence between inspiration and expiration. • It is normal to hear bronchial sounds close to the midline. • It is abnormal to hear bronchial breathing over the remaining lung fields. Such sounds may be produced by pathological ‘solid’
lung which allows the transmission of bronchial sounds directly from the trachea and main bronchi to the chest wall (e.g., in lung consolidation due to infection, fibrosis or collapse).
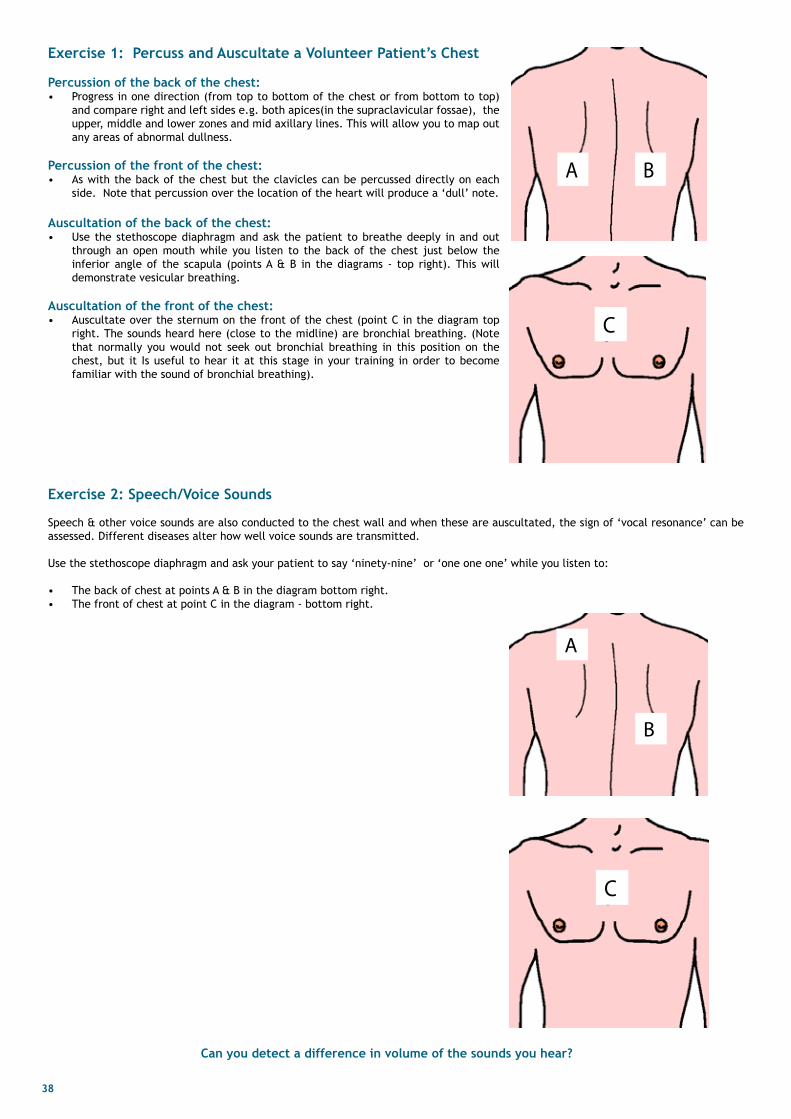
38
Exercise 1: Percuss and Auscultate a Volunteer Patient’s Chest
Percussion of the back of the chest: • Progress in one direction (from top to bottom of the chest or from bottom to top)
and compare right and left sides e.g. both apices(in the supraclavicular fossae), the upper, middle and lower zones and mid axillary lines. This will allow you to map out any areas of abnormal dullness.
Percussion of the front of the chest: • As with the back of the chest but the clavicles can be percussed directly on each
side. Note that percussion over the location of the heart will produce a ‘dull’ note.
Auscultation of the back of the chest: • Use the stethoscope diaphragm and ask the patient to breathe deeply in and out
through an open mouth while you listen to the back of the chest just below the inferior angle of the scapula (points A & B in the diagrams - top right). This will demonstrate vesicular breathing.
Auscultation of the front of the chest: • Auscultate over the sternum on the front of the chest (point C in the diagram top
right. The sounds heard here (close to the midline) are bronchial breathing. (Note that normally you would not seek out bronchial breathing in this position on the chest, but it Is useful to hear it at this stage in your training in order to become familiar with the sound of bronchial breathing).
C
A
B
Exercise 2: Speech/Voice Sounds
Speech & other voice sounds are also conducted to the chest wall and when these are auscultated, the sign of ‘vocal resonance’ can be assessed. Different diseases alter how well voice sounds are transmitted.
Use the stethoscope diaphragm and ask your patient to say ‘ninety-nine’ or ‘one one one’ while you listen to:
• The back of chest at points A & B in the diagram bottom right. • The front of chest at point C in the diagram - bottom right.
C
A B
Can you detect a difference in volume of the sounds you hear?

39
Exercise 3: Added Sounds
You will have the chance to listen to and become familiar with the following added sounds during this session using various manikins in the Clinical Skills Centre.
Wheezes are musical sounds produced by air ‘whistling’ through narrowed bronchi, usually during expiration e.g. asthma.
Crackles or crepitations are non-musical sounds and they can be divided into fine or coarse.
• Fine crackles/crepitations are caused by the explosive reopening of peripheral small airways which have become blocked during expiration e.g. in pulmonary oedema.
• Coarse crackles/crepitations are caused by air bubbling through secretions in larger airways e.g. in bronchitis or Chronic Obstructive Pulmonary Disease (COPD).
• Normally, during respiration, the visceral and parietal layers of pleura glide smoothly over each other. A Pleural Rub is a creaking to-and-fro sound (i.e. heard in both inspiration and expiration) which sounds close to the end of the stethoscope. It is caused by the inflamed parietal and visceral pleura rubbing against each other. Inflammation of the pleura may be due to pneumonia or pulmonary embolism with infarction.
Session 2
During this session you will be introduced to and practise the examination of the respiratory system as a whole. During Term 1 you were introduced to the standard order used in clinical practice for examination
• Inspection (looking) • Palpation (feeling) • Percussion (tapping to assess the resonance of underlying tissues) • Auscultation (listening with a stethoscope)
During the general examination we concentrated on inspection and palpation. This term during examination of both the respiratory and the cardiovascular system you will use all four of the above.

40
ExAMINATION OF ThE rESPIrATOrY SYSTEM You should commence every examination with a general overview by:
• making an initial assessment to determine the need for immediate treatment or observation • observing the patient’s environment e.g. for use of oxygen or the presence of sputum in the sputum pot • Then a peripheral examination of the hands, lips and tongue for cyanosis, then the neck lymph nodes. The respiratory examination should include palpation of the neck for scalene and other supraclavicular lymphadenopathy (found in bronchial carcinoma, lymphoma or lymph node tuberculosis).
Then examine the chest in the following order;
• Inspection • Palpation • Percussion • Auscultation
Inspection
Observe the patient’s breathing and assess the following:- (1) respiratory rate Normally about 12-15 cycles a minute at rest. If possible the patient should not be aware that the breathing is being observed.
(2) respiratory rhythm Normal breathing is regular. Alternating periods of apnoea and hyperpnoea (Cheyne-Stokes respiration) may occur with cerebral disease e.g. stroke and cardiac failure.
(3) depth By observing many people breathing you will become familiar with what is normal depth. The depth of breathing may be increased in conditions producing metabolic acidosis (air hunger), e.g. diabetic coma, salicylate poisoning or decreased due to pain, e.g. pleurisy, fractured ribs and “acute abdomen”, or depression of the respiratory centre by drugs such as morphine (which also slows the respiratory rate)
(4) use of accessory muscles of respiration (e.g. sternocleidomastoids, scalene muscles, platysma)
(5) Sound Normal breathing is quiet and barely audible. Noisy breathing indicates a degree of airway obstruction and the quality of the sound can help decide what level this obstruction is found. Snoring indicates obstruction at the level of the pharynx. Stridor, a harsh inspiratory noise, indicates obstruction at the level of the larynx. Wheeze is predominantly an expiratory noise found in lower airways obstruction such as asthma or emphysema.
(6) Chest Expansion Normal chest expansion is symmetrical. Uneven movement may result from chest wall deformity, or where there is reduced lung movement due to increased “stiffness” of one lung, pleural thickening or effusion or lung collapse. The affected side may move less and the other side may move more than normal.
The following are some symmetrical abnormalities in the shape of the chest:-
(a) Barrel chest Increased antero-posterior diameter with horizontal ribs so that the chest assumes more or less permanently the position of full inspiration. This may occur in some patients with asthma or emphysema.
(b) Pigeon chest (Pectus carinatum) An abnormality in which the transverse (coronal) diameter of the chest is reduced in relation to the anteroposterior (saggital) diameter; usually caused by severe childhood asthma.
(c) Sternal depression (Pectus excavatum). Usually congenital and not clinically significant.
Palpation (1) Position and length of the trachea The patient’s chin should be in the midline with the neck slightly extended. Place the index finger in the suprasternal notch and gently feel for the trachea which should be central. Movement to one side or the other indicates that the mediastinum has shifted to that side. Normally 2 to 3 fingertips can be inserted between the suprasternal notch and the cricoid cartilage - this distance may be reduced in patients with chronic obstructive pulmonary disease. Descent of the trachea into the chest (tracheal descent) is a sign of lung pathology such as severe obstructive pulmonary disease or airway obstruction.
(2) Chest expansion Assess from the front or back by laying the hands on each side of the chest symmetrically, stretch the skin with the fingers, with the thumbs extended to try to touch each other in the midline. The fingers remain fixed on the chest wall and the movement of the thumbs with respiratory effort reflects the extent of chest wall movement.

41
(3) Tactile vocal fremitus Place one hand on the chest wall and feel for vibration produced when the patient pronounces a “resonant” word, e.g. ‘one, one, one’ or ‘ninety nine’. Fremitus is usually equal on both sides. Only marked differences should be heeded.
Percussion Gives an indication of the condition of the underlying lung or pleura, or of both. Compare the note over corresponding areas on each side.
(1) hyper-resonance When the lung contains more air than usual as in some cases of emphysema, or when there is air in the pleural cavity as in pneumothorax. Hyper-resonance may be difficult to detect as the range of normal resonance is so wide.
(2) dull or impaired When the lung has less air (ie is more solid) the percussion note becomes duller. This can occur with lung collapse, consolidation or fibrosis. The note may also become dull due to a thickened chest wall or pleura.
(3) Stony dullness The note is completely dull when fluid is present. Stony dullness usually signifies a large pleural effusion.
(4) upper border of liver dullness Normally the upper border of the liver can be percussed at the level of the 5th interspace anteriorly in the mid clavicular line. This is often lower than normal when emphysema is present. The lower border of lung resonance is found to lie at the 8th rib in the mid-axillary line and at the 10th rib posteriorly in the scapular line.
Auscultation Compare the breath sounds on the two sides of the chest; slight differences are usually not significant.
(1) Breath sounds Normal vesicular breath sounds are heard mainly during inspiration and early expiration
Abnormalities of breath sounds: (a) The breath sounds may be diminished in the following conditions
• abnormally thickened chest wall • emphysema • poor chest movement e.g. due to pain on respiration • fluid or air in the pleural cavity • pleural thickening • total obstruction of a large airway leading to collapse of a lung or lobe.
(b) Increased breath sounds may be heard through a thin chest wall or if the patient is over-breathing. (c) Alterations in the quality of breath sounds The expiratory phase of vesicular breathing can be prolonged where there is airway narrowing (bronchitis, asthma). Bronchial breathing is quite distinctive and must be learned by practise. Its characteristics include:
(i) a harsh resonant quality(ii) equality in length of the sounds heard during inspiration and expiration (iii) the expiratory sound has the same or higher pitch than the inspiratory sound (iv) a distinct pause between the sounds heard during inspiration and expiration.
When heard over the lung fields bronchial breathing indicates consolidation, fibrosis or cavity formation in the lung and implies direct conduction of sounds from a patent bronchus through a solid medium. It is usually accompanied by increased vocal resonance and whispering pectoriloquy.
(2) Voice sounds The voice normally resonates through the lungs and can be easily heard through the stethoscope. This is examined by asking the patient to repeat ‘one-one-one’ or ‘ninety nine’ while listening over comparable areas on the two sides of the chest.
Increased vocal resonance indicates consolidation or cavity formation. When even the whispered voice is transmitted this is referred to as whispering pectoriloquy. (Note the association between bronchial breathing, whispering pectoriloquy and increased vocal resonance).
decreased vocal resonance may occur where there is fluid in the pleural cavity, reduced ventilation of a part of the lung (for example in bronchial narrowing or lobar collapse due to a tumour) or where there is significant pleural thickening.
Sometimes at the upper limit of a pleural effusion the voice sounds have a bleating quality - aegophony.
(3) Added sounds Three types of added sounds may be heard in addition to normal or abnormal breath sounds. These are:
(a) Wheezes
(b) Crackles They are heard predominantly at the end of inspiration and may be altered by coughing. In bed-ridden patients, basal crackles which disappear on coughing or after a few deep breaths are usually of no significance.
(c) Pleural Friction rub Friction is always best heard where movement of the lungs is greatest and so is often detected at the bases laterally or posteriorly. If the patient has pleuritic pain, ask them to point to the area of maximum intensity, which is where you are most likely to hear a rub.

42
WOrKShEET FOr ExAMINATION OF ThE rESPIrATOrY SYSTEM
Generalinformation
• Clean your hands• Introduction:
- Give your name & status (i.e. 1st year medical student) • Ask the patient their name and Date of Birth • Check these details are the same on the wrist band and charts.• Explain to the patient what you would like to examine, the amount of exposure you would like and await their verbal consent
Initial Assessment - Consider: Do you need to make any immediate intervention (e.g. take first aid measures)OR - Do you need to do a rapid ABCD assessment then call for help? OR - Is the patient well enough for a full examination?
• Position the patient correctly:- Semi-reclined in bed at about 45°( incline the upper end of the bed using the control buttons or red bar on the trolley
couches) • Expose the patient’s body parts appropriately:
- Ask the patient to remove any necessary clothing - Cover the patient discreetly with bed linen,( uncovering only when necessary)
Generaloverview• Assess the level of patient comfort or distresses e.g. are they in pain, coughing, short of breath, using accessory muscles of
respiration?• Assess general signs of severity of illness, nutritional state• Assess the environment around the patient
• Is there any medication (e.g. inhalers) or is the patient on oxygen • If there is sputum pot then check the contents
• What is the patient’s temperature?• Palpate the pulse at the right radial artery for 15 seconds record the pulse rate then discreetly count the respiratory rate over 1
minute. Observe the chest or abdominal movement, whichever is most notable.
Peripheral examination: hands
Compare both hands and look for evidence of :• Tar staining of fingers • Peripheral cyanosis or anaemia (interlace your fingers with the patient’s and compare the colour) •• Clubbing:
- loss of the nail angle (view both hands from the side) - nailbed fluctuation (place your 2 thumbs under the patient’s finger pulp, hold the IP joint with your middle fingers and rock
the nail from side to side with your index fingers while viewing & feeling the nailbed) - increase in (longitudinal) nail curvature- increased bulk of the soft tissues over the terminal phalanges
• CO2 retention:- palmar warmth & pinkness- flapping tremor (Ask patient to stretch out their arms and to bend back their wrists) - wait for 15 secs
Peripheral examination: head
Examine the tongue looking for central cyanosis Assess the conjunctivae for pallor
Peripheral examination: Neck
Assess the tracheal position:- Place your index finger in the sternal notch and push backwards to feel the trachea. - Loop each of your thumbs round the medial edges of the sternocleidomastoid muscles.
Ask the patient to sit forward and palpate the cervical lymph nodes from behind: - supraclavicular (scalene nodes especially)- anterior cervical chain - tonsillar nodes- submandibular nodes- submental nodes- post auricular nodes- posterior cervical nodes
Examination of the back of the chest
Ask the patient to lean forwards and to bring their arms forward over a pillow. Perform the following examination:• inspection:
- Are there any scars (N.B. may be well hidden)?- Are there any visible abnormalities of the sternum or the chest wall?- Are any skin lesions or dilated veins evident?
• Palpation:- What is the tracheal position – is there any evidence of (upper) mediastinal displacement?- What is the position of apex beat- is there any evidence of (lower) mediastinal displacement?- Check for expansion (see description under back of chest above).- Tactile vocal fremitus (see description under back of chest above).

43
• Percussion: Follow the same pattern as for the back of the chest noting that- The clavicles can be percussed directly- Heart location will produce a ‘dull’ note
• Auscultation Apply the diaphragm of the stethoscope over the chest wall, making good contact with the skin.
- Ask the patient to breathe in & out deeply through their open mouth. - Listen over the whole chest in the same or similar locations that you have percussed, moving in one direction (i.e. from the
apex to the base or vice versa) always comparing sides. Assess in each area:
• whether the breathing is vesicular or bronchial• the intensity of the breath sounds i.e., loudness of sounds• are there any added sounds (crackles, wheezes, rubs)?• whether abnormalities occur during inspiration, expiration or both?
• Vocalresonance: Ask patient to say ‘ninety-nine’ while you listen to each area you have previously auscultated
- Consider the loudness of the sound and compare the two sides of the chest.
Examination of front of chest
With the patient semi-reclining at approximately 45°, examine the front of the chest in the following order.• Inspection:
- Are there any scars (N.B. may be well hidden)?- Are there any visible abnormalities of the sternum or the chest wall?- Are any skin lesions or dilated veins evident?
• Palpation:- What is the tracheal position – is there any evidence of (upper) mediastinal displacement? - What is the position of apex beat- is there any evidence of (lower) mediastinal displacement?
• - Check for expansion (see description under back of chest above). - Tactile vocal fremitus (see description under back of chest above).
• Percussion: Follow the same pattern as for the back of the chest noting that - The clavicles can be percussed directly- Heart location will produce a ‘dull’ note
• Auscultation Ask the patient to breathe in & out deeply through their mouth to assess breath sounds (See description under back of chest above)Assess vocal resonance by asking the patient to say ‘ninety-nine’ or ‘one, one, one’ while auscultating the chest (See description under back of chest above).
Closure
• Inform the patient you have finished the examination. Thank the patient.• Ask the patient to redress if necessary.• Clean your hands.
Session 3
During this session you will have the opportunity to integrate your knowledge and skills of the General Examination with examination of the Respiratory System. There will be further opportunities to become used to identifying signs of respiratory disease and to get feedback on your knowledge and performance.
youshouldbeconfidentinassessingthefollowingbytheendofthisblock.• Respiratory rate • Cervical lymph nodes • Tracheal position • Chest movement and shape youshouldbeconfidentinchestpercussionandmappingoutareasof• Resonance • Dullness
youshouldbeconfidentinchestauscultationandbeabletorecognisethefollowinginamanikinorpods • Normal breath sounds • Wheezes • Crackles • Bronchial breathing• Pleural friction rub
44
Testing your understanding of clinical issues
exercise1:Writedownthesignsthatyouwouldexpecttofindinapatientwiththefollowingconditions
Chronic obstructive pulmonary disease
Acute lobar pneumonia
Pneumothorax (noting the difference between a simple and tension pneumothorax)
Collapse of the lung
Pleural effusion
Acute severe asthma exercise2:Answerthefollowingquestions.youmightneedtoseekclarificationinclinicaltextbooks:
1. Name four daily activities which can be used to grade breathlessness in a patient
2. A toddler chokes whilst eating a small sweet. A chest X-ray indicates the presence of a small foreign body. In which area of the chest is it most likely to be located? Why?
3. In a patient who is already experiencing some breathing difficulties, why might their symptoms be exacerbated (become worse) during the night?
4. You find a marked difference in expansion of a patient’s right and left lung bases. Which is the abnormal side…the side with the greater or lesser movement? Can you explain your answer?
5. Why does a ‘flail chest’ cause respiratory distress?
Important: the next two sections on Peak Flow measurement and Inhalers are included here since they are part of the respiratory System. however they will be taught in the Fourth session of the Cardiovascular Block.
MEASurEMENT OF PEAK ExPIrATOrY FlOW rATE ANd IT’S APPlICATIONThe peak expiratory flow rate is used to assess the extent of respiratory obstruction in conditions such as Asthma and COPD. It’s major advantage is that it can be used to measure Peak flow and hence respiratory obstruction at home by patients or in a GPs office, using a cheap convenient meter such as the Mini Wright meter.
Peak Expiratory Flow rate Measurement
Important
There are a number of distinct steps in the use of peak flow to assess and treat respiratory obstruction. The skills for the steps need to be acquired before moving on to the next step. When examining or treating patients or in you exams only certain steps may be appropriate/tested. You need to know which steps are appropriate for specific situations.
1. Know how to use the PEFR meter so that you can demonstrate its use clearly for the patient2. Teaching the patient how to use the PEFR meter by demonstrating, correcting errors, finishing with patient having acquired the skills
to take effective readings.3. Knowing how to teach the patient to measure their peak flow by selecting the highest of three readings on each occasion.4. Know how to estimate expected peak flow rate for the patient from their height, age and gender using the standard graphs.5. Knowing the normal range for males and females that are within normal limits to reassure patients whose readings are below the
expected figure or to make a preliminary diagnosis of obstruction.6. If the patient is to record peak flow at home he/she should record the (best of three) reading twice or three times a day readings
over a period of time to reveal the extent of diurnal variation in PEFR (usually at least 2 weeks).

45
7. You need the ability to determine whether the chart recorded by the patient shows plausible readings (i.e. diurnal variation) indication that the patient had understood how to us the meter and how to record the results.
8. Ability to interpret a pattern of diurnal variation of peak flow produced by patient’s recordings over time (usually at least 2 weeks), including the significance of >15% variation in diurnal peak flow.
9. Ability to calibrate a patient’s knowledge of their Asthma/COPD and to appropriately give them further information based on the calibration. This will empower
Peak Flow Meters (Mini-Wright Peak Flow Meters) are available for use in the CSC and on many wards. Compare the patient’s PEFR result with normal /expected values using chart, otherwise the information obtained is of limited use.
You should be familiar with how to complete a PEFR chart and be able to interpret results from e-g., the Peak Flow chart as reproduced after the worksheet. You should be able to explain to a patient how they should complete a chart by themselves (eg., at home). Discussion of the results with the patient is particularly important as this forms part of patient education and allows for greater understanding of the disorder and its management, which should improve compliance with treatment. You will find that patients with chronic conditions such as Asthma and Diabetes often become experts in their own care. It is both efficient and effective to develop a strong partnership between clinicians and patients having these conditions. Monitoring of Peak Flow at home by Asthmatic patients is an example of this
use of Peak Flow Meters and Patient Training for Partnership in Care
how to use the Peak Flow Meter
1. Wash your hands 2. Zero the device 3. Patient should stand (where possible) 4. Take maximum inspiration 5. Make airtight seal with mouth around mouthpiece, holding Peak Flow Meter level. 6. Hold meter horizontally so that fingers do not touch the slide 7. Forcefully exhale as rapidly as possible into meter. 8. Read directly from scale. 9. Record the best of three attempts and mark in an appropriate position (morning, midday or evening) on the chart (if the patient is to
record over time at home). 10. Dispose of the used mouthpiece appropriately 11. Calculate what the expected peak PEFR is from their height, age and gender using the predicted values chart.
traininganddevelopingapartnershipwithpatientstomonitortheirownpeakflowmeasurements 1. Patient to perform steps 1 to 7 (above) initially under supervision. (ie demonstrating the technique yourself first) 2. Explain the recording chart to the patient (i.e. x axis three daily readings over a period of several weeks & y axis peak flow readings
- best of three each time) 3. Ask the patient to perform the test, three times daily (each time taking the best of 3 readings) for say 2 weeks then return for a
review. 4. Inform the patient that readings taken before and 15 minutes after use of β agonist inhaler are sometimes helpful. 5. Tell the patients what their expected PEFR is and if they are below this, explain that 100 litres per minutes in males and 85 litres per
minute in females below this figure is considered to be within normal limits.6. Show the patient an example of a completed chart covering several weeks so that they can begin to monitor their progress on
treatment and enter a partnership with health care workers in their care. 7. Calibrate the amount of information you give them against their current level of understanding of PEFR in relation to asthma.
commondifficultiespatientsmayexperienceinuseofPeakFlowMetersandcharts
• Poor co-ordination between insertion of device into mouth and inspiration and expiration.• Poor sharp expiratory technique • Fingers obstruct gauge. • Hands obstruct the outflow of the meter • Mouthpiece used incorrectly. • Poor inspiratory effort. • Confusion between ‘suck’ and ‘blow’. • The elderly may have difficulty reading the meter. • Patients may have difficulty in understanding and interpreting the charts.

46
This
is a
pat
ient
’s P
eak
Flow
Cha
rt
• D
escr
ibe
the
abno
rmal
ity
show
n•
Wha
t is
the
dia
gnos
is?
• H
ow h
as t
reat
men
t al
tere
d th
e Pe
ak F
low
?

47
INhAlEr TEChNIQuE Inhalers are used for the control and treatment of Asthma and COPD. It is essential that Doctors have the knowledge and skills required to train patients in their use and motivate them to achieve concordance with treatment. As with the monitoring of Peak flow by patients the sense of control over their condition is a powerful motivation - “Give them the tools and they will finish the job” (Paraphrased from Winston Churchill) Aim To learn the principles of inhaler technique
learning Outcomes By the end of this session you will: • Understand the importance of good inhaler technique • Be able to identify the core groups of inhaler devices used for inhalation therapy • Demonstrate the correct use of the core inhaler devices
An inhaler is a medical device used for delivering medication directly into the lungs. Inhalation is the preferred route of administration of drugs in the treatment of many respiratory disorders such as asthma and COPD. The onset of action is rapid and lower doses can be given, which reduces the risk of systemic side-effects.
The aims of inhaled therapy in asthma and COPD are to: • Deliver drugs such as: bronchodilators (which open the airways), long acting cholinergics and corticosteroids (which help reduce
inflammation).
Inhaler technique and compliance Good inhaler technique is essential in ensuring that patients receive maximum benefit from their prescribed medication.
Poor asthma and COPD control may result from the patient being given an inappropriate device or incorrect use of the right device
Inhaler technique and compliance should be evaluated before making any changes to asthma or COPD therapy as poor symptom control may be linked with incorrect use of the inhaler device.
Which device? Incorrect use of inhalers and non-compliance (usually due to poor concordance) with inhaled medications are 2 key factors which compromise asthma and COPD management.
To select an appropriate inhaler, the healthcare professional needs to know:
• What drugs are available in each device (see www.patient.co /Health information/ inhalers for Asthma and Inhalers for COPD. Note the detail in these web pages, an indication that NHS experience with patients with chronic illnesses such as Asthma & COPD is
that they both want and are able to absorb detained information about their condition.) • Possible side-effects (not covered in this session) • Practical knowledge on how the devices work (includes ability to demonstrate use to patient) • How to clean each device• Patient preference – if patients do not like the device, they may not use it. • The patient’s ability to learn to use the device • Whether an inhaler that indicates when it is running out of medication is required – some have a dose counter. • The age of the patient – for example, young children and some older patients may find certain inhalers difficult to use. Children < 5
years should use a pressurised metered-dose inhaler with a spacer.
Several types of inhaler devices are available. These fall into 4 core groups: 1. Conventional pressurised metered dose inhalers (pMDIs) 2. Pressurised metered dose inhalers with a spacer device 3. Breath-actuated pressurised metered dose inhalers 4. Dry powder inhalers
Pressurised metered-dose inhalers (pMdI) These were the first type of inhaler device to be introduced, and remain the most commonly prescribed delivery system.
The device consists of a plastic case with a mouthpiece, a pressurised metal canister containing a drug and propellant, and a cap to protect the mouthpiece. To activate the inhaler, the canister is pushed down and a valve delivers a measured dose of drug in a fine mist. The propellant evaporates quickly, leaving the drug particles which are inhaled. To use the inhaler correctly patients must have excellent coordination of inspiration with inhaler activation to achieve optimum drug delivery of the lungs. The patient needs to coordinate breathing in with depressing the canister to release medication.
Devices may seem simple to use but are often used incorrectly by patients and indeed clinical staff.
An incorrect technique will result in decreased delivery of the drug to the lungs and potentially reduce its effectiveness. (See Youtube clip on “House MD - Do I Look Like An Idiot?”)
The technique is outlined in Box 1.

48
Box 1. The Technique for using a Pressurised metered-dose inhaler
1. Sit up straight or stand up and lift the chin to open the airways 2. Remove the cap from the mouthpiece 3. Shake the inhaler 4. Breathe out gently 5. Immediately place the mouthpiece in your mouth and put your teeth around it (not in front of it and do not bite it) 6. Start to breathe in slowly and deeply through the mouthpiece. As you breathe in, simultaneously press the canister to release one
puff of medication. Do not keep pressing the canister 7. Hold your breath for 10 seconds, or as long as possible 8. If a second dose of medication is required, wait 30–60 seconds before taking a second puff. Repeat the procedure if necessary 9. Replace the cap
Several problems can be encountered when using pMDIs: • Poor coordination of breathing and activating the inhaler can reduce drug delivery • Inhaling too quickly or too slowly can affect the amount of drug deposited in the lungs • The teeth or tongue can obstruct the flow of the medication from the inhaler; • The spray from the inhaler can cause coughing • Side-effects such as hoarse voice (dysphonia) or thrush (candidiasis) can occur with some inhaled steroids. This can be reduced by
using a spacer device and gargling with water after use.
Pressurised metered-dose inhalers (pMdIs) and spacer devicespMDIs are often used with a spacer or holding chamber device. These ‘hold’ the medication and allow sufficient time for it to be breathed in through the one-way valve of the spacer.
Spacers are useful when: • The patient has poor coordination when using an inhaler • High doses of inhaled corticosteroids are needed • Infants and toddlers require inhaled medicines
Spacers also help to reduce local side-effects, such as dysphonia or candidiasis, from inhaled corticosteroids. The procedure for using a large-volume spacer is outlined in Box 2.
Box 2. how to use a large-Volume Spacer device
using a single-breath technique 1. Remove the cap of the pMDI 2. Shake the inhaler and insert into the spacer device 3. Place the mouthpiece into the mouth 4. Ensure the valve can be opened by breathing in and out slowly (a ‘clicking’ sound will be heard) 5. Press the canister, keeping the inhaler in the chamber 6. Take a deep, slow breath in Hold the breath for about 10 seconds or as long as comfortable then breathe out through the
mouthpiece 7. Remove the device from the mouth 8. For a further dose, wait 30–60 seconds before repeating technique
using a multiple-breath technique 1. Follow steps 2-6 above 2. Breathe in and out five times (tidal breathing) 3. Remove the device from the mouth
• The drug should be administered by single actuations of the pMDI into the spacer followed by an inhalation. Multiple presses of
medication into the spacer can reduce the medication delivered to the lung as this will make more of the drug adhere to the inside of the spacer
• Patients can take a slow single breath to retrieve the medication or take tidal breaths from the chamber
Either technique can be used – often young children and older patients find the tidal breathing (multiple breathes) method easier.
Spacer device cleaning: • Clean monthly • Wash in warm soapy water – DO NOT RINSE - Leave to air dry • All plastic spacer devices are susceptible to static charge. This attracts medication to the side of the spacer device and reduces the
amount of drug available for inhalation. This would limit the effectiveness of the drug. The mouthpiece should be wiped clean of detergent before and after use.
• It is important to check that the one-way valve is clean and moves freely. • Plastic spacers should be replaced at least every 12 months.
Breath-actuated pressurised metered-dose inhalersThese devices overcome some of the coordination problems associated with the ‘press-and-breath’ pMDIs because they automatically actuate on inspiration.
Advantages:• Overcome coordination problems between inhalation and actuation • Fewer steps for use so easier to use

49
• Popular with patients • Small and portable
disadvantages: • Require SLOW inhalation • Limited range of drugs available with this particular device • Cannot be used with a spacer device • Unsuitable for children (<5 years)
Breath activated inhaler (this one is an Autohaler)
• Unsuitable for children (<5 years)
dry powder inhalers
A Dry powder inhaler (DPI) is a device that delivers medication to the lungs in the form of a dry powder. DPIs are an alternative to the aerosol based inhalers (pMDIs and Breath-actuated pressurised metered dose inhalers).
Most DPIs rely on the force of patient inhalation to entrain powder from the device and subsequently break-up the powder into aerosol particles that are small enough to reach the lungs. The inhalation manoeuvre used should be as deep and as hard as possible. Therefore most DPIs have a minimum inspiratory effort that is needed for proper use and it is for this reason that DPIs are normally used only in older children and adults.
A commonly used Dry powder inhaler is called an Accuhaler. The procedure for using an Accuhaler is outlined in Box 3. This is demonstrated in the practical session.
Box 3. Procedure for using an Accuhaler
1. Check dose counter2. Open using thumb grip3. Holding horizontally, load dose by sliding lever until it clicks. This makes the dose available for inhalation and moves the dose
counter on.4. Breathe out gently away from mouthpiece5. Place mouthpiece in mouth and seal lips6. Breathe in steadily and deeply7. Hold breath for about 10 seconds or as long as comfortable8. While holding breath, remove inhaler from mouth9. Breathe out gently away from mouthpiece10. If an extra dose is needed, repeat steps 3 to 911. Close cover to click shut
reference British Thoracic Society and Scottish Intercollegiate Guidelines Network (2008) British guideline on the management of asthma. Thorax; 63: 5 (Supp IV), iv 1–iv 121

50
CArdIOVASCulAr SYSTEM: ClINICAl ExAMINATION Having learned how to examine the general condition of the patient and the Respiratory System you are now ready to learn the Cardiovascular System (CVS) examination. This is a logical progression as the two systems are closely related both anatomically and functionally.
The CVS is an extensive and complicated system to learn how to examine. Please ensure that you prepare fully for each session by reading your workbooks and watching the on-line videos BEFORE each session. Supplement your reading by revising your CVS lectures and the relevant chapter in Macleod’s Clinical Examination.
N.B. Volunteer patients will be used during all of these sessions except session 4. You should come dressed appropriately for a clinical setting.
Session 1The session will focus mainly on assessment of the jugular venous pulse and on learning how to use the stethoscope for auscultation of the precordium.
Session 2In this session you will build on the skills learnt in session 1 by adding in general and peripheral examinations. You will also learn how to take a blood pressure and practise this with your colleagues.
Session 3In this session you will learn how to examine the vascular system - peripheral pulses and palpating for an abdominal aortic aneurysm, thuscompleting the teaching of a full CVS examination. You will also be shown how to document your findings.
Session 4This session does not involve volunteer patients and is divided between CVS and Respiratory systems in 4 workshops.Workshop 1: Resp – Measurement of PEFR - Page 44Workshop 2: Resp – Inhaler technique - Page 47Workshop 3: CVS – Auscultatory skills on Mr K (specialised training manikin)Workshop 4: CVS – Auscultatory pods – interactive tutorial.
Session 5In this session you will learn how to carry out a 12 lead ECG and do some basic interpretation of ECGs
Session 6In this final session, your group will have the opportunity to carry out a full, integrated CVS and respiratory examination on a volunteerpatient and you will have the chance to revise any areas
Note: Sessions 5 &6 will take place in the third term.

51
Self Study Exercise
This exercise should be completed before attending the clinical examination sessions in the Clinical Skills Centre
The following are professional terms used to describe clinical signs. What do you understand by these terms? (N.B. When communicating findings to a patient you will need to use language that the patient can understand!)
Professional Term Definition
Arrhythmia
Apex beat
Blood Pressure
Bruit
Cardiomegaly
Cardiac Murmur
Diastole
Systole
Jugular Venous Pulse
Palpitations
Tachycardia / Bradycardia
Precordium
Pericardial friction rub
Orthopnoea
Paroxysmal nocturnal dyspnoea
Heave
Thrill
Ventricular hypertrophy
Radiation (of a cardiac murmur)
Stenosis (of a cardiac valve)
Incompetence (of a cardiac valve)
revision exercises
revisetheanatomyoftheheart&greatvessels
heart: GreatVessels:• The heart is a 4 chamber structure: there are 2 sides 2 atria → 2 ventricles• Valves: 4 one-way valves prevent back flow of blood• Blood flow through the: Left side of the heart: Left Atrium → Mitral Valve → Left Ventricle → Aortic valve
and aorta and systemic circulation Right side of heart: Right Atrium → Tricuspid valve → Right ventricle → Pulmo-
nary valve → pulmonary artery and pulmonary circulation
• Veins return blood to heart: - Pulmonary veins enter L atrium- Vena cava (superior & inferior) enter R atrium
• Arteries take blood to organs:
- Aorta leaves L ventricle- Pulmonary arteries leave R ventricle
• Pericardium consists of 2 layers surrounding the heart,
separated by the pericardial cavity which contains a tiny amount of lubricating fluid.
There are a number of noises which can be produced by the heart: • First & Second Heart Sounds (S1 and S2) • Extra Heart Sounds (e.g. Third & Fourth Sounds) • Added Sounds e.g. a click or a snap or a pericardial friction rub • Murmurs
heart Sounds and how they indicate the timing of the cardiac cycle When the heart pumps blood backflow of blood is prevented by the sequential closure of the four heart valves. Consider the LEFT side of the heart first:
• When left ventricular filling is complete the mitral valve slams shut and contraction (SYSTOLE) of the ventricle begins. The aortic valve opens and blood is propelled out of the ventricle into the aorta. The closure of the mitral valve results in a sound called the FIRST HEART SOUND which sounds like ‘lub’
• The left ventricle then relaxes (DIASTOLE) and the aortic valve closes, producing the SECOND HEART SOUND - ‘dub’. When the pressure in the ventricle falls below that in the atrium the mitral valve opens and ventricular filling begins again.

52
The timing of systole and diastole is identical on the RIGHT side of the heart so that:
• The FIRST HEART SOUND (lub) = closure of mitral & tricuspid valves and indicates the onset of SYSTOLE.• The SECOND HEART SOUND (dub) = closure of aortic & pulmonary valves and indicates the onset of DIASTOLE.• Thus the sounds produced by the heart are: ‘lub-dub, lub-dub, lub-dub’.• Lub occurs at the start of systole & dub occurs at the start of diastole i.e.: ‘lub-systole-dub-diastole’.
heart Murmurs• Heart murmurs are produced by turbulent blood flow in the heart. This can be caused by:- An abnormal valve- Increased volume or velocity of blood flow through a normal valve.- Abnormal openings between chambers, usually congenital• Murmurs occur either in systole or diastole. Diastolic murmurs are usually quiet. You will have to position the patients specifically in
order to hear them.• Heart valves abnormalities may be described as:- STENOSIS where there is a thickened or fused valve causing blood to make a noise as it passes through the narrowed opening- INCOMPETENCE where the valve doesn’t close completely, so blood leaks backwards or ‘regurgitates’- A combination of STENOSIS & INCOMPETENCE
Where to listen for heart soundsHeart sounds are heard best for each valve at specific auscultation points. These points are not always directly overlying the valve areas- they are where the sounds for that valve are best heard.
location of Auscultation PointsThe areas where each of the four valves are best heard are marked on the diagram below.1. Aortic valve: upper right sternal border at the level of the 2nd right intercostal space2. Pulmonary valve: upper left sternal border at the level of the 2nd left intercostal space3. Tricuspid valve: lower left sternal border at the level of the 4th left intercostal space4. Mitral valve: over the apex beat point (which is normally (if palpable) felt just within the mid-clavicular line at the level of the
5th intercostal space)
using the stethoscope to listen for heart soundsSounds heard are either:• Low-pitched (e.g. brrru-umm, brrruumm)• High-pitched (e.g. peesshhh, peesshhh)
Stethoscope is designed to hear both types of noises:• Bell to hear low-pitched noises …Twist to engage…• Diaphragm to hear high-pitched noises
Exercise 1: Auscultating the heartUsing the stethoscope bell (used to hear low pitched sounds), listen at all four auscultation points on yourself or a colleague to hear the double noise (lub-dub) of valve closures in each area:
• Mitral valve• Tricuspid valve• Pulmonary valve• Aortic valve
Now repeat using the stethoscope diaphragm (used to hear high-pitched sounds.) Notice the difference.
Exercise 2: locating peripheral pulsesLocate these pulses on both sides of yourself or a colleague:• Carotid• Brachial• Radial• Femoral• Popliteal• Posterior tibial

53
CVS SESSION 1
Please refer to the Worksheet for Examination of the CVS System on Page
during this session you will focus on sections 1, 5, 6 and 8 of the worksheet -• introduction,• theassessmentofJugularVenousPulse(JVP)• examinationofthePraecordium• closure
Section 1 - Introduction
Follow the Worksheet
Section5-AssessmentoftheJugularVenousPulse
Follow the Worksheet.
You will hear the both the Jugular venous Pulse and the Jugular Venous Pressure referred to as the ‘JVP’. The term ‘pulse’ is generally used when describing the waveform of the blood in the jugular vein, whereas the term ‘pressure’ is the actually measurement of the waveform above the sternal angle.
DifferentiationoftheJVPandcarotidpulse
Multiphasic The JVP ‘beats’ twice (in quick succession) in the cardiac cycle. The first beat is called the ‘a’ wave, the second the ‘v’ wave. The carotid artery has only one beat per cycle.
Non-palpable The JVP cannot be palpated. If you feel a pulse in the neck, it is probably the common carotid artery.
Occludable The JVP can be stopped be occluding the internal jugular vein by lightly pressing against the neck.
Varies with head up tilt (HUT) The JVP varies with the angle of the neck. If a person is standing their JVP appears to be lower in the neck (or may not be seen at all because it’s lower than the sternal angle). The carotid pulse does not vary with HUT.
Varies with respiration The JVP usually decreases with deep inspiration as a consequence of the Frank-Starling mechanism (inspiration decreases intrathoracic pressure which in turn increases venous return.
Hepato-jugular reflux The JVP increases with increase abdominal pressure.
The JVP is affected by certain arrhythmias and cardiac conditions. It is elevated in fluid overload and heart failure, primarily right ventricular failure. It can also be elevated in conditions such as acute pulmonary embolism and COPD. Mechanical obstruction of the SVC may cause extreme elevation of the JVP – under these circumstances, the JVP would no longer reflect right atrial pressure.
Section 6 - Examination of the Praecordium.
Ensure that the patient is laying at 45 degrees, and ask for the chest to be fully exposed. If a female patient removes her brassiere, please pay attention to modesty and allow her to cover herself with a sheet or towel as soon as it is appropriate.Follow the worksheet for Inspection, Palpation and Auscultation.
Remind yourself of the surface anatomy of the valve areas.:Aortic (2nd right intercostal space)Pulmonary (2nd left intercostal space)Tricuspid (4th intercostal space at the left sternal edge)mitral (5th left intercostal space in the mid clavicular line)
Once you have identified S1 and S2, you do not need to continue to palpate the carotid. Some experienced clinicians are sometimes ableto identify S1 and S2 by their different sound qualities (lub-dub) but this is NOT recommended at this stage in your training.
Causes of Added Sounds• 3rd heart sound (heard in diastole) A 3rd heart is sometimes heard just after S2. Below the age of 40 it can be physiological, but over this age it is more likely to be
pathological and a sign of left ventricular failure and mitral regurgitation.• A 4th heart sound - this is less common and occurs just before S1. Usually associated with left ventricular hypertrophy. a snaps, clicks
or sounds from mechanical heart valves.• pericardial friction rub - a coarse scratching sound.
Section 8 - Closure
Follow the Worksheet.

54
CVS SESSION 2
during this session you will focus on sections 1, 2, 3, 4 and 8 of the worksheet -•introduction,•thegeneralandperipheralexaminations,•theexaminationofthebloodpressure• closure
Section 1 - Introduction
Follow the worksheet
Section2-Generaloverview
Follow the worksheet
Section3-General/Peripheralexamination
AbdomenNB Examination of the abdomen will be taught in yr 2. It is included here for completeness but Yr 1 students are not expected to be able to demonstrate these skills.

55
Section 4 - Examination of the Blood Pressure
WOrKShEET FOr ExAMINATION OF BlOOd PrESSurE
Generalintroduction
• Wash your hands• Introduce yourself with name and status. Check patient’s name and DOB• Outline the procedure & warn about any potential discomfort: e.g. ‘ I will inflate a cuff around your upper arm, it will feel like a
tight band around your arm, but should not last too long’Seek permission to undertake the examination (i.e. take their blood pressure)
Prepare the sphygmomanometer
• Sphygmomanometer placed on surface with dial facing you, on a level with the patient’s heart• Select the appropriate size cuff for the size of arm (bladder at least 80% of circumference of arm)• Disconnect tubing & squeeze out excess air from cuff• Ensure dial is centred at ‘zero’
Position patient correctly
• Seated & relaxed• Upper arm fully exposed• Arm positioned to allow ease of application of cuff i.e., arm abducted, hand supinated & elbow extended• Arm should be supported level with the heart
Apply BP cuff
• Apply correct side of the cuff snugly around the upper arm, such that one finger can be inserted between cuff and arm• Cuff bladder should be centred over cubital fossa but tubing should not interfere with stethoscope placement • Cuff to be applied as high up arm a possible to allow plenty of space for application of stethoscope over site of brachial artery • (N.B.It may be easier to apply the cuff snuggly if you stand up to do so)• Reconnect tubes • Close the valve of the inflation bulb (one handed)
locate brachial artery
Most easily palpated at the antecubital fossa when forearm supinated & elbow extended • Position is variable, commonly:
- Medial to biceps tendon - Lateral to muscle bulk attached to common flexor origin - Often 1” above flexure - Radial artery can be used for palpation only (never for auscultation)
Estimate systolic pressure by palpation to identify the presence of an auscultatory gap.
• Palpate brachial pulse – easily done using the thumb, the remaining hand holding the elbow extended• Inflate cuff until pulse is not palpable & note this pressure on the dial (often easier to note the point at which pulse becomes
palpable again after starting to deflate cuff). This is the estimated systolic pressure• Deflate cuff rapidly to zero• N.B. If the brachial artery is difficult to locate rapidly, perform the procedure palpating the radial artery instead
Ausculatesystolic&diastolicpressures
• Apply stethoscope diaphragm to expected site of brachial artery• Avoid contact between cuff or sphygmomanometer tubes & stethoscope head (to avoid hearing spurious sounds) • Re-inflate cuff straight up to 30mm Hg greater than your estimated systolic pressure• Slowly open the valve & release pressure from the cuff such that the pressure falls at approx 2mm Hg per second• As the cuff pressure decreases, note the onset of repeated beats/tapping noises (>2 consecutive beats) which may initially be very
soft. This indicates the level of the systolic pressure• Continue to let air slowly out of the cuff; the beats you hear may progressively change in volume (becoming louder then softer)
until they disappear completely. This indicates the value for diastolic pressure. In some patients, the sound of the beats does not disappear. in this case, you would take the diastolic pressure to be when the sound of the beats becomes muffled (korotkov 3) and document this.
• Now rapidly fully deflate the cuff
document your results
• When writing in the patient’s notes, the blood pressure is written without units, appearing like a ‘fraction’ with the systolic value placed on the top level & the diastolic value written beneath (e.g., 120/80 mmHg). Usually recorded to the nearest 2mm Hg
• When completing ward charts, V-shaped arrows are often used to locate the systolic & diastolic values on the chart, and a dotted line is commonly used to join these 2 levels. This allows for ease of recognition of the trend of a series of results
Closure
• Thanks to patient• Help make more comfortable• Wash your hands
Section 8 - Closure
Follow the worksheet

56
CVS SESSION 3
during this session you will focus on sections 1, 7, 8 and 9 of the worksheet - • introduction,• examinationofperipheralpulses,• closure• documentation
Section 1 - Introduction
Follow the worksheet
Section 7 - Examination of the peripheral pulses.
Follow the worksheet
Section 8 - Closure
Follow the worksheet
Section 9 - documentation of examination
You should review the notes about documentation in the communication section of this workbook.
Remember: Such documentation is both a medico-legal requirement and is necessary for the following reasons:
• The initial clerking notes the condition of a patient at a recorded time and date. The patient’s improvement or deterioration can be assessed as moving away from this ‘baseline’.’
• Further entries into notes record the progress of the disease, including the treatment offered and its success. This helps build the clinical picture and helps to further the diagnostic process.
• By reading patients’ notes, the inexperienced can learn about and reflect on their more senior colleagues’ opinions.
ifanentryintothepatientcasenotesisillegible,absent,notspecificorisabbreviated(allowingformisinterpretation),notdatedand signed, the patient’s progress may be severely compromised.

57
WOrKShEET FOr ExAMINATION OF CArdIOVASCulAr SYSTEM
Section 1 Introduction
Wash your hands Introduce yourself to the patient (use your full name and status i.e.1st year medical student)
Your ID Check patient’s name and date of birth. If they are wearing a name band, check it is correct. Often there are 2 patients with a similar name on a ward so make sure you READ the name band properly. Patient’s ID
Explanation Explain what the examination will entail (in words the patient is able to understand)
Consent Ask permission to continue
Pain/Tenderness Ask the patient if they have any pain or tenderness in the areas you intend to examine.
Positioning Position the patient on the bed semi-reclining at approximately 45° and adjust the height to suit you.
Exposure Ask the patient to remove the necessary clothing and cover with bed linen.
Section 2 Initial observation / general assessment
Initial Assessment Do you need to make an immediate intervention?
Assess how comfortable/distressed e.g. secondary to pain, cough, dysp-noea. Is the patient sweaty or cyanosed?
General observations
Environment
Charts
Check the area around the patient - are there any medications (e.g. in-halers / nebuliser) or is the patient using oxygen, check contents of a sputum pot; note the presence and readings on any monitors to which the patient may be attached.
If a SEWS chart is available, check the temperature, pulse, blood pressure & respiratory rate. Notice any trends.
Section 3 Peripheral examination
hands and Arms
Look at and compare both hands and nails Compare both hands looking for:• Tar staining of fingers• Warmth of hands - (think why the hands may be cool or warm and
sweaty)• Peripheral cyanosis or anaemia - (interlace your fingers with patient’s
to compare colour)• Clubbing • Splinter haemorrhages in the nail beds• Capillary refill time - press on the nail bed for 5 seconds, release and
then observe the refill time (normal less than or equal to 2 seconds)• Fine tremor (arms outstretched, fingers slightly spread)
Assess the radial pulse and comment on:Rate Count the number of beats over 15 seconds and multiply by 4
Rhythm Rhythm (regular, irregularly irregular - commonest cause atrial fibrillation, or regularly irregular)
Volume Normal, bounding, full, thready, low volume.
Character Normal, slow rising (AS) or collapsing (AR). Test for a collapsing pulse, lift the patient’s arm above the levelof the heart while feeling the radial pulse.
Look at the arms Check for track marks of IV drug abuse
head
Look at the face Look for Malar Flush (MS)
Look at the conjunctivae Check for pallor / anaemia by gently pulling down the lower eyelid(communicate with the patient before doing this!)Check for xanthelasmata and corneal arcus
Assess the tongue and lips Look for central cyanosis – blue discolouration of tongue and/orlipsCheck for angular stomatitis and a sore red tongue indicative of iron de-ficiency anaemia

58
Chest
Listen to the lung bases for crackles which may indicate left sided heart failure
Abdomen
Liver Palpate abdomen for a tender, enlarged, pulsatile liver (which may indicate cardiac failure)
Ascites Percuss abdomen for shifting dullness (characteristic of ascites - which may be due to cardiac failure)
NB Examination of the abdomen will be taught in yr 2. It is included here for completeness but Yr 1 students are not expected to be able to demonstrate these skills.
lower limbs
Pitting oedema Check for pitting oedema:- In an ambulant patient (start at the ankle before moving up towards
the calf and thigh to identify the extent of the oedema) Apply firm pressure with your fingers or thumb for at least 15 secs- In bed-bound patient (over the sacrum and back of chest)
Arterial disease Look for evidence of poor arterial perfusion:- ischemia e.g. cold, smooth, hairless skin; increased capillary refill
time ; arterial leg ulcers or gangrene
Varicose veins Check for the presence of varicose veins of either or both legs
Section 4 Examination of Blood Pressure
Please refer to separate worksheet
Section 5 AssessmentofJVP
Identify the jugular venous pulse Patient MUST be positioned correctly – lying at 45° to horizontal,neck muscles relaxed, head turned slightly to the left. Look for the double venous flickering’ of blood in internal jugularvein in supraclavicular area. Anatomically, the internal jugularvein lies between the sternal & clavicular heads ofsternocleidomastoid, but the movement of the venous columnmay sometimes be seen more clearly lateral to the muscle.
Check you are looking in the correct location by performing hepatojugular reflux (gentle, but firm pressure applied over the liver area for ~10secs. will increase
Measure the jugular venous pressure. Jugular Venous Pressure assessment = vertical height of flickering column of blood within the vein, above the sternal angle. JVP normally <4cm. Do NOT measure the JVP while you are still performing hepatojugular reflux!
Section 6 Examination of the Praecordium
Inspection Look for any chest deformities e.g.Kyphoscoliosis, pectus excavatum, Look for any scars. Is there a cardiac pacemaker (often felt rather than seen unless patient very thin). if present - usually in the left infra-clavicular area. Look for any visible pulsation.
Palpation:
Tracheal position
Cardiac pacemaker Often in right infra-clavicular area. Maybe visible in thin patients.
Apex beat The apex beat is most lateral & inferior palpable pulsation. Use the whole hand, then fingers to locate accurately (The apex beat is the most lateral and inferior point where it can be felt). The apex beat is usually felt in the 5th ICS at, or just medial to the mid-clavicular line. NB a significant number of patients do not have a palpable apex beat
Heaves Hand easily lifted with chest wall movement (Indicates ventricular hypertrophy). Press flat of hand firmly to L of sternum (for the left parasternal heave of right ventricular hypertrophy)
Thrills Thrills are palpable murmur (usually systolic) - Feel at apex and both sides of sternum with flat of fingers. (Three sites to cover 4 valve areas).

59
Auscultation
1. Listen in all 4 valve areas with the diaphragm and then the bell of the stethoscope. Palpate carotid pulse. Listen for
S1 and S2 S1 = mitral & tricuspid valve closure (onset of systole) Synchronous with pulseS2 = aortic & pulmonary valve closure (onset of diastole) Asynchronous with pulse
Added sounds 3rd heart sound (heard in diastole)
4th heart sound - this is less common and occurs just before S1Snaps, clicks or sounds from mechanical heart valves. Pericardial friction rub - a coarse scratching sound.
Murmurs Listen for murmurs between S1 and S2 (systolic) and between S2 and S1 (diastolic).
2. Listen for left sided systolic murmurs and radiation
Aortic Stenosis Listen over aortic valve area and then over the carotid arteries with the stethoscope diaphragm for the murmur and the radiation of this high-pitched ejection systolic murmur.
Mitral regurgitation Listen over the apex and then in L axilla with the stethoscope diaphragm for radiation of this high-pitched pansystolic murmur.
3. Listen for left sided diastolic murmurs –
Aortic regurgitation Ask the patient to sit up, leaning forwards, and ask them to hold their breath in expiration (“please take a deep breath in, breathe out, now hold your breath”). Listen at the lower L sternal edge with the diaphragm of the stethoscope for the high-pitched early diastolic murmur
Mitral stenosis Ask the patient to roll onto their left side and at listen at the apex with the stethoscope bell with the breath held in expiration, for this low-pitched ‘rumbling‘ mid-diastolic murmur.
Section 7 Examination of Peripheral Pulses
Palpate the pulses- note the volume and compare sides:
Radial Just proximal to the wrist joint, on the radial side of the flexor surface of the wrist and lateral to the tendon of flexor carpi radialis. Palpate using 3 fingers (index, middle & ring fingers).
Brachial In the antecubital fossa, medial to biceps tendon. It may be easier to use your thumb to locate this pulse as it is deeper than the radial pulse. The arm should be supinated and elbow extended and the pulse is often palpable ~2cm. above the flexure (as in ‘Manual Measurement of Blood Pressure’ on MyMBChB).
Carotid In the neck, medial to sternocleidomastoid muscle. Always palpate carotid pulses one at a time. Using index & middle fingers (or the thumb), locate the thyroid cartilage and slide fingers laterally, displacing the sternocleidomastoid muscle laterally. The carotid pulse should be easily palpable between the muscle and the trachea.
Femoral (and radial-femoral delay) Just inferior to the inguinal ligament, half-way between the anterior superior iliac spine and the symphysis pubis (mid-inguinal point). With the patient lying supine, explain what you are doing and palpate the pulse with index & middle fingers. Simultaneously palpate radial and femoral pulses for delay
Popliteal Behind the knee joint, deep in the popliteal fossa. With the knee flexed to 30˚ ensure the patient is relaxed and hold the knee with both hands with the thumbs in front. Feel for the pulse with the fingers, pressing the vessels forwards against the back of the tibia.
Posterior tibial Behind and ~2cm. below the medial malleolus. Use 2-3 fingers to locate
Dorsalis pedis On the dorsum of the foot, lateral to tendon of extensor hallucis longus. Feel in the groove between the 1st and 2nd metatarsals using 2-3 fingers.

60
Auscultate for bruits Auscultate over the carotids, femorals and aorto-iliac area for bruits.
Palpate for aortic aneurysm Palpate on the epigastrium GENTLY for aortic aneurysm. .Deep in the midline of the upper abdomen. Best felt between the umbilicus and xiphisternum using the flat of the hand and all four fingers. Please do not examine aggressively! The abdominal aorta is normally only easily palpable in slim individuals, but PLEASE NOTE that particular care must be taken when examining older patients, as a readily palpable abdominal aorta may indicate that there is an aortic aneurysm.
Section 8 Closure
Thank patientHelp make more comfortable Clean your hands
Section 9 documentation
Document your findings Write legibly – clear and logical sequence.Remember to identify each sheet with patient’s ID (use initials only while in training unless told otherwise)Date and time your notes.Print your name and status.Signature.
CVS SESSION 4
during this session you will attend 4 workshops;
1. PEFr2. Inhaler technique3. Mr K4. Pods
Details of the first two workshops can be found in the respiratory section of this workbook.
Mr KIn this workshop, you will have the opportunity to practice examination of the praecordium (section 6 of the worksheet) on a specialized manikin. You will have the opportunity to feel a heave, thrill and an apex beat. You will also be able to listen to and time heart murmurs. Please ensure you have revised CVS session 1 fully BEFORE attending this session.
PodsThis workshop is in the format of an interactive tutorial. You will all have an auscultatory pod and listen to systolic and diastolic murmurs. Please remember to bring your stethoscope! There will be discussion around these murmurs, so please revise lectures on valvular heart disease before this workshop.
CVS SESSION 5Please revise the ECG lecture before you attend this session.
During this practical session you will have the opportunity to revise how an ECG is taken and in particular to understand the basic wave patterns and ECG paper calculations.
You should know the various waves found on an ECG during a single cardiac cycle and be able to relate these to the activity in the chambers of the heart • atrial depolarisation being the P wave; • the QRS complex representing ventricular depolarisation; • ventricular repolarisation is the T wave.
You should also know about the PR and QT intervals. • The PR interval is the time taken from atrial depolarisation to ventricular depolarisation and should be between 0.12 - 0.2 secs. • The QT interval is the total time the ventricles spend in depolarisation and repolarisation. Normal values for this vary with age,
gender and heart rate, but should be no more than 0.42 secs* (UK Resus Council figure).

61
Introduction to 12 Lead ECGs
Step two -What to look for on a rhythm strip
• Is there electrical activity
• What is the QRS rate?
• Is the ventricular rhythm regular or irregular?
• Is the QRS complex widened >120ms?
• Are all the P waves and QRS complexes related or occurring independently?
• Is there a P wave in front of every QRS complex?
• Is the PR interval constant or does it vary?
• Is the PR interval too short (<0.12 s) or too long (>0.2 s)?
ecG
BasicecGinterpretation
During this practical session you will have the opportunity to revise how an ECG is taken and in particular to understand the basic wave patterns and ECG paper calculations.
You should know the various waves found on an ECG during a single cardiac cycle and be able to relate these to the activity in the chambers of the heart –atrial depolarisation being the P wave; the QRS complex representing ventricular depolarisation; while ventricular repolarisation is the T wave.
You will have the opportunity to recognise a correctly taken 12 Lead ECG from one where the leads have been attached incorrectly and then to develop a system which will allow you to interpret the rhythm on the ECG.
Howtotakea12leadecG
It is important to follow your normal and familiar approach to this skill as with any other patient examination. • Introduce yourself to the patient • Check the patient’s name and date of birth against the patient identification band • Explain the purpose of the investigation and what it entails • Gain the consent of the patient • Perform a 12 Lead ECG • Completion

62
Introduction The electrical activity produced in the heart which stimulates its rhythmical contraction, can be recorded using the 12 Lead ECG. The leads view this electrical impulse from a series of different directions, allowing the position of abnormalities of the conduction system and myocardial muscle to be identified. All 12 leads need to be reviewed to confirm the findings.
Patient Explanation The patient may be very apprehensive and might misconstrue the purpose of the wires connecting them to the ECG machine. Best not to talk about electrical currents but rather talk in more general terms about recording the heart beat and reassuring the patient that they will not experience any discomfort or sensations during the test.
takinga12leadecG
The 12 lead Machine • Ensure the ECG machine is either plugged into the mains or has a charged battery • The leads should be untangled and plugged into the ECG machine • You should have sufficient patient contacts (ECG biotabs) • Switch the ECG machine on and allow it to perform its self check • Ensure the machine has enough paper to print the trace The Patient • Ensure the patient is comfortable in bed, rested and warm • The arms and legs should be exposed as should the front of the chest • Apply the patient contacts as described on this and the next page • Ensure the patient is not shivering or otherwise moving before starting to record the trace
The Trace • Check the ECG machine is correctly set up (speed of paper 25 mm/sec, and calibration 1mV = 1cm)• Switch the machine to record and it should automatically record all the leads simultaneously• The 12 Lead ECG should be printed off• Quickly scan the trace to ensure it has been correctly taken and does not have any artefacts (repeat the trace if there are any• problems)
Completion • Disconnect all the leads and carefully tidy the leads – leave unknotted • Remove all the ECG biotabs. DO NOT stick these onto your own skin. • Ensure the patient redresses, is comfortable and has no immediate questions • Correctly label the 12 Lead ECG
- The patient’s name,- Date of birth, - CHI number (community health index – number is patient’s DoB and four other digits), - Date and time ECG was taken, - Any symptoms the patient experienced over the time the ECG was taken (e.g. chest discomfort)
• Tell the patient that you will return to explain the results from the ECG

63
Positionoftheleadstotakea12leadecGThe four limb leads should be attached on the inside of the wrists and ankles. On the wrist the tabs on the patient contacts should point downwards while the contacts on the ankles should have the tabs pointing upwards. The colour coding for the limb leads is universal and the leads will be labelled to indicate the limb they should be attached to.
On all patients make sure the patient is not sweaty or the skin is otherwise moist – dry the skin to provide a good contact
The chest leads are attached across the front of the chest and are often called V or C. There is no difference with this nomenclature. You may find that different ECG machine may colour the chest leads differently – each lead is clearly numbered whatever the colour.
The surface points of contact for the chest leads are • V/C 1 = 4th intercostal space to the right of the sternum • V/C 2 = 4th intercostal space to the left of the sternum • V/C 3 = midway between Leads 2 and 4 • V/C 4 = 5th left intercostal space midclavicular line • V/C 5 = same level as Lead 4 anterior axillary line • V/C 6 = same level as Lead 4 mid axillary line
While there are other chest lead positions that can be taken for special reasons those described here are the conventional positions which you should know. It is very important that lead placement is correct as often ECGs are compared over time to provide a diagnosis and if the lead position changes then the ECG may be misinterpreted.
troubleshootingecGproblemsCommon problems include - base line wandering, interference (ensure the filter button is on), - poor contact (use cardioprep to clean skin)

64
CVS SESSION 6This is the final session for the CVS block. During this session, you will have the opportunity (depending on time available) to do a completeCVS and Resp examination on a VP.Ensure that you fully revise both of these examinations BEFORE attending this session.
There is no set way to integrate these two examinations but think about minimising the inconvenience to the patient by only asking them to sit forward once for instance.
revisingyourskills&knowledge
• Review the Cardiovascular System Examination DVD by accessing the MyMBChB website • Answer the following questions
1. The apex beat is commonly located in which intercostal space?
…and just within which vertical chest landmark?
2. What does a parasternal heave feel like to a clinician examining the patient?
3. Which side of the stethoscope would you use to examine the murmur of mitral stenosis?
Why?
4. In a patient with a massive pericardial effusion, what would you expect the heart sounds to sound like and why?
5. closureofwhichheartvalvescausesthefirstheartsound?
Closure of which heart valves causes the second heart sound?
What causes the sound of a murmur?

65

66
How
to H
andw
ash?
Du
rati
on
of
the
enti
re p
roce
du
re: 4
0-60
sec
on
ds
12
3 Rub
han
ds
pal
m t
o p
alm
Ap
ply
eno
ugh
soap
to
co
ver
all h
and
sur
face
sW
et h
and
s w
ith w
ater
4 Rig
ht p
alm
ove
r le
ft d
ors
um w
ith
inte
rlac
ed f
ing
ers
and
vic
e ve
rsa
56
Pal
m t
o p
alm
with
fin
ger
s in
terl
aced
Bac
ks o
f fin
ger
s to
op
po
sing
pal
ms
with
fin
ger
s in
terl
ock
ed
78
Ro
tatio
nal r
ubb
ing
of
left
thu
mb
cl
asp
ed in
rig
ht p
alm
and
vic
e ve
rsa
Ro
tatio
nal r
ubb
ing
, bac
kwar
ds
and
fo
rwar
ds
with
cla
sped
fin
ger
s o
f ri
ght
ha
nd in
left
pal
m a
nd v
ice
vers
a
9 Rin
se h
and
s w
ith w
ater
1011
12 Your
han
ds
are
now
saf
e.W
here
ap
plic
able
, use
to
wel
to
tur
n o
ff t
ap
Dry
han
ds
tho
roug
hly
with
a s
ing
le u
se t
ow
el
9492
v1
12/0
9

67

68
DreSSGuiDAnceForMeDicAl&PHySiciAnASSiStAntStuDentSrev.Aug2011
Alwaysdressandbehaveinaprofessionalandappropriatemannerinclinicalareas,whetheronhospitalwards,inGPsurgeries, on home visits or in the Clinical Skills Centre with volunteer and simulated patients. Patients, visitors and carers generally perceive how you dress as an indication of your competence and of the standard of care you deliver.
• Identity badges must be worn at all times in clinical settings.
• You must ensure that your face is exposed and fully visible for the purposes of recognition by patients, tutors and other staff.
• Showing your face also makes it easier for hearing -impaired patients to hear and/or lip read.
• An important part of communication is by using facial expression and so any headdress must not cover the face while attending your course.
• White coats are not worn by students in Aberdeen and so both you and your clothing must be kept clean and tidy.
• Dress modestly to ensure that staff, visitors and, especially, patients are not distracted or offended.
• Denim jeans, very short skirts, shorts, tops with low or revealing necklines or any clothing which exposes the midriff or underwear is not appropriate in any clinical setting.
• Sleeves must either be short,¾ length or rolledup away from the wrists prior to hand decontamination, examination of patients or when carrying out procedures.
• This will enable effective hand decontamination to be carried out and reduce the risk of cross- infection.
• Ties, if worn, must be secured (e.g. by means of a clip or tie- tack) or tucked into the front of the shirt so that risk of cross- infection is minimised.
• If your ID badge is worn on a neck lanyard, ensure that the badge does not come into contact with patients or their immediate surroundings during clinical examination or procedures.
• Similarly, headscarves must be worn in a way which avoids contact with patients and their immediate surroundings.
• Footwear must be clean and in good repair and of a material which can be easily cleaned - splashes and spillages are not uncommon in clinical areas.
• Open--toed foot wear must be avoided for health and safety reasons.
• Longer hair must be tied or clipped back at all times in clinical areas.
• Hairstyles must not require frequent readjustment.
• Constantly having to move your hair out of your eyes/away from your face is not acceptable.
• Fingernails must be kept short and scrupulously clean.
• Long nails or nails with sharp edges can pierce fragile skin and can puncture latex gloves – cases of mucosal laceration have even occurred during rectal examination!
• False finger nails are totally inappropriate in a clinical setting.
• Nail varnish must not be worn.
• Jewellery must be kept to a reasonable minimum.
• Dangling beads and necklaces/long dangling earrings may interfere with some clinical examinations and procedures.
• Rings with stones, ridges, sharp edges or crevices must not be worn.
• A plain, smooth ‘wedding’ band is usually acceptable in most clinical areas.
• Any ring must be small enough to allow the use of gloves, without risk of tearing.
• Special care must be taken to wash and dry under the ring when decontaminating hands.
• Wrist watches must be removed to allow for effective hand decontamination and must not be worn during patient contact.
• You may pin your watch to your clothing or alternatively use a ‘fob’ style watch.
• Bracelets, rubber charity bangles and, in particular, the fabric or leather tie -on type of bracelet are not appropriate wear in any clinical area.
Always remember that the well-being and safety of the patient is of paramount importance. If you have a particular reason why you cannot comply with the above guidelines, please contact your Year Co- ordinator who will be happy to discuss the matter with you.


