Year A, Term 4 - QUT - Research
56
G1 Accelerated Inclusive Mathematics Project YuMi Deadly Maths AIM Module G1 Year A, Term 4 Geometry: Shape (3D, 2D, Line and Angle) Prepared by the YuMi Deadly Centre Queensland University of Technology Kelvin Grove, Queensland, 4059
Transcript of Year A, Term 4 - QUT - Research

G1 N
Acc
eler
ated
Incl
usi
ve M
ath
emat
ics
Pro
ject
YuMi Deadly Maths
AIM Module G1 Year A, Term 4
Geometry: Shape (3D, 2D,
Line and Angle)
Prepared by the YuMi Deadly Centre
Queensland University of Technology
Kelvin Grove, Queensland, 4059

Page ii AIM Module G1: Geometry – Shape (3D, 2D, Line and Angle) YuMi Deadly Maths AIM
ACKNOWLEDGEMENT
The YuMi Deadly Centre acknowledges the traditional owners and custodians of the lands in
which the mathematics ideas for this resource were developed, refined and presented in
professional development sessions.
YUMI DEADLY CENTRE
The YuMi Deadly Centre is a research centre within the Faculty of Education at the Queensland University of
Technology which is dedicated to enhancing the learning of Indigenous and non-Indigenous children, young
people and adults to improve their opportunities for further education, training and employment, and to equip
them for lifelong learning.
“YuMi” is a Torres Strait Islander Creole word meaning “you and me” but is used here with permission from the
Torres Strait Islanders’ Regional Education Council to mean working together as a community for the
betterment of education for all. “Deadly” is an Aboriginal word used widely across Australia to mean smart in
terms of being the best one can be in learning and life.
YuMi Deadly Centre’s motif was developed by Blacklines to depict learning, empowerment, and growth within
country/community. The three key elements are the individual (represented by the inner seed), the community
(represented by the leaf), and the journey/pathway of learning (represented by the curved line which winds
around and up through the leaf). As such, the motif illustrates the YuMi Deadly Centre’s vision: Growing
community through education.
The YuMi Deadly Centre (YDC) can be contacted at [email protected]. Its website is http://ydc.qut.edu.au.
CONDITIONS OF USE AND RESTRICTED WAIVER OF COPYRIGHT
Copyright and all other intellectual property rights in relation to this booklet (the Work) are owned by the
Queensland University of Technology (QUT). Except under the conditions of the restricted waiver of copyright
below, no part of the Work may be reproduced or otherwise used for any purpose without receiving the prior
written consent of QUT to do so.
The Work may only be used by schools that have received professional development as part of a YuMi Deadly
Centre project. The Work is subject to a restricted waiver of copyright to allow copies to be made, subject to the
following conditions:
1. all copies shall be made without alteration or abridgement and must retain acknowledgement of the
copyright;
2. the Work must not be copied for the purposes of sale or hire or otherwise be used to derive revenue;
3. the restricted waiver of copyright is not transferable and may be withdrawn if any of these conditions are
breached.
DEVELOPMENT OF THE AIM MODULES
The Accelerated Inclusive Mathematics (AIM) modules were originally developed from 2010 to 2013 as part of
the Accelerated Indigenous Mathematics project funded under the Commonwealth Government’s Closing the
Gap: Expansion of Intensive Literacy and Numeracy program for Indigenous students. The project aimed to
assist secondary schools with beginning junior-secondary Indigenous students who were at Year 2/3 level in
mathematics by developing a junior-secondary mathematics program that accelerates the students’ learning to
enable access to mathematics subjects in the senior-secondary years and therefore enhance employment and
life chances. The project developed three years of modules (Years A to C) that are vertical sequences of
learning to take students from their ability level to their age level in mathematics. The YuMi Deadly Centre
acknowledges the role of the Department of Education, Employment and Workplace Relations in the
development of the AIM project and these modules.
© 2014 Queensland University of Technology
through the YuMi Deadly Centre

© QUT YuMi Deadly Centre 2014 AIM Module G1: Geometry – Shape (3D, 2D, Line and Angle) Page iii
Contents
Page
Module Overview ....................................................................................................................................... 1 Background information for teaching shape ........................................................................................ 1 Sequencing for shape .......................................................................................................................... 4 Relation to Australian Curriculum: Mathematics .................................................................................. 6
Unit 1: 3D Shape Concepts and Experiences ............................................................................................... 7 1.1 Identifying and naming 3D shapes ............................................................................................... 7 1.2 3D construction activities ............................................................................................................ 8
Unit 2: 2D Shape Concepts and Experiences ............................................................................................. 11 2.1 Construction and properties/principles of 2D shapes ................................................................. 11 2.2 Exploring 2D shape properties/principles with geostrips ............................................................ 14 2.3 Exploring line and angle ............................................................................................................. 16
Unit 3: Line-Angle-Path Experiences ......................................................................................................... 17 3.1 Body (position/direction 2D shape) ....................................................................................... 17 3.2 Circle wheel/Rotagrams (turn angle) ..................................................................................... 18 3.3 Paper folding (line/angle shape) ............................................................................................ 19
Unit 4: 2D Shape Properties and Relationships ......................................................................................... 21 4.1 Geoboards/Dot paper/Maths Mat (line/angle 2D shape) ....................................................... 21 4.2 Geostrips (line/angle 2D shape) ............................................................................................ 22 4.3 Surface construction material (2D shape 3D shape) ............................................................... 23
Unit 5: Integration, Extension and Pythagoras .......................................................................................... 25 5.1 Developing relationships and principles ..................................................................................... 25 5.2 Relating 2D and 3D shapes ........................................................................................................ 26 5.3 Visualising cube nets ................................................................................................................. 27 5.4 Using Euler’s formula ................................................................................................................ 29 5.5 Pythagoras’s theorem ............................................................................................................... 30
Test Item Types ......................................................................................................................................... 33 Instructions ....................................................................................................................................... 33 Sub test items ................................................................................................................................... 35
Appendix A: Shapes and Their Properties ................................................................................................. 41 Shape concepts ................................................................................................................................. 41 3D shapes.......................................................................................................................................... 42 2D shape, lines and angles ................................................................................................................. 45
Appendix B: RAMR Cycle........................................................................................................................... 50
Appendix C: AIM Scope and Sequence ...................................................................................................... 51


© QUT YuMi Deadly Centre 2014 AIM Module G1: Geometry – Shape (3D, 2D, Line and Angle) Page 1
Module Overview
As stated in earlier AIM modules (e.g. Module N1), human thinking has two aspects: verbal logical and visual
spatial. Verbal logical thinking, associated in some literature with the left hemisphere of the brain, is the
conscious processing of which we are always aware. It tends to operate sequentially and be language and
symbol (e.g. number) oriented. Visual spatial thinking, associated in some literature with the right hemisphere
of the brain, can occur unconsciously without us being aware of it. It tends to operate holistically and
intuitively, to be oriented towards the use of pictures and to be capable of simultaneous processing.
Our senses and the world around us have enabled both these forms of thinking to evolve and develop. To
understand and to modify our environment has required the use of logic, the development of language and
number, an understanding of the space that the environment exists in and an understanding of shape, size and
position that enables these to be visualised (what we call geometry). Thus, as it is a product of human thinking
that has emerged from solving problems in the world around us, mathematics has, historically and presently,
two aspects at the basis of its structure: number and geometry.
This module is one of four in AIM that cover geometry. It looks at the basic component of geometry, namely
shape. It covers line, angle, 2D plane shape and 3D solid shape. This overview section looks briefly at
background information for teaching shape, sequencing for shape, and how the module relates to the
Australian Curriculum: Mathematics.
Background information for teaching shape
This subsection looks at a general framework for teaching geometry, the environmental and sub-concept
approaches to shape, the relationship and transformational approaches to geometry, and big ideas for shape.
General framework for geometry
Geometry can be one of the most exciting and interesting topics of mathematics. It provides an opportunity for
motivating learners that should not be missed. It can be colourful and attractive. Pattern and shape can be
created and admired. Success can be enjoyed by the majority. However, some approaches make geometry
teaching more effective:
1. The focus of geometry should be from and to the everyday world of the learner, and there should be a
balance between experiences which enable learners to interpret their geometric world, and processes
where problems are solved with visual imagery.
1. Learners’ activities should be multisensory (using actual physical materials and moving and transforming
them) and structuring (recording results on paper in words and pictures) – the “typical” geometry
classroom would have groups, physical materials and pens and books ready to record, and there should
also be opportunities for learners to display what they have made.
2. Teaching activities should move through three levels of development (based on van Hiele levels):
the experiential level, at which learners learn through their own interaction with their environment
(shapes are identified and named – e.g. this is a triangle);
the informal/analysis level, in which certain shapes and concepts are singled out for investigation at
an active, non-theoretical level (e.g. triangles have three sides and three angles); and
the formal/synthesis level, where a systematic study is undertaken and relationships identified (e.g.
interior angle sum of triangles is 180 degrees).

Page 2 Module Overview YuMi Deadly Maths AIM
At the experiential level learners should be allowed to learn through experience with materials not the
teacher’s words. Shape can be labelled and described but not broken into its component parts. Learners should
not be expected to be accurate in their statements. At the informal level, experiences can include analysing
shapes and constructing shapes from their properties. The sub-concept approach discussed later would be
appropriate here. At the formal level properties such as congruence and similarity can be investigated, and
formulae discovered. There should be no attempt at deductive proof and posing abstract systems.
It is also important to reverse activities. We tend to make shapes and then explore the diagonals. Why not
make diagonals and then see what shapes emerge as we move them, change their length, and their point of
intersection? Similarly, give a shape and ask for lines of symmetry – then ask students to draw a shape with a
given number, say three, lines of symmetry. Try to allow students to explore change in the two scenarios. It is
also important to be flexible and to show shapes in non-prototypic ways (e.g. a rectangle at angle to
horizontal) and to look for generalities (e.g. all squares are rectangles, all rectangles are parallelograms, all
parallelograms are quadrilaterals).
Specific framework for 2D and 3D shape
There are two ways of teaching shape that flow in opposite directions: the first of these, which AIM calls the
environmental approach, starts with the world around us, experiences 3D shapes, recognises 2D shapes from
the surfaces of the 3D shapes, and discovers properties; while the second, which AIM calls the sub-concept
approach, works in the opposite direction, from properties to 2D shape to 3D shape.
The environmental approach (or 3D approach)
Here the starting point and organising imperative for teaching is the environment, the everyday three-
dimensional world around the learners. Ideas are first developed from instances in the world and these ideas
then improve the observation powers, as the following shows:
In developing geometric concepts and processes, learners are given practical experiences classifying,
constructing and manipulating solids. Discussion of these experiences leads to identifying key distinguishing
properties. For example corners, flat and curved surfaces, edges, ability to roll, and so on. 2D shapes are
presented as they are encountered in the 3D solids, for example, rectangles from table tops, circles from
clocks, triangles from roofs of houses, and so on. These 2D shapes are then investigated for their properties. In
summary, this approach works as follows:
The sub-concept approach
Here the starting point for teaching is to analyse a task into its prior abilities and to order these abilities the
way they should be developed in learners. Then the ideas are taught, building from sub-concepts and sub-
processes to final concepts or processes. For a rectangle, the sub-concepts are line (straight and parallel), turn
and angle, right angle, closed, simple (lines do not cross), and boundary – the rectangle is a simple closed
boundary of 4 sides with opposite sides equal and parallel and all angles 90 degrees.
3D shape
2D shape
properties of shapes
line and angle

© QUT YuMi Deadly Centre 2014 AIM Module G1: Geometry – Shape (3D, 2D, Line and Angle) Page 3
We start with the concepts of boundary, line and angle. Lines are joined at angles to give paths. The ends of
these paths are joined to give a closed boundary. This closed boundary encloses a region. Simple closed paths
are seen as products of their paths and (unlike the 3D approach) it is not necessary to investigate these 2D
shapes for their properties to the same extent. For example, a figure formed from four equal straight lines
(composed of parallel pairs) with four right angles is a square. These do not have to be found as the properties
of a square. The resulting 2D shapes are then used as surfaces to construct 3D shapes. Once again, the
properties of the shape precede the naming of the shape (e.g. make a shape where all surfaces are squares –
always makes a cube). In summary the approach works as follows:
Relationship vs transformational geometry
Similar to number and operations, geometry can be taught from a relationship perspective or a
transformational or change perspective. An example of this is similarity. Similar shapes can be considered as
shapes that have angles the same and sides in ratio – this is relationship geometry. Similar shapes can also be
considered as a result of one shape being blown up by a projector – this is transformational geometry.
Overall, transformational geometry is concerned with three changes: (a) topological (how living things change
– length and straightness change); (b) projective (how our eyes see the world – length changes, straightness
does not change); and (c) Euclidean (how the human-made world changes – length and straightness both do
not change). The Australian Mathematics Curriculum emphasises Euclidean and these changes are flips, slides
and turns. They are similar to symmetries and lead to tessellations and dissections. They also underpin
congruence. These topics are covered in Module G2 Euclidean Transformations. Projective and topological
changes are not a strong part of the Australian Mathematics Curriculum but are common in NAPLAN items.
They begin with visualisation experiences and lead to similarity, trigonometry, perspective and networks. These
topics are covered in Module G4 Projective and Topology.
This module, Module G1 Shape, is relationship geometry and does not deal with change. So also is the third
module, Module G3 Coordinates and Graphing.
Big ideas for shape
1. Change vs relationship. Mathematics has three components – objects, relationships between objects, and
changes/transformations between objects. Everything can be seen as a change (e.g. similar shapes are
formed by “blowing one up” using a projector) or as a relationship (similar shapes have angles the same
and sides in proportion or equivalent ratio). Geometry can be studied as change or relationship.
2. Interpretation vs construction. Things can either be interpreted (e.g. what are the line and angle
properties for this shape) or constructed (construct a shape of 4 sides with 2 sides parallel). This is
particularly true of geometry – shapes can be interpreted or constructed.
3. Parts vs wholes. Parts can be combined to make wholes and wholes can be partitioned to form parts (e.g.
making or dividing a shape from or into a collection of smaller shapes). In geometry, this big idea is
particularly applicable to dissections and tessellations.
4. Angle formulae. Polygon interior angle sum = 180 × (number of sides – 2); polygon exterior supplementary
angle sum = 360; line crossing a parallel has corresponding and alternate angles equal; and so on.
5. Length, diagonal and rigidity relationships. Pythagoras’s theorem (square of hypotenuse equals square of
adjacent side plus square of opposite side for right-angle triangles); the number of diagonals in a polygon is
equal to half the product of number of sides and number of sides minus 3; the number of diagonals to
make a polygon rigid is 3 less than the number of sides; and so on.
6. Euler’s formula. Nodes/corners plus regions/surfaces equals lines/edges plus 2 (holds for 3D shapes and
networks).
line and angle
properties of shapes
2D shape
3D shape
position and direction
Perspective drawing

Page 4 Module Overview YuMi Deadly Maths AIM
Sequencing for shape
This section briefly looks at the role of sequencing in shape (and geometry in general) and in this module. The
section concludes with a brief comment on the cultural implications for geometry.
Sequencing in geometry
AIM divides geometry into four separate modules each with its own sequence:
(a) Module G1: Shape – 3D and 2D shape, line and angle and their properties (using both environmental
and sub-concept approaches, and including Pythagoras’s theorem);
(b) Module G2: Euclidean Transformations – the geometry of flips, slides and turns, line and rotational
symmetry, tessellations and dissections (puzzles) leading to congruence;
(c) Module G3: Coordinates and Graphing – directions and polar coordinates, Cartesian coordinates,
directed numbers, axes and line graphs, slope and -intercept, distance and midpoints, graphical
solution methods, and nonlinear graphs; and
(d) Module G4: Projective and Topology – visualisation, divergent and affine projections, topology,
similarity and scale, perspective and networks, and trigonometry.
Modules G1 and G3 tend to be relationship geometry and Modules G2 and G4 tend to be transformational
geometry. However, this dichotomy is not strict and both sides can be used in all modules. It is more exact to
say that Modules G1 and G3 take a relationship perspective while G2 and G4 take a transformational
perspective.
Because they are different to each other, each of the modules has its own vertical sequence and this is given
below, with dotted lines showing across-module connections and sequences.
Shape
GEOMETRY
3D concepts and experiences
Euclidean Transformations
2D concepts and experiences
Projective and Topology
Line-angle-path experiences
3D properties and relationships
Relationships, visual imagery
and art
Flips-slides-turns and symmetry concepts
Congruence
2D properties and relationships
Pythagoras
Tessellation and dissection
experiences
Properties and puzzles
Visualisation experiences
Perspective and networks
Projective experiences and
properties
Similarity and scale
Coordinates and Graphing
Directions and polar coordinates
Cartesian coordinates
Directed-number axes and line graphs
Distance and midpoints
Slope and y-intercept
Graphical methods to solve for
unknowns
Topology experiences and
properties
TRANSFORMATIONRELATIONSHIP
Trigonometry

© QUT YuMi Deadly Centre 2014 AIM Module G1: Geometry – Shape (3D, 2D, Line and Angle) Page 5
Sequencing in this module
The shape sequence in this module follows the teaching framework given above (except in the positioning of
Pythagoras). It begins with 3D shape experiences, uses these to introduce 2D shape experiences and then uses
these 2D shape experiences to introduce line and angle. At this point the direction of learning changes and line
and angle are used to rebuild 2D shape at a deeper level. In turn, this new understanding of 2D shape is used to
rebuild 3D shape again at a deeper level. This is a curriculum reversing from 3D shape 2D shape line and
angle properties to line and angle properties 2D shape 3D shape. This sequence also encompasses
Pythagoras’s theorem.
The module is, therefore, composed of the following sections:
Overview: Background information, sequencing and relation to Australian Curriculum
Unit 1: 3D shape concepts and experiences
Unit 2: 2D shape concepts and experiences
Unit 3: Line-angle-path experiences
Unit 4: 2D shape properties and relationships
Unit 5: Integration, extension and Pythagoras
Test item types: Test items associated with the five units above which can be used for pre- and post-tests
Appendix A: Shapes and their properties – descriptions and teaching ideas for 3D shape, 2D shape, line
and angle
Appendix B: RAMR cycle components and description
Appendix C: AIM scope and sequence showing all modules by year level and term.
Units 1 and 2 follow the environmental approach and Units 3 and 4 follow the sub-concept approach, while
Unit 5 integrates both approaches. The module provides many ideas for exploring shape. At this stage, these
ideas are not given as RAMR cycle lessons. It is the expectation that teachers will provide a rich teaching plan
for each of the sets of ideas based on the RAMR cycle from Appendix B.
Cultural implications
The teaching of geometry appears not to have the same problems for Indigenous and low SES students as the
teaching of number, operations and measurement. The first reason for this is that the learning style and
thinking strengths of both Aboriginal and Torres Strait Islander and low SES students are holistic-intuitive and
visual-spatial, meaning that they have an affinity for geometry as this is mathematics taught as a structural
whole and in a visual-spatial form. Second, traditional Australian teaching of mathematics is procedural and
rote and focuses on number and arithmetic as algorithmic procedures, while geometry lends itself to hands-on,
investigative, and thematic learning. The third reason is that geometry teaching, if done expertly, involves
construction and pattern, and a strong connection to trades and art, both endeavours that attract Aboriginal,
Torres Strait Islander and low SES students. Finally, geometry is a strong cultural tradition for Aboriginal and
Torres Strait Islander people.
Page 6 Module Overview YuMi Deadly Maths AIM
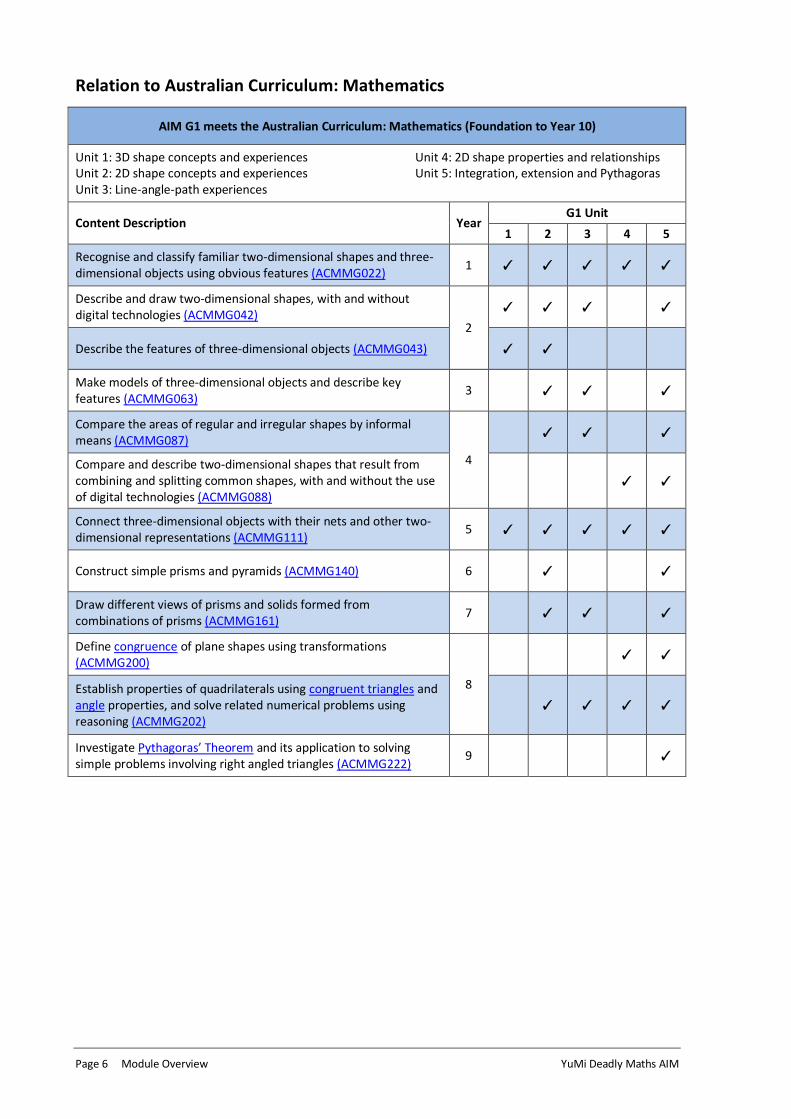
Relation to Australian Curriculum: Mathematics
AIM G1 meets the Australian Curriculum: Mathematics (Foundation to Year 10)
Unit 1: 3D shape concepts and experiences Unit 4: 2D shape properties and relationships Unit 2: 2D shape concepts and experiences Unit 5: Integration, extension and Pythagoras Unit 3: Line-angle-path experiences
Content Description Year G1 Unit
1 2 3 4 5
Recognise and classify familiar two-dimensional shapes and three-dimensional objects using obvious features (ACMMG022)
1 ✓ ✓ ✓ ✓ ✓
Describe and draw two-dimensional shapes, with and without digital technologies (ACMMG042)
2
✓ ✓ ✓ ✓
Describe the features of three-dimensional objects (ACMMG043) ✓ ✓
Make models of three-dimensional objects and describe key features (ACMMG063)
3 ✓ ✓ ✓
Compare the areas of regular and irregular shapes by informal means (ACMMG087)
4
✓ ✓ ✓
Compare and describe two-dimensional shapes that result from combining and splitting common shapes, with and without the use of digital technologies (ACMMG088)
✓ ✓
Connect three-dimensional objects with their nets and other two-dimensional representations (ACMMG111)
5 ✓ ✓ ✓ ✓ ✓
Construct simple prisms and pyramids (ACMMG140) 6 ✓ ✓
Draw different views of prisms and solids formed from combinations of prisms (ACMMG161)
7 ✓ ✓ ✓
Define congruence of plane shapes using transformations (ACMMG200)
8
✓ ✓
Establish properties of quadrilaterals using congruent triangles and angle properties, and solve related numerical problems using reasoning (ACMMG202)
✓ ✓ ✓ ✓
Investigate Pythagoras’ Theorem and its application to solving simple problems involving right angled triangles (ACMMG222)
9 ✓

© QUT YuMi Deadly Centre 2014 AIM Module G1: Geometry – Shape (3D, 2D, Line and Angle) Page 7
Unit 1: 3D Shape Concepts and Experiences
This unit has the first activities for the environmental approach. It covers identifying and naming 3D shapes,
and constructing 3D shapes
1.1 Identifying and naming 3D shapes
3D shapes in the environment
Look around school and home – what 3D shapes can be identified? – houses, shed, cupboards, clocks, tanks,
beach balls, and so on. What properties do they have – which objects roll, which have flat surfaces, which have
pointy corners, which stack easily, which pack with best use of space, and so on?
Draw these shapes. Look for shapes in the classroom that are the same.
Use simple 3D shapes to construct a shape similar to a house, a clock, and so on.
Deconstructing 3D shapes
Materials: Various sizes and shapes of 3D shapes that can be unfolded – commercial packaging is very good.
Include a sphere as well.
Have students do the following:
Take the boxes of the 3D shapes and cut them/pull them apart so they can see the net.
Reconstruct the 3D shape by reforming it from the net. Practise this until familiar with relationship
between net and box.
Cut/pull apart same boxes different ways so they can see that different looking nets form the same
box.
Notice that the different prisms and pyramids are formed by different 2D shapes.
Classifying 3D shapes
Have a selection of solid 3D shapes available for students to handle, touch and feel. Have students do the
following activities:
Divide the set of shapes into two groups according to some criteria.
Draw the two sets of shapes and write an explanation of the basis for your classification. For example:
I put all the shapes with ___ in one group and all the shapes with ___ in the other group.
Put all the solid shapes into one group and then form another two groups with the shapes but use a
different basis for this classification.
Draw the new two groups of shapes and write your reasons for classifying them as you did.
Compare your classifications with other group members. Discuss the utilitarian properties of the
shapes.
Discuss naming conventions of 3D shapes (e.g. prism vs pyramid).
Acknowledge the differences between a pyramid and prism, particularly that the sides of a pyramid
are made up of triangular shapes coming to a point, while the sides of a prism are rectangular.
Pyramids have one base and prisms have two bases.

Page 8 Unit 1: 3D Shape Concepts and Experiences YuMi Deadly Maths AIM
1.2 3D construction activities
Constructions from nets
This activity is similar to the previous activity in section 1.1, but involves the students in constructing the
shapes themselves from nets provided.
Purposes:
To develop the notion that 3D shapes are closed and have three dimensions (length, width, height).
To develop the notion that solid shapes have faces which are plane shapes and that many of the faces
are congruent.
To develop the language associated with solid shapes (e.g. face, base, closed, open, edge, vertex).
To develop the notion that 2D and 3D shapes are related.
Materials: Nets of the following 3D shapes – rectangular prism, cube, triangular-based prism; square-based
pyramid, pentagonal-based pyramid; cylinder (six nets altogether); a sphere; scissors, tape, ruler, compasses;
waste paper basket.
Processes: Folding, visualising.
Problem-solving strategy: Following directions; guess and check (cone); thinking visually.
Directions:
Construct the 3D shapes from the nets provided on the next page and obtain a sphere.
Divide your set of shapes (the ones you constructed and the sphere) into two groups according to
some criteria. Draw the two sets of shapes and write an explanation of the basis for your classification.
For example: I put all the shapes with ___ in one group and all the shapes with ___ in the other group.
Put all your solid shapes into one group and then form another two groups with the shapes but use a
different basis for this classification. Draw the new two groups of shapes and write your reason for
classifying them as you did.
Compare your classifications with other group members. Discuss the utilitarian properties of the
shapes.
Challenge – make a net into a solid, place symbols/pictures on each side of the solid, ask the students
to place the same symbols/pictures on their nets before folding them so that when folded, the
resulting solid has symbols/pictures the same as the original (very hard).

© QUT YuMi Deadly Centre 2014 AIM Module G1: Geometry – Shape (3D, 2D, Line and Angle) Page 9
RECTANGULAR PRISM CUBE
TRIANGULAR-BASED PRISM SQUARE-BASED PRISM
PENTAGONAL-BASED PYRAMID CYLINDER
CONE

Page 10 Unit 1: 3D Shape Concepts and Experiences YuMi Deadly Maths AIM
Construction from other materials
Purposes:
To develop creativity and the language associated with solid shapes (e.g. face, base, closed, open,
edge, point/vertex).
To develop the notion that 3D shapes are closed, have three dimensions (length, width, height), have
faces which are plane shapes and that many of the faces are congruent.
Materials: Zaks, polydrons, construct-o-straws, other commercial materials. (Students need a lot of free play
with materials right throughout their school life – they never tire of such creative activities.) A special material
for constructing 3D shapes is the Maths Mat – this is a 6×10 grid on hessian with different-coloured long elastic
bands – it is extremely effective as students can quickly build large 3D shapes, get inside them, and see them
from all directions.
Processes: Flipping, turning, sliding, visualising, assessing, monitoring.
Problem-solving strategy: Guess and check; thinking visually and creatively.
General directions:
Create as many different solid shapes as you can. Think about what you would call your shape and
how you would describe it to someone else.
Make basic shapes (prisms, pyramid) and look for properties (e.g. the type of faces).
Make shapes out of play dough or potatoes and cut cross-sections – look at relation between shape
and cross-section.
Discover Euler’s formula (edges + 2 = surfaces + vertices).
Directions for Maths Mat:
Use the first elastic band and students holding corners to construct a 2D base on the mat (e.g.
triangles, square, rectangle).
Use other students and other bands to build a prism or pyramid on the base (students have to hold
more than one band at a vertex) – a good idea is to make a rectangle, add two more bands and
another student and turn into a pyramid, then add another student and no more bands and turn the
pyramid into a triangular prism on its side, then add another band and change to a rectangular prism –
then make these shapes higher, lower, and so on.
Give more complex shapes to make (e.g. a trapezium prism on its side – like a folder box).
Count edges, surfaces and vertices (and discover Euler’s formula – edges + 2 = surfaces + vertices) –
note how the vertices equal (in number) the people holding the bands.
Put one student in charge – get a 3D shape to copy – student has to organise/direct other students to
make the shape.

© QUT YuMi Deadly Centre 2014 AIM Module G1: Geometry – Shape (3D, 2D, Line and Angle) Page 11
Unit 2: 2D Shape Concepts and Experiences
This unit takes the environmental approach from 3D shapes to 2D shapes, lines and angles.
2.1 Construction and properties/principles of 2D shapes
Purposes:
To construct plane shapes.
To consolidate the properties of plane shapes through investigations.
To develop principles that hold true for shapes.
Materials: Maths Mat, geoboards, geostrips, A4 paper, circles, scissors, rotagrams, protractors, ruler, coloured
texta, coloured squares.
Processes: Constructing, folding, visualising. Problem-solving strategy: Modelling.
Constructing polygons
Use elastic bands on the Maths Mat, rubber bands on geoboards to make shapes by students/nails
holding the corners of the shapes – make basic shapes then more complicated ones – which can you
make and which can you not make?
Draw a shape and then get students to copy it, then change its length and orientation (always use at
least three orientations to prevent shapes always being made parallel to vertical and horizontal lines).
Repeat above for geostrips but join plastic strips with fasteners.
Count sides and angles and name the shapes.
Investigating the diagonals, angles and sides of a square
Fold a rectangular sheet of paper as shown to produce a square.
Fold the square to show that: its opposite angles are equal; its adjacent angles are equal; its opposite
sides are equal; and its adjacent sides are equal.
Mark the diagonals in texta colour and then fold the square along the diagonals to show that the
diagonals bisect each other. Use a rotagram set at 90°, a protractor or a right-angle reckoner to show
that all the angles in the square (including those where the diagonals intersect) are right angles.
Investigating the diagonals, angles and sides of a rhombus
Fold a rectangular sheet of paper to produce a
rhombus, as shown on right. By folding, show that
the opposite angles are equal, the adjacent angles
are not equal, and the adjacent sides are equal.
Mark the diagonals with a texta. Fold to show that the diagonals bisect each other and are
perpendicular (use right-angle reckoner to validate perpendicularity). Can you show, by folding,
whether the opposite sides are equal/unequal? What would you need to do?
Cut here and discard the shaded portion
Cut here and discard the shaded portion
A 1
2
A Fold Corner A to the opposite longer
Side so that the edges don’t coincide.
Cut off the parts marked 1 and 2.
A 1
2
A Fold Corner A to the opposite longer
Side so that the edges don’t coincide.
Cut off the parts marked 1 and 2.

Page 12 Unit 2: 2D Shape Concepts and Experiences YuMi Deadly Maths AIM
Circles and polygons
Determining the diameter, centre and radius of a circle
Fold a circle in half; open it. What part of the circle is shown by the fold line?
Fold the circle in half again, using a different fold line (does not have to be perpendicular to the first
fold line); open it. Can you see the centre of the circle?
How many radii do you see?
Inscribing a square in a circle
Fold a circle in half; fold in half again; open the circle. You should see two diameters bisecting each other at
right angles. Fold in the edges of the circle to form four equal arcs (as shown in the diagram below). These fold
lines will be chords of the circle. Open the circle; you should see a square formed by the chords.
Inscribing a rectangle in a circle
Fold a circle in half; open it; fold again but not at right angles to the first fold; open it. You should see two
diagonals that bisect each other but are not perpendicular to each other.
Fold in the edges of the circle to form four arcs. Open the circle. You should see a rectangle formed by the fold
lines (chords of the circle). This is a similar process to the example above.
Inscribing an equilateral triangle in a circle
Find the centre of the circle (fold in half, then in half again). Fold one side to the centre to form an arc; repeat
this for the second and third sides (as shown below). Open the circle and you should see an equilateral triangle
inscribed in the circle.
Check that all sides are equal and that all angles are equal. Fold the triangle to
make 4 smaller triangles; fold these triangles differently to make a tetrahedron.
Inscribing a regular hexagon in a circle
Fold to find the centre; open. Fold opposite edges to the
centre line; open. Fold in edges to make six arcs; open.
You should see a hexagon formed by the chords (fold
lines).

© QUT YuMi Deadly Centre 2014 AIM Module G1: Geometry – Shape (3D, 2D, Line and Angle) Page 13
Constructing polygons through cutting and folding coloured squares
Constructing an isosceles triangle
Fold the coloured square in half either horizontally or vertically; cut from one corner of the fold line to the
opposite edge (see the diagram below); open the shape and you should see an isosceles triangle (two equal
sides and angles).
Constructing a square and a rhombus
Fold the square in half vertically; fold in half again horizontally. If you cut along any diagonal, you will produce a
rhombus. However, to produce the square, you need to cut across the fold at an angle of 45.
Constructing a regular octagon and an irregular octagon (a star)
(1) Fold a square in half vertically and then fold again horizontally (as for the rhombus). (2) Fold the paper again
but along the diagonal. (You have now folded the paper in eighths.) Hold the paper so that the diagonal is in
the position shown below. Cut through the folds at an angle of 45. Open the paper and you should see a
regular octagon.
Repeat steps (1) and (2) with another square. Hold the paper in the same position
as before but this time cut so that you have one long side and one short side (see
the diagram on right). Open the paper and you should see a star with eight sides.
To make a square with eight equal parts, fold into eighths as
before but cut from the diagonal fold to the top at a right angle
(see the diagram on left.)
Investigations
There are wonderful designs that can be made from a circle using a compass and pen. Search the Internet and
books to find some of these designs. Make one and colour it. Make a large poster of your design.
Circles are the basis of designs in Indigenous art. Approach local Indigenous artists and learn about the role of
circles in art. Construct your own Indigenous circle design.
Why are circles good for wheels? Does this relate to line and rotational symmetry? What are the line
symmetries and rotational symmetries for a circle?

Page 14 Unit 2: 2D Shape Concepts and Experiences YuMi Deadly Maths AIM
2.2 Exploring 2D shape properties/principles with geostrips
Purposes:
To develop the notion of rigidity and the relationship between rigidity and diagonals.
To develop relationship between polygons and interior angles and polygons and total number of
diagonals.
To develop the notion that space and number are related.
To develop, informally, the language associated with polygons (e.g. regular, irregular, diagonals,
angles).
Materials: Geostrips; worksheet with Table 1 and Table 2 (see below).
Processes: Constructing.
Problem-solving strategy: Investigating, looking for patterns.
Rigidity and interior angles
Using the geostrips, construct a door (a rectangle). Can you move the sides or are they fixed/rigid? When you
move the sides of the rectangle, what part changes – the length of each side? The parallelness of the opposite
sides? The size of the angles? How can you make the shape rigid?
Construct a triangle, a square, a trapezium, a pentagon, a hexagon. Which shapes have rigidity? Add the
minimum number of diagonals needed to make each of the above shapes rigid. (Don’t forget the diagonals
cross.) How many triangles did the diagonal/s divide the original shape into? (Hint: This process will divide the
polygon into triangles.)
Complete Table 1 using the information you have gained from the previous activities. Find a pattern and then
predict how many diagonals are required to make a heptagon (7-sided polygon) and an octagon rigid. What
would be the sum of the interior angles of each shape? Do the same patterns hold for both regular and
irregular polygons? Find out where the property of rigidity is used in real life.
Table 1: Relationships between polygons and the sum of the interior angles
Name of polygon No. of sides No. of diagonals
required for rigidity No. of triangles
made Sum of the interior
angles
Triangle 3 0 1 180°
Rectangle 4 1 2 360°
Square
Trapezium
Pentagon
Hexagon
Number of diagonals
Construct the shapes listed in Table 2 and add in all the possible diagonals (the diagonals will cross each other).
Complete Table 2.
Find a pattern that will enable you to determine all of the different possible diagonals for a 100-sided polygon.
Write an algebraic equation for the pattern.

© QUT YuMi Deadly Centre 2014 AIM Module G1: Geometry – Shape (3D, 2D, Line and Angle) Page 15
Table 2: Relationship between polygons and the number of different diagonals
Name of polygon
No. of sides No. of vertices
(A) Diagonals from each
vertex (B) A × B
Total no. of different diagonals
Triangle 3 3 0 0 0
Rectangle 4 4 1 4 2
Square
Pentagon
Hexagon
Heptagon
Octagon
Investigating shapes built from diagonals (part whole)
Take two equal geostrips and join them at their centre. Considering these as the diagonals, build the shape that
encloses them, using the fewest number of strips. What shape have you made? Repeat the process above but,
this time, use two unequal geostrips. What shape have these diagonals produced?
Join two equal geostrips with the centre of one joined to anything but the centre or the end of the other. What
shape have these diagonals produced? Repeat the process but use two unequal geostrips as the diagonals.
What shape have these diagonals produced?
Experiment with different diagonals to answer the following:
(a) Can the diagonals of a rectangle intersect at right angles without forming a square?
(b) Can the diagonals of a parallelogram be equal without forming a rectangle?
(c) When do the diagonals of a parallelogram intersect at right angles?
(d) Can a kite have equal diagonals intersecting at right angles?
(e) Can a quadrilateral have equal diagonals intersecting at right angles and yet not be a kite, a
parallelogram or a trapezium?
Linkages (work in pairs for these activities)
Using three equal geostrips, construct the James Watt linkage shown below. Place a sharp pencil through the
centre point of the middle strip (P). Keeping the end points of the other geostrips fixed, move the geostrips as
much as possible. What path does the pencil at P trace out?
P (ce n tre o f m id d le s tr i p )
FIXED
FIXED
Using two long and equal geostrips and two short and equal geostrips, construct a pantograph as shown below.
B ( mi d- poi nt )
mi d- poi nt s
AFIXED

Page 16 Unit 2: 2D Shape Concepts and Experiences YuMi Deadly Maths AIM
Copy a picture. Insert a sharp pencil through A. Place the picture under B and move point B around the outline
of the picture. Is the copy larger or smaller than the original? Insert a sharp pencil at B. Place the picture under
A and move point A around the outline of the picture. Is the copy larger or smaller than the original?
2.3 Exploring line and angle
Straight and parallel
Students can use reality to study line and angle. For example, they can identify as many occurrences of straight
lines in their life as possible. For each, they can describe the occurrence and analyse why they think the line is
straight. The same can be done for parallel lines.
Get students to try to describe a straight line to a classmate without relating to physical objects. Get them to
list those attributes of a straight line which distinguish it from a curved line. Discuss in what situations each is
most useful. For example, which is easier to measure and why?
Lead discussion to wider meanings of straight, for example, what attributes of a straight line is Johnny Cash
evoking when he sings, “Because you’re mine, I’ll walk the line”?
Get students to explore what straightness means in reality. For example, discuss what is a straight line when
walking on the equator. Experiment with a globe to determine which curves on the globe share which
properties of straight lines. For example, on a sphere what are the analogues to parallel lines?
Angles at intersections
When two straight lines intersect in a point, several angles are formed. Are all of the angles always the same?
Explore these angles. Are all of the angles sometimes the same? Are some of the angles always the same? Are
some of the angles sometimes the same? Experiment with some straight lines in order to arrive at answers to
these questions. Illustrate your answers with examples. Discover the parallel line-angle principles.
Problems to solve:
1. Two straight lines intersect in such a way that the measure
of angle A is 145°. Find the measures of angles B, C, and D.
Use reasoning rather than a protractor to arrive at your
answer.
Measure of angle A = 145° Measure of angle C = 35°
Measure of angle B = 35° Measure of angle D = 145°
2. Two parallel lines are intersected by a transversal in such a way
that the measure of angle F is 72°. Find the measures of the
other lettered angles.
Measure of angle A = Measure of angle E = Measure of angle C = Measure of angle G = 108°.
Measure of angle B = Measure of angle F = Measure of angle D= Measure of angle H = 72°.
3. Two perpendicular lines are intersected by a transversal in such a way
that the measure of angle D is 54o. Find the measures of the other
lettered angles.
Measure of angle B = 54°. Measure of angles A and C = 126°. Measure
of angle I = 90°. Measure of angles F and H = 36°. Measures of angles E
and G = 144°.

© QUT YuMi Deadly Centre 2014 AIM Module G1: Geometry – Shape (3D, 2D, Line and Angle) Page 17
Unit 3: Line-Angle-Path Experiences
This is the first unit for the sub-concept approach. It looks at building the position and direction angle and
line path as a precursor to building 2D shape from earlier concepts. It organises activities by the material
being used (bodies, circle wheel, and paper folding).
3.1 Body (position/direction 2D shape)
Angle as turn
Stand and pick two directions. Place arms together in front of body and aim at the first direction. Turn body
(holding arms in same position in front of body) to second position.
Repeat this turn in a different way. Point towards the first direction, turn one hand to the second direction
(without moving body), turn body, and then turn second hand (in four steps as below).
Relate the change from one direction to another to the drawing of angle – stress that angle is the
turn between the two directions. Use body to make large angles (turning a long way) and small
angles (turning only a short amount). Use body to make a right angle – put arms straight out
forward, swing one arm around to the side (so it makes a straight line from fingertips to across
the shoulders), then complete this turn – this is close to a right angle.
Introducing lines and paths
For a straight line, walk forward without turning. For a curved line, walk forward turning
constantly. For parallel lines, link up with a partner and walk forward side by side in the same
direction without turning. For intersecting lines, walk forward with your partner so your paths
cross (don’t bump into each other). For paths, walk forward without turning, stop and turn, walk
forward, stop and turn, and so on. Repeat this until you have the straight lines that your path
requires.
Introducing 2D shape
Walk simple open paths (starting and stopping at different positions, with no crossing) and complex open paths
(starting and stopping at different positions, with crossing). Walk complex closed paths (starting and stopping
at same place, with crossing) and finally walk simple closed paths (starting and stopping at same place without
crossing). Discuss how simple closed paths are 2D shapes.
Make shapes from characteristics. For example, walk a simple closed path of three straight-line sides (result is
always a triangle); walk a simple closed path of four sides with all angles equal to 90 degrees (a rectangle or
square – depending on whether you walk the same or different length sides). Lay out shapes by placing objects
at turning points.

Page 18 Unit 3: Line-Angle-Path Experiences YuMi Deadly Maths AIM
Sunlight (parallel lines)
Parallel lines can be advantageously studied by shadows in sunlight. Since the rays
of the sun are parallel, then parallel sides remain parallel regardless of the way we
tilt the shape and screen. (This does not happen in shadows by torchlight.)
Cut out a figure which has one pair of parallel sides. Go out into the sunlight. Cast
shadows on the screen. Tilt screen and shape. Do the parallel sides remain parallel
in the shadow? Go inside and cast shadows on the screen using a torch. Can you
now get non-parallel sides? You can also study straight lines in this way. If your
screen is flat a shadow of a straight stick is always straight.
3.2 Circle wheel/Rotagrams (turn angle)
Angle as turn
Construct an angle wheel by cutting out two identical circles of different colours (shade one in). Put one circle
on top of the other (the coloured one underneath) and cut a slit to the centre of both circles. With the slits in
line and at 3 o’clock slip the lower right part of the top circle underneath the upper right part of the bottom
circle. Turn the top circle anticlockwise and you will see an angle whose arms are the slits in the two circles, as
shown below.
Use your angle wheel to make an acute angle, a right angle, an obtuse angle, a straight angle, and a reflex
angle. Use your right-angle reckoner (see section 3.2 Paper folding). It may be useful to mark, with lines, 90°,
180°, 270° points on the top circle of your angle wheel.
Look at angles on the circle wheel – which of the angles below are acute, obtuse or reflex?
Comparing angles
Do one of the following. Build an angle wheel out of a square of plastic with a circle and
radius line drawn on it and a circle of plastic with a radius line as on right. Pin the two
pieces together through the centre of both circles so that the circle will turn on top of the
square (and as it turns, the two radius lines will turn apart showing an angle). Or get hold
of rotagrams – a commercial form of angle wheels that are plastic and see-through.
Use the wheel to compare size of angles (the bigger angle has the most turn) as below – turn the wheel so that
it equals the first angle, then move wheel to second angle and check whether the wheel has to be turned more
(first angle is smaller) or less (first angle is larger).

© QUT YuMi Deadly Centre 2014 AIM Module G1: Geometry – Shape (3D, 2D, Line and Angle) Page 19
3.3 Paper folding (line/angle shape)
Use scrap paper to complete the following paper-folding activities.
Representation with paper Development
1. Line
Test for occurrence of straight lines, flatness (of desks),
straightness (of doors), etc.
2. Angle as turn
Open and close folded sheet (or book or hinged
strips).
Progress to angle as amount of turn. Classify turns as more
or less than a right angle (obtuse and acute) – classify
angles as more than a straight line (reflex).
3. Right angle (making a right-angle reckoner)
Classify angles as being equal to a right angle, smaller than
a right angle (acute angle), and larger than a right angle
(obtuse angle). Classify triangles: one right angle = right
triangle; all angles less than right angle = acute triangle;
one angle larger than a right angle = obtuse triangle.
4. Two right angles meeting in a straight line
Test for where two right angles meet in a straight line (e.g.
door frame, window). Use to also classify angles as larger
than a straight line (reflex angle).
5. Right angles meeting in a complete turn
Test for occurrence (e.g. window). Put paper on floor.
Stand where fold lines meet. Turn from one fold line to the
next, i.e. rotate body through right angle or quarter turn
(showing that four such turns give a complete 360° turn –
see below). Introduce compass bearings of north, south,
east and west.
The four turns on the right-angle reckoner (fully opened) that can lead to compass bearings (north, east, south
and west):
N
E W
S

Page 20 Unit 3: Line-Angle-Path Experiences YuMi Deadly Maths AIM
6. Bisector of an angle
7. Perpendicular
Construct perpendiculars from a point to a line (ensure fold
goes through point). Construct perpendicular bisectors (see
8 below).
Use these to construct squares, rectangles, etc.
8. Perpendicular bisector
Construct isosceles triangles
9. Parallel
Test for parallel lines (e.g. windows, doors, shelves).

© QUT YuMi Deadly Centre 2014 AIM Module G1: Geometry – Shape (3D, 2D, Line and Angle) Page 21
Unit 4: 2D Shape Properties and Relationships
This is the second unit for the sub-concept approach and continues work into 2D shape as a closed simple path
for geoboards and geostrips. It continues on to using surfaces to construct 3D shapes.
4.1 Geoboards/Dot paper/Maths Mat (line/angle 2D shape)
Purposes:
To develop the basic geometric ideas in the sub-concept approach (e.g. points, angle, line, path, region
and shape) and, informally, the language associated with plane shapes (e.g. side, closed–open,
parallel, equal length, angle, simple–complex, concave–convex).
To show a sequence of activities involving problem solving that move from angle to shape.
To develop the notion that plane shapes have a boundary with no gaps (and therefore enclose a
region with two dimensions – length and width).
Materials: At least 5 × 5 geoboards; rubber bands or dot paper.
Processes: Creating, constructing.
Lines
Make the shortest line segment (part of a line) possible on your geoboard. Make the longest line segment
possible. Make three line segments of different lengths (different rubber bands). Make as many different line
segments as you can in 30 seconds. How many times did your line segments cross? What shapes did your lines
make? (Note: Make sure students realise that straight lines do not have to be only vertical, horizontal, or 45°.)
Angles
Make a narrow angle then a wide angle. (Use different rubber bands for each ray/arm.) Make an angle from a
starting point: at the edge of the geoboard and near the centre.
Make an angle like the corner of a square (a right angle). Make an angle with two nails between the rays and
with zero nails between the rays. Make an angle with six nails outside the rays, and with four nails inside and
five nails outside the rays.
Use right-angle reckoner to help make acute, obtuse, reflex and right angles – make the right angle so its rays
are not vertical, horizontal or at 45°. (Note: The way to do this is to have opposite nail movements, e.g. if one
ray is two nails up-down and three nails left-right or across, then the other ray must be the opposite – three
nails up-down and two nails across).
Paths and region
Choose one nail. Choose another nail as far away as possible. Make a path of line segments from one nail to the
other (use double rubber band method). How many times did your lines cross? How many angles did you
make? Repeat above but return to the first nail. Try again without any crossings (to make a region). How many
lines, how many angles?
Introduce types of paths. If lines cross, path is complex; if lines do not cross, path is simple. If path returns to
starting nail, path is closed; if path does not return to starting nail, path is open. Make examples – simple open
path, complex open path with one crossing, complex closed path with two crossings.
Focus on simple closed paths that make shapes (the boundary) and regions (boundary and inside). Students can
now try switching to one rubber band.

Page 22 Unit 4: 2D Shape Properties and Relationships YuMi Deadly Maths AIM
Make a region with five nails on the outside, only one nail inside it, zero nails inside it, one nail outside it, one
nail outside and three nails inside, and three nails on the boundary.
Solve puzzles. For example, if the geoboard has 25 nails and there are two nails on the inside of a region and
three nails on the outside, where are the other 20? Make such a region on your board.
Shape
Using one rubber band, try to make a shape that has: (a) one side; (b) two sides; (c) three sides. What is the
three-sided shape called? How many triangles can you make with: (a) two rubber bands? (b) three rubber
bands? Who has the most triangles? Try to make a star from several triangles.
Make shapes from properties, for example, four equal sides with opposite sides parallel – a rhombus; four sides
with opposite sides equal and parallel – a parallelogram; one pair of sides parallel – a trapezium. What do all of
these shapes have in common? Make a three-sided shape with two sides equal – isosceles triangle. What about
the angles?
Make the following: (a) a square inside a square; (b) a triangle inside a rectangle; (c) a square inside a triangle
inside a square; and (d) a parallelogram overlapping a trapezium.
Challenges
Give angles and sides and ask for shape to be made, for example: five sides, one reflex angle, one right angle,
one obtuse angle, and two acute angles.
Introduce concave shapes – no reflex angle, and convex shapes – at least one reflex angle. Concave shapes
have “jut ins” – like chevrons.
Puzzles
Select a 3 × 3 set of nails (as shown).
Construct five isosceles triangles that have different sizes in this small area
Make the shape shown on the geoboard. Divide the region into four congruent parts
(i.e. same size and shape).
4.2 Geostrips (line/angle 2D shape)
Geostrips are lengths of plastic with holes regularly along them that can be joined by fasteners. They are very
useful for the sub-concept sequence as the following shows:
(a) each strip is a straight line;
(b) two strips joined at end form an angle which can be easily turned to form acute, right, obtuse and
reflex angles;
(c) strips joined end to end form paths (which can be simple and complex) and if the first strip is joined to
the last they form simple closed paths or shapes/regions;
(d) properties can be used to make shapes – all geoboard activities can be emulated; and
(e) angle, diagonals and rigidity properties/principles can be explored (see earlier work in section 2.2) – in
particular, diagonal properties can be represented and shown to lead to shapes (e.g. two unequal
length diagonals bisecting each other gives a parallelogram).

© QUT YuMi Deadly Centre 2014 AIM Module G1: Geometry – Shape (3D, 2D, Line and Angle) Page 23
4.3 Surface construction material (2D shape 3D shape)
Construction material for 3D shapes can be solid (e.g. play dough), made from nets, made from faces (e.g.
polydrons) and made from edges (e.g. construct-o-straws). The material that builds from surfaces can be used
to show the last step of the sub-concept journey – 2D shape 3D shape.
The type of material used to construct the 3D shape will affect the focus students have. For example, polydrons
(solid variety) and Zaks provide a focus on how faces as 2D shapes are connected to form 3D shapes. Construct-
o-straws, open-face polydrons, and geoframes have open faces and provide a natural focus on edges and
vertices as the faces are transparent. Straws/toothpicks and Blu Tack have a similar effect.
A sequence of activities is as follows:
(a) explore using 2D shapes to make 3D shapes (2D shapes become surfaces);
(b) use properties of 2D shapes to make special 3D shapes (teaching properties shapes instead of
shapes properties) – for example, a base shape joined with squares or rectangles to a second base
shape is a prism; a base shape with triangles attached is a pyramid;
(c) make special shapes (e.g. the platonic solids); and
(d) use Euler’s formula to make challenges (e.g. Euler’s formula is that edges + 2 = surfaces + vertices, so ask
students to make shapes for which this holds – Make a solid with 5 surfaces, 4 vertices and 7 edges.)


© QUT YuMi Deadly Centre 2014 AIM Module G1: Geometry – Shape (3D, 2D, Line and Angle) Page 25
Unit 5: Integration, Extension and Pythagoras
So far in this module, we have looked at the environmental approach and the sub-concept approach. This final
unit brings the two sides together as we look at integration and extension. For instance, the environmental
approach takes 3D to 2D and the sub-concept approach takes 2D to 3D but stronger learning comes from
continuously reversing between the two directions (i.e. 2D 3D). Further, we start to look across examples
for generalisations that form principles and relationships (e.g. all prisms have rectangles between base and top;
a base shape joined with squares or rectangles to a second base shape is a prism, and a base shape with
triangles attached is a pyramid).
Examples of extension/integration activities are: (a) dividing polygons into triangles with diagonals and using
this to determine interior angle sums for shapes with 4, 5, 6, sides and so on, and looking for a pattern and
general rule for interior angle sum of an -sided polygon; (b) making platonic solids and stellating them (i.e.
replacing the flat surfaces of polyhedra with pyramids); and (c) using Euler’s formula to make challenges as
described in section 4.3 (d) above.
5.1 Developing relationships and principles
Developing principles for 2D shapes
Line and angle principles can be developed for 2D shapes. These cover:
(a) relationships between different-sided polygons (e.g. squares are rectangles are parallelograms are
trapeziums are quadrilaterals are polygons); and
(b) angle, diagonal and rigidity principles – e.g. interior angle sum of an -sided polygon is ( −2)×180°;
minimum number of diagonals for rigidity of an -sided polygon is −3; the total number of diagonals
possible in an -sided figure is 1 + 2 + 3 ... up to ( −3) + ( −3).
The activities for these are in subsection 2.2.
Constructions and principles for 3D shapes
Constructing 3D shapes can assist in developing principles (relationships and formulae) for these 3D shapes.
Constructing and relating
Use construction methods to make 3D shapes out of faces (e.g. nets) or out of edges (e.g. mat and elastic
bands).
(a) Construct all the same 3D shapes (e.g. prisms) and look for similarities (all have rectangles).
(b) Construct different 3D shapes (e.g. a prism and a pyramid) and look for differences (one has
rectangles, the other has triangles).
(c) Construct 3D shapes from four or more 2D shapes. Look up names for these 3D shapes in terms of the
number of surfaces using the generic name for a 3D shape made out of flat surfaces (polydrons).
Example – make a shape out of six squares – what is its name based on the number of surfaces?
[hexadron] – what is its other better known name? [cube].
(d) Repeat (c) but for curved shapes. What is the difference between cone and cylinder? What is similar
about cone and pyramid, and cylinder and prism?

Page 26 Unit 5: Integration, Extension and Pythagoras YuMi Deadly Maths AIM
Constructions from nets
Construct the 3D shapes from the nets provided in section 1.2.
Find an example of a sphere (not available as a net).
Challenge – make a net into a solid, place symbols/pictures on each side of solid, ask the students to
place the same symbols/pictures on their nets before folding them so that when folded, the resulting
solid has symbols/pictures the same as the original (very hard).
Defining shapes
Use the findings from above to define/determine what a shape is from its surfaces, and so on. For example,
two pentagons on each end, and rectangles between the pentagons – what is it?
Euler’s formula/principle
Construct different 3D shapes and record surfaces, vertices (corners) and edges. Record in a table like below.
Shape Surfaces Vertices Edges
Cube 6 8 12
Triangular pyramid 4 4 6
and so on
If students have problems discovering the formula (surfaces + vertices = edges + 2), ask them to add a column
with surfaces + vertices in it and to compare with edges.
Euler’s formula for 3D solids is related to Euler’s formula for networks (because a 3D shape made out of edges
becomes a network if a light is used to project the edges and vertices onto a flat piece of paper). Euler’s
formula is also useful in setting up problems – see section 5.4.
5.2 Relating 2D and 3D shapes
There are relationships between 3D shapes and their 2D or curved surfaces. For example, prisms join the two
ends/bases by rectangles while pyramids join the end/base to a point by triangles. We need to relate 3D shapes
to their surfaces.
2D shape to 3D solid
The objective of this activity is to reinforce that 3D shapes are put together using 2D faces and that different
combinations of 2D faces will result in different 3D shapes but only certain combinations will work together.
1. Provide the nets below (enlarged). Ensure that the edges of a net are congruent (the same) to make the
shape work.
2. Ask students to determine what 3D shapes can be made from the nets. Ask students to say why as well as
what.
3. Let the students make the shapes. Discuss relationships between nets and shapes (e.g. triangles give
pyramids, rectangles give prisms).

© QUT YuMi Deadly Centre 2014 AIM Module G1: Geometry – Shape (3D, 2D, Line and Angle) Page 27
Cut nets problems
The objective of this activity is to provide nets which have been cut into two. Students have to choose two that
can be put together to make a 3D solid, and then find more than one way to put them together. The cut nets
below could be enlarged, cut out and manipulated and made with sticky tape. Students should also be asked to
visualise and state the formed solid shape before it is made.
1. The two shapes on right are a net of a cube that has been
cut into two. Put it together to form the cube. Can you do
this in more than one way?
2. On the next page are the nets of nine solid shapes. Each one of these has been cut into two pieces, like the
net of the cube.
(a) Most pieces will not go together to form a shape; which ones will?
(b) What is it about those combinations that make them work?
(c) Enlarge the shapes and make the solids that are possible. Can you do this more than one way?
(d) Make a table of the shapes that went together. Does another student have a different table?
5.3 Visualising cube nets
The objective of this activity is for students to realise that:
(a) there are many possible nets for folding into a cube;
(b) different nets use different amounts of paper; and
(c) it is big business determining the net that gives the required cube for the least area of paper.
There are several options for implementing this activity. Students could do either or all of the following.
1. Draw as many nets as possible that will fold together to make a cube. What is similar about the cube nets
that make them possible? How many different nets are there that will make a cube?
2. Select the nets from the table on the following pages that will fold to form a cube – these could be copied
and enlarged to allow students to test their assumptions.
3. Challenge. Design a net to create the most cube boxes possible from a sheet of card (i.e. find the net that
is most space efficient). Extend their design by adding gluing flaps to their chosen net and designing cover
art so that it all fits together when folded.
Note: this activity covers net 3D and 3D net; sometimes starting from the net and other times from the
3D shape. It also has a real-world problem in the challenge – producing cubes with the least wastage.

Page 28 Unit 5: Integration, Extension and Pythagoras YuMi Deadly Maths AIM
Cut nets
Cube nets

© QUT YuMi Deadly Centre 2014 AIM Module G1: Geometry – Shape (3D, 2D, Line and Angle) Page 29
Drawing nets from 2D shapes and for 3D shapes
This activity allows students to explore the 3D shapes that can be made from the following combinations of 2D
shapes. It moves on to get the students to visualise what 2D surfaces go where on the 3D shape.
1. Draw a net for the following shapes that would fold into a 3D shape:
(a) 2 congruent squares and 4 rectangles;
(b) 2 congruent triangles and 3 rectangles;
(c) 2 triangles and 3 trapeziums.
Note: Combinations can be given where there is:
a surplus of 2D shapes where students have to determine which one to omit; or
one shape missing and students have to determine what the 2D shape would be.
2. Problem solving: A 3D shape (e.g. a cube) can be shown with patterns on each face – students have to find
a net for the shape and then draw patterns on the net so that, when folded, it is the same as the shape.
5.4 Using Euler’s formula
Students can use Euler’s formula (surfaces + vertices = edges + 2) to design nets of possible 3D shapes.
1. Provide students with a selection of surfaces, vertices, edges for 3D shapes as below.
2. Ask the students to determine from which of the selections it is possible to make a 3D shape and from
which it is not.
Surfaces Vertices Edges Tick if possible
6 8 12
4 6 8
8 17 25
12 10 20
9 15 22
14 16 30

Page 30 Unit 5: Integration, Extension and Pythagoras YuMi Deadly Maths AIM
3. Ask students to make nets and create designs on the net so that, when the nets are folded into 3D shapes,
the designs match along the edges (design must be constructed to go around the shape and cross edges).
4. Challenge. Ask students to link to packaging challenge from earlier. Ask students to design cover art for
package so that writing is the same way up all the way around and readable on top when viewed from the
front.
5. Investigation. Finally, for the last activity, provide students with numbers of vertices, surfaces and edges –
use Euler’s formula so that it is theoretically possible to make the 3D shapes (e.g. 4 vertices, 5 surfaces and
7 edges because 7+2 = 4+5). Give students polydrons or construct-o-straws or another commercial
construction kit to try to make the shapes. State that they may not be able to make them all; their job is to
find which ones can be made. Ask them to work out why.
5.5 Pythagoras’s theorem
This subsection looks at Pythagoras’s theorem, a theorem that is crucial in trades –
it is used to square foundations, walls and so on.
Discovering Pythagoras’s theorem
Pythagoras’s theorem states that a right-angle triangle’s sides have lengths so that
a2 + b2 = c2, where a, b and c are the triangle’s sides as on right. a and b are called
the adjacent sides (next to the right angle) and c is the opposite side (opposite to
the right angle).
There are famous right-angle triangle types – e.g. the 3-4-5 triangle as
9+16=25, and the 5-12-13 triangle as 25+144=169 which is 13×13.
If one wants to square a foundation which is a rectangle, one ensures
that the diagonal forms a triangle where the length of the diagonal
obeys Pythagoras’s theorem in relation to the sides of the rectangle.
Using squared paper
Show that the square of a line of length L, that is, L2, is the area of a square made with the length of that line.
This means that if squares are made on the sides of a right-angle triangle, as above, and the area of the largest
square is equal to the sum of the areas of the other two squares, we have Pythagoras (a2 + b
2 = c
2).
Draw three different right-angle triangles on squared paper so that the triangles’ corners are where lines cross
and one of the adjacent sides is vertical and the other horizontal. Draw squares on each side of each of the
triangles (as in diagram above).
Find the area of the three squares for each of the triangles and put them on a table as below:
Triangle Area of square
on side a (a2)
Area of square
on side b (b2)
Area of square
of side c (c2)
Sum of areas for
a and b (a2+b
2)
1
2
3
Using the data encourage students to show that Pythagoras’s theorem holds for these – to see that c2 = a2 + b2.
Drawing methods
There are other ways to show Pythagoras’s theorem – methods can be looked up online. Here is one drawing
method based on rearranging four copies of the right-angled triangles.
b
c a
L
L2

© QUT YuMi Deadly Centre 2014 AIM Module G1: Geometry – Shape (3D, 2D, Line and Angle) Page 31
Diagram A has four triangles plus a large square; diagram B has the four triangles and two smaller squares.
Since diagram A is the same size as diagram B, this means that the area of the large square (c2) is the same size
as the sum of the areas of the other two squares (a2+b
2). This means that Pythagoras’s theorem holds.
Applying Pythagoras’s theorem
Some applications are as follows.
1. If we have a right-angle triangle and know the measurements of two of the sides, we can use Pythagoras’s
theorem to find the length of the third side. The three ways are: c2 = a2 + b2, a2 = c2 − b2, and b2 = c2 − a2.
Calculate d: (1) (2) (3)
3m d 15m 9m 14m
6m
6m
2. If we have two sides of a rectangle, we can work out what the diagonal length would be if the angle
between the two sides is a right angle by using c2 = a2 + b2. If we measure the diagonal and the length does
follow Pythagoras’s theorem, this means the angle is a right angle and the rectangle is “square”.
3. Challenge. Mark out a side of a path on the floor of a room or in the yard (even better, a garden bed that
needs squaring). The path has to be 1.2 m wide. Using pegs or blocks and measuring tape:
(a) mark out the 1.2 m end of the path so it is square to the line; and
(b) mark out the other side of the path so that it is parallel to the first side and square to the end.
Hint: For the end:
4. Investigation. You mark out a rectangular concrete slab for a house. You measure the diagonals – one is
longer than the other. What does this mean? Particularly for the squareness of the slab? How can it help us
square the slab?
A B
Square root of 1.22 + 12
1.2m
1m
d
d


© QUT YuMi Deadly Centre 2014 AIM Module G1: Geometry – Shape (3D, 2D, Line and Angle) Page 33
Test Item Types
This section presents instructions and the test item types for the subtests associated with the units. These will
form the bases of the pre-test and post-test for this module.
Instructions
Selecting the items and administering the pre-post tests
This section provides an item bank of test item types, constructed around the units in the module. From this
bank, items should be selected for the pre-test and post-test; these selected items need to suit the students
and may need to be modified, particularly to make post-test items different to pre-test items. The purpose of
the tests is to measure students’ performance before and after the module is taught. The questions should be
selected so that the level of difficulty progresses from easier items to more difficult items. In some modules
this will follow the order of the units and subtests, and in other modules it will not, depending on the
sequencing across the module and within units. The pre-test items need to allow for students’ existing
knowledge to be shown but without continual failure, and the post-test items need to cover all the sections in a
manner that maximises students’ effort to show what they can do.
In administering the pre-test, the students should be told that the test is not related to grades, but is to find
out what they know before the topic is taught. They should be told that they are not expected to know the
work as they have not been taught it. They should show what they know and, if they cannot do a question,
they should skip it, or put “not known” beside questions. They will be taught the work in the next few weeks
and will then be able to show what they know. Stress to students that any pre-test is a series of questions to
find out what they know before the knowledge is taught. They should do their best but the important questions
come at the end of the module. For the post-test, the students should be told that this is their opportunity to
show how they have improved.
For all tests, teachers should continually check to see how the students are going. Items in later subtests, or
more difficult items within a particular subtest, should not be attempted if previous similar items in earlier
subtests show strong weaknesses. Students should be allowed to skip that part of the test, or the test should
be finished. Students can be marked zero for these parts.
Information on the shape item types
There are five subtests in Module G1 Shape matching the five units in the module. The test items are in
sequence in each subtest.
Decisions regarding items to choose for pre-tests can be made in terms of difficulty, with the teacher deciding
not to include items that they know students cannot do. Difficulty in geometry is also not as clear as in number.
The Van Hiele levels (experiential informal/analysis formal/synthesis) provide a sequence that should
represent easy to hard but familiarity with the ideas being covered may also determine whether items are
chosen. YuMi Deadly Maths has much richer geometry activities than most schools and even the Australian
Mathematics Curriculum. Therefore, students may be unfamiliar with quite simple ideas in topics of which they
have never been made aware.
As well, the units reflect two teaching approaches, environmental and sub-concept, with which students may
be unfamiliar.
However, whatever the pre-test, the post-test should cover all question types. And the pre-test should have
enough questions to show growth.


© QUT YuMi Deadly Centre 2014 AIM Module G1: Shape (3D, 2D, Line and Angle) Page 35
Sub test items
Subtest 1 (Unit 1: 3D shape concepts and experiences)
1. (a) Circle the 2D shapes.
(b) Put a cross on the 3D shapes.
2.
(a) Draw a circle around the shapes that roll easily.
(b) Put a tick on the shapes that stack easily.
(c) Put a cross on the shapes that are prisms.
3. (a) How many faces does this 3D shape have?
(b) How many edges does this 3D shape have?

Page 36 Test Item Types YuMi Deadly Maths AIM
Subtest 2 (Unit 2: 2D shape concepts and experiences)
1. Tick the statements that are true.
(a) A plane shape is a solid shape.
(b) A 2D shape is always flat.
(c) A 2D shape always has straight sides.
(d) All faces of 3D shapes are plane shapes.
2. (a) How many sides does this polygon have?
(b) What is the name of this polygon?
3. Draw a quadrilateral.

© QUT YuMi Deadly Centre 2014 AIM Module G1: Shape (3D, 2D, Line and Angle) Page 37
Subtest 3 (Unit 3: Line-angle-path experiences)
1. This angle is a right angle:
(a) How many right angles are required to make a straight line?
(b) How many right angles are required for a complete turn?
(c) Draw an angle that is smaller than a right angle.
(d) Draw an angle that is bigger than a right angle.
2. Draw a picture to show the following:
(a) Parallel lines (b) Perpendicular lines
3. Show a line of symmetry on this shape:

Page 38 Test Item Types YuMi Deadly Maths AIM
Subtest 4 (Unit 4: 2D shape properties and relationships)
1. Where will the rubber band need to be shifted to make a rectangle?
Draw a circle around the point.
. . . . .
. . . . .
. . . . .
. . . . .
. . . . .
2. Draw a shape that has 5 sides, 2 acute and 3 obtuse angles.
3. This shape is a rectangle.
Fill in the blanks in this sentence:
The opposite sides of a rectangle are and .
All the in a rectangle are 90°.
There are axes of symmetry and diagonals.
The diagonals each other.

© QUT YuMi Deadly Centre 2014 AIM Module G1: Shape (3D, 2D, Line and Angle) Page 39
Subtest 5 (Unit 5: Integration, extension and Pythagoras)
1. (a) Angle A is 58°. What is the size of angle C?
(b) Lines A and B are perpendicular. Angle C is 50°. How big is angle D?
2. Find and fill in the missing angle for each shape:
(a) (b)
3. What shape will this ‘net’ make when it is folded up (circle your answer)?
(a) Matchbox
(b) Tent
(c) Pyramid
(d) Cube
C
B D
A
55° 55°
B A C
D
120°
85° 75°

Page 40 Test Item Types YuMi Deadly Maths AIM
4. (a) Draw the shape that this net would make.
(b) Draw the net for this shape.
5. (a) Describe the features of a cone that make it unique.
___________________________________________________________________________
___________________________________________________________________________
___________________________________________________________________________
__________________________________________________________________________
(b) Describe the features of a prism that make it unique.
___________________________________________________________________________
___________________________________________________________________________
___________________________________________________________________________
__________________________________________________________________________

© QUT YuMi Deadly Centre 2014 AIM Module G1: Geometry – Shape (3D, 2D, Line and Angle) Page 41
Appendix A: Shapes and Their Properties
This appendix describes and defines the different types of 3D shapes, 2D shapes, lines and angles, and their
teaching and properties.
Shape concepts
Three-dimensional shape (solids)
This is a most crucial area as we live, work and play in a three-dimensional world. Initially we can use solids
(bricks, Lego, etc.) to construct things. We can sort and classify solids in the environment by their properties —
corners/no corners, rolls/does not roll, and so on. We can study their surfaces and edges (leading into the
study of line and two-dimensional shape). Names of solid shapes are determined by the type of surface and
edge a shape has, whether they are flat, curved, or straight. We particularly focus on five types of solid (see
below) and also solids which have flat surfaces and straight edges called polyhedra.
Two-dimensional shape (plane shapes)
This is another crucial area because it is how we represent our three-dimensional world (e.g. in seeing,
drawing, video, film, etc.). Two-dimensional shape can be developed in two ways: (a) from study of the
surfaces of the 3D solids, and (b) from the sub-concepts of line and angle. For example, the triangle can be
considered as the end of a roof or as three straight lines (and three angles) which form a closed and simple
(lines do not cross) boundary around a region.
Two-dimensional shapes are classified by their boundaries. When these are straight lines, they are called
polygons. Polygons have special names based on the number of sides and whether these sides are parallel,
equal in length or meet at special angles (see examples below). When these are curved lines, special attention
is given to circles. Shapes bound an area of a plane called a region. The circular region is called a disc. A section
of a disc is a sector.
Two-dimensional shapes have properties important in vocational education and training, for example, using
diagonals to square foundations, using triangles to make shapes strong and rigid, and using Pythagoras’s
theorem and tangents for right-angle triangles.
Line and angle
This is associated with plane shapes. It relates to the types of lines and angles that classify shapes and to the
diagonal and angle properties for plane shapes. Angles are acute, right, obtuse and reflex, and external and
internal, while lines are equal, parallel, bisected, perpendicular, and diagonal.
Triangular
Prism
Square Based
Pyramid Cylinder Cone Sphere
Pentagon Hexagon Triangle Rectangle Circle

Page 42 Appendix A: Shapes and Their Properties YuMi Deadly Maths AIM
3D shapes
Formally, a solid or 3D shape is something that encloses a portion of space. It may or may not be filled (or
“solid”). For example, a matchbox, whether, it is filled or not, is a solid shape. True solid shapes must be
completely closed. That is, they must have a “top”, a “bottom” and “sides”. (These words have been placed
inside inverted commas because they are not the proper words to use.)
Types of 3D shapes
Formally, a solid or 3D shape is something that encloses a portion of space. It may or may not be filled (or
“solid”). For example, a matchbox, whether it is filled or not, is a solid shape. True solid shapes must be
completely closed. That is, they must have a “top”, a “bottom” and “sides”. These words have been placed in
inverted commas because they are not the proper words to use. We will now develop the correct terms.
Three-dimensional shapes are important in vocational education and training (VET) because many trades are
about building 3D constructions and knowing what is possible is always an advantage.
Solid shapes can be divided into two types: polyhedra (which have flat surfaces and straight-line edges, i.e. they have
polygons for surfaces) and non-polyhedra (which have curved surfaces). Important examples of polyhedra are:
Important examples of non-polyhedra are:
The major terms with regard to these solid shapes are:
(a) surface – all solid shapes are enclosed by surfaces which are either curved or flat;
(b) face – a flat surface of a solid shape;
(c) base – a face on which the solid shape rests – a sphere has no base but all prisms and cylinders have
two bases;
(d) edge – an edge is formed on a solid shape when one surface meets another – an edge may be curved
or straight; and
(e) vertex – a special point on a solid shape when three or more straight edges meet – the cone also has a
vertex but this is a special case; the plural of vertex is vertices.
Prisms
Each prism is made up of a certain number of flat surfaces called faces. The two parallel and congruent faces of
each of the prisms illustrated below are called bases. There are many types of prisms because the base of a
prism is a polygon and there are an infinite number of polygons. Each prism is named according to the shape of
its base. All the other faces of a prism must be rectangular or square in shape.
Rectangular Pentagonal Hexagonal
prism prism prism
Note: All prisms have at least five faces, two bases (at each end of the shape) which are congruent polygons
and parallel, and all other faces rectangular.
Prisms Pyramids Platonic Solids
Cylinders Cones Spheres

© QUT YuMi Deadly Centre 2014 AIM Module G1: Geometry – Shape (3D, 2D, Line and Angle) Page 43
Pyramids
Pyramids differ from prisms in that they have only one base and all their other faces are triangular. One end is a
point or vertex. Each pyramid is named according to the shape of its base.
Cones
When the number of sides on the base of a pyramid increases without limit
until the base finally becomes a “smooth” curve (a circle) without vertices,
we have a cone. A cone has a base which is circular, a pointed top which is
called a vertex, a curved surface from circle to vertex and a height which is
found by a perpendicular line from vertex to base, as in the diagram on
right.
Cylinders
A cylinder is similar to a cone in having bases that are smooth curves.
However, the cylinder is related to the prism in the same way the cone is
related to the pyramid. When the sides of a prism increase without limit
the bases become circular and we have a cylinder. A cylinder has two
congruent and parallel bases, which are circular, a curved surface joining
both bases and a height which is found by drawing a perpendicular from
top base to bottom base, as in the diagram on right.
Spheres
The sphere is the most difficult solid to construct but probably the easiest to identify.
Anything shaped like a round ball is a sphere, e.g. a tennis ball, golf ball, cricket ball, and
so on. The diagram of the sphere on right has a completely curved surface. It has no
polygonal base, no edges, and no vertices. The centre (O) of the sphere is the same
distance from any point on its surface. Any line segment from the centre to the surface
is the radius and any line segment through the centre from one side to the other is
called a diameter of the sphere.
Platonic solids
These are polyhedra that are composed of congruent surfaces. There are only five of them and they are named
by the number of surfaces.
Rectangular Pyramid
Pentagonal Pyramid
Hexagonal Pyramid
Tetrahedron
(a pyramid)
4 triangles
Hexahedron
(a cube)
6 squares
Octahedron
8 triangles
Dodecahedron
12 pentagons
Icosahedron
20 triangles
base
perpendicularheight
curved surface
base
vertex
height
curved surface
base

Page 44 Appendix A: Shapes and Their Properties YuMi Deadly Maths AIM
Teaching 3D shape and properties
Environmental vs sub-concept approaches
At the beginning, the best way to teach geometry is through the environmental approach. Learners should
experience many 3D shapes. It is important that care is taken with the examples students experience to
understand 3D shapes. The teacher should ensure that learners see: (a) many different examples of a solid
type; and (b) examples that are not that type of solid as well as examples of the solid. Furthermore, activities
should be structured so that both the following are done: (a) the teacher says or writes the names of the solid –
the learner finds an example or model of it; and (b) the teacher shows a model – the learner says or writes its
name.
In later learning, the sub-concept approach should be used. 2D shapes should be joined to make 3D shapes,
and 3D shapes should be de-constructed to form faces. There should be a focus on the relationship between
faces and 3D shape. Learners should look, observe, describe, experiment, analyse, dissect, construct and infer.
It is essential that students have a balance of activities that describe (interpret) solids and that construct solids.
A construction is a useful starting point to discuss what will happen in real life, that is, to infer. A construction
gives insight into what surfaces a shape will dissect to. Construction requires a focus on the faces, edges,
vertices of the shape and their particular properties — a starting point for the formal analysis of a solid shape.
Constructions, particularly when insufficient detail is given in instructions and the students have to work out
what to do themselves, are great opportunities for observations, experimentations, and actions.
Construction techniques to achieve this include: (a) solid techniques like making shapes out of clay, plasticine
or LEGO™; (b) closed techniques like nets (diagrams of faces that are cut out and folded to make the shape)
and cardboard and plastic faces that staple or “click” to form solid shapes; and (c) open techniques like straws
and string that build edges and vertices and show the skeleton of the shape (triangles are often required for
rigidity).
Properties of 3D shapes
Once shapes are constructed they can be examined for properties. The properties that are worth investigating
in solids are: characteristics of the surface of the solid (its vertices, edges and surfaces), the shape of cross-
sections, the way shapes pack together, and the relative strength of different shapes.
Classifying solids. Attributes upon which classification may be based include roll or not roll, rock or not rock,
rough, smooth, pointed, vertices, faces, edges, regularity, volume, surface area, base area, shape of base,
shape of faces, flat or curved surfaces, solid construction, open construction, hollow construction, and mass.
Relationships such as the ratio of vertices to faces, edges to faces and edges to vertices can be explored. Venn
and Carroll diagrams can be used to record the classifications.
Euler’s formula. There is a relation between the number of surfaces, vertices and edges of polyhedra called
Euler’s formula. It is: number of surfaces + number of vertices = number of edges + 2. Once this relationship is
known, learners can tell whether a polyhedra of a certain number of faces, edges and corners can exist.
Cross-sections. Cross-sections are two dimensional shapes that are formed by cutting across a solid shape.
Learners can (a) cut solids made from potatoes, plasticine, and so on and study their shape; (b) predict the
shape of cross-sections; and (c) predict which solids can have given cross-sections.
Packing and strength. Which solid shapes tessellate – pack together without gaps or overlaps? This is a crucial
characteristic of packaging – the boxes, tins, and so on, into which goods are placed for sale. What solid shapes
are strong? What shapes can hold material under pressure? Or can stand rough treatment? Again this is
important for packaging. Triangular, square and rectangular prisms and pyramids tessellate. Cones, cylinders
and spheres do not. Yet spheres and cylinders are much stronger than prisms and pyramids because edges and
vertices are weaknesses.

© QUT YuMi Deadly Centre 2014 AIM Module G1: Geometry – Shape (3D, 2D, Line and Angle) Page 45
2D shape, lines and angles
Our world is three-dimensional. But we observe, perceive and represent the world two-dimensionally. Our
evolution and our experience have developed the ability to operate in our three-dimensional world through
two-dimensional representations.
Points and lines
It is useful to begin by looking at line in relation to point and plane. We represent a point by a circular region
but as having no size at all. That is, we say a point has no dimensions. However, a small dot is a good “model”
of the idea we have in mind. The point of a needle or pin, or the sharp top of a well-made pyramid or cone,
would also be models of points.
We represent a line by a long, thin, shaded rectangular region, which again never actually becomes a line,
because mathematically a line has length but no thickness. (Note: In spatial knowledge, we understand line to
mean a straight line unless stated otherwise.) Therefore, we can say a line has one dimension. A line can be
extended infinitely in both directions. We could never find such a thing in practice but we use a thin rectangle
with arrows at each end, e.g. , as a model of a line. The arrows at both ends show that the line
can be extended without ending in both directions. Other models of lines are the sharp edge of a ruler, or the
edge of a box (if we imagine the edge, in these cases, extending without ending in both directions). Since we
want to show direction, we always name a line with two points. For example, is named AB.
A plane (2D) is a flat surface which is very thin and extending without ending in all directions. A table top, a
sheet of glass, and a skating rink are models of planes (if we imagine them extending without ending in all
directions). Each page in this book is a model of a plane. Each surface of a box, or a pyramid, is a model of a
plane. We do not usually state exactly what the words point, line, and plane mean. Instead, we have a picture
in the mind of what we mean by point or line or plane — and we find models of these things in the world
around us which help us use these ideas. It should be noted that only three points, if they are not in a line, are
necessary to define a plane.
Some examples of points, lines and planes are (a) a town in Australia is a point on a map; (b) telephone wires
stretched between poles are lines; and (c) the top of a table is a plane.
A line segment is only part of a line. For example, when you rule a line in your exercise book, you are really
only drawing a part of a line. You start at one point and finish at another point. This part of a line is called a line
segment (the word segment means a part of). In notation, we represent a line segment by capital letters at the
two ends of the line segment.
A ray is a line that has a starting point but no ending point. In other words, it can extend in only one direction,
without ending. A ray can be thought of as a “half-line”, e.g. . A good model of a ray is the light
from a torch. Each ray of light has a starting point (i.e. the bulb), and extends in one direction in a straight line.
We draw rays with two points. For example, is named AB.
There are many types of lines: (a) when two lines meet at a point, these two lines are called intersecting;
(b) when two lines meet at right angles, they are called perpendicular; and (c) when two lines never meet, they
are called parallel.
Angles
An angle is the opening between two rays that have a
common end point; it is the amount of turn, the measure of
the change of direction between the rays. The point is called
the vertex and the two rays that form the angle are called
the arms of the angle. B
Arm
Arm
A
C
Vertex
B A
B A

Page 46 Appendix A: Shapes and Their Properties YuMi Deadly Maths AIM
We can name an angle by naming a point on each arm of the angle and the point at the vertex. The point at the
vertex is always stated in the middle of the angle name. For example, in the diagram on right above, this angle
could be labelled ABC or CBA.
The angles which have particular emphasis are: (a) the right angle (rays meet at 90° – ¼ turn), (b) the straight
angle (180°), (c) the acute angle (less than 90°), (d) the obtuse angle (between 90° and 180°), and (e) the reflex
angle (over 180°).
With regard to parallel lines, there are: (a) the vertically opposite angle, (b) the alternate angle, and (c) the
corresponding angle (see diagram below). Vertically opposite, alternate and corresponding angles are
congruent (equal).
There are also: (a) interior angles (between the arms), and (b) exterior angles (the other part of the angle):
A curved line is a two-dimensional boundary that does not go on continually in the same direction, but turns
constantly. A curve cannot be defined by a fixed number of points (unless it is regular, e.g. a circle or ellipse); it
has to be drawn.
Types of 2D shapes
A 2D shape lies in a plane and is a closed simple boundary consisting of straight and curved
lined segments. For example, the figure on the right is a shape because: (a) it is a boundary
in a plane; (b) it is closed, not open; (c) it is simple, not crossing like a figure eight; and (d) it
is composed of curved and straight lines. (Note: The point at which two straight lines or a
curved and straight line meet or intersect is called a vertex, similarly to a 3D shape).
beginning position (0°)ending position (360°)
¼ turn – right angle (90°)
½ turn – straight angle(180°)
¾ turn (270°)
obtuseangles
>90°, <180°
acuteangles<90°
reflexangles >180°
acute anglebeing measured
outside partof the anglenot beingmeasured
obtuse anglebeing measured
outside part ofthe angle notbeing measured
reflex anglebeing measured
outside part ofthe angle notbeing measured

© QUT YuMi Deadly Centre 2014 AIM Module G1: Geometry – Shape (3D, 2D, Line and Angle) Page 47
Polygons
Any closed simple plane figure consisting of three or more vertices and straight line segments
(sides) joining them is called a polygon. The name comes from poly, a Greek word for many,
and gonos, a Greek word meaning angles. There are many examples of polygons in everyday
life – for example, the stop sign. Polygons can be convex or non-convex. A convex polygon
does not “jut in”, while a non-convex polygon does “jut in” – the 12-sided figure on right is a
non-convex polygon, while the 8-sided figure is a convex polygon. Polygons can be different
sizes, and can have sides of unequal length and angles of unequal size. Polygons are named
from their number of sides (using Latin). The names are:
3 sides – triangle
4 sides – quadrilateral
5 sides – pentagon
6 sides – hexagon
7 sides – heptagon
8 sides – octagon, and so on.
Polygons with sides of equal length and angles of equal size are called regular polygons. The
hexagon on the right is an example of a regular polygon.
Polygons have interior and exterior angles as shown on right. The exterior angle
is the turn if one was walking around the shape.
Triangles have three sides and three angles. Triangles are named by their
angles and lengths of sides:
Quadrilaterals are four-sided figures. They can be categorised according to whether or not they have sides in
parallel. Their names are determined by their angles and lengths of sides as well as parallelness. The most
important are:
Square (equal sides) Rectangle Rhombus (equal sides) Parallelogram
Trapezium Kite Arrowhead Irregular
Circles
Circles are a boundary which is equidistant from a centre point. Circles have important characteristics and parts
– for example, arc is a part of a circle. Diagrams showing them are:
Acute
triangle
Circumference Centre Radius Diameter Chord Semi-circle
interior exterior

Page 48 Appendix A: Shapes and Their Properties YuMi Deadly Maths AIM
Regions and discs
2D shapes are the boundary – what is inside the boundary is the region (or disc for circle). Some examples are
below:
Teaching 2D shape and properties
Environmental vs sub-concept approach
Learners should be given many opportunities to construct 2D shapes, to analyse such shapes, and to
manipulate such shapes. The introduction of 2D shapes should contain many opportunities for learners to
experience many examples (and non-examples) of the different shape types. This should be initially with the
environmental approach by looking at the surfaces of 3D shapes in the environment and investigating
properties. The environmental approach uses the world around us to find and classify examples of shapes.
However, a richer approach is to use the idea that a 2D shape can be considered as a simple closed boundary
composed of straight or curved lines with the inside being called a region. Thus, we can use the sub-concept
approach to develop the notion of 2D and 3D shape through these stages. (Note: A path is composed of lines
and angles.)
It seems appropriate to use this environmental approach as the starting point for instruction but to fall back to
the sub-concept approach for more formal analysis. Thus, the idea is to let the learners first experience shape
in their everyday world and then build it up more formally from sub-concepts. The sub-concept approach has
the advantage that properties are developed before names. If we make 4-sided shapes with one opposite set of
sides parallel, then everything we make is a trapezium – thus the name can be attached to the properties.
AIM believes that the environmental approach precedes and interlinks with the sub-concept approach as
follows: ENVIRONMENTAL SUB-CONCEPT 3D shape 2D shape Position-direction to line-angle Path to 2D shape Shape properties 2D to 3D shape
Properties of 2D shapes
Angle properties and principles. The interior angle sum of a triangle is 180° and of a quadrilateral is 360°. The
interior angle sum of any polygon is (the number of sides subtract 2) × 180°. The exterior angle sum is always
360° for any polygon, since walking once around a polygon is a complete turn.
Diagonal properties. Quadrilaterals have particular properties with regard to diagonals: a square has equal and
perpendicular-bisected diagonals, a rectangle has equal bisected diagonals, a rhombus has perpendicular-
bisected diagonals but not equal, and a parallelogram has bisected diagonals but not equal.
Triangular region Square region Quadrant Sector Segment
Boundary
Straight and curved lines Paths
Simple closed paths
Shape and region
Turn Angle

© QUT YuMi Deadly Centre 2014 AIM Module G1: Geometry – Shape (3D, 2D, Line and Angle) Page 49
Rigidity. Triangles make polygons rigid so they can be used in construction – the number of
triangles is equal to the number of sides subtract 2. This is particularly important for the
rectangle where a diagonal is needed to make it rigid (as on right). The number of diagonals to
make a shape rigid is 2 less than the number of sides.
Pythagoras’s theorem. Right-angle triangles obey Pythagoras’s theorem – the sum of the squares
of the two sides adjacent to the right angle equals the square of the side opposite the right angle
(the hypotenuse). For the example on right, A2 + B2 = C2.
Tangent. Most construction uses a horizontal floor and a vertical wall, i.e. a right triangle. Triangles of this type
are different in relation to the opposite over adjacent side length. This division is called the tangent, e.g. for the
triangle above, the tangent is A/B. The tangent can be used to find height if distance is known and vice versa.
This can be useful for building ramps and stairs.
C A
B

Page 50 Appendix B: RAMR Cycle YuMi Deadly Maths AIM
REALITY
MATHEMATICS
ABSTRACTION REFLECTION
Appendix B: RAMR Cycle
AIM advocates using the four components in the figure on right,
reality–abstraction–mathematics–reflection (RAMR), as a cycle for
planning and teaching mathematics. RAMR proposes: (a) working from
reality and local culture (prior experience and everyday kinaesthetic
activities); (b) abstracting mathematics ideas from everyday instances
to mathematical forms through an active pedagogy (kinaesthetic,
physical, virtual, pictorial, language and symbolic representations, i.e.
body hand mind); (c) consolidating the new ideas as mathematics
through practice and connections; and (d) reflecting these ideas back to
reality through a focus on applications, problem solving, flexibility,
reversing and generalising (see figure on right).
The innovative aspect of RAMR is that the right half develops the mathematics idea while the left half
reconnects it to the world and extends it. For example, whole-number place value built around the pattern of
threes where hundreds-tens-ones applies to ones, thousands, millions, and so on, can be easily extended to
metrics by considering the ones to be millimetres, the thousands to be metres and the millions to be
kilometres.
Planning the teaching of mathematics is based around the RAMR cycle if it is deconstructed into components
that are applied to a mathematical idea. By breaking instruction down into the four parts and taking account of
the pedagogical approaches described above, the cycle can lead to a structured instructional sequence for
teaching the idea. The table below briefly outlines how this can be done. Prerequisite mathematical ideas are
considered in the Reality and Mathematics components of the cycle, while extensions and follow-up ideas are
considered in the Reflection component.
REALITY
Local knowledge: Identify local student cultural-environmental knowledge and interests that can be used to introduce the idea.
Prior experience: Ensure existing knowledge and experience prerequisite to the idea is known. Kinaesthetic: Construct kinaesthetic activities, based on local context, that introduce the idea.
ABSTRACTION
Representation: Develop a sequence of representational activities (physical to virtual to pictorial materials to language to symbols) that develop meaning for the mathematical idea.
Body-hand-mind: Develop two-way connections between reality, representational activities, and mental models through body hand mind activities.
Creativity: Allow opportunities to create own representations, including language and symbols.
MATHEMATICS
Language/symbols: Enable students to appropriate and understand the formal language and symbols for the mathematical idea.
Practice: Facilitate students’ practice to become familiar with all aspects of the idea. Connections: Construct activities to connect the idea to other mathematical ideas.
REFLECTION
Validation: Facilitate reflection of the new idea in terms of reality to enable students to validate and justify their new knowledge.
Applications/problems: Set problems that apply the idea back to reality.
Extension: Organise activities so that students can extend the idea (use reflective strategies – flexibility, reversing, generalising, and changing parameters).

© QUT YuMi Deadly Centre 2014 AIM Module G1: Geometry – Shape (3D, 2D, Line and Angle) Page 51
Appendix C: AIM Scope and Sequence
Yr Term 1 Term 2 Term 3 Term 4
A
N1: Whole Number Numeration
Early grouping, big ideas for H-T-O; pattern of threes; extension to large numbers and number system
O1: Addition and Subtraction for Whole Numbers
Concepts; strategies; basic facts; computation; problem solving; extension to algebra
O2: Multiplication and Division for Whole Numbers
Concepts; strategies; basic facts; computation; problem solving; extension to algebra
G1: Shape (3D, 2D, Line and Angle)
3D and 2D shapes; lines, angles, diagonals, rigidity and properties; Pythagoras; teaching approaches
N2: Decimal Number Numeration
Fraction to decimal; whole number to decimal; big ideas for decimals; tenths, hundredths and thousandths; extension to decimal number system
M1: Basic Measurement (Length, Mass and Capacity)
Attribute; direct and indirect comparison; non-standard units; standard units; applications
M2: Relationship Measurement (Perimeter, Area and Volume)
Attribute; direct and indirect comparison; non-standard units; standard units; applications and formulae
SP1: Tables and Graphs Different tables and charts; bar, line, circle, stem and leaf, and scatter graphs; use and construction
B
M3: Extension Measurement (Time, Money, Angle and Temperature)
Attribute; direct and indirect comparison; non-standard units; standard units; applications and formulae
G2: Euclidean Transformations (Flips, Slides and Turns)
Line-rotation symmetry; flip-slides-turns; tessellations; dissections; congruence; properties and relationships
A1: Equivalence and Equations
Definition of equals; equivalence principles; equations; balance rule; solutions for unknowns; changing subject
SP2: Probability Definition and language; listing outcomes; likely outcomes; desired outcomes; calculating (fractions); experiments; relation to inference
N3: Common Fractions Concepts and models of common fractions; mixed numbers; equivalent fractions; relationship to percent, ratio and probability
O3: Common and Decimal Fraction Operations
Addition, subtraction, multiplication and division of common and decimal fractions; models, concepts and computation
N4: Percent, Rate and Ratio
Concepts and models for percent, rate and ratio; proportion; applications, models and problems
G3: Coordinates and Graphing
Polar and Cartesian coordinates; line graphs; slope and y-intercept; distance and midpoints; graphical solutions; nonlinear graphs
C
A2: Patterns and Linear Relationships
Repeating and growing patterns; position rules, visual and table methods; application to linear and nonlinear relations and graphs
A3: Change and Functions Function machine; input-output tables; arrowmath notation, inverse and backtracking; solutions for unknowns; model for applications to percent, rate and ratio
O4: Arithmetic and Algebra Principles
Number-size, field and equivalence principles for arithmetic; application to estimation; extension to algebra; simplification, expansion and factorisation
A4: Algebraic Computation
Arithmetic to algebra computation; modelling-solving for unknowns; simultaneous equations, quadratics
N5: Directed Number, Indices and Systems
Concept and operations for negative numbers; concept, patterns and operations for indices; scientific notation and number systems
G4: Projective and Topology
Visualisation; divergent and affine projections; perspective; similarity and trigonometry; topology and networks
SP3: Statistical Inference Gathering and analysing data; mean, mode, median, range and deviation; box and whisker graphs; large data sets, investigations and inferences
O5: Financial Mathematics
Applications of percent, rate and ratio to money; simple and compound interest; best buys; budgeting and planning activities
Key: N = Number; O = Operations; M = Measurement; G = Geometry; SP = Statistics and Probability; A = Algebra.

Acc
eler
ated
Incl
usi
ve M
ath
emat
ics
Pro
ject
© 2014 Queensland University of Technology through the YuMi Deadly Centre
Faculty of Education School of Curriculum
S Block, Room 404 Victoria Park Road
KELVIN GROVE QLD 4059
CRICOS No. 00213J
Phone: +61 7 3138 0035 Fax: +61 7 3138 3985
Email: [email protected] Website: ydc.qut.edu.au