
Xito BootStrap Developers Guidexito.sourceforge.net/documentation/BootStrap_Dev_Guide.pdfXito...
34
Xito BootStrap Developers Guide prepared by: Deane Richan Covers Version: 1.0.1
Transcript of Xito BootStrap Developers Guidexito.sourceforge.net/documentation/BootStrap_Dev_Guide.pdfXito...

Xito BootStrap Developers Guide
prepared by: Deane Richan
Covers Version: 1.0.1
Table of ContentsIntroduction............................................................................................................ 1BootStrap Architecture.......................................................................................... 1BootStrap Installation............................................................................................ 3Boot Sequence of a BootStrap Application........................................................... 7
Determine Boot Dir............................................................................................ 7Read boot.properties......................................................................................... 7Read logging.properties.................................................................................... 7Setup Security Manager.................................................................................... 8Setup the Cache Manager................................................................................ 8Proxy Configuration........................................................................................... 8Service Startup.................................................................................................. 8UI Check........................................................................................................... 8
Configuring BootStrap ........................................................................................ 10Startup Arguments.......................................................................................... 10Configuring boot.properties............................................................................. 10
Launching BootStrap from Java WebStart.......................................................... 13Deploy BootStrap Service files on Web Server............................................... 13QuickLaunch JNLP File................................................................................... 13
Boot and Startup Services................................................................................... 16Services XML File........................................................................................... 16Service XML (srv) File..................................................................................... 17Using BootStrap API in your Service............................................................... 19initService Method........................................................................................... 19StartupListener................................................................................................ 20
Launcher API....................................................................................................... 21Proxy Server Configuration................................................................................. 23Security Configuration......................................................................................... 25
Security Policy................................................................................................. 26Security Permission Prompt............................................................................ 26Restricted Permissions.................................................................................... 28Executable Descriptors and Security.............................................................. 30
Sharing Virtual Machine Issues........................................................................... 31System.exit...................................................................................................... 31Shared Virtual Machine Resources................................................................. 32

IntroductionSince the introduction of Java technology, developers have used Java to create clientapplications. In the beginning Java Applets embedded in web pages were used todeploy application functionality. Later many Java developers began to write fat clientapplications that are installed and run directly from the local computer. More recentlythe Java Network Launching Protocol (JNLP) has been introduced to allow fullapplications to be deployed through a link on a web page. Although each of these approaches have their place there continues to be a need forbetter client platform Java integration. Xito BootStrap addresses these issues by providing the following basic functionality:
• Provide a Simple mechanism to launch applications and services from remoteInternet Servers
• Provide an elegant and seamless security model enabling network deployedapplications to be executed in a secure environment
• Provide functionality to deploy Shared Services and applications running in a singleVM to reduce memory requirements and improve startup times.
These three high level goals can be described simply as: Remote Launching, SecureExecution, and Shared VM. In addition, an important aspect of the approach followedby the BootStrap is seamless native integration, both in terms of user interface andfunctionality.
This document describes how developers can use the BootStrap to deploy theirapplications and create execution environments that take advantage of BootStrap'sbuilt-in abilities.
BootStrap ArchitectureThe Xito BootStrap is the entry point to the larger Xito platform. Although BootStrap isdesigned to boot the Xito platform it can be used to boot any application or set ofapplication services.
The BootStrap initializes the environment, sets up the security manager, and then loadsa set of services. Services are just Java Applications and don't require any specificinterface implementation.
The BootStrap launches services and applications into a single Java virtual machine.This reduces memory requirements of all applications and services running in theenvironment, and also enables very quick execution of downloaded applications.
Sharing of a single Virtual Machine increases performance and reduces memory
1
requirements and allows untrusted code to run along side trusted code. Howeversharing a VM requires applications to cooperate with relation to the VM resources.Applications that want full control over the virtual machine can be launched into a newVM instance from the bootstrap.
Applications and services running in the BootStrap are designed to be executed directlyfrom a web server. Therefore there is no installation required for services orapplications. They are also always up to date because they are running from remoteservers.
A caching mechanism is used in the BootStrap to cache Java applications and serviceresources on the local hard drive so that they do not need to be downloaded each timethey are executed. Also the local cache enables applications to be executed when theclient is not connected to the network, a feature not available for traditional HTMLbased web applications. This network launching functionality allows applicationsdeployed through Xito to have the benefits of a web application and also the benefits ofa rich client application.
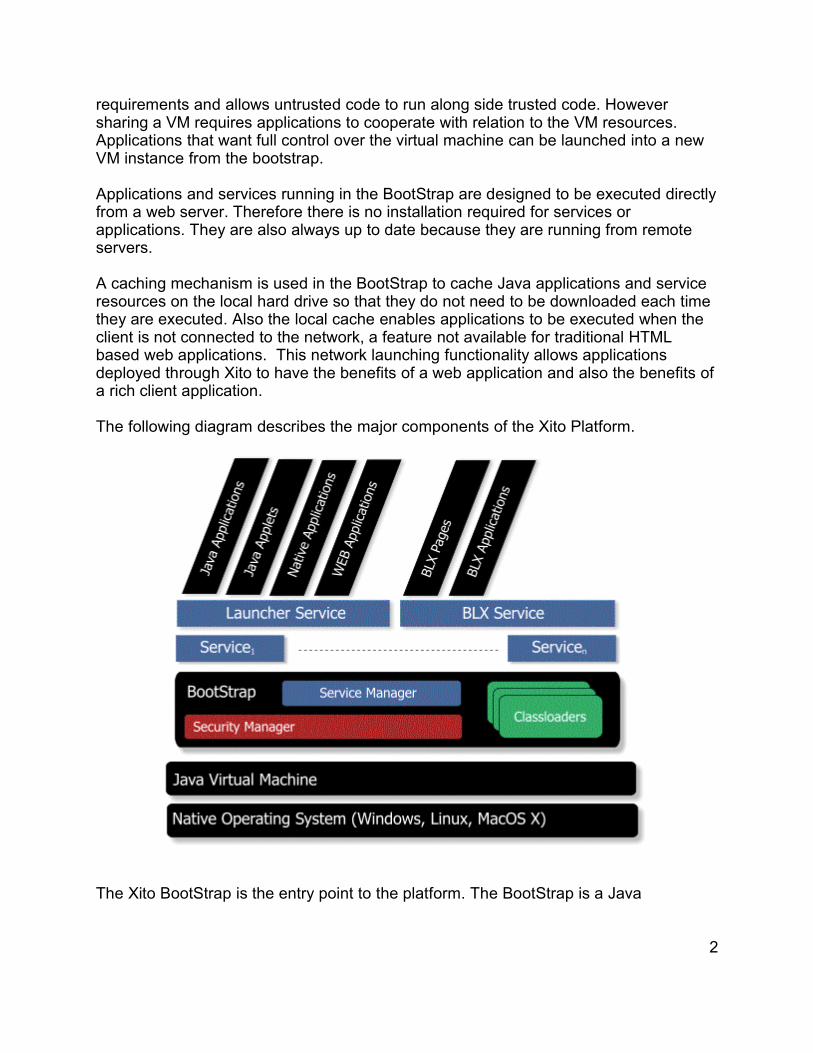
The following diagram describes the major components of the Xito Platform.
The Xito BootStrap is the entry point to the platform. The BootStrap is a Java
2
Application that initializes the environment, reads system properties, starts a SecurityManager, and then executes a set of services.
The BootStrap also handles all loading of application resources and execution ofapplications. It provides this functionality through four main components: ServiceManger, Cache Manager, ClassLoaders and Executable Descriptors. A separateLaunching Service is provided to perform more complex application launching such asJava Applets or JNLP based Java applications.
Bootstrap also contains a win32 native executable that can be used to launch theapplication on Windows platforms. The native exe can be renamed to what everapplication name the developer wants for their application.
BootStrap Installation
System RequirementsJRE 1.4.2+Windows, MacOSX, Linux x86
Note: BootStrap has been primarily written and tested on the Windows Platform.MacOSX and Linux should also work but testing efforts have not been completed onthose platforms.
LicenseXito BootStrap is distributed under the Common Development and DistributionLicense (CDDL) version 1.0. See: http://www.sun.com/cddl/cddl.html for moreinformation.
Obtaining the BootStrap
Visit the http://xito.sourceforge.net/projects/bootstrap and choose download.Download the most recent version of BootStrap. This document is based on version0.9.2.
Unzip the BootStrap into a directory of your choosing. The following files are included:
Filename Descriptionboot.jar Main Jar of the BootStrap environmentboot.properties BootStrap properties to initialize this
environmentboot_services.xml List of Boot Servicessample.jar Jar of Sample Service
3
Filename Descriptionsample.srv Sample Service Descriptorstart_services.xml List of Startup Servicesbootstrap.exe Win32 Launcherbootstrap_console.exe Win32 Launcher with console outputlicense.html CDDL License Info
Note: The bootstrap.exe and bootstrap_console.exe are provided with the Win32bootstrap release. These executables will attempt to locate the Java VM using theWindows Registry and then boot the environment. They can be renamed to yourapplication name if you prefer.
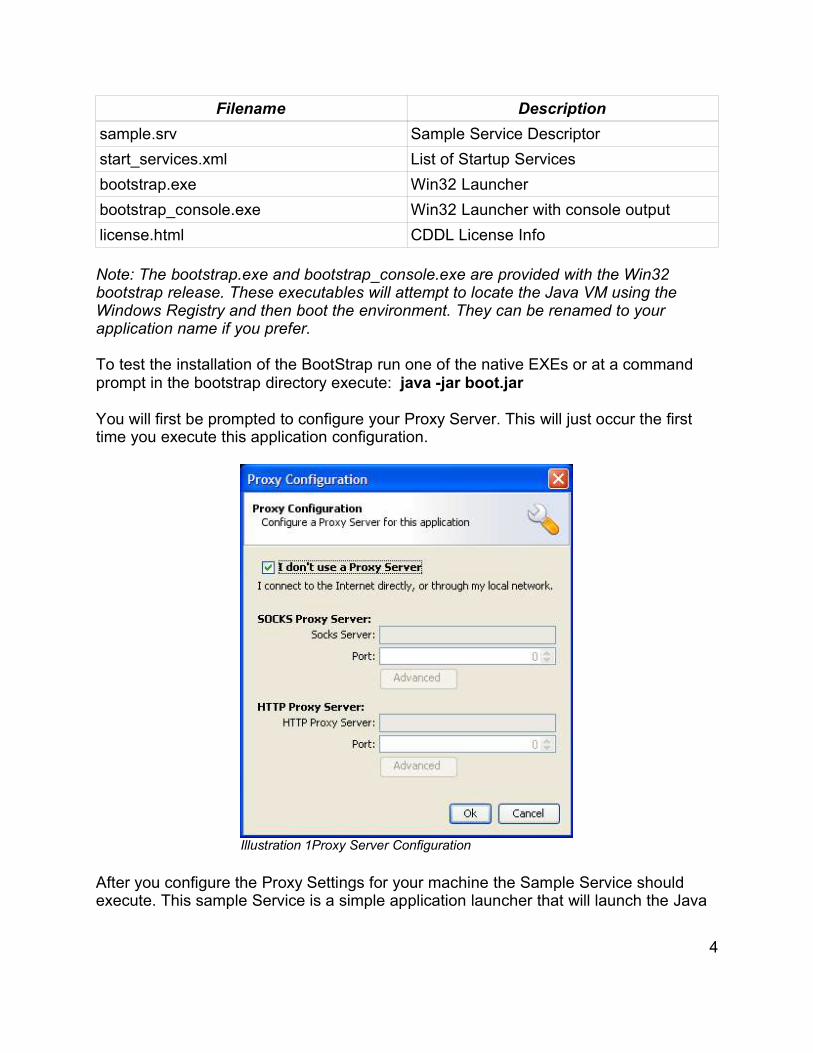
To test the installation of the BootStrap run one of the native EXEs or at a commandprompt in the bootstrap directory execute: java -jar boot.jar
You will first be prompted to configure your Proxy Server. This will just occur the firsttime you execute this application configuration.
After you configure the Proxy Settings for your machine the Sample Service shouldexecute. This sample Service is a simple application launcher that will launch the Java
4
Illustration 1Proxy Server Configuration
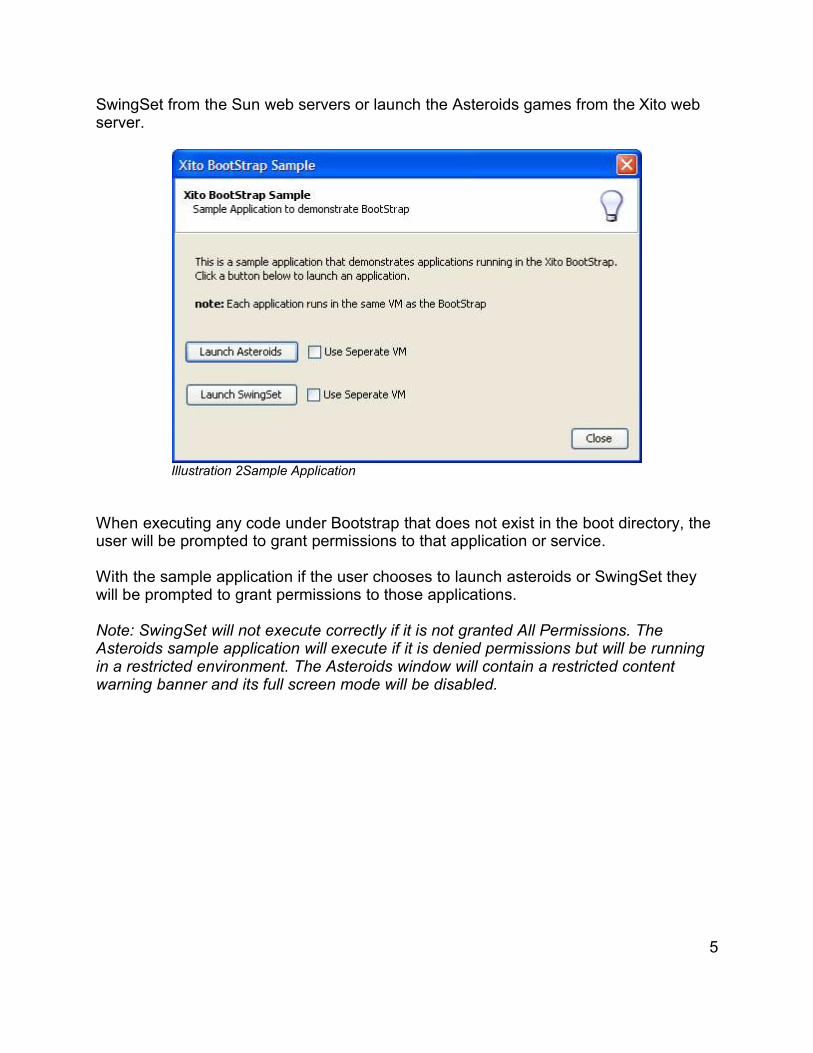
SwingSet from the Sun web servers or launch the Asteroids games from the Xito webserver.
When executing any code under Bootstrap that does not exist in the boot directory, theuser will be prompted to grant permissions to that application or service.
With the sample application if the user chooses to launch asteroids or SwingSet theywill be prompted to grant permissions to those applications.
Note: SwingSet will not execute correctly if it is not granted All Permissions. TheAsteroids sample application will execute if it is denied permissions but will be runningin a restricted environment. The Asteroids window will contain a restricted contentwarning banner and its full screen mode will be disabled.
5
Illustration 2Sample Application

Using this dialog the user can view the code source of the application and whether itwas signed and by whom. They can then Allow the permission or Deny it.
6
Illustration 3Sample Permissions dialog for launching Asteroids
Boot Sequence of a BootStrap Application
To launch a BootStrap configured application you simply execute the BootStrap using:
java -jar boot.jar
Note: On Windows a native EXE launcher is provided that automaticallydetermines the location of the installed JRE and launches the environment.When using this native launcher the bootdir defaults to the location of the EXE.
This will start the boot process using the following sequence:
Determine Boot DirThe bootdir is the directory where the bootstrap configuration is located. Bydefault the bootdir is the current directory. You can specify a different bootdirby passing:
-bootdir [boot directory]
example:
java -jar boot.jar -bootdir c:/temp/test_boot_dir
If the bootdir is not a valid directory then the boot process will fail with an error.
Read boot.properties
After the bootdir is located a boot.properties file is read from that directory. Aboot.properties file must exist. If it does not the boot process will fail with anerror.
Information about the settings in the boot.properties are explained in theConfiguring Bootstrap section below. Note: All settings in the boot.propertiesfile are also loaded into the System.properties object. Therefore you can specifyany Java System property in the boot.properties file.
Read logging.propertiesIf a logging.properties file is found in the bootdir it will be processed to configurethe logging settings of the environment. BootStrap uses the built in
7

java.util.logging package for log messages. For information on configuring thelogging.properties file see the Java Logging API documentation in the class:java.util.logging.LogManager
Setup Security ManagerThe Security Manager is then initialized. BootStrap uses built in SecurityManagerof the class: org.xito.boot.BootSecurityManager. More information aboutBootStrap security is found in the Security Configuration section.
Setup the Cache ManagerThe cache manager is initialized to create a local directory where all downloadedresources will be cached. This directory is configurable but by default is relativeto the users home directory.
Proxy ConfigurationThe first time the application is executed the user will be prompted for a ProxyConfiguration. This prompt is skipped if proxy settings are already contained inthe boot.properties
Service StartupThe services are then started using the boot_services.xml and start_services.xmlfiles located in the bootdir. These files list the service applications or a singleapplication that should be started by the bootstrap.All Boot Services must execute without exception for the environment to boot. AllStartup Services are considered optional and therefore don't need to executesuccessfully for the boot process to succeed.
UI CheckBecause BootStrap is a client execution framework the assumption is that a GUIwill be presented to the user by one of the running services. When BootStraphas finished launching all services it will attempt to determine if a UI Window hasbeen created. It does this by creating a timer to check for a UI Window after 20seconds of the Services being started. If a UI window can not be found then theBoot process will fail with an Error. This behavior can be turned off by runningBootStrap in the nogui mode.
After the services are started the environment has been booted and should be up andrunning.
8

Configuring BootStrap
The main Bootstrap configuration consists of three separate configuration files. Theseinclude: boot.properties, boot_services.xml and start_services.xml.These files specify how the environment is to initialize and what services should bestarted. Also a limited number of Startup Arguments can be passed on the commandline.
Startup ArgumentsThe following startup arguments can be passed to the bootstrap command line.
Argument Description-bootdir Directory where the boot files will reside-nogui Defaults to false. If true then Bootstrap will not
display any UI Prompts or messages. Seeboot.nogui boot property for moreinformation
-minmode Start the environment in minimum mode. Thiswill cause only boot_services to be started andonly those flagged as:<minimum-srv>true</minimum-srv> in theboot_services.xml file
Configuring boot.propertiesThe boot.properties settings contains options to configure the BootStrapenvironment. The file can also contain any Java System property because allsettings in the boot.properties file will be loaded into System.properties. The fileshould be located in the boot dir of the application. The following boot.properties settings can be specified in the file
Property Descriptionapp.name (required) The app.name property specifies
the name of this application. This name shouldbe a short variable style name. For example ifyour application is called “ACME SQL Editor”then the app.name property should besomething like: acme_sql_editor
9
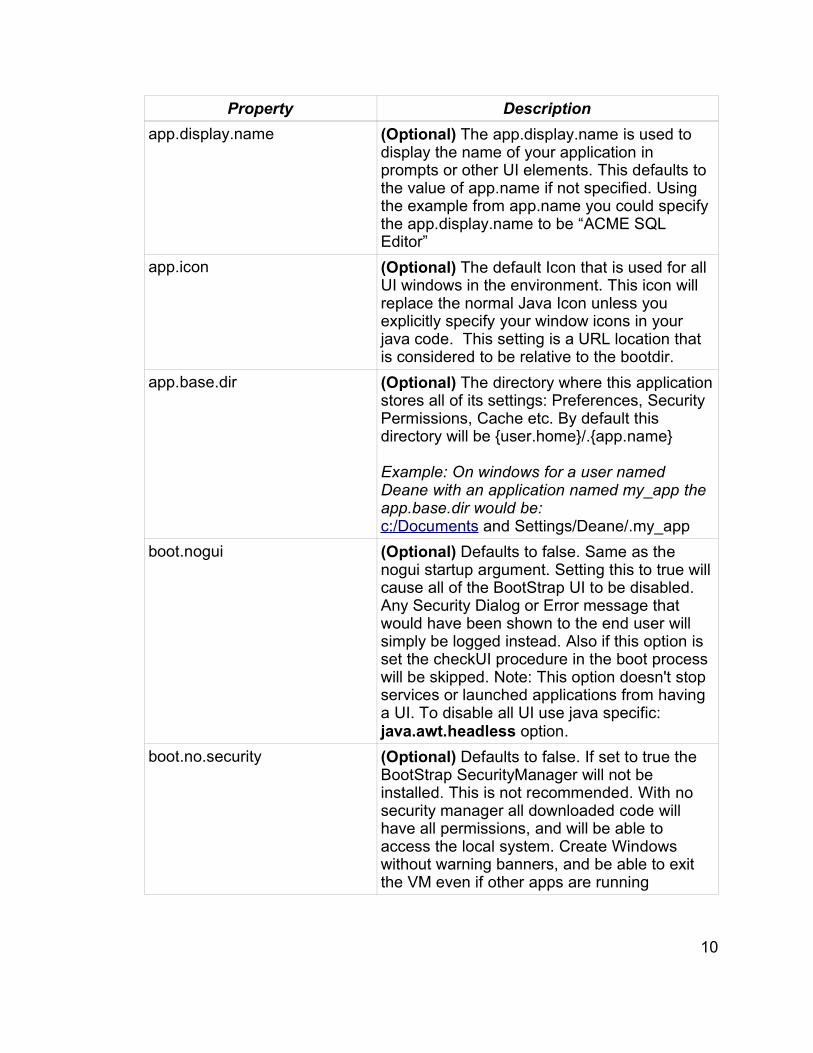
Property Descriptionapp.display.name (Optional) The app.display.name is used to
display the name of your application inprompts or other UI elements. This defaults tothe value of app.name if not specified. Usingthe example from app.name you could specifythe app.display.name to be “ACME SQLEditor”
app.icon (Optional) The default Icon that is used for allUI windows in the environment. This icon willreplace the normal Java Icon unless youexplicitly specify your window icons in yourjava code. This setting is a URL location thatis considered to be relative to the bootdir.
app.base.dir (Optional) The directory where this applicationstores all of its settings: Preferences, SecurityPermissions, Cache etc. By default thisdirectory will be {user.home}/.{app.name}
Example: On windows for a user namedDeane with an application named my_app theapp.base.dir would be: c:/Documents and Settings/Deane/.my_app
boot.nogui (Optional) Defaults to false. Same as thenogui startup argument. Setting this to true willcause all of the BootStrap UI to be disabled.Any Security Dialog or Error message thatwould have been shown to the end user willsimply be logged instead. Also if this option isset the checkUI procedure in the boot processwill be skipped. Note: This option doesn't stopservices or launched applications from havinga UI. To disable all UI use java specific:java.awt.headless option.
boot.no.security (Optional) Defaults to false. If set to true theBootStrap SecurityManager will not beinstalled. This is not recommended. With nosecurity manager all downloaded code willhave all permissions, and will be able toaccess the local system. Create Windowswithout warning banners, and be able to exitthe VM even if other apps are running
10

Property Descriptionboot.use.cache (Optional) Defaults to true. Setting this to false
will cause the Cache Manager to not storedownloaded resources in the local cache.
boot.cache.dir (Optional) This is the directory where thecache manager will stored downloadedresources. This directory will default to{app.base.dir}/cache
boot.proxy.prompt (Optional) Defaults to true. If this setting is setto false then the user will not be prompted forProxy settings on the first launch.
native.laf (Optional) Defaults to true. By defaultbootstrap will use the native platforms look andfeel for its GUI. Setting this to false will causeJava to use its default look and feel which isusually the Swing Metal Look and Feel.
Note: Even if BootStrap is using the nativelook your launched applications can use theirown look and feel because of the AppContextoption.
boot.services.url (Optional) This is the URL to theboot_services.xml file that this BootStrapshould boot. If not specified it will default toboot_services.xml located in the bootdir.
startup.services.url (Optional) This is the URL to thestart_services.xml file that this BootStrapshould startup. If not specified it will default tostart_services.xml located in the bootdir.
quicklaunch.install.dir (Optional) When launching BootStrap fromWebStart this is the directory where thequicklaunch files will be copied to on the client.See the Launching from WebStart section formore information.
As the table above describes the only setting that is required is the app.name. All othersettings are optional.
11
Launching BootStrap from Java WebStartThe Xito BootStrap is designed to work in place of the Java WebStart thereforelaunching a BootStrap based application from WebStart is error prone. However attimes it may be useful to have WebStart launch your application. Therefore starting withthe 1.0.1 release, the ability to launch a BootStrap based application environment fromWebStart is now supported.The functionality in the BootStrap to enable this is called QuickLaunch. Basically youcan provide a JNLP file that will launch the BootStrap. When BootStrap sees that it hasbeen launched by a JNLP Client such as WebStart it will tricker the BootStrap to go intoQuickLaunch Mode.While in QuickLaunch Mode the BootStrap will obtain a list of Boot Files to install on theclient from the server and will cache and copy these files to the local machine. It willthen launch a new instance of the BootStrap based on these copied files.
Steps for QuickLaunch deployment:1. Deploy BootStrap and Service files on WebServer2. Modify QuickLaunch JNLP File3. Create QuickLaunch File List4. Modify the boot.properties
Deploy BootStrap Service files on Web ServerFollow normal BootStrap deployment information to create your services and deploythem on your web server for your clients to use.
QuickLaunch JNLP File
To use QuickLaunch you need a JNLP file that webstart can use to launch theBootStrap. The BootStrap distribution contains a sample JNLP file for this purposecalled quick_launch.jnlp.
12

Sample quick_launch.jnlp file:
<?xml version="1.0" encoding="UTF-8"?><!-- NOTE: The codebase should be changed to your codebase for deployment --><jnlp spec="1.0+" codebase="http://quick_launch.test/"> <information> <title>Xito</title> <vendor>Xito.org</vendor> <description>Xito Application Platform</description> <description kind="tooltip">Xito Application Platform</description> <homepage href="http://xito.sourceforge.net"/> <offline-allowed/> </information> <security> <all-permissions/> </security> <resources> <j2se version="1.4+"/> <jar href="boot.jar" main="true"/> <property name="quicklaunch.app.display.name" value="Xito"/> </resources> <application-desc main-class="org.xito.boot.Boot"> </application-desc></jnlp>
The code base should be the location on the webserver you have placed your boot.jarand boot.properties files.You can also modify the <property name=”quicklaunch.app.display.name”> to changethe name of the application that the BootStrap will use while its in QuickLaunch mode.
Create a QuickLaunch File ListIn the codebase directory on the webserver you should place a file named:quick_launch_file_list.txt, this file will list the files that need to be copied from theWebServer to the client in order for BootStrap to be launched. You can list just theBootStrap if you want all services to launch from the web server or you can haveindividual service files also listed. A sample quick_launch_file_list.txt file is shownbelow:
13

Sample quick_file_list.txt:
#List each file that should be copied to the local machine#These filenames should be relative to the JNLP codebase#specified in quick_launch.jnlp
boot.jarboot.propertiesxito_16.png
The files boot.jar and boot.properties are required. These are the minimum files thatyou need to start the BootStrap. The files listed should be placed on the webserverrelative to the codebase specified in the JNLP file. Lines starting with # are consideredcomments in this file.
Modify the boot.propertiesUsing the QuickLaunch File List the BootStrap will copy the files listed to the localmachine however it needs to know which directory on the local machine to copy thefiles to. To specify this directory you need to add a property to the boot.properties filecalled: quicklaunch.install.dirThis property should name a directory on the client where the files listed in the File Listwill be copied. The directory name should not be a full path just a name for yourapplication.
Sample boot.properties with quicklaunch.install.dir propety:app.name = xito_testapp.display.name = Xito Test Appapp.icon = xito_16.png
boot.services.url=http://xito.test/test_app/boot_services.xmlstartup.services.url=http://xito.test/test_app/start_services.xml
quicklaunch.install.dir=Xito
On the Windows platform the quicklaunch.install.dir will be placed under “c:\ProgramFiles” on MacOSX the directory will be placed under “/Applications”.
14

Once the files have been copied to the install directory BootStrap will launch theboot.jar that it copied to the install directory using a new Java VM process. The VM willbe the same version that was used by the WebStart application.From this point execution resembles the normal BootStrap boot process.
15
Boot and Startup ServicesAfter the Boot process has configured the environment, and setup the cache managerand security manager, it will boot a set of specified Services. Services are simply Javaapplications that have been configured to be started by the BootStrap. There are twosets of Services: boot services and startup services. Boot Services are required toexecute with out exception for the environment to boot successfully. Startup Servicesare started after Boot Services and do not have to start successfully for theenvironment to complete the boot process. In other words, Boot Services are requiredservices and Startup Services are optional services. Note: If the environment is in minmode only boot services specified as minimumservices will be started. Startup Services will be skipped.
Services XML FileThe Services that are to be started are listed in two files boot_services.xml andstart_services.xml. By default these files should reside in the bootdir however remotefiles can be used by specifying boot.services.url and startup.services.url in theboot.properties file.The content of each of these files lists the services that should be started. They will bestarted in the order they appear in the XML file. An example Services XML File isshown below:
<?xml version="1.0" encoding="UTF-8"?><services> <service> <name>test.sample.MyApp</name> <display-name>Sample App</display-name>
<minimum-srv>false</minimum-srv > <href>sample.srv</href> </service> <service> ... </service></services>
There are four settings that can be specified for each service, two are required. Theyare
16

Element Descriptionname (Required) This is a name of the service.
The name should follow Java's packagenaming structure. The name will uniquelyidentify the service to the Service Managerand be use to resolve dependent servicesclass dependences.
display-name (Optional) A Descriptive Name of Thisservice
minimum-srv (Optional) If set to true then this servicewill be started if BootStrap is in minmode.Min mode can be configured by passing a-minmode command line argument. Thedefault is false.
href (Required) A URL pointing to a ServiceDescriptor .srv file for this Service. TheURL can be absolute or relative to thisservices.xml file
The Service Manager will iterate through each <service> element and load eachservice in turn. The <href> element should point to a valid Service Descriptor XML filefor each Service. By convention each individual Service Descriptor file should have a .srv extension.
Service XML (srv) FileThe Service Descriptor file describes each Service in detail including the jars that theservice will use to load and also the name of the main service class.
An example Service Descriptor XML File is shown below:
<?xml version="1.0" encoding="UTF-8"?><service> <name>test.sample.MyApp</name> <display-name>Sample Application</display-name> <desc>This is a Sample Application</desc> <version>1.0.0</version> <service-cls>test.sample.MyApp</service-cls> <append-to-classpath>true</append-to-classpath>
17

<classpath> <service-ref name="test.shared.service"/> <lib path="sample.jar"/> </classpath></service>
The Elements in the Service Descriptor file are described below:
Element Descriptionname (Required) The name of the service this
should be the same name that was listedin the file for boot_services.xml orstart_services.xml
display-name (Optional) A Descriptive Name of thisService
desc (Optional) A Description of what thisService is or what it does
version (Optional) xx.xx.xx version number of thisservice
service-cls (Optional) This is the class name thatcontains the main method of the service
append-to-classpath (Optional) If this option is set to true thenthis services classes will be included in theclasspath for all following services orapplications launched in this VM. By usingthis option Applications and Services don'tneed to explicitly declare their servicedependancies
classpath (Optional) A list of jar libraries or servicesthat should be included in this Servicesclasspath. This element uses two sub-elements named: lib and service-ref
Native-libs (Optional) A list of jar libraries that containnative operating system libraries. Thiselement will contain a lib sub-element.
18

Element Descriptionlib (Optional)This element must reside under
a classpath element and names a jarlibrary that should be included in theclasspath. The attribute path is used toname the path to the jar file. The path canbe absolute or relative to this ServiceDescriptor file. If the element is usedunder a native-libs element the attribute:os can be used with the value “windows”,“mac”, or “linux”
service-ref (Optional) This element must resideunder a classpath element and names aservice that should be included in thisservices classpath. The attribute name isused to name a service that should beincluded. The service that is name musthave been already started by the servicemanager.
Each service is configured to require All Permissions. Therefore when services arelaunched from locations other then the bootdir the user will be prompted to grant theservice permissions.To create a service the developer simply needs to write a standard Java Applicationwith a main method. Bundle that application into a jar and then create a ServiceDescriptor file for it. Then list the service in either the boot or startup list of services. Nointerfaces or BootStrap APIs need to be used.
Using BootStrap API in your ServiceThe service can take advantage of the BootStrap API if it so chooses. There areseveral ways that a service can more tightly integrate with the BootStrap:• Implement a static initService method in your main Service class• Register a StartupListener• Use Launcher API's to launch separate embedded applications
To access this functionality in your Service you can import org.xito.boot.*
initService MethodIf the main Service class has implemented an initService method of the
19

signature:public static void initService(ServiceDesc service)Then the ServiceManager will call this method on your service just prior to callingthe static main method. The passed ServiceDesc object can be used to obtaininformation about this service description which your Service can use todynamically alter the behavior of the service.
StartupListenerA StartupListener can be registered with the ServiceManager so that it can benotified about the boot process taking place. An example of such aStartupListener could be a SplashScreen service that listens for each ServiceStarting and displays a message showing which services are starting. To install a StartupListener implement the org.xito.boot.StartupListenerinterface in a class and install the listener into the ServiceManager in theinitService or main method of the service, using this method:ServiceManager.getManager().addStartupListener(myListener);
20
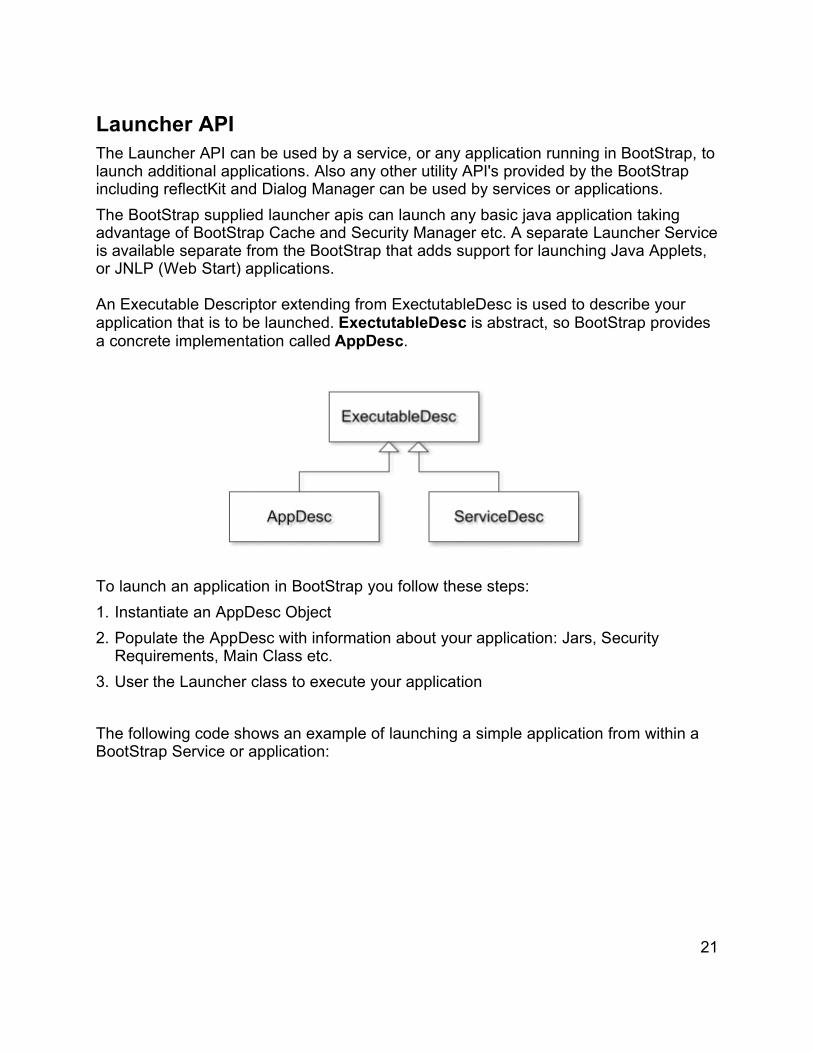
Launcher APIThe Launcher API can be used by a service, or any application running in BootStrap, tolaunch additional applications. Also any other utility API's provided by the BootStrapincluding reflectKit and Dialog Manager can be used by services or applications. The BootStrap supplied launcher apis can launch any basic java application takingadvantage of BootStrap Cache and Security Manager etc. A separate Launcher Serviceis available separate from the BootStrap that adds support for launching Java Applets,or JNLP (Web Start) applications.
An Executable Descriptor extending from ExectutableDesc is used to describe yourapplication that is to be launched. ExectutableDesc is abstract, so BootStrap providesa concrete implementation called AppDesc.
To launch an application in BootStrap you follow these steps:1. Instantiate an AppDesc Object2. Populate the AppDesc with information about your application: Jars, Security
Requirements, Main Class etc.3. User the Launcher class to execute your application
The following code shows an example of launching a simple application from within aBootStrap Service or application:
21

try { AppDesc appDesc = new AppDesc("Asteroids", "Asteroids"); String codebase = "http://xito.sourceforge.net/apps/games/asteroids/"; appDesc.addURL(new URL(codebase+"asteroids.jar")); appDesc.setPermissions(appDesc.getAllPermissions()); appDesc.setMainClass("org.xito.asteroids.MainApp"); appDesc.setNewAppContext(true); AppLauncher launcher = new AppLauncher(); launcher.launchBackground(appDesc);}catch(Exception e) { //Show user error}
The constructor of AppDesc takes two String parameters the first is the ApplicationName, the second is the Display name of the Application. These are used in securitydialogs and error messages.
When specifying the permissions the application will require, you should currently use 1of 2 options either appDesc.setPermissions(AppDesc.getAllPermissions()) orappDesc.setPermissions(AppDesc.getRestrictedPermissions())
When using the AppLauncher class to launch the application described by the AppDescyou can call 1 of 3 methods they are described below:
AppLauncher Method DescriptionlaunchBackground(appDesc) This will launch the application in a separate
Thread in the Background. This method will notthrow an exceptions if an execption is thrownduring execution the BootStrap will display anerror Message.
launchInternal(appDesc) This will launch the application in a separatethread by the calling Thread will join this newThread causing the callling application to blockuntil the execution is complete. This methodwill throw an Exception if there is a problemlaunching the application
launchExternal(appDesc) This will launch the application in a new VMand BootStrap. A new VM will be launched theBootStrap will be launched in minimum modeand the application will be started.
22

Proxy Server ConfigurationBecause BootStrap is designed to run applications over the Internet or local network theconfiguration of Proxy settings by users that need them becomes an important aspectof the user interface. Bootstrap provides built in proxy configuration for your applicationenvironment so you don't need to worry about it for your applications. The first time the BootStrap environment is executed BootStrap checks to see if aproxy.properties file exists in the app.base.dir. If the file exists Bootstrap will load thesettings in the file and continue booting the services. If the file does not exist and if theboot.proxy.prompt is set to true (the default), BootStrap will prompt the user for theirproxy settings. The following dialog shows the options available:
This Proxy Configuration is a thin wrapper around the Java Proxy implementation. Javauses a set of System.properties that determine the proxy configuration. If the userspecifies Proxy Settings in the dialog BootStrap will write those settings into therequired System.properties. The default setting is just set to: “I don't use a Proxy Server” in this case the user simplehits OK and the environment continues to boot. If the user hits Cancel the environment
23

will boot but they will be prompted again next time the environment is launched. If the boot.propeties setting of boot.proxy.prompt is set to false or the boot.propertiesfile contains proxy settings hard coded in it the proxy prompt will not appear.
Note: Any application that has permission can cause the Proxy Prompt to reappear bycalling the org.xito.boot.ProxyConfig.getProxyConfig().showProxyDialog();
24
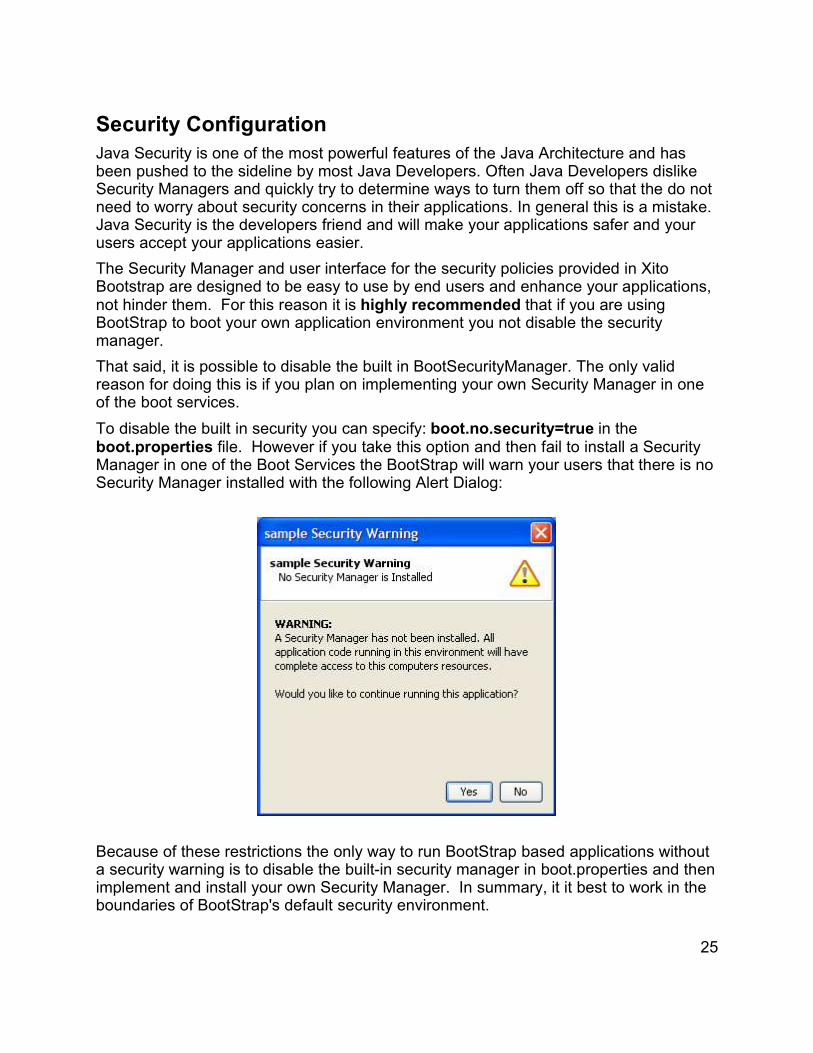
Security ConfigurationJava Security is one of the most powerful features of the Java Architecture and hasbeen pushed to the sideline by most Java Developers. Often Java Developers dislikeSecurity Managers and quickly try to determine ways to turn them off so that the do notneed to worry about security concerns in their applications. In general this is a mistake.Java Security is the developers friend and will make your applications safer and yourusers accept your applications easier. The Security Manager and user interface for the security policies provided in XitoBootstrap are designed to be easy to use by end users and enhance your applications,not hinder them. For this reason it is highly recommended that if you are usingBootStrap to boot your own application environment you not disable the securitymanager. That said, it is possible to disable the built in BootSecurityManager. The only validreason for doing this is if you plan on implementing your own Security Manager in oneof the boot services. To disable the built in security you can specify: boot.no.security=true in theboot.properties file. However if you take this option and then fail to install a SecurityManager in one of the Boot Services the BootStrap will warn your users that there is noSecurity Manager installed with the following Alert Dialog:
Because of these restrictions the only way to run BootStrap based applications withouta security warning is to disable the built-in security manager in boot.properties and thenimplement and install your own Security Manager. In summary, it it best to work in theboundaries of BootStrap's default security environment.
25

Security PolicyJava Security Functionality is out of the scope of this document. Sun has publishedmany documents concerning Java Security Architecture and these documents shouldbe consulted for an in depth understanding of Security features in Java. Xito Bootstrap attempts to make Security easy to understand for developers deployingapplications on top of the bootstrap.
In general the following Security Policy rules are implemented in the BootStrap:1. All Permissions specified in Java's default java.policy file are honored.2. All Code that resides in the boot directory of bootstrap are granted All
permissions.3. All Other code that requests all Permissions will require the User to Grant those
permissions.4. Code that has not be granted All Permissions will run in a Restricted
Permission Mode.
It is envisioned that the majority of service and application code running on top ofBootStrap will be downloaded and executed from the Internet or some other localnetwork server. Therefore, the vast majority of application code running within theBootStrap environment will fall under rule: 3 or 4 above.The easiest way to ensure that your application has All Permissions without causing theSecurity Prompt to occur is to place your code in the boot dir of the BootStrap. This willcause the code to be run under rule 2 of the policy. The assumption with granting all code in the boot dir with All Permissions is that theuser has gone through the work to download and install your application “bootstrap”onto their computer. Therefore code that has been bundled along with bootstrap andplaced in the boot dir should also have the same permissions that bootstrap itselfenjoys. Of course deploying your application in such a way requires that usersdownload new versions of your bootstrap based app each time you make changes.Having bootstrap launch your application over the net removes this issue, and is thepreferred way to use BootStrap with your applications.
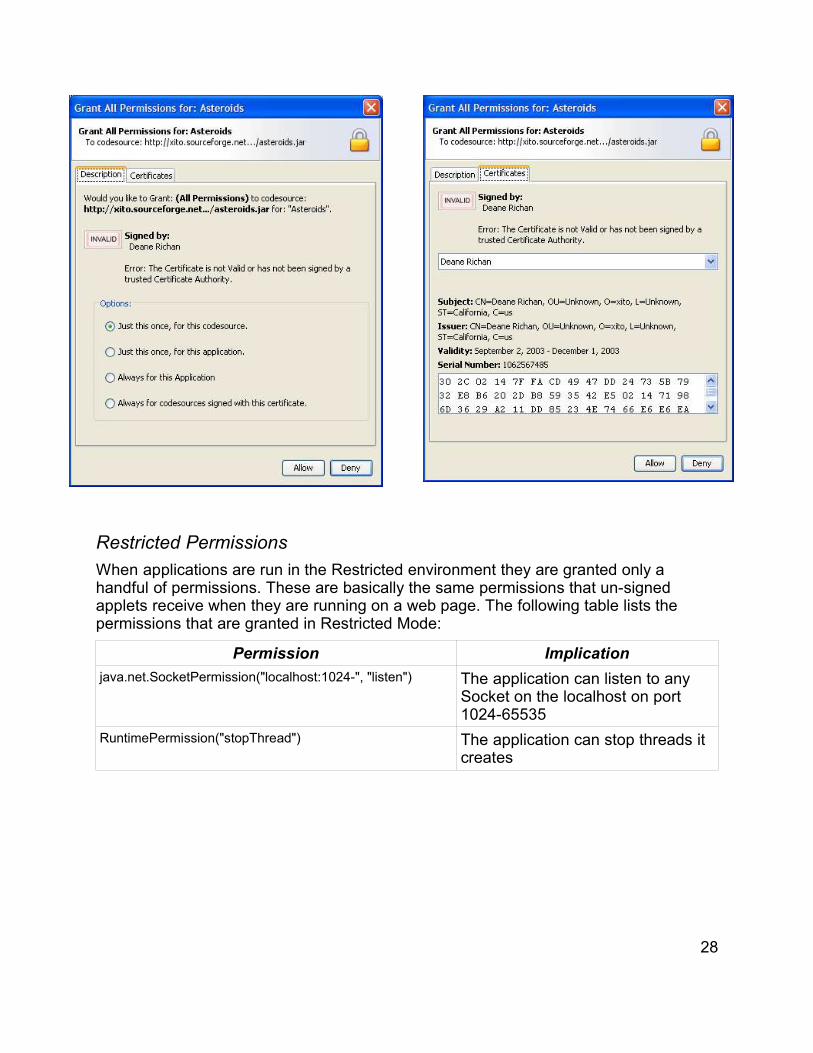
Security Permission PromptIf your application or service code resides in any location other then the boot dir theBootStrap Security Manager will prompt your users to grant permission for this code torun. The Permission prompt has the following information:
26
Description: This is basically a sentence that describes what the user is being asked todo. An example description is:
Would you like to Grant: (All Permissions) to code source: http://host/.../myapp.jarfor “My Application”
Signed By: If the application code has been signed the prompt will display who it issigned by and whether the certificate used to sign the code is valid. Valid certificatesare not expired and signed by a valid root certificate authority. Detailed informationabout the certificate can be found by clicking view certificate on the security promptdialog.
Grant Options: The user will be given the following grant options:
Option DescriptionJust this once, for this code source Grant permissions to the code source for
just this Execution.Just this once, for this application Grant permissions to this code source and
other code sources for this application forjust this Execution
Always, for this application Grant permissions to this code source andother code sources for this application forthis and all future sessions
Always, for code sources signed with thiscertificate
Grant permissions to this code source andany other code sources signed by thiscertificate for this and all future sessions
A dialog showing an example of a security prompt along with an example of theCertificate Tab is shown below. The Certificate information can be used by users toobtain more information about the certificates used to sign this application's code andwhether they are valid certificates or not.
If the user chooses Allow the security permission will be granted with the option theyspecified. If the user chooses Deny the application will be given Restricted Permissionsan application should be designed so that it can run with Restricted Permissions or inthe least case inform the user that it can't run in restricted permissions and exit.
27
Restricted PermissionsWhen applications are run in the Restricted environment they are granted only ahandful of permissions. These are basically the same permissions that un-signedapplets receive when they are running on a web page. The following table lists thepermissions that are granted in Restricted Mode:
Permission Implicationjava.net.SocketPermission("localhost:1024-", "listen") The application can listen to any
Socket on the localhost on port1024-65535
RuntimePermission("stopThread") The application can stop threads itcreates
28
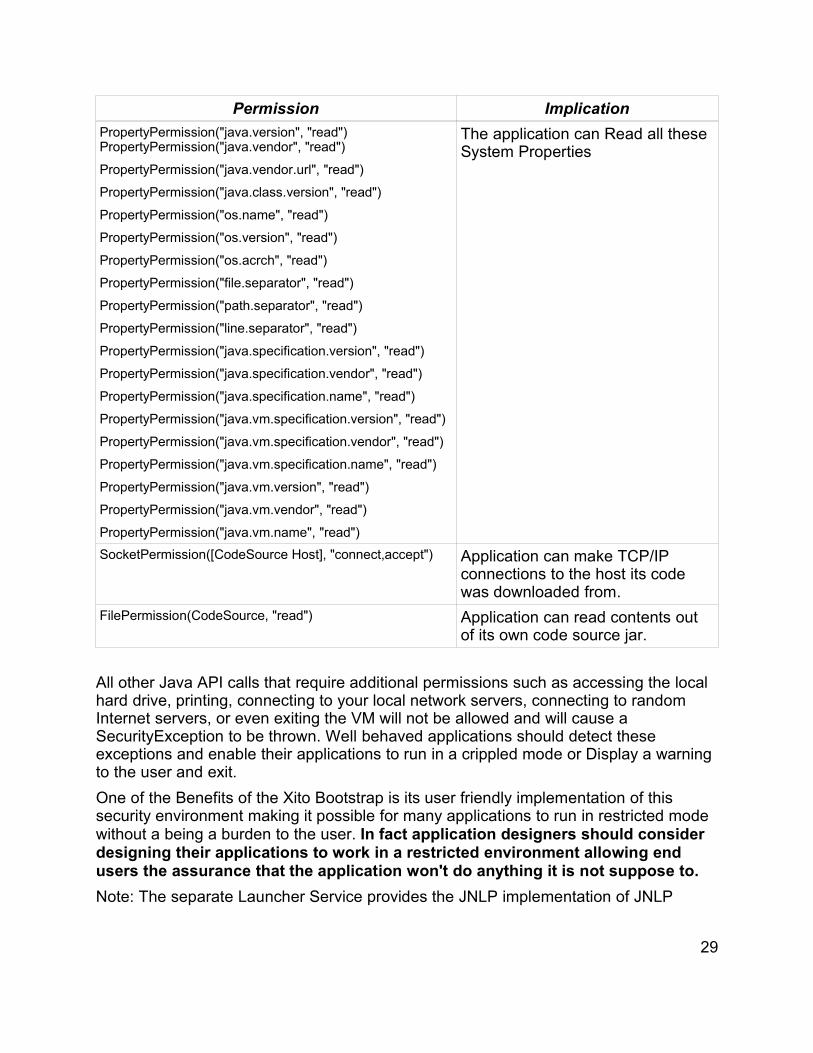
Permission ImplicationPropertyPermission("java.version", "read")PropertyPermission("java.vendor", "read")
PropertyPermission("java.vendor.url", "read")
PropertyPermission("java.class.version", "read")
PropertyPermission("os.name", "read")
PropertyPermission("os.version", "read")
PropertyPermission("os.acrch", "read")
PropertyPermission("file.separator", "read")
PropertyPermission("path.separator", "read")
PropertyPermission("line.separator", "read")
PropertyPermission("java.specification.version", "read")
PropertyPermission("java.specification.vendor", "read")
PropertyPermission("java.specification.name", "read")
PropertyPermission("java.vm.specification.version", "read")
PropertyPermission("java.vm.specification.vendor", "read")
PropertyPermission("java.vm.specification.name", "read")
PropertyPermission("java.vm.version", "read")
PropertyPermission("java.vm.vendor", "read")
PropertyPermission("java.vm.name", "read")
The application can Read all theseSystem Properties
SocketPermission([CodeSource Host], "connect,accept") Application can make TCP/IPconnections to the host its codewas downloaded from.
FilePermission(CodeSource, "read") Application can read contents outof its own code source jar.
All other Java API calls that require additional permissions such as accessing the localhard drive, printing, connecting to your local network servers, connecting to randomInternet servers, or even exiting the VM will not be allowed and will cause aSecurityException to be thrown. Well behaved applications should detect theseexceptions and enable their applications to run in a crippled mode or Display a warningto the user and exit.One of the Benefits of the Xito Bootstrap is its user friendly implementation of thissecurity environment making it possible for many applications to run in restricted modewithout a being a burden to the user. In fact application designers should considerdesigning their applications to work in a restricted environment allowing endusers the assurance that the application won't do anything it is not suppose to.Note: The separate Launcher Service provides the JNLP implementation of JNLP
29
Services that enable restricted applications to access the File System, Printer Servicesetc in a controlled fashion. Your application can use these services to can access tolocal resources without requesting your application have All Permissions.
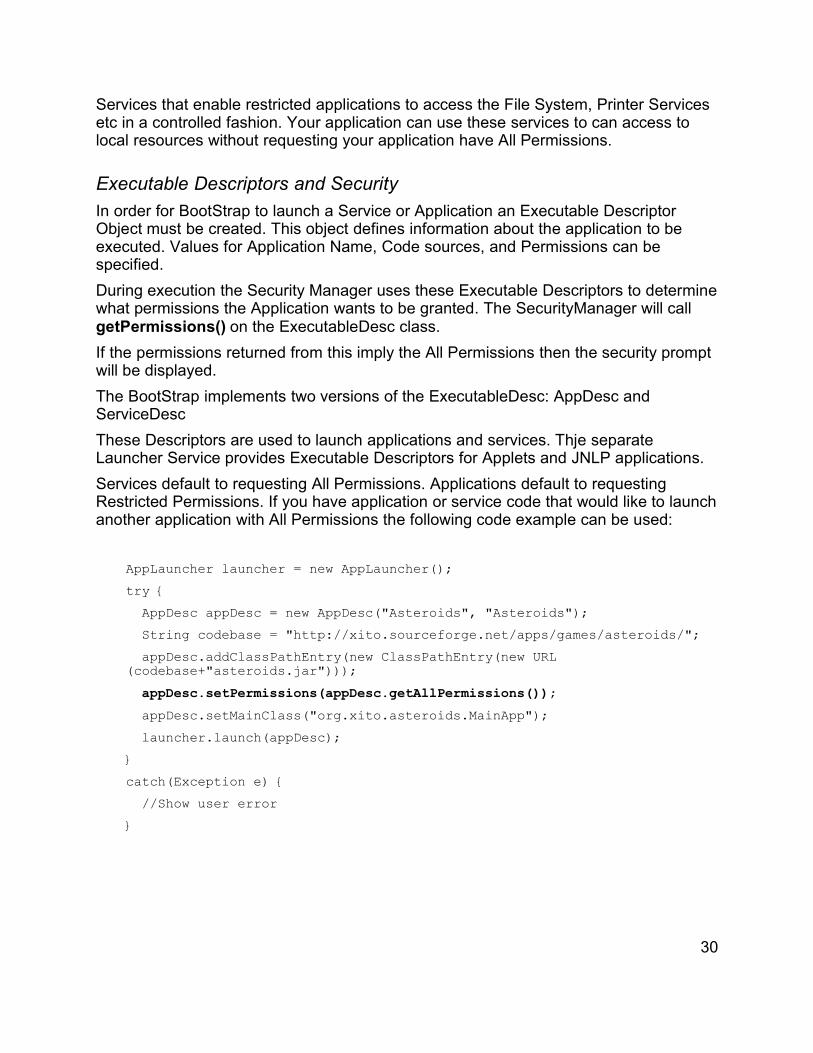
Executable Descriptors and SecurityIn order for BootStrap to launch a Service or Application an Executable DescriptorObject must be created. This object defines information about the application to beexecuted. Values for Application Name, Code sources, and Permissions can bespecified. During execution the Security Manager uses these Executable Descriptors to determinewhat permissions the Application wants to be granted. The SecurityManager will callgetPermissions() on the ExecutableDesc class. If the permissions returned from this imply the All Permissions then the security promptwill be displayed. The BootStrap implements two versions of the ExecutableDesc: AppDesc andServiceDescThese Descriptors are used to launch applications and services. Thje separateLauncher Service provides Executable Descriptors for Applets and JNLP applications.Services default to requesting All Permissions. Applications default to requestingRestricted Permissions. If you have application or service code that would like to launchanother application with All Permissions the following code example can be used:
AppLauncher launcher = new AppLauncher();try { AppDesc appDesc = new AppDesc("Asteroids", "Asteroids"); String codebase = "http://xito.sourceforge.net/apps/games/asteroids/"; appDesc.addClassPathEntry(new ClassPathEntry(new URL(codebase+"asteroids.jar"))); appDesc.setPermissions(appDesc.getAllPermissions()); appDesc.setMainClass("org.xito.asteroids.MainApp"); launcher.launch(appDesc);}catch(Exception e) { //Show user error}
30

Sharing Virtual Machine IssuesXito BootStrap is designed to launch multiple applications in the same VM. Although inpractice the implementation works for the most part there are various issues thatdevelopers should be made aware of while running in a Shared VM.
System.exitTraditionally Java developers assume their applications are the only applicationsrunning in a VM. Therefore their application will often create many Frames or Windows,spawn several Threads and then when the user wants to exit the application thedeveloper simple calls System.exit(0). On the surface this seems reasonable but in a shared VM world this behavior is notdesired. In order to allow multiple applications to run in a single VM BootStrap SecurityManagerenforces that only a Single Class has the permission to exit the VM. By default thisclass in the Boot class. Because of this security implementation when any other application running in theshared VM calls System.exit() a security exception will be thrown. In general this approach is reasonable except when an application is running that doesnot know that it is running in the BootStrap environment ie (most current applications).For these applications the user will choose Exit from the UI and then the app will callSystem.exit() a security exception will be thrown and the application would still berunning. Very frustrating to the end user. Because of this when such an applicationattempts to call System.exit the SecurityManager will attempt to shutdown theirapplication through other means. It does this by keeping track of all Windows andFrames the App has created and then calls dispose on each one. It also attempts tokeep track of all Threads started by the application and call stop on each one. This approach is problematic especially the Thread.stop issue because this method hasbeen deprecated for being DeadLock prone. Although this mechanism works for the most part it is much better if applications avoidcalling System.exit(). Rather then call System.exit applications should simply dispose oftheir own windows and notify any running threads to die on their own. This way theirapplication will stop running without calling System.exit(). This is the best approach to take until Sun increases the ability of Java Applications torun in a single VM or multiple VMs with low overhead.
As part of the Xito Bootstrap a special class called AppShutdownHelper has beencreated to facilitate shutting down your application in Xito. This can be used withreflection so that your application will perform the same while running in non Xitoplatforms but will shutdown your application in Xito without calling System.exit.
31

In place of System.exit use the following code sample:
try { Class.forName("org.xito.boot.AppShutdownHelper").newInstance();}catch(Exception exp) { System.exit(0);}
Simpling instantiating an AppShutdownHelper anywhere in your application code willcause your application to be destroyed.
Shared Virtual Machine ResourcesThere are many parts of the virtual machine that multiple application must share. If yourapplication makes changes to these single resources other applications in theenvironment may suffer. Some examples are System.properties, Security Policy,Security Manager, java.awt.Toolkit, URLStreamHandlerFactory and other VMSingletons. If your application needs to change or manipulate these or other VM sharedresources it should probably not run in a shared environment. It should either find otherways to implement the functionality in a spirit of cooperation or simply choose to run ina separate VM.
32


![[BOOK] [Bootstrap] [Awesome] Bootstrap-Programming-Cookbook](https://static.fdocuments.net/doc/165x107/577ca6bf1a28abea748c023f/book-bootstrap-awesome-bootstrap-programming-cookbook.jpg)
