wrench Serial Number - Cdi Torque · Before using all models of dial torque wrenches, it is...
4
FOR YOUR PERMANENT FILE 19220 SAN JOSE AVENUE • CITY OF INDUSTRY, CA 91748 • USA (626) 965-0668 Find other fine torque products at WWW.CDITORQUE.COM WRENCH MODEL NUMBER: WRENCH SERIAL NUMBER: Form 20-220-CDI 6/2010 Rev. A US and Foreign Patents Pending - Made in USA with US and Global Components For Warranty Claims, Contact CDI Torque Products at (626) 965-0668. LIMITED WARRANTY The CDI Dial Torque Wrench Dual Scale is backed by a one year warranty. This warranty covers manufacturer defects and workmanship. The warranty excludes misuse, abuse and normal wear and tear. Exclusion is not allowed in some states and may not apply. This warranty gives you specific legal rights, and you may have other rights, which vary from state to state. IMPORTANT ENVIRONMENTAL NOTES: 1. This equipment may contain hazardous materials which can be harmful to the environment. 2. Do not dispose of this equipment as municipal waste. Return it to the distributor or a designated collection center. Thank you for caring about our environment! DIAL TORQUE WRENCH DUAL SCALE OPERATION MANUAL
Transcript of wrench Serial Number - Cdi Torque · Before using all models of dial torque wrenches, it is...

FOR YOUR PERMANENT FILE
19220 SAN JOSE AVENUE • CITY OF INDUSTRY, CA 91748 • USA (626) 965-0668
Find other fine torque products at WWW.CDITORQUE.COM
WRENCH MODEL NUMBER:
WRENCH SERIAL NUMBER:
Form 20-220-CDI6/2010 Rev. A
US and Foreign Patents Pending - Made in USA with US and Global Components
For Warranty Claims, Contact CDI Torque Products at (626) 965-0668.
LIMITED WARRANTY The CDI Dial Torque Wrench Dual Scale is backed by a one year warranty. This warranty covers manufacturer defects and workmanship. The warranty excludes misuse, abuse and normal wear and tear. Exclusion is not allowed in some states and may not apply. This warranty gives you specific legal rights, and you may have other rights, which vary from state to state.
IMPORTANT ENVIRONMENTAL NOTES: 1. This equipment may contain hazardous materials which can be harmful to the environment. 2. Do not dispose of this equipment as municipal waste. Return it to the distributor or a designated collection center.Thank you for caring about our environment!
dIAL TORQUE WRENCHdUAL SCALE
OPERATION MANUAL
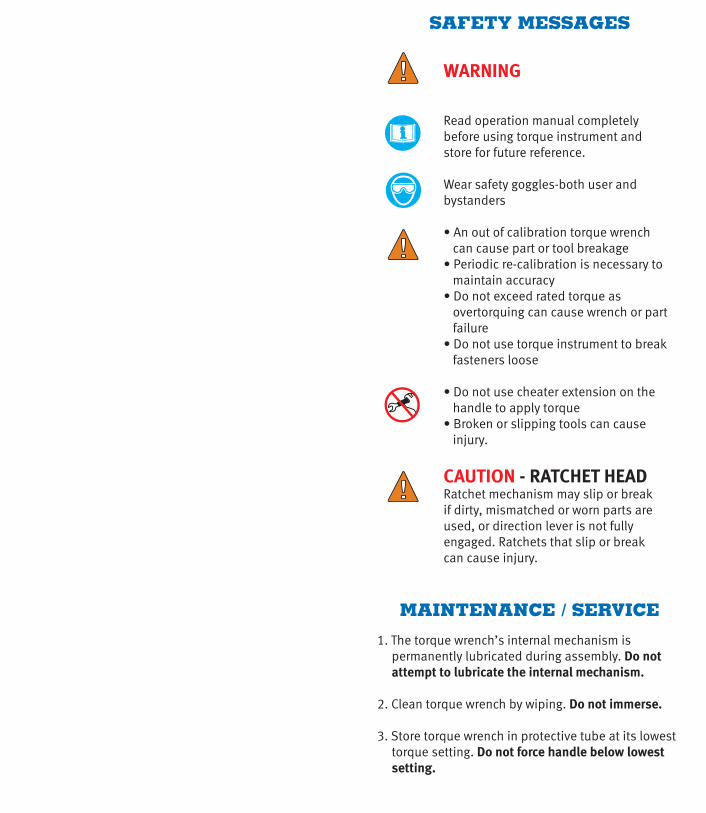
SAFETY MESSAGES
WARNING
Read operation manual completely before using torque instrument and store for future reference.
Wear safety goggles-both user and bystanders
• An out of calibration torque wrench can cause part or tool breakage
• Periodic re-calibration is necessary to maintain accuracy
• Do not exceed rated torque as overtorquing can cause wrench or part failure
• Do not use torque instrument to break fasteners loose
• Do not use cheater extension on the handle to apply torque
• Broken or slipping tools can cause injury.
CAUTION - RATCHET HEADRatchet mechanism may slip or break if dirty, mismatched or worn parts are used, or direction lever is not fully engaged. Ratchets that slip or break can cause injury.
MAINTENANCE / SERVICE
1. The torque wrench’s internal mechanism is permanently lubricated during assembly. Do not attempt to lubricate the internal mechanism.
2. Clean torque wrench by wiping. Do not immerse.
3. Store torque wrench in protective tube at its lowest torque setting. Do not force handle below lowest setting.

Before using all models of dial torque wrenches, it is strongly suggested to cycle/operate them 3 times at full scale in the torque direction in which they will be used. Dial torque wrenches must always be zeroed before use. To set orange pusher & blue follower needle for right-hand (CW) torquing:
1. Turn bezel in left-hand (CCW) direction until, blue memory follower needle contacts orange pusher needle.
2. Continue to turn bezel left-hand (CCW) until blue memory follower needle is lined up with zero (0) of outer graduation on portion of dial for IN.LB., FT.LB., METRIC readings.
3. Apply force on the wrench handle until blue follower needle reaches desired torque. When force is released orange pusher needle will return to zero and blue memory follower needle will remain at torque applied.
4. For repetitive torque operations (once the zero has been set as instructed above), the blue memory follower needle can be returned to zero by use of the follower needle knob. It is ready for the next operation.
5. IMPORTANT - When using the memory feature always make sure that the blue follower memory needle is on zero before torquing.
BEZEL
MEMORYFOLLOWERNEEDLE(BLUE)
PUSHERNEEDLE(ORANGE)
FOLLOWER NEEdLE dIAL
MEMORYFOLLOWERNEEDLEKNOB
SETTING MEMORY FOLLOWER NEEdLE
ON dUAL SCALE MOdEL
BEZEL
ELECTRICCONTACTARM
PUSHERNEEDLE(ORANGE)
ELECTRIC SIGNAL dIALSetting electric arm at zero with all torque readings made from inner circle of numbers on the scale for right-hand (CW) torquing, and the outer circle of numbers on the scale for left-hand (CCW) torquing:
1. Turn bezel (CCW) until light and buzzer goes on.
2. Continue to turn bezel (CCW) until inner zero of desired scale (English or Metric) is lined up with orange pusher needle.
3. Now turn bezel (CW) until light goes off and orange pusher needle is aligned with desired torque graduation in inner portion of scale orange pusher needle is now preset to desired torque value.
4. Apply force to handle in the (CW) direction. When the preset torque value is reached the light and buzzer will go on. When force on the handle is released orange pusher needle will return to the preset torque value.
5. To change the preset torque value to another, turn the bezel as required to the new torque value within the same dial graduation and proceed as in step 4 above.
6. IMPORTANT - Always make sure that the electric contact arm is zeroed.
SETTING ELECTRICCONTACT ARM
ON dUAL SCALE MOdEL

CERTIFICATION
CONVERSION TAbLE
This torque wrench as calibrated at the factory, is certified to meet the current ASME specification.Additionally, all wrenches are calibrated on a torquestandard traceable to the National Institute of Standards and Technology (N.I.S.T.).
To Convert Multiply From To By
in. oz. in. lb. 0.06250
in. lb. in. oz. 16
in. lb. ft. lb. 0.08333
in. lb. cmkg 1.15212
in. lb. mkg 0.01152
in. lb. Nm 0.11298
in. lb. dNm 1.12984
ft. lb. in. lb. 12
ft. lb. mkg 0.13825
ft. lb. Nm 1.35581
dNm in. lb. 0.88507
dNm Nm 0.1
Nm dNm 10
Nm cmkg 10.1971
Nm mkg 0.10197
Nm in. lb. 8.85074
Nm ft. lb. 0.73756
cmkg in. lb. 0.86796
cmkg Nm 0.09806
mkg in. lb. 86.7961
mkg ft. lb. 7.23301
mkg Nm 9.80665
USE OF ExTENSIONSANd AdAPTERS
When using an extension or adapter (increasing the effective length of the torque wrench) the output torque value will change. To calculate the new torque output of the wrench use the following formula:
TA = Torque exerted @ end of adapterL = Distance between square drive and hand positionTW = Wrench scale readingA = Length of adapter or extension
A number of variables can affect torque accuracy. These include the length of an adapter or extension, length of the wrench and variations in hand position on the wrench will affect the accuracy of the above calculation.
TW = TA x L
L + A
NOTES
TA TW
AL