WPS-700-BUL-A-GR BULLET CAMERA - Datatailmedia.datatail.com/docs/manual/125602_en.pdfeffects dzoom...
28
WPS-700-BUL-A-GR CAMERA BULLET INSTALLATION MANUAL Review manual thoroughly before installation. Retain for future reference.
Transcript of WPS-700-BUL-A-GR BULLET CAMERA - Datatailmedia.datatail.com/docs/manual/125602_en.pdfeffects dzoom...
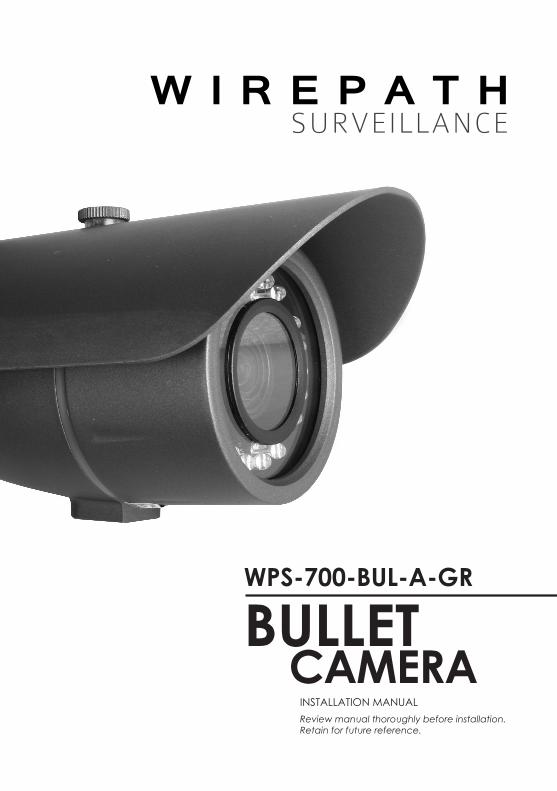
WPS-700-BUL-A-GR
CAMERABULLET
INSTALLATION MANUALReview manual thoroughly before installation.Retain for future reference.


3
WPS-700-BUL-A-GR Installation Manual
© 2012 Wirepath Surveillance
CONTENTSSafety Instructions............................................................................... 4
Features............................................................................................... 5
Package Contents............................................................................. 6
Installation Instructions....................................................................... 6
Set-Up................................................................................................... 8 1. Operating The OSD Menu..................................................... 8 2. OSD Menu Structure............................................................... 8 3. OSD Menu Settings................................................................. 12 3.1 Camera Name Setting....................................... 12 3.2 Lens....................................................................... 12 3.3 Exposure............................................................... 13 3.4 Day/Night.............................................................14 3.5 WDR/BLC/ECLPS.................................................. 15 3.6 White Balance..................................................... 16 3.7 3D-DNR................................................................. 17 3.8 Effects................................................................... 18 3.9 Special................................................................. 19 3.10 Exit....................................................................... 22
RS485 System Diagram....................................................................... 23
Warranty.............................................................................................. 23
Troubleshooting................................................................................. 24
Specifications......................................................................................26
Dimensions........................................................................................... 27
3

4
WPS-700-BUL-A-GR Installation Manual
SAFETY INSTRUCTIONSThis information is provided to ensure your safety and to prevent physicalorfinancialloss.Pleasereadthisdocumentcarefullybeforeinstalling and operating the camera.
1. Handle with care.Use caution when handling to avoid damage to sensitive internal components.
2. Do not install camera under extreme temperatures.This camera only operates under temperature conditions between 14˚F~140˚F.
3. Do not mount the camera directly facing bright light sources. Exposing the camera to strong light over long periods of time will damage the camera’s sensor.
4. Do not supply voltage other than 12~30V DC or 24V AC.This camera regulates power within this range. Higher voltages will damage the camera’s electronic components.
5. Do not install camera in environments with extreme humidity.Installing camera in environments with extreme humidity may cause moisture to condense on the surface of the lens or dome cover, which can affect picture quality.
5
WPS-700-BUL-A-GR Installation Manual
© 2012 Wirepath Surveillance
FEATURES
• 1/3” Sony Super-HAD II CCD The Sony Super HAD II CCD is ideal for low lux illumination resulting in a clear and crisp image.
• Varifocal Auto-Iris Lens This camera features a varifocal lens with a focal length of 3.7-12 mm. The auto-iris function intuitively manages the amount of light passing through the lens for consistent image brightness.
• Super WDR (Wide Dynamic Range) Super WDR improves the contrast between bright and dark areas of a scene to present a balanced image even in high-contrast environments.
• True Day/Night (ICR) AnIRcutfilterisautomaticallydeployedinthedaytimetoproduce the most accurate color, then removed at night for maximum visibility with IR illumination.
• 3D-DNR and Global Movement The powerful 3D-DNR function with Global Movement not only helps to reduce digital noise, but also minimizes the blurring effect when an object is in motion.
• Special Functions Automatic White Balance settings, Eclipse, Sense-up, and other features optimize the camera to provide the best image in specificorchanginglightingconditions.
• RS-485 Connection and OSD This camera features an OSD (on-screen display) for initial setup and settings adjustment. Remote control is possible using a compatible DVR or PTZ controller connected to the camera’s RS485 wire leads.
• Weatherproof Housing The IP66-rated weatherproof housing makes this camera ideal for outdoor surveillance.
6
WPS-700-BUL-A-GR Installation Manual
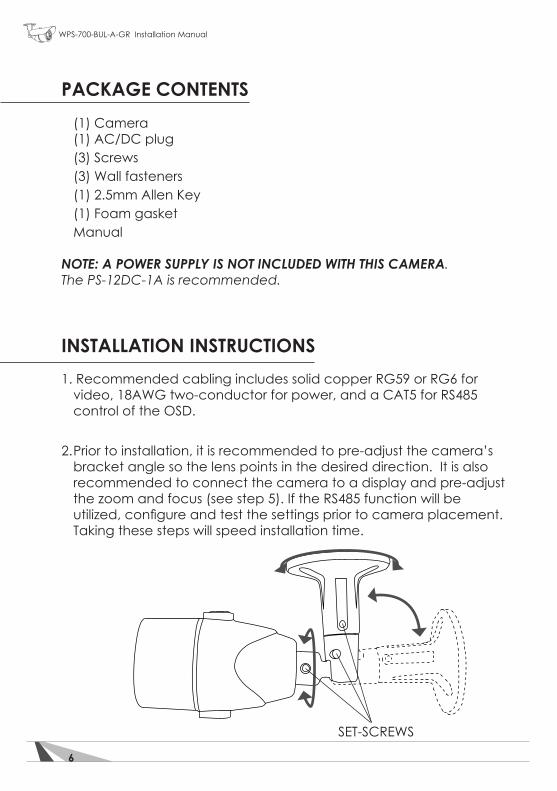
PACKAGE CONTENTS (1) Camera (1) AC/DC plug (3) Screws (3) Wall fasteners (1) 2.5mm Allen Key (1) Foam gasket Manual
NOTE: A POWER SUPPLY IS NOT INCLUDED WITH THIS CAMERA. The PS-12DC-1A is recommended.
INSTALLATION INSTRUCTIONS1. Recommended cabling includes solid copper RG59 or RG6 for video, 18AWG two-conductor for power, and a CAT5 for RS485 control of the OSD.
2. Prior to installation, it is recommended to pre-adjust the camera’s bracket angle so the lens points in the desired direction. It is also recommended to connect the camera to a display and pre-adjust the zoom and focus (see step 5). If the RS485 function will be utilized,configureandtestthesettingspriortocameraplacement. Taking these steps will speed installation time.
SET-SCREWS
7
WPS-700-BUL-A-GR Installation Manual
© 2012 Wirepath Surveillance
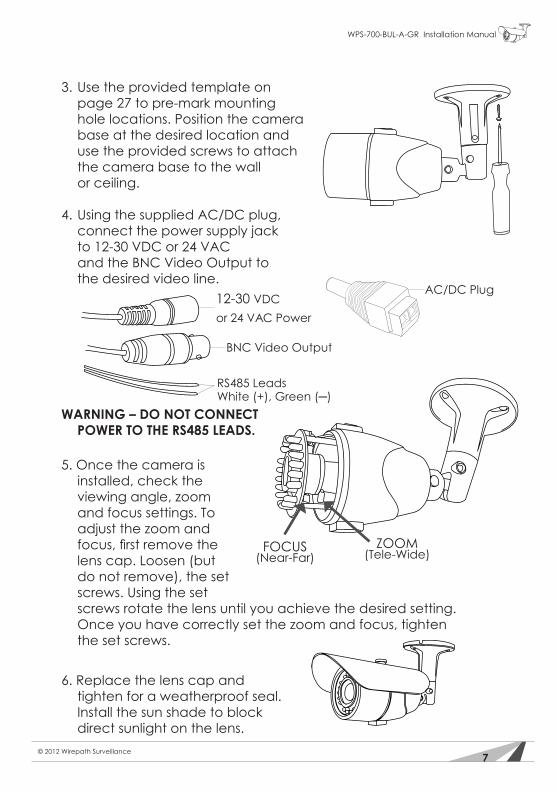
3. Use the provided template on page 27 to pre-mark mounting hole locations. Position the camera base at the desired location and use the provided screws to attach the camera base to the wall or ceiling.
4. Using the supplied AC/DC plug, connect the power supply jack to 12-30 VDC or 24 VAC and the BNC Video Output to the desired video line.
WARNING – DO NOT CONNECT POWER TO THE RS485 LEADS.
5. Once the camera is installed, check the viewing angle, zoom and focus settings. To adjust the zoom and focus,firstremovethe lens cap. Loosen (but do not remove), the set screws. Using the set screws rotate the lens until you achieve the desired setting. Once you have correctly set the zoom and focus, tighten the set screws.
6. Replace the lens cap and tighten for a weatherproof seal. Install the sun shade to block direct sunlight on the lens.
12-30 VDC or 24 VAC Power
BNC Video Output
RS485 LeadsWhite (+), Green(─)
FOCUS(Near-Far)
ZOOM(Tele-Wide)
AC/DC Plug
8
WPS-700-BUL-A-GR Installation Manual
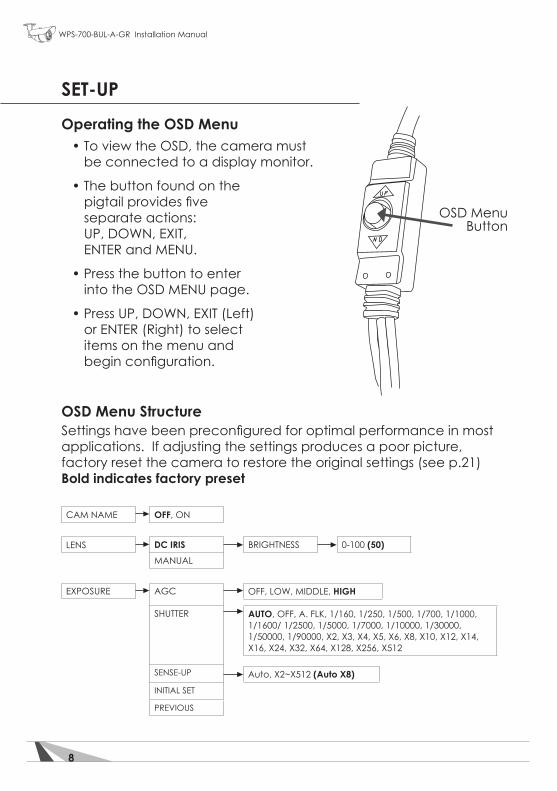
SET-UP
Operating the OSD Menu •ToviewtheOSD,thecameramust be connected to a display monitor.
•Thebuttonfoundonthe pigtailprovidesfive separate actions: UP, DOWN, EXIT, ENTER and MENU.
•Pressthebuttontoenter into the OSD MENU page.
•PressUP,DOWN,EXIT(Left) or ENTER (Right) to select items on the menu and beginconfiguration.
OSD Menu StructureSettingshavebeenpreconfiguredforoptimalperformanceinmost applications. If adjusting the settings produces a poor picture, factory reset the camera to restore the original settings (see p.21)Bold indicates factory preset
OSD Menu Button
CAM NAME
LENS
EXPOSURE
OFF, ON
DC IRISMANUAL
AGC
SHUTTER
SENSE-UP
INITIAL SET
PREVIOUS
BRIGHTNESS 0-100 (50)
OFF, LOW, MIDDLE, HIGH
Auto,X2~X512(Auto X8)
AUTO, OFF, A. FLK, 1/160, 1/250, 1/500, 1/700, 1/1000, 1/1600/ 1/2500, 1/5000, 1/7000, 1/10000, 1/30000, 1/50000, 1/90000, X2, X3, X4, X5, X6, X8, X10, X12, X14, X16, X24, X32, X64, X128, X256, X512
9
WPS-700-BUL-A-GR Installation Manual
© 2012 Wirepath Surveillance
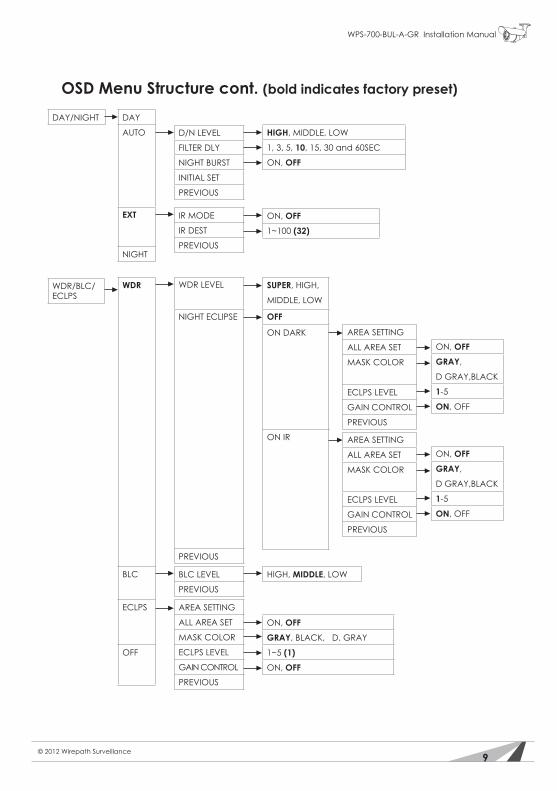
OSD Menu Structure cont. (bold indicates factory preset)
DAY/NIGHT
WDR/BLC/ECLPS
DAY
AUTO
EXT
NIGHT
WDR
BLC
ECLPS
OFF
D/N LEVEL
FILTER DLY
NIGHT BURST
INITIAL SET
PREVIOUS
WDR LEVEL
NIGHT ECLIPSE
PREVIOUS
HIGH, MIDDLE, LOW
1, 3, 5, 10, 15, 30 and 60SEC
ON, OFF
ON, OFF1~100(32)
SUPER, HIGH,
MIDDLE, LOW
OFF
ON DARK
ON IR
IR MODE
IR DEST
PREVIOUS
AREA SETTING
ALL AREA SET
MASK COLOR
ECLPS LEVEL
GAIN CONTROL
PREVIOUS
ON, OFFGRAY,
D GRAY,BLACK
1-5
ON, OFF
ON, OFFGRAY,
D GRAY,BLACK
1-5
ON, OFF
AREA SETTING
ALL AREA SET
MASK COLOR
ECLPS LEVEL
GAIN CONTROL
PREVIOUS
AREA SETTING
ALL AREA SET
MASK COLOR
ECLPS LEVEL
GAIN CONTROL
PREVIOUS
HIGH, MIDDLE, LOW
ON, OFFGRAY, BLACK, D. GRAY
1~5(1)ON, OFF
BLC LEVEL
PREVIOUS
10
WPS-700-BUL-A-GR Installation Manual
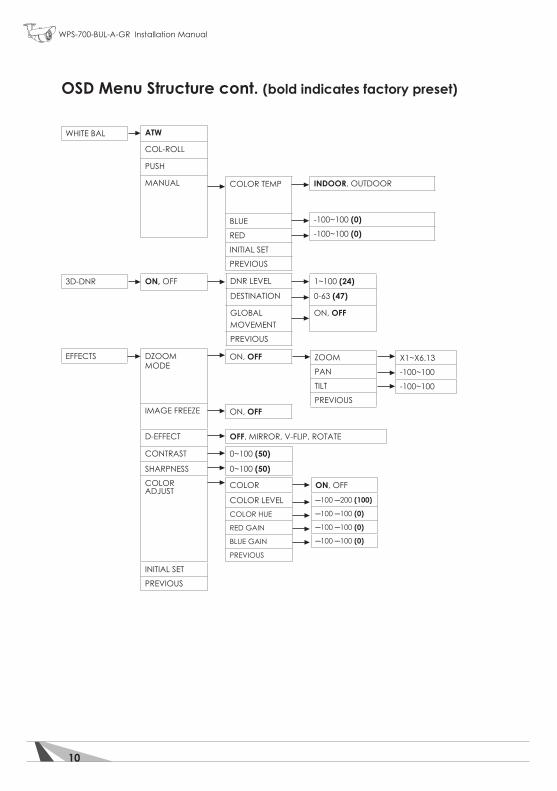
OSD Menu Structure cont. (bold indicates factory preset)
EFFECTS DZOOM MODE
IMAGE FREEZE
D-EFFECT
CONTRAST
SHARPNESS
COLOR ADJUST
INITIAL SET
PREVIOUS
ZOOM
PAN
TILT
PREVIOUS
OFF, MIRROR, V-FLIP, ROTATE
0~100(50)
0~100(50)
COLOR
COLOR LEVELCOLOR HUE
RED GAIN
BLUE GAIN
PREVIOUS
ON, OFF
─100─200(100)
─100─100(0)
─100─100(0)
─100─100(0)
ON, OFF
ON, OFF X1~X6.13
-100~100
-100~100
WHITE BAL
3D-DNR
ATW
COL-ROLL
PUSH
MANUAL
ON, OFF DNR LEVEL
DESTINATION
GLOBAL MOVEMENT
PREVIOUS
COLOR TEMP
BLUE
RED
INITIAL SET
PREVIOUS
1~100(24)
0-63 (47)
ON, OFF
INDOOR, OUTDOOR
-100~100(0)-100~100(0)

11
WPS-700-BUL-A-GR Installation Manual
© 2012 Wirepath Surveillance
SPECIAL ITS MODE
MOTION DET
PRIVACY MASK
ZONE NUMBER
ZONE STATE
WIDTH
HEIGHT
MOVE X
MOVE Y
SENSITIVITY
INITIAL SET
PREVIOUS
MASK NUMBER
MASK STATE
MASK COLOR
WIDTH
HEIGHT
MOVE X
MOVE Y
INITIAL SET
PREVIOUS
ZONE 1-8
ON, OFF0~100
0~100
0~100
0~100
0~100
MASK 1-8
ON, OFFGRAY / BLACK / YELLOW / BLUE / GREEN / RED/ WHITE
0~100(30)0~100(30)0~100(30)0~100(25)
ONOFF
ONOFF
ONOFF
DAY
NIGHT
SHUTTER
AGC
LICENSE PLATE
PREVIOUS
SHUTTER
AGC
LICENSE PLATE
PREVIOUS
CONTRAST
OUTPUT LEVEL
TONE
PREVIOUS
CONTRAST
OUTPUT LEVEL
TONE
PREVIOUS
0~100(50)
64~64(0)
1~64(0)
0~100(50)
64~64(0)
1~64(0)
1/1600, 1/2500, 1/5000, 1/7000, 1/10,000, 1/30,000, 1/50,000, 1/90,000, OFF, A.FLK, 1/160, 1/250, 1/500, 1/700, 1/1000
1/1600, 1/2500, 1/5000, 1/7000, 1/10,000, 1/30,000, 1/50,000, 1/90,000, OFF, A.FLK, 1/160, 1/250, 1/500, 1/700, 1/1000
OFF, LOW, MIDDLE, HIGH
OFF, LOW, MIDDLE, HIGH
EXIT
LANGUAGE
STABILIZER
L/L SYNC
MONITOR TYPE
FACTORY RESET
COMM SET
PREVIOUS
English / Korean / Spanish / French / Russian
ON, OFFINT
CRT, LCR
PROTOCOL
CAMERA ID
BAUD RATE
SAVE / REBOOT
PREVIOUS
PELCO-D
0~255
DISPLAY ID
ID POSITION
PREVIOUS
4800 / 9600 / 19200 / 38400 / 57600
12
WPS-700-BUL-A-GR Installation Manual
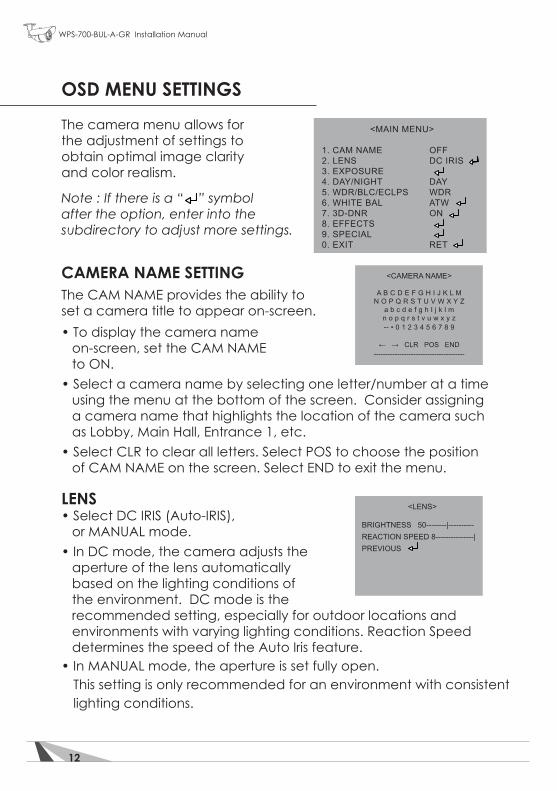
OSD MENU SETTINGS
The camera menu allows for the adjustment of settings to obtain optimal image clarity and color realism.
Note : If there is a “ ” symbol after the option, enter into the subdirectory to adjust more settings.
CAMERA NAME SETTINGThe CAM NAME provides the ability to set a camera title to appear on-screen.•Todisplaythecameraname on-screen, set the CAM NAME to ON.•Selectacameranamebyselectingoneletter/numberatatime using the menu at the bottom of the screen. Consider assigning a camera name that highlights the location of the camera such as Lobby, Main Hall, Entrance 1, etc. •SelectCLRtoclearallletters.SelectPOStochoosetheposition of CAM NAME on the screen. Select END to exit the menu.
LENS•SelectDCIRIS(Auto-IRIS), or MANUAL mode. •InDCmode,thecameraadjuststhe aperture of the lens automatically based on the lighting conditions of the environment. DC mode is the recommended setting, especially for outdoor locations and environments with varying lighting conditions. Reaction Speed
determines the speed of the Auto Iris feature. •InMANUAL mode, the aperture is set fully open. This setting is only recommended for an environment with consistent
lighting conditions.
<CAMERA NAME>
A B C D E F G H I J K L MN O P Q R S T U V W X Y Z
a b c d e f g h I j k l m n o p q r s t v u w x y z-- • 0 1 2 3 4 5 6 7 8 9
← → CLR POS END
---------------------------------------
<MAIN MENU>
1. CAM NAME OFF2. LENS DC IRIS3. EXPOSURE 4. DAY/NIGHT DAY5. WDR/BLC/ECLPS WDR6. WHITE BAL ATW7. 3D-DNR ON8. EFFECTS 9. SPECIAL0. EXIT RET
<LENS>
BRIGHTNESS 50--------|---------- REACTION SPEED 8---------------|PREVIOUS
13
WPS-700-BUL-A-GR Installation Manual
© 2012 Wirepath Surveillance
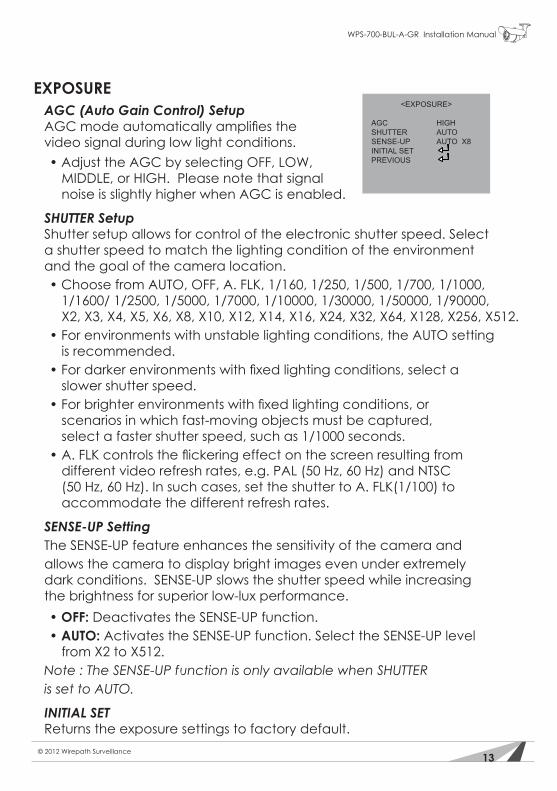
EXPOSURE AGC (Auto Gain Control) Setup AGCmodeautomaticallyamplifiesthe video signal during low light conditions. •Adjust the AGC by selecting OFF, LOW, MIDDLE, or HIGH. Please note that signal noise is slightly higher when AGC is enabled.
SHUTTER Setup Shutter setup allows for control of the electronic shutter speed. Select a shutter speed to match the lighting condition of the environment and the goal of the camera location. •ChoosefromAUTO,OFF,A.FLK,1/160,1/250,1/500,1/700,1/1000, 1/1600/ 1/2500, 1/5000, 1/7000, 1/10000, 1/30000, 1/50000, 1/90000, X2, X3, X4, X5, X6, X8, X10, X12, X14, X16, X24, X32, X64, X128, X256, X512. •Forenvironmentswithunstablelightingconditions,theAUTOsetting is recommended. •Fordarkerenvironmentswithfixedlightingconditions,selecta slower shutter speed. •Forbrighterenvironmentswithfixedlightingconditions,or scenarios in which fast-moving objects must be captured, select a faster shutter speed, such as 1/1000 seconds. •A.FLKcontrolstheflickeringeffectonthescreenresultingfrom different video refresh rates, e.g. PAL (50 Hz, 60 Hz) and NTSC (50 Hz, 60 Hz). In such cases, set the shutter to A. FLK(1/100) to accommodate the different refresh rates.
SENSE-UP Setting The SENSE-UP feature enhances the sensitivity of the camera and allows the camera to display bright images even under extremely dark conditions. SENSE-UP slows the shutter speed while increasing the brightness for superior low-lux performance. • OFF: Deactivates the SENSE-UP function. • AUTO: Activates the SENSE-UP function. Select the SENSE-UP level from X2 to X512. Note : The SENSE-UP function is only available when SHUTTER is set to AUTO.
INITIAL SET Returns the exposure settings to factory default.
<EXPOSURE>
AGC HIGHSHUTTER AUTOSENSE-UP AUTO X8INITIAL SET PREVIOUS
14
WPS-700-BUL-A-GR Installation Manual
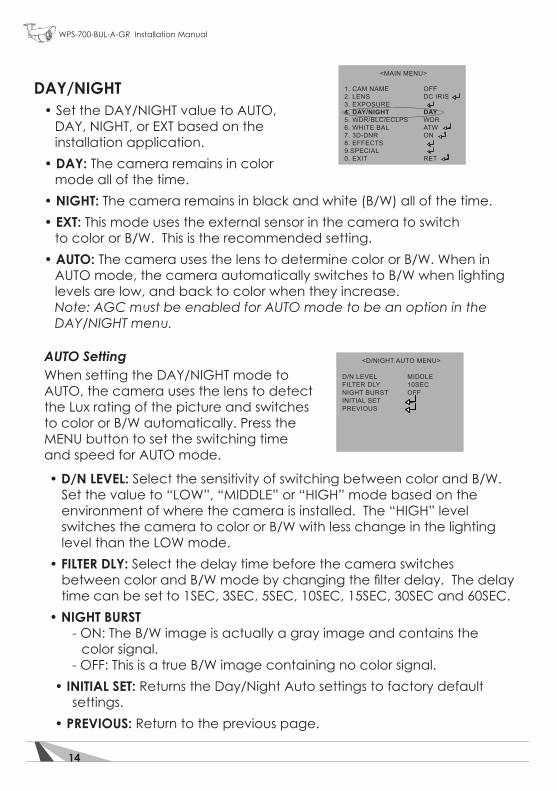
DAY/NIGHT •SettheDAY/NIGHTvaluetoAUTO, DAY, NIGHT, or EXT based on the installation application. • DAY: The camera remains in color mode all of the time. • NIGHT: The camera remains in black and white (B/W) all of the time. • EXT: This mode uses the external sensor in the camera to switch to color or B/W. This is the recommended setting. • AUTO: The camera uses the lens to determine color or B/W. When in AUTO mode, the camera automatically switches to B/W when lighting levels are low, and back to color when they increase. Note: AGC must be enabled for AUTO mode to be an option in the DAY/NIGHT menu.
AUTO Setting When setting the DAY/NIGHT mode to AUTO, the camera uses the lens to detect the Lux rating of the picture and switches to color or B/W automatically. Press the MENU button to set the switching time and speed for AUTO mode.
• D/N LEVEL: Select the sensitivity of switching between color and B/W. Set the value to “LOW”, “MIDDLE” or “HIGH” mode based on the environment of where the camera is installed. The “HIGH” level switches the camera to color or B/W with less change in the lighting level than the LOW mode. • FILTER DLY: Select the delay time before the camera switches betweencolorandB/Wmodebychangingthefilterdelay.Thedelay time can be set to 1SEC, 3SEC, 5SEC, 10SEC, 15SEC, 30SEC and 60SEC. • NIGHT BURST - ON: The B/W image is actually a gray image and contains the color signal. - OFF: This is a true B/W image containing no color signal. • INITIAL SET: Returns the Day/Night Auto settings to factory default settings. • PREVIOUS: Return to the previous page.
<MAIN MENU>
1. CAM NAME OFF2. LENS DC IRIS3. EXPOSURE 4. DAY/NIGHT DAY5. WDR/BLC/ECLPS WDR6. WHITE BAL ATW7. 3D-DNR ON8. EFFECTS 9.SPECIAL0. EXIT RET
<D/NIGHT AUTO MENU>
D/N LEVEL MIDDLEFILTER DLY 10SECNIGHT BURST OFFINITIAL SET PREVIOUS
15
WPS-700-BUL-A-GR Installation Manual
© 2012 Wirepath Surveillance
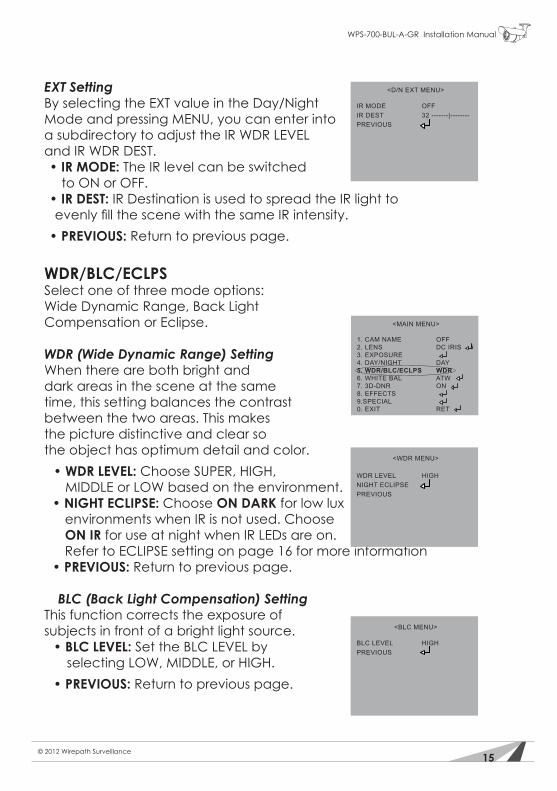
EXT Setting By selecting the EXT value in the Day/Night Mode and pressing MENU, you can enter into a subdirectory to adjust the IR WDR LEVEL and IR WDR DEST. • IR MODE: The IR level can be switched to ON or OFF. • IR DEST: IR Destination is used to spread the IR light to evenlyfillthescenewiththesameIRintensity. • PREVIOUS: Return to previous page.
WDR/BLC/ECLPS Select one of three mode options: Wide Dynamic Range, Back Light Compensation or Eclipse.
WDR (Wide Dynamic Range) Setting When there are both bright and dark areas in the scene at the same time, this setting balances the contrast between the two areas. This makes the picture distinctive and clear so the object has optimum detail and color. • WDR LEVEL: Choose SUPER, HIGH, MIDDLE or LOW based on the environment.
• NIGHT ECLIPSE: Choose ON DARK for low lux environments when IR is not used. Choose ON IR for use at night when IR LEDs are on. Refer to ECLIPSE setting on page 16 for more information
• PREVIOUS: Return to previous page.
BLC (Back Light Compensation) Setting This function corrects the exposure of subjects in front of a bright light source. • BLC LEVEL: Set the BLC LEVEL by selecting LOW, MIDDLE, or HIGH. • PREVIOUS: Return to previous page.
<D/N EXT MENU>
IR MODE OFFIR DEST 32 -------|-------- PREVIOUS
<WDR MENU>
WDR LEVEL HIGHNIGHT ECLIPSEPREVIOUS
<BLC MENU>
BLC LEVEL HIGHPREVIOUS
<MAIN MENU>
1. CAM NAME OFF2. LENS DC IRIS3. EXPOSURE 4. DAY/NIGHT DAY5. WDR/BLC/ECLPS WDR6. WHITE BAL ATW7. 3D-DNR ON8. EFFECTS 9.SPECIAL0. EXIT RET
16
WPS-700-BUL-A-GR Installation Manual
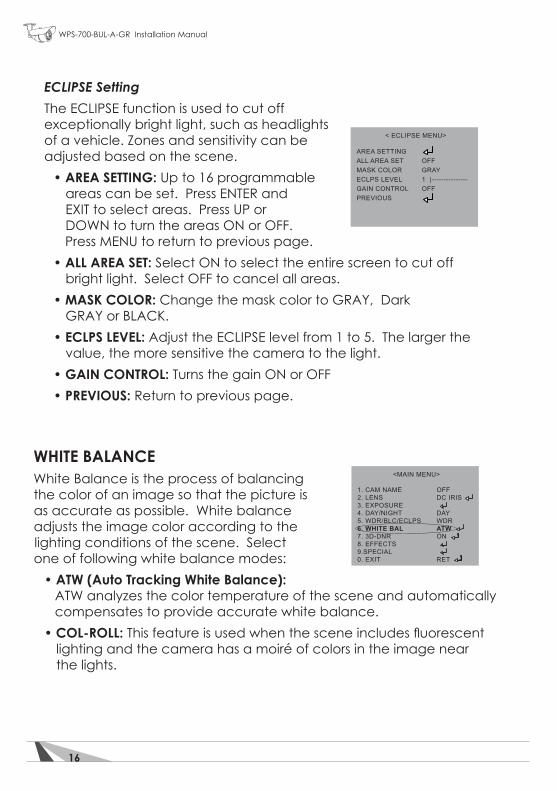
ECLIPSE Setting The ECLIPSE function is used to cut off exceptionally bright light, such as headlights of a vehicle. Zones and sensitivity can be adjusted based on the scene. • AREA SETTING: Up to 16 programmable areas can be set. Press ENTER and EXIT to select areas. Press UP or DOWN to turn the areas ON or OFF. Press MENU to return to previous page. • ALL AREA SET: Select ON to select the entire screen to cut off bright light. Select OFF to cancel all areas. • MASK COLOR: Change the mask color to GRAY, Dark GRAY or BLACK. • ECLPS LEVEL: Adjust the ECLIPSE level from 1 to 5. The larger the value, the more sensitive the camera to the light. • GAIN CONTROL: Turns the gain ON or OFF • PREVIOUS: Return to previous page.
WHITE BALANCEWhite Balance is the process of balancing the color of an image so that the picture is as accurate as possible. White balance adjusts the image color according to the lighting conditions of the scene. Select one of following white balance modes: •ATW (Auto Tracking White Balance): ATW analyzes the color temperature of the scene and automatically compensates to provide accurate white balance. •COL-ROLL: Thisfeatureisusedwhenthesceneincludesfluorescent lighting and the camera has a moiré of colors in the image near the lights.
<MAIN MENU>
1. CAM NAME OFF2. LENS DC IRIS3. EXPOSURE 4. DAY/NIGHT DAY5. WDR/BLC/ECLPS WDR6. WHITE BAL ATW7. 3D-DNR ON8. EFFECTS 9.SPECIAL0. EXIT RET
< ECLIPSE MENU>
AREA SETTING ALL AREA SET OFFMASK COLOR GRAYECLPS LEVEL 1 |---------------GAIN CONTROL OFFPREVIOUS
17
WPS-700-BUL-A-GR Installation Manual
© 2012 Wirepath Surveillance
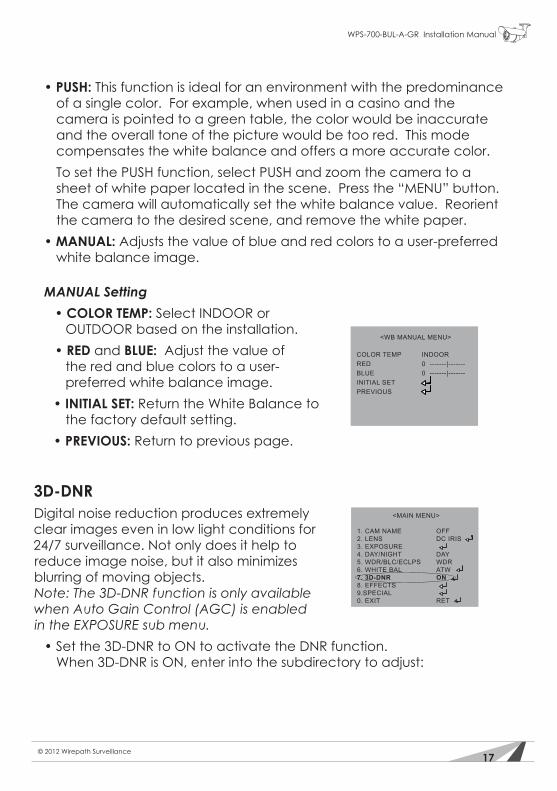
• PUSH: This function is ideal for an environment with the predominance of a single color. For example, when used in a casino and the camera is pointed to a green table, the color would be inaccurate and the overall tone of the picture would be too red. This mode compensates the white balance and offers a more accurate color. To set the PUSH function, select PUSH and zoom the camera to a sheet of white paper located in the scene. Press the “MENU” button. The camera will automatically set the white balance value. Reorient the camera to the desired scene, and remove the white paper. • MANUAL: Adjusts the value of blue and red colors to a user-preferred white balance image.
MANUAL Setting • COLOR TEMP: Select INDOOR or OUTDOOR based on the installation. • RED and BLUE: Adjust the value of the red and blue colors to a user- preferred white balance image. • INITIAL SET: Return the White Balance to the factory default setting. • PREVIOUS: Return to previous page.
3D-DNRDigital noise reduction produces extremely clear images even in low light conditions for 24/7 surveillance. Not only does it help to reduce image noise, but it also minimizes blurring of moving objects. Note: The 3D-DNR function is only available when Auto Gain Control (AGC) is enabled in the EXPOSURE sub menu. •Setthe3D-DNRtoONtoactivatetheDNRfunction. When 3D-DNR is ON, enter into the subdirectory to adjust:
<MAIN MENU>
1. CAM NAME OFF2. LENS DC IRIS3. EXPOSURE 4. DAY/NIGHT DAY5. WDR/BLC/ECLPS WDR6. WHITE BAL ATW7. 3D-DNR ON8. EFFECTS 9.SPECIAL0. EXIT RET
<WB MANUAL MENU>
COLOR TEMP INDOORRED 0 -------|-------BLUE 0 -------|-------INITIAL SET PREVIOUS
18
WPS-700-BUL-A-GR Installation Manual
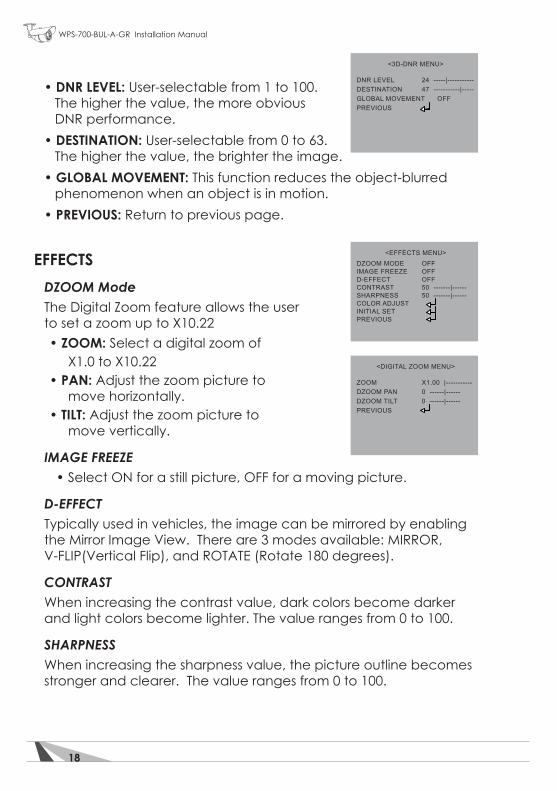
• DNR LEVEL: User-selectable from 1 to 100. The higher the value, the more obvious DNR performance. • DESTINATION: User-selectable from 0 to 63. The higher the value, the brighter the image. • GLOBAL MOVEMENT: This function reduces the object-blurred phenomenon when an object is in motion. • PREVIOUS: Return to previous page.
EFFECTS DZOOM Mode The Digital Zoom feature allows the user to set a zoom up to X10.22 • ZOOM: Select a digital zoom of X1.0 to X10.22 • PAN: Adjust the zoom picture to move horizontally. • TILT: Adjust the zoom picture to move vertically.
IMAGE FREEZE •SelectONforastillpicture,OFFforamovingpicture.
D-EFFECT Typically used in vehicles, the image can be mirrored by enabling the Mirror Image View. There are 3 modes available: MIRROR, V-FLIP(Vertical Flip), and ROTATE (Rotate 180 degrees).
CONTRAST When increasing the contrast value, dark colors become darker and light colors become lighter. The value ranges from 0 to 100.
SHARPNESS When increasing the sharpness value, the picture outline becomes stronger and clearer. The value ranges from 0 to 100.
<3D-DNR MENU>
DNR LEVEL 24 -----|----------- DESTINATION 47 -----------|-----GLOBAL MOVEMENT OFFPREVIOUS
<EFFECTS MENU>DZOOM MODE OFFIMAGE FREEZE OFFD-EFFECT OFFCONTRAST 50 -------|------SHARPNESS 50 -------|------COLOR ADJUSTINITIAL SET PREVIOUS
<DIGITAL ZOOM MENU>
ZOOM X1.00 |-----------DZOOM PAN 0 ------|------DZOOM TILT 0 ------|------PREVIOUS
19
WPS-700-BUL-A-GR Installation Manual
© 2012 Wirepath Surveillance
COLOR ADJUST Adjust the color of the image.
INITIAL SET Return to factory default setting.
PREVIOUS Return to previous page.
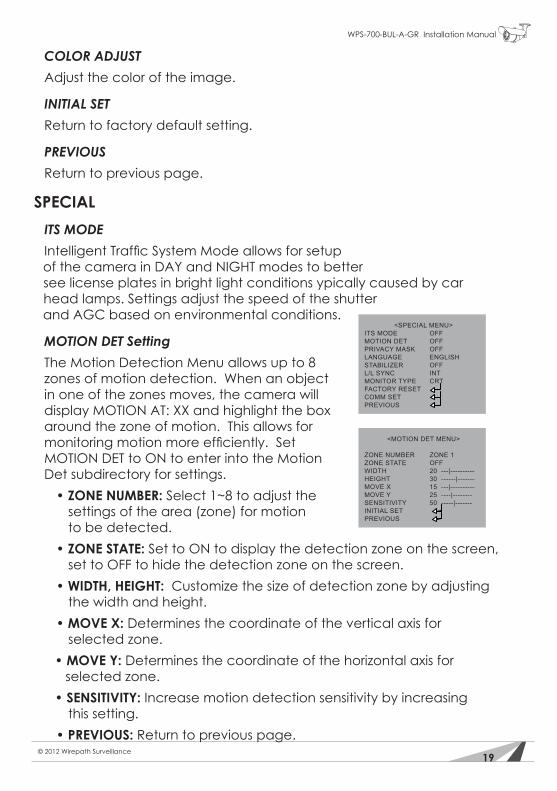
SPECIAL ITS MODE IntelligentTrafficSystemModeallowsforsetup
of the camera in DAY and NIGHT modes to better see license plates in bright light conditions ypically caused by carhead lamps. Settings adjust the speed of the shutter and AGC based on environmental conditions.
MOTION DET Setting The Motion Detection Menu allows up to 8 zones of motion detection. When an object in one of the zones moves, the camera will display MOTION AT: XX and highlight the box around the zone of motion. This allows for monitoringmotionmoreefficiently.Set MOTION DET to ON to enter into the Motion Det subdirectory for settings. • ZONE NUMBER: Select1~8toadjustthe settings of the area (zone) for motion to be detected. • ZONE STATE: Set to ON to display the detection zone on the screen, set to OFF to hide the detection zone on the screen. • WIDTH, HEIGHT: Customize the size of detection zone by adjusting the width and height. • MOVE X: Determines the coordinate of the vertical axis for selected zone. • MOVE Y: Determines the coordinate of the horizontal axis for selected zone. • SENSITIVITY: Increase motion detection sensitivity by increasing this setting. • PREVIOUS: Return to previous page.
<MOTION DET MENU>
ZONE NUMBER ZONE 1ZONE STATE OFF WIDTH 20 ---|----------HEIGHT 30 ------|-------MOVE X 15 ---|----------MOVE Y 25 ----|--------SENSITIVITY 50 -----|-------INITIAL SET PREVIOUS
<SPECIAL MENU>ITS MODE OFFMOTION DET OFFPRIVACY MASK OFFLANGUAGE ENGLISHSTABILIZER OFFL/L SYNC INTMONITOR TYPE CRTFACTORY RESET COMM SET PREVIOUS
20
WPS-700-BUL-A-GR Installation Manual
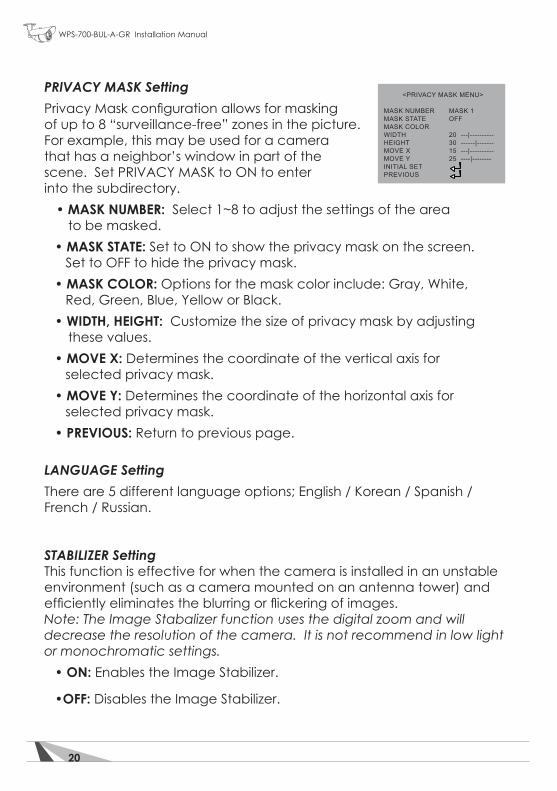
PRIVACY MASK Setting PrivacyMaskconfigurationallowsformasking of up to 8 “surveillance-free” zones in the picture. For example, this may be used for a camera that has a neighbor’s window in part of the scene. Set PRIVACY MASK to ON to enter into the subdirectory. • MASK NUMBER: Select1~8toadjustthesettingsofthearea to be masked. • MASK STATE: Set to ON to show the privacy mask on the screen. Set to OFF to hide the privacy mask. • MASK COLOR: Options for the mask color include: Gray, White, Red, Green, Blue, Yellow or Black. • WIDTH, HEIGHT: Customize the size of privacy mask by adjusting these values. • MOVE X: Determines the coordinate of the vertical axis for selected privacy mask. • MOVE Y: Determines the coordinate of the horizontal axis for selected privacy mask. • PREVIOUS: Return to previous page.
LANGUAGE Setting There are 5 different language options; English / Korean / Spanish / French / Russian.
STABILIZER Setting This function is effective for when the camera is installed in an unstable environment (such as a camera mounted on an antenna tower) and efficientlyeliminatestheblurringorflickeringofimages. Note: The Image Stabalizer function uses the digital zoom and will decrease the resolution of the camera. It is not recommend in low light or monochromatic settings. • ON: Enables the Image Stabilizer.
•OFF: Disables the Image Stabilizer.
<PRIVACY MASK MENU>
MASK NUMBER MASK 1MASK STATE OFF MASK COLOR WIDTH 20 ---|----------HEIGHT 30 ------|-------MOVE X 15 ---|----------MOVE Y 25 ----|--------INITIAL SET PREVIOUS
21
WPS-700-BUL-A-GR Installation Manual
© 2012 Wirepath Surveillance
L/L SYNC Line Lock Sync is used to reduce picture “roll” when the camera is connected to an AC power supply and its picture is switched with other cameras on a monitor. MONITOR TYPE Select CRT or LCD based upon the type of monitor being used to view the camera.
FACTORY RESET If adjustment to the camera’s settings results in poor picture quality, it is recommended to restore the camera to factory default settings. AllconfigurationswiththeexceptionoftheCOMMSETTINGScanbe reset to factory default settings by selecting FACTORY RESET and pressing the MENU button. This option does not have an "UNDO" feature, so ensure default settings are desired before selecting this function.
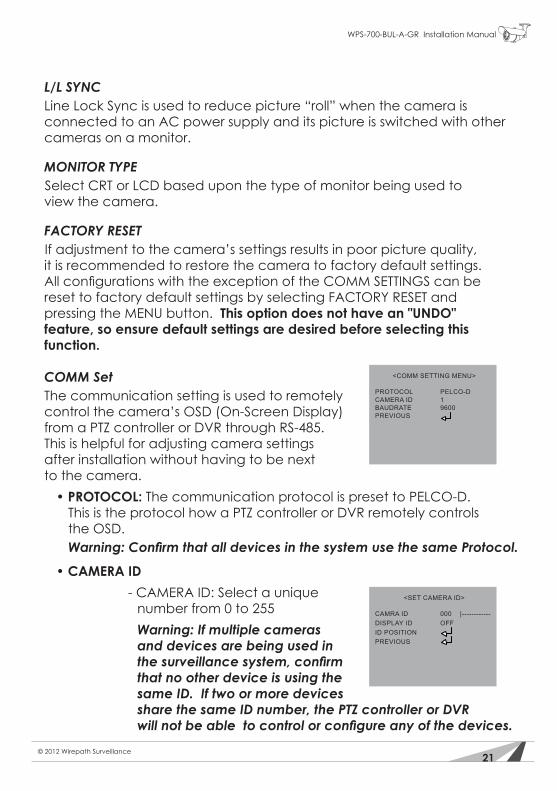
COMM Set The communication setting is used to remotely control the camera’s OSD (On-Screen Display) from a PTZ controller or DVR through RS-485. This is helpful for adjusting camera settings after installation without having to be next to the camera. • PROTOCOL: The communication protocol is preset to PELCO-D. This is the protocol how a PTZ controller or DVR remotely controls the OSD. Warning:ConfirmthatalldevicesinthesystemusethesameProtocol.
• CAMERA ID - CAMERA ID: Select a unique number from 0 to 255 Warning: If multiple cameras anddevicesarebeingusedin thesurveillancesystem,confirm thatnootherdeviceisusingthe sameID.Iftwoormoredevices sharethesameIDnumber,thePTZcontrollerorDVR willnotbeabletocontrolorconfigureanyofthedevices.
<COMM SETTING MENU>
PROTOCOL PELCO-DCAMERA ID 1BAUDRATE 9600PREVIOUS
<SET CAMERA ID>
CAMRA ID 000 |------------DISPLAY ID OFFID POSITION PREVIOUS
22
WPS-700-BUL-A-GR Installation Manual
- DISPLAY ID: Set DISPLAY ID to ON to display the CAMERA ID on the screen. This feature is useful when needing to know the ID of a camera simply by viewing a picture. - ID POSITION: Select the position for the CAMERA ID on the display screen by using the left and right arrows “”, “” to move the ID. - PREVIOUS: Return to previous page.
BAUD RATE Choose a baud rate for RS-485 communication between the camera and controller. Baud rate options include 4800, 9600, 19200, 38400, and 57600, and must be set to the same rate in all of the devices. Warning:ConfirmthatalldevicesinthesystemusethesameBaudRate. SAVE/REBOOT Once changes have been made to the COMM SETTINGS, Save and Reboot the camera to retain the settings. These settings are stored even when the Factory Default settings are applied. Select SAVE/REBOOT and press the MENU button.
PREVIOUS Return to previous page.
EXITSelect EXIT to save settings and exit the OSD menu.
23
WPS-700-BUL-A-GR Installation Manual
© 2012 Wirepath Surveillance
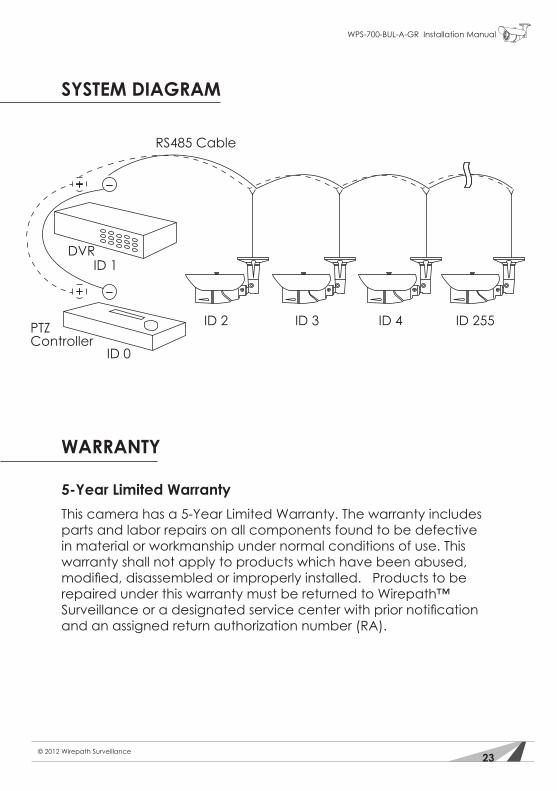
SYSTEM DIAGRAM
WARRANTY
5-Year Limited WarrantyThis camera has a 5-Year Limited Warranty. The warranty includes parts and labor repairs on all components found to be defective in material or workmanship under normal conditions of use. This warranty shall not apply to products which have been abused, modified,disassembledorimproperlyinstalled.Productstobe repaired under this warranty must be returned to Wirepath™ Surveillanceoradesignatedservicecenterwithpriornotification and an assigned return authorization number (RA).
RS485 Cable
ID 2
ID 0
ID 1DVR
PTZ Controller
ID 3 ID 4 ID 255
24
WPS-700-BUL-A-GR Installation Manual
TROUBLESHOOTINGIfyouhavetroubleoperatingthecamera,firstrefertothefollowingguidelines. If the problem persists, contact Technical Support at 866.838.5052.
Nothing appears on the display •CheckifthepowerforcameraandmonitorisON. •CheckiftheVIDEOcableisconnectedtothecamera BNC video output jack. •CheckiftheVIDEOcableisconnectedtothemonitor VIDEO input jack.
Image appears dim on the display •Checkthemonitorcontrastsetting. •Checkthemonitorandcamerabrightnesssetting. •Checkthecameraexposureandshuttersettings. •Checkthelens.Ifnecessary,cleanwithasoft,cleancloth. •Checkifthecameraisfacingtowardsabrightlight.Ifso, change the camera position. •Ifadeviceexistsbetweenthecameraandscreen,confirm the signal accepted by the screen is strong enough – 75 Ohm. •Resetthecameratofactorydefaultsettings.
Imageappearsblurryonthedisplay •Checkthefocusofthelens. •Checkthelens.Ifnecessary,cleanwithasoft,cleancloth. •Checkthecamerairisandshuttersettings. •Resetthecameratofactorydefaultsettings.
Thecameraisnotworkingproperlyandthecamerahousingishot •Checkifcameraisconnectedtothecorrectpowersource.
25
WPS-700-BUL-A-GR Installation Manual
© 2012 Wirepath Surveillance
TheSENSE-UPfunctioncannotbeactivated •CheckifSHUTTERissettoOFForothervalue.SENSE-UP function is only available when SHUTTER is set to AUTO.
TheDAY/NIGHTmenucannotbesettoAUTO •CheckifAGCissettoOFF.WhenAGCisOFF,AUTO cannot be activated.
The3D-DNRfunctioncannotbesettoON •CheckifAGCissettoOFF.WhenAGCisOFF,3D-DNR cannot be activated.
The color of the picture is not correct •CheckWhiteBalanceandColor(Red/Blue)settings. •Resetthecameratofactorydefaultsettings.
Screenflickerscontinuously •Checkthecameralocationtomakesureitisnotpointing directly towards the sun or bright light source. •Checkiftheflickerlesscontrolissetcorrectly;propersettings shouldreflectrequiredrefreshrates. •Resetthecameratofactorydefaultsettings.
RS-485 communication failure •CheckwhethertheRS-485polarityisconnectedcorrectlyto the RS-485 port. •ChecktheCameraIDsettingandmakesurethereisnot more than one device with the same ID on the RS485 network. •CheckthattheProtocolandBaudRateforalldevicesareset tothesameconfiguration. •Warning:ConflictingsettingsoftheProtocolandBaudRate amongdevicesconnectedtotheRS485networkcouldresult inabnormaloperationofthecamera.EnsurethattheProtocol andBaudRateforalldevisesaresettothesameconfiguration.
26
WPS-700-BUL-A-GR Installation Manual
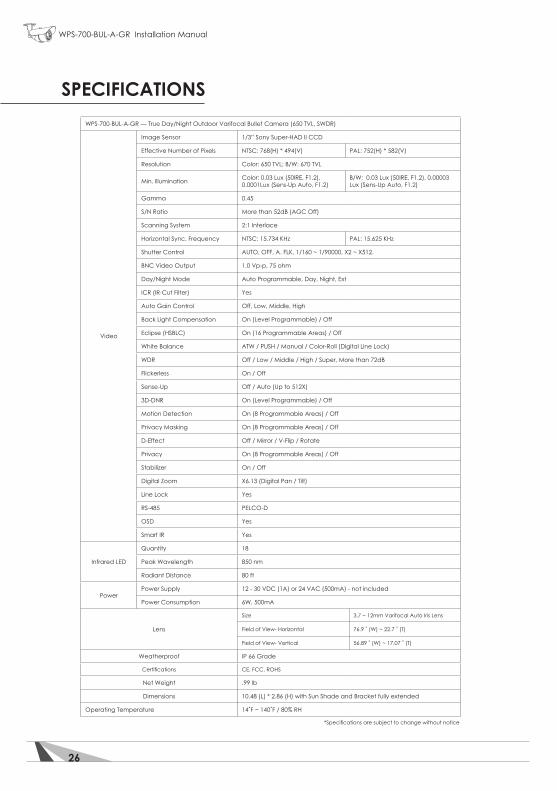
SPECIFICATIONSWPS-700-BUL-A-GR — True Day/Night Outdoor Varifocal Bullet Camera (650 TVL, SWDR)
Video
Image Sensor 1/3” Sony Super-HAD II CCD
Effective Number of Pixels NTSC: 768(H) * 494(V) PAL: 752(H) * 582(V)
Resolution Color: 650 TVL; B/W: 670 TVL
Min. Illumination Color: 0.03 Lux (50IRE, F1.2), 0.0001Lux (Sens-Up Auto, F1.2)
B/W: 0.03 Lux (50IRE, F1.2), 0.00003 Lux (Sens-Up Auto, F1.2)
Gamma 0.45
S/N Ratio More than 52dB (AGC Off)
Scanning System 2:1 Interlace
Horizontal Sync. Frequency NTSC: 15.734 KHz PAL: 15.625 KHz
Shutter Control AUTO,OFF,A.FLK,1/160~1/90000,X2~X512.
BNC Video Output 1.0 Vp-p, 75 ohm
Day/Night Mode Auto Programmable, Day, Night, Ext
ICR (IR-Cut Filter) Yes
Auto Gain Control Off, Low, Middle, High
Back Light Compensation On (Level Programmable) / Off
Eclipse (HSBLC) On (16 Programmable Areas) / Off
White Balance ATW / PUSH / Manual / Color-Roll (Digital Line Lock)
WDR Off / Low / Middle / High / Super, More than 72dB
Flickerless On / Off
Sense-Up Off / Auto (Up to 512X)
3D-DNR On (Level Programmable) / Off
Motion Detection On (8 Programmable Areas) / Off
Privacy Masking On (8 Programmable Areas) / Off
D-Effect Off / Mirror / V-Flip / Rotate
Privacy On (8 Programmable Areas) / Off
Stabilizer On / Off
Digital Zoom X6.13 (Digital Pan / Tilt)
Line Lock Yes
RS-485 PELCO-D
OSD Yes
Smart IR Yes
Infrared LED
Quantity 18
Peak Wavelength 850 nm
Radiant Distance 80 ft
PowerPower Supply 12 - 30 VDC (1A) or 24 VAC (500mA) - not included
Power Consumption 6W, 500mA
Lens
Size 3.7~12mmVarifocalAutoIrisLens
Field of View- Horizontal 76.9˚(W)~22.7˚(T)
Field of View- Vertical 56.89˚(W)~17.07˚(T)
Weatherproof IP 66 Grade
Certifications CE, FCC, ROHS
Net Weight .99 lb
Dimensions 10.48 (L) * 2.86 (H) with Sun Shade and Bracket fully extended
Operating Temperature 14˚F~140˚F/80%RH
*Specificationsaresubjecttochangewithoutnotice
27
WPS-700-BUL-A-GR Installation Manual
© 2012 Wirepath Surveillance
*Specificationsaresubjecttochangewithoutnotice
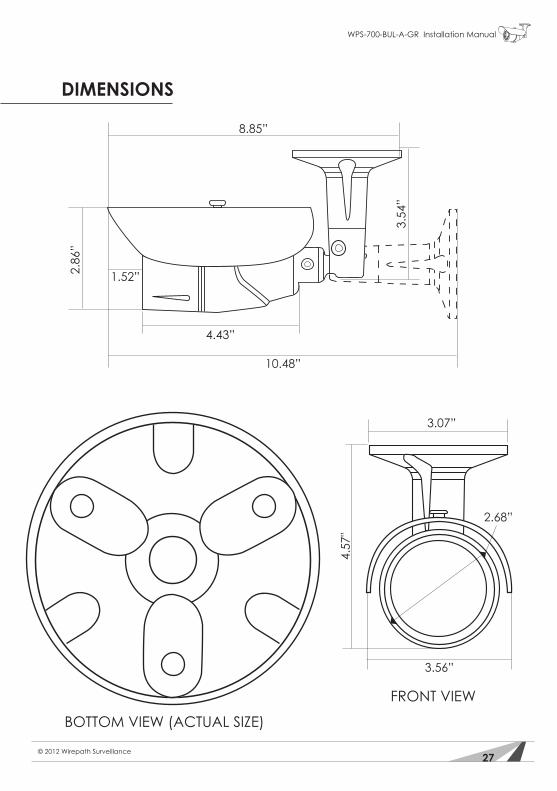
DIMENSIONS
4.43”
10.48”
2.68”
3.56”
1.52”
8.85”
3.54
”
2.86
”
4.57
"
FRONT VIEW
BOTTOM VIEW (ACTUAL SIZE)
3.07”

111002 © 2012 Wirepath Surveillance


![Time Lapses Guia Completa dZoom[1]](https://static.fdocuments.net/doc/165x107/557202d64979599169a429ff/time-lapses-guia-completa-dzoom1.jpg)