Wpc11-V4 User Guide
25
Instant Wireless ® Series User Guide Wireless-B Notebook Adapter Use this Guide to install: WPC11
-
Upload
dgamache19622295 -
Category
Documents
-
view
254 -
download
0
Transcript of Wpc11-V4 User Guide

8/7/2019 Wpc11-V4 User Guide
http://slidepdf.com/reader/full/wpc11-v4-user-guide 1/25
Instant Wireless® Series
User Guide
Wireless-B
Notebook Adapter
Use this Guide to install: WPC11

8/7/2019 Wpc11-V4 User Guide
http://slidepdf.com/reader/full/wpc11-v4-user-guide 2/25

8/7/2019 Wpc11-V4 User Guide
http://slidepdf.com/reader/full/wpc11-v4-user-guide 3/25
Table of Contents
Chapter 1: Introduction 1
The Wireless-B Notebook Adapter 1
Features 1
Chapter 2: Planning Your Wireless Network 2
Network Topology 2
Ad-Hoc versus Infrastructure Mode 2
Chapter 3: Getting to Know
the Wireless-B Notebook Adapter 4
The Adapter’s LEDs 4
Chapter 4: Using the Setup Wizard to
Configure Windows 98SE, Me, and 2000 5
Chapter 5: Hardware Installation 9
Chapter 6: Driver Installation and Configuration for
Windows XP 10
Overview 10
Driver Installation for Windows XP 10
Windows XP Wireless Zero Configuration 12
Chapter 7: Using the WLAN Monitor for Windows
98SE, Me, and 2000 14
Overview 14
Accessing the WLAN Monitor 14
Link Information 15Site Survey 17
Profiles 19
Creating a New Profile 21
Appendix A: Troubleshooting 27
Common Problems and Solutions 27
Frequently Asked Questions 28
Appendix B: Glossary 32
Appendix C: Specifications 40
Environmental 40
Appendix D: Warranty Information 41
Appendix E: Contact Information 42

8/7/2019 Wpc11-V4 User Guide
http://slidepdf.com/reader/full/wpc11-v4-user-guide 4/25

8/7/2019 Wpc11-V4 User Guide
http://slidepdf.com/reader/full/wpc11-v4-user-guide 5/25
Wireless-B Notebook Adapter
4
Chapter 3: Getting to Know the
Wireless-B Notebook Adapter
The Adapter has two LEDs to let you know how the card is functioning. Here
are a description of those LEDs:
Power Green. The Power LED lights up when the PC Card is pow-
ered on.
Link Green. The Link LED lights up and stays solid when theAdapter is inserted correctly and a link is established with
the notebook. The LED flashes when data is transmitted or
received..
The Adapter’s LEDs
Instant Wireless ® Series
If the wireless network is relatively small and needs to share resources only
with the other computers on the wireless network, then the ad-hoc mode can
be used. (See Figure 2-2.) Ad-hoc mode allows computers equipped with wire-
less transmitters and receivers to communicate directly with each other, elimi-
nating the need for an access point. The drawback of this mode is that, in Ad-Hoc mode, wireless-equipped computers are not able to communicate with
computers on a wired network. And, of course, communication between the
wireless-equipped computers is limited by the distance and interference direct-
ly between them.
3
Figure 2-2
8/7/2019 Wpc11-V4 User Guide
http://slidepdf.com/reader/full/wpc11-v4-user-guide 6/25
Wireless-B Notebook Adapter
6
Instant Wireless ® Series
5
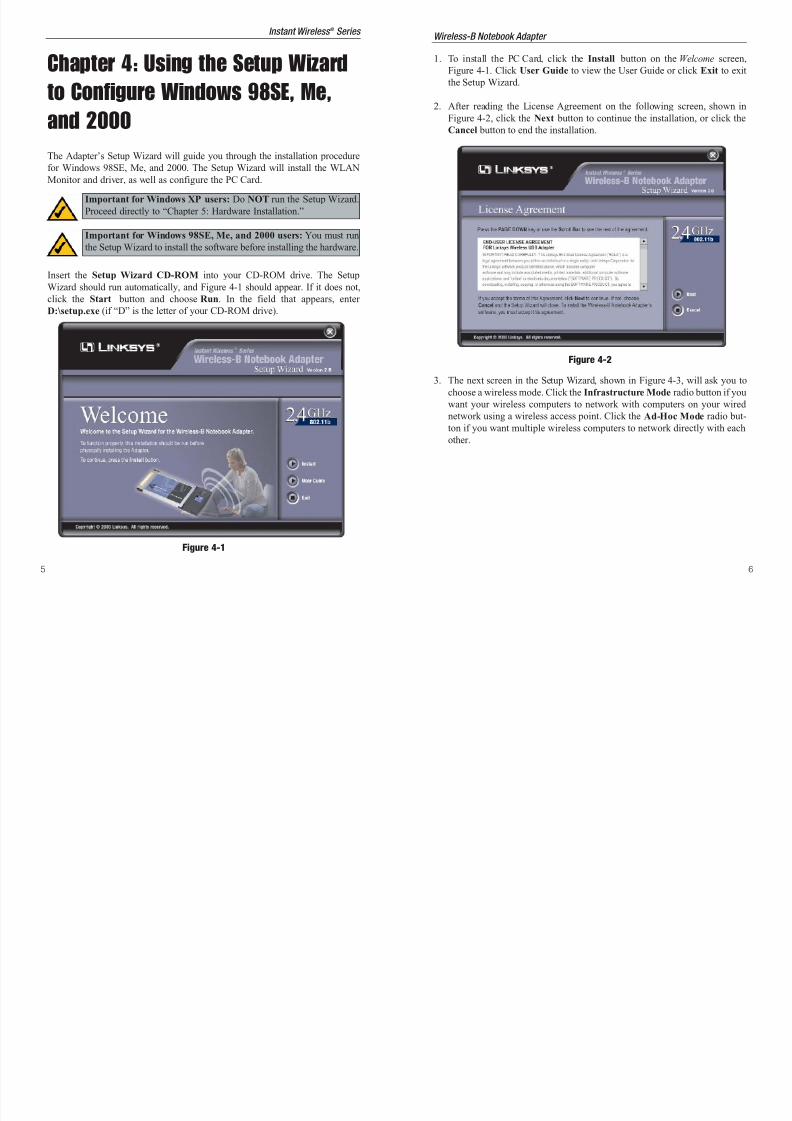
1. To install the PC Card, click the Install button on the Welcome screen,
Figure 4-1. Click User Guide to view the User Guide or click Exit to exit
the Setup Wizard.
2. After reading the License Agreement on the following screen, shown inFigure 4-2, click the Next button to continue the installation, or click the
Cancel button to end the installation.
3. The next screen in the Setup Wizard, shown in Figure 4-3, will ask you to
choose a wireless mode. Click the Infrastructure Mode radio button if you
want your wireless computers to network with computers on your wired
network using a wireless access point. Click the Ad-Hoc Mode radio but-
ton if you want multiple wireless computers to network directly with eachother.
Figure 4-2
Chapter 4: Using the Setup Wizard
to Configure Windows 98SE, Me,
and 2000
The Adapter’s Setup Wizard will guide you through the installation procedure
for Windows 98SE, Me, and 2000. The Setup Wizard will install the WLAN
Monitor and driver, as well as configure the PC Card.
Insert the Setup Wizard CD-ROM into your CD-ROM drive. The Setup
Wizard should run automatically, and Figure 4-1 should appear. If it does not,
click the Start button and choose Run. In the field that appears, enter
D:\setup.exe (if “D” is the letter of your CD-ROM drive).
Figure 4-1
Important for Windows 98SE, Me, and 2000 users: You must run
the Setup Wizard to install the software before installing the hardware.
Important for Windows XP users: Do NOT run the Setup Wizard.
Proceed directly to “Chapter 5: Hardware Installation.”

8/7/2019 Wpc11-V4 User Guide
http://slidepdf.com/reader/full/wpc11-v4-user-guide 7/25
Wireless-B Notebook Adapter
8
5. The next screen, shown in Figure 4-5, will ask you to review your settings
before it starts to copy f iles. Click the Next button to save these settings, or
click the Back button to change any settings.
6. After the files have been successfully copied, the screen in Figure 4-6 will
appear. Click the Exit button.
Proceed to “Chapter 5: Hardware Installation.”
Figure 4-6
Figure 4-5
Instant Wireless ® Series
7
In the SSID field, enter the SSID (Network Name) of your wireless net-
work. The SSID must be identical for all devices in the network. The
default set-
ting is linksys
(all lower-case). Click
the Next but-
ton, or click
the Back but-
ton to return
to the previ-
ous page.
4. If you chose Infrastructure Mode, go to Step 5 now. If you chose Ad-Hoc
Mode, the screen shown in Figure 4-4 will appear and you will need to
select the correct operating channel for your network from the Channel
drop-down menu. Click the Next button, and go to Step 5. Click the Back button to change any settings.
Channel - The channel you choose should match the channel set on the
other devices
in your wire-
less network
or using the
channel to set
the wirelessnetwork. If
you are
unsure about
which chan-
nel to use,
select the
default chan-
nel (Channel
6).
Figure 4-3
Figure 4-4

8/7/2019 Wpc11-V4 User Guide
http://slidepdf.com/reader/full/wpc11-v4-user-guide 8/25
Wireless-B Notebook Adapter
Chapter 6: Driver Installation and
Configuration for Windows XP
After inserting it into your notebook, you will install the driver and configure
the Adapter.
1. Windows XP will automatically detect the PC Card. Insert the Setup CD-
ROM into the CD-ROM drive. From the screen shown in Figure 6-1, click the radio button next to Install the software automatically
(Recommended). Then, click the Next button.
109
Figure 6-1
Overview
Driver Installation for Windows XP
Instant Wireless ® Series
Chapter 5: Hardware Installation
1. Turn off your notebook PC.
2. Locate an available PC Card slot on your notebook PC.
3. With the PC Card’slabel facing up, as
shown in Figure 5-1,
slide the PC Card
completely into the
PC Card slot.
4. Restart your note-
book PC.
5. Windows will begin copying the driver files to your computer. (Windows
2000 users may see a digital signature screen. This is normal. Click Yes to
continue, and then click the Finish button to end the hardware detection
process.) If Windows asks you for the original Windows CD-ROM, insert
the CD-ROM, and direct Windows to its proper location (e.g., D:\).
If your PC is using Windows 98SE, Me, or 2000, proceed to the next sec-
tion, “Chapter 7: Using the WLAN Monitor for Windows 98SE, Me, and
2000.”
If your PC is using Windows XP, proceed to “Chapter 6: Driver
Installation and Configuration for Windows XP.”
Figure 5-1
Important for Windows 98SE, Me, and 2000 users: You must run
the Setup Wizard to install the software before installing the hardware.
Important for Windows XP users: You must install the PC Card’s
hardware before installing the software.

8/7/2019 Wpc11-V4 User Guide
http://slidepdf.com/reader/full/wpc11-v4-user-guide 9/25
Wireless-B Notebook Adapter
12
2. The following screen, shown in Figure 6-2, mentions Windows XP com-
patibility. The
Adapter has
been tested and
is compatiblewith Windows
XP. Click the
C o n t i n u e
Anyway but-
ton to contin-
ue.
3. When Windows has finished installing the driver, click the Finish button on
the screen that appears (shown in Figure 6-3).
You have now completed the PC Card’s driver installation. To configure
the PC Card, proceed to the next section, “Windows XP Wireless ZeroConfiguration.”
11
1. After installing the PC Card, the
Windows XP Wireless Zero
Configuration icon will appear in
your computer’s system tray (see
Figure 6-3). Double-click the icon.
2. The screen that appears
will show any available
wireless network. Select
the network you want.
If this network has WEP
encryption enabled, go to
step 3. If this network
does not have WEPencryption enabled, then
the screen in Figure 6-4
will appear. Check the
box next to Allow me to
connect to the selected
wireless network, even
though it is not secure.
Then click the Connect
button and go to step 4.
For Windows XP users: Windows XP has a built-in configuration tool.
Use Windows XP Wireless Zero Configuration (in the system tray atthe bottom of your screen) to configure the PC Card.
Figure 6-3
Figure 6-4
Note: In Steps 2 and 3, these are the instructions and screenshots for
Windows XP with Service Pack 1 installed. If you have not installed
Service Pack 1, select the network you want, and click the Connect
button. If the network has WEP encryption enabled, enter the WEP
key in the Network key field, and then click the Connect button.
Windows XP Wireless Zero Configuration
Instant Wireless ® Series
Figure 6-3
Figure 6-2

8/7/2019 Wpc11-V4 User Guide
http://slidepdf.com/reader/full/wpc11-v4-user-guide 10/25
Wireless-B Notebook Adapter
14
Chapter 7: Using the WLAN Monitor
for Windows 98SE, Me, and 2000
Use the WLAN Monitor to check the link information, search for available
wireless networks, or create profiles that hold different configuration settings.
After installing the Adapter, its WLAN Monitor icon will appear in your sys-
tem tray. Double-click the icon (see Figure 7-1).
The Link Information screen, shown in Figure 7-2, will appear.
From this screen, you can find out how strong the current wire-
less signal is and how good the connection’s quality is. You can
also click the More Information button to view additional status information
about the current wireless connection. To search for available wireless net-
works, click the Site Survey tab. To perform configuration changes, click the
Profiles tab.
Figure 7-1
Figure 7-2
Accessing the WLAN Monitor
Overview
Instant Wireless ® Series
3. The screen in Figure 6-
5 will appear. Enter the
WEP key of your wire-
less network in the
Network key field, and re-enter it in the
Confirm network key
field. Click the
Connect button.
4. The screen in Figure 6-6 will
appear if your connection is
active.
For more information about WEP, refer to your access point’s documentation,
or visit www.linksys.com.
For more information about wireless networking on a Windows XP computer,
enter the keyword wireless in the Windows XP search engine.
Congratulations!
Your notebook is now connected to your wireless network.
Figure 6-5
Figure 6-6
13

8/7/2019 Wpc11-V4 User Guide
http://slidepdf.com/reader/full/wpc11-v4-user-guide 11/25
Wireless-B Notebook Adapter
16
The Link Information screen, shown in Figure 7-3, displays signal strength and
link quality information about the current connection and provides a button to
click for additional status information.
Ad-Hoc Mode or Infrastructure Mode - The screen indicates whether the
Adapter is currently working in ad-hoc or infrastructure mode.
Signal Strength - The Signal Strength bar indicates signal strength, from 0 to
100%.
Link Quality - The Link Quality bar indicates the quality of the wireless net-
work connection, from 0 to 100%.
Click the More Information button to view more information about the wire-
less network connection, shown in Figure 7-4.
Click the X (Close) button in the upper right corner to exit the WLAN Monitor.
15
Wireless Network Status
State - The status of the wireless network connection.
SSID - The unique name of the wireless network.
Wireless Mode - The mode of the wireless network currently in use.
Transfer Rate - The data transfer rate of the current connection.
Channel - The channel to which the wireless network devices are set.
WEP - The status of the WEP encryption security feature.MAC - The MAC address of the wireless network’s device you connect to.
TCP/IP Setting
IP Address - The Adapter’s IP Address.
Subnet Mask - The Adapter’s Subnet Mask.
Default Gateway - The Adapter’s Default Gateway address.
DNS - The Adapter’s DNS address.
DHCP - The status of the DHCP client.
Save to Profile - Click this button to save the current connection prof ile to.
Signal Strength - The Signal Strength bar indicates signal strength, from 0 to
100%.
Link Quality - The Link Quality bar indicates the quality of the wireless net-
work connection, from 0 to 100%.
Click the Back button to return to the initial Link Information screen. Click theX (Close) button in the upper right corner to exit the WLAN Monitor.
Figure 7-4
Instant Wireless ® Series
Link Information
Figure 7-3
8/7/2019 Wpc11-V4 User Guide
http://slidepdf.com/reader/full/wpc11-v4-user-guide 12/25
Wireless-B Notebook Adapter
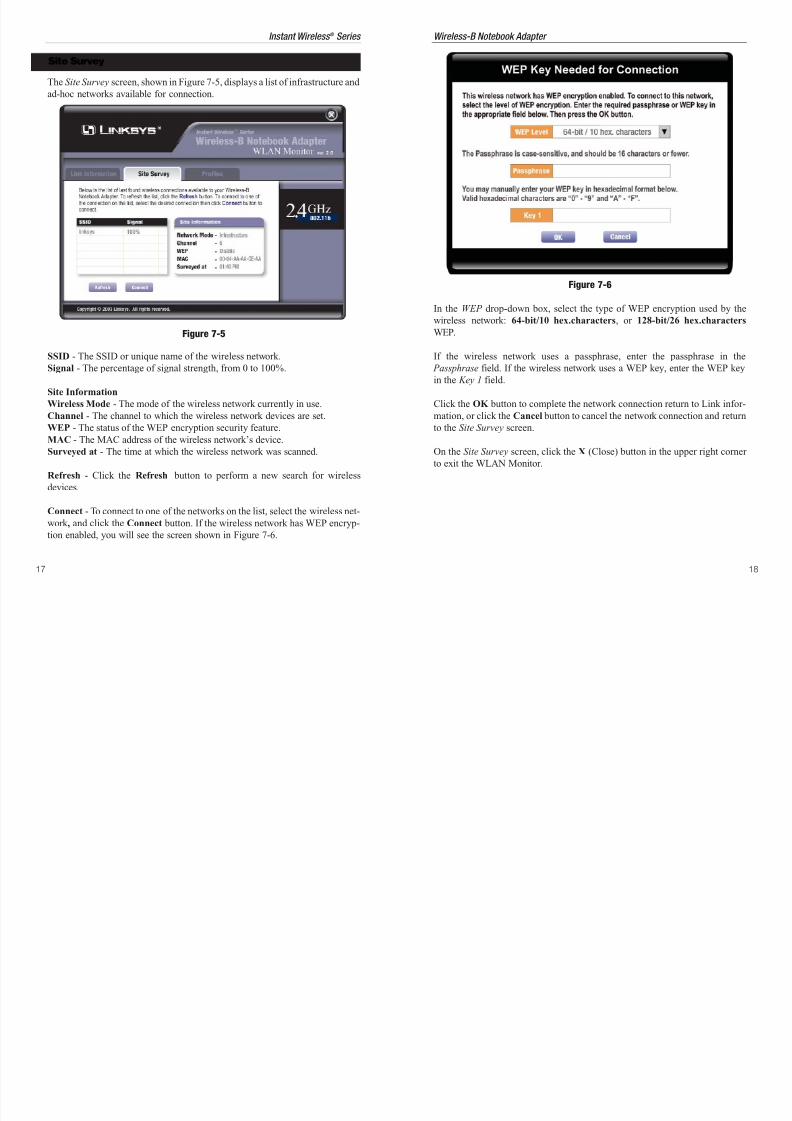
In the WEP drop-down box, select the type of WEP encryption used by the
wireless network: 64-bit/10 hex.characters, or 128-bit/26 hex.charactersWEP.
If the wireless network uses a passphrase, enter the passphrase in the
Passphrase field. If the wireless network uses a WEP key, enter the WEP key
in the Key 1 field.
Click the OK button to complete the network connection return to Link infor-
mation, or click the Cancel button to cancel the network connection and return
to the Site Survey screen.
On the Site Survey screen, click the X (Close) button in the upper right corner
to exit the WLAN Monitor.
1817
Figure 7-6
Instant Wireless ® Series
The Site Survey screen, shown in Figure 7-5, displays a list of infrastructure and
ad-hoc networks available for connection.
SSID - The SSID or unique name of the wireless network.
Signal - The percentage of signal strength, from 0 to 100%.
Site Information
Wireless Mode - The mode of the wireless network currently in use.
Channel - The channel to which the wireless network devices are set.
WEP - The status of the WEP encryption security feature.MAC - The MAC address of the wireless network’s device.
Surveyed at - The time at which the wireless network was scanned.
Refresh - Click the Refresh button to perform a new search for wireless
devices.
Connect - To connect to one of the networks on the list, select the wireless net-
work , and click the Connect button. If the wireless network has WEP encryp-
tion enabled, you will see the screen shown in Figure 7-6.
Figure 7-5
Site Survey

8/7/2019 Wpc11-V4 User Guide
http://slidepdf.com/reader/full/wpc11-v4-user-guide 13/25
Wireless-B Notebook Adapter
2019
Import - Click the Import button to import a profile that has been saved in
another location. Select the appropriate file, in the screen that appears (Figure
7-8), and click the Open button.
Export - To save the profile(s) in a different location, click the Export button.
Direct Windows to the appropriate folder, from the screen that appears (Figure
7-9), and enter the file name and click Save.
Delete - Click the Delete button to delete a profile.
Click the X (Close) button in the upper right corner to exit the WLAN Monitor.
Figure 7-8
Figure 7-9
Instant Wireless ® Series
The Profiles screen, shown in Figure 7-7, lets you save different configuration
profiles for different network setups. You can also import or export profiles.
The default profile holds the initial configuration saved when you ran the SetupWizard.
Profile - Name of the setting profile.
SSID - The wireless network’s unique name, as set in the connection profile.
Profile Information
Network Type - The mode of the wireless network currently in use.
Transfer Rate - The data transfer rate of the connection. (In Auto mode, the
Adapter dynamically shifts to the fastest data transfer rate possible at any given
time.)
Channel - The channel to which the wireless network devices are set.
WEP - The status of the WEP encryption security feature.
Connect - To connect to a wireless network using a specific profile, select the
profile, and click the Connect button.
Edit - Select a profile, and click the Edit button to change an existing profile.
New - Click the New button to create a new profile. See the next section,
“Creating a New Profile,” for detailed instructions.
Figure 7-7
Profiles

8/7/2019 Wpc11-V4 User Guide
http://slidepdf.com/reader/full/wpc11-v4-user-guide 14/25
Wireless-B Notebook Adapter
2. The Choose a wireless mode screen (Figure 7-12) shows a choice of two
wireless modes. Click the Infrastructure Mode radio button if you want
your wireless computers to communicate with computers on your wired
network via a wireless access point. Click the Ad-Hoc Mode radio button
if you want multiple wireless computers to communicate directly with eachother. Click the Next button to continue or the Back button to return to the
previous screen.
Infrastructure Mode - This mode allows wireless and wired networks to
communicate through an access point.
Ad-Hoc Mode - This mode allows wireless-equipped computers to com-
municate directly with each other. No access point is used.
22
1. On the Profiles screen, shown in Figure 7-10, click the New button to cre-
ate a new profile.
2. When the Create connection profile screen (Figure 7-11) appears, enter a
name for the new profile. Click OK to save the profile name or click
Cancel to return to the previous screen.
21
Figure 7-12
Instant Wireless ® Series
Figure 7-11
Creating a New Profile
Figure 7-10

8/7/2019 Wpc11-V4 User Guide
http://slidepdf.com/reader/full/wpc11-v4-user-guide 15/25
Wireless-B Notebook Adapter
24
3. The Wireless Settings screen, shown in Figure 7-13, will appear. If you
chose Infrastructure Mode, go to Step 4 now. If you chose Ad-Hoc Mode,
select the correct operating channel for your network from the Channel
drop-down menu. Click the Next button, and go to Step 4. Click the Back
button to change any settings.
Channel - The channel you choose should match the channel set on the
other devices in your wireless network or what channel you want set up
your network. If you are unsure about which channel to use, select the
default channel (Channel 6).
23
4. The Network Setting screen, shown in Figure 7-14, will appear.
If your network has a DHCP server, click the radio button next to Obtain
an IP address automatically (DHCP). Click the Next button to continue,
or click the Back button to return to the previous screen. Then go to Step 5.
If your network does not have a DHCP server, click the radio button next to
Specify the IP address. Enter an IP Address, Subnet Mask , Default
Gateway, and DNS appropriate for your network. Enter each address in this
format: xxx.xxx.xxx.xxx (the x’s represent the numbers that make up each
address). You must specify the IP Address and Subnet Mask on this screen.
If you are unsure about the Default Gateway and DNS addresses, then leave
these fields alone.
Click the Next button to continue or the Back button to return to the previ-
ous screen. Then go to Step 5.
IP Address - This IP Address must be unique to your network.
Subnet Mask - The PC Card’s Subnet Mask must be the same as your
wired network’s Subnet Mask.
Default Gateway - Enter the IP address of your network’s Gateway here.
DNS - Enter the DNS addresses of your Ethernet (wired) network here.
Figure 7-14
Instant Wireless ® Series
Figure 7-13

8/7/2019 Wpc11-V4 User Guide
http://slidepdf.com/reader/full/wpc11-v4-user-guide 16/25
Wireless-B Notebook Adapter
26
5. The Security Settings screen, shown in Figure 7-15, will appear. Enable or
disable Wired Equivalent Privacy (WEP) encryption for your wireless net-
work. If you enable WEP, enter a Passphrase or WEP key. Click the Next
button to continue or the Back button to return to the previous screen.
WEP (Disabled/64-bit WEP/128-bit WEP) - If you do not want to use
WEP encryption, choose Disabled. To use WEP encryption (recommended
to increase network security), select 64-bit/10 hex. characters or 128-
bit/26 hex. characters WEP from the drop-down menu, and enter either a
Passphrase or WEP key.
Passphrase - Instead of manually entering WEP keys, you can enter a
Passphrase, so that a WEP key is automatically generated. It is case-sensi-
tive and should not be longer than 16 alphanumeric characters. This passphrase must match the passphrase of your wireless network and is com-
patible with other Linksys wireless products only. (If you have any non-
Linksys wireless products, enter the WEP key(s) manually on those prod-
ucts.)
WEP Key - This WEP key must match the WEP key of your wireless net-
work. If you are using 64-bit WEP encryption, then the key must consist of
exactly 10 hexadecimal characters. If you are using 128-bit WEP encryp-
tion, then the key must consist of exactly 26 hexadecimal characters. Valid hexadecimal characters are “0” to “9” and “A” to “F”.
Key Index - The default transmit key number is 1. If your network’s access
point or wire-
less router
uses transmit
key number
2, 3, or 4,
then selectthe appropri-
ate number in
the Key Index
d r o p - d o w n
box.
25
6. The Confirm New
Settings screen
(Figure 7-16) will
appear. To save the
new settings, click the Yes button. To
cancel the settings
and return to the
Profiles screen,
click the Exit but-
ton. To edit the new
settings, click the
Back button.
7. The Congratulations screen will appear next. Click Activate new settings
now to implement the new settings immediately and return to the Link
Information screen.
Click Activate new
settings later to
keep the current
settings active, and return to the
Profiles screen so
that you can edit
your profile or cre-
ate another profile.
You have successfully created a connection profile. Click the X (Close) but-
ton in the upper right corner to exit the WLAN Monitor.
Figure 7-16
Figure 7-17
Instant Wireless ® Series
Figure 7-15

8/7/2019 Wpc11-V4 User Guide
http://slidepdf.com/reader/full/wpc11-v4-user-guide 17/25

8/7/2019 Wpc11-V4 User Guide
http://slidepdf.com/reader/full/wpc11-v4-user-guide 18/25

8/7/2019 Wpc11-V4 User Guide
http://slidepdf.com/reader/full/wpc11-v4-user-guide 19/25

8/7/2019 Wpc11-V4 User Guide
http://slidepdf.com/reader/full/wpc11-v4-user-guide 20/25

8/7/2019 Wpc11-V4 User Guide
http://slidepdf.com/reader/full/wpc11-v4-user-guide 21/25

8/7/2019 Wpc11-V4 User Guide
http://slidepdf.com/reader/full/wpc11-v4-user-guide 22/25

8/7/2019 Wpc11-V4 User Guide
http://slidepdf.com/reader/full/wpc11-v4-user-guide 23/25
Wireless-B Notebook Adapter
40
phone (DSL) or cable systems, or through leased lines or satellites. In its most
basic definition, the Internet could be considered a WAN.
WEP (Wired Equivalent Privacy) - A data privacy mechanism based on a 64-
bit or 128-bit shared key algorithm, as described in the IEEE 802.11 standard.
WLAN (Wireless Local Area Network) - A group of computers and associat-
ed devices that communicate with each other wirelessly.
39
Appendix C: SpecificationsStandards: IEEE 802.11b
Channels: 11 Channels (US, Canada)13 Channels (Europe)
14 Channels (Japan)
LEDs: Power, Link
Transmit Power: 3.3V
Protocols: CCK, QPSK, BPSK
WEP key bits: 64 Bit and 128 Bit
Dimensions: 4.5" x 2.1" x 0.3" (115 mm x 54 mm x 7.5 mm)
Unit Weight: 1.65 oz. (47g)
Power: 5V DC, 275mA Tx, 225mA Rx,
200mA Standby
Certifications: FCC Class B, CE Mark, Telec
Operating Temp.: 32ºF to 131ºF (0ºC to 55ºC)
Storage Temp.: -4ºF to 158ºF (-20ºC to 70ºC)
Operating Humidity: 0% to 90% Non-Condensing
Storage Humidity: 0% to 95% Non-Condensing
Environmental
Instant Wireless ® Series
Wi l B N t b k Ad tI t t Wi l ® S i

8/7/2019 Wpc11-V4 User Guide
http://slidepdf.com/reader/full/wpc11-v4-user-guide 24/25
Wireless-B Notebook Adapter
4241
Appendix E: Contact InformationFor help with the installation or operation of the Wireless-G Notebook Adapter,
contact Linksys Technical Support at one of the phone numbers or Internet
addresses below.
Sales Information 800-546-5797 (LINKSYS)
Technical Support 800-326-7114
RMA (Return Merchandise
Authorization) Issues www.linksys.com (or call 949-271-5461)
Fax 949-265-6655
E-mail [email protected]
Web http://www.linksys.com
FTP Site ftp.linksys.com
Instant Wireless ® Series
Appendix D: Warranty Information
BE SURE TO HAVE YOUR PROOF OF PURCHASE AND A BARCODE
FROM THE PRODUCT’S PACKAGING ON HAND WHEN CALLING.RETURN REQUESTS CANNOT BE PROCESSED WITHOUT PROOF OF
PURCHASE.
IN NO EVENT SHALL LINKSYS’ LIABILITY EXCEED THE PRICE PAID
FOR THE PRODUCT FROM DIRECT, INDIRECT, SPECIAL, INCIDEN-
TAL, OR CONSEQUENTIAL DAMAGES RESULTING FROM THE USE
OF THE PRODUCT, ITS ACCOMPANYING SOFTWARE, OR ITS DOCU-
MENTATION. LINKSYS DOES NOT OFFER REFUNDS FOR ANY PROD-
UCT.
LINKSYS OFFERS CROSS SHIPMENTS, A FASTER PROCESS FOR PRO-
CESSING AND RECEIVING YOUR REPLACEMENT. LINKSYS PAYS
FOR UPS GROUND ONLY. ALL CUSTOMERS LOCATED OUTSIDE OF
THE UNITED STATES OF AMERICA AND CANADA SHALL BE HELD
RESPONSIBLE FOR SHIPPING AND HANDLING CHARGES. PLEASE
CALL LINKSYS FOR MORE DETAILS.

8/7/2019 Wpc11-V4 User Guide
http://slidepdf.com/reader/full/wpc11-v4-user-guide 25/25
© Copyright 2003 Linksys, All Rights Reserved.
http://www.linksys.com