World’s First Battery-Operated Kegerator - Micro Matic Fre… · Congratulations on the purchase...
20
World’s First Battery-Operated Kegerator Installation, Use & Maintenance Guide PATENT NO. 7,735,334 B2 PLEASE READ BEFORE USE Before getting started please read this user manual and at all times follow the important safety instructions.
Transcript of World’s First Battery-Operated Kegerator - Micro Matic Fre… · Congratulations on the purchase...

World’s First Battery-Operated Kegerator
Installation, Use & Maintenance Guide
PATENT NO. 7,735,334 B2
PLEASE READ BEFORE USE
Before getting started please read this user manual and at all times follow the important safety instructions.

Freedom™ KegeratorYOU NOW HAVE THE FREEDOM TO ROAM!
Congratulations on the purchase of your new Freedom™ Kegerator, the World’s First Battery-Operated Kegerator.
The Freedom™ Kegerator is designed to operate on either AC Power (115V) or DC Power (Battery) and maintain recommended keg storage temperatures of 35˚- 40˚ F. On battery power the Freedom™ Kegerator can maintain this temperature for up to 24 hours at 70˚ F*.
Convenient and flexible; you can now dispense draft beer indoors or outside and do so CORDLESS.
Enjoy the “Freedom to Roam” anytime or anywhere.
Cheers!
*Please see battery operating instructions
Part No. MMF-B
www.micromatic.com•1(866)327-4159 Installation, Use & Maintenance
Freedom™ Kegerator
1
PATENT NO. 7,735,334 B2

www.micromatic.com•1(866)327-4159 Installation, Use & Maintenance
Freedom™ Kegerator
2
Freedom™ Kegerator Reference Guide
Inside View
NOTE: Tapping Kit Shown(Not Provided)
Temperature Control
Draft TowerPower SwitchesBattery Charge Indicator
Refrigerated Storage Cabinet
(Holds All Keg Sizes)
CastersSeparate Gas CylinderCompartment
Side Panel View
Inverter
AC/DC Compressor Unit
PlugReceptacle
BatteryCharger
RechargeableBattery
CondenserWick Tray
Integrated Drain TrayEasy Access Handle
Side Access Panel

www.micromatic.com•1(866)327-4159 Installation, Use & Maintenance3
1. Inspection Uncrating1. The Freedom™ Kegerator is attached to the skid by two “L” brackets; remove
the 2 screws from the undercarriage, or the skid.
2. Remove all packaging materials and lift the unit off the skid. Be careful when lifting!
3. If the unit has been laid down, turn upright for 24 hours before plugging into the power source.
4. Open the side access panel and visually inspect equipment. Check all connections and make sure the battery is secure.
Check for damage. If damage is found, notify the carrier immediately both verbally as well as in written form. Request an inspection by the shipping company of the damaged equipment. Retain all crating material until inspection has been made. Finally, contact Micro Matic.
Freedom™ Kegerator
Side Access Panel
Tower Mounting Hole

www.micromatic.com•1(866)327-4159 Installation, Use & Maintenance 4
Place rubber washer over draft tower mounting holes in cabinet top.
Place beer line connector down through hole.
Secure draft tower with four bolts provided. Insert blower hose.
2. Set UpInstalling Draft Tower
21
3 4
Freedom™ Kegerator

2. Set UpInstall Keg Tapping Kit:
Keg Tapping Installation Kits are Sold Separately at www.micromatic.com
Connect the gas regulator to the gas cylinder (some gas regulators have integrated o-ring seals on the tank connector; if they do a fiber washer is not necessary.)
Securely tighten the gas regulator tank nut onto the gas cylinder.
Attach red gas pressure hose to the gas regulator outlet nipple; secure with clamp.
Feed gas pressure hose through the opening in the side compartment.
IMPORTANT: Before connecting the gas regulator to the gas cylinder you will need to get the gas cylinder filled as it ships empty.
21
3 4
www.micromatic.com•1(866)327-4159 Installation, Use & Maintenance5
Freedom™ Kegerator

Connect the beer hose hex nut to the keg coupler. Make sure a neoprene (black) washer is installed before screwing on the nut.
First, slide hose clamp onto gas pressure hose. Slide hose on to barbed fitting on coupler. Squeeze clamp to secure.
5 6
www.micromatic.com•1(866)327-4159 Installation, Use & Maintenance 6
Freedom™ Kegerator

3. Operating InstructionsSetting the Gas Regulator:The Freedom™ Kegerator is designed to operate at 14 PSI; at a keg storage temperature of 38˚ F.
Once the cylinder valve is open; the high pressure gauge should read approximately 750 PSI.
• Check for leaks; close the cylinder valve clockwise until it stops. Gauge reading should remain at 750 PSI.
• If the pressure drops; check all connections.• Place shut-off valve in the “off position”.
Place the keg coupler into the keg valve and rotate clockwise approximately one-quarter (1/4) turn until it fits snug (DO NOT OVER-TIGHTEN).
Start the flow of beer by pulling the keg coupler handle out and pushing down (make sure faucet is closed) into the locked position. The beer flow will start immediately.
Setting the keg pressure:
• Set the gas pressure gauge to 14 PSI. This will accommodate most beers with the exception of stouts.
• Tighten the lock nut on the pressure adjusting screw to prevent tampering.
• Open the shut-off valve by turning the lever down into the “on position”.
Tapping Instructions (Keg Coupler)
www.micromatic.com•1(866)327-4159 Installation, Use & Maintenance7
Freedom™ Kegerator
NOTE: Gas pressure settings and length of beer line may vary depending upon; the beer brand, changes to storage temperatures, and altitude.
2
2
1
1

4. Tips & TricksKeg Storage & Temperature • The recommended temperature to store and dispense draft beer is 38˚ F. • Before purchasing a keg of beer, give your keg refrigerator time to cool down to 38˚ F. • The secret to trouble free keg beer dispensing is to keep the door closed (lock the door)
once the keg is tapped. • Constantly opening and closing the door will warm the beer and cause foaming problems. • Checking temperature; place a thermometer in a glass of water inside the kegerator, or
pour beer from the keg. • If possible, try and store the keg in the kegerator for at least 12 hours before tapping.
IMPORTANT NOTE: • When a keg of beer is purchased, place in the kegerator as soon as possible. • No provision is made for rapid cooling: if a keg becomes to warm it may take up to 24 hours
to cool down. • During transportation, wrap the keg in a blanket or other insulation to keep it cold.
Pressure • The balance between temperature and pressure is critically important;
the Freedom™ Kegerator is designed to operate at 14 PSI at 38˚ F. • Too little pressure causes flat beer (gas escapes); too much pressure increases
(overtime) the amount of gas in the beer which cause foaming problems.
How to PourReady to pour: Start with a beer clean glass that has been wetted in cold water.
Place the glass at a 45° angle, one inch below the faucet. Do not let the glass touch the faucet. Open the faucet all the way.
After the glass has reached half full, gradually bring the glass to an upright position.
Let the remaining beer run straight down the middle. This insures proper release of CO2 by producing a 3/4” to a 1” foam head.
Close the faucet completely and quickly.
www.micromatic.com•1(866)327-4159 Installation, Use & Maintenance 8
Freedom™ Kegerator
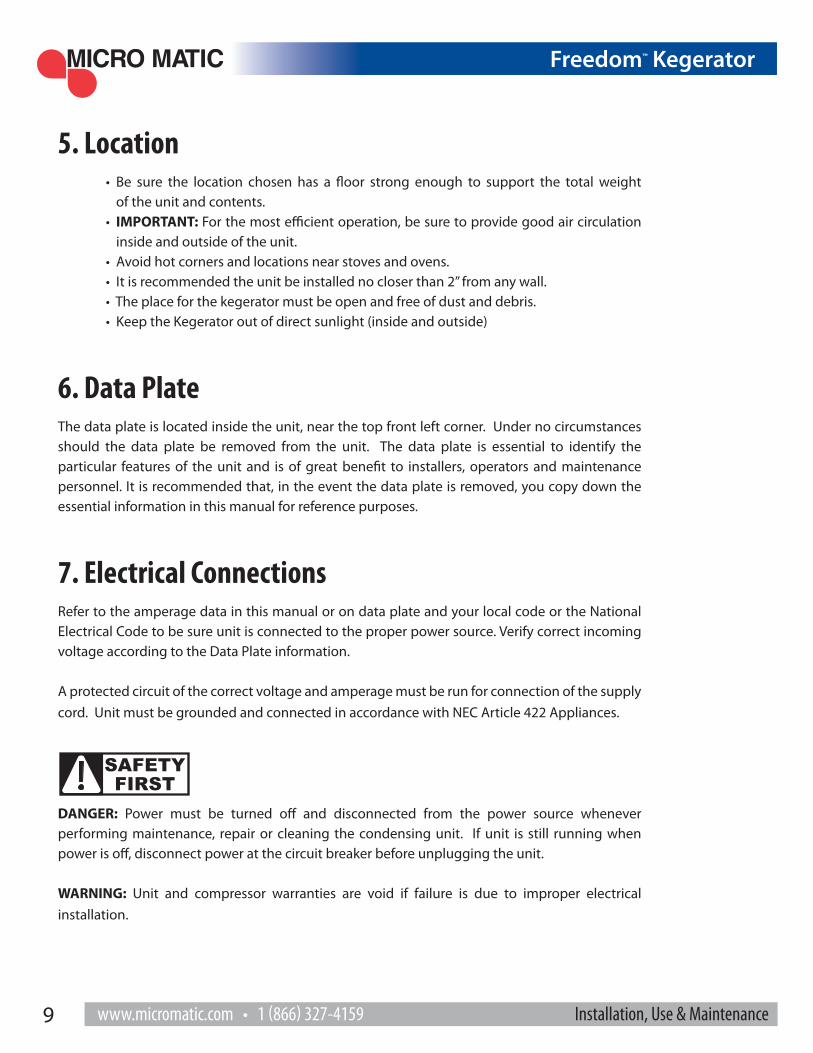
5. Location • Be sure the location chosen has a floor strong enough to support the total weight
of the unit and contents. • IMPORTANT: For the most efficient operation, be sure to provide good air circulation
inside and outside of the unit. • Avoid hot corners and locations near stoves and ovens. • It is recommended the unit be installed no closer than 2” from any wall. • The place for the kegerator must be open and free of dust and debris. • Keep the Kegerator out of direct sunlight (inside and outside)
6. Data PlateThe data plate is located inside the unit, near the top front left corner. Under no circumstances should the data plate be removed from the unit. The data plate is essential to identify the particular features of the unit and is of great benefit to installers, operators and maintenance personnel. It is recommended that, in the event the data plate is removed, you copy down the essential information in this manual for reference purposes.
7. Electrical ConnectionsRefer to the amperage data in this manual or on data plate and your local code or the National Electrical Code to be sure unit is connected to the proper power source. Verify correct incoming voltage according to the Data Plate information.
A protected circuit of the correct voltage and amperage must be run for connection of the supply cord. Unit must be grounded and connected in accordance with NEC Article 422 Appliances.
DANGER: Power must be turned off and disconnected from the power source whenever performing maintenance, repair or cleaning the condensing unit. If unit is still running when power is off, disconnect power at the circuit breaker before unplugging the unit.
WARNING: Unit and compressor warranties are void if failure is due to improper electrical installation.
www.micromatic.com•1(866)327-4159 Installation, Use & Maintenance9
Freedom™ Kegerator

8. Operation The Freedom™ Kegerator operates on AC (115 volt) and DC (12 volt) power. • Maximum operating time on DC (battery) power: up to 24 hours @ 70˚ F • Time to recharge battery: less than 8 hours
The AC and DC power switches are located on the back wall of the left side storage compartment.
NOTE: As a best practice, please make sure the battery is fully charged prior to use.
Battery Operation • Kegerator can remain plugged into AC power indefinitely without overcharging
the battery. • If you leave the DC switch in the “on position” for more than 24 hours without turning on
the AC switch; you will drain the battery and shorten battery life. • Do not run the kegerator on DC only power until the battery is dead. It will drastically
shorten the life of the battery. The compressor has a low voltage cutout that will turn the compressor off when the DC voltage drops below 10.4 volts. The evaporator fan motor will continue to operate and the electronic temperature control will still display, but the kegerator will start to warm up.
Both switches on. Refrigeration and charge battery.
AC Switch On. Charge Battery Only.
www.micromatic.com•1(866)327-4159 Installation, Use & Maintenance 10
Freedom™ Kegerator
Operation DC (Battery)Switch Position
AC (Wall Outlet)Switch Position
Charge Battery Only Off On
Refrigeration & Charge Battery On On

Battery Charge IndicatorAs the battery discharges, successive LEDs light; only one at a time. NOTE: LEDs can flash for up to 160 seconds after voltage fluctuations.
Replacing the Battery • The battery is an AGM lead acid battery that is maintenance free. It is
sealed and water never needs to be added. As with all batteries, the kegerator battery will eventually need to be replaced.
• Access to the battery, charger, and condensing unit is located behind the perforated cover equipment panel on the side of the unit.
• Always disconnect AC power before servicing battery. • Remove the grounding screw holding the battery bracket in place. • Slide the battery towards you and lift it out of the kegerator. Use caution,
it is heavy. • Slide back the rubber boots covering the terminals and remove the
connectors from the negative and positive terminals. • Replace the battery and re-attach the connectors to the positive and
negative terminals - in that order! • Fully charge the new battery on AC power before using the kegerator on
DC power.
www.micromatic.com•1(866)327-4159 Installation, Use & Maintenance11
Freedom™ Kegerator
Battery Charge Indicator Located on the back wall of the left hand storage compartment.
Full Charge: Green
During Use: Yellow
Battery is empty: Red
Energy Reserve: Flashing Yellow Compressor will turn off due to low
voltage cutout. Plug kegerator into AC Power.
Grounding Screw

Battery Charger • The battery charger is mounted on the back wall and wired into a 115 volt
receptacle on the side of the switch box. • The display panel indicates the charging output of the charger, charger status,
battery type (AGM), battery temperature (warm), and faults. Any issues with the charger can be determined by looking at the display panel.
Condenser Coil A clogged/dirty condenser will reduce the performance of the cooling system and the battery.
Cleaning Instructions:
DANGER: Power must be turned off and disconnected from the power source whenever performing maintenance, repair, or cleaning the condensing unit. • Disconnect unit from power supply. • Remove side equipment panel cover and carefully remove any dust or debris on
or around the condensing unit. Use a vacuum or compressed air to clear dust/dirt and debris from the condenser coil.
• THE CONDENSER MUST BE CLEANED AT REGULAR INTERVALS (30-60 DAYS). FAILURE TO DO SO CAN CAUSE COMPRESSOR MALFUNCTION AND WILL VOID WARRANTY.
• If you keep the condenser clean you will minimize your service expense and lower your electrical costs. Failure to maintain a clean condenser coil will cause high temperatures and excessive run times. Continuous operation with dirty or clogged condenser coils can result in compressor failures.
Note: Both the battery charger and condensing unit have thermal cut-outs which will shut down if the ambient temperature is too high. Do not block airflow to the perforated equipment panel and do not operate the kegerator in environments above 100 degrees.
DefrostingThe Freedom™ Kegerator does not require defrosting if the door is only opened for a minimum time. Defrosting should be done when the keg is changed. To do this simply unplug the unit and leave the door open for 15 minutes.
Do not use a pick, knife, etc., to pry ice from evaporator as this could puncture evaporator or damage the finish.
www.micromatic.com•1(866)327-4159 Installation, Use & Maintenance 12
Freedom™ Kegerator

9. MaintenanceCleaning the Cabinet
• Proper cleaning of stainless steel requires a soft cloth, never use steel pads, wire brushes or scrapers.
• Cleaning solutions need to be alkaline or non-chloride cleaners. Any cleaner containing chlorides will damage the protective film of the stainless steel. Chlorides are also commonly found in hard water, salts, household and industrial cleaners.
• Routine cleaning of stainless steel can be done with soap and water. Extreme stains or grease should be cleaned with a non-abrasive cleaner and plastic scrub pad.
• There are stainless steel cleaners available to restore and preserve the finish of the protective layer.
• Never use an acid based cleaning solution. Many food products have an acidic content which can deteriorate the finish - these items include peppers, tomatoes and other vegetables.
• Be sure to clean ALL food products from any stainless steel surface. • The interior of the cabinet should be cleaned only with lukewarm water, taking care
not to scratch the galvanized metal surface. Mild detergents are recommended.
Door Gasket Maintenance • Door Gaskets require regular cleaning with the use of warm soapy water. • Avoid full strength cleaning products on the gasket as this can cause it to become
brittle and prevent a proper seal. • Never use sharp tools or knives to scrape or clean the gasket which could possibly
tear the gasket and rip the bellows. • Door Gaskets can easily be replaced and do not require the use of tools or
authorized service persons.
www.micromatic.com•1(866)327-4159 Installation, Use & Maintenance13
Freedom™ Kegerator

10. TroubleshootingRefrigeration Sometimes, working failures are due to simple causes which can be solved by the user. Before asking for help from a qualified technician, you should perform some basic checks.
1. Refrigeration is not cooling? a. Check - the unit is still connected to power supply and/or has a full
battery charge.
2. After 24 hours, refrigerated cabinet doesn’t reach temperature? a. Check - thermostat in OFF position. b. Check - thermostat at correct temperature. c. Check - unit on “defrost cycle”. d. Check - door gasket is clean and in good condition; door is sealed. e. Check - fan is operating.
Common Draft Problems Improper Pour
Wild BeerBeer, when drawn, is all foam, or too much foam and not enough liquid beer
Flat BeerFoamy head disappears quickly; beer lacks brewery fresh flavor
Cloudy BeerBeer in glass appears hazy, not clear
False HeadLarge soap-like bubbles, head dissolves very quickly
Too warm
Too cold
Too high Needs cleaning Check Pour
Too low Needs cleaning
Too coldContaminated
CO2 gas Needs cleaning Needs cleaning
Too warm Too low Check PourHouseholddetergentand dust
Detergentfilm inside
of glass
Ice inside of glass
Condition Temperature Pressure Equipment Glassware
www.micromatic.com•1(866)327-4159 Installation, Use & Maintenance 14
Freedom™ Kegerator

11. Wiring Diagram
www.micromatic.com•1(866)327-4159 Installation, Use & Maintenance15
Freedom™ Kegerator

12. Replacement Parts
www.micromatic.com•1(866)327-4159 Installation, Use & Maintenance 16
Freedom™ Kegerator
Part No. Description8A24M Deep Cycle -12 Volt (Sealed) Battery
PO2159 Power Cord-Detachable
D4743T Draft Tower
DP-220D-GO Drain Grill
CMT13BBN-4 Casters (4)
CLFV625-45 Plastic Drain Tubing (45”)
10542 Door Gasket
35532 Overflow Beer Container
V28C Spring to Hold CO2 Bottle
113A Hooks to Hold Gas Bottle Spring (2)
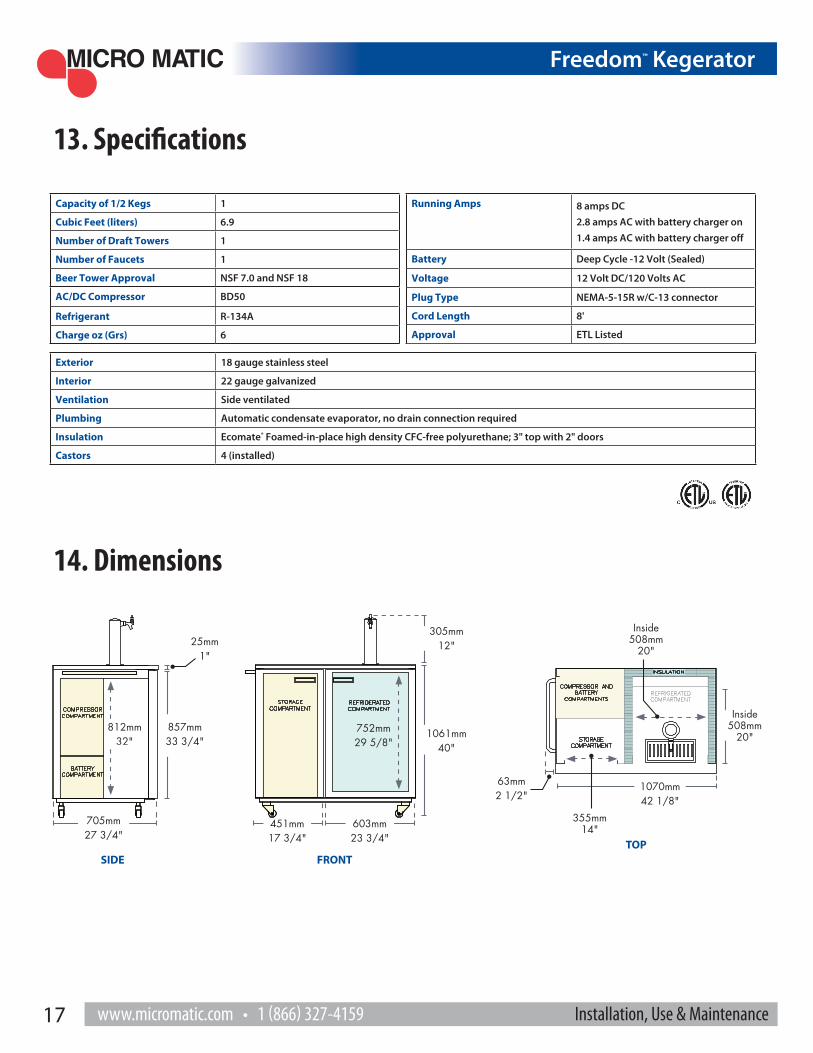
TOP
Inside508mm
20"
1070mm42 1/8"
63mm2 1/2"
Inside508mm
20"
355mm14"
FRONTSIDE
1061mm 40"
305mm 12"
857mm 33 3/4"
705mm27 3/4"
451mm17 3/4"
603mm23 3/4"
25mm1"
812mm32"
752mm29 5/8"
Capacity of 1/2 Kegs 1
Cubic Feet (liters) 6.9
Number of Draft Towers 1
Number of Faucets 1
Beer Tower Approval NSF 7.0 and NSF 18
AC/DC Compressor BD50
Refrigerant R-134A
Charge oz (Grs) 6
Exterior 18 gauge stainless steel
Interior 22 gauge galvanized
Ventilation Side ventilated
Plumbing Automatic condensate evaporator, no drain connection required
Insulation Ecomate® Foamed-in-place high density CFC-free polyurethane; 3" top with 2" doors
Castors 4 (installed)
Running Amps 8 amps DC2.8 amps AC with battery charger on 1.4 amps AC with battery charger off
Battery Deep Cycle -12 Volt (Sealed)
Voltage 12 Volt DC/120 Volts AC
Plug Type NEMA-5-15R w/C-13 connector
Cord Length 8'
Approval ETL Listed
13. Specifications
14. Dimensions
www.micromatic.com•1(866)327-4159 Installation, Use & Maintenance17
Freedom™ Kegerator

15. Warranty
www.micromatic.com•1(866)327-4159 Installation, Use & Maintenance 18
Freedom™ Kegerator
The Freedom™ Kegerator carries a full warranty against defects in material and workmanship for a period of twelve (12) months from date of sale. Defective parts, subject to Micro Matic inspection, will be replaced or repaired for ninety (90) days on a no charge basis. The compressor has a standard four (4) year warranty. All loss of sales must be borne by the purchaser.
Warranty Claims Procedure:Purchaser shall notify Micro Matic of any defect discovered in the Product during the Warranty Period, and obtain a return authorization number. Purchaser must ship the Product per Micro Matic’s instruction. After receipt of the Product, Micro Matic shall, at its option, repair (or authorize the repair of), or replace or refund the purchase price for the Products found by Micro Matic to be defective. Micro Matic’s determination of defects is final. Failure by Purchaser to give notice of claims of breach of warranty within the Warranty Period shall be deemed an absolute and unconditional waiver of Purchaser’s claim for such defects. Products repaired or replaced during the Warranty Period shall be covered by the foregoing warranties for the remainder of the original Warranty Period or ninety (90) days from the date of delivery of the repaired or replaced Products, whichever is longer.
ALL REPAIRS MUST BE FIRST AUTHORIZED BY MICRO MATIC PER THE ABOVE PROCEDURE. UNAUTHORIZED REPAIRS WILL NOT BE REIMBURSED BY MICRO MATIC UNDER ANY CIRCUMSTANCES.
Micro Matic is not responsible for parts damaged from factors including, but not limited to any part that has been subject to misuse, neglect, alteration, accident, unauthorized service, abuse, or to any damage caused by transportation. This warranty does not cover items subject to normal wear and tear (gaskets, seals, o-rings, etc.).
Purchaser Responsibility:Except as expressly provided in this Agreement, Purchaser assumes all other responsibility for any loss, damage, or injury to persons or property arising out of, connected with, or resulting from the use of Products, either alone or in combination with other products or components. In no event will Micro Matic be responsible for incidental, consequential or punitive damages of any kind, including without limitation, claims for loss of beer, loss of gas or loss of sales.
Other Warranties Disclaimed:These are the sole and exclusive warranties and conditions given by Micro Matic with respect to the products and services and are in lieu of and exclude all other warranties or conditions, express or implied, arising by operation of law or otherwise, including without limitation, warranties of merchantability, fitness for a particular purpose and non-infringement, whether or not the purpose or use has been
disclosed to Micro Matic in specifications, drawings or otherwise, and whether or not Micro Matic’s products are specifically designed and/or manufactured by Micro Matic for purchaser’s use or purpose.
Limitation of Remedy:Purchaser’s sole and exclusive remedy for breach of any warranty or condition under this Article IV shall be limited to the repair, correction or replacement, or refund of the purchase price paid in respect of the defective Products, unless the claim falls under the provisions of Section 6.2, in which case Purchaser may also claim damages in accordance with the terms of Section 6.2.

www.micromatic.com•1(866)327-4159 Installation, Use & Maintenance
Artwork©
2011MicroM
aticUSA,Inc.1008-D0311