World Class ARM Templates - Considerations and...
61
World Class ARM Templates - Considerations and Proven Practices Marc Mercuri, Principal Program Manager, Ulrich Homann, Distinguished Architect George Moore, Principal Program Manager Lead Reviewers – Silvano Coriani, Rafael Godinho, Paige Lu, Rama Ramani, Jeremiah Talker, Arsen Vladimirskiy, Tim Wieman , Geert Baeke June 30, 2015 Executive summary In our work with enterprises, system integrator (SIs), cloud service vendor (CSVs), and open source software (OSS) project teams, it’s often necessary to quickly deploy environments, workloads, or scale units. These deployments need to be supported, follow proven practices, and adhere to identified policies. Using a flexible approach based on Microsoft Azure Resource Manager (ARM) templates, you can deploy complex topologies quickly and consistently and then adapt these deployments easily as core offerings evolve or to accommodate variants for outlier scenarios or customers. ARM templates combine the benefits of the underlying Azure Resource Manager with the adaptability and readability of JavaScript Object Notation (JSON). Using ARM templates, you can: Deploy topologies and their workloads consistently. Manage all your resources in an application together using resource groups. Apply role-based access control (RBAC) to grant appropriate access to users, groups, and services. Use tagging associations to streamline tasks such as billing rollups. This document provides details on consumption scenarios, architecture, and implementation patterns identified during our design sessions and real-world template implementations with Azure Customer Advisory Team (AzureCAT) customers. Far from academic, these are proven practices informed by the development of ARM templates for 12 of the top Linux-based OSS technologies, including: Apache Kafka, Apache Spark, Cloudera, Couchbase, Hortonworks HDP, DataStax Enterprise powered by Apache Cassandra, Elasticsearch, Jenkins, MongoDB, Nagios, PostgreSQL, Redis, and Nagios. The majority of these templates were developed with a well- known vendor of a given distribution and influenced by the requirements of Microsoft’s enterprise and SI customers during recent projects. This document shares these proven practices to help you architect world class ARM templates.
Transcript of World Class ARM Templates - Considerations and...
World Class ARM Templates -
Considerations and Proven Practices
Marc Mercuri, Principal Program Manager,
Ulrich Homann, Distinguished Architect
George Moore, Principal Program Manager Lead
Reviewers – Silvano Coriani, Rafael Godinho, Paige Lu, Rama Ramani, Jeremiah Talker, Arsen
Vladimirskiy, Tim Wieman , Geert Baeke
June 30, 2015
Executive summary
In our work with enterprises, system integrator (SIs), cloud service vendor (CSVs), and open source
software (OSS) project teams, it’s often necessary to quickly deploy environments, workloads, or
scale units. These deployments need to be supported, follow proven practices, and adhere to
identified policies. Using a flexible approach based on Microsoft Azure Resource Manager (ARM)
templates, you can deploy complex topologies quickly and consistently and then adapt these
deployments easily as core offerings evolve or to accommodate variants for outlier scenarios or
customers.
ARM templates combine the benefits of the underlying Azure Resource Manager with the
adaptability and readability of JavaScript Object Notation (JSON). Using ARM templates, you can:
Deploy topologies and their workloads consistently.
Manage all your resources in an application together using resource groups.
Apply role-based access control (RBAC) to grant appropriate access to users, groups,
and services.
Use tagging associations to streamline tasks such as billing rollups.
This document provides details on consumption scenarios, architecture, and implementation
patterns identified during our design sessions and real-world template implementations with
Azure Customer Advisory Team (AzureCAT) customers. Far from academic, these are proven
practices informed by the development of ARM templates for 12 of the top Linux-based OSS
technologies, including: Apache Kafka, Apache Spark, Cloudera, Couchbase, Hortonworks HDP,
DataStax Enterprise powered by Apache Cassandra, Elasticsearch, Jenkins, MongoDB, Nagios,
PostgreSQL, Redis, and Nagios. The majority of these templates were developed with a well-
known vendor of a given distribution and influenced by the requirements of Microsoft’s
enterprise and SI customers during recent projects.
This document shares these proven practices to help you architect world class ARM templates.

World Class Azure Resource Manager Templates – Considerations and Proven Practices
ii
Contents Common template consumption scenarios ......................................................................................................................... 3
Enterprises and System Integrators .................................................................................................................................. 3
Cloud service vendors ............................................................................................................................................................ 4
OSS projects ............................................................................................................................................................................... 4
Key concepts and considerations ............................................................................................................................................. 5
Identifying the outside vs. inside of a VM ...................................................................................................................... 5
Common Template Scopes .................................................................................................................................................. 5
Choosing free-form vs. known configurations ............................................................................................................. 6
Identifying resource groups ................................................................................................................................................. 8
Deploying Multiple Instances .............................................................................................................................................. 8
Understanding template linking ........................................................................................................................................ 9
Using the concat() function ............................................................................................................................................... 10
Tagging resources ................................................................................................................................................................. 12
Defining Dependencies ....................................................................................................................................................... 13
Resource Locking .................................................................................................................................................................. 17
Considerations for Handling State ........................................................................................................................................ 18
Complex objects as a means for sharing state .......................................................................................................... 18
Sharing state in ...................................................................................................................................................................... 20
Sharing state out ................................................................................................................................................................... 25
Security Considerations ............................................................................................................................................................. 27
Secrets and Certificates ....................................................................................................................................................... 27
Assigning access with RBAC in Azure ........................................................................................................................... 29
Understanding network security groups ..................................................................................................................... 32
User Defined Routes ............................................................................................................................................................ 37
The template decomposition approach .............................................................................................................................. 39
Capacity and Capability Scoped Solution Templates ............................................................................................. 39
Capability Scoped Solution Template Example - Redis ......................................................................................... 47
Decomposition and End to End Solution Scoped Templates ............................................................................. 48
Preparing Templates for the Marketplace .................................................................................................................. 49
Contextual Examples ................................................................................................................................................................... 51
Moving a Capability Scoped Template into an End to End Solution Scoped Template .......................... 51
Creating an End to End Solution Template with Multiple Capability Scoped Templates ........................ 52
Creating an End to End Solution Scoped Template with Partial On/Off Pattern ........................................ 53
Supporting Distinct Environments within a Subscription ..................................................................................... 53
Delivering Environments with Additional Customer Policy Constraints ......................................................... 57
Securing Resources from Internal Bad Actors ........................................................................................................... 57
Enabling a “Bring Your Own Subscription” Model .................................................................................................. 58
For more information ................................................................................................................................................................. 60

World Class ARM Templates – Considerations and Proven Practices
3
Common template consumption scenarios
In our work with customers, we have identified a number of ARM template consumption
experiences across enterprises, System Integrators (SI)s, and CSVs. This section provides a
high-level overview of common scenarios and patterns for different customer types.
Enterprises and System Integrators
Within large organizations, we commonly see two consumers of ARM templates: internal
software development teams and corporate IT. The scenarios for the SIs we’ve worked with
have mapped to those of Enterprises, so the same considerations apply.
Internal software development teams
If your team develops software to support your business, templates provide an easy way to
quickly deploy technologies for use in business-specific solutions. You can also use templates
to rapidly create training environments that enable team members to gain necessary skills.
You can use templates as-is or extend or compose them to accommodate your needs. Using
tagging within templates, you can provide a billing summary with various views such as team,
project, individual, and education.
Businesses often want software development teams to create a template for consistent
deployment of a solution while also offering constraints so certain items within that
environment remain fixed and can’t be overridden. For example, a bank might require an ARM
template to include RBAC so that a programmer can’t revise a banking solution to send data
to a personal storage account.
Corporate IT
Corporate IT organizations typically use ARM templates for delivering cloud capacity and
cloud-hosted capabilities.
Cloud capacity
A common way for corporate IT groups to provide cloud capacity for teams within their
organization is with “t-shirt sizes”, which are standard offering sizes such as small, medium,
and large. The t-shirt sized offerings can mix different resource types and quantities while
providing a level of standardization that makes it possible to use ARM templates. The
templates deliver capacity in a consistent way that enforces corporate policies and uses
tagging to provide chargeback to consuming organizations.
For example, you may need to provide development, test, or production environments within
which the software development teams can deploy their solutions. The environment has a
predefined network topology and elements which the software development teams cannot
change, such as rules governing access to the public internet and packet inspection. You may
also have organization-specific roles for these environments with distinct access rights for the
environment.
Cloud-hosted capabilities
You can use ARM templates to support cloud-hosted capabilities, including individual
software packages or composite offerings that are offered to internal lines of business. An
example of a composite offering would be analytics-as-a-service—analytics, visualization, and
other technologies—delivered in an optimized, connected configuration on a predefined
network topology.

World Class ARM Templates – Considerations and Proven Practices
4
Cloud-hosted capabilities are affected by the security and role considerations established by
the cloud capacity offering on which they’re built as described above.
These capabilities are offered as is or as a managed service. For the latter, access-constrained
roles are required to enable access into the environment for management purposes.
Cloud service vendors
After talking to many CSVs, we have identified multiple approaches you can take to deploy
services for your customers and associated requirements.
CSV-hosted offering
If you host your offering in your own Azure subscription, two hosting approaches are
common: deploying a distinct deployment for every customer or deploying scale units that
underpin a shared infrastructure used for all customers.
Distinct deployments for each customer. Distinct deployments per customer
require fixed topologies of different known configurations. These may have
different virtual machine (VM) sizes, varying numbers of nodes, and different
amounts of associated storage. Tagging of deployments is used for roll-up billing
of each customer. RBAC may be enabled to allow customers access to aspects of
their cloud environment.
Scale units in shared multi-tenant environments. A template can represent a scale
unit for multi-tenant environments. In this case, the same infrastructure is used to
support all customers. The deployments represent a group of resources that
deliver a level of capacity for the hosted offering, such as number of users and
number of transactions. These scale units are increased or decreased as demand
requires.
CSV offering injected into customer subscription
You may want to deploy your software into subscriptions owned by end customers. You can
use templates to deploy distinct deployments into a customer’s Azure account.
These deployments use RBAC so you can update and manage the deployment within the
customer’s account.
Azure Marketplace
If you want to advertise and sell your offerings through a marketplace, such as Azure
Marketplace, you can develop ARM templates to deliver distinct types of deployments that
will run in a customer’s Azure account. This distinct deployments can be typically described as
a t-shirt size (small, medium, large) , product/audience type (community, developer,
enterprise), or feature type (basic, high availability). In some cases, these types will allow you
to specify certain attributes of the deployment, such as VM type or number of disks.
OSS projects
Within open source projects, ARM templates enable a community to deploy a solution quickly
using proven practices. You can store templates in a GitHub repository so the community can
revise them over time. End users can then deploy these templates in their own Azure
subscriptions.
World Class ARM Templates – Considerations and Proven Practices
5
Key concepts and considerations
This section identifies the things you need to know about ARM, the ARM template language,
and RBAC before continuing.
Identifying the outside vs. inside of a VM
As you design your template, it’s helpful to look at the requirements in terms of what’s
outside and inside of the virtual machines (VMs):
Outside means the VMs and other resources of your deployment, such as the
network topology, tagging, references to the certs/secrets, and role-based access
control. All are part of your ARM template.
For the VM’s insides—that is, the installed software and overall desired state
configuration—other mechanisms are used in whole or in part, such as VM
extensions or scripts. These may be identified and executed by the template but
aren’t in it.
Common examples of activities you would do “inside the box” include -
• Install or remove server roles and features
• Install and configure software at the node or cluster level
• Deploy websites on a web server
• Deploy database schemas
• Manage registry or other types of configuration settings
• Manage files and directories
• Start, stop, and manage processes and services
• Manage local groups and user accounts
• Install and manage packages (.msi, .exe, yum, etc.)
• Manage environment variables
• Run native scripts (Windows PowerShell, bash, etc.)
Desired State Configuration (DSC)
Thinking about the internal state of your VMs beyond deployment, you’ll want to make sure
this deployment doesn’t “drift” from the configuration that you have defined and checked
into source control. This ensures your developers or operations staff don’t manually make ad-
hoc changes to an environment that are not vetted, tested or recorded in source control. This
is important, because the manual changes are not in source control, they are also not part of
the standard deployment and will impact future automated deployments of the software.
Beyond your internal employees, desired state configuration is also important from a security
perspective. Hackers are regularly trying to compromise and exploit software systems. When
successful, its common to install files and otherwise change the state of a compromised
system. Using desired state configuration, you can identify deltas between the desired and
actual state and restore a known configuration.
There are resource extensions for the most popular mechanisms for DSC- PowerShell DSC ,
Chef, and Puppet. Each of these can deploy the initial state of your VM and also be used to
make sure the desired state is maintained.
Common Template Scopes
In our experience, we’ve seen three key solution templates scopes emerge. These three
World Class ARM Templates – Considerations and Proven Practices
6
scopes – capacity, capability, and end to end solution – are described in more detail below.
Capacity Scope
A capacity scope delivers a set of resources in a standard topology that is pre-configured to
be in compliance with regulations and policies. The most common example is deploying a
standard development environment in an Enterprise IT or SI scenario.
Capability Scope
A capability scope is focused on deploying and configuring a topology for a given technology.
Common scenarios including technologies such as SQL Server, Cassandra, Hadoop, etc.
End to End Solution Scope
An End to End SolutioN Scope is targeted beyond a single capability, and instead focused on
delivering an end to end solution comprised of multiple capabilities.
A solution scoped template scope manifests itself as a set of one or more capability scoped
templates with solution specific resources, logic, and desired state. An example of a solution
scoped template is an end to end data pipeline solution template that might mix solution
specific topology and state with multiple capability scoped solution templates such as Kafka,
Storm, and Hadoop.
Choosing free-form vs. known configurations
You might initially think a template should give consumers the utmost flexibility, but many
considerations affect the choice of whether to use free-form configurations vs. known
configurations. This section identifies the key customer requirements and technical
considerations that shaped the approach shared in this document.
Free-form configurations
On the surface, free-form configurations sound ideal. They allow you to select a VM type and
provide an arbitrary number of nodes and attached disks for those nodes—and do so as
parameters to a template. When you look closely, though, and consider templates that will
deploy multiple virtual machines of different sizes, additional considerations appear that make
the choice less appropriate in a number of scenarios.
In the article Virtual Machine and Cloud Service Sizes for Azure1 on the Azure website, the
different VM types and available sizes are identified, and each of the number of durable disks
(2, 4, 8, 16, or 32) that can be attached. Each attached disk provides 500 IOPS and multiples of
these disks can be pooled for a multiplier of that number of IOPS. For example, 16 disks can
be pooled to provide 8,000 IOPS. Pooling is done with configuration in the operating system,
using Microsoft Windows Storage Spaces or redundant array of inexpensive disks (RAID) in
Linux.
A free-form configuration enables the selection of a number of VM instances, a number of
different VM types and sizes for those instances, a number of disks that can vary based on the
VM type, and one or more scripts to configure the VM contents.
It is common that a deployment may have multiple types of nodes, such as master and data
nodes, so this flexibility is often provided for every node type.
As you start to deploy clusters of any significance, you begin to work with multiples of all of
1 http://msdn.microsoft.com/library/azure/dn641267.aspx
World Class ARM Templates – Considerations and Proven Practices
7
these. If you were deploying a Hadoop cluster, for example, with 8 master nodes and 200 data
nodes, and pooled 4 attached disks on each master node and pooled 16 attached disks per
data node, you would have 208 VMs and 3,232 disks to manage.
A storage account will throttle requests above its identified 20,000 transactions/second limit,
so you should look at storage account partitioning and use calculations to determine the
appropriate number of storage accounts to accommodate this topology. Given the multitude
of combinations supported by the free-form approach, dynamic calculations are required to
determine the appropriate partitioning. The ARM Template Language does not presently
provide mathematical functions, so you must perform these calculations in code, generating a
unique, hard-coded template with the appropriate details.
In enterprise IT and SI scenarios, someone must maintain the templates and provide support
for the deployed topologies for one or more organizations. This additional overhead—
different configurations and templates for each customer—is far from desirable.
You can use these templates to deploy environments in your customer’s Azure subscription,
but both corporate IT teams and CSVs typically deploy them into their own subscriptions,
using a chargeback function to bill their customers. In these scenarios, the goal is to deploy
capacity for multiple customers across a pool of subscriptions and keep deployments densely
populated into the subscriptions to minimize subscription sprawl—that is, more subscriptions
to manage. With truly dynamic deployment sizes, achieving this type of density requires
careful planning and additional development for scaffolding work on behalf of the
organization.
In addition, you can’t create subscriptions via an API call but must do so manually through the
portal. As the number of subscriptions increases, any resulting subscription sprawl requires
human intervention—it can’t be automated. With so much variability in the sizes of
deployments, you would have to pre-provision a number of subscriptions manually to ensure
subscriptions are available.
Considering all these factors, a truly free-form configuration is less appealing than at first
blush.
Known configurations—the t-shirt sizing approach
Rather than offer a template that provides total flexibility and countless variations, in our
experience a common pattern is to provide the ability to select known configurations—in
effect, standard t-shirt sizes such as sandbox, small, medium, and large. Other examples of t-
shirt sizes are product offerings, such as community edition or enterprise edition. In other
cases, it may be workload specific configurations of a technology – such as map reduce or no
sql.
Many enterprise IT organizations, OSS vendors, and SIs make their offerings available today in
this way in on-premises, virtualized environments (enterprises) or as software-as-a-service
(SaaS) offerings (CSVs and OSVs).
This approach provides good, known configurations of varying sizes that are preconfigured
for customers. Without known configurations, end customers must determine cluster sizing
on their own, factor in platform resource constraints, and do math to identify the resulting
partitioning of storage accounts and other resources (due to cluster size and resource
constraints). Known configurations enable customers to easily select the right t-shirt size—
that is, a given deployment. In addition to making a better experience for the customer, a
small number of known configurations is easier to support and can help you deliver a higher
level of density.
A known configuration approach focused on t-shirt sizes may also have varying number of
nodes within a size. For example, a small t-shirt size may be between 3 and 10 nodes. The t-

World Class ARM Templates – Considerations and Proven Practices
8
shirt size would be designed to accommodate up to 10 nodes and provide the consumer the
ability to make free form selections up to the maximum size identified.
A t-shirt size based on workload type, may be more free form in nature in terms of the
number of nodes that can be deployed but will have workload distinct node size and
configuration of the software on the node.
T-shirt sizes based on product offerings, such as community or Enterprise, may have distinct
resource types and maximum number of nodes that can be deployed, typically tied to
licensing considerations or feature availability across the different offerings.
You can also accommodate customers with unique variants using the JSON-based templates.
When dealing with outliers, you can incorporate the appropriate planning and considerations
for development, support, and costing.
Identifying resource groups
Resource groups enable you to manage all your resources in an application together. A
resource group might include all the resources for an application or only those that are
logically grouped together.
Consider these important factors when defining your resource group:
All the resources in your group must share the same lifecycle. You will deploy,
update, and delete them together. If one resource, such as a database server,
needs to exist on a different deployment cycle, it should be in another resource
group.
Each resource can exist in only one resource group.
You can add or remove a resource to or from a resource group at any time.
A resource group can contain resources that reside in different regions.
A resource group can be used to scope access control for administrative actions.
When defining your resource groups, it’s important to consider your deployment lifecycle
(how you deploy, update, delete).
For example, if you have parts of your solution which have different lifecycles, you may choose
to deploy them using different resource groups. If you’re using an on/off pattern but keeping
one resource alive, you may still use a single resource group but apply a resource lock on the
single resource to avoid it being deleted. More details on resource locks and this scenario can
be found later in the document.
If sections of your application must have constraints that identify distinct roles that can create,
update, or delete your resources, this may be another area where you may choose to utilize
different resource groups. Additional details on role based access control generally and this
scenario specifically canbe found later in the document.
Deploying Multiple Instances
It is very common that you’ll want to deploy multiple instances of a given resource. For
example, your front end may have multiple web servers, your Hadoop cluster will have
multiple data nodes, etc.
Within ARM, resource looping provides the ability to deploy a number of instances of a given
resource type. A copy property is attached to a resource, and the loop is provided both a
name and count values, the latter indicating how many of the resource should be deployed.
World Class ARM Templates – Considerations and Proven Practices
9
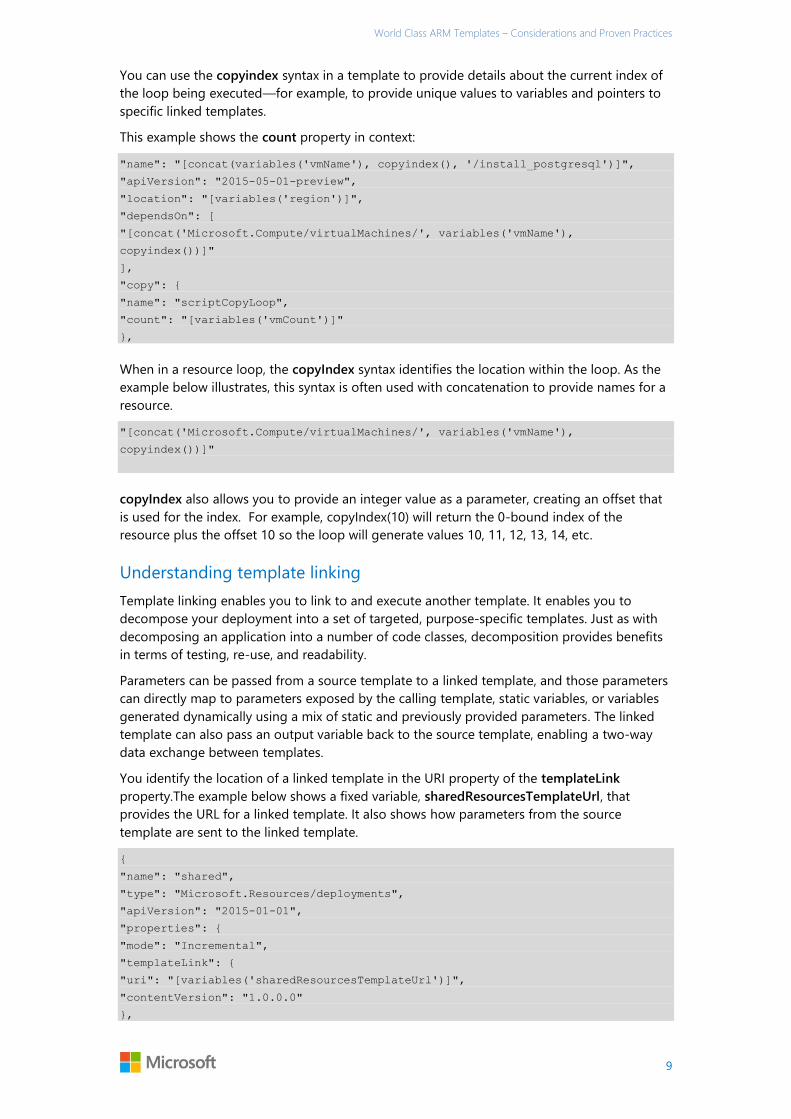
You can use the copyindex syntax in a template to provide details about the current index of
the loop being executed—for example, to provide unique values to variables and pointers to
specific linked templates.
This example shows the count property in context:
"name": "[concat(variables('vmName'), copyindex(), '/install_postgresql')]",
"apiVersion": "2015-05-01-preview",
"location": "[variables('region')]",
"dependsOn": [
"[concat('Microsoft.Compute/virtualMachines/', variables('vmName'),
copyindex())]"
],
"copy": {
"name": "scriptCopyLoop",
"count": "[variables('vmCount')]"
},
When in a resource loop, the copyIndex syntax identifies the location within the loop. As the
example below illustrates, this syntax is often used with concatenation to provide names for a
resource.
"[concat('Microsoft.Compute/virtualMachines/', variables('vmName'),
copyindex())]"
copyIndex also allows you to provide an integer value as a parameter, creating an offset that
is used for the index. For example, copyIndex(10) will return the 0-bound index of the
resource plus the offset 10 so the loop will generate values 10, 11, 12, 13, 14, etc.
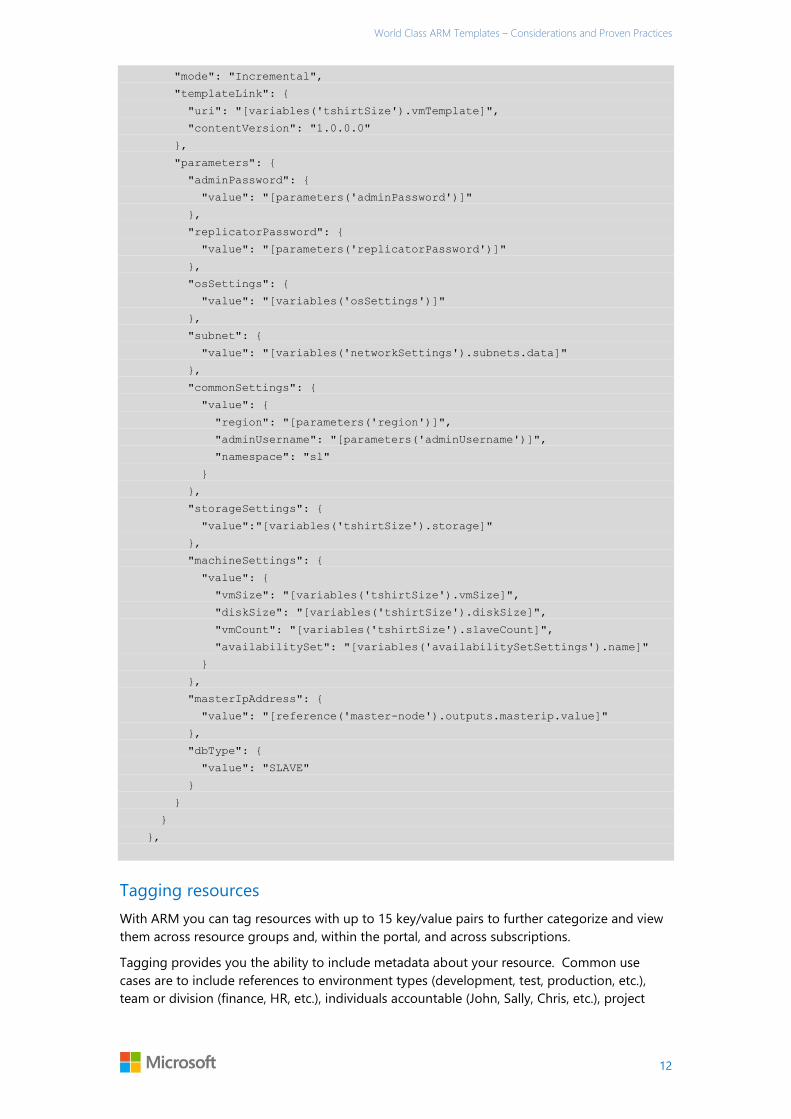
Understanding template linking
Template linking enables you to link to and execute another template. It enables you to
decompose your deployment into a set of targeted, purpose-specific templates. Just as with
decomposing an application into a number of code classes, decomposition provides benefits
in terms of testing, re-use, and readability.
Parameters can be passed from a source template to a linked template, and those parameters
can directly map to parameters exposed by the calling template, static variables, or variables
generated dynamically using a mix of static and previously provided parameters. The linked
template can also pass an output variable back to the source template, enabling a two-way
data exchange between templates.
You identify the location of a linked template in the URI property of the templateLink
property.The example below shows a fixed variable, sharedResourcesTemplateUrl, that
provides the URL for a linked template. It also shows how parameters from the source
template are sent to the linked template.
{
"name": "shared",
"type": "Microsoft.Resources/deployments",
"apiVersion": "2015-01-01",
"properties": {
"mode": "Incremental",
"templateLink": {
"uri": "[variables('sharedResourcesTemplateUrl')]",
"contentVersion": "1.0.0.0"
},
World Class ARM Templates – Considerations and Proven Practices
10
"parameters": {
"storageSettings": {
"value": "[variables('tshirtSize').storage]"
},
"region": {
"value": "[parameters('region')]"
},
"networkSettings": {
"value": "[variables('networkSettings')]"
},
"availabilitySetSettings": {
"value": "[variables('availabilitySetSettings')]"
}
}
}
},
Using the concat() function
ARM Template Language provides the concat() function for concatenating multiple strings. In
our template decomposition approach, we use it for two significant purposes:
Providing unique names for resources.
Dynamically identifying templates to link to.
Creating unique resource names
The copyIndex() function is often used with concat to take a base name and append it with
the current index. In the example below, it takes the value of another parameter,
publicIPNamePrefix, and combines it with the current index to generate resource names. For
example, if publicIPNamePrefix is cloudfe, enabling resource names such as cloudfe1,
cloudfe2, and so on.
"name": "[concat(parameters('publicIPNamePrefix'), copyIndex())]"
Defining appropriate linked template names
The concat() function is also used heavily when defining the appropriate name of templates
to link to. The most common example is to take the known configuration type being
requested by the template consumer, then generating a variable that contains the appropriate
URI for that template.
This example shows how concat is first used to define a URL for the VM template that is used
in t-shirt sizes of small, medium, and large:
"tshirtSizeSmall": {
"vmSize": "Standard_A1",
"diskSize": 1023,
"vmTemplate": "[concat(variables('templateBaseUrl'), 'database-2disk-
resources.json')]",
"vmCount": 2,
"slaveCount": 1,
"storage": {
"name": "[parameters('storageAccountNamePrefix')]",
"count": 1,
"pool": "db",

World Class ARM Templates – Considerations and Proven Practices
11
"map": [0,0],
"jumpbox": 0
}
},
"tshirtSizeMedium": {
"vmSize": "Standard_A3",
"diskSize": 1023,
"vmTemplate": "[concat(variables('templateBaseUrl'), 'database-8disk-
resources.json')]",
"vmCount": 2,
"slaveCount": 1,
"storage": {
"name": "[parameters('storageAccountNamePrefix')]",
"count": 2,
"pool": "db",
"map": [0,1],
"jumpbox": 0
}
},
"tshirtSizeLarge": {
"vmSize": "Standard_A4",
"diskSize": 1023,
"vmTemplate": "[concat(variables('templateBaseUrl'), 'database-16disk-
resources.json')]",
"vmCount": 3,
"slaveCount": 2,
"storage": {
"name": "[parameters('storageAccountNamePrefix')]",
"count": 2,
"pool": "db",
"map": [0,1,1],
"jumpbox": 0
}
},
Later in the template, a tshirtSize variable is dynamically created and takes the size provided
for the template (Small, Medium or Large), concatenates it with the prefix tshirtSize, and
assigns the appropriate tshirtSize variable (tshirtSizeSmall, tshirtSizeMedium,
tshirtSizeLarge) to the tshirtSize variable. This tshirtSize variable is then used later in the
template for template linking.
"tshirtSize": "[variables(concat('tshirtSize', parameters('tshirtSize')))]",
When slave nodes are defined later in the template, you can see that the vmTemplate
property of the tshirtSize variable is provided as the uri property of templateLink.
{
"name": "slave-node",
"type": "Microsoft.Resources/deployments",
"apiVersion": "2015-01-01",
"dependsOn": [
"[concat('Microsoft.Resources/deployments/', 'master-node')]"
],
"properties": {
World Class ARM Templates – Considerations and Proven Practices
12
"mode": "Incremental",
"templateLink": {
"uri": "[variables('tshirtSize').vmTemplate]",
"contentVersion": "1.0.0.0"
},
"parameters": {
"adminPassword": {
"value": "[parameters('adminPassword')]"
},
"replicatorPassword": {
"value": "[parameters('replicatorPassword')]"
},
"osSettings": {
"value": "[variables('osSettings')]"
},
"subnet": {
"value": "[variables('networkSettings').subnets.data]"
},
"commonSettings": {
"value": {
"region": "[parameters('region')]",
"adminUsername": "[parameters('adminUsername')]",
"namespace": "sl"
}
},
"storageSettings": {
"value":"[variables('tshirtSize').storage]"
},
"machineSettings": {
"value": {
"vmSize": "[variables('tshirtSize').vmSize]",
"diskSize": "[variables('tshirtSize').diskSize]",
"vmCount": "[variables('tshirtSize').slaveCount]",
"availabilitySet": "[variables('availabilitySetSettings').name]"
}
},
"masterIpAddress": {
"value": "[reference('master-node').outputs.masterip.value]"
},
"dbType": {
"value": "SLAVE"
}
}
}
},
Tagging resources
With ARM you can tag resources with up to 15 key/value pairs to further categorize and view
them across resource groups and, within the portal, and across subscriptions.
Tagging provides you the ability to include metadata about your resource. Common use
cases are to include references to environment types (development, test, production, etc.),
team or division (finance, HR, etc.), individuals accountable (John, Sally, Chris, etc.), project

World Class ARM Templates – Considerations and Proven Practices
13
name, system name or internal chargeback ID. The benefit of tags is that they can be pulled
together in billing roll up or within a summary view.
The following template excerpt contains JSON that describes tags for a resource that specify
the environment type, project name and internal billing chargeback ID. The values for these
are passed in via parameters to make this template more re-usable and of higher value for
Systems Integrators, Corporate IT, and Cloud Service Vendors. This approach enables them to
use the same template to deploy capacity or capabilities for a multitude of customers that
each will have distinct values for these tags. x
"tags": {
"ChargebackID": "[parameters(chargebackID)]",
"ProjectName": "[parameters(projectName)]",
"EnvironmentType" :"[parameters('environmentType')]"
},
Tags should not be used to provide metadata that you will use to identify and query links
between resources. The next section, “Defining Dependencies”, will provide more context and
guidance for that use case.
Defining Dependencies
For a given resource, there can be multiple upstream and child dependencies that are critical
to the success of your topology. You can define dependencies on other resources using
dependsOn and resources property of a resource. A dependency can also be specified using
the reference function.
{
"name": "<name-of-the-resource>",
"type": "<resource-provider-namespace/resource-type-name>",
"apiVersion": "<supported-api-version-of-resource>",
"location": "<location-of-resource>",
"tags": { <name-value-pairs-for-resource-tagging> },
"dependsOn": [ <array-of-related-resource-names> ],
"properties": { <settings-for-the-resource> },
"resources": { <dependent-resources> },
}
There are also resource links which can define relationships between resources, and support
defining these relationships across resource groups.
This section provides background on each of these features and guidance on how to identify
if one or more are appropriate for your design.
dependsOn
For a given VM, you may be dependent on having a database resource successfully
provisioned. In another case, you may be dependent for multiple nodes in your cluster to be
installed before deploying a VM with the cluster management tool.
Within your template, the dependsOn property provides the ability to define this dependency
for a resource. It’s value can be a comma separated list of resource names. The dependencies
between resources are evaluated and resources are deployed in their dependent order. When
resources are not dependent on each other, they are attempted to be deployed in parallel.
While you may be inclined to use dependsOn to map dependencies between your resources,
World Class ARM Templates – Considerations and Proven Practices
14
it’s important to understand why you’re doing it because it can impact the performance of
your deployment. For example, if you’re doing this because you want to document how
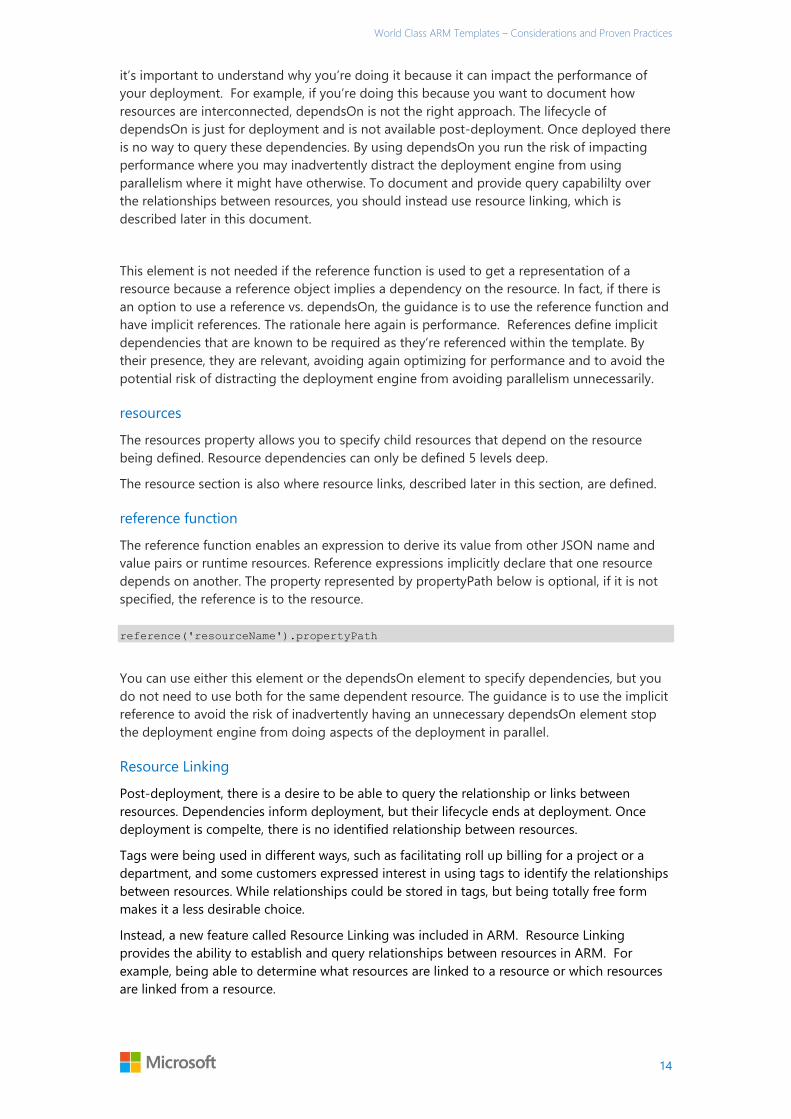
resources are interconnected, dependsOn is not the right approach. The lifecycle of
dependsOn is just for deployment and is not available post-deployment. Once deployed there
is no way to query these dependencies. By using dependsOn you run the risk of impacting
performance where you may inadvertently distract the deployment engine from using
parallelism where it might have otherwise. To document and provide query capabililty over
the relationships between resources, you should instead use resource linking, which is
described later in this document.
This element is not needed if the reference function is used to get a representation of a
resource because a reference object implies a dependency on the resource. In fact, if there is
an option to use a reference vs. dependsOn, the guidance is to use the reference function and
have implicit references. The rationale here again is performance. References define implicit
dependencies that are known to be required as they’re referenced within the template. By
their presence, they are relevant, avoiding again optimizing for performance and to avoid the
potential risk of distracting the deployment engine from avoiding parallelism unnecessarily.
resources
The resources property allows you to specify child resources that depend on the resource
being defined. Resource dependencies can only be defined 5 levels deep.
The resource section is also where resource links, described later in this section, are defined.
reference function
The reference function enables an expression to derive its value from other JSON name and
value pairs or runtime resources. Reference expressions implicitly declare that one resource
depends on another. The property represented by propertyPath below is optional, if it is not
specified, the reference is to the resource.
reference('resourceName').propertyPath
You can use either this element or the dependsOn element to specify dependencies, but you
do not need to use both for the same dependent resource. The guidance is to use the implicit
reference to avoid the risk of inadvertently having an unnecessary dependsOn element stop
the deployment engine from doing aspects of the deployment in parallel.
Resource Linking
Post-deployment, there is a desire to be able to query the relationship or links between
resources. Dependencies inform deployment, but their lifecycle ends at deployment. Once
deployment is compelte, there is no identified relationship between resources.
Tags were being used in different ways, such as facilitating roll up billing for a project or a
department, and some customers expressed interest in using tags to identify the relationships
between resources. While relationships could be stored in tags, but being totally free form
makes it a less desirable choice.
Instead, a new feature called Resource Linking was included in ARM. Resource Linking
provides the ability to establish and query relationships between resources in ARM. For
example, being able to determine what resources are linked to a resource or which resources
are linked from a resource.
World Class ARM Templates – Considerations and Proven Practices
15
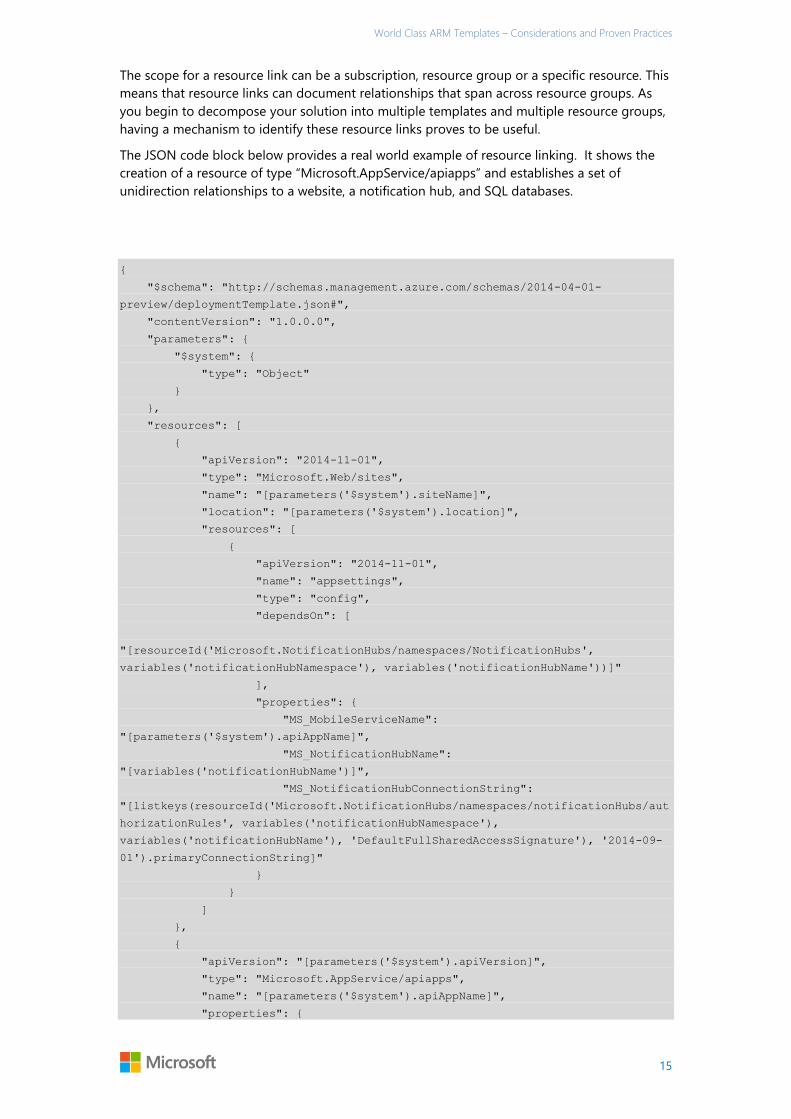
The scope for a resource link can be a subscription, resource group or a specific resource. This
means that resource links can document relationships that span across resource groups. As
you begin to decompose your solution into multiple templates and multiple resource groups,
having a mechanism to identify these resource links proves to be useful.
The JSON code block below provides a real world example of resource linking. It shows the
creation of a resource of type “Microsoft.AppService/apiapps” and establishes a set of
unidirection relationships to a website, a notification hub, and SQL databases.
{
"$schema": "http://schemas.management.azure.com/schemas/2014-04-01-
preview/deploymentTemplate.json#",
"contentVersion": "1.0.0.0",
"parameters": {
"$system": {
"type": "Object"
}
},
"resources": [
{
"apiVersion": "2014-11-01",
"type": "Microsoft.Web/sites",
"name": "[parameters('$system').siteName]",
"location": "[parameters('$system').location]",
"resources": [
{
"apiVersion": "2014-11-01",
"name": "appsettings",
"type": "config",
"dependsOn": [
"[resourceId('Microsoft.NotificationHubs/namespaces/NotificationHubs',
variables('notificationHubNamespace'), variables('notificationHubName'))]"
],
"properties": {
"MS_MobileServiceName":
"[parameters('$system').apiAppName]",
"MS_NotificationHubName":
"[variables('notificationHubName')]",
"MS_NotificationHubConnectionString":
"[listkeys(resourceId('Microsoft.NotificationHubs/namespaces/notificationHubs/aut
horizationRules', variables('notificationHubNamespace'),
variables('notificationHubName'), 'DefaultFullSharedAccessSignature'), '2014-09-
01').primaryConnectionString]"
}
}
]
},
{
"apiVersion": "[parameters('$system').apiVersion]",
"type": "Microsoft.AppService/apiapps",
"name": "[parameters('$system').apiAppName]",
"properties": {

World Class ARM Templates – Considerations and Proven Practices
16
"accessLevel": "PublicAnonymous"
},
"resources": [
{
"apiVersion": "2015-01-01",
"type": "providers/links",
"name": "Microsoft.Resources/mobile-codesite",
"dependsOn": [
"[resourceId('Microsoft.AppService/apiapps',
parameters('$system').apiAppName)]",
"[resourceId('Microsoft.Web/Sites',
variables('userSiteName'))]"
],
"properties": {
"targetId": "[resourceId('Microsoft.Web/sites',
variables('userSiteName'))]"
}
},
{
"apiVersion": "2015-01-01",
"type": "providers/links",
"name": "Microsoft.Resources/mobile-notificationhub",
"dependsOn": [
"[resourceId('Microsoft.AppService/apiapps',
parameters('$system').apiAppName)]",
"[resourceId('Microsoft.NotificationHubs/namespaces/NotificationHubs',
variables('notificationHubNamespace'), variables('notificationHubName'))]"
],
"properties": {
"targetId":
"[resourceId('Microsoft.NotificationHubs/namespaces/NotificationHubs',
variables('notificationHubNamespace'), variables('notificationHubName'))]"
}
},
{
"apiVersion": "2015-01-01",
"type": "providers/links",
"name": "Microsoft.Resources/mobile-sqlserver",
"dependsOn": [
"[resourceId('Microsoft.AppService/apiapps',
parameters('$system').apiAppName)]"
],
"properties": {
"targetId": "[concat('/subscriptions/',
parameters('userDatabase').subscriptionId, '/resourcegroups/',
parameters('userDatabase').resourceGroupName,
'/providers/Microsoft.Sql/servers/', parameters('userDatabase').serverName)]"
}
},
{
"apiVersion": "2015-01-01",
"type": "providers/links",
"name": "Microsoft.Resources/mobile-sqldb",
"dependsOn": [
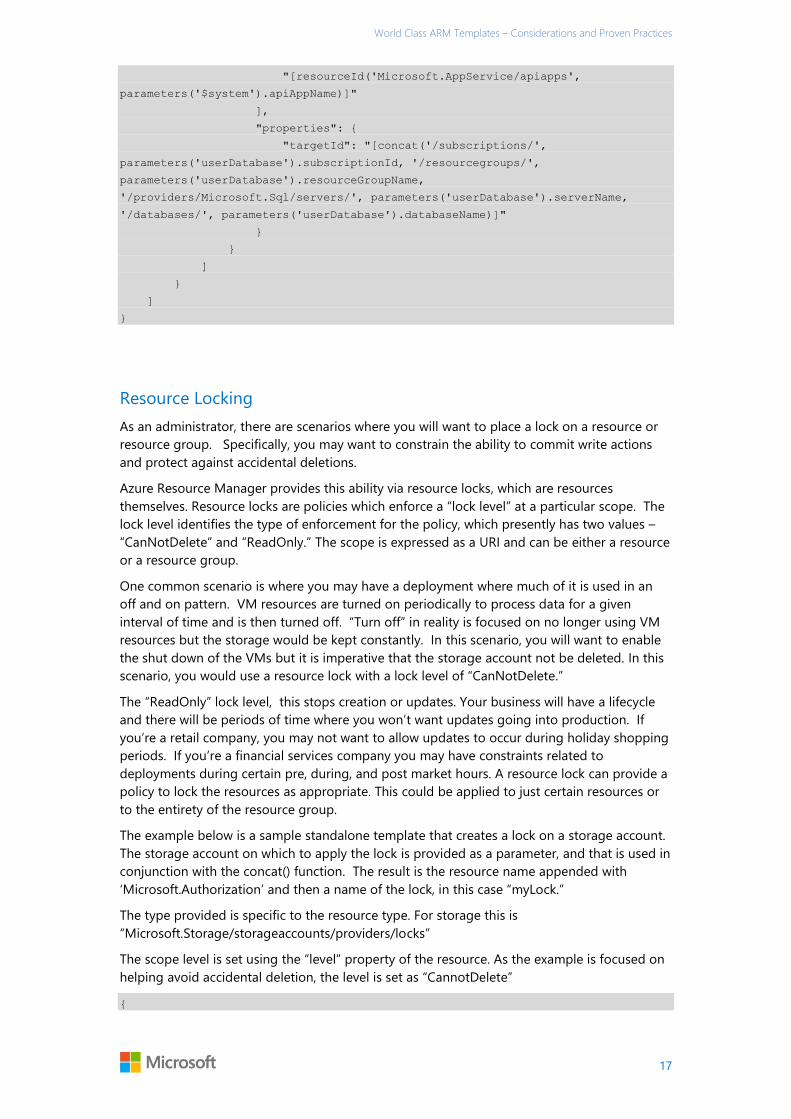
World Class ARM Templates – Considerations and Proven Practices
17
"[resourceId('Microsoft.AppService/apiapps',
parameters('$system').apiAppName)]"
],
"properties": {
"targetId": "[concat('/subscriptions/',
parameters('userDatabase').subscriptionId, '/resourcegroups/',
parameters('userDatabase').resourceGroupName,
'/providers/Microsoft.Sql/servers/', parameters('userDatabase').serverName,
'/databases/', parameters('userDatabase').databaseName)]"
}
}
]
}
]
}
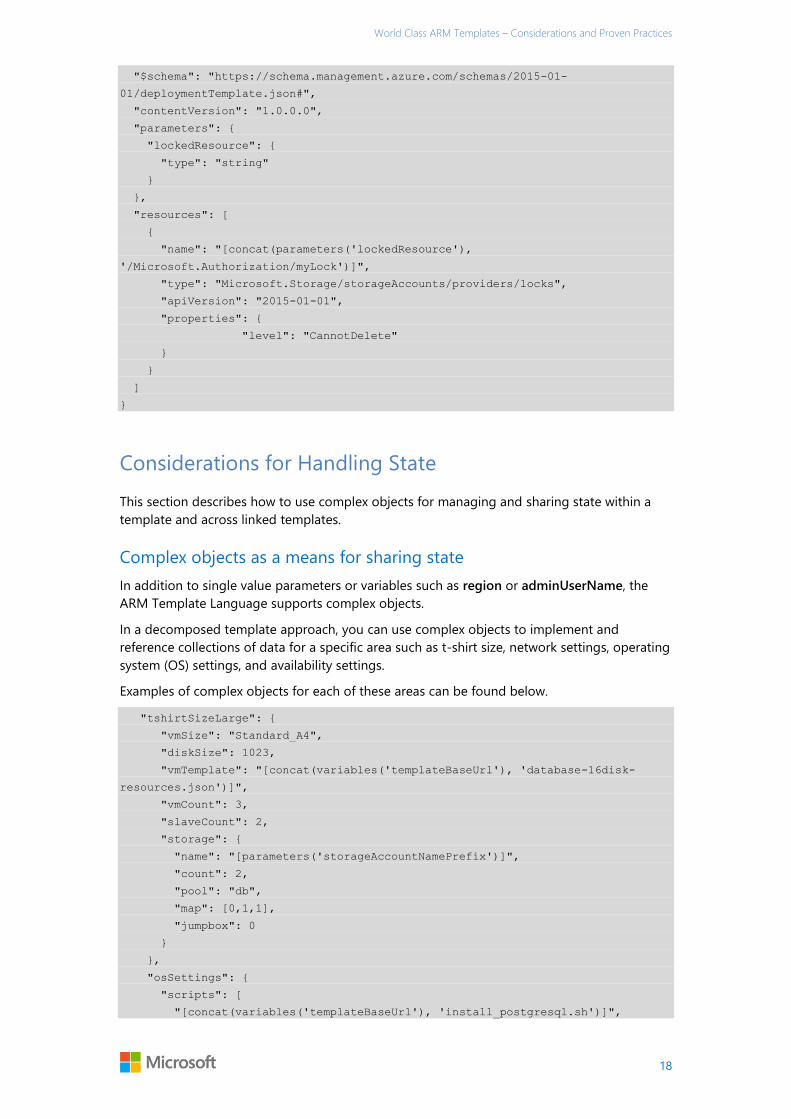
Resource Locking
As an administrator, there are scenarios where you will want to place a lock on a resource or
resource group. Specifically, you may want to constrain the ability to commit write actions
and protect against accidental deletions.
Azure Resource Manager provides this ability via resource locks, which are resources
themselves. Resource locks are policies which enforce a “lock level” at a particular scope. The
lock level identifies the type of enforcement for the policy, which presently has two values –
“CanNotDelete” and “ReadOnly.” The scope is expressed as a URI and can be either a resource
or a resource group.
One common scenario is where you may have a deployment where much of it is used in an
off and on pattern. VM resources are turned on periodically to process data for a given
interval of time and is then turned off. “Turn off” in reality is focused on no longer using VM
resources but the storage would be kept constantly. In this scenario, you will want to enable
the shut down of the VMs but it is imperative that the storage account not be deleted. In this
scenario, you would use a resource lock with a lock level of “CanNotDelete.”
The “ReadOnly” lock level, this stops creation or updates. Your business will have a lifecycle
and there will be periods of time where you won’t want updates going into production. If
you’re a retail company, you may not want to allow updates to occur during holiday shopping
periods. If you’re a financial services company you may have constraints related to
deployments during certain pre, during, and post market hours. A resource lock can provide a
policy to lock the resources as appropriate. This could be applied to just certain resources or
to the entirety of the resource group.
The example below is a sample standalone template that creates a lock on a storage account.
The storage account on which to apply the lock is provided as a parameter, and that is used in
conjunction with the concat() function. The result is the resource name appended with
‘Microsoft.Authorization’ and then a name of the lock, in this case “myLock.”
The type provided is specific to the resource type. For storage this is
“Microsoft.Storage/storageaccounts/providers/locks”
The scope level is set using the “level” property of the resource. As the example is focused on
helping avoid accidental deletion, the level is set as “CannotDelete”
{
World Class ARM Templates – Considerations and Proven Practices
18
"$schema": "https://schema.management.azure.com/schemas/2015-01-
01/deploymentTemplate.json#",
"contentVersion": "1.0.0.0",
"parameters": {
"lockedResource": {
"type": "string"
}
},
"resources": [
{
"name": "[concat(parameters('lockedResource'),
'/Microsoft.Authorization/myLock')]",
"type": "Microsoft.Storage/storageAccounts/providers/locks",
"apiVersion": "2015-01-01",
"properties": {
"level": "CannotDelete"
}
}
]
}
Considerations for Handling State
This section describes how to use complex objects for managing and sharing state within a
template and across linked templates.
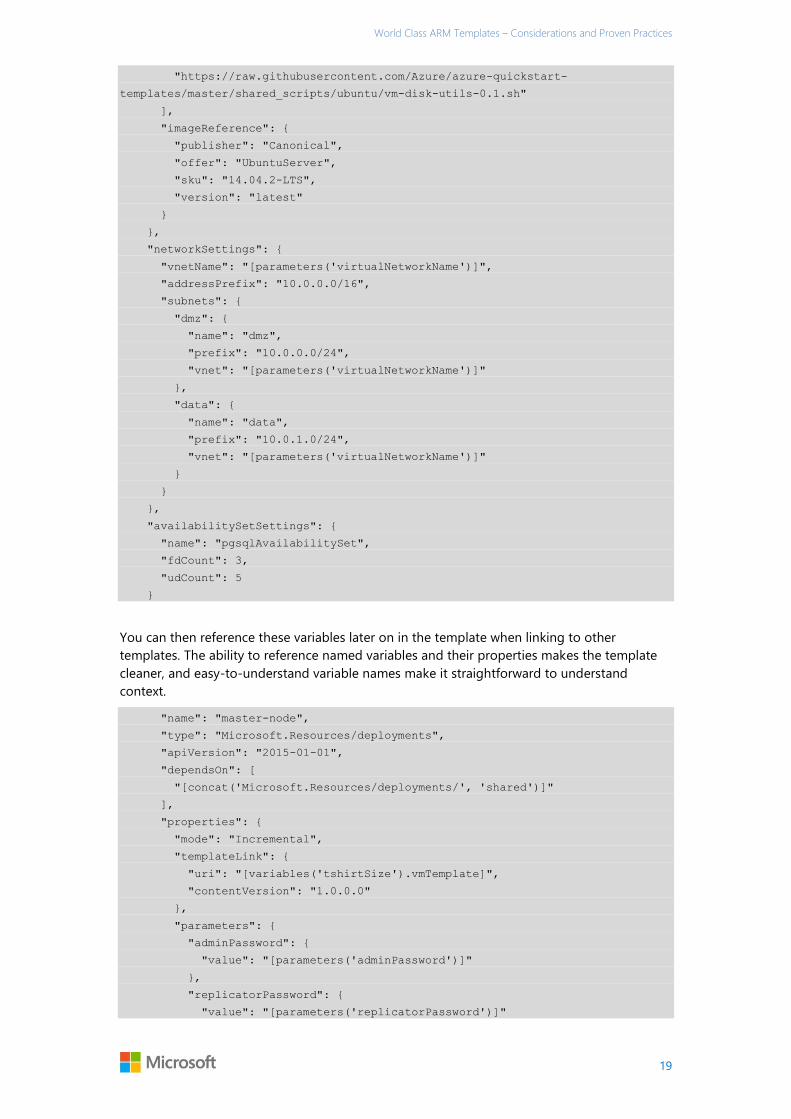
Complex objects as a means for sharing state
In addition to single value parameters or variables such as region or adminUserName, the
ARM Template Language supports complex objects.
In a decomposed template approach, you can use complex objects to implement and
reference collections of data for a specific area such as t-shirt size, network settings, operating
system (OS) settings, and availability settings.
Examples of complex objects for each of these areas can be found below.
"tshirtSizeLarge": {
"vmSize": "Standard_A4",
"diskSize": 1023,
"vmTemplate": "[concat(variables('templateBaseUrl'), 'database-16disk-
resources.json')]",
"vmCount": 3,
"slaveCount": 2,
"storage": {
"name": "[parameters('storageAccountNamePrefix')]",
"count": 2,
"pool": "db",
"map": [0,1,1],
"jumpbox": 0
}
},
"osSettings": {
"scripts": [
"[concat(variables('templateBaseUrl'), 'install_postgresql.sh')]",
World Class ARM Templates – Considerations and Proven Practices
19
"https://raw.githubusercontent.com/Azure/azure-quickstart-
templates/master/shared_scripts/ubuntu/vm-disk-utils-0.1.sh"
],
"imageReference": {
"publisher": "Canonical",
"offer": "UbuntuServer",
"sku": "14.04.2-LTS",
"version": "latest"
}
},
"networkSettings": {
"vnetName": "[parameters('virtualNetworkName')]",
"addressPrefix": "10.0.0.0/16",
"subnets": {
"dmz": {
"name": "dmz",
"prefix": "10.0.0.0/24",
"vnet": "[parameters('virtualNetworkName')]"
},
"data": {
"name": "data",
"prefix": "10.0.1.0/24",
"vnet": "[parameters('virtualNetworkName')]"
}
}
},
"availabilitySetSettings": {
"name": "pgsqlAvailabilitySet",
"fdCount": 3,
"udCount": 5
}
You can then reference these variables later on in the template when linking to other
templates. The ability to reference named variables and their properties makes the template
cleaner, and easy-to-understand variable names make it straightforward to understand
context.
"name": "master-node",
"type": "Microsoft.Resources/deployments",
"apiVersion": "2015-01-01",
"dependsOn": [
"[concat('Microsoft.Resources/deployments/', 'shared')]"
],
"properties": {
"mode": "Incremental",
"templateLink": {
"uri": "[variables('tshirtSize').vmTemplate]",
"contentVersion": "1.0.0.0"
},
"parameters": {
"adminPassword": {
"value": "[parameters('adminPassword')]"
},
"replicatorPassword": {
"value": "[parameters('replicatorPassword')]"
World Class ARM Templates – Considerations and Proven Practices
20
},
"osSettings": {
"value": "[variables('osSettings')]"
},
"subnet": {
"value": "[variables('networkSettings').subnets.data]"
},
"commonSettings": {
"value": {
"region": "[parameters('region')]",
"adminUsername": "[parameters('adminUsername')]",
"namespace": "ms"
}
},
"storageSettings": {
"value":"[variables('tshirtSize').storage]"
},
"machineSettings": {
"value": {
"vmSize": "[variables('tshirtSize').vmSize]",
"diskSize": "[variables('tshirtSize').diskSize]",
"vmCount": 1,
"availabilitySet": "[variables('availabilitySetSettings').name]"
}
},
"masterIpAddress": {
"value": "0"
},
"dbType": {
"value": "MASTER"
}
}
}
}
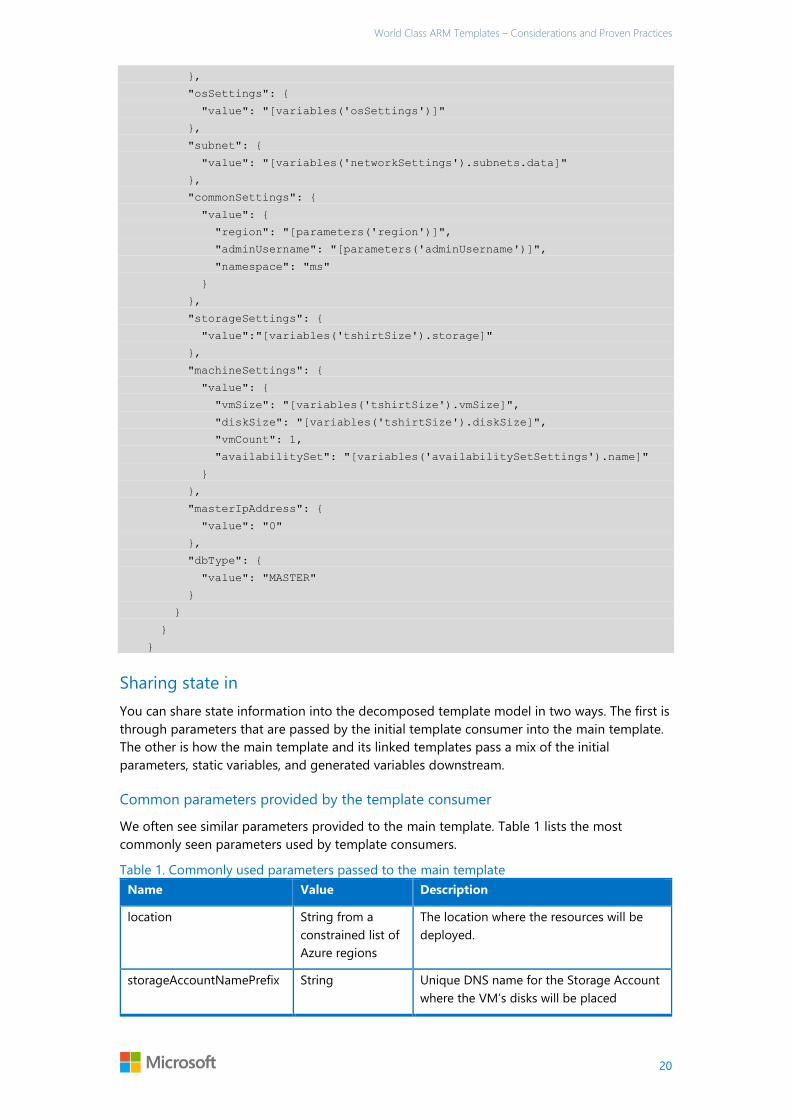
Sharing state in
You can share state information into the decomposed template model in two ways. The first is
through parameters that are passed by the initial template consumer into the main template.
The other is how the main template and its linked templates pass a mix of the initial
parameters, static variables, and generated variables downstream.
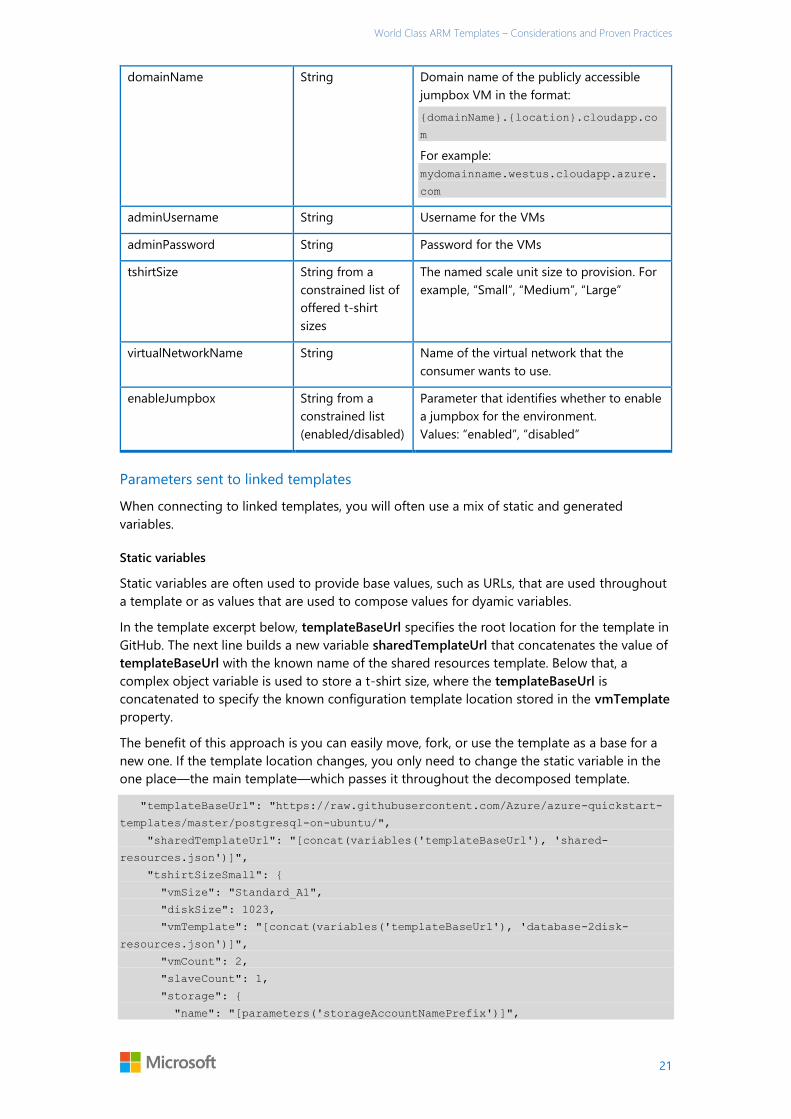
Common parameters provided by the template consumer
We often see similar parameters provided to the main template. Table 1 lists the most
commonly seen parameters used by template consumers.
Table 1. Commonly used parameters passed to the main template
Name Value Description
location String from a
constrained list of
Azure regions
The location where the resources will be
deployed.
storageAccountNamePrefix String Unique DNS name for the Storage Account
where the VM’s disks will be placed
World Class ARM Templates – Considerations and Proven Practices
21
domainName String Domain name of the publicly accessible
jumpbox VM in the format:
{domainName}.{location}.cloudapp.co
m
For example:
mydomainname.westus.cloudapp.azure.
com
adminUsername String Username for the VMs
adminPassword String Password for the VMs
tshirtSize String from a
constrained list of
offered t-shirt
sizes
The named scale unit size to provision. For
example, “Small”, “Medium”, “Large”
virtualNetworkName String Name of the virtual network that the
consumer wants to use.
enableJumpbox String from a
constrained list
(enabled/disabled)
Parameter that identifies whether to enable
a jumpbox for the environment.
Values: “enabled”, “disabled”
Parameters sent to linked templates
When connecting to linked templates, you will often use a mix of static and generated
variables.
Static variables
Static variables are often used to provide base values, such as URLs, that are used throughout
a template or as values that are used to compose values for dyamic variables.
In the template excerpt below, templateBaseUrl specifies the root location for the template in
GitHub. The next line builds a new variable sharedTemplateUrl that concatenates the value of
templateBaseUrl with the known name of the shared resources template. Below that, a
complex object variable is used to store a t-shirt size, where the templateBaseUrl is
concatenated to specify the known configuration template location stored in the vmTemplate
property.
The benefit of this approach is you can easily move, fork, or use the template as a base for a
new one. If the template location changes, you only need to change the static variable in the
one place—the main template—which passes it throughout the decomposed template.
"templateBaseUrl": "https://raw.githubusercontent.com/Azure/azure-quickstart-
templates/master/postgresql-on-ubuntu/",
"sharedTemplateUrl": "[concat(variables('templateBaseUrl'), 'shared-
resources.json')]",
"tshirtSizeSmall": {
"vmSize": "Standard_A1",
"diskSize": 1023,
"vmTemplate": "[concat(variables('templateBaseUrl'), 'database-2disk-
resources.json')]",
"vmCount": 2,
"slaveCount": 1,
"storage": {
"name": "[parameters('storageAccountNamePrefix')]",
World Class ARM Templates – Considerations and Proven Practices
22
"count": 1,
"pool": "db",
"map": [0,0],
"jumpbox": 0
}
Generated variables
In addition to static variables, a number of variables are generated dynamically. This section
identifies some of the common types of generated variables.
tshirtSize
When calling the main template (azuredeploy.json), you can select a t-shirt size from a
fixed number of options, which typically include values such as Small, Medium, and Large.
In the main template, this option appears in a parameter such as tshirtSize as shown:
"tshirtSize": {
"type": "string",
"defaultValue": "Small",
"allowedValues": [
"Small",
"Medium",
"Large"
],
"metadata": {
"Description": "T-shirt size of the MongoDB deployment"
}
}
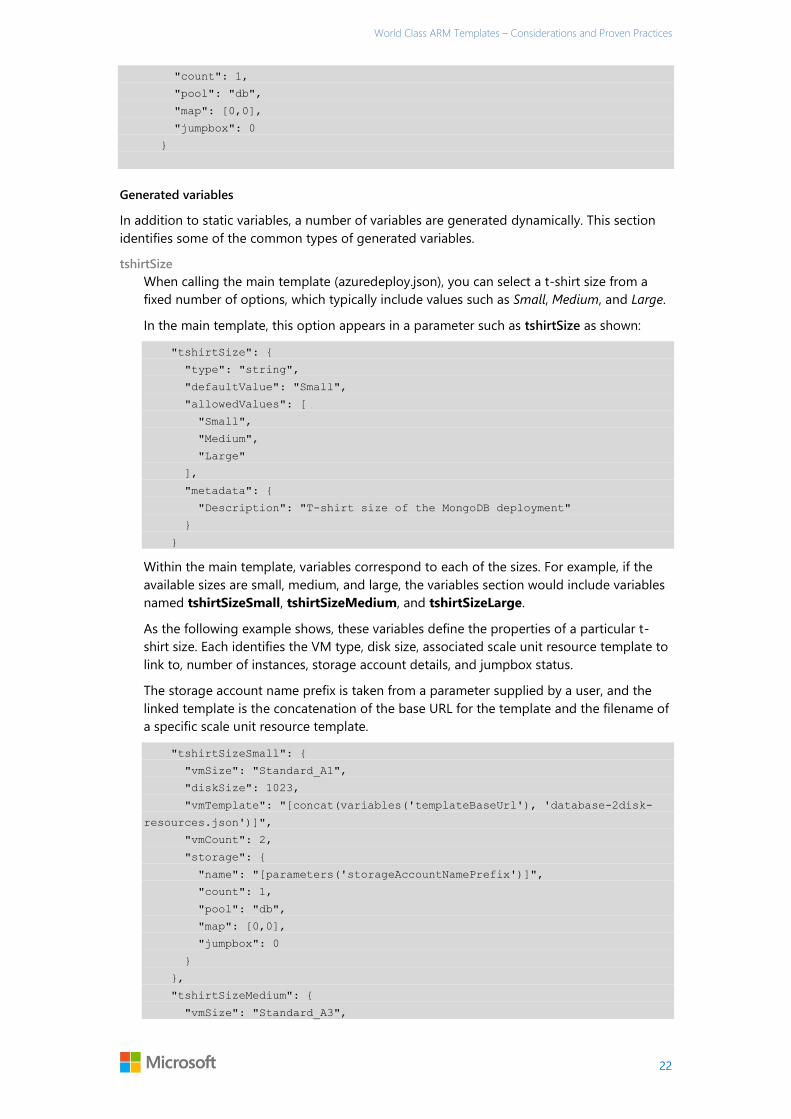
Within the main template, variables correspond to each of the sizes. For example, if the
available sizes are small, medium, and large, the variables section would include variables
named tshirtSizeSmall, tshirtSizeMedium, and tshirtSizeLarge.
As the following example shows, these variables define the properties of a particular t-
shirt size. Each identifies the VM type, disk size, associated scale unit resource template to
link to, number of instances, storage account details, and jumpbox status.
The storage account name prefix is taken from a parameter supplied by a user, and the
linked template is the concatenation of the base URL for the template and the filename of
a specific scale unit resource template.
"tshirtSizeSmall": {
"vmSize": "Standard_A1",
"diskSize": 1023,
"vmTemplate": "[concat(variables('templateBaseUrl'), 'database-2disk-
resources.json')]",
"vmCount": 2,
"storage": {
"name": "[parameters('storageAccountNamePrefix')]",
"count": 1,
"pool": "db",
"map": [0,0],
"jumpbox": 0
}
},
"tshirtSizeMedium": {
"vmSize": "Standard_A3",

World Class ARM Templates – Considerations and Proven Practices
23
"diskSize": 1023,
"vmTemplate": "[concat(variables('templateBaseUrl'), 'database-8disk-
resources.json')]",
"vmCount": 2,
"storage": {
"name": "[parameters('storageAccountNamePrefix')]",
"count": 2,
"pool": "db",
"map": [0,1],
"jumpbox": 0
}
},
"tshirtSizeLarge": {
"vmSize": "Standard_A4",
"diskSize": 1023,
"vmTemplate": "[concat(variables('templateBaseUrl'), 'database-16disk-
resources.json')]",
"vmCount": 3,
"storage": {
"name": "[parameters('storageAccountNamePrefix')]",
"count": 2,
"pool": "db",
"map": [0,1,1],
"jumpbox": 0
}
}
The tshirtSize variable appears further down in the variables section. The end of the t-
shirt size you provided (Small, Medium, Large) is concatenated with the text tshirtSize to
retrieve the associated complex object variable for that t-shirt size:
"tshirtSize": "[variables(concat('tshirtSize',
parameters('tshirtSize')))]",
This variable is passed to the linked scale unit resource template.
networkSettings
In a capacity, capability, or end to end scoped solution template, the linked templates
typically create resources that exist on a network. One straightforward approach is to use
a complex object to store network settings and pass them to linked templates.
An example of communicating network settings can be seen below.
"networkSettings": {
"vnetName": "[parameters('virtualNetworkName')]",
"addressPrefix": "10.0.0.0/16",
"subnets": {
"dmz": {
"name": "dmz",
"prefix": "10.0.0.0/24",
"vnet": "[parameters('virtualNetworkName')]"
},
"data": {
"name": "data",
"prefix": "10.0.1.0/24",
"vnet": "[parameters('virtualNetworkName')]"
World Class ARM Templates – Considerations and Proven Practices
24
}
}
}
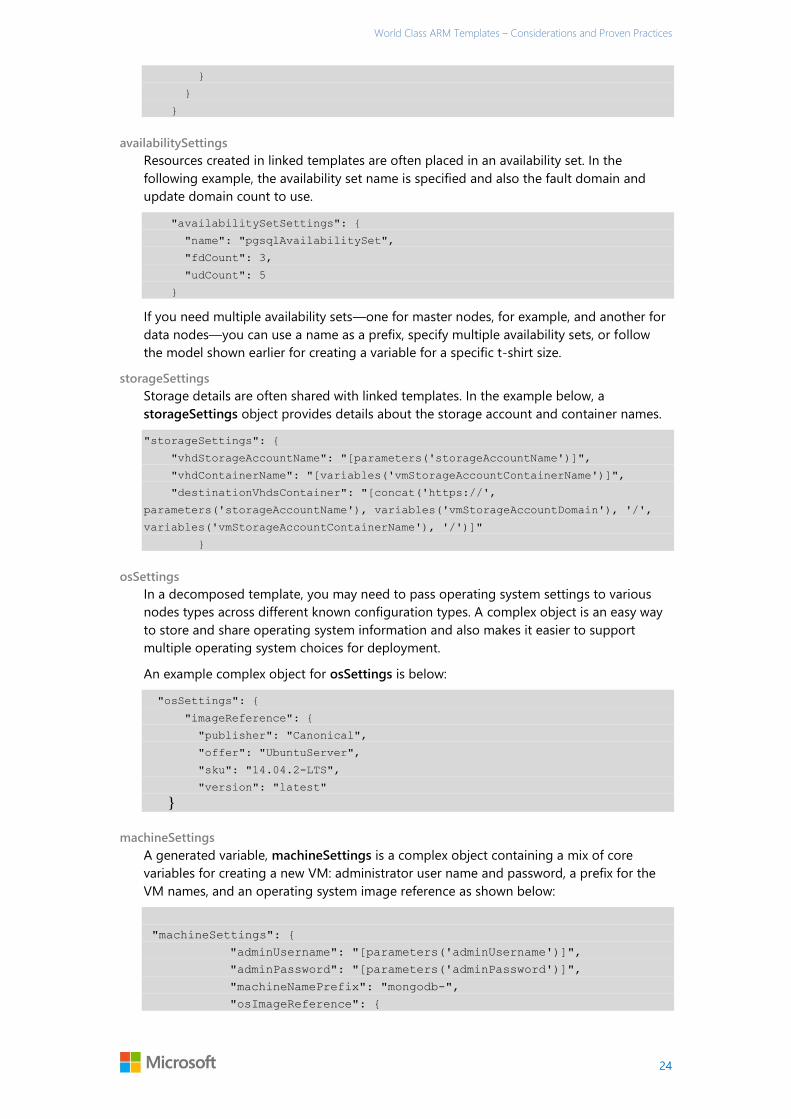
availabilitySettings
Resources created in linked templates are often placed in an availability set. In the
following example, the availability set name is specified and also the fault domain and
update domain count to use.
"availabilitySetSettings": {
"name": "pgsqlAvailabilitySet",
"fdCount": 3,
"udCount": 5
}
If you need multiple availability sets—one for master nodes, for example, and another for
data nodes—you can use a name as a prefix, specify multiple availability sets, or follow
the model shown earlier for creating a variable for a specific t-shirt size.
storageSettings
Storage details are often shared with linked templates. In the example below, a
storageSettings object provides details about the storage account and container names.
"storageSettings": {
"vhdStorageAccountName": "[parameters('storageAccountName')]",
"vhdContainerName": "[variables('vmStorageAccountContainerName')]",
"destinationVhdsContainer": "[concat('https://',
parameters('storageAccountName'), variables('vmStorageAccountDomain'), '/',
variables('vmStorageAccountContainerName'), '/')]"
}
osSettings
In a decomposed template, you may need to pass operating system settings to various
nodes types across different known configuration types. A complex object is an easy way
to store and share operating system information and also makes it easier to support
multiple operating system choices for deployment.
An example complex object for osSettings is below:
"osSettings": {
"imageReference": {
"publisher": "Canonical",
"offer": "UbuntuServer",
"sku": "14.04.2-LTS",
"version": "latest"
}
machineSettings
A generated variable, machineSettings is a complex object containing a mix of core
variables for creating a new VM: administrator user name and password, a prefix for the
VM names, and an operating system image reference as shown below:
"machineSettings": {
"adminUsername": "[parameters('adminUsername')]",
"adminPassword": "[parameters('adminPassword')]",
"machineNamePrefix": "mongodb-",
"osImageReference": {
World Class ARM Templates – Considerations and Proven Practices
25
"publisher":
"[variables('osFamilySpec').imagePublisher]",
"offer": "[variables('osFamilySpec').imageOffer]",
"sku": "[variables('osFamilySpec').imageSKU]",
"version": "latest"
}
},
Note that osImageReference retrieves the values from the osSettings variable defined in
the main template. That means you can easily change the operating system for a VM—
entirely or based on the preference of a template consumer.
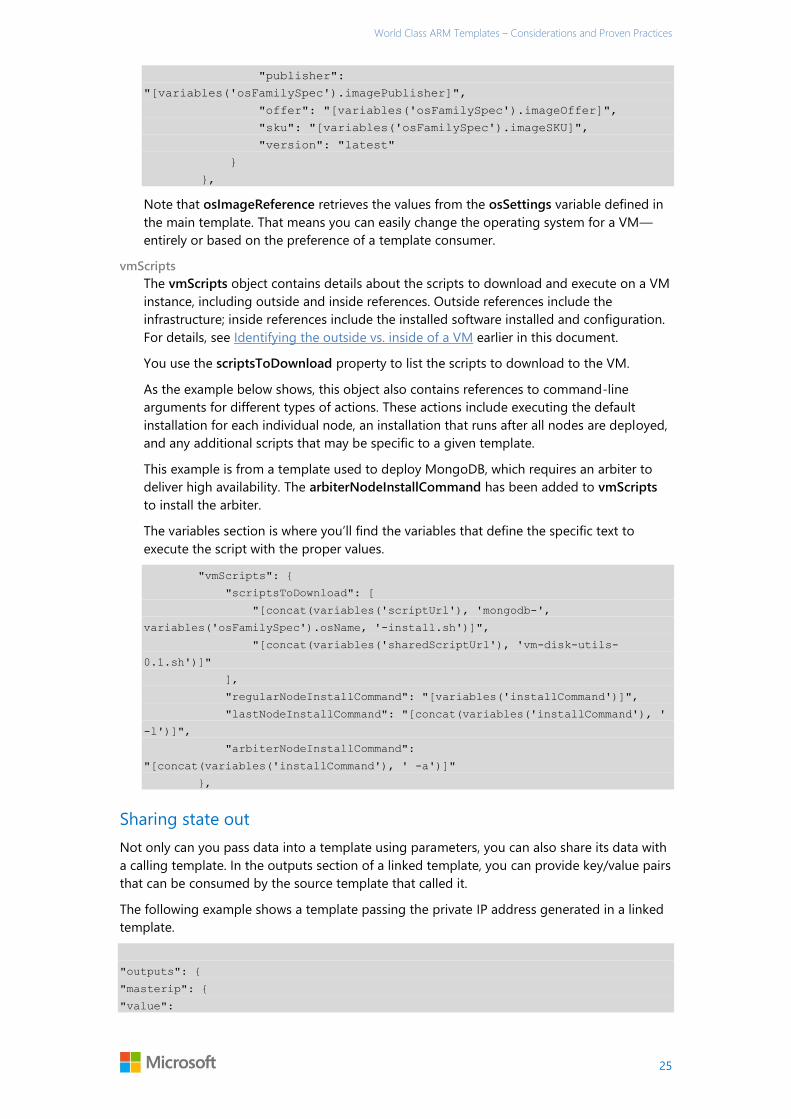
vmScripts
The vmScripts object contains details about the scripts to download and execute on a VM
instance, including outside and inside references. Outside references include the
infrastructure; inside references include the installed software installed and configuration.
For details, see Identifying the outside vs. inside of a VM earlier in this document.
You use the scriptsToDownload property to list the scripts to download to the VM.
As the example below shows, this object also contains references to command-line
arguments for different types of actions. These actions include executing the default
installation for each individual node, an installation that runs after all nodes are deployed,
and any additional scripts that may be specific to a given template.
This example is from a template used to deploy MongoDB, which requires an arbiter to
deliver high availability. The arbiterNodeInstallCommand has been added to vmScripts
to install the arbiter.
The variables section is where you’ll find the variables that define the specific text to
execute the script with the proper values.
"vmScripts": {
"scriptsToDownload": [
"[concat(variables('scriptUrl'), 'mongodb-',
variables('osFamilySpec').osName, '-install.sh')]",
"[concat(variables('sharedScriptUrl'), 'vm-disk-utils-
0.1.sh')]"
],
"regularNodeInstallCommand": "[variables('installCommand')]",
"lastNodeInstallCommand": "[concat(variables('installCommand'), '
-l')]",
"arbiterNodeInstallCommand":
"[concat(variables('installCommand'), ' -a')]"
},
Sharing state out
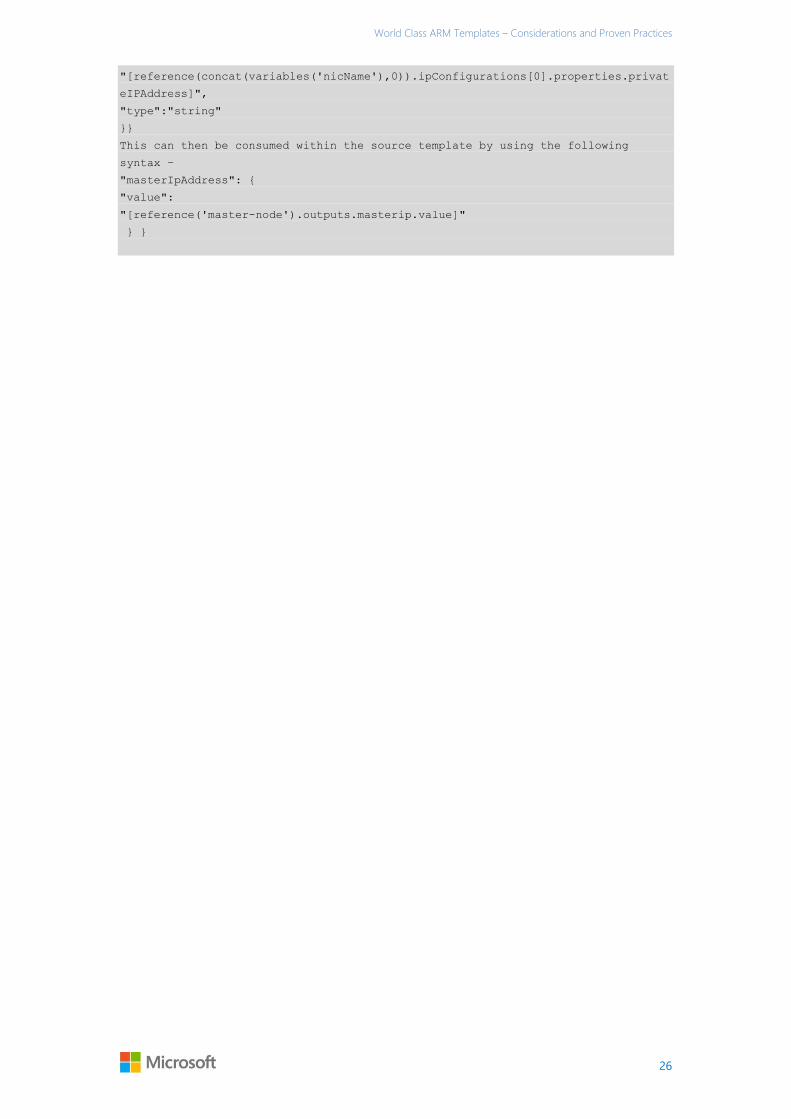
Not only can you pass data into a template using parameters, you can also share its data with
a calling template. In the outputs section of a linked template, you can provide key/value pairs
that can be consumed by the source template that called it.
The following example shows a template passing the private IP address generated in a linked
template.
"outputs": {
"masterip": {
"value":
World Class ARM Templates – Considerations and Proven Practices
26
"[reference(concat(variables('nicName'),0)).ipConfigurations[0].properties.privat
eIPAddress]",
"type":"string"
}}
This can then be consumed within the source template by using the following
syntax –
"masterIpAddress": {
"value":
"[reference('master-node').outputs.masterip.value]"
} }
World Class ARM Templates – Considerations and Proven Practices
27
Security Considerations
When looking at aspects of security for your templates, there are several areas to consider –
keys and secrets, role based access control, and network security groups.
Secrets and Certificates
Azure Virtual Machines, ARM and Azure Key Vault are fully integrated to provide support for
the secure handling of certs which are to be deployed in the VM. Utilizing Azure Key Vault
with ARM to orchestrate and store VM secrets and certificates is a best practice and provides
the following advantages:
The ARM templates only contain URI references to the secrets, which means the
actual secrets are not in code, config or source code repositories. This prevents key
phishing attacks on internal or external repos, such as harvest-bots in github.
Secrets stored in the Key Vault are under full RBAC control of a trusted operator. If
the trusted operator leaves the company or transfers within the company to a new
group, they no longer have access to the keys they created in the Vault.
Full compartmentalization of all assets: a) the templates to deploy the keys, b) the
templates to deploy a VM with references to the keys, and c) the actual key materials
in the Vault. Each template (and action) can be under different RBAC roles for full
separation of duties.
The loading of secrets into a VM at deployment time occurs via direct channel
between Azure Fabric and the Key Vault within the confines of the Microsoft
datacenter. Once the keys are in the Key Vault, they never see ‘daylight’ over an
untrusted channel outside of the datacenter.
Key Vaults are always regional, so the secrets always have locality (and sovereignty)
with the VMs. There are no global Key Vaults.
Separation of Keys from Deployments
A best practice is to maintain separate ARM templates for:
1. Creation of vaults (which will contain the key material)
2. Deployment of the VMs (with URI references to the keys contained in the vaults)
A typical enterprise scenario is to have a small group of Trusted Operators who have access
to critical secrets within the deployed workloads, with a broader group of dev/ops personnel
who can create or update VM deployments. Below is an example ARM template which
creates and configures a new vault in the context of the currently authenticated user’s
identity in Azure Active Directory. This user would have the default permission to create,
delete, list, update, backup, restore, and get the public half of keys in this new key vault.
While most of the fields in this template should be self-explanatory, the
enableVaultForDeployment setting deserves more background: vaults do not have any
default standing access by any other Azure infrastructure component. By setting this value, it
allows the Azure Compute infrastructure components read-only access to this specific named
vault. Therefore, a further best practice is to not comingle corporate sensitive data in the
same vault as virtual machine secrets.
{
"$schema": "https://schema.management.azure.com/schemas/2015-01-
01/deploymentTemplate.json#",
"contentVersion": "1.0.0.0",
"parameters": {
World Class ARM Templates – Considerations and Proven Practices
28
"keyVaultName": {
"type": "string",
"metadata": {
"description": "Name of the Vault"
}
},
"location": {
"type": "string",
"allowedValues": ["East US", "West US", "West Europe", "East Asia",
"South East Asia"],
"metadata": {
"description": "Location of the Vault"
}
},
"tenantId": {
"type": "string",
"metadata": {
"description": "Tenant Id of the subscription. Get using Get-
AzureSubscription cmdlet or Get Subscription API"
}
},
"objectId": {
"type": "string",
"metadata": {
"description": "Object Id of the AD user. Get using Get-
AzureADUser cmdlet"
}
},
"skuName": {
"type": "string",
"allowedValues": ["Standard", "Premium"],
"metadata": {
"description": "SKU for the vault"
}
},
"enableVaultForDeployment": {
"type": "bool",
"allowedValues": [true, false],
"metadata": {
"description": "Specifies if the vault is enabled for a VM
deployment"
}
}
},
"resources": [{
"type": "Microsoft.KeyVault/vaults",
"name": "[parameters('keyVaultName')]",
"apiVersion": "2014-12-19-preview",
"location": "[parameters('location')]",
"properties": {
"enabledForDeployment": "[parameters('enableVaultForDeployment')]",
"tenantid": "[parameters('tenantId')]",
"accessPolicies": [{
"tenantId": "[parameters('tenantId')]",
"objectId": "[parameters('objectId')]",
World Class ARM Templates – Considerations and Proven Practices
29
"permissions": {
"secrets": ["all"],
"keys": ["all"]
}
}],
"sku": {
"name": "[parameters('skuName')]",
"family": "A"
}
}
}]
}
Once the vault is created, the next step is to reference that vault in the deployment template
of a new VM. As mentioned above, a best practice is to have a different dev/ops group
manage VM deployments, with that group having no direct access to the keys as stored in the
vault.
The below template fragment would be composed into higher order deployment constructs,
each safely and securely referencing highly-sensitive secrets which are not under the direct
control of the operator.
"vaultName": {
"type": "string",
"metadata": {
"description": "Name of Key Vault that has a secret"
}
},
{
"apiVersion": "2015-05-01-preview",
"type": "Microsoft.Compute/virtualMachines",
"name": "[parameters('vmName')]",
"location": "[parameters('location')]",
"properties": {
"osProfile": {
"secrets": [{
"sourceVault": {
"id": "[resourceId('vaultrg',
'Microsoft.KeyVault/vaults', 'kayvault')]"
},
"vaultCertificates": [{
"certificateUrl": "[parameters('secretUrlWithVersion')]",
"certificateStore": "My"
}]
}]
}
}
Assigning access with RBAC in Azure
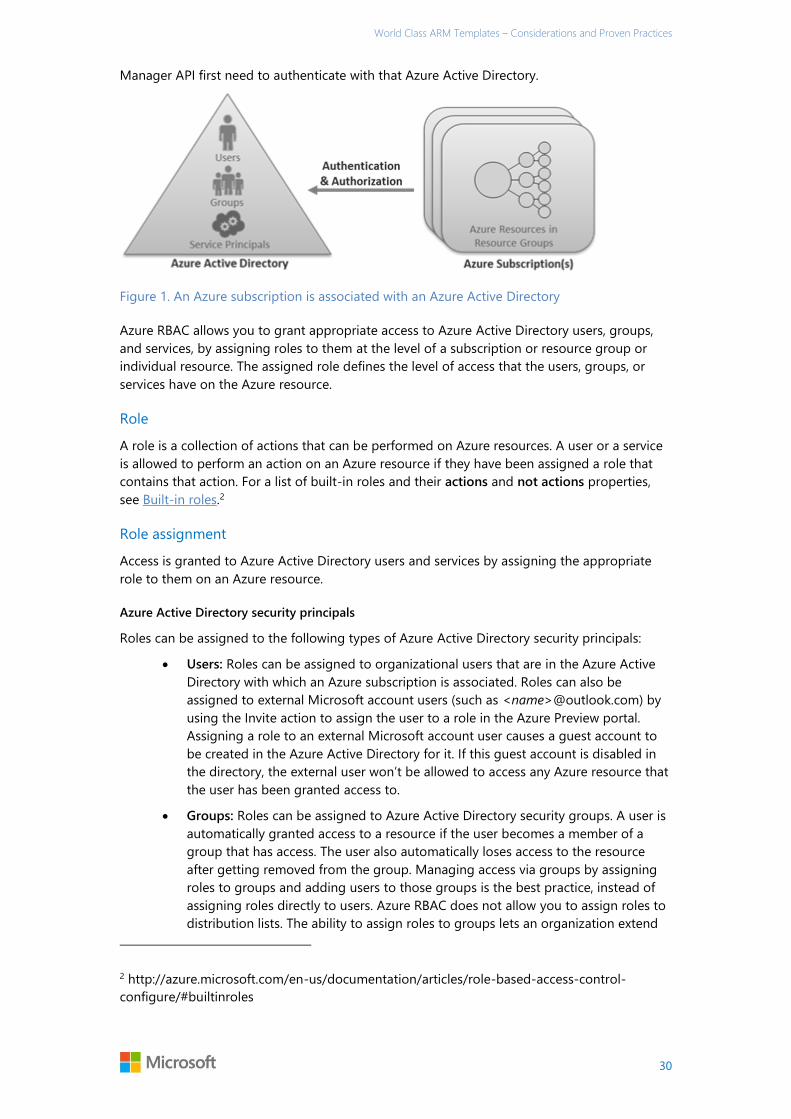
Every Azure subscription is associated with an Azure Active Directory. Users and services that
access resources of the subscription using Azure Management portal or Azure Resource
World Class ARM Templates – Considerations and Proven Practices
30
Manager API first need to authenticate with that Azure Active Directory.
Figure 1. An Azure subscription is associated with an Azure Active Directory
Azure RBAC allows you to grant appropriate access to Azure Active Directory users, groups,
and services, by assigning roles to them at the level of a subscription or resource group or
individual resource. The assigned role defines the level of access that the users, groups, or
services have on the Azure resource.
Role
A role is a collection of actions that can be performed on Azure resources. A user or a service
is allowed to perform an action on an Azure resource if they have been assigned a role that
contains that action. For a list of built-in roles and their actions and not actions properties,
see Built-in roles.2
Role assignment
Access is granted to Azure Active Directory users and services by assigning the appropriate
role to them on an Azure resource.
Azure Active Directory security principals
Roles can be assigned to the following types of Azure Active Directory security principals:
Users: Roles can be assigned to organizational users that are in the Azure Active
Directory with which an Azure subscription is associated. Roles can also be
assigned to external Microsoft account users (such as <name>@outlook.com) by
using the Invite action to assign the user to a role in the Azure Preview portal.
Assigning a role to an external Microsoft account user causes a guest account to
be created in the Azure Active Directory for it. If this guest account is disabled in
the directory, the external user won’t be allowed to access any Azure resource that
the user has been granted access to.
Groups: Roles can be assigned to Azure Active Directory security groups. A user is
automatically granted access to a resource if the user becomes a member of a
group that has access. The user also automatically loses access to the resource
after getting removed from the group. Managing access via groups by assigning
roles to groups and adding users to those groups is the best practice, instead of
assigning roles directly to users. Azure RBAC does not allow you to assign roles to
distribution lists. The ability to assign roles to groups lets an organization extend
2 http://azure.microsoft.com/en-us/documentation/articles/role-based-access-control-
configure/#builtinroles

World Class ARM Templates – Considerations and Proven Practices
31
its existing access control model from its on-premises directory to the cloud, so
security groups that are already established to control access on-premises can be
re-used to control access to resources in the Azure Preview portal. For more
information about different options for synchronizing users and groups from an
on-premises directory, see Directory integration.3 Azure Active Directory Premium
also offers a delegated group management feature4 with which the ability to
create and manage groups can be delegated to non-administrator users from
Azure Active Directory.
Service principals: Service identities are represented as service principals in the
directory. They authenticate with Azure Active Directory and communicate with
one another. Services can be granted access to Azure resources by assigning roles
via the Azure module for Windows PowerShell to the Azure Active Directory
service principal representing that service.
Resource scope
Access does not need to be granted to an entire subscription. Roles can also be assigned for
resource groups as well as for individual resources. In Azure RBAC, a resource inherits role
assignments from its parent resources. So if a user, group, or service is granted access to only
a resource group within a subscription, they will be able to access only that resource group
and resources within it, and not the other resources groups within the subscription. As
another example, a security group can be added to the Reader role for a resource group, but
be added to the Contributor role for a database within that resource group.
Figure 2. Role assignment scopes
Service Principals Unlock Multi-Organization Subscription Interactions
As identified in the previous section, service identities are represented by service principals in
Active Directory. Service principals will be at the center of enabling key scenarios for
Enterprise IT organizations, System Integrators, and Cloud Service Vendors.
Specifically, there will be use cases where one of these organizations will need to interact with
the subscription of one of their customers.
Your organization could provide an offering that will monitor a solution deployed in your
customers environment and subscription. In this case, you will need to get access to logs and
3 http://technet.microsoft.com/library/jj573653.aspx 4 http://msdn.microsoft.com/library/azure/dn641267.aspx
World Class ARM Templates – Considerations and Proven Practices
32
other data within a customers account so that you can utilize it in your monitoring solution.
If you’re a Corporate IT organization, a Systems Integrator, you may provide an offering to a
customer where you will deploy and manage a capability for them, such as a data analytics
platform, where the offering resides in the customers own subscription.
In these use cases your organization would require an identity that could be given access to
perform these actions within the context of a customer subscription.
These scenarios bring with them a certain set of considerations for your customer –
For security reasons, access may need to be scoped to certain types of actions, e.g.
read only access.
As deployed resources are provided at a cost, there may be similar constraints on
access required for financial reasons.
For security reasons, access may need to be scoped only to a specific resource
(storage accounts) or resources (resource group containing an environment or
solution)
As a relationship with a vendor may change, the customer will want to have the ability
to enable/disable access to SI or CSV
As actions against this account having billing implications, the customer desires
support for auditability and accountability for billing.
From a compliance perspective, the customer will want to be able to audit your
behavior within their environment
A combination of a service principal and RBAC can be used to address these requirements.
Additional detail on these scenarios in the contextual examples at the end of this document.
Understanding network security groups
Many scenarios will have requirements that specify how traffic to one or more VM instances in
your virtual network is controlled. You can use a network security group (NSG) to do this as
part of an ARM template deployment.
A network security group is a top-level object that is associated with your subscription. An
NSG contains access control rules that allow or deny traffic to VM instances. The rules of an
NSG can be changed at any time, and changes are applied to all associated instances. To use
an NSG, you must have a virtual network that is associated with a region (location). NSGs are
not compatible with virtual networks that are associated with an affinity group. If you don’t
have a regional virtual network and you want to control traffic to your endpoints, please see
About Network Access Control Lists (ACLs).5
You can associate an NSG with a VM, or to a subnet within a virtual network. When associated
with a VM, the NSG applies to all the traffic that is sent and received by the VM instance.
When applied to a subnet within your virtual network, it applies to all the traffic that is sent
and received by all the VM instances in the subnet. A VM or subnet can be associated with
only 1 NSG, but each NSG can contain up to 200 rules. You can have 100 NSGs per
subscription.
NOTE Endpoint-based ACLs and network security groups are not supported on the
same VM instance. If you want to use an NSG and have an endpoint ACL already in
5 https://msdn.microsoft.com/en-us/library/azure/dn376541.aspx
World Class ARM Templates – Considerations and Proven Practices
33
place, first remove the endpoint ACL. For information about how to do this, see
Managing Access Control Lists (ACLs) for Endpoints by using PowerShell.6
How NSGs work
Network security groups are different than endpoint-based ACLs. Endpoint ACLs work only on
the public port that is exposed through the Input endpoint. An NSG works on one or more
VM instances and controls all the traffic that is inbound and outbound on the VM.
A network security group has a Name, is associated with a Region (one of the supported
Azure locations), and has a descriptive label. It contains two types of rules, Inbound and
Outbound. The Inbound rules are applied on the incoming packets to a VM and the
Outbound rules are applied to the outgoing packets from the VM. The rules are applied at the
server machine where the VM is located. An incoming or outgoing packet must match an
Allow rule to be permitted; otherwise, it’s dropped.
Rules are processed in the order of priority. For example, a rule with a lower priority number
such as 100 is processed before rules with a higher priority numbers such as 200. Once a
match is found, no more rules are processed.
A rule specifies the following:
Name: A unique identifier for the rule
Type: Inbound/Outbound
Priority: An integer between 100 and 4096
Source IP Address: CIDR of source IP range
Source Port Range: An integer or range between 0 and 65536
Destination IP Range: CIDR of the destination IP Range
Destination Port Range: An integer or range between 0 and 65536
Protocol: TCP, UDP or ‘*’
Access: Allow/Deny
Default rules
An NSG contains default rules. The default rules can’t be deleted, but because they are
assigned the lowest priority, they can be overridden by the rules that you create. The default
rules describe the default settings recommended by the platform. As illustrated by the default
rules below, traffic originating and ending in a virtual network is allowed both in Inbound and
Outbound directions.
While connectivity to the Internet is allowed for Outbound direction, it is by default blocked
for Inbound direction. A default rule allows the Azure load balancer to probe the health of a
VM. You can override this rule if the VM or set of VMs under the NSG does not participate in
the load balanced set.
The default rules are shown in Tables 1 and 2.
6 https://msdn.microsoft.com/en-us/library/azure/dn376543.aspx
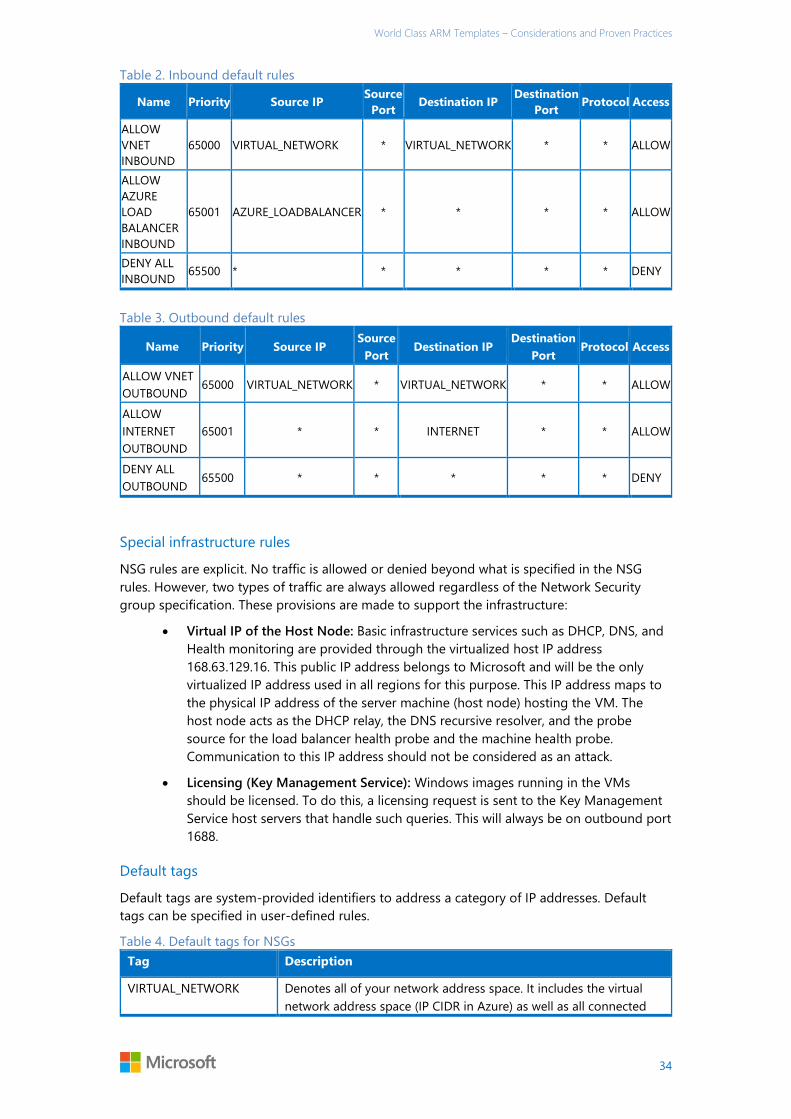
World Class ARM Templates – Considerations and Proven Practices
34
Table 2. Inbound default rules
Name Priority Source IP Source
Port Destination IP
Destination
Port Protocol Access
ALLOW
VNET
INBOUND
65000 VIRTUAL_NETWORK * VIRTUAL_NETWORK * * ALLOW
ALLOW
AZURE
LOAD
BALANCER
INBOUND
65001 AZURE_LOADBALANCER * * * * ALLOW
DENY ALL
INBOUND 65500 * * * * * DENY
Table 3. Outbound default rules
Name Priority Source IP Source
Port Destination IP
Destination
Port Protocol Access
ALLOW VNET
OUTBOUND 65000 VIRTUAL_NETWORK * VIRTUAL_NETWORK * * ALLOW
ALLOW
INTERNET
OUTBOUND
65001 * * INTERNET * * ALLOW
DENY ALL
OUTBOUND 65500 * * * * * DENY
Special infrastructure rules
NSG rules are explicit. No traffic is allowed or denied beyond what is specified in the NSG
rules. However, two types of traffic are always allowed regardless of the Network Security
group specification. These provisions are made to support the infrastructure:
Virtual IP of the Host Node: Basic infrastructure services such as DHCP, DNS, and
Health monitoring are provided through the virtualized host IP address
168.63.129.16. This public IP address belongs to Microsoft and will be the only
virtualized IP address used in all regions for this purpose. This IP address maps to
the physical IP address of the server machine (host node) hosting the VM. The
host node acts as the DHCP relay, the DNS recursive resolver, and the probe
source for the load balancer health probe and the machine health probe.
Communication to this IP address should not be considered as an attack.
Licensing (Key Management Service): Windows images running in the VMs
should be licensed. To do this, a licensing request is sent to the Key Management
Service host servers that handle such queries. This will always be on outbound port
1688.
Default tags
Default tags are system-provided identifiers to address a category of IP addresses. Default
tags can be specified in user-defined rules.
Table 4. Default tags for NSGs
Tag Description
VIRTUAL_NETWORK Denotes all of your network address space. It includes the virtual
network address space (IP CIDR in Azure) as well as all connected
World Class ARM Templates – Considerations and Proven Practices
35
on-premises address space (Local Networks). This also includes
virtual network-to-virtual network address spaces.
AZURE_LOADBALANCER Denotes the Azure Infrastructure load balancer and will translate to
an Azure datacenter IP where Azure’s health probes will originate.
This is needed only if the VM or set of VMs associated with the NSG
is participating in a load balanced set.
INTERNET Denotes the IP address space that is outside the virtual network and
can be reached by public Internet. This range includes Azure-owned
public IP space as well.
Ports and port ranges
NSG rules can be specified on a single source or destination port, or on a port range. This
approach is particularly useful when you want to open a wide range of ports for an
application, such as FTP. The range must be sequential and can’t be mixed with individual port
specifications.
To specify a range of ports, use the hyphen (–) character. For example, 100-500.
ICMP traffic
With the current NSG rules, you can specify TCP or UDP as protocols but not ICMP. However,
ICMP traffic is allowed within a virtual network by default through the Inbound rules that
support traffic from and to any port and protocol (*) within the virtual network.
Associating an NSG with a VM
When an NSG is directly associated with a VM, the network access rules in the NSG are
directly applied to all traffic that is destined to the VM. Whenever the NSG is updated for rule
changes, the traffic handling reflects the updates within minutes. When the NSG is
disassociated from the VM, the state reverts to its pre-NSG condition—that is, to the system
defaults before the NSG was introduced.
Associating an NSG with a subnet
When an NSG is associated with a subnet, the network access rules in the NSG are applied to
all the VMs in the subnet. Whenever the access rules in the NSG are updated, the changes are
applied to all VMs in the subnet within minutes.
Associating an NSG with a subnet and a VM
You can associate one NSG with a VM and another NSG with the subnet where the VM
resides. This scenario is supported to provide the VM with two layers of protection. On the
inbound traffic, the packet follows the access rules specified in the subnet, followed by rules in
the VM. When outbound, the packet follows the rules specified in the VM first, then follows
the rules specified in the subnet as Figure 3 shows.
World Class ARM Templates – Considerations and Proven Practices
36
Figure 3. Associating an NSG to a subnet and a VM
When an NSG is associated with a VM or subnet, the network access control rules become
very explicit. The platform will not insert any implicit rule to allow traffic to a particular port. In
this case, if you create an endpoint in the VM, you must also create a rule to allow traffic from
the Internet. If you don’t do this, the VIP:<Port> can’t be accessed from outside.
For example, you can create a new VM and a new NSG. You associate the NSG with the VM.
The VM can communicate with other VMs in the virtual network through the ALLOW VNET
INBOUND rule. The VM can also make outbound connections to the Internet using the
ALLOW INTERNET OUTBOUND rule. Later, you create an endpoint on port 80 to receive traffic
to your website running in the VM. Packets destined to port 80 on the VIP (public Virtual IP
address) from the Internet will not reach the VM until you add a rule similar to the following
(Table 4) to the NSG.
Table 5. Explicit rule allowing traffic to a particular port
Name Priority Source IP
Source
Port
Destination
IP
Destination
Port Protocol Access
WEB 100 INTERNET * * 80 TCP ALLOW
World Class ARM Templates – Considerations and Proven Practices
37
User Defined Routes
Azure uses a route table to decide how to forward IP traffic based on the destination of each
packet. Although Azure provides a default route table based on your virtual network settings,
you may need to add custom routes to that table.
The most common need for a custom entry in the route table is the use of a virtual appliance
in your Azure environment. Take into account the scenario shown in the Figure below.
Suppose you want to ensure that all traffic directed to the mid-tier and backed subnets
initiated from the front end subnet go through a virtual firewall appliance. Simply adding the
appliance to your virtual network and connecting it to the different subnets will not provide
this functionality. You must also change the routing table applied to your subnet to ensure
packets are forwarded to the virtual firewall appliance.
The same would be true if you implemented a virtual NAT appliance to control traffic between
your Azure virtual network and the Internet. To ensure the virtual appliance is used you have
to create a route specifying that all traffic destined to the Internet must be forwarded to the
virtual appliance.
Routing
Packets are routed over a TCP/IP network based on a route table defined at each node on
the physical network. A route table is a collection of individual routes used to decide
where to forward packets based on the destination IP address. A route consists of the
following:
Address Prefix. The destination CIDR to which the route applies, such as
10.1.0.0/16.
Next hop type. The type of Azure hop the packet should be sent to. Possible
values are:
o Local. Represents the local virtual network. For instance, if you have two subnets,
10.1.0.0/16 and 10.2.0.0/16 in the same virtual network, the route for each subnet
in the route table will have a next hop value of Local.
o VPN Gateway. Represents an Azure S2S VPN Gateway.
o Internet. Represents the default Internet gateway provided by the Azure
Infrastructure
o Virtual Appliance. Represents a virtual appliance you added to your Azure virtual
network.
o NULL. Represents a black hole. Packets forwarded to a black hole will not be
forwarded at all.
Nexthop Value. The next hop value contains the IP address packets should be
forwarded to. Next hop values are only allowed in routes where the next hop type
is Virtual Appliance.
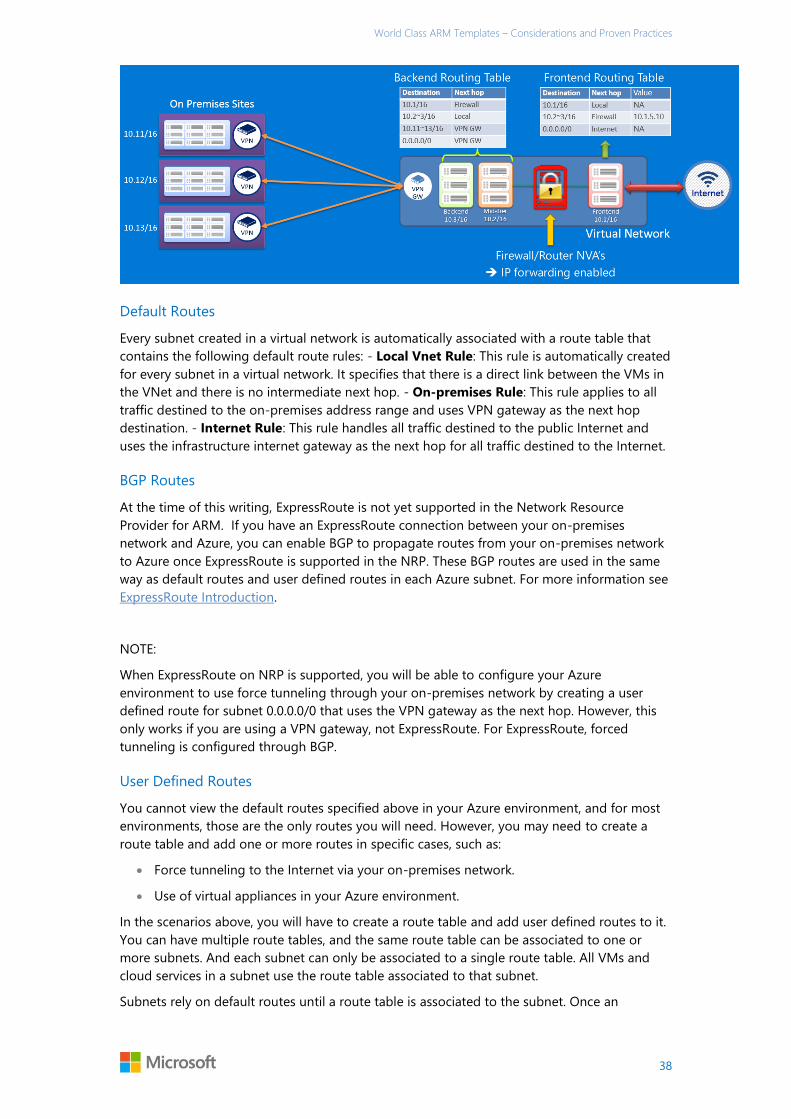
World Class ARM Templates – Considerations and Proven Practices
38
Default Routes
Every subnet created in a virtual network is automatically associated with a route table that
contains the following default route rules: - Local Vnet Rule: This rule is automatically created
for every subnet in a virtual network. It specifies that there is a direct link between the VMs in
the VNet and there is no intermediate next hop. - On-premises Rule: This rule applies to all
traffic destined to the on-premises address range and uses VPN gateway as the next hop
destination. - Internet Rule: This rule handles all traffic destined to the public Internet and
uses the infrastructure internet gateway as the next hop for all traffic destined to the Internet.
BGP Routes
At the time of this writing, ExpressRoute is not yet supported in the Network Resource
Provider for ARM. If you have an ExpressRoute connection between your on-premises
network and Azure, you can enable BGP to propagate routes from your on-premises network
to Azure once ExpressRoute is supported in the NRP. These BGP routes are used in the same
way as default routes and user defined routes in each Azure subnet. For more information see
ExpressRoute Introduction.
NOTE:
When ExpressRoute on NRP is supported, you will be able to configure your Azure
environment to use force tunneling through your on-premises network by creating a user
defined route for subnet 0.0.0.0/0 that uses the VPN gateway as the next hop. However, this
only works if you are using a VPN gateway, not ExpressRoute. For ExpressRoute, forced
tunneling is configured through BGP.
User Defined Routes
You cannot view the default routes specified above in your Azure environment, and for most
environments, those are the only routes you will need. However, you may need to create a
route table and add one or more routes in specific cases, such as:
Force tunneling to the Internet via your on-premises network.
Use of virtual appliances in your Azure environment.
In the scenarios above, you will have to create a route table and add user defined routes to it.
You can have multiple route tables, and the same route table can be associated to one or
more subnets. And each subnet can only be associated to a single route table. All VMs and
cloud services in a subnet use the route table associated to that subnet.
Subnets rely on default routes until a route table is associated to the subnet. Once an

World Class ARM Templates – Considerations and Proven Practices
39
association exists, routing is done based on Longest Prefix Match (LPM) among both user
defined routes and default routes. If there is more than one route with the same LPM match
then a route is selected based on its origin in the following order:
1. User defined route
2. BGP route (when ExpressRoute is used)
3. Default route
NOTE:
User defined routes are only applied to Azure VMs and cloud services. For instance, if you
want to add a firewall virtual appliance between your on-premises network and Azure, you will
have to create a user defined route for your Azure route tables that forward all traffic going to
the on-premises address space to the virtual appliance. However, incoming traffic from the
on-premises address space will flow through your VPN gateway or ExpressRoute circuit
straight to the Azure environment, bypassing the virtual appliance.
IP Forwarding
As describe above, one of the main reasons to create a user defined route is to forward traffic
to a virtual appliance. A virtual appliance is nothing more than a VM that runs an application
used to handle network traffic in some way, such as a firewall or a NAT device.
This virtual appliance VM must be able to receive incoming traffic that is not addressed to
itself. To allow a VM to receive traffic addressed to other destinations, you must enable IP
Forwarding in the VM.
The template decomposition approach
Based on the customer template consumption scenarios, requirements identified at the start
of this document, and our hands-on experience creating numerous templates, we identified a
pattern for template decomposition.
Capacity and Capability Scoped Solution Templates
Decomposition provides a modular approach to template development that supports reuse,
extensibility, testing, and tooling. This section provides detail on how a decomposition
approach can be applied to templates with a Capacity or Capability scope.
In this approach, a main template receives parameter values from a template consumer, then
links to several types of templates and scripts downstream as Figure 4 shows. Parameters,
static variables, and generated variables are used to provide values in and out of the linked
templates.
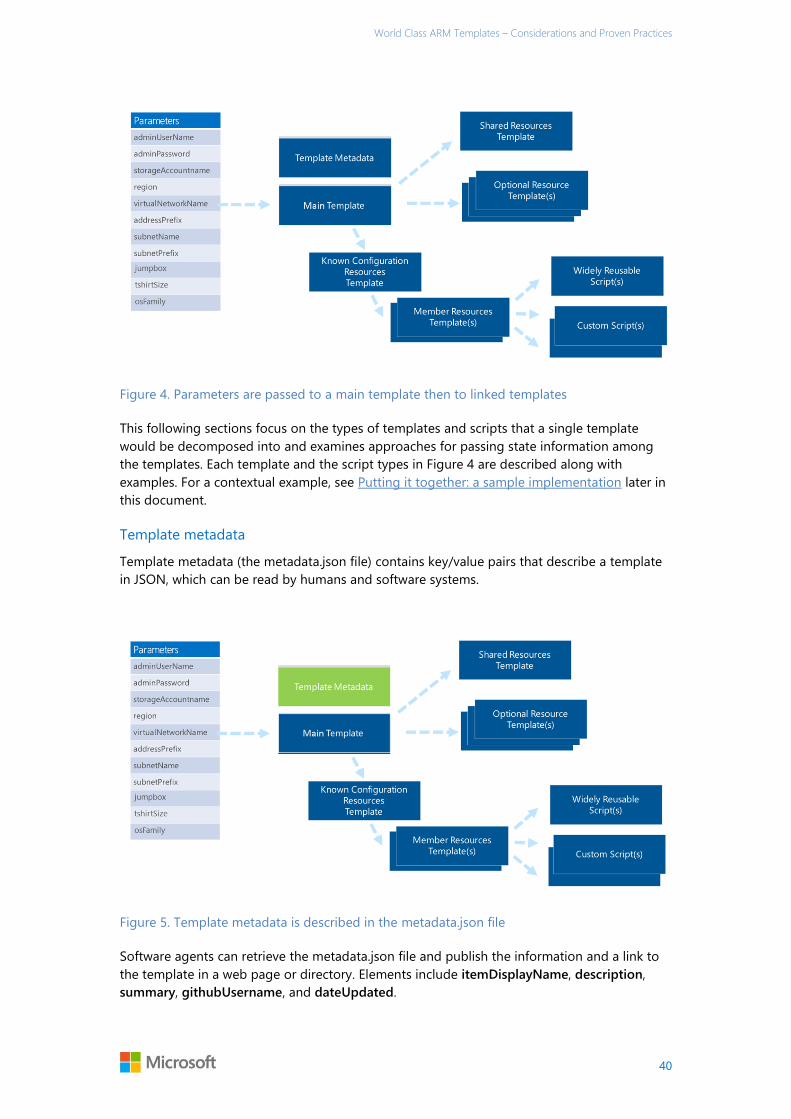
World Class ARM Templates – Considerations and Proven Practices
40
Figure 4. Parameters are passed to a main template then to linked templates
This following sections focus on the types of templates and scripts that a single template
would be decomposed into and examines approaches for passing state information among
the templates. Each template and the script types in Figure 4 are described along with
examples. For a contextual example, see Putting it together: a sample implementation later in
this document.
Template metadata
Template metadata (the metadata.json file) contains key/value pairs that describe a template
in JSON, which can be read by humans and software systems.
Figure 5. Template metadata is described in the metadata.json file
Software agents can retrieve the metadata.json file and publish the information and a link to
the template in a web page or directory. Elements include itemDisplayName, description,
summary, githubUsername, and dateUpdated.
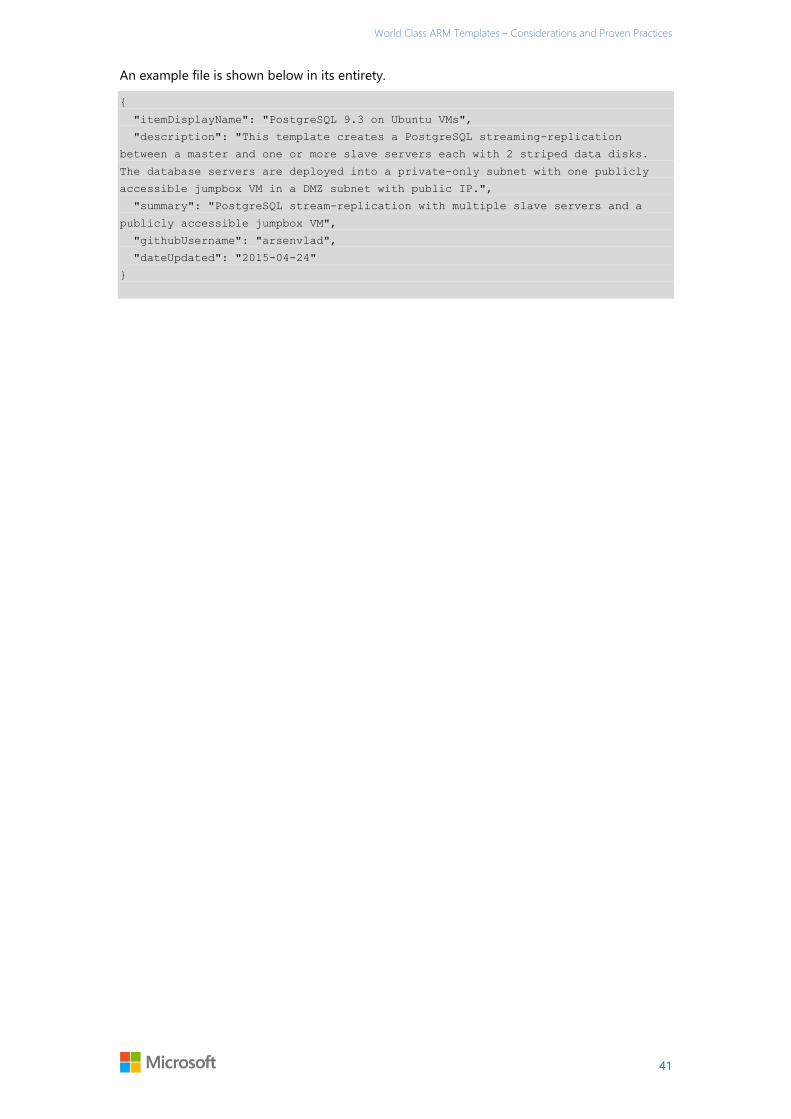
World Class ARM Templates – Considerations and Proven Practices
41
An example file is shown below in its entirety.
{
"itemDisplayName": "PostgreSQL 9.3 on Ubuntu VMs",
"description": "This template creates a PostgreSQL streaming-replication
between a master and one or more slave servers each with 2 striped data disks.
The database servers are deployed into a private-only subnet with one publicly
accessible jumpbox VM in a DMZ subnet with public IP.",
"summary": "PostgreSQL stream-replication with multiple slave servers and a
publicly accessible jumpbox VM",
"githubUsername": "arsenvlad",
"dateUpdated": "2015-04-24"
}

World Class ARM Templates – Considerations and Proven Practices
42
Main template
The main template (the azuredeploy.json file) is called by an end user and is the template
through which a set of user-defined parameters are presented.
Figure 6. The main template receives parameters from a user
The role of this template is to receive parameters from a user, use that information to
populate a set of complex object variables, then execute the appropriate set of related
templates using template linking.
One parameters that is provided is a known configuration type also known as the t-shirt size
parameter because of its standardized values such as small, medium, or large. In practice you
can use this parameter in multiple ways. For details, see Known configuration resources
template later in this document.
Some resources are deployed regardless of the known configuration specified by a user
parameter. These resources are provisioned using a single shared resource template and are
shared by other templates, so the shared resource template is run first.
Some resources are deployed optionally regardless of the specified known configuration.
Shared resources template
This template delivers resources that are common across all known configurations. It contains
the virtual network, availability sets, and other resources that are required regardless of the
known configuration template that is deployed.
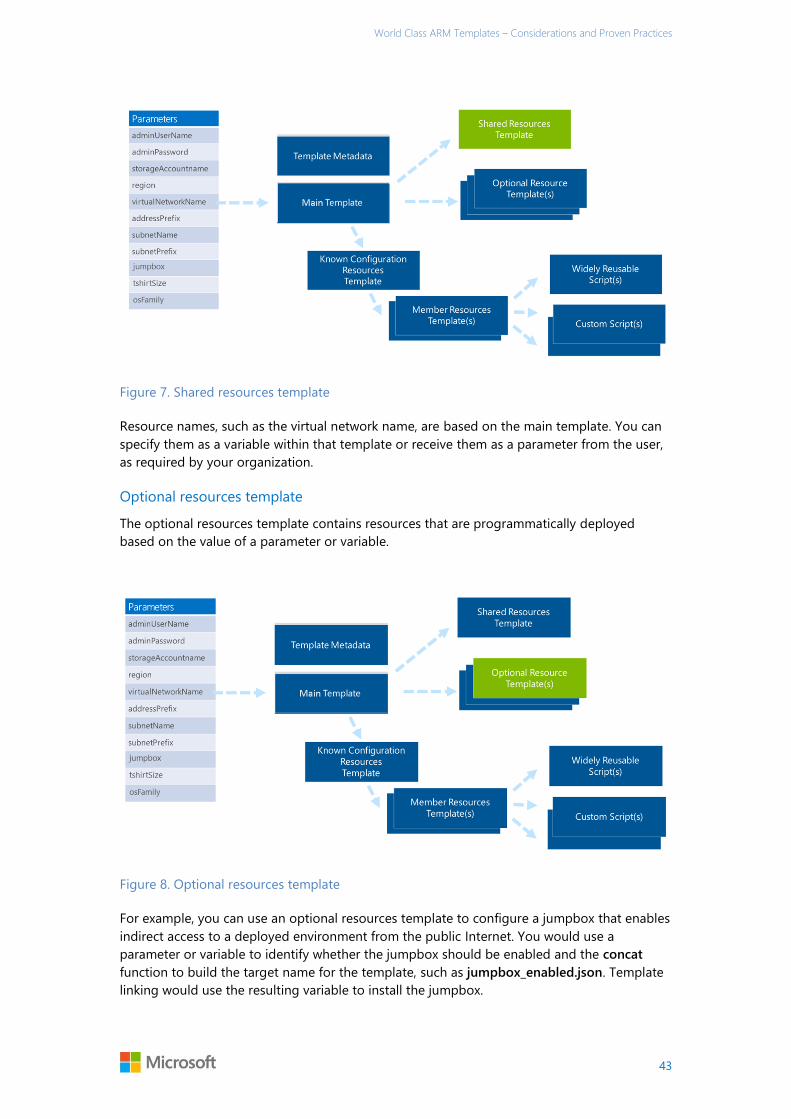
World Class ARM Templates – Considerations and Proven Practices
43
Figure 7. Shared resources template
Resource names, such as the virtual network name, are based on the main template. You can
specify them as a variable within that template or receive them as a parameter from the user,
as required by your organization.
Optional resources template
The optional resources template contains resources that are programmatically deployed
based on the value of a parameter or variable.
Figure 8. Optional resources template
For example, you can use an optional resources template to configure a jumpbox that enables
indirect access to a deployed environment from the public Internet. You would use a
parameter or variable to identify whether the jumpbox should be enabled and the concat
function to build the target name for the template, such as jumpbox_enabled.json. Template
linking would use the resulting variable to install the jumpbox.

World Class ARM Templates – Considerations and Proven Practices
44
You can link the optional resources template from multiple places:
When applicable to every deployment, create a parameter-driven link from the
shared resources template.
When applicable to select known configurations—for example, only install on
large deployments—create a parameter-driven or variable-driven link from the
known configuration template.
Whether a given resource is optional may not be driven by the template consumer but
instead by the template provider. For example, you may need to satisfy a particular product
requirement or product add-on (common for CSVs) or to enforce policies (common for SIs
and enterprise IT groups). In these cases, you can use a variable to identify whether the
resource should be deployed.
Known configuration resources template
In the main template, a parameter can be exposed to allow the template consumer to specify
a desired known configuration to deploy. In many cases, this known configuration uses a t-
shirt size approach with a set of fixed configuration sizes such as sandbox, small, medium, and
large.
Figure 9. Known configuration resources template
The t-shirt size approach is commonly used, but the parameters can represent any set of
known configurations. For example, you can specify a set of environments for an enterprise
application such as Development, Test, and Product. Or you could use it for a cloud service to
represent different scale units, product versions, or product configurations such as
Community, Developer, or Enterprise.
As with the shared resource template, variables are passed to the known configurations
template from either:
An end user—that is, the parameters sent to the main template.
An organization—that is, the variables in the main template that represent internal
requirements or policies.

World Class ARM Templates – Considerations and Proven Practices
45
Member resources template
Within a known configuration, one or more member node types are often included. For
example, with Hadoop you would have master nodes and data nodes. If you are installing
MongoDB, you would have data nodes and an arbiter. If you are deploying DataStax, you
would have data nodes as well as a VM with OpsCenter installed.
Figure 10. Member resources template
Each type of nodes can have different sizes of VMs, numbers of attached disks, scripts to
install and set up the nodes, port configurations for the VM(s), number of instances, and other
details. So each node type gets its own member resource template, which contains the details
for deploying and configuring an infrastructure as well as executing scripts to deploy and
configure software within the VM.
For VMs, typically two types of scripts are used, widely reusable and custom scripts.
Widely reusable scripts
Widely reusable scripts can be used across multiple types of templates. One of the better
examples of these widely reusable scripts sets up RAID on Linux to pool disks and gain a
greater number of IOPS. Regardless of the software being installed in the VM, this script
provides reuse of proven practices for common scenarios.
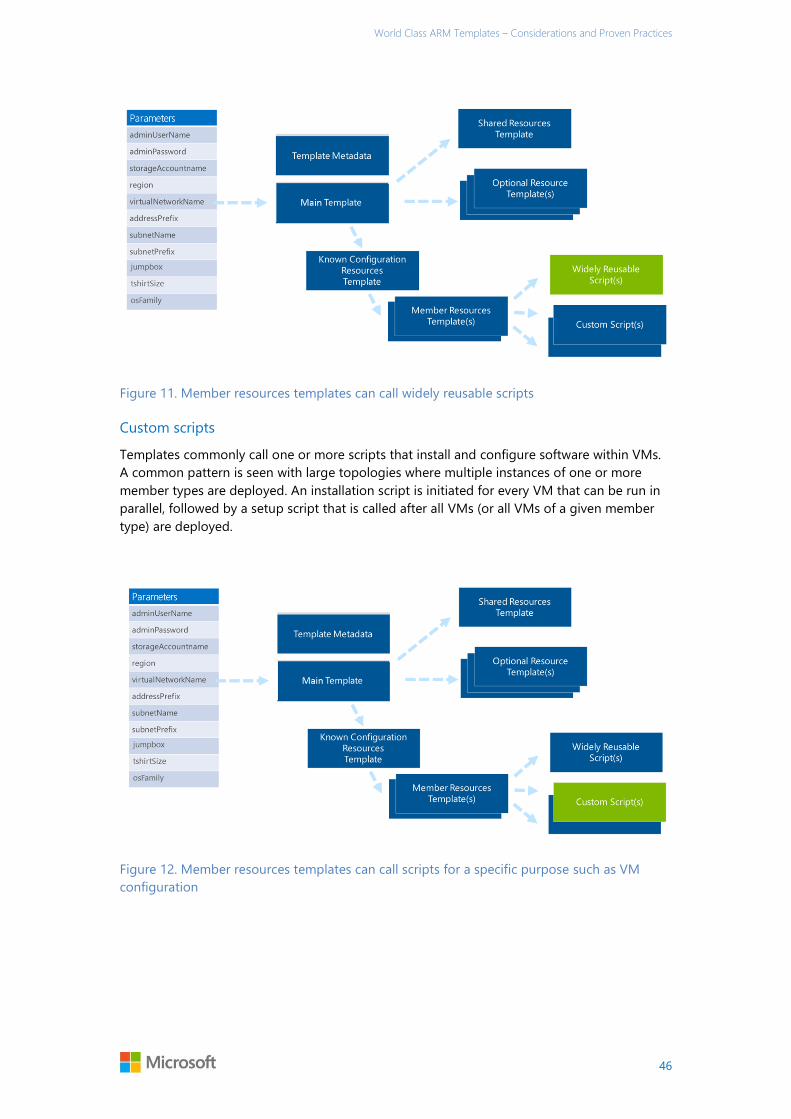
World Class ARM Templates – Considerations and Proven Practices
46
Figure 11. Member resources templates can call widely reusable scripts
Custom scripts
Templates commonly call one or more scripts that install and configure software within VMs.
A common pattern is seen with large topologies where multiple instances of one or more
member types are deployed. An installation script is initiated for every VM that can be run in
parallel, followed by a setup script that is called after all VMs (or all VMs of a given member
type) are deployed.
Figure 12. Member resources templates can call scripts for a specific purpose such as VM
configuration
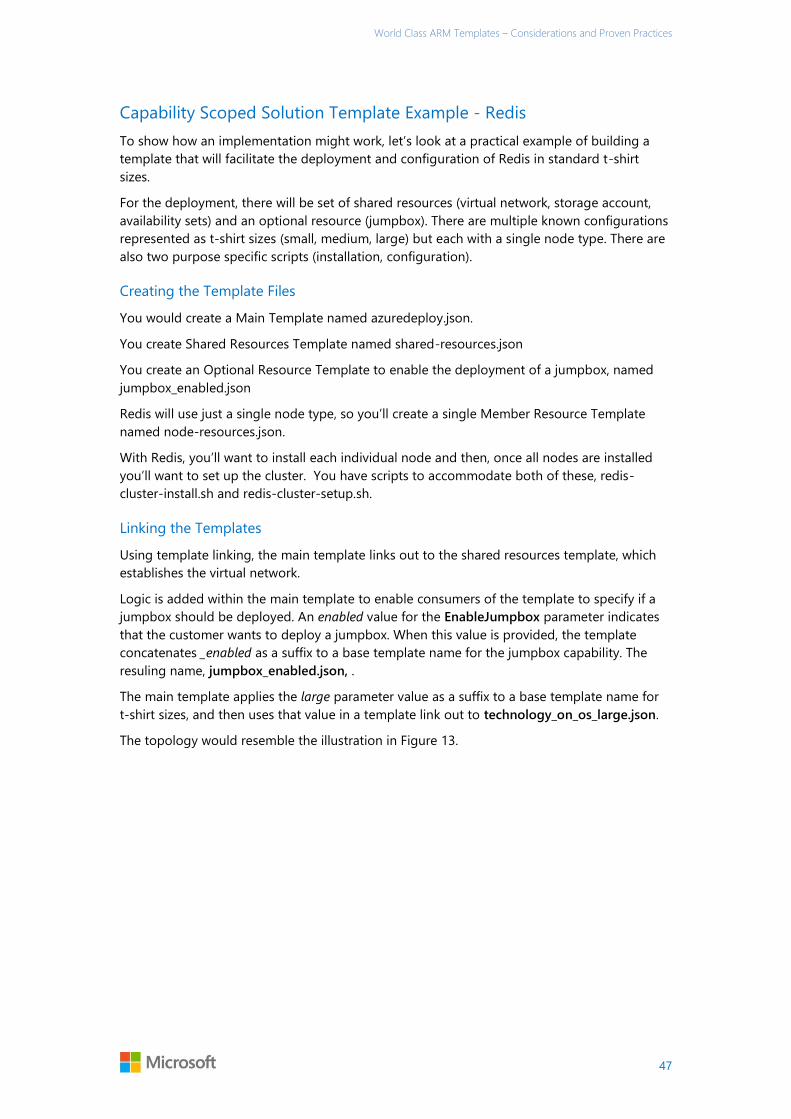
World Class ARM Templates – Considerations and Proven Practices
47
Capability Scoped Solution Template Example - Redis
To show how an implementation might work, let’s look at a practical example of building a
template that will facilitate the deployment and configuration of Redis in standard t-shirt
sizes.
For the deployment, there will be set of shared resources (virtual network, storage account,
availability sets) and an optional resource (jumpbox). There are multiple known configurations
represented as t-shirt sizes (small, medium, large) but each with a single node type. There are
also two purpose specific scripts (installation, configuration).
Creating the Template Files
You would create a Main Template named azuredeploy.json.
You create Shared Resources Template named shared-resources.json
You create an Optional Resource Template to enable the deployment of a jumpbox, named
jumpbox_enabled.json
Redis will use just a single node type, so you’ll create a single Member Resource Template
named node-resources.json.
With Redis, you’ll want to install each individual node and then, once all nodes are installed
you’ll want to set up the cluster. You have scripts to accommodate both of these, redis-
cluster-install.sh and redis-cluster-setup.sh.
Linking the Templates
Using template linking, the main template links out to the shared resources template, which
establishes the virtual network.
Logic is added within the main template to enable consumers of the template to specify if a
jumpbox should be deployed. An enabled value for the EnableJumpbox parameter indicates
that the customer wants to deploy a jumpbox. When this value is provided, the template
concatenates _enabled as a suffix to a base template name for the jumpbox capability. The
resuling name, jumpbox_enabled.json, .
The main template applies the large parameter value as a suffix to a base template name for
t-shirt sizes, and then uses that value in a template link out to technology_on_os_large.json.
The topology would resemble the illustration in Figure 13.

World Class ARM Templates – Considerations and Proven Practices
48
Figure 13. Template structure for a Redis template
Configuring State
For the nodes in the cluster, there are two steps to configuring the state, both represented by
Purpose Specific Scripts. “redis-cluster-install.sh” will perform an installation of Redis and
“redis-cluster-setup.sh” will set up the cluster.
Supporting Different Size Deployments
Inside of variables, the t-shirt size template specifies the number of nodes of each type to
deploy for the specified size (large). It then deploys that number of VM instances using
resource loops, providing unique names to resources by appending a node name with a
numeric sequence number from copyIndex(). It does this for both hot and warm zone VMs, as
defined in the t-shirt name template
Decomposition and End to End Solution Scoped Templates
A solution template with an end to end solution scope is focused on delivering an end to end
solution. This will typically be a composition of multiple capability scoped templates with
additional resources, logic and state.
As highlighted in Figure 14 below, the same model used for capability scoped templates is
extended for templates with an End to End Solution Scope.
A Shared Resources Template and Optional Resources Templates serve the same function as
in the capacity and capability scoped template approaches, but are scoped for the end to end
solution.
As end to end solution scoped templates also can typically have t-shirt sizes, the Known
Configuration Resources template reflects what is required for a given known configuration of
the solution.
The Known Configuration Resources Template will link to one or more capability scoped
solution templates that are relevant to the end to end solution as well as the Member
Resource Templates that are required for the end to end solution.
As the t-shirt size of the solution may be different than that of individual capability scoped
template, variables within the Known Configuration Resources Template are used to provide
the appropriate values for downstream capability scoped solution templates to deploy the
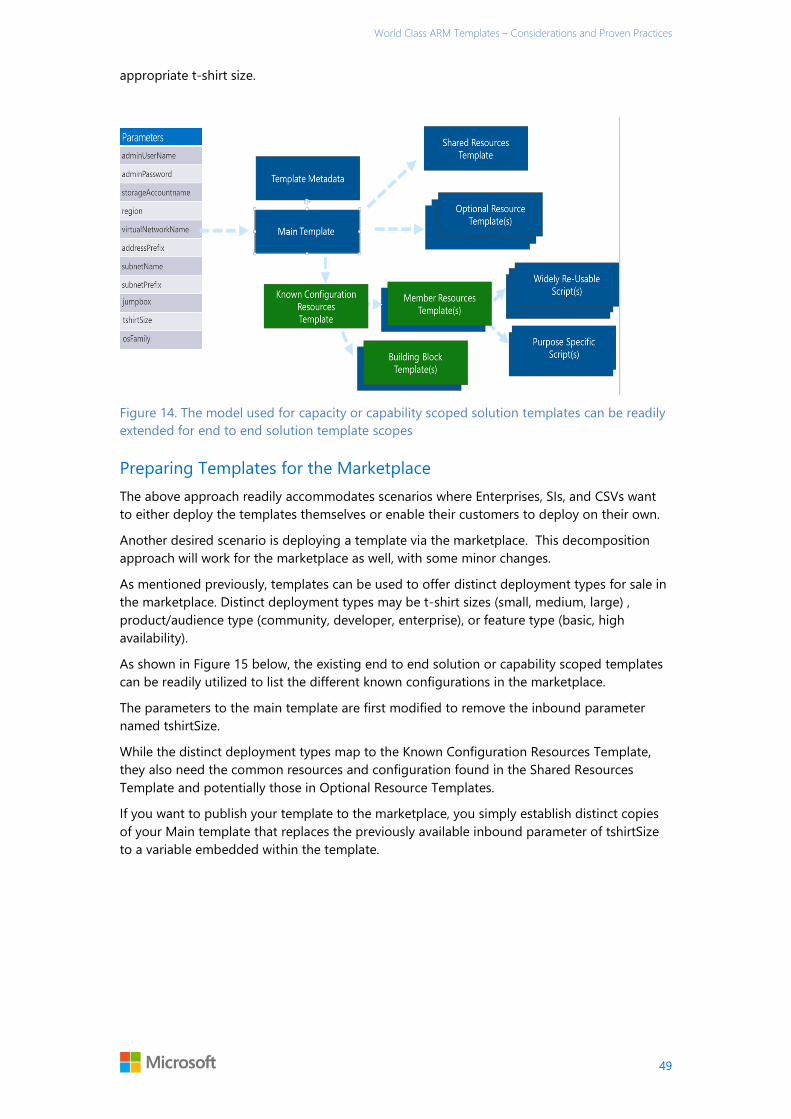
World Class ARM Templates – Considerations and Proven Practices
49
appropriate t-shirt size.
Figure 14. The model used for capacity or capability scoped solution templates can be readily
extended for end to end solution template scopes
Preparing Templates for the Marketplace
The above approach readily accommodates scenarios where Enterprises, SIs, and CSVs want
to either deploy the templates themselves or enable their customers to deploy on their own.
Another desired scenario is deploying a template via the marketplace. This decomposition
approach will work for the marketplace as well, with some minor changes.
As mentioned previously, templates can be used to offer distinct deployment types for sale in
the marketplace. Distinct deployment types may be t-shirt sizes (small, medium, large) ,
product/audience type (community, developer, enterprise), or feature type (basic, high
availability).
As shown in Figure 15 below, the existing end to end solution or capability scoped templates
can be readily utilized to list the different known configurations in the marketplace.
The parameters to the main template are first modified to remove the inbound parameter
named tshirtSize.
While the distinct deployment types map to the Known Configuration Resources Template,
they also need the common resources and configuration found in the Shared Resources
Template and potentially those in Optional Resource Templates.
If you want to publish your template to the marketplace, you simply establish distinct copies
of your Main template that replaces the previously available inbound parameter of tshirtSize
to a variable embedded within the template.
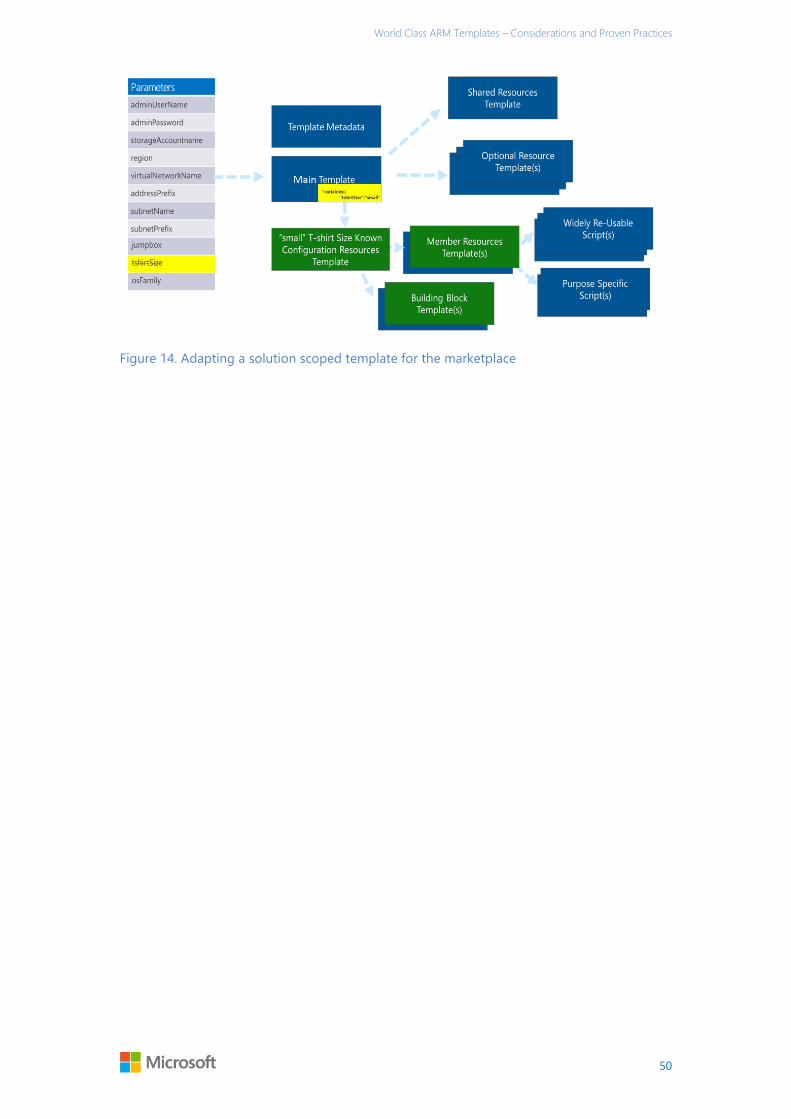
World Class ARM Templates – Considerations and Proven Practices
50
Figure 14. Adapting a solution scoped template for the marketplace

World Class ARM Templates – Considerations and Proven Practices
51
Contextual Examples
A number of concepts, patterns, and features of ARM and ARM Templates have been shared
in this document. To help you better understand how these should be utilized together, this
section provides a set of 7 contextual samples.
Moving a Capability Scoped Template into an End to End Solution
Scoped Template
The pattern for developing a capability scoped template was shared earlier. One question
that you may ask yourself is if there are different considerations when using this capability
scoped template by itself or as part of an end to end scoped solution template.
For example, if there was a technology focused template that deployed SQL Server as a
capability, what would be the considerations, if any, from using that independently or as part
of a broader end to end solution scoped template that may use that SQL Server to support a
web application.
Implementing with ARM and ARM Templates
When looking at this scenario, it’s relevant to look at the number of resources likely involved.
For a robust implementation, your capability scoped template won’t just be a storage account
and a single VM with one installation of SQL Server. A robust capability scoped template will
deploy multiple VMs with SQL Server deployed for high availability. For some capabilities,
such as Analysis Services, your topology will also have likely have Active Directory deployed
with it as well.
Two key considerations for this scenario include the lifecycle of how SQL Server will be used
and the Role Based Access Control (RBAC) that you wish to apply to it. Specifically, will the
SQL Server be updated and deleted with the rest of the solution or will it’s lifecycle vary from
the solution or other parts of the solution. If the lifecycle will vary, you will want to consider
placing it in another resource group.
Another consideration is how you would like to apply Role Based Access Control (RBAC) to
your SQL Server capability scoped solution template. Based on how you want to apply RBAC
within your topology, you may opt for different resource groups based to align with those
specifics. You can apply RBAC at the Resource Level, but given the number of resources for
the SQL Server capability scoped solution template, a distinct resource group with RBAC
applied to it should be a consideration.
Another consideration is an evaluation of the SQL Server capability scoped solution template
to identify if it currently creates certain resources itself vs. allowing you to “Bring Your Own
Resources.” In a “Bring Your Own Resources” (BYOR) model, the capability scoped solution
template would allow your template to re-use previously existing resources, with the typical
examples being a storage account, virtual network or an availability set. If a BYOR approach
doesn’t exist in your capability scoped template, you can alter it using the approach defined
earlier in this document for optional resource templates. In this case, your end to end
solution scoped template would have a shared resource template with these common
resources, and the capability scoped template would be extended to support these resources
as optional. This creates a better capability scoped solution template as it now can be used
independently or part of a composition.
When assessing whether the storage account should be passed in from the end to end
solution scoped template, RBAC should also be re-evaluated. Specifically, do you need to
ensure that RBAC be applied to this specific resource? If so, if the resource is expected to
World Class ARM Templates – Considerations and Proven Practices
52
have this applied when it is passed in, a level of trust is being placed not just in the Solution
Block but any user who wishes to optionally provide this to the capability scoped template
when used independently. If RBAC is critical, then you should consider on whether to make
this an optional template within the capability scoped solution template or to require it’s
creation with the required RBAC from within the capability scoped solution template.
If a decision is made to place these in different resource groups, you can also use Resource
Links to define the relationships between the resources – even when the resources span
resource groups.
Creating an End to End Solution Scoped Template with Multiple
Capability Scoped Templates
This is largely a a superset of the previous example. In this scenario, an organization has
multiple capability scoped solution templates for a set of data technologies such as Kafka,
Apache Hadoop, Apache Spark, and Apache Storm that they wish to pull together in a single
solution block. The resulting composition will use those capability scoped solution templates
as well as a shared storage and virtual network with specific subnet assignments.
Implementing with ARM and ARM Templates
Outside of the specific capability scoped templates required, additional resources will be
necessary for the solution, even if just scripts to stitch the capability scoped templates
together and configure them.
In this case, it’s identified that there’s a shared virtual network and a shared storage account.
To accommodate this, you should add these to a shared resources template in your end to
end solution scoped template and ensure that a “Bring Your Own Resource” approach is
supported in the capability scoped templates. If it is not, you can modify your capability
scoped templates to accommodate this, as described in the previous example.
For the additional resources that you will be adding, you will follow a superset of the pattern
used for creating an individual capability scoped template. In this case, you will add a Shared
Resources Template, Optional Resources Template(s), Member Node template(s), and desired
state configuration (scripts, Chef, Puppet, Powershell DSC) for the new resources. Where
there are dependencies, you’ll optimize to use implicit references vs. dependsOn where
possible to eliminate the potential for stray dependencies which may impact the parallelism
(and speed) of your deployment. You’ll also consider the lifecycle of these resources, the
RBAC considerations, and dependencies to determine if they should be placed in different
resource groups.
When adding shared resources, such as the shared storage account, you should also evaluate
if a resource lock is required for it, as this can help avoid accidental deletions.
When adding new resources, you should also examine if any of the resources being added to
the end to end solution scoped template could be isolated out as capability scoped templates
themselves. If so, this should be strongly considered as to promote further decomposition
which can provide benefits for both re-use and testing.
When integrating in your solution blocks, your next considerations are, as identified in the
previous example, to identify if the lifecycle for the individual capability scoped solution
templates are different from that of the broader solution and if any RBAC requirements would
necessitate separating these into separate resource groups.
Finally, you will want to consider if you would like to be able to define and query links
between the resources. If you do, employing resource links will enable you to do this across
your end to end scoped solution template, even when spanning multiple resource groups.
World Class ARM Templates – Considerations and Proven Practices
53
Creating an End to End Solution Scoped Template with Partial On/Off
Pattern
This scenario is a variant of the previous one. In this case, the customer extracts data from an
on premise system at fixed intervals over the course of a day. They have a data pipeline to
process this incoming data and a relational data store where the data is always available for
queries. As the cloud is a pay-as-you-go model, the customer would like to have the data
pipeline operational only during those intervals when data is presented for processing.
As part of their data pipeline, they have a SQL Server, which receives the processed data and
makes it available for querying. The customer has indicated that while they would like to turn
the ingestion and processing pieces of the pipeline on and off on a fixed schedule, they would
like to always have the SQL Server available.
Implementing with ARM and ARM Templates
In this scenario, there are what appear to be explicit differences in lifecycle and potentially
some additional considerations the customer hasn’t raised but should be evaluated.
As described, the SQL Server deployment will be kept alive while other resources will be
created and deleted. They will be deployed together initially but then other members of the
template will be destroyed and created on a different lifecycle. These can be isolated into
different resource groups or be left in the same resource group with resource locking applied
to the SQL Server resources. As SQL Server specifically is, as described in the earlier examples,
likely represented as a larger set of resources, separating it out into it’s own resource group
would be appropriate.
The other consideration is that while the customer has said that they want the rest of the data
pipeline turned on and off on a schedule, they may not be considering the inconsist behavior
of reporting systems. Scheduled delivery of data from third parties is not always precise –
connectivity may be unavailable for a period of time, clocks on local or cloud based servers
may drift, time changes may or may not occur as expected, etc. It should be evaluated if your
ingestion mechanism should be used in an on/off pattern as well, and if so, if the lifecycle for
that is greater than that of the processing components.
If you’re using a managed service such as Azure Data Factory or Event Hub, this is less of an
issue as their operating models and associated billing approach make them readily available
to ingest your data and place it in storage. If you’re using another technology, such as Kafka,
that you’ve deployed to a virtual machine, you may want to look at the lifecycle for how you
make that and the associated storage account(s) required for ingestion available. This may
result in the ingestion and processing resources being placed in a different resource groups
based on their lifecycle.
Supporting Distinct Environments within a Subscription
To effectively deliver services, many organizations have a set of scale, billing isolation,
accountability isolation and geographic isolation needs that must be met. When designing
services for Azure, they would have historically used subscription partitioning in their
approach to satisfy these needs.
ARM relaxes constraints on the number of resources of a given type that can be deployed
within a subscription and also introduces resource groups, RBAC, and auditing. The
combination of these can allow organizations to use resource groups for partitioning,
allowing them to meet their requirements and reduce the amount, if any, of subscription
partitioning they might have to do.
World Class ARM Templates – Considerations and Proven Practices
54
This section looks at the requirements seen for these types of environments and provides
guidance on how to deliver environments that satisfy them with ARM.
Isolation Considerations
This section explores common customer drivers for environment, billing, and geographic
isolation in more detail.
Environment Isolation
Service owners have a desire to isolate their different environments. Having each
environment isolated allows teams the ability to have more fine grained control over who can
have access to the environments. While development environments may be more open in
terms of who can access them, as the environment scope moves closer to production the
number of users – be they human or system accounts used for automation – is reduced to aid
in compliance and minimize overall risk.
Billing Isolation – Developing vs. Running a Service
To accurately reflect Cost of Goods Sold (COGS) and Operating Expenses (OpEx), business
owners want to be able to break apart the cost of researching and building the service vs.
running the services.
A superset of environment isolation mentioned previously, the intent would be consolidation
of development and test for individual and/or aggregated billing for the former while
production would remain independent for the latter.
Billing Isolation – Adding Transparency and Accountability to Service Consumption Costs
Billing isolation is also used to both gain transparency into costs related to platform
consumption by specific teams and introducing appropriate levels of accountability.
While the cloud is elastic and allows for a pay-as-you-go model, this is less familiar to some
developers coming from a non-cloud model where hardware is procured and owned. In the
non-cloud model, there were physical limitations in terms of the number of “machines” that
could be turned on and there were limited incentives to scale down or turn off resources
when not in use. Procurement of this dedicated hardware, in many cases, was not done by
the developers that were utilizing it.
By isolating subscriptions and assigning accountability for those subscriptions to specific
teams, service owners found this type of subscription partitioning beneficial in driving and
enforcing desired behaviors.
Geography Driven Isolation – Deployments Specific to and Governed by Laws of a Specific
Geography
In certain contexts, there will be requirements that services targeted for a specific geography
will need to consider how they deploy to address compliance considerations.
While a service may be global in nature, deployments that reside within or provide service to
certain geographies may be governed by operational staffing requirements. Specifically,
having only individuals who are citizens of a specific country or country set and/or pass
certain background screening processes operate those services.
Geographic isolation also provides benefits in terms of taking advantage of new platform
services and capabilities. Some geographies, such as China, may have only a subset of the

World Class ARM Templates – Considerations and Proven Practices
55
platform services available and/or have delayed deployment of platform services.
Geographic isolation allows teams the ability to evolve their services to take advantage of new
or enhanced platform services and capabilities where they are available.
Compliance Considerations
Services can be delivered across multiple geographies and to multiple verticals. These
audiences often have sensitive data or processes contained within their applications and there
are associated compliance regulations designed to both protect them and audit engagement
with them.
Separation of Roles and Duties
Separation of roles and duties is a key requirement for internal services to be compliant with
internal policies. Many commercial services also require this to remain in compliance with
governments and industry regulatory guidelines. Services need to limit access to services and
their underlying resources to authorized roles under specific circumstances. Many services
have built scaffolding to deliver two capabilities – Role Based Access Control (RBAC) and
auditing.
Role Base Access Control (RBAC) Use Cases
In compliance scenarios, it is important to constrain access to certain resources.
For example, when looking at sensitive data across multiple scenarios where compliance is
relevant - health information, financial data, tax records, etc. - it is important to limit the
number of individuals who can access, view, or manipulate the data to just those who require
access to do the business of the parent organization.
RBAC provides a distinct individual, system, or group with access to specific resources under
identified conditions.
Auditing
In addition to constrained access provided by RBAC, organizations also need to audit resource
access and interaction with resources.
Implementing with ARM and ARM Templates
Previously, organizations would have used subscription partitioning to accomplish these
goals. While possible, this was not ideal. As the creation of a subscription is effectively a
commerce activity, the Service Management API did not expose a mechanism by which to
create or delete new subscriptions automatically and subscriptions needed to be created
manually. The resulting number of subscriptions could grow significantly – for very large
services such as Microsoft’s own commercial services – that number could span into over one
thousand subscriptions. This would often result in the creation of custom scaffolding to
create and manage subscriptions for an organization.
With ARM and ARM templates, deploying multiple environments within a subscription is
much more straightforward. ARM relaxes the previous fixed caps on resources that was in the
previous model, which greatly reduces the need to partition due to resource constraints.
Environments can be placed in resource groups, which can have specific RBAC applied to
them, enabling you to deliver environment isolation. In scenarios where geographic isolation
is required, this can also be accomplished utilizing resource groups. As resource groups can

World Class ARM Templates – Considerations and Proven Practices
56
span geographies, specific isolation for one or more geographies can be achieved.
You can apply tags to resources and resource groups which can be used in billing roll ups and
summarized views to provide billing isolation. You can use tags to define the environment
type (research, education, development, test, production), accountable organization or
individual (“HR”, “Finance”, “John Smith”, “Jane Jones”).
The auditing requirement is delivered as part of the underlying Azure Resource Manager’s set
of out of the box capabilities and can be viewed in a central location.
End customers would have accounts registered in Azure Active Directory that would be used
for authentication and for role based access control to the environment and resources.
Optimizing for Density
While the resource limits are relaxed in ARM, there will still be limits. Beyond creating the
environments themselves, you should also look at achieving density of environments within
subscriptions as well. Delivering an environment is delivering capacity to an indivual or
organization and you should evaluate what relevant “t-shirt size(s)” you will want to deliver.
Specifically, identify the variants between small, medium, large, and extra larger customers in
terms of the resources required.
You may choose to use different subscriptions for different t-shirt sizes to achieve greater
density. For example, you may be able to accommodate 1000 small t-shirt size environments,
500 medium size deployments, 100 large deployments, and 10 extra-large deployments in a
given subscription. As there’s no billed cost to have multiple subscriptions, you may want to
isolate the different sizes into different subscriptions to provide maximum density. This can
be done while keeping the number of subscriptions relatively modest and easy to manage.
One key consideration you should have is identifying if you would be willing to allow a
customer to increase or change their t-shirt size and ,if so, how you would want to
accommodate it.
One approach is to allow a customer to acquire additional capacity within their existing
resource group. This can be easily accommodated technically, but it has implications on
density. Instead of crisply defined sizes for all customers, this introduces a level of variability
that adds more overhead for optimizing for density. If every small size environment is a size
X, you can easily pre-calculator how many small size environments to place in a subscription
for optimal density. When allowing customers to customize the environment, the result is an
unpredictable number of variants and quantities of environments that could be X, X+1, X+2,
etc. With this level of variability, you would achieve less density as you would need to set
aside capacity within a subscription to accommodate these variances.
While possible, this is less than ideal as a general approach, as it achieves less density and
requires more overhead to manage. For larger sized environments, this may be a more viable
option. As fewer of these large and extra large environments would be placed in a
subscription, you may choose to place fewer of these in a subscription to accommodate
growth.
Another approach is that the customers current size environment is deleted and a new
environment of a different size is created. While not appropriate for some scenarios, this
works well for environments that are used temporarily such as development and test
environments.
World Class ARM Templates – Considerations and Proven Practices
57
The next easiest approach here is to provide the customer the ability to acquire a larger size
environment and then manage the migration to that environment on their own. For example,
a customer who had a SQL Server deployment in a small environment could purchase a
medium environment and would be individually responsible for the transfer of data and
custom state.
An alternate approach is to provide a managed service where this transition from one size to
another is accommodated. This is obviously more complicated, but based on the workload(s)
and customer(s) this may be something your organization would be willing to accommodate.
Delivering Environments with Additional Customer Policy Constraints
Some organizations have additional requirements and policies for the environments that they
deploy. Specifically, they have policies that constrain the ports exposed externally and may
have policies that require monitoring of inbound and outbound traffic to the environment.
For supportability and cost considerations, there may also be constraints on what resources
an end customer can create, update or delete.
For the organization providing the environment, they will also typically require access to the
subscription for support.
Implementing with ARM and ARM Templates
A superset of the previous scenario, this would require the addition of certain resources that
would have additional constraints on who could and could not create resources of a given
type.
The ability for a user to create, update, or delete certain resources can be constrained using
role based access control. Examples would include an organization requiring a certain
network VNET and potentially subnets which the end customer could not update or delete.
Resource locks can be implemented to establish that resources are read only or cannot be
deleted. RBAC can be used to allow users or service principals to perform certain activities
against a resource or resource group.
If the organization requires that certain traffic, e.g. traffic between tiers in the application, first
go through an intermediary such as a virtual network appliance, user defined routes should be
used.
A virtual appliance is nothing more than a VM that runs an application used to handle
network traffic in some way, such as a firewall or a NAT device. A number of third parties
provide virtual network appliances on Azure, and organizations can also bring their own.
A “bring your own” appliance approach allows an organization to re-use existing code that
may be used in their on premise environments. This virtual appliance VM must be able to
receive incoming traffic that is not addressed to itself. To allow a VM to receive traffic
addressed to other destinations, you must enable IP Forwarding in the VM.
As with prior examples, resource lifecycle and RBAC constraints should be reviewed and
considered as part of your resource group strategy.
Securing Resources from Internal Bad Actors
One concern for an organization may be protecting their resources and the templates that
provision them from bad actors.
One example of this could be a bank wishing to ensure that a rogue software developer or
member of their IT staff don’t make modifications or extract key information that results in
World Class ARM Templates – Considerations and Proven Practices
58
data going to a bad actor for criminal purposes.
Implementing with ARM and ARM Templates
A typical enterprise scenario is to have a small group of Trusted Operators who have access to
critical secrets within the deployed workloads, with a broader group of dev/ops personnel
who can create or update VM deployments.
Azure Key Vault woud be used with ARM to orchestrate and store VM secrets and certificates.
A best practice is to maintain separate ARM templates for creation of vaults (which will
contain the key material) and deployment of the VMs (with URI references the keys contained
in the vaults).
Secrets stored in the Key Vault are under full RBAC control of a trusted operator. If the
trusted operator leaves the company or transfers within the company to a new group, he or
she will no longer have access to the keys they created in the Vault.
The ARM templates for deployment only contain URI references to the secrets, which means
the actual secrets are not in code, config or source code repositories. This mitigates
opportunities for both phishing secrets and limiting the ability for bad actors to make
changes.
As stated earlier in the document, there are no global Key Vaults. As Key Vaults are always
regional, the secrets always have locality (and sovereignty) with the VMs.
An example implementation of this approach was provided in the Secrets and Certificates
section found earlier in this document.
Enabling a “Bring Your Own Subscription” Model
Corporate IT, System Integrators, and Cloud Services vendors may employ a “Bring Your Own
Subscription” model with their customers. Specifically, the organization provides a service to
an end customer and utilizes that customer’s Azure subscription in some fashion.
There are multiple variants of this approach, each with slightly different requirements, as
detailed below.
Enabling Third Party Access for Monitoring of Resources within an Account
An organization with a monitoring application may require read-only access to a customer’s
subscription to retrieve data for use in that application. This would require read-only access
for an ongoing period of time. Access would need to be in the customer’s control, providing
them the ability to terminate the access if the relationship with the provider of the monitoring
service is severed.
Implementing with ARM and ARM Templates
Details on implementing this are provided in significant detail in the “Developers Guide to
Auth with the Azure Resource Manager API” which can be found here. That document
provides step by step implementation instructions as well as sample code.
Enabling 3rd Party Access for One Time Deployment of Software
In another example, an organization may deploy and configure a version of their software in a

World Class ARM Templates – Considerations and Proven Practices
59
customer’s account, requiring write access for the period of time for the deployment.
Implementing with ARM and ARM Templates
This would follow a similar approach to the prior example.
Depending on the specific needs of the installation, the specific role assigned to the service
principal should allow only the minimal level of access required to achieve the installation and
then have that access be immediately revoked after completion of the installation.
Enabling 3rd Party Access to Use Customer Subscriptions for Data Storage
In another example, an organization may wish to run software in their own environment but
use the customer’s account for storage. This places the customer in control of their data at all
times and enables them to leverage other technologies on the platform, e.g. Azure Machine
Learning or HDInsight, at their own discretion while not adding cost/billing overhead for the
Enterprise IT, System Integrator, or CSV providing the capability. This requires ongoing access
to the storage account for the organization, with the customer in control and having access to
audit information for accesses to that information.
Implementing with ARM and ARM Templates
This is implemented using the same pattern as the other examples. A service principal is
provided access to the storage resource. As this scenario required the role to have read and
write access to the storage account, the built in Contributor role would be assigned to the
service principal to achieve this level of access.
As this scenario involves both a first and a third party with a shared storage account, there will
also be a desire to ensure that the storage account is not deleted accidentally. For this aspect
of the scenario, you would apply a resource lock to the storage account.
Enabling Service Management by a 3rd Party
In another example, an organization will want to deploy, monitor, and manage software in the
customers subscription. There may be constraints on the customer in terms of changes they
can (or more explicitly cannot) make to an environment where software deployed.
Implementing with ARM and ARM Templates
This follows a supserset of the pattern identified at the start of this section. Specifically, a
service principal used by a 3rd party is provided full access to the resources within the resource
group.
In addition, as there are constraints on the customer, users or groups from the customer
would be given rights appropriate to utilize the environment. This can be done via ARM
templates as identified earlier in this section.
Finally, there may be a desire to ensure that certain resources are not deleted accidentally. If
this is the case, resource locks should also be considered for resources which require such
protection.
World Class ARM Templates – Considerations and Proven Practices
60
For more information
We have seen how the patterns in this guide have proven successful in addressing the
requirements of our customers’ scenarios—all based on an approach that decomposes a
single template into a set of templates with specific scopes and interaction patterns. With
ARM templates, you can deploy complex topologies quickly and consistently, using
mechanisms to deploy an infrastructure and trigger an installation or configuration of
software running within VMs.
For more information about ARM and related Azure scenarios, see:
The Next Generation of Azure Compute Platform with Mark Russinovich (video) at
http://channel9.msdn.com/Events/Build/2015/3-618
Azure Resource Manager (video) at
http://channel9.msdn.com/Events/Build/2015/2-659
Deploying, Organizing, and Securing Applications with the Azure Resource
Manager (video) at http://channel9.msdn.com/Events/Ignite/2015/BRK4453
Role-based access control in the Microsoft Azure portal at
azure.microsoft.com/en-us/documentation/articles/role-based-access-control-
configure/#builtinroles
Azure Active Directory Directory integration at
technet.microsoft.com/library/jj573653.aspx
Self-service group management for users in Azure AD at
msdn.microsoft.com/library/azure/dn641267.aspx
Azure Resource Manager Template Language at https://msdn.microsoft.com/en-
us/library/azure/dn835138.aspx
Managing Linux and Windows on Microsoft Azure with Chef at
http://channel9.msdn.com/Events/Ignite/2015/BRK3722
For guidance and tutorials specifically related to tooling and deploying templates, see:
Using Windows PowerShell with Resource Manager
Using the Azure Cross-Platform Command-Line Interface with the Resource
Manager
Using the Azure Portal to manage your Azure resources
Creating and Deploying Applications
Authoring Azure Resource Manager Templates
Deploy an application with Azure Resource Manager template
Troubleshooting Resource Group Deployments in Azure
Azure Resource Manager Template Functions
Advanced Template Operations
Organizing Resources
World Class ARM Templates – Considerations and Proven Practices
61
Using tags to organize your Azure resources
Managing and Auditing Access
Managing and Auditing Access to Resources
Authenticating a Service Principal with Azure Resource Manager
Create a new Azure Service Principal using the Azure classic portal
Developers guide to auth with the Azure Resource Manager API
Workload Specific Tutorials
DataStax Enterprise Cassandra on Ubuntu Template Deployment
Spark on Ubuntu Template Deployment
Redis Cache Cluster Template Deployment
Ubuntu VM with Docker Extensions Deployment
Information in this document, including URL and other Internet website references, is subject to change without notice. Unless
otherwise noted, the example companies, organizations, products, domain names, e-mail addresses, logos, people, places, and
events depicted herein are fictitious, and no association with any real company, organization, product, domain name, e-mail address,
logo, person, place, or event is intended or should be inferred. Complying with all applicable copyright laws is the responsibility of
the user. Without limiting the rights under copyright, no part of this document may be reproduced, stored in or introduced into a
retrieval system, or transmitted in any form or by any means (electronic, mechanical, photocopying, recording, or otherwise), or for
any purpose, without the express written permission of Microsoft Corporation.
Microsoft may have patents, patent applications, trademarks, copyrights, or other intellectual property rights covering subject matter
in this document. Except as expressly provided in any written license agreement from Microsoft, the furnishing of this document
does not give you any license to these patents, trademarks, copyrights, or other intellectual property.
© 2015 Microsoft Corporation. All rights reserved.
Microsoft, MS-DOS, Windows, Windows NT, Windows Server, and the other product names listed on the trademarks page of the
Microsoft website are either registered trademarks or trademarks of Microsoft Corporation in the United States and/or other
countries.All other trademarks are property of their respective owners.