Workshop manual 435 435e 440e
56
Workshop manual English 435 435e 440e
Transcript of Workshop manual 435 435e 440e

Workshop manual
English
435 435e 440e

English – 3
Workshop manualHusqvarna 435, 435e och 440e
Contents
Index .......................................................................4Introduction and safety instructions ...................6Technical data ......................................................10Service tools ........................................................12Service data .........................................................14Safety equipment ................................................. 16Repair instructions ..............................................24Carburettor ...........................................................33Troubleshooting................................................... 53
Contents
Husqvarna AB has a policy of continuous product development and therefore reserves the right to modify the design and appearance of products without prior notice.

4 – English
Index
IndexBBar bolt 52
Replacing the bar bolt 52
CCarburettor 33
Assemble on the saw 40Assembly 38Carburettor adjustment 41Cleaning and inspection 37Design 33Dismantling 35Function 34Pressure testing the carburettor 39
Centrifugal clutch 30Centrifugal clutch - refi tting 31Centrifugal clutch - removal 30Inspection and cleaning 30
Chain brake 17Chaine brake - reassembly 18Cleaning and inspection 17Dismantling the chaine brake 17
Chain catcher 20Chain catcher - replacement 20
Crankcase and crankshaft 50Crankshaft bearings - replacement 50Crankshaft complete - dismantling 50Crankshaft complete - reassembly 51
FFuel system 44
Replacing the fuel fi lter 44Replacing the fuel hose/return hose 44Replacing the air-purge 44Venting the fuel tank 42
IIgnition module and fl ywheel 28
Cleaning and inspection 28Ignition module - testing 27Ignition module and fl ywheel - refi tting 29Ignition module and fl ywheel - removal 28
Intake system 32Air intake system removal 32Assembling the intake system 32, 48Cleaning and inspection 32
Introduction and safety instructions 7Changes 7General 7General Instructions 8Numbering 7Safety 7Special Instructions 8
Symbols in the Workshop Manual 9Symbols on the saw 9Structure 7Target group 7Tools 7
OOil pump and screen 31
Assembling the oil pump and screen 32Cleaning and inspection 31Dismantling the oil pump and screen 31
PPiston and cylinder 45
Cleaning and inspection 45Cylinder - pressure testing 49Faults and causes 47Piston and cylinder - refi tting 47Piston and cylinder - removal 45
SService data 14Special tools 12Silencer 19
Cleaning and inspection 19Silencer - refi tting 19Silencer - removal 19
Starter 25, 26Changing a broken or worn starter cord 26Cleaning and inspection 25, 26Replacing a worn recoil spring 27Starter assembly - refi tting 27Starter assembly - removal 25Tensioning the recoil spring 26
Start/Stop switch 20Assembling the start/stop control 21Cleaning and inspection 20Dismantling the start/stop control 20
Stopping function 21Stop switch - resistance measurement 21
TTank unit 42
Assembly 43Dismantling 42
Technical Data 10Threads 51
Repairing damaged threads 51Throttle lock, throttle trigger and return spring 22
Cleaning and inspection 23Throttle lock, throttle trigger and return spring - refi tting 23Throttle lock, throttle trigger and return spring - removal 22

English – 5
Index
Trouble shooting 54Trouble-shooting methods 55
VVibration damping system 43
Assembly 43Cleaning and inspection 43Dismantling 43

6 – English
Introduction and safety instructions
2 Introduction and safety instructions
Contents
2.1 General ...........................................................................................................................72.2 Safety .............................................................................................................................72.3 Target group ...................................................................................................................72.4 Changes ..........................................................................................................................72.5 Tools ...............................................................................................................................72.6 Structure .........................................................................................................................72.7 Numbering ......................................................................................................................72.8 General instructions ........................................................................................................82.9 Special instructions .........................................................................................................82.10 Symbols on the saw .......................................................................................................92.11 Symbols in the Workshop Manual ..................................................................................9

English – 7
2 Introduction and safety instructions
Introduction and safety instructions
2.1 General
This Workshop Manual describes in detail how the chain saw is to be fault traced, repaired and tested. A description of different safety measures that should be taken during repair work is also given.
2.2 Safety
Note! The section dealing with safety must be read and understood by all those carrying out repair work or service on the chain saw.
Warning symbols can be found in this Workshop Manual and on the chain saw. See “Symbols on the saw” and “Symbols in the Workshop Manual”. A new decal must be applied as soon as possible if a warning symbol on the chain saw has been da-maged or is missing so that the greatest possible safety can be obtained when using the chain saw.
2.3 Target group
This Workshop Manual is written for personnel with general knowledge about the repair and service of chain saws.
The Workshop Manual must be read and under-stood by personnel who will carry out repair work and service on the chain saw. The Manual is also suitable for use when training new employees.
2.4 Changes
Modifications will be successively introduced on the chain saw during production. When these modifications affect the service and/or spare parts, separate service information will be sent out on each occasion. This means that in time this Work-shop Manual will become out of date. In order to prevent this, the Manual should be read together with all service information concerning the chain saw in question.
2.5 Tools
Special tools are required for some stages. All service tools are listed in the Workshop Manual. Usage is evident from respective sections.
Always use Husqvarna’s original:• Spare parts
• Service tools
• Accessories
2.6 Structure
This Workshop Manual can be used in two diffe-rent ways:
• For the repair of a particular system on the chain saw.
• Dismantling and assembly of the entire chain saw.
Repair of a specific systemWhen a particular system on the chain saw is to be repaired, proceed as follows:
1. Look up the page for the system in question.2. Carry out the sections: Dismantling Cleaning and inspection Assembling
Dismantling and assembling the entire chain sawProceed as follows when the entire chain saw is to be dismantled and assembled:
1. Look up the chapter “Repair instructions”, which deals with the Starter and carry out the instructions set out under Dismantling.
2. Work forward in the Manual and carry out Dis-mantling in the order set out in the sections.
3. Go back to the Starter and carry out the in-structions under Cleaning and Inspection.
4. Work forward in the Manual and carry out Cleaning and Inspection in the order set out in the sections.
5. Order or take out all requisite spare parts from the stores.
6. Look up the chapter “Repair instructions” which deals with the Crankcase and carry out the instructions set out under Assembling.
7. Work back in the Manual and carry out As-sembling in the order set out in the sections.
Some sections include a Description of the actual unit in order to increase the basic understanding.
2.7 Numbering
Position references to components inside the figu-res are designated A, B, etc.The figures are numbered 1, 2 etc.The position references and figure numbers restart in each new section.

8 – English
2.8 General instructions
The workshop where chain saw repairs are to be done must be equipped with safety equipment as set out in local provisions.
No one may repair the chain saw unless they have read and understood the content of this Workshop Manual.
In this workshop manual the following boxes indi-cate where caution should be taken.
2.9 Special instructions
The fuel that is used in a chainsaw poses the fol-lowing hazards:
• The fuel and its fumes are toxic.• May cause irritation to skin or eyes.• May cause breathing difficulties.• Highly flammable.
When using compressed air the air jet should never be pointed at the body. Air can be forced into the bloodstream and cause fatal injury.
Wear ear protection when testing saws.
After testing a saw do not touch the silencer until it has cooled down. The silencer gets very hot and you may burn yourself. Wear protective gloves when working on the silencer.
The guide bar, chain and clutch cover (chain brake) must be fitted before the saw is started. If not, the clutch may come loose and cause injury.
Poor chain lubrication can result in failure of the chain, which could cause serious or fatal injury.
Take care to ensure that the spring inside the starter assembly does not fly out and cause injury. Wear eye protection. If the spring is under compression when the pulley is removed it could fly out and cause injury.
Before removing the tensioning spring from the chain brake, ensure that the brake is in the on position, otherwise the spring may fly out and cause injury.
After completing the repair the chain brake must be tested, see “Chain brake – reassembly \ Operating test”.
Always consider the fire risk. A chainsaw can produce sparks that could start a fire.
Inspect the chain catcher and replace it if it is damaged.
WARNING!The warning text warns of the risk of personal injury if the instruc-tions are not followed.
NOTE!
The warning text warns of the risk of ma-terial damage if the instructions are not followed.
Introduction and safety instructions
English – 9
Introduction and safety instructions
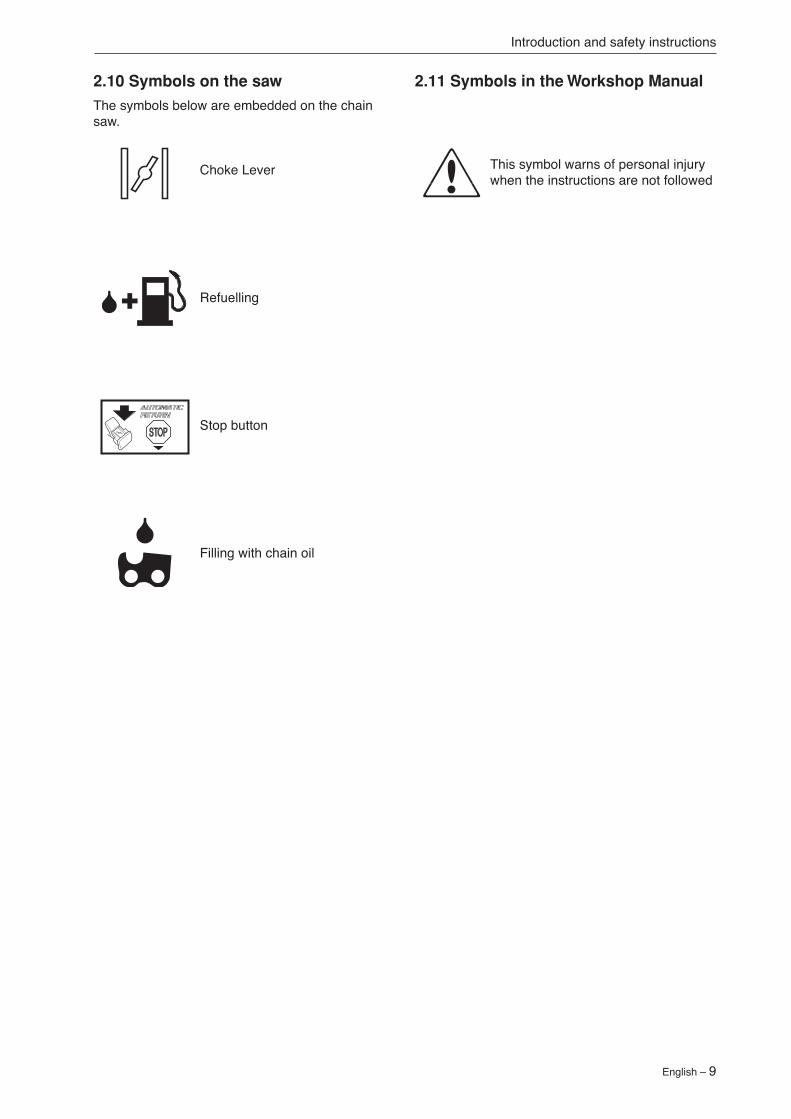
2.10 Symbols on the saw
The symbols below are embedded on the chain saw.
Choke Lever
Refuelling
Stop button
Filling with chain oil
2.11 Symbols in the Workshop Manual
This symbol warns of personal injury when the instructions are not followed

10 – English
Displacement Cylinder bore Stroke Max power/speed cm3/cubic inches Ø mm/Ø inches mm/inches kW/hp/rpm
435/e: 37,0 / 2,25 39 / 1,53 31 / 1,22 1,6 / 2,1 / 9 000440e: 40,9 / 2,49 41 / 1,51 31 / 1,22 1,8 / 2,4 / 9 000
Spark plug gap Ignition system Air gap Carburettor type mm/inches mm/inches
435/e: 0,5 / 0,02 Walbro MBU-33 0,3 / 0,012 Zama EL41AC1T440e: 0,5 / 0,02 Walbro MBU-33 0,3 / 0,012 Zama EL41AC1T
Effective cutting length Chain speed at Chain pitch Drive link cm/inches max power – revs mm/inches mm/inches m/s - r/min
435/e: 33-46 / 13-18 17,3 / 9 000 8,25 / 0,325 1,3 / 0,050 - 1,5 / 0,058440e: 33-46 / 13-18 17,3 / 9 000 8,25 / 0,325 1,3 / 0,050 - 1,5 / 0,058
3 Technical data
Technical data

English – 11
Idling speed Engagement speed Spark plug rpm rpm
435/e: 2 900 3 800 NGK BPMR 7A Champion RCJ 7Y440e: 2 900 3 800 NGK BPMR 7A Champion RCJ 7Y
Fuel tank capacity Oil pump capacity at Oil tank capacity Automatic oil pump Litres/US pints 8,500 rpm, Litres/US pints ml/min
435/e: 0,37 / 0,78 9 0,25 / 0,53 Yes440e: 0,37 / 0,78 9 0,25 / 0,53 Yes
Weight without Weight with bar and chain bar and chain kg / lbs kg / lbs
435/e: 4,4 / 9,7 6,2 / 13,7440e: 4,4 / 9,7 6,2 / 13,7
rpm
�GAS OIL
Technical data

12 – English
4 Special tools
Special tools
11
4 6
9
1 2 3
7
8
10
M5M6
5
M5

English – 13
Special tools
12 13a 14
15
13b
16a
16c16b
17
18
Item Description Used for Order no. 1 Clutch tool Centrifugal clutch 502 54 16-03 2 Piston stop Locking the crankshaft 504 91 06-05 3 Fuel filter hook Withdrawing the fuel filter 502 50 83-01 4 Allen key, 4mm For M5 bolts 502 50 87-01 5 Allen key, 4mm For M5 bolts 502 50 18-01 5 Allen key, 5mm For M6 bolts 502 50 64-01 6 Pressure tester Pressure testing cylinder 503 84 40-02 7 Feeler gauge Adjusting ignition module 502 51 34-02 8 Assembly fixture Assembling chain saw 502 51 02-01 9 Pressure gauge Pressurisation during testing 531 03 06-23 10 Test spark plug Checking the ignition module 501 97 64-01 11 Rev counter Adjusting carburettor 502 71 14-01 12 Assembly pliers Fitting spark plug guard 502 50 06-01 13a Cover plate, exhaust Sealing the exhaust port 502 54 11-02 13b Cover plates, inlet Sealing the intake manifold 504 63 93-01 14 Assembly tool Assembling spring, chain brake 502 50 67-01 15 Puller Pulling bearing of crankshaft 504 90 90-01 16a Sleeve Fitting crankshaft 502 50 30-22 16b Shaft extension Flywheel side 502 50 30-22 16c Shaft extension Cluch side 502 50 30-22 17 Punch Dismantling the flywheel 502 51 94-01 18 Adjustment screwdriver Adjustment of the carburettor 530 03 55-60

14 – English
5 Service data
Service data

English – 15
Service data
5Nm 4mm
5Nm 4mm
5Nm 4mm
5Nm 4mm
4Nm
2.5Nm 4mm
5Nm 4mm
8Nm 4mm
23Nm 13mm
5Nm 4mm
7Nm 4mm
5Nm 4mm
9Nm 4mm
2.5Nm 4mm

16 – English
6 Safety equipment
Safety equipment
Contents
6.1 Dismantling the chain brake ...........................................................................................176.2 Chain brake - reassembly ...............................................................................................186.3 Silencer - removal ...........................................................................................................196.4 Silencer - refitting ............................................................................................................196.5 Chain catcher - replacement ..........................................................................................206.6 Dismantling the start/stop control ...................................................................................206.7 Stop switch - resistance measurement ...........................................................................216.8 Assembling the start/stop control ....................................................................................216.9 Throttle lock, throttle trigger and return spring - removal ................................................226.10 Throttle lock, throttle trigger and return spring - refitting .................................................23
English – 17
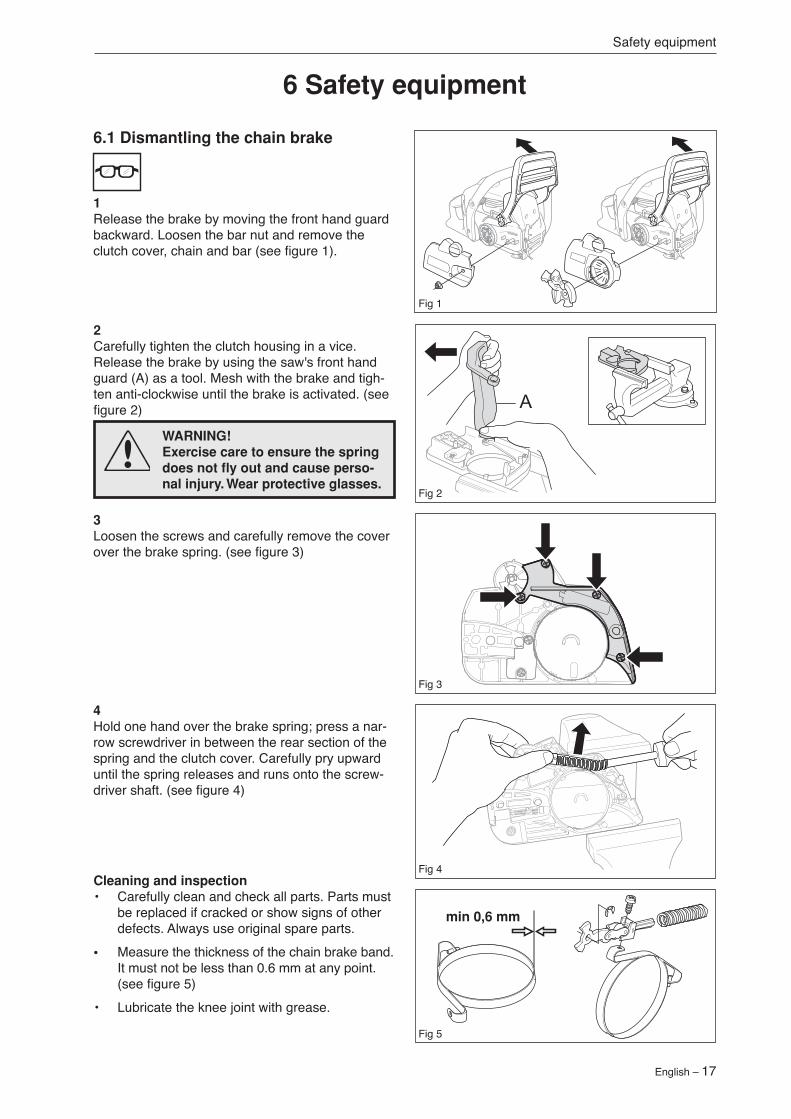
3Loosen the screws and carefully remove the cover over the brake spring. (see figure 3)
WARNING!Exercise care to ensure the spring does not fly out and cause perso-nal injury. Wear protective glasses.
6.1 Dismantling the chain brake
2Carefully tighten the clutch housing in a vice. Release the brake by using the saw's front hand guard (A) as a tool. Mesh with the brake and tigh-ten anti-clockwise until the brake is activated. (see figure 2)
Cleaning and inspection• Carefully clean and check all parts. Parts must
be replaced if cracked or show signs of other defects. Always use original spare parts.
• Measure the thickness of the chain brake band. It must not be less than 0.6 mm at any point. (see figure 5)
• Lubricate the knee joint with grease.
4Hold one hand over the brake spring; press a nar-row screwdriver in between the rear section of the spring and the clutch cover. Carefully pry upward until the spring releases and runs onto the screw-driver shaft. (see figure 4)
Safety equipment
6 Safety equipment
1Release the brake by moving the front hand guard backward. Loosen the bar nut and remove the clutch cover, chain and bar (see figure 1).
min 0,6 mm
Fig 1
Fig 2
Fig 3
Fig 4
Fig 5

18 – English
NOTE!
After completing the repair the chain brake must be tested as described below.
6.2 Chain brake – reassembly
1Bolt the elbow joint to the brake band (see figure 5) and tighten to a torque of 1–1.5 Nm.Locate the elbow joint and connected brake band in their recesses in the clutch cover. Lubricate the recess for the spring with grease (see figure 6).
Secure the circlip (A) (see figure 6).
2Grip the clutch cover in a vice. Compress the spring with special tool 502 50 67-01 and push it down with your thumb (see figure 7).
3Fit the cover over the chain brake spring, tighten-ing the screws to a torque of 1–1.5 Nm (see figure 8).
WARNING!Make sure the spring does not fly out and cause injury. Wear eye protection.
4Tension the brake spring by using the kickback guard from the saw as a tool. Engage it with the brake mechanism and turn clockwise to release the brake (see figure 9).
5Turn the chain tensioner anticlockwise as far as it will go.
Refit:• guide bar• chain• clutch cover
Safety equipment
Fig 6
Fig 7
Fig 8
Fig 9

English – 19
Operating test:The engine must not be running during the test.
Guide bar length Height
38cm/15" 50 cm/20"
• Hold the chainsaw over a firm surface. The height of the guide bar above the surface is given in the table above.
• Let go of the front handle and let the chainsaw fall towards the surface.
• When the guide bar hits the surface the chain brake must engage (see figure 10).
Safety equipment
WARNING!Do not touch the silencer until it has cooled down, otherwise you may burn yourself.
6.3 Silencer – removal
1Remove the cylinder cover, silencer, gasket and cooling plate.
2If the saw is fitted with a spark arrestor mesh (A) this must also be removed. If necessary, use the com-If necessary, use the com-bination spanner to push down the plate edge and remove the spark arrestor mesh (see figure 11).
Cleaning and inspectionClean and inspect all parts carefully. If there are any cracks or other defects replace the damaged parts with new ones.The spark arrestor mesh is best cleaned with a wire brush. If the mesh is damaged it must be replaced.If the mesh is blocked the saw will overheat and this will cause damage to cylinder and piston.Never use the saw with a silencer that is in poor condition. Always use original parts.
6.4 Silencer – refitting
1If the saw is equipped with a spark arrestor mesh this should be fitted first. When fitting the mesh, make sure that the mesh is inserted in the right position. If necessary, use the combination spanner to insert the mesh.
2Refit• cooling plate• gasket• silencer, tighten bolts to a torque of 8–10 Nm.• cylinder cover
3Run the saw for at least 1 minute, then retighten the silencer bolts to 12–14 Nm.
Fig 10
Fig 11

20 – English
6.5 Chain catcher – replacement
If the chain catcher is worn it must be replaced with a new one.
1Release the brake by pushing the kickback guard backwards. Undo the guide bar bolts and remove the clutch cover, chain and guide bar.
2Remove the chain catcher and replace it with a new one. Check that the vibration damping spring locates correctly against the crankcase when you bolt the new chain catcher in position. (see figure 12)
Safety equipment
6.6 Dismantling the start/stop control
1Remove the cylinder cover and air filter.
2Loosen the screw and dismantle the control (see figure 13).
3Loosen the filter holder from the rubber mountings (B). (see figure 13)
4Cut off the starlock washer and pull out the control from the shaft on the filter holder.(see figure 14)
Cleaning and inspectionClean and inspect all parts carefully. If there are any cracks or other defects replace the damaged parts with new ones. Always use original parts.
Fig 12
Fig 13

English – 21
Safety equipment
6.7 Stop switch – resistance measurement
Clean the mating surfaces and check the resis-tance as follows:
Measure the resistance by connecting a multime-ter to the ignition coil. NOTE! The switch must be in the “on” (A) position to give the correct reading (see figure 14).
The resistance must not be higher than 0.5 Ohm when the switch is in the on position.
The stop switch is in the on position when the button is held down (A) (see figure 14) and in the off-position the button is neutral (B) (see figure 15).
6.8 Assembling the start/stop control
1Fit a new control and tighten the screw.
2Fit air filter and cylinder cover.
Fig 14
Fig 15
Fig 16

22 – English
Safety equipment
3Dismantle the handle insert (B) by loosening the screw C on the handle (see figure 18).
4Press out the throttle control pin (D) with the help of a punch (see figure 19).
5Loosen the throttle lock as illustrated with the help of a screwdriver or the like. Then dismantle from the shaft in the handle (see figure 20).
6Dismantle the throttle control (see figure 20).
6.9 Throttle lock, throttle trigger and return spring – removal
1Loosen the throttle actuator rod on the carburettor, the fuel hose and the suction hose to the fuel pump.
2Dismantle the tank unit from the engine unit by loosening the screws A (see figure 17)
Fig 17
Fig 18
Fig 19
Fig 20
Fig 21
7Now loosen the spring.

English – 23
6.10 Throttle lock, throttle trigger and return spring – refitting
1Lubricate all pins and mating surfaces with a light oil.
2Fit the throttle control (B) and spring (C) (see figure 22).
3Hold the spring and insert the throttle lock into the cut-out in the handle (see figure 23).
4Fit the throttle control pin (E) with the help of a punch. (see figure 23)
5Fit the throttle lock (D) by pressing it onto the shaft in the handle (see figure 24).
6Assemble the handle insert using a screw, when the throttle control, lever, throttle cable and throttle control lock with pin are fitted correctly (see figure 25).
Safety equipment
Cleaning and inspection• Clean and inspect all parts carefully. If there are
any cracks or other defects replace the dama-ged parts with new ones. Always use original parts.
• Check that the spring is not broken and has not lost its tension.
Fig 22
Fig 23
Fig 24

24 – English
7 Repair instructions
Repair instructions
Contents
7.1 Starter assembly - removal .............................................................................................257.2 Changing a broken or worn starter cord .........................................................................267.3 Tensioning the recoil spring ............................................................................................267.4 Replacing a worn recoil spring .......................................................................................277.5 Starter assembly - refitting ..............................................................................................277.6 Ignition module - testing .................................................................................................277.7 Ignition module and flywheel - removal ..........................................................................287.8 Ignition module and flywheel - refitting ...........................................................................297.9 Centrifugal clutch - removal ............................................................................................307.10 Centrifugal clutch - refitting .............................................................................................317.11 Dismantling the oil pump and screen ..............................................................................317.12 Assembling the oil pump and screen ..............................................................................327.13 Air intake system - removal ............................................................................................327.14 Assembling the intake system ........................................................................................327.15 Carburettor .....................................................................................................................337.16 Tank unit .........................................................................................................................427.17 Venting the fuel tank .......................................................................................................427.18 Vibration damping system ..............................................................................................437.19 Replacing the fuel filter ...................................................................................................447.20 Replacing the fuel hose/return hose ...............................................................................447.21 Replacing the air-purge ...................................................................................................447.22 Piston and cylinder - removal .........................................................................................457.23 Piston and cylinder - refitting ..........................................................................................477.24 Cylinder - pressure testing ..............................................................................................497.25 Crankshaft complete - dismantling .................................................................................507.26 Crankshaft bearings - replacement ................................................................................507.27 Crankshaft complete - reassembly .................................................................................517.28 Repairing damaged threads ...........................................................................................517.29 Replacing the bar bolt .....................................................................................................52

English – 25
Repair instructions
WARNING!If the recoil spring is still under tension when the pulley is re-moved it can fly out and cause injury. Wear eye protection.
7.1 Starter assembly – removal
1Undo the four bolts that fasten the starter assembly to the crankcase and lift off the starter assembly. (see figure 1)
3Remove the bolt from the centre of the pulley and lift off the pulley. (see figure 3)
Cleaning and inspectionClean the parts and check the following:• The starter cord.• That the pawls on the flywheel are undama-
ged, i.e. that they spring back towards the centre and move freely.
• Lubricate the return spring with light oil.
7 Repair instructions
1 22Pull out about 30 cm of the cord and fasten it in the notch in the pulley rim. Release the tension in the return spring by letting the pulley wind backwards slowly. (see figure 2)
Fig 1
Fig 2
Fig 3

26 – English
Repair instructions
7.2 Changing a broken or worn starter cord
When the starter cord is worn and must be replaced, the tension on the return spring must be released.
1Pull the cord out about 30 cm and lift it into the notch on the outside of the starter pulley. Release the tension on the return spring by allowing the starter pulley to rotate slowly backwards (see figure 2).
7.3 Tensioning the recoil spring
1Fasten the starter cord in the notch in the pulley rim and wind the pulley about 3 turns clockwise.Check that the pulley is free to rotate at least an-other half turn when the starter cord is fully exten-ded (see figure 4).
2Tension the cord with the handle. Remove the thumb and released back the cord (see figure 5).
WARNING!If the spring tension is activated on the starter pulley, the spring can fly out and cause personal injury. Wear protective glasses.
2Undo the bolt in the centre of the pulley and re-move the pulley (see figure 3).
3Fit a new cord through the hole in the pulley and tie a knot to secure it. Feed the other end of the cord through the hole in the starter housing and through the starter handle, then tie a double knot in the end. Wind about 3 turns of the starter cord onto the pulley. Fit the bolt through the centre of the pulley and tighten to a torque of 2–3 Nm.
Cleaning and inspection• Clean and inspect all parts carefully. If there
are any cracks or other defects replace the damaged parts with new ones. Lubricate the return spring with a little grease.
Fig 4
Fig 5
English – 27
Repair instructions
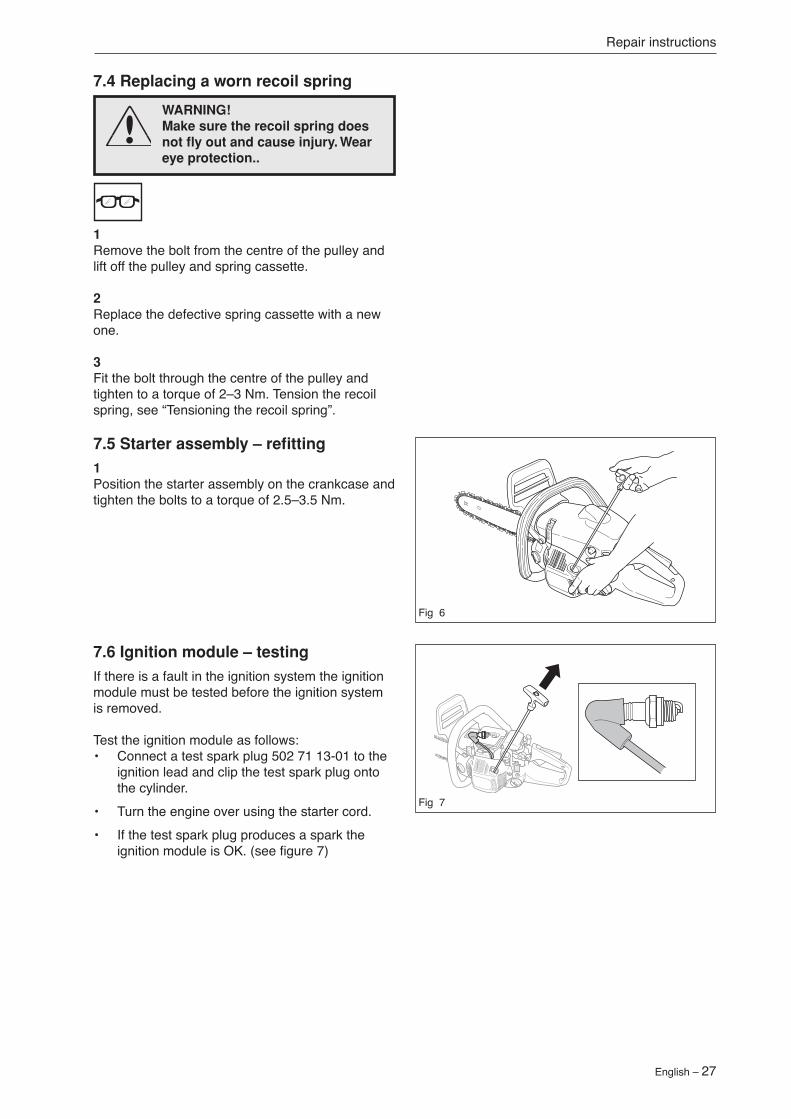
WARNING!Make sure the recoil spring does not fly out and cause injury. Wear eye protection..
7.4 Replacing a worn recoil spring
1Remove the bolt from the centre of the pulley and lift off the pulley and spring cassette.
2Replace the defective spring cassette with a new one.
3Fit the bolt through the centre of the pulley and tighten to a torque of 2–3 Nm. Tension the recoil spring, see “Tensioning the recoil spring”.
7.5 Starter assembly – refitting
1Position the starter assembly on the crankcase and tighten the bolts to a torque of 2.5–3.5 Nm.
7.6 Ignition module – testing
If there is a fault in the ignition system the ignition module must be tested before the ignition system is removed.
Test the ignition module as follows:• Connect a test spark plug 502 71 13-01 to the
ignition lead and clip the test spark plug onto the cylinder.
• Turn the engine over using the starter cord.• If the test spark plug produces a spark the
ignition module is OK. (see figure 7)
Fig 6
Fig 7

28 – English
Repair instructions
7.7 Ignition module and flywheel – removal
1
Remove the cylinder cover. Disconnect the HT lead, remove the spark plug and fit piston stop 502 54 15-01. in its place. Take off the starter assembly, release the leads from the cable guide and remove it (see figure 8).
4Knock on the punch using a metal mallet until the flywheel releases from the shaft. Remove the punch and the flywheel (see figure 10).
Cleaning and inspection• Clean all parts, especially the tapers on the
flywheel and shaft.• Check that the flywheel is not cracked or da-
maged in any other way.
2If replacing the ignition module (B), loosen the cable lug (C) and screw (A) and unscrew it. The ignition module can be left in place if you are simply removing the flywheel (see figure 9).
3Loosen the flywheel nut (E) using a suitable socket and remove it (see figure 10).
When replacing the cables, they are fitted on the stop switch, as shown in figure (see figure 9).
Fig 8
Fig 9
Fig 10

English – 29
Repair instructions
7.8 Ignition module and flywheel – refitting
1Fit the flywheel on the crankshaft journal. Turn the flywheel so that the key lines up with the keyway in the shaft.
Fit the nut on the shaft and tighten to a torque of 25-30 Nm (see figure 11).
2To refit the ignition module proceed as follows:
Turn the flywheel so that the magnets are in line with the ignition module. Fit the ignition module with the plastic feeler gauge (502 51 34- 02) held in position at the same time, without tightening the bolts. Fit the earth cable (black) (A). Set a distance of 0.3 +/- 0.1 mm, between the ignition module and magnet. The measurement applies to the two lowest lugs on the ignition module. Tighten the screws, tightening torque 4.5–6 Nm. Fit the blue cable on the ignition module (see figure 12).
3Then refit:• cable guide and press the leads into position• HT lead• starter assembly, tighten to a torque of 2.5–3.5
Nm• cylinder cover
When replacing the cables, they are fitted on the stop switch as shown in middle figure on the pre-vious page.
Fig 11
Fig 12

30 – English
Repair instructions
4Secure the clutch in a vice as shown in figure. Care-fully release the clutch springs (C) (see figure 16).
NOTE! Handle the clutch springs carefully. If they are opened up too much they could dam-age the saw.
Inspection and cleaning• Clean and inspect all parts carefully. If there
are any cracks or other defects replace the damaged parts with new ones. Always use original parts.
• Check the thickness of the clutch shoes by using vernier callipers to measure the diameter of the clutch. If the diameter is less than 60 mm the clutch assembly must be replaced (see figure 16).
3Unbolt the clutch using tool 502 54 16-03 (B) and a suitable socket or wrench. Turn the clutch clock-wise to remove it (see figure 15).
7.9 Centrifugal clutch – removal
1Remove the cylinder cover. Disengage the chain brake by pushing the kickback guard backwards. Undo the bar nut and remove the clutch cover, bar and chain (see figure 13).
2Disconnect the HT lead. Remove the spark plug and fit piston stop 502 54 15-01 (A) in its place (see figure 14). Fig 13
Fig 14
Fig 15
Fig 16

English – 31
7.10 Centrifugal clutch – refitting
1Insert the clutch springs in the shoes.
2Screw the clutch (anti-clockwise) until it stops. Now tighten using tool 502 54 16-03 and a suitable socket wrench or combination spanner. Tightening torque min. 20 Nm.
3Remove the piston stop. Fit the spark plug, tightening it to a torque of 20 Nm, then connect the HT lead.
Then refit:• cylinder cover• guide bar• chain• clutch cover
7.11 Dismantling the oil pump and screen
1Empty and clean the oil tank.
Remove the cylinder cover. Release the brake by moving the front hand guard backward. Undo the bar nut and remove the clutch cover, bar and chain. Loosen spark plug cap and remove the spark plug, fit the piston stop 502 54 15-01. Loosen the clutch (clockwise) using tool 502 54 16-03 and a suitable socket wrench or combination spanner.
2Remove the centrifugal clutch (A). Remove the clutch drum (B), needle bearing (C) and pump drive wheel (D) (see figure 17).
3Unscrew the chain guide plate (see figure 18).
4Unbolt the oil pump from the crankcase and remove it together with the oil pressure hose (see figure 19).
5The oil pump (E) is not adjustable (see figure 20).
Cleaning and inspection• Clean and inspect all parts carefully. If there are
any cracks or other defects replace the dama-ged parts with new ones. Always use original parts.
• Lubricate all moving parts with chain oil.
Repair instructions
E
E
Fig 17
Fig 18
Fig 19
Fig 20

32 – English
Repair instructions
7.12 Assembling the oil pump and screen
1Fit the chain guide plate with tightening torque 1–1.5 Nm.
Fit the drive gear, needle bearing, clutch drum and the clutch (min. 20 Nm).
Fit the chain, bar and clutch cover.
WARNING!Poor chain lubrication can result in failure of the chain, which could cause serious or fatal injury.
7.13 Air intake system – removal
The air intake system comprises:• intake manifold (A)• plastic partition wall (B)• rubber partition wall (C) (see figure 21)1
Now loosen the screws using tool 502 50 87-01..
7.14 Assembling the intake system
1Fit the intake manifold (A) and the partition walls (B and C) on the cylinder using tool 502 50 87-01 (see figure 21).
Cleaning and inspectionClean and check all parts carefully. Parts must be replaced if cracked or show signs of other defects. Always use original spare parts.
Fig 21

English – 33
Repair instructions
WARNING! The fuel used in the chainsaw has the following hazardous properties:1. The fluid and its fumes are poisonous.2. Can cause skin irritation.3. Is highly inflammable.
7.15 Carburettor
DescriptionThe drawings accompanying this description do not correspond with the carburettor on the chainsaw. They only show the principle for the design and function.
DesignThe carburettor is based on three sub-systems:
• The metering unit, A.• The mixing venturi, B.• The pump unit, C.
In the pump unit (C), fuel is pumped from the fuel tank to the metering unit. One side of the pump di-aphragm is connected to the crankcase and pulses in time with the pressure changes in the crankcase. The other side of the diaphragm pumps the fuel (see figure 24).
The jets and the fuel’s control functions are located in the metering unit (A). Here the correct quantity of fuel is adjusted for the actual speed and power output (see figure 22).
The mixing venturi (B) houses the choke, throttle valve and diffuser jets. Here air is mixed with the fuel to give a fuel/air mixture that can be ignited by the ignition spark (see figure 23).
Fig 22
Fig 23
Fig 24

34 – English
Repair instructions
FunctionThe carburettor operates differently in the following modes:
• Cold start mode• Idling mode• Part throttle mode• Full throttle mode
In the cold start mode (see figure) the choke valve (H) is fully closed. This increases the vacuum in the carburettor so that fuel is sucked more easily from all the diffuser jets (D, E and F). The throttle valve (I) is partly open. Extra air inlet (J) is closed (see figure 25).
In the idling mode (see figure) the throttle valve (I and J) is closed and the choke valve (H) is open.
Air is sucked in through an aperture in the throttle valve and a small amount of fuel is supplied th-rough the diffuser jet (D) (see figure 26).
In the part throttle mode (see figure below) the th-rottle valve (I) is partially open and the choke valve (H) is open. Fuel is supplied through the diffuser jets (D and E). The throttle valve (J) starts to open (see figure 27).
In full throttle mode (se figure below) all valves are open and fuel is supplied through all diffuser jets (D, E, F and G). Extra air inlet (J) is also fully opened (see figure 28).
Fig 25
Fig 26
Fig 27
Fig 28

English – 35
Repair instructions
Dismantling the carburettor1. Dismantle the cylinder cover and the air filter.2. Disassemble the handle holder (see figure 29).
Fig 29
Fig 30
Fig 31
Fig 32
3. Push the throttle actuator rod out of the han-Push the throttle actuator rod out of the han-dle part. Unhook it from the carburettor (see figure 30).
4. Remove the return hose (B) and suction hose (C). Loosen the fuel pump (D). Let the fuel hose (G) remain in place (see figure 31).
5. Loosen the screws (E) and unhook the rubber mountings (F) (see figure 32).
NOTE! Take care when lifting out the carburettor so that the fuel hose does not become loose.
36 – English
Repair instructions
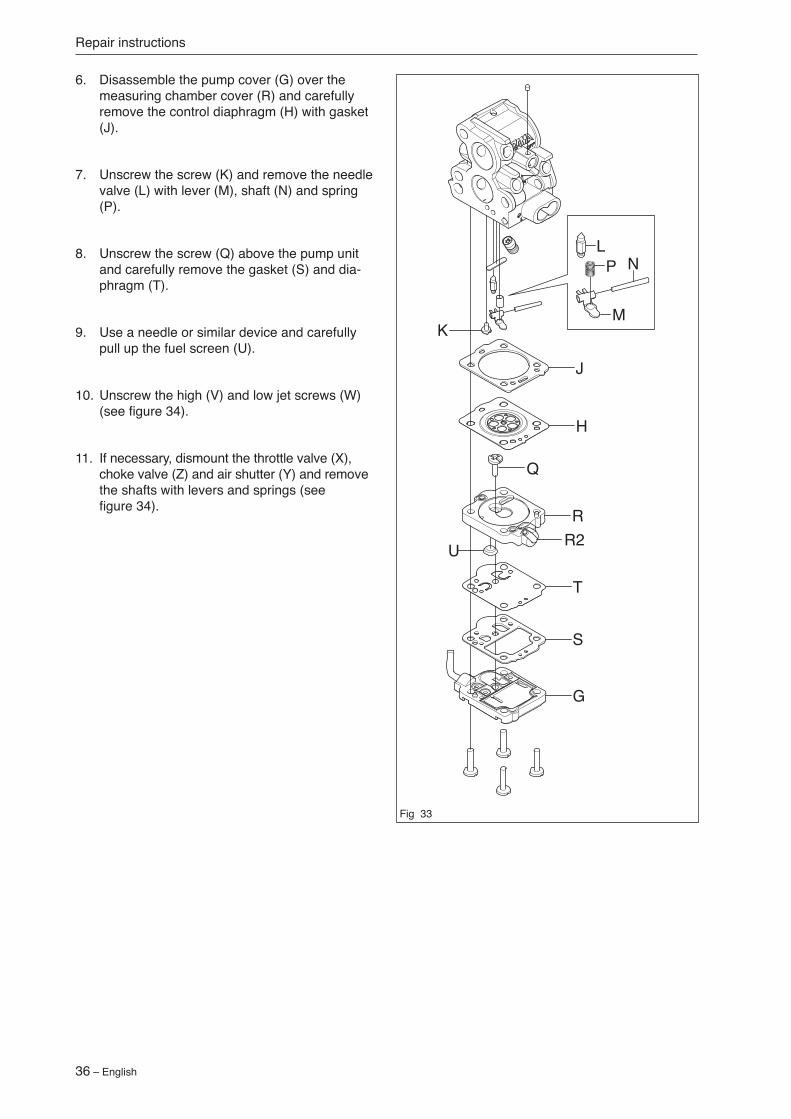
6. Disassemble the pump cover (G) over the measuring chamber cover (R) and carefully remove the control diaphragm (H) with gasket (J).
7. Unscrew the screw (K) and remove the needle valve (L) with lever (M), shaft (N) and spring (P).
8. Unscrew the screw (Q) above the pump unit and carefully remove the gasket (S) and dia-phragm (T).
9. Use a needle or similar device and carefully pull up the fuel screen (U).
10. Unscrew the high (V) and low jet screws (W) (see figure 34).
11. If necessary, dismount the throttle valve (X), choke valve (Z) and air shutter (Y) and remove the shafts with levers and springs (see figure 34).
Fig 33

English – 37
Repair instructions
Cleaning and inspectionClean all units in clean petrol.
Use compressed air to dry the petrol on the com-ponents. Direct the air through all channels in the carburettor housing and ensure that they are not blocked. Check the following:
1. That gaskets, pump and control diaphragms are undamaged.
2. That there is no play on the throttle and choke valve shafts.
3. That the needle valve (L) and its lever (M) are not worn (see figure 33).
4. That the fuel screen (U) is whole and clean (see figure 33).
5. That the tips of the high (V) and low jet screws (W) are not damaged (see figure 34).
6. That the intake manifold (R2) is undamaged (see figure 33).
7. The carburettor has an extra air shutter con-nected in parallel with the ordinary throttle valve.
Fig 34

38 – English
Repair instructions
AssemblyMaintain a high level of cleanliness when assem-bling the carburettor. The slightest contamination can result in running problems.1. If the throttle and choke valves, together with
levers and springs were removed, they should be refitted. The spring is tensioned 1-2 turns. Lubricate the shaft bearings with light oil.
2. Fit the high (V) and low (W) speed needles and springs. Note! Do not fully tighten the screws. This will damage the seats and needle tips.
3. Fit the fuel filter (U) by using the handle of a small screwdriver. (see figure 33)
4. Fit pump cover (G), gasket (S) and measuring chamber cover (R) over the pump unit (see figure 33).
5. Fit the needle valve (L) with lever (M), shaft (N) and spring (P) and tighten the screw (K). Fit the expansion washer (F) (see figure 35).
6. Check using a ruler or the like that the lever is level with the assembly plane on the cover. The lever arm can be bent if necessary (see figure 36).
7. Fit the control diaphragm (T) with gasket (S) and measuring chamber cover (R) over the metering unit (see figure 37).
8. Press in the screen (U). Fit the measuring chamber cover (R) and tighten the screw (Q) (see figure 37).
9. Put together the gasket (J) and control dia-phragm (H) and press up (see figure 37).
10. Assemble all the parts and tighten the four screws (see figure 37).
11.. Carry out a pressure test.
Fig 35
Fig 36
Fig 37

English – 39
Leakage at Fault with
Diffuser jets Needle valve Leakage in impulse tube Pump diaphragm Ventilation hole on metering unit. Control diaphragm
Pressure testing the carburettorPressure testing should be carried out with the car-burettor fully assembled. Testing should always be carried out after the carburettor has been repaired, but it can also be carried out as trouble shooting before dismantling the carburettor.
See figure and carry out the test as follows:1Set the high and low jet screws two turns fromthe bottom.
2 Connect pressure tester to the carburettor’s fuel intake.
3 Lower the carburettor into a beaker of water (see figure 37).
4 Pump the pressure up to 50 kPa.
5 No leakage is permitted. If a leakage occurs refer to the table below.
Repair instructions
Fig 38

40 – English
Assemble on the saw1. Press the carburettor down towards the parti-
tion wall. Make sure that it gets into the correct position.
2. Fit the filter holder by hooking the choke con-trol into the choke lever (A).
3. Hook on the rubber mountings. Insert and tighten the screws.
Repair instructions
Fig 39
Fig 40
Fig 41
Fig 42
4. Insert the return hose (B) into its position in the filter holder.
5. Press on the fuel diaphragm (D). Fit the suc-tion hose (C) and return hose (B).
6. Hook in the throttle actuator rod into the carbu-rettor. Thread the handle holder into the throttle actuator rod (A). Push the rod forwards so that it can be inserted into the handle part.
7. Push down the handle holder into the filter holder (see figure 42).
8. Assemble the air filter and cylinder cover.9. Mount the handle holder.

English – 41
Repair instructions
Carburettor adjustmentConditions during adjustment• The air filter should be clean and the cylinder
cover fitted when adjustments are made. Ad-justing the carburettor with a dirty air filter will give a too lean fuel mixture the next time the air filter is cleaned. This can result in serious damage to the engine.
• Mount, for this model, approved bar and chain combination (see Technical data in the Operator's Manual).
435/e 16" 440e 16"• The chain should not be tensioned more than
that it remains ~ 0,2 inches to the bar.(See figure 43)
Replacement of the H-needle or complete car-burettor1. Carefully screw the new H-needle to the bot-
tom and turn it anticlockwise ”A” turns. 435/e A = 2 440e A = 22. Start the engine. If necessary, adjust the idling
speed with the T-screw until the chain stops.3. Adjust the H-needle to give a top speed of ”B”
rpm. Use a tachometer. 435/e B = 12500 -13 000, speed limitation
440e B = 12500-13 000, speed limitationUse screwdriver 530 03 55-60.
4. Let the engine run at ”B” rpm ~ 1 minute, until warm.
Replacement of the L-needle1. Screw the new L-needle to the bottom and
then turn it counterclockwise ”D” turns. 435/e D = 2,5
440e D = 2,5
(See figure 44)
Fig 43
Fig 44

42 – English
7.16 Tank unit
Dismantling1. Drain the fuel from the tank.2. Dismantle the cylinder cover, bar and chain.
See the Operator's Manual.3. Unhook the throttle actuator rod (G) from the
carburettor (see figure 45).4. Dismantle the fuel hose (B) and the fuel pump
return hose (D) (see figure 45).5. Remove the screws. (A). Loosen the handle
(see figure 46).6. Dismantle the fuel tank.
NOTE! Exercise care so that the fuel hose and throttle cable are not damaged.
Repair instructions
WARNING! The fuel used in the chain saw has the following hazardous properties:1. The fluid and its vapour are poisonous.2. Can cause skin irritation.3. Is highly inflammable.
7.17 Venting the fuel tank
The two-way valve (C) has the following properties(see figure 47):• Controlled opening pressure in both directions,
which prevents a positive pressure or a vacuum developing in the fuel tank and impairing engine performance. This also prevents fuel leakage.
• Opening pressure outward 100–450 mbar.• Opening pressure inward (vacuum) max.
70 mbar. (2 positions)TestOpening pressure outward:1. Open the filler cap and let the cap remain open
during the entire test. Drain the fuel from the tank.
2. Connect the pump, ref. no. 531 03 06-23, to the tank valve. (C)
3. Switch the pump to vacuum mode.4. After pumping the indicator should be between
10–45 kPa.Opening pressure inward:1. Open the filler cap and let the cap remain open
during the entire test. Drain the fuel from the tank.
2. Connect the pump, ref. no. 531 03 06-23, to the tank valve. (C)
3. Switch the pump to pressure mode.4. After pumping the indicator should stop at max.
7 kPa.
Fig 45
Fig 46
Fig 47

English – 43
Assembly 1. If the throttle lock has been removed, this must
be assembled before the tank unit and engine unit are assembled.
2. Lift the engine unit above the tank unit and insert the fuel hose (in J), return hose (in H) in the bottom of the carburettor compartment (see figure 48).
3. Fit the handle with the screws (A). Tighten the screws with the torque set out in the service data (see figure 46).
4. Fit the fuel hose (B) and fuel pump return hose (D) on the carburettor (see figure 45).
5 Mount the throttle actuator rod (see figure 45).6 Assemble the cylinder cover, bar and chain.
See the Operator's Manual.
Repair instructions
7.18 Vibration damping system
Dismantling1. Dismantle the following parts: • Bar and chain. See the Operator's Manual. • Cylinder cover. See the Operator's Manual. • Tank unit and handle.2. Dismantle the spring on the cylinder with the
help of a 5 mm allen key (see figure 49).3. Dismantle the springs on the tank unit with the
help of a 5 mm allen key (tool 502 50 18-01) (see figure 50).
Cleaning and inspectionClean and inspect all parts.
Assembly1. Assemble the springs on the cylinder with the
help of a 5 mm allen key (tool 502 50 18-01). Note! Springs with a greater resistance are av-
ailable, but should only be used together with a longer bar. See illustrated part list for spare part number.
2. Assemble the following parts: • Tank unit and handle. • Cylinder cover. See the Operator's Manual. • Bar and chain. See the Operator's Manual.
Fig 48
Fig 49
Fig 50

44 – English
1First remove the old fuel filter from the tank unit using special tool 502 50 83-01.
2Pull the fuel hose (B) out of the tank unit and pull off the filter.
3Fit the new fuel filter (A) and feed the fuel hose back into position.
7.20 Replacing the fuel hose/ return hoseThe fuel hose is moulded and can only be removed from outside of the fuel tank.Use suitable pliers with a plain cutting face and loosen the hose (B) (see figure 45) from the fuel tank. Align the cut-out against the plastic pin when assembling. Replace the return hose when required.
7.21 Replacing the air-purgeDismantling
1. Dismantle the cylinder cover and the air filter.2. Loosen the suction hose (C) and return hose
from the fuel pump (see figure 31).3. Unsnap the fuel pump from the filter holder.Assembling
1. Fit the return hose on the fuel pump.2. Snap the purge into the filter holder (see figure
51).4. Assemble the air filter and cylinder cover.
NOTE!
Do not use knurled pliers to disconnect or reconnect the fuel hose. This could dam-age the hose and lead to leakage or frac-ture.
Repair instructions
7.19 Replacing the fuel filter
Fig 51
Fig 52

English – 45
Repair instructions
7.22 Piston and cylinder – removal
1Remove:• cylinder cover• carburettor (see “Carburettor – removal”)• silencer• spark plug• fuel unit
If replacing the cylinder:Remove the intake manifold, see “Air intake sys-tem – removal”.
Cleaning and inspectionClean all the components, scraping off all traces of old gasket and carbon from the following places:
• Piston crown• Top of the cylinder bore• Cylinder exhaust port• Decompression valve channel• Cylinder base and/or crankcase(see figure 56)
Fig 53
3Cover the opening in the crankcase (see figure 54).
4Remove the circlips from the ends of the gudgeon pin and press it out. Then lift off the piston (see figure 53 and 54).
5Remove the little end bearing (see figure 54).
Fig 54
Fig 55
2Undo the four cylinder bolts from the underside and lift the cylinder off carefully (see figure 52).
Fig 56

46 – English
Repair instructions
Check the following:
• The surface coating of the cylinder is not worn through, especially in the upper part of the cylinder.
• The cylinder is free from score marks and areas of wear.
• The piston is free from score marks. Small scratches can be polished out with fine emery paper.
• The piston ring is freely moving in its groove.(see figure 57)
• Measure piston ring wear. This should not exceed 1 mm (see figure 58). Use the piston to push the piston ring for correct alignment.
• The needle roller bearing is undamaged.• The intake manifold is undamaged.• That the air hoses and impulse hose are unda-
maged.• Pressure test the decompression valve.
Fig 57
Fig 58

English – 47
A BFaults and causesScore marks on the piston (A)1. Incorrect carburettor setting. Too high over-
speed.2. Too low octane fuel.3. Too low or incorrect oil in the fuel.
Carbon build-up (B)1. Incorrect carburettor setting. Too low over-
speed. 2. Too much or incorrect oil in the fuel.
Piston ring breakage1. Excessive engine speed.2. Piston ring worn out.3. Oversized piston ring groove.(See figure 59)
7.23 Piston and cylinder – refitting
1Lubricate the little end bearing with two-stroke oil and insert it in the connecting rod (see figure 60).
2Fit the piston with the arrow pointing towards the exhaust port. Push the gudgeon pin in and fit the circlips. NOTE! Use new wire fuses (see figure 60).
3Fit the intake manifold on the cylinder, with insula-ting plate (4 screws).
4Lubricate the piston ring and piston with two-stroke oil.
5Fit new cylinder base gaskets. Lower the cylinder over the piston carefully.
6Fit the cylinder bolts, tightening them in diagonal pairs to a torque of 13–15 Nm.
NOTE!
It is very important that there are no leaks in the inlet system, otherwise the engine may seize.
Repair instructions
Fig 59
Fig 60
Fig 61

48 – English
Repair instructions
Inlet manifoldThe intake system has two intakes.1. The lower intake leads the fuel and air mixture
from the carburettor to the cylinder.2. The upper intake leads air to the cylinder.
Assembling the intake system
1Mount the intake manifold (A) and the partition walls (B and C) on the cylinder using tools 502 50 87-01 (see figure 62).
Fig 62

English – 49
Repair instructions
WARNING!After pressure testing the cylinder, check that the inlet manifold is seated correctly, otherwise the saw may be damaged.
7.24 Cylinder – pressure testing
1 Remove:• cylinder cover• carburettor• spark plug
2Mount cover plate 504 63 93-01 (see figure 63).
3 Loosen the screws on the muffler and press the rubber sheet 502 54 11-02 between the muffler and cylinder. Tighten the top two muffler screws (see figure 64).
4Fit the pressure testing spark plug 503 84 40-02 and connect the pressure testing tool 531 03 06-23 (see figure 64).
5Pump the pressure up to 80 kPa (0.8 bar). Wait 30 seconds. The pressure should not be less than 60 kPa (0.6 bar). Remove the cover plates from the silencer and carburettor, tighten the bolts to the specified torque. Remove the pressure test nipple 503 84 40-02 and refit the spark plug.
Fig 63
Fig 64
Fig 65
asahaglundovinder
Typewritten Text
asahaglundovinder
Typewritten Text
asahaglundovinder
Typewritten Text
asahaglundovinder
Typewritten Text
asahaglundovinder
Typewritten Text

50 – English
Repair instructions
7.25 Crankshaft complete - dismantling 1Remove the following:• chain and bar • clutch cover• cylinder cover• starter assembly* • centrifugal clutch* • carburettor* • silencer* • handle system• hand guard• piston and cylinder* * See special instructions.
2Lift the crankshaft completely out of the crankcase (see figure 66).
7.26 Crankshaft bearings – replacement
Remove:• The crankshaft complete from the crankcase.1Pull the crankshaft bearing off of the crankshaft using a bearing puller (see figure 67).
Fig 66
Fig 67
Fig 68
2Place a new bearing on the shaft and push into position using tool 502 50 30-18 (see figure 68).

English – 51
Repair instructions
7.27 Crankshaft complete – reassembly
1Fit the crankshaft complete in the crankcase.
Refit the following parts:• piston and cylinder* • handle system• hand guard • silencer* • carburettor* • centrifugal clutch* • starter assembly* • cylinder cover• clutch cover• chain and bar * See special instructions.
7.28 Repairing damaged threads
A repair kit, 503 27 33-01, is available for repairing damaged threads.
First drill out the hole using: 6,1 mm drill bit for plastic crankcaseThen screw in the thread insert using a suitable bolt and spanner.
This type of thread insert is best suited for use in plastic and magnesium, but not for repairing threads in aluminium. In that case use a helicoil insert with metric screw (see figure 69).
Fig 69

52 – English
Repair instructions
7.29 Replacing the bar bolt
Replacing the front bar guide.
1Drain the oil tank.
2Knock through the old guide bar bolt so that it falls into the oil tank.3Remove the bolt from the oil tank.
4Secure steel wire to the outer part of the bar bolt (A), thread the steel wire through the oil tank and out through the bolt hole in the crankcase (see figure 70).
5Pull the steel wire so the bolt comes out of its hole (see figure 71).
6Check that the bolt's square head fits in the washer (D) which is positioned in the cut-out in the crankcase.
7Pull out the bar bolt with its nut. Place a spacer between the nut and crankcase (see figure 71).
8Refill with chain oil.
Replacing the rear bar guide1Pull out the bar guide (C) with the help of slip-joint pliers (see figure 70).
2Fit the bar guide with the help of a hammer.
Fig 70
Fig 71

English – 53
Troubleshooting
8 Troubleshooting
Contents
8.1 Troubleshooting ..............................................................................................................548.2 Troubleshooting methods ...............................................................................................55

54 – English
Troubleshooting
Starting
Idling (low rpm)
Idling (low rpm) (cont.)
Adjust L screwLeaking air intake hose (rubber)Loose carburettor mounting boltsLoose or faulty fuel hoseFuel filter blockedFuel line blockedFuel tank vent blockedThrottle valve pivot stiffThrottle pushrod stickingDefective throttle return springBent throttle stopFaulty diffuser jet
Adjust L screwWorn needle valveNeedle valve set too highWorn needle valve leverLeaking control diaphragm/cover plateNeedle valve assembly sticking
Will not idle
Idling too rich
8.1 Troubleshooting
The various faults that can affect a chainsaw are divided into four groups. In each group the likely symptoms are given on the left and possible causes are listed on the right. The most likely faults are given first, and so on.
Worn needle valveLeaking control diaphragm/cover plateNeedle valve assembly stickingWorn needle valve leverFaulty diffuser jet
Fuel filter blockedFuel line blockedLeaking air intake hose (rubber)Loose carburettor mounting boltsWorn throttle valve pivotLoose throttle valve screwWorn throttle valveNeedle valve assembly stickingLeak in metering system (air or fuel)Metering system centre knob is wornHole in diaphragmLeaking control diaphragm/cover plateCrankcase leaking
Fuel line blockedNeedle valve set too highNeedle valve assembly stickingLeak in metering system (air or fuel)Leaking control diaphragm/cover plateFaulty diffuser jetsCrankcase leaking
Needle valve set too highNeedle valve assembly stickingMetering system damagedWorn needle valveLeaking control diaphragm/cover plateMetering system incorrectly assembled
Difficulty starting
Carburettor leaking fuel
Flooding when engine not running
Adjust L screwAir filter blockedChoke not workingWorn choke pivotWorn choke valveFuel filter blockedFuel line blockedPiston ring seizedBlocked impulse channel
Loose or faulty fuel pipeHole in diaphragmWorn needle valveNeedle valve assembly stickingNeedle valve set too highLeak in metering system (air or fuel)Loose cover on carburettorpump side
Worn needle valveNeedle valve set too highNeedle valve assembly sticking
Idles when L screw closed
Idling uneven
L screw requires constant adjust-ment
Too much fuel at idling

English – 55
Troubleshooting
Acceleration och retardation
Does not accelerate
Engine stalls when throttle released
Over rich acceleration
Adjust L screwAdjust H screwBlocked air filterBlocked fuel tank ventBlocked fuel filterFuel line blockedLoose or damaged fuel hoseImpulse channel blockedLoose cover on carburettor pump sideFaulty pump diaphragmLeaking air intake hose (rubber)Loose carburettor mounting boltsNeedle valve set too lowMetering system incorrectly assembledNeedle valve assembly stickingFaulty diffuser jetsBlocked silencer
Adjust L screwAdjust H screwFaulty pump diaphragmNeedle valve set too highNeedle valve assembly stickingFaulty diffuser jets
Adjust L screwAdjust H screwBlocked air filterFaulty pump diaphragmFaulty diffuser jets
8.2 Troubleshooting methods
In addition to the faults described in the above table, trouble shooting can be carried out on specific components or sub-systems of the chainsaw. The various procedures are described in the relevant chapters, see the contents page, as follows:
• Checking the operation of the chain brake • Measuring the resistance of the stop plate • Pressure testing the carburettor• Pressure testing the decompression valve • Pressure testing the cylinder
High rpm
Will not run at full throttle
Low power
Will not “four-stroke”
Adjust H screwBlocked air filterBlocked fuel tank ventBlocked fuel filterFuel line blockedLoose or damaged fuel hoseImpulse channel leakingImpulse channel blockedLoose cover on carburettor pump sideFaulty pump diaphragmLeaking air intake hose (rubber)Loose carburettor mounting boltsNeedle valve set too lowMetering system damagedMetering system incorrectly assembledLeaking control diaphragm/cover plateNeedle valve assembly stickingBlocked silencer
Adjust H screwBlocked fuel tank ventBlocked fuel filterImpulse channel leakingImpulse channel blockedLoose cover on carburettor pump sideFaulty pump diaphragmBlocked air filterNeedle valve assembly stickingLeak in metering system (air or fuel)Metering system incorrectly assembledLoose diaphragm rivetHole in diaphragmLeaking control diaphragm/cover plate
Blocked fuel tank ventBlocked fuel filterFuel line blockedLoose or damaged fuel hoseImpulse channel leakingImpulse channel blockedLoose cover on carburettor pump sideFaulty pump diaphragmLeaking air intake hose (rubber)Loose carburettor mounting boltsNeedle valve set too lowLeak in metering system (air or fuel)Metering unit incorrectly assembledLoose diaphragm rivetHole in diaphragmLeaking control diaphragm/cover plate

2008W11
504 64 38-26