Working with Giano Richard Neil Pittman Microsoft Research.
51
Working with Giano Richard Neil Pittman Microsoft Research
-
date post
21-Dec-2015 -
Category
Documents
-
view
222 -
download
1
Transcript of Working with Giano Richard Neil Pittman Microsoft Research.

Working with Giano
Richard Neil Pittman
Microsoft Research

Procedures
• Installing Giano• Running Simulations in Giano from Visio• Running Simulations from the Command
Line• Connecting to Simulations using Serplexd• Simulating EB63 with HostFS• Creating/modifying a configuration• Creating a new Giano module

Procedure #1
• Installing Giano• Running Simulations in Giano from Visio• Running Simulations from the Command
Line• Connecting to Simulations using Serplexd• Simulating EB63 with HostFS• Creating/modifying a configuration• Creating a new Giano module

Installing Giano
1. Extract Giano Files from archive, or copy from CD, or just run the MSI file (V2)
2. Rebuild Giano (if necessary)
3. Install Microsoft Visio Scripts (if Microsoft Visio 2003 installed, strongly recommended)

Rebuilding Giano1. Have Microsoft Visual Studio installed on the
Computer (VC6,7 and 8 are all ok)2. Delete all *.manifest files from the subtree3. Do not delete the following files from the ‘bin’
folder:
4. Open a MVS Command Prompt and call ‘nmake clean all’
5. For Win64 do a “set AMD64=1” first.
• bbuniq.exe• bbw.dll• cbw32.dll• mcc.dll• msvcr71.dll• np.dll• vpi2g.dll• vssver.scc• vvp.dll
• bbcat.exe• bbdump.exe• bbfind.exe• bbmatch.exe• bbmerge.exe• bbrewrite.exe• bbs.dll• bbselect.exe• bbsort.exe

Install Microsoft Visio Templates
• Double click the ‘giano.msi’ file in the Visio\v2\ directory
• Follow the installation wizard and select the ‘Typical Install’
• Copy the Giano binaries from the ‘bin’ directory to ‘C:\Program Files\Microsoft Giano\bin\’
• Add the installation directory to your path:– set path=%path%;” C:\Program Files\
Microsoft Giano\bin”

Visio and Macros
• You must enable Visio macros, set Tools::Macros::Security to Medium or Low

Procedure #2
• Installing Giano• Running Simulations in Giano from Visio• Running Simulations from the Command Line• Connecting to Simulations using Serplexd• Simulating EB63 with HostFS• Creating/modifying a configuration• Creating a new Giano module

Running Simulations in Giano from Microsoft Visio
1. Open the *.vsd of the configuration you wish to run.

Running Simulations in Giano from Microsoft Visio
2. Right Click on CPU model and select ‘Create the Simulation Configuration File’. This creates the *.plx configuration file based on the model drawn in Microsoft Visio
3. Right Click on the CPU model and select ‘Start Simulation’. The simulation will start in a command window.

Running Simulations in Giano from Microsoft Visio

Running Simulations in Giano from Microsoft Visio

Procedure #3
• Installing Giano• Running Simulations in Giano from Visio• Running Simulations from the
Command Line• Connecting to Simulations using Serplexd• Simulating EB63 with HostFS• Creating/modifying a configuration• Creating a new Giano module

Running Simulations from the Command Line
1. Open a Command Prompt to the directory where your *.plx configuration file is located.

Running Simulations from the Command Line
2. Type “giano.exe –Platform <name of *.plx file>” and press ‘Enter’. The simulation will begin running in this Command Window.

Running Simulations from the Command Line

Procedure #4
• Installing Giano• Running Simulations in Giano from Visio• Running Simulations from the Command Line• Connecting to Simulations using Serplexd• Simulating EB63 with HostFS• Creating/modifying a configuration• Creating a new Giano module

Connecting to Simulation using Serplexd
1. Open a Command Prompt to the directory where serplexd.exe is located.

Connecting to Simulation using Serplexd
2. Type ‘serplexd -n \\.\pipe\usart0’ and press ‘Enter’. Serplexd will begin running in this Command Window.

Connecting to Simulation using Serplexd
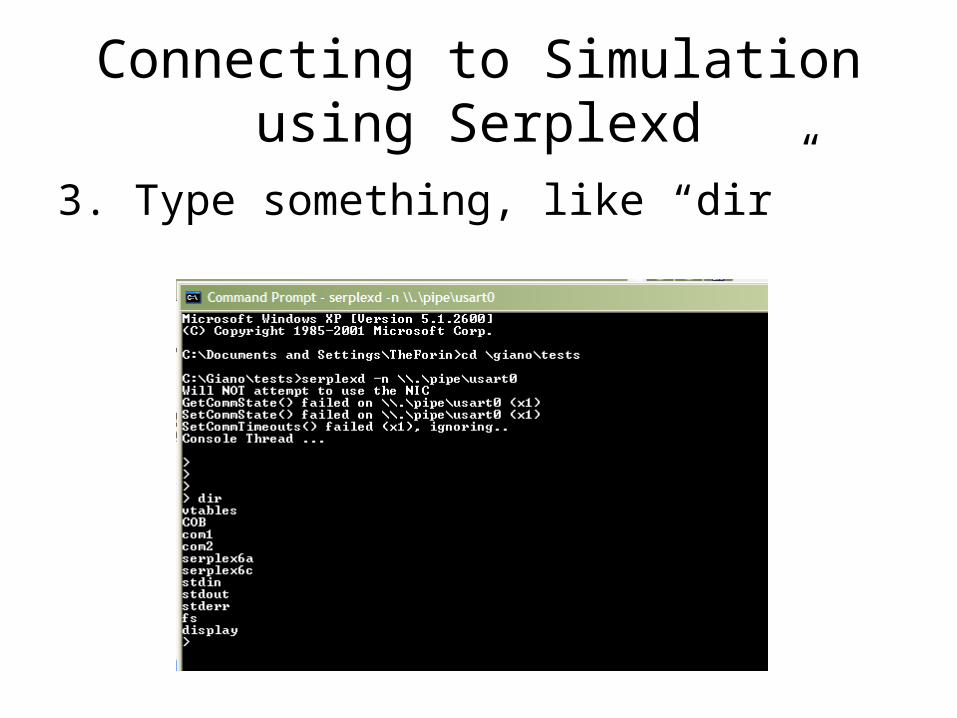
Connecting to Simulation using Serplexd
3. Type something, like “dir”

Procedure #5
• Installing Giano• Running Simulations in Giano from Visio• Running Simulations from the Command
Line• Connecting to Simulations using Serplexd• Simulating EB63 with HostFS• Creating/modifying a configuration• Creating a new Giano module

Simulating EB63 with HostFS
1. Build MMlite (compile source code)
2. Copy serplexd to MMlite build directory bin of the desired compiler (EX. C:\inv\build\arm_gnu\release\bin)
3. Copy the *.plx configuration file to the MMlite build directory

Simulating EB63 with HostFS
4. Run Microsoft Giano in the Command Line with the following in the location of the Eb63.plx file: giano.exe –Platform Eb63.plx FLASH::PermanentStorage eb63.bin

Simulating EB63 with HostFS

Simulating EB63 with HostFS
5. Run serplexd.exe from the MMlite build directory bin.

Simulating EB63 with HostFS
6. After a short time you should see the ‘Done Prompt’ to inform you that it has completed loading the first program from HostFS

Procedure #6
• Installing Giano• Running Simulations in Giano from Visio• Running Simulations from the Command
Line• Connecting to Simulations using Serplexd• Simulating EB63 with HostFS• Creating/modifying a configuration• Creating a new Giano module

Creating/modifying a Configuration
1- Start Visio and select File::New::Electrical Engineering::Giano Configurations or..
1a- Open an existing .VSD configuration
Note: the .plx file is just XML, you can edit it directly but Visio is much easier

Creating/modifying a Configuration

Creating/modifying a Configuration
2- Drag&drop new objects from “Giano Shapes” to your configuration

Creating/modifying a Configuration

Creating/modifying a Configuration
3- Connect objects with the “Connector Tool”:

Creating/modifying a Configuration

Creating/modifying a Configuration

Creating/modifying a Configuration
4- Edit an object properties by selecting it and working on the “Custom Properties”
5- Add/Remove properties by right-clicking on the Custom Properties and selecting “Define Properties”

Creating/modifying a Configuration

Creating/modifying a Configuration

Creating/modifying a Configuration
6- Save your new configuration with File::SaveAs
7- Create your .PLX file by right-clicking on a CPU module and selecting “Create the Simulation Configuration File”
8- Run your new configuration

Creating/modifying a Configuration

Procedure #7
• Installing Giano• Running Simulations in Giano from Visio• Running Simulations from the Command
Line• Connecting to Simulations using Serplexd• Simulating EB63 with HostFS• Creating/modifying a configuration• Creating a new Giano module

Creating a new Giano module
1- Create a suitable new object in your configuration and change the “Implementation” property to the name of your new device, such as “MyDevice”
Note: We will create a new Device object. Busses, CPUs and memories are similar

Creating a new Giano module

Creating a new Giano module
2- Go to the Peripherals folder and copy the template file Unknown.cpp to MyDevice.cpp
3- Edit the file as needed to implement your functionality
Note: To debug you should build Giano for debugging with “nmake clean debug”
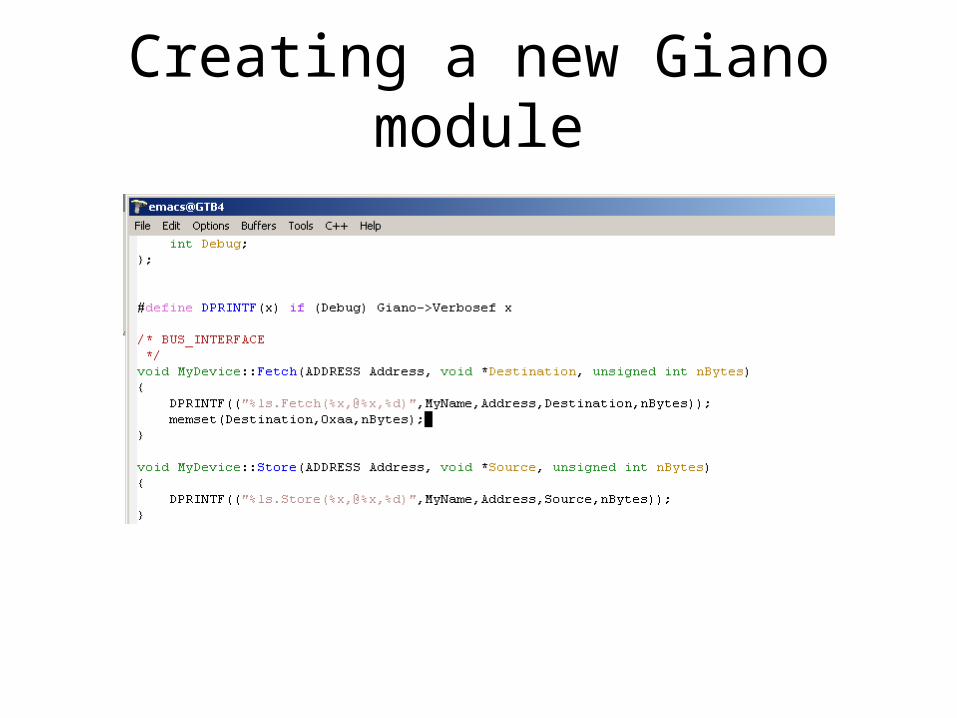
Creating a new Giano module

Creating a new Giano module
4- Edit the Peripherals\makefile to build your module along with the others

Creating a new Giano module

Creating a new Giano module
5- Rebuild from the top with “nmake debug”

Creating a new Giano module
Creating a new Giano module
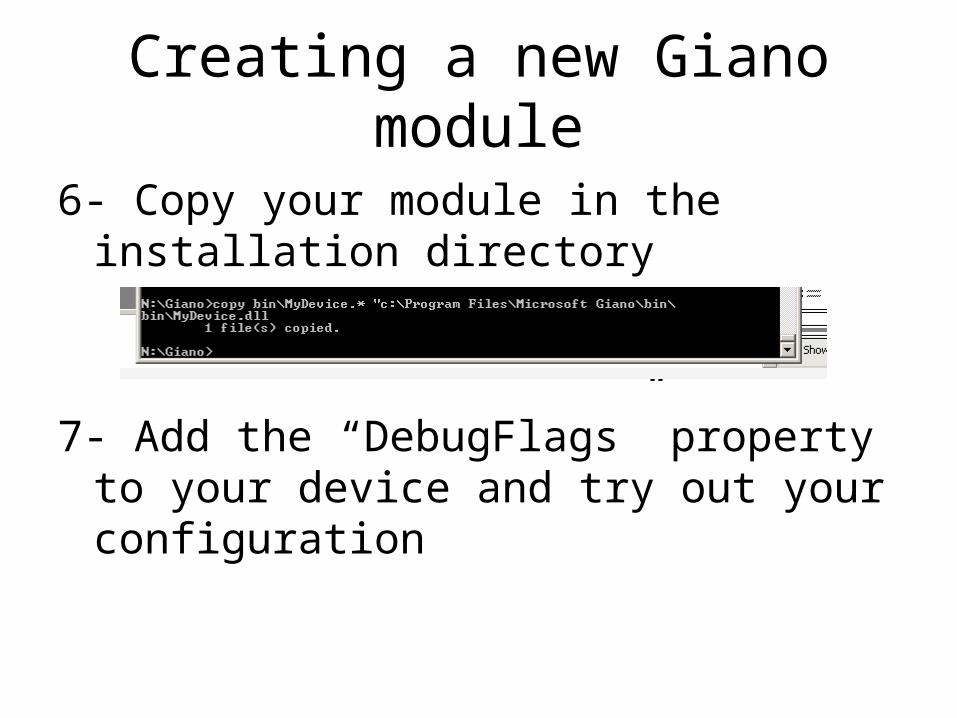
6- Copy your module in the installation directory
7- Add the “DebugFlags” property to your device and try out your configuration

Creating a new Giano module