Woods & Water Youth Outdoor Adventure Education Program
40
1 Woods & Water An educational track created for LOST Camp 2015 Audience: 7 th and 8 th Graders in Louisiana LSU AgCenter- Grant Walker 4-H Educational Center Ashley L. Powell, Associate Program Coordinator Kaitlyn Kight, Summer Staff Candace Goldbeck, Summer Staff
-
Upload
ashley-l-powell -
Category
Documents
-
view
192 -
download
0
Transcript of Woods & Water Youth Outdoor Adventure Education Program
1
Woods & Water An educational track created for LOST Camp 2015
Audience: 7th
and 8th
Graders in Louisiana
LSU AgCenter- Grant Walker 4-H Educational Center
Ashley L. Powell, Associate Program Coordinator
Kaitlyn Kight, Summer Staff
Candace Goldbeck, Summer Staff
2
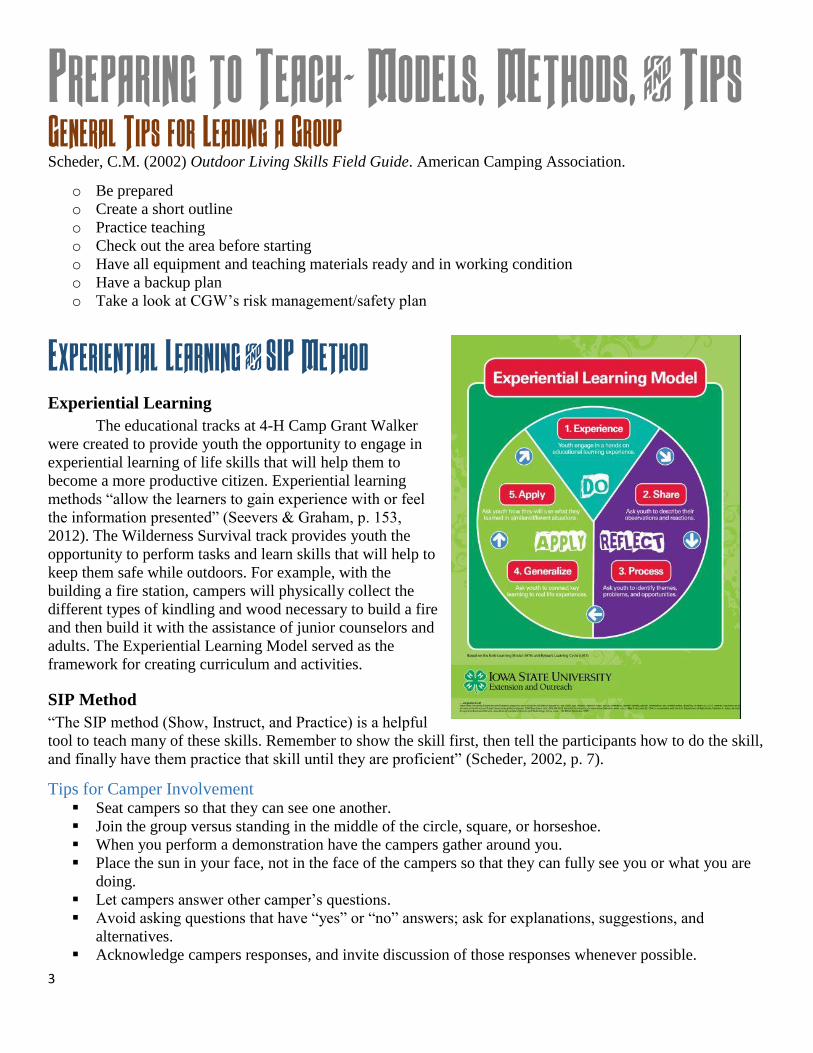
Track Schedule Morning 8:30am-11:45am Afternoon 1:30pm-4:00pm
Rotation 1 8:40am-9:30am Station 1 1:30pm-1:50pm
Rotation 2 9:40am-10:30am Station 2 1:50pm-2:50pm
Rotation 3 10:40am-11:30am RACE 3:00pm-4:00pm
Morning Schedule Station # Topic Rotation Location
1 Navigation A B C Trail by Old Rifle Range
2 Shelter Construction &
Paracord B C A Trail behind boy’s Cabin 16
3 Trip Prep & Edible Plants C A B Trail between old rifle range
Afternoon Schedule Station # Topic Rotation Location
1 Lifejacket Jeans & Standup
Paddle Boarding A B C Pond
2 Canoe Rescue B C A Pond
Amazing Race Various locations on the premises
Track Description Woods and Water is an outdoor educational program that teaches 7
th & 8
th grade students important wilderness
survival and water safety skills. This track was created specifically for the Louisiana Outdoor Science and
Technology (LOST) Camp in the summer of 2015. The program can be implemented with a group ranging
from 20-60 campers. The program can accommodate more depending on your program’s availability of
teachers, materials and resources, and space.
In the mornings, campers will be divided up into three group of 12 and rotate in 50 minute intervals through the
stations. Stations in the morning teach components of 4-H Camp Grant Walker’s Wilderness Survival and
Outdoor Adventures educational tracks.
In the afternoon, campers will rotate, as a group, through three stations at the pond. Stations in the afternoon
teach components of 4-H Camp Grant Walker’s Water Safety track, plus boating safety.
You will need a minimum of three instructors for the lessons and two lifeguards for the afternoon water
activities. Two volunteers are needed at each station in the morning and afternoon session.
3
Preparing to Teach- Models, Methods, & Tips General Tips for Leading a Group Scheder, C.M. (2002) Outdoor Living Skills Field Guide. American Camping Association.
o Be prepared
o Create a short outline
o Practice teaching
o Check out the area before starting
o Have all equipment and teaching materials ready and in working condition
o Have a backup plan
o Take a look at CGW’s risk management/safety plan
Experiential Learning & SIP Method Experiential Learning
The educational tracks at 4-H Camp Grant Walker
were created to provide youth the opportunity to engage in
experiential learning of life skills that will help them to
become a more productive citizen. Experiential learning
methods “allow the learners to gain experience with or feel
the information presented” (Seevers & Graham, p. 153,
2012). The Wilderness Survival track provides youth the
opportunity to perform tasks and learn skills that will help to
keep them safe while outdoors. For example, with the
building a fire station, campers will physically collect the
different types of kindling and wood necessary to build a fire
and then build it with the assistance of junior counselors and
adults. The Experiential Learning Model served as the
framework for creating curriculum and activities.
SIP Method
“The SIP method (Show, Instruct, and Practice) is a helpful
tool to teach many of these skills. Remember to show the skill first, then tell the participants how to do the skill,
and finally have them practice that skill until they are proficient” (Scheder, 2002, p. 7).
Tips for Camper Involvement Seat campers so that they can see one another.
Join the group versus standing in the middle of the circle, square, or horseshoe.
When you perform a demonstration have the campers gather around you.
Place the sun in your face, not in the face of the campers so that they can fully see you or what you are
doing.
Let campers answer other camper’s questions.
Avoid asking questions that have “yes” or “no” answers; ask for explanations, suggestions, and
alternatives.
Acknowledge campers responses, and invite discussion of those responses whenever possible.

4
Ask for ideas instead of saying a response is right or wrong.
Share several answers and discuss why some are appropriate than others.
5
Stations & Procedures
Before You Begin… Roll call
Have the group of campers recite the Outdoor Living Skills Pledge by the American Camping
Association
Break campers up into groups A, B, and C
Assign two volunteers to each group
Make sure leaders have a map of camp, the location of all the stations, and a rotation schedule
Materials Needed:
Outdoor Living Skills Pledge Poster (staff members make)
Outdoor Living Skills Pledge Instructor sheet (Appendix A)
Activity
1. Say to campers:
Just like 4-H has a pledge, there is also an Outdoor Living Skills Pledge. I will say the parts of the pledge
and you will repeat it back to me. We will also say the pledge at the end of the rotation. I hope you
commit it to memory and say it every time you go outdoors to explore or hunt. Okay, repeat after me:
“I Pledge: To be among the plants and animals (wait for them to repeat it back) and in providing for my
comfort and safety, (wait for them to repeat it back) to respect my natural neighbors and their homes; (wait
for them to repeat it back) to step carefully and travel gently (wait for them to repeat it back) finding
friendships and beauty in the natural world (wait for them to repeat it back).
2. Reveal to campers the pledge poster, and have everyone say it together.
3. Divide & Conquer
Make sure there are 3 groups of campers. If we are maxed out at 36 campers, then each group should have 12
campers. Once each group has been given an assignment and an agent/volunteer an agenda card, dismiss
campers to their stations.
6
Morning Stations 1. Navigation Location: Trail by Old Rifle Range
Teacher: Xavier
Length: 50 minutes
Lesson objectives:
Campers will be able to identify the parts of a compass
Campers will be able to point out cardinal points and the four subcardinal directions using a compass
Campers will be able to use a compass and take a bearing
Campers will be able to determine the approximate distance between two points, using pacing
Vocabulary and Concepts
Base plate
Bearing
Cardinal points
Compass
Direction of travel arrow
Dial
Compass needle
Orienting arrow
Compass housing
Orienting lines
Magnetic needle
Pace
Sources:
American Camping Association Outdoor Living Skills Manual
https://www.maricopa.gov/parks/doc/arizonastandards/Compass%20Parts%20Purpose%20(Mad%20Ma
p%20Relay%20Pre-visit%20Activity).pdf
Rock Eagle Environmental Education Curriculum Fall 2010
Procedure:
I. Interest Approach 10min
Materials Needed:
Multi colored beanbags
2 Start cones
15 blindfolds/bandanas
This game is called Trust Walkabout communication, navigation, and teamwork. Adults and junior counselors
will distribute a bandana/blindfold to eat pair of campers. The staff member will place bean bags around the
area of the station.
Explanation of Game to Campers Directions to Campers
1. One of you will be blindfolded and led
by your partner, at first across a level
grass area, filled with obstacles, to pick
up a red bean bag.
2. Navigators will “lead” their partner by
Tell campers to pair up
One partner must be the navigator, and
the other be blindfolded.
When the blindfolded partner is ready,
slowly spin your partner around a few
7
their voice only.
3. The sighted person must stay close to
their partner to support the person and
to watch out for their safety. Have
campers swap roles about half way
through.
times so that they do not know which
direction they are headed.
From this point on, the Navigator will
not touch your partner at all, but rely
solely on verbal cues.
The Navigator is solely responsible for
their partner’s safety.
Debriefing questions to ask campers:
What do you think was the purpose of this activity?
What was it like to be the Navigator, responsible for the safety of your partner?
Why is trust in your partners’ navigation important in the outdoors?
II. Introduction to Compass 3min
Materials Needed
12 compasses (one for each camper)
Teaching compass
Ask campers: “How do you get from one place to another?”
Ask campers: “What do you do when you do not know how to get somewhere?”
Explain to campers that when outdoors, they may need to use tools to help them get where they need to go.
One such tool is the compass. Compasses were originally used as tools for explorers, but are now used in
the workforce, recreational activities, and survival situations. A compass allows you to travel in a straight
line. Orienteering is an activity in which people navigate through a wilderness area using a map and
compass. Orienteering can be enjoyed as a walk through the woods, in survival situations, or a
competitive sport.
III. Parts of a Compass 5-7min
Materials Needed
One compass per camper
One Parts of a Compass worksheet per camper (Appendix B)
One Parts of a Compass answer sheet (Appendix B)
One writing utensil per camper
Ask campers: “Has anyone ever used a compass before?” If so, ask “Can you tell us the parts of the
compass?”
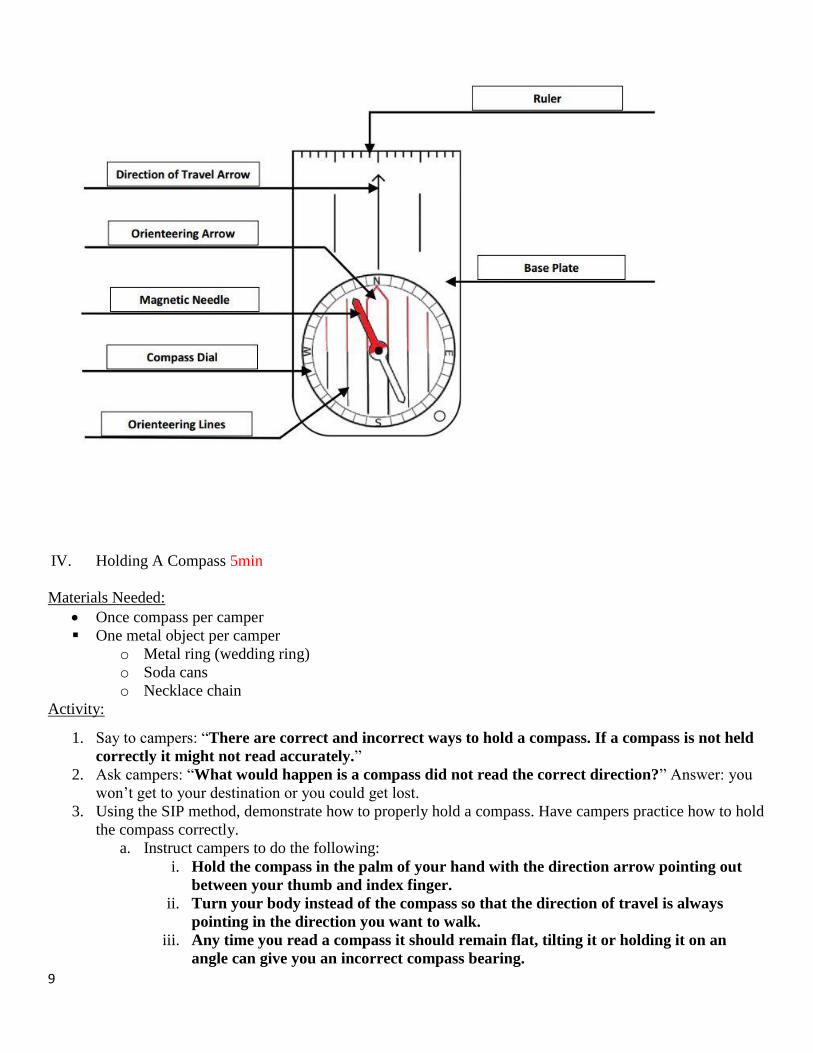
Explain to campers that a compass is critical piece of equipment for outdoor travel. A good orienteering
compass has (1) a clear base plate that allows you to see the map underneath; (2) straight sides for
aligning two points; (3) liquid-filled needle housing that keeps the magnetic needle relatively steady when
taking readings; and lastly (4) two arrows: direction arrow painted on the base plate and an orienting
arrow.
At this time, have one Junior Counselor hand out a compass to each camper and another pass out the parts of a
compass worksheet.
8
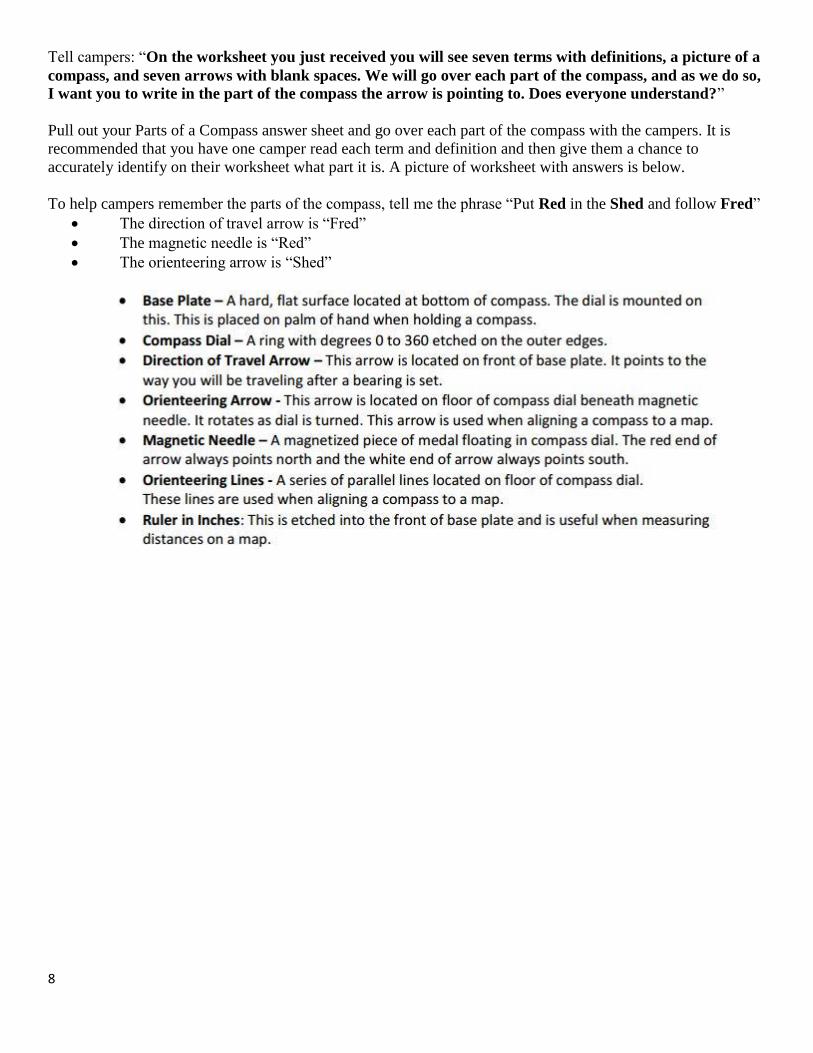
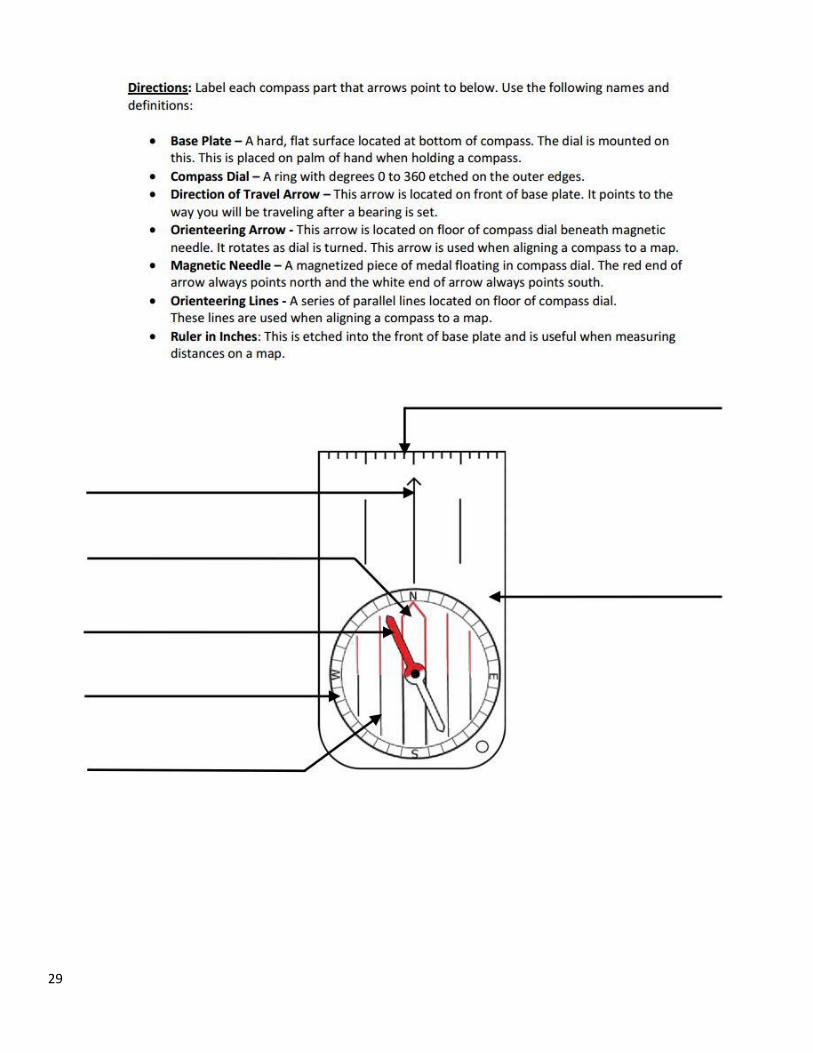
Tell campers: “On the worksheet you just received you will see seven terms with definitions, a picture of a
compass, and seven arrows with blank spaces. We will go over each part of the compass, and as we do so,
I want you to write in the part of the compass the arrow is pointing to. Does everyone understand?”
Pull out your Parts of a Compass answer sheet and go over each part of the compass with the campers. It is
recommended that you have one camper read each term and definition and then give them a chance to
accurately identify on their worksheet what part it is. A picture of worksheet with answers is below.
To help campers remember the parts of the compass, tell me the phrase “Put Red in the Shed and follow Fred”
The direction of travel arrow is “Fred”
The magnetic needle is “Red”
The orienteering arrow is “Shed”
9
IV. Holding A Compass 5min
Materials Needed:
Once compass per camper
One metal object per camper
o Metal ring (wedding ring)
o Soda cans
o Necklace chain
Activity:
1. Say to campers: “There are correct and incorrect ways to hold a compass. If a compass is not held
correctly it might not read accurately.”
2. Ask campers: “What would happen is a compass did not read the correct direction?” Answer: you
won’t get to your destination or you could get lost.
3. Using the SIP method, demonstrate how to properly hold a compass. Have campers practice how to hold
the compass correctly.
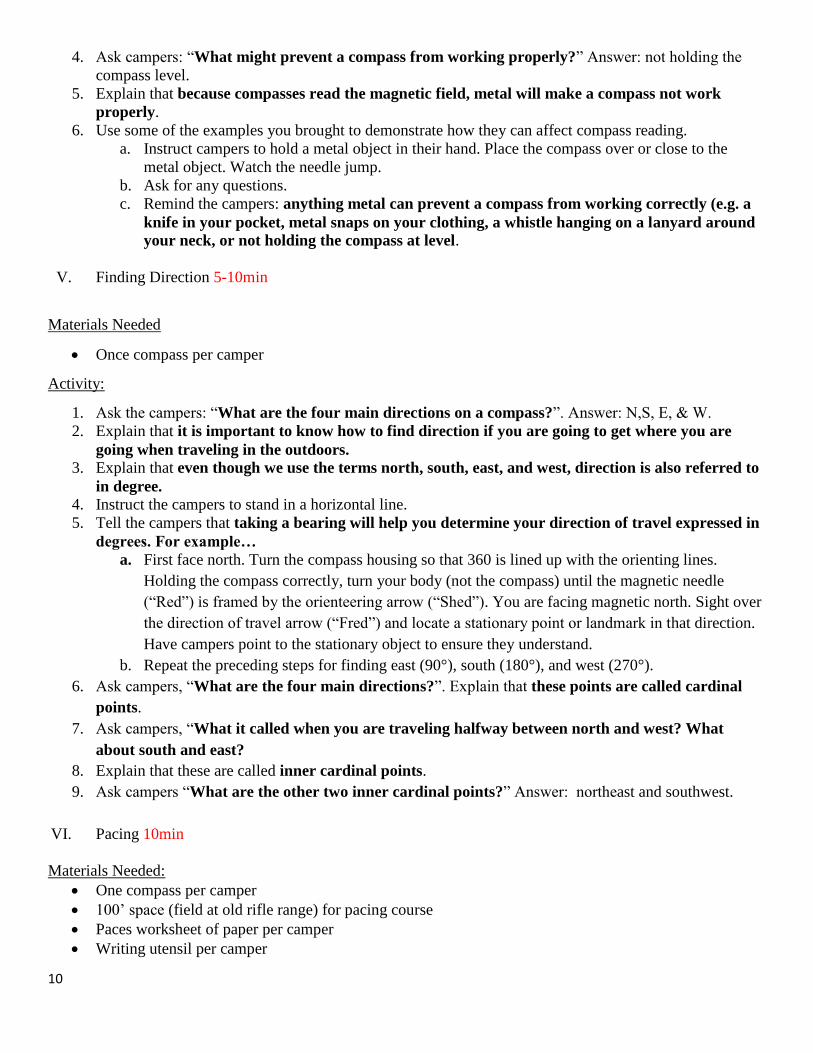
a. Instruct campers to do the following:
i. Hold the compass in the palm of your hand with the direction arrow pointing out
between your thumb and index finger.
ii. Turn your body instead of the compass so that the direction of travel is always
pointing in the direction you want to walk.
iii. Any time you read a compass it should remain flat, tilting it or holding it on an
angle can give you an incorrect compass bearing.
10
4. Ask campers: “What might prevent a compass from working properly?” Answer: not holding the
compass level.
5. Explain that because compasses read the magnetic field, metal will make a compass not work
properly.
6. Use some of the examples you brought to demonstrate how they can affect compass reading.
a. Instruct campers to hold a metal object in their hand. Place the compass over or close to the
metal object. Watch the needle jump.
b. Ask for any questions.
c. Remind the campers: anything metal can prevent a compass from working correctly (e.g. a
knife in your pocket, metal snaps on your clothing, a whistle hanging on a lanyard around
your neck, or not holding the compass at level.
V. Finding Direction 5-10min
Materials Needed
Once compass per camper
Activity:
1. Ask the campers: “What are the four main directions on a compass?”. Answer: N,S, E, & W.
2. Explain that it is important to know how to find direction if you are going to get where you are
going when traveling in the outdoors.
3. Explain that even though we use the terms north, south, east, and west, direction is also referred to
in degree.
4. Instruct the campers to stand in a horizontal line.
5. Tell the campers that taking a bearing will help you determine your direction of travel expressed in
degrees. For example…
a. First face north. Turn the compass housing so that 360 is lined up with the orienting lines.
Holding the compass correctly, turn your body (not the compass) until the magnetic needle
(“Red”) is framed by the orienteering arrow (“Shed”). You are facing magnetic north. Sight over
the direction of travel arrow (“Fred”) and locate a stationary point or landmark in that direction.
Have campers point to the stationary object to ensure they understand.
b. Repeat the preceding steps for finding east (90°), south (180°), and west (270°).
6. Ask campers, “What are the four main directions?”. Explain that these points are called cardinal
points.
7. Ask campers, “What it called when you are traveling halfway between north and west? What
about south and east?
8. Explain that these are called inner cardinal points.
9. Ask campers “What are the other two inner cardinal points?” Answer: northeast and southwest.
VI. Pacing 10min
Materials Needed:
One compass per camper
100’ space (field at old rifle range) for pacing course
Paces worksheet of paper per camper
Writing utensil per camper
11
36 multicolored bandana
Activity:
1. Tell campers, “A pace is the distance between every two steps you take and it varies for each
person. Before you can accurately reach your destination through orienteering in the wilderness,
you must first determine the length of your pace.”
2. Have junior counselors pass out the pacing worksheet and a writing utensil to each camper.
3. Tell campers, “Along the field, a 100’ course is marked by the cones. I want you all to line up at one
end and walk a normal pace the length of the course, counting your paces. The easiest way to
count paces is to always start with your left foot and slap your right thigh each time your right
foot strikes the ground.” 4. Instruct campers to, walk the course two times and average your pace. Write the number of paces
in the appropriate blank on your worksheet for the first time, and do the same for the second time.
Then determine the length of the pace by using the following formula: 100’ / number of paces =
length of your pace. Round off the length of your pace to the nearest ½ foot. Therefore, the last
blank on your worksheet should read “Every pace I take equals ______ feet”. Remember one pace
= 2 steps! 5. Ask campers, does anyone need help with their calculations?
6. Once campers are done, go around the group and ask a few campers how many feet their paces are.
Once a camper gives you an answer, ask other campers who have the same length to raise their hand.
This is how you will group them for their Amazing Race teams.
7. At that time, have campers group up with the others who have the same pace length as them. There can
be multiple groups with the same pace length.
8. Divide the larger groups into smaller ones to ensure that there are 12 groups of three campers.
9. Once into groups, have two Junior Counselors or adult volunteers hand out a colored bandana to each
team. There should be enough bandanas for each camper. For example, one group who all have a pace
length of 4.5ft should be the green team, another group with a pace length of 3 f.t should be the pink
team, and so on.
Review & Reflection 5-10 min
1. Why would you need a compass in the wilderness?
2. What is a pace?
3. What does the following phrase mean: “Put Red in the Shed and follow Fred”?
4. What are some of the things that you may carry with you could affect the accuracy of your compass?
5. What would you do if you were lost in the wilderness with a compass?

12
2. Shelter Construction and Paracord Location: Trail behind boy’s cabin
Teacher: Leigh & Mikaela
Length: 50 minutes
Lesson objectives:
Campers will know how to construct a shelter out of materials found in the woods.
Campers will know what the four basic survival needs are for animals and humans.
Campers will learn how to make a paracord bracelet that can be used to assist in building their shelter
** Emphasize that knocking down trees or logs is strictly forbidden (for conservation reasons they should try to
damage the environment as little as possible). **
Sources:
University of Wisconsin System. School Library Education Consortium.
http://uwsslec.libguides.com/c.php?g=186997&p=1235156
A Girl and a Glue Gun blog: http://www.agirlandagluegun.com/2013/07/how-to-make-paracord-
bracelets.html
Procedure
I. Introduction 5min
What YOU Say What CAMPERS
Say
What CAMPERS Do
Hello Campers! My name is _______ and today we will be
learning about habitats shelter construction in the wilderness.
“Hello” Campers are to be sitting on
the benches that surround
the campfire.
All forms of life, from humans to cows to bears to flowers,
need certain things to live. Survival depends on getting enough
food, water, cover and places to raise young. Animals, plants,
fungi and microbes share these same survival needs, though it
is a little more challenging to think about how plants and
microbes meet these needs. This activity focuses exclusively on
animals.
Listening
Animals must have a place to live where they can get food,
water, cover and places to raise young. Cover may mean
protection from sun or other elements as well as protection
from other animals (called predators) that may eat the animal.
Places to raise young can also mean a protected spot, like a
bird’s nest, or an area with specific qualities that enable
offspring to survive. For example, monarch butterflies lay their
eggs on milkweed plants, which provide some cover as well as
a food source for growing monarch larvae. Therefore, a
monarch habitat must include milkweed plants for the butterfly
to raise young.
Listening
Do humans have the same requirements as animals? They do.
Humans build houses for cover and places to raise young. Other
animals may build nests or burrows for protection or cover.
Still others take cover where they find it, under trees or in a
large herd. But for all animals (including humans), home is
13
much bigger than a house. It’s the entire neighborhood where
an animal gets the food, water and cover it needs to survive.
Scientists call this home or place its habitat. For humans,
habitat may mean
the neighborhood or city in which they live.
Ask students, What do all humans need to survive? Which of
these do plants and animals also require?
Focus on the four basic
survival needs true for
all living things. Guide
class to generate a list
with these needs: food,
water, cover and
places to raise young.
Raise their hand and give an
answer. Do not let them talk
all at once.
Ask, Where do humans get the food, water, cover and
places to raise young they need to survive? Where do they
store and cook food?
A variety of answers-
home, neighborhood,
or city.
Supermarket; garden.
Raise their hand and give an
answer. Do not let them talk
all at once.
Ask, Whose habitat are we in right now? Where do you
think the animals at Camp Grant Walker get their food,
water, and shelter?
Animals.
In the woods, creek,
etc.
Raise their hand and give an
answer. Do not let them talk
all at once.
You are correct. Animals at Camp Grant Walker have all
of their basic needs met. If we were to camp here in this
habitat, would we have our basic needs met? Ask why “yes”
and why “no”.
Some “yes” some “no”
The basic need I am going to teach you how to provide in
this station is shelter construction. Who here has ever built
a tent?
Say things like “me!”
“I have!”
Raise their hands up high
II. Shelter Construction 25 min
Materials Needed:
A large wooded area with adequate trees and brush
Activity:
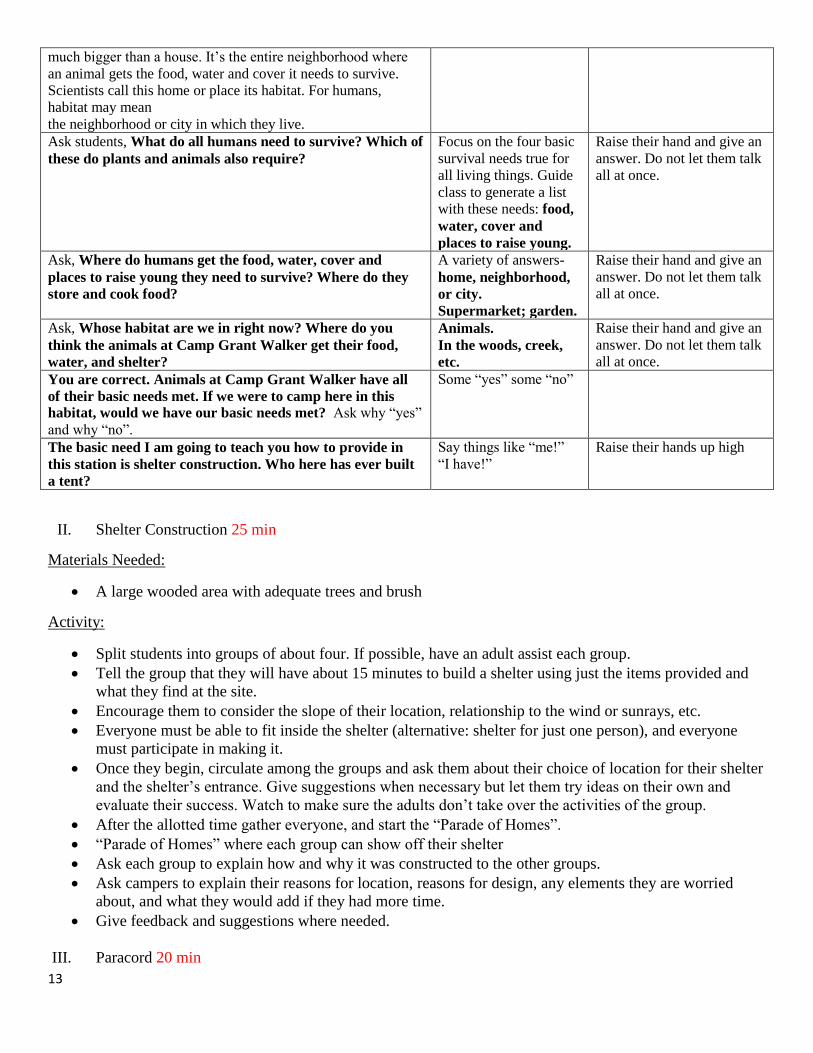
Split students into groups of about four. If possible, have an adult assist each group.
Tell the group that they will have about 15 minutes to build a shelter using just the items provided and
what they find at the site.
Encourage them to consider the slope of their location, relationship to the wind or sunrays, etc.
Everyone must be able to fit inside the shelter (alternative: shelter for just one person), and everyone
must participate in making it.
Once they begin, circulate among the groups and ask them about their choice of location for their shelter
and the shelter’s entrance. Give suggestions when necessary but let them try ideas on their own and
evaluate their success. Watch to make sure the adults don’t take over the activities of the group.
After the allotted time gather everyone, and start the “Parade of Homes”.
“Parade of Homes” where each group can show off their shelter
Ask each group to explain how and why it was constructed to the other groups.
Ask campers to explain their reasons for location, reasons for design, any elements they are worried
about, and what they would add if they had more time.
Give feedback and suggestions where needed.
III. Paracord 20 min
14
Materials Needed:
Paracord for 36 campers
36 plastic clasps
Boards with nails from A&C building
Lighter
Knife
12 foldout chairs
Activity:
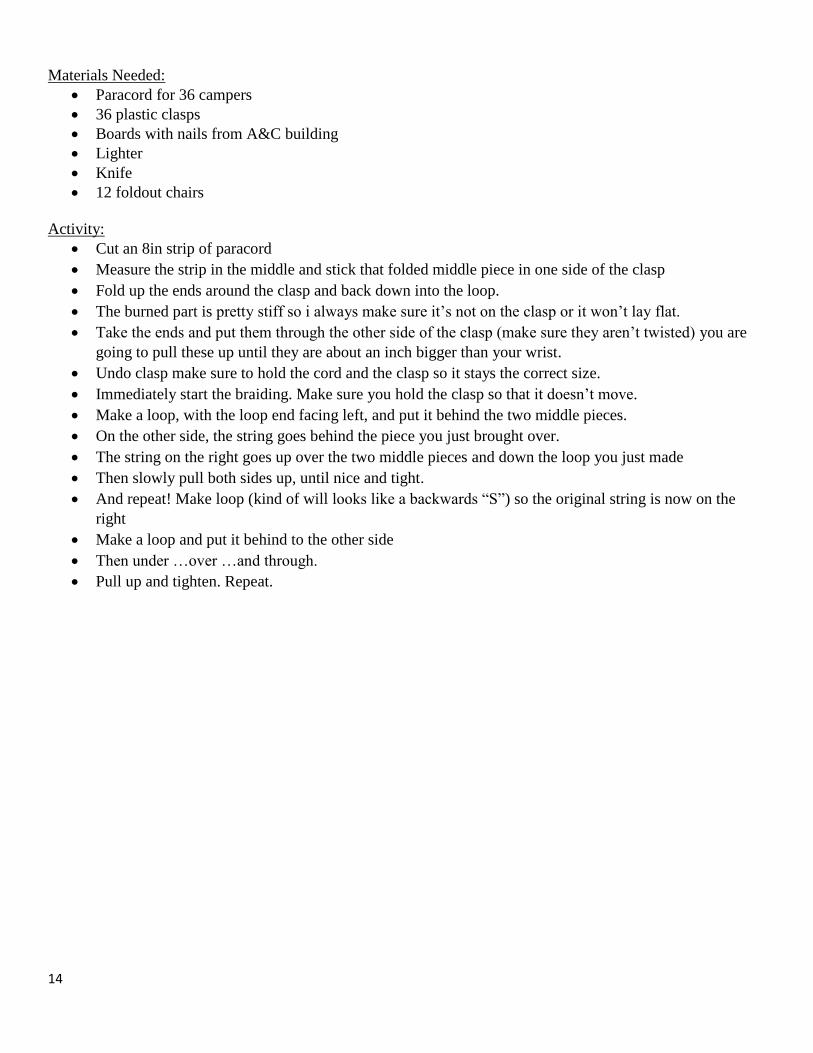
Cut an 8in strip of paracord
Measure the strip in the middle and stick that folded middle piece in one side of the clasp
Fold up the ends around the clasp and back down into the loop.
The burned part is pretty stiff so i always make sure it’s not on the clasp or it won’t lay flat.
Take the ends and put them through the other side of the clasp (make sure they aren’t twisted) you are
going to pull these up until they are about an inch bigger than your wrist.
Undo clasp make sure to hold the cord and the clasp so it stays the correct size.
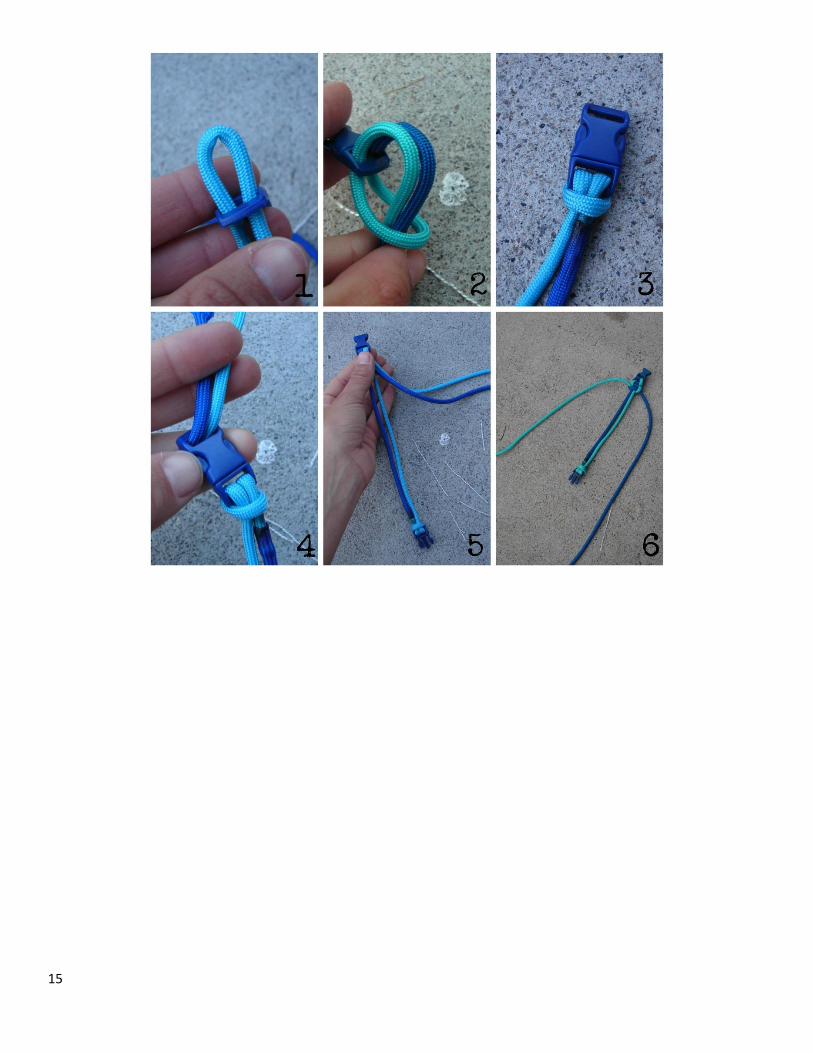
Immediately start the braiding. Make sure you hold the clasp so that it doesn’t move.
Make a loop, with the loop end facing left, and put it behind the two middle pieces.
On the other side, the string goes behind the piece you just brought over.
The string on the right goes up over the two middle pieces and down the loop you just made
Then slowly pull both sides up, until nice and tight.
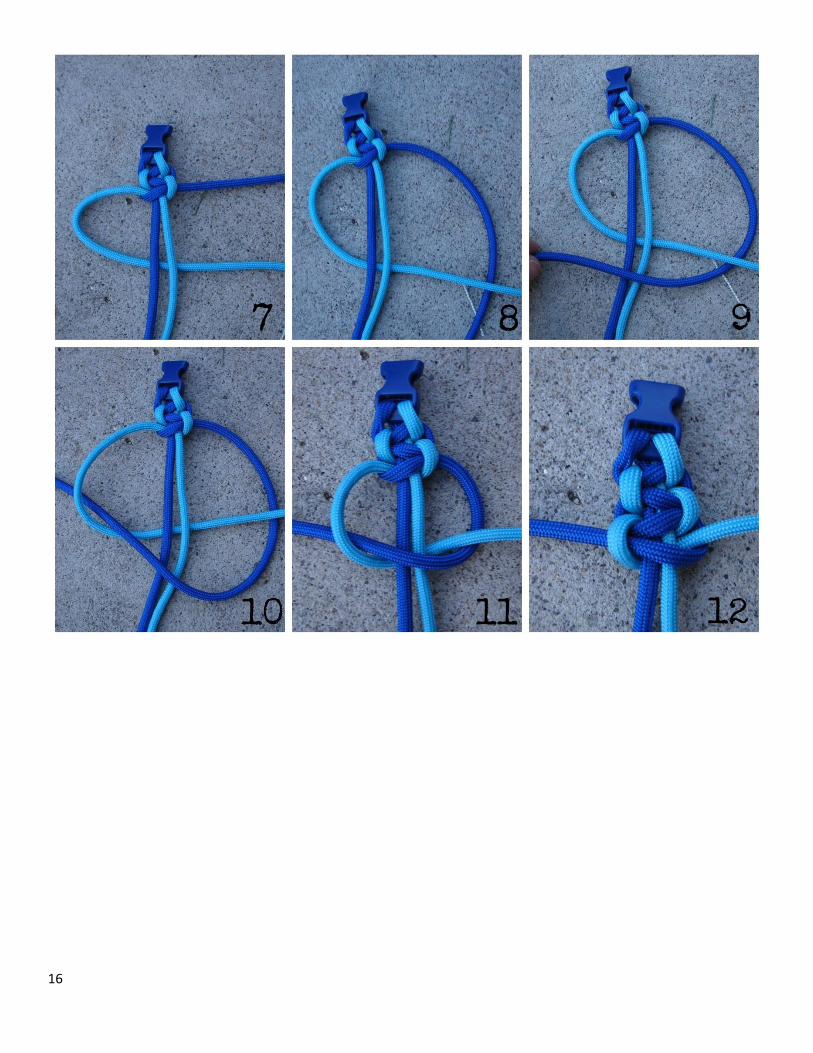
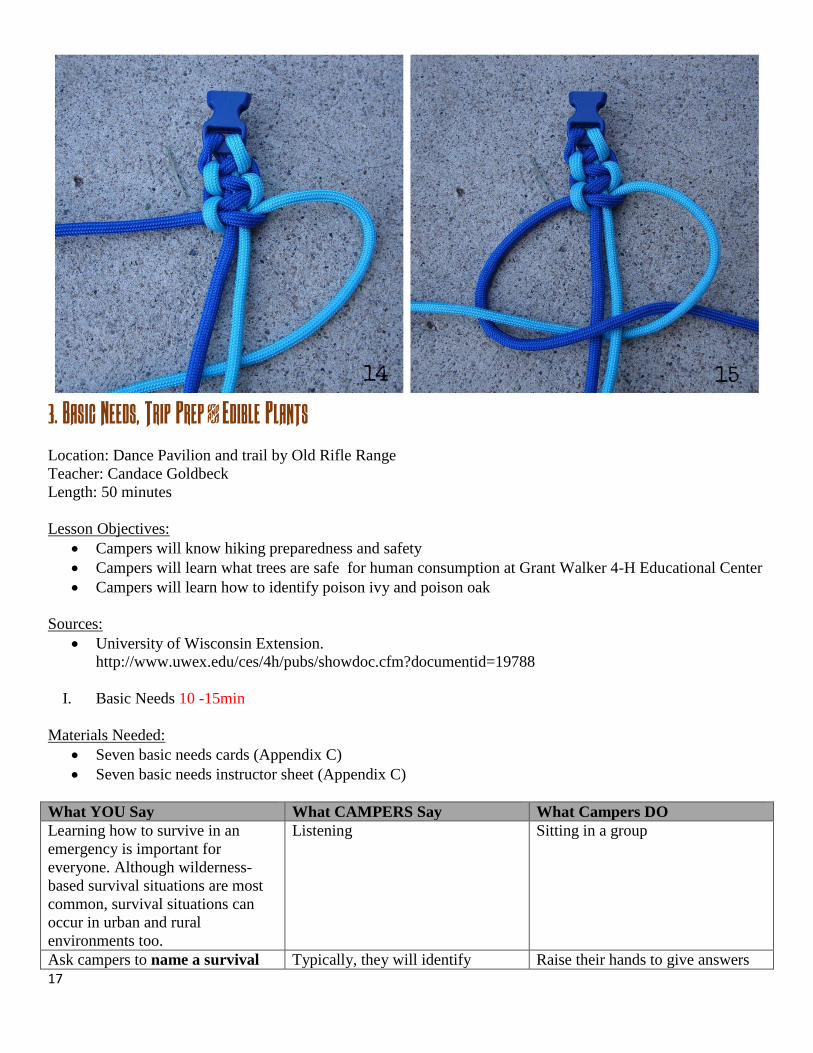
And repeat! Make loop (kind of will looks like a backwards “S”) so the original string is now on the
right
Make a loop and put it behind to the other side
Then under …over …and through.
Pull up and tighten. Repeat.
15
16
17
3. Basic Needs, Trip Prep & Edible Plants
Location: Dance Pavilion and trail by Old Rifle Range
Teacher: Candace Goldbeck
Length: 50 minutes
Lesson Objectives:
Campers will know hiking preparedness and safety
Campers will learn what trees are safe for human consumption at Grant Walker 4-H Educational Center
Campers will learn how to identify poison ivy and poison oak
Sources:
University of Wisconsin Extension.
http://www.uwex.edu/ces/4h/pubs/showdoc.cfm?documentid=19788
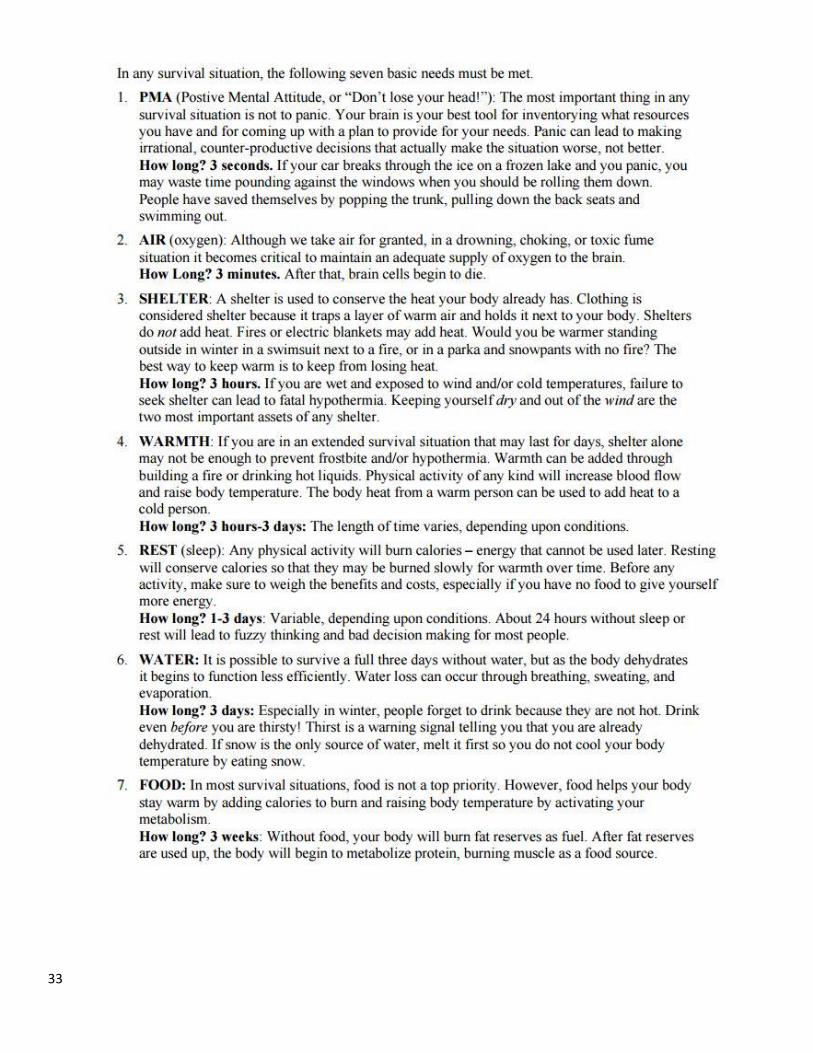
I. Basic Needs 10 -15min
Materials Needed:
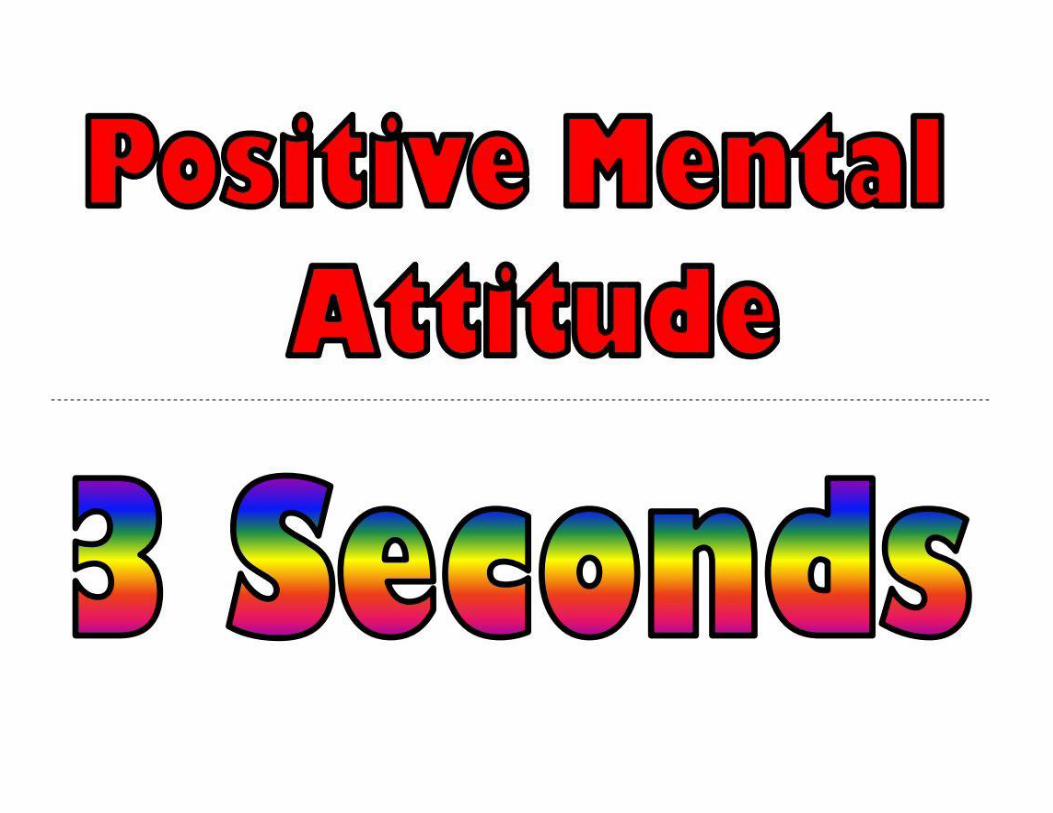
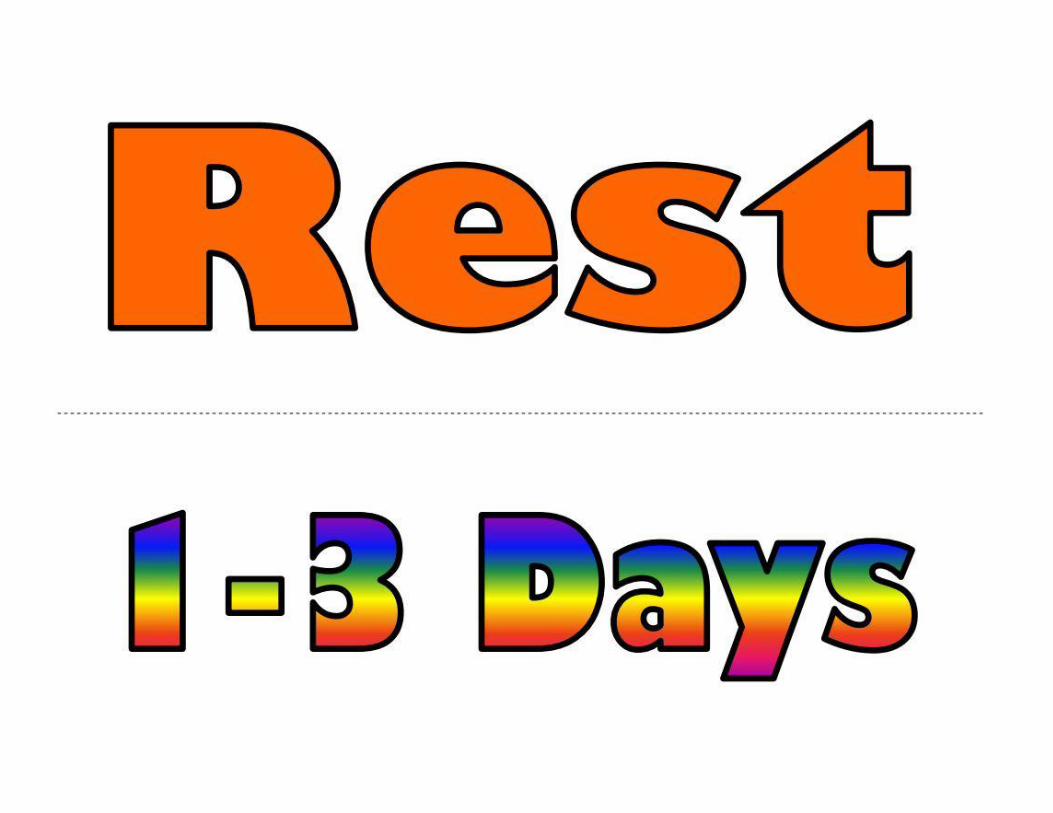
Seven basic needs cards (Appendix C)
Seven basic needs instructor sheet (Appendix C)
What YOU Say What CAMPERS Say What Campers DO
Learning how to survive in an
emergency is important for
everyone. Although wilderness-
based survival situations are most
common, survival situations can
occur in urban and rural
environments too.
Listening Sitting in a group
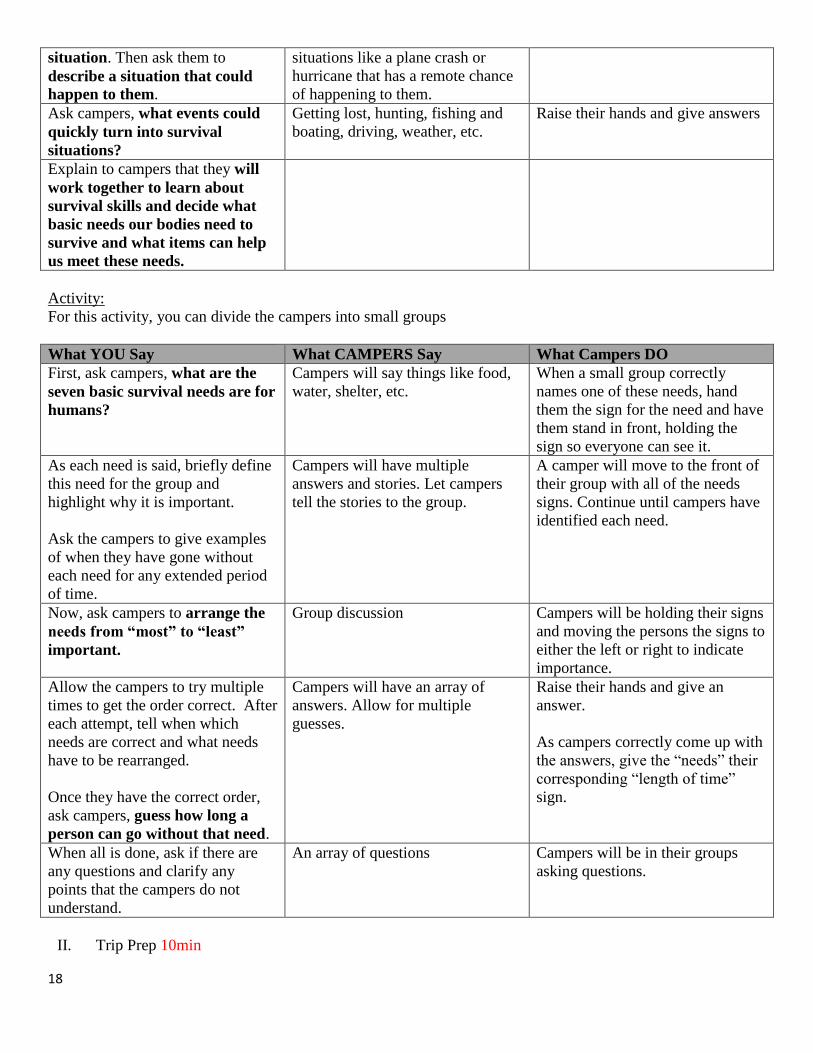
Ask campers to name a survival Typically, they will identify Raise their hands to give answers
18
situation. Then ask them to
describe a situation that could
happen to them.
situations like a plane crash or
hurricane that has a remote chance
of happening to them.
Ask campers, what events could
quickly turn into survival
situations?
Getting lost, hunting, fishing and
boating, driving, weather, etc.
Raise their hands and give answers
Explain to campers that they will
work together to learn about
survival skills and decide what
basic needs our bodies need to
survive and what items can help
us meet these needs.
Activity:
For this activity, you can divide the campers into small groups
What YOU Say What CAMPERS Say What Campers DO
First, ask campers, what are the
seven basic survival needs are for
humans?
Campers will say things like food,
water, shelter, etc.
When a small group correctly
names one of these needs, hand
them the sign for the need and have
them stand in front, holding the
sign so everyone can see it.
As each need is said, briefly define
this need for the group and
highlight why it is important.
Ask the campers to give examples
of when they have gone without
each need for any extended period
of time.
Campers will have multiple
answers and stories. Let campers
tell the stories to the group.
A camper will move to the front of
their group with all of the needs
signs. Continue until campers have
identified each need.
Now, ask campers to arrange the
needs from “most” to “least”
important.
Group discussion Campers will be holding their signs
and moving the persons the signs to
either the left or right to indicate
importance.
Allow the campers to try multiple
times to get the order correct. After
each attempt, tell when which
needs are correct and what needs
have to be rearranged.
Once they have the correct order,
ask campers, guess how long a
person can go without that need.
Campers will have an array of
answers. Allow for multiple
guesses.
Raise their hands and give an
answer.
As campers correctly come up with
the answers, give the “needs” their
corresponding “length of time”
sign.
When all is done, ask if there are
any questions and clarify any
points that the campers do not
understand.
An array of questions Campers will be in their groups
asking questions.
II. Trip Prep 10min
19
Materials Needed:
None
Activity:
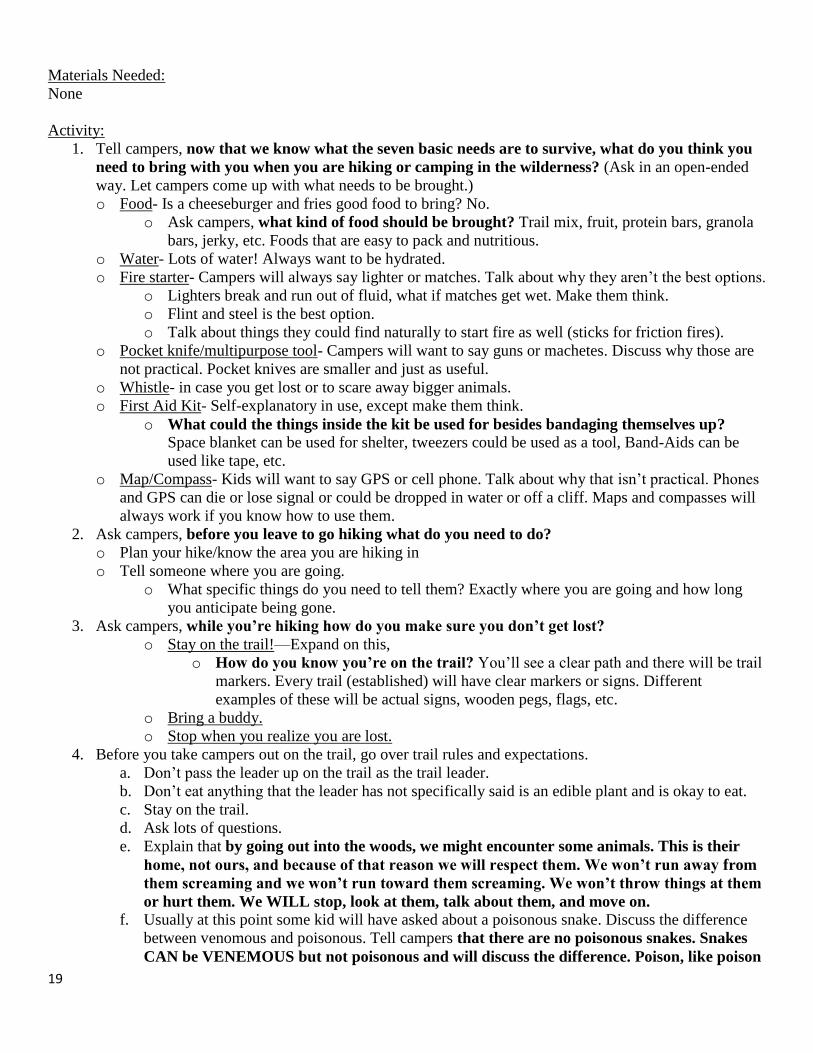
1. Tell campers, now that we know what the seven basic needs are to survive, what do you think you
need to bring with you when you are hiking or camping in the wilderness? (Ask in an open-ended
way. Let campers come up with what needs to be brought.)
o Food- Is a cheeseburger and fries good food to bring? No.
o Ask campers, what kind of food should be brought? Trail mix, fruit, protein bars, granola
bars, jerky, etc. Foods that are easy to pack and nutritious.
o Water- Lots of water! Always want to be hydrated.
o Fire starter- Campers will always say lighter or matches. Talk about why they aren’t the best options.
o Lighters break and run out of fluid, what if matches get wet. Make them think.
o Flint and steel is the best option.
o Talk about things they could find naturally to start fire as well (sticks for friction fires).
o Pocket knife/multipurpose tool- Campers will want to say guns or machetes. Discuss why those are
not practical. Pocket knives are smaller and just as useful.
o Whistle- in case you get lost or to scare away bigger animals.
o First Aid Kit- Self-explanatory in use, except make them think.
o What could the things inside the kit be used for besides bandaging themselves up? Space blanket can be used for shelter, tweezers could be used as a tool, Band-Aids can be
used like tape, etc.
o Map/Compass- Kids will want to say GPS or cell phone. Talk about why that isn’t practical. Phones
and GPS can die or lose signal or could be dropped in water or off a cliff. Maps and compasses will
always work if you know how to use them.
2. Ask campers, before you leave to go hiking what do you need to do?
o Plan your hike/know the area you are hiking in
o Tell someone where you are going.
o What specific things do you need to tell them? Exactly where you are going and how long
you anticipate being gone.
3. Ask campers, while you’re hiking how do you make sure you don’t get lost?
o Stay on the trail!—Expand on this,
o How do you know you’re on the trail? You’ll see a clear path and there will be trail
markers. Every trail (established) will have clear markers or signs. Different
examples of these will be actual signs, wooden pegs, flags, etc.
o Bring a buddy.
o Stop when you realize you are lost.
4. Before you take campers out on the trail, go over trail rules and expectations.
a. Don’t pass the leader up on the trail as the trail leader.
b. Don’t eat anything that the leader has not specifically said is an edible plant and is okay to eat.
c. Stay on the trail.
d. Ask lots of questions.
e. Explain that by going out into the woods, we might encounter some animals. This is their
home, not ours, and because of that reason we will respect them. We won’t run away from
them screaming and we won’t run toward them screaming. We won’t throw things at them
or hurt them. We WILL stop, look at them, talk about them, and move on. f. Usually at this point some kid will have asked about a poisonous snake. Discuss the difference
between venomous and poisonous. Tell campers that there are no poisonous snakes. Snakes
CAN be VENEMOUS but not poisonous and will discuss the difference. Poison, like poison
20
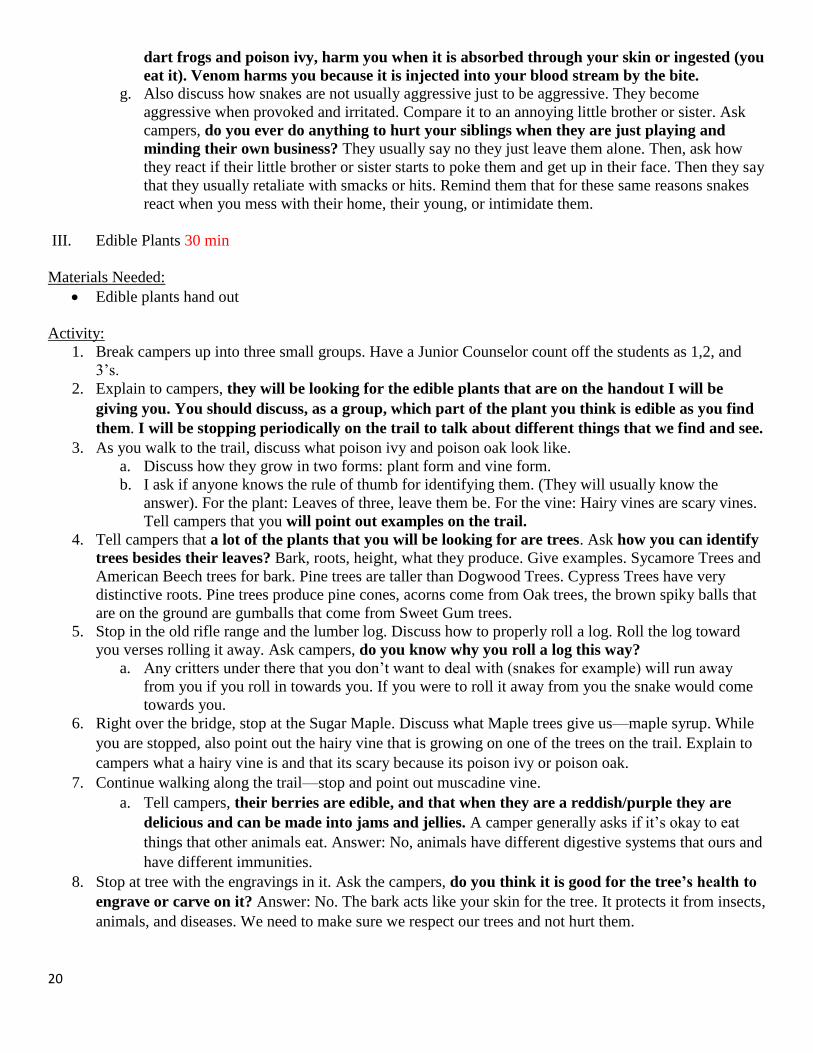
dart frogs and poison ivy, harm you when it is absorbed through your skin or ingested (you
eat it). Venom harms you because it is injected into your blood stream by the bite. g. Also discuss how snakes are not usually aggressive just to be aggressive. They become
aggressive when provoked and irritated. Compare it to an annoying little brother or sister. Ask
campers, do you ever do anything to hurt your siblings when they are just playing and
minding their own business? They usually say no they just leave them alone. Then, ask how
they react if their little brother or sister starts to poke them and get up in their face. Then they say
that they usually retaliate with smacks or hits. Remind them that for these same reasons snakes
react when you mess with their home, their young, or intimidate them.
III. Edible Plants 30 min
Materials Needed:
Edible plants hand out
Activity:
1. Break campers up into three small groups. Have a Junior Counselor count off the students as 1,2, and
3’s.
2. Explain to campers, they will be looking for the edible plants that are on the handout I will be
giving you. You should discuss, as a group, which part of the plant you think is edible as you find
them. I will be stopping periodically on the trail to talk about different things that we find and see.
3. As you walk to the trail, discuss what poison ivy and poison oak look like.
a. Discuss how they grow in two forms: plant form and vine form.
b. I ask if anyone knows the rule of thumb for identifying them. (They will usually know the
answer). For the plant: Leaves of three, leave them be. For the vine: Hairy vines are scary vines.
Tell campers that you will point out examples on the trail.
4. Tell campers that a lot of the plants that you will be looking for are trees. Ask how you can identify
trees besides their leaves? Bark, roots, height, what they produce. Give examples. Sycamore Trees and
American Beech trees for bark. Pine trees are taller than Dogwood Trees. Cypress Trees have very
distinctive roots. Pine trees produce pine cones, acorns come from Oak trees, the brown spiky balls that
are on the ground are gumballs that come from Sweet Gum trees.
5. Stop in the old rifle range and the lumber log. Discuss how to properly roll a log. Roll the log toward
you verses rolling it away. Ask campers, do you know why you roll a log this way?
a. Any critters under there that you don’t want to deal with (snakes for example) will run away
from you if you roll in towards you. If you were to roll it away from you the snake would come
towards you.
6. Right over the bridge, stop at the Sugar Maple. Discuss what Maple trees give us—maple syrup. While
you are stopped, also point out the hairy vine that is growing on one of the trees on the trail. Explain to
campers what a hairy vine is and that its scary because its poison ivy or poison oak.
7. Continue walking along the trail—stop and point out muscadine vine.
a. Tell campers, their berries are edible, and that when they are a reddish/purple they are
delicious and can be made into jams and jellies. A camper generally asks if it’s okay to eat
things that other animals eat. Answer: No, animals have different digestive systems that ours and
have different immunities.
8. Stop at tree with the engravings in it. Ask the campers, do you think it is good for the tree’s health to
engrave or carve on it? Answer: No. The bark acts like your skin for the tree. It protects it from insects,
animals, and diseases. We need to make sure we respect our trees and not hurt them.
21
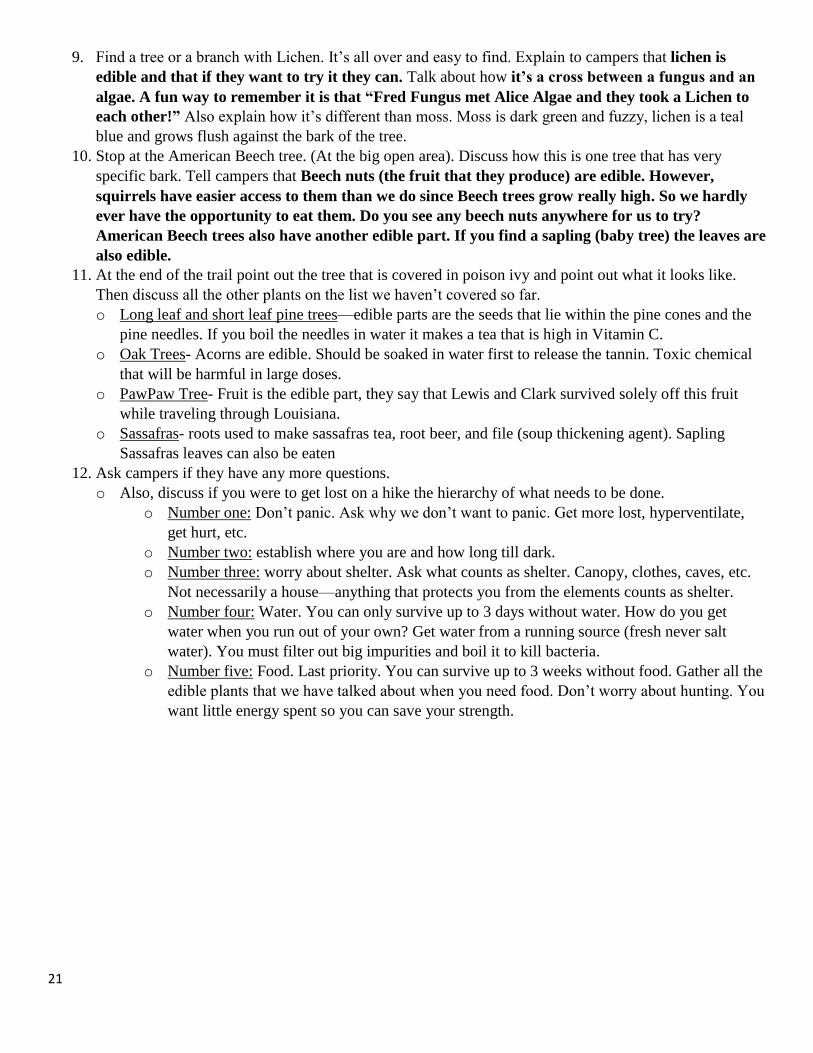
9. Find a tree or a branch with Lichen. It’s all over and easy to find. Explain to campers that lichen is
edible and that if they want to try it they can. Talk about how it’s a cross between a fungus and an
algae. A fun way to remember it is that “Fred Fungus met Alice Algae and they took a Lichen to
each other!” Also explain how it’s different than moss. Moss is dark green and fuzzy, lichen is a teal
blue and grows flush against the bark of the tree.
10. Stop at the American Beech tree. (At the big open area). Discuss how this is one tree that has very
specific bark. Tell campers that Beech nuts (the fruit that they produce) are edible. However,
squirrels have easier access to them than we do since Beech trees grow really high. So we hardly
ever have the opportunity to eat them. Do you see any beech nuts anywhere for us to try?
American Beech trees also have another edible part. If you find a sapling (baby tree) the leaves are
also edible.
11. At the end of the trail point out the tree that is covered in poison ivy and point out what it looks like.
Then discuss all the other plants on the list we haven’t covered so far.
o Long leaf and short leaf pine trees—edible parts are the seeds that lie within the pine cones and the
pine needles. If you boil the needles in water it makes a tea that is high in Vitamin C.
o Oak Trees- Acorns are edible. Should be soaked in water first to release the tannin. Toxic chemical
that will be harmful in large doses.
o PawPaw Tree- Fruit is the edible part, they say that Lewis and Clark survived solely off this fruit
while traveling through Louisiana.
o Sassafras- roots used to make sassafras tea, root beer, and file (soup thickening agent). Sapling
Sassafras leaves can also be eaten
12. Ask campers if they have any more questions.
o Also, discuss if you were to get lost on a hike the hierarchy of what needs to be done.
o Number one: Don’t panic. Ask why we don’t want to panic. Get more lost, hyperventilate,
get hurt, etc.
o Number two: establish where you are and how long till dark.
o Number three: worry about shelter. Ask what counts as shelter. Canopy, clothes, caves, etc.
Not necessarily a house—anything that protects you from the elements counts as shelter.
o Number four: Water. You can only survive up to 3 days without water. How do you get
water when you run out of your own? Get water from a running source (fresh never salt
water). You must filter out big impurities and boil it to kill bacteria.
o Number five: Food. Last priority. You can survive up to 3 weeks without food. Gather all the
edible plants that we have talked about when you need food. Don’t worry about hunting. You
want little energy spent so you can save your strength.
22
Afternoon Stations 1. Lifejacket Jeans & Standup Paddle Boarding Teacher: Chelsea Ingraham & Kelsey Stratton
Location: Pond
Length: 20 minutes
*Before you get started, split the campers up into two groups. One group will stay with Chelsea to make life
jacket jeans and the other group will go with Kelsey to standup paddle board.
I. Life jacket jeans 10 min
Materials Needed:
1 pair of jeans per camper
Sources:
Boaterexam.com: http://www.boaterexam.com/blog/2011/03/sinking-ship-survival-guide.aspx
Livestrong.com: http://www.livestrong.com/article/515816-what-is-survival-floating-in-swimming/
Activity:
1. Ask campers, whether you are fishing, canoeing, deep sea fishing, kayaking what is the one thing
you need to have with you? Answer: a life jacket
2. Ask campers, what do you do if you do not have a life jacket with you? Campers will have one or two
answers. Tell campers that you can make one out of your pants!
3. Ask campers, in what situations could you possibly encounter not having a life jacket with you
when you are out on the water? 4. Tell campers, if you ever find yourself in a survival situation in the water, you will need to know
what to do to survive. Groups like the Marines and the Boy Scouts have been teaching their folks
for decades how to make a pair of pants into a personal flotation device (PFD). That is what we
will be doing today. 5. Have a Junior Counselor hand out one pair of pants per camper.
6. Instruct campers to put on their pair of pants, enter the pond, and swim to an area where the whole
group cannot touch the bottom. 7. Instruct the campers to do the following:
a. First, you will want to take the pants off
b. Second, blow air into one of the pockets of you pants. This ensures that you will stay afloat while
preparing your flotation device.
c. Next, tie the pant legs together.
d. Stick your head between the tied legs, just like you would a real life jacket.
e. Once you have your head secured, put the waistband above your head and quickly bring the
opening back down toward the water—this will allow your paints to collect on air before hitting
the water—and wrap your hands around the waistband
f. The pants legs, then, will swell up with air, creating a makeshift life jacket.
8. Campers may not get it the first time, so allow them multiple tries to get it right.
II. Standup Paddle Boarding 10 min
23
Materials Needed:
One standup paddle board and oar per camper
A lifejacket to place on the board
You recommended a certified standup paddle board instructor to teach this lesson. At minimum, you must have
an American Red Cross certified lifeguard with at least one year experience paddle boarding.
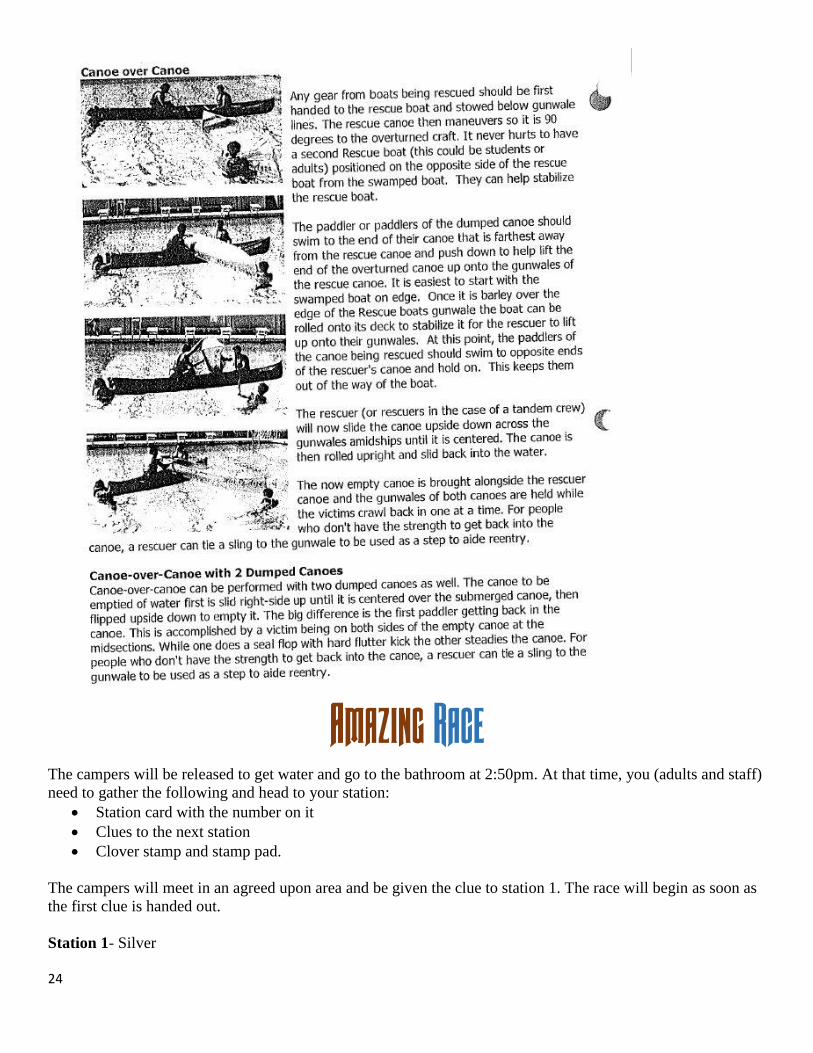
2. Canoe Rescue Teacher: Kelsey Stratton & Logan Brown (certified lifeguards)
Location: Pond
Length: 1hr
Source: Rock Eagle Environmental Education Curriculum Fall 2010
Materials Needed:
Canoe and oars
Activity:
24
Amazing Race The campers will be released to get water and go to the bathroom at 2:50pm. At that time, you (adults and staff)
need to gather the following and head to your station:
Station card with the number on it
Clues to the next station
Clover stamp and stamp pad.
The campers will meet in an agreed upon area and be given the clue to station 1. The race will begin as soon as
the first clue is handed out.
Station 1- Silver
25
Pick up backpacks by Christy’s house. Inside the backpacks are three water bottles, three bags of cheese-itz as a
snack, a map of the campground to help campers locate the stations, three bandanas, and a clue to the second
station. Once a team has picked up their backpack, make sure they put on their bandanas and pull out their
booklet for you to stamp the “station 1” page. Have them locate the clue to station 2 and send them on their
way.
Station 2- Mikaela
Shelter construction behind boy’s cabin 16. Have each camper construct a shelter from debris laying around the
forest floor. When complete, stamp their “station 2” page in the booklet and give them the clue to station 3.
Station 3- Mark & Luke
Life jacket jeans at pool. Have each camper make life jacket jeans that float for at least 5 seconds. Once
complete, stamp their “station 3” card in the booklet and give them the clue to find station 4.
Station 4- Scott
Chubby Grey Squirrel between A&C building. One camper per group must put as many marshmallows in their
mouths as they can and sing “Grey squirrel, grey squirrel, shake your fluffy tail” and do the corresponding
movements. When campers can no longer fit anymore marshmallows in their mouth and sing, stamp their
“station 4” card and give them the clue to station 5.
Station 5- Chelsea
Edible plants on old rifle range trail. Campers must find and collect a sample of a muscadine vine and a paw
paw tree. Bring the sample back to Chelsea to make sure you collected the sample from the correct source. If
correct, she will stamp your “station 5” card and give you the clue to the last station.
Station 7- Kelsey, Danny, Katie, & Leigh
Canoe rescue at pond. The team must perform a canoe rescue using the canoe over canoe technique taught
earlier in track. Once completed, the lifeguards will stamp your “station 7” card and send you back through the
Old Rifle Range trail to cross the finish line.
Finish Line
Have chalk color to throw on the teams of campers as they cross the finish line. Be sure to have more snacks
and a cooler of water and/or Gatorade available.
26
Appendices
A. American Camping Association Outdoor Living Skills Pledge
27
“I Pledge: To be among the
plants and animals and in
providing for my comfort and
safety, to respect my natural
neighbors and their homes; to
step carefully and travel gently
finding friendships and beauty
in the natural world.”

28
B. Parts of a Compass Worksheet and Answer Sheet
29

30
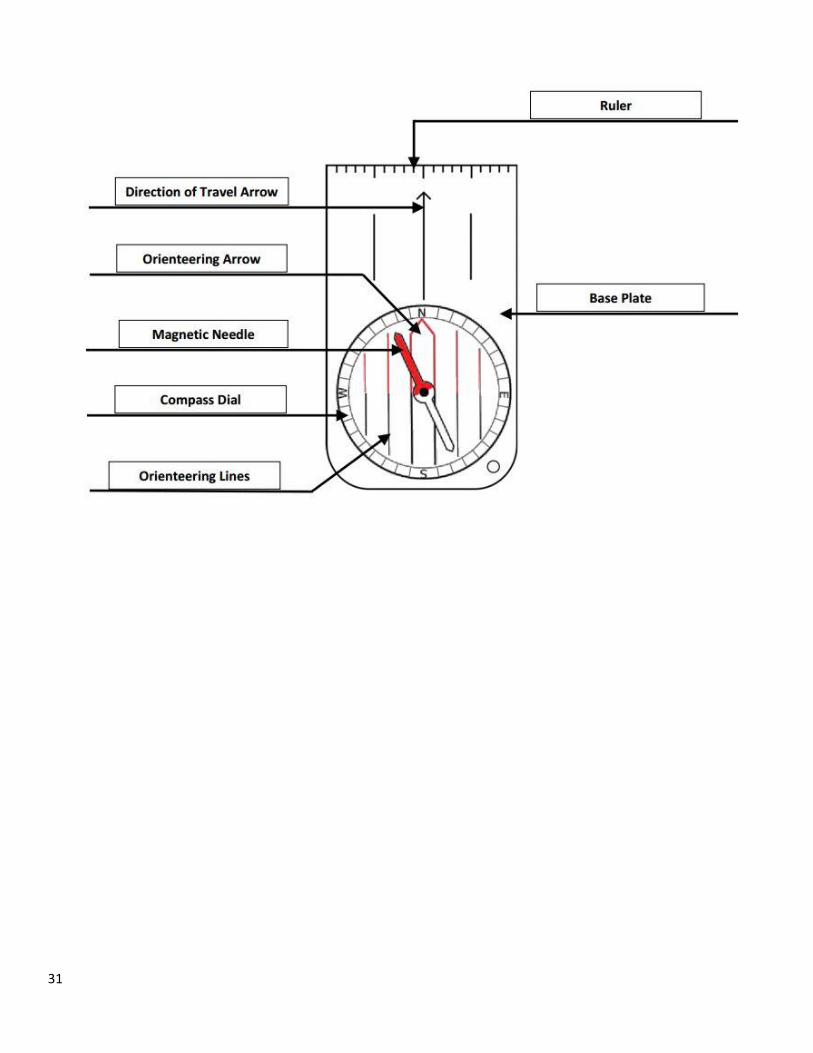
31
32
C: Seven Basic Needs Instructor Sheet and Cards
33
34

35

36

37
38
39

40