WLAN-Hi-Fi-Verstärker WLAN Hi-Fi Amplifier · Streaming-Protokoll „AirPlay“ des...
20
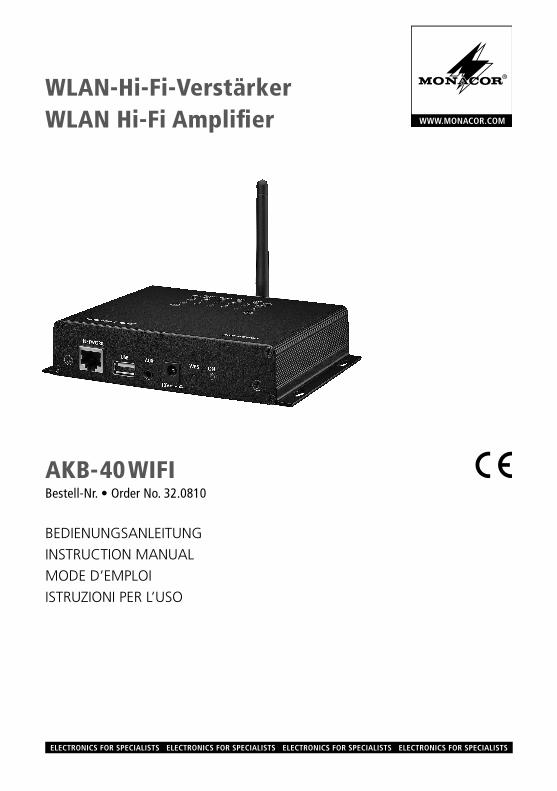
BEDIENUNGSANLEITUNG INSTRUCTION MANUAL MODE D’EMPLOI ISTRUZIONI PER L’USO ELECTRONICS FOR SPECIALISTS ELECTRONICS FOR SPECIALISTS ELECTRONICS FOR SPECIALISTS ELECTRONICS FOR SPECIALISTS AKB- 40 WIFI Bestell-Nr. • Order No. 32.0810 WLAN-Hi-Fi-Verstärker WLAN Hi-Fi Amplifier
Transcript of WLAN-Hi-Fi-Verstärker WLAN Hi-Fi Amplifier · Streaming-Protokoll „AirPlay“ des...
BEDIENUNGSANLEITUNGINSTRUCTION MANUALMODE D’EMPLOIISTRUZIONI PER L’USO
ELECTRONICS FOR SPECIALISTS ELECTRONICS FOR SPECIALISTS ELECTRONICS FOR SPECIALISTS ELECTRONICS FOR SPECIALISTS
AKB- 40 WIFIBestell-Nr. • Order No. 32.0810
WLAN-Hi-Fi-VerstärkerWLAN Hi-Fi Amplifier
2
AKB-40WIFI
MODE
WLAN USB
1 2 3 4 5 6
1 12 3 4
AUXUSB WPS ON
NETWORK
18V
5 6 7 8 9 10
ANTENNALEFT OUT RIGHT OUT
11
12 13 12

3
ELECTRONICS FOR SPECIALISTS ELECTRONICS FOR SPECIALISTS ELECTRONICS FOR SPECIALISTS ELECTRONICS FOR SPECIALISTS
Deutsch . . . . . . . . . . Seite 4
English . . . . . . . . . . . Page 8
Français . . . . . . . . . . Page 12
Italiano . . . . . . . . . . . Pagina 16

4
Referenz für Sprachkennzeichnung der Seiten und Inhaltsverzeichnis
Referenz für Sprachen-Inhaltsverzeichnis
DeutschDeutsch Seite
WLAN-Hi-Fi-VerstärkerDiese Anleitung richtet sich an Benutzer mit Kenntnissen der Netzwerktechnik und Grund-kenntnissen der Audiotechnik . Bitte lesen Sie die Anleitung vor dem Betrieb gründlich durch und heben Sie sie für ein späteres Nachlesen auf . Auf Seite 2 finden Sie alle beschriebenen Bedien elemente und Anschlüsse .
1 EinsatzmöglichkeitenDer Stereo-Verstärker AKB-40WIFI dient zur Musik wiedergabe in Hi-Fi-Qualität über ein lokales Funknetzwerk (WLAN) . Er kann in ein bestehendes Netzwerk eingebunden werden oder mit einem Abspielgerät ein eigenes Funk-netzwerk aufbauen . Als Abspielgerät wird ein Smartphone, Tabletcomputer oder PC benö-tigt, auf dem eine DLNA-kompatible Software (DLNA -Audiospieler) installiert sein muss . Das Streaming-Protokoll „AirPlay“ des Geräteher-stellers Apple wird ebenfalls unterstützt .
Einige DLNA-Audiospieler bieten eine Mehr-raumnutzung (Multiroom): In verschiedenen Räumen ist jeweils ein AKB- 40WIFI installiert . Von einem DLNA-Spieler aus kann dann den einzelnen Verstärkern unterschiedliche Musik zugespielt werden oder diese können gekoppelt und gemeinsam bedient werden .
Ein USB-Anschluss ermöglicht die Wieder-gabe von Audiodateien auf einem USB-Spei-cherstick . Die Bedienung kann dabei über die Tasten am Verstärker oder über die Abspiel- Software erfolgen .
Über einen analogen Stereoeingang kann zudem eine Tonquelle mit Line-Ausgangspegel (z . B . CD-Spieler) angeschlossen werden .DLNA: Die Digital Living Network Alliance ist eine inter-nationale Vereinigung von Computer-, Mobiltelefon- und Unterhaltungselektronik-Herstellern, die sich auf einen gemeinsamen Standard zur digitalen Datenübertra-gung geeinigt haben und den Standard ständig weiter-entwickeln .
1.1 Konformität und ZulassungHiermit erklärt MONACOR INTERNATIONAL, dass das Gerät AKB-40WIFI der Richtlinie 2014 / 53 / EU entspricht . Die EU-Konformitäts-erklärung ist im Internet verfügbar:www .monacor .com
Das Gerät arbeitet im 2,4-GHz-Bereich und ist für den Betrieb in den EU- und EFTA-Staaten allgemein zugelassen und anmelde- und ge-bührenfrei .
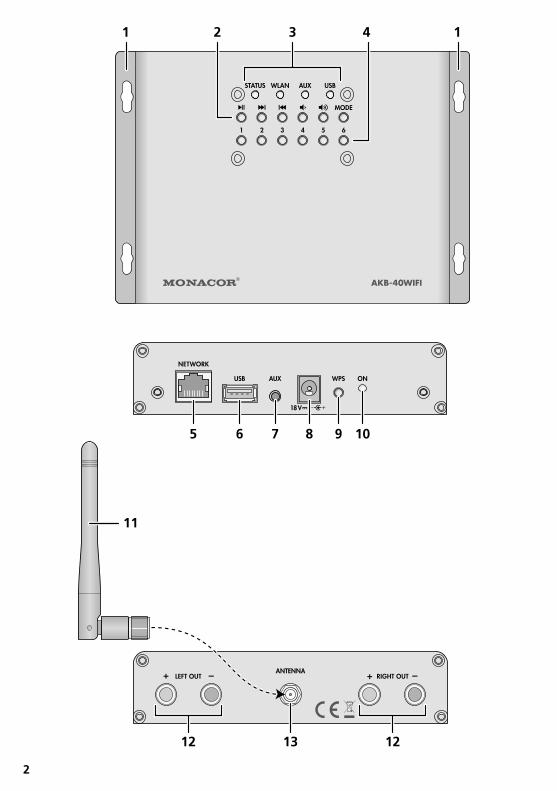
2 Übersicht der Bedienelemente und Anschlüsse
1 Montagewinkel
2 Bedientasten (Funktionen ☞ Kapitel 5)
3 Status-LEDs
STATUS: blinkt langsam bei fehlender WLAN-Verbindung blinkt schnell beim Verbindungs-aufbau leuchtet konstant bei bestehender WLAN-Verbindung
WLAN: Audiostreaming über WLAN
AUX: Tonquelle: AUX-Eingang
USB: Wiedergabe von Audiodateien über den USB-Anschluss (6)
4 Funktionstasten, Funktionen per Software definiert (z . B . Internetradiostationen)
5 RJ45-Buchse NETWORK für die Ethernet- Verbindung zu einem Netzwerk
6 USB-Buchse (Typ A) zum Anschluss eines USB-Speichersticks für die Wiedergabe von Audiodateien
7 Eingangsbuchse AUX, 3,5-mm-Klinke zum Anschluss einer Stereotonquelle (Line-Pegel)
8 Buchse zum Anschluss des mitgelieferten Netzgeräts
9 WPS-Taste für die schnelle Einrichtung einer WLAN-Verbindung z . B . zu einem Router, der die WPS-Funktion (Wi-Fi Protected Setup) unterstützt
10 Betriebsanzeige ON
11 Antenne
12 Klemmen zum Anschluss der Lautsprecher: LEFT OUT = linker Lautsprecher RIGHT OUT = rechter Lautsprecher
13 Antennenbuchse
Deu
tsch
5
Deu
tsch3 Hinweise
für den sicheren GebrauchDie Geräte (Verstärker und Netzgerät) entspre-chen allen relevanten Richtlinien der EU und sind deshalb mit ge kennzeichnet .
WARNUNG Das Netzgerät wird mit lebens-gefährlicher Netzspannung ver-sorgt . Nehmen Sie daran keine Eingriffe vor . Es besteht die Ge-fahr eines elektrischen Schlages .
• Setzen Sie die Geräte nur im Innenbereich ein und schützen Sie sie vor Tropf- und Spritzwas-ser und hoher Luftfeuchtigkeit . Der zulässige Einsatztemperaturbereich beträgt 0 – 40 °C .
• Stellen Sie keine mit Flüssigkeit gefüllten Ge-fäße, z . B . Trinkgläser, auf die Geräte .
• Nehmen Sie die Geräte nicht in Betrieb und ziehen Sie sofort den Netzstecker des Netz-geräts aus der Steckdose:1 . wenn sichtbare Schäden an einem der Ge-
räte oder am Netzkabel vorhanden sind,2 . wenn nach einem Sturz oder Ähnlichem der
Verdacht auf einen Defekt besteht,3 . wenn Funktionsstörungen auftreten .Lassen Sie die Geräte in jedem Fall in einer Fachwerkstatt reparieren .
• Ziehen Sie den Netzstecker nie am Kabel aus der Steckdose, fassen Sie immer am Stecker an .
• Verwenden Sie zum Säubern nur ein tro-ckenes, weiches Tuch, niemals Wasser oder Chemikalien .
• Werden die Geräte zweckentfremdet, nicht richtig angeschlossen, falsch bedient oder nicht fachgerecht repariert, kann keine Haf-tung für daraus resultierende Sach- oder Per-sonenschäden und keine Garantie für die Ge-räte übernommen werden . Ebenso kann keine Haftung für durch Fehlbedienung oder durch einen Defekt entstandene Daten verluste und deren Folgeschäden übernommen werden .
Sollen die Geräte endgültig aus dem Betrieb genommen werden, übergeben Sie sie zur umweltgerechten Entsorgung einem örtlichen Recyclingbetrieb .
4 Installation 1) Den Verstärker an geeigneter Stelle platzie-
ren und bei Bedarf die Montagewinkel (1) festschrauben .
2) Die Antenne (11) auf die Buchse ANTENNA (13) stecken, festschrauben und senkrecht stellen .
3) Die Lautsprecher an die Buchsen (12) an-schließen (RIGHT OUT für den rechten und LEFT OUT für den linken Kanal) . Die größte Ausgangsleistung wird beim Anschluss von Lautsprechern mit einer Impedanz von 4 Ω er-reicht . Es können auch Lautsprecher mit einer höheren Impedanz angeschlossen werden, jedoch verringert sich dann die Ausgangs-leistung entsprechend .
4) Bei Bedarf den Ausgang einer Stereo-tonquelle mit Line-Pegel (z . B . CD-Spieler, Tuner, Mischpult etc .) mit der 3,5-mm-Klin-kenbuchse AUX (7) verbinden .
5) Zur Wiedergabe von Audiodateien auf einem USB-Speicherstick diesen in die Buchse USB (6) stecken .Wichtig: Der AKB-40WIFI speichert eine Playlist-Da-tei auf dem Speicherstick . Damit es dabei nicht zu Daten verlusten kommen kann, vor dem Entfernen des Speichersticks immer die Wiedergabe unterbrechen .
6) Für eine Ethernet-Verbindung zu einem loka-len Netzwerk die RJ45-Buchse NETWORK (5) verwenden .
7) Das Netzgerät an die Buchse 18 V⎓ (8) an-schließen und den Netzstecker in eine Steck-dose (230 V/ 50 Hz) stecken . Der Verstärker ist damit eingeschaltet . Wird der Verstärker für einen längeren Zeitraum nicht genutzt, zur Vermeidung unnötigen Stromverbrauchs das Netzgerät vom Netz trennen .
4.1 NetzwerkanbindungDer AKB-40WIFI kann über seine WLAN-Funkti-onalität in ein bestehendes WLAN als Client ein-gebunden oder als selbstständiger Access point direkt verbunden werden . Beide Zugriffsarten sind auch gleichzeitig möglich . Eine Kabelver-bindung per Ethernet zu einem bestehenden Netzwerk ist ebenfalls möglich .
6
Deu
tsch 4.1.1 Verstärker als Accesspoint
Der AKB-40WIFI kann als selbstständiger Access-point ein WLAN aufbauen . Dies ist die einfachste Möglichkeit, mit einem DLNA- Spieler auf einem Mobilgerät Audiodateien über den AKB-40WIFI wiederzugeben . Dabei erscheint der Verstärker in der Liste der anderen WLAN-Geräte mit der SSID „WIFI-Speaker_xxxx“ (xxxx = Nummer) .
Verbindet sich ein WLAN-Gerät, z . B . Tablet-computer, PC, Smartphone etc ., mit diesem Netzwerk, kann eine auf dem Gerät installierte DLNA -kompatible Software Audiodateien über den Verstärker als Stream wiedergeben oder die Wiedergabe von Audiodateien auf einem am Verstärker angeschlossenen USB-Speicher steuern .
Der Zugang zum internen Webserver des AKB-40WIFI ist zunächst offen, kann aber mit einem Passwort gesichert werden . Zum Anzeigen oder Ändern der Netzwerkeinstel-lungen über einen Webbrowser die Adresse 10 .10 .10 .254 aufrufen .
4.1.2 Integration in ein WLANDer AKB-40WIFI lässt sich auch in ein bestehen-des WLAN integrieren . Geräte, die demselben Netz angehören, können dann über den Ver-stärker Audiostreams abspielen . Wenn dieses Netzwerk eine Internetverbindung hat, kann der AKB-40WIFI auch Daten von Musik- Streaming-Diensten oder Internetradio empfangen .Tipp: Mit der Müzo-Software lassen sich z . B . Strea-
ming-Angebote wie TuneIn oder Spotify nutzen .
Die Verbindung zum bestehenden WLAN kann sehr einfach hergestellt werden, wenn der Wireless Accesspoint dieses Netzwerks (z . B . WLAN-Router) den WPS-Standard (Wi-Fi Pro-tected Setup) unterstützt . In diesem Fall beim Router WPS aktivieren und beim AKB- 40WIFI die WPS-Taste (9) kurz drücken (➾ Ansage: „Sear-ching for Wi-Fi connection“) . Der AKB-40WIFI wird nun automatisch mit dem WLAN verbun-den (➾ Ansage: „Wi-Fi connected“) .
Verfügt das WLAN nicht über die WPS-Funk-tion, über den Webbrowser eines WLAN-fä-higen Geräts die Netzwerkeinstellungen des AKB-40WIFI aufrufen (☞ Kapitel 4 .1 .1) . Über die Schaltfläche „Wifi“ lässt sich hier eine Liste aller verfügbaren WLAN-Netzwerke anzeigen . Das gewünschte Netzwerk auswählen und das
Netzzugangskennwort eingeben, falls erfor-derlich . Die LED STATUS (3) blinkt während des Verbindungsaufbaus schneller . Der Verstärker bestätigt die Verbindung mit der Ansage „WiFi connected“ und einer konstant leuch tenden LED .Hinweis: Die Ansagen erfolgen nur, wenn die voreinge-
stellte Sprache nicht geändert wird .
4.1.3 Netzwerkanbindung per EthernetSollte am Montageort keine Verbindung zu einem anderen WLAN möglich sein, kann der AKB-40WIFI auch per Ethernetkabel mit einem bestehenden Netzwerk verbunden werden . Die-ses muss über einen DHCP-Server verfügen, der am AKB-40WIFI die erforderliche Konfiguration durchführt .
4.1.4 Netzwerknamen ändernBei der Verwendung mehrerer AKB-40WIFI sind unterschiedliche Namen sinnvoll . Zum Ändern eines Namens: Über den Webbrowser eines WLAN-fähigen Geräts die Netzwerkeinstel-lungen des AKB-40WIFI aufrufen (☞ Kapitel 4 .1 .1) . Wenn der Verstärker in ein Netzwerk eingebunden ist, können die Netzwerkeinstel-lungen auch über den Webbrowser auf einem Gerät desselben Netzwerks aufgerufen werden . Dazu im Webbrowser die Adresse eingeben, die dem AKB-40WIFI in dem Netzwerk zugewiesen wurde . Die Konfigurationsseite wird angezeigt und unter „Network ➧ Change device name“ lässt sich der Name des Geräts ändern .Hinweis: Eine Änderung unter „Network ➧ Change device name“ führt auch zu einer Änderung des Netzwerk namens (SSID) und damit zum Abbruch der bestehenden Netzwerkverbindung, wenn das Gerät wie in Kapitel 4 .1 .1 direkt mit dem AKB-40WIFI verbunden ist .
5 BedienungMit dem Anschluss an die Stromversorgung ist der AKB-40WIFI eingeschaltet . Er startet auto-matisch in der zuletzt gewählten Betriebsart, die mit den LEDs (3) angezeigt und über die angeschlossenen Lautsprecher angesagt wird (vgl . Taste MODE in der folgenden Tabelle) . War der Verstärker bereits mit einem WLAN verbun-den, wird automatisch versucht, die Verbindung wiederherzustellen . Dabei blinkt die LED STA-TUS (3) schneller und leuchtet bei erfolgreicher
7
Deu
tschVerbindung konstant . Die Bedienung des Ver-
stärkers kann über die Bedientasten (2, 4) und per Softwaresteuerung über einen DLNA- Spieler erfolgen . Als Bestätigung werden bei einigen Bedienvorgängen Statusinformationen über die angeschlossenen Lautsprecher angesagt .
Hinweise:
Die Reaktion auf einen Tastendruck erfolgt manchmal verzögert .
Die Ansagen erfolgen nur, wenn in den Einstellungen des AKB-40WIFI die voreingestellte Sprache nicht geän-dert wird .
Die Bedientasten haben folgende Funktionen:
Taste FunktionWiedergabe unterbrechen/fortsetzen oder stummschalten /wiedereinschalten (AUX-Eingang, Internetradio)
Sprung zum nächsten Titel
Sprung zum vorherigen Titel
∕ Lautstärke erhöhen /verringern
MODE 1
Umschalten der Quelle ➾ Ansage über Laut sprecher:WLAN ➾ „Wi-Fi playback“AUX ➾ „Line in“USB ➾ „U-disk playback“
1 … 6 softwareabhängige 2 Funktionstasten, z. B. zum Abrufen von Internetradiostationen
1 Beim Umschalten von USB-Wiedergabe auf WLAN wird die Wiedergabe vom USB-Speicher so lange fortgesetzt, bis eine andere Wiedergabe per Audiostream gestartet wird.
2 Die Funktionstasten werden beispielsweise von der Müzo-Soft-ware unterstützt: Die Zuordnung zu einer Taste erfolgt dort über die Schaltfläche hinter dem Namen einer Internetradio-station in der Liste. Die Streaming-Internetadressen werden im AKB-40WIFI gespeichert und können anschließend unabhängig von der Software über die zugewiesenen Tasten am Verstärker abgerufen werden.
6 RücksetzenZum Zurücksetzen auf die Werkseinstellungen die Taste WPS länger als 5 s drücken (➾ Ansage: „Restore to factory settings“) . Der AKB-40WIFI startet danach neu . Dieser Vorgang kann auch über einen Webbrowser in den Netzwerkein-stellungen unter „System ➧ Restore Factory Set-tings“ durchgeführt werden (☞ Kapitel 4 .1 .1 und 4 .1 .4) .
7 Technische DatenSinusleistung an 4 Ω: � � � � � 2 × 25 W
Verstärkerklasse: � � � � � � � �D
Lautsprecherimpedanz: � � �≥ 4 Ω
Frequenzbereich: � � � � � � � � 20 – 20 000 Hz
Störabstand: � � � � � � � � � � �> 86 dB
unterstützte Audioformate: MP3, WMA, AAC/AAC+, ALAC, FLAC, APE, WAV
WLAN-Standards: � � � � � � � 802�11 B/G/N, 2,4 GHz
Audio-Streaming-Standards: � � � � � � � � � � � � �DLNA, Apple AirPlay,
Spotify Connect, QQ music Qplay
Stromversorgung: � � � � � � �⎓18 V über beiliegendes Netz gerät an 230 V/50 Hz
Einsatztemperatur:� � � � � � � 0 – 40 °C
Abmessungen (B × H × T): 155 × 33 × 135 mm
Gewicht: � � � � � � � � � � � � � � 370 g
Änderungen vorbehalten .
Diese Bedienungsanleitung ist urheberrechtlich für MONACOR ® INTERNATIONAL GmbH & Co. KG geschützt. Eine Reproduktion für eigene kommerzielle Zwecke – auch auszugsweise – ist untersagt.
8
English
Referenz für Sprachkennzeichnung der Seiten und Inhaltsverzeichnis
Referenz für Sprachen-Inhaltsverzeichnis
EnglishEnglish Page
WLAN Hi-Fi AmplifierThe instructions are intended for users with knowledge in network technology and basic knowledge in audio technology . Please read the instructions carefully prior to operation and keep them for later reference . All operating ele-ments and connections described can be found on page 2 .
1 ApplicationsThe stereo amplifier AKB-40WIFI is designed to reproduce music in hi-fi quality via a wire-less local network (WLAN) . It can be integrated into an existing network or it can be used in combination with a player to create a wireless network of its own . As a player, a smartphone, tablet computer or PC with a DNLA compatible software (DNLA audio player) is required . The streaming protocol “AirPlay” from Apple is also supported .
Some DLNA audio players provide a multi- room option: an AKB-40WIFI is installed in differ-ent rooms; using a DLNA player, different pieces of music can be transmitted to the individual amplifiers or multiple AKB-40WIFI can be linked and controlled together .
The AKB-40WIFI provides a USB port to replay audio files stored on a USB flash drive . For operation, the buttons on the amplifier or the player software can be used .
In addition, an analog stereo input is availa-ble to connect an audio source with line output level (e . g . CD player) .DNLA: The Digital Living Network Alliance is an inter-national organization of computer, mobile phone and consumer product manufacturers that have agreed on a common standard for digital data transmission and that work constantly on further development of this standard .
1.1 Conformity and approvalHerewith, MONACOR INTERNATIONAL declare that the AKB-40WIFI complies with the directive 2014 / 53 / EU . The EU declaration of conformity is available on the internet:www .monacor .com
The unit operates in the 2 .4 GHz range . It is licence-free, requires no registration and is generally approved for operation in EU and EFTA countries .
2 Operating Elements and Connections
1 Mounting brackets
2 Control buttons (functions ☞ chapter 5)
3 Status LED indicators:
STATUS: will flash slowly when there is no WLAN connection will flash rapidly when the con-nection is being established will light continuously when a WLAN connection exists
WLAN: audio streaming via WLAN
AUX: audio source: AUX input
USB: audio files are being replayed via the USB port (6)
4 Function keys; functions defined by software (e . g . internet radio stations)
5 RJ45 jack NETWORK for Ethernet connection to a network
6 USB port (type A) to connect a USB flash drive for the replay of audio files
7 Input jack AUX, 3 .5 mm, to connect a stereo audio source (line level)
8 Jack to connect the power supply unit pro-vided
9 WPS button for fast establishment of a WLAN connection, e . g . to a router support-ing the WPS function (Wi-Fi Protected Setup)
10 Power indicator ON
11 Antenna
12 Terminals to connect the speakers:
LEFT OUT = left speaker
RIGHT OUT = right speaker
13 Antenna jack

9
English3 Safety Notes
The units (amplifier and power supply unit) cor-respond to all relevant directives of the EU and are therefore marked with .
WARNING The power supply unit uses dan-gerous mains voltage . Leave ser-vicing to skilled personnel only . Inexpert handling of the unit may result in electric shock .
• The units are suitable for indoor use only . Pro-tect them against dripping water, splash water and high air humidity . The admissible ambient temperature range is 0 – 40 °C .
• Do not place any vessels filled with liquid, e . g . drinking glasses on the units .
• Do not operate the units and immediately dis-connect the mains plug of the power supply unit from the mains socket if1 . there is visible damage to one of the units
or to the mains cable2 . a defect might have occurred after a drop
or similar accident,3 . malfunctions occur .The units must in any case be repaired by skilled personnel .
• Never pull the mains cable to disconnect the mains plug from the mains socket, always seize the plug .
• For cleaning only use a dry, soft cloth; never use water or chemicals .
• No guarantee claims for the units and no liability for any resulting personal damage or material damage will be accepted if the units are used for other purposes than originally intended, if they are not correctly connect-ed or operated, or if they are not repaired in an expert way . Likewise, no liability will be accepted for data loss caused by a defect or operating errors and for any consequential damage of this data loss .
If the units are to be put out of oper-ation definitively, take them to a local recycling plant for a disposal which is not harmful to the environment .
4 Installing the Amplifier1) Find a suitable location for the amplifier
and set it up; if necessary, screw on the two mounting brackets (1) .
2) Insert the antenna (11) into the jack ANTEN-NA (13); then tighten the antenna and place it in a vertical position .
3) Connect the speakers to the jacks RIGHT OUT and LEFT OUT (12) . To obtain the high-est output power, connect speakers with an impedance of 4 Ω . It is also possible to connect speakers with a higher impedance; this, however, will reduce the output power accordingly .
4) If required, connect the output of a stereo audio source with line level (e . g . CD player, tuner, mixer etc .) to the 3 .5 mm jack AUX (7) .
5) To replay audio files from a USB flash drive, connect the USB flash drive to the USB port (6) .Important: The AKB-40WIFI will store a playlist file on the USB flash drive . To avoid any data loss, always stop the replay before removing the USB flash drive .
6) Use the RJ45 jack NETWORK (5) for Ethernet connection to a local network .
7) Connect the power supply unit to the jack 18 V⎓ (8) and the mains plug to a mains socket (230 V/ 50 Hz) . The amplifier will be switched on . To prevent unnecessary power consumption, disconnect the power supply unit from the mains if the amplifier is not used for a longer period of time .
4.1 Network connectionVia its WLAN functionality, the AKB-40WIFI can be integrated as a client into an existing net-work or directly connected as an independent access point . Both access types can be used at the same time . Cable connection via Ethernet to an existing network is also supported .
4.1.1 Amplifier as access pointThe AKB-40WIFI can be used as an independ-ent access point to create a WLAN . This is the easiest way to replay, via the AKB-40WIFI, audio files with a DLNA player on a mobile device . In the list of the other WLAN units, the amplifier will appear with the SSID “WIFI- Speaker_xxxx”(xxxx = number) .
10
English When a WLAN unit, such as a tablet com-
puter, PC or smartphone, connects to this net-work, a DLNA compatible software installed on the unit can stream and replay audio files via the amplifier or it can control the replay of audio files from a USB flash drive connected to the amplifier .
Access to the internal web server of the AKB-40WIFI is open first; it can be pass-word-protected . To view or change the network settings, call up the address 10 .10 .10 .254 via a web browser .
4.1.2 Integration into a WLANThe AKB-40WIFI can also be integrated into an existing WLAN . Units that are in the same network can then replay audio streams via the amplifier . If the network is connected to the internet, the AKB-40WIFI will also be able to receive data from music streaming services or internet radio .Hint: With the Müzo software, streaming services such
as TuneIn or Spotify can be used .
Connection to the existing WLAN can be most conveniently established provided that the wire-less access point of this network (e . g . WLAN router) supports the WPS standard (Wi-Fi Pro-tected Setup): Activate the WPS at the router and then briefly press the WPS button (9) at the AKB-40WIFI (➾ announcement: “Searching for Wi-Fi connection”) . The AKB-40WIFI will be automatically connected to the WLAN (➾ an-nouncement: “Wi-Fi connected”) .
If the WLAN does not provide the WPS function, call up the network settings of the AKB-40WIFI via the web browser of a WLAN-en-abled unit (☞ chapter 4 .1 .1) . Then use the but-ton “Wifi” in the network settings to show a list of all WLAN networks available . Select the network desired and, if required, enter the password for network access . The LED indica-tor STATUS (3) will flash rapidly while the con-nection is being established . Upon completion, the amplifier will announce “WiFi connected” and the LED will light continuously .Note: The announcements will only be made when the
predefined language is not changed .
4.1.3 Network connection via EthernetIf the location where the AKB-40WIFI is installed does not allow connection to another WLAN, an Ethernet cable can be used to connect the AKB-40WIFI to an existing network . This network must include a DHCP server that will configure the AKB-40WIFI as required .
4.1.4 Changing network namesIn case of multiple AKB-40WIFI, different names should be used . To change a name: Call up the network settings of the AKB-40WIFI via the web browser of a WLAN-enabled unit (☞ chapter 4 .1 .1) . When the amplifier is integrated into a network, it is also possible to call up the network settings via the web browser of a unit in the same network: In the web browser, enter the address assigned to the AKB-40WIFI in the net-work . The configuration page will be displayed and you can change the name of the unit via “Network ➧ Change device name” .Note: When you change the name via “Network ➧ Change device name”, you will also automatically change the network name (SSID) and thus disconnect the existing network connection if the unit has been directly con-nected to the AKB-40WIFI as described in chapter 4 .1 .1 .
5 OperationThe AKB-40WIFI will be switched on as soon as it is connected to the power supply . It will automatically go to the operating mode most recently selected; the operating mode will be indicated by the LEDs (3) and announced via the speakers connected (cf . button MODE in the table below) . If the amplifier was connected to a WLAN before, it will automatically try to re-establish the connection: The LED indicator STATUS (3) will flash rapidly during this process; it will light continuously once the connection has been established . For operation of the amplifier, the control buttons (2, 4) and software control via a DLNA player are available . Some control operations will be confirmed by status infor-mation announced via the speakers connected . Notes:
The AKB-40WIFI will sometimes respond with a delay to the press of a button .
The announcements will only be made when the pre-defined language in the settings of the AKB-40WIFI is not changed .
11
EnglishThe control buttons have the following func-
tions:
Button Functionto pause /continue the replay or to mute / unmute the sound (AUX input, internet radio)
go to the next title
go to the previous title
∕ to increase /reduce the volume
MODE 1
to change source ➾ announcement via speaker:WLAN ➾ “Wi-Fi playback”AUX ➾ “Line in”USB ➾ “U-disk playback”
1 … 6 software-dependent 2 function keys, e. g. to call up internet radio stations
1 When you switch from USB replay to WLAN, the replay from the USB flash drive will continue until a different replay via audio streaming is started.
2 The function keys are supported by the Müzo software, for example: To assign a function key to an internet radio station, select the button after the name of the internet radio station desired. The streaming internet addresses will be stored in the AKB-40WIFI and can then be called up independently of the software via the appropriate buttons on the amplifier.
6 ResettingTo reset the amplifier to its factory settings, keep the button WPS pressed for more than 5 sec-onds (➾ announcement: “Restore to factory settings”) . The AKB-40WIFI will restart after the reset . The reset can also be started via a web browser in the network settings: “System ➧ Restore Factory Settings” (☞ chapters 4 .1 .1 and 4 .1 .4) .
7 SpecificationsRMS power at 4 Ω: � � � � � � 2 × 25 W
Amplifier class: � � � � � � � � �D
Speaker impedance:� � � � � �≥ 4 Ω
Frequency range: � � � � � � � � 20 – 20 000 Hz
S/N ratio: � � � � � � � � � � � � � �> 86 dB
Audio formats supported: �MP3, WMA, AAC/AAC+, ALAC, FLAC, APE, WAV
WLAN standards: � � � � � � � 802�11 B/G/N, 2�4 GHz
Audio streaming standards: DLNA, Apple AirPlay, Spotify Connect, QQ music Qplay
Power supply: � � � � � � � � � �⎓18 V via PSU provid-ed and connected to 230 V/ 50 Hz
Ambient temperature: � � � � 0 – 40 °C
Dimensions (W × H × D): � 155 × 33 × 135 mm
Weight: � � � � � � � � � � � � � � � 370 g
Subject to technical modification .
All rights reserved by MONACOR ® INTERNATIONAL GmbH & Co. KG. No part of this instruction manual may be reproduced in any form or by any means for any commercial use.
12
Referenz für Sprachkennzeichnung der Seiten und Inhaltsverzeichnis
Referenz für Sprachen-Inhaltsverzeichnis
FrançaisFrançais Page
Amplificateur Hi-Fi WLANCette notice s’adresse aux utilisateurs avec des connaissances de base en technologie réseau et des connaissances de base en audio . Veuillez lire la présente notice avec attention avant le fonctionnement et conservez-la pour pouvoir vous y reporter ultérieurement . Vous trouverez sur la page 2 une description des éléments et branchements .
1 Possibilités d’utilisationL’amplificateur stéréo AKB-40WIFI sert à la resti-tution de musique en qualité Hi-Fi via un réseau local sans fil (WLAN) . Il peut être intégré dans un réseau existant ou, avec un lecteur, constituer un réseau sans fil propre . Comme lecteur, vous pouvez utiliser un Smartphone, une tablette ou un PC sur lequel un logiciel compatible DLNA (lecteur audio DLNA) doit être installé . Le proto-cole de streaming «AirPlay» du fabricant Apple est également accepté .
Certains lecteurs audio DLNA offrent une utilisation multi-pièces (multiroom) : un AKB-40WIFI est respectivement installé dans différentes pièces . Il est possible de transmettre des musiques différentes aux AKB-40WIFI indivi-duels depuis un lecteur DLNA ou de coupler de multiples AKB-40WIFI et les contrôler ensemble .
Un port USB permet une lecture de fichiers audio depuis une clé USB . L’utilisation peut se faire via les touches sur l’amplificateur ou via le logiciel de lecture .
De plus, une source audio avec niveau de sortie ligne (par exemple lecteur CD) peut être reliée via une entrée stéréo analogique .DLNA : La Digital Living Network Alliance est une alliance internationale de fabricants d’ordinateurs, téléphones mobiles et électronique grand public qui se sont entendus sur un standard commun pour la transmission digitale de données et poursuivent son développement .
1.1 Conformité et autorisationPar la présente, MONACOR INTERNATIONAL déclare que l’appareil AKB-40WIFI est en conformité avec les exigences fondamentales et les réglementations inhérentes à la directive 2014 / 53 / CE . La déclaration de conformité UE est disponible sur notre site :www .monacor .com
L’appareil fonctionne dans la plage 2,4 GHz et est autorisé pour un fonctionnement dans les pays de l’Union européenne et de l’A .E .L .E . sans déclaration et gratuitement.
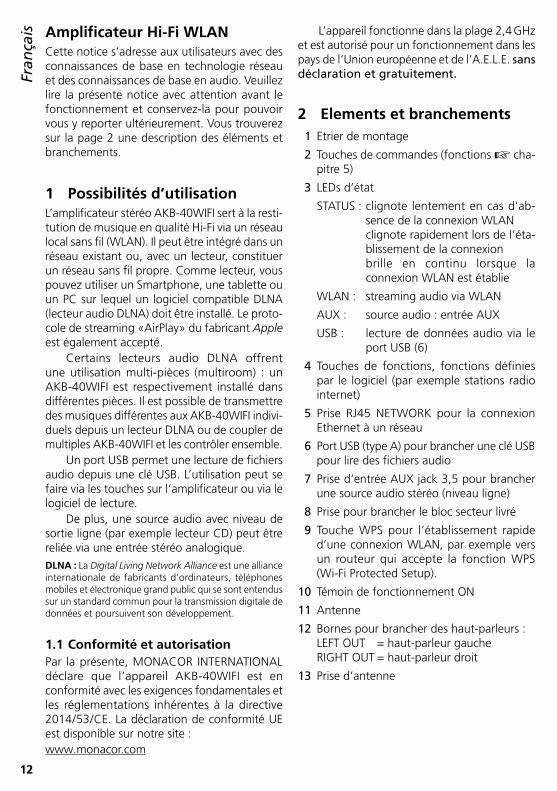
2 Elements et branchements1 Etrier de montage
2 Touches de commandes (fonctions ☞ cha-pitre 5)
3 LEDs d’état
STATUS : clignote lentement en cas d’ab-sence de la connexion WLAN clignote rapidement lors de l’éta-blissement de la connexion brille en continu lorsque la connexion WLAN est établie
WLAN : streaming audio via WLAN
AUX : source audio : entrée AUX
USB : lecture de données audio via le port USB (6)
4 Touches de fonctions, fonctions définies par le logiciel (par exemple stations radio internet)
5 Prise RJ45 NETWORK pour la connexion Ethernet à un réseau
6 Port USB (type A) pour brancher une clé USB pour lire des fichiers audio
7 Prise d’entrée AUX jack 3,5 pour brancher une source audio stéréo (niveau ligne)
8 Prise pour brancher le bloc secteur livré
9 Touche WPS pour l’établissement rapide d’une connexion WLAN, par exemple vers un routeur qui accepte la fonction WPS (Wi-Fi Protected Setup) .
10 Témoin de fonctionnement ON
11 Antenne
12 Bornes pour brancher des haut-parleurs : LEFT OUT = haut-parleur gauche RIGHT OUT = haut-parleur droit
13 Prise d’antenne
Fran
çais

13
Fran
çais3 Conseils d’utilisation et
de sécuritéLes appareils (amplificateur et bloc secteur) répondent à toutes les directives nécessaires de l’Union européenne et portent donc le sym-bole .
AVERTISSEMENT Le bloc secteur est alimenté par une tension dangereuse . Ne touchez jamais l’intérieur de l’appareil . Risque de dé-charge électrique .
• Les appareils ne sont conçus que pour une utilisation en intérieur . Protégez-les des écla-boussures, de tout type de projections d’eau et d’une humidité d’air élevée . La plage de température ambiante admissible est de 0 – 40 °C .
• En aucun cas, vous ne devez poser d’objet contenant du liquide ou un verre sur les appareils .
• Ne faites pas fonctionner les appareils ou débranchez immédiatement la fiche du bloc secteur lorsque :1 . des dommages visibles apparaissent sur
l’appareil ou sur le cordon secteur,2 . après une chute ou un cas similaire, vous
avez un doute sur l’état de l’appareil,3 . des dysfonctionnements apparaissent .Dans tous les cas, les dommages doivent être réparés par un technicien spécialisé .
• Ne débranchez jamais l’appareil en tirant sur le cordon secteur ; retirez toujours le cordon secteur en tirant la fiche .
• Pour le nettoyage, utilisez un chiffon sec et doux, en aucun cas de produits chimiques ou d’eau .
• Nous déclinons toute responsabilité en cas de dommages matériels ou corporels résultants si les appareils sont utilisés dans un but autre que celui pour lequel ils ont été conçus, s’ils ne sont pas correctement branchés ou utilisés ou s’ils ne sont pas réparés par une personne habilitée, en outre, la garantie deviendrait caduque . De même, notre responsabilité ne saurait être engagée en cas de pertes de don-nées et leurs conséquences, causées par une mauvaise utilisation ou un défaut .
Lorsque les appareils sont définitive-ment retirés du service, vous devez les déposer dans une usine de recyclage adaptée pour contribuer à leur élimi-nation non polluante .
CARTONS ET EMBALLAGE PAPIER À TRIER
4 Installation1) Placez l’amplificateur à un endroit adapté et
si besoin, vissez les étriers de montage (1) .
2) Placez l’antenne (11) sur la prise ANTENNA (13), vissez-la et mettez-la à la verticale .
3) Reliez les haut-parleurs aux prises (12) (RIGHT OUT pour le canal droit et LEFT OUT pour le canal gauche) . La puissance de sortie la plus grande est atteinte avec des haut-parleurs ayant une impédance de 4 Ω . Il est possible de relier des haut-parleurs avec une impé-dance supérieure mais la puissance de sortie diminue en conséquence .
4) Si besoin, reliez la sortie d’une source audio stéréo avec niveau ligne (p . ex . lecteur CD, tuner, table de mixage . . .) à la prise jack 3,5 AUX (7) .
5) Pour la lecture de fichiers audio depuis une clé USB, mettez la clé dans le port USB (6) .Important : le AKB-40WIFI mémorise un fichier Play-list sur la clé . Pour éviter toute perte de données, arrêtez toujours la lecture avant de retirer la clé .
6) Pour une connexion Ethernet à un réseau local, utilisez la prise RJ45 NETWORK (5) .
7) Reliez le bloc secteur à la prise 18 V⎓ (8) et la fiche secteur à une prise 230 V/ 50 Hz . L’amplificateur est ainsi allumé . En cas de non utilisation prolongée de l’amplificateur et pour éviter toute consommation inutile, débranchez le bloc secteur .
4.1 Connexion réseauLe AKB-40WIFI peut être intégré via sa fonction-nalité WLAN dans un WLAN existant comme Client ou être relié directement comme Access- point autonome . Les deux types d’accès sont simultanément possibles . Une connexion filaire par Ethernet à un réseau existant est également possible .
14
Fran
çais 4.1.1 Amplificateur comme Accesspoint
Le AKB-40WIFI peut constituer un WLAN comme point d’accès (Accesspoint) autonome . C’est la possibilité la plus simple pour restituer, avec un lecteur DLNA, des données audio sur un appareil mobile via le AKB-40WIFI . L’amplificateur appa-raît dans la liste des autres appareils WLAN avec la SSID «WIFI-Speaker_xxx» (xxxx = numéro) .
Si un appareil WLAN, par exemple tablette, PC, Smartphone . . ., se connecte à ce réseau, un logiciel compatible DLNA installé sur l’appareil peut lire des fichiers audio via l’amplificateur comme Stream ou gérer la lecture de fichiers audio sur une clé USB reliée à l’amplificateur .
L’accès au serveur web interne du AKB- 40WIFI est ouvert mais il peut être sécurisé par un mot de passe . Pour afficher ou modifier les réglages réseau via un navigateur, appelez l’adresse 10 .10 .10 .254 .
4.1.2 Intégration dans un WLANLe AKB-40WIFI peut être également intégré dans un WLAN existant . Les appareils appartenant au même réseau peuvent également lire des streamings audio via l’amplificateur . Si ce réseau a une connexion internet, le AKB-40WIFI peut également recevoir des données de services de streaming de musique ou d’une radio internet .
Remarque : avec le logiciel Müzo, on peut utiliser par exemple des offres de streaming comme TuneIn ou Spotify .
La connexion au WLAN existant peut être très facilement réalisée si le point d’accès Wireless Accesspoint de ce réseau (p . ex . routeur WLAN) accepte le stand WPS (Wi-Fi Protected Setup) . Dans ce cas, activez sur le routeur la fonction WPS et sur le AKB-40WIFI, appuyez brièvement sur la touche WPS (9) (➾ annonce : «Searching for Wi-Fi connection») . Le AKB-40WIFI est maintenant automatiquement relié au WLAN (➾ annonce : «Wi-Fi connected») .
Si le WLAN ne dispose pas de la fonction WPS, appelez les réglages réseau du AKB-40WIFI via le navigateur internet d’un appareil compa-tible WLAN (☞ chapitre 4 .1 .1) . Via le bouton «Wifi», une liste de tous les réseaux WLAN dis-ponibles s’affiche . Sélectionnez le réseau voulu et saisissez le mot de passe d’accès au réseau si besoin . La LED STATUS (3) clignote rapidement pendant l’établissement de la connexion . L’am-
plificateur confirme la connexion avec l’annonce «WiFi connected» et une LED brille en continu .Remarque : les annonces ne s’effectuent que si la langue
préréglée n’a pas été modifiée .
4.1.3 Connexion réseau par EthernetSi aucune connexion à un autre WLAN n’est possible sur le lieu de montage, le AKB-40WIFI peut également être relié à un réseau existant via un câble Ethernet . Il doit disposer d’un ser-veur DHCP qui effectue sur le AKB-40WIFI la configuration nécessaire .
4.1.4 Modification des noms de réseauSi vous utilisez plusieurs AKB-40WIFI, il est intéressant d’avoir des noms différents . Pour modifier un nom : via le navigateur internet d’un appareil compatible WLAN, appelez les réglages réseau du AKB-40WIFI (☞ chapitre 4 .1 .1) . Si l’amplificateur est intégré dans un réseau, les réglages réseau peuvent être appelés via le navigateur internet sur un appareil du même réseau . Pour ce faire, saisissez l’adresse dans le navigateur internet, qui doit être attribuée au AKB-40WIFI dans le réseau . La page de configu-ration s’affiche et vous pouvez modifier le nom de l’appareil sous «Network ➧ Change device name» .Remarque : Toute modification sous «Network ➧ Change device name» conduit également à une modification du nom du réseau (SSID) et ainsi à l’interruption de la connexion réseau existante si l’appareil est relié direc-tement au AKB-40WIFI comme indiqué dans le chapitre 4 .1 .1 .
5 UtilisationLe AKB-40WIFI est allumé avec le branchement au secteur . Il démarre automatiquement dans le dernier mode de fonctionnement sélectionné qui est indiqué par les LEDs (3) et annoncé par les haut-parleurs reliés (voir touche MODE dans le tableau suivant) . Si l’amplificateur est déjà relié à un WLAN, il essaie automatiquement de rétablir la connexion . La LED STATUS (3) clignote rapidement et brille en continu si la connexion est rétablie . L’utilisation de l’amplificateur peut se faire via les touches de commandes (2, 4) et par gestion via le logiciel avec un lecteur DLNA . Comme confirmation, lors de certaines étapes d’utilisation, des informations de statut sont annoncées via les haut-parleurs reliés .
15
Fran
çaisRemarques :
La réaction à une pression de touche se fait parfois avec temporisation .Les annonces ne se font que si la langue préréglée n’a pas été modifiée dans les réglages du AKB-40WIFI .
Les touches de commande ont les fonctions suivantes :
Touche FunctionInterrompre / Poursuivre la lecture ou couper / réactiver le son (entrée AUX, radio internet)
Saut au titre suivant
Saut au titre précédent
∕ Augmenter / Diminuer le volume
MODE 1
Commutation de la source ➾ annonce via les haut-parleurs :WLAN ➾ «Wi-Fi playback»AUX ➾ «Line in»USB ➾ «U-disk playback»
1 … 6 Touches de fonction dépendant du logiciel2, p. ex. pour appeler les stations radio internet
1 Lors de la commutation de la lecture USB sur WLAN, la lecture de la clé USB est poursuivie jusqu’à ce qu’une autre lecture démarre par streaming audio.
2 Les touches de fonction sont acceptées par exemple par le logiciel Müzo : l’attribution d’une touche se fait via le bouton
derrière le nom d’une station de radio internet dans la liste. Les adresses de streaming internet sont mémorisées dans le AKB-40WIFI et peuvent être appelées, indépendamment du logiciel, via les touches attribuées sur l’amplificateur.
6 RéinitialisationPour réinitialiser l’appareil sur les réglages usine, maintenez la touche WPS enfoncée plus de 5 secondes (➾ annonce : «Restore to factory settings») . Le AKB-40WIFI démarre à nouveau . Ce processus peut également être effectué via un navigateur internet dans les réglages réseau sous «System ➧ Restore Factory Settings» (☞ chapitre 4 .1 .1 et 4 .1 .4) .
7 Caractéristiques techniquesPuissance RMS sous 4 Ω : � 2 × 25 W
Classe amplificateur :� � � � �D
Impédance haut-parleurs : �≥ 4 Ω
Bande passante : � � � � � � � � 20 – 20 000 Hz
Rapport signal / bruit : � � � �> 86 dB
Formats audio acceptés : � �MP3, WMA, AAC/AAC+, ALAC, FLAC, APE, WAV
Standards WLAN : � � � � � � � 802�11 B/G/N, 2,4 GHz
Standards streaming audio : � � � � � � � � � � � � � � �DLNA, Apple AirPlay,
Spotify Connect, QQ music Qplay
Alimentation : � � � � � � � � � �⎓18 V via bloc secteur livré relié à 230 V/50 Hz
Température fonc� : � � � � � � 0 – 40 °C
Dimensions (l × h × p) : � � � 155 × 33 × 135 mm
Poids : � � � � � � � � � � � � � � � � 370 g
Tout droit de modification réservé .
Notice d’utilisation protégée par le copyright de MONACOR ® INTERNATIONAL GmbH & Co. KG. Toute repro-duction même partielle à des fins commerciales est interdite.
Fran
çais
16
Italiano
Referenz für Sprachkennzeichnung der Seiten und Inhaltsverzeichnis
Referenz für Sprachen-Inhaltsverzeichnis
ItalianoItaliano Pagina
Amplificatore Hi-Fi WLANQueste istruzioni sono rivolte a utenti con co-noscenze nella tecnica delle reti e con cono-scenze base nella tecnica audio . Vi preghiamo di leggerle attentamente prima della messa in funzione e di conservarle per un uso futuro . A pagina 2 vedrete tutti gli elementi di comando e i collegamenti descritti .
1 Possibilità d’impiegoL’amplificatore stereo AKB-40WIFI serve per la riproduzione di musica con qualità hi-fi per mezzo di una network wireless locale (WLAN) . Può essere integrato in una rete esistente oppure può creare una sua rete wireless con un lettore di musica . Come lettore di musica è richiesto uno smartphone, un tablet o un PC dove deve essere installato un software compatibile DLNA (lettore audio DLNA) . È supportato anche il protocollo streaming “AirPlay” di Apple .
Alcuni lettori DLNA offrono l’utilizzo di più ambienti (multiroom): in varie sale è installato sempre un AKB-40WIFI . Da un lettore DLNA si può inviare musica differente ai singoli ampli- ficatori oppure è possibile accoppiarli per comandarli insieme .
Un contatto USB permette la riproduzione di file audio da una chiavetta USB . Il comando può essere fatto attraverso i tasti sull’amplificatore oppure tramite il software di riproduzione .
Per mezzo di un ingresso stereo analogico si può collegare anche una fonte audio con livello Line (p . es . lettore CD) .DLNA: La Digital Living Network Alliance è un consorzio internazionale di produttori di computer, cellulari e elet-tronica d’intrattenimento che si sono accordati su uno standard comune per la trasmissione digitale di dati e che provvedono agli ulteriori sviluppi dello standard .
1.1 Conformità e omologazioneCon la presente, MONACOR INTERNATIONAL dichiara che l’apparecchio AKB-40WIFI corri-sponde alla Direttiva 2014 / 53 / UE . La dichiara-zione di conformità è disponibile in Internet:www .monacor .com
L’apparecchio funziona nel campo 2,4 GHz ed è omologato per l’uso negli stati UE e EFTA e non richiede né registrazione né paga-mento di tasse.
2 Elementi di comando e collegamenti
1 Angoli di montaggio
2 Tasti funzione (Funzioni ☞ Capitolo 5)
3 LED di stato
STATUS: lampeggia lentamente con con-nessione WLAN mancante lampeggia velocemente mentre si crea la connessione è acceso costantemente con la connessione WLAN attiva
WLAN: streaming audio tramite WLAN
AUX: fonte audio: ingresso AUX
USB: riproduzione di file audio tramite il contatto USB (6)
4 Tasti funzione, funzioni definite tramite il software (p . es . stazioni radio Internet)
5 Presa RJ45 NETWORK per la connessione Ethernet con una rete
6 Presa USB (tipo A) per il collegamento di una chiavetta USB per la riproduzione di file audio
7 Presa d’ingresso AUX, jack 3,5 mm per il collegamento di una fonte audio stereo (livello Line)
8 Presa per il collegamento dell’alimentatore in dotazione
9 Tasto WPS per la creazione rapida di una connessione WLAN, p . es . con un router che supporta la funzione WPS (Wi-Fi Protected Setup)
10 Spia di funzionamento ON
11 Antenna
12 Morsetti per il collegamento degli altopar-lanti: LEFT OUT = altoparlante sinistro RIGHT OUT = altoparlante destro
13 Presa per l’antenna
17
Italiano3 Avvertenze per l’uso sicuro
Questi apparecchi (amplificatore e alimentatore) sono conformi a tutte le direttive rilevanti dell’UE e pertanto portano la sigla .
AVVERTIMENTO L’alimentatore è alimenta-to con pericolosa tensione di rete . Non intervenire mai personalmente al suo inter-no . Esiste il pericolo di una scossa elettrica .
• Usare gli apparecchi solo all’interno di lo-cali e proteggerli dall’acqua gocciolante e dagli spruzzi d’acqua nonché da alta umidità dell’aria . La temperatura d’esercizio ammessa è 0 – 40 °C .
• Non depositare sugli apparecchi dei conteni-tori riempiti di liquidi, p . es . bicchieri .
• Non mettere in funzione gli apparecchi e stac-care subito la spina rete dell’alimentatore se:1 . uno degli apparecchi o il cavo rete presen-
tano dei danni visibili;2 . dopo una caduta o dopo eventi simili sus-
siste il sospetto di un difetto;3 . l’apparecchio non funziona correttamente .Per la riparazione rivolgersi sempre ad un’of-ficina competente .
• Staccare il cavo rete afferrando la spina, senza tirare il cavo .
• Per la pulizia usare solo un panno morbido, asciutto; non impiegare mai acqua o prodotti chimici .
• Nel caso d’uso improprio, di collegamenti sbagliati, d’impiego scorretto o di riparazione non a regola d’arte degli apparecchi, non si assume nessuna responsabilità per eventuali danni consequenziali a persone o a cose e non si assume nessuna garanzia per gli apparecchi . Nello stesso modo non si assume nessuna responsabilità per la perdita di dati e per i re-lativi danni consequenziali causati da impiego sbagliato o da un difetto dell’apparecchio .
Se si desidera eliminare gli apparecchi definitivamente, consegnarli per lo smaltimento ad un’istituzione locale per il riciclaggio .
4 Installazione1) Posizionare l’amplificatore in un punto adatto
e, se necessario, avvitare bene gli angoli di montaggio (1) .
2) Inserire l’antenna (11) nella presa ANTENNA (13), avvitarla e raddrizzarla in senso verticale .
3) Collegare gli altoparlanti con le prese (12) (RIGHT OUT per il canale destro e LEFT OUT per quello sinistro) . La massima potenza d’uscita si raggiunge collegando degli alto-parlanti con impedenza di 4 Ω . Si possono collegare anche altoparlanti con impeden-za maggiore, ma in questo caso la potenza d’uscita sarà ridotta in corrispondenza .
4) Se necessario collegare l’uscita di una fonte audio stereo con livello Line (p . es . lettore CD, tuner, mixer ecc .) con la presa jack 3,5 mm AUX (7) .
5) Per riprodurre dei file audio da una chiavetta USB, inserire la stessa nella presa USB (6) .Importante: L’AKB-40WIFI salva un file Playlist sulla chiavetta di memoria . Per escludere delle perdite di dati, prima di togliere la chiavetta interrompere sempre la riproduzione .
6) Per una connessione Ethernet a una rete locale, usare la presa RJ45 NETWORK (5) .
7) Collegare l’alimentatore con la presa 18 V⎓ (8) e inserire la spina in una presa di rete (230 V/ 50 Hz) . In questo modo, l’amplifica-tore è acceso . Se non si usa l’amplificatore per un certo periodo, staccare l’alimentatore dalla rete per evitare un consumo inutile di corrente .
4.1 Connessione con una reteGrazie alla sua funzionalità WLAN, l’AKB-40WIFI può essere integrato come client in una WLAN esistente oppure può essere collegato diretta-mente come accesspoint autonomo . Entrambi i modi d’acceso sono possibili anche contempo-raneamente . È possibile anche una connessione con una rete esistente via cavo tramite Ethernet .
4.1.1 Amplificatore come AccesspointL’AKB-40WIFI può creare una WLAN come accesspoint autonomo . Questo è il modo più semplice per riprodurre tramite l’AKB-40WIFI dei file audio con un lettore DLNA su un dispositivo
18
Italiano mobile . In questo caso, l’amplificatore è segna-
lato nell’elenco degli altri dispositivi WLAN con l’SSID “WIFI-Speaker_xxxx” (xxxx = numero) .
Se un dispositivo WLAN, p . es . un tablet, PC, smartphone ecc ., si collega con questa rete, un software compatibile DLNA installato sul dispo-sitivo può riprodurre tramite l’amplificatore dei file audio come streaming oppure può gestire la riproduzione di file audio su una memoria USB collegata con l’amplificatore .
L’accesso al web server interno dell’A-KB-40WIFI è aperto inizialmente, ma può esse-re protetto con una password . Per visualizzare o modificare le impostazioni della rete aprire l’indirizzo 10 .10 .10 .254 per mezzo di un web browser .
4.1.2 Integrazione in una WLANL’AKB-40WIFI può essere integrato anche in una WLAN esistente . Gli apparecchi che fanno parte della stessa rete possono riprodurre degli stre-aming audio attraverso l’amplificatore . Se tale rete ha anche una connessione con Internet, l’AKB-40WIFI può ricevere anche i dati di servizi di streaming musicali o di radio Internet .Un consiglio: Con il software Müzo si possono utilizzare
p . es . offerte di streaming come TuneIn o Spotify .
Il collegamento con la WLAN esistente è molto semplice se il Wireless Accesspoint di tale rete (p . es . router WLAN) supporta lo standard WPS (Wi-Fi Protected Setup) . In questo caso attivare WPS sul router e premere brevemente il tasto WPS (9) sull’AKB-40WIFI (➾ Segnalazione a voce: “Searching for Wi-Fi connection”) . L’AKB-40WIFI sarà ora collegato automaticamente con la WLAN (➾ Segnalazione a voce: “Wi-Fi connected”) .
Se la WLAN non dispone di una funzione WPS, tramite il web browser di un apparecchio con WLAN aprire le impostazioni della rete dell’AKB-40WIFI (☞ Capitolo 4 .1 .1) . Tramite il pulsante “Wifi” si può visualizzare un elenco di tutte le reti WLAN disponibili . Scegliere la rete desiderata e digitare la password per il login se necessario . Il LED STATUS (3) lampeggia più velocemente durante la creazione della connes-sione . L’amplificatore conferma la connessione con la segnalazione a voce “WiFi connected” e con un LED che rimane acceso costantemente .N. B.: Le segnalazioni a voce avvengono solo se la lingua
preimpostata non viene cambiata .
4.1.3 Collegamento con una rete via Ethernet
Se sul luogo di montaggio non è possibile una connessione con un’altra WLAN, l’AKB-40WIFI può essere collegato con una rete esistente anche tramite un cavo Ethernet . Tale rete deve disporre di un server DHCP, che effettua sul- l’AKB-40WIFI la configurazione necessaria .
4.1.4 Modificare il nome di una reteUtilizzando più AKB-40WIFI è conveniente usare nomi differenti . Per modificare un nome: Tramite il web browser di un apparecchio con WLAN aprire le impostazioni della rete dell’AKB-40WIFI (☞ Capitolo 4 .1 .1) . Se l’amplificatore è integra-to in una rete, le impostazioni della rete possono essere aperte anche tramite il web browser di un apparecchio della medesima rete . Per fare ciò digitare nel web browser l’indirizzo che è stato assegnato all’AKB-40WIFI nella rete . Appare la pagina della configurazione e alla voce “Network ➧ Change device name” si può modificare il nome dell’apparecchio .N. B.: Una modifica con “Network ➧ Change device name” comporta anche la modifica del nome della rete (SSID) e quindi l’interruzione della connessione esistente con la rete se l’apparecchio è collegato direttamente con l’AKB-40WIFI come descritto nel capitolo 4 .1 .1 .
5 FunzionamentoCon il collegamento con l’alimentazione, l’AKB-40WIFI è acceso . Si avvia automatica-mente con il modo di funzionamento scelto per ultimo, indicato con il LED (3) e che viene pronunciato anche attraverso gli altoparlanti col-legati (cfr . il tasto MODE nella tabella seguente) . Se l’amplificatore è già stato collegato con una WLAN si cerca automaticamente di ripristinare la connessione . Il LED STATUS (3) lampeggia più velocemente e rimane acceso se la connessio-ne ha avuto successo . L’uso dell’amplificatore è possibile per mezzo dei tasti funzione (2, 4) e tramite software per mezzo di un lettore DLNA . In alcuni casi, le informazioni sullo stato ven-gono pronunciate come conferma tramite gli altoparlanti collegati .N. B.:Delle volte, la reazione alla pressione di un tasto avviene con ritardo .Le segnalazioni a voce avvengono solo se nelle imposta-zioni dell’AKB-40WIFI la lingua preimpostata non viene cambiata .

19
ItalianoI tasti hanno le seguenti funzioni:
Tasto FunzioneInterrompere/continuare la riproduzione oppure mettere in muto /riattivare (ingresso AUX, radio Internet)
Salto al titolo successivo
Salto al titolo precedente
∕ Aumentare / ridurre il volume
MODE 1
Cambio di Fonte ➾ Segnalazione a voce tramite altopar-
lanti:WLAN ➾ “Wi-Fi playback”AUX ➾ “Line in”USB ➾ “U-disk playback”
1 … 6 Tasti dipendenti dal software 2, p. es. aprendo stazioni radio Internet
1 Passando dalla riproduzione USB a WLAN, la riproduzione dalla memoria USB continua finché non si avvia un’altra riproduzione tramite streaming audio.
2 I tasti sono supportati per esempio dal software Müzo: L’as-segnazione di un tasto avviene tramite il pulsante dietro il nome di una stazione radio Internet nell’elenco. Gli indirizzi Internet degli streaming sono memorizzati nell’AKB-40WIFI e possono essere chiamati indipendentemente dal software attraverso i tasti assegnati sull’amplificatore.
6 ResetPer il reset alle impostazioni della fabbrica pre-mere per più di 5 s il tasto WPS (➾ Segnala-zione a voce: “Restore to factory settings”) . Dopodiché, l’AKB-40WIFI si avvia nuovamente . Tale processo può essere attivato anche tramite un web browser nelle impostazioni della rete alla voce “System ➧ Restore Factory Settings” (☞ Capitoli 4 .1 .1 e 4 .1 .4) .
7 Dati tecniciPotenza RMS con 4 Ω: � � � 2 × 25 W
Classe amplificatore: � � � � �D
Impedenza altoparlanti: � � �≥ 4 Ω
Banda passante: � � � � � � � � 20 – 20 000 Hz
Rapporto S / R: � � � � � � � � � �> 86 dB
Formati audio supportati: � �MP3, WMA, AAC/AAC+, ALAC, FLAC, APE, WAV
Standard WLAN: � � � � � � � � 802�11 B/G/N, 2,4 GHz
StandardStreaming audio: � � � � � � � �DLNA, Apple AirPlay,
Spotify Connect, QQ music Qplay
Alimentazione: � � � � � � � � �⎓18 V tramite alimen-tatore in dotazione con 230 V/50 Hz
Temperatura d’esercizio: � � 0 – 40 °C
Dimensioni (l × h × p): � � � 155 × 33 × 135 mm
Peso: � � � � � � � � � � � � � � � � � 370 g
Con riserva di modifiche tecniche .
La MONACOR ® INTERNATIONAL GmbH & Co. KG si riserva ogni diritto di elaborazione in qualsiasi forma delle presenti istruzioni per l’uso. La riproduzione – anche parziale – per propri scopi commerciali è vietata.

MONACOR INTERNATIONAL GmbH & Co. KG • Zum Falsch 36 • 28307 Bremen • Germany Copyright © by MONACOR INTERNATIONAL. All rights reserved. A-1860.99.01.09.2017