
WK3 Serial PCB Assembly Guide – Version R00 …WK3 Serial PCB Assembly Guide – Version R00...
11
WK3 Serial PCB Assembly Guide – Version R00 11/18/2016 This document describes the assembly, checkout, and hook up of the K1EL Winkey3 Serial Kit with a version R00 PCB. This design is powered directly off the PC’s serial port and does not require an external power source. Current draw is minimal, a low dropout, low quiescent current 3.3V voltage regulator helps in this regard. Open collector keying and PTT outputs are provided as well as speed pot and iambic paddle connections. WK3 Serial PCB Bill of Materials __ R1, R2, R3, R5 4.7K ¼W resistor (yellow violet red) __ R4, R6 470 ohm ¼W resistor (yellow violet brown) __ RN1 6 pin 4.7K SIP bussed resistor network __ Rx 10K Linear Taper Speed potentiometer __ Q1 2N3906 PNP transistor TO92 __ Q2 2N3904 NPN transistor TO92 __ Q4 PN2222A NPN transistor TO92 __ Q3, Q5 2N7000 MOSFET TO92 (2N2222A may be substituted) __ D2, D5 BAT43 Schottky Diode __ D1, D3 1N4148 or 1N914 silicon diode __ D4 LED __ VR1 ST LP2950CZ-3.3 or equivalent TO92 3.3V LDO Regulator __ U1 WinKey3 PIC processor (serial WK version) __ C2, C5 .1 uF ceramic capacitor (104) __ C3 33 uF electrolytic capacitor __ C1, C4, C7, C8 .001 uF ceramic disc capacitor (102) __ C6 .0047uF dipped ceramic capacitor (472 blue) __ J1 DB9 9 pin female D connector __ S1 14 pin DIP socket Kit Assembly 1) Verify and check off components against the bill of materials listed above. If there are any parts missing, notify K1EL by email and we will send them to you. 2) The WK3 Serial PCB does have a solder mask but it is quite easy to inadvertently bridge two etches or pads together. Please solder carefully and use the checkplots below to resolve any connections in question. 95% of all kits returned for repair have had soldering errors 3) Carefully check the PC board for any defects, although it’s very rare it has happened. 4) Follow the silkscreen and carefully install all six resistors (R1 – R6) then solder and trim leads. Note that the 470 ohm resistor (yellow violet brown) is easily confused with the 4.7K resistors (yellow violet red). 5) Install resistor network RN1, pin one of the network is marked with a dot. If you are unsure you can verify pin one with an ohmmeter. You will measure 4.7K between pin 1 and 2. Between pin 5 and 6 you will measure 9.4K. Orient the network so that pin 1 goes into the square pad. 6) Observe polarity band markings and install diodes D1, D2, D3, D5. Solder and trim leads 7) Install the keying indicator LED. There is a flat on the body of the LED that must align with the flat on the silkscreen. WK3 Serial Assembly Guide Version 1.0 – 11/18/2016 Page 1
Transcript of WK3 Serial PCB Assembly Guide – Version R00 …WK3 Serial PCB Assembly Guide – Version R00...
WK3 Serial PCB Assembly Guide – Version R00 11/18/2016
This document describes the assembly, checkout, and hook up of the K1EL Winkey3 Serial Kit with a version R00 PCB. This design is powered directly off the PC’s serial port and does not require an external power source. Current draw is minimal, a low dropout, low quiescent current 3.3V voltage regulator helps in this regard. Open collector keying and PTT outputs are provided as well as speed pot and iambic paddle connections.
WK3 Serial PCB Bill of Materials
__ R1, R2, R3, R5 4.7K ¼W resistor (yellow violet red) __ R4, R6 470 ohm ¼W resistor (yellow violet brown)__ RN1 6 pin 4.7K SIP bussed resistor network__ Rx 10K Linear Taper Speed potentiometer__ Q1 2N3906 PNP transistor TO92__ Q2 2N3904 NPN transistor TO92__ Q4 PN2222A NPN transistor TO92__ Q3, Q5 2N7000 MOSFET TO92 (2N2222A may be substituted)__ D2, D5 BAT43 Schottky Diode__ D1, D3 1N4148 or 1N914 silicon diode__ D4 LED__ VR1 ST LP2950CZ-3.3 or equivalent TO92 3.3V LDO Regulator__ U1 WinKey3 PIC processor (serial WK version)__ C2, C5 .1 uF ceramic capacitor (104)__ C3 33 uF electrolytic capacitor __ C1, C4, C7, C8 .001 uF ceramic disc capacitor (102) __ C6 .0047uF dipped ceramic capacitor (472 blue)__ J1 DB9 9 pin female D connector__ S1 14 pin DIP socket
Kit Assembly
1) Verify and check off components against the bill of materials listed above. If there are any
parts missing, notify K1EL by email and we will send them to you.2) The WK3 Serial PCB does have a solder mask but it is quite easy to inadvertently bridge
two etches or pads together. Please solder carefully and use the checkplots below to resolve any connections in question. 95% of all kits returned for repair have had solderingerrors
3) Carefully check the PC board for any defects, although it’s very rare it has happened.
4) Follow the silkscreen and carefully install all six resistors (R1 – R6) then solder and trim
leads. Note that the 470 ohm resistor (yellow violet brown) is easily confused with the 4.7K resistors (yellow violet red).
5) Install resistor network RN1, pin one of the network is marked with a dot. If you are
unsure you can verify pin one with an ohmmeter. You will measure 4.7K between pin 1 and 2. Between pin 5 and 6 you will measure 9.4K. Orient the network so that pin 1 goes into the square pad.
6) Observe polarity band markings and install diodes D1, D2, D3, D5. Solder and trim leads
7) Install the keying indicator LED. There is a flat on the body of the LED that must align
with the flat on the silkscreen.
WK3 Serial Assembly Guide Version 1.0 – 11/18/2016 Page 1
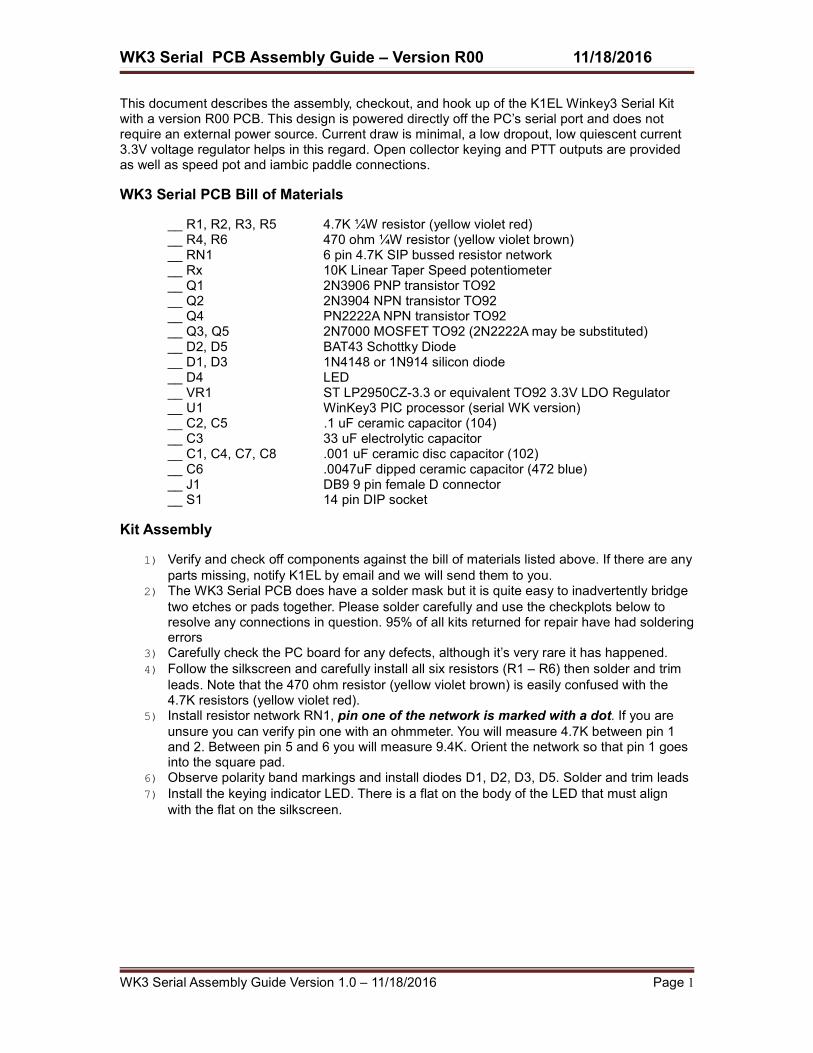
8) Install and solder the 14 pin socket, make sure the alignment marking matches the
silkscreen.
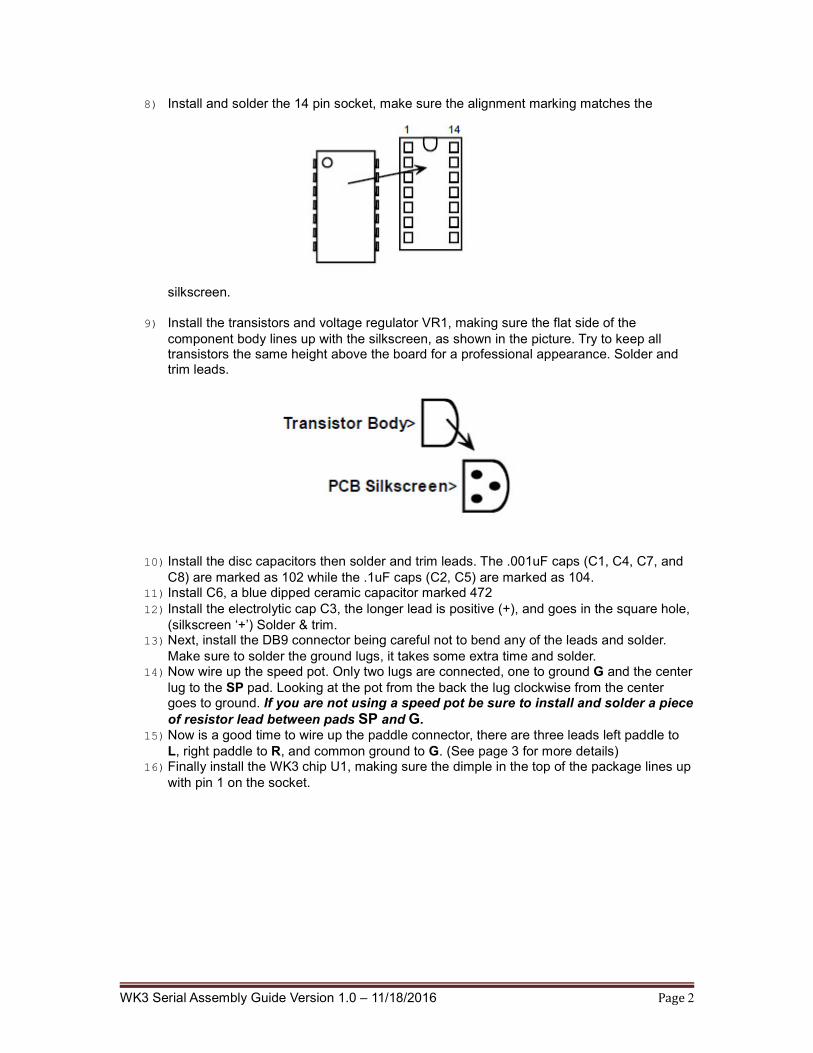
9) Install the transistors and voltage regulator VR1, making sure the flat side of the
component body lines up with the silkscreen, as shown in the picture. Try to keep all transistors the same height above the board for a professional appearance. Solder and trim leads.
10) Install the disc capacitors then solder and trim leads. The .001uF caps (C1, C4, C7, and
C8) are marked as 102 while the .1uF caps (C2, C5) are marked as 104.11) Install C6, a blue dipped ceramic capacitor marked 472
12) Install the electrolytic cap C3, the longer lead is positive (+), and goes in the square hole,
(silkscreen ‘+’) Solder & trim.13)Next, install the DB9 connector being careful not to bend any of the leads and solder.
Make sure to solder the ground lugs, it takes some extra time and solder.14)Now wire up the speed pot. Only two lugs are connected, one to ground G and the center
lug to the SP pad. Looking at the pot from the back the lug clockwise from the center goes to ground. If you are not using a speed pot be sure to install and solder a piece
of resistor lead between pads SP and G.
15)Now is a good time to wire up the paddle connector, there are three leads left paddle to
L, right paddle to R, and common ground to G. (See page 3 for more details)16)Finally install the WK3 chip U1, making sure the dimple in the top of the package lines up
with pin 1 on the socket.
WK3 Serial Assembly Guide Version 1.0 – 11/18/2016 Page 2
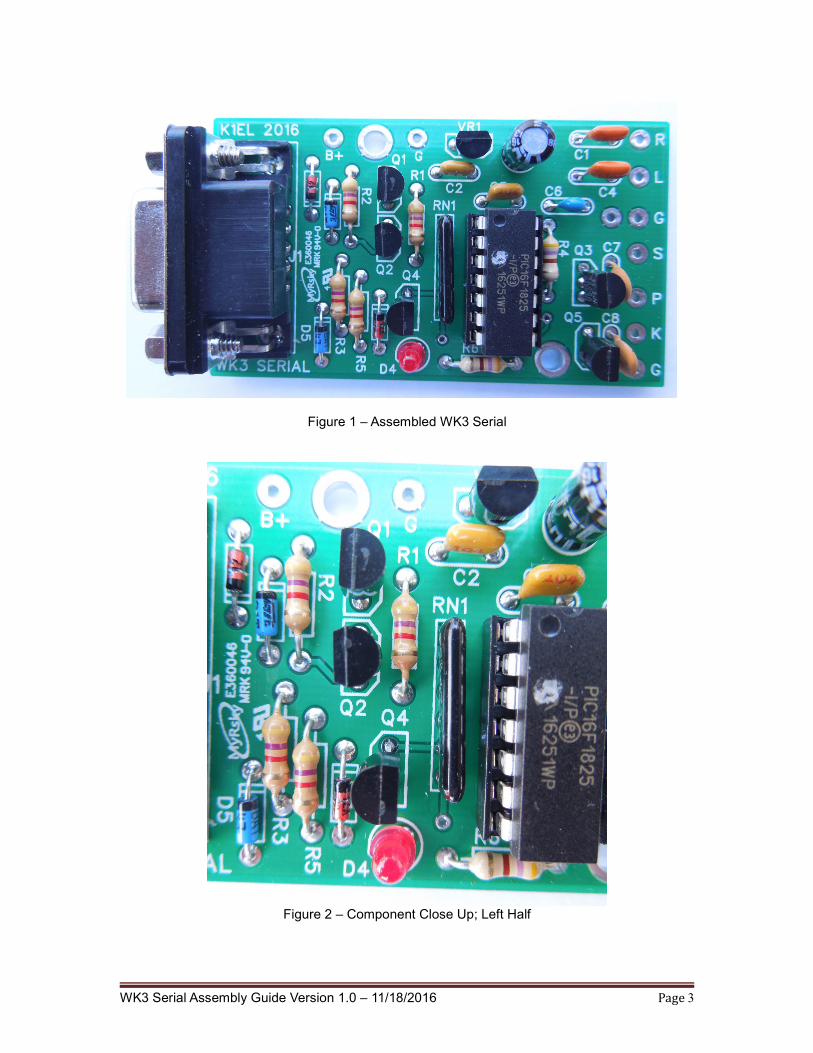
Figure 1 – Assembled WK3 Serial
Figure 2 – Component Close Up; Left Half
WK3 Serial Assembly Guide Version 1.0 – 11/18/2016 Page 3

Figure 3 – Component Close Up; Right Half
Kit Wiring
Here is a handy table of all PCB connections:
Pad Label Wire Connection
R Right Paddle
L Left Paddle
G Paddle and Speed Pot Grounds
S Speed Pot Wiper (10K Linear Taper)
P Open collector PTT output (50 VDC max)
K Open collector keying output (50 VDC max)
G Keying Ground
Table 1 – WK3 Serial PCB Connection List
WK3 Serial Assembly Guide Version 1.0 – 11/18/2016 Page 4
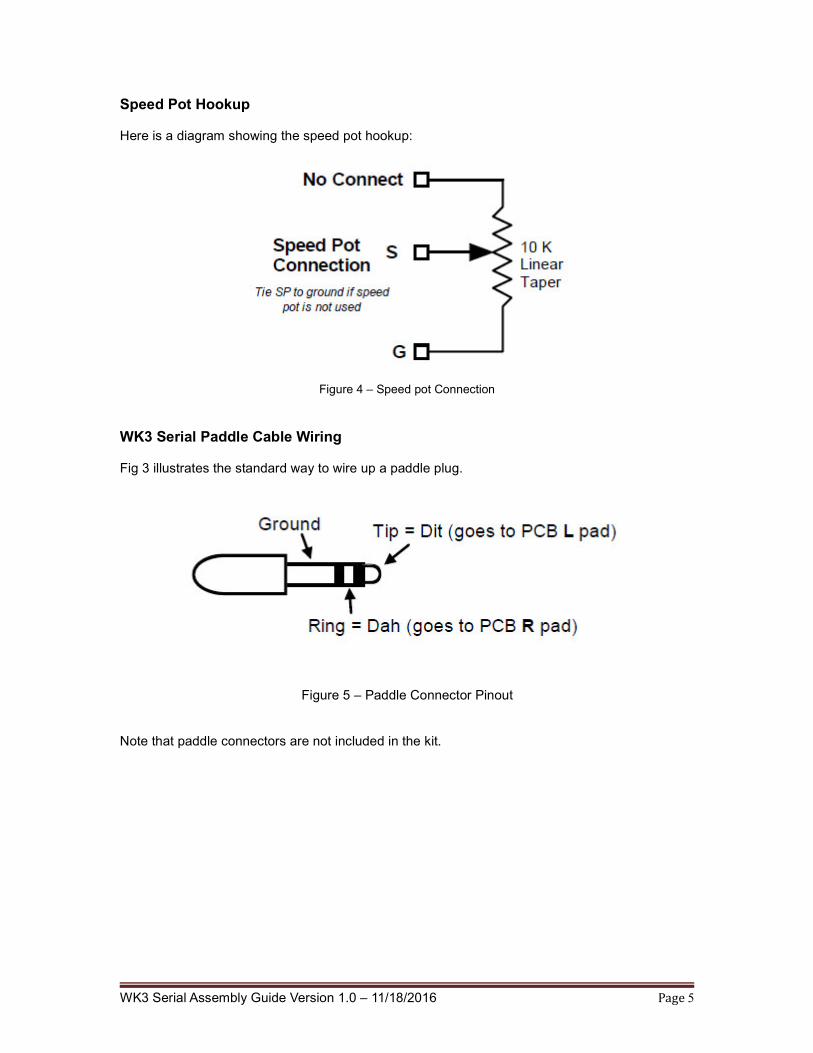
Speed Pot Hookup
Here is a diagram showing the speed pot hookup:
Figure 4 – Speed pot Connection
WK3 Serial Paddle Cable Wiring
Fig 3 illustrates the standard way to wire up a paddle plug.
Figure 5 – Paddle Connector Pinout
Note that paddle connectors are not included in the kit.
WK3 Serial Assembly Guide Version 1.0 – 11/18/2016 Page 5

WiK3 Serial Keying Cable Wiring
Most amateur transceivers use a stereo ¼ inch phone plugs to connect to a keying paddle. WK3 Serial expects the following connections as shown in Fig 3. There are some radios that use 1/8 inch stereo plugs so check your radio out to be sure.
Figure 5 – Keying Cable Connections
If you are connecting to a transceiver that has an internal keyer, you will need to configure the radio to operate in straight key mode. This disables the internal keyer and allows you to key with one lead instead of two. In almost all cases, when you set the radio to straight key mode the TIP and Ground connector pins are used to key the radio. Again check you manual to be sure. Note that a keying connector is not included in the kit.
WK3 Serial RS232 Interface Cable
WK3 Serial should be connected via a straight through cable (not null modem). The cable will need a male DB9 plug at one end (WK3 Serial end) and a female DB9 at the other. This assumesthat a DB9 male is at the PC end.
If you make up your own cable, note that WiK3 Serial uses both DTR and RTS to derive power, so these lines must be connected in addition to the normal TxD, RxD and Ground.
Figure 5 – WK3 Serial RS232 Interface Cable Schematic
A WK3 Serial PCB does not require external power since it is powered from the PC’s RS232 serial interface. Note carefully that WK3 Serial will not work unless an appropriate application is running and it is configured to use the correct serial port, asserting the RTS and DTR lines properly. As convenience, WK3 Serial PCB provides an external battery connection, see details on page 10.
For Mac users, be sure your interface is RS232 not RS422, WK3 Serial will not work with a RS422 connection.
WK3 Serial Assembly Guide Version 1.0 – 11/18/2016 Page 6

Kit Checkout
Take a look at the WK3 Serial schematic on page 9 to familiarize yourself with the circuitry on the PCB. It is a fairly simple design. The PCB requires a positive and a negative power supply to operate. The positive supply comes from the RS232 signal DTR on Pin 4 of the DB9. This voltageis connected to a 3.3 volt regulator (VR1) that powers the WinKeyer3 controller IC. It also provides the positive bias for the plus swing of RS232 transmit back to the PC. The negative supply comes from the RS232 signal RTS on pin 7 of the DB9. This supply is used only to providenegative swing on RS232 transmit. Transistor Q4, diode D3, and resistor R3 level convert the incoming bipolar RS232 receive signal to 3.3 volt LVTTL suitable to drive the Winkey3 IC. The circuit made up of Q1, Q2 and associated resistors convert the 3.3 volt LVTTL output of the WinKeyer3 serial transmit pin to a bipolar RS232 level which swings plus and minus around ground.
WinKeyer3 senses paddle action on pins 2 and 4, internal PIC pullup resistors set the off state to a high. The paddle input lines go low (ground) on paddle press. Two open collector transistors Q3and Q5 provide a high current sinking capability for the Key and PTT outputs of the Winkey3 chip.Note that the keying outputs are open drain and act only as a switch to ground. In other words there is no active output voltage level on either the K or P outputs.
The best application to use to check out the WK3 Serial kit is K1EL’s WKtest which can be downloaded from the software area of the k1el website. Here is a link to the setup file for Wktest:
http://k1el.com/WKTESTX.html
Here is a brief procedure to follow:
1) Install the application and Start it up.
2) Tell the app which com port WK3 Serial will be attached to; pull down the COM selection from the Menu Bar to do this. If you are using a USB to serial adapter you will have to determine which COM port the USB serial port is installed on. You can find this using the Wkscan application:
http://www.k1el.com/WKscan.html
3) Make sure you have Wk3 Serial connected to the configured port with a straight through cable, if you don’t have a cable or unsure of it, you can remove the screw lugs on the WK DB9 connector and plug the PC board right into the PC comport.
4) Click on OpenWK.
5) The app will attempt to open WK3 Serial and it will display a status message to let you know if it was successful. If successful, it will tell you the version of the WinKeyer chip it found. If not successful, an error message will be displayed. If it says comport open error, you probably didn't select the correct port, or there is another device using that port. Otherwise you will get either an echoor response error. This means the port opened properly but the WinKeyer IC did not respond.
6) If WK3 Serial did not respond you can test the board using the Diags feature of WKtest. Click on the Debug menu pick and select power on. This will drive the DTR pin on the port interface and you can use a voltmeter to see if the voltage regulator is working. You should be able to measure 3.3 voltsbetween pin 1 and 14 on the WinKeyer IC. If 3.3V is not present, carefully check the voltage supply circuitry for a problem.
WK3 Serial Assembly Guide Version 1.0 – 11/18/2016 Page 7

7) If you have 3.3 volts on the Winkeyer IC, you need to figure out why the PC can’t talk to it. A good strategy at this point is to carefully go over the whole board looking for bad or missing solder connections, solder shorts or missing wrongly installed components. That is the most common problem at this stage. If you have a scope you can trace the receive data path from the connector through Q3 to WinKeyer pin 5. Click on Wk open while lookingP a short burst of serial data is sent every time you click on Wk open. If you see it reach the WinKeyer IC, the next thing to do is trace transmit from the chip back to pin2 on the DB9 connector. You should see a clean swing from about -9 to +9 volts. This could be more or less depending on the PC, but should swing both plus and minusin order for the PC host to see it.
8) Once you get WK3 Serial to open properly you can experiment with various controls on WKtest: Place the cursor into the Keyboard Entry Window and type, this will cause Winkey to transmit what you type. Click the paddle and serial echo checkboxes and WinKeyer will echo what’s sent to the Outgoing Morse Window. You can test the paddles at this point and you will see BreakIn status reported and also entered letters will be echoed. The last thing to check is the speed pot, click on PotLock and twist the speed pot, the scroll bar and WPM readout should track the twist.
9) If you change any of the settings in the Customize group make sure you press the Update button to force the app to write the new value to WK.
Precautions when connecting kit to a rig
NOTE!!! : The on-board keying circuit on the WK3 Serial PCB is only capable of keying positive voltages up to 50 VDC and is not compatible with transmitters that use negative keying voltages.
RFI Immunity
There are several RF filter points included in the WK3 Serial circuit design. Caps C7 and C8 on the Key and PTT lines bypass RF coming in through the keying leads. C4 and C1 bypass RF arriving over the paddle leads to ground. C7 attenuates RF arriving over the speed pot leads. These components also reduce RF radiation from WK3 Serial. No bypass is provided on the RS232 interface leads. For maximum RF immunity a shielded RS232 cable is recommended.
Even with good filtering the WK3 Serial PCB is susceptible to problems if exposed to high RF potentials in the shack. Please observe standard RF grounding precautions to reduce RF at the operation position. This includes but is not limited to: multiple connection paths to a good earth ground, common grounding for all equipment, quarter wave stubs at particularly troublesome frequencies, and double checking all mechanical ground connections for oxidation. It is highly recommended that WK serial is housed in a metal enclosure that is grounded to shack ground.
WK3 Serial Assembly Guide Version 1.0 – 11/18/2016 Page 8

Figure 6 - WK3 Serial Schematic
WK3 Serial Assembly Guide Version 1.0 – 11/18/2016 Page 9

What’s Next?
Now it’s time to make a more permanent installation.
The following diagrams illustrate Winkey2 Serial installed in a generic enclosure of your own choosing:
Figure 7 - Winkey2 Serial in an Enclosure
Sidetone Connection
Although most users will want to use their rig’s sidetone, it is possible to obtain a sidetone output from the WK PCB. The keying LED is connected to the sidetone output pin. If you remove the LED you can connect those pins to a sidetone mini speaker. Note that Winkey powered from the PC’s serial port may not have enough drive capability to run an external speaker. In this event, feed the sidetone output through an amplifier stage.
External Battery Connection
Winkey2 Serial V6 Assembly Guide Version 1.3 Page 10
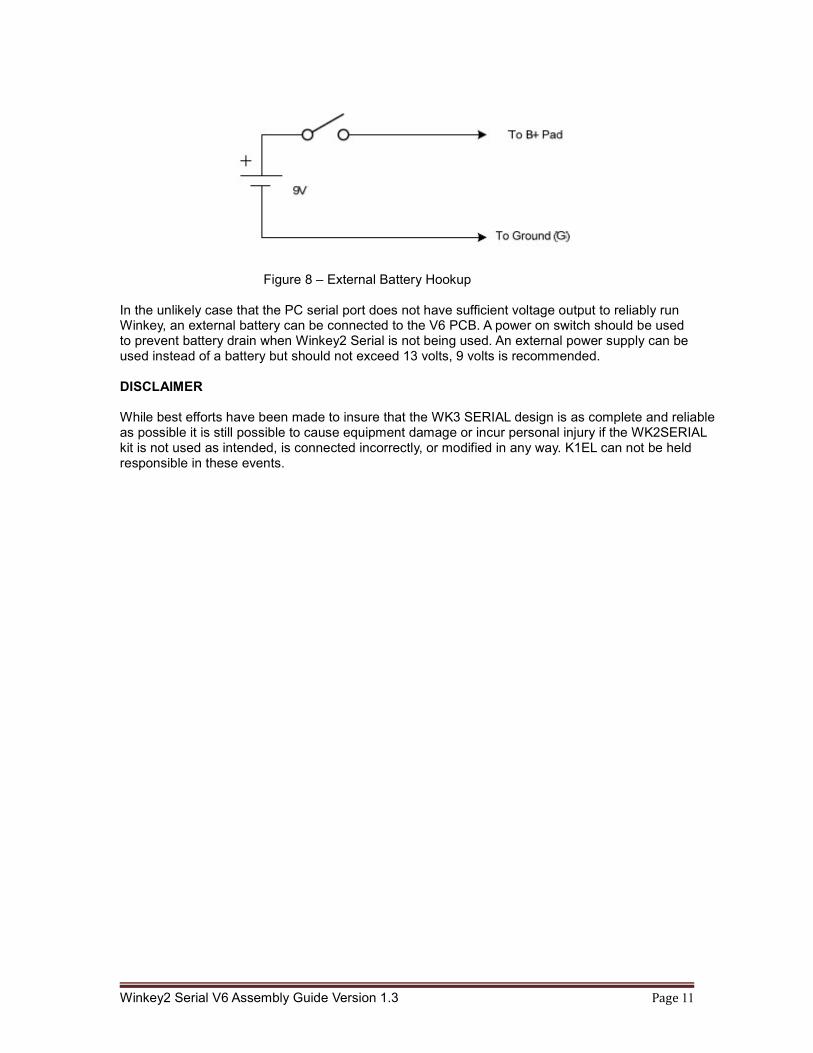
Figure 8 – External Battery Hookup
In the unlikely case that the PC serial port does not have sufficient voltage output to reliably run Winkey, an external battery can be connected to the V6 PCB. A power on switch should be used to prevent battery drain when Winkey2 Serial is not being used. An external power supply can be used instead of a battery but should not exceed 13 volts, 9 volts is recommended.
DISCLAIMER
While best efforts have been made to insure that the WK3 SERIAL design is as complete and reliableas possible it is still possible to cause equipment damage or incur personal injury if the WK2SERIAL kit is not used as intended, is connected incorrectly, or modified in any way. K1EL can not be held responsible in these events.
Winkey2 Serial V6 Assembly Guide Version 1.3 Page 11


