WIX Guide for e - Auburn Universityauburn.edu/~peekpau/assets/eportfolio_wixguide.pdf · WIX Guide...
22
WIX Guide for e‐Portfolios CAHS 4500 Portfolio Presentation for Apparel Designers Dr. Veena Chattaraman & Eloise Faber Department of Consumer Affairs Auburn University
Transcript of WIX Guide for e - Auburn Universityauburn.edu/~peekpau/assets/eportfolio_wixguide.pdf · WIX Guide...

WIXGuidefore‐Portfolios
CAHS 4500 Portfolio Presentation for Apparel Designers
Dr. Veena Chattaraman & Eloise FaberDepartment of Consumer Affairs
Auburn University

CAHS 4500 Wix Guide
1
Planning
Before you begin creating your website, decide how you want to present your portfolio.
Decide what the overall aesthetic will be and what components you want and need to
incorporate into the website.
Things needed before creation of the website:
• Four portfolio projects edited and ready for final submission before you can use
them for your web portfolio.
• Logo
• Resume
• Design aesthetic/ about me
• Photography
• Inspiration images
Decide how many tabs you will need on your website.
Below are the minimum tabs you need for your website:
• Home
• About
• Portfolio
• Contact
Other tabs you want to add to your website later:
• Photography
• Additional Projects
• Honors, Awards, or Competitions
WIX.COM GUIDE TO CREATING A WEB PORTFOLIO
CAHS 4500 Wix Guide
2
Initial Steps
Wix.com is a flash based website for website building. If a website is run on flash, it will
not work on cellular phones with web capabilities. There is a way to make a version of
your final web portfolio compatible with cellular phones on Wix.
Wix is good for students, artists, and businesses. Some of the templates are e-
commerce enabled for small businesses. The templates range in complexity and
difficulty. For your first web portfolio it is recommended to use a simple template
provided by Wix and then add to it later. This demo will guide you through the
fundamental tasks required to create a web portfolio.
Before creating your own website from the templates available on wix.com, you must create an account.
1. Go to wix.com 2. Create a new account
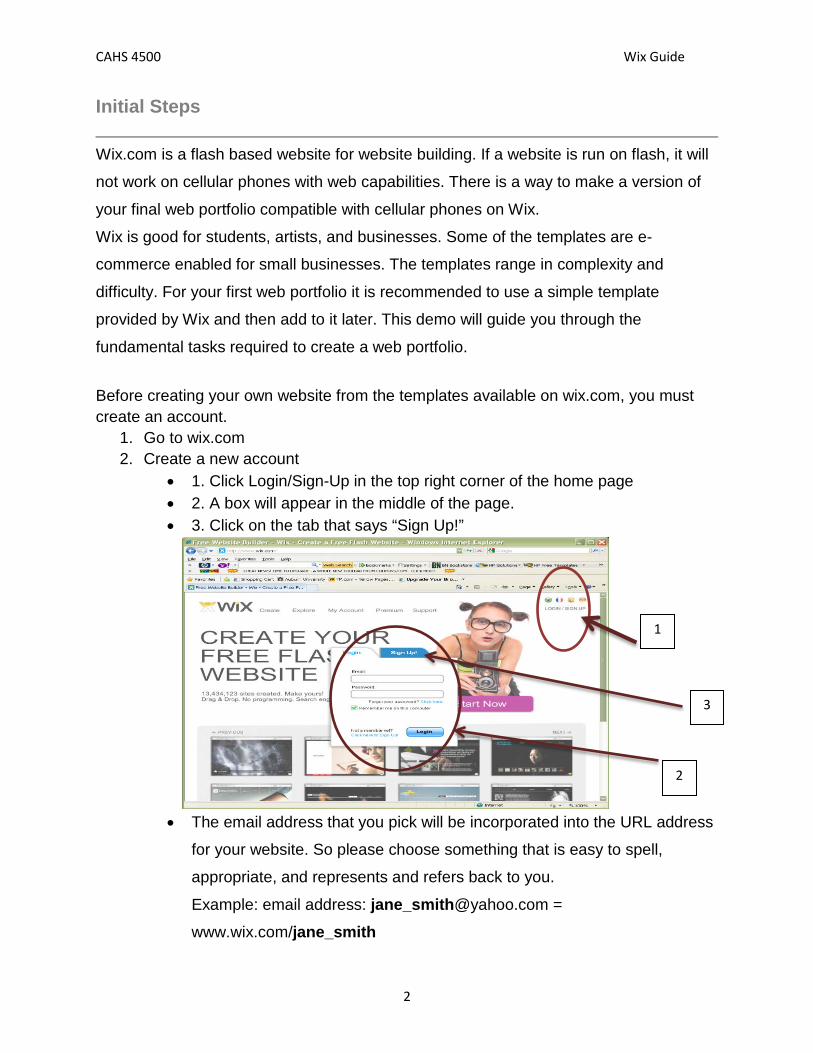
• 1. Click Login/Sign-Up in the top right corner of the home page • 2. A box will appear in the middle of the page. • 3. Click on the tab that says “Sign Up!”
• The email address that you pick will be incorporated into the URL address
for your website. So please choose something that is easy to spell,
appropriate, and represents and refers back to you.
Example: email address: [email protected] =
www.wix.com/jane_smith
1
2
3

CAHS 4500 Wix Guide
3
3. Select a template.
• “Explore” the templates provided on Wix.com
• Click through the different templates to see what others have done and
what Wix has to offer. “Beauty and Fashion” is an appropriate one to start
looking at for inspiration.
4. After looking through some templates go to the “Create” tab to begin creating
your web portfolio.
• Click on the tab “Create” at the top of the web page.
• Click on the “2 min Demo” on the right side of the web page. Watch the
demo to get an idea of the some of the basic functions of a wix website.

CAHS 4500 Wix Guide
4
Creating a Website
In order to demonstrate how to use the functions of Wix, we will use a popular template
for designers. “Photo Focus” is a good template because it is clean, simple, but
aesthetically pleasing and easily customized.
• Click on “Photo Focus” Template and click on “edit”
When you come to some of the templates, the template will be on “WixEXPRESS”. You
do not want to create your website on this setting. It is better for experienced users who
are maintaining their website. You want to create your website in the “Editor” setting.
Click on “Go to Editor”

CAHS 4500 Wix Guide
5
Uploading Pictures
It is easier to upload your jpeg images in the beginning so when you are changing
pictures or managing a gallery, your images are already uploaded to Wix. You can
always upload images and files at any time during creating and editing.
Portfolio project pages/boards need to be saved as .jpeg files in order to upload them to
Wix.com to use in a gallery.
• Scroll over the “Add” tab and click on “Pics”
• Click “Upload” to choose pictures, jpeg files, and png files.

CAHS 4500 Wix Guide
6
Logo Uploading
Save your logo as a PNG file before uploading it to Wix.com. Then you can use it as an image
on the website on the pages without an extra background on the logo.
Text
Changing Text:
• Practice changing the name (Matt Whitby Photography) to your own by clicking
on the name and selecting “edit” and typing your name.
• When you click “edit” a text toolbox will appear at the top of the web page. You
can change the font, size, color, and style.
Creating New Text
• Scroll over “Add” “Text” “Title” or “Paragraph”

CAHS 4500 Wix Guide
7
Changing a Picture
• Click on the picture click “Change Photo”
• A box will appear with options to pick pictures from your “My pixs”, “wix files”, or
“Community”. Click on “My Pixs”. Chose a picture. (Note. “My Pixs” are jpeg or
png files that you upload to the site).

CAHS 4500 Wix Guide
8
Saving your Work
• When you save the template after editing, the words you use to save the
template will also be incorporated into your URL address
Example: save as: design1 = www.wix.com/jane_smith/design1
• Save your template FREQUENTLY!
Adding Pages for Portfolio Contents
• Click on one of the pages in the “Page Manager” box.
• In the “Page Group” box Click “ Add Page”

CAHS 4500 Wix Guide
9
• Scroll down and choose “Blank”. Name the Page “Photography” and click “Ok”
• Scroll over the “Add” tab “Page Parts” click on “Page Groups”

CAHS 4500 Wix Guide
10
• Click on “Page Group”
• A new page will appear on the web page. Move the new page so that it is in the
main page space (Photography page).
• Then look at the “Page Manager” and see that it has added 3 subpages under
the “Photography” page. You can always add more than the first 3 provided.
You can change the name of the subpages by clicking on the page in the “Page Manager” and choosing

CAHS 4500 Wix Guide
11
• Scroll over the “Add” tab Click on “Pics”
• Choose a picture from the “Wix” photos.
• The picture will show up on the web page.
• Move the picture to the middle of the new
empty page.
• Add one more picture and place in the
white space

CAHS 4500 Wix Guide
12
• Click on the existing text box “Edit” and change the text so that it gives a
command to the viewer to click on the photos for more.
Linking a Photo to a Page
• Click on one of the photos and click “Link”

CAHS 4500 Wix Guide
13
• Click on the “Wix Page” tab “Select Page”
• Choose “Page 2” under “Photography” Click “Ok”
• Link the other photo to “Page3” under Photography.

CAHS 4500 Wix Guide
14
Adding a New Gallery
• Make sure you are on “Page 2” under “Photography”.
• Scroll over the “Add” tab “Galleries” Choose a gallery
• Choose a gallery (Matrix). The gallery will appear on your screen.
• Move the gallery so that it is in the “Page 2” box. Increase the size so that the
gallery squares are large enough.
CAHS 4500 Wix Guide
15
• Click on the gallerya small box will appear Click “Manage Photos”
You can now add photos, replace or delete. If you have your images already uploaded
to wix.com, “managing” the gallery is easy.
You can now add a gallery to “Page 3” under Photography with other images.
Managing a Gallery
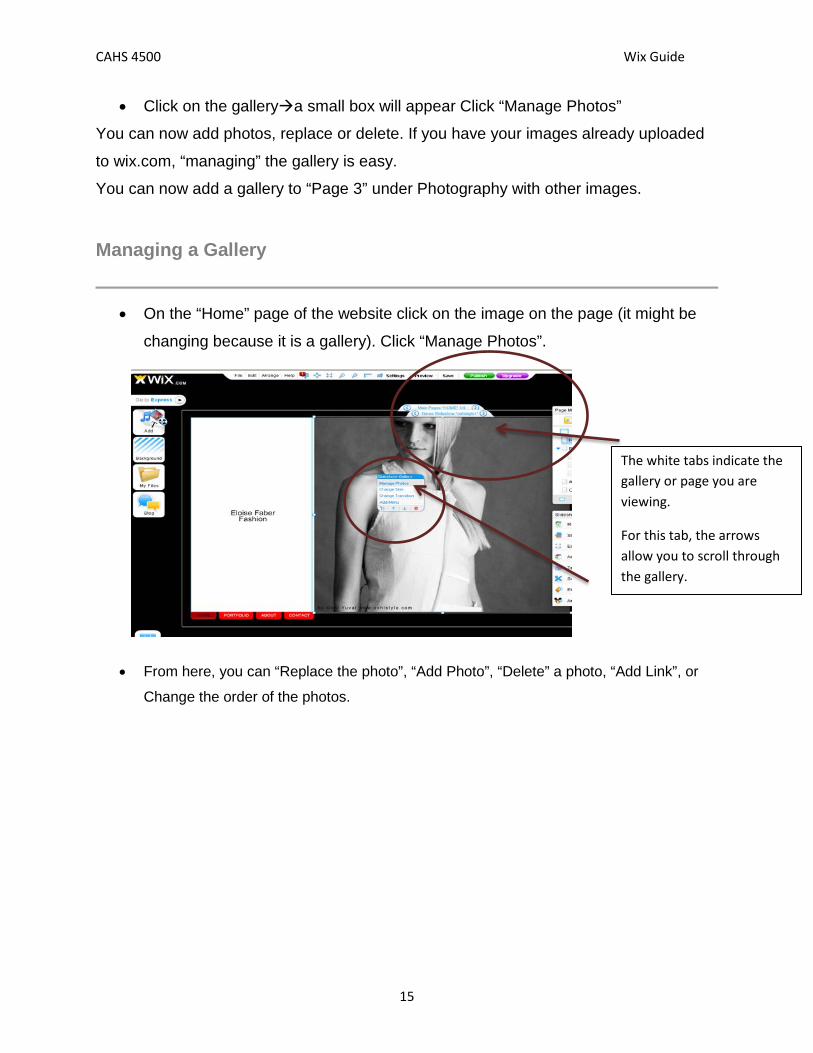
• On the “Home” page of the website click on the image on the page (it might be
changing because it is a gallery). Click “Manage Photos”.
• From here, you can “Replace the photo”, “Add Photo”, “Delete” a photo, “Add Link”, or
Change the order of the photos.
The white tabs indicate the gallery or page you are viewing.
For this tab, the arrows allow you to scroll through the gallery.

CAHS 4500 Wix Guide
16
• Pick some pictures or rearrange the photos. Choose a vertical picture when the
orientation is vertical.
• When you are done, click “ok”.
• As seen below, the picture chosen for the gallery is cut off because the gallery is
horizontal and the picture is vertical.
• Click “Settings” “Auto Crop” and play with the options so that you are able to
see your picture well.

CAHS 4500 Wix Guide
17
To Expand an Image: When a person clicks on one the pictures the image can expand. This is good to set up
for galleries with images of portfolio projects. Designers will be able to expand the
image so they can see the detail of your work.
• Click on “Expand” to adjust the settings of the photos/images.
Adding an Image or Logo and Linking back to Main Pages
• Click on “Page 2” in the “Page Manager” box.
• Scroll on the “Add” tab “Pics” “Community” Choose an image
(sunglasses)
• Move the image to the top left corner of “Page 2”.

CAHS 4500 Wix Guide
18
• Click on the sunglasses “Link”
• Click on the “Wix Page” tab “Select Page”
• Choose “Main” under the Photography Page Click “Ok”
• Place the same image on “Page 3” under Photography and link it to the “Main”
page under “Photography”.
It is always helpful to add directions for the viewer to navigate the website better.
Note: Add text to tell the viewer to click on the sunglasses to return to the main
“Photography” page. (Scroll over the “Add” tab ”Text”)

CAHS 4500 Wix Guide
19
Uploading Resume in .pdf and .jpeg Format
There are two ways to display your resume on Wix.
1. Save as .pdf to upload the resume as a “doc” that can be a link that the viewer
can click on and download on their computer to print. So when you are finished
editing your resume in MS Word or Illustator, save your resume in .pdf format.
2. Save as .jpeg to upload the resume as an image to view on the site
• Scroll over “My Files” “Docs” and upload your document.
• Scroll over “Add” “Pixs” and upload your jpeg image of your resume
CAHS 4500 Wix Guide
20
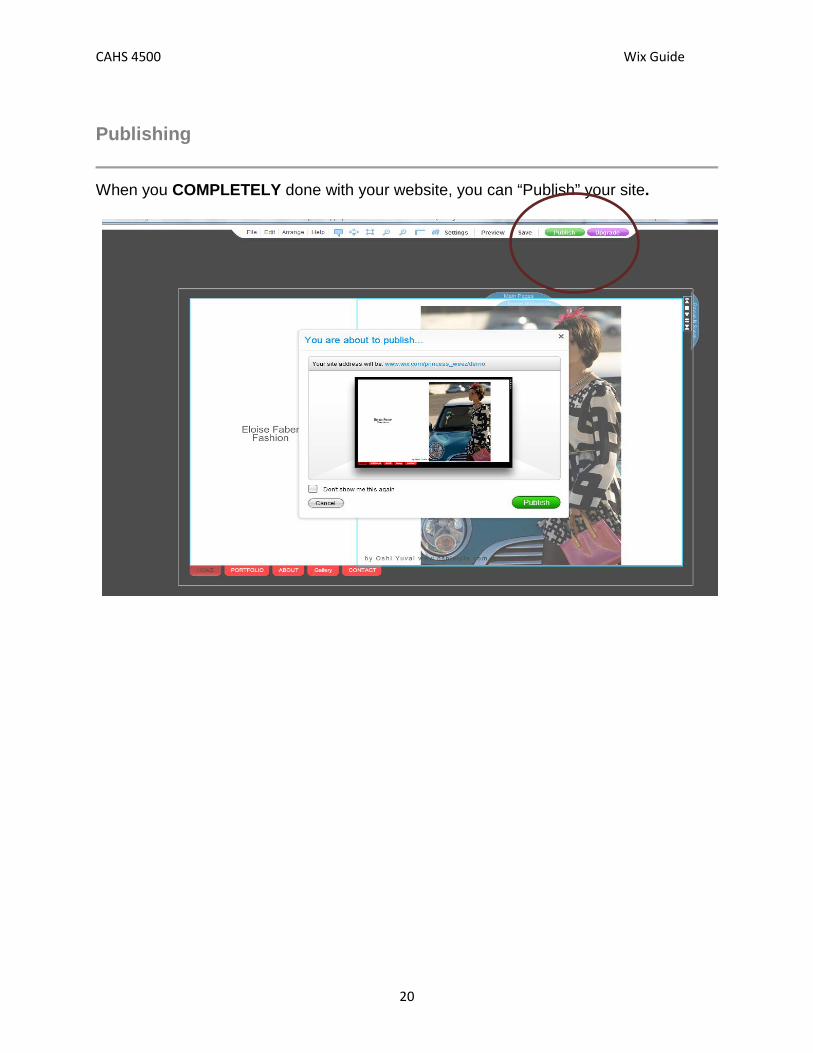
Publishing
When you COMPLETELY done with your website, you can “Publish” your site.

CAHS 4500 Wix Guide
21
Upgrading
After searching through templates and finding some you would like use, click on “Edit” on the templates. You can have multiple templates that you are “editing”.
Once you have found one template that is a possible template, Click on “Upgrade” to
look at the prices of memberships. A membership is not required, but if you do have a
membership, you will get your own domain. (e.g. www.jane.com; instead of
www.wix.com/”emailaddress”/”whatyousaveditas”)
Minimum membership:
$4.08/month for one year
OR $4.95/month monthly agreement.
Helpful Hints
• Include text to guide the viewer through the website!
• Include your logo on pages.
• Insert a PDF version of your resume for the employer to download and print off.
(“My Files” “Docs” “Upload”)
• Include images that the viewer can click on that will link back to main pages.
• For portfolio project pages, make it so that the images will “Expand” from the
gallery so that vewers can see the pages better.
• Avoid add sound or music
• SAVE CONSTANTLY! – When using wix.com, you are putting a lot of
information on Fire Fox, Internet Explorer, or Safari. Sometimes the internet
connection is slow or not strong enough and the windows will close WITHOUT
saving. THEREFORE SAVE CONSTANTLY!