Scripting and Development Series: Volume 2, Editor Step Reference ...

WiseScript™ Editor Reference
WiseScript™ Editor (Wise Installation Express 7.0 SP1 and Wise Package Studio® 7.0 SP3)
Copyright © 1994-2008 Symantec Corporation. All rights reserved.
Symantec, the Symantec Logo, Altiris, and any Altiris and Symantec trademarks used in the product are trademarks or registered trademarks of Symantec Corporation or its affiliates in the U.S. and other countries. Other names may be trademarks of their respective owners.
The product described in this document is distributed under licenses restricting its use, copying, distribution, and decompilation/reverse engineering. No part of this document may be reproduced in any form by any means without prior written authorization of Symantec Corporation and its licensors, if any.
THE DOCUMENTATION IS PROVIDED “AS IS” AND ALL EXPRESS OR IMPLIED CONDITIONS, REPRESENTATIONS AND WARRANTIES, INCLUDING ANY IMPLIED WARRANTY OF MERCHANTABILITY, FITNESS FOR A PARTICULAR PURPOSE OR NON-INFRINGEMENT, ARE DISCLAIMED, EXCEPT TO THE EXTENT THAT SUCH DISCLAIMERS ARE HELD TO BE LEGALLY INVALID. SYMANTEC CORPORATION SHALL NOT BE LIABLE FOR INCIDENTAL OR CONSEQUENTIAL DAMAGES IN CONNECTION WITH THE FURNISHING, PERFORMANCE, OR USE OF THIS DOCUMENTATION. THE INFORMATION CONTAINED IN THIS DOCUMENTATION IS SUBJECT TO CHANGE WITHOUT NOTICE.
The Licensed Software and Documentation are deemed to be commercial computer software as defined in FAR 12.212 and subject to restricted rights as defined in FAR Section 52.227-19 “Commercial Computer Software - Restricted Rights” and DFARS 227.7202, “Rights in Commercial Computer Software or Commercial Computer Software Documentation”, as applicable, and any successor regulations. Any use, modification, reproduction release, performance, display or disclosure of the Licensed Software and Documentation by the U.S. Government shall be solely in accordance with the terms of this Agreement.
ConflictManager® is protected by U.S. Patent No. 7,028,019.
Symantec Corporation20330 Stevens Creek Blvd.Cupertino, CA 95014http://www.symantec.com
Altiris, Inc.47911 Halyard Dr.Plymouth, MI 48170http://www.altiris.com
WiseScript Editor Reference 2

Contents
Preface . . . . . . . . . . . . . . . . . . . . . . . . . . . . . . . . . . . . . . . . . . . . . . . . . . . . . . . . . . . . . . . 8Product Documentation . . . . . . . . . . . . . . . . . . . . . . . . . . . . . . . . . . . . . . . . . . . . . . . . . . . . . . . 8Technical Support Resources . . . . . . . . . . . . . . . . . . . . . . . . . . . . . . . . . . . . . . . . . . . . . . . . . . . 8
Chapter 1: Introduction . . . . . . . . . . . . . . . . . . . . . . . . . . . . . . . . . . . . . . . . . . . . . . . . . 10About WiseScript . . . . . . . . . . . . . . . . . . . . . . . . . . . . . . . . . . . . . . . . . . . . . . . . . . . . . . . . . . 10WiseScript Benefits. . . . . . . . . . . . . . . . . . . . . . . . . . . . . . . . . . . . . . . . . . . . . . . . . . . . . . . . . 10Starting the Software . . . . . . . . . . . . . . . . . . . . . . . . . . . . . . . . . . . . . . . . . . . . . . . . . . . . . . . 11The Product Interface . . . . . . . . . . . . . . . . . . . . . . . . . . . . . . . . . . . . . . . . . . . . . . . . . . . . . . . 12Using WiseScripts in a Windows Installer Installation . . . . . . . . . . . . . . . . . . . . . . . . . . . . . . . . . 12Compiling, Testing, and Running a WiseScript . . . . . . . . . . . . . . . . . . . . . . . . . . . . . . . . . . . . . . 13Creating a Portable Project . . . . . . . . . . . . . . . . . . . . . . . . . . . . . . . . . . . . . . . . . . . . . . . . . . . 13
Chapter 2: Project Settings for Script Support . . . . . . . . . . . . . . . . . . . . . . . . . . . . . . . . 15About Project Settings . . . . . . . . . . . . . . . . . . . . . . . . . . . . . . . . . . . . . . . . . . . . . . . . . . . . . . 15About the Project Settings View . . . . . . . . . . . . . . . . . . . . . . . . . . . . . . . . . . . . . . . . . . . . . . . . 15Compiler Variables . . . . . . . . . . . . . . . . . . . . . . . . . . . . . . . . . . . . . . . . . . . . . . . . . . . . . . . . . 16Digital Signature . . . . . . . . . . . . . . . . . . . . . . . . . . . . . . . . . . . . . . . . . . . . . . . . . . . . . . . . . . 18General Information . . . . . . . . . . . . . . . . . . . . . . . . . . . . . . . . . . . . . . . . . . . . . . . . . . . . . . . . 19
Chapter 3: Using Script Editor. . . . . . . . . . . . . . . . . . . . . . . . . . . . . . . . . . . . . . . . . . . . . 20About Script Editor . . . . . . . . . . . . . . . . . . . . . . . . . . . . . . . . . . . . . . . . . . . . . . . . . . . . . . . . . 20The Script Editor Window . . . . . . . . . . . . . . . . . . . . . . . . . . . . . . . . . . . . . . . . . . . . . . . . . . . . 20
Customizing the List of Actions. . . . . . . . . . . . . . . . . . . . . . . . . . . . . . . . . . . . . . . . . . . . . . 22Types of Scripts . . . . . . . . . . . . . . . . . . . . . . . . . . . . . . . . . . . . . . . . . . . . . . . . . . . . . . . . . . . 23Adding an Action to a Script . . . . . . . . . . . . . . . . . . . . . . . . . . . . . . . . . . . . . . . . . . . . . . . . . . 24Editing Scripts . . . . . . . . . . . . . . . . . . . . . . . . . . . . . . . . . . . . . . . . . . . . . . . . . . . . . . . . . . . . 24
Finding and Replacing Text in a Script. . . . . . . . . . . . . . . . . . . . . . . . . . . . . . . . . . . . . . . . . 25About User-Defined Actions . . . . . . . . . . . . . . . . . . . . . . . . . . . . . . . . . . . . . . . . . . . . . . . . . . . 26
Creating a User-Defined Action . . . . . . . . . . . . . . . . . . . . . . . . . . . . . . . . . . . . . . . . . . . . . 27Creating a User-Defined Action: Tutorial . . . . . . . . . . . . . . . . . . . . . . . . . . . . . . . . . . . . . . . 28
Basic Scripting Concepts . . . . . . . . . . . . . . . . . . . . . . . . . . . . . . . . . . . . . . . . . . . . . . . . . . . . . 31Conditions and Loops . . . . . . . . . . . . . . . . . . . . . . . . . . . . . . . . . . . . . . . . . . . . . . . . . . . . 31Variables and Expressions . . . . . . . . . . . . . . . . . . . . . . . . . . . . . . . . . . . . . . . . . . . . . . . . . 32Compiler Variables and Run-time Variables . . . . . . . . . . . . . . . . . . . . . . . . . . . . . . . . . . . . . 33Anatomy of an Installation Script . . . . . . . . . . . . . . . . . . . . . . . . . . . . . . . . . . . . . . . . . . . . 34
Chapter 4: WiseScript Actions. . . . . . . . . . . . . . . . . . . . . . . . . . . . . . . . . . . . . . . . . . . . . 36About WiseScript Actions. . . . . . . . . . . . . . . . . . . . . . . . . . . . . . . . . . . . . . . . . . . . . . . . . . . . . 39About SVS Script Actions. . . . . . . . . . . . . . . . . . . . . . . . . . . . . . . . . . . . . . . . . . . . . . . . . . . . . 39Activate SVS Layer . . . . . . . . . . . . . . . . . . . . . . . . . . . . . . . . . . . . . . . . . . . . . . . . . . . . . . . . . 40Add Directory to PATH. . . . . . . . . . . . . . . . . . . . . . . . . . . . . . . . . . . . . . . . . . . . . . . . . . . . . . . 41Add File to SVS Layer . . . . . . . . . . . . . . . . . . . . . . . . . . . . . . . . . . . . . . . . . . . . . . . . . . . . . . . 41Add Text to INSTALL.LOG . . . . . . . . . . . . . . . . . . . . . . . . . . . . . . . . . . . . . . . . . . . . . . . . . . . . 42Add to AUTOEXEC.BAT . . . . . . . . . . . . . . . . . . . . . . . . . . . . . . . . . . . . . . . . . . . . . . . . . . . . . . 43Add to CONFIG.SYS . . . . . . . . . . . . . . . . . . . . . . . . . . . . . . . . . . . . . . . . . . . . . . . . . . . . . . . . 44Add to SYSTEM.INI. . . . . . . . . . . . . . . . . . . . . . . . . . . . . . . . . . . . . . . . . . . . . . . . . . . . . . . . . 45Browse for Directory . . . . . . . . . . . . . . . . . . . . . . . . . . . . . . . . . . . . . . . . . . . . . . . . . . . . . . . . 45
WiseScript Editor Reference 3

DLL Parameter Settings. . . . . . . . . . . . . . . . . . . . . . . . . . . . . . . . . . . . . . . . . . . . . . . . . . . 47Passing Complex Structures to a .DLL: An Example . . . . . . . . . . . . . . . . . . . . . . . . . . . . . . . 49
Capture Application to SVS Layer . . . . . . . . . . . . . . . . . . . . . . . . . . . . . . . . . . . . . . . . . . . . . . . 50Change SVS Layer GUID . . . . . . . . . . . . . . . . . . . . . . . . . . . . . . . . . . . . . . . . . . . . . . . . . . . . . 51Check Configuration . . . . . . . . . . . . . . . . . . . . . . . . . . . . . . . . . . . . . . . . . . . . . . . . . . . . . . . . 51Check Disk Space . . . . . . . . . . . . . . . . . . . . . . . . . . . . . . . . . . . . . . . . . . . . . . . . . . . . . . . . . . 52Check HTTP Connection. . . . . . . . . . . . . . . . . . . . . . . . . . . . . . . . . . . . . . . . . . . . . . . . . . . . . . 54Check If File/Dir Exists . . . . . . . . . . . . . . . . . . . . . . . . . . . . . . . . . . . . . . . . . . . . . . . . . . . . . . 55Check In-use File . . . . . . . . . . . . . . . . . . . . . . . . . . . . . . . . . . . . . . . . . . . . . . . . . . . . . . . . . . 56Check Service . . . . . . . . . . . . . . . . . . . . . . . . . . . . . . . . . . . . . . . . . . . . . . . . . . . . . . . . . . . . 56Compiler Variable Actions . . . . . . . . . . . . . . . . . . . . . . . . . . . . . . . . . . . . . . . . . . . . . . . . . . . . 57Config ODBC Data Source . . . . . . . . . . . . . . . . . . . . . . . . . . . . . . . . . . . . . . . . . . . . . . . . . . . . 58Copy Local File(s) . . . . . . . . . . . . . . . . . . . . . . . . . . . . . . . . . . . . . . . . . . . . . . . . . . . . . . . . . . 58Create Directory. . . . . . . . . . . . . . . . . . . . . . . . . . . . . . . . . . . . . . . . . . . . . . . . . . . . . . . . . . . 60Create Directory in SVS Layer . . . . . . . . . . . . . . . . . . . . . . . . . . . . . . . . . . . . . . . . . . . . . . . . . 61Create Service . . . . . . . . . . . . . . . . . . . . . . . . . . . . . . . . . . . . . . . . . . . . . . . . . . . . . . . . . . . . 61Create Shortcut . . . . . . . . . . . . . . . . . . . . . . . . . . . . . . . . . . . . . . . . . . . . . . . . . . . . . . . . . . . 62Create Shortcut in SVS Layer. . . . . . . . . . . . . . . . . . . . . . . . . . . . . . . . . . . . . . . . . . . . . . . . . . 63Create SVS Layer . . . . . . . . . . . . . . . . . . . . . . . . . . . . . . . . . . . . . . . . . . . . . . . . . . . . . . . . . . 65Create Virtual Directory. . . . . . . . . . . . . . . . . . . . . . . . . . . . . . . . . . . . . . . . . . . . . . . . . . . . . . 65Custom Billboard . . . . . . . . . . . . . . . . . . . . . . . . . . . . . . . . . . . . . . . . . . . . . . . . . . . . . . . . . . 65Custom Dialog . . . . . . . . . . . . . . . . . . . . . . . . . . . . . . . . . . . . . . . . . . . . . . . . . . . . . . . . . . . . 66Deactivate SVS Layer . . . . . . . . . . . . . . . . . . . . . . . . . . . . . . . . . . . . . . . . . . . . . . . . . . . . . . . 66Delete File from SVS Layer . . . . . . . . . . . . . . . . . . . . . . . . . . . . . . . . . . . . . . . . . . . . . . . . . . . 66Delete File(s) . . . . . . . . . . . . . . . . . . . . . . . . . . . . . . . . . . . . . . . . . . . . . . . . . . . . . . . . . . . . . 67Delete SVS Layer . . . . . . . . . . . . . . . . . . . . . . . . . . . . . . . . . . . . . . . . . . . . . . . . . . . . . . . . . . 67Display Billboard . . . . . . . . . . . . . . . . . . . . . . . . . . . . . . . . . . . . . . . . . . . . . . . . . . . . . . . . . . 68Display Message. . . . . . . . . . . . . . . . . . . . . . . . . . . . . . . . . . . . . . . . . . . . . . . . . . . . . . . . . . . 69Display Progress Message . . . . . . . . . . . . . . . . . . . . . . . . . . . . . . . . . . . . . . . . . . . . . . . . . . . . 70Display Text File . . . . . . . . . . . . . . . . . . . . . . . . . . . . . . . . . . . . . . . . . . . . . . . . . . . . . . . . . . . 70Edit INI File . . . . . . . . . . . . . . . . . . . . . . . . . . . . . . . . . . . . . . . . . . . . . . . . . . . . . . . . . . . . . . 71Edit Registry . . . . . . . . . . . . . . . . . . . . . . . . . . . . . . . . . . . . . . . . . . . . . . . . . . . . . . . . . . . . . 71
Registry Key Settings Dialog Box . . . . . . . . . . . . . . . . . . . . . . . . . . . . . . . . . . . . . . . . . . . . 72Edit Registry for SVS Layer . . . . . . . . . . . . . . . . . . . . . . . . . . . . . . . . . . . . . . . . . . . . . . . . . . . 74Else Statement . . . . . . . . . . . . . . . . . . . . . . . . . . . . . . . . . . . . . . . . . . . . . . . . . . . . . . . . . . . 75ElseIf Statement . . . . . . . . . . . . . . . . . . . . . . . . . . . . . . . . . . . . . . . . . . . . . . . . . . . . . . . . . . 75End Statement. . . . . . . . . . . . . . . . . . . . . . . . . . . . . . . . . . . . . . . . . . . . . . . . . . . . . . . . . . . . 76Evaluate Windows Installer Condition . . . . . . . . . . . . . . . . . . . . . . . . . . . . . . . . . . . . . . . . . . . . 76Execute Program . . . . . . . . . . . . . . . . . . . . . . . . . . . . . . . . . . . . . . . . . . . . . . . . . . . . . . . . . . 77Execute VBScript . . . . . . . . . . . . . . . . . . . . . . . . . . . . . . . . . . . . . . . . . . . . . . . . . . . . . . . . . . 77
Editing a VBScript. . . . . . . . . . . . . . . . . . . . . . . . . . . . . . . . . . . . . . . . . . . . . . . . . . . . . . . 78VBScript Actions. . . . . . . . . . . . . . . . . . . . . . . . . . . . . . . . . . . . . . . . . . . . . . . . . . . . . . . . 79Calling a COM Object in a VBScript . . . . . . . . . . . . . . . . . . . . . . . . . . . . . . . . . . . . . . . . . . . 80
Exit Installation . . . . . . . . . . . . . . . . . . . . . . . . . . . . . . . . . . . . . . . . . . . . . . . . . . . . . . . . . . . 81Export SVS Layer . . . . . . . . . . . . . . . . . . . . . . . . . . . . . . . . . . . . . . . . . . . . . . . . . . . . . . . . . . 82Find File in Path . . . . . . . . . . . . . . . . . . . . . . . . . . . . . . . . . . . . . . . . . . . . . . . . . . . . . . . . . . . 82Find First SVS Layer . . . . . . . . . . . . . . . . . . . . . . . . . . . . . . . . . . . . . . . . . . . . . . . . . . . . . . . . 83Find Next SVS Layer . . . . . . . . . . . . . . . . . . . . . . . . . . . . . . . . . . . . . . . . . . . . . . . . . . . . . . . . 83Find SVS Layer GUID . . . . . . . . . . . . . . . . . . . . . . . . . . . . . . . . . . . . . . . . . . . . . . . . . . . . . . . 84Get Environment Variable . . . . . . . . . . . . . . . . . . . . . . . . . . . . . . . . . . . . . . . . . . . . . . . . . . . . 84Get Name/Serial Number . . . . . . . . . . . . . . . . . . . . . . . . . . . . . . . . . . . . . . . . . . . . . . . . . . . . 85Get Registry Key Value . . . . . . . . . . . . . . . . . . . . . . . . . . . . . . . . . . . . . . . . . . . . . . . . . . . . . . 85Get SVS Layer Info . . . . . . . . . . . . . . . . . . . . . . . . . . . . . . . . . . . . . . . . . . . . . . . . . . . . . . . . . 86
WiseScript Editor Reference 4

Process for Adding Mobile Device Support to a WiseScript . . . . . . . . . . . . . . . . . . . . . . . . . . . 97Install Windows Mobile Application . . . . . . . . . . . . . . . . . . . . . . . . . . . . . . . . . . . . . . . . . . . 97
Modify Component Size. . . . . . . . . . . . . . . . . . . . . . . . . . . . . . . . . . . . . . . . . . . . . . . . . . . . . . 98Open/Close Install.log. . . . . . . . . . . . . . . . . . . . . . . . . . . . . . . . . . . . . . . . . . . . . . . . . . . . . . . 99Parse String. . . . . . . . . . . . . . . . . . . . . . . . . . . . . . . . . . . . . . . . . . . . . . . . . . . . . . . . . . . . . . 99Pause . . . . . . . . . . . . . . . . . . . . . . . . . . . . . . . . . . . . . . . . . . . . . . . . . . . . . . . . . . . . . . . . . 100Play Multimedia File . . . . . . . . . . . . . . . . . . . . . . . . . . . . . . . . . . . . . . . . . . . . . . . . . . . . . . . 100Post to HTTP Server . . . . . . . . . . . . . . . . . . . . . . . . . . . . . . . . . . . . . . . . . . . . . . . . . . . . . . . 101Prompt for Filename . . . . . . . . . . . . . . . . . . . . . . . . . . . . . . . . . . . . . . . . . . . . . . . . . . . . . . . 102Prompt for Text . . . . . . . . . . . . . . . . . . . . . . . . . . . . . . . . . . . . . . . . . . . . . . . . . . . . . . . . . . 103Radio Button Dialog . . . . . . . . . . . . . . . . . . . . . . . . . . . . . . . . . . . . . . . . . . . . . . . . . . . . . . . 103Read INI Value. . . . . . . . . . . . . . . . . . . . . . . . . . . . . . . . . . . . . . . . . . . . . . . . . . . . . . . . . . . 104Read/Update Text File . . . . . . . . . . . . . . . . . . . . . . . . . . . . . . . . . . . . . . . . . . . . . . . . . . . . . . 104Read/Write Binary File . . . . . . . . . . . . . . . . . . . . . . . . . . . . . . . . . . . . . . . . . . . . . . . . . . . . . 105Reboot System. . . . . . . . . . . . . . . . . . . . . . . . . . . . . . . . . . . . . . . . . . . . . . . . . . . . . . . . . . . 106Register Font . . . . . . . . . . . . . . . . . . . . . . . . . . . . . . . . . . . . . . . . . . . . . . . . . . . . . . . . . . . . 106Remark . . . . . . . . . . . . . . . . . . . . . . . . . . . . . . . . . . . . . . . . . . . . . . . . . . . . . . . . . . . . . . . . 106Remove SVS Exclude Entry . . . . . . . . . . . . . . . . . . . . . . . . . . . . . . . . . . . . . . . . . . . . . . . . . . 106Rename File/Directory. . . . . . . . . . . . . . . . . . . . . . . . . . . . . . . . . . . . . . . . . . . . . . . . . . . . . . 107Rename File or Directory in SVS Layer . . . . . . . . . . . . . . . . . . . . . . . . . . . . . . . . . . . . . . . . . . 108Rename SVS Layer . . . . . . . . . . . . . . . . . . . . . . . . . . . . . . . . . . . . . . . . . . . . . . . . . . . . . . . . 108Search for File . . . . . . . . . . . . . . . . . . . . . . . . . . . . . . . . . . . . . . . . . . . . . . . . . . . . . . . . . . . 109Self-Register OCXs/DLLs . . . . . . . . . . . . . . . . . . . . . . . . . . . . . . . . . . . . . . . . . . . . . . . . . . . . 110Set Activate SVS Layer on Startup . . . . . . . . . . . . . . . . . . . . . . . . . . . . . . . . . . . . . . . . . . . . . 110Set Control Attributes . . . . . . . . . . . . . . . . . . . . . . . . . . . . . . . . . . . . . . . . . . . . . . . . . . . . . . 110Set Control Text . . . . . . . . . . . . . . . . . . . . . . . . . . . . . . . . . . . . . . . . . . . . . . . . . . . . . . . . . . 111Set Current Control . . . . . . . . . . . . . . . . . . . . . . . . . . . . . . . . . . . . . . . . . . . . . . . . . . . . . . . 111Set File Attributes. . . . . . . . . . . . . . . . . . . . . . . . . . . . . . . . . . . . . . . . . . . . . . . . . . . . . . . . . 112Set Files/Buffers. . . . . . . . . . . . . . . . . . . . . . . . . . . . . . . . . . . . . . . . . . . . . . . . . . . . . . . . . . 112Set SVS Exclude Entry . . . . . . . . . . . . . . . . . . . . . . . . . . . . . . . . . . . . . . . . . . . . . . . . . . . . . 113Set Variable . . . . . . . . . . . . . . . . . . . . . . . . . . . . . . . . . . . . . . . . . . . . . . . . . . . . . . . . . . . . . 113Set Web Permissions. . . . . . . . . . . . . . . . . . . . . . . . . . . . . . . . . . . . . . . . . . . . . . . . . . . . . . . 114Set Windows Installer Property . . . . . . . . . . . . . . . . . . . . . . . . . . . . . . . . . . . . . . . . . . . . . . . 115Start/Stop Service . . . . . . . . . . . . . . . . . . . . . . . . . . . . . . . . . . . . . . . . . . . . . . . . . . . . . . . . 115While Statement . . . . . . . . . . . . . . . . . . . . . . . . . . . . . . . . . . . . . . . . . . . . . . . . . . . . . . . . . 116Win32 System Directory . . . . . . . . . . . . . . . . . . . . . . . . . . . . . . . . . . . . . . . . . . . . . . . . . . . . 117Wizard Loop. . . . . . . . . . . . . . . . . . . . . . . . . . . . . . . . . . . . . . . . . . . . . . . . . . . . . . . . . . . . . 117
Chapter 5: Creating Custom Dialog Boxes . . . . . . . . . . . . . . . . . . . . . . . . . . . . . . . . . . 118About Dialog Boxes. . . . . . . . . . . . . . . . . . . . . . . . . . . . . . . . . . . . . . . . . . . . . . . . . . . . . . . . 118About the Custom Dialog Editor . . . . . . . . . . . . . . . . . . . . . . . . . . . . . . . . . . . . . . . . . . . . . . . 118
WiseScript Editor Reference 5

About Dialog Box Controls . . . . . . . . . . . . . . . . . . . . . . . . . . . . . . . . . . . . . . . . . . . . . . . . . . . 120Adding and Editing Dialog Box Controls. . . . . . . . . . . . . . . . . . . . . . . . . . . . . . . . . . . . . . . 121
Adding Check Box Controls . . . . . . . . . . . . . . . . . . . . . . . . . . . . . . . . . . . . . . . . . . . . 122Adding Combo Box Controls. . . . . . . . . . . . . . . . . . . . . . . . . . . . . . . . . . . . . . . . . . . . 123Adding Edit Text Controls . . . . . . . . . . . . . . . . . . . . . . . . . . . . . . . . . . . . . . . . . . . . . 125Adding Graphic Controls . . . . . . . . . . . . . . . . . . . . . . . . . . . . . . . . . . . . . . . . . . . . . . 126Adding Group Box Controls . . . . . . . . . . . . . . . . . . . . . . . . . . . . . . . . . . . . . . . . . . . . 127Adding Hot Text Controls. . . . . . . . . . . . . . . . . . . . . . . . . . . . . . . . . . . . . . . . . . . . . . 128Adding List Box Controls . . . . . . . . . . . . . . . . . . . . . . . . . . . . . . . . . . . . . . . . . . . . . . 130Adding Play AVI Controls . . . . . . . . . . . . . . . . . . . . . . . . . . . . . . . . . . . . . . . . . . . . . . 131Adding Push Button Controls . . . . . . . . . . . . . . . . . . . . . . . . . . . . . . . . . . . . . . . . . . . 132Adding Radio Button Controls. . . . . . . . . . . . . . . . . . . . . . . . . . . . . . . . . . . . . . . . . . . 134Adding Rectangle Controls . . . . . . . . . . . . . . . . . . . . . . . . . . . . . . . . . . . . . . . . . . . . . 135Adding Text Controls. . . . . . . . . . . . . . . . . . . . . . . . . . . . . . . . . . . . . . . . . . . . . . . . . 136Specifying Execute Program Settings . . . . . . . . . . . . . . . . . . . . . . . . . . . . . . . . . . . . . 137
Aligning and Spacing Dialog Box Controls . . . . . . . . . . . . . . . . . . . . . . . . . . . . . . . . . . . . . 138Setting Tab Order of Dialog Box Controls . . . . . . . . . . . . . . . . . . . . . . . . . . . . . . . . . . . . . 138
Solutions for Dialog Box Problems . . . . . . . . . . . . . . . . . . . . . . . . . . . . . . . . . . . . . . . . . . . . . 139Changing the Default Graphic on Wizard Dialog Boxes . . . . . . . . . . . . . . . . . . . . . . . . . . . . 140Keeping Disabled Controls From Reactivating. . . . . . . . . . . . . . . . . . . . . . . . . . . . . . . . . . . 140
About Custom Dialog Box Sets. . . . . . . . . . . . . . . . . . . . . . . . . . . . . . . . . . . . . . . . . . . . . . . . 141Creating a Dialog Box Set . . . . . . . . . . . . . . . . . . . . . . . . . . . . . . . . . . . . . . . . . . . . . . . . 141Configuring Dialog Box Set Properties . . . . . . . . . . . . . . . . . . . . . . . . . . . . . . . . . . . . . . . . 141
Creating a Custom Dialog Box Script . . . . . . . . . . . . . . . . . . . . . . . . . . . . . . . . . . . . . . . . . . . 142Dialog Box Script Actions. . . . . . . . . . . . . . . . . . . . . . . . . . . . . . . . . . . . . . . . . . . . . . . . . 143Dialog Box Script Examples . . . . . . . . . . . . . . . . . . . . . . . . . . . . . . . . . . . . . . . . . . . . . . . 143
Chapter 6: Creating Custom Billboards. . . . . . . . . . . . . . . . . . . . . . . . . . . . . . . . . . . . . 145About Billboards . . . . . . . . . . . . . . . . . . . . . . . . . . . . . . . . . . . . . . . . . . . . . . . . . . . . . . . . . . 145Accessing the Custom Billboard Editor . . . . . . . . . . . . . . . . . . . . . . . . . . . . . . . . . . . . . . . . . . 145About the Custom Billboard Editor . . . . . . . . . . . . . . . . . . . . . . . . . . . . . . . . . . . . . . . . . . . . . 146Opening and Saving Custom Billboards . . . . . . . . . . . . . . . . . . . . . . . . . . . . . . . . . . . . . . . . . . 147Adding Objects to a Billboard . . . . . . . . . . . . . . . . . . . . . . . . . . . . . . . . . . . . . . . . . . . . . . . . . 147
Editing Billboard Text Objects . . . . . . . . . . . . . . . . . . . . . . . . . . . . . . . . . . . . . . . . . . . . . 147Editing Billboard Line Objects. . . . . . . . . . . . . . . . . . . . . . . . . . . . . . . . . . . . . . . . . . . . . . 148Editing Billboard Rectangles and Ellipses . . . . . . . . . . . . . . . . . . . . . . . . . . . . . . . . . . . . . . 149Editing Billboard Polygon Objects . . . . . . . . . . . . . . . . . . . . . . . . . . . . . . . . . . . . . . . . . . . 149Editing Billboard Bitmap Objects. . . . . . . . . . . . . . . . . . . . . . . . . . . . . . . . . . . . . . . . . . . . 150Resizing, Moving, and Aligning Billboard Objects . . . . . . . . . . . . . . . . . . . . . . . . . . . . . . . . 151Setting Billboard Properties . . . . . . . . . . . . . . . . . . . . . . . . . . . . . . . . . . . . . . . . . . . . . . . 151
Chapter 7: Troubleshooting WiseScripts. . . . . . . . . . . . . . . . . . . . . . . . . . . . . . . . . . . . 153About Troubleshooting a WiseScript . . . . . . . . . . . . . . . . . . . . . . . . . . . . . . . . . . . . . . . . . . . . 153Using the Installation Log . . . . . . . . . . . . . . . . . . . . . . . . . . . . . . . . . . . . . . . . . . . . . . . . . . . 153File Replacement Problems in System32 . . . . . . . . . . . . . . . . . . . . . . . . . . . . . . . . . . . . . . . . . 153
Chapter 8: Quick Reference . . . . . . . . . . . . . . . . . . . . . . . . . . . . . . . . . . . . . . . . . . . . . 155Automatic Compiler Variables . . . . . . . . . . . . . . . . . . . . . . . . . . . . . . . . . . . . . . . . . . . . . . . . 155Automatic Run-time Variables . . . . . . . . . . . . . . . . . . . . . . . . . . . . . . . . . . . . . . . . . . . . . . . . 156Run-time Variables . . . . . . . . . . . . . . . . . . . . . . . . . . . . . . . . . . . . . . . . . . . . . . . . . . . . . . . . 158SVS Variables . . . . . . . . . . . . . . . . . . . . . . . . . . . . . . . . . . . . . . . . . . . . . . . . . . . . . . . . . . . 160
WiseScript Editor Reference 6
WiseScript Command-Line Options . . . . . . . . . . . . . . . . . . . . . . . . . . . . . . . . . . . . . . . . . . 164WiseScript Installations Command-Line Options . . . . . . . . . . . . . . . . . . . . . . . . . . . . . . . . . 165Uninstall Command-Line Options . . . . . . . . . . . . . . . . . . . . . . . . . . . . . . . . . . . . . . . . . . . 165
Index. . . . . . . . . . . . . . . . . . . . . . . . . . . . . . . . . . . . . . . . . . . . . . . . . . . . . . . . . . . . . . . 167
WiseScript Editor Reference 7

Preface
This chapter includes the following topics:
Product Documentation on page 8
Technical Support Resources on page 8
Product DocumentationThis documentation assumes that you are proficient in the use of the Windows operating system. If you need help using the operating system, consult its user documentation.
Use the following sources of information to learn this product.
Online Help
The online help contains detailed technical information and step-by-step instructions for performing common tasks.
Access help in the following ways:
To display context-sensitive help for the active window or dialog box, press F1.
To select a help topic from a table of contents, index, or search, select Help menu > Help Topics.
Reference Manual
All the material in the online help is also available in a .PDF-format reference manual, which you can access by selecting Help menu > Reference Manual.
Getting Started Guide
The Getting Started Guide contains system requirements and installation instructions. You can access a .PDF version of the Getting Started Guide from the Windows Start menu.
Release Notes
The product release notes cover new features, enhancements, bug fixes, and known
issues for the current version of this product. Access the release notes in the following ways:
Browse the product CD.
Select Release Notes from the Altiris program group on the Windows Start menu.
Technical Support ResourcesIf you need help beyond what the product documentation provides, visit the Altiris Service Center, which is your complete online resource for Altiris product support. Access the Altiris Service Center from the Support section of the Altiris Web site.
Use the Altiris Service Center to access the following Altiris support tools and services.
WiseScript Editor Reference 8

Before you contact technical support, obtain the following information:
Serial number and product version, which you can find by selecting Help menu > About.
Operating system version and service pack version if applicable.
A description of what you do before the problem occurs.
The text of any error messages that appear.
Your name, company name, and how to contact you.
Contract number or payment information, if applicable.
Knowledgebase Provides a central repository for technical information at Altiris. Articles are reviewed and refined by Altiris personnel and provide information about past problems and their resolutions.
Support forums Lets Altiris users collaborate and share information. The support forums are monitored by experienced customers, Altiris partners and Altiris personnel.
License Management Portal
Manages and provides access to Altiris product licenses.
Altiris Support Helpdesk Lets Altiris premium and enterprise support customers use a Web-based tool to log new support incidents, update existing incidents and communicate with Altiris support personnel.
User groups Provide a place for Altiris users to discuss IT management projects, learn best practices, discover the latest product features, and network with other users.
WiseScript Editor Reference 9

Chapter 1Introduction
This chapter includes the following topics:
About WiseScript on page 10
WiseScript Benefits on page 10
Starting the Software on page 11
The Product Interface on page 12
Using WiseScripts in a Windows Installer Installation on page 12
Compiling, Testing, and Running a WiseScript on page 13
About WiseScriptWiseScript Editor is a WiseScript™ authoring environment that you can use to automate administrative tasks. You also can use it to create .EXEs to use as custom actions in Windows Installer installations. These custom actions can extend the capabilities of Microsoft Windows Installer and simplify installation tasks (example: parsing and arithmetic functions) that are difficult to accomplish with Windows Installer.
WiseScript Editor is embedded within Windows Installer Editor and appears when you create a custom action that calls a WiseScript.
WiseScript BenefitsWiseScript is a high-level scripting language that consolidates dozens or hundreds of lines of code into predefined script actions.
What Makes WiseScript Unique
Easy to learnWiseScript supports a point-and-click method of scripting. The script author is prompted for the parameters needed by each script action, so a script can be created and tested very quickly. The script is displayed in clear, English-like statements. For those who need additional flexibility and control, WiseScript provides advanced features (examples: IF blocks, WHILE loops, UI dialog boxes).
No runtime neededWiseScripts are compiled into self-contained .EXEs that do not require an agent or runtime files on the destination computer.
Compact sizeA WiseScript .EXE is small in size (about 100 KB). If a script uses any files that may not be on the destination computer, it can compress those files into the .EXE. (Example: A script that detects and removes spyware might temporarily install Kill.exe on the destination computer while the script is running.)
Built-in rollbackWiseScripts can be rolled back after they are executed on the destination computer.
WiseScript Editor Reference 10

Introduction
User interfaceWiseScripts can incorporate any type of dialog box to either inform the end user or prompt for input.
WiseScript is powerfulIn addition to the dozens of predefined actions, WiseScripts can call VBScripts and DLL functions, making it possible to use any Windows system call.
WiseScript is fastBecause the WiseScript engine is written in C++, when you build a WiseScript, you are building a C++ program. A WiseScript executes faster than a VBScript that performs the same operation.
WiseScript is extensibleYou can streamline your scripting process by creating your own script actions for tasks that you perform frequently. To create a user-defined action, create a WiseScript .WSE (project file) and save it in the Actions subdirectory of the WiseScript product’s installation directory. Your action will be available for use in future scripts.
WiseScript Examples
In addition to creating installation packages, following are just a few of the tasks you can accomplish with WiseScript. For samples of some of these scripts, see the article Performing System Administration Tasks With WiseScripts in the Altiris Knowledgebase (Article #27374).
Move files and directories.
Modify a machine resource (example: registry key or .INI file).
Locate and delete a file and its directory (example: to remove a spyware program).
Free disk space by clearing the Temp directory, the Recycle Bin, or the Internet cache.
Find the current Windows version.
Find and report system information and take action depending on the results.
Map a network drive.
Create, edit, or manage virtual software layers on computers that have the SVS Driver (Altiris Software Virtualization Agent). For details, see the article Using WiseScripts to Manage and Update Virtual Software Packages in the Altiris Knowledgebase (article 27373).
Assign license numbers from a text file.
Starting the SoftwareThe WiseScript Editor interface is embedded within MSI Script in Windows Installer Editor. This lets you create WiseScripts for Windows Installer custom actions.
In MSI Script, add or double-click a custom action that runs a WiseScript. On the Details tab of the Run WiseScript dialog box, click Options.
To open a blank script, select Create New WiseScript from the button menu.
To open an existing script, select Edit Existing WiseScript from the button menu.
WiseScript Editor Reference 11

Introduction
You can begin to add or edit script actions. For information on adding script actions, see Adding an Action to a Script on page 24. For a description of each script action, see About WiseScript Actions on page 39.
See also:
About Script Editor on page 20
The Product InterfaceWiseScript Editor has the following views:
Project SettingsThe Project Settings view contains several pages that provide information that is required by certain script actions.
See About the Project Settings View on page 15.
Script EditorScript Editor provides a powerful and easy-to-use scripting environment based on the WiseScript™ scripting language.
See About Script Editor on page 20.
Script Editor lets you create powerful .EXEs to use as custom actions in a Windows Installer installation.
To navigate between views, click the navigation tabs at the lower left of the main window.
Using WiseScripts in a Windows Installer Installation
Windows Installer Editor compiles installations into Windows Installer (.MSI) format. Therefore, it can provide only those capabilities that are provided by the Windows Installer SDK environment. WiseScript Editor provides an additional authoring environment that has a larger selection of more versatile script actions than those provided by Windows Installer products.
You can use WiseScript-based .EXEs in the same way that you use functions in .DLLs. You write the main installation in a Windows Installer product, but when you need to perform an advanced function, you can create a WiseScript .EXE and call it with a custom action in the Windows Installer installation.
Creating a WiseScript .EXE has some advantages over writing a custom program to create an .EXE:
WiseScript Editor uses predefined, easy-to-use script actions to accomplish common installation tasks.
You can pass Windows Installer properties in and out of the WiseScript .EXE.
See Get Windows Installer Property on page 89 and Set Windows Installer Property on page 115.
You can evaluate Windows Installer conditions within a WiseScript .EXE.
See Evaluate Windows Installer Condition on page 76.
WiseScript Editor Reference 12
Introduction
The disadvantage of using a WiseScript .EXE is that Windows Installer does not know about or manage system changes performed by a WiseScript .EXE (example: installation of a file).
See Uninstalling Changes Made by a WiseScript in the Windows Installer Editor Help.
Compiling, Testing, and Running a WiseScriptTo test an installation, use the Compile, Test, and Run buttons at the bottom of the main window.
CompileClick Compile to build a single executable file that contains the installation script as well as all the files needed for the installation. This is the installation .EXE that you distribute to end users. If any files are absent or not readable, error messages appear when compiling.
TestClick Test to compile and run the installation in test mode. In test mode, the installation performs all script actions without actually installing or modifying files. However, if any script lines are dependent on files being installed by previous script lines, then test mode might fail. Example: If an Install File(s) line copies a ReadMe to the Temp directory and a second script line tries to open ReadMe, the second script line fails because the ReadMe is not in the Temp directory.
RunClick Run to execute the installation just as it would execute on the destination computer. Files are installed on your computer and your system is modified.
Creating a Portable ProjectYou can create a portable WiseScript project that contains all of the files in a WiseScript including its source files. A portable project is a self-extracting .EXE. Use it to:
Easily move WiseScript projects from one computer to another without having to copy source files.
Share WiseScript projects with others, who can then open and edit your WiseScript with all of its source files.
To create a portable project
1. Select File menu > Create Project Package.
2. Complete the Create Project Package dialog box:
Project NameEnter a name for the portable project. When the portable project .EXE is run, it extracts the project’s files and puts them in a directory with this name.
Add default scripts that are included in this WiseScriptMark this to add any default WiseScripts or VBScripts that are included in the WiseScript. These default scripts are in the WiseScript Editor\Actions or WiseScript Editor\Include directories. If you have modified these scripts and they are included in the WiseScript, then you should include them in the project
WiseScript Editor Reference 13

Introduction
Password protect the project packageTo add password protection to the project, mark this option and then enter and confirm the password.
3. Click OK.
The Save As dialog box appears.
4. Specify the file name and location for the portable WiseScript project and click Save.
WiseScript Editor Reference 14

Chapter 2Project Settings for Script Support
This chapter includes the following topics:
About Project Settings on page 15
About the Project Settings View on page 15
Compiler Variables on page 16
Digital Signature on page 18
General Information on page 19
About Project SettingsSeveral script actions require information that is defined outside Script Editor. The Project Settings view provides pages on which you can define that information.
See About the Project Settings View on page 15.
See also:
Compiler Variables on page 16Digital Signature on page 18General Information on page 19
About the Project Settings ViewThe Project Settings view contains several pages that provide information that is required by certain script actions. (Example: The Compiler Variable If action requires a compiler variable to be defined on the Compiler Variables page.)
To access Project Settings, click Project Settings at the lower left of the WiseScript Editor main window.
WiseScript Editor Reference 15

Project Settings for Script Support
Page AreaWhen you click a page name in a page group, this area displays the page’s options. Each page lets you define information that is required by a specific script action.
Use ( ) on the toolbar to navigate from page to page, or click the page name in
the list of pages.
To display help for the current page, press F1.
To return a page to its last saved state, select Edit menu > Reset Page.
View Navigation
Click these tabs to change views.
Compiling and Testing
Compile, Test, Debug, and Run buttons test and compile the WiseScript.
Compiler VariablesUse the Compiler Variables page to set compiler variables that change the WiseScript during compile. You can use compiler variables to include or exclude portions of script from the compiled .EXE or to build a debug version of the WiseScript.
You set the default value of compiler variables on the Compiler Variables page, and then you select the compiler variables in the Compiler Variable If action in Script Editor.
Page AreaPage Groups
Compile, Test, and RunView Navigation
WiseScript Editor Reference 16

Project Settings for Script Support
Compiler variables are surrounded by % characters in the script. (Example: %_DEBUG_%)
You can change the value of compiler variables when you compile.
The sample script Compvar.wse uses compiler variables. For details on sample scripts, see ScriptHelp.htm in the Samples subdirectory of this product’s installation directory.
To add a compiler variable
1. Select Project Settings > Compiler Variables page.
2. Click Add.
The Compiler Variable Settings dialog box appears.
3. Complete the dialog box:
Variable NameEnter the name of the compiler variable. By convention, compiler variables begin and end with an underscore character (_). Although this convention is not enforced, it helps distinguish compiler variables from regular variables in scripts.
Default ValueEnter the default value of the compiler variable.
DescriptionBriefly describe how the variable is used. This appears on the dialog box when you are asked to choose a value for the variable.
Value ListFor compiler variables that are displayed as a list, enter a list of valid values, each on a separate line.
Data Entry TypeSelect the method to use to enter data for the compiler variable.
Do Not Prompt for ValueIf this is marked, you are not prompted for the value of this variable when compiling even if Prompt for Compiler Variables is marked on the Compiler Variables page. Mark this for variables that you do not expect to change frequently.
4. Click OK.
5. On the Compiler Variables page, mark one of the following:
Compiling from Command LineMark this to be prompted for the value of compiler variables when you compile from the command line. Use this for automated build processes. You can specify compiler variable values by entering the value directly on the command line or by storing the values in a text file.
See Command-Line Options on page 164.
Compiling from Within WiseMark this to be prompted for the value of compiler variables when you compile from WiseScript Editor. If you mark this, then a Select Compile Settings dialog box appears during compile and lists this compiler variable’s values. A dialog box appears for each compiler variable you define. Value length is limited by the amount of text that displays on the dialog box. The Do not prompt for value check box on the Compiler Variable Settings dialog box overrides this setting.
WiseScript Editor Reference 17

Project Settings for Script Support
See also:
Automatic Compiler Variables on page 155
Digital SignatureUse the Digital Signature page to add an Authenticode digital signature to an installation file so its integrity and authenticity can be verified.
Digital signature methods
The file signing tool that is used to digitally sign a file depends on the type of your digital certificate:
Public/private key pair files
This method requires a credentials file (.SPC or .CER) and a private key file (.PVK). This method is supported by the signcode.exe tool. For details, search for “Signcode” in the MSDN Library (msdn.microsoft.com/library/).
Personal Information Exchange file
This method requires a Personal Information Exchange file (.PFX), which is a container file for the public/private key information. This method is supported by the signtool.exe tool. For details, search for “Signtool” in the MSDN Library (msdn.microsoft.com/library/).
Requirements
You must have a valid code signing certificate, which you can obtain from a commercial certificate authority such as Verisign. For a list of certificate authorities, search for “Microsoft Root Certificate Program Members” in the MSDN Library (msdn.microsoft.com/library/).
You must have the signtool.exe or signcode.exe tool on your computer.
Signtool.exe requires the CAPICOM 2.0 redistributable to be installed and registered on your computer. CAPICOM provides services for digitally signing applications, and is available from the Microsoft Web site.
The location of signtool.exe or signcode.exe must be added to your Path environment variable.
To add a digital signature
Select Project Settings > Digital Signature and complete the page.
Add a digital signature externallyMark this to leave space in the installation for a digital signature without actually adding it to the installation. This is useful if the installation must be digitally signed under a higher security environment by a different individual. Extra space is reserved to allow for the digital signature information. If an installation does not have extra space (approximately 5 K), and a digital signature is added, errors occur when CRC checks are performed because of the resulting size increase. This option eliminates those errors.
Add a digital signatureMark this to add a digital signature to the installation and to enable the following fields:
WiseScript Editor Reference 18

Project Settings for Script Support
Web URLEnter your company’s Web site address.
Descriptive NameEnter the name of your application. This name is embedded in your Authenticode certificate to let end users verify the name of the application they are installing.
TimeStamp URLSpecify the URL you use for your timestamping service. Timestamping lets end users distinguish between a certificate that has expired but was valid when it was used to sign the installation, and a certificate that was used to sign an installation while it was expired. The timestamping service must be available on your computer to build the installation but does not need to be available to the end user running the installation.
Certificate options
Signtool.exe with Personal Information Exchange fileMark this to use signtool.exe and then specify the Personal Information Exchange file (.PFX) to use.
Signcode.exe with public/private key pair filesMark this to use signcode.exe and then specify the credentials file (.SPC or .CER) that contains your Digital ID, and your private key file (.PVK).
General InformationUse the General Information page to set the summary information for the compiled .EXE file. End users can see the summary information by right-clicking the compiled .EXE in Windows Explorer and selecting Properties.
If you plan to use an automated build system and want to set these values at compile time, create compiler variables to set these values, and enter the compiler variable name, surrounded by percent signs, in these fields. (Example: If you create a compiler variable named _INST_VERSION_ to set the version, enter %_INST_VERSION_% in the Installation Version field.)
See Compiler Variables on page 16.
Select Project Settings > General Information and complete the page.
Installation VersionThe version number of the WiseScript.
DescriptionA description of the WiseScript, perhaps including your application’s name.
CopyrightThe copyright notice for the WiseScript.
Company Name
WiseScript Editor Reference 19

Chapter 3Using Script Editor
This chapter includes the following topics:
About Script Editor on page 20
The Script Editor Window on page 20
Types of Scripts on page 23
Adding an Action to a Script on page 24
Editing Scripts on page 24
About User-Defined Actions on page 26
Basic Scripting Concepts on page 31
About Script EditorAll WiseScript products contain the Script Editor scripting environment. The Script Editor scripting environment consolidates numerous lines of code into predefined script actions. You don’t need to memorize commands because Script Editor supports a point-and-click method of scripting. The script you create is displayed in clear, English-like statements. You compile the script, along with files and other resources, into an .EXE. When the .EXE is run, the script runs, executing the actions that are specified in the script.
The Script Editor WindowThe Script Editor window contains all the tools necessary to develop and edit WiseScripts. To access Script Editor, click Script Editor at the lower left of the main window.
WiseScript Editor Reference 20
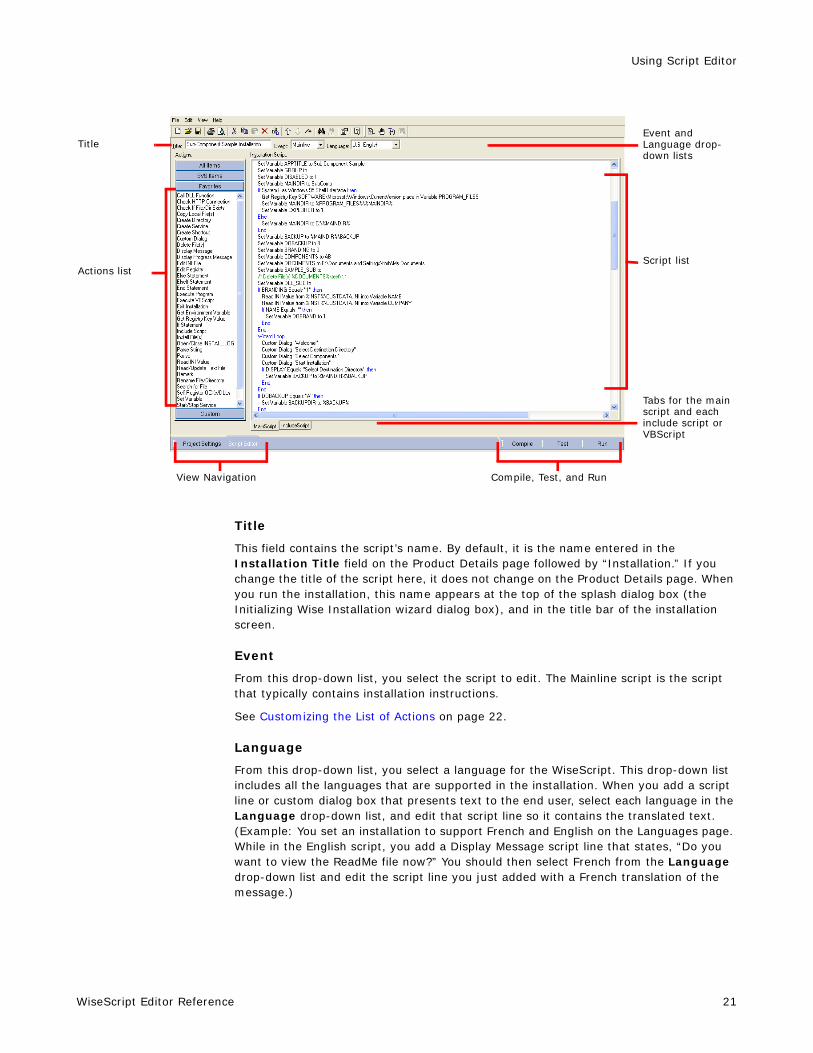
Using Script Editor
TitleThis field contains the script’s name. By default, it is the name entered in the Installation Title field on the Product Details page followed by “Installation.” If you change the title of the script here, it does not change on the Product Details page. When you run the installation, this name appears at the top of the splash dialog box (the Initializing Wise Installation wizard dialog box), and in the title bar of the installation screen.
Event
From this drop-down list, you select the script to edit. The Mainline script is the script that typically contains installation instructions.
See Customizing the List of Actions on page 22.
Language
From this drop-down list, you select a language for the WiseScript. This drop-down list includes all the languages that are supported in the installation. When you add a script line or custom dialog box that presents text to the end user, select each language in the Language drop-down list, and edit that script line so it contains the translated text. (Example: You set an installation to support French and English on the Languages page. While in the English script, you add a Display Message script line that states, “Do you want to view the ReadMe file now?” You should then select French from the Language drop-down list and edit the script line you just added with a French translation of the message.)
Event and Language drop-down lists
Tabs for the main script and each include script or VBScript
Script list
Title
Actions list
Compile, Test, and RunView Navigation
WiseScript Editor Reference 21
Using Script Editor
Actions
The actions are arranged in groups under title bars. If you click the All Items title bar, it displays all the actions you can add to your script. The SVS Items group displays SVS specific actions, the Favorites group displays some of the most commonly used actions, while the Custom group is by default empty. You can also create your own action groups.
See Customizing the List of Actions on page 22.
Script List
This list contains the script that is executed when an end user runs the .EXE.
For information on working with scripts, see Adding an Action to a Script on page 24 and Editing Scripts on page 24.
Script lines are color-coded based on the type of the script line. The color code is as follows:
Compiler Variable Items - gray
Include Script Items - black
Install/Copy File Items - black
Logic items - blue
New Variable Values - red
Remarks - green
Script Tabs
A tab for the current installation script appears at the bottom of the installation script area. When you add an Include Script or VB Script action to the current installation script, a tab for that script appears next to the tab for the current installation script.
To show tabs for Wise include scripts, mark the Show Tabs for Wise Include Scripts check box in Preferences.
Script Line Numbering
To show or hide script line numbers, select View menu > Line Numbers.
Connection lines connect the beginning and end of an If block or a loop. To show or hide connection lines, select View menu > Connection Lines.
Customizing the List of ActionsScript Editor contains four default action groups: All Items, SVS Items, Favorites, and Custom. You can add up to 10 additional groups and add any actions that appear in the All Items group to any other group. The All Items group contains all actions, and you cannot remove this group or any of its actions. You can remove any of the other groups and edit the actions that appear in the groups.
To add an action group
1. Right-click anywhere in the Actions list and select Add Group.
The Group Name dialog box appears.
2. Enter the name of the new group and click OK.
WiseScript Editor Reference 22

Using Script Editor
The Select Items for Group dialog box appears.
3. Select the actions to include in the group and click OK.
The new action group appears with the actions you selected.
To edit an action group
1. Click the title bar of the action group.
You cannot edit or remove the All Items group.
2. Right-click below the action group title bar and select Add/Remove Items.
The Select Items for Group dialog box appears.
3. Add, delete, or move group items and click OK.
You can customize the Actions list further by creating user-defined actions.
See About User-Defined Actions on page 26.
Types of ScriptsIn Script Editor, you can edit the following scripts:
Event Scripts
Event scripts handle events. (Example: The end user cancels the installation.) You can select from the Event drop-down list and edit:
MainlineThe primary script that’s executed during the normal installation process. It contains placeholders for Cancel and Exit scripts. When you open a script, that script is considered the “main installation script,” and is on the first tab below the installation script.
ExitThe script that’s executed when the installation is complete, or when an Exit Installation script command is executed. If you create a user-defined action, you store its custom dialog box here.
See Creating a User-Defined Action on page 27.
CancelThe script that’s executed when the end user cancels the installation. Because some files might already be installed when the end user cancels, the Cancel script contains the include script, rollback.wse, which returns the destination computer to its pre-installation state.
Include Scripts
Include scripts are added to an installation with an Include Script action.
See Include Script on page 91.
Scripts can be included either in the main installation script or in other include scripts. At run time, include scripts are run when the Include Script action that references them is encountered. For each Include Script action in a script, a new tab appears at the bottom of the Installation Script pane.
WiseScript Editor Reference 23

Using Script Editor
Include scripts can help save time in developing installations, because you can develop a library of WiseScripts that perform very specific functions. You can re-use these specialized scripts in future installations and easily share them with colleagues.
VBScripts
VBScripts are added to an installation with an Execute VBScript action.
See Execute VBScript on page 77.
VBScripts can be included either in the main installation script or in include scripts. At run time, VBScripts are run when the Execute VBScript action that references them is encountered. For each Execute VBScript action in a WiseScript, a new tab appears at the bottom of the Installation Script pane. When you click this tab, a VBScript window appears.
See Editing a VBScript on page 78.
By adding VBScripts, you can greatly expand the functionality of WiseScripts because you can use all the scripting capabilities of VBScript (example: arrays and subfunctions). Adding VBScripts can also save you time because you can use scripts that others have created.
Adding an Action to a Scriptin Script Editor, do any of the following:
From the Actions list in the left pane, drag an action onto a line in the Installation Script list in the right pane. The new action appears above the line that is highlighted when you drop the action.
Click in the script and double-click the action in the Actions list to place the new action above the line you clicked.
Click in the script and start typing the first few letters of the action name. As you type, the current line becomes a drop-down list with all the action names, and the action that most closely matches the letters you typed is the current item in the list. When the action you want is the current item in the list, press Enter.
When you add an action, a dialog box appears that lets you set the parameters for the action unless it does not require parameters. When you add a Custom Dialog or Custom Billboard action, the appropriate editing environment opens.
Some actions come in pairs. (Example: When you add an If action, you must also add an End action at the end of the condition block.) Script Editor indents actions inside these pairs.
Use the same methods to add an action to a VBScript.
See VBScript Actions on page 79.
Editing ScriptsTo edit a WiseScript in Script Editor, use the commands on the Edit menu, the commands on the right-click menu, or the tools on the toolbar. You can edit only one script line at a time, but you can cut, copy, or paste several lines at one time.
To edit an include script, select it by clicking its tab. Changes that you make to an include script are saved when you save the project.
WiseScript Editor Reference 24

Using Script Editor
To edit a VBScript, see Editing a VBScript on page 78.
Editing Script Action Parameters
Double-click the action in the script. For most script actions, a dialog box appears so you can configure its parameters. When you double-click a Custom Billboard or Custom Dialog action, the appropriate editing environment opens.
Copying and Pasting Script Lines
1. Select one or more script lines.
2. Select Edit menu > Cut or Copy.
3. If you’re copying the lines to another installation, open that installation script in Script Editor.
You cannot open multiple scripts in the same instance of WiseScript Editor unless it is an include script or VBScript. However, you can open multiple instances of WiseScript Editor, and open different scripts in each.
See Customizing the List of Actions on page 22.
4. Select a line in the script above which to place the lines you copied, then select Edit menu > Paste.
The lines appear above the line you selected.
Duplicating or Moving Script Lines
1. Select one or more script lines.
2. Select Edit menu > Duplicate, or Edit menu > Move Up or Move Down.
Commenting Out Script Lines
You can temporarily comment out certain script lines to help with the debug process. Commented out lines remain in the script, but are skipped when the script is executed.
1. Select one or more lines.
2. Select Edit menu > Comment.
The commented out lines appear in green and begin with “/*”. To reactivate commented out lines, select the lines and select Edit menu > Comment.
Saving a Script to a Text File
This text file is for viewing and printing only. You cannot make changes in the text file and import it back into Script Editor.
1. Select File menu > Save Script Text to File.
2. Specify the location and name of the file.
Finding and Replacing Text in a Script
Not available in VBScripts.
1. In Script Editor, do one of the following:
To find text, press Ctrl+F to find text.
WiseScript Editor Reference 25

Using Script Editor
To find and replace text, press Ctrl+H.
2. Enter the text to find.
This function searches the visible text in the script lines as well as the parameters that are associated with the script lines.
3. (Replace function only) Enter the replacement text.
You can replace a command’s parameters and editable text, but not the command itself.
4. To search for the text across all WiseScripts, mark Search Across Include Scripts.
For information on include scripts, see Customizing the List of Actions on page 22.
5. Click Find Next, Replace, or Replace All.
About User-Defined ActionsYou can streamline your development process by creating your own script actions for tasks that you perform frequently.
Example: You have written a section of script that opens a Web page on your company’s Web site. Some of the script lines search the registry to determine the default browser on the destination computer, and other lines open the browser to the specified URL. To avoid having to copy and paste this section of script into new WiseScripts that you create, you can make it a user-defined action that will be available in all new WiseScripts that you develop.
User-defined actions appear in the Actions list in Script Editor along with the predefined script actions.
You create a user-defined action by creating a separate WiseScript and saving it in the Actions subdirectory of this product’s installation directory, or in the shared directory that is specified in Preferences.
See Creating a User-Defined Action on page 27.
When you create a user-defined action, specify the following in the script:
Action Name
The file name of the script.
Dialog Box
Include a dialog box only if your action has parameters that you must change each time you use the action. This dialog box appears when your action is double-clicked. Example: For an action that opens a URL in the in the destination computer’s browser, you might include a dialog box that asks for the URL. Then if the URL changes frequently, you can specify the new URL each time you use the action.
Script Lines
The script lines that perform the action are the functional part of the action. Example: For an action that opens a URL in the destination computer’s browser, the script lines determine the default browser and opens the Web page.
WiseScript Editor Reference 26
Using Script Editor
Format of the Script Line
The format of the script line refers to how the script line looks after you add the action to your script. You enter a combination of text and variables to define the format.
See also:
Creating a User-Defined Action: Tutorial on page 28Adding an Action to a Script on page 24
Creating a User-Defined ActionThis procedure describes the general steps for creating a user defined action. It does not contain details on what kind of action to create, or what to enter for the parts of the user-defined action.
For an example of how to complete these details, see Creating a User-Defined Action: Tutorial on page 28.
To create a user-defined action
1. Select File menu > New.
2. Select Blank Script and click OK.
If you see a message that the installation script is not compatible with Installation Expert, click OK. In Script Editor, you should see an empty script.
3. If your user-defined action includes a dialog box where you can enter options for the action, create the dialog box.
a. From the Event drop-down list in Script Editor, select Exit.
b. Add a Custom Dialog action to the Exit script, and create your dialog box in the Custom Dialog Editor.
See About the Custom Dialog Editor on page 118.
NoteTo add a drop-down list on your custom dialog box that contains all the WiseScript variables currently defined in this script, set the list to display the compiler variable %_VAR_LIST_%. It contains all the non-compiler variables.
4. From Event, select Mainline.
The main script reappears.
5. Add script lines that perform the function of your user-defined script action.
This might be something as simple as a single line that calls a .DLL, or it could be a complex set of script lines that perform an advanced function.
6. In Title, enter a combination of text and variables to define the format of the script line.
Example: Your user-defined action displays an HTML file on the Web. In your action, a dialog box asks for the URL to the file, and the URL is put in the variable URL_PATH. In Title, you might enter: Display HTML File %URL_PATH%. When you add your user-defined action to an installation script, the dialog box appears and you enter www.sample.com/support.htm for the URL. The script line for your user-defined action appears in the format you specified, except that it shows the
WiseScript Editor Reference 27

Using Script Editor
variable’s value instead of the variable name. It displays: Display HTML File www.sample.com/support.htm.
7. Save the script file in the Actions subdirectory of this product’s installation directory, or in the shared directory that is specified in Preferences.
Your new action does not appear in the appears in the Actions list in Script Editor until you close and re-open WiseScript Editor.
8. Test the new user-defined action:
a. Close WiseScript Editor.
b. Open WiseScript Editor and select File menu > New > Empty Project.
c. In Script Editor, double-click your user-defined action in the Actions list. If it includes a dialog box, the dialog box opens. Complete the dialog box and click OK.
d. Save the project and click Test to test your script.
Creating a User-Defined Action: TutorialThis tutorial guides you through the process of creating a user-defined action named Wait. The Wait action contains a custom dialog box in which you can specify how many milliseconds to pause the installation.
To create a new blank script for the action
1. Select File menu > New.
The New Installation File dialog box appears.
2. Select Blank Script and click OK.
If you see a message that the installation script is not compatible with Installation Expert, click OK. In Script Editor, you should see a completely empty script.
3. Select File menu > Save.
The Save As dialog box appears.
4. Save the script file in the Actions subdirectory of this product’s installation directory, or in the shared directory that is specified in Preferences. Name the file Wait.
Your new action appears in the Actions list in Script Editor after you close and re-open WiseScript Editor.
To create a dialog box for the action
1. From Event, select Exit.
To write a script action that interacts with the developer who uses it, you must add a Custom Dialog script line, which you must store in the Exit script.
A user-defined action requires a dialog box only if it has parameters that you need to change when you use the action.
2. In the Actions list, double-click the Custom Dialog action.
The Dialog Box Properties dialog box appears.
3. In Dialog Title, enter “Enter Time to Wait” and click OK.
The Custom Dialog Editor opens.
WiseScript Editor Reference 28

Using Script Editor
4. Click on the toolbar.
The Text Control Settings dialog box appears.
5. In Text, enter “Milliseconds to Wait” and click OK.
6. Click on the toolbar.
The Edit Text Control Settings dialog box appears.
7. Enter the following on the dialog box and click OK.
In Default, enter %WAIT_TIME%.
In Variable, enter WAIT_TIME.
8. Click on the toolbar.
The Push Button Control Settings dialog box appears.
9. Enter the following on the dialog box and click OK.
In Label, enter OK
Mark the Return to Previous Dialog action.
Mark Default Button.
10. Click the Push Button tool on the toolbar again.
The Push Button Control Settings dialog box appears.
11. Enter the following on the dialog box and click OK.
In Label, enter Cancel.
Mark the Abort Installation action.
12. Rearrange the dialog box so that it looks something like this:
13. When you finish editing the dialog box, select File menu > Save Changes and exit.
To create a script for the action
For the Wait action, you write a very simple script. The script calls kernel32.dll, a Windows system .DLL that contains a function that stops execution of the current application for the specified number of milliseconds. To learn more about calling Windows system .DLLs, see the Microsoft Developer Network (msdn.microsoft.com).
1. From Event, select Mainline to return to the main part of your script.
The script should be blank.
2. In the Actions list, double-click Call DLL Function.
The Call DLL Function dialog box appears.
WiseScript Editor Reference 29

Using Script Editor
3. Complete the dialog box:
DLL PathnameEnter %SYS32%\Kernel32.dll.
Function NameEnter Sleep.
Call a function with variable parameter listMark this option and click Add.
Complete the DLL Parameter Settings dialog box that appears and click OK:
From Parameter Type, select dword.
From Value Source, select Constant.
In Constant Value, enter %WAIT_TIME%.
4. Click OK on the DLL Parameter Settings dialog box.
5. Click OK on the Call DLL Function dialog box.
6. In Title (located above the Actions list), enter “Wait %WAIT_TIME% Milliseconds.”
This determines how the script line looks in the script.
7. Save the script.
It should already be named Wait.wse and should be in the Actions subdirectory of this product’s installation directory, or in the shared directory that is specified in Preferences.
To test the action
1. Close WiseScript Editor.
2. Open WiseScript Editor and select File menu > New > Empty Project and click OK.
An empty project contains a default script in Script Editor.
3. In the Installation Script list, click the top line in the script.
4. In the Actions list, double-click the Wait action.
The dialog box you created for your user-defined action appears.
5. Enter 9000 and click OK.
A new script line appears in your script that looks like this:
Wait 9000 Milliseconds
9000 milliseconds equals nine seconds.
6. Save the script.
7. Click Test to test your script.
After the blue screen appears, there should be a nine-second delay before the Welcome dialog box appears.
If the action does not work, check the options you entered for the Call DLL statement. If it still doesn’t work, open the Pause.wse file located in the Actions directory and view its parameters. The Pause action is identical to the Wait action you just created.
WiseScript Editor Reference 30

Using Script Editor
You can place the Wait action anywhere in the script to pause the script execution. Example: To display a detailed billboard for several seconds, you could place a Wait action immediately after the Display Billboard script line.
See also:
About User-Defined Actions on page 26
Basic Scripting ConceptsIf you do not have a basic understanding of scripting concepts, you should become familiar with them before trying to write a WiseScript.
See:
About Script Editor on page 20Conditions and Loops on page 31Variables and Expressions on page 32Compiler Variables and Run-time Variables on page 33Anatomy of an Installation Script on page 34
Conditions and LoopsNormally, script actions are executed in the order in which they appear in the script. However, the order of execution can be changed by special script actions called conditions and loops.
Conditions specify script actions that are executed only when certain conditions are true. Example: In WiseScript, you can test what version of Windows a destination computer is running, then execute different script actions depending on the version of Windows they’re running.
Loops specify script actions that are repeated until a certain condition is met. Example: You might prompt the end user to enter specific information during installation. To make sure the information the end user enters meets certain criteria, use a loop to repeat the prompt until the data entered is appropriate.
If, While, and End Actions
Because a condition or loop can apply to more than one script action, they are defined using at least two statements: one to mark the beginning of the block of script and the other to mark its end. The standard action for beginning a condition is the If action, and the standard action for beginning a loop is the While action. The end of both conditions and loops is marked using the End action. Script Editor indents everything inside a condition or loop so you can see which actions are affected.
Else and ElseIf Actions
Conditions can use the Else and ElseIf actions, which mark the beginning of actions to be executed when the condition described by the If action (or other condition statement) is not true. The Else action is used between the If and End actions. Actions after the If but before the Else are executed if the condition is true. Actions after the Else are executed if the condition is false. Loops cannot have Else statements.
WiseScript Editor Reference 31

Using Script Editor
Nesting
In WiseScript, one condition or loop can contain another condition or loop. This is called nesting. You define a nested condition or loop by adding a second If or While action (or other start-of-condition or start-of-loop marker) before the End action of the first condition or loop. The second block of script must be fully contained within the first. When you add an End action, it always applies to the most recently begun If or While action that does not already have an End action. You can nest conditions and loops to many levels, but in most circumstances it won’t be necessary to nest more than three or four levels deep. The indentation, which increases for each nested structure, helps you interpret deep nestings.
Connection Lines
Connection lines connect the beginning and end of conditions or loops. To add connection lines, select View menu > Connections Lines.
Variables and Expressions
Variables
Variables are named storage locations that hold information about the system, information entered by the end user, or information derived or calculated from either of these sources. You can define up to 986 variables using the Set Variable action. You can then gather data from the end user or read data from files to put into variables. Variables hold ASCII text, not binary data. They can be up to 32 KB in length.
Variable Naming Conventions
Must begin with a letter.
Must be 28 characters or less.
Cannot begin with an underscore character; only compiler variables can start with an underscore character.
Cannot contain % characters, except when using substitution as described below.
Variables and Substitution
By using variables, the installation .EXE can adapt to each destination computer. Once information is stored in a variable, it can be used in most script actions through a process called substitution. Any parameter for a script action can get part or all of its value from a variable.
To use substitution, specify the variable name preceded and followed by %. (Examples: %WIN% refers to the contents of the WIN variable, which is the path to the Windows system directory, and %WIN%\Fonts refers to the path to the Windows font directory.) The % character is not part of the variable name, but rather a marker that tells WiseScript to replace the variable’s name with its value before executing the command. To include an actual % character in the script, use %%.
You can use substitution to:
Build messages to display to the end user.
Set locations for copying or installing files.
Initialize new variables to the value of one or more other variables.
WiseScript Editor Reference 32

Using Script Editor
Expressions
If you are using a variable name as part of an expression, do not surround the variable name with % characters. (Example: When you use an If, ElseIf, While, Set Variable, or a Wizard Loop action to evaluate an expression, do not surround the variables you reference in the expression with %.)
Do surround compiler variables with % characters no matter where you enter them.
Some actions (If, While, Set Variable, and some others) can use a more flexible scheme that lets you use arithmetic expressions and other options.
See Expression Operators on page 162.
To read about sample scripts that use expressions, see ScriptHelp.htm in the Samples subdirectory of this product’s installation directory and find scripts that manipulate strings and perform calculations.
Compiler Variables and Run-time Variables
When They Are Set
WiseScript uses two kinds of variables: compiler and run-time. When you start a compile by clicking the Compile, Test, or Run button, the values of compiler variables are set immediately, either by prompting you or by reading the values from the Compiler Variables page. Script Editor then searches the entire script and replaces any instance of the compiler variable with the value. These variables cannot be changed by end users who run the installation .EXE.
Run-time variables are set by selections the end user makes on the installation’s dialog boxes, by characteristics of their computer, or by the contents of files on their hard disk (example: a settings file, an .INI file, or the registry).
The difference between compiler variables and run-time variables is similar to the difference in C programming between preprocessor variables and C language variables. Preprocessor <#ifdef> statements determine which code is compiled. C language If statements determine which code is executed at run time.
In Conditions and Expressions
You can use both types of variables in variable substitution. However, they have distinctly different behaviors when used in conditions and expressions. When you enter a regular variable into an expression, you do not need to surround it with % signs, but when you enter a compiler variable in an expression, you must surround the compiler variable with % signs.
With a condition based on run-time variables, all the script actions required by the condition are included in the installation .EXE. WiseScript Editor doesn’t know which part of the condition will be executed until the installation .EXE is run because it depends on variables whose values are not known until run time. The values of compiler variables, on the other hand, are known when the installation .EXE is built. Therefore, WiseScript Editor does not include the script actions inside a compiler variable condition when building the installation .EXE.
Naming Compiler Variables
By convention, the names of compiler variables begin and end with an underscore. WiseScript does not enforce this convention, but it might help you keep track of which variables are known at compile time and which are known only at run time.
WiseScript Editor Reference 33

Using Script Editor
Using Compiler Variables
If an Install File(s) action is included inside a Compiler Variable If block, the file it installs is not added to the installation .EXE if the condition is false.
See Compiler Variables on page 16.
Example: You can create a script that compiles an installation .EXE for either a 16-bit or 32-bit version of your application based on the value of a compiler variable and includes only the files needed by each version of the application. Because the Install File(s) actions that install the other version of the application are not compiled, those files are not in the installation .EXE, making it smaller than a universal installation for both 16-bit and 32-bit systems.
You can also use compiler variables to create a debug version of your script that includes Display Action messages to display run-time variable values and other useful information at various points in the installation. By enclosing your debugging actions in compiler variable conditions, you can easily remove them when the installation has been debugged by changing the value of a compiler variable. The debugging actions are not compiled into the final build.
When to Use
Variable substitution can use either type of variable.
When a script action places a value into a variable, use a run-time variable. Compiler variables can’t be changed by scripts, but only by the person who builds the installation .EXE.
In most other instances, the type of variable to use is implicit (example: the Compiler If script action requires a compiler variable) or is noted explicitly.
Anatomy of an Installation ScriptAn installation script has four basic sections. Whether you are modifying the default script that is generated by Installation Expert or writing your own script, an understanding of these sections can help insure that your script works correctly.
Initialization
In this section, default values for an installation are set, including the default directory, standard components, and Start menu. Information that is needed later in the installation is read from .INI files or the registry. Files that are displayed to the end user (ReadMe.txt, License.txt, etc.) are installed. A search can also be performed for a previous version of an application to use its location as the default installation directory.
User Input
This section contains a series of dialog boxes that ask the end user what optional components to install, what directory to install the files in, and so on. This section generally uses a Wizard Loop action. It displays any ReadMe or License files that are installed in the Initialization section.
File Copy
This is the longest section of the installation script. Files are copied from the installation .EXE to the destination computer.
WiseScript Editor Reference 34

Using Script Editor
System Configuration
After files are installed, the destination computer’s configuration files (.INI files, registry, Start menu, etc.) are updated so that the new application works correctly. The end user might then be prompted to restart their computer.
WiseScript Editor Reference 35

Chapter 4WiseScript Actions
This chapter includes the following topics:
About WiseScript Actions on page 39
About SVS Script Actions on page 39
Activate SVS Layer on page 40
Add Directory to PATH on page 41
Add File to SVS Layer on page 41
Add Text to INSTALL.LOG on page 42
Add to AUTOEXEC.BAT on page 43
Add to CONFIG.SYS on page 44
Add to SYSTEM.INI on page 45
Browse for Directory on page 45
Call DLL Function on page 46
Capture Application to SVS Layer on page 50
Change SVS Layer GUID on page 51
Check Configuration on page 51
Check Disk Space on page 52
Check HTTP Connection on page 54
Check If File/Dir Exists on page 55
Check In-use File on page 56
Check Service on page 56
Compiler Variable Actions on page 57
Config ODBC Data Source on page 58
Copy Local File(s) on page 58
Create Directory on page 60
Create Directory in SVS Layer on page 61
Create Service on page 61
Create Shortcut on page 62
Create Shortcut in SVS Layer on page 63
Create SVS Layer on page 65
Create Virtual Directory on page 65
Custom Billboard on page 65
WiseScript Editor Reference 36

WiseScript Actions
Custom Dialog on page 66
Deactivate SVS Layer on page 66
Delete File from SVS Layer on page 66
Delete File(s) on page 67
Delete SVS Layer on page 67
Display Billboard on page 68
Display Message on page 69
Display Progress Message on page 70
Display Text File on page 70
Edit INI File on page 71
Edit Registry on page 71
Edit Registry for SVS Layer on page 74
Else Statement on page 75
ElseIf Statement on page 75
End Statement on page 76
Evaluate Windows Installer Condition on page 76
Execute Program on page 77
Execute VBScript on page 77
Exit Installation on page 81
Export SVS Layer on page 82
Find File in Path on page 82
Find First SVS Layer on page 83
Find Next SVS Layer on page 83
Find SVS Layer GUID on page 84
Get Environment Variable on page 84
Get Name/Serial Number on page 85
Get Registry Key Value on page 85
Get SVS Layer Info on page 86
Get System Information on page 87
Get Temporary Filename on page 89
Get Windows Installer Property on page 89
Halt Compilation on page 89
If Statement on page 90
Import SVS Layer on page 91
Include Script on page 91
Initialize SVS on page 92
WiseScript Editor Reference 37
WiseScript Actions
Insert Line Into Text File on page 92
Install File(s) on page 93
Install SVS Package on page 95
Install Windows Mobile Application on page 97
Install WiseUpdate Client on page 95
Modify Component Size on page 98
Open/Close Install.log on page 99
Parse String on page 99
Pause on page 100
Play Multimedia File on page 100
Post to HTTP Server on page 101
Prompt for Filename on page 102
Prompt for Text on page 103
Radio Button Dialog on page 103
Read INI Value on page 104
Read/Update Text File on page 104
Read/Write Binary File on page 105
Reboot System on page 106
Register Font on page 106
Remark on page 106
Remove SVS Exclude Entry on page 106
Rename File or Directory in SVS Layer on page 108
Rename File/Directory on page 107
Rename SVS Layer on page 108
Search for File on page 109
Self-Register OCXs/DLLs on page 110
Set Activate SVS Layer on Startup on page 110
Set Control Attributes on page 110
Set Control Text on page 111
Set Current Control on page 111
Set File Attributes on page 112
Set Files/Buffers on page 112
Set SVS Exclude Entry on page 113
Set Variable on page 113
Set Web Permissions on page 114
Set Windows Installer Property on page 115
WiseScript Editor Reference 38

WiseScript Actions
Start/Stop Service on page 115
While Statement on page 116
Win32 System Directory on page 117
Wizard Loop on page 117
About WiseScript ActionsThe WiseScript™ scripting language contains script actions that let you perform various installation-related tasks. The script actions are fully coded; all you do is enter parameters for the action. This section describes the function and usage of each action.
All possible WiseScript actions are available in all WiseScript-based editors. This lets you open any WiseScript in any WiseScript-based editor without errors. However, a WiseScript will run only in an environment that supports all the actions in the script. Example: The “Get Windows Installer Property” action will not work in a script that runs outside a Windows Installer installation.
See also:
About Script Editor on page 20About SVS Script Actions on page 39
About SVS Script ActionsScript Editor has a set of script actions that you can use to manage, edit, find, and create virtual software layers. Each of these script actions has SVS (Software Virtualization Solution) in its name. For your convenience, these script actions are grouped by default under the SVS Items title bar.For information about SVS, see http://juice.altiris.com/svs.
Script Actions for Managing a Layer
Use these script actions to change the state of layers, gather information about layers, create archive files from layers, and install and remove layers.
Activate SVS Layer
Deactivate SVS Layer
Delete SVS Layer
Export SVS Layer
Get SVS Layer Info
Import SVS Layer
Install SVS Package
Set Activate SVS Layer on Start
Script Actions for Editing a Layer
Use these script actions to edit the files, registry keys, directories, name, or GUID of a layer. These script actions make changes to the read-only sublayer so they are not lost
WiseScript Editor Reference 39

WiseScript Actions
when the layer is reset. The exception is the Delete File from SVS Layer action that makes changes to the writeable sublayer.
The Remove SVS Exclude Entry and Set SVS Exclude Entry actions set or remove an exclude entry for a single layer or for all layers on a computer.
Add File to SVS Layer
Capture Application to SVS Layer
Change SVS Layer GUID
Create Directory in SVS Layer
Create Shortcut in SVS Layer
Delete File from SVS Layer
Edit Registry in SVS Layer
Remove SVS Exclude Entry
Rename File or Directory in SVS Layer
Rename SVS Layer
Set SVS Exclude Entry
Script Actions for Finding a Layer
Use these script actions to find a layer’s GUID. You then store the value of the GUID in a variable and use this variable in the SVS script actions that manage or update a layer. Use the find first and find next actions to iterate through all the layers on a computer.
Find First SVS Layer
Find Next SVS Layer
Find SVS Layer GUID
Script Action for Creating a Layer
Use the Create SVS Layer script action to create an empty layer. You can then use the Capture Application to SVS script action to add an application to the layer, or use other SVS script actions to add directories, files, registry keys, and shortcuts to the layer.
Script Action for Initializing SVS
The Initialize SVS script action initializes the SVS Driver (Altiris Software Virtualization Agent) so that you can communicate with it. It is part of all of the SVS specific actions. If you create a user-defined, SVS-specific action, begin the action with this action.
Also see the article Using WiseScripts to Manage and Update Virtual Software Packages in the Altiris Knowledgebase (article 27373).
Activate SVS LayerThis SVS script action activates a virtual software layer.
WiseScript Editor Reference 40

WiseScript Actions
To complete the dialog box
Layer GUIDEnter the layer’s GUID (globally unique identifier) or a variable that represents the layer’s GUID. If you enter the layer’s GUID, do not include the { } brackets.
For information on creating a variable for a layer’s GUID, see Create SVS Layer on page 65 and Find SVS Layer GUID on page 84.
See also:
About SVS Script Actions on page 39
Add Directory to PATHThis action adds a directory to the PATH environment variable, as set in Autoexec.bat. The directory is appended to every occurrence of the SET PATH statement that does not already contain it. A SET PATH statement is added if none exists. The system restarts at the end of installation so that the new PATH takes effect.
To complete the dialog box
Directory to Add to PATHEnter the directory to be added to PATH (example: enter %MAINDIR%).
Location of New DirectorySelect to add to the beginning or end of the PATH.
Path SelectionSome destination computers have several PATH variables. Use this list to add the directory to all PATH variables.
Add File to SVS LayerThis SVS script action adds a file to a virtual software layer. This can be an existing layer or a layer that the WiseScript creates. The file is added to the read-only sublayer.
NoteUse this action on a deactivated SVS layer only.
To complete the dialog box
Layer GUIDEnter the layer’s GUID (globally unique identifier) or a variable that represents the layer’s GUID. If you enter the layer’s GUID, do not include the { } brackets.
For information on creating a variable for a layer’s GUID, see Create SVS Layer on page 65 and Find SVS Layer GUID on page 84.
Source pathSpecify the complete path and file name of the source file to add. You can use WiseScript variables.
Layer pathEnter the complete path in the layer to which the file will be added. The path must include the file name. When you add the file, you can change its name. You can use
WiseScript Editor Reference 41

WiseScript Actions
SVS variables or WiseScript variables that resolve to a valid SVS path. Example: [PROGRAMFILES]\Application\Readme.txt.
See SVS Variables on page 160.
Return variable(Optional.) Enter a name for the return variable. When this script action runs successfully, either 0 or 1 is placed in this variable.
See also:
About SVS Script Actions on page 39
Add Text to INSTALL.LOGThis action adds commands to the installation log (Install.log).
Use the Open/Close Install.log action to create the installation log.
See Open/Close Install.log on page 99.
As the installation runs on the destination computer, each action it performs is logged in the installation log (installation of files, additions or changes to registry, and so on). Failures are listed also, with the reason for failure. The uninstall reverses each action recorded in the Install.log, starting at the bottom of the log and going up. Typically, you add commands to the Install.log to customize the uninstall process for an application.
Because the log is written continuously during installation, the location of the text in the log depends on where in the script you place the Add Text to Install.log script line.
NoteWhen a WiseScript is called by a Windows Installer installation, the Windows Installer installation does not recognize changes that the WiseScript makes to the destination computer and will not uninstall them. Therefore, you must provide a way to uninstall or repair such changes. See Uninstalling Changes Made by a WiseScript in the Windows Installer Editor Help.
To complete the dialog box
Log TextEnter the text to be added to the log file. You can enter variables surrounded by %. To see the format of lines, open existing log files.
Examples
By default, uninstall does not remove files that were installed to Windows, Windows\System, or Windows\System32. To remove these files, place an Add Text to Install.log script line directly before the Install File(s) script lines that install files to one of these directories. Type the following as the Log Text (exactly as shown because it is case-sensitive):
Non-System File:
You can add a line to the Install.log that pauses the uninstall, executes an application until it finishes, then resumes the uninstall. To do this, type the following as Log Text, substituting your own path to the .EXE (case-sensitive):
Execute path: %MAINDIR%\Remove.exe
WiseScript Editor Reference 42

WiseScript Actions
If you want the uninstall to remove not only files that were installed, but also files that were added later, you can remove all the files and sub-directories within a specified directory. Use this option with caution because end users might have stored their own files in the directory. You can use Windows standard wildcard notation (example: *.* for all files). Type the following as Log Text, substituting your own directory path (case-sensitive):
File Tree: %MAINDIR%\Data\Temp\*.*
If you want the uninstall to remove not only the registry keys that were installed, but also keys that were added later, you can remove an entire registry key, including all its sub-keys and values. Type the following as Log Text, substituting your own registry tree (case-sensitive):
RegDB TREE: SOFTWARE\WiseRegDB Root: 2
where RegDB Root is one of the following:
0 - HKEY_CLASSES_ROOT1 - HKEY_CURRENT_USER2 - HKEY_LOCAL_MACHINE3 - HKEY_USERS
Add to AUTOEXEC.BATThis action edits Autoexec.bat, which is executed during startup, allowing you to add commands that are executed before Windows loads.
Insert commands at a particular line number, or search the file for specific text and insert the new line before, after, or in place of the existing line. The destination computer is restarted after installation to force the new commands to take effect.
To complete the dialog box
Text to InsertEnter the line to add to Autoexec.bat. If the line refers to an application file, use a path (example: %MAINDIR%\Application\Application.exe). The PATH variable might not be set when the command is executed, so always use a path.
Line NumberEnter the line number at which the new line should be inserted. Enter 0 (zero) to append the command to the end of the file. The Search for Existing Text area in this dialog box overrides the line number specified here. The line number applies only when the text is not found or when you do not specify any text.
Search for TextEnter the text to search for here. The installation scans Autoexec.bat looking for a line that begins with, ends with, or contains the text, depending on what you set in Match Criteria. The line is inserted at the first found match.
Comment TextEnter text to insert at the beginning of the line that is found. Insert “REM ” (with the trailing space but without the quotation marks) to comment out the line, which lets you replace an existing command with a new command while leaving the existing command in place but inactive. If this is the case, set Insert Action to insert before the existing line so that a subsequent installation finds and edits the active command, not the commented line.
WiseScript Editor Reference 43

WiseScript Actions
Insert ActionSelect where to insert the new line in relation to the found line.
Match CriteriaSelect how the found line matches the Search for Text.
Ignore White SpaceMark this to ignore spaces and tab characters.
Case SensitiveMark this to match case.
Make Backup FileMark this to make a copy of Autoexec.bat before editing it.
Add to CONFIG.SYSThis action edits the Config.sys file to add new commands. Insert commands at a particular line number, or search the file for specific text and insert the new line before, after, or in place of the existing line. The destination computer is restarted automatically to force the new commands to take effect.
To complete the dialog box
Text to InsertEnter the line to add to Config.sys. If the line refers to a file, use a path. Example: %SYS%\Application.dll. %SYS% refers to the active system folder.
Line NumberEnter the line number at which the new line should be inserted. Enter 0 (zero) to append the command to the end of the file. The Search for Existing Text area in this dialog box overrides the line number specified here. The line number applies only when the text is not found or when you do not specify any text.
Search for TextEnter the text to search for here. The installation scans Config.sys looking for a line that begins with, ends with, or contains the text, depending on the setting of the Match Criteria field. The line is inserted at the first found match.
Comment TextEnter text to insert at the beginning of the line that is found. Insert “REM ” (with the trailing space but without the quotation marks) to comment out the line, which lets you replace an existing command with a new command while leaving the existing command in place but inactive. If this is the case, set Insert Action to insert before the existing line so that a subsequent installation finds and edits the active command, not the commented line.
Insert ActionSelect where to insert the new line in relation to the found line.
Match CriteriaSelect how the found line matches the Search for Text.
Ignore White SpaceMark this to ignore spaces and tab characters.
Case SensitiveMark this to match case.
WiseScript Editor Reference 44

WiseScript Actions
Make Backup FileMark this to make a copy of Config.sys before editing it.
Add to SYSTEM.INI(Windows 3.1x or Windows 9x only) This action adds a device entry to the 386Enh section of the System.ini file. The destination computer is restarted automatically to force the new device driver to be loaded.
Do not use this action to modify the display driver (display=xxx) or any other non-device entry. Instead, use the Edit INI action.
See Edit INI File on page 71.
To complete the dialog box
Device NameEnter the full command line for the device (example: device=vshare.386). The referenced files need a path unless they are in the System directory.
If you precede the command line with a semicolon (example: ;device=*vcp), the device entry is commented out if it exists in the 386Enh section of System.ini. If you add a device entry with the same device name but a different driver path, the old entry is commented out and the new entry is added.
Browse for DirectoryThis action displays a dialog box asking the end user to select a directory. It is included to provide backward compatibility for older WiseScripts. In new scripts, use custom dialog boxes instead.
To complete the dialog box
Window NameEnter the title for the dialog box.
DescriptionEnter text to explain the dialog box to the end user.
Prompt NameEnter explanatory text to be displayed above the directory field.
Default ValueEnter the default location of the new directory. This appears as a default in the directory field.
Variable NameEnter a variable to store the chosen directory. The standard script uses the variable MAINDIR for this purpose.
Don’t AppendMark this to prevent the default directory (Default Value field) from being appended to the chosen directory.
Confirm If ExistsMark this to warn the end user if the chosen directory already exists.
WiseScript Editor Reference 45
WiseScript Actions
Call DLL FunctionThis action calls a .DLL function from a .DLL on the destination computer. They can be be .DLLs you have written, .DLLs developed for WiseScript, or Windows .DLLs. You can branch the script based on the returned results of a .DLL by setting the Action to Start Block if Return Value True or Start While Loop.
When a WiseScript is called by a Windows Installer installation, you can also call a .DLL by using one of the Call Custom DLL or Call DLL actions in MSI Script in Windows Installer Editor.
To complete the dialog box
DLL PathnameSpecify the path of the .DLL file (example: %MAINDIR%\Jso32.dll).
For non-system .DLLs, the installation script must install the .DLL before the script calls it or it will not be found. If the .DLL is only needed temporarily during installation, copy it to the Temp directory, represented by %TEMP%.
NoteYou cannot test an installation that installs and immediately calls a .DLL unless you install the .DLL to the Temp directory. Testing installs files, then immediately deletes them, unless they are installed to the Temp directory.
Function NameEnter the name of the function to call. The function should be exported when creating the .DLL. The function’s parameters and return value must exactly match those specified below (case-sensitive).
Call a function written specifically for WiseScriptWhen calling functions developed specifically for WiseScript, mark this option and fill in Variables Added, Parameter String, and Action below.
Each .DLL function takes a single parameter (lpDllParams) that points to a structure containing information that can be passed back and forth between the .DLL function and the running installation script.
Variables AddedBecause WiseScript-specific .DLL functions have access to the variable list of the running installation, you can add new variables. List the names of the variables to add, separated by commas. Do not use variables enclosed in %.
Parameter StringUse this to pass information to the .DLL function. Text you enter here is passed to the .DLL in the IpszParam variable. This can include variables surrounded with % signs.
ActionSelect the installation’s action when it returns from the .DLL call. The .DLL returns a boolean value (zero equals false, non-zero equals true).
Ignore return valueThe script continues regardless of any value returned.
Exit if function returns trueThe installation exits if the .DLL function returns non-zero.
WiseScript Editor Reference 46

WiseScript Actions
Start block if function returns trueIf the .DLL function returns non-zero, all actions between this action and its matching End action are executed. Otherwise these actions are skipped.
Loop while function returns trueThe actions between this action and the matching End action (including the .DLL call) are executed repeatedly until the .DLL function returns zero.
Perform while loop at least once.If you select Loop while function returns true, mark this to force the loop to execute once before the test is performed. If the check box is cleared, the loop is executed if the condition is true, but is not executed if the condition is false.
Call a function with variable parameter list(Enables the options below.) Mark this to call .DLLs not specifically written for WiseScript. These .DLLs cannot access any of the installation’s internal variables, but you can pass this information to them. Below, specify the required parameters and Return Value Type.
Return Value TypeSelect the data type of the return value, which are described in DLL Parameter Settings.
Returned VariableSelect or enter a variable to store the returned value.
Get Last Error VariableWhen you call a Windows API function that uses the GetLastError() function to report errors, select a variable to hold the return value of that function. Doing so ensures that GetLastError() is called immediately following your function to prevent problems that can occur when you debug the WiseScript.
Keep DLL loaded in memory after returning from functionBy default, the Call DLL Function action loads a .DLL, calls a function in that .DLL, and then unloads the .DLL. If you call many functions from a certain .DLL, then the unload is unnecessary and can cause problems with certain .DLLs. To leave this .DLL loaded, check this check box.
Hide progress bar before calling functionIf the .DLL has UI, you can us this to hide the progress bar.
If you write a .DLL, use CALLBACK or WINAPI in the declaration of the .DLL.
For help with .DLL development, review sample source code, such as GETCPU32.C, in the DLL subdirectory of this product’s installation directory. Also included is sample source code for C and Delphi .DLLs written for WiseScript.
Calling Visual Basic ActiveX controls is not supported.
The sample scripts Application kill.wse, CheckDiskSpace.wse, Color.wse, and Prompt.wse use this action. For details on sample scripts, see ScriptHelp.htm in the Samples subdirectory of this product’s installation directory.
DLL Parameter SettingsThe DLL Parameter Settings dialog box appears when you add a new parameter to a Call DLL Function action. Add parameters in the order in which they appear in the .DLL’s function prototype.
WiseScript Editor Reference 47

WiseScript Actions
To complete the dialog box
Parameter TypeCheck the table below for alternate names for data types.
NoteIf you are using the Win16 SDK, use word instead of dword for parameters that start with H or end with HANDLE.
Buffer LengthIf you set Parameter Type to string buffer, then this field is enabled. Enter the number of string buffer characters. The limit is 446.
Passing typeLeave this set to Normal unless you are passing a complex structure to the .DLL. In that case, select First element of structure for the first element in the structure,
WiseScript Corresponds to Win32 SDK type
Corresponds to Visual Basic type
Description
short SHORT Integer 16-bit, signed integer data type
word WORD Integer 16-bit, unsigned integer data type
long LONG, LRESULT, BOOL Long, Boolean 32-bit, signed integer data type
dword DWORD (Use this for any parameter type that begins with an “H” or ends with the word “HANDLE,” such as HWND, HANDLE, HPEN, HFONT, and LPHANDLE.)
Long 32-bit, unsigned integer data type
string pointer Use for any parameter that ends in STR such as LPSTR and LPTSTR.
Long 32-bit pointer to an ANSI character type null terminated string
short pointer Pointer to SHORT or SHORT* (use for PSHORT or LPSHORT)
Long 32-bit pointer to a SHORT data type (see SHORT for the reference to this data type)
word pointer Pointer to WORD or WORD* (use for PWORD or LPWORD)
Long 32-bit pointer to a WORD data type (see WORD for the reference to this data type)
long pointer Pointer to LONG or LONG* (use for PLONG or LPLONG)
Long 32-bit pointer to a LONG data type (see LONG for the reference to this data type)
dword pointer Pointer to DWORD or DWORD* (use for LPDWORD or PDWORD)
Long 32-bit pointer to a DWORD data type (see DWORD for the reference to this data type)
string buffer char [size] String Use to place a character buffer of the given size (number of characters) into a structure. Use only with structures.
WiseScript Editor Reference 48

WiseScript Actions
and select Contained within structure for all subsequent elements of the structure. You do not pass the structure name, just the elements inside it.
See Passing Complex Structures to a .DLL: An Example on page 49
Value SourceSelect the type of value to be passed: Variable (pass by reference), constant (pass by value), constant with null value, or constant with window handle (pointing to the installation window).
Variable NameIf Value Source is set to Variable, select or enter a variable.
Constant ValueIf Value Source is set to Constant, enter a constant here. You can enter a variable here (example: %NUMUSERS%).
Passing Complex Structures to a .DLL: An ExampleYou can use a Call DLL Function to call a .DLL. In addition to passing simple parameters, such as integers and strings, to a .DLL, you can also pass complex structures (sometimes called records in Pascal or Visual Basic). For each parameter, you select a passing type. For non-structure parameters, select Normal from Passing Type in the DLL Parameter Settings dialog box. However, for structure elements (also referred to as members), select First element of structure for the first item in the structure, or Contained within structure for subsequent items. A structure ends if there are no more parameters, or if the next parameter is set to Normal or First element of a structure.
NoteThe following code samples are in the C programming language.
Suppose that you have a function in a .DLL that processes information for a new employee. The return value of the function is a simple integer indicating success or failure. The function accepts three parameters: a structure that contains three elements, an integer, and another structure that contains two elements. The calling statement for the .DLL is:
int NewEmployee (EMPLOYEE*, int, DEPARTMENT*);
where EMPLOYEE* is a pointer to a structure, int is a simple integer, and DEPARTMENT* is a pointer to a structure.
In this example, the layout of the EMPLOYEE structure is as follows:
typedef structure EMPLOYEE {
LPSTR name;
LONG salary;
CHAR title[50];
}
The layout of the DEPARTMENT structure is as follows:
typedef structure DEPARTMENT {
LPSTR deptname;
LPSTR deptnum;
WiseScript Editor Reference 49

WiseScript Actions
}
To call the function NewEmployee from an installation script, you add six parameters in the Call DLL Function dialog box: the three elements of the first structure, the integer, and the two elements of the second structure.
To add parameters, see DLL Parameter Settings on page 47.
Capture Application to SVS LayerThis SVS script action captures an application to a virtual software layer. You can use this script action to update a layer by adding the files that are installed by an .EXE. (Example: If you have a layer for Microsoft Word, you could create a WiseScript that installs Word templates. You could use the Capture Application to SVS Layer script action to capture the templates installed by the WiseScript .EXE and to add these templates to the Word layer.)
You can add an application to an existing layer or to a layer that the WiseScript creates.
See Create SVS Layer on page 65.
When a WiseScript that contains this script action runs, it runs the .EXE you specify and captures its installation. You can use this script action to capture an .MSI by running msiexec.exe.
To complete the dialog box
Layer GUIDEnter the layer’s GUID (globally unique identifier) or a variable that represents the layer’s GUID. If you enter the layer’s GUID, do not include the { } brackets.
For information on creating a variable for a layer’s GUID, see Create SVS Layer on page 65 and Find SVS Layer GUID on page 84.
Program pathSpecify the path and file name of the .EXE. When the WiseScript runs, it executes the .EXE and captures whatever it installs. To capture an .MSI, enter the path to msiexec.exe. You can use WiseScript variables.
Parameter in the C function Parameter type in WiseScript
Passing Type in WiseScript
name (first element of EMPLOYEE structure)
string pointer First element of a structure
salary (second element of EMPLOYEE structure)
long Contained within structure
title (third element of EMPLOYEE structure)
string buffer
(buffer length of 50)
Contained within structure
int long Normal
deptname (first element of DEPARTMENT structure)
string pointer First element of a structure
deptnum (second element of DEPARTMENT structure)
string pointer Contained within structure
WiseScript Editor Reference 50

WiseScript Actions
Parameters(Optional) Enter parameters for running the .EXE. If you specified .msiexec.exe in Program path, use Windows Installer command-line options. You can use these command-line options to create a WiseScript that captures an application by performing a silent installation of an .MSI. Example: /package “C:\Application.msi” /qn.
Return variable(Optional.) Enter a name for the return variable. When this script action runs successfully, either 0 or 1 is placed in this variable.
See also:
About SVS Script Actions on page 39
Change SVS Layer GUIDThis SVS script action changes a layer’s GUID.
Example: You can use this action to create a copy of a layer that is seen by SVS as a different layer. This is similar to changing the ProductCode and PackageCode of an .MSI file. To create a copy of a layer, create a script that imports an archive file, changes the layer’s GUID, and then exports a copy of the original archive file.
To complete the dialog box
Layer GUIDEnter the layer’s GUID (globally unique identifier) or a variable that represents the layer’s GUID. If you enter the layer’s GUID, do not include the { } brackets.
For information on creating a variable for a layer’s GUID, see Create SVS Layer on page 65 and Find SVS Layer GUID on page 84.
New Layer GUIDEnter a new GUID for the layer or a variable that represents the new GUID. If you enter a new GUID, do not include the { } brackets.
Return variable(Optional.) Enter a name for the return variable. When this script action runs successfully, either 0 or 1 is placed in this variable.
See also:
About SVS Script Actions on page 39
Check ConfigurationThis action tests the hardware configuration, operating system, and other characteristics of the destination computer. As a result of this check, the action can display a message, halt the installation after displaying a message, or start a conditional block.
When a WiseScript is called by a Windows Installer installation, you can also check graphics by using the System Requirements page in Windows Installer Editor.
WiseScript Editor Reference 51

WiseScript Actions
To complete the dialog box
If SystemUse the drop-down lists to build a statement of what to check for.
NoteWhen you check for an operating system, this action looks for the minimum operating system of the type for which you’re checking. Example: If you check for Windows XP, this action returns TRUE if Windows XP or later is running.
ActionOccurs when the statement above is true. All options below display the message described in Title and Message Text below, unless Message Text is blank.
Display Message Only
Abort Installation
Start BlockBegins a conditional block. All actions between this action and the next Else or End action are executed.
TitleEnter the title for the dialog box.
Message TextAppears in the body of the message dialog box. Leave this blank to prevent a message from appearing.
NoteChecking for “Share Loaded” opens a temporary file and tries to lock a section of it. It detects all versions of DOS SHARE, Windows VSHARE, Windows NT/2000/XP/2003/Vista, and Windows 95/98. Checking for “VGA or better” graphics ensures that display resolution is at least 640x480. Checking for free memory tests the amount of memory (including virtual memory) available at installation time.
The sample script CheckVGA.wse uses this action. For details on sample scripts, see ScriptHelp.htm in the Samples subdirectory of this product’s installation directory.
Check Disk SpaceThis action determines if enough disk space is available for the installation, based on files that are always installed. You would use this action only if the WiseScript contains Install File(s) actions that install files permanently on the destination computer.
NoteWhen a WiseScript is used in a Windows Installer installation, an alternative to using the Check Disk Space action is to determine how much disk space the WiseScript .EXE requires, and putting that figure in the ReserveCost table in the Windows Installer database. This works best when all files are always installed. See ReserveCost Table in the Windows Installer SDK Help.
You can leave all fields blank and the action checks disk space for all files. This action takes the cluster size of the disk into account.
WiseScript Editor Reference 52
WiseScript Actions
To complete the dialog box
Component Variable(s)If a WiseScript installs files based on whether a component in the .MSI is set to be installed, specify the name of the variable that contains the list of components that are set to be installed.
Status VariableSelect or enter the variable to store the result of the disk space check. If there is not enough disk space, an error message is displayed, and the end user can halt installation, ignore the error, or retry the disk space check. Status Variable is set to R if the end user chooses to retry, which lets you define what retrying means. (Example: Let the end user select a different directory or different components.) If no status variable is selected, clicking Retry simply executes the test again.
Reserve SpaceYou can specify required disk space for up to three additional disks. (Example: Use this option if your application requires temporary disk space to operate, or if you plan to run a separate installer .EXE to install another application with its own space requirements.) Select or enter a Disk Variable, which contains a directory name to test. Enter the amount of space to check for in Extra Space.
See Modify Component Size on page 98.
Do not cancel during silent installationMark this to continue installing if the disk space check fails during a silent installation. If you script includes an installation log, a message is written to Install.log. Otherwise, if the disk space check fails, the installation is halted with no message to the end user.
For information on how to create an installation log, see Open/Close Install.log on page 99.
Using Check Disk Space Within a Windows Installer Installation
When a WiseScript is called by a Windows Installer installation, the Check Disk Space action only checks disk space for files installed by this WiseScript. In other words, the WiseScript .EXE and the Windows Installer installation are unaware of each other’s disk space requirements. To avoid erroneous disk space estimates by either the WiseScript .EXE or the Windows Installer installation, place the Run WiseScript custom action before CostInitialize or after InstallFinalize in the Windows Installer installation. That way it does not interfere with Windows Installer disk space requirements. Place it in the User Interface sequence, the Execute Immediate sequence, or both.
If the installation of files by the WiseScript does not depend on which .MSI components are installed, you can insert the Check Disk Space action and leave the fields in the Check Disk Space Settings dialog box blank. However, if the WiseScript installs files based on whether a component in the .MSI is set to be installed, you must set a component variable and specify it in the Check Disk Space Settings dialog box.
Example:
Your .MSI installation contains two features: Standard and Plus. If the end user chooses to install Plus, which installs the component Plus.txt, you want the WiseScript to install the license file PlusLicense.exe.
Here’s how you create this portion of the WiseScript:
WiseScript Editor Reference 53

WiseScript Actions
Add an Evaluate Windows Installer Condition action that determines whether the Plus feature is to be installed ($Plus.exe = 3) and places the result into the variable CHECK.
Add an If Statement action that determines if the variable CHECK equals 1, that is, if it is to be installed, and add a Set Variable action that then sets the variable COMPONENTS to the value Plus.exe.
Insert a Check Disk Space action and, in the Check Disk Space Settings dialog box, enter COMPONENTS in the Component Variable field.
Add an If Statement action that determines if the variable COMPONENTS equals Plus.exe, and then use an Install File(s) action to install the license file.
The script would look like this:
Evaluate Windows Installer Condition "$Plus.exe=3" into CHECK
If CHECK equals "1" then
Set Variable COMPONENTS to Plus.exe (Append)
End
Check free disk space
If COMPONENTS Contains "Plus.exe" then
Install File C:\Installation Files\PlusLicense.exe to %MAINDIR%\PlusLicense.exe
End
Check HTTP ConnectionThis action determines whether a given URL is valid by using WinSock.dll to try to download the HTML page.
If the installation is not true 32-bit, specify both Win16 and Win32 error variables. Then, the Win32 WinSock.dll is used, followed by the Win16 WinSock.dll. Otherwise, only the 32-bit version is used.
If the download is successful, the Win32 Error Number Variable or Win16 Error Number Variable is set to 0, which indicates success. If an error occurs, the number variable is set to another error code, and the text variable is set to a string that describes the error return codes. The return codes and error strings come from the APIs that try the download. A sample of the return string is:
ProxyServer=ProxyIgnore=ProxyPort=80ProxyType=CERNWinInetText=WinInetError=0WinSockError=11001
This indicates that no proxy server was used and that WinSock returned the error code 11001.
WiseScript Editor Reference 54

WiseScript Actions
NoteIf the Web server redirects URLs that are not valid to another internal Web page, no error is detected by this action.
To complete the dialog box
URL to CheckInclude “http://” in the URL.
Win32 Error Text VariableSelect or enter a variable to store the error text returned by the 32-bit winsock.dll.
Win32 Error Number VariableSelect or enter a variable to store the error code returned by the 32-bit winsock.dll.
Win16 Error Text VariableSelect or enter a variable to store the error text returned by the 16-bit winsock.dll.
Win16 Error Number VariableSelect or enter a variable to store the error code returned by the 16-bit winsock.dll.
Check If File/Dir ExistsThis action determines if a file or directory exists, whether a directory is writable, or if a .DLL is loaded into memory. It can perform different actions based on the result of the check.
To complete the dialog box
IfSelect the condition to check. To check if a .DLL is loaded, select Module loaded in memory.
Pathname
To check a file or directory, enter its path. Wildcard characters, such as *, are not valid. Use variables (example: %WIN%) rather than hardcoding a path.
To check if a .DLL is loaded, enter just the .DLL name, not a path. To check if a .DLL is loaded in a specific directory, include the full path.
Example: To determine if any User32.dll is loaded, just specify user32.dll. To determine if c:\Windows\System32\User32.dll is loaded specify the full path.
TitleEnter the title for the dialog box.
Message TextAppears in the body of the message dialog box. Leave this blank to prevent the message from appearing.
ActionOccurs when the If statement above is true. The message described in the Title and Message Text fields appears unless Message Text is blank. In addition, select from these options.
WiseScript Editor Reference 55

WiseScript Actions
Display Message Only
Abort Installation
Start BlockBegins a conditional block. All actions between this action and the next Else or End action are executed.
Start While LoopBegins a loop block. All actions between this action and the next End action are executed repeatedly as long as the condition is true.
Perform loop at least onceIf you chose Start While Loop, mark this to force the loop to execute once before the test is performed. If the check box is cleared, the loop is executed if the condition is true, but is not executed if the condition is false.
The sample script Newdisk.wse uses this action. For details on sample scripts, see ScriptHelp.htm in the Samples subdirectory of this product’s installation directory.
Check In-use FileThis action determines whether a particular file is “in use”, indicating a file is being accessed by a process. Typically, in-use files cannot be moved, deleted, or opened by other processes.
To complete the dialog box
VariableSelect or enter a variable to store the result of this test. After this action runs, the variable contains one of the following values: In-Use, Not In-Use, or Non-Existent (which means the file could not be found).
PathnameEnter the path of the file to check. You can use variables to build the path.
Check ServiceThis action checks if a particular service is running.
To complete the dialog box
VariableSelect or enter a variable in which to put the status of the service. Possible return results are: Unknown, Running, Stopped, Paused, StartPending, StopPending, ContinuePending, or PausePending. Unknown means the service was not found or the current user does not have privileges to query the service. If the status ends with the word Pending, the service has received a request, but is still processing the request.
Service NameEnter the name of the service. This is not necessarily the same name you see in the Services control panel. If you are unsure of the service name, consult its documentation or manufacturer.
WiseScript Editor Reference 56

WiseScript Actions
Compiler Variable ActionsCompiler Variable If, Else, and End actions are used in an If block to let you compile different versions of an installation. You set the value of a compiler variable at compile time, and the actions inside a compiler variable If block are added to the script according to the value of the compiler variable
You create compiler variables on the Compiler Variables page. When you create a compiler variable, you specify its default value. You also specify when you should be prompted for a compiler variable value.
See Compiler Variables on page 16.
Example:
On the Compiler Variable page, create a compiler variable named _DEBUG_ with a default value of “N”.
Mark the Compiling From Within Wise option.
In the installation script, add a Compiler Variable If action that checks if _DEBUG_ equals “Y”.
Below the Compiler Variable If action, add an Add Text to INSTALL.LOG action that contains useful debug information.
End the If block with a Compiler Variable End action.
When you compile, you are prompted for the value of this compiler variable. Change it to “Y”.
The Add Text to INSTALL.LOG action within the Compiler Variable If block is added to the final script. The debug information you requested then appears in the installation log.
To create a compiler variable If block
1. Add a Compiler Variable If action and complete the dialog box:
If VariableBuild an If statement by selecting a compiler variable and a comparison. The first list shows compiler variables on the Compiler Variables page. The second list shows available comparisons.
The ValueEnter the value to be used in the comparison. This is case-sensitive. Do not enter variables in this field, because it checks your computer in real time, not run time.
If you selected File Exists above, the If statement checks to see if the file that you enter in The Value exists. If you selected File Version Equal or Greater, enter the file in The Value.
2. Below the Compiler Variable If action, add one or more actions to perform if the compiler variable has the specified value.
3. (Optional) Add a Compiler Variable Else action, followed by one or more actions to perform if the compiler variable does not have the specified value.
4. Add a Compiler Variable End action.
The sample script Compvar.wse uses this action. For details on sample scripts, see ScriptHelp.htm in the Samples subdirectory of this product’s installation directory.
WiseScript Editor Reference 57
WiseScript Actions
See also:
Compiler Variables and Run-time Variables on page 33
Config ODBC Data SourceThis action configures an ODBC data source for use with an existing ODBC (Open Database Connectivity) driver.
To complete the dialog box
Data Source NameThis name will be displayed in the ODBC data sources list on the destination computer. The Import button adds an ODBC data source from your computer and populates the fields.
Driver NameEnter the name of the ODBC driver used by this data source. The driver, along with its support files, must already have been installed on the destination computer.
Install Data Source forSelect Win16 or Win32 APIs.
Data Source AttributesEither enter attributes, or use the Import button to import them from an ODBC data source installed on your computer.
Display Configuration DialogsMark this to display standard data source configuration dialog boxes to the end user. Otherwise, the data source is configured with default settings.
System DSNMark this check box to make the data source available to all user accounts on the destination computer.
Copy Local File(s)This action copies uncompressed files from a floppy disk, CD, the destination computer, or a network drive.
NoteWhen a WiseScript is called by a Windows Installer installation, the Windows Installer installation does not recognize changes that the WiseScript makes to the destination computer and will not uninstall them. Therefore, you must provide a way to uninstall or repair such changes. See Uninstalling Changes Made by a WiseScript in the Windows Installer Editor Help.
To complete the dialog box
SourceSpecify the path of the file or files to be copied at installation time. Specify the path using a variable, such as %INST% for the directory where the installation .EXE is running. The value of the field should evaluate to a valid directory, file, or files.
To copy more than one file, do one of the following:
WiseScript Editor Reference 58

WiseScript Actions
If you want the progress bar to update correctly, specify a directory in Source without wildcards (example: %INST%\Pictures\), a directory in Destination, and a directory ending with a wildcard in Local Path (example: C:\My Pictures\*.jpg). The Source field will pick up the wildcard specified in Local Path. Specifying a wildcard in both the Source field and the Local Path field results in a compile error.
If you don’t need the progress bar to update correctly, use wildcards in Source (example: %INST%\Pictures\*.jpg), specify a directory in Destination, and leave Local Path blank.
DestinationSpecify the location on the destination computer. If a single file is being copied, this should contain a full file path. If multiple files are being copied, this should contain a full directory path. To copy files to the installation directory, start this path with %MAINDIR%.
DescriptionEnter text to display in the progress bar during file copy.
Local PathA hard-coded path that specifies the location of the files on your computer at compile time. Specify this for the installation progress bar to update correctly based on file size. See the description of the Source field above.
Require Password(Not applicable in this product)
If you entered a password on the Password page, and you mark this, the end user is prompted for the password before this file is installed.
The password prompt appears only once, for the first password-protected file in an installation, regardless of the number of password-protected files. If no password-protected files are slated for installation, the prompt does not appear.
Include Sub-DirectoriesIf you specify a directory in Source, mark this to include all subdirectories and their contents.
Shared DLL CounterIf this is marked, and the file is a .DLL or .VBX, Windows tracks the file to prevent its removal if an application is still using it.
No Progress BarMark this to hide the progress bar while this file is being copied.
Self-Register OCX/DLL/EXE/TLBAll .OCXs and .TLBs and some .DLLs and .EXEs support self-registration. Mark this so the file registers itself in the Windows registry before it is used. This action does not register the file, but specifies that it should be registered later. Include a Self-Register OCX/DLL action to register the file.
See Self-Register OCXs/DLLs on page 110.
Don’t Convert to Floppy(Not applicable in this product)
If you marked Convert CD-ROM to Floppy on the Build Settings page, mark this to override that option for this file.
Replace Existing FileSelect when to replace existing files on the destination computer.
WiseScript Editor Reference 59

WiseScript Actions
AlwaysThe new file always replaces the old file.
NeverThe file never overwrites an existing file. Select this for files that should be installed if they are not present, but that might be customized by the end user and should therefore not be replaced on re-installation (example: configuration files).
Check FileThe existing file is replaced only if the requirements you set in File Version and File Date/Time are true.
Doesn’t MatterSelect this option if only one of the requirements, File Version or File Date/Time, must be fulfilled to replace the existing file.
Same or Older For File Version, this replaces the existing file if it has a version resource that is the same as or older than the new file. If the existing file lacks a version resource, it is not replaced.
For File Date/Time, this replaces the existing file if its modification date and time are the same as or older than the new file.
OlderFor File Version, this replaces the existing file if it has a version resource that is older than the new file. If the existing file lacks a version resource, it is not replaced.
For File Date/Time, this replaces the existing file if its modification date and time are older than the new file.
Retain Duplicates in PathBy default, version checking removes existing copies of .DLLs that are found in the path list. To suppress this feature, mark this check box.
The sample script FTPCopy.wse uses this action. For details on sample scripts, see ScriptHelp.htm in the Samples subdirectory of this product’s installation directory.
Create DirectoryDirectories are created when files are installed to them. Use this action only to create an empty directory on the destination computer.
When a WiseScript is called by a Windows Installer installation, you also can create a directory on the Features or Components tabs of Setup Editor in Windows Installer Editor.
NoteWhen a WiseScript is called by a Windows Installer installation, the Windows Installer installation does not recognize changes that the WiseScript makes to the destination computer and will not uninstall them. Therefore, you must provide a way to uninstall or repair such changes. See Uninstalling Changes Made by a WiseScript in the Windows Installer Editor Help.
WiseScript Editor Reference 60
WiseScript Actions
To complete the dialog box
PathnameEnter the directory path to create. Start the path with a variable (example: %MAINDIR%).
Create Directory in SVS LayerThis SVS script action creates a directory in a virtual software layer. You can create a directory in an existing layer or in the layer that the WiseScript creates. The directory is added to the read-only sublayer.
NoteUse this action on a deactivated SVS layer only.
To complete the dialog box
Layer GUIDEnter the layer’s GUID (globally unique identifier) or a variable that represents the layer’s GUID. If you enter the layer’s GUID, do not include the { } brackets.
For information on creating a variable for a layer’s GUID, see Create SVS Layer on page 65 and Find SVS Layer GUID on page 84.
Path to createEnter the full path of the directory to create. You can use SVS variables or WiseScript variables that resolve to a valid SVS path.
See SVS Variables on page 160.
Return variable(Optional.) Enter a name for the return variable. When this script action runs successfully, either 0 or 1 is placed in this variable.
See also:
About SVS Script Actions on page 39
Create ServiceThis action installs a Windows service on operating systems where they are supported.
When a WiseScript is called by a Windows Installer installation, you also can create a service on the Features or Components tabs of Setup Editor in Windows Installer Editor.
NoteWhen a WiseScript is called by a Windows Installer installation, the Windows Installer installation does not recognize changes that the WiseScript makes to the destination computer and will not uninstall them. Therefore, you must provide a way to uninstall or repair such changes. See Uninstalling Changes Made by a WiseScript in the Windows Installer Editor Help.
Service NameEnter the internal service name, which is used in the registry.
WiseScript Editor Reference 61

WiseScript Actions
Display NameEnter the name to appear in the Services control panel.
Executable PathSpecify the complete path to the executable file as it will be on the destination computer. Start the path with a variable (example: %MAINDIR%).
Login Username, Login PasswordEnter the user name and password under which the service should run.
Error ControlSpecify what happens if an error occurs while the service starts.
Ignore ErrorLogs the error and continues.
Normal ErrorDisplays a message to the end user, logs the error, and continues.
Severe ErrorLogs the error. If the computer is starting the last known good configuration, startup continues. Otherwise, it restarts with the last known good configuration.
Critical ErrorLogs the error if possible. If the computer is starting the last known good configuration, startup fails. Otherwise, it restarts with the last known good configuration.
GroupEnter the name of the load ordering group to which this service belongs. Leave this empty if the service does not belong to a group.
DependenciesEnter a list of semicolon-separated names of services or load ordering groups that must start before this service. Leave this empty if there are no dependencies. If a service is dependent on a group, at least one member of the group must be started for this service to run.
Enter a plus sign (+) before group names to distinguish them from service names. Services and service groups share the same name space. Example: If you enter this string, "ftpsvr;httpsvr;drc;+sample", you create dependencies on the ftpsvr, httpsvr, and drc services and the sample group.
Service TypeSelect a service type.
Start ServiceSelect the default setting for starting the service.
Service Interacts With DesktopMark this to let the service display its user interface.
Create ShortcutThis action creates a shortcut. Common locations include the Start menu (%STARTMENUDIR%), the Startup directory (%STARTUPDIR%), the installation directory (%MAINDIR%), and the desktop (%DESKTOPDIR%).
When a WiseScript is called by a Windows Installer installation, you also can create a shortcut on the Features or Components tabs of Setup Editor in Windows Installer Editor.
WiseScript Editor Reference 62

WiseScript Actions
NoteWhen a WiseScript is called by a Windows Installer installation, the Windows Installer installation does not recognize changes that the WiseScript makes to the destination computer and will not uninstall them. Therefore, you must provide a way to uninstall or repair such changes. See Uninstalling Changes Made by a WiseScript in the Windows Installer Editor Help.
To complete the dialog box
Source PathSpecify the path of a file that will be installed on the destination computer. Start the path with a variable (example: %MAINDIR%\Application.EXE) and do not enclose it in quotation marks.
Destination PathEnter the path to the shortcut to be created, which should end in .LNK (example: %GROUP%\Application.lnk). For the current user’s desktop, Start menu, or Startup directory, use %DESKTOPDIR%, %STARTMENUDIR%, or %STARTUPDIR%. For the All Users equivalents, use %CDESKTOPDIR%, %CSTARTMENUDIR%, or %CSTARTUPDIR%.
Command Options(Optional) If the shortcut is for an .EXE, enter command-line options.
Default DirectorySpecify the default directory that should be set when running the target file, if different from the target file’s location. In Windows Explorer, this field is referred to as the Start in directory.
DescriptionEnter text to appear in the Comment field of the shortcut’s properties dialog box.
Icon Pathname(Optional) Specify the file that contains the icon to be used for the shortcut. Otherwise, the target file’s icon is used.
Window SizeSelect an option to determine the appearance of the .EXE file’s window.
Icon NumberEnter the number of the icon to use from the file specified in Icon Pathname above.
Shift State, Hot Key LetterThese fields together populate the Shortcut Key field in the shortcut’s Properties dialog box in Windows Explorer. See Windows help.
Support OSD software update checkingOpen Software Description (OSD) is a Microsoft technology for describing and distributing software. Mark this for the shortcut to work with OSD.
Create Shortcut in SVS LayerThis SVS script action creates a shortcut in the virtual software layer. The shortcut can reference a program outside the layer. Common locations for shortcuts include the Start menu, the Startup directory, the installation directory, and the desktop.
WiseScript Editor Reference 63

WiseScript Actions
NoteUse this action on a deactivated SVS layer only.
To complete the dialog box
Layer GUIDEnter the layer’s GUID (globally unique identifier) or a variable that represents the layer’s GUID. If you enter the layer’s GUID, do not include the { } brackets.
For information on creating a variable for a layer’s GUID, see Create SVS Layer on page 65 and Find SVS Layer GUID on page 84.
Shortcut NameEnter the name to appear on the shortcut.
Source PathSpecify the path of a file that will be installed on the destination computer. You can only use an SVS variable to reference a program inside the layer. If you use a variable, start the path with a variable (example: [PROGRAMFILES]\Application.EXE) and do not enclose it in quotation marks.
SVS Destination PathEnter the path to the shortcut to be created (example: [DESKTOP]\). For the current user’s desktop, Start menu, or Startup directory, use [DESKTOP], [STARTMENU], or [STARTUP]. For the All Users equivalents, use [COMMONDESKTOP], [COMMONSTARTMENU], or [COMMONSTARTUP].
Arguments(Optional) If the shortcut is for an .EXE, enter command-line options.
Default DirectorySpecify the default directory that should be set when running the target file, if different from the target file’s location. In Windows Explorer, this field is referred to as the Start in directory. You an SVS path unless the shortcut references a program outside the layer.
DescriptionEnter text to appear in the Comment field of the shortcut’s properties dialog box.
Icon Path(Optional) Specify the file that contains the icon to be used for the shortcut. Otherwise, the target file’s icon is used.
Icon Number Enter the number of the icon to use from the file specified in Icon Pathname above. You an SVS path unless the shortcut references a program outside the layer.
Window StyleSelect an option to determine the appearance of the .EXE file’s window.
Hot key shift state and Hot key letterThese fields together populate the Shortcut Key field in the shortcut’s Properties dialog box in Windows Explorer. See Windows help.
See also:
About SVS Script Actions on page 39
WiseScript Editor Reference 64

WiseScript Actions
Create SVS LayerThis SVS script action creates an empty virtual software layer. You can then use the Capture Application to SVS script action to add an application to the layer, or use other SVS script actions to add directories, files, registry keys, and shortcuts to the layer.
This script action can create a variable for the layer’s GUID. You can use this variable in most of the other SVS script actions to identify the layer in the Layer GUID field.
To complete the dialog box
Layer nameEnter the name for the layer.
GUID variable (Optional) Enter a name for a variable in which to place the layer’s GUID.
Return variable(Optional.) Enter a name for the return variable. When this script action runs successfully, either 0 or 1 is placed in this variable.
See also:
About SVS Script Actions on page 39
Create Virtual DirectoryThis script action creates a new IIS Web site or virtual directory. To set permissions for this Web site, also use the Set Web Permissions script action.
See Set Web Permissions on page 114.
To complete the dialog box
Computer nameEnter the name of the computer where the virtual directory is to be created.
Web site nameEnter the name of a new or existing Web site.
Virtual directory nameEnter a name for the new virtual directory.
Virtual directory pathEnter the path for the virtual directory on the destination computer.
Custom BillboardThis action opens the Custom Billboard Editor, which lets you create scalable graphics to display to end users during installation.
See About Billboards on page 145.
WiseScript Editor Reference 65
WiseScript Actions
Custom DialogUse this action to create your own dialog box or dialog box set. See About Dialog Boxes on page 118. To add a new dialog box within a wizard loop, see Adding a Dialog Box to the Installation on page 119.
For details on the Dialog Box Properties dialog box, see Setting Dialog Box Properties on page 119.
For details on sample scripts that use this action, see ScriptHelp.htm in the Samples subdirectory of this product’s installation directory.
Deactivate SVS LayerThis SVS script action deactivates a virtual software layer.
To complete the dialog box
Layer GUIDEnter the layer’s GUID (globally unique identifier) or a variable that represents the layer’s GUID. If you enter the layer’s GUID, do not include the { } brackets.
For information on creating a variable for a layer’s GUID, see Create SVS Layer on page 65 and Find SVS Layer GUID on page 84.
Return variable(Optional.) Enter a name for the return variable. When this script action runs successfully, either 0 or 1 is placed in this variable.
Force running processes to terminate(Optional) Mark this to force all processes that are associated with the layer to terminate when the layer is deactivated.
See also:
About SVS Script Actions on page 39
Delete File from SVS LayerThis SVS script action deletes a file from a virtual software layer. This adds the file to the delete entries list so that it doesn’t appear when the layer is activated. If you reset the layer, the file is restored because the deletion entry is in the writeable sublayer of the delete entries.
NoteUse this action on a deactivated SVS layer only.
To complete the dialog box
Layer GUIDEnter the layer’s GUID (globally unique identifier) or a variable that represents the layer’s GUID. If you enter the layer’s GUID, do not include the { } brackets.
For information on creating a variable for a layer’s GUID, see Create SVS Layer on page 65 and Find SVS Layer GUID on page 84.
WiseScript Editor Reference 66

WiseScript Actions
File pathEnter the path and file name of the file to delete. You can use SVS variables or WiseScript variables that resolve to a valid SVS path.
See SVS Variables on page 160.
Return variable(Optional.) Enter a name for the return variable. When this script action runs successfully, either 0 or 1 is placed in this variable.
See also:
About SVS Script Actions on page 39
Delete File(s)This action removes files from the destination computer.
You do not need to delete temp files if you use the Get Temporary Filename action to create them because they are deleted automatically.
To complete the dialog box
PathnameSpecify the directories or files to delete. For example, %TEMP%\Application.dll or %MAINDIR%\*.htm. You cannot perform wildcard deletions in the Windows, System, or root directories.
Click Browse to display and select files in the current WiseScript that are installed into the %MAINDIR%, %SYS32%, %SYS%, OR %FONTS% directories. When you select a path in the Browse for File dialog box, you must select a file.
Include Sub-DirectoriesIf you entered the path to a directory or used a wildcard, mark this to delete matching files in all subdirectories as well.
Remove Directory Containing FilesIf this is marked, and if the deletion leaves the directory empty, then the directory is deleted also.
If you mark this check box and Include Sub-Directories, and you do not include a file in the path, then all other empty subdirectories are deleted also. To prevent deletion of the other subdirectories, add a trailing backslash to the path. For example,
%MAINDIR%\Help\ deletes the Help directory if it is empty.
%MAINDIR%\Help deletes the Help directory if it is empty and also deletes all other empty subdirectories of %MAINDIR%.
Delete SVS LayerThis SVS script action deletes an installed virtual software layer.
WiseScript Editor Reference 67

WiseScript Actions
To complete the dialog box
Layer GUIDEnter the layer’s GUID (globally unique identifier) or a variable that represents the layer’s GUID. If you enter the layer’s GUID, do not include the { } brackets.
For information on creating a variable for a layer’s GUID, see Create SVS Layer on page 65 and Find SVS Layer GUID on page 84.
Return variable(Optional.) Enter a name for the return variable. When this script action runs successfully, either 0 or 1 is placed in this variable.
See also:
About SVS Script Actions on page 39
Display BillboardNot applicable in this product.
This action displays a bitmap or .GRF file during installation if you have set the background to display a gradient on the Screen page. Create .GRF files (scalable bitmaps) with the Custom Billboard Editor.
See About Billboards on page 145.
You can use up to 16 Display Billboard actions in the script.
To complete the dialog box
PathnameSpecify the full path to the graphic file on your computer. To use variables in this field, you must mark the Local Graphic option below.
X-Position, Y-PositionIndicate the location on a 640 x 480 screen to place graphics. On larger screens, the billboard is placed proportionately based on the 640 x 480 location.
Erase NumEnter how many previously displayed graphics are erased before this graphic is displayed. To display one graphic at a time, set this to 1. To display all graphics simultaneously, set this to 0. The oldest graphic is removed first.
Build EffectSelect a transition effect.
TransparentMark this to have pure blue (R=0, G=0, B=255) parts of the graphic become transparent.
Center Horizontal
Place at Right
Scale to ScreenMark this for the graphic to cover the same percentage of the screen regardless of screen size.
WiseScript Editor Reference 68

WiseScript Actions
Hide Progress BarMark this to hide the progress bar during graphic display.
Center Vertical
Place at Bottom
Tile BackgroundMark this to repeat the graphic edge-to-edge to fill the entire screen.
Erase AllMark this to remove all previous graphics from the screen before displaying the new one.
Timed DisplayMark this to display a series of graphics at evenly-spaced intervals, which is calculated by the number of files to be installed. Place all Display Billboard actions before the first Install File(s) action if you are using Timed Display.
Local GraphicNormally, you specify graphic files on your computer, which are then compiled into the installation. Mark this to specify a file from the destination computer. With this option, you can use variables in the Pathname field above. Example: %INST% to indicate the directory from which the installation .EXE is running. Use this to change graphics without rebuilding the .EXE.
Display MessageThis action displays a message dialog box and can optionally branch the script based on the end user response. Without the branching option, this dialog box has an OK button, which continues, and a Cancel button, which halts installation.
To complete the dialog box
Message TitleEnter the title for the dialog box.
Message TextThis is displayed in the dialog box. Press Ctrl+Enter to add line breaks in the displayed text. You can use variables in this text.
Message IconSelect an icon for the dialog box.
Start If BlockMark this to display Yes, No, and Cancel buttons instead of OK and Cancel. This action then acts like an If action. Statements between this action and its matching End action are executed if the end user clicks Yes. If the user clicks No, execution continues with the first action after the End action. Cancel halts the installation.
No CancelMark this to suppress the Cancel button. Use this in informational messages to prevent the end user from canceling installation.
NoteThe Display Message action can help you debug. Use this action anywhere in the script to display the value of a variable by entering %VARIABLE_NAME% in Message Text.
WiseScript Editor Reference 69

WiseScript Actions
The sample scripts CheckDiskSpace.wse and Search.wse use this action. For details on sample scripts, see ScriptHelp.htm in the Samples subdirectory of this product’s installation directory.
Display Progress MessageThis action displays a small dialog box during installation, typically to indicate the computer is still working during a long operation. The dialog box cannot be closed or cancelled. Also use this action to remove a previous progress dialog box.
To complete the dialog box
Remove previous progress message(s)Mark this to remove the previous progress dialog box from the screen. Marking this disables the rest of this dialog box. To display another progress message, add another Display Progress Message action.
Display a new progress message
Message TitleEnter the title for the dialog box.
Message TextEnter text to display in the dialog box. You can use variables in this text.
X-Position, Y-PositionIn pixels, enter the location of the upper-left corner of the dialog box.
Height, WidthIn pixels, enter the dimensions of the dialog box.
Center HorizontallyMark this check box to override the X-Position field.
Center VerticallyMark this check box to override the Y-Position field.
Display Text FileThis action displays a 30 K or smaller text file in a dialog box. It is included to provide backward compatibility for older WiseScripts.
To complete the dialog box
File PathnameSpecify a file on the destination computer (examples: %MAINDIR%\Readme.txt, %TEMP%\%TEMPFILENAME%).
Window TitleEnter the title for the dialog box.
DescriptionEnter text to explain the dialog box to the end user.
WiseScript Editor Reference 70

WiseScript Actions
Edit INI FileThis action edits an .INI file on the destination computer. To edit SYSTEM.INI, use the Add to SYSTEM.INI action instead.
When a WiseScript is called by a Windows Installer installation, you also can edit an .INI file on the Features or Components tabs of Setup Editor in Windows Installer Editor.
NoteWhen a WiseScript is called by a Windows Installer installation, the Windows Installer installation does not recognize changes that the WiseScript makes to the destination computer and will not uninstall them. Therefore, you must provide a way to uninstall or repair such changes. See Uninstalling Changes Made by a WiseScript in the Windows Installer Editor Help.
To complete the dialog box
FileEnter the .INI file path, or select a path from the list and edit it.
INI File ContentsEnter changes to make in the .INI file. Changes are interpreted as follows:
To add to a section, type the section name in brackets, then type new lines for that section. If the .INI file already contains a name-value pair that you type, the existing line is replaced by the new one. Example:
[SECTIONNAME]Color=Blue
To delete a section and its contents, type a section name with no lines after it. Example:
[SECTIONNAME]
To delete a name-value pair, type the name with an equals sign followed by nothing. Example:
Color=
Comments (lines starting with ;) are not supported.
Edit RegistryThis action adds, edits, or deletes registry keys or values. You can create registry entries manually or import a registry file (.REG).
When a WiseScript is called by a Windows Installer installation, you also can edit the registry on the Features or Components tabs of Setup Editor in Windows Installer Editor.
NoteWhen a WiseScript is called by a Windows Installer installation, the Windows Installer installation does not recognize changes that the WiseScript makes to the destination computer and will not uninstall them. Therefore, you must provide a way to uninstall or repair such changes. See Uninstalling Changes Made by a WiseScript in the Windows Installer Editor Help.
WiseScript Editor Reference 71

WiseScript Actions
To complete the dialog box
Registry KeysThis field shows root registry keys and the keys added by this action. Select a root before adding or importing a key.
Value NamesThis field shows values being added or changed that reside under the key selected on the left.
New KeyTo add a new key, select the parent key in Registry Keys, click the New Key button, and select Key from the drop-down. A dialog box appears, where you enter information about the new key.
See Registry Key Settings Dialog Box on page 72.
To import from a .REG file, select the parent key in Registry Keys, click the New Key button, and select Import.
When you add a key, you are not necessarily adding it to the registry on the destination computer. If the key already exists, this action might add a value to it, update it, or delete it and all its associated values.
Delete KeyRemoves the selected key from the current installation. This does not remove it from the destination computer. To do that, you must change the Operation field in the key’s details dialog box.
New ValueTo add a new value, select the parent key in Registry Keys, then click the New Value button. A dialog box appears, where you enter information about the new value.
Delete ValueRemoves the selected value from the current installation. This does not remove it from the destination computer. To do that, you must change the Operation field in the value’s details dialog box.
Data SettingsThese fields in this section of the dialog box correspond to fields you set when creating the value.
See Registry Key Settings Dialog Box on page 72.
The sample script RunOnce.wse uses this action. For details on sample scripts, see ScriptHelp.htm in the Samples subdirectory of this product’s installation directory.
Registry Key Settings Dialog BoxThis dialog box appears when you double-click the Edit Registry action and create or edit a registry key on the Edit Registry Settings dialog box.
When a WiseScript is called by a Windows Installer installation, you also can create or edit registry entries by using the Registry page.
To complete the dialog box
OperationSelect the operation to apply to the key or its associated value.
WiseScript Editor Reference 72

WiseScript Actions
Create/update key and valueThe value is updated if it already exists. If the key or value does not exist, it is created.
Create empty keyCreates the key but does not add any values.
Remove key and all subkeysDeletes the key, its subkeys, and all named values associated with the key and its subkeys on the destination computer.
Remove key and value onlyRemoves the named value from the key on the destination computer. If the key has other named values, they are preserved.
Preserve existing key and valueAdds a new key or value if the specified item does not exist, but leaves the existing value in place if one already exists. This option is not available with the Edit Registry for SVS Layer script action.
RootSelect the parent key in which the new key is added.
KeyEnter the name of the new key. You can create multiple hierarchical keys at once by separating them with backslashes, as in directory paths. (Example: Entering NewDocument\Protocol\StdFileEditing creates the StdFileEditing key inside the Protocol key, which is created inside the NewDocument key.) Any keys in the path that do not exist are automatically created.
Value NameEnter the name of a new named value.
Data ValueThe data for the value. If the Data Type (below) is Double Word (DWORD), the data should be in decimal notation. To insert multiple lines of data here, press Ctrl+Enter to begin a new line.
Data TypeSelect the type of data contained in the named value. Available types are listed below. The associated Windows API data types are in parentheses.
String(REG_SZ prefix) Indicates that a value entry is an expandable string. To embed a variable name, (such as %WIN%), enclose it with double percents (%%WIN%%). If you enclose it in single percents, then the variable name is expanded to its actual value. This allows Windows system variables to be embedded.
Unexpanded String(REG_EXPAND_SZ prefix) Identifies a value entry as an unexpanded data string. To embed a variable name, (such as %WIN%), you must enclose it with double percents (%%WIN%%). If you only enclose it in single percents, then the variable name is expanded to its actual value. This allows Windows system variables to be embedded.
Multiple Strings(REG_MULTI_SZ prefix) Identifies a value entry as a multiple string. These are multiple pieces of text, separated by carriage returns.
WiseScript Editor Reference 73
WiseScript Actions
Double Word(REG_DWORD prefix) Identifies a value entry as a 32-bit (DWORD) entry.
Binary/Hex(REG_BINARY prefix) Identifies a value entry as binary. Each byte should be separated by at least one blank space. For instance: AD 30 C0 A9 40 20 A8 FC 4C 00 08.
NoneThis is provided for compatibility with SMS Installer installations. It behaves the same as the binary data type.
Append DataNormally, if you set a registry key to a new value and the key already exists, the value is replaced with the new value. If you want to append the new data to an existing multiple strings value instead of replacing it, mark this check box. This option is unavailable unless Multiple Strings is selected in the Data Type drop-down list.
Edit Registry for SVS LayerThis action adds, edits, or deletes registry keys or values in an SVS Layer. You can create registry entries manually or import a registry file (.REG).
NoteUse this action on a deactivated SVS layer only.
To complete the dialog box
Registry KeysThis field shows root registry keys and the keys added by this action. Select a root before adding or importing a key.
Value NamesThis field shows values being added or changed that reside under the key selected on the left.
New KeyTo add a new key, select the parent key in Registry Keys, click the New Key button, and select Key from the drop-down. A dialog box appears, where you enter information about the new key.
See Registry Key Settings Dialog Box on page 72.
To import from a .REG file, select the parent key in Registry Keys, click the New Key button, and select Import.
When you add a key, you are not necessarily adding it to the registry on the destination computer. If the key already exists, this action might add a value to it, update it, or delete it and all its associated values.
Delete KeyRemoves the selected key from the current installation. This does not remove it from the destination computer. To do that, you must change the Operation field in the key’s details dialog box.
WiseScript Editor Reference 74

WiseScript Actions
New ValueTo add a new value, select the parent key in Registry Keys, then click the New Value button. A dialog box appears, where you enter information about the new value.
Delete ValueRemoves the selected value from the current installation. This does not remove it from the destination computer. To do that, you must change the Operation field in the value’s details dialog box.
Data SettingsThese fields in this section of the dialog box correspond to fields you set when creating the value.
See Registry Key Settings Dialog Box on page 72.
SVS Layer GUIDEnter the layer’s GUID (globally unique identifier) or a variable that represents the layer’s GUID. If you enter the layer’s GUID, do not include the { } brackets.
For information on creating a variable for a layer’s GUID, see Create SVS Layer on page 65 and Find SVS Layer GUID on page 84.
See also:
About SVS Script Actions on page 39
Else StatementThis action marks the beginning of a section of instructions to be executed when the condition specified in the matching If action is false. It takes no parameters, and selecting it from the Actions list inserts it directly into the script with no further dialog boxes or prompts.
See also:
If Statement on page 90
ElseIf StatementThis action is put inside an If block to check for another condition. It marks the beginning of a block of code that is executed only if the condition checked by the If Statement is false, all previous ElseIfs are false, and this ElseIf is true. You can use one If Statement with multiple ElseIf Statements to check for multiple conditions.
To complete the dialog box
If VariableSelect a variable from the first drop-down list, and a comparison method from the second drop-down list.
Expression True means the expression in the Value field below is evaluated according to the conventions for WiseScript expressions.
See Variables and Expressions on page 32.
WiseScript Editor Reference 75
WiseScript Actions
The variable is ignored and can be left blank. The result is considered true if it evaluates to a non-zero result. Valid Password and Invalid Password evaluate according to the password that is entered on the Passwords page.
(The password comparisons are not applicable in this product.)
The ValueEnter the value to be used in the comparison, or an expression if the comparison is set to Expression True. If you enter variable names in this field, do not surround them with percent signs (%). If you enter compiler variables, then you must surround them with percent signs.
See also:
If Statement on page 90
End StatementThis action marks the end of an If block or a While loop. It takes no parameters, and selecting it from the Action list inserts it directly into the script with no further dialog boxes or prompts.
NoteThis is different from the End Statement action that is in MSI Script in a Windows Installer installation.
See also:
If Statement on page 90
Evaluate Windows Installer ConditionThis action evaluates a condition in the currently-running Windows Installer installation. You enter a Windows Installer condition and select a WiseScript variable to store the result. It puts the value of 1 (true) or 0 (false) into the WiseScript variable. Use this action only in WiseScripts that are called from a Windows Installer installation.
To complete the dialog box
Dest. VariableSelect or enter a variable to store the result of the Windows Installer condition. The variable is set to 1 if the condition is true, or 0 if false.
ConditionEnter a condition to evaluate. This can be any condition that can be evaluated in Windows Installer. You can either enter the literal condition or use WiseScript variables enclosed in percent signs.
See also:
Get Windows Installer Property on page 89Set Windows Installer Property on page 115
WiseScript Editor Reference 76

WiseScript Actions
Execute ProgramThis action runs another .EXE. The .EXE can be a file that is already installed on the destination computer, a file you installed as part of the installation, or a file you provide on a separate disk.
When a WiseScript is called by a Windows Installer installation, you can also use the Execute Program custom actions in MSI Script in Windows Installer Editor.
If the .EXE you plan to execute is coded to pass back a return value, the resulting return value is put into the variables %INSTALL_RESULT% and %PROCEXITCODE%. If the .EXE passes back a return value, mark the Wait for Program to Exit check box.
To complete the dialog box
.EXE PathSpecify the full path to the program to run, including the program file name. Example: %MAINDIR%\Application.exe
Command LineEnter any command-line options to apply to the .EXE when it runs, as if you were typing them in the Run dialog box.
Default DirectorySpecify the directory that should be current when the .EXE file is executed. The installation performs the equivalent of a Change Directory command (cd) before running the .EXE. Click Browse and select a directory from your installation. You can select from directories that you created using the Create Directory action.
See Create Directory on page 60.
Variables AddedList any variables created in the .EXE that are not present in the calling script.
Window SizeYou can force the .EXE file to run in a maximized or a minimized window, or you can let it run in its default window. Select Hidden to run the .EXE silently, which means it runs minimized and its task is not shown on the task bar.
Wait for Program to ExitMark this to stop the installation while this program runs. The installation does not resume until the program exits. Be sure to mark this if the .EXE returns a value to the script. If the installation does not wait for the .EXE to exit, add the command-line option -sms.
NoteThis action uses the Windows ShellExecute call, which means that you can open documents as well as applications. When the script opens a document, the associated application starts.
The sample scripts FTPCopy.wse and Newdisk.wse use this action. For details on sample scripts, see ScriptHelp.htm in the Samples subdirectory of this product’s installation directory.
Execute VBScriptThis action lets you execute VBScripts from within a WiseScript. This greatly expands the functionality of WiseScripts because you can use all the scripting capabilities of
WiseScript Editor Reference 77

WiseScript Actions
VBScript (example: arrays and subfunctions). Adding VBScripts can also save you time because you can use scripts that others have created.
For each VBScript action in a script, a new tab appears at the bottom of the Installation Script pane. When you click this tab, the VBScript window appears. In this window, you can create and edit the VBScript. The window is similar to a WiseScript window, but has functionality that is appropriate only for a VBScript.
See Editing a VBScript on page 78.
The WiseScript and VBScript interact so you can set a variable in either script and then use that variable in the other script. The VBScript window also has an action to facilitate the calling of COM objects.
See VBScript Actions on page 79.
WarningYou should be familiar with VBScript to use this feature.
To complete the dialog box
VB Script PathSpecify the full path to a .VBS file including the file name. To create a new .VBS file, specify its full path including the file name and click Yes when prompted to create a new file. You can use compiler variables in the path.
Command LineIf the VBscript requires a command line, enter it here. A command line is probably required if:
The VBScript required a command line when it ran stand-alone.
The WScript object with the Arguments property (WScript.Arguments) is in the VBScript.
You can use WiseScript variables in the command line. The sample script MakeWebDir.wse uses WiseScript variables in the command line to let the end user specify the name and location of a virtual directory that the script creates. For details on sample scripts, see ScriptHelp.htm in the Samples subdirectory of this product’s installation directory.
Editing a VBScriptWhen you use the Execute VBScript action in a WiseScript, a new tab appears at the bottom of the Installation Script pane. When you click this tab, the VBScript window appears. In this window, you can create and edit the VBScript. The window is similar to a WiseScript window, but has functionality that is appropriate only for a VBScript.
To edit a VBScript in Script Editor, use the following:
Actions in the Actions pane.
See VBScript Actions on page 79.
Buttons and drop-down list at the top of the Installation Script pane.
Right-click menu.
Any options on the Edit menu that are enabled.
WiseScript Editor Reference 78

WiseScript Actions
Display Options
Use the buttons and drop-down list at the top of the Installation Script pane to display different portions of the VBScript.
Right-Click Menu Options
List ObjectsDisplays a drop-down list of predefined objects and, when possible, objects that are called in the script.
For details on when called objects appear in this drop-down list, see VBScript Actions on page 79.
List Properties/MethodsDisplays, when possible, a drop-down list of the properties and methods of an object when the cursor is on that object’s property or method. This drop-down list also appears as a pop-up when you enter the object’s name followed by a period.
For details on when this list appears for an object, see VBScript Actions on page 79.
List FunctionsDisplays a list of VBScript functions. For help on VBScript functions, see the MSDN Library (msdn.microsoft.com/library/).
Quick InfoDisplays help text, when possible, for a selected item. This help text can also appear as a pop-up. Example: when you select an item in a drop-down list.
Check SyntaxChecks the script for basic syntax and displays a Syntax Error message. A syntax error message also appear as a pop-up when a syntax error is detected.
Revert to SavedReverts the current script to the last saved version, to undo any changes you made since you last saved.
VBScript ActionsWhen you use the Execute VBScript action in a WiseScript, a new tab appears at the bottom of the Installation Script pane. When you click this tab, the VBScript window appears. The VBScript window has three actions that facilitate the creation of the VB script.
Add an action to a VBScript in the same ways that you add an action to a WiseScript.
See Adding an Action to a Script on page 24.
Event View Click this button and select a method from the drop-down list to display one method at a time.
Full Module View Click this button to display the entire script. When you select a method from the drop-down list, the script opens to that method.
WiseScript Editor Reference 79

WiseScript Actions
Call COM Object
Use this action to create a script to call a COM object in the VBScript. You can manually enter the script to call a COM object, but the Call COM Object action facilitates this process by providing information about the COM objects. If the object is registered on your computer, this action can provide the following functionality:
The object appears in the List Objects drop-down list that is accessed from the right-click menu.
The object has a List Properties/Methods drop-down that lists the exposed properties and methods of that object. Example: This drop-down list appears when you enter the object’s name followed by a period.
A help pop-up is associated with the object and its properties and methods. This pop-up displays help text for these items when they are selected in a drop-down list or when you select Quick Info from the right-click menu.
When you call an object in a VBScript, the object persists between the execution of that script and any other VBScripts that are executed by the same WiseScript. (Example: If the WiseScript executes two VBScripts and the first VBScript calls an object, you do not need to create the object in the second script to access its properties and methods.) However, if you create an object in one editor window you will not automatically see its properties and methods in a second window even though they will execute properly.
See Calling a COM Object in a VBScript on page 80
Get WiseScript Variable
Use this action to create script code that gets a WiseScript variable. You must set the variable in the WiseScript or another VBScript prior to the Execute VBScript action.
See Set Variable on page 113.
In the VBScript, you put the name of the variable in the Get Variable function that appears when you double-click this action. This action uses the VBScript GetVariable function.
The sample script SetGetVariable.wse uses the Get WiseScript Variable action in its VBScript to get a variable that is set in the WiseScript. For details on sample scripts, see ScriptHelp.htm in the Samples subdirectory of this product’s installation directory.
Set WiseScript Variable
Use this action to create a script that sets a variable in the VBScript that can be used in the WiseScript. You must also set the variable in the WiseScript prior to the Execute VBScript action, but the VBScript determines the value of the variable.
See Set Variable on page 113.
To use the variable in the WiseScript, you must place the variable after the Execute VBScript action. This action uses the VBScript SetVariable function.
The sample script SetGetVariable.wse uses the Set WiseScript Variable action in its VBScript and then uses this variable in the WiseScript. For details on sample scripts, see ScriptHelp.htm in the Samples subdirectory of this product’s installation directory.
Calling a COM Object in a VBScriptWhen you use the Execute VBScript action in a WiseScript, a new tab appears at the bottom of the Installation Script pane. When you click this tab, the VBScript window
WiseScript Editor Reference 80

WiseScript Actions
appears. In the VBScript, you can call a COM object and then use the functions and properties that are exposed by this object.
To call a COM object in a VBScript
1. Use the Execute VBScript action to add a VBScript to the WiseScript.
See Execute VBScript on page 77.
2. Click the tab for the VBScript that appears at the bottom of the Installation Script pane.
The VBScript window appears.
3. Add a Call COM Object action.
The Call COM Object dialog box appears. The only required fields on this dialog box are Creatable Object ProgID and Variable name. The other fields help you identify an object’s ProgID.
NoteThe Call COM Object dialog box only facilitates calling a COM object, it does not guarantee that the information it accesses on your computer is correct.
4. To use TypeLib information to identify the object, click Select.
The Browse Typelib Information dialog box appears. It lists TypLib information for all the objects registered on your computer.
5. Do one of the following:
For an object that is registered on your computer, select the TypeLib information for the object.
For an object that is not registered on your computer, click Browse and locate the file that contains the TypeLib information. TypeLib information for an unregistered object does not help you identify the object’s ProgID, but it does display a list of objects in the Objects field for the file you selected. This information might help you identify the correct object.
The Call COM Object dialog box reappears.
6. If the desired object does not appear in the Object field, select it from the drop-down list.
If a registered object has a ProgID, it will appear in Creatable Object ProgID. If an object does not have a ProgID, you can not call that object. A ProgID consists of the name of the application providing the object, followed by a period and the type or class of the object. If an object is not registered, you must enter its ProgID in Creatable Object ProgID.
7. In Variable name, enter a name for this object.
You use this name in the VBScript to access it methods and properties.
8. Click OK.
The script to call the selected object appears in the VBScript.
Exit InstallationThis action exits the installation.
WiseScript Editor Reference 81

WiseScript Actions
No message appears unless you also set the RESTART variable.
See Automatic Run-time Variables on page 156.
NoteWhen a WiseScript is called by a Windows Installer installation, this does not exit the MSI installation. It only exits the WiseScript .EXE.
To complete the dialog box
Application Exit CodeIf this script is called by another application, this is the return code to the calling application. If the WISE_ERROR_RTN variable is already set, the value in WISE_ERROR_RTN does not override the Application Exit Code but is written to the installation log.
See Run-time Variables on page 158.
Export SVS LayerTo complete the dialog box
Layer GUIDEnter the layer’s GUID (globally unique identifier) or a variable that represents the layer’s GUID. If you enter the layer’s GUID, do not include the { } brackets.
For information on creating a variable for a layer’s GUID, see Create SVS Layer on page 65 and Find SVS Layer GUID on page 84.
Archive pathEnter the path and file name to which the archive file is to be exported. This directory must already exist. You can use WiseScript variables.
Return variable(Optional.) Enter a name for the return variable. When this script action runs successfully, either 0 or 1 is placed in this variable.
Overwrite archive file if it already existsMark this to overwrite the archive file if it already exists.
See also:
About SVS Script Actions on page 39
Find File in PathThis action searches for a file on the destination computer. If more than one match exists, only the first match is returned.
To complete the dialog box
File NameEnter just the file name, not a full path. Wildcard characters (*, ?) are not allowed.
Variable NameEnter a variable in which to store the path of the file if it is found. If the file is not found, this variable stores the Default Value specified below.
WiseScript Editor Reference 82

WiseScript Actions
Default ValueEnter a value to put into the variable if the file is not found. To use an If statement that tests the variable, leave this blank so it evaluates to false.
To install a new version of the file, specify the file’s typical location here. Then, if the file is found, the location replaces the default value, but if it is not, this default value is used to install the file.
DescriptionEnter text to display if the find operation takes more than 1.5 seconds to complete. This happens only if the list of directories in the PATH is very long or a directory is on a slow device (example: CD-ROM).
Search DirectoriesEnter a semicolon-delimited list of directories to search. You can use variables. If this field is blank, only directories in the PATH environment variable are searched.
Remove File NameMark this to remove the file name from the end of a returned path, leaving only the directory name. This operation is not performed on the Default Value.
Find First SVS LayerThis SVS script action starts a search for a virtual software layer on the destination computer. To find additional layers, use this script action with the Find Next SVS Layer script action.
See Find Next SVS Layer on page 83.
To complete the dialog box
Layer GUID VariableEnter a name for a variable in which to place the layer’s GUID.
Return variable(Optional.) Enter a name for the return variable. When this script action runs successfully, either 0 or 1 is placed in this variable.
See also:
About SVS Script Actions on page 39
Find Next SVS LayerThis SVS script action finds the next virtual software layer on the destination computer after the Find First SVS Layer script action finds the first layer. To find additional layers, repeat this script action.
See Find First SVS Layer on page 83.
To complete the dialog box
Layer GUID VariableEnter a name for a variable in which to place the layer’s GUID.
Return variable(Optional.) Enter a name for the return variable. When this script action runs successfully, either 0 or 1 is placed in this variable.
WiseScript Editor Reference 83

WiseScript Actions
See also:
About SVS Script Actions on page 39
Find SVS Layer GUIDThis SVS script action finds the GUID of a virtual software layer and creates a variable for this GUID. You can use this variable in most of the other SVS script actions to identify the layer in the Layer GUID field.
To complete the dialog box
Layer nameEnter the name of the layer.
GUID variable Enter a name for a variable in which to place the layer’s GUID.
Return variable(Optional.) Enter a name for the return variable. When this script action runs successfully, either 0 or 1 is placed in this variable.
See also:
About SVS Script Actions on page 39
Get Environment VariableThis action puts the value of a Windows environment variable into a WiseScript variable.
To complete the dialog box
Env. VariableEnter a Windows environment variable.
Variable NameEnter a variable to store the value of the environment variable.
Default Value(Optional) Enter the value to store in the variable if the environment variable is not found.
Remove File NameMark this to remove a file name from the end of a returned path, leaving only the directory name. This operation is not performed on the Default Value.
To run a batch file or other application in a DOS window, use Get Environment Variable to put the value of ComSpec (path to command.com) into a variable (example: put it in %COMMAND%). Then use the Execute Program action to call command.com by entering %COMMAND% in the EXE Path field. Specify the file to open in the Command Line field. Add the /c command-line option to cause the command-line window to close when your program finishes execution.
WiseScript Editor Reference 84

WiseScript Actions
Get Name/Serial NumberThis action displays a dialog box that requests the end user’s name, company name, and a product serial number.
To complete the dialog box
TitleEnter the title for the dialog box.
DescriptionEnter text to explain the dialog box to the end user.
Name PromptEnter text to appear next to the Name field.
CompanyEnter text to appear next to the Company field.
Serial NumberEnter text to appear next to the Serial Number field.
VariableIn the three Variable fields, enter the variables to store the Name, Company, and Serial Number.
Confirm Text(Optional) Enter text to be displayed in a separate dialog box to confirm registration. If this is blank, no confirmation dialog box appears.
Get Registry Key ValueThis action puts the value of a registry key into a variable. Multi-line (MULTI_SZ) registry values are read into a list format.
To complete the dialog box
Variable NameSelect or enter a variable to store the value.
Default Value(Optional) Enter the value to put into the variable if the value is not found.
Registry KeyEnter the key that contains the value to be retrieved.
Value NameEnter the value name. (If you are reading the Win16 registry, leave this field blank.)
RootSelect the root that contains the registry key. (If you are reading the Win16 registry, leave HKEY_CLASSES_ROOT selected.)
Remove File NameMark this to remove a file name from the end of a returned path, leaving only the directory name. This operation is not performed on the Default Value.
Expand Environment VariablesIf you read a REG_EXPAND_SZ value, mark this to have all environment variables in the registry value replaced with their actual values.
WiseScript Editor Reference 85

WiseScript Actions
The sample script URL.wse uses this action. For details on sample scripts, see ScriptHelp.htm in the Samples subdirectory of this product’s installation directory.
Get SVS Layer InfoThis action retrieves information about an SVS layer on the destination computer and puts that information into different variables.
To complete the dialog box
Specify the layer’s GUID and select or enter a variable name in each field whose information you want to gather. Leave the other fields empty.
Layer GUIDEnter the layer’s GUID (globally unique identifier) or a variable that represents the layer’s GUID. If you enter the layer’s GUID, do not include the { } brackets.
For information on creating a variable for a layer’s GUID, see Create SVS Layer on page 65 and Find SVS Layer GUID on page 84.
Return variable(Optional.) Enter a name for the return variable. When this script action runs successfully, either 0 or 1 is placed in this variable.
Active VariableIf the layer is deactivated, 1 is placed in this variable. If the layer is activated, 2 is placed in this variable.
Active On Start VariableIf the layer is deactivated when the computer starts, 1 is placed in this variable. If the layer is activated when the computer starts, 2 is placed in this variable.
Layer Name VariableThe name of the layer as it appears in the Altiris SVS applet is placed in this variable.
Layer Type VariableIf the layer is read-only, 0 is placed in the variable. If the layer is writeable (peer layer), 1 is placed in the variable. If the layer is a data layer, 2 is placed in the variable.
Peer GUID VariableThe GUID of the writeable layer that is associated with this layer is placed in this variable.
Reg Path VariableThe path to the registry key where layer attributes are stored is placed in this variable. These attributes include information such as the layer’s name and GUID.
File Redir Path VariableThe file redirect path where the layer’s files are stored is placed in this variable.
Reg Redir Path VariableThe registry redirect path where the layer’s registry keys are stored is placed in this variable.
Creation, Activate, and Reset Time VariablesThe time the layer was created, activated, or reset is placed in these variables. The time is reported as the number of seconds since midnight (00:00:00), January 1, 1970.
WiseScript Editor Reference 86

WiseScript Actions
See also:
About SVS Script Actions on page 39
Get System InformationThis action retrieves information about the destination computer and puts it into a variable.
To complete the dialog box
Variable NameSpecify the variable in which to store the retrieved value.
RetrieveSelect the information to retrieve:
Current Date/TimeThe time is in 24-hour format. Example: 07/14/05 11:18:10
Windows VersionExample: 5.0.2195 (Windows 2000 Professional)
DOS VersionExample: 6.22
K Bytes Physical MemoryThe amount of physical RAM.
File Date/Time ModifiedThe time and date on which the file that is specified in Pathname was modified.
File Version NumberThe version of the file that is specified in Pathname. Example: 2.5.4.0 If the file does not have a version resource, the response is blank.
Registered Owner NameThe user name entered when Windows was installed. This is used to pre-fill the Branding / Registration dialog box.
Registered Company NameThe company name entered when Windows was installed. This is used to pre-fill the Branding / Registration dialog box.
Drive Type for PathnameThe type of drive of the file or directory that is specified in Pathname: N (network), H (hard disk), C (CD-ROM), F (floppy or removable disk), R (RAM disk).
First Network DriveThe letter of the first network drive, followed by a colon If there are no network drives, the response is blank.
First CD-ROM DriveThe letter of the first CD-ROM drive, followed by a colon. If there is no CD-ROM drive, the response is blank.
Win32s VersionThe version number of the currently running Win32s system in #.# format or blank if Win32s is not installed.
WiseScript Editor Reference 87

WiseScript Actions
Full UNC PathnameThe UNC path of the destination computer.
Installer EXE PathnameThe path, including the file name, of the installation currently executing.
File Size (Bytes)The size of the file that is specified in Pathname.
Volume Serial NumberThe serial number of the disk drive that is specified in Pathname.
Volume LabelThe label of the disk drive that is specified in Pathname.
Windows Logon NameThe Windows network logon name of the user logged onto the destination computer.
Service Pack NumberService pack number of the current operating system, if one exists.
Current Date/Time (four-digit year)Same as Current Date/Time above except a different format. Example: 07/14/2005 11:18:10
File Date/Time Modified (four-digit year)Same as File Date/Time Modified above except a different format. Example: 07/14/2005 11:18:10
Disk Free Space (KBytes)Free disk space of the drive that is specified in Pathname. In Pathname, enter a drive (C:\) or a path (%MAINDIR%\Readme.txt). If you enter a path, it returns the free space on the drive that the path refers to. You can enter a UNC path such as \\Server_Name\Apps\Cat.exe.
Current Date/Time (Regional settings)The date and time specified by the destination computer’s regional settings.
UTC File Date/Time ModifiedSame as File Date/Time Modified above except in Coordinated Universal Time (UTC) format. Coordinated Universal Time is an international time standard, in which all time zones are computed relative to UTC. Example: in the United States, Central Standard Time (CST) is six hours earlier than UTC time—10:00 UTC is 4:00 CST.
Is OS 64 BitThe value of the variable you specified above is set to 1 if the destination computer is running a 64-bit operating system, and 0 if not.
PathnameUse this field only for operations that retrieve information on files or directories. Specify the full path of the file or directory to retrieve information from. You can use variables (example: %MAINDIR%\Readme.txt). You also can enter a hardcoded path (example: C:\Program Files\File.exe) but it is not recommended.
The sample script Autoplay.wse uses this action. For details on sample scripts, see ScriptHelp.htm in the Samples subdirectory of this product’s installation directory.
WiseScript Editor Reference 88

WiseScript Actions
Get Temporary FilenameThis action generates a unique, temporary file name and stores it in a variable. Use the temporary name when you need to install a file to the Windows Temp directory (%TEMP%). Files that you create using this file name are deleted when the installation finishes. Example: Use this to install a .DLL that is called during installation, and is then no longer needed.
To complete the dialog box
VariableSpecify a variable in which to store the temporary file name. Only a file name is generated. To refer to this file, prefix it with the %TEMP% variable extension. Example: If the variable is %HELPFILE%, the full path of the file would be %TEMP%\%HELPFILE%.
Get Windows Installer PropertyThis action gets the value of a Windows Installer property in the currently running Windows Installer installation and puts it into a WiseScript variable. Use this action only in WiseScripts that are called from a Windows Installer installation.
To complete the dialog box
Dest. VariableSelect or enter a variable to store the value of a Windows Installer property.
Property NameEnter the name of the Windows Installer property in the currently running Windows Installer installation.
See also:
Set Windows Installer Property on page 115Evaluate Windows Installer Condition on page 76
Halt CompilationThis action immediately stops compilation of the script. It must be placed between Compiler Variable If and Compiler Variable End statements or the script will never compile. Use this to ensure that conditions are met before compiling.
To complete the dialog box
Message TextEnter a message to display to the user if the compile is stopped.
Example: You develop a script that uses runtime files. On your own computer, you have the correct runtime files to pull into the installation. However, you want to prevent compilation on other computers if they lack correct runtime files because the resulting installation could damage runtime installations on destination computers.
You do this by adding a Compiler Variable If/Else/End block. You get the file version of a key runtime file using the file version option of a Compiler If statement. Then, if the file
WiseScript Editor Reference 89
WiseScript Actions
version is not the one the script requires, use the Halt Compilation action to prevent compilation.
If StatementThis action marks the beginning of a conditional block of script, an If block. If the condition specified in the If Statement is true, the lines inside the If block are executed. The If block can also contain an Else or several ElseIf actions.
NoteThis is different from the If Statement action that is in MSI Script in a Windows Installer installation.
To create an If block
1. Add an If Statement and complete the dialog box:
If VariableSelect a variable from the first drop-down list, and a comparison method from the second drop-down list.
Expression True means the expression in the Value field below is evaluated according to the rules outlined in Variables and Expressions on page 32. The variable is ignored and can be left blank. The result is considered true if it evaluates to a non-zero result.
(The password comparisons are not applicable in this product.)
The ValueEnter the value to be used in the comparison, or an expression if the comparison is set to Expression True. If you enter variable names, do not surround them with percent signs (%). If you enter compiler variables, then you must surround them with percent signs.
2. Below the If Statement, add one or more actions to perform if the variable has the specified value.
3. (Optional) Add an Else or several ElseIf actions. Follow the Else action with one or more actions to perform if the compiler variable does not have the specified value.
4. Add an End Statement.
Sample scripts that use this action are Search.wse, WiseUp.wse, and scripts that manipulate strings and perform calculations. For details on sample scripts, see ScriptHelp.htm in the Samples subdirectory of this product’s installation directory.
See also:
Else Statement on page 75ElseIf Statement on page 75End Statement on page 76
WiseScript Editor Reference 90

WiseScript Actions
Import SVS LayerTo complete the dialog box
Archive pathSpecify the path and file name for the archive file. You can use WiseScript variables.
GUID variable(Optional) Enter a name for a variable in which to place the layer’s GUID.
Return variable(Optional.) Enter a name for the return variable. When this script action runs successfully, either 0 or 1 is placed in this variable.
Overwrite layer if it already existsMark this option to overwrite the layer if it already exists.
See also:
Activate SVS Layer on page 40About SVS Script Actions on page 39
Include ScriptThis action adds an additional script to the current installation script. During compile, the include script is copied into the calling script at the location of the Include Script action, resulting in a combination of the scripts.
Include scripts can save time because you can develop a library of WiseScripts that perform specific functions, like subroutines. You can re-use include scripts and share them with colleagues. They typically contain just a few lines of code, such as calling an .EXE or displaying a particular dialog box. Include scripts can be any size with the limitation that the calling script plus include scripts cannot be more than 32,000 lines.
Include scripts are displayed in tabs at the bottom of the script window.
To make an include script, create a new file and select Blank Script. Otherwise the include script contains the default script, which is designed to perform an installation. The combined script would then have two wizard loops, two of every dialog box, and so on. Only the script is inserted into the calling script.
Any Compiler variables that are defined on the Compiler Variables page are ignored.
To complete the dialog box
PathnameSpecify the path of the script. It should be a .WSE file on your computer, not the destination computer. Because the main script and include scripts are combined during compile, not run time, do not use a run-time variable in Pathname. You can, however, use a compiler variable.
Example of a line in the script that includes a script:
Include Script C:\Scripts\OpensWord.wse
Example of what a short include script might look like:
Execute %PROGRAM_FILES%\winword.exe
WiseScript Editor Reference 91

WiseScript Actions
Initialize SVSThis action initializes the SVS Driver (Altiris Software Virtualization Agent) so that you can communicate with it. It takes no parameters, and selecting it from the Action list inserts it directly into the script with no further dialog boxes or prompts. It is included in all of the SVS-specific actions. If you create a user-defined SVS-specific action, begin the action with this action.
See also:
About SVS Script Actions on page 39
Insert Line Into Text FileThis action edits a text file on the destination computer. Use it to edit configuration files that cannot be edited by Edit INI File, Add Device to System.ini, Add Command to Config.sys, or Add Command to Autoexec.bat.
You can insert a new line at a particular line number, or you can search for text and insert a new line before, after, or in place of the line where the text was found. Either complete the Line Number field or the Search for Existing Text section. Do not complete both because you can only do one or the other.
To complete the dialog box
File to EditSpecify the path of the text file to edit (example: %SYS32%\File.txt).
Text to InsertEnter the text to add to the file. If the line refers to a directory or file, start the path with a variable (example: %MAINDIR%\Application.exe).
Line NumberEnter the line number at which to insert the new text. Enter 0 to append to the end of the file. Information in the Search for Existing Text area overrides any line number that is specified here unless the text is not found.
Search for TextEnter the text to search for. If more than one line in the file matches, only the first is edited.
Comment TextEnter comment to insert at the beginning of the found line. When replacing an existing line, use this to leave the existing line in place but inactive. Set Insert Action to insert before the existing line so that subsequent installations find and edit the active command, not the commented line.
Insert ActionSelect the action to be taken when a line is found.
Match CriteriaSelect how the line is matched with the text in Search for Text.
Ignore White SpaceMark this to ignore spaces and tab characters.
Case SensitiveMark this to make the match case-sensitive.
WiseScript Editor Reference 92

WiseScript Actions
Make Backup FileMark this to make a copy of the text file before editing it. A number is appended to the end of the file name for the backup copies (example: text.001, text.002, and so on).
The sample scripts Add Tnsnames entry.wse and TextFile.wse use this action. For details on sample scripts, see ScriptHelp.htm in the Samples subdirectory of this product’s installation directory.
Install File(s)This action installs files on the destination computer. Each file or directory to be installed must have a separate Install File(s) action.
NoteWhen a WiseScript is called by a Windows Installer installation, the Windows Installer installation does not recognize changes that the WiseScript makes to the destination computer and will not uninstall them. Therefore, you must provide a way to uninstall or repair such changes. See Uninstalling Changes Made by a WiseScript in the Windows Installer Editor Help.
When you’re installing files permanently on the destination computer using the Install File(s) script action, you might also want to make sure that the destination computer has enough disk space available for these files. Do this using the Check Disk Space script action.
See Check Disk Space on page 52.
The results from an Install File(s) action are put into a variable, INSTALL_RESULT.
See its description in Automatic Run-time Variables on page 156.
To complete the dialog box
Source PathnameSpecify the path of the file on your computer. You can use wildcards in this field to indicate that all the files in a directory that match a certain pattern should be installed (example: C:\Dev\*.exe). You can also use compiler variables, but you should not use run-time variables, because this field is used at compile time.
Destination PathnameSpecify the path the file will have on the destination computer. Use variables to start the path (example: %MAINDIR%\Dev\File.txt). This field has a drop-down list with common variables. Do not include wildcards in this field.
DescriptionEnter text to appear in the progress bar while this file is installed.
Require Password(Not applicable in this product)
If you entered a password on the Password page, and you mark this, the end user is prompted for the password before this file is installed.
The password prompt appears only once, for the first password-protected file in an installation, regardless of the number of password-protected files. If no password-protected files are slated for installation, the prompt does not appear.
WiseScript Editor Reference 93

WiseScript Actions
Include Sub-DirectoriesIf you specify a directory in Source Pathname, mark this to include all subdirectories and their contents.
Shared DLL CounterIf this is marked, and the file is a .DLL or .VBX, Windows tracks the file to prevent its removal if an installed application is still using it.
No Progress BarTo hide the progress bar, mark this for every file in the installation. If you mark it for some files, but not others, the progress bar seems to display continuously because the screen does not refresh between files.
Self-Register OCX/DLL/EXE/TLBAll .OCXs and .TLBs and some .DLLs and .EXEs support self-registration. Mark this so the file registers itself in the Windows registry before it is used. This action does not register the file, but specifies that it should be registered later. Include a Self-Register OCX/DLL action to register the file.
See Self-Register OCXs/DLLs on page 110.
Replace Existing FileSelect when to replace existing files on the destination computer.
AlwaysThe new file always replaces the old file.
NeverThe file never overwrites an existing file. Select this for files that should be installed if they are not present, but which might be customized by the end user and should therefore not be replaced on re-installation (example: configuration files).
Check FileThe existing file is only replaced if the requirements you set in File Version and File Date/Time are true.
Doesn’t MatterSelect this option if only one of the requirements, File Version or File Date/Time, must be fulfilled to replace the existing file.
Same or OlderFor File Version, this replaces the existing file if it has a version resource that is the same as or older than the new file. If the existing file lacks a version resource, it is not replaced.
For File Date/Time, this replaces the existing file if its modification date and time are the same or older than the new file.
OlderFor File Version, this replaces the existing file if it has a version resource that is older than the new file. If the existing file lacks a version resource, it is not replaced.
For File Date/Time, this replaces the existing file if its modification date and time are older than the new file.
Retain Duplicates in PathBy default, version checking removes existing copies of .DLLs that are found in the path list. To suppress this feature, mark this check box.
WiseScript Editor Reference 94
WiseScript Actions
Install SVS PackageThis action installs a Virtual Software Package (VSP) on a destination computer. You can use this action to create a WiseScript that installs any number of VSPs.
After you add an Install SVS Package action to a script, you can open its .WVP file in Virtual Package Editor directly from the WiseScript. To open the .WVP file, select its Install SVS Package action and select Open Package from its right-click menu. If you edit and recompile the .WVP in Virtual Package Editor, those changes are incorporated into the WiseScript the next time it is compiled.
To complete the dialog box
Source PathnameSpecify the .WVP file.
Activate LayerCheck this to activate the layer after it is imported on the end user’s computer. We recommend that you check this unless you have a specific reason to not activate the layer when it is imported on the end user’s computer.
See also:
About SVS Script Actions on page 39
Install WiseUpdate ClientWiseUpdate updates an application on destination computers over the Internet. The Install WiseUpdate Client action reflects the settings on the WiseUpdate page and vice versa. You can either complete the WiseUpdate page, or add the Install WiseUpdate Client action.
To complete the dialog box
Host AddressEnter the Web server address or IP address where the WiseUpdate Client looks for updated software (example: www.company.com or 1.1.1.1). The WiseUpdate Client on the destination computer uses this information when it checks for updates.
NoteThe host must be accessible through both FTP and HTTP. You use an FTP client to transfer files to it, and WiseUpdate Client (on the destination computers) uses HTTP to read and download files.
Sever Username, Server PasswordIf necessary, enter the user name and password that are required to connect to the server. Typically, Web servers don’t require user names and passwords. This is used for basic HTTP authentication.
Host DirectoryEnter the directory name on the host that stores the WiseUpdate configuration file. Your installation and its ReadMe are also stored in this directory. Leave this field blank to put the files on the top level of the host.
WiseScript Editor Reference 95

WiseScript Actions
Update FilenameEnter a name for the WiseUpdate update file. This file, which resides in the host directory, is a text file in .INI format that the WiseUpdate client reads to determine if a new version exists, and if so, where the new version and its ReadMe can be found. You must use the same file name when you use WiseUpdate in the future (example: WiseUpdate.INI).
Product VersionEnter the version of the current installation. This version will be stored in the configuration file specified in Update Filename.
Check Interval (days)This works in conjunction with the Add client to Startup Group check box (see below). Enter the number of days between update reminders for the end user.
Alternate Web PageEnter the location of a Web page to display if the WiseUpdate client cannot check for updates or download the installation. Examples: A page with technical support, upgrade information, or troubleshooting.
Start Menu IconEnter a name for a shortcut to the WiseUpdate Client, which appears in the Windows Start menu, giving end users the ability to check for updates. To communicate the shortcut’s purpose, give it a descriptive name, such as “Update Productname.” If this is left blank, mark Add client to Startup Group so that the WiseUpdate Client runs automatically.
Add client to Startup GroupMark this to add a shortcut for the WiseUpdate Client to the Windows Startup group. The WiseUpdate Client runs silently every time the destination computer is restarted or the end user logs into Windows. If the Check Interval time has not been reached, is simply runs silently, checks the time interval, and quits. However, after the number of days in Check Interval elapse, instead of running silently and quitting, it runs with its normal interface and prompts the end user to check for updates.
About Windows Mobile InstallationsThe Microsoft® Windows Mobile™ platform supports Pocket PC and Smartphone devices. A Windows Mobile device installation consists of a single, self-extracting .CAB file and an optional Setup.dll file. The .CAB file contains all the resources (files, registry keys, and shortcuts) that comprise the application. The Setup.dll file provides functions for performing certain operations during the installation and removal of your application.
Mobile device .CAB files are generated by the CabWiz program from an information file (.INF). The .INF is a text file that specifies directories, files, settings, and configurations that are used to install a mobile device application.
(Pocket PC applications only.) A single .INF file can contain information to produce multiple .CAB files. Example: An application supports the Windows Mobile and Pocket PC 2002 platforms, but several of the application files are platform-dependent. When you create the installation, you assign the files to the device that supports that platform. When you compile, the Windows Mobile-specific files are placed in the Windows Mobile .CAB file, and the Pocket PC 2002-specific files are placed in the Pocket PC 2002 .CAB file.
A mobile device application can be installed in the following ways:
WiseScript Editor Reference 96

WiseScript Actions
The .CAB file and an .INI file that describes the .CAB are included in an installation that runs on the desktop computer. The desktop computer contains Application Manager (CeAppMgr.exe), which is installed with ActiveSync. Application Manager installs the mobile device application on the device.
The end user copies the .CAB file to the mobile device and opens it. The .CAB file extracts its contents to the directories that were specified in the .INF file.
Uninstall of the mobile device application is controlled by the mobile device and ActiveSync. Uninstalling the mobile device installation from the desktop computer does not affect the application that is installed on the mobile device.
To add mobile device .CAB files to a WiseScript, use the Install Windows Mobile Application script action.
See:
Process for Adding Mobile Device Support to a WiseScriptInstall Windows Mobile Application on page 97
Process for Adding Mobile Device Support to a WiseScriptYou can configure a WiseScript to install files that support a Windows Mobile device application.
1. Obtain the mobile device installation file or files. Windows Mobile installations consists of one or more .CAB files.
Obtain the .CAB files from a vendor or other source.
2. In WiseScript Editor, add the Install Windows Mobile Application script action and specify the .CAB files to add.
3. Finish assembling the WiseScript. Any resources that you add to the WiseScript, other than those in any Install Windows Mobile Application script actions, are installed on the desktop computer, not the mobile device.
4. Compile the WiseScript. The .CAB files are included in the compiled .EXE. Also, an .INI file that describes the .CABs is created and included in the compiled .EXE.
See:
About Windows Mobile Installations on page 96Install Windows Mobile Application on page 97
Install Windows Mobile ApplicationThis action adds mobile device support for the Microsoft® Windows Mobile™ platform for Pocket PC and Smartphone devices. Use it to configure a WiseScript to install files that support a Windows Mobile device application.
See About Windows Mobile Installations on page 96.
Each action line represents one mobile device application; each .CAB file represents a different device that is supported by the application.
WiseScript Editor Reference 97

WiseScript Actions
To complete the dialog box
Application NameEnter the name of the application you are installing. It also appears in the desktop computer’s mobile device software (the Add/Remove Programs dialog box, which is accessible from the Microsoft ActiveSync window).
DescriptionThis appears on the Add/Remove Programs dialog box on the desktop computer.
Installation Files sectionSpecify up to three .CAB files to install.
Desktop Shortcut sectionIf installation onto the mobile device will not take place immediately following the desktop installation, then use the following fields to create a shortcut on the desktop computer. This shortcut starts the installation onto the mobile device by calling the Application Manager.
NameEnter the name for the shortcut on the mobile device.
Icon FileTo use a custom icon, enter the path to the .ICO, .EXE, or .DLL file that contains the icon.
Install on the mobile device following the desktop installationIf you mark this and the mobile device is connected during the desktop installation, then the end user is prompted to perform the mobile device installation immediately following the desktop installation.
See also:
Process for Adding Mobile Device Support to a WiseScript on page 97
Modify Component SizeFor files within the installation .EXE, the amount of required disk space is automatically tracked. However, if you call external .EXEs that install more files, the space those files require is not accounted for. Use this action to increase the amount of required disk space. Then use the Check Disk Space action to make sure that enough space exists.
Use this action inside an If block that checks whether the affected component is being installed. Example:
If COMPONENTS Contains Any Letters in “A” then
Modify Component Size: 1024
End
The COMPONENTS variable is populated with a letter of the English alphabet for each component set to be installed, starting with A for the first component, B for the second, and so on.
To complete the dialog box
Size (Kbytes)Enter the amount of additional disk space to reserve.
WiseScript Editor Reference 98

WiseScript Actions
Dest. PathEnter the directory where the files will be installed (example: %MAINDIR%\Pictures).
Open/Close Install.logUse this action to create an installation log.
Normally, every file that is installed is recorded in the install.log. The uninstall works by reading Install.log from bottom to top and reversing each recorded action.
The Open/Close Install.log action lets you customize the uninstall, by turning logging off and on at key points to prevent some actions from being recorded in the log. If you use this action to stop logging, you must also use it to resume logging or no log file is created.
NoteWhen a WiseScript is called by a Windows Installer installation, the Windows Installer installation does not recognize changes that the WiseScript makes to the destination computer and will not uninstall them. Therefore, you must provide a way to uninstall or repair such changes. See Uninstalling Changes Made by a WiseScript in the Windows Installer Editor Help.
To complete the dialog box
Select one of the following options for each Open/Close Install.log action that you add to the script.
Resume/Start writing entries into installation log
Pause writing entries into installation logThis must be followed, at some point, by another Open/Close Install.log action that resumes writing, or no log file is created.
Open new installation logMark this to create an installation log. Then enter the complete path or just the file name of the new log to the right (examples: %MAINDIR%\Speciallog.log or Speciallog.log). If just a file name is entered, the log is written to the same directory as the first installed file.
See also:
Add Text to INSTALL.LOG on page 42
Parse StringThis action splits a text string and places the results in two variables.
You can split the string at a character or substring that you specify, which discards the character or substring you specified. Example: If you split the string “ONE,TWO” at the first occurrence of a comma, “ONE” is put into destination variable 1 and “TWO” is put into the destination variable 2. If the character or substring is not found, the entire string is put into destination variable 1, and nothing is put into destination variable 2. The find is case-sensitive.
WiseScript Editor Reference 99
WiseScript Actions
You can also split a string at any arbitrary character position, which discards no characters. Example: If you split the string “ONE,TWO” at character position four from left, then “ONE,” is put into the destination variable 1 and “TWO” is put into the destination variable 2.
To complete the dialog box
Source ValueEnter the text to be parsed. You enter text and variables (examples: %MAINDIR% or %MAINDIR%\%PICTDIR%). To include a literal percent (%) symbol, use %%.
Pattern/PositionEnter the character pattern or the character position at which to split. Character patterns are case-sensitive unless you mark Ignore Case. To split at a pattern, enter any number of characters, including numbers, and select one of the pattern options in Operation. To split a string based on character position, enter the character position, where 1 is the first character, and select one of the position options in Operation.
Destination Variable 1,2Select or enter variables to store the two strings resulting from this operation. Operation, below, determines how each variable is populated.
OperationSelect how to split the text string.
Trim SpacesMark this to remove leading and trailing spaces from both destination variables.
Ignore CaseMark to make pattern matching case-insensitive.
The sample scripts TextFile.wse and URL.wse use this action. For details on sample scripts, see ScriptHelp.htm in the Samples subdirectory of this product’s installation directory.
PauseThis action temporarily stops a script from executing. After the specified number of milliseconds, the script continues. Example: Use this action to display a billboard for several seconds.
To complete the dialog box
Milliseconds to pauseEnter the number of milliseconds to pause the script. A millisecond is 1/1000 of a second. To pause for one second, enter 1000.
Play Multimedia FileThis action plays an audio (.WAV) or video (.AVI) file during installation. Playback is asynchronous, which means the sound or movie can play while the installation continues. The multimedia file must be installed on the destination computer before this action is called. It must be small enough to fit into the destination computer’s RAM for it to play correctly, because the disk is heavily accessed by the installation process. To produce sound, the destination computer must be properly equipped and configured.
WiseScript Editor Reference 100

WiseScript Actions
To complete the dialog box
File TypeSelect either .WAV or .AVI.
PathnameSpecify the path to the .WAV or .AVI file. Start this field with a variable (example: %MAINDIR%\Movie.avi). If the multimedia file is used only during installation, you can use the Get Temporary Filename action to obtain a random file name, then install the file to %TEMP%\%TEMPFILENAME%.
X Position, Y PositionIndicate the location on a 640 x 480 screen at which an .AVI file should be played back. Coordinates are adjusted proportionately for the display resolution on the destination computer.
Loop Continuously
Post to HTTP ServerThis action posts information over the Internet to a Web server. (Example: Use it to record user registration information or other data.) You must set up a CGI program or Active Server Page (.ASP) on the server that accepts data sent by an HTTP POST operation and deciphers encoded characters.
The destination computer must have a valid Internet connection. If end users might not have this capability, you can add a prompt on a dialog box asking the end user if they have Internet connectivity. Then use the results from the prompt to run this action or not.
To complete the dialog box
Destination URLEnter the URL of the CGI program or ASP page that accepts posted data.
Text to PostThe text to post should be one or more lines in the format:
field=data
where field is the name of the field as it is expected by the CGI program, and data is the data to be sent in that field. If a line does not appear to contain a field name followed by =, it is assumed to be a continuation of the previous line, and the data on the two lines is concatenated and sent with a single field identifier.
The field names might be the same as variable names, but they do not have to be. You include variables enclosed in % in the text to be posted. Use %% to send an actual % symbol.
Error HandlingSpecify how to handle errors in the posting operation.
Ignore ErrorsThe script continues regardless of any errors.
Abort InstallationThe installation stops if the post cannot be completed.
WiseScript Editor Reference 101

WiseScript Actions
Start BlockThe Post to HTTP Server action begins a conditional block. The statements between this action and the next End statement are executed only in the event of an error.
Prompt for FilenameThis action prompts the end user to select a file using a standard Open or Save dialog box. The complete path of the file or directory is returned in a variable. (Example: Use the returned directory to set the installation directory for a subset of files.) No file is actually opened or saved by this action. This action is included to provide backward compatibility for older WiseScripts. In new scripts, use custom dialog boxes or dialog box controls to perform the same function. This action requires an End Statement, because it begins a block of statements, similar to an If Statement.
To complete the dialog box
Dialog TypeSelect Open File or Save As.
Dialog TitleEnter the title for the dialog box.
Dest. VariableSelect or enter a variable to store the path of the file or directory the end user selects.
Default ExtensionEnter the extension to append to the file name if the end user does not enter one.
Filter ListEnter the file types to appear in the Files of Type drop-down list in the Open or Save dialog box. Use Shift+Enter to enter a carriage return in this field. Example: to show text, .JPGs and bitmaps, enter:
Text Files (*.txt);*.txt;Pictures (*.jpg);*.jpg;Bitmaps (*.bmp);*.bmp
Allow selection of multiple filesMark this to let end users select multiple files with Ctrl or Shift.
Prompt if file does not existMark this to display a confirmation dialog box if the specified file does not exist.
File must existMark this to halt the installation until an existing file has been specified.
Pathname must existMark this to halt the installation until an existing path has been specified.
Skip write permissions testIf you selected Save As for Dialog Type, and you clear this check box, the installation tries to create the file that the end user specified in the Save As dialog box to verify write permissions. If you mark this check box, the installation does not try to create the file.
Do not validate the pathnameMark this to accept any path without any validation.
WiseScript Editor Reference 102

WiseScript Actions
Display prompt if overwriting existing fileMark this to display a message if a file selected by the end user already exists.
Prompt for TextThis action displays a dialog box that lets an end user enter a line of text. Optionally, you can treat the entered text as a path and do verification on it. It is included to provide backward compatibility for older WiseScripts. In new scripts, use custom dialog boxes or dialog box controls to perform the same function.
To complete the dialog box
Window NameEnter the title for the dialog box.
DescriptionEnter brief instructions here.
Prompt NameEnter the label to be displayed next to the text input field.
Default ValueEnter the text to be displayed in the text input field by default.
Variable NameEnter a variable to store the text entered by the end user.
DirectoryMark this to delete trailing backslashes from the text, so you can use it as a directory path.
Confirm If ExistsIf this check box is marked, and the end user enters the path of an existing file or directory, a dialog box asks whether to overwrite.
The sample scripts Adding.wse, Comcat$.wse, Division.wse, Instr.wse, Lcase$.wse, Left$.wse, and Len.wse use this action. For details on sample scripts, see ScriptHelp.htm in the Samples subdirectory of this product’s installation directory.
Radio Button DialogThis action displays a dialog box with up to 10 radio buttons. It provides backward compatibility with older WiseScripts. In new scripts, use custom dialog boxes and dialog box controls to perform the same function.
To complete the dialog box
TitleEnter the title for the dialog box.
Dest. VariableEnter a variable to store the letters corresponding to the button the end user clicks.The button clicked by the end user is returned as a letter: A for the first radio button, B for the second, and so on. If the script sets this variable to a letter before this action runs, the corresponding button appears selected by default.
WiseScript Editor Reference 103
WiseScript Actions
DescriptionEnter explanatory text to be displayed above the radio buttons. Press Shift+Enter for a carriage return.
Component ListEnter the choices, one on each line, pressing Enter after each.
Read INI ValueThis action reads an entry from an existing .INI file into a variable. Example: Obtain a path to a file.
To complete the dialog box
INI PathnameSpecify a complete path to the .INI file (example: %WIN%\Sample.ini).
INI SectionINI files have sections that are delineated by bracketed section names (example: [DIRECTORIES]). Enter the name of the section that contains the entry to be read, without brackets (example: DIRECTORIES).
INI ItemEnter the name of the entry to read from the .INI file.
Default ValueEnter the value to store in the variable below if the specified entry is not found.
Variable NameEnter a variable to store the value of the INI item.
Remove File NameMark this to remove a file name from the end of a returned path, leaving only the directory name. This operation is not performed on the Default Value.
Read/Update Text FileThis action begins a loop that reads and, optionally, updates text in a text file. Each loop puts the next line of text into a variable. You can put actions in the loop that change the contents of the variable (example: Parse String). Optionally, the changed variable can be written back to the file. The loop repeats for each line of the file. This action requires an End Statement.
NoteWhen a WiseScript is called by a Windows Installer installation, the Windows Installer installation does not recognize changes that the WiseScript makes to the destination computer and will not uninstall them. Therefore, you must provide a way to uninstall or repair such changes. See Uninstalling Changes Made by a WiseScript in the Windows Installer Editor Help.
To complete the dialog box
PathnameSpecify the full path to the text file to be edited on the destination computer (example: %WIN%\Sample.txt).
WiseScript Editor Reference 104

WiseScript Actions
VariableSpecify the variable in which to store each line of the text file (example: TEXTLINE).
ActionSelect an action:
Read lines of file into variableReads a line into the variable, but does not write it back to the original file.
Update file with new contents of variableReads a line into the variable, and at the end of the loop, writes the contents of the variable back to the line in the text file.
Make Backup FileMark this to make a copy of the text file before editing it. A number is appended to the end of the file name for the backup copies (example: text.001, text.002, and so on).
The sample script TextFile.wse uses this action. For details on sample scripts, see ScriptHelp.htm in the Samples subdirectory of this product’s installation directory.
See also:
End Statement on page 76
Read/Write Binary FileThis action reads from a binary file to a variable, or writes from a variable to a binary file. If you write to the file, the existing information in the file is not moved, it is overwritten.
This action does not support reading or writing non-ASCII characters (characters with codes above 127).
NoteWhen a WiseScript is called by a Windows Installer installation, the Windows Installer installation does not recognize changes that the WiseScript makes to the destination computer and will not uninstall them. Therefore, you must provide a way to uninstall or repair such changes. See Uninstalling Changes Made by a WiseScript in the Windows Installer Editor Help.
To complete the dialog box
File PathnameSpecify the path of the file to be read (example: %MAINDIR%\File.exe).
Variable NameSelect or enter the variable that is to be read into or written from.
File OffsetEnter the number of bytes into the file to start writing or reading. Bytes are numbered starting with zero.
Max. LengthEnter the maximum number of bytes to be written to or read from the file. When writing, if the length of the variable exceeds this value, the string is truncated. When reading, any trailing spaces are trimmed.
WiseScript Editor Reference 105

WiseScript Actions
Transfer DirectionSelect whether to write to or read from the file.
Null TerminatedIf this check box is marked, a zero byte is written to the binary file after the string.
Reboot SystemThis action restarts the destination computer.
To complete the dialog box
Reboot Operating SystemThis option logs the end user out of Windows.
Reboot Computer SystemIf the end user has administrator privileges, this option performs a full system restart on the destination computer at the end of installation. If the end user does not have administrator privileges, this option only logs the end user out.
Register FontThis action registers a new TrueType font (.TTF file) that has been copied into the Windows font directory.
To complete the dialog box
Font File NameSpecify the file name of the .TTF font file (not the path) to be registered. The drop-down list contains font files that you have added to this installation. The file must already have been installed in the font directory on your computer, and the font’s file name must match its internal name.
Font NameEnter the full name of the font here. The name you enter here appears in Font menus on the destination computer. It is added to the Fonts section of the WIN.INI file and to the registry.
RemarkThis action adds comments or blank lines to the script. Remarks are green by default.
NoteThis is different from the Remark action that is in MSI Script in a Windows Installer installation.
CommentEnter the comment. To add a blank line, leave this field blank.
Remove SVS Exclude EntryThis SVS script action removes an SVS exclude entry on the destination computer. You can remove a layer exclude entry or a global exclude entry. A layer exclude entry applies
WiseScript Editor Reference 106

WiseScript Actions
to a specific layer on a computer, while a global exclude entry applies to every layer on a computer.
You set an exclude entry to exclude files from a specific layer or any layer on a computer. By default, when an application layer generates files, those files are redirected to the application’s writeable sublayer. If the layer is reset, the files in the writeable sublayer are lost. With an exclude entry, the files are saved in the base file system and are not lost.
To set an exclude entry, use the Set SVS Exclude Entry action.
See Set SVS Exclude Entry on page 113.
To complete the dialog box
Layer GUIDFor a global exclude, leave this blank. For a layer exclude, enter the layer’s GUID (globally unique identifier) or a variable that represents the layer’s GUID. If you enter the layer’s GUID, do not include the { } brackets.
For information on creating a variable for a layer’s GUID, see Create SVS Layer on page 65 and Find SVS Layer GUID on page 84.
Exclude entry textEnter the text used to set the exclude. If the exclude entry type is an extension, enter the file extension. If the exclude entry type is a directory or a directory with its subdirectories, enter the directory. For a directory, you can use a WiseScript variable that resolves to a valid path. For example, %PROGRAM_FILES%.
Return variable(Optional.) Enter a name for the return variable. When this script action runs successfully, either 0 or 1 is placed in this variable.
Rename File/DirectoryThis action renames a file or directory on the destination computer. This can be an existing file or directory, or a file or directory that your installation installed. The file must not be busy.
NoteWhen a WiseScript is called by a Windows Installer installation, the Windows Installer installation does not recognize changes that the WiseScript makes to the destination computer and will not uninstall them. Therefore, you must provide a way to uninstall or repair such changes. See Uninstalling Changes Made by a WiseScript in the Windows Installer Editor Help.
To complete the dialog box
Old PathnameSpecify the full path to the existing file or directory (examples: %MAINDIR%\Pictures\Picture.jpg or %MAINDIR%\Pictures\). If you click Browse, you can select only a file.
New File NameEnter the new file name or directory name (examples: picture2.jpg or Photos).
WiseScript Editor Reference 107

WiseScript Actions
Rename File or Directory in SVS LayerThis SVS script action renames a file or directory a virtual software layer. This can be an existing file or directory, or a file or directory that the WiseScript installs. The file must not be busy.
NoteUse this action on a deactivated SVS layer only.
To complete the dialog box
Layer GUIDEnter the layer’s GUID (globally unique identifier) or a variable that represents the layer’s GUID. If you enter the layer’s GUID, do not include the { } brackets.
For information on creating a variable for a layer’s GUID, see Create SVS Layer on page 65 and Find SVS Layer GUID on page 84.
Source pathEnter the full path to the existing directory and file in the virtual software layer. You can use SVS variables or WiseScript variables that resolve to a valid SVS path.
See SVS Variables on page 160.
Destination pathEnter the new path, or file name, or both. Any new path you enter must exist in the layer. You can use SVS variables or WiseScript variables that resolve to a valid SVS path.
See SVS Variables on page 160.
Return variable(Optional.) Enter a name for the return variable. When this script action runs successfully, either 0 or 1 is placed in this variable.
See also:
About SVS Script Actions on page 39
Rename SVS LayerThis SVS script action renames a virtual software layer that is installed. The layer must be deactivated before it can be renamed.
To complete the dialog box
Layer GUIDEnter the layer’s GUID (globally unique identifier) or a variable that represents the layer’s GUID. If you enter the layer’s GUID, do not include the { } brackets.
For information on creating a variable for a layer’s GUID, see Create SVS Layer on page 65 and Find SVS Layer GUID on page 84.
New nameEnter the new name for the virtual software layer.
WiseScript Editor Reference 108

WiseScript Actions
Return variable(Optional.) Enter a name for the return variable. When this script action runs successfully, either 0 or 1 is placed in this variable.
See also:
About SVS Script Actions on page 39
Search for FileThis action searches for a file on local drives, network drives, or all drives, and returns the full path to the file.
To complete the dialog box
File NameEnter the name of the file to search for. The file name can contain wildcard characters (*, ?). If you select Directory given by File Name field in the Drives to Search field, then include the full path rather than just a file name.
Variable NameEnter a variable to store the file path.
Default ValueIf the file is not found, the variable above contains the value you enter here. If this is left blank, the variable is blank if the file is not found.
Example: Specify the location where the file is normally installed. If the file is found, the new version could overwrite the found file. If the file is not found, the new version could be installed to the default location.
Message TextEnter a message to display during the search operation.
Return TypeSelect whether to return only the first match, or list of all matches.
Drives to SearchSelect to search local drives, network drives, or both. You can also choose to search the directory path specified in File Name.
Search DepthEnter how deep into subdirectories the search should look. A depth of 1 searches only the root directory, a depth of 2 searches the root directory and any subdirectories in it, and so on. A depth of 0 searches the entire drive.
Use this field cautiously when searching large network volumes. A search depth over 3 or 4 can result in a long wait. Alternatively, prompt the end user to manually locate the directory containing the file.
See Browse for Directory on page 45.
Remove File NameMark this to remove a file name from the end of a returned path, leaving only the directory name. This does not apply to the Default Value field.
The sample script Search.wse uses this action. For details on sample scripts, see ScriptHelp.htm in the Samples subdirectory of this product’s installation directory.
WiseScript Editor Reference 109

WiseScript Actions
Self-Register OCXs/DLLsUse this action to self-register all queued .OCX, .DLL, and .EXE files or to add an existing file to the queue.
Description/Pathname
If you mark Register all pending OCXs/DLLs/EXEs below, enter a message to display to the end user during registration. The Browse button is unavailable if you mark this option.
If you mark Queue existing file for self-registration below, specify a full path of the file to register.
Register all pending OCXs/DLLs/EXEsMark this to register all queued .OCX, .DLL, and .EXE files. In the Install File(s) and Copy Local Files(s) actions, there is an option to queue files for self-registration.
See Install File(s) on page 93 and Copy Local File(s) on page 58.
Queue existing file for self-registrationMark this to queue the file listed in Pathname for later self-registration.
Set Activate SVS Layer on StartupThis SVS script action activates a virtual software layer when the computer restarts.
To complete the dialog box
Layer GUIDEnter the layer’s GUID (globally unique identifier) or a variable that represents the layer’s GUID. If you enter the layer’s GUID, do not include the { } brackets.
For information on creating a variable for a layer’s GUID, see Create SVS Layer on page 65 and Find SVS Layer GUID on page 84.
Return variable(Optional.) Enter a name for the return variable. When this script action runs successfully, either 0 or 1 is placed in this variable.
Activate SVS layer on system startup.Mark this option to set the layer to activate when the computer starts. Clear this option to set the layer to not activate when the computer starts.
See also:
About SVS Script Actions on page 39
Set Control AttributesThis action appears only when you are in a dialog box script.
This action shows, hides, enables, or disables a control in a dialog box. Controls without names cannot be manipulated with this action.
To access this action
1. Double-click a Custom Dialog script line.
WiseScript Editor Reference 110

WiseScript Actions
The dialog box appears in the Custom Dialog Editor.
2. Select View > Dialog Script Editor.
A smaller list of actions appears in the Actions list, including this action.
3. Double-click Set Control Attributes.
Control NameThis contains all controls in the current dialog box. Select a control.
Use the Dialog Editor view (which shows the dialog box) to see or change the name of controls. To name a control, right-click the control, select Control Properties, and, in the dialog box that appears, enter a name in the Control Name field.
OperationSelect how to manipulate the control.
The sample scripts Event Handler.wse and License Agreement.wse use this action. For details on sample scripts, see ScriptHelp.htm in the Samples subdirectory of this product’s installation directory.
Set Control TextThis action appears only when you are in a dialog box script.
This action changes the text associated with a control in a dialog box. Controls without names cannot be manipulated with this action.
To access this action
1. Double-click a Custom Dialog script line.
The dialog box appears in the Custom Dialog Editor.
2. Select View > Dialog Script Editor.
A smaller list of actions appears in the Actions list, including this action.
3. Double-click Set Control Text.
Control NameThis contains all controls in the current dialog box. Select a control.
Use the Dialog Editor view (which shows the dialog box) to see or change the name of controls. To name a control, right-click the control, select Control Properties, and, in the dialog box that appears, enter a name in the Control Name field.
Control TextEnter new text to associate with the control.
The sample script Event Handler.wse uses this action. For details on sample scripts, see ScriptHelp.htm in the Samples subdirectory of this product’s installation directory.
Set Current ControlThis action appears only when you are in a dialog box script.
This action sets a control to be the current control in a dialog box. The current control is the one to which keyboard operations apply. (Example: If the OK button is the current
WiseScript Editor Reference 111

WiseScript Actions
control, and you press Enter, the OK button is activated.) Controls without names cannot be manipulated with this action.
To access this action
1. Double-click a “Custom Dialog” line in the script.
The dialog box appears in the Custom Dialog Editor.
2. Select View > Dialog Script Editor.
A smaller list of actions appears in the Actions list, including this action.
3. Double-click Set Current Control.
Control NameThis contains all controls in the current dialog box. Select a control to set as current.
Use the Dialog Editor view (which shows the dialog box) to see or change the name of controls. To name a control, right-click the control, select Control Properties, and, in the dialog box that appears, enter a name in the Control Name field.
Set File AttributesThis action sets the attributes of one file or a group of files.
To complete the dialog box
File PathnameSpecify a file to change (example: %MAINDIR%\Acrobat.pdf). You can use wildcards to specify multiple files (example: %MAINDIR%\*.pdf).
Read Only / Hidden / SystemMark the attributes to set.
Scan Directory TreeMark this to apply the changes to all files in the specified directory, along with all files in its subdirectories and their subdirectories.
ArchiveMark this to set the archive attribute, which is used by some backup programs.
Set Files/BuffersThis action sets the FILES= and BUFFERS= lines in Config.sys. If either is currently lower than the minimum specified in this action, it is increased to the specified value. If either is already greater than the minimum specified in this action, it is not changed.
To complete the dialog box
Minimum FilesThe minimum number of files to be specified by FILES= in Config.sys. Set this to zero or leave blank to leave FILES= unchanged.
Minimum BuffersThe minimum number of buffers to be specified by BUFFERS= in Config.sys. Set this to zero or leave blank to leave BUFFERS= unchanged.
WiseScript Editor Reference 112

WiseScript Actions
Set SVS Exclude EntryThis SVS script action sets an SVS exclude entry on the destination computer. You can set a layer exclude entry or a global exclude entry. A layer exclude entry applies to a specific layer on a computer, while a global exclude entry applies to every layer on a computer. This action appends its exclude entry to any existing exclude entries.
You set an exclude entry to exclude files from a specific layer or any layer on a computer. By default, when an application layer generates files, those files are redirected to the application’s writeable sublayer. If the layer is reset, the files in the writeable sublayer are lost. With an exclude entry, the files are saved in the base file system and are not lost.
To remove an SVS exclude entry, use the Remove SVS Exclude Entry action.
See Remove SVS Exclude Entry on page 106.
To complete the dialog box
Layer GUIDFor a global exclude, leave this blank. For a layer exclude, enter the layer’s GUID (globally unique identifier) or a variable that represents the layer’s GUID. If you enter the layer’s GUID, do not include the { } brackets.
For information on creating a variable for a layer’s GUID, see Create SVS Layer on page 65 and Find SVS Layer GUID on page 84.
Exclude TypeSelect the type of exclude entry.
Exclude entry textIf you select Extension in the Exclude Type section, type the extension. You can specify only one extension per action. If you select one of the directory options in the Exclude Type section, type the directory. For a directory, you can use a WiseScript variable that resolves to a valid path. For example, %PROGRAM_FILES%.
Return variable(Optional.) Enter a name for the return variable. When this script action runs successfully, either 0 or 1 is placed in this variable.
Set VariableThis action sets the value of a variable by providing a literal value, by modifying the variable’s existing value, or by evaluating an expression.
To complete the dialog box
VariableSpecify a variable. A variable name must begin with a letter, must contain only numbers, letters, and underscore characters, and must be 28 characters or less. It should not be enclosed in % signs.
New ValueEnter the new value of the variable. If you enter a variable, enclose it in % signs. The value of a variable can be up to 32 K in size.
The new value is also affected by the option set in Operation.
WiseScript Editor Reference 113

WiseScript Actions
OperationSelect the operation to be performed on the value in New Value.
NothingNo additional changes are made.
Increment, DecrementIf the value is a number, it is increased or decreased by one. To do this operation, you must specify the variable’s existing value in the New Value field. Example: To increment the variable VAR, enter VAR in the Variable field and %VAR% in the New Value field.
Remove trailing backslashesTrailing \ characters are removed, converting the variable to a valid directory name.
Convert to long or short filenameConverts an existing path to its equivalent long or short path if the installation runs on Windows 95 or NT. For this to work, the specified directory or file must exist.
Convert to uppercase or lowercaseAll alphabetical characters are converted to the case you select.
Evaluate ExpressionThe expression in New Value is evaluated according to the rules outlined in Variables and Expressions on page 32.
Append to Existing ValueMark this to add the variable’s new value to the end of its original value instead of replacing it.
Remove File NameMark this to remove a file name from the end of a returned path, leaving only the directory name.
Read Variable From Values FileMark this to read the variable from the values file that is specified on a command line to the installation .EXE using the /M command-line option. The values file is a simple text file with variables listed, one per line, in NAME=“VALUE” format. If the variable is found in the values file, the specified value is used; otherwise, its value is unchanged. It can be up to 32 K in size.
The sample scripts Adding.wse and Division.wse use this action. For details on sample scripts, see ScriptHelp.htm in the Samples subdirectory of this product’s installation directory.
Set Web PermissionsThis script action sets permissions for an existing virtual directory of a Web site or a virtual directory that you create with the Create Virtual Directory script action.
See Create Virtual Directory on page 65.
To complete the dialog box
ComputerEnter the name of the computer where the Web site resides.
WiseScript Editor Reference 114

WiseScript Actions
WebsiteEnter the name of the Web site.
Virtual DirectoryEnter the name of the virtual directory.
PermissionsMark the permission options to set for this virtual directory. These permissions determine what actions are allowed on the Web server for a virtual directory when an anonymous user connects to the Web site. The Script and Execute permissions let users run scripts or executables. (Example: If you turn Execute permissions off, anyone who accesses your Web site will not be able to run any of your Web site’s executable files.) If scripts or executables are not needed for your Web site to operate, we recommend that you turn these permissions off to limit the possibility of malicious code destroying your Web server.
Set Windows Installer PropertyThis action sets the value of a property in the currently-running Windows Installer installation. You can either hard-code a value or set the property to the value of a variable. Use this action only in WiseScripts that are called from a Windows Installer installation.
To complete the dialog box
Property NameEnter the name of a Windows Installer property. This can be either an existing Windows Installer property, or a new property name. Entering a new property name creates the property in Windows Installer.
Property ValueEnter the value to assign to the Windows Installer property. You can either hard-code a value or enter a WiseScript variable enclosed in percent signs.
See also:
Get Windows Installer Property on page 89Evaluate Windows Installer Condition on page 76
Start/Stop ServiceThis action lets you start or stop a service on the destination computer. It only applies to operating systems that support services.
When a WiseScript is called by a Windows Installer installation, you can also start and stop services by using the Services page in Windows Installer Editor.
After you try to stop a service, the script pauses to give the service time to stop. The currently logged-in end user must have the appropriate privileges to start and stop services.
To complete the dialog box
Service NameEnter the name of the service. This is not necessarily the same name you see in the Services control panel, but is the services internal name. If you used the Create
WiseScript Editor Reference 115

WiseScript Actions
Service action to create the service, this is the same name you entered in the Create Service Settings dialog box.
OperationSelect to start or stop the service.
Example: Suppose a service must be stopped before it can be updated. Use this action to first stop the service, then update its files.
See also:
Create Service on page 61
While StatementThis action begins a While loop. An End Statement must end the loop. As long as the condition specified in the While Statement Settings dialog box is true, the script lines inside the loop execute repeatedly. If the condition is not true, then the While loop is exited, and the next script line is executed.
To create a While loop
1. Add a While Statement and complete the dialog box:
While VariableSelect a variable from the first drop-down list, and a comparison method from the second drop-down list.
Expression True means the expression in the Value field below is evaluated according to the rules outlined in Variables and Expressions on page 32. The variable is ignored and can be left blank. The result is considered true if it evaluates to a non-zero result.
(The password comparisons are not applicable in this product.)
The ValueEnter the value to be used in the comparison, or an expression if the comparison is set to Expression True. If you enter variable names in this field, do not surround them with percent signs (%). If you enter compiler variables, then you must surround them with percent signs.
Perform While loop at least onceMark this so the loop executes once before the test is performed. If the check box is cleared, the loop is executed if the condition is true, but is not executed if the condition is false.
2. Below the While Statement, add one or more actions to perform if the variable has the specified value.
3. Add an End Statement.
The sample scripts Division.wse and Application kill.wse use this action. For details on sample scripts, see ScriptHelp.htm in the Samples subdirectory of this product’s installation directory.
See also:
End Statement on page 76
WiseScript Editor Reference 116

WiseScript Actions
Win32 System DirectoryThis action puts the path to the operating system directory (%WIN%\System32) into a variable. Alternatively, use the predefined variables %SYS% or %SYS32% to access the system directory. This action is included to provide backward compatibility for older WiseScripts.
To complete the dialog box
Variable NameEnter a variable to store the result.
Wizard LoopThis action precedes dialog boxes that make up the majority of the installation’s end user interface. End users can move forward and backward through these dialog boxes. The script continues executing inside the wizard loop until the last dialog box has been completed and accepted.
Use this script action to create the wizard loop.
To complete the dialog box
Dialog BoxesDisplays a list of the Custom Dialog actions inside the wizard loop structure. Select a dialog box to edit its setting in the bottom part of the Wizard Loop Settings dialog box.
Skip DialogThis lets you set a condition under which a dialog box is skipped. You can set different Skip settings for each dialog box.
Example: If one dialog box asks whether to back up configuration files before installing, and the next asks where to store the backup files, you could set a condition on the second dialog box to skip it if the DOBACKUP variable, which is set by the first dialog box, is equal to “NO.”
If VariableBuild a condition by selecting or entering a variable and by selecting a comparison. The first list shows variables defined in this installation. The second list shows available comparisons.
Expression True means the expression in the Value field below is evaluated according to the rules outlined in Variables and Expressions on page 32. The variable is ignored and can be left blank. The result is considered true if it evaluates to a non-zero result.
(The password comparisons are not applicable in this product.)
WiseScript Editor Reference 117

Chapter 5Creating Custom Dialog Boxes
This chapter includes the following topics:
About Dialog Boxes on page 118
About the Custom Dialog Editor on page 118
About Dialog Box Controls on page 120
Solutions for Dialog Box Problems on page 139
About Custom Dialog Box Sets on page 141
Creating a Custom Dialog Box Script on page 142
About Dialog BoxesUse the Custom Dialog Editor to change the appearance of installation dialog boxes and to create new dialog boxes. You can edit and create default dialog box templates, add interactivity to dialog boxes, and work with dialog box sets, and translate dialog box text to other languages.
Typically, dialog boxes are not used in WiseScripts that run silently, or in WiseScripts that you use as custom actions in a Windows Installer installation. The information in this section is provided in case you open or edit WiseScripts that contain dialog boxes.
About the Custom Dialog EditorThe Custom Dialog Editor is a built-in utility.
Use it to do the following:
Access the Custom Dialog Editor from:
Create new dialog boxes See Adding a Dialog Box to the Installation on page 119.
Edit dialog boxes See Editing Dialog Boxes on page 119.
Set dialog box properties See Setting Dialog Box Properties on page 119.
Create a dialog box set See About Custom Dialog Box Sets on page 141.
Add interactivity to dialog boxes See Creating a Custom Dialog Box Script on page 142
Script Editor Double-click the Custom Dialog script action or a Custom Dialog script line.
WiseScript Editor Reference 118

Creating Custom Dialog Boxes
Adding a Dialog Box to the InstallationWhen you add a dialog box, the dialog box is empty, and nothing is preconfigured. You must design and configure it yourself.
To create a new dialog box
1. In Script Editor, double-click the Custom Dialog script action in the Actions list.
The Dialog Box Properties dialog box appears.
2. Enter a title for the dialog box in Dialog Title and click OK. Do not enter the same title as an existing dialog box.
See Setting Dialog Box Properties on page 119.
The new dialog box opens in the Custom Dialog Editor.
3. Add and configure controls on the new dialog box.
See About Dialog Box Controls on page 120
See Adding and Editing Dialog Box Controls on page 121
4. Select File menu > Save Changes and exit.
NoteTo use this dialog box in other installation scripts, select File menu > Save As and save the dialog box as a .DLG file in the \Dialogs\Template subdirectory of this product’s installation directory. This does not affect the current installation. You can add a saved dialog box to another installation by selecting File menu > Open in the Custom Dialog Editor.
Editing Dialog BoxesWhen you edit a dialog box, the changes affect the current installation only. However, if you save the dialog box and overwrite the .DLG template file, then the dialog box is changed for all future installations.
1. In Script Editor, locate and double-click the Custom Dialog script line that calls the dialog box.
The dialog box opens in the Custom Dialog Editor.
2. Make changes to the dialog box by adding, editing, or removing controls.
See Adding and Editing Dialog Box Controls on page 121
See Aligning and Spacing Dialog Box Controls on page 138
3. Select File menu > Save Changes and exit.
See also:
Adding a Dialog Box to the Installation on page 119
Setting Dialog Box PropertiesYou can create or change the properties of a dialog box including its title, default font, dimensions, and positions.
1. Open the dialog box in the Custom Dialog Editor.
WiseScript Editor Reference 119

Creating Custom Dialog Boxes
See Editing Dialog Boxes on page 119.
2. Select Edit menu > Dialog Box Properties.
The Dialog Box Properties dialog appears. (This dialog box also appears when you click Add on the Dialogs page.)
3. Complete the dialog box:
Dialog TitleEnter the title for the dialog box.
Font Name / Font SizeEnter the exact name of a font and a point size. This font type and size is applied to any text whose font attribute is set to Default Font. When you add or edit a text box, you can set the font to the default or override the default with a customized font.
Width / HeightEnter the dialog box size in points. All dialog boxes in a wizard loop must have the same size as the first dialog box or screen refresh problems occur.
NoteYou can also resize the dialog box by clicking its edges and dragging. Use the Width and Height fields for more precise sizing.
Horiz. Position / Vert. PositionSelect where on the screen to display the dialog box. If you select Default, the dialog box is centered on the screen.
Do not display wizard graphic on this dialogNormally, the wizard graphic is set in the Wizard Loop script action, and applies to all dialog boxes in the wizard loop. Mark this check box to turn off the wizard graphic on this dialog box.
4. Click OK.
About Dialog Box ControlsInstallation dialog boxes contain standard controls, which you can add and edit. Most controls are configured by completing their Settings dialog box.
See Adding and Editing Dialog Box Controls on page 121.
You can add the following types of controls to dialog boxes:
Check box A single check box for on/off, true/false settings.
See Adding Check Box Controls on page 122.
Combo Box A combination edit field and drop-down list control that lets the end user select a predefined value or enter a value.
See Adding Combo Box Controls on page 123.
Edit Text An editable text field that accepts single or multiple lines. You can also use this type of control to display a text file.
See Adding Edit Text Controls on page 125.
WiseScript Editor Reference 120

Creating Custom Dialog Boxes
The sample scripts that use custom dialog boxes all use dialog box controls. For details on sample scripts, see ScriptHelp.htm in the Samples subdirectory of this product’s installation directory.
Adding and Editing Dialog Box Controls1. Open the dialog box in the Custom Dialog Editor.
See Editing Dialog Boxes on page 119.
2. Select the control by doing one of the following:
Click the control in the Control Palette.
Right-click, select Add, and select a command.
Use the Add menu on the main menu bar.
The settings dialog box for the control appears.
3. Complete the dialog box.
Graphic A non-editable bitmap graphic.
See Adding Graphic Controls on page 126.
Group Box A boundary box drawn around related controls.
See Adding Group Box Controls on page 127.
Hot Text Text that you can link to actions or a Web page.
See Adding Hot Text Controls on page 128.
List Box A single column of values. The end user can select one or more values from the list.
See Adding List Box Controls on page 130.
Play AVI An animation. This does not include controls to play, stop, rewind, or fast forward the movie.
See Adding Play AVI Controls on page 131.
Push Button A clickable button. Generally you must configure buttons to perform an action, such as displaying another dialog box. Buttons can also close a dialog box, set script variables, and take other actions. Every dialog box must contain at least one button.
See Adding Push Button Controls on page 132.
Radio Button A group of mutually exclusive options with a separate radio button for each option.
See Adding Radio Button Controls on page 134.
Rectangle A box.
See Adding Rectangle Controls on page 135.
Text Control Static text field for displaying messages. The end user cannot change text in this type of field.
See Adding Text Controls on page 136.
WiseScript Editor Reference 121

Creating Custom Dialog Boxes
For information about the settings dialog box for each control, see About Dialog Box Controls on page 120.
4. Click OK to add the new control to the dialog box.
You can resize and move the control using its handles. To select multiple controls, use Shift+click. To resize and move controls with more precision, double-click the control to open its settings dialog box.
Adding Check Box ControlsLike radio buttons, a group of check boxes is considered a single control. However, unlike radio buttons, the end user can select multiple check boxes. Alignment and spacing between the individual check boxes is maintained by the Custom Dialog Editor. Check boxes are often used to control the installation of components or sub-components.
1. Open the dialog box in the Custom Dialog Editor.
See Editing Dialog Boxes on page 119.
2. Select Add menu > Checkbox.
The Checkbox Control Settings dialog box appears.
3. Complete the dialog box:
Checkbox TextEnter the text options for the check boxes, one on each line. If the end user selects the first check box, the letter A is appended to the variable that stores the return value. If the end user selects the second check box, the letter B is appended, and so on. The variable stores letters of all check boxes that are selected. Example: If the end user marks the first, third, and fourth check boxes, the variable is “ABD.”
VariableSpecify the name of the script variable that stores the return value of this dialog box control.
NoteIf you set the variable to a string containing one or more lowercase letters, the corresponding options are unavailable in the radio button control when it appears on the dialog box. Example: For a radio button with four options and a variable of “ABcd,” last two options unavailable.
Sub-ComponentsIf the check box control is being used to specify the components to be installed, and if the components have sub-components, enter the names of sub-component variables separated by commas.
Control NameEnter the name by which you will refer to this control in the dialog box script. Leave this blank if you will not manipulate this control with a script.
X-Position / Y-PositionSpecify the exact location of the control on the dialog box. You can also use the alignment commands to precisely arrange controls on the dialog box.
See Aligning and Spacing Dialog Box Controls on page 138.
WiseScript Editor Reference 122

Creating Custom Dialog Boxes
NoteA dialog unit is based on the size of the dialog font, usually 8-point MS Sans Serif. A horizontal dialog unit is 1/4 the average width of the font and a vertical dialog unit is 1/8 the average height of the font.
Width / HeightSpecify the exact dimensions of the control in dialog units. You can also resize controls by dragging their handles, though this is not as precise.
ComponentsIf this is marked, the sizes of the components that correspond to the variable specified are displayed to the right of the check boxes. Normally, you mark this check box only if you are selecting components and you have specified the COMPONENTS variable.
Retain DisabledIf you set the check box variable so that some of its options are disabled, those options become enabled if the end user proceeds to the next dialog box and uses the Back button. Mark this check box to cause any lowercase letters in the variable to stay in the variable, which makes disabled options retain their disabled state even when the end user navigates between dialog boxes. If this check box is cleared, the variable takes the value of the option that was selected, and the lowercase information is lost.
4. Click OK.
Adding Combo Box ControlsA combo box can take three forms: a list box, a drop-down list, and a drop-down list that can accept text entry. In the text entry drop-down list, end users can enter text or select a value from the list. The size of a combo box determines where the drop-down list drops.
NoteWhen you place a combo box, you must resize the bounding box so that it is taller than the visible combo box. Otherwise, the drop-down list fails to drop down when the installation runs.
1. Open the dialog box in the Custom Dialog Editor.
See Editing Dialog Boxes on page 119.
2. Select Add menu > Combo Box.
The Combo Box Control Settings dialog box appears.
3. Complete the dialog box:
Combo Box TextEnter the text to be displayed in the list. Enter one item per line.
SortMark this to sort the combo box items into ascending order.
Vert. ScrollMark this to let the end user scroll vertically if there are more items than fit into the allocated space.
WiseScript Editor Reference 123

Creating Custom Dialog Boxes
Auto HScrollMark this to scroll the text entry field horizontally if more text is entered than fits.
ProgMan GroupsMark this to have the items in the Programs group of the Windows Start menu appear in the combo box.
Drive ListMark this to display the end user’s available drives in the combo box. The value returned is a letter and a colon (example: C:).
DirectoryMark this to remove trailing backslashes from the text before it is placed in the variable.
Confirm If ExistsMark this to prompt for confirmation if the path that the end user enters already exists on the destination computer. Clear this check box to prevent the “This directory already exists” message from appearing.
VariableSpecify the name of the script variable that stores the return value of this dialog box control.
NoteTo cause an option in the list to be pre-selected, use a Set Variable action to set a variable to the value of one of the options. Then select that variable in the Variable field.
Combo Box TypeSelect the combo box type:
Simple. List box from which end users can make a selection.
Drop Down. Drop-down list that allows text entry or selection from the list.
Drop List. Drop-down list that only allows selection from the list.
Control NameEnter the name by which you will refer to this control in the dialog box script. Leave this blank if you will not manipulate this control with a script.
X-Position / Y-PositionSpecify the exact location of the control on the dialog box. You can also use the alignment commands to precisely arrange controls on the dialog box.
See Aligning and Spacing Dialog Box Controls on page 138.
NoteA dialog unit is based on the size of the dialog font, usually 8-point MS Sans Serif. A horizontal dialog unit is 1/4 the average width of the font and a vertical dialog unit is 1/8 the average height of the font.
Width / HeightSpecify the exact dimensions of the control in dialog units. You can also resize controls by dragging their handles, though this is not as precise.
WiseScript Editor Reference 124
Creating Custom Dialog Boxes
NoteA combo box field should be at least as wide as the longest option in the list.
Adding Edit Text ControlsAn edit text control lets the end user enter and edit text information. You can also use it to display text (example: license agreements or ReadMe files).
1. Open the dialog box in the Custom Dialog Editor.
See Editing Dialog Boxes on page 119.
2. Select Add menu > Edit Text.
The Edit Text Control Settings dialog box appears.
3. Complete the dialog box:
DefaultEnter text to appear in the Edit Text control by default. To start a new line, press Ctrl+Enter and then mark the Multi-line check box below.
VariableSpecify the name of the script variable that stores the return value of this dialog box control.
AlignmentSelect how to align the text in the edit field. This is enabled only when the Multi-line check box is marked.
Control NameEnter the name by which you will refer to this control in the dialog box script. Leave this blank if you will not manipulate this control with a script.
Horiz. ScrollMark this to add a horizontal scroll bar.
Vert. ScrollMark this to add a vertical scroll bar.
Auto HScrollMark this to scroll the text if it extends past the right edge of the edit field.
Auto VScrollMark this to scroll the text if it extends past the bottom of the edit field.
Multi-lineMark this to allow multiple lines of text to be entered into the edit field.
PasswordMark this if entered text should display as asterisks (*), providing password security.
No Hide SelNormally, text highlighting is hidden when the dialog box loses focus. Mark this check box to suppress the hiding of highlighting.
Want ReturnMark this to let the end user advance to the next line with the Enter key. This option must be used with the Multi-line option.
WiseScript Editor Reference 125

Creating Custom Dialog Boxes
BorderMark this to include a border around the edit field.
Uppercase / LowercaseMark one of these check boxes to convert all entered characters to a different case.
Read OnlyMark this to prevent end users from entering data into the field.
Tab StopMark this to let end users use the Tab key to give focus to this field. Make sure this is marked for input fields.
RichEditMark this to support rich text objects (example: formatted text, bold, italic, font size variations, and colors). This causes rich text files to display properly.
Read Default Text from FileEnter the path of a text file. This path should be relative. Use variable substitution (example: %MAINDIR% to refer to the destination directory) to begin the path. The file contents are displayed in this field.
Min. Length / Max. LengthEnter the minimum or maximum allowed number of characters for text entered in this field. To make the field optional, set the minimum length to zero.
DirectoryMark this to remove trailing backslashes from the text before it is placed in the variable.
Confirm If ExistsMark this to prompt for confirmation if the path that the end user enters already exists on the destination computer. Clear this check box to prevent the “This directory already exists” message from appearing.
X-Position / Y-PositionSpecify the exact location of the control on the dialog box. You can also use the alignment commands to precisely arrange controls on the dialog box.
See Aligning and Spacing Dialog Box Controls on page 138.
NoteA dialog unit is based on the size of the dialog font, usually 8-point MS Sans Serif. A horizontal dialog unit is 1/4 the average width of the font and a vertical dialog unit is 1/8 the average height of the font.
Width / HeightSpecify the exact dimensions of the control in dialog units. You can also resize controls by dragging their handles, though this is not as precise.
4. Click OK.
Adding Graphic ControlsYou can add graphics to be displayed on a dialog box. Graphic controls are static controls, which means that the end user cannot make changes to them.
1. Open the dialog box in the Custom Dialog Editor.
See Editing Dialog Boxes on page 119.
WiseScript Editor Reference 126

Creating Custom Dialog Boxes
2. Select Add menu > Graphic in the Custom Dialog Editor.
The Graphic Control Settings dialog box appears.
3. Complete the dialog box:
Graphic PathnameSpecify the path for the bitmap graphic to add to the dialog box.
Control NameEnter the name by which you will refer to this control in the dialog box script. Leave this blank if you will not manipulate this control with a script.
Do not resize bitmap graphicNormally, graphics are resized if the dialog box needs to be made larger (example: if the destination computer uses a larger font size). Mark this check box to keep the graphic at the same size, regardless of the system settings. Because this option may cause the graphic to appear in a different place on the dialog box, test the installation thoroughly.
X-Position / Y-PositionSpecify the exact location of the control on the dialog box. You can also use the alignment commands to precisely arrange controls on the dialog box.
See Aligning and Spacing Dialog Box Controls on page 138.
NoteA dialog unit is based on the size of the dialog font, usually 8-point MS Sans Serif. A horizontal dialog unit is 1/4 the average width of the font and a vertical dialog unit is 1/8 the average height of the font.
Width / HeightSpecify the exact dimensions of the control in dialog units. You can also resize controls by dragging their handles, though this is not as precise.
4. Click OK.
Adding Group Box ControlsA group box encloses a group of related controls with a rectangle. Example: The Placement section on the Group Box Control Settings dialog box is a group box.
1. Open the dialog box in the Custom Dialog Editor.
See Editing Dialog Boxes on page 119.
2. Select Add menu > Group Box.
The Group Box Control Settings dialog box appears.
3. Complete the dialog box:
Group Box TextEnter a name to appear at the top of the group box. Example: On the Group Box Control Settings dialog box, “Placement” is the group box text.
Control NameEnter the name by which you will refer to this control in the dialog box script. Leave this blank if you will not manipulate this control with a script.
Transparent BackgroundMark this to make the background for this control transparent.
WiseScript Editor Reference 127

Creating Custom Dialog Boxes
X-Position / Y-PositionSpecify the exact location of the control on the dialog box. You can also use the alignment commands to precisely arrange controls on the dialog box.
See Aligning and Spacing Dialog Box Controls on page 138.
NoteA dialog unit is based on the size of the dialog font, usually 8-point MS Sans Serif. A horizontal dialog unit is 1/4 the average width of the font and a vertical dialog unit is 1/8 the average height of the font.
Width / HeightSpecify the exact dimensions of the control in dialog units. You can also resize controls by dragging their handles, though this is not as precise.
4. Click OK.
Adding Hot Text ControlsUse the Hot Text control to link an action to specific text. (Example: Add hot text with a link to a Web page or to a different dialog box.) Hot text changes color and might also become underlined as the mouse pointer passes over it.
1. Open the dialog box in the Custom Dialog Editor.
See Editing Dialog Boxes on page 119.
2. Select Add menu > Hot Text.
The Hot Text Control Settings dialog box appears.
3. Complete the dialog box:
LabelEnter the text to use as hot text.
VariableSpecify the name of the script variable that stores the return value of this dialog box control.
ValueEnter the value that gets assigned to the variable if this button is clicked. This can be useful in a script when you need to know which hot text the end user clicked.
Control NameEnter the name by which you will refer to this control in the dialog box script. Leave this blank if you will not manipulate this control with a script.
ActionSelect an action for the control:
Return to Previous DialogDisplays the previously-displayed dialog box in the dialog box set. (Exception: The Back buttons on wizard dialog boxes do not use this option. They are controlled by the Wizard Loop script action.) If this is the first dialog box in the set, it returns to the installation script.
Return to ScriptReturns to the installation script, even if this dialog box was called from another dialog box in the dialog box set.
WiseScript Editor Reference 128

Creating Custom Dialog Boxes
Display DialogDisplays the selected dialog box from the current set.
Abort InstallationThe end user is asked to confirm that the installation should be aborted.
Display Help ContextIf the HELPFILE variable points to a valid copy of a Windows help file, the specified numeric help context is displayed.
Execute ProgramStarts another application or links to a Web page. Click Edit to specify and configure the application to be started.
See Specifying Execute Program Settings on page 137.
Execute Named EventPasses a named event to the dialog box script. The DLG_EVENT_TYPE variable is set to the entered text.
See Creating a Custom Dialog Box Script on page 142.
Set FontNormally, all controls use the default font, which you set on the Dialog Box Properties dialog box. Click this to override the default font for this control. If the font you choose is not available on this computer, the system font is used.
Default FontClick this to use the font specified on the Dialog Box Properties dialog box.
Disabled Color / Enabled ColorClick Color to choose from the palette or to define custom colors. Enabled Color is the color in which the hot text appears when the end user moves the mouse pointer moves over the text.
Underline Enabled TextMark this to underline the hot text when the end user moves the mouse pointer over the text.
X-Position / Y-PositionSpecify the exact location of the control on the dialog box. You can also use the alignment commands to precisely arrange controls on the dialog box.
See Aligning and Spacing Dialog Box Controls on page 138.
NoteA dialog unit is based on the size of the dialog font, usually 8-point MS Sans Serif. A horizontal dialog unit is 1/4 the average width of the font and a vertical dialog unit is 1/8 the average height of the font.
Width / HeightSpecify the exact dimensions of the control in dialog units. You can also resize controls by dragging their handles, though this is not as precise.
Do Not Check FieldsMark this to suppress directory confirmation and field validity checking.
4. Click OK.
WiseScript Editor Reference 129

Creating Custom Dialog Boxes
Adding List Box ControlsA list box is a list of values from which the end user can choose. The control can return either the actual string the end user selected, or its position in the list as a letter. If it returns letters, it returns A if the first item is selected, B if the second item is selected, and so on.
1. Open the dialog box in the Custom Dialog Editor.
See Editing Dialog Boxes on page 119.
2. Select Add menu > List Box.
The List Box Control Settings dialog box appears.
3. Complete the dialog box:
List Box TextEach line of this text is displayed as a separate item in the list box. Press Enter between selections so there is only one item per line.
VariableSpecify the name of the script variable that stores the return value of this dialog box control.
Control NameEnter the name by which you will refer to this control in the dialog box script. Leave this blank if you will not manipulate this control with a script.
List Box TypeSelect the list box type:
Normal. A simple list.
Program Manager Groups. A list of the items in the Programs group of the Start menu.
Directory Tree Browse. A directory tree browser including an edit field, directory tree, and disk drive list.
List Box with Checkboxes. A list containing a check box for each item, allowing multiple items to be selected simultaneously.
ComponentsIf this list box control is being used to specify the components to be installed, and if the components have sub-components, enter the names of sub-component variables separated by commas.
SortMark this to sort the list box items in ascending order.
Vert. ScrollMark this to add a vertical scroll bar.
Horiz. ScrollMark this to add a horizontal scroll bar.
Disable No ScrollMark this to display a vertical scrollbar even if one is not needed.
Multi-SelectMark this to let the end user select multiple items from the list.
WiseScript Editor Reference 130

Creating Custom Dialog Boxes
Return LettersMark this to cause the control to return a list of letters representing the item selected (that is, A for the first, B for the second, etc.) rather than the item text itself.
Don’t AppendMark this to not append the “Program Files” directory name to the Destination Directory selected by the end user.
Confirm If ExistsMark this to prompt for confirmation if the path that the end user enters already exists on the destination computer. Clear this check box to prevent the “This directory already exists” message from appearing.
ComponentsTo create named components, populate the Components field above and mark this check box.
Store PositionMark this to store the position of the last selected item. The position is stored as a zero-padded, two-digit decimal number at the beginning of the variable. Example: If the end user selects the first, the third, then the fourth item, this control returns a value of 04ACD.
X-Position / Y-PositionSpecify the exact location of the control on the dialog box. You can also use the alignment commands to precisely arrange controls on the dialog box.
See Aligning and Spacing Dialog Box Controls on page 138.
NoteA dialog unit is based on the size of the dialog font, usually 8-point MS Sans Serif. A horizontal dialog unit is 1/4 the average width of the font and a vertical dialog unit is 1/8 the average height of the font.
Width / HeightSpecify the exact dimensions of the control in dialog units. You can also resize controls by dragging their handles, though this is not as precise.
4. Click OK.
Adding Play AVI ControlsYou can play an animation on any of the installation dialog boxes by adding a Play AVI dialog box control. (Example: You might want to provide marketing information or offer animated help on how to install your application.) The .AVI will play once or loop continuously.
1. Open the dialog box in the Custom Dialog Editor.
See Editing Dialog Boxes on page 119
2. Select Add menu > Play AVI.
The Play AVI Control Settings dialog box appears.
3. Complete the dialog box:
.AVI PathnameSpecify the path for the animation file (.AVI) to play on the dialog box.
WiseScript Editor Reference 131

Creating Custom Dialog Boxes
Control NameEnter the name by which you will refer to this control in the dialog box script. Leave this blank if you will not manipulate this control with a script.
X-Position / Y-PositionSpecify the exact location of the control on the dialog box. You can also use the alignment commands to precisely arrange controls on the dialog box.
See Aligning and Spacing Dialog Box Controls on page 138.
NoteA dialog unit is based on the size of the dialog font, usually 8-point MS Sans Serif. A horizontal dialog unit is 1/4 the average width of the font and a vertical dialog unit is 1/8 the average height of the font.
Width / HeightSpecify the exact dimensions of the control in dialog units. You can also resize controls by dragging their handles, though this is not as precise.
Loop ContinuouslyMark this to repeatedly start the animation from the beginning.
4. Click OK.
Adding Push Button ControlsPush buttons are simply buttons (example: OK or Cancel). When clicked, they perform an action, such as saving the dialog box data, closing the dialog box, or advancing to the next dialog box. Each dialog box must have at least one button that allows the end user to exit the dialog box.
1. Open the dialog box in the Custom Dialog Editor.
See Editing Dialog Boxes on page 119.
2. Select Add menu > Push Button.
The Push Button Control Settings dialog box appears.
3. Complete the dialog box:
LabelEnter the name of the push button. To create a keyboard shortcut for the button, enter an ampersand (&) immediately before a letter. For example, “< &Back” would display the label “< Back” and set the keyboard shortcut to Alt+B.
VariableSpecify the name of the script variable that stores the return value of this dialog box control.
ValueEnter the value that gets assigned to the variable if this button is clicked. This can be useful in a script when more than one button can dismiss a dialog box and you need to know which one the end user clicked.
Control NameEnter the name by which you will refer to this control in the dialog box script. Leave this blank if you will not manipulate this control with a script.
WiseScript Editor Reference 132
Creating Custom Dialog Boxes
ActionSelect an action for the control:
Return to Previous DialogDisplays the previously-displayed dialog box in the dialog box set. (Exception: The Back buttons on wizard dialog boxes do not use this option. They are controlled by the Wizard Loop script action.) If this is the first dialog box in the set, it returns to the installation script.
Return to ScriptReturns to the installation script, even if this dialog box was called from another dialog box in the dialog box set.
Display DialogDisplays the selected dialog box from the current set.
Abort InstallationThe end user is asked to confirm that the installation should be aborted.
Display Help ContextIf the HELPFILE variable points to a valid copy of a Windows help file, the specified numeric help context is displayed.
Execute ProgramStarts another application or links to a Web page. Click Edit to specify and configure the application to be started.
See Specifying Execute Program Settings on page 137.
Execute Named EventPasses a named event to the dialog box script. The DLG_EVENT_TYPE variable is set to the entered text.
See Creating a Custom Dialog Box Script on page 142.
X-Position / Y-PositionSpecify the exact location of the control on the dialog box. You can also use the alignment commands to precisely arrange controls on the dialog box.
See Aligning and Spacing Dialog Box Controls on page 138.
NoteA dialog unit is based on the size of the dialog font, usually 8-point MS Sans Serif. A horizontal dialog unit is 1/4 the average width of the font and a vertical dialog unit is 1/8 the average height of the font.
Width / HeightSpecify the exact dimensions of the control in dialog units. You can also resize controls by dragging their handles, though this is not as precise.
Default ButtonMark this to make this the default button, that is, the one that is selected if the end user presses the Enter key. Specify only one default button per dialog box.
Do Not Check FieldsMark this to suppress directory confirmation and field validity checking (useful for Browse buttons).
4. Click OK.
WiseScript Editor Reference 133

Creating Custom Dialog Boxes
The sample script Event Handler.wse uses scripting to handle push button controls. For details on sample scripts, see ScriptHelp.htm in the Samples subdirectory of this product’s installation directory.
Adding Radio Button ControlsA group of radio buttons is considered a single control. The end user can select only one button from the group. Alignment and spacing between the individual buttons is maintained by the Custom Dialog Editor.
1. Open the dialog box in the Custom Dialog Editor.
See Editing Dialog Boxes on page 119.
2. Select Add menu > Radio Button.
The Radio Button Control Settings dialog box appears.
3. Complete the dialog box:
Radio Button TextEnter the text options for the radio buttons, one on each line. If the end user selects the first radio button, the letter A will be put into the variable that stores the return value. If the end user selects the second radio button, the letter B is returned, and so on.
Retain DisabledIf you set the radio button variable so that some of its options are disabled, those options become enabled if the end user proceeds to the next dialog box and uses the Back button. Mark this check box to cause any lowercase letters in the variable to stay in the variable, which makes disabled options retain their disabled state even when the end user navigates between dialog boxes. If this check box is cleared, the variable takes the value of the option that was selected, and the lowercase information is lost.
VariableSpecify the name of the script variable that stores the return value of this dialog box control.
NoteIf you set the variable to a string containing one or more lowercase letters, the corresponding options are disabled in the radio button control when it appears on the dialog box. Example: A radio button with four options and a variable of “ABcd” would have the last two options disabled.
Control NameEnter the name by which you will refer to this control in the dialog box script. Leave this blank if you will not manipulate this control with a script.
X-Position / Y-PositionSpecify the exact location of the control on the dialog box. You can also use the alignment commands to precisely arrange controls on the dialog box.
See Aligning and Spacing Dialog Box Controls on page 138.
NoteA dialog unit is based on the size of the dialog font, usually 8-point MS Sans Serif. A horizontal dialog unit is 1/4 the average width of the font and a vertical dialog unit is 1/8 the average height of the font.
WiseScript Editor Reference 134

Creating Custom Dialog Boxes
Width / HeightSpecify the exact dimensions of the control in dialog units. You can also resize controls by dragging their handles, though this is not as precise.
4. Click OK.
The sample script License Agreement.wse uses scripting to handle radio button controls. For details on sample scripts, see ScriptHelp.htm in the Samples subdirectory of this product’s installation directory.
Adding Rectangle ControlsUse the Rectangle dialog box control to draw a box on the dialog box. Rectangle controls are static controls, which means that the end user cannot make changes to them.
1. Open the dialog box in the Custom Dialog Editor.
See Editing Dialog Boxes on page 119.
2. Select Add menu > Rectangle.
The Frame/Rectangle Control Settings dialog box appears.
3. Complete the dialog box:
TypeSelect Frame or Rectangle. Operating systems used to treat rectangles and frames differently, but now there is no longer any difference.
BevelSpecify the 3D appearance of the frames or rectangles:
Inset. Frame/rectangle appears to sink into the dialog box.
Flush. Frame/rectangle appears at the same level with the dialog box.
Outset. Frame/rectangle appears to pop out of the dialog box.
Control NameEnter the name by which you will refer to this control in the dialog box script. Leave this blank if you will not manipulate this control with a script.
X-Position / Y-PositionSpecify the exact location of the control on the dialog box. You can also use the alignment commands to precisely arrange controls on the dialog box.
See Aligning and Spacing Dialog Box Controls on page 138.
NoteA dialog unit is based on the size of the dialog font, usually 8-point MS Sans Serif. A horizontal dialog unit is 1/4 the average width of the font and a vertical dialog unit is 1/8 the average height of the font.
Width / HeightSpecify the exact dimensions of the control in dialog units. You can also resize controls by dragging their handles, though this is not as precise.
4. Click OK.
WiseScript Editor Reference 135

Creating Custom Dialog Boxes
Adding Text ControlsUse text controls to display information on a dialog box. Text controls are static controls, which means that the end user cannot change them.
1. Open the dialog box in the Custom Dialog Editor.
See Editing Dialog Boxes on page 119.
2. Select Add menu > Text Control.
The Text Control Settings dialog box appears.
3. Complete the dialog box:
TextEnter the text, up to a maximum of 511 characters. To start a new line, press Ctrl+Enter. Enter variable names surrounded by percent signs to display the application’s name or other information.
See Variables and Expressions on page 32.
Control NameEnter the name by which you will refer to this control in the dialog box script. Leave this blank if you will not manipulate this control with a script.
Text AlignmentSelect how to align the text in the field.
Fit pathname to field widthIf the control displays a path, mark this to cause the path to be shortened, if necessary, to allow it to fit in the allotted space. Omitted directories are indicated in the path by “\…\”.
No WrapMark this to prevent text wrapping if the text is too long to display on a single line.
No PrefixNormally, the ampersand character (&) in static text indicates that the next character should be underlined and used as a shortcut to that control. If you mark this check box, the & is displayed literally and no underlining is performed.
Set FontNormally, all controls use the default font, which you set on the Dialog Box Properties dialog box. Click this to override the default font for this control. If the font you select is not available on this computer, the system font is used.
Default FontClick this to use the font specified on the Dialog Box Properties dialog box.
Transparent backgroundMark this to make the background for this control transparent.
Calculated ValueThis section is used primarily in component installations to display the space requirements for the selected components. Example: When a component installation is run, the Select Component Dialog displays the disk space required and the disk space remaining. That information is provided by the following fields:
WiseScript Editor Reference 136

Creating Custom Dialog Boxes
ComponentsThis variable represents the Disk Space Required by the selected component set. Select the COMPONENTS variable, as it calculates the total space requirements for the currently-selected component set.
DiskThis variable represents the Disk Space Remaining on the installation drive. Select the MAINDIR variable, as it keeps track of free space in the installation directory.
X-Position / Y-PositionSpecify the exact location of the control on the dialog box. You can also use the alignment commands to precisely arrange controls on the dialog box.
See Aligning and Spacing Dialog Box Controls on page 138.
NoteA dialog unit is based on the size of the dialog font, usually 8-point MS Sans Serif. A horizontal dialog unit is 1/4 the average width of the font and a vertical dialog unit is 1/8 the average height of the font.
Width / HeightSpecify the exact dimensions of the control in dialog units. You can also resize controls by dragging their handles, though this is not as precise.
4. Click OK.
Specifying Execute Program SettingsYou can execute a program or link to a Web page when the end user clicks a hot text or button control on a dialog box.
1. Open the Hot Text or Push Button Control Settings dialog box.
See Adding Hot Text Controls on page 128 or Adding Push Button Controls on page 132.
2. Mark the Execute Program option and click Edit.
The Execute Program Settings dialog box appears.
3. Complete the dialog box:
EXE PathSpecify the path to the application to be executed, including the application executable. Use variable substitution (example: %MAINDIR% to refer to the application directory) to ensure a valid path regardless the installation location. Enter only the file name if you set the path in the Default Directory field below.
Command LineEnter the command-line options for the application (example: /S /Q). To link to a Web page, enter the URL for the Web page (example: http://www.sample.com).
Default DirectorySpecify the directory where the application looks first when looking for a file. If you entered only the file name in the EXE Path field, the file must exist in this directory. You can also use variable substitution.
WiseScript Editor Reference 137

Creating Custom Dialog Boxes
Variables AddedAny script variables that were added by the executable program using a DDE link are displayed.
NoteThis field is retained for backward compatibility only.
Window SizeYou can force the application to run in a maximized or minimized window, or allow it to run in its default (normal) window.
Wait for Program to ExitMark this to pause the installation until the executed installation has exited.
4. Click OK.
Aligning and Spacing Dialog Box ControlsThe alignment and spacing commands help you align and space controls in relation to one another.
1. Open the dialog box in the Custom Dialog Editor.
See Editing Dialog Boxes on page 119.
2. Select multiple controls.
3. From the Layout menu, select one of the following commands:
Align Controls LeftAligns the left edge of the selected controls with the left edge of the leftmost control.
Align Controls RightAligns the right edge of the selected controls with the right edge of the rightmost control.
Align Controls TopAligns the top edge of the selected controls with the top edge of the topmost control.
Align Controls BottomAligns the bottom edge of the selected controls with the bottom edge of the bottommost control.
Space Evenly DownDistributes the selected controls vertically between the topmost and bottommost controls. Their horizontal position is not changed. Use an Align Controls Left or Align Controls Right command to move them into a column.
Space Evenly AcrossDistributes the selected controls horizontally between the topmost and bottommost controls. Their vertical position is not changed. Use an Align Controls Top or Align Controls Bottom command to move them into a row.
Setting Tab Order of Dialog Box ControlsTab order refers to the sequence in which controls are selected when the end user presses the Tab key. By default, the tab order is the order in which the dialog box controls were created.
WiseScript Editor Reference 138

Creating Custom Dialog Boxes
1. Open the dialog box in the Custom Dialog Editor.
See Editing Dialog Boxes on page 119.
2. Select Layout menu > Set Tab Order.
A blue number appears next to each dialog box control, showing the current tab sequence. The first control in the tab order has the focus when a dialog box is first displayed.
3. Specify the new tab order by clicking the controls in the desired order.
As you click each control, its number turns black.
When you click the last control, the numbers disappear and the new tab order is applied.
To exit the tab order view, press Esc.
NoteAlthough static controls (example: graphics, text messages, divider lines, and so on) are included in the tab order, they are ignored when the end user presses the Tab key. Therefore, their actual tab order is irrelevant.
Solutions for Dialog Box Problems.Typically, dialog boxes are not used in WiseScripts that run silently, or in WiseScripts that you use as custom actions in a Windows Installer installation. The information in this section is provided in case you open or edit WiseScripts that contain dialog boxes.
For solutions to some of the most common dialog box editing problems, see:
Changing the Default Graphic on Wizard Dialog Boxes on page 140Keeping Disabled Controls From Reactivating on page 140About Custom Dialog Box Sets on page 141About Dialog Boxes on page 118
WiseScript Editor Reference 139

Creating Custom Dialog Boxes
Dialog boxes can exhibit different behaviors based on end user input. See ScriptHelp.htm in the Samples subdirectory of this product’s installation directory.
Changing the Default Graphic on Wizard Dialog BoxesBy default, wizard dialog boxes contain a graphic that is not part of the individual dialog boxes. It is specified on the Wizard Loop Settings dialog box, where you configure the Wizard Loop script action. You can change this graphic and turn it off for selected dialog boxes.
To change the bitmap that applies to all wizard dialog boxes
1. In Script Editor, double-click the Wizard Loop script line. There are two Wizard Loop script lines: one for the main installation and one that contains the Finish dialog box. Change both of these to display the same graphic on all dialog boxes.
The Wizard Loop Settings dialog box appears.
See Wizard Loop on page 117.
2. In the Wizard Bitmap section, in Pathname, specify a path for a new graphic.
This changes the graphic for all dialog boxes in the loop sequence.
3. Click OK.
To turn off the wizard bitmap on selected wizard dialog boxes
1. In Script Editor, double-click the Custom Dialog script line for the dialog box.
The Custom Dialog Editor opens.
2. Select Edit menu > Dialog Box Properties.
The Dialog Box Properties dialog box appears.
See Setting Dialog Box Properties on page 119.
3. Towards the bottom of the dialog box, mark Do not display wizard graphic on this dialog.
4. Click OK.
Keeping Disabled Controls From ReactivatingThis problem affects radio buttons and check boxes.
Example:
A dialog box in a wizard loop has a radio button with four options. You disable several options by setting the variable associated with the radio button to “ABcd.” The lowercase “c” and “d” disable the third and fourth options. If the end user selects an option and continues through the wizard dialog boxes, the dialog box works as designed. However, if the end user clicks the Back button to return to the dialog box that contains the radio button, then all four of the button’s options are enabled.
To correct this problem, mark the Retain Disabled check box on the settings dialog box for radio buttons and check boxes. This causes any lowercase letters in the variable to stay in the variable, even when the end user navigates between dialog boxes.
In the example above, if Retain Disabled is marked and an end user selects the first radio button option, the value of the variable is set to “cdA” (uppercase “A” because the user selected the first option.) If Retain Disabled is not marked, the radio button's
WiseScript Editor Reference 140

Creating Custom Dialog Boxes
variable is set to “A.” That is why all four radio buttons are enabled when the end user backs up, because the variable does not contain “a,” “b,” “c,” or “d.”
About Custom Dialog Box SetsA single Custom Dialog script action can display a set of related dialog boxes. You do this by using a button on one dialog box as a gateway to another dialog box. This secondary dialog box can link to another dialog box, link back to the master dialog box, or return to the installation script. A single dialog box set can contain up to 256 separate dialog boxes.
Generally, dialog box sets consist of one dialog box and the other dialog boxes that it calls. (Example: A dialog box might have an Options and Browse buttons, each of which opens a dialog box. The three dialog boxes together comprise a dialog box set.) The main dialog boxes that appear during installation are not a dialog box set, but are controlled by a Wizard Loop action in the script.
Creating a Dialog Box Set1. Create the master dialog box.
See Adding a Dialog Box to the Installation on page 119.
The master dialog box is the first dialog box that is displayed when the associated Custom Dialog script action is executed.
2. In the Custom Dialog Editor, select File menu > New Dialog.
The Dialog Box Properties dialog box appears.
3. Complete the dialog box and click OK.
See Setting Dialog Box Properties on page 119.
4. Configure the new dialog box.
See Adding and Editing Dialog Box Controls on page 121.
5. Link the set of dialog boxes together using push button controls. For information on the various actions you can assign to a button, see Adding Push Button Controls on page 132. You can link to another dialog box, link back to the master dialog box, or return to the installation script.
To switch between dialog boxes in the set, select the dialog boxes from the Window menu. (You can also delete the current dialog box using the Delete Dialog command on this menu.)
6. When you finish creating the dialog box set, select File menu > Save Changes and exit.
All the dialog boxes in the set are saved simultaneously.
Configuring Dialog Box Set PropertiesOn the Dialog Set Properties dialog box, you name the dialog box set and specify the variable on which to base the display of this set.
1. Open a dialog box from the set in the Custom Dialog Editor.
See Editing Dialog Boxes on page 119.
WiseScript Editor Reference 141

Creating Custom Dialog Boxes
2. Select Edit menu > Dialog Set Properties.
The Dialog Set Properties dialog box appears.
3. Complete the dialog box:
Dialog Set NameEnter the name of this dialog box set. If this dialog box set is comprised of only one dialog box, then this is usually the same name as the dialog box. The name must be unique within a wizard loop. This value is displayed in the installation script.
Display VariableThe display variable determines which dialog box in the wizard loop to present to the end user the next time the wizard loop is executed. When this dialog box is presented to the end user, the display variable is set to this dialog box set name. If this field is not blank, the dialog box is only displayed if the variable holds the same value as the Dialog Set Name field.
Called Dialogs FloatIf you are displaying a dialog box outside a wizard loop, mark this check box to have called dialog boxes appear in front of the calling dialog box. (Example: Suppose you display a Select Destination Directory dialog box that contains a Browse button. If this check box is marked, and the end user clicks Browse, the Browse dialog box appears in front of the Select Destination Directory dialog box instead of replacing it.) This behavior is built into the wizard loop dialog boxes by default.
4. Click OK.
Creating a Custom Dialog Box ScriptEach dialog box can include an attached WiseScript that lets you perform script actions in response to events inside a dialog box. You create this WiseScript in the Dialog Script Editor, which is a scaled-down version of Script Editor. It contains only those script actions that can be used in dialog box scripts. It lets you script dialog boxes to handle mouse movements, gather user input, and branch according to end user choices.
Events are generated as the end user works with the dialog box on the destination computer. Built-in dialog box events include first-time display of the dialog box (INIT), updating of information displayed on the dialog box (UPDATE), and verification of the validity of the contents of the dialog box (VERIFY). Additional events, whose names you define, can be generated by marking the Execute Named Event option on the settings dialog box of push button or hot text controls.
To handle the generated events, you create a conditional structure in the dialog box script that tests the variable DLG_EVENT_TYPE for the appropriate value. (Example: If DLG_EVENT_TYPE is equal to INIT, the INIT event is being called.) The script actions between the If statement that tests for this value and the End statement that goes with it should handle that event. The script can handle multiple events in different ways by including multiple conditional blocks, one after the other.
WiseScript Editor Reference 142

Creating Custom Dialog Boxes
To create a custom dialog box script
NoteBefore you write a custom dialog box script, review the introductory material in About Script Editor on page 20. Also see Conditions and Loops on page 31 and Variables and Expressions on page 32.
1. Open the dialog box in the Custom Dialog Editor.
See Editing Dialog Boxes on page 119.
2. Select View menu > Dialog Script Editor.
The Dialog Script Editor opens.
3. Create the script as you would in Script Editor.
The sample scripts Event Handler.wse and License Agreement.wse use scripting to handle mouse events. For details on sample scripts, see ScriptHelp.htm in the Samples subdirectory of this product’s installation directory.
Dialog Box Script ActionsThe script actions available in the Dialog Script Editor are a subset of the actions in Script Editor, with the addition of these script actions that manipulate controls on the dialog box programmatically: Set Control Attributes, Set Control Text, and Set Current Control.
Call DLL Function on page 46Check Configuration on page 51Check If File/Dir Exists on page 55Display Message on page 69Edit INI File on page 71Edit Registry on page 71Else Statement on page 75ElseIf Statement on page 75End Statement on page 76Get Registry Key Value on page 85Get System Information on page 87If Statement on page 90Parse String on page 99Prompt for Filename on page 102Read INI Value on page 104Remark on page 106Set Control Attributes on page 110Set Control Text on page 111Set Current Control on page 111Set Variable on page 113While Statement on page 116
Dialog Box Script Examples
To see an example of a dialog box script
1. Open the sample script Event Handler.wse in the Samples subdirectory of this product’s installation directory.
2. In Script Editor, double-click the Custom Dialog “Event Handler” script line.
WiseScript Editor Reference 143

Creating Custom Dialog Boxes
The dialog box opens in the Custom Dialog Editor.
3. Select View menu > Dialog Script Editor.
The script for the dialog box appears in the Dialog Script Editor.
How you might use a dialog box script:
Have the INIT event enable buttons on the current dialog box if the end user answers a previous dialog box in a certain way. Check the variable containing the value returned from the previous dialog box, then use one or more Set Control Attributes script actions to enable buttons.
Have the INIT event disable certain buttons if they are not valid based on previously chosen options.
Have the INIT event store the current amount of free memory in a static text control, then set the dialog box to display the current amount of free memory in the lower-left corner.
Have the UPDATE event enable the Next button on a wizard dialog box when a password field contains the correct value. The UPDATE event is called whenever any field or control is changed, and the variable associated with each field or control contains its current value, suitable for testing in a script.
Have the VERIFY event check the contents of one or more fields on the dialog box and reject the end user’s entry if it is not valid. VERIFY is called when the end user tries to exit the dialog box. Set the DLG_EVENT_TYPE variable to an empty string within the handler to prevent the dialog box from closing. If all fields are correct, do not change DLG_EVENT_TYPE.
Create a button on the dialog box that generates a custom event. Example: Create an event called DISKSPACE, and set its handler to show the amount of free disk space using a Display Message event.
WiseScript Editor Reference 144

Chapter 6Creating Custom Billboards
This chapter includes the following topics:
About Billboards on page 145
Accessing the Custom Billboard Editor on page 145
About the Custom Billboard Editor on page 146
Opening and Saving Custom Billboards on page 147
Adding Objects to a Billboard on page 147
About BillboardsBillboards are a series of one or more graphics that present a slide show to the end user while files are being installed on the destination computer. These are typically used to encourage the end user to register the product, to promote related products, or to provide other useful information.
Accessing the Custom Billboard Editor1. Select Script Editor.
2. In the Actions List, double-click the Custom Billboard action.
The Custom Billboard Editor window opens.
WiseScript Editor Reference 145

Creating Custom Billboards
The tools you need to work in the Custom Billboard Editor are accessible from its menubar or the icons on the toolbar.
About the Custom Billboard EditorThe Custom Billboard Editor provides a basic set of drawing tools for creating billboards. You can create scalable, vector-based artwork that can be added to the billboards and displayed during installation. Although you can import graphics created in other drawing programs, there are advantages to using the Custom Billboard Editor. Example: The Scale to Screen option can resize native billboard objects so they look the same regardless of the resolution of the destination computer.
In the Custom Billboard Editor, you can move, rearrange, recolor, or resize all objects. (Example: Text remains editable once it has been added, making it easy to translate your billboards into multiple languages.) If you import bitmaps created in other programs, you can still use the Custom Billboard Editor to place other objects (example: editable text) over them.
The Custom Billboard Editor includes a blue work area with black lines marking the boundaries of a monitor set for 640 x 480 resolution. The blue work area indicates that the background is transparent, so any objects you place here appear over whatever background is displayed by the installation.
When you save a billboard from the Custom Billboard Editor, you are saving the entire blue screen area, including the text, lines, shapes, and graphics that are on the screen. When you save a billboard as a separate file, it is assigned the extension .GRF.
WiseScript Editor Reference 146
Creating Custom Billboards
Opening and Saving Custom BillboardsYou can access the commands for creating, saving, exporting, and importing billboards from the File menu in the Custom Billboard Editor. There is no New command on the File menu because a new blank billboard screen appears when you open the Custom Billboard Editor.
The commands on the File menu are:
OpenOpens a billboard from a .GRF file, importing it to the current installation.
Save AsSaves a billboard to a .GRF file so you can share the file with others, or re-use it on future projects.
Exit Without SavingReturns to Script Editor without saving the changes made to the billboard.
Save Changes and ExitSaves the changes made to the billboard and returns to Script Editor saving the graphic as part of the installation. It is only saved as a separate file if you use Save As.
Adding Objects to a BillboardThe Custom Billboard Editor is object-based and lets you add different types of objects.
1. Access the Custom Billboard Editor.
See Accessing the Custom Billboard Editor on page 145.
2. From the Add menu, select an object.
3. Drag in the work area to create the object. (The polygon tool requires that you click at each point of the polygon, then double-click at the last point.)
A settings dialog box appears.
4. Complete the dialog box:
For text objects, see Editing Billboard Text Objects.
For line objects, see Editing Billboard Line Objects on page 148.
For rectangles, rounded rectangles, and ellipses, see Editing Billboard Rectangles and Ellipses on page 149.
For polygons, see Editing Billboard Polygon Objects on page 149.
For bitmaps, see Editing Billboard Bitmap Objects on page 150.
5. Click OK.
6. Position the object on the billboard.
See Resizing, Moving, and Aligning Billboard Objects on page 151.
Editing Billboard Text ObjectsText you place on a billboard using the Text tool is editable. Each text object can use only one font, size, and style.
WiseScript Editor Reference 147

Creating Custom Billboards
1. Access the Custom Billboard Editor.
See Accessing the Custom Billboard Editor on page 145.
2. Select Add menu > Text and drag the dimensions of the object in the billboard editor.
The Text Settings dialog box opens.
3. Complete the dialog box:
TextEnter the text to display. No variables can be referenced here, except compiler variables.
Extra Bold
Shadow
AlignmentSpecify the alignment of the text within its bounding rectangle.
Text AngleSpecify the angle at which text should be displayed. If a non-zero text angle is used, the text is centered regardless of the alignment setting. This feature is available only if you selected a TrueType font.
Font StyleClick Set Font to choose the font, size, and style for this object.
Text ColorClick Pick to choose a color for the text.
PlacementSpecify the size and location of the object in pixels. The upper-left corner is 0,0. The black rectangle on the billboard editor defines an area of 640 x 480 pixels.
4. Click OK.
Editing Billboard Line ObjectsWhen you draw a line on a billboard, you define a box in which the line will fit. The line is drawn from one corner of the box (either the upper left or the lower left) to its opposite.
1. Access the Custom Billboard Editor.
See Accessing the Custom Billboard Editor on page 145.
2. Select Add menu > Line and drag the dimensions of the object in the billboard editor.
The Line Settings dialog box opens.
3. Complete the dialog box:
Line StyleChoose the texture for the line.
Line ArrowsDetermines which ends of the line will have arrowheads.
Line DirectionDetermines whether the line should connect the lower-left corner of the bounding rectangle to the upper-right corner, or the upper left to the lower right.
WiseScript Editor Reference 148

Creating Custom Billboards
Line WidthThe width of the line in pixels.
Line ColorClick Pick to choose a color for the line.
PlacementSpecify the size and location of the object in pixels. The upper-left corner is 0,0. The black rectangle on the billboard editor defines an area of 640 x 480 pixels.
4. Click OK.
Editing Billboard Rectangles and EllipsesThe procedure for editing rectangles, rounded rectangles, and ellipses is the same, except that rectangles also have a 3D option.
1. Access the Custom Billboard Editor.
See Accessing the Custom Billboard Editor on page 145.
2. Select Add menu > Rectangle or Rounded Rectangle or Ellipse and drag the dimensions of the object in the billboard editor.
The Object Settings dialog box opens.
3. Complete the dialog box:
Line StyleChoose the texture for the line that outlines the shape.
Fill StyleSelect a pattern to fill the object.
3D(Rectangle only) Select a 3D effect.
Line WidthThe width of the object’s outline in pixels.
Line Color / Fill ColorClick Pick to choose a color for the line and fill.
PlacementSpecify the size and location of the object in pixels. The upper-left corner is 0,0. The black rectangle on the billboard editor defines an area of 640 x 480 pixels.
4. Click OK.
Editing Billboard Polygon ObjectsThe polygon object consists of a series of points that are connected by lines.
1. Access the Custom Billboard Editor.
See Accessing the Custom Billboard Editor on page 145.
2. Select Add menu > Polygon, click where the points should be located, and close the polygon’s path by double-clicking on the starting point.
WiseScript Editor Reference 149

Creating Custom Billboards
When you double-click the mouse button, the Polygon Settings dialog box opens.
3. Complete the dialog box:
Line StyleChoose the texture for the line that outlines the polygon.
Fill StyleSelect a pattern to fill the object.
Line WidthThe width of the object’s outline in pixels.
Polygon PointsThe list of points that define the polygon’s vertices. Click Delete to delete a selected point, or use the X and Y fields to move the selected point to new coordinates.
Line Color / Fill ColorClick Pick to choose a color for the line and fill.
4. Click OK.
Editing Billboard Bitmap ObjectsUse the Bitmap object to import bitmaps into a custom billboard. Use the text tool in the Custom Billboard Editor to add captions and content to the bitmap, rather than making the text part of the bitmap, so that you can edit the text later.
The Custom Billboard Editor supports 256-color and true-color bitmap (.BMP) files. When using multiple bitmaps, it is important that they all be created using the same graphics editor so the files share a common color palette. Otherwise, the colors can shift when the bitmaps display on-screen.
NoteImported bitmap objects can appear distorted when the billboard is run with the Scale to Screen option enabled on the Billboard Settings dialog box. This is not true of objects created in the Custom Billboard Editor.
1. Access the Custom Billboard Editor.
See Accessing the Custom Billboard Editor on page 145.
2. Select Add menu > Bitmap and drag the dimensions of the bitmap frame in the billboard editor.
The Bitmap Settings dialog box opens.
3. Complete the dialog box:
PathnameSpecify the path to a bitmap.
Closing the polygon.
WiseScript Editor Reference 150

Creating Custom Billboards
TransparentMark this to make the color in Transparent Color transparent.
Transparent ColorClick Pick to choose which color in the bitmap will be transparent. Every pixel in the image with this color becomes transparent.
PlacementSpecify the size and location of the object. For best results, make the width and height equal to the actual width and height of the image.
4. Click OK.
Resizing, Moving, and Aligning Billboard ObjectsResize an object in the Custom Billboard Editor by clicking it and dragging one of the eight handles that appear around the object.
Move objects in the Custom Billboard Editor by clicking and dragging them. For fine placement of objects, use the arrow keys on the keyboard to nudge an object one pixel at a time.
When two or more objects overlap, you can choose which one appears in front by selecting Bring to Front or Send to Back from the Edit menu.
To align billboard objects
The alignment and spacing commands help you align and space objects in relation to one another.
1. Open the billboard in the Custom Billboard Editor by double-clicking its custom action in Script Editor.
2. Use Shift+click to select multiple objects.
3. Select one of the following commands from the Layout menu:
Align Left
Align Right
Align Top
Align Bottom
Space Evenly DownDistributes the selected objects vertically between the topmost and bottommost objects. Their horizontal position is not changed. Use Align Left or Align Right to move them into a column.
Space Evenly AcrossDistributes the selected objects horizontally between the topmost and bottommost objects. Their vertical position is not changed. Use Align Top or Align Bottom to move them into a row.
Setting Billboard PropertiesWhen you are done creating a billboard, use the Billboard Settings dialog box to set the behavior of the billboard as a whole. Besides being able to specify where the billboard appears on the screen, you can control how it interacts with other billboards and choose from several fade-in or slide in effects.
WiseScript Editor Reference 151

Creating Custom Billboards
1. Open the billboard in the Custom Billboard Editor by double-clicking its custom action in Script Editor.
2. Select Edit menu > Graphic Properties.
The Billboard Settings dialog box appears. The options on this dialog box are a subset of the settings for the Display Billboard script action.
3. Complete the dialog box:
X Position, Y PositionIndicate the location on a 640 x 480 screen to place images. On larger screens, the billboard is placed proportionately based on the 640 x 480 location.
Erase NumSpecify how many previously displayed graphics are erased before this image is displayed. To display one image at a time, set to 1. To display all images simultaneously, set to 0. The oldest image is removed first.
Build EffectSpecify a transition effect.
Center Horizontal
Place at Right
Scale to ScreenMark this for the image to cover the same percentage of the screen regardless of screen size.
Hide Progress BarMark this to hide the progress bar during image display.
Center Vertical
Place at Bottom
Tile BackgroundMark this check box to repeat the graphic edge-to-edge to fill the entire screen.
Erase AllMark this check box to remove all previous graphics from the screen before displaying the new one.
Timed DisplayMark this check box to display a series of graphics at evenly-spaced intervals, which is calculated by the number of files to be installed. Place all Display Billboard actions before the first Install File(s) action if you use Timed Display.
4. Click OK.
WiseScript Editor Reference 152

Chapter 7Troubleshooting WiseScripts
This chapter includes the following topics:
About Troubleshooting a WiseScript on page 153
Using the Installation Log on page 153
File Replacement Problems in System32 on page 153
About Troubleshooting a WiseScriptUse the following features to troubleshoot a WiseScript:
Using the Installation LogThe installation log is a text file that helps you debug your script. The log is the most complete record of what the installation did. As your script runs on the destination computer, each action it performs is logged in Install.log. This includes: failures of actions to execute, the reasons for the failure, and what changes on your system.
Use the installation log to determine where problems occur and why. Quality assurance can use it to check the accuracy of the installation. It also helps technical support because end users who have problems installing can email the installation log.
Use the Add Text to Install.log script action to add your own commands to the log. You can use it to comment the install log or to customize your uninstall.
See Add Text to INSTALL.LOG on page 42.
File Replacement Problems in System32Following are file replacement problems you might encounter:
Files that you assign to the application directory or to the Windows directory incorrectly install to the System or System32 directory.
A later version of a system file does not replace an earlier version.
Installation log Lets you determine what happens during the installation, including what fails.
See Using the Installation Log on page 153.
Compiler variables Let you build a debug version of your installation .EXE that displays values of variables and other useful information while it is executing. The compiler itself helps ensure stability because it checks that all required information is present before it builds an installation .EXE.
See Compiler Variables on page 16.
WiseScript Editor Reference 153

Troubleshooting WiseScripts
Both of these symptoms can be caused by version checking code, which is executed if a file is set to be replaced based on version number. The code that does version checking also checks such things as operating system (OS) type and language, and it won’t replace files if the OS or language does not match, regardless of version.
To check if a file is replaced based on version, double-click its Install File(s) script line. In the Install File Settings dialog box that appears, if Check File is selected from the Replace Existing File drop-down list, then version checking occurs for the file.
To troubleshoot file replacement problems, you can do one of the following:
If the problem occurs because your file coincidentally has the same name as an already existing system file, rename your file.
If the problem occurs because your file is a later version of a system file, but you are trying to install it to a different location than the existing system file, consider installing it to the existing location and changing your application to look for it in the existing location.
You can turn off version checking for the file (not recommended). Do this by selecting an option from the Replace Existing File drop-down list other than Check File.
Bypass the default version checking code. By default, WiseScript calls a Microsoft .DLL for version checking. You can use the WiseScript Editor version checking method instead of Microsoft’s. To change the version checking method to the WiseScript Editor method, set the variable VER_CHECK_TYPE to 1 directly before the Install File(s) line that exhibits the problem. Then reset VER_CHECK_TYPE to null after the line, which re-enables Microsoft version checking.
Example:
Set Variable VER_CHECK_TYPE to 1Install File C:\Program Files\Application\Country.sysSet Variable VER_CHECK_TYPE to
WiseScript Editor Reference 154

Chapter 8Quick Reference
This chapter includes the following topics:
Automatic Compiler Variables on page 155
Automatic Run-time Variables on page 156
Run-time Variables on page 158
SVS Variables on page 160
Expression Operators on page 162
Command-Line Options on page 164
Automatic Compiler VariablesCompiler variables are set before the installation is built and cannot be changed by an installation script. Paths are relative to the build computer, not the destination computer. You can create and initialize compiler variables by adding an entry to the Compiler Variables page.
See Compiler Variables on page 16.
Variable Description
_ALIASNAME_ BDE Alias name
_ALIASPATH_ BDE Alias path
_ALIASTYPE_ BDE Alias type
_BDEWIN16DIR_ BDE directory for 16-bit systems
_BDEWIN32DIR_ BDE directory for 32-bit systems
_BDEWIN32INST_ BDE custom directory for use on systems that previously did not have BDE installed
_BDEWIN32LANG_ BDE language code
_BDEWIN32OPT_ BDE options
_LOGFILE_PATH_ Path to the Install.log file
_ODB16_ ODBC directory for 16-bit systems
_ODBC32_ ODBC directory for 32-bit systems
_SYS_ The Windows system directory on the build computer
_VAR_LIST_ Contains all the variables defined in this installation file, but not compiler variables
_VB4WIN16DIR_ Visual Basic directory for 16-bit systems
_VB4WIN16OPT_ Visual Basic options for 16-bit systems
WiseScript Editor Reference 155

Quick Reference
See also:
Automatic Run-time Variables on page 156Run-time Variables on page 158
Automatic Run-time VariablesThese variables are set on the destination computer just before the script executes.
_VB4WIN32DAO_ Visual Basic DAO directory
_VB4WIN32DIR_ Visual Basic directory for 32-bit systems
_VB4WIN32OPT_ Visual Basic options for 32-bit systems
_VFOXPRODIR_ Visual FoxPro directory
_VFPOPTIONS_ Visual FoxPro options
_WIN_ Windows directory on the build computer
_WISE_ The directory containing WiseScript Editor
Variable Description
BACKUPDIR If this is set to a path, any files that are replaced during installation are backed up. This variable is set by the end user on the Backup Replaced Files dialog box.
BDE_CONFIGDIR Directory where the BDE configuration file is stored on the destination computer. This is the directory where idapi32.dll is installed and registered. It is used by the BDE runtime script for installing new aliases and for ensuring that updates to the BDE get installed into the correct directory. We recommend that you do not change this variable.
CMDLINE The command-line options passed to the installation .EXE.
CRLF Holds a carriage return/linefeed character for use in making lists and separating items in lists.
DISK_NUMBER (read-only)
The number of the disk currently being used by the installation. We recommend that you do not change this variable.
DLG_EVENT_TYPE Used for custom dialog box scripts. Built-in dialog box events are INIT, UPDATE, VERIFY.
See Creating a Custom Dialog Box Script on page 142.
FONTS Path to the directory where fonts should be installed.
HELPFILE Used by custom dialog boxes to display a help context. Set this to the full path of the help file. We recommend that you do not change this variable.
INST Path to the directory containing the installation .EXE. We recommend that you do not change this variable.
Variable Description
WiseScript Editor Reference 156

Quick Reference
INST_LOG_PATH Full path in which to place Install.log at end of installation.
INSTALL_RESULT (read-only)
Holds the result of the last action performed for Install File(s), Copy Local File(s), Edit INI, and Execute Program actions. (This variable is similar to PROCEXITCODE.)
Install File(s) and Copy Local File(s) return:
V = Version. Replacement option was set to check version, and the version being installed was not newer.
D = Date. Replacement option was set to check Date/Time and the condition was not met.
E = Exists. Replacement option was Never, and the file exists.
I = Install on restart. The file was in use and will be installed on restart. (RESTART variable also set to “S”)
A null value signals success.
If the file specification is a wildcard, the value represents the last file copied or installed.
Edit INI File returns: E if the file could not be written, or null if the edit was successful.
Execute Program returns: the numeric exit code (return code) from the called application.
LANG The language the end user selects in a multi-language installation. We recommend that you do not change this variable.
PASSWORD Set this to the password to be used for password-protected files. Setting this variable disables the password prompt. Set this for distributions that do not use prompting.
PROCEXITCODE (read-only)
Holds the result of the last Execute Program action. (This variable is similar to INSTALL_RESULT.) After an Execute Program script action, this returns the exit code (return code) from the called application.
RESTART At the end of the script, set this variable to:
S -
If the current end user does not have administrator privileges, logs the user off.
If the current end user has administrator privileges, performs a full system restart at completion of the script.
W -
Logs the user off.
When left blank, it turns off the RESTART function.
Variable Description
WiseScript Editor Reference 157

Quick Reference
See also:
Automatic Compiler Variables on page 155Run-time Variables on page 158
Run-time VariablesYou can use the following run-time variables in your script.
SYS Windows System directory path. We recommend that you do not change this variable.
SYS32 Path to the system directory for Win32 files. We recommend that you do not change this variable.
TEMP Windows temporary directory path. We recommend that you do not change this variable.
UNINSTALL_LANG Language information to make the UNWISE.EXE language match the installation language.
UNINSTALL_PATH Location to place UNWISE.EXE.
WIN Path to the Windows directory. We recommend that you do not change this variable.
Variable Description
APPTITLE The title of the installation.
BACKUP Path to the end user’s selected backup directory on the destination computer.
BRANDING If this is set to 1, user information is written to CUSTDATA.INI in the directory containing the installation .EXE.
CDESKTOPDIR Common desktop directory for adding shortcuts to desktop.
CGROUPDIR Path to the directory where shortcuts for all end users are stored on Windows operating systems.
COMMON Common files directory.
COMPONENTS A list of the components the end user selects for installation on the destination computer (A for the first component, B for the second, etc.).
CSTARTMENUDIR Common Start menu directory for adding shortcuts to the Start menu.
CSTARTUPDIR Common StartUp directory for adding shortcuts to the StartUp group.
DESKTOPDIR Desktop directory for adding shortcuts to the desktop.
DIRECTION Used by the Wizard Loop action to control direction of motion through dialog boxes.
Variable Description
WiseScript Editor Reference 158

Quick Reference
See also:
DISPLAY Holds the name of the current wizard dialog box (read-only).
DOBACKUP Holds the end user’s choice as to whether to back up replaced files.
DOBRAND If this is set to 1, this is the first time the installation has been branded and user information is written to CUSTDATA.INI.
EXPLORER If this is set to 1, the end user has a Windows 95-style user interface on the destination computer (95/98, NT 4 or later).
GROUP Default group (or Start menu Programs group) for application shortcuts.
GROUPDIR Path to the directory where application shortcuts should be created (corresponds to GROUP variable).
MAINDIR Directory for application files.
NAME Used for branding and registration.
PROCEXITCODE Lets you add error codes to the built-in error codes that are returned from an installation. Check for an error condition and, if the error condition is true, put your own error text into PROCEXITCODE. At the end of the installation, if PROCEXITCODE is not blank, the return code from the installation is set to the contents of PROCEXITCODE. This lets you write conditional code based on the results of an external program.
Be sure to mark the Wait for Program to Exit check box on the Execute Program Settings dialog box for the Execute Program action.
PROGRAM_FILES Windows Program Files directory.
STARTMENUDIR Directory of the Start menu for adding shortcuts.
STARTUPDIR Directory of the StartUp group for adding shortcuts.
VER_CHECK_TYPE Set this to 1 to cause the installation to use the WiseScript simple version checking method instead of the standard Microsoft version checking method. This can fix problems when files are not being replaced as you expect. Set this variable before the Install File(s) script line that exhibits the problem.
See File Replacement Problems in System32 on page 153.
WISE_ERROR_RTN Lets you write errors to the installation log. Check for an error condition and, if the error condition is true, put your own error text into WISE_ERROR_RTN. At the end of the installation, if WISE_ERROR_RTN is not blank, the contents of WISE_ERROR_RTN are written to the installation log.
Variable Description
WiseScript Editor Reference 159

Quick Reference
Automatic Compiler Variables on page 155Automatic Run-time Variables on page 156
SVS VariablesYou can use the following SVS variables in some of the SVS script actions.
See About SVS Script Actions on page 39.
System Variables
System variables are static properties of a layer.
Variable Description Example Value
SYSTEMDRIVE The drive letter that contains the Windows directory that the system started.
C:
WINDIR The Windows directory that was started.
C:\Windows
PROFILESDIRECTORY The directory that contains local user profile information.
C:\Documents and Settings
ALLUSERSPROFILE The directory that contains the All Users profile.
C:\Documents and Settings\All Users
DEFAULTUSERPROFILE The directory that contains the Default User profile.
C:\Documents and Settings\Default User
COMMONADMINTOOLS C:\Documents and Settings\All Users\Start Menu\Programs\Administrative Tools
COMMONAPPDATA C:\Documents and Settings\All Users\Application Data
COMMONDESKTOP C:\Documents and Settings\All Users\Desktop
COMMONDOCUMENTS C:\Documents and Settings\All Users\Documents
COMMONFAVORITES C:\Documents and Settings\All Users\Favorites
COMMONPROGRAMS Folder that contains common items that appear under Start Menu / All Programs.
C:\Documents and Settings\All Users\Start Menu\Programs
COMMONSTARTMENU C:\Documents and Settings\All Users\Start Menu
COMMONSTARTUP C:\Documents and Settings\All Users\Start Menu\Programs\Startup
COMMONTEMPLATES C:\Documents and Settings\All Users\Templates
COMMONMUSIC C:\Documents and Settings\All Users\Documents\My Music
COMMONPICTURES C:\Documents and Settings\All Users\Documents\My Pictures
WiseScript Editor Reference 160

Quick Reference
Per User Variables
Per user variables are static properties of a layer.
COMMONVIDEO C:\Documents and Settings\All Users\Documents\My Videos
PROGRAMFILES C:\Program Files
MEDIAPATH C:\Windows\Media
COMMONFILES C:\Program Files\Common Files
MSSHAREDTOOLS C:\Program Files\Common Files\Microsoft Shared
Variable Description Example Value
ADMINTOOLS C:\Documents and Settings\User\Start Menu\Programs\Administrative Tools
APPDATA C:\Documents and Settings\User\Application Data
CACHE C:\Documents and Settings\User\Local Settings\Temporary Internet Files
CDBURNING C:\Documents and Settings\User\Local Settings\Application Data\Microsoft\CD Burning
COOKIES C:\Documents and Settings\User\Cookies
DESKTOP C:\Documents and Settings\User\Desktop
FAVORITES C:\Documents and Settings\User\Favorites
FONTS C:\WINDOWS\Fonts
HISTORY C:\Documents and Settings\User\Local Settings\History
LOCALAPPDATA C:\Documents and Settings\User\Local Settings\Application Data
LOCALSETTINGS C:\Documents and Settings\User\Local Settings
MYMUSIC C:\Documents and Settings\User\My Documents\My Music
MYPICTURES C:\Documents and Settings\User\My Documents\My Pictures
MYVIDEO C:\Documents and Settings\User\My Documents\My Videos
NETHOOD C:\Documents and Settings\User\NetHood
PERSONAL C:\Documents and Settings\User\My Documents
PRINTHOOD C:\Documents and Settings\User\PrintHood
PROGRAMS Folder that contains user specific items that appear under Start Menu / All Programs.
C:\Documents and Settings\User\Start Menu\Programs
RECENT C:\Documents and Settings\User\Recent
Variable Description Example Value
WiseScript Editor Reference 161

Quick Reference
Expression OperatorsIn conditionals, loops, and Set Variable commands, you can use the following operators: symbols, functions, or logical operators.
Operators can operate on a variable or a constant. There are two types of constants: numeric and string. Numeric constants must be a positive or negative integer (example: 234 or -100). Strings must be enclosed in quotation marks (“ ”).
If you enter a variable name instead of a number or string in any of the functions below, do not enter the % characters around the variable name. Variables must follow standard naming conventions.
See Variables and Expressions on page 32.
For details on scripts that demonstrate using expression operators, see the sample scripts that manipulate strings and perform calculations. For details on sample scripts, see ScriptHelp.htm in the Samples subdirectory of this product’s installation directory.
Symbols
Functions
SENDTO C:\Documents and Settings\User\SendTo
STARTMENU C:\Documents and Settings\User\Start Menu
STARTUP Folder that contains user specific items to be run on startup on the destination computer.
C:\Documents and Settings\User\Start Menu\Programs\Startup
TEMPLATES C:\Documents and Settings\user\Templates.
TEMP Folder where temporary files can be created.
C:\DOCUME~1\User\LOCALS~1\Temp
USERPROFILE Location of the current user’s profile.
C:\Documents and Settings\User
+ Addition
– Subtraction
* Multiplication
/ Division
Left$(str, position) Returns the left portion of a string, where str is the string, and position is the number of characters from the left to return. Example: Left$(“windows”,3) returns “win.”
Variable Description Example Value
WiseScript Editor Reference 162

Quick Reference
Logical Operators
Right$(str,position) Returns the right portion of a string, where str is the string, and position is the number of characters from the right to return. Example: Right$(“windows”,3) returns “ows.”
Mid$(str,position, length)
Returns the middle portion of a string, where str is the string, position is the number of characters from the left to start, and length is the number of characters to return. Example: Mid$(“windows”,2,3) returns “ind.”
Concat$(str1,str2) Joins two strings.
Instr(str1,str2) Determines if a substring (str2) is present within an original string (str1). Do not include the $ character because this operator does not return a string.
Before$(str1,str2) Returns the portion of a string (str1) before the indicated substring (str2). Example: Before$(“windows”,“d”) returns “win.”
After$(str1,str2) Returns the portion of a string (str1) after the indicated substring (str2). Example: After$(“windows”,“d”) returns “ows.”
Len(str) Returns the length of a given string. Do not include the $ character because this operator does not return a string.
Lcase$(str) Converts all characters in a string to lowercase.
Ucase$(str) Converts all characters in a string to uppercase.
Ltrim$(str) Deletes all leading spaces.
Rtrim$(str) Deletes all trailing spaces.
Logical Operator
Example Description
And A And B True only if expression A and B are both true
Or A Or B True if either expression, A or B, is true, or if both A and B are true
Not A Not B True only if one expression is true. Example: A but not B
> X>Y True if expression X is numerically greater than Y
< X<Y True if expression X is numerically less than Y
>= X>=Y True if expression X is numerically greater than or equal to Y
<= X<=Y True if expression X is numerically less than or equal to Y
= X=Y True if expression X is numerically equal to Y
<> X<>Y True if expression X is not numerically equal to Y
WiseScript Editor Reference 163

Quick Reference
Command-Line OptionsYou can set command-line options when you run WiseScript Editor, the installation executable, and the uninstaller executable. These are especially useful for running an installation as part of a batch file or other automated installation system.
If you compile from the command line, compile errors generate return codes. To see the error message associated with the return code, run the compile directly from WiseScript Editor. When compile errors occur, a dialog box appears during compile with a specific error message.
WiseScript Command-Line OptionsYou can apply the following command-line options to the WiseScript Editor executable file, Wise32.exe. Command-line options let you compile as well as set properties.
Examples:
Compiling a .WSE file while defining a compiler variable named _PATH_:
"product_installation_directory\Wise32.exe" /d_PATH_=C:\Test /c "C:\Development\Application.wse"
Compiling a .WSE file while setting compiler variables defined in a text file named Compile.txt:
“product_installation_directory\Wise32.exe” /c /d=C:\Development\Compile.txt “C:\Development\Application.wse”
Automated build process
You can use command-line options in conjunction with other processes to create an automated build process.
1. Enter the following command-line statement into a batch file or program that has the ability to run command-line statements:
“product_installation_directory\Wise32.exe” /c /s “C:\Development\Application.wse”
2. Use Scheduled Tasks in Control Panel to schedule the running of the batch file.
/c file.wse Compiles the installation script.
/c /s file.wse Compiles the installation script silently. You can use this option with the /d option.
/r Opens the application in SetupCapture mode.
/u Checks for updates on the Wise Web site.
/c /d_VAR_=value Defines one compiler variable for this run only. Additional compiler variables require additional /d switches. Do not put a space between the /d and the compiler variable name.
/c /d=file.txt Defines compiler variables from a text file for this run only. The format for the text file is _VAR_=value, with one entry per line. You can use the /s option with this option.
WiseScript Editor Reference 164

Quick Reference
NoteTo test the options without the scheduling program, select Windows Start menu > Run, type cmd, click OK, and type a command-line statement in the command-line window.
WiseScript Installations Command-Line OptionsYou can apply the following command-line options to .EXE files that you compile from WiseScript Editor projects.
Uninstall Command-Line OptionsYou can apply the following command-line options to the WiseScript Editor uninstall executable file, unwise.exe or unwise32.exe.
When you use command-line options for the uninstall program, you must send it the path to the log file as a parameter. It must be the log file that is in the same folder as unwise.exe. If the path to the log file contains spaces, it must be surrounded by quotation marks.
/T Installs in Test mode.
/X path Extracts files to the specified path.
/Z path Extracts files to the specified path, then restarts.
/M Runs the installation in manual mode, prompting for system directories (examples: Windows, System).
/M=file name Specifies a values file for installation.
For information on reading variables, see Set Variable on page 113.
/M1 Displays the name of each self-registering .OCX or .DLL as it is registered.
/M2 Reserved for internal use by WiseScript Editor during debugging sessions.
/M5=dir_name During installation, temporary files are written to the hard drive. On some locked-down machines with restricted privileges, these temporary files might fail to write, resulting in a failed installation. Use this command-line option to specify a directory name for which the end user has write privileges.
/S Installs in silent (automatic) mode with no end user choices.
/Z Removes empty directories, including the one containing Unwise.
/A Automatic mode. The Wise splash screen appears on the destination computer, and the uninstall proceeds immediately with no end user choices, except for questions about uninstalling shared files.
WiseScript Editor Reference 165

Quick Reference
Example:
"C:\Program Files\Application\Unwise.exe" /A "C:\Program Files\Application\Install.log" Application Uninstall
You can specify the title of the Uninstall dialog box that appears. Type the title at the end of the command line after all other options. In the example above, the title would be “Application Uninstall.”
/S Silent mode. The uninstall proceeds silently with no splash screen, no dialog boxes, and no end user choices.
/R Rollback mode.
/U Removes the Select Uninstall Method dialog box, which means the end user does not see options for a custom, automatic, or repair uninstall.
WiseScript Editor Reference 166

Index
Symbols% sign with compiler variable 33_ALIASNAME_ 155_ALIASPATH_ 155_ALIASTYPE_ 155_BDEWIN16DIR_ 155_BDEWIN32DIR_ 155_BDEWIN32INST_ 155_BDEWIN32LANG_ 155_BDEWIN32OPT_ 155_LOGFILE_PATH_ 155_ODB16_ 155_ODBC32_ 155_SYS_ 155
_VAR_LIST_ 155_VB4WIN16DIR_ 155_VB4WIN16OPT_ 155_VB4WIN32DAO_ 156_VB4WIN32DIR_ 156_VB4WIN32OPT_ 156_VFOXPRODIR_ 156_VFPOPTIONS_ 156_WIN_ 156_WISE_ 156
Numerics386Enh 45
Aaction
about 39adding to script 24Also see actions by namecopying 25custom list 22dialog box 143pasting 25repeating 31
action group 22Actions list 22Activate SVS Layer 40Add Directory to Path 41Add File to SVS Layer 41Add Text to Install.log 42Add to Autoexec.bat 43Add to Config.sys 44Add to System.ini 45administrator rights, checking 52
After$ 163Altiris Support Helpdesk 9animation on dialog box 131append data to registry key 74application
executing 77exit code 82
Application Manager 97APPTITLE 158ASP 101Authenticode 18Autoexec.bat
backing up 44editing 43PATH variable 41
automated build process 17, 164automatic run-time variable 156AVI
control 131playing 100
Bbackground of installer
displaying images in 68BACKUP 158BACKUPDIR 156, 156batch file, scheduling 164BDE_CONFIGDIR 156Before$ 163billboard
about 146adding to script 68arranging object 151bitmap, adding 150editing text 147ellipse, adding 149exporting 147importing 147line, adding 148location 151moving object 151number to display 152object, adding 147opening 147overlapping object 151polygon, adding 149properties 151rectangle, adding 149resizing object 151saving 147scaling to screen 152settings 151
slowing down 152timing the display 152transition 151working with 146
binary filereading from 105writing to 105
bitmapadding to billboard 150displaying in background 68, 145
Bitmap Settings dialog box 150blank line in script 106BRANDING 158Browse for Directory 45BUFFERS 112build, automated 17, 164built-in dialog box event 142
CCAB file, mobile device
about 96adding to installation 97device support 97
CabWizabout 96
Call COM Object 80Call DLL Function
example using structure 49script action 46
cancel script 23CAPICOM 18Capture Application to SVS Layer 50CD
copying files from 58CDESKTOPDIR 158CD-ROM drive, getting 87CER file 18CGI 101CGROUPDIR 158Change SVS Layer GUID 51check box control
adding to dialog box 122problem with disabling 140
Check Configuration 51Check Disk Space 52Check HTTP Connection 54Check If File/Dir Exists 55Check In-use File 56Check Service 56CMDLINE 156
WiseScript Editor Reference 167

See digital signaturecolor, in script 22combo box control
adding to dialog box 123pre-selected option 124size requirement 125
command-line optionsabout 164automated build 164compile 164silent compile 164silent installation 165silent uninstall 166test mode 165uninstall 165WiseScript executable 164WiseScript project 165
comment out lines 25comments in scripts 106COMMON 158company name, getting 87compile
automated 17, 164errors 164from command line 164installation 13silently 164stopping 89
compiler variableabout 16, 33adding to script 57description 155disabling prompt 17entering into an expression 33list of 155naming convention 33percent sign 33prompting for value 17referenced in script 16sample script 17setting 16underscore 33
Compiler Variable Else 57Compiler Variable End 57Compiler Variable If 57Compiler Variables page 16complex structure 49component
disk space for 136list box for 130size, modify 98
COMPONENTS 98, 158Concat$ 163conditional loop 31Config ODBC Data Source 58Config.sys
backing up before editing 45
editing 44connection lines in script 22Contained within structure 49control
attributes 110changing text 111setting to current 111
control, dialog boxabout 120adding 121aligning 138check box, See check boxcombo box, See combo boxdrop-down 123edit text 125editing 121frame 135graphic 126group box 127hot text 128list box 130location 138play AVI 131push button 132radio button 134rectangle 135spacing 138static 126, 136tab order 138text 136
Copy Local File(s) 58Create Directory 60Create Directory in SVS Layer 61Create Service 61Create Shortcut 62Create Shortcut in SVS Layer 63Create SVS Layer 65Create Virtual Directory 65credentials file 18, 19CRLF 156CSTARTMENUDIR 158CSTARTUPDIR 158Custom Billboard 65Custom Billboard Editor
about 146accessing 145window 145
custom dialog box 66Also see dialog box
custom dialog box scriptabout 142creating 143examples 144
custom dialog box setSee dialog box set
Custom Dialog Editorabout 118accessing 118
Ddata source, ODBC 58date/time file modified
getting 87getting four-digit year 88
date/time, currentgetting 87getting four-digit year 88
Deactivate SVS Layer 66debugging
commenting out script lines 25Delete File from SVS Layer 66Delete File(s) 67Delete SVS Layer 67dependency, service 62DESKTOPDIR 158development process, streamlining 26device 45dialog box
Also see dialog box setanimation 131appearance 119calling dialog boxes 141changing control text 111common problems 139creating 66default image, changing 140displaying text file 70editing 119event, built-in 142executing program from 137floating 142getting file name 102getting text input 103listing Program groups 130message 69movie 131properties 119saving 119script actions 143script, custom 142scripting 110, 111settings 119size 120tab order, setting 138title 120Web link 129wizard loop dialog boxes 117
dialog box controlSee control, dialog box
dialog box setabout 141creating 141editing 141floating dialog box 142master dialog box 141naming 141properties 141
WiseScript Editor Reference 168

adding 18Digital Signature page 18DIRECTION 158directory
checking existence 55creating empty 60creating in layer 61renaming 107renaming in layer 108
disable script lines 25disk space
checking 52getting 88
DISK_NUMBER 156DISPLAY 159Display Billboard 68Display Message
script action 69Display Progress Message 70Display Text File 70DLG 119DLG_EVENT_TYPE 156DLL
call function 46checking if loaded 55self-registering 59, 94, 110sending parameters 48
DOBACKUP 159DOBRAND 159documentation, Wise 8DOS version, getting 87drive
CD-ROM, getting 87getting first network drive 87type, getting 87
drop-down list control 123dword 48dword pointer 48
EEdit INI File 71Edit Registry 71Edit Registry for SVS Layer 74edit text control 125ellipse in billboard 149Else Statement 75ElseIf Statement 75End Statement 76environment variable
getting 84reading 85
error messageAlso refer to Knowledgebase
evaluate expression 114
Evaluate Windows Installer Condition 76event script
cancel 23exit script 23mainline 23selecting 21
exclude entrysetting 113
EXEAlso see installer .EXEcompiling 13getting path 88running silently 77self-registering 59, 94, 110
execute installation 13execute program
from dialog box 137script action 77
Execute VBScript 77exit code 82Exit Installation 81exit script 23
Exit Without Saving 147EXPLORER 159expression
about 33evaluating 114
expression operators 162Expression True 75, 90, 116, 117
Ffile
adding to layer 41attributes 112checking existence 55copying to destination
computer 93date/time modified 87deleting 67deleting from layer 66downloading from Web 58finding on destination
computer 82four-digit modified date 88FTP from Web 58in use 56renaming 107renaming in layer 108replacing in System32 153replacing on destination
computer 59, 94searching for 109size, getting 88troubleshooting replacement 153version checking 59, 94version, getting 87
file nameconverting short to long 114
long 114prompting for 102short 114
file, CAB (mobile device)about 96adding 97
Find File in Path 82Find First SVS Layer 83Find Next SVS Layer 83Find SVS Layer GUID 84First element of structure 49font 106FONTS variable 156forums 9four-digit year 88free disk space, getting 88FTP
copying files through 58function
DLL function 46sending parameters 48
function, VBScript 79
GGeneral Information page 19Get Environment Variable 84Get Name/Serial Number 85Get Registry Key Value 85Get SVS Layer Info 86Get System Information 87Get Temporary Filename 89Get Windows Installer Property 89Get WiseScript Variable 80Getting Started Guide 8graphi
control 126graphic
checking support 52displaying in background 68, 145in wizard dialog box 140
GRF file 146GROUP 159group box control 127group for service 62group, action 22GROUPDIR 159GUID, layer
finding 84variable, creating 65
HHalt Compilation 89hardware, check 51
WiseScript Editor Reference 169
about 8Project Settings 16using 8
HELPFILE 156hot text control
adding to dialog box 128link to Web 129
HTTPchecking connection 54copying files through 58server, post to 101
HTTP POST 101
Iicon
adding 62Also see shortcut
If Statementending 76starting 90
IIS Web sitecreating 65setting permissions 114
image, displaying in background 68, 145include script
about 23action 91adding 91editing 24, 24saving 24selecting 24tab 22
INF file, mobile deviceabout 96
INI fileediting 71reading value 104
Initialize SVS 92Insert Line into Text File 92INST 156INST_LOG_PATH 157Install File(s) 93Install SVS Package 95Install Windows Mobile Application 97Install WiseUpdate Client 95Install.log 153
adding text 42opening, closing 99
INSTALL_RESULT 77, 157Install_SVS_Package 95installation
billboard, displaying 68building 13copying from 58pausing 100recording activity 153
script, See scriptsingle-file 13testing 13troubleshooting 153version 19
installation logadding text 42opening, closing 99using 153
installer .EXEAlso see EXEbuilding 13command-line options 165path 88
Instr$ 163Internet
check 54
KKnowledgebase 9
LLANG 157language
specifying 21launch
WiseScript Editor 11layer
See virtual software layerLcase$ 163Left$ 162Len$ 163License Management Portal 9line
adding to billboard 148number 22
list box controladding to dialog box 123, 130with check boxes 130
logging 153logon name, getting 88long 48long pointer 48loop
beginning 116ending 76
lowercase, converting 114Ltrim$ 163
Mmain installation script 23MAINDIR 159mainline script 23manual, reference 8master dialog box 141
memorychecking 52finding 87
messagedisplaying to user 69
Microsoft Windows MobileSee Windows Mobile
Mid$ 163mobile device installation
about 96Also see Windows Mobile
installationModify Component Size 98movie on dialog box 131multimedia file, playing 100multiple scripts 25
NNAME 159name script 21navigating between views 12network
drive, getting 87new features
Refer to Release Notes
Oobject list 79OCX
self-registering 59, 94, 110Open Software Description 63Open/Close Install.log 99operating system, check 52operators 162options for command line 164OSD 63owner name, getting 87
Ppaging 52parameters, pass to function 49Parse String 99PASSWORD 157password, requiring 59, 93PATH variable 41, 83Pause 100percent sign with compiler variable 33Personal Information Exchange file 18PFX file 18play AVI control 131Play Multimedia File 100Pocket PC
See Windows Mobile installationpolygon in billboard 149portable project 13
WiseScript Editor Reference 170

executing 77executing from dialog box 137running silently 77
PROGRAM_FILES 159progress message 70Project Settings
about 15help 16page navigation 16pages, resetting 16undo changes 16
project, portable 13prompt
for file name 102for text 103
propertiesgetting 89setting 115
Public/private key pair 18push button control 132PVK file 18
Rradio button control
adding to dialog box 134problem with disabling 140
Radio Button Dialog 103Read INI Value 104Read/Update Text File 104Read/Write Binary File 105readme
See release notesreboot
at script completion 106, 157Reboot System 106rectangle control, on dialog box 135rectangle, in billboard 149reference manual 8REG file
importing 71importing to virtual layer 74
REG_EXPAND_SZ 85register files 59, 94Register Font 106register software 9registry
editing 71editing in virtual layer 74
registry keyappending to 74
getting value 85removing from destination
computer 73removing from installation 72,
72, 74, 75settings 72
release notes 8Remark 106Remove SVS Exclude Entry 106Rename File or Directory in SVS Layer 108Rename File/Directory 107Rename SVS Layer 108require password 59, 93reset page 16RESTART 82, 157restart
at script completion 106, 157return code 164Right$ 163rollback, from command line 166rollback.wse 23
Rtrim$ 163run installation 13run program from installation 77run-time variable
about 33automatic 156with script actions 158
SSave Changes and Exit 147, 147scheduling task 164script
about 34adding action 24blank 28commenting out lines 25comments 106conditional loop 31connection lines 22editing 24, 25finding text in 25include script, See include scriptline number 22naming 21opening multiple 25referencing compiler variable 16replacing text in 25saving 24saving to text file 25sections 34testing 13
script actionabout 39adding 24Also see actions by namecolors for 22
copying 25dialog box 143pasting 25repeating 31
Script Editorabout 20actions, customizing list 22line color 22window 20
Search for File 109self-register files 59, 94Self-Register OCXs/DLLs 110serial number
getting from user 85service
adding 61checking 56controlling behavior 61creating 61dependency 62group 62settings 61starting 62, 115stopping 115
service pack number, getting 88Set Activate SVS Layer on Startup 110Set Control Attributes 110Set Control Text 111Set Current Control 111Set File Attributes 112Set Files/Buffers 112Set SVS Exclude Entry 113Set Variable 113Set Web Permissions 114Set Windows Installer Property 115Set WiseScript Variable 80Setup.dll, mobile device 96setup.exe
See installer .EXEshared .DLL 59, 94shared directory for user-defined action 26shell execute 77short 48short pointer 48shortcut
creating in layer 63creating, editing 62
shortcut, mobile device 98signcode.exe 18signtool.exe 18silent compile 164silent installation
from command line 165silent uninstall 166single installation file 13
WiseScript Editor Reference 171

See Windows Mobile installationsoftware registration 9Software Virtualization Solution 39space, checking 52SPC file 18start
WiseScript Editor 11Start menu 62, 130Start/Stop Service 115STARTMENUDIR 159STARTUPDIR 159static control 126, 136string
buffer 48parsing 99pointer 48
structurepassing structure example 49passing to DLL 48
substitution 32
supportAltiris Support Helpdesk 9forums 9Knowledgebase 9user groups 9
SVSdata protection 113exclude entry, removing 106exclude entry,setting 113initialize 92Items 39script actions 39variables 160
SVS exclude entryremoving 106
SVS layer GUIDchanging 51
SVS layer infogetting 86
syntax, check in VBScript 79SYS 158SYS32 158system information, getting 87system requirements
checking 51system requirements, Wise product
Refer to Getting Started GuideSystem.ini, adding device 45System32
installing files 153replacing files 153
Ttab 78
tab order in dialog box 138technical support
Altiris Support Helpdesk 9forums 9Knowledgebase 9user groups 9
Temp 89TEMP variable 158temporary file name, getting 89testing installation 13
from command line 165text
adding to billboards 147finding in script 25manipulating 99prompting for 103reading from file 104updating in file 104
text control 136text file
displaying in dialog box 70editing 92
TLB, self-registering 59, 94
troubleshootingdialog box 139installations 153
TrueType font 106TTF file 106
UUcase$ 163UNC path
getting 88underscore in compiler variable 33undo
Project Settings page 16uninstall
Windows Mobile application 97UNINSTALL_LANG 158UNINSTALL_PATH 158uninstaller
adding commands 19customizing with log file 99using installation log 42
unwise.exe 165unwise32.exe 165uppercase, converting 114URL check 54user groups 9user-defined action
about 26blank script for 28changing parameter 26creating 27dialog box for 28in actions list 28interacting with developer 28
parameters for action 28shared directory 26testing 30tutorial 28
Vvalues file 114variable
about 32automatic run-time 156compiler 33, 155filling from file 114incrementing, decrementing 114run-time 33, 158setting value 113
variable, SVS 160VBScript 78
about 24actions 79calling COM object 80checking syntax 79editing 78executing from WiseScript 77functions, viewing 79getting WiseScript variable 80objects, viewing 79setting WiseScript variable 80tab 22
VER_CHECK_TYPE 159version checking 59, 94version number, getting 87version, installation 19virtual directory
creating 65setting permissions 114
virtual software layeractivating 40, 110adding file 41capturing application to 50creating 65creating directory in 61creating shortcut in 63deactivating 66deleting 67deleting file 66finding first 83finding GUID 84finding next 83GUID 65registry, editing 74renaming 108renaming file, directory 108
virtual software packageinstalling 95
volume label, getting 88VSP
installing 95
WiseScript Editor Reference 172

process overview 19While Statement
beginning 116ending 76
WIN 158Win16 SDK 48Win32 System Directory 117Win32s version, getting 87Windows
logon name, getting 88version, getting 87
Windows Installerusing WiseScript 12
Windows Installer condition, evaluate 76Windows Installer property
getting 89setting 115
Windows Mobileabout 96
Windows Mobile installationabout 96Also see mobile device installationCAB file 96INF file 96process for adding 97Setup.dll 96uninstalling 97
Windows serviceadding 61checking 56controlling behavior 61creating 61starting, stopping 115
WinSock 54Wise scripting language 10WISE_ERROR_RTN 82, 159Wise32.exe, run from command 164WiseScript
about 10actions 39in Windows Installer 12portable project 13troubleshooting 153
WiseScript Editorstarting 11
WiseUpdateadding with script 95
wizard dialog boxchanging image 140disabling check box 140disabling radio button 140
Wizard Loopaction 117adding dialog box 66
word 48word pointer 48
WiseScript Editor Reference 173