Wireless transmitter and receiver kit · the transmission about. So can a large garden shrub during...
8
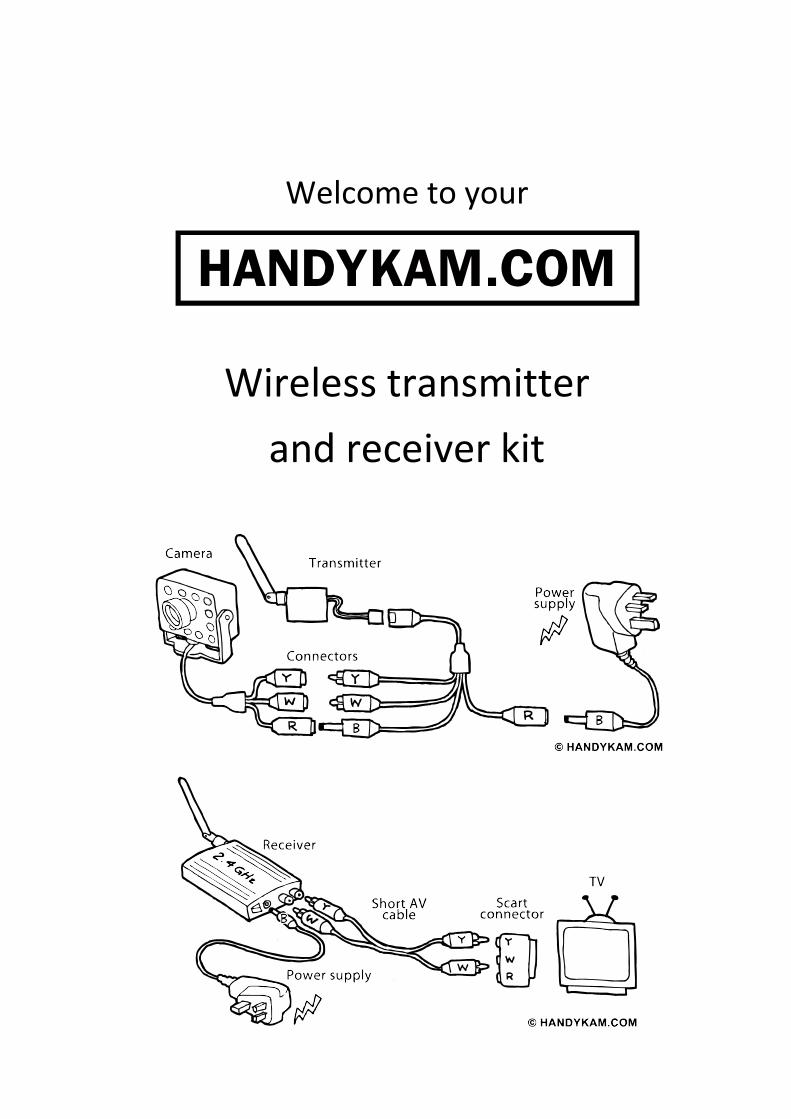
Welcome to your Wireless transmitter and receiver kit
Transcript of Wireless transmitter and receiver kit · the transmission about. So can a large garden shrub during...
Welcome to your
Wireless transmitter
and receiver kit

HANDYKAM.COM – Wireless transmitter and receiver kit
© HANDYKAM.COM – V.1c Page 2
Your Handykam camera Transmitter/Receiver (T/R) kit is designed to transmit and receive both pictures and sound (video and audio) with a choice of four channels. The system consists of a transmitter end to attach to a camera and a receiver end to attach to a TV.
In the box, you should find a transmitter consisting of a little black box transmitter , an aerial and an adapter . There is also a receiver consisting of a silver receiver box , an
aerial, and a short AV connector cable.
Finally, there are two power supplies, one each for the transmitter and receiver. The power supplies plug into your mains wall sockets and convert mains (220v -250v AC) electricity into low voltage DC power. We stock suitable versions for systems in the UK, Europe and the USA.
Setting the system up.
If you have never connected up a wireless system, it can appear a bit daunting at first, but the reality is that it is quite easy if you work step by step. Just work methodically, and suddenly the penny will drop. As always, connect everything up before you plug any system into a wall socket. Make sure the wall socket is turned off before you plug anything in, then plug in and turn on when you are ready.
TRANSMITTER END
This is how the transmitter end (camera end) of the system is connected.
Here, we show the transmitter connected to a camera and a power supply. Follow the power from the power supply. See how the power (12v DC) from the power supply goes into the red socket on the transmitter, through the little black box transmitter, then the power comes out again through the black plug on the

HANDYKAM.COM – Wireless transmitter and receiver kit
© HANDYKAM.COM – V.1c Page 3
transmitter and is connected into the red camera socket. This way, the power works both the transmitter and the camera. (The camera needs power to make pictures and sound, and the transmitter needs power to send them back to you at the receiver).
Alternative power arrangement – DC cable
That’s fine if the camera is going to be close to a power source for the power supply. But most power supplies only have very short cables. If the camera and transmitter are quite far from a power source (for example in a nest box up a tree), then a DC power extension cable is used to get power from the power supply (plugged into the mains indoors or in a shed, etc) all the way to the camera and transmitter. We stock 5m, 10m, 20m and 50m lengths. The DC power extension cable simply plugs in between the power supply plug and the red socket on the transmitter, allowing them to be further apart. Everything else remains the same.
Alternative power arrangement – AV cable
Instead of using a DC power extension cable, you might (converting from a wired CCTV system to a wireless system) have an unused three plug AV cable from a wired CCTV system lying about, whose power wire inside is still working. You can use the red plug and socket on that old AV cable as your DC extension cable - simply use the power side and disregard the old white and yellow plugs.

HANDYKAM.COM – Wireless transmitter and receiver kit
© HANDYKAM.COM – V.1c Page 4
Alternative power arrangement - Battery
It is possible to connect the transmitter to a battery. However, it will need to be a fairly big battery - a 12v acid gel battery would be needed, and you would have to turn it on to view then disconnect it after watching, because the camera and transmitter would run the battery down. It would be pretty inconvenient to switch on and off, but we mention the battery because there are big batteries available, and there are interesting developments in solar powered systems, where solar panels charge up a battery to run the system.
So, that’s the power side of the transmitter. Now let’s consider the pictures and sound. These are even easier to understand. The pictures and sound flow out of the camera through the white (sound) and yellow (picture) connectors, into the little black box transmitter that chucks them up into the air through its aerial for the receiver to pick up. The system works on a frequency of 2.4GHz, and the most important thing about it is that it is best used “line of sight”. This means that it is not very good at transmitting through some obstacles and is better when the transmitter and receiver can “see” each other. Metal objects (galvanised iron roofing and diamond mesh fencing are typical) can mess the transmission about. So can a large garden shrub during rainy weather.
Booster Aerial
If needed, you might be able to improve performance by using a booster aerial, either at the transmitter end, or the receiver end, or both. Here’s how booster aerials are fitted.

HANDYKAM.COM – Wireless transmitter and receiver kit
© HANDYKAM.COM – V.1c Page 5
Moving the transmitter
And, once again, in order to help the transmitter get a direct line of sight to the receiver, you may find it helpful to extend the distance between the camera and the transmitter. This is done by inserting a normal AV extension cable and connector between the camera and the transmitter. We stock AV extension cables up to 50m in length.
That is just about all there is to the transmitting side. Let’s move on to the receiver.
RECEIVER END
This is how the receiver is connected where you want to watch the pictures.
Connecting the receiver to a TV.
A 12v DC power supply changes mains voltage into 12v DC, then feeds it into the silver receiver. The receiver grabs the signals coming from the air via its aerial, and pumps the pictures and sound out through its white and yellow connectors. The white and yellow connectors are plugged into your TV. They can be plugged directly into the white and yellow AV or RCA
sockets on (usually the front or side of) your TV, or you can plug the yellow and white connectors from the receiver into a SCART IN adapter that in turn plugs into the SCART socket on your TV (a SCART plug or socket is the wide, rectangular connector with lots of pins or holes inside).

HANDYKAM.COM – Wireless transmitter and receiver kit
© HANDYKAM.COM – V.1c Page 6
Please note that TVs and many SCART adapters have THREE AV connectors - a white, a yellow and a red socket. A red socket on the TV and the SCART adapter is for stereo sound and you can ignore them. Also please note that some SCART adapters are
switchable between SCART IN and SCART OUT. Make sure you are using SCART IN. The SCART adapters we supply are SCART IN adapters.
Sometimes, you may want the receiver to be further away from the TV. For example, have the receiver on the window sill for better reception. All you need is a longer AV cable and swap it for the short AV cable.
Transmitter and receiver channels.
Both transmitter and receiver have four channels. This is so you can use up to four cameras with one receiver - you simply set each camera to a different channel. When you select channel 1 on the receiver, you will get the signals from the transmitter set to channel 1; when you select channel 2 on the receiver, you will get the signals from the transmitter set to channel 2, and so on. In this way, channel 1 on the receiver might be a blue tit family, channel two a sparrow family, channel 3 an owl family and channel 4 a hedgehog box. This is great for multiple cameras, but when you are only using one camera, make
sure its transmitter and receiver are both set to the same channel - I, 2, 3 or 4. Another handy feature is that you may find interference on one channel, so set them both to another channel. To change channels on the receiver, press the blue button on the end of the unit. When the power in on, a red LED will light up indicating which channel has been

HANDYKAM.COM – Wireless transmitter and receiver kit
© HANDYKAM.COM – V.1c Page 7
selected. To change channel on the transmitter, set the slide switch (on the cable end of the transmitter) to 1, 2, 3 or 4.
With everything connected up and turned on, and with the transmitter and receiver both tuned to the same channel, you should get pictures from the camera on your TV’s AV channel. If you don’t, don’t panic. Just work through the instructions once more, making sure everything is connected up and switched on.
We suggest that, if possible, you connect everything up and test it indoors before you go climbing up trees or buildings to install the system outside. That way you will familiarise yourself with all the bits and make sure it is all connected properly and working.
Putting the transmitter into a Handykam nest box.
First, mount the camera inside the nest box - the camera mounting bolt simply pushes through the hole provided and a nut on the outside of the nest box keeps the camera in place. You can drill a 4.5mm hole elsewhere if you prefer another view, and a further hole is provided in the ceiling. Once the camera is in place, install the ceiling, bringing the camera connectors up through the slot provided, so that they lie on top of the ceiling. Now connect the transmitter to the camera connectors. Finally, plug in the power connectors as shown in the earlier diagrams. Coil all the bits up neatly on the ceiling, making sure the DC power cable runs out through the slot in the wall, and carefully close the roof down. Our system is designed this way to keep all the electronics dry under the roof.

HANDYKAM.COM – Wireless transmitter and receiver kit
© HANDYKAM.COM – V.1c Page 8
Putting the transmitter into your own nest box.
You will need to provide a weatherproof box, shelf or ceiling big enough to hold the transmitter, cables and connectors where they will be dry and protected from the elements. You’ll also need some means of getting the DC power into the transmitter and camera without letting the rain in. Without a shelf or similar, it is possible to bundle up the transmitter with its cables and connectors and secure the bundle with a nylon or Velcro cable tie, electrical tape or even string or garden ties. The bundle can then be hung up inside the nest box on a cup hook or similar arrangement. Its not pretty, but, kept dry, it works. We sell a weather resistant plastic box that can be screwed to a nest box and used to contain the transmitter. Make sure your nest box does not allow rainwater to trickle in, onto the feathered occupants or onto the electronics.
Connecting to a computer.
The receiver in this kit produces an AV signal suitable for a television set, video recorder or CCTV monitor. To plug the receiver into a computer, you will need a plug-in video grabber. We sell a suitable device, and also the necessary software that will allow you to record, manipulate, edit and export your clips.
We hope you have found these notes helpful and you have many hours of fascinating fun with this kit.
[email protected] © 2011 HANDYKAM.COM