WIRELESS SYSTEM QLX-D USER GUIDE - soundpro.com · Manuale d’uso. ... Dieses Gerät darf nicht...
21
© 2014 Shure Incorporated Printed in U.S.A 27A22352 (Rev. 2) WIRELESS SYSTEM QLX-D USER GUIDE Le Guide de l’Utilisateur Guia del Usuario Guida dell’Utente Bedienungsanleitung Manuale d’uso Руководство пользователя Gebruikershandleiding
Transcript of WIRELESS SYSTEM QLX-D USER GUIDE - soundpro.com · Manuale d’uso. ... Dieses Gerät darf nicht...

© 2014 Shure Incorporated Printed in U.S.A 27A22352 (Rev. 2)
WIRELESS SYSTEM
QLX-DUSER GUIDE
Le Guide de l’Utilisateur
Guia del UsuarioGuida dell’Utente
BedienungsanleitungManuale d’uso
Руководство пользователяGebruikershandleiding

3
WICHTIGE SICHERHEITSHINWEISE
1. Diese Hinweise LESEN. 2. Diese Hinweise AUFBEWAHREN. 3. Alle Warnungen BEACHTEN.4. Alle Hinweise BEFOLGEN. 5. Dieses Gerät NICHT in Wassernähe VERWENDEN. 6. NUR mit einem sauberen Tuch REINIGEN. 7. KEINE Lüftungsöffnungen verdecken. Hinreichende Abstände für ausreichende Belüftung
vorsehen und gemäß den Anweisungen des Herstellers installieren. 8. NICHT in der Nähe von Wärmequellen wie zum Beispiel offenen Flammen, Heizkörpern,
Wärmespeichern, Öfen oder anderen Hitze erzeugenden Geräten (einschließlich Verstärkern) installieren. Keine Quellen von offenen Flammen auf dem Produkt platzieren.
9. Die Schutzfunktion des Schukosteckers NICHT umgehen. Ein Schukostecker verfügt über zwei Steckerzinken sowie Schutzleiter. Bei dieser Steckerausführung dienen die Schutzleiter Ihrer Sicherheit. Wenn der mitgelieferte Stecker nicht in die Steckdose passt, einen Elektriker mit dem Austauschen der veralteten Steckdose beauftragen.
10. VERHINDERN, dass das Netzkabel gequetscht oder darauf getreten wird, insbesondere im Bereich der Stecker, Netzsteckdosen und an der Austrittsstelle vom Gerät.
11. NUR das vom Hersteller angegebene Zubehör und entsprechende Zusatzgeräte verwenden.
12. NUR in Verbindung mit einem vom Hersteller angegebenen oder mit dem Gerät verkauften Transportwagen, Stand, Stativ, Träger oder Tisch verwenden. Wenn ein Transportwagen verwendet wird, beim Verschieben der Transportwagen/Geräte-Einheit vorsichtig vorgehen, um Verletzungen durch Umkippen zu verhüten.
13. Bei Gewitter oder wenn das Gerät lange Zeit nicht benutzt wird, das Netzkabel HERAUSZIEHEN.
14. ALLE Reparatur- und Wartungsarbeiten von qualifiziertem Kundendienstpersonal durchführen lassen. Kundendienst ist erforderlich, wenn das Gerät auf irgendwelche Weise beschädigt wurde, z. B. wenn das Netzkabel oder der Netzstecker beschädigt wurden, wenn Flüssigkeiten in das Gerät verschüttet wurden oder Fremdkörper hineinfielen, wenn das Gerät Regen oder Feuchtigkeit ausgesetzt war, nicht normal funktioniert oder fallen gelassen wurde.
15. Dieses Gerät vor Tropf- und Spritzwasser SCHÜTZEN. KEINE mit Wasser gefüllten Gegenstände wie zum Beispiel Vasen auf das Gerät STELLEN.
16. Der Netzstecker oder eine Gerätesteckverbindung muss leicht zu betätigen sein. 17. Der Luftschall des Geräts überschreitet 70 dB (A) nicht. 18. Das Gerät mit Bauweise der KLASSE I muss mit einem Schukostecker mit Schutzleiter in
eine Netzsteckdose mit Schutzleiter eingesteckt werden. 19. Dieses Gerät darf nicht Regen oder Feuchtigkeit ausgesetzt werden, um das Risiko von
Bränden oder Stromschlägen zu verringern. 20. Nicht versuchen, dieses Produkt zu modifizieren. Ansonsten könnte es zu Verletzungen
und/oder zum Produktausfall kommen.21. Dieses Produkt muss innerhalb des vorgeschriebenen Temperaturbereichs betrieben
werden.
Dieses Symbol zeigt an, dass gefährliche Spannungswerte, die ein Stromschlagrisiko darstellen, innerhalb dieses Geräts auftreten.
Dieses Symbol zeigt an, dass das diesem Gerät beiliegende Handbuch wichtige Betriebs- und Wartungsanweisungen enthält.
CONSIGNES DE SÉCURITÉ IMPORTANTES
1. LIRE ces consignes. 2. CONSERVER ces consignes. 3. OBSERVER tous les avertissements.4. SUIVRE toutes les consignes. 5. NE PAS utiliser cet appareil à proximité de l'eau. 6. NETTOYER UNIQUEMENT avec un chiffon sec. 7. NE PAS obstruer les ouvertures de ventilation. Laisser des distances suffisantes pour
permettre une ventilation adéquate et effectuer l'installation en respectant les instructions du fabricant.
8. NE PAS installer à proximité d'une source de chaleur telle qu'une flamme nue, un radiateur, une bouche de chaleur, un poêle ou d'autres appareils (dont les amplificateurs) produisant de la chaleur. Ne placer aucune source à flamme nue sur le produit.
9. NE PAS détériorer la sécurité de la fiche polarisée ou de la fiche de terre. Une fiche polarisée comporte deux lames dont l'une est plus large que l'autre. Une fiche de terre comporte deux lames et une troisième broche de mise à la terre. La lame la plus large ou la troisième broche assure la sécurité de l'utilisateur. Si la fiche fournie ne s'adapte pas à la prise électrique, demander à un électricien de remplacer la prise hors normes.
10. PROTÉGER le cordon d'alimentation afin que personne ne marche dessus et que rien ne le pince, en particulier au niveau des fiches, des prises de courant et du point de sortie de l'appareil.
11. UTILISER UNIQUEMENT les accessoires spécifiés par le fabricant.12. UTILISER uniquement avec un chariot, un pied, un trépied, un support ou
une table spécifié par le fabricant ou vendu avec l'appareil. Si un chariot est utilisé, déplacer l'ensemble chariot-appareil avec précaution afin de ne pas le renverser, ce qui pourrait entraîner des blessures.
13. DÉBRANCHER l'appareil pendant les orages ou quand il ne sera pas utilisé pendant longtemps.
14. CONFIER toute réparation à du personnel qualifié. Des réparations sont nécessaires si l'appareil est endommagé d'une façon quelconque, par exemple : cordon ou prise d'alimentation endommagé, liquide renversé ou objet tombé à l'intérieur de l'appareil, exposition de l'appareil à la pluie ou à l'humidité, appareil qui ne marche pas normale-ment ou que l'on a fait tomber.
15. NE PAS exposer cet appareil aux égouttures et aux éclaboussements. NE PAS poser des objets contenant de l'eau, comme des vases, sur l'appareil.
16. La prise SECTEUR ou un coupleur d’appareil électrique doit rester facilement utilisable. 17. Le bruit aérien de l'appareil ne dépasse pas 70 dB (A). 18. L'appareil de construction de CLASSE I doit être raccordé à une prise SECTEUR dotée
d'une protection par mise à la terre. 19. Pour réduire les risques d'incendie ou de choc électrique, ne pas exposer cet appareil à
la pluie ou à l'humidité. 20. Ne pas essayer de modifier ce produit. Cela risque de causer des blessures et/ou la
défaillance du produit.21. Utiliser ce produit dans sa plage de températures de fonctionnement spécifiée.
Ce symbole indique la présence d'une tension dangereuse dans l'appareil constituant un risque de choc électrique.
Ce symbole indique que la documentation fournie avec l'appareil con-tient des instructions d'utilisation et d'entretien importantes.
IMPORTANT SAFETY INSTRUCTIONS
1. READ these instructions. 2. KEEP these instructions. 3. HEED all warnings.4. FOLLOW all instructions. 5. DO NOT use this apparatus near water. 6. CLEAN ONLY with dry cloth. 7. DO NOT block any ventilation openings. Allow sufficient distances for adequate ventila-
tion and install in accordance with the manufacturer’s instructions. 8. DO NOT install near any heat sources such as open flames, radiators, heat registers,
stoves, or other apparatus (including amplifiers) that produce heat. Do not place any open flame sources on the product.
9. DO NOT defeat the safety purpose of the polarized or groundingtype plug. A polarized plug has two blades with one wider than the other. A grounding type plug has two blades and a third grounding prong. The wider blade or the third prong are provided for your safety. If the provided plug does not fit into your outlet, consult an electrician for replace-ment of the obsolete outlet.
10. PROTECT the power cord from being walked on or pinched, particularly at plugs, conve-nience receptacles, and the point where they exit from the apparatus.
11. ONLY USE attachments/accessories specified by the manufacturer.12. USE only with a cart, stand, tripod, bracket, or table specified by the manu-
facturer, or sold with the apparatus. When a cart is used, use caution when moving the cart/apparatus combination to avoid injury from tip-over.
13. UNPLUG this apparatus during lightning storms or when unused for long periods of time.
14. REFER all servicing to qualified service personnel. Servicing is required when the ap-paratus has been damaged in any way, such as power supply cord or plug is damaged, liquid has been spilled or objects have fallen into the apparatus, the apparatus has been exposed to rain or moisture, does not operate normally, or has been dropped.
15. DO NOT expose the apparatus to dripping and splashing. DO NOT put objects filled with liquids, such as vases, on the apparatus.
16. The MAINS plug or an appliance coupler shall remain readily operable. 17. The airborne noise of the Apparatus does not exceed 70dB (A). 18. Apparatus with CLASS I construction shall be connected to a MAINS socket outlet with a
protective earthing connection. 19. To reduce the risk of fire or electric shock, do not expose this apparatus to rain or
moisture. 20. Do not attempt to modify this product. Doing so could result in personal injury and/or
product failure.21. Operate this product within its specified operating temperature range.
This symbol indicates that dangerous voltage constituting a risk of electric shock is present within this unit.
This symbol indicates that there are important operating and mainte-nance instructions in the literature accompanying this unit.
WARNING: This product contains a chemical known to the State of California to cause cancer and birth defects or other reproductive harm.

4
ISTRUZIONI IMPORTANTI PER LA SICUREZZA
1. LEGGETE queste istruzioni. 2. CONSERVATELE. 3. OSSERVATE tutte le avvertenze.4. SEGUITE tutte le istruzioni. 5. NON usate questo apparecchio vicino all'acqua. 6. PULITE l'apparecchio SOLO con un panno asciutto. 7. NON ostruite alcuna apertura per l'aria di raffreddamento. Consentite distanze sufficienti
per un'adeguata ventilazione e installate l'apparecchio seguendo le istruzioni del costrut-tore.
8. NON installate l'apparecchio accanto a fonti di calore, quali fiamme libere, radiatori, aper-ture per l'efflusso di aria calda, forni o altri apparecchi (amplificatori inclusi) che generano calore. Non esponete il prodotto a fonti di calore non controllate.
9. NON modificate la spina polarizzata o con spinotto di protezione per non alterarne la funzione di sicurezza. Una spina polarizzata è dotata di due lame, una più ampia dell'altra. Una spina con spinotto è dotata di due lame e di un terzo polo di messa a terra. La lama più ampia ed il terzo polo hanno lo scopo di tutelare la vostra incolumità. Se la spina in dotazione non si adatta alla presa di corrente, rivolgetevi ad un elettricista per far eseguire le modifiche necessarie.
10. EVITATE di calpestare il cavo di alimentazione o di comprimerlo, specie in corrispon-denza di spine, prese di corrente e punto di uscita dall'apparecchio.
11. USATE ESCLUSIVAMENTE i dispositivi di collegamento e gli accessori specificati dal costruttore.
12. USATE l'apparecchio solo con carrelli, sostegni, treppiedi, staffe o tavoli specificati dal produttore o venduti unitamente all'apparecchio stesso. Se us-ate un carrello, fate attenzione quando lo spostate con l'apparecchio collocato su di esso, per evitare infortuni causati da un eventuale ribaltamento del carrello stesso.
13. Durante i temporali o in caso di inutilizzo prolungato dell'apparecchio, SCOLLEGATELO dalla presa di corrente.
14. Per qualsiasi intervento, RIVOLGETEVI a personale di assistenza qualificato. È neces-sario intervenire sull'apparecchio ogniqualvolta è stato danneggiato, in qualsiasi modo; ad esempio la spina o il cavo di alimentazione sono danneggiati, si è versato liquido sull'apparecchio o sono caduti oggetti su di esso, l'apparecchio è stato esposto alla piog-gia o all'umidità, non funziona normalmente o è caduto.
15. NON esponete l'apparecchio a sgocciolamenti o spruzzi. NON appoggiate sull'apparecchio oggetti pieni di liquidi, ad esempio vasi da fiori.
16. La spina ELETTRICA o l'accoppiatore per elettrodomestici deve restare prontamente utilizzabile.
17. Il rumore aereo dell'apparecchio non supera i 70 dB (A). 18. L'apparecchio appartenente alla CLASSE I deve essere collegato ad una presa elettrica
dotata di messa a terra di protezione. 19. Per ridurre il rischio di incendio o folgorazione, non esponete questo apparecchio alla
pioggia o all'umidità. 20. Non tentate di modificare il prodotto. Tale operazione può causare infortuni e/o il guasto
del prodotto stesso.21. Utilizzate questo prodotto entro la gamma di temperatura operativa specificata.
Questo simbolo indica la presenza di alta tensione all'interno dell'apparecchio, che comporta il rischio di folgorazione.
Questo simbolo indica la presenza di istruzioni importanti per l'uso e la manutenzione nella documentazione in dotazione all'apparecchio.
BELANGRIJKE VEILIGHEIDSINSTRUCTIES
1. LEES deze instructies. 2. BEWAAR deze instructies. 3. NEEM alle waarschuwingen in acht.4. VOLG alle instructies op. 5. GEBRUIK dit apparaat NIET in de buurt van water. 6. REINIG UITSLUITEND met een droge doek. 7. DICHT GEEN ventilatieopeningen AF. Zorg dat er voldoende afstand wordt gehouden
voor adequate ventilatie. Installeer het product volgens de instructies van de fabrikant. 8. Plaats het apparaat NIET in de buurt van warmtebronnen, zoals vuur, radiatoren,
warmteroosters, kachels of andere apparaten (waaronder versterkers) die warmte genereren. Plaats geen vuurbronnen in de buurt van het product.
9. Zorg ervoor dat de beveiliging van de gepolariseerde stekker of randaardestekker INTACT blijft. Een gepolariseerde stekker heeft twee pennen waarbij er één breder is dan de andere. Een randaardestekker heeft twee pennen en een extra aardaansluiting. De breedste pen en de aardaansluiting zijn bedoeld om uw veiligheid te garanderen. Als de meegeleverde stekker niet in de contactdoos past, vraag een elektricien dan om de verouderde contactdoos te vervangen.
10. BESCHERM het netsnoer tegen erop lopen of afknelling, vooral in de buurt van stekkers en uitgangen en op de plaats waar deze het apparaat verlaten.
11. GEBRUIK UITSLUITEND door de fabrikant gespecificeerde hulpstukken/accessoires.12. GEBRUIK het apparaat UITSLUITEND in combinatie met een door de
fabrikant gespecificeerde wagen, standaard, driepoot, beugel of tafel of met een meegeleverde ondersteuning. Wees bij gebruik van een wagen voorzichtig tijdens verplaatsingen van de wagen/apparaat-combinatie om letsel door omkantelen te voorkomen.
13. HAAL de stekker van dit apparaat uit de contactdoos tijdens onweer/bliksem of wanneer het lange tijd niet wordt gebruikt.
14. Laat onderhoud altijd UITVOEREN door bevoegd servicepersoneel. Onderhoud moet worden uitgevoerd wanneer het apparaat op enigerlei wijze is beschadigd, bijvoorbeeld beschadiging van netsnoer of stekker, vloeistof of voorwerpen in het apparaat zijn terechtgekomen, het apparaat is blootgesteld aan regen of vocht, niet naar behoren werkt of is gevallen.
15. STEL het apparaat NIET bloot aan druppelend en rondspattend vocht. PLAATS GEEN voorwerpen gevuld met vloeistof, bijvoorbeeld een vaas, op het apparaat.
16. De NETSTEKKER of een koppelstuk van het apparaat moet klaar voor gebruik zijn. 17. Het door het apparaat verspreide geluid mag niet meer zijn dan 70 dB(A). 18. Apparaten van een KLASSE I-constructie moeten worden aangesloten op een
WANDCONTACTDOOS met beschermende aardaansluiting. 19. Stel dit apparaat niet bloot aan regen of vocht om het risico op brand of elektrische
schokken te verminderen. 20. Probeer dit product niet te wijzigen. Anders kan lichamelijk letsel optreden en/of het
product defect raken.21. Gebruik dit product binnen de gespecificeerde bedrijfstemperaturen.
Dit symbool geeft aan dat in deze eenheid een gevaarlijk spanning aan-wezig is met het risico op een elektrische schok.
Dit symbool geeft aan dat in de documentatie bij deze eenheid belangri-jke bedienings- en onderhoudsinstructies zijn opgenomen.
5
ВАЖНЫЕ ИНСТРУКЦИИ ПО ТЕХНИКЕ БЕЗОПАСНОСТИ1. ПРОЧИТАЙТЕ эти инструкции. 2. СОХРАНИТЕ эти инструкции. 3. ОБРАЩАЙТЕ ВНИМАНИЕ на все предупреждения.4. СЛЕДУЙТЕ всем инструкциям. 5. НЕ пользуйтесь этим прибором вблизи воды. 6. ЧИСТИТЕ ТОЛЬКО сухой тканью. 7. НЕ закрывайте никакие вентиляционные отверстия. Оставляйте расстояния, нужные
для достаточной вентиляции, и выполняйте установку в соответствии с инструкциями изготовителя.
8. НЕ устанавливайте вблизи каких бы то ни было источников тепла — открытого пламени, радиаторов, обогревателей, печей или других приборов (включая усилители), выделяющих тепло. Не помещайте на изделие источники открытого пламени.
9. НЕ пренебрегайте защитными свойствами поляризованной или заземляющей вилки. Поляризованная вилка имеет два ножевых контакта, из которых один шире другого. Заземляющая вилка имеет два ножевых контакта и третий, заземляющий, штырь. Более широкий контакт или третий штырь предусматриваются для безопасности. Если вилка прибора не подходит к вашей розетке, обратитесь к электрику для замены розетки устаревшей конструкции.
10. ЗАЩИТИТЕ силовой шнур, чтобы на него не наступали и чтобы он не был пережат, особенно в местах подсоединения к вилкам, розеткам и в месте выхода из прибора.
11. ИСПОЛЬЗУЙТЕ ТОЛЬКО те принадлежности и приспособления, которые предусмотрены изготовителем.
12. ИСПОЛЬЗУЙТЕ только с тележкой, стендом, штативом, кронштейном или столом, которые предусмотрены изготовителем или наглухо прикреплены к прибору. При использовании тележки будьте осторожны, когда передвигаете тележку вместе с прибором — переворачивание может привести к травме.
13. ОТСОЕДИНЯЙТЕ прибор ОТ СЕТИ во время грозы или если он не используется длительное время.
14. ПОРУЧИТЕ все обслуживание квалифицированному техническому персоналу. Обслуживание требуется при каком-либо повреждении прибора, например, при повреждении шнура питания или вилки, если на прибор была пролита жидкость или на него упал какой-либо предмет, если прибор подвергся воздействию дождя или сырости, не функционирует нормально или если он падал.
15. НЕ допускайте попадания на прибор капель или брызг. НЕ ставьте на прибор сосуды с жидкостью, например, вазы.
16. Вилка электропитания или штепсель прибора должны быть легко доступны. 17. Уровень воздушного шума этого аппарата не превышает 70 дБ (A). 18. Аппараты конструкции КЛАССА I необходимо подсоединять к СЕТЕВОЙ розетке с
защитным соединением для заземления. 19. Чтобы уменьшить риск возгорания или поражения электрическим током, не
допускайте попадания на этот аппарат дождя или влаги. 20. Не пытайтесь вносить изменения в это изделие. Это может привести к травме и (или)
выходу изделия из строя.21. Эксплуатируйте это изделие в указанном диапазоне рабочих температур.
Этот знак показывает, что внутри прибора имеется опасное напряжение, создающее риск электрического удара.
Этот знак показывает, что в сопроводительной документации к прибору есть важные указания по его эксплуатации и обслуживанию.
INSTRUCCIONES IMPORTANTES DE SEGURIDAD
1. LEA estas instrucciones. 2. CONSERVE estas instrucciones. 3. PRESTE ATENCION a todas las advertencias.4. SIGA todas las instrucciones. 5. NO utilice este aparato cerca del agua. 6. LIMPIE UNICAMENTE con un trapo seco. 7. NO obstruya ninguna de las aberturas de ventilación. Deje espacio suficiente para
proporcionar ventilación adecuada e instale los equipos según las instrucciones del fabricante.
8. NO instale el aparato cerca de fuentes de calor tales como llamas descubiertas, radiad-ores, registros de calefacción, estufas u otros aparatos (incluyendo amplificadores) que produzcan calor. No coloque artículos con llamas descubiertas en el producto.
9. NO anule la función de seguridad del enchufe polarizado o con clavija de puesta a tierra. Un enchufe polarizado tiene dos patas, una más ancha que la otra. Un enchufe con pu-esta a tierra tiene dos patas y una tercera clavija con puesta a tierra. La pata más ancha o la tercera clavija se proporciona para su seguridad. Si el tomacorriente no es del tipo apropiado para el enchufe, consulte a un electricista para que sustituya el tomacorriente de estilo anticuado.
10. PROTEJA el cable eléctrico para evitar que personas lo pisen o estrujen, particularmente en sus enchufes, en los tomacorrientes y en el punto en el cual sale del aparato.
11. UTILICE únicamente los accesorios especificados por el fabricante.12. UTILICE únicamente con un carro, pedestal, trípode, escuadra o mesa del
tipo especificado por el fabricante o vendido con el aparato. Si se usa un carro, el mismo debe moverse con sumo cuidado para evitar que se vuelque con el aparato.
13. DESENCHUFE el aparato durante las tormentas eléctricas, o si no va a ser utilizado por un lapso prolongado.
14. TODA reparación debe ser llevada a cabo por técnicos calificados. El aparato requiere reparación si ha sufrido cualquier tipo de daño, incluyendo los daños al cordón o enchufe eléctrico, si se derrama líquido sobre el aparato o si caen objetos en su interior, si ha sido expuesto a la lluvia o la humedad, si no funciona de modo normal, o si se ha caído.
15. NO exponga este aparato a chorros o salpicaduras de líquidos. NO coloque objetos llenos con líquido, tales como floreros, sobre el aparato.
16. El enchufe de alimentación o un acoplador para otros aparatos deberá permanecer en buenas condiciones de funcionamiento.
17. El nivel de ruido transmitido por el aire del aparato no excede de 70 dB(A). 18. Los aparatos de fabricación CLASE I deberán conectarse a un tomacorriente de ALI-
MENTACION con clavija de puesta a tierra protectora. 19. Para reducir el riesgo de causar un incendio o sacudidas eléctricas, no exponga este
aparato a la lluvia ni a humedad. 20. No intente modificar este producto. Hacerlo podría causar lesiones personales y/o la falla
del producto.21. Utilice este producto únicamente dentro de la gama de temperaturas de funcionamiento
especificadas.
Este símbolo indica que la unidad contiene niveles de voltaje peligrosos que representan un riesgo de choques eléctricos.
Este símbolo indica que la literatura que acompaña a esta unidad con-tiene instrucciones importantes de funcionamiento y mantenimiento.
6
WARNING• Battery packs may explode or release toxic materials. Risk of fire
or burns. Do not open, crush, modify, disassemble, heat above 140°F (60°C), or incinerate.
• Follow instructions from manufacturer• Only use Shure charger to recharge Shure rechargeable
batteries• WARNING: Danger of explosion if battery incorrectly replaced.
Replace only with same or equivalent type.• Never put batteries in mouth. If swallowed, contact your
physician or local poison control center• Do not short circuit; may cause burns or catch fire• Do not charge or use battery packs other than Shure
rechargeable batteries• Dispose of battery packs properly. Check with local vendor for
proper disposal of used battery packs.• Batteries (battery pack or batteries installed) shall not be
exposed to excessive heat such as sunshine, fire or the like
WARNING: Danger of explosion if battery incorrectly replaced. Operate only with Shure compatible batteries.
Note: Use only with the included power supply or a Shure-approved equivalent.
LICENSING INFORMATIONLicensing: A ministerial license to operate this equipment may be required in certain areas. Consult your national authority for possible requirements. Changes or modifications not expressly approved by Shure Incorporated could void your authority to operate the equipment. Licensing of Shure wireless microphone equipment is the user’s responsibility, and licensability depends on the user’s classification and application, and on the selected frequency. Shure strongly urges the user to contact the appropriate telecommunications authority concerning proper licensing, and before choosing and ordering frequencies.
This Class B digital apparatus complies with Canadian ICES-003. Cet appareil numérique de la classe B est conforme à la norme NMB-003 du Canada.
Caution: Avoid operating mobile phones and mobile broadband devices near your wireless system to prevent the possibility of interference.
Information to the userThis equipment has been tested and found to comply with the limits for a Class B digital device, pursuant to Part 15 of the FCC Rules. These limits are designed to provide reasonable protection against harmful interference in a residential installation. This equipment generates uses and can radiate radio frequency energy and, if not installed and used in accordance with the instructions, may cause harmful interference to radio communications. However, there is no guarantee that interference will not occur in a particular installation. If this equipment does cause harmful interference to radio or television reception, which can be determined by turning the equipment off and on, the user is encouraged to try to correct the interference by one or more of the following measures:
• Reorient or relocate the receiving antenna.• Increase the separation between the equipment and the
receiver.• Connect the equipment to an outlet on a circuit different from
that to which the receiver is connected.• Consult the dealer or an experienced radio/TV technician for
help.
Australia Warning for WirelessThis device operates under an ACMA class licence and must comply with all the conditions of that licence including operating frequencies. Before 31 December 2014, this device will comply if it is operated in the 520-820 MHz frequency band. WARNING: After 31 December 2014, in order to comply, this device must not be operated in the 694-820 MHz band.
AVERTISSEMENT• Les accus risquent d'exploser ou d'émettre des matières toxiques.
Risque d'incendie ou de brûlures. Ne pas ouvrir, écraser, altérer, démonter, chauffer au-dessus de 60 °C (140 °F) ou incinérer.
• Suivre les instructions du fabricant• Utiliser uniquement un chargeur Shure pour recharger les accus
rechargeables Shure• AVERTISSEMENT : Danger d'explosion si l'accu est mal placé.
Remplacer uniquement avec le même type ou un type équivalent.• Ne jamais mettre les accus dans la bouche. En cas d'ingestion,
contacter un médecin ou le centre anti-poison local• Ne pas court-circuiter ; cela risque de causer des brûlures ou un
incendie• Ne pas charger ou utiliser des accus autres que les accus
rechargeables Shure• Mettre les accus au rebut de manière appropriée. Vérifier auprès
du fournisseur local la manière appropriée de mettre au rebut les accus usagés.
• Les accus (bloc accu ou accus installés) ne doivent pas être exposés à une chaleur excessive, p. ex. lumière du soleil, feu ou similaire
AVERTISSEMENT : Danger d'explosion si l'accu est mal placé. N'utiliser qu'avec des accus compatibles Shure.
Remarque : Utiliser exclusivement avec le bloc d'alimentation inclus ou un produit équivalent approuvé par Shure.
RENSEIGNEMENTS SUR L'OCTROI DE LICENCEAutorisation d'utilisation : Une licence officielle d'utilisation de ce matériel peut être requise dans certains pays. Consulter les autorités compétentes pour les exigences éventuelles. Tout changement ou modification n'ayant pas fait l'objet d'une autorisation expresse de Shure Incorporated peut entraîner la nullité du droit d'utilisation de l'équipement. La licence d’utilisation de l'équipement de microphone sans fil Shure demeure de la responsabilité de l'utilisateur, et dépend de la classification de l'utilisateur et de l'application prévue par lui ainsi que de la fréquence sélectionnée. Shure recommande vivement de se mettre en rapport avec les autorités compétentes des télécommunications pour l'obtention des autorisations nécessaires, et ce avant de choisir et de commander des fréquences.
Cet appareil numérique de classe B est conforme à la norme ICES-003 (Canada). Cet appareil numérique de la classe B est conforme à la norme NMB-003 du Canada.
Attention : éviter d’utiliser des téléphones portables et appareils mobiles large bande près du système sans fil pour prévenir tout risque d’interférences.
Information à l'utilisateurCet équipement a été testé et déclaré conforme aux limites pour les appareils numériques de classe B, selon la section 15 des règlements de la FCC. Ces limites sont destinées à assurer une protection raisonnable contre les interférences nuisibles dans une installation résidentielle. Cet équipement produit, utilise et peut émettre de l'énergie radio électrique et, s'il n'est pas installé et utilisé conformément aux présentes instructions, peut causer des interférences nuisibles aux communications radio. Il n'existe toutefois aucune garantie que de telles interférences ne se produiront pas dans une installation particulière. Si cet équipement produit des interférences nuisibles à la réception d'émissions de radio ou de télévision, ce qui peut être établi en mettant l'appareil sous, puis hors tension, il est recommandé à l'utilisateur d'essayer de corriger le problème en prenant l'une ou plusieurs des mesures suivantes :
• Réorienter ou déplacer l'antenne réceptrice.• Augmenter la distance séparant l'équipement du récepteur.• Brancher l'équipement sur un circuit électrique différent de celui
du récepteur.• Consulter le distributeur ou un technicien radio et télévision.
Avertissement Australie pour le sans filCet appareil fonctionne sur la base d’une licence de l’ACMA et doit respecter toutes les conditions de cette licence, y compris les fréquences de fonctionnement. D’ici au 31 décembre 2014, cet appareil les respecte s’il fonctionne dans la bande de fréquences 520-820 MHz. AVERTISSEMENT : pour les respecter après le 31 décembre 2014, cet appareil devra fonctionner dans la bande 694-820 MHz.

7
ACHTUNG• Akkusätze können explodieren oder giftiges Material freisetzen.
Es besteht Feuer- und Verbrennungsgefahr. Nicht öffnen, zusammenpressen, modifizieren, auseinander bauen, über 60 °C erhitzen oder verbrennen.
• Die Anweisungen des Herstellers befolgen.• Nur Shure-Ladegerät zum Aufladen von wiederaufladbaren Shure-
Akkus verwenden.• ACHTUNG: Es besteht Explosionsgefahr, wenn die Batterie nicht richtig
ersetzt wird. Nur mit dem gleichen bzw. einem gleichwertigen Typ ersetzen.
• Akkus niemals in den Mund nehmen. Bei Verschlucken ärztlichen Rat einholen oder die Giftnotrufzentrale anrufen.
• Nicht kurzschließen; kann Verbrennungen verursachen oder in Brand geraten.
• Keine anderen Akkusätze als die wiederaufladbaren Shure-Akkus aufladen bzw. verwenden.
• Akkusätze vorschriftsmäßig entsorgen. Beim örtlichen Verkäufer die vorschriftsmäßige Entsorgung gebrauchter Akkusätze erfragen.
• Akkus (Akkusätze oder eingesetzte Akkus) dürfen keiner starken Hitze wie Sonnenstrahlung, Feuer oder dergleichen ausgesetzt werden.
ACHTUNG: Es besteht Explosionsgefahr, wenn die Batterie nicht richtig ersetzt wird. Nur mit kompatiblen Shure-Batterien betreiben.
Hinweis: Das Gerät darf nur mit dem im Lieferumfang enthaltenen Netzteil oder einem gleichwertigen, von Shure zugelassenen Gerät verwendet werden.
LIZENZINFORMATIONENZulassung: In einigen Gebieten ist für den Betrieb dieses Geräts u. U. eine behördliche Zulassung erforderlich. Wenden Sie sich bitte an die zuständige Behörde, um Informationen über etwaige Anforderungen zu erhalten. Nicht ausdrücklich von Shure Incorporated genehmigte Änderungen oder Modifikationen können den Entzug der Betriebsgenehmigung für das Gerät zur Folge haben. Das Erlangen einer Lizenz für drahtlose Shure-Mikrofonsysteme obliegt dem Benutzer. Die Erteilung einer Lizenz hängt von der Klassifizierung und Anwendung durch den Benutzer sowie von der ausgewählten Frequenz ab. Shure empfiehlt dem Benutzer dringend, sich vor der Auswahl und Bestellung von Frequenzen mit der zuständigen Fernmelde-/Regulierungsbehörde hinsichtlich der ordnungsgemäßen Zulassung in Verbindung zu setzen.
Dieses digitale Gerät der Klasse B entspricht den kanadischen ICES-003-Vorschriften.
Vorsicht: Keine Mobiltelefone und mobile Breitbandgeräte in der Nähe des Funksystems verwenden, um Interferenzen zu verhindern.
Informationen für den BenutzerDieses Gerät wurde geprüft und entspricht demnach den Grenzwerten für ein digitales Gerät der Klasse B gemäß Teil 15 der Richtlinien der US-Fernmeldebehörde (FCC Rules). Diese Grenzwerte sollen einen angemessenen Schutz gegen störende Interferenzen in Wohngebieten bieten. Dieses Gerät erzeugt und arbeitet mit HF-Energie und kann diese ausstrahlen; wenn es nicht gemäß den Anweisungen installiert und verwendet wird, kann es störende Interferenzen mit dem Funkverkehr verursachen. Allerdings wird nicht gewährleistet, dass es bei einer bestimmten Installation keine Interferenzen geben wird. Wenn dieses Gerät störende Interferenzen beim Radio- und Fernsehempfang verursacht (was durch Aus- und Anschalten des Geräts festgestellt werden kann), wird dem Benutzer nahe gelegt, die Interferenz durch eines oder mehrere der folgenden Verfahren zu beheben:
• Die Empfangsantenne anders ausrichten oder anderswo platzieren.• Den Abstand zwischen dem Gerät und dem Empfänger vergrößern.• Das Gerät an eine Steckdose eines Netzkreises anschließen, der nicht
mit dem des Empfängers identisch ist.• Den Händler oder einen erfahrenen Radio- und Fernsehtechniker zu
Rate ziehen.
Warnhinweis für Funkgeräte in AustralienDieses Gerät unterliegt einer ACMA-Klassenlizenz und muss sämtliche Bedingungen dieser Lizenz erfüllen, auch die der Sendefrequenzen. Vor dem 31. Dezember 2014 erfüllt dieses Gerät die Bedingungen, wenn es im Frequenzband von 520-820 MHz betrieben wird. ACHTUNG: Um die Bedingungen nach dem 31. Dezember 2014 zu erfüllen, darf das Gerät nicht im Frequenzband von 694-820 MHz betrieben werden.
ADVERTENCIA• Los conjuntos de baterías pueden estallar o soltar materiales
tóxicos. Riesgo de incendio o quemaduras. No abra, triture, modifique, desarme, caliente a más de 60°C (140°F) ni incinere
• Siga las instrucciones del fabricante• Utilice únicamente el cargador Shure para cargar las baterías
recargables Shure.• ADVERTENCIA: Si se sustituye la batería incorrectamente, se
crea el riesgo de causar una explosión. Sustitúyala únicamente por otra igual o de tipo equivalente.
• Nunca ponga baterías en la boca. Si se tragan, acuda al médico o a un centro local de control de envenenamiento
• No ponga en cortocircuito; esto puede causar quemaduras o incendios
• No cargue ni utilice baterías diferentes de las baterías recargables Shure.
• Deseche los conjuntos de baterías de forma apropiada. Consulte al vendedor local para el desecho adecuado de conjuntos de baterías usados.
• Las baterías (conjuntos de baterías o baterías instaladas) no deben exponerse al calor excesivo causado por la luz del sol, las llamas o condiciones similares.
ADVERTENCIA: Si se sustituye la batería incorrectamente, se crea el riesgo de causar una explosión. Funciona sólo con baterías compatibles con dispositivos Shure.
Nota: Use sólo con la fuente de alimentación incluida o una equivalente aprobada por Shure.
INFORMACION DE LICENCIALicencia de uso: Se puede requerir una licencia ministerial para utilizar este equipo en algunas áreas. Consulte a la autoridad nacional para posibles requisitos. Los cambios o modificaciones que no tengan la aprobación expresa de Shure Incorporated podrían anular su autoridad para usar el equipo. La obtención de licencias para los equipos de micrófonos inalámbricos Shure es responsabilidad del usuario, y la posibilidad de obtenerlas depende de la clasificación del usuario y el uso que va a hacer del equipo, así como de la frecuencia seleccionada. Shure recomienda enfáticamente que el usuario se ponga en contacto con las autoridades de telecomunicaciones correspondientes respecto a la obtención de licencias antes de seleccionar y solicitar frecuencias.
Este aparato digital de categoría B cumple con la norma canadiense ICES-003. Cet appareil numérique de la classe B est conforme à la norme NMB-003 du Canada.
Precaución: Evite usar teléfonos móviles y dispositivos de banda ancha móviles cerca del sistema inalámbrico para evitar la posibilidad de interferencias.
Información para el usuarioEste equipo ha sido probado y hallado en cumplimiento con los límites establecidos para un dispositivo digital categoría B, según la Parte 15 de las normas de la FCC. Estos límites han sido diseñados para proporcionar una protección razonable contra las interferencias perjudiciales en instalaciones residenciales. Este equipo genera, utiliza y puede irradiar energía de radiofrecuencia y, si no se instala y utiliza de acuerdo con las instrucciones, puede causar interferencias perjudiciales a las comunicaciones de radio. Sin embargo, no se garantiza que no ocurrirán interferencias en una instalación particular. Si este equipo causara interferencias perjudiciales a la recepción de radio o televisión, que se puede determinar apagando y encendiendo el equipo, se recomienda tratar de corregir la interferencia realizando una de las siguientes acciones:
• Cambie la orientación o la ubicación de la antena receptora.• Aumente la distancia entre el equipo y el receptor.• Conecte el equipo a un tomacorriente de un circuito diferente al
que está conectado el receptor.• Consulte al concesionario o a un técnico de radio/TV con
experiencia para recibir ayuda.
Advertencia para sistemas inalámbricos en AustraliaEste dispositivo funciona con una licencia de categoría ACMA y debe satisfacer todas las condiciones de dicha licencia, incluyendo las frecuencias de trabajo. Antes del 31 de diciembre de 2014, este dispositivo cumple si se lo usa en la banda de 520-820 MHz. ADVERTENCIA: Después del 31 de diciembre de 2014, para que cumpla, este dispositivo no deberá ser utilizado en la banda de 694-820 MHz.

8
AVVERTENZA• Le pile possono esplodere o rilasciare sostanze tossiche.
Rischio di incendio o ustioni. Non aprite, schiacciate, modificate, smontate, scaldate oltre i 60 °C né bruciate.
• Seguite le istruzioni del produttore• Per la ricarica delle pile ricaricabili utilizzate esclusivamente un
caricabatteria Shure• AVVERTENZA: pericolo di esplosione in caso di errato
posizionamento della pila. Sostituite la pila esclusivamente con pile di tipo identico o equivalente.
• Non mettete le pile in bocca. Se ingerite, rivolgetevi al medico o al centro antiveleni locale.
• Non causate cortocircuiti, per evitare ustioni o incendi.• Caricate e usate esclusivamente pile ricaricabili Shure.• Smaltite le pile in modo appropriato. Per lo smaltimento
appropriato delle pile usate, rivolgetevi al fornitore locale.• Le pile (pile ricaricabili o installate) non devono essere esposte
a calore eccessivo (luce del sole diretta, fuoco o simili).
AVVERTENZA: pericolo di esplosione in caso di errato posizionamento della pila. Da utilizzare esclusivamente con pile compatibili Shure.
Nota: utilizzate unicamente con l'alimentatore in dotazione o con uno equivalente autorizzato da Shure.
INFORMAZIONI SULLA CONCESSIONE DI LICENZAConcessione della licenza all'uso: per usare questo apparecchio, in determinate aree può essere necessaria una licenza ministeriale. Per i possibili requisiti, rivolgetevi alle autorità competenti. Eventuali modifiche di qualsiasi tipo non espressamente autorizzate dalla Shure Incorporated possono annullare il permesso di utilizzo di questo apparecchio. Chi usa l'apparecchio radiomicrofonico Shure ha la responsabilità di procurarsi la licenza adatta al suo impiego; la concessione di tale licenza dipende dalla classificazione dell'operatore, dall'applicazione e dalla frequenza selezionata. La Shure suggerisce vivamente di rivolgersi alle autorità competenti per le telecomunicazioni riguardo alla concessione della licenza adeguata, e prima di scegliere e ordinare frequenze.
Questo apparato digitale di Classe B è conforme alle norme canadesi ICES-003. Cet appareil numérique de la classe B est conforme à la norme NMB-003 du Canada.
Attenzione: per evitare possibili interferenze, evitate l'utilizzo di telefoni cellulari e dispositivi mobili a banda larga in prossimità del sistema wireless.
Avviso per gli utentiin base alle prove su di esso eseguite, si è determinata la conformità ai limiti relativi ai dispositivi digitali di Classe B, secondo la Parte 15 delle norme FCC. Tali limiti sono stati concepiti per fornire una protezione adeguata da interferenze pericolose in ambiente domestico. Questo apparecchio genera, utilizza e può irradiare energia a radiofrequenza e, se non installato ed utilizzato secondo le istruzioni, può causare interferenze dannose per le comunicazioni radio. Tuttavia, non esiste alcuna garanzia che, in una specifica installazione, non si verificheranno interferenze. Se questo apparecchio causasse interferenze dannose per la ricezione dei segnali radio o televisivi, determinabili spegnendolo e riaccendendolo, si consiglia di tentare di rimediare all'interferenza tramite uno o più dei seguenti metodi:
• cambiate l'orientamento dell'antenna ricevente o spostatela;• aumentate la distanza tra l'apparecchio ed il ricevitore;• collegate l'apparecchio ad una presa inserita in un circuito
diverso da quello a cui è collegato il ricevitore;• rivolgetevi al rivenditore o ad un tecnico radio/TV qualificato.
Avvertenza relativa al wireless per l'AustraliaQuesto dispositivo funziona in base ad una licenza di categoria ACMA e deve essere conforme a tutte le disposizioni di questa licenza, incluse le frequenze di funzionamento. Prima del 31 dicembre 2014, questo dispositivo risulterà a norma se utilizzato nella banda di frequenza 520-820 MHz. AVVERTENZA: dopo il 31 dicembre 2014, per essere a norma, questo dispositivo non deve essere utilizzato nella banda 694-820 MHz.
ATENÇÃO• Baterias podem explodir ou liberar materiais tóxicos. Risco
de incêndio ou queimaduras. Não abra, esmague, modifique, desmonte, aqueça acima de 60 °C (140 °F) ou incinere.
• Siga as instruções do fabricante• Use somente carregador Shure para recarregar baterias Shure
recarregáveis• ATENÇÃO: Perigo de explosão se a bateria for substituída
incorretamente. Substitua somente pelo mesmo tipo ou por um equivalente.
• Nunca ponha baterias na boca. Se engolida, procure um médico ou centro local de controle de veneno
• Não provoque curto-circuito; isto pode causar queimaduras ou incêndios
• Não carregue nem use baterias que não sejam baterias recarregáveis Shure
• Descarte as baterias apropriadamente. Verifique com o fornecedor local a forma correta de descarte de baterias usadas.
• Baterias (a embalagem ou as baterias instaladas) não devem ser expostas a calor excessivo como luz do sol, fogo etc.
ATENÇÃO: Existe perigo de explosão caso a bateria seja substituída incorretamente. Utilize apenas com baterias Shure compatíveis.
Observação: Use somente com a fonte de alimentação inclusa ou uma equivalente aprovada pela Shure.
INFORMAÇÕES SOBRE A LICENÇALicença: Em determinados locais, pode ser necessário obter uma autorização ministerial para operar este equipamento. Consulte a sua autoridade nacional sobre possíveis requisitos. Alterações ou modificações não expressamente aprovadas pela Shure Incorporated podem anular a autorização do usuário para a operação do equipamento. A licença do equipamento de microfone sem fio da Shure é de responsabilidade do usuário e a licença depende da classificação e aplicação do usuário e da freqüência selecionada. A Shure recomenda enfaticamente ao usuário contatar a devida autoridade de telecomunicações com relação à devida licença antes de escolher e encomendar as frequências.
Este aparelho digital Classe B está em conformidade com a Canadian ICES-003. Cet appareil numérique de la classe B est conforme à la norme NMB-003 du Canada.
Cuidado: Evite operar telefones celulares e dispositivos móveis de banda larga perto de seu sistema sem fio para prevenir a possibilidade de interferência.
Informações para o usuárioEste equipamento foi testado e está de acordo com os limites para um dispositivo digital Classe B, segundo a Parte 15 das Normas do FCC. Estes limites foram projetados para fornecer razoável proteção contra interferência prejudicial em uma instalação residencial. Este equipamento gera, usa e pode irradiar energia de radiofrequência e, se não for instalado e usado conforme as instruções, pode causar interferência prejudicial às comunicações de rádio. Entretanto, não há garantias de que não ocorrerão interferências em uma determinada instalação. Se este equipamento causar interferência prejudicial à recepção de rádio ou televisão, o que pode ser determinado ao desligar e ligar o equipamento, o usuário deve tentar corrigir a interferência tomando uma das seguintes medidas:
• Reoriente ou mude de lugar a antena receptora.• Aumente a distância entre o equipamento e o receptor.• Conecte o equipamento a uma tomada de um circuito diferente
do circuito da tomada onde o receptor está conectado.• Consulte o fabricante do equipamento ou um técnico de rádio/
televisão experiente.
Advertência Australiana para Conexão sem fioEste dispositivo opera sob licença tipo ACMA e deve estar em conformidade com todas as condições dessa licença, incluindo frequências de operação. Antes de 31 de dezembro de 2014, este dispositivo deve estar em conformidade se for operado na banda de frequência de 520 a 820 MHz. ATENÇÃO: Após 31 de dezembro de 2014, para estar em conformidade, este dispositivo não deve ser operado na banda de 694 a 820 MHz.

9
ВНИМАНИЕ• Батарейные блоки питания могут взрываться или выделять
токсичные материалы. Остерегайтесь ожогов или возгорания. Ни в коем случае нельзя вскрывать, разбивать, модифицировать, разбирать, нагревать выше 60 °C или сжигать батарейки.
• Следуйте инструкциям изготовителя• Для подзарядки аккумуляторных батареек Shure используйте
только зарядное устройство Shure• ПРЕДОСТЕРЕЖЕНИЕ. Неправильная замена батарейки может
привести к взрыву. Заменяйте только батарейкой того же или эквивалентного типа.
• Ни в коем случае не берите батарейки в рот. При проглатывании обратитесь к врачу или в местный токсикологический центр
• Не замыкайте батарейки накоротко; это может привести к ожогам или возгоранию
• Не заряжайте и не используйте никакие другие батарейки, кроме аккумуляторных батареек Shure
• Утилизируйте батарейки надлежащим образом. По вопросам надлежащей утилизации использованных батареек обращайтесь к местному поставщику
• Не подвергайте батарейки (батарейные блоки питания или установленные батарейки) чрезмерному нагреву от солнца, открытого пламени и т.п.
ВНИМАНИЕ: Неправильная замена батарейки может привести к взрыву. Используйте только батарейки, совместимые с Shure.
Примечание. Используйте только с блоком питания, входящим в комплект, или эквивалентным устройством, утвержденным Shure.
ЛИЦЕНЗИОННАЯ ИНФОРМАЦИЯЛицензирование: Для эксплуатации этого оборудования на некоторых территориях может требоваться административная лицензия. В отношении возможных требований обращайтесь в соответствующий национальный орган. Изменения или модификации, не получившие четко выраженного утверждения Shure Incorporated, могут лишить вас права эксплуатировать это оборудование. Лицензирование беспроводного микрофонного оборудования Shure является обязанностью пользователя, и возможность получения пользователем лицензии зависит от классификации и применения, а также от выбранной частоты. Компания Shure настоятельно рекомендует пользователю, прежде чем выбирать и заказывать частоты, обратиться в соответствующий регулятивный орган по телекоммуникациям в отношении надлежащего лицензирования.
Этот цифровой аппарат класса В соответствует канадским нормам ICES-003. Cet appareil numérique de la classe B est conforme à la norme NMB-003 du Canada.
Предупреждение. Во избежание помех следите, чтобы поблизости от вашей беспроводной системы не было работающих мобильных телефонов и мобильных широкополосных устройств.
Информация для пользователяДанное оборудование прошло испытания, и было установлено, что оно соответствует пределам для цифрового устройства класса В согласно части 15 Правил FCC. Эти пределы определены исходя из обеспечения обоснованного уровня защиты от вредных помех при установке в жилых зданиях. Это оборудование генерирует, использует и может излучать высокочастотную энергию; если его установка осуществляется не в соответствии с инструкциями, оно может создавать вредные помехи для радиосвязи. Однако нет гарантии, что при конкретной установке помехи не возникнут. Если оборудование создает вредные помехи приему радио- или телевизионных передач, в чем можно убедиться, включая и выключая оборудование, пользователю рекомендуется устранить помехи одной или несколькими из следующих мер:
• Измените ориентацию или переместите приемную антенну.• Увеличьте расстояние между оборудованием и приемником.• Подключите оборудование к розетке, находящейся не в той цепи,
к которой подсоединен приемник.• Обратитесь за помощью к дилеру или опытному радио- или
телевизионному технику.
Предупреждение для цифровых устройств (Австралия)Настоящее устройство действует согласно лицензии класса ACMA и должно соответствовать всем условиям этой лицензии, включая рабочие частоты. До 31 декабря 2014 соответствие этого устройства будет обеспечено, если оно работает в диапазоне частот 520-820 МГц. ПРЕДОСТЕРЕЖЕНИЕ. После 31 декабря 2014 для обеспечения соответствия необходимо, чтобы устройство не работало в диапазоне 694-820 МГц.
WAARSCHUWING• Batterijpakketten kunnen exploderen of giftige stoffen afgeven.
Gevaar voor brand of verbranding. Niet openen, indeuken, wijzigen, demonteren, tot boven 60 °C verwarmen of verbranden.
• Volg de instructies van de fabrikant op.• Gebruik uitsluitend een Shure-lader om oplaadbare Shure-
batterijen op te laden.• WAARSCHUWING: Explosiegevaar indien batterij door
verkeerd exemplaar wordt vervangen. Uitsluitend vervangen met hetzelfde type of een gelijkwaardig type.
• Stop nooit een batterij in uw mond. Neem bij doorslikken contact op met een arts of de plaatselijke eerste hulp.
• Niet kortsluiten; dit kan brandwonden of brand opleveren.• Geen batterijpakketten opladen of gebruiken met andere dan
oplaadbare Shure-batterijen.• Voer batterijpakketten op juiste wijze af. Raadpleeg de
plaatselijke verkoper voor de juiste afvoermethode voor gebruikte batterijpakketten.
• Batterijen (batterijpakketten of geplaatste batterijen) mogen niet worden blootgesteld aan grote hitte, zoals direct zonlicht, vuur etc.
WAARSCHUWING: Explosiegevaar indien batterij door verkeerd exemplaar wordt vervangen. Alleen gebruiken met compatibele Shure-batterijen.
Opmerking: Gebruik dit apparaat alleen met de bijgeleverde voeding of een door Shure goedgekeurd equivalent.
LICENTIE-INFORMATIELicenties: Een vergunning om deze apparatuur te gebruiken kan in bepaalde streken nodig zijn. Raadpleeg de autoriteiten in uw land voor mogelijke vereisten. Wijzigingen of aanpassingen die niet expliciet zijn goedgekeurd door Shure Incorporated, kunnen uw bevoegdheid om de apparatuur te gebruiken tenietdoen. Het is de verantwoordelijkheid van de gebruiker een vergunning aan te vragen voor de Shure draadloze microfoon, en het verkrijgen van de vergunning hangt af van de classificatie van de gebruiker en de toepassing, en van de geselecteerde frequentie. In Nederland is in de band 470 tot 790 Mhz geen vergunning nodig. Shure raadt de gebruiker dringend aan contact op te nemen met de desbetreffende telecommunicatie-autoriteit betreffende de juiste vergunning en alvorens frequenties te kiezen en te bestellen.
Dit digitale apparaat van klasse B voldoet aan de Canadese norm ICES-003. Cet appareil numérique de la classe B est conforme à la norme NMB-003 du Canada.
Voorzichtig: Vermijd het gebruik van mobiele telefoons en mobiele breedbandapparatuur in de buurt van uw draadloze systeem om de mogelijkheid van interferentie te voorkomen.
Informatie voor de gebruikerDeze apparatuur is getest en goed bevonden volgens de limieten van een digitaal apparaat van klasse B, conform deel 15 van de FCC-regelgeving. Deze limieten zijn bedoeld als aanvaardbare bescherming tegen schadelijke interferentie bij plaatsing in woonwijken. Deze apparatuur genereert en gebruikt hoogfrequente energie, kan deze ook uitstralen en kan, indien niet geplaatst en gebruikt in overeenstemming met de instructies, schadelijke interferentie aan radiocommunicatie veroorzaken. Er is echter geen garantie dat in specifieke installaties geen storingen kunnen optreden. Als deze apparatuur schadelijke interferentie in radio- of televisieontvangst veroorzaakt, wat kan worden vastgesteld door het apparaat uit- en weer in te schakelen, wordt de gebruiker geadviseerd om de storing te corrigeren door een of meer van onderstaande maatregelen:
• Richt de ontvangstantenne opnieuw of plaats deze ergens anders.
• Vergroot de scheidingsafstand tussen het apparaat en de ontvanger.
• Sluit het apparaat aan op een contactdoos van een ander circuit dan dat waarop de ontvanger is aangesloten.
• Vraag de dealer of een ervaren radio/TV-monteur om hulp.
Waarschuwing voor draadloze toepassingen in AustraliëDit apparaat valt onder een licentie voor de ACMA-klasse en dient te voldoen aan alle voorwaarden van die licentie, evenals de werkfrequenties. Dit apparaat zal al vóór 31 december 2014 moeten voldoen als het wordt gebruikt in de frequentieband van 520-820 MHz. WAARSCHUWING: Dit apparaat mag na 31 december 2014 om te voldoen niet meer worden gebruikt in de frequentieband van 694-820 MHz.

11
FeaturesFeatures• Transparent 24-bit digital audio• Extended 20 Hz to 20 kHz frequency range (microphone dependent)• 120 dB dynamic range• Digital predictive switching diversity• 64 MHz tuning bandwidth (region dependent)• More than 60 available channels per frequency band (region dependent)• Up to 17 compatible systems per 6MHz TV band; 22 systems per 8 MHz band• Easy pairing of transmitters and receivers over IR scan and sync• Automatic channel scan
Full Manual OnlineThis guide is a quick reference covering the essential features and functions of the QLX-D system.
A comprehensive version of the guide covering the following topics is available online by visiting www.shure.com
System Components
Model VariationsModel variations with additional components are available to meet specific performance situations.
QLXD2 Handheld Transmitter QLXD1 Bodypack Guitar System QLXD1 Bodypack Headworn or Lavalier
Bodypack and Handheld Combo System
Includes QLXD2 Handheld, available with any of the following microphone cartridges:• SM58• Beta 58A• SM86• Beta 87A• SM87A• Beta 87C• KSM9• KSM9HS (black)Microphone ClipBattery Contact CoverZipper Bag
Includes QLXD1 bodypack transmitterWA305 Premium instrument cableZipper Bag
Includes QLXD1 bodypack, available with any of the following microphone cartridges:• Beta 98H/C• WL93• WL183• WL184• WL185• MX150 (omni)• MX150 (cardioid)• MX153 (black or tan)• SM35Zipper Bag
• QLXD1 bodypack transmitter with WL185 Microflex cardioid lavalier microphone
• QLXD2 handheld transmitter with Shure SM58 microphone cartridge
• Battery Contact Cover• Zipper Bag (2)
• Encryption• Network Scan• Networking
• Firmware Updates• Wireless Workbench 6• Setting IP Addresses and Subnet Masks
• Connecting to External Controls Systems (AMX/Crestron)
• Transmitter RF Power• Selecting Regional TV Bandwidth
• Combo Systems• Custom Groups• Optional Accessories
menu
enter sync
on
① QLXD4 Receiver② PS23 Power Supply
③ 1/2 Wave Antennas (2)④ 2 ft. BNC Cables with Bulkhead Adapters (2)⑤ Choice of QLXD1 Bodypack Transmitter or QLXD2
Handheld Transmitter
⑥ AA Alkaline Batteries (not included in Argentina)⑦ Rackmount Hardware
System OverviewQLX-D™ Digital Wireless delivers defined, streamlined performance with transparent 24-bit digital audio. Combining professional features with simplified setup and operation, QLX-D offers outstanding wireless functionality for demanding live sound events and installations.
Shure digital wireless technology enables QLX-D to transmit clearly detailed audio with extended, virtually flat frequency response. Designed to be highly RF spectrum efficient, QLX-D can operate more than 60 compatible channels simultaneously in a single frequency band. Automatic channel scan and IR sync make finding and assigning an open frequency quick and easy. Ethernet connection provides networked channel scanning across multiple receivers and Shure Wireless Workbench® control software compatibility for advanced frequency coordination. AES-256 encryption comes standard and can be easily enabled for secure wireless transmission.
QLX-D also adds Shure rechargeable power options to provide dramatic long-term cost savings and extended transmitter battery life over alkaline batteries, and battery metering that reports remaining runtime in hours and minutes. With clearly defined performance and innovation, QLX-D delivers the very latest in digital wireless technology from Shure.
• Ethernet networking for multiple receiver systems• Network channel scanning configures open frequencies for networked
receivers• Compatible with Shure Wireless Workbench® 6 control software• Remote control from a mobile device or tablet via ShurePlus™ Channels app• AES-256 encryption for secure wireless transmission• Elegant and easy-to-use interface with high-contrast LCD menu• Compatible with external control systems such as AMX or Crestron• Professional-grade all-metal construction• Transmitters use 2 AA batteries or Shure SB900 rechargeable battery

12
Quick StartStep 1: Power and Antenna Connection
① Connect an antenna to each of the antenna connectors.② Connect the power supply to the receiver and plug into an AC power
source.③ Connect the receiver audio output to a mixer or amplifier.④ Press and hold the power button to turn on the receiver.
Step 2: Scanning for the Best Available Channel
1. Press the menu button on the receiver to access the scan function.
menu
enter
audio rf ir
sync
I I I I I I I IIIIIIIIIIIIIIIIIIIIIIIIII I
I I I I I I I I I I I I I
group channel
scan
2. Press the enter button to start a frequency scan. The scan icon will flash while in scan mode. When the scan is complete, the selected group and channel appear on the display.
menu
enter
audio rf ir
syncgroup channel rf audio gain
dB
TV MHz
Step 3: Install Batteries into Transmitter
AA Batteries Shure SB900 Battery
on
no
2DXL
U
on
AA Adapter AA Adapter
① Accessing the Battery CompartmentPress the side tabs on the bodypack or unscrew the cover on the handheld as shown to access the battery compartment.
② Installing Batteries - AA Batteries: Place batteries (note polarity markings) and AA Adaptor as shown - Shure SB900 Battery: Place battery as shown (note polarity markings), remove AA Adaptor from
bodypack transmitter, stow AA Adaptor in door for handheld transmitter Note: If using AA batteries, select a battery type from the transmitter menu to ensure accurate battery metering.
Step 4: IR Sync to Create an Audio Channel
1. Turn on the transmitter.2. Press the sync button on the receiver. The red ir LED
will blink indicating that sync mode is active.3. Align the IR sync windows of the transmitter and
receiver at a distance of <15 cm (6 in.). When the transmitter and receiver are aligned, the red ir LED remains on and the sync will automatically occur.
< 15 cm (6 in.)
4. sync good appears on the display when IR sync is complete. The blue rf LED will illuminate indicating that the transmitter is within range of the receiver.Note: If the IR sync fails, repeat the IR sync procedure, carefully maintaining alignment between the IR windows of the transmitter and receiver.
menu
enter
audio rf ir
sync
l l l l lllllllllll l l ll l l l lllllllllll l l l
l l l l l l ll
llllllllllllllll
ll
l l l l l l l l
Step 5: Sound Check and Gain Adjustment
1. Test the transmitter at performance levels while monitoring the audio meter and the audio LED. The audio meter should display at least 3 bars and the audio LED should be green. Reduce the gain if there is audible distortion of the audio.
2. Increase or decrease the gain if necessary by pressing the arrow buttons on the receiver front panel.
group channel rf audio gain
dB
TV MHz
hr mn
INSTRUMENT OUT
INSTRUMENT OUT
PS23
13
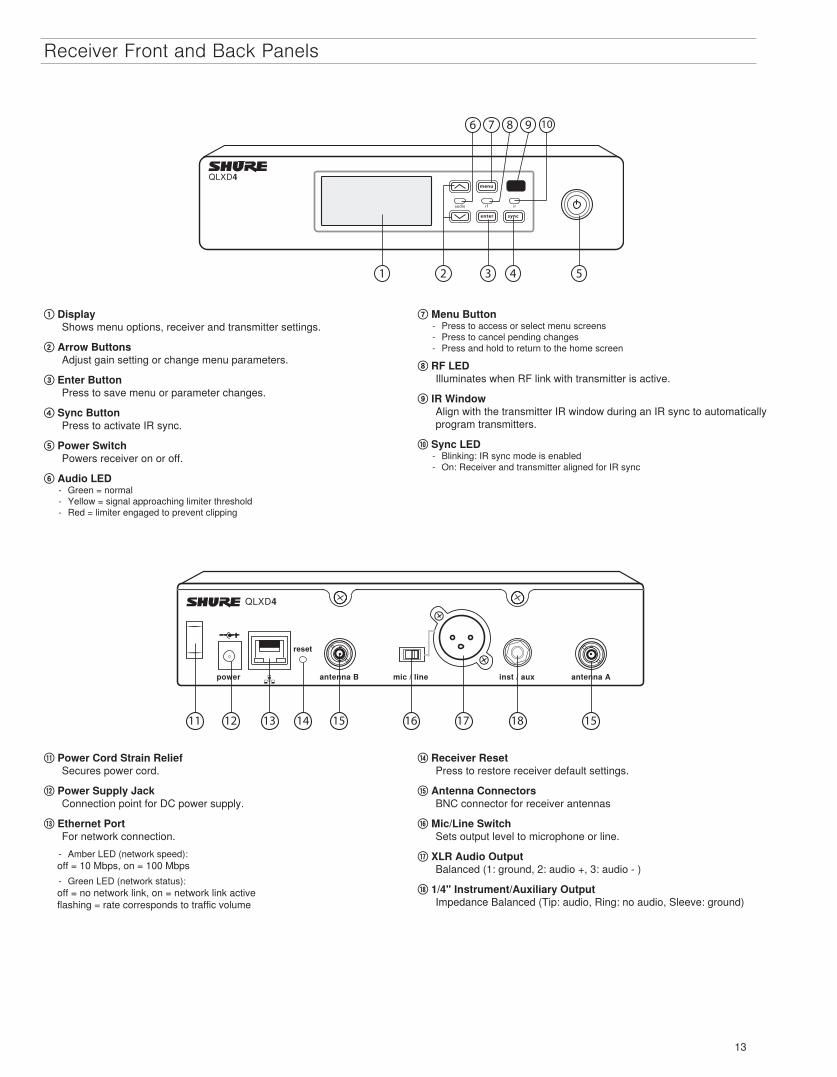
Receiver Front and Back Panels
1 2 3 4 5
6 7 8 9 10
① DisplayShows menu options, receiver and transmitter settings.
② Arrow ButtonsAdjust gain setting or change menu parameters.
③ Enter ButtonPress to save menu or parameter changes.
④ Sync ButtonPress to activate IR sync.
⑤ Power SwitchPowers receiver on or off.
⑥ Audio LED - Green = normal - Yellow = signal approaching limiter threshold - Red = limiter engaged to prevent clipping
⑦ Menu Button - Press to access or select menu screens - Press to cancel pending changes - Press and hold to return to the home screen
⑧ RF LEDIlluminates when RF link with transmitter is active.
⑨ IR WindowAlign with the transmitter IR window during an IR sync to automatically program transmitters.
⑩ Sync LED - Blinking: IR sync mode is enabled - On: Receiver and transmitter aligned for IR sync
11 12 13 14 15 16 17 1518
⑪ Power Cord Strain ReliefSecures power cord.
⑫ Power Supply JackConnection point for DC power supply.
⑬ Ethernet PortFor network connection. - Amber LED (network speed):
off = 10 Mbps, on = 100 Mbps - Green LED (network status):
off = no network link, on = network link activeflashing = rate corresponds to traffic volume
⑭ Receiver ResetPress to restore receiver default settings.
⑮ Antenna ConnectorsBNC connector for receiver antennas
⑯ Mic/Line SwitchSets output level to microphone or line.
⑰ XLR Audio OutputBalanced (1: ground, 2: audio +, 3: audio - )
⑱ 1/4" Instrument/Auxiliary OutputImpedance Balanced (Tip: audio, Ring: no audio, Sleeve: ground)

14
Transmitters① Power LED
- Green = unit is powered on - Red = low battery
② On/Off SwitchPowers the transmitter on or off.
③ Display: View menu screens and settings. Press any control button to activate the backlight.
④ IR window Align with the receiver IR window during an IR sync for automated transmitter programming.
⑤ Menu Navigation Buttons menu = Use to navigate between menu screens. ▼▲ = Use to select menu screens, edit menu parameters, or choose a home screen display option.enter = Press to confirm and save parameter changes.Tip: Press the menu button to exit without saving parameter changes.
⑥ Battery CompartmentRequires 2 AA batteries or a Shure SB900 rechargeable battery.
⑦ AA Battery AdapterSecures batteries when powering transmitter with AA batteries instead of Shure SB900 battery.
⑧ Bodypack AntennaFor RF signal transmission.
⑨ Handheld Integrated AntennaFor RF signal transmission.
⑩ Microphone CartridgeSee Optional Accessories for a list of compatible cartridges.
⑪ TA4M Input JackConnects to a 4-Pin Mini Connector (TA4F) microphone or instrument cable.
⑫ Battery Contact Cover Align the cover as shown to prevent reflections from the battery contacts during broadcasts or performances.
on
QLXD2QLXD1
1 2
2
3
4
3
4
55
6
67
7
8
9
10
11
12
Battery Installation
AA Batteries Shure SB900 Battery
on
no
2DXL
U
on
AA Adapter AA Adapter
① Accessing the Battery CompartmentPress the side tabs on the bodypack or unscrew the cover on the handheld as shown to access the battery compartment.
② Installing Batteries - AA Batteries: Place batteries (note polarity markings) and AA Adaptor as shown - Shure SB900 Battery: Place battery as shown (note polarity markings), remove AA Adaptor
from bodypack transmitter, stow AA Adaptor in door for handheld transmitter Note: If using AA batteries, set the battery type using the transmitter menu.
Setting the AA Battery TypeTo ensure accurate display of transmitter runtime, set the battery type in the transmitter menu to match the installed AA battery type. If a Shure SB900 rechargeable battery is installed, selecting a battery type is not necessary and the battery type menu will not be displayed.
1. Press the menu button to navigate to the battery icon.2. Use the ▼▲ buttons to select the installed battery type:
- AL = Alkaline - nH = Nickel Metal Hydride - Li = Lithium Primary
3. Press enter to save.
AA Battery InstallationFully insert the batteries as shown to ensure proper battery contact and to allow the door to latch securely.
Correct Incorrect

15
Transmitter Display① Battery Indicator
Bars displayed indicate remaining battery life.
② Home Screen Display: Group and Channel/Frequency/SB900 Battery Runtime
Use the arrow keys to select one of the following home screen displays:
Group and Channel
SB900 battery runtime
Frequency
group channel MHz
③ Encryption StatusIcon displayed when encryption is enabled.
④ LockDisplayed when transmitter controls are locked.
⑤ RF PowerRF power setting (Lo or Hi).
⑥ Mic OffsetDisplays mic offset level in 3 dB increments.
group channel
rf powermic o�set
MHz
dB1
2
3
4
56
Transmitter controls• To increase, decrease or change a parameter, use the ▼▲ buttons• To save a menu change, press enter• To exit a menu without saving a change, press the menu button
menu enter
Bodypack
menu
enter
Handheld
Transmitter Menu Options and NavigationThe transmitter features individual menu screens for setting up and adjusting the transmitter. To access the menu options from the home screen, press the menu button. Each additional press of the menu button advances to the next menu screen.
① Home ScreenUse the arrow keys to select one of the following home screen displays: - Battery Icon/group and channel - Battery Icon/frequency - Battery Icon/Battery Runtime (SB900 installed)
② groupUse the arrow buttons to scroll through the groups.
③ channelUse the arrow buttons to scroll through the channels.
④ frequencyUse the arrow buttons to adjust the frequency. Press and hold for faster scrolling.
⑤ lockSelect a lock option: - On = controls locked - OFF = controls unlocked
⑥ rf powerSelect an rf power setting: - Lo = 1 mW - Hi = 10 mW
⑦ mic offset dBUse to match audio levels between two transmitters used in a combo system. Range is 0 to 21 dB (3 dB increments). Adjustments occur in realtime.
⑧ battery typeUse to set the battery type to match the installed AA battery type to ensure accurate battery metering. Menu is not displayed when Shure SB900 batteries are installed.
group channel
group channel
MHz
MHz
rf power
mic o�set dB
1
2
3
4
5
6
7
8
I I II
II
IIIIIIIII
II
II
I II I I I
I I II
II
IIIIIIIII
II
II
I II I I I
Tips for Editing Menu Parameters• To access the menu options from the home screen, press the menu button. Each
additional press of the menu button advances to the next menu screen.• A menu parameter will blink when editing is enabled• To increase, decrease or change a parameter, use the arrow buttons• To save a menu change, press enter• To exit a menu without saving a change, press menu
on
QLXD2QLXD1
1 2
2
3
4
3
4
55
6
67
7
8
9
10
11
12

16
Receiver Display
group channel rf audio gain
scannetwork
menupowergain
dB
TV
OL TxOL
MHz
hr mn
1 2 3 4 5
6
7
8910111213
14
15
① GroupDisplays group setting.
② ChannelDisplays channel setting.
③ Active Antenna IndicatorIlluminates to indicate which antenna is active.
④ RF Signal MeterNumber of bars displayed corresponds to RF signal level - OL = overload.
⑤ Audio MeterNumber of bars displayed corresponds to audio level. - OL = Illuminates when receiver audio limiter is
active to prevent clipping - TxOL = Illuminates when transmitter input is
overloaded. Reduce input from microphone or instrument to prevent clipping.
⑥ Gain LevelDisplays receiver gain setting in 1 dB increments.
⑦ Receiver Lock StatusLock icon and name of locked control: - menu - power - gain
⑧ Frequency SettingSelected frequency (MHz).
⑨ Encryption StatusIlluminates when encryption is enabled.
⑩ ScanDisplayed when scan function is active.
⑪ Network ScanDisplayed when network scan function is active in multi-receiver systems.
⑫ Network Connection IndicatorIlluminates when additional Shure components are detected on the network.
⑬ TV ChannelDisplays the number of the TV channel containing the selected frequency.
⑭ Transmitter Battery IconIndicates remaining battery life.
⑮ SB900 Battery RuntimeWhen the transmitter is powered by a Shure SB900 rechargeable battery, remaining runtime is displayed in hours:minutes.
Navigating the Receiver MenusThe receiver has a main menu for setup and configuration and an advanced menu to access additional receiver functions.
Main MenuPress the menu button to access the menu. Each additional press of the menu button advances to the next menu screen in the following order:
MH z
T V MH z
group channel
T V MH z
audior f gain
I I I II
II
II
IIIIII
II
II
II
I I
group
I
II
II
IIII
II
II
I I
channel
scan
I
II
II
I
III
II
II
I I
channel
network scan
I
II
II
I
III
II
II
I I
channel
I
II
II
I
III
II
II
I I
1 2 3
4567
① ScanReceiver automatically scans for the best available frequency
② Network ScanScans to find frequencies for networked receivers operating in the same frequency band
③ GroupEdit the receiver group settings
④ ChannelEdit the receiver channel settings
⑤ LockChoose a control lock option
⑥ EncryptionUse the arrow buttons to enable encryption (on) or disable encryption (off)
⑦ FrequencyUse the arrow buttons to edit the frequency value
Advanced MenuStarting from the main menu home screen, press menu while holding the enter button to access the advanced menu. Each additional press of the menu button advances to the next menu screen in the following order.
T V MH z
group channel
T V MH z
audior f gain
MH z
group channel
I
II
II
I
III
II
II
I I
net work
menu
enter
+T V MH z
1 2
3456
① Custom GroupsUse to add channels and frequencies to Custom Groups
② TV Channel SpacingSelects the regional bandwidth for TV channel display
③ Firmware UpdateUse to update the transmitter firmware
④ IP SettingsUse to select and edit IP settings and subnet masks
⑤ Network ResetReturns network settings and IP address to default setting
⑥ Factory ResetRestores factory settings
For application and configuration details, see the related guide topic for each advanced feature.
Tips for Editing Menu Parameters• To increase, decrease or change a parameter, use the arrow buttons• A menu setting will blink when editing is enabled• To save a menu change, press enter• To exit a menu without saving a change, press menu• To access the advanced menu, press menu while holding the enter button from the home screen• To return to the home screen from any menu without saving changes, press and hold the menu button.

17
AA Batteries and Transmitter RuntimeQLX-D transmitters are compatible with the following AA battery types:
• Alkaline• Nickel Metal Hydride (NiMH)• Lithium Primary
A 5-segment battery indicator representing the charge level of the transmitter battery is displayed on the screens of the transmitter and receiver. The following tables contain the approximate remaining transmitter runtime in hours:minutes.
Alkaline Batteries: Up to 9 Hours of Runtime
Battery Indicator Approximate Runtime Remaining (hours:minutes)9:30 to 7:30
7:30 to 5:30
5:30 to 3:30
3:30 to 2:30
2:30 to 1:30
< 0:30
NiMH Batteries: Up to 10 Hours of Runtime
Battery Indicator Approximate Runtime Remaining (hours:minutes)10:00 to 8:00
8:00 to 6:00
6:00 to 4:00
4:00 to 2:00
2:00 to 0:20
0:20 to 0:00
Lithium Primary Batteries: Up to 16 Hours of Runtime
Battery Indicator
Approximate Runtime Remaining (hours:minutes)16:00 to 12:45
12:45 to 9:30
9:30 to 6:30
6:30 to 3:15
3:15 to 0:20
0:20 to 0:00
Shure SB900 Rechargeable BatteryShure SB900 lithium-ion batteries offer a rechargeable option for powering the QLX-D transmitters. Batteries quickly charge to 50% capacity in one hour and reach full charge within three hours.
Single chargers and multiple bay chargers are available to recharge the Shure batteries.
Caution: Only charge Shure rechargeable batteries with a Shure battery charger.
Single Bay ChargerThe single bay charger offers a compact charging solution.
1. Plug the charger into an AC power source or USB port.
2. Insert a battery into the charging bay.3. Monitor the charging status LEDs until
charging is complete.
LED
Charging Status LED
Color StatusRed ChargingGreen Charging CompleteAmber Flashing Fault: check connections and batteryOff No battery in bay
Multiple Bay ChargersShure offers two models of multiple bay chargers:
• SBC-200 two bay charger• SBC-800 eight bay charger
Multiple bay chargers can charge individual batteries or batteries installed in transmitters.
1. Plug the charger into an AC power source.2. Insert batteries or transmitters into the charging bay.3. Monitor the charging status LEDs until charging is complete.
Charging Status LED
Color StatusGreen Charging CompleteGreen/Red Charge level above 90%Red ChargingAmber Flashing Fault: check connections and batteryOff No battery in bay
Important Tips for Care and Storage of Shure Rechargeable BatteriesProper care and storage of Shure batteries results in reliable performance and ensures a long lifetime.
• Always store batteries and transmitters at room temperature • Ideally, batteries should be charged to approximately 40% of capacity for
long-term storage• During storage, check batteries every 6 months and recharge to 40% of
capacity as needed

18
Creating Audio ChannelsA wireless audio channel is formed when a receiver and transmitter are tuned to the same frequency. To ease setup, frequencies available to the QLX-D system are organized into groups and channels. Each group contains a number of channels, and each channel is assigned to a specific preset frequency.
The QLX-D system provides 3 methods for tuning the receiver and transmitter to the same frequency:
• Scan and IR Sync: The receiver scans the RF spectrum for the best available frequency and an IR sync automatically tunes the transmitter to the receiver frequency• Manual Group and Channel Assignment: Manually setting the receiver and transmitter to the same group and channel number forms an audio channel• Manual Frequency Assignment: Manually setting the receiver and transmitter to the same frequency rather than using groups and channels forms an audio channelImportant: Before you begin a scan or frequency assignment:
• Turn off: All transmitters for system you are setting up to prevent interference with frequency scans.• Turn on: The following potential sources of interference including other wireless systems, computers, CD players, large LED panels, and effects processors to prevent
selection of occupied frequencies.
Scan and IR Sync The simplest way to create an audio channel is to use the scan function to find the best available receiver channel, and then use the IR sync feature to automatically tune the transmitter to the receiver channel.
Step 1: Scanning to Find the Best Group and ChannelThe Scan function automatically selects the best available receiver group and channel.
1. Navigate to the Scan menu option. 2. Press enter to start the scan.3. When the scan is complete, the group and channel will appear on the display. channel
I I I I I I I I I I IIIIIIIIIIIIIIIIIIIIIIIIIIII I
I I II I I I I I I I I I I I scan
Step 2: IR Sync for Automatic Transmitter Set UpPerforming an IR Sync automatically tunes the transmitter to match the receiver frequency, forming a wireless audio channel.
1. Turn on the transmitter.2. Press the sync button on the receiver. The red ir LED will blink indicating that sync mode is active.3. Align the IR sync windows of the transmitter and receiver at a distance of <15 cm (6 in.). When the transmitter and receiver
are aligned, the red ir LED remains on and the sync will automatically occur. 4. sync good appears on the display when IR sync is complete. The blue rf LED will illuminate indicating that the transmitter
is within range of the receiver.Note: If the IR sync fails, repeat the IR sync procedure, carefully maintaining alignment between the IR windows of the transmitter and receiver.
< 15 cm (6 in.)
Manual Group and Channel AssignmentAn audio channel can be manually created by simply setting the receiver and transmitter to the same group number and channel number. For example, a receiver set to Group 2, Channel 3 and a transmitter set to Group 2, Channel 3 would form an audio channel.
Use manual group and channel configuration to assign specific groups and channels to receivers and transmitters as an alternative method to automatically creating channels with IR sync.
Use the following steps to set the group and channel in the receiver and transmitter:
1. Navigate to the group setting.2. Use the arrow buttons to scroll through the groups.3. Press enter to select a group.4. Next, use the arrow buttons to select a channel.5. Press enter to save.
group
I I I I I I I I I I I I I I IIIIIIIIIIIIIIIIIIIIIIIIIIIIIIIIIIIIIII
II II I I I
I I I I I I I I I I I I I I I I I I
channel
I I I I I I I I I I IIIIIIIIIIIIIIIIIIIIIIIIIIII I
I I II I I I I I I I I I I I
Manual Frequency SelectionManual frequency selection can be used instead of groups and channels to set the transmitter and receiver to a specific frequency. For example, an audio channel can be created by setting the receiver and transmitter to same frequency.
Setting the Receiver Frequency1. Press menu to navigate to the frequency
setting option.2. Use the arrow buttons to adjust the
frequency. Press and hold for faster scrolling.
3. Press enter to save.
MHz
Setting the Transmitter Frequency1. Press menu to navigate to the frequency setting
option.2. Use the arrow buttons to adjust the frequency.
Press and hold for faster scrolling.3. Press enter to save.
MHz

19
Receiver Gain AdjustmentThe gain control sets the overall signal level for the system. The default gain level is 12 dB and the available gain range is -18 to 42 dB, in 1 dB increments.
Set the gain to a level where the audio LED appears green or yellow, with only the highest audio peaks causing the LED to occasionally turn red and engage the limiter. Reduce the gain if there is audible distortion of the audio.
From the receiver home screen, use the arrow buttons to increase or decrease the gain:
• A single button press adjusts the gain in 1 dB increments• Press and hold the button for larger adjustments
Test the transmitter at performance levels when adjusting the gain. Monitor the audio meter and the audio LED to prevent overloads.
channel rf audio gain
dB
TV MHz
hr mn
Control Lock Options for the Receiver and TransmitterControl lock options are available for both the receiver and the transmitter to protect against accidental or unauthorized changes. Locks can be directly set from the component menu, or remotely set from WWB6. To maintain protection, controls remain locked when the transmitter is turned off and turned on.
Locking and Unlocking the Receiver ControlsThe receiver has the following control lock options which can be used separately or in any combination:
• gain: locks the arrow buttons to prevent changes to the audio gain settings• menu: prevents access to menu items and IR sync (gain controls and power
switch remain active)• power: disables power switch (gain and menu controls remain active)
To lock a receiver control:
1. Press the menu button to navigate to the lock settings.
2. Use the arrow buttons to add or remove the lock options shown next to the lock icon.
3. Press enter to save the lock settings.
To unlock a receiver:
Tip: To unlock the menu and clear all locks, press and hold the menu button while in the home screen until the unlock icon appears. Press enter to confirm and save change.
1. To unlock gain or power settings, navigate to the lock settings by pressing the menu button.
2. Press the arrow buttons to de-select a lock option.
3. Press enter to confirm and save change.
Locking and Unlocking Transmitter ControlsThe transmitter controls can be locked or unlocked by selecting On (locked) or OFF (unlocked) from the transmitter lock menu.
If an attempt is made to access a locked control, the lock icon will flash, indicating that the transmitter controls are locked.
To set a transmitter lock:
1. Press the menu button to navigate to the lock settings.
2. Use the arrow buttons to select on.3. Press enter to save. The lock icon
appears on the display to confirm that the control locks are enabled.
To unlock the transmitter:
1. Press and hold the menu button until OFF and the unlock icon appear on the display.
2. Press enter to save changes. OFF
Error Codes and SolutionsError codes are generated when the receiver detects a condition that can potentially affect system performance.
If an error is displayed on the receiver, use the following table to identify the problem and find the corresponding solution.
Error Code Description SolutionsErr.001 Audio Compatibility Update transmitter and receiver firmware to the latest version.Err.002 Encryption Mismatch between
Shure product linesSet encryption to off for components from different Shure products lines, such as QLX-D and ULX-D.
Err.003 Encryption Mode Mismatch Perform an IR sync between the transmitter and receiver to clear the error.Err.004 Band Mismatch Receiver and transmitter are operating in overlapping frequencies from different bands.Err.005 Frequency Mismatch Receiver and transmitter are from bands that do not share compatible frequencies.Err.006 No Frequencies Found Rescan, select a different group, or use WWB to find a frequency.Err.007 Firmware Mismatch Update firmware on the transmitter and receiver.Err.008 Shure SB900 battery runtime does
not appear on displayCheck that battery is firmly installed into the battery compartment. If condition persists, replace the battery.
menu
enter
gain

20
Troubleshooting
Issue See Solution...No Sound Power, Cables, or Radio FrequencyFaint sound or distortion Gain, Cables, Reducing Interference or Radio FrequencyLack of range, unwanted noise bursts, or dropouts RFCannot turn transmitter off or change frequency settings, or can't program receiver
Interface Locks
Receiver display shows FAIL after encryption is disable Encryption MismatchGroup and Channel display shows "--" Custom Group IR Sync
PowerMake sure that the receiver and transmitter are receiving sufficient voltage. Check the battery indicators. Replace or recharge the batteries if necessary.
GainAdjust the system gain on the front of the receiver. Ensure the mic/line switch setting (XLR output only) on the back of the receiver corresponds to the input of the mixing console, amplifier, or processor.
CablesCheck that all cables and connectors are fully engaged or locked into position. Inspect cables for damage. Replace if necessary.
Interface LocksThe transmitter and the receiver can be locked to prevent accidental or unauthorized changes. If a locked control is accessed, the lock icon on the display will flash. Follow the instructions to unlock the receiver or transmitter.
Firmware MismatchPaired transmitters and receivers must have the same firmware version installed to ensure consistent operation. See Firmware Updates topic for firmware update procedure.
Encryption MismatchIndicates an encryption key mismatch has been detected. Perform an IR sync between the receiver and transmitter to clear the error.
Custom Group IR SyncWhen using Custom Groups, always perform an IR sync from the Custom Groups menu in the receiver to ensure accurate display of group and channel information. See Custom Groups topic for additional details.
Radio Frequency (RF)The blue RF LED will illuminate when a linked transmitter is within range of the receiver. Measure the transmitter range before a performance to avoid operating beyond the specified transmitter range.
The RF meter bars indicate amount of RF power being received. This signal could be from the transmitter, or it could be from an interfering source, such as a television broadcast. If the meter shows a signal level when the transmitter is off, then that channel may have interference. Check the surrounding area for sources of interference or change the receiver to a clear frequency.
A red RF LED indicates RF overload. Avoid operating multiple systems in close proximity.
Frequency Compatibility• Perform a Scan and Sync to ensure the transmitter and receiver are set to the
same channel or frequency• Look at the label on the transmitter and receiver to make sure they are in the
same band (G50, J50, L50, etc...).
Reducing Interference• Perform a scan to find the best open frequency. Perform an IR sync to transfer
the settings to the transmitter.• For multiple systems, make sure that each receiver is assigned to a unique
channel. Interference will occur if two transmitters are set to the same channel.• Maintain a line of sight between transmitter and receiver antennas.• Move receiver antennas away from metal objects or other sources of RF
interference (such as CD players, computers, digital effects, network switches, network cables and Personal Stereo Monitor (PSM) wireless systems).
• Eliminate RF overload (see below).
Increasing Range• Increase transmitter RF power level to Hi• Use an active directional antenna, antenna distribution system, or other
antenna accessory to increase RF range
Eliminating RF OverloadIf the RF OL icon appears on the RF meter, try the following:
• Reduce the transmitter RF power level from Hi to Lo• Move the transmitter further away from the receiver—at least 6 m (20 ft)• If you are using active antennas, reduce antenna or amplifier gain.• Use omnidirectional antennas

21
RF Carrier Frequency Range470–937.5 MHz, varies by region (See Frequency Range and Output Power table)
Working Range100 m (328 ft)Note: Actual range depends on RF signal absorption, reflection and interference.
RF Tuning Step Size25 kHz, varies by region
Image Rejection>70 dB, typical
RF Sensitivity-97 dBm at 10-5 BER
QLXD SpecificationsLatency
<2.9 msAudio Frequency Response
QLXD1 20 – 20 kHz (±1 dB)
QLXD2 Note: Dependent on microphone type
Audio Dynamic RangeSystem Gain @ +10
>120 dB, A-weighted, typicalTotal Harmonic Distortion−12 dBFS input, System Gain @ +10
<0.1%
QLXD4Dimensions
41 mm x 197 mm x 151 mm (1.63 in. x 7.75 in. x 5.94 in.), H x W x D
Weight777 g (1.71 lbs), without antennas
Housingsteel
Power Requirements12 V DC @ 0.4 A, supplied by external power supply (tip positive)
RF InputSpurious Rejection
>80 dB, typicalConnector Type
BNCImpedance
50 Ω
Audio OutputGain Adjustment Range
-18 to +42 dB in 1 dB stepsConfiguration
1/4" (6.35 mm) Impedance balanced (Tip=audio, Ring=no audio, Sleeve=ground)
XLR balanced (1=ground, 2=audio +, 3=audio −)
Impedance
1/4" (6.35 mm) 100 Ω (50 Ω Unbalanced)
XLR 100 Ω
Full Scale Output
1/4" (6.35 mm) +12 dBV
XLR LINE setting= +18 dBV, MIC setting= -12 dBV
Mic/Line Switch30 dB pad
Phantom Power Protection
1/4" (6.35 mm) Yes
XLR Yes
NetworkingNetwork Interface
Single Port Ethernet 10/100 MbpsNetwork Addressing Capability
DHCP or Manual IP addressMaximum Cable Length
100 m (328 ft)
QLXD1Mic Offset Range
0 to 21 dB (in 3 dB steps)Battery Type
Shure SB900 Rechargeable Li-Ion or AA batteries 1.5 VBattery Runtime@ 10 mW
Shure SB900 up to10 hours
alkaline up to 9 hours
See Battery Runtime ChartDimensions
86 mm x 65 mm x 23 mm (3.38in. x 2.57 in. x 0.92 in.) H x W x D,without antenna
Weight138 g (4.9 oz.), without batteries
HousingCast aluminum
Audio InputConnector
4-Pin male mini connector (TA4M), See drawing for detailsConfiguration
UnbalancedImpedance
1 MΩ, See drawing for detailsMaximum Input Level1 kHz at 1% THD
8.5 dBV (7.5 Vpp)Preamplifier Equivalent Input Noise (EIN)System Gain Setting ≥ +20
-120 dBV, A-weighted, typical
RF OutputConnector
SMAAntenna Type
1/4 waveImpedance
50 ΩOccupied Bandwidth
<200 kHzModulation Type
Shure proprietary digitalPower
1 mW or 10 mWSee Frequency Range and Output Power table, varies by region
QLXD2Mic Offset Range
0 to 21 dB (in 3 dB steps)Battery Type
Shure SB900 Rechargeable Li-Ion or AA batteries 1.5 VBattery Runtime@ 10 mW
Shure SB900 up to10 hours
alkaline up to 9 hours
See Battery Runtime ChartDimensions
256 mm x 37 mm (10.1 in. x 1.5 in.) L x Dia.Weight
347 g (12.2 oz.), without batteriesHousing
Machined aluminum
Audio InputConfiguration
UnbalancedMaximum Input Level1 kHz at 1% THD
145 dB SPL (SM58), typicalNote: Dependent on microphone type
RF OutputAntenna Type
Integrated Single Band HelicalOccupied Bandwidth
<200 kHzModulation Type
Shure proprietary digitalPower
1 mW or 10 mWSee Frequency Range and Output Power table, varies by region
System Audio PolarityPositive pressure on microphone diaphragm produces positive voltage on pin 2 (with respect to pin 3 of XLR output) and the tip of the 6.35 mm (1/4-inch) output.
Operating Temperature Range-18°C (0°F) to 50°C (122°F)Note: Battery characteristics may limit this range.
Storage Temperature Range-29°C (-20°F) to 74°C (165°F)Note: Battery characteristics may limit this range.

22
CertificationsThis product meets the Essential Requirements of all relevant European directives and is eligible for CE marking.
Certified under FCC Part 74.
Certified by IC in Canada under RSS-123 and RSS-102.
Approved under the Declaration of Conformity (DoC) provision of FCC Part 15.
Certified by IC in Canada under RSS-210.
Conforms to electrical safety requirements based on IEC 60065.
Complies with and/or is certified to RSS-210, RSS-GEN.
The CE Declaration of Conformity can be obtained from: www.shure.com/europe/compliance
Authorized European representative:Shure Europe GmbHHeadquarters Europe, Middle East & AfricaDepartment: EMEA ApprovalJakob-Dieffenbacher-Str. 1275031 Eppingen, GermanyPhone: 49-7262-92 49 0Fax: 49-7262-92 49 11 4Email: [email protected]
QLXD1, QLXD2IC: 616A-QLXD1G50, 616A-QLXD1H50, 616A-QLXD1J50, 616A-QLXD1L50, 616A-QLXD2G50, 616A-QLXD2H50, 616A-QLXD2J50, 616A-QLXD2L50.
FCC: DD4QLXD1G50, DD4QLXD1H50, DD4QLXD1J50, DD4QLXD1L50, DD4QLXD2G50, DD4QLXD2H50, DD4QLXD2J50, DD4QLXD2L50.
Country Code Code de Pays
Codice di paese Código de país Länder-Kürzel
Frequency Range Gamme de frequences Gamme di frequenza Gama de frequencias
Frequenzbereich
QLXD-G51 470 - 534 MHz
1 or 10 mW
A, B, BG, CH, CY, CZ, D, DK, EST, F, *FIN, GB, GR, H, HR, I, IRL, IS, L, LT, *M, N, NL, P, PL RO, S, SK, SLO, TR, *
All other countries *
QLXD-H51 534 - 598 MHz
1 or 10 mW
A, B, BG, CH, CY, CZ, D, DK, EST, F, *FIN, GB, GR, H, HR, I, IRL, IS, L, LT, *M, N, NL, P, PL RO, S, SK, SLO, TR, *
All other countries *
QLXD-K51 606 - 670 MHz
1 or 10 mW
A, B, BG, CH, CY, CZ, D, DK, EST, F, *FIN, GB, GR, H, HR, I, IRL, IS, L, LT, *M, N, NL, P, PL RO, S, SK, SLO, TR, *
All other countries *
QLXD-L52 632 - 694 MHz
1 or 10 mW
A, B, BG, CH, CY, CZ, D, DK, EST, F, *FIN, GB, GR, H, HR, I, IRL, IS, L, LT, *M, N, NL, P, PL RO, S, SK, SLO, TR, *
All other countries *
QLXD-P51 710 - 782 MHz
1 or 10 mW
A, B, BG, CH, CY, CZ, D, DK, EST, F, *FIN, GB, GR, H, HR, I, IRL, IS, L, LT, *M, N, NL, P, PL RO, S, SK, SLO, TR, *
all other countries *
QLXD-Q51 794 - 806 MHz
1 or 10 mW
A, B, BG, CH, CY, CZ, D, DK, EST, F, *FIN, GB, GR, H, HR, I, IRL, IS, L, LT, *M, N, NL, P, PL RO, S, SK, SLO, TR, *
All other countries *
QLXD-S50 823 - 832 MHz863 - 865 MHz
1 or 10 mW
D license freeA, B, BG, CH, CY, CZ, D, DK, EST, F, *FIN, GB, GR, H, HR, I, IRL, IS, L, LT, *M, N, NL, P, PL RO, S, SK, SLO, TR, *
863 - 865 MHz EU: license freeall other countries *
FREQUENCIES FOR EUROPEAN COUNTRIES
*REMARQUE : Ce matériel radio est prévu pour une utilisation en spectacles musicaux professionnels et applications similaires. Il est possible que cet appareil radio soit capable de fonctionner sur certaines fréquences non autorisées localement. Se mettre en rapport avec les autorités compétentes pour obtenir les informations sur les fréquences et niveaux de puissance HF autorisés pour les systèmes de microphones sans fil. *HINWEIS: Diese Funkausrüstung ist zum Gebrauch bei professionellen Musikveranstaltungen und ähnlichen Anwendungen vorgesehen. Dieses Gerät kann möglicherweise auf einigen Funkfrequenzen arbeiten, die in Ihrem Gebiet nicht zugelassen sind. Wenden Sie sich bitte an die zuständige Behörde, um Informationen über zugelassene Frequenzen und erlaubte Sendeleistungen für drahtlose Mikrofonprodukte zu erhalten. *NOTA: Este equipo de radio está destinado para uso en presentaciones musicales profesionales y usos similares. Este aparato de radio puede ser capaz de funcionar en algunas frecuencias no autorizadas en su región. Por favor comuníquese con las autoridades nacionales para información sobre las frecuencias autorizadas y los niveles de potencia de radiofrecuencia para micrófonos inalámbricos.
*NOTA: questo apparecchio radio è concepito per l'intrattenimento musicale a livello professionale ed applicazioni simili. Questo apparecchio radio può essere in grado di funzionare a frequenze non autorizzate nel Paese in cui si trova l'utente. Rivolgetevi alle autorità competenti per ottenere le informazioni relative alle frequenze ed ai livelli di potenza RF autorizzati nella vostra regione per i prodotti radiomicrofonici.
*NOTE: This Radio equipment is intended for use in musical professional entertainment and similar applications. This Radio apparatus may be capable of operating on some frequencies not authorized in your region. Please contact your national authority to obtain information on authorized frequencies and RF power levels for wireless microphone products.
*OPMERKING: Deze radioapparatuur is bedoeld voor gebruik bij professionele muzikale amusementsproducties en soortgelijke toepassingen. Dit radioapparaat kan mogelijk werken op bepaalde frequenties die niet zijn toegestaan in uw regio. Raadpleeg de autoriteiten in uw land voor informatie over goedgekeurde frequenties en RF-vermogensniveaus voor draadloze microfoons.
*ПРИМЕЧАНИЕ. Данная радиоаппаратура предназначается для использования в профессиональных музыкальных представлениях и аналогичных приложениях. Может оказаться, что эта радиоаппаратура в состоянии работать на некоторых частотах, не разрешенных в вашем регионе. За информацией о разрешенных частотах и уровнях РЧ мощности для беспроводных микрофонных систем обращайтесь в национальные органы власти.