Windows XP Mode and AutoVISION installation
7
Configuring Windows 7 – 64 bit for AutoVISION GLOBAL HEADQUARTER OFFICES Corporate & Americas Asia-Pacific Europe–Middle East–Africa 700 SW 39th Street 31 Kaki Bukit Road 3 #06-04/05 Lemelerberg 17 Renton, WA 98057 | USA TechLink, Singapore 417818 NL2402 ZN | Alphen aan den Rijn Tel: 425.226.5700 Tel: 65.6846.1214 The Netherlands Fax: 425.226.8250 Fax: 65.6846.4641 Tel: 31.172.4233.60 | Fax: 31.172.4233.66 [email protected] [email protected] [email protected] 1 This document will describe how to configure a 64 bit version of Windows 7 Professional, Ultimate or Enterprise to utilize the Windows XP Mode (Virtual PC) capabilities to allow AutoVISION to be used in a 64 bit operating system. Windows XP Mode and AutoVISION installation 1. Go to http://windows.microsoft.com/en-us/windows7/install-and-use-windows-xp-mode-in-windows-7 and follow the instructions on this web page to install Windows XP Mode and Windows Virtual PC. 2. After Windows XP Mode and Windows Virtual PC are installed and the computer reboots, Go to the Windows 7 Start menu > All Programs > Windows Virtual PC > Windows XP Mode as shown in picture 1. Allow Windows XP Mode to configure itself for use. 3. Right click on the desktop in Windows XP Mode and select New > Folder. Rename this folder to Install_AutoVISION. 4. Double click on the Install_AutoVISION folder. Copy the SetupAutoVISION.exe to the Install_AutoVISION folder. 5. Double click SetupAutoVISION.exe to start the software installation. The installation may take 15 to 20 minutes and Windows XP Mode will reboot a couple of times. Picture 1
Transcript of Windows XP Mode and AutoVISION installation
Configuring Windows 7 – 64 bit for AutoVISION
GLOBAL HEADQUARTER OFFICES Corporate & Americas Asia-Pacific Europe–Middle East–Africa
700 SW 39th Street 31 Kaki Bukit Road 3 #06-04/05 Lemelerberg 17 Renton, WA 98057 | USA TechLink, Singapore 417818 NL2402 ZN | A lphen aan den Ri jn Tel: 425.226.5700 Tel: 65.6846.1214 The Netherlands Fax: 425.226.8250 Fax: 65.6846.4641 Tel: 31.172.4233.60 | Fax: 31.172.4233.66 [email protected] [email protected] [email protected]
1
This document will describe how to configure a 64 bit version of Windows 7 Professional, Ultimate or Enterprise to utilize the Windows XP Mode (Virtual PC) capabilities to allow AutoVISION to be used in a 64 bit operating system.
Windows XP Mode and AutoVISION installation 1. Go to http://windows.microsoft.com/en-us/windows7/install-and-use-windows-xp-mode-in-windows-7
and follow the instructions on this web page to install Windows XP Mode and Windows Virtual PC.
2. After Windows XP Mode and Windows Virtual PC are installed and the computer reboots, Go to the Windows 7 Start menu > All Programs > Windows Virtual PC > Windows XP Mode as shown in picture 1. Allow Windows XP Mode to configure itself for use.
3. Right click on the desktop in Windows XP Mode and select New > Folder. Rename this folder to Install_AutoVISION.
4. Double click on the Install_AutoVISION folder. Copy the SetupAutoVISION.exe to the Install_AutoVISION folder.
5. Double click SetupAutoVISION.exe to start the software installation. The installation may take 15 to 20 minutes and Windows XP Mode will reboot a couple of times.
Picture 1

Configuring Windows 7 – 64 bit for AutoVISION
GLOBAL HEADQUARTER OFFICES Corporate & Americas Asia-Pacific Europe–Middle East–Africa
700 SW 39th Street 31 Kaki Bukit Road 3 #06-04/05 Lemelerberg 17 Renton, WA 98057 | USA TechLink, Singapore 417818 NL2402 ZN | A lphen aan den Ri jn Tel: 425.226.5700 Tel: 65.6846.1214 The Netherlands Fax: 425.226.8250 Fax: 65.6846.4641 Tel: 31.172.4233.60 | Fax: 31.172.4233.66 [email protected] [email protected] [email protected]
2
6. After the AutoVISION software is installed, go to the Windows XP Start Menu > Control Panel. Select Network and Internet Connections, right click on the Local Area Connection and select Properties as shown in picture 2.
7. Select Internet Protocol (TCP/IP) and click the Properties button. Select Use the following IP address. Change the IP address to: 192.168.0.2 and Subnet mask to: 255.255.255.0
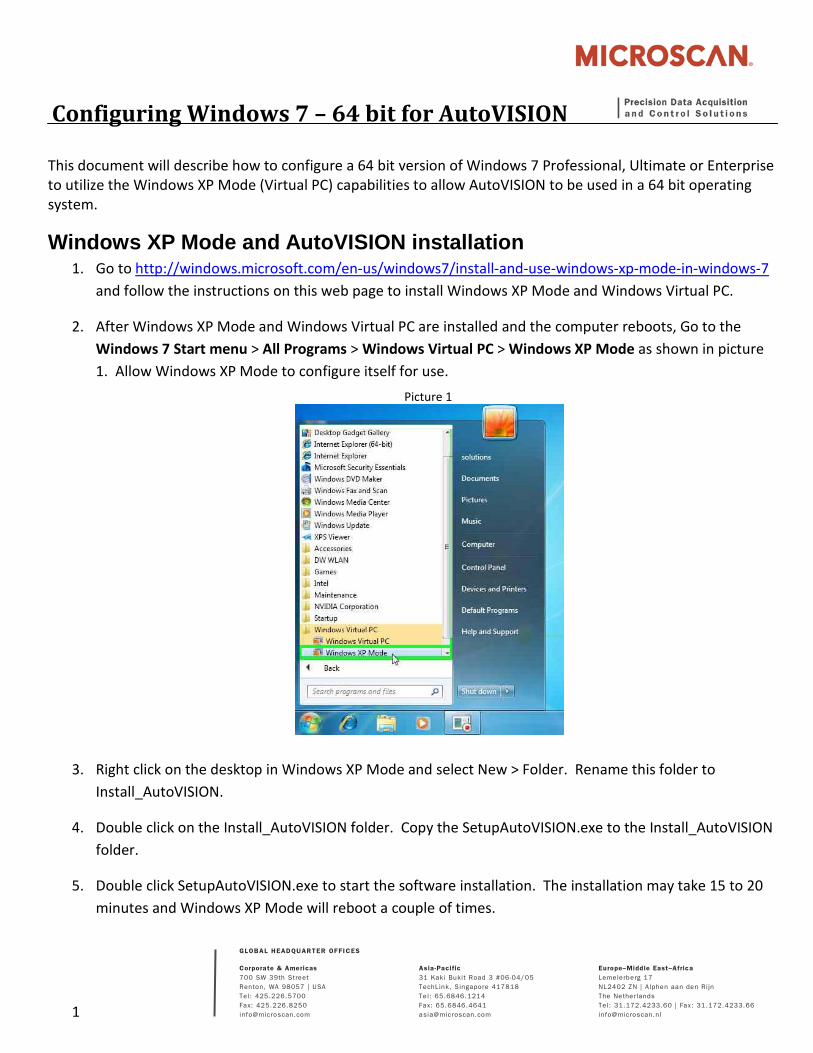
8. At the top of the Windows XP Mode window select Tools > Settings... as shown in picture 4.
as shown in picture 3. Click the OK button to close the Internet Protocol (TCP/IP) Properties and click OK to close the Local Area Connection Properties window.
Picture 3
Picture 2
Configuring Windows 7 – 64 bit for AutoVISION
GLOBAL HEADQUARTER OFFICES Corporate & Americas Asia-Pacific Europe–Middle East–Africa
700 SW 39th Street 31 Kaki Bukit Road 3 #06-04/05 Lemelerberg 17 Renton, WA 98057 | USA TechLink, Singapore 417818 NL2402 ZN | A lphen aan den Ri jn Tel: 425.226.5700 Tel: 65.6846.1214 The Netherlands Fax: 425.226.8250 Fax: 65.6846.4641 Tel: 31.172.4233.60 | Fax: 31.172.4233.66 [email protected] [email protected] [email protected]
3
9. With the Windows XP Mode - Windows Virtual PC Settings window open, click on the Ctrl-Alt-Del in the Windows XP Mode window and select Shut Down.
10. In the Windows XP Mode - Windows Virtual PC Settings make the following changes:
Change the Memory to 1024
MB.
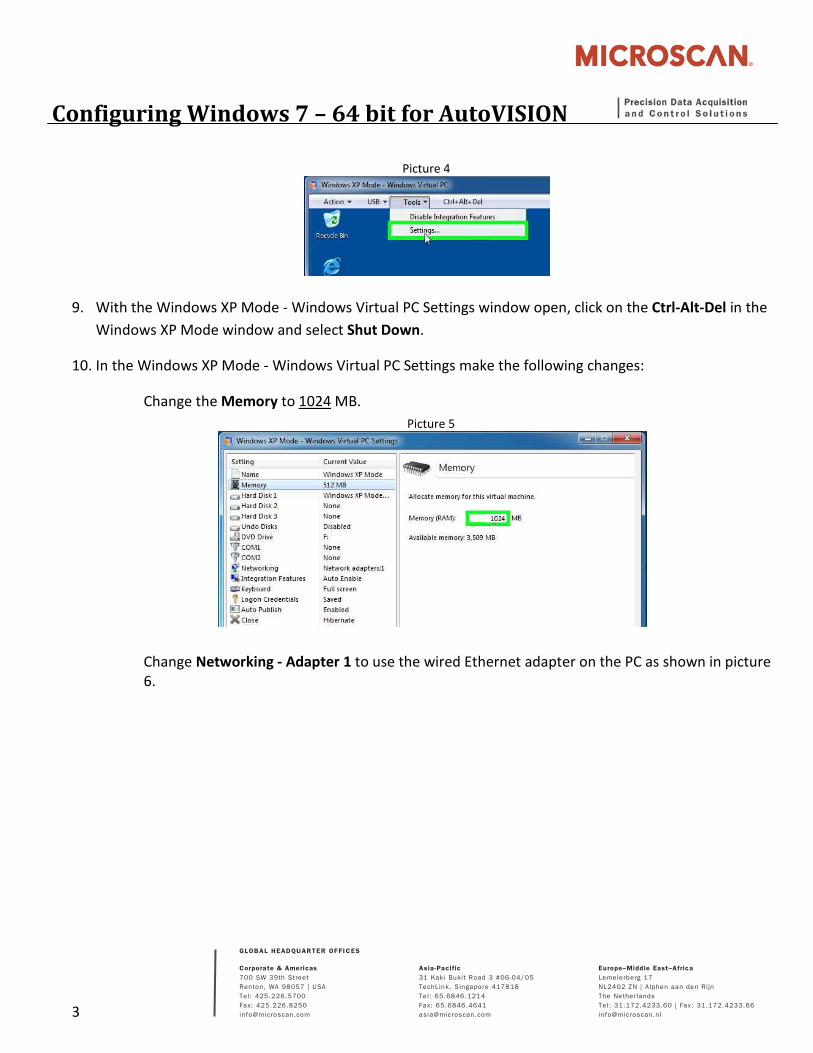
Change Networking - Adapter 1 to use the wired Ethernet adapter on the PC as shown in picture 6.
Picture 5
Picture 4
Configuring Windows 7 – 64 bit for AutoVISION
GLOBAL HEADQUARTER OFFICES Corporate & Americas Asia-Pacific Europe–Middle East–Africa
700 SW 39th Street 31 Kaki Bukit Road 3 #06-04/05 Lemelerberg 17 Renton, WA 98057 | USA TechLink, Singapore 417818 NL2402 ZN | A lphen aan den Ri jn Tel: 425.226.5700 Tel: 65.6846.1214 The Netherlands Fax: 425.226.8250 Fax: 65.6846.4641 Tel: 31.172.4233.60 | Fax: 31.172.4233.66 [email protected] [email protected] [email protected]
4
Change Close to Shut Down. Click OK to save these settings and to close this window.
Using AutoVISION with the Emulator 1. In Windows 7, select Start menu > All Programs > Windows Virtual PC > Windows XP Mode.
Picture 7
Picture 6
Configuring Windows 7 – 64 bit for AutoVISION
GLOBAL HEADQUARTER OFFICES Corporate & Americas Asia-Pacific Europe–Middle East–Africa
700 SW 39th Street 31 Kaki Bukit Road 3 #06-04/05 Lemelerberg 17 Renton, WA 98057 | USA TechLink, Singapore 417818 NL2402 ZN | A lphen aan den Ri jn Tel: 425.226.5700 Tel: 65.6846.1214 The Netherlands Fax: 425.226.8250 Fax: 65.6846.4641 Tel: 31.172.4233.60 | Fax: 31.172.4233.66 [email protected] [email protected] [email protected]
5
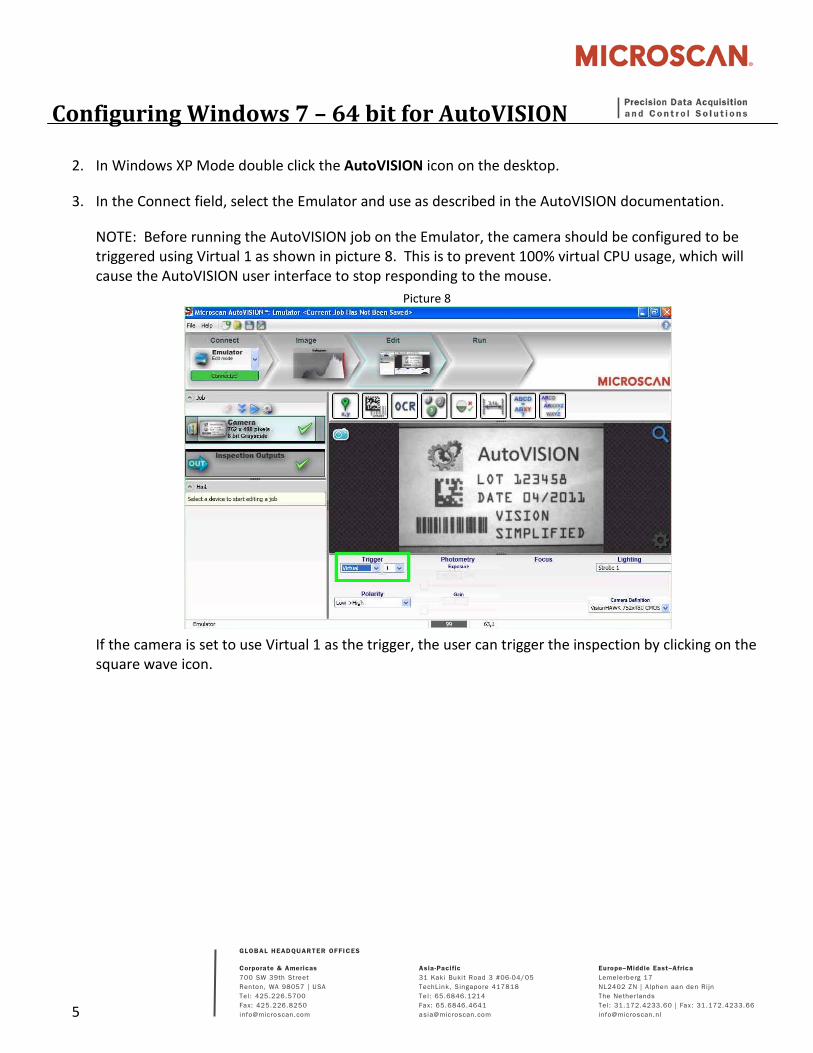
2. In Windows XP Mode double click the AutoVISION icon on the desktop.
3. In the Connect field, select the Emulator and use as described in the AutoVISION documentation.
NOTE: Before running the AutoVISION job on the Emulator, the camera should be configured to be triggered using Virtual 1 as shown in picture 8. This is to prevent 100% virtual CPU usage, which will cause the AutoVISION user interface to stop responding to the mouse.
If the camera is set to use Virtual 1 as the trigger, the user can trigger the inspection by clicking on the square wave icon.
Picture 8
Configuring Windows 7 – 64 bit for AutoVISION
GLOBAL HEADQUARTER OFFICES Corporate & Americas Asia-Pacific Europe–Middle East–Africa
700 SW 39th Street 31 Kaki Bukit Road 3 #06-04/05 Lemelerberg 17 Renton, WA 98057 | USA TechLink, Singapore 417818 NL2402 ZN | A lphen aan den Ri jn Tel: 425.226.5700 Tel: 65.6846.1214 The Netherlands Fax: 425.226.8250 Fax: 65.6846.4641 Tel: 31.172.4233.60 | Fax: 31.172.4233.66 [email protected] [email protected] [email protected]
6
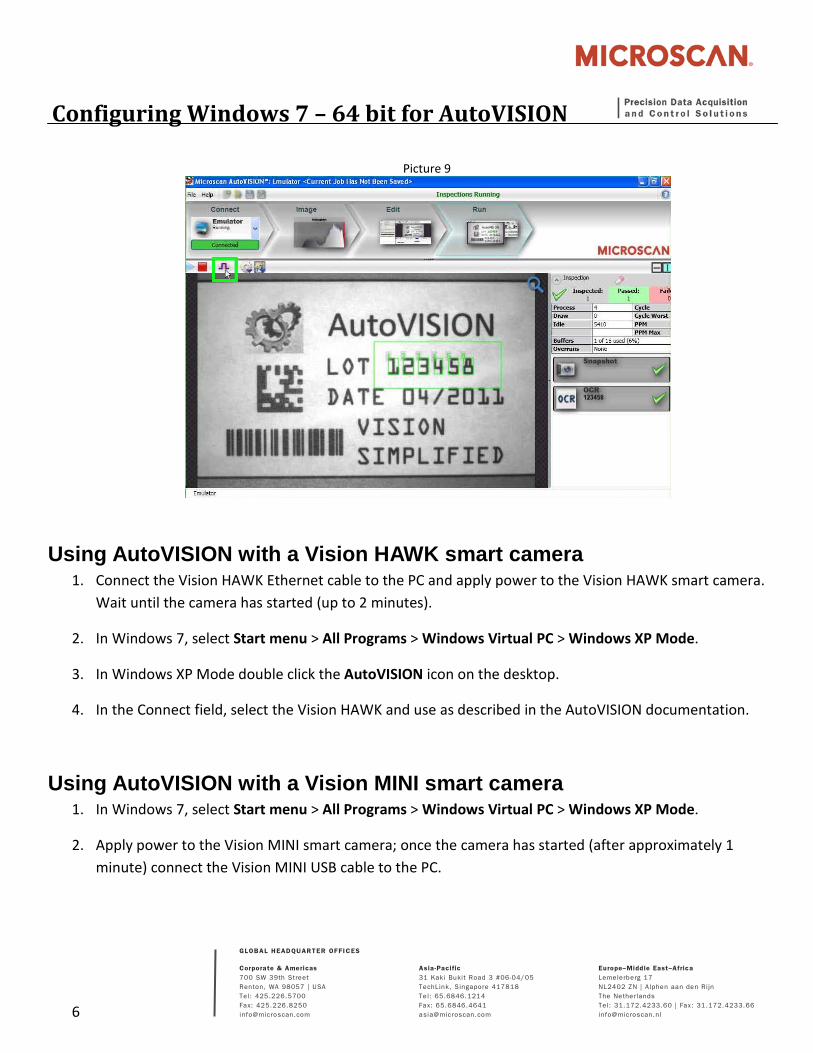
Using AutoVISION with a Vision HAWK smart camera 1. Connect the Vision HAWK Ethernet cable to the PC and apply power to the Vision HAWK smart camera.
Wait until the camera has started (up to 2 minutes).
2. In Windows 7, select Start menu > All Programs > Windows Virtual PC > Windows XP Mode.
3. In Windows XP Mode double click the AutoVISION icon on the desktop.
4. In the Connect field, select the Vision HAWK and use as described in the AutoVISION documentation.
Using AutoVISION with a Vision MINI smart camera 1. In Windows 7, select Start menu > All Programs > Windows Virtual PC > Windows XP Mode.
2. Apply power to the Vision MINI smart camera; once the camera has started (after approximately 1 minute) connect the Vision MINI USB cable to the PC.
Picture 9
Configuring Windows 7 – 64 bit for AutoVISION
GLOBAL HEADQUARTER OFFICES Corporate & Americas Asia-Pacific Europe–Middle East–Africa
700 SW 39th Street 31 Kaki Bukit Road 3 #06-04/05 Lemelerberg 17 Renton, WA 98057 | USA TechLink, Singapore 417818 NL2402 ZN | A lphen aan den Ri jn Tel: 425.226.5700 Tel: 65.6846.1214 The Netherlands Fax: 425.226.8250 Fax: 65.6846.4641 Tel: 31.172.4233.60 | Fax: 31.172.4233.66 [email protected] [email protected] [email protected]
7
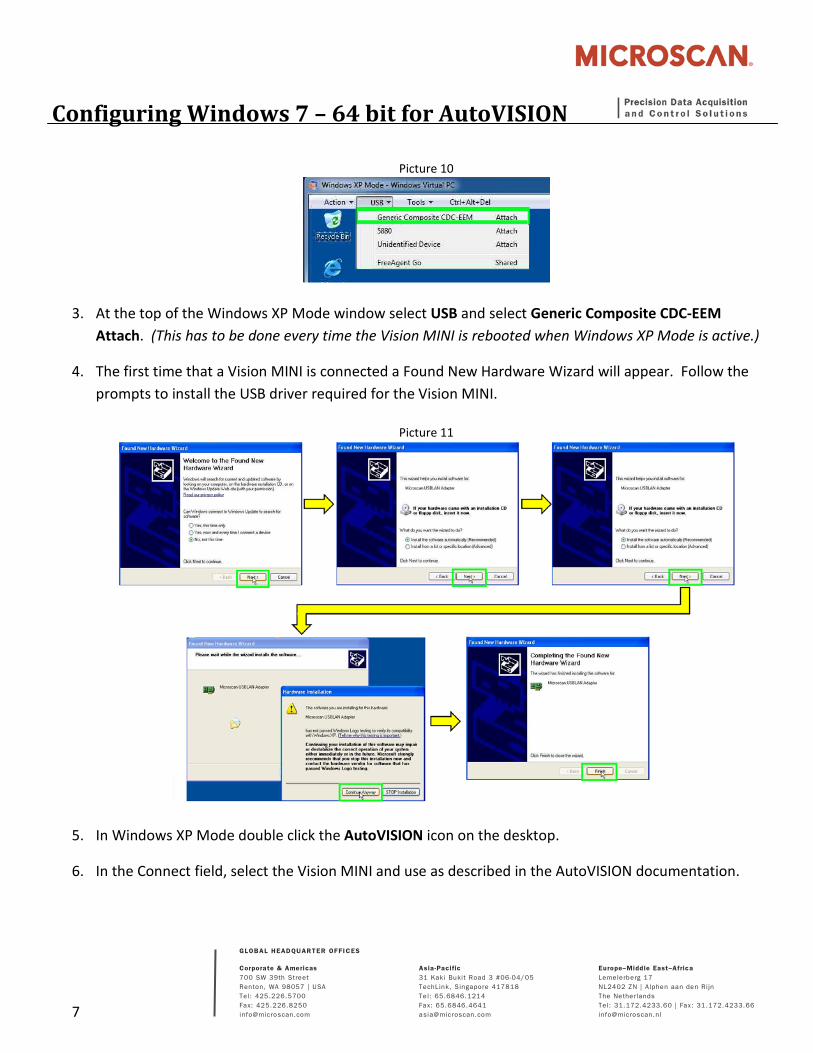
Picture 11
3. At the top of the Windows XP Mode window select USB and select Generic Composite CDC-EEM Attach. (This has to be done every time the Vision MINI is rebooted when Windows XP Mode is active.)
4. The first time that a Vision MINI is connected a Found New Hardware Wizard will appear. Follow the prompts to install the USB driver required for the Vision MINI.
5. In Windows XP Mode double click the AutoVISION icon on the desktop.
6. In the Connect field, select the Vision MINI and use as described in the AutoVISION documentation.
Picture 10


![Windows XP Mode IT Pro Overview_3_16[1]](https://static.fdocuments.net/doc/165x107/577d355b1a28ab3a6b903864/windows-xp-mode-it-pro-overview3161.jpg)