Windows 8.1 Creating a Windows 8.1 reference imageCreating an Windows 8.1 reference image Lab...
27
Creating a Windows 8.1 reference image Windows 8.1 Hands-on lab In this lab, you will learn how to create a Windows 8.1 reference image using MDT 2013. Produced by Deployment Artist Version 1.0 28/02/2014
Transcript of Windows 8.1 Creating a Windows 8.1 reference imageCreating an Windows 8.1 reference image Lab...
Creating a Windows 8.1 reference image
Windows 8.1
Hands-on lab
In this lab, you will learn how to create a Windows 8.1
reference image using MDT 2013.
Produced by Deployment Artist
Version 1.0
28/02/2014

This document is provided for informational purposes only and Microsoft makes no warranties, either express or implied, in this
document. Information in this document, including URL and other Internet Web site references, is subject to change without notice.
The entire risk of the use or the results from the use of this document remains with the user. Unless otherwise noted, the
companies, organizations, products, domain names, e-mail addresses, logos, people, places, and events depicted in examples herein
are fictitious. No association with any real company, organization, product, domain name, e-mail address, logo, person, place, or
event is intended or should be inferred. Complying with all applicable copyright laws is the responsibility of the user. Without
limiting the rights under copyright, no part of this document may be reproduced, stored in or introduced into a retrieval system, or
transmitted in any form or by any means (electronic, mechanical, photocopying, recording, or otherwise), or for any purpose, without
the express written permission of Microsoft Corporation.
Microsoft may have patents, patent applications, trademarks, copyrights, or other intellectual property rights covering subject matter
in this document. Except as expressly provided in any written license agreement from Microsoft, the furnishing of this document
does not give you any license to these patents, trademarks, copyrights, or other intellectual property.
Copyright 2014 © Microsoft Corporation. All rights reserved.
Microsoft, Active Directory, Hyper-V, Windows PowerShell, and Windows Server 2012 are trademarks of the Microsoft group of
companies.
All other trademarks are property of their respective owners.
Creating an Windows 8.1 reference image
Lab created by Deployment Artist. For questions or comments, send an email message to [email protected] Page | 3
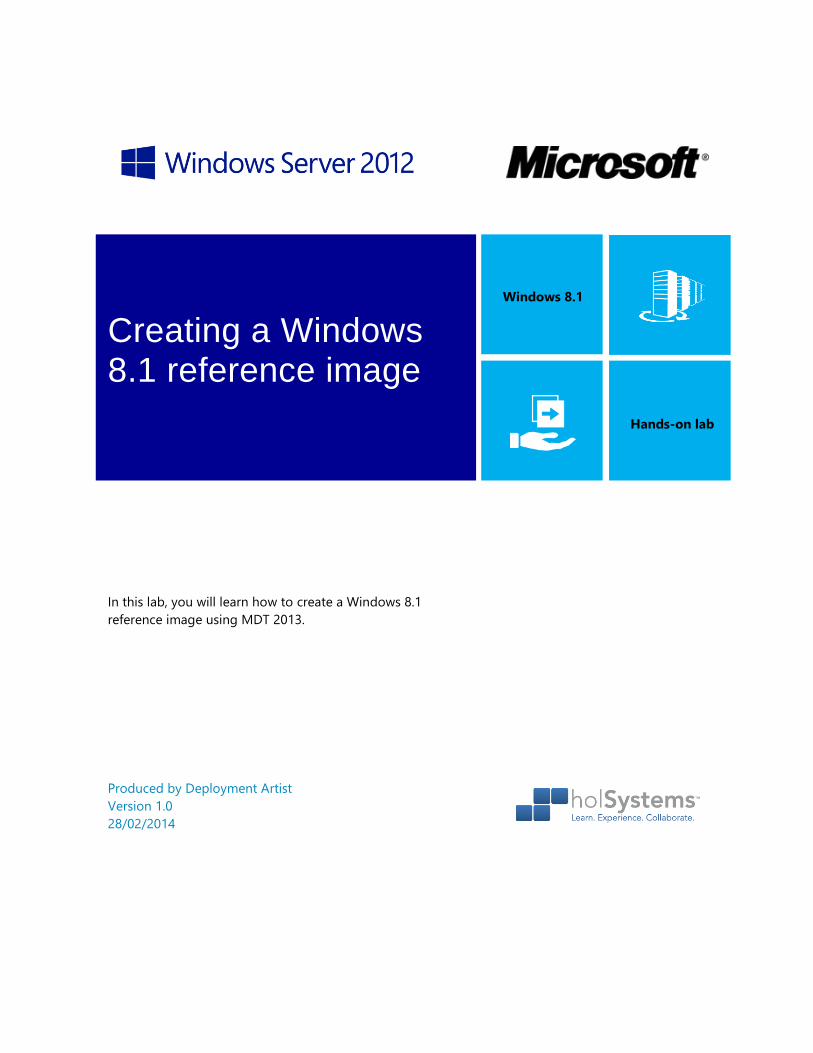
Introduction
Estimated time to complete this lab
60 minutes
Objectives
After completing this lab, you will be able to:
Create a deployment share in MDT 2013.
Add Setup files, create task sequences, and configure deployment share settings.
Create a Windows 8.1 reference image using MDT 2013.
Prerequisites
Before working on this lab, you must have:
An understanding of Windows deployment.
The ability to work with Windows PowerShell.
An understanding of Windows Server 2012 management tools and procedures.
Overview of the lab
In this lab, you will learn how to create a Windows 8.1 reference image using MDT 2013.
Intended audience
This lab is intended for individuals who are responsible for deploying Windows clients and wish to
leverage the features of MDT 2013 to simplify the process for deploying Windows clients.
Virtual machine technology
This lab is completed using virtual machines that run on Windows Server 2012 R2 Hyper-V technology. To
log on to the virtual machines, press CTRL+ALT+END and enter your logon credentials.
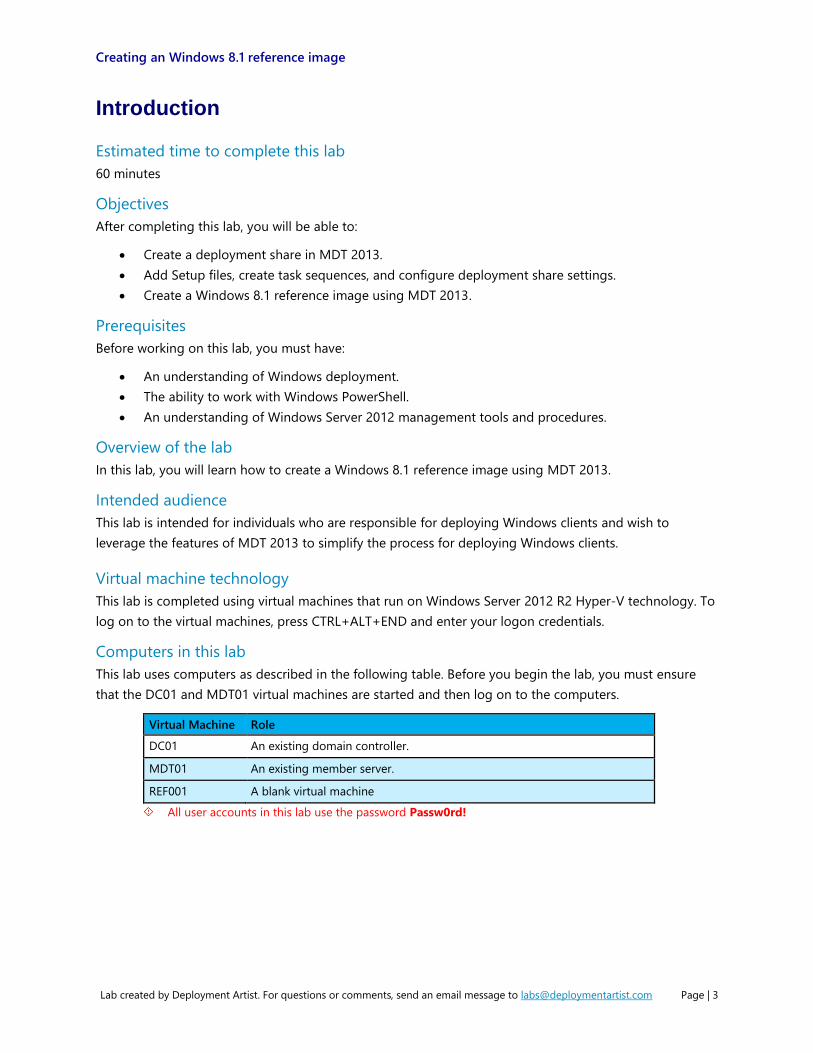
Computers in this lab
This lab uses computers as described in the following table. Before you begin the lab, you must ensure
that the DC01 and MDT01 virtual machines are started and then log on to the computers.
Virtual Machine Role
DC01 An existing domain controller.
MDT01 An existing member server.
REF001 A blank virtual machine
All user accounts in this lab use the password Passw0rd!
Creating an Windows 8.1 reference image
Lab created by Deployment Artist. For questions or comments, send an email message to [email protected] Page | 4
Exercise 1: Creating the server structure
In this exercise, you create the MDT 2013 server structure which includes installing Windows ADK 8.1 and
MDT 2013, review service accounts, create a folder structure, and create a MDT deployment share.
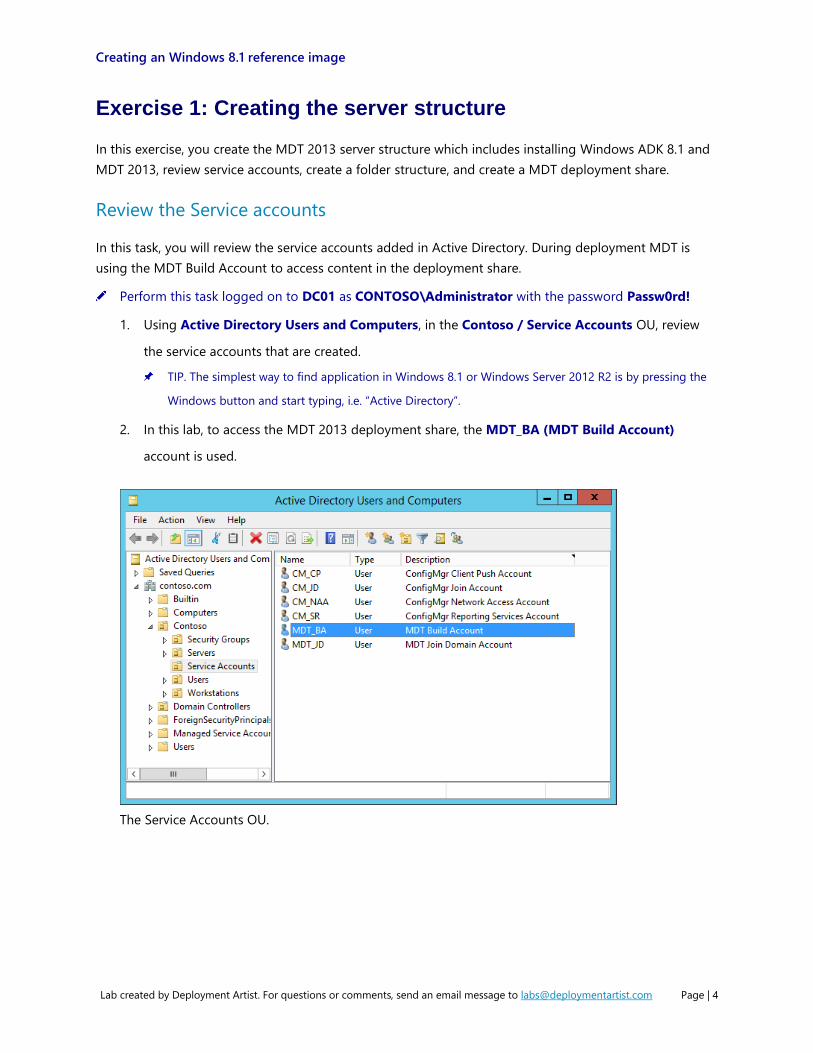
Review the Service accounts
In this task, you will review the service accounts added in Active Directory. During deployment MDT is
using the MDT Build Account to access content in the deployment share.
Perform this task logged on to DC01 as CONTOSO\Administrator with the password Passw0rd!
1. Using Active Directory Users and Computers, in the Contoso / Service Accounts OU, review
the service accounts that are created.
TIP. The simplest way to find application in Windows 8.1 or Windows Server 2012 R2 is by pressing the
Windows button and start typing, i.e. “Active Directory”.
2. In this lab, to access the MDT 2013 deployment share, the MDT_BA (MDT Build Account)
account is used.
The Service Accounts OU.
Creating an Windows 8.1 reference image
Lab created by Deployment Artist. For questions or comments, send an email message to [email protected] Page | 5
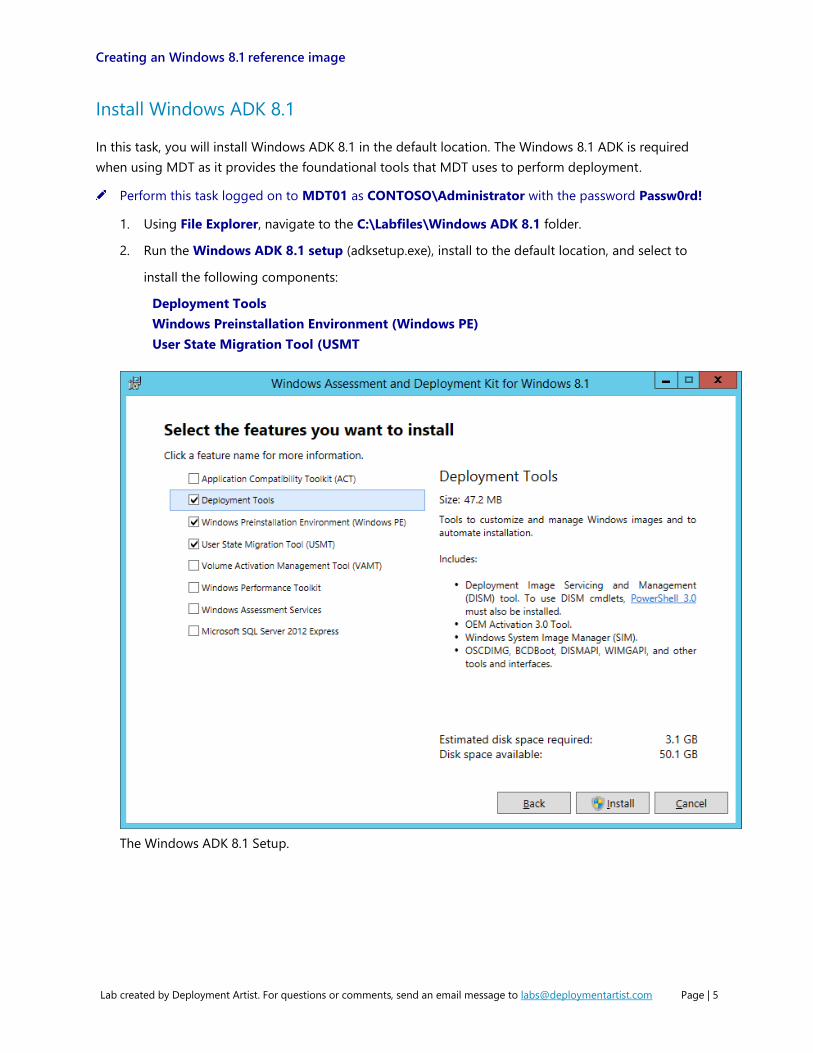
Install Windows ADK 8.1
In this task, you will install Windows ADK 8.1 in the default location. The Windows 8.1 ADK is required
when using MDT as it provides the foundational tools that MDT uses to perform deployment.
Perform this task logged on to MDT01 as CONTOSO\Administrator with the password Passw0rd!
1. Using File Explorer, navigate to the C:\Labfiles\Windows ADK 8.1 folder.
2. Run the Windows ADK 8.1 setup (adksetup.exe), install to the default location, and select to
install the following components:
Deployment Tools
Windows Preinstallation Environment (Windows PE)
User State Migration Tool (USMT
The Windows ADK 8.1 Setup.

Creating an Windows 8.1 reference image
Lab created by Deployment Artist. For questions or comments, send an email message to [email protected] Page | 6
Install MDT 2013
In this task, you will install MDT 2013 in the default location. This setup also installs the Deployment
Workbench, the console you use to manage the MDT 2013 Lite Touch deployment solution.
Perform this task logged on to MDT01 as CONTOSO\Administrator with the password Passw0rd!
1. Using File Explorer, navigate to the C:\Labfiles\MDT 2013 folder.
2. Run the MDT 2013 setup (MicrosoftDeploymentToolkit2013_x64.msi), and use the default
options in the setup wizard.
Running the MDT 2013 setup.
Create and share the Logs folder
In this task, you create and share the E:\Logs folder on MDT01 using PowerShell. The Logs folder is used
to store the server side logs that MDT provides. During deployment, if something goes wrong, MDT will
copy the log files to that location for troubleshooting. MDT will also copy the log files when a deployment
completes successfully.
Perform this task logged on to MDT01 as CONTOSO\Administrator with the password Passw0rd!
1. Start an elevated Windows PowerShell prompt (run as Administrator)
2. Type the following commands, pressing ENTER after each one.
↪ New-Item -Path E:\Logs -ItemType directory
↪ New-SmbShare –Name Logs$ –Path E:\Logs -ChangeAccess EVERYONE
↪ icacls E:\Logs /grant '"MDT_BA":(OI)(CI)(M)'
TIP: You can use tab completion on all parameters to simplify typing.
Creating an Windows 8.1 reference image
Lab created by Deployment Artist. For questions or comments, send an email message to [email protected] Page | 7
Creating and sharing the Logs folder.
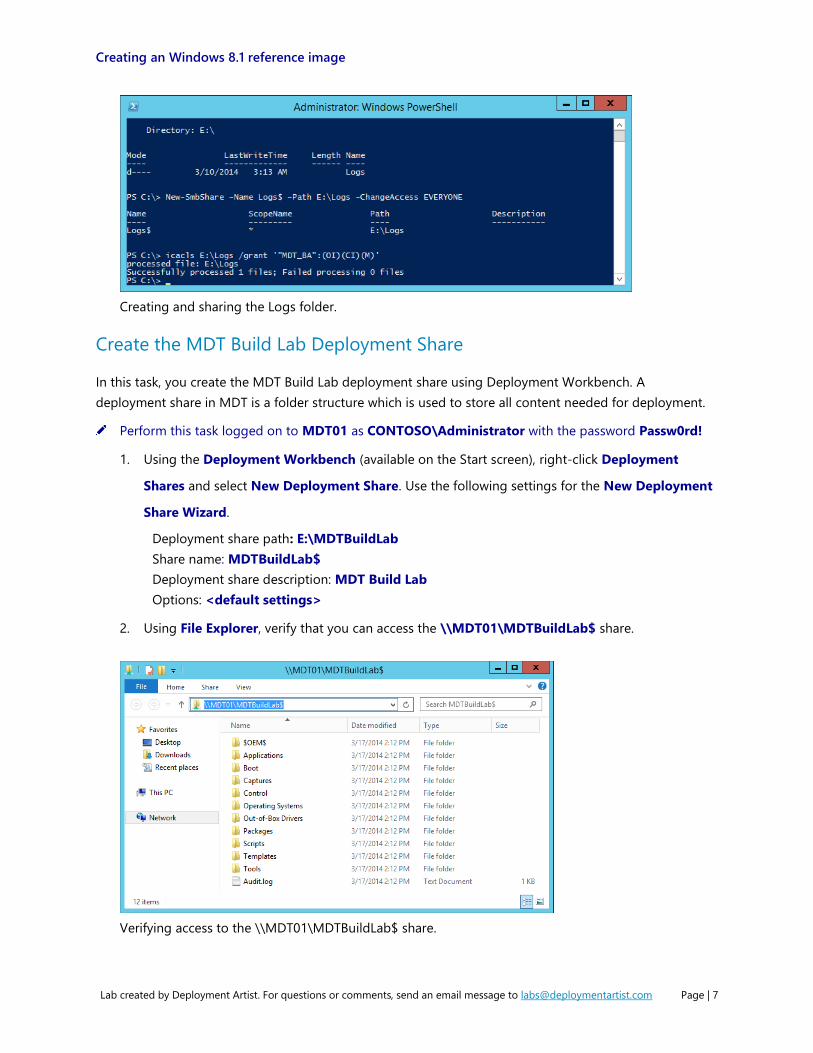
Create the MDT Build Lab Deployment Share
In this task, you create the MDT Build Lab deployment share using Deployment Workbench. A
deployment share in MDT is a folder structure which is used to store all content needed for deployment.
Perform this task logged on to MDT01 as CONTOSO\Administrator with the password Passw0rd!
1. Using the Deployment Workbench (available on the Start screen), right-click Deployment
Shares and select New Deployment Share. Use the following settings for the New Deployment
Share Wizard.
Deployment share path: E:\MDTBuildLab
Share name: MDTBuildLab$
Deployment share description: MDT Build Lab
Options: <default settings>
2. Using File Explorer, verify that you can access the \\MDT01\MDTBuildLab$ share.
Verifying access to the \\MDT01\MDTBuildLab$ share.
Creating an Windows 8.1 reference image
Lab created by Deployment Artist. For questions or comments, send an email message to [email protected] Page | 8
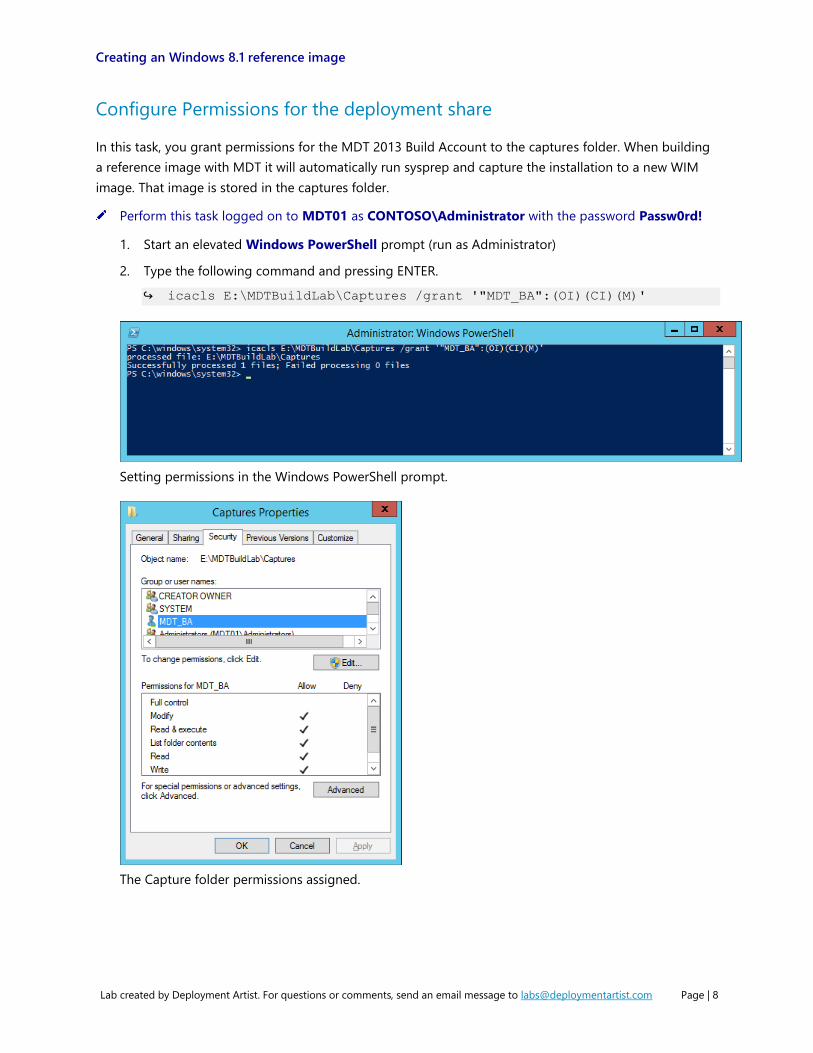
Configure Permissions for the deployment share
In this task, you grant permissions for the MDT 2013 Build Account to the captures folder. When building
a reference image with MDT it will automatically run sysprep and capture the installation to a new WIM
image. That image is stored in the captures folder.
Perform this task logged on to MDT01 as CONTOSO\Administrator with the password Passw0rd!
1. Start an elevated Windows PowerShell prompt (run as Administrator)
2. Type the following command and pressing ENTER.
↪ icacls E:\MDTBuildLab\Captures /grant '"MDT_BA":(OI)(CI)(M)'
Setting permissions in the Windows PowerShell prompt.
The Capture folder permissions assigned.
Creating an Windows 8.1 reference image
Lab created by Deployment Artist. For questions or comments, send an email message to [email protected] Page | 9
Exercise 2: Add Windows installation files
In this exercise, you add the Windows 8.1 operating system to the previously created deployment share.
Import the Windows 8.1 operating system
In this task, you import add the default Windows 8.1 operating system image to MDT. These setup files
are used during the build and capture process in MDT.
Perform this task logged on to MDT01 as CONTOSO\Administrator with the password Passw0rd!
1. Using the Deployment Workbench, expand the Deployment Shares node, expand MDT Build
Lab, right-click the Operating Systems node and select New Folder. Name the new folder
Windows 8.1.
2. Expand the Operating Systems node, right-click the Windows 8.1 node, and select Import
Operating System. Use the following settings for the Import Operating System Wizard:
Full set of source files
Source directory: C:\Labfiles\Windows 8.1 Enterprise x64
Destination directory name: W81EX64RTM
TIP: Due to the Windows limits on path length, we are purposely keeping the operating system
destination directory short, using the folder name W81EX64RTM rather than a more descriptive name.
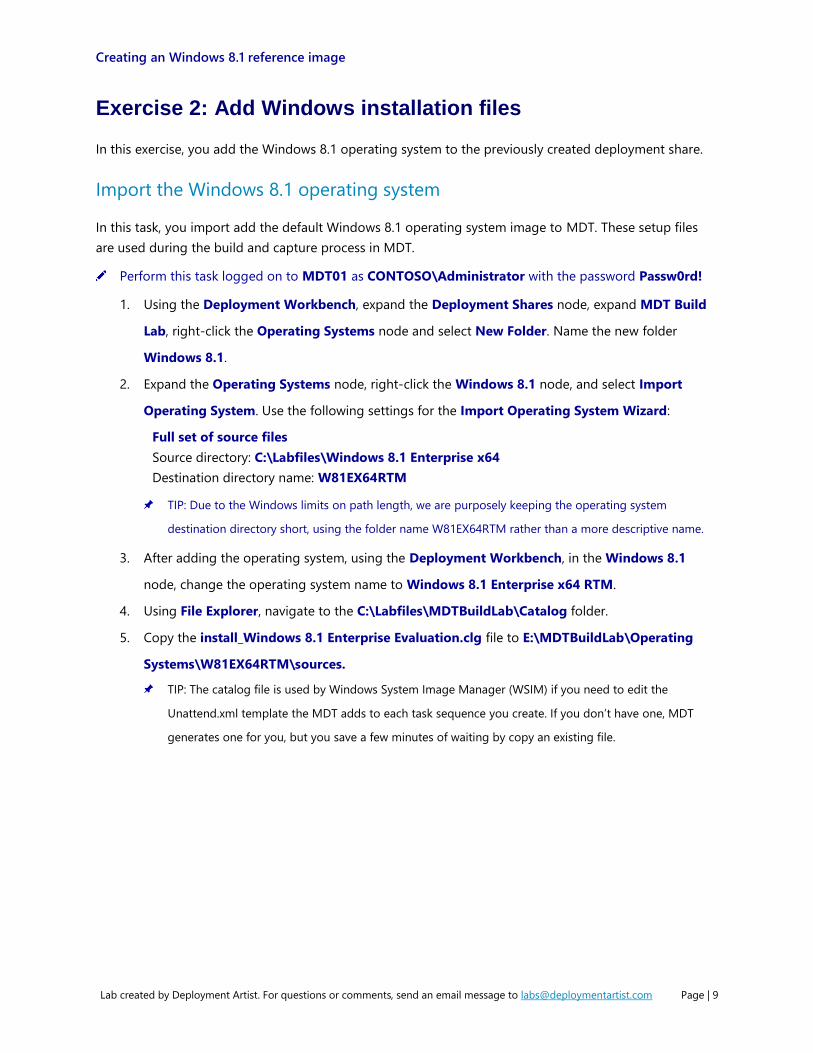
3. After adding the operating system, using the Deployment Workbench, in the Windows 8.1
node, change the operating system name to Windows 8.1 Enterprise x64 RTM.
4. Using File Explorer, navigate to the C:\Labfiles\MDTBuildLab\Catalog folder.
5. Copy the install_Windows 8.1 Enterprise Evaluation.clg file to E:\MDTBuildLab\Operating
Systems\W81EX64RTM\sources.
TIP: The catalog file is used by Windows System Image Manager (WSIM) if you need to edit the
Unattend.xml template the MDT adds to each task sequence you create. If you don’t have one, MDT
generates one for you, but you save a few minutes of waiting by copy an existing file.
Creating an Windows 8.1 reference image
Lab created by Deployment Artist. For questions or comments, send an email message to [email protected] Page | 10
The Windows 8.1 node after renaming the label (name) for the imported operating system.
Creating an Windows 8.1 reference image
Lab created by Deployment Artist. For questions or comments, send an email message to [email protected] Page | 11
Exercise 3: Add Applications
In this exercise, you add a few applications to the deployment share.
Add Office 2013 Pro Plus x86
In this task, you add Office 2013 as an application in MDT 2013. Also, Office 2013 is a special application
to MDT, because MDT will detect that it’s office and provide additional settings.
Perform this task logged on to MDT01 as CONTOSO\Administrator with the password Passw0rd!
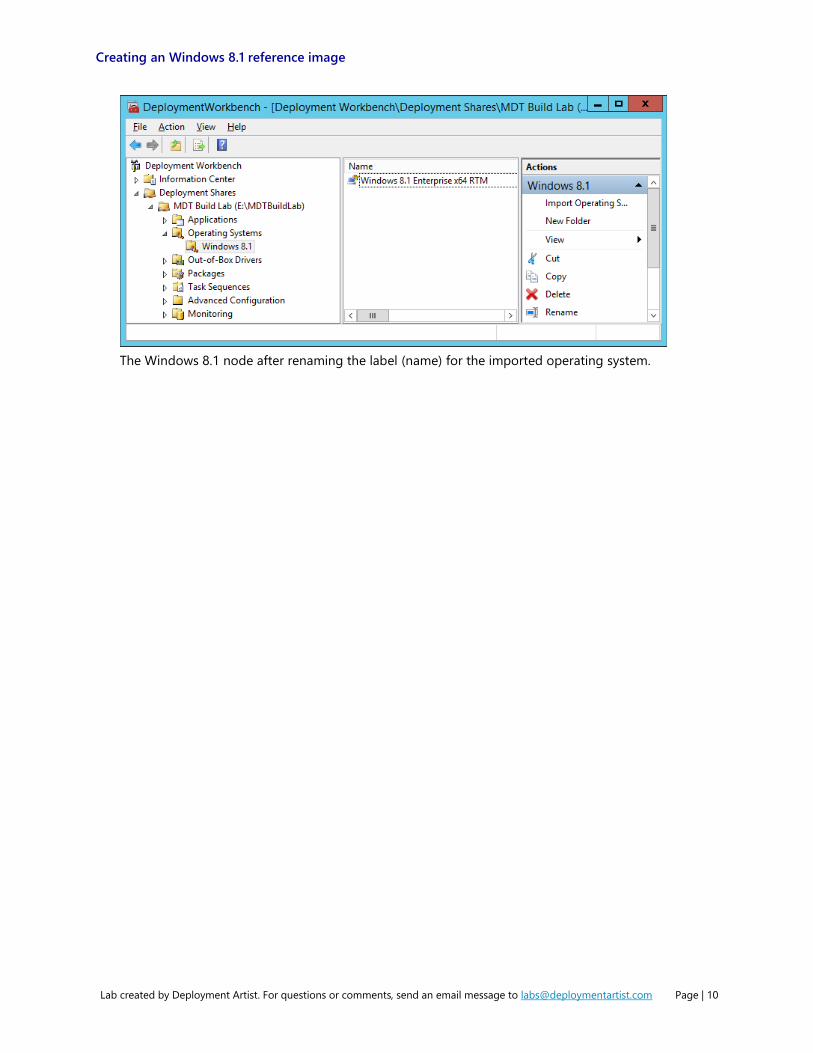
1. Using the Deployment Workbench, expand the Deployment Shares node, expand MDT Build
Lab, right-click the Applications node and select New Folder. Name the folder Microsoft.
2. Expand the Applications node, right-click the Microsoft folder, and select New Application.
3. Use the following settings for the New Application Wizard:
Application Type: Application with source files
Publisher: <blank>
Application name: Install - Microsoft Office 2013 Pro Plus - x86
Version: <blank>
Language: <blank>
Source Directory: C:\Labfiles\Office 2013 Pro Plus x86
Specify the name of the directory that should be created:
Install - Microsoft Office 2013 Pro Plus - x86
Command Line: Setup.exe
Working directory: <default>
The Office 2013 application added.
Creating an Windows 8.1 reference image
Lab created by Deployment Artist. For questions or comments, send an email message to [email protected] Page | 12
Automate the Office 2013 setup
In this task, you will use the Office Customization Tool to automate the Office 2013 setup. The Office
Customization Tool offers rich customization options for the Office 2013 setup. The resulting
configuration is stored in an MSP file that is stored in the Updates folder within the Office 2013
installation files.
Perform this task logged on to MDT01 as CONTOSO\Administrator with the password Passw0rd!
1. Using Deployment Workbench, In the Applications / Microsoft node, double-click the Install -
Microsoft Office 2013 Pro Plus - x86 application.
2. In the Office Products tab, click Office Customization Tool, and click OK on the Information
dialog box.
3. Wait for the Office Customization Tool dialog box to start (will take a short while), then select
the Create a new Setup customization file for the following product option, and click OK.
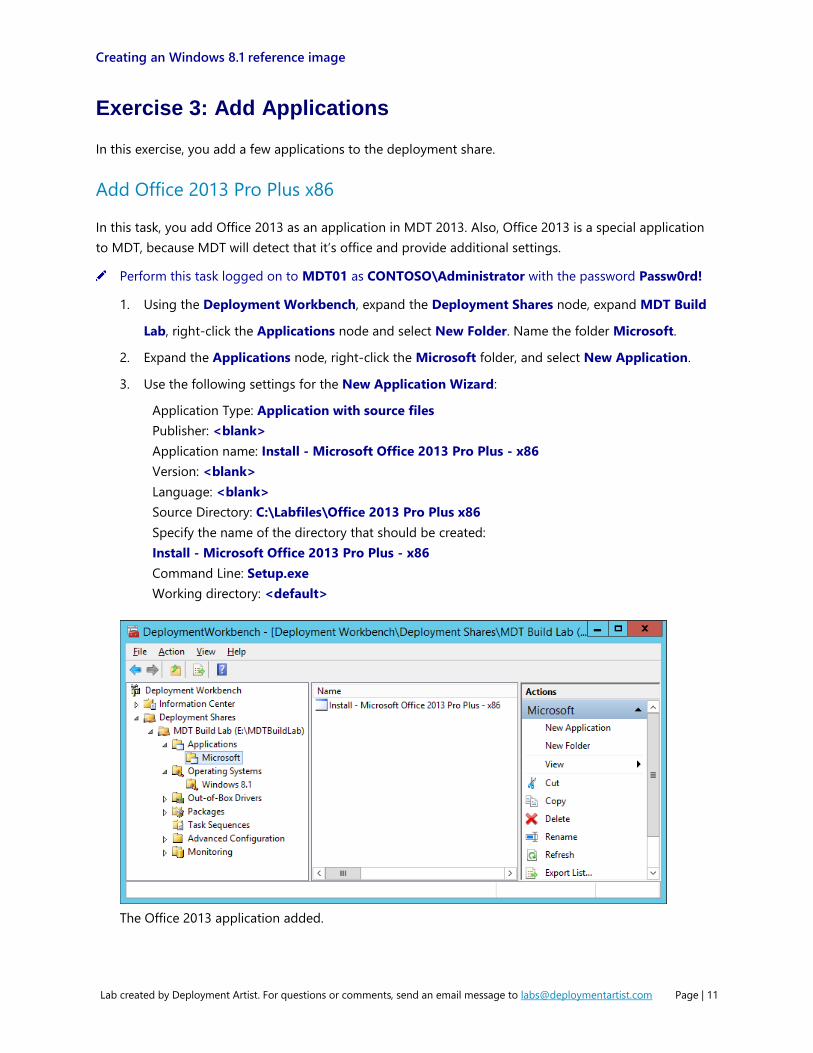
4. In the Install Location and organization name node, set Organization name to Contoso.
5. In the Licensing and user interface node, select the Use KMS client key check box, select the I
accept the terms in the License Agreement check box, and in the Display level dropdown list,
select None.
6. In the Modify Setup Properties node, add the SETUP_REBOOT property and set the value to
Never.
7. In the Modify User settings node, expand Microsoft Office 2013, expand Privacy, select Trust
Center, and enable the Disable Opt-in Wizard on first run setting.
The Office 2013 user settings.
Creating an Windows 8.1 reference image
Lab created by Deployment Artist. For questions or comments, send an email message to [email protected] Page | 13
8. In the File menu, select Save. Save the configuration as 0_Office2013ProPlusx86.msp in the
E:\MDTBuildLab\Applications\Install - Microsoft Office 2013 Pro Plus - x86 \Updates folder.
9. Close the Microsoft Office Customization Tool, click Yes on the dialog box.
10. In the Install - Microsoft Office 2013 Pro Plus - x86 Properties window, click OK.
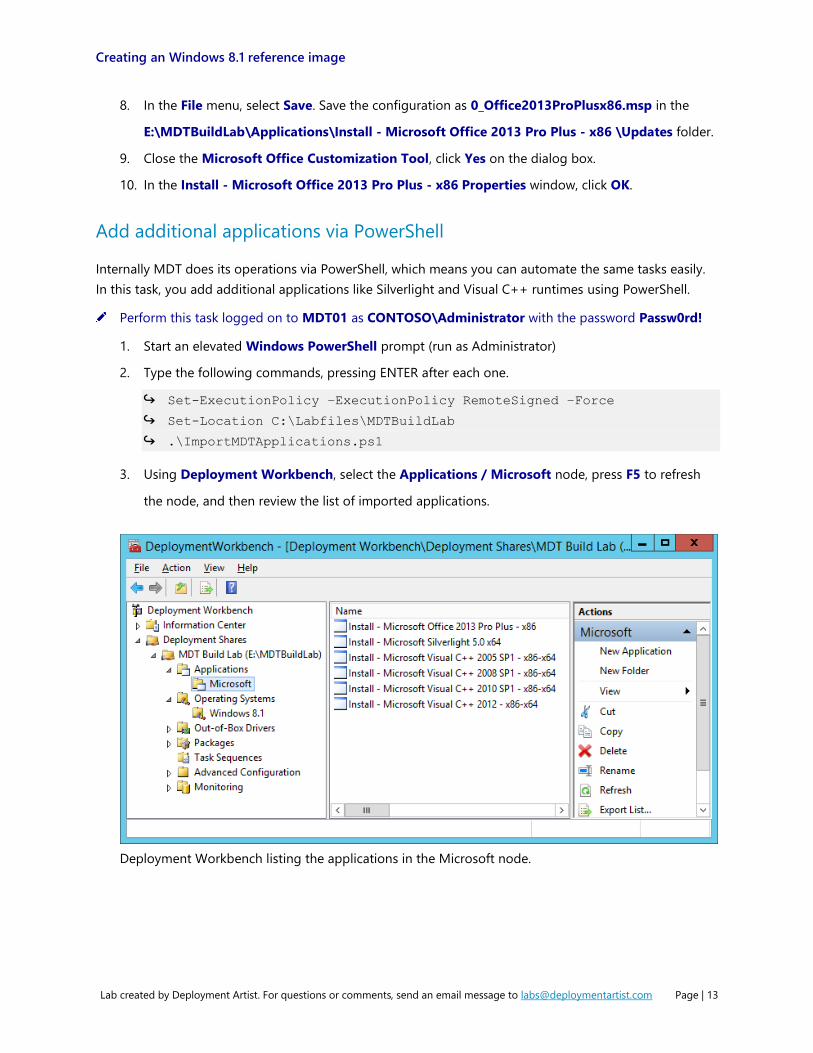
Add additional applications via PowerShell
Internally MDT does its operations via PowerShell, which means you can automate the same tasks easily.
In this task, you add additional applications like Silverlight and Visual C++ runtimes using PowerShell.
Perform this task logged on to MDT01 as CONTOSO\Administrator with the password Passw0rd!
1. Start an elevated Windows PowerShell prompt (run as Administrator)
2. Type the following commands, pressing ENTER after each one.
↪ Set-ExecutionPolicy –ExecutionPolicy RemoteSigned –Force
↪ Set-Location C:\Labfiles\MDTBuildLab
↪ .\ImportMDTApplications.ps1
3. Using Deployment Workbench, select the Applications / Microsoft node, press F5 to refresh
the node, and then review the list of imported applications.
Deployment Workbench listing the applications in the Microsoft node.
Creating an Windows 8.1 reference image
Lab created by Deployment Artist. For questions or comments, send an email message to [email protected] Page | 14
Exercise 4: Create the MDT Task Sequence
In this exercise, you create and edit the MDT task Sequence for Windows 8.1
Create and configure a Task Sequence
In this task, you create a task sequence using the standard client task sequence template. The task
sequence is just a list of actions that are carried out during deployment.
Perform this task logged on to MDT01 as CONTOSO\Administrator with the password Passw0rd!
1. Using the Deployment Workbench, in the MDT Build Lab deployment share, select the Task
Sequences node, and create a folder named Windows 8.1.
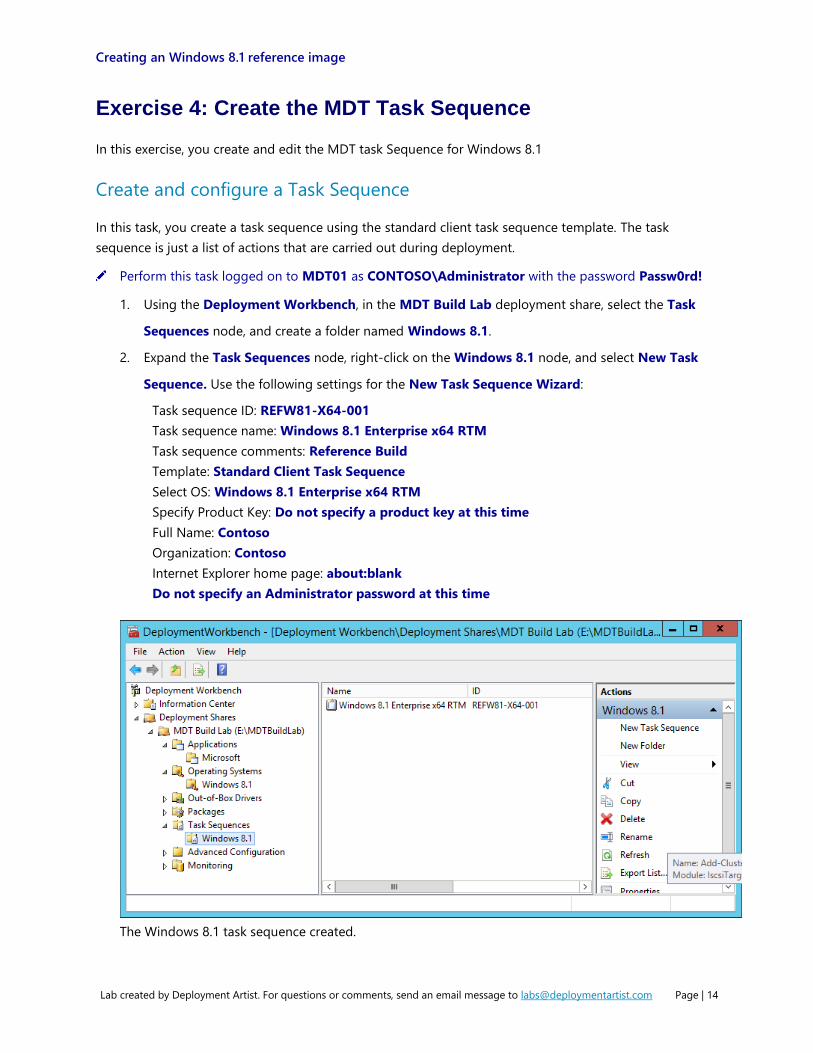
2. Expand the Task Sequences node, right-click on the Windows 8.1 node, and select New Task
Sequence. Use the following settings for the New Task Sequence Wizard:
Task sequence ID: REFW81-X64-001
Task sequence name: Windows 8.1 Enterprise x64 RTM
Task sequence comments: Reference Build
Template: Standard Client Task Sequence
Select OS: Windows 8.1 Enterprise x64 RTM
Specify Product Key: Do not specify a product key at this time
Full Name: Contoso
Organization: Contoso
Internet Explorer home page: about:blank
Do not specify an Administrator password at this time
The Windows 8.1 task sequence created.
Creating an Windows 8.1 reference image
Lab created by Deployment Artist. For questions or comments, send an email message to [email protected] Page | 15
Edit the Task Sequence
Task sequences in MDT are easy to customize with additional actions. In the “Add” menu of a task
sequence you find many ready-made actions you can use. In this task you add the previously create
applications as well as the built-in .NET Framework feature to the task sequence.
Perform this task logged on to MDT01 as CONTOSO\Administrator with the password Passw0rd!
1. Using the Deployment Workbench, in the MDT Build Lab deployment share, in the Task
Sequences / Windows 8.1 node, right-click the Windows 8.1 Enterprise x64 RTM task
sequence, and select Properties.
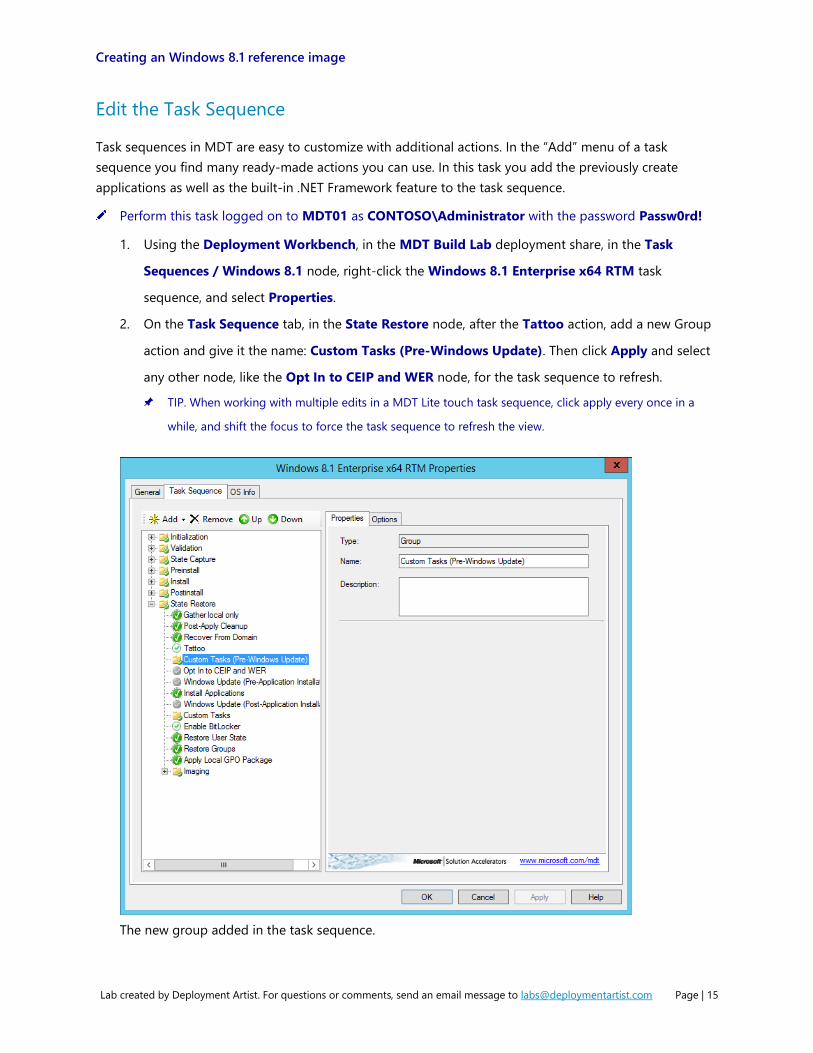
2. On the Task Sequence tab, in the State Restore node, after the Tattoo action, add a new Group
action and give it the name: Custom Tasks (Pre-Windows Update). Then click Apply and select
any other node, like the Opt In to CEIP and WER node, for the task sequence to refresh.
TIP. When working with multiple edits in a MDT Lite touch task sequence, click apply every once in a
while, and shift the focus to force the task sequence to refresh the view.
The new group added in the task sequence.
Creating an Windows 8.1 reference image
Lab created by Deployment Artist. For questions or comments, send an email message to [email protected] Page | 16
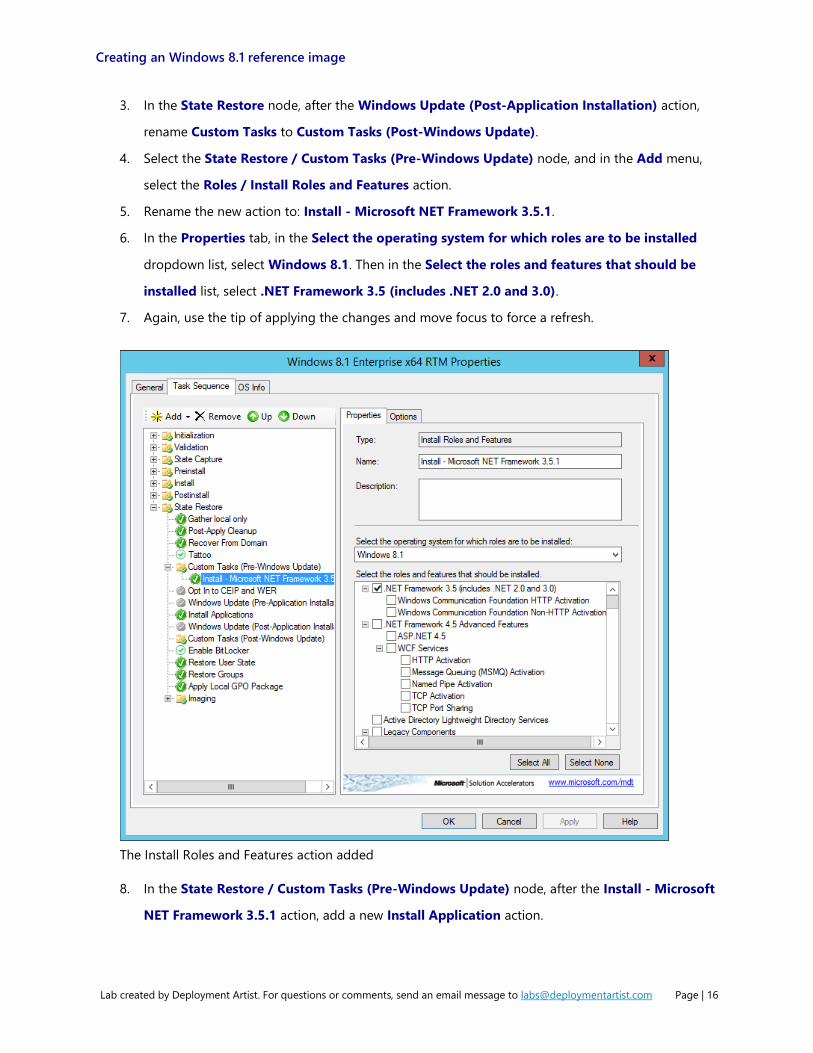
3. In the State Restore node, after the Windows Update (Post-Application Installation) action,
rename Custom Tasks to Custom Tasks (Post-Windows Update).
4. Select the State Restore / Custom Tasks (Pre-Windows Update) node, and in the Add menu,
select the Roles / Install Roles and Features action.
5. Rename the new action to: Install - Microsoft NET Framework 3.5.1.
6. In the Properties tab, in the Select the operating system for which roles are to be installed
dropdown list, select Windows 8.1. Then in the Select the roles and features that should be
installed list, select .NET Framework 3.5 (includes .NET 2.0 and 3.0).
7. Again, use the tip of applying the changes and move focus to force a refresh.
The Install Roles and Features action added
8. In the State Restore / Custom Tasks (Pre-Windows Update) node, after the Install - Microsoft
NET Framework 3.5.1 action, add a new Install Application action.
Creating an Windows 8.1 reference image
Lab created by Deployment Artist. For questions or comments, send an email message to [email protected] Page | 17
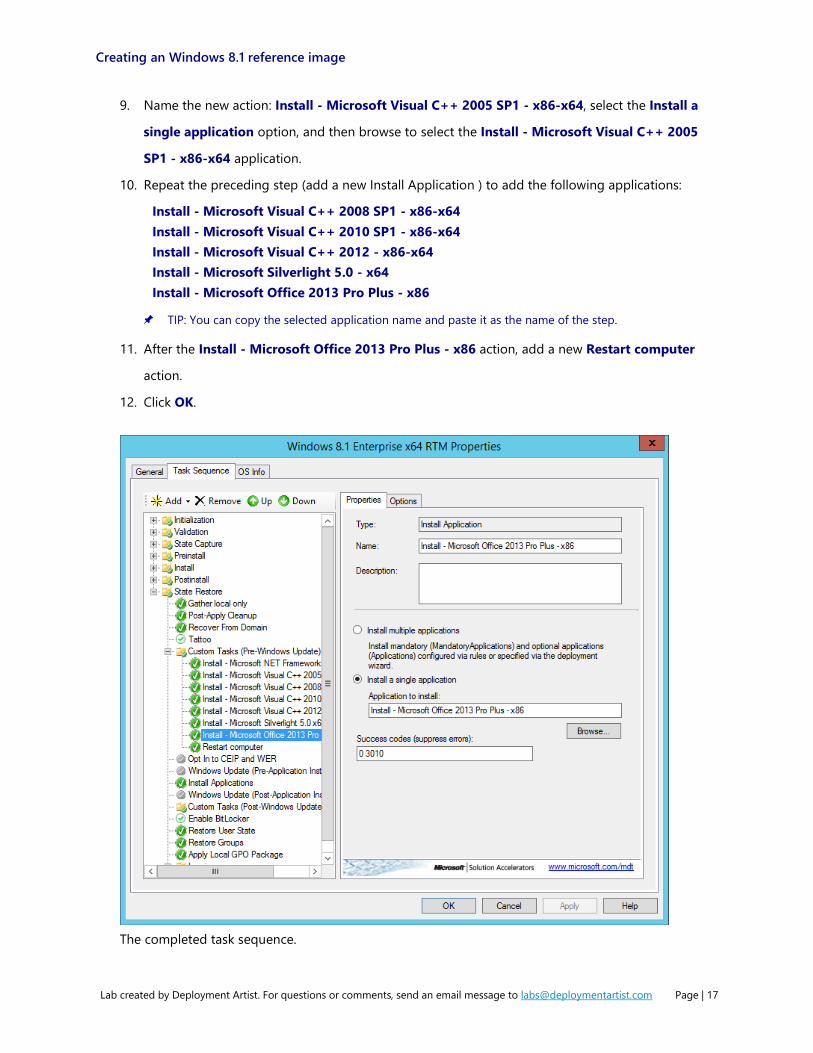
9. Name the new action: Install - Microsoft Visual C++ 2005 SP1 - x86-x64, select the Install a
single application option, and then browse to select the Install - Microsoft Visual C++ 2005
SP1 - x86-x64 application.
10. Repeat the preceding step (add a new Install Application ) to add the following applications:
Install - Microsoft Visual C++ 2008 SP1 - x86-x64
Install - Microsoft Visual C++ 2010 SP1 - x86-x64
Install - Microsoft Visual C++ 2012 - x86-x64
Install - Microsoft Silverlight 5.0 - x64
Install - Microsoft Office 2013 Pro Plus - x86
TIP: You can copy the selected application name and paste it as the name of the step.
11. After the Install - Microsoft Office 2013 Pro Plus - x86 action, add a new Restart computer
action.
12. Click OK.
The completed task sequence.
Creating an Windows 8.1 reference image
Lab created by Deployment Artist. For questions or comments, send an email message to [email protected] Page | 18
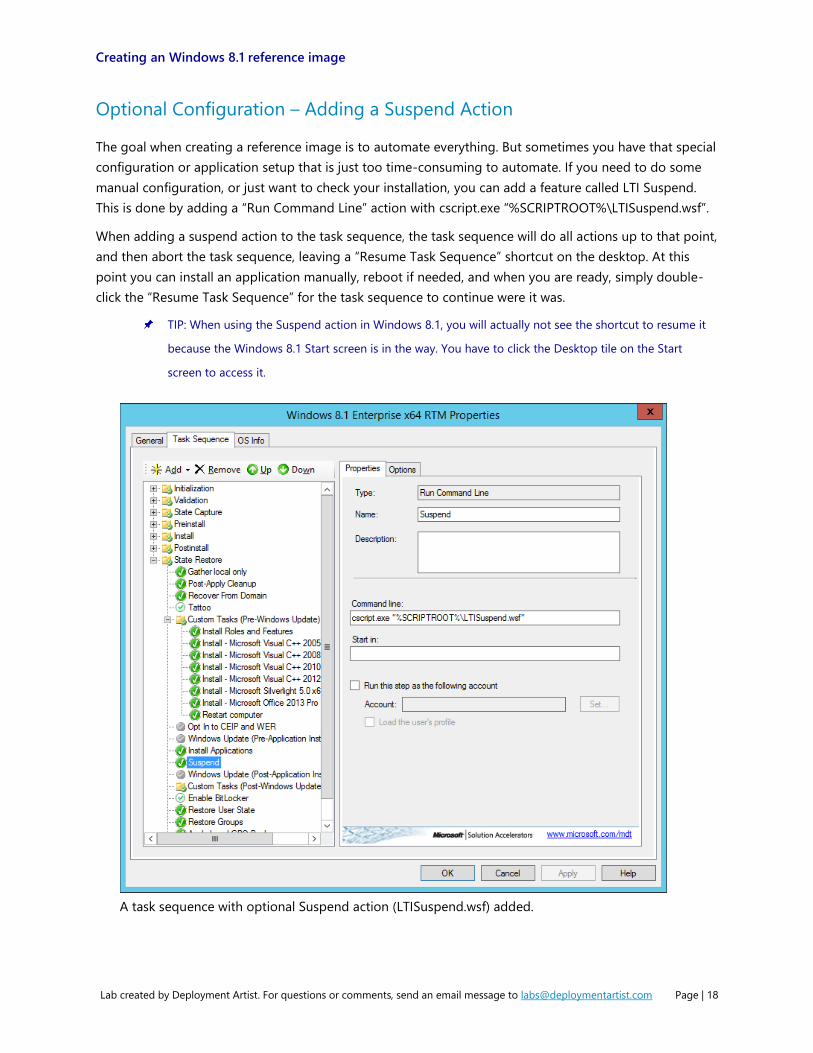
Optional Configuration – Adding a Suspend Action
The goal when creating a reference image is to automate everything. But sometimes you have that special
configuration or application setup that is just too time-consuming to automate. If you need to do some
manual configuration, or just want to check your installation, you can add a feature called LTI Suspend.
This is done by adding a “Run Command Line” action with cscript.exe “%SCRIPTROOT%\LTISuspend.wsf”.
When adding a suspend action to the task sequence, the task sequence will do all actions up to that point,
and then abort the task sequence, leaving a “Resume Task Sequence” shortcut on the desktop. At this
point you can install an application manually, reboot if needed, and when you are ready, simply double-
click the “Resume Task Sequence” for the task sequence to continue were it was.
TIP: When using the Suspend action in Windows 8.1, you will actually not see the shortcut to resume it
because the Windows 8.1 Start screen is in the way. You have to click the Desktop tile on the Start
screen to access it.
A task sequence with optional Suspend action (LTISuspend.wsf) added.
Creating an Windows 8.1 reference image
Lab created by Deployment Artist. For questions or comments, send an email message to [email protected] Page | 19
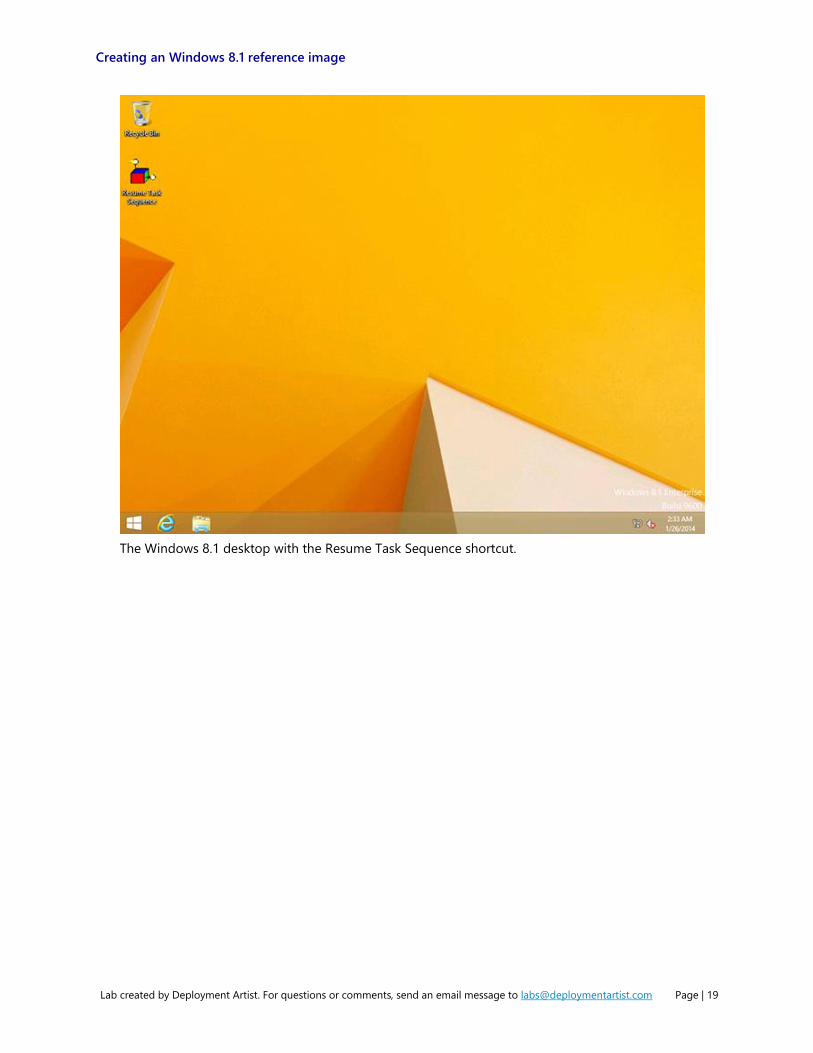
The Windows 8.1 desktop with the Resume Task Sequence shortcut.
Creating an Windows 8.1 reference image
Lab created by Deployment Artist. For questions or comments, send an email message to [email protected] Page | 20
Exercise 5: Edit the Unattend.xml File
In this exercise, you edit the Unattend.xml file belonging to the previously created task sequence.
Edit the Unattend.xml File for Windows 8.1 Enterprise
Most time you don’t need to modify the Unattend.xml template that is copied to the task sequence when
you create a task sequence. This is because the Unattend.xml file is dynamically updated during
deployment, but if you want to add a setting that is not available as a rule in MDT, you can. In this task,
you use Windows System Image Manager to edit the Unattend.xml file belonging to the Windows 8.1 task
sequence you created earlier.
Perform this task logged on to MDT01 as CONTOSO\Administrator with the password Passw0rd!
1. Using Deployment Workbench, in the Task Sequences / Windows 8.1 node, right-click the
Windows 8.1 Enterprise x64 RTM task sequence and select Properties.
2. In the OS Info tab, click Edit Unattend.xml.
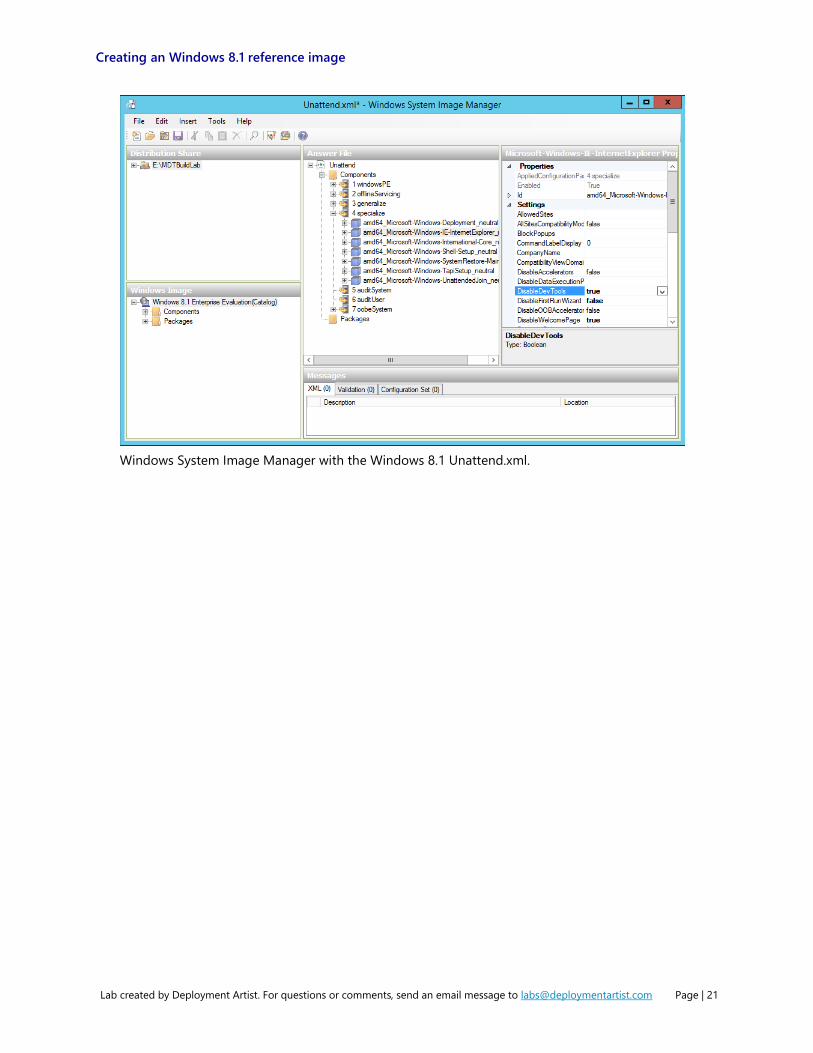
3. In Windows System Image Manager (WSIM), in the Answer File pane, expand the
4 specialize node, and select the amd64_Microsoft-Windows-IE-InternetExplorer_neutral
entry.
4. In the amd64_Microsoft-Windows-IE-InternetExplorer_neutral properties window (right-hand
window), set the DisableDevTools value to true.
5. Save the Unattend.xml file, and close Windows System Image Manager.
6. On the Windows 8.1 Enterprise x64 RTM Properties window, click OK.
Creating an Windows 8.1 reference image
Lab created by Deployment Artist. For questions or comments, send an email message to [email protected] Page | 21
Windows System Image Manager with the Windows 8.1 Unattend.xml.
Creating an Windows 8.1 reference image
Lab created by Deployment Artist. For questions or comments, send an email message to [email protected] Page | 22
Exercise 6: Configure the deployment share
In this exercise, you configure the deployment share settings and rules.
Prepare the deployment share rules
In this task, you configure the deployment share rules for a reference image build. The deployment share
rules controls the behavior of the deployment wizard as well as settings for the task sequence.
Perform this task logged on to MDT01 as CONTOSO\Administrator with the password Passw0rd!
1. Using File Explorer, navigate to the C:\Labfiles\MDTBuildLab\Control folder.
2. Copy the Bootstrap.ini and CustomSettings.ini files to E:\MDTBuildLab\Control (replace the
existing files).
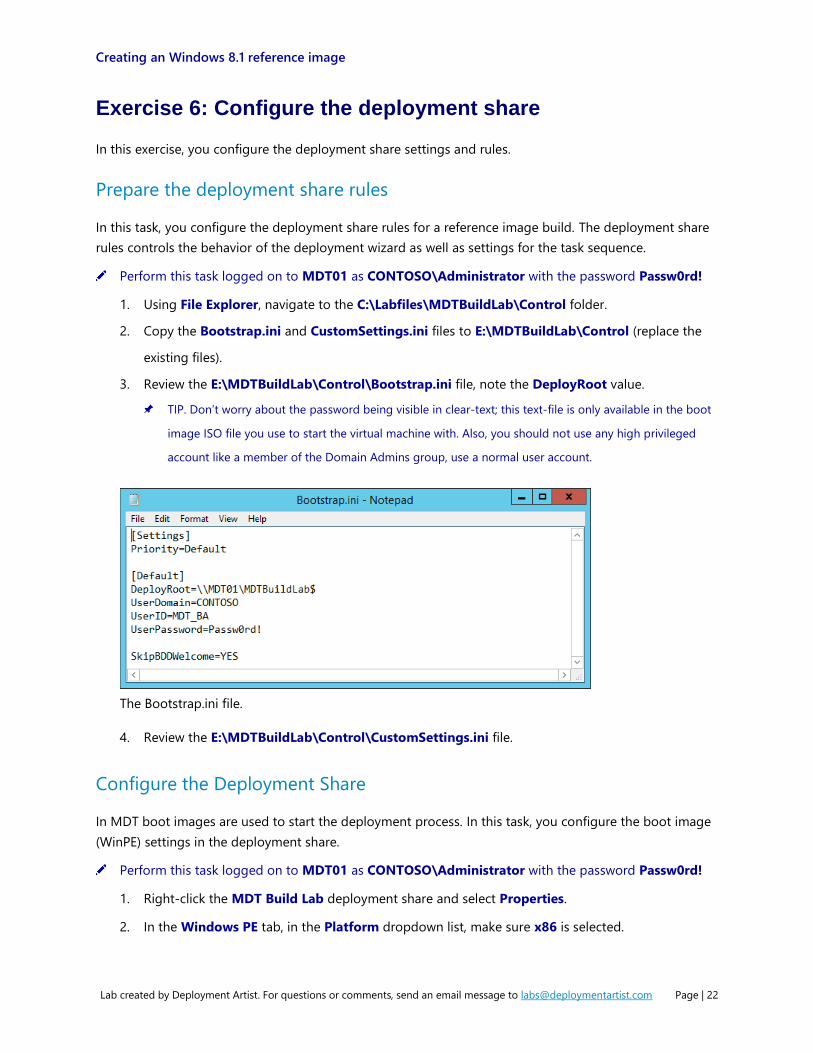
3. Review the E:\MDTBuildLab\Control\Bootstrap.ini file, note the DeployRoot value.
TIP. Don’t worry about the password being visible in clear-text; this text-file is only available in the boot
image ISO file you use to start the virtual machine with. Also, you should not use any high privileged
account like a member of the Domain Admins group, use a normal user account.
The Bootstrap.ini file.
4. Review the E:\MDTBuildLab\Control\CustomSettings.ini file.
Configure the Deployment Share
In MDT boot images are used to start the deployment process. In this task, you configure the boot image
(WinPE) settings in the deployment share.
Perform this task logged on to MDT01 as CONTOSO\Administrator with the password Passw0rd!
1. Right-click the MDT Build Lab deployment share and select Properties.
2. In the Windows PE tab, in the Platform dropdown list, make sure x86 is selected.
Creating an Windows 8.1 reference image
Lab created by Deployment Artist. For questions or comments, send an email message to [email protected] Page | 23
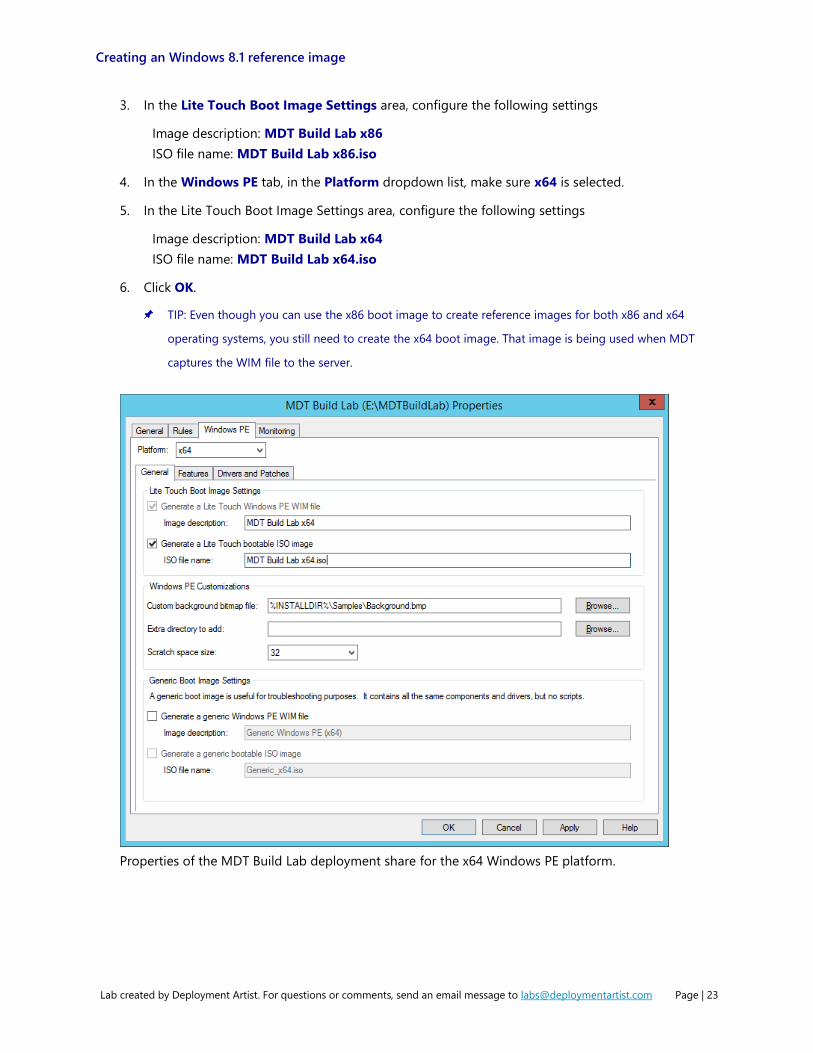
3. In the Lite Touch Boot Image Settings area, configure the following settings
Image description: MDT Build Lab x86
ISO file name: MDT Build Lab x86.iso
4. In the Windows PE tab, in the Platform dropdown list, make sure x64 is selected.
5. In the Lite Touch Boot Image Settings area, configure the following settings
Image description: MDT Build Lab x64
ISO file name: MDT Build Lab x64.iso
6. Click OK.
TIP: Even though you can use the x86 boot image to create reference images for both x86 and x64
operating systems, you still need to create the x64 boot image. That image is being used when MDT
captures the WIM file to the server.
Properties of the MDT Build Lab deployment share for the x64 Windows PE platform.
Creating an Windows 8.1 reference image
Lab created by Deployment Artist. For questions or comments, send an email message to [email protected] Page | 24
Update the Deployment Share
When you change boot image (Windows PE) properties in the deployment share, you need to update the
deployment share so the boot image is updated. The first time you update the deployment share you
don’t yet have any boot image so they are created for you automatically during the update deployment
share process. In this task, you create the boot image by updating the deployment share.
Perform this task logged on to MDT01 as CONTOSO\Administrator with the password Passw0rd!
1. Right-click the MDT Build Lab deployment share and select Update Deployment Share.
2. Use the default Options for the Update Deployment Share wizard.
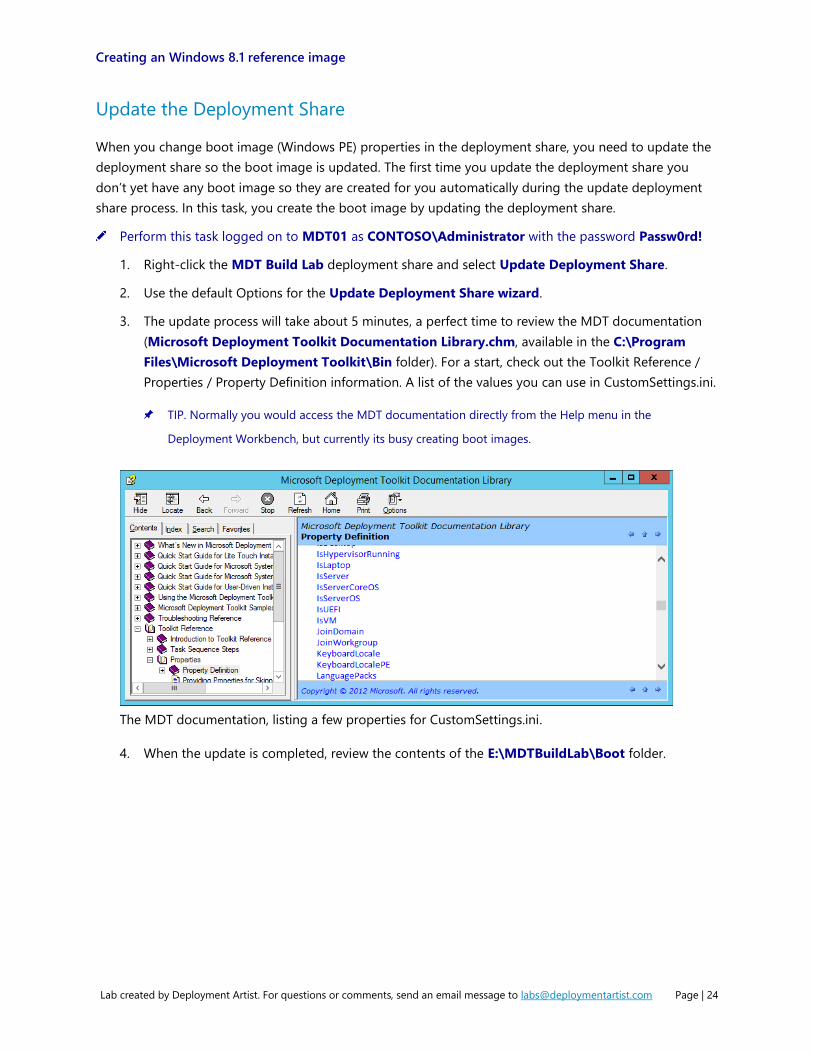
3. The update process will take about 5 minutes, a perfect time to review the MDT documentation
(Microsoft Deployment Toolkit Documentation Library.chm, available in the C:\Program
Files\Microsoft Deployment Toolkit\Bin folder). For a start, check out the Toolkit Reference /
Properties / Property Definition information. A list of the values you can use in CustomSettings.ini.
TIP. Normally you would access the MDT documentation directly from the Help menu in the
Deployment Workbench, but currently its busy creating boot images.
The MDT documentation, listing a few properties for CustomSettings.ini.
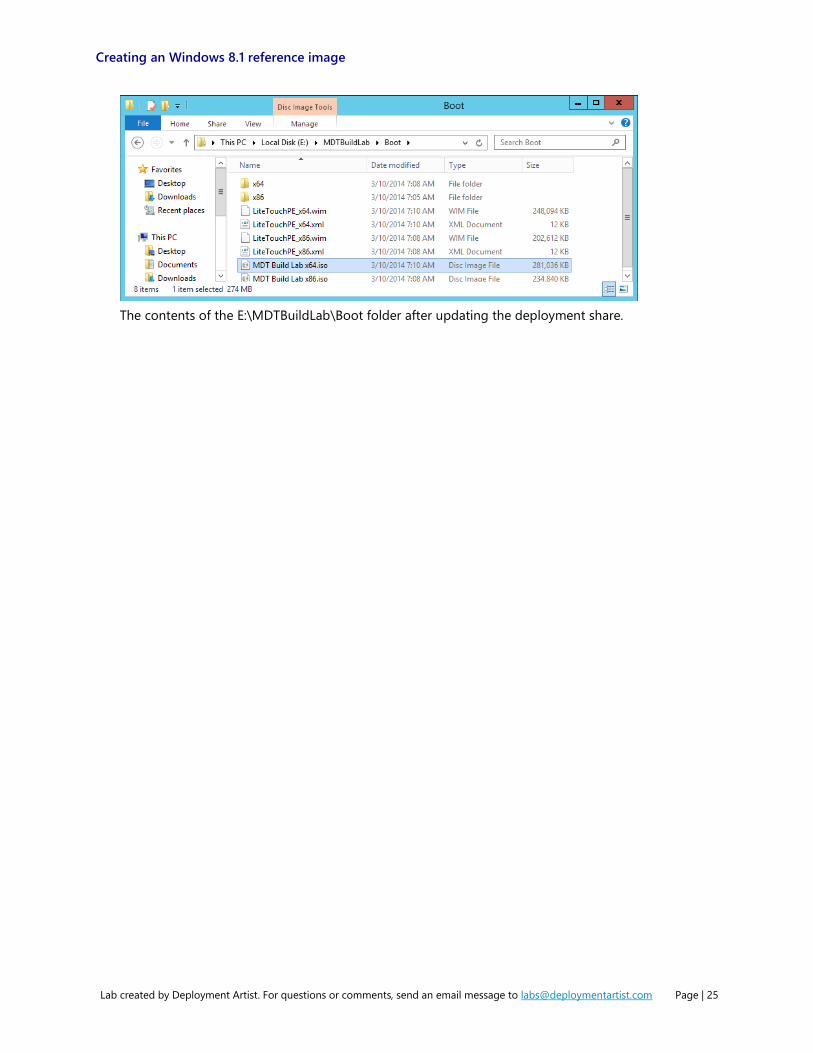
4. When the update is completed, review the contents of the E:\MDTBuildLab\Boot folder.
Creating an Windows 8.1 reference image
Lab created by Deployment Artist. For questions or comments, send an email message to [email protected] Page | 25
The contents of the E:\MDTBuildLab\Boot folder after updating the deployment share.
Creating an Windows 8.1 reference image
Lab created by Deployment Artist. For questions or comments, send an email message to [email protected] Page | 26
Exercise 7: Create Windows Reference Images
In this exercise, you create a Windows 8.1 reference image.
Create a Windows 8.1 Reference WIM Image, fully automated
In this task, you start a virtual machine and use it to create a Windows 8.1 reference image. Normally you
would have to copy the boot image (MDT Build Lab x86.iso) you generated, to the Hyper-V host and then
configure a virtual machine to use it. In this lab environment this has already be done for you.
Perform this task on to the REF001 virtual machine.
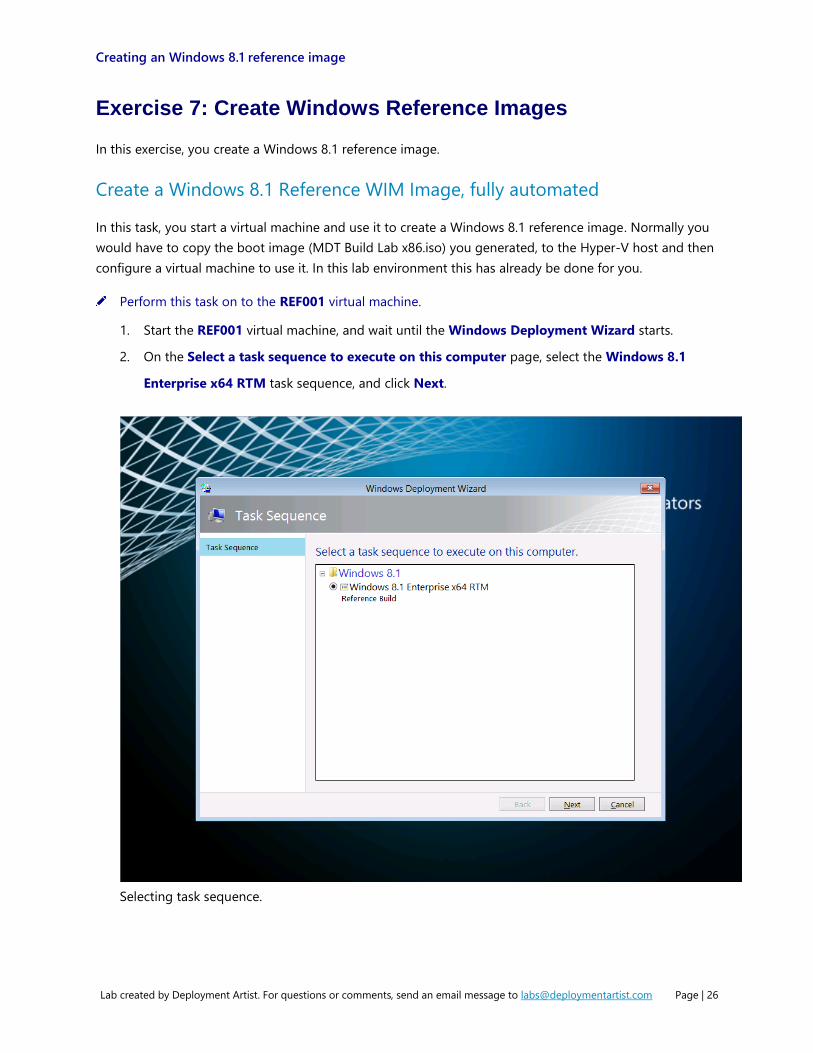
1. Start the REF001 virtual machine, and wait until the Windows Deployment Wizard starts.
2. On the Select a task sequence to execute on this computer page, select the Windows 8.1
Enterprise x64 RTM task sequence, and click Next.
Selecting task sequence.
Creating an Windows 8.1 reference image
Lab created by Deployment Artist. For questions or comments, send an email message to [email protected] Page | 27
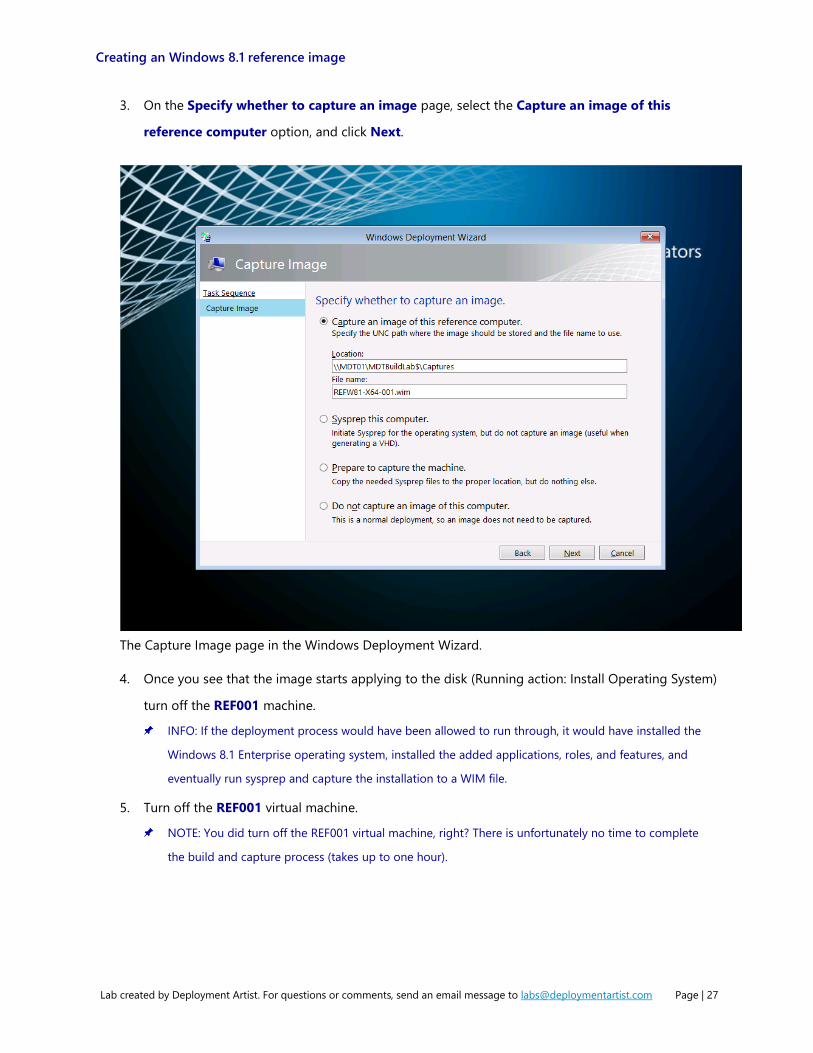
3. On the Specify whether to capture an image page, select the Capture an image of this
reference computer option, and click Next.
The Capture Image page in the Windows Deployment Wizard.
4. Once you see that the image starts applying to the disk (Running action: Install Operating System)
turn off the REF001 machine.
INFO: If the deployment process would have been allowed to run through, it would have installed the
Windows 8.1 Enterprise operating system, installed the added applications, roles, and features, and
eventually run sysprep and capture the installation to a WIM file.
5. Turn off the REF001 virtual machine.
NOTE: You did turn off the REF001 virtual machine, right? There is unfortunately no time to complete
the build and capture process (takes up to one hour).