Web Order Forms with JavaScript - University of Wolverhampton
IT Services, University of Wolverhampton
Microsoft®
WWiinnddoowwss 77

2 © 2009 CustomGuide, Inc.
© 2009 by CustomGuide, Inc. 1502 Nicollet Avenue South, Suite 1; Minneapolis, MN 55403
This material is copyrighted and all rights are reserved by CustomGuide, Inc. No part of this publication may be reproduced, transmitted, transcribed, stored in a retrieval system, or translated into any language or computer language, in any form or by any means, electronic, mechanical, magnetic, optical, chemical, manual, or otherwise, without the prior written permission of CustomGuide, Inc.
We make a sincere effort to ensure the accuracy of the material described herein; however, CustomGuide makes no warranty, expressed or implied, with respect to the quality, correctness, reliability, accuracy, or freedom from error of this document or the products it describes. Data used in examples and sample data files are intended to be fictional. Any resemblance to real persons or companies is entirely coincidental.
The names of software products referred to in this manual are claimed as trademarks of their respective companies. CustomGuide is a registered trademark of CustomGuide, Inc.
IT Services, University of Wolverhampton 3
Table of Contents
The Fundamentals................................................................................................................................................. 10 A Look at Windows 7 ............................................................................................................................................ 11 What’s New in Windows 7 .................................................................................................................................... 12 Starting and Logging On to Windows 7 ................................................................................................................ 13 Understanding the Windows 7 Screen ................................................................................................................. 14 Using the Mouse: Pointing, Clicking, and Double-clicking ................................................................................... 15 Using the Mouse: Clicking and Dragging, and Right-clicking .............................................................................. 17 Using the Keyboard .............................................................................................................................................. 18 Understanding the Start Menu .............................................................................................................................. 20 Using Help and Support ....................................................................................................................................... 22 Turning Off Your Computer ................................................................................................................................... 24
The Fundamentals Review .................................................................................................................................... 26
Working with a Window ........................................................................................................................................ 28 Understanding the Parts of a Window .................................................................................................................. 29 Using Windows Aero ............................................................................................................................................ 31 Using Window Sizing Buttons .............................................................................................................................. 33 Moving and Resizing a Window ........................................................................................................................... 35 Switching Between Windows ............................................................................................................................... 36 Arranging Windows Automatically ........................................................................................................................ 38 Closing a Window ................................................................................................................................................. 39
Working with a Window Review ........................................................................................................................... 40
Working with a Program ....................................................................................................................................... 42 Opening a Program .............................................................................................................................................. 43 Understanding the Program Window ................................................................................................................... 44 Understanding the Ribbon .................................................................................................................................... 45 Using the Program Button and Quick Access Toolbar ......................................................................................... 46 Understanding Controls ........................................................................................................................................ 47 Entering and Editing Text in WordPad .................................................................................................................. 49 Opening a File ...................................................................................................................................................... 50 Saving a File ......................................................................................................................................................... 51 Selecting and Replacing Text ............................................................................................................................... 53 Using Undo and Redo .......................................................................................................................................... 55 Cutting, Copying, and Pasting Text ...................................................................................................................... 56 Previewing and Printing a Document ................................................................................................................... 58 Getting Help .......................................................................................................................................................... 60
Working with a Program Review .......................................................................................................................... 61
Working with Folders and Files ........................................................................................................................... 64 Understanding What’s in Your Computer ............................................................................................................. 66 Opening Drives, Folders, and Files ...................................................................................................................... 68 Understanding the Windows Explorer Window .................................................................................................... 69 Using Windows Explorer to Navigate Your Computer .......................................................................................... 70 Folder and File Basics .......................................................................................................................................... 72 Using and Creating Libraries ................................................................................................................................ 74 Modifying and Deleting Libraries .......................................................................................................................... 75 Selecting Multiple Folders and Files ..................................................................................................................... 77 Copying and Moving Folders and Files ................................................................................................................ 78 Changing Window Layout and Views ................................................................................................................... 80 Sorting and Filtering Items ................................................................................................................................... 81 Using Search ........................................................................................................................................................ 83 Working with Compressed Folders ...................................................................................................................... 85

4 © 2009 CustomGuide, Inc.
Working with Folders and Files Review............................................................................................................... 86
Working with the Taskbar and Desktop .............................................................................................................. 89 Customizing the Taskbar ...................................................................................................................................... 90 Resizing and Moving the Taskbar......................................................................................................................... 91 Using Jump Lists .................................................................................................................................................. 93 Customizing the Start Menu ................................................................................................................................. 94 Working with Desktop Icons ................................................................................................................................. 96 Using Gadgets ...................................................................................................................................................... 97 Starting a Program Automatically with Windows .................................................................................................. 99
Working with the Taskbar and Desktop Review ............................................................................................... 100
Personalizing Windows ...................................................................................................................................... 102 A Look at the Control Panel ................................................................................................................................ 103 Changing Color and Theme ............................................................................................................................... 104 Changing the Desktop Background .................................................................................................................... 106 Using a Screen Saver ......................................................................................................................................... 108 Adjusting Display Settings .................................................................................................................................. 109 Adjusting Sound ................................................................................................................................................. 111 Adjusting the Mouse ........................................................................................................................................... 113 Changing the Date and Time .............................................................................................................................. 115 Changing Language and Region Options .......................................................................................................... 117 Customizing Folder View Options ...................................................................................................................... 119
Personalizing Windows Review .......................................................................................................................... 120
Using Windows Accessories ............................................................................................................................. 122 Calculator............................................................................................................................................................ 123 Connect to a Projector ........................................................................................................................................ 124 Getting Started .................................................................................................................................................... 125 Notepad .............................................................................................................................................................. 126 Paint .................................................................................................................................................................... 127 Remote Desktop Connection.............................................................................................................................. 129 Snipping Tool ...................................................................................................................................................... 131 Sound Recorder ................................................................................................................................................. 132 Sticky Notes ........................................................................................................................................................ 133 Sync Center ........................................................................................................................................................ 134 Windows Explorer ............................................................................................................................................... 135 Windows Mobility Center .................................................................................................................................... 136 WordPad ............................................................................................................................................................. 137 Ease of Access ................................................................................................................................................... 138 System Tools ...................................................................................................................................................... 139 Tablet PC Accessories ........................................................................................................................................ 140
Using Windows Accessories Review ................................................................................................................. 142
Connecting to the Internet ................................................................................................................................. 145 Dial-Up Connections ........................................................................................................................................... 146 Broadband Connections ..................................................................................................................................... 148 Mobile Broadband Connections ......................................................................................................................... 150 Connecting to a Wireless Network ..................................................................................................................... 151 Using Windows to Diagnose and Repair a Connection ..................................................................................... 153
Connecting to the Internet Review ..................................................................................................................... 155
Working with Hardware and Peripherals .......................................................................................................... 157 Understanding Computer Ports .......................................................................................................................... 158 Installing New Hardware ..................................................................................................................................... 159 Installing a Printer ............................................................................................................................................... 161

IT Services, University of Wolverhampton 5
Working with USB Flash Drives.......................................................................................................................... 163 Troubleshooting Hardware ................................................................................................................................. 165
Working with Hardware and Peripherals Review .............................................................................................. 166
Optimizing and Maintaining Your Computer .................................................................................................... 167 Installing Software .............................................................................................................................................. 168 Removing Software ............................................................................................................................................ 170 Shutting Down a Frozen Program ...................................................................................................................... 171 Adjusting Power Settings ................................................................................................................................... 172 Repairing Disk Errors ......................................................................................................................................... 174 Defragmenting Your Hard Disk ........................................................................................................................... 176 Freeing Up Space on Your Hard Disk ................................................................................................................. 177 Restoring Your Computer ................................................................................................................................... 179 Turning Windows Features On or Off ................................................................................................................. 181 Using Windows Update ...................................................................................................................................... 183 Setting Default Programs ................................................................................................................................... 185 Scheduling Tasks ................................................................................................................................................ 187 Running Older Programs in Windows XP Mode ................................................................................................ 189
Optimizing and Maintaining Your Computer Review ........................................................................................ 191
Networking with Windows 7............................................................................................................................... 194 Understanding Networks .................................................................................................................................... 195 Browsing a Network ............................................................................................................................................ 196 Mapping a Network Drive ................................................................................................................................... 197 Connecting to a Network Printer ........................................................................................................................ 199 Connecting to a Virtual Private Network (VPN) .................................................................................................. 201 Using HomeGroup .............................................................................................................................................. 203 Sharing Files and Folders .................................................................................................................................. 205
Networking with Windows 7 Review .................................................................................................................. 207

6 © 2009 CustomGuide, Inc.
IInnttrroodduucciinngg
CCuussttoommGGuuiiddee
CCoouurrsseewwaarree
Thank you for choosing CustomGuide courseware as the
solution to your training needs. A proven leader in the
computer training industry, CustomGuide has been the
key to successful training for thousands of students and
instructors across the globe.
This manual is designed for computer users of all
experience levels. Novice users can use it to learn skills
such as formatting text, while advanced users can use it to
create their own templates.
All this information is quickly accessible. Lessons are
broken down into basic step-by-step instructions that
answer “how-to” questions in minutes. You can print a
complete 300-page training manual or a single page of
instructions.
Here’s how a CustomGuide manual is organized:
Chapters Each manual is divided into several chapters. Aren't sure
if you're ready for a chapter? Look at the table of contents
that appears at the beginning of each chapter. It will tell
you the name of each lesson and subtopic included in the
chapter.
Lessons
Each chapter contains lessons on related topics. Each
lesson explains a new skill or topic and contains an
exercise and exercise file to give you hands-on-
experience. These skills can also be practiced using
CustomGuide Online Learning.
Review
A review is included at the end of the manual. Use these
quiz questions and answers to assess how much you've
learned.
What People Are Saying
“I have saved hundreds of hours of design
time by just picking and choosing what I want
from the courseware.”
— Stephanie Zimmerman
Lancaster County Library
“We have been able to customize our training
sessions on all Microsoft Office products, at
all levels. The ROI of these guides is great.”
— Dawn Calvin
Las Virgenes Municipal Water District
“All in all, the friendliest, most open and easy
to understand tutorial of its type that I’ve ever
seen.”
— W. Boudville
Amazon.com
“…curriculum that is of high quality, student
friendly, and adaptable to the audience.”
— Sherrill Wayland
St. Charles Community College
“…a nice training option for almost any need.
Their complete Microsoft Office package is
by far the best deal on the market.”
— Technical Assistance Program
Purdue University
“Any instructor teaching classes on Windows
or Microsoft Office will definitely want to
give serious consideration to this important
collection of titles that will definitely fit well
into their classroom learning.”
— Dale Farris
Golden Triangle PC Club
“The materials are exceptional – I am so
excited about using them! Thanks to you and
your team for doing this wonderful work!”
— Shannon Coleman
Learning Post Ltd.

IT Services, University of Wolverhampton 7
How It Works
Streamlined design Featuring a professional-looking, easy-to-read design, 3rd
generation courseware appeals to instructors, students and individual users alike.
Exercise Notes A new Exercise Notes section appears at the top of each lesson. Rather than practicing the topic step by step through the lesson as in 2
nd generation courseware, the topic can be
practiced using the exercise file and exercise described here.
Table of Contents In addition to the Table of Contents found at the beginning of each courseware title, 3rd
generation courseware includes a Table of Contents at the beginning of each chapter, making
it even easier to locate the lessons you need.
Smart Quizzes The Quiz section, located at the back of the book, automatically updates itself when the manual is customized. For example, if you remove a lesson regarding cutting and pasting text, there will be no questions in the Quiz section that relate to cutting and pasting text.
Easier customization The design of 3rd
generation is simplified, which makes it easier to customize. All you have to do is click and drag or copy and paste, or press the <Delete> key to remove a lesson, and voila; you’re done!
Use as a reference tool 3rd
generation courseware breaks tasks down into basic step-by-step instructions and can be used as a virtual help desk, answering “how-to” questions in minutes.
1. Open Microsoft Word Our customizable courseware is provided as
simple-to-use, editable Microsoft Word
documents—if you can use Microsoft Word you
can create your own training materials in minutes!
2. Select Your Topics
Select the content you need from our award-
winning courseware library. You can even mix
and match topics between titles, such as Windows
Vista and Microsoft Word.
3. Customize Arrange topics in the order you want—the
courseware automatically updates to reflect your
changes. Add your organization’s name and logo
for a professional “in-house” look.
4. Print and Distribute Print as many copies as you need at your site,
without paying any per-unit royalties or
maintaining physical inventories. You can print
single-page handouts, a group of related lessons,
or a complete manual. It’s fast, convenient, and
very affordable.
5. Teach and Learn You’ll love having your own customized training
materials, and your users will appreciate the
colorful illustrations, down-to-earth writing style,
and the convenience of having a reference guide
that they can use in or out of the classroom.
3rd
Generation Courseware: What’s New?
CustomGuide is pleased to introduce 3rd
generation courseware. Completely redesigned from years of customer feedback,
3rd
generation courseware features a streamlined design that is easier to customize and use as a reference tool. Take a look
at the table below for more information regarding these features.

8 © 2009 CustomGuide, Inc.
Courseware Features
Lessons are presented on one or two pages, so you can follow along without wondering when a lesson ends and a new one begins.
Each lesson includes a hands-on exercise and practice file so users can practice the topic of the lesson.
Clear step-by-step instructions answer “how-to” questions. Anything you need to click appears like
this.
Tips let you know more information about a specific step or topic as a whole.
Whenever there is more than one way to do something, the most common method is presented in the numbered step, while the alternate methods appear beneath.
Tables provide summaries of the terms, toolbar buttons, and options covered in the lesson.
The table of contents, index, tables, figures, and quiz questions automatically update to reflect any changes you make to the courseware.
Icons and pictures show you what to look for as you follow the instructions.
Working with Shapes and Pictures
Exercise
Exercise File: AmericanHistory7-3.docx
Exercise: Select the header row containing the month labels, the Income row, the Total
Exp. Row, and the Net Inc. row (use the Ctrl
key to select multiple rows). Create a 2-D
Clustered Column chart.
© 2009 CustomGuide, Inc. 102
Whenever you insert a graphic into a document, it is
inserted inline with text by default. This means that the
text in the document moves in order to accommodate the
graphic. This lesson will show you how to adjust text
wrapping and how to use the grid to position objects.
Positioning Pictures
1. Double-click the object whose text wrapping you
wish to adjust.
2. Click the Text Wrapping button in the Arrange group.
3. Select a text wrapping style from the list.
The Format contextual tab appears on the Ribbon.
Horizontal and vertical gridlines appear on the page.
Tip: Gridlines do NOT appear in the printed
document.
Tips
If you want to use a graphic with other graphics or objects, they must be on a drawing canvas. See the
lesson on Inserting Shapes for more information.
Adjust text wrapping
To adjust how text reacts to the objects in your documents,
change the object’s text wrapping.
A list of text wrapping styles appears. Take a look at the Text Wrapping Styles table for a description of
each style.
The text wrapping style is applied to the image.
Other Ways to Adjust Text Wrapping: Right-click the image, point to Text Wrapping
in the contextual menu, and select an option
from the submenu.
Other Ways to Display the Grid: Press <Shift> + <F9>, or click the Format
contextual tab on the Ribbon, click the Align button in theArrange group, and select View
Gridlines from the list.
1. Click the View tab on the Ribbon.
2. Click the Gridlines check box in the Show/Hide group.
To display/hide the grid
Just like the graph paper you used to use in geometry
class, the grid consists of horizontal and vertical lines that
help you draw and position objects.
Table 7-2: Text Wrapping Styles
In Line
with Text
This places the object at the insertion point in a
line of text in the document. The object remains
on the same layer as the text.
Square Wraps text around all sides of the square
bounding box for the selected object.
Tight
Wraps text tightly around the edges of the actual
image (instead of wrapping around the object’s
bounding box).
Behind
Text
This removes text wrapping and puts the object
behind text in a document The object floats on
its own layer.
In Front
of Text
This removes text wrapping and puts the object
in front of text in a document. The object floats
on its own layer.
Top and
Bottom
Wraps text around the top and bottom of the
object, leaving the area to the right and left of
the object clear.
Through Similar to the Tight style, this style wraps text
throughout the image.
Figure 7-3: A document with the grid displayed.

IT Services, University of Wolverhampton 9
10 © 2009 CustomGuide, Inc.
TThhee
FFuunnddaammeennttaallss
A Look at Windows 7 ......................................... 11 Operating systems: a brief overview ....... 11 System requirements and editions .......... 11
What’s New in Windows 7 ................................. 12
Starting and Logging On to Windows 7 .......... 13
Understanding the Windows 7 Screen ............ 14
Using the Mouse: Pointing, Clicking, and Double-clicking .................................................. 15
Using the Mouse: Clicking and Dragging, and Right-clicking ..................................................... 17
Using the Keyboard ........................................... 18 Use a keystroke combination .................. 18 Special keys and their functions .............. 19
Understanding the Start Menu ......................... 20
Using Help and Support .................................... 22 Search for help ........................................ 22 Browse for help ........................................ 22
Turning Off Your Computer .............................. 24
Welcome to Windows 7! If you’re new to
Windows, or to computers altogether,
you’re starting at the right place. This
chapter covers the “bare-bones” basics
about learning how to start your computer
and load Windows. You’ll learn how to
operate the mouse by clicking, double-
clicking, clicking and dragging, and right-
clicking. You’ll also learn about your
computer’s keyboard. Finally, you’ll learn
how to exit Windows and shut down your
computer.
Before we start, take a deep breath and
relax. You may find this difficult to
believe, but computers aren’t nearly as
difficult and complicated as you might
think they are. This chapter keeps
everything as simple as possible, so you’ll
be able to follow along no matter what
your previous computer experience.
Actually, you may find that some of the
lessons in this chapter are a little too easy.
When you come across something you
already know, go ahead and skip the
lesson.
Ready? Then turn the page and let’s get
started!
1

IT Services, University of Wolverhampton 11
A Look at Windows 7
What exactly is Windows 7? What kind of computer
hardware do you need to use it? This lesson answers these
questions and provides more basic information about
Windows 7, Microsoft’s newest operating system.
Operating systems: a brief overview
Windows 7 is an operating system. Okay, so what’s an
operating system? An operating system is a software
program that controls and runs just about everything on
your computer, including:
Controls Your Computer’s Hardware Windows controls the different devices on your
computer system. It’s what makes your printer print,
what makes graphics and text appear on your
monitor, and what makes your mouse point and click.
(Actually, you make the mouse point and click, but
Windows is what puts the mouse pointer on the
screen and electronically connects it to your mouse.)
Runs Your Computer’s Programs Windows is what runs all your programs. Without
Windows, your word processor, Web browser
(Internet), and games wouldn’t work. Windows lets
your programs talk to your hardware, so you can do
things like print documents from your word processor
on the printer.
Organizes Files Windows stores information in files and folders on
your computer’s hard disk, just as you store files and
folders in a filing cabinet.
Think of the operating system as an engineer who makes
sure all the parts of your computer—your hardware and
programs—work together. Operating systems have been
around for a long time; what makes Windows special is its
ability to make computer operations easy by using a
graphical user interface. With Windows, all you have to
do is point and click to do something.
System requirements and editions
Windows 7 is a significant upgrade to the Windows line
of operating systems. To use Windows 7, your computer
should meet the settings in the table to the right, Minimum
System Requirements. Additional requirements for certain
features include Internet access, audio output, and a
CD/DVD drive.
If your computer doesn’t meet these requirements, you
probably need to beef up your system before you make
the switch to Windows 7.
Exercise
• Exercise File: None required.
• Exercise: Identify the Windows 7 edition installed on your
computer. Understand how this edition is different from
other editions.
Table 1-1: Windows 7 Editions
Home
Premium
Includes dynamic usability features, such as
easier desktop navigation, improved search
features, and faster ways to start programs.
HomeGroup networking, full system Backup
and Restore, and an improved Media Center
are also included.
Professional Offers the same features as Home Premium,
with additional features for business
computing, such as Windows XP Mode for
compatibility with Windows XP programs,
Domain Join for easier and more secure
connections to company networks, and the
ability to backup and restore to a network.
Ultimate Offers the same features as Home Premium
and Professional, with additional features for
protecting data and devices with BitLocker,
and the option to work in the language of
your choice.
Table 1-2: Minimum System Requirements
1 GHz 32-bit (x86) or 64-bit (x64) processor
Minimum 1 GB RAM (32-bit) or 2 GB RAM (64-bit)
16 GB free disk space
Support for DirectX 9 graphics with
WDDM 1.0 or higher driver
The Fundamentals

12 © 2009 CustomGuide, Inc.
What’s New in Windows 7
Unlike Windows Vista, which introduced a large number
of new features, Windows 7 focuses mostly on improving
and enhancing these features to maximize usability. The
table below provides an overview of what to expect.
Tips
The features listed below are available in the Home
Premium, Professional, and Ultimate editions of
Windows 7.
Table 1-3: What’s New in Windows 7
Aero updates The Windows Aero interface is back, with many new functions and features.
Aero Peek: Want a quick peek at your desktop? Use Aero Peek to make all open windows
transparent.
Aero Shake: Click a window’s Title bar and “shake” your mouse to temporarily minimize all open
windows except the active window. Shake again to revive all windows.
Snap: Click and drag a window to the right or left of the screen to snap the window to either side of
the desktop. Click and drag a window to the top of the screen to maximize it.
Retooled taskbar The taskbar has been completely redesigned for Windows 7. Now you can pin your favorite programs and
files to the taskbar, rearrange taskbar buttons, and more.
Free-floating gadgets In Windows 7 you can position gadgets anywhere on the desktop. They are no longer stuck in the Sidebar.
Jump Lists Jump Lists contain shortcuts to popular program commands and recently used files. To open a Jump List
for a program, right-click the program icon on the taskbar or open the Start menu and click the program’s
list arrow. You can also customize a Jump List by pinning your own items to it.
Action Center Pop-ups, be gone! The Action Center in Windows 7 consolidates all messages from Windows maintenance
and security. Instead of bombarding you with pop-up balloons every time Windows requires your
attention, a simple Action Center icon will appear on the taskbar.
Libraries A library gathers files from different locations on your computer and displays them as a single collection,
without moving them from where they’re stored. There are four default libraries in Windows 7:
Documents, Music, Pictures, and Videos.
Search filters Search filters are now built right into the Search box in Windows Explorer, enabling you to fine-tune your
searches quickly and easily.
Improved Windows
Media Center
Use the new Turbo Scroll feature to quickly jump to songs and shows, create photo collages with the Slide
Show Maker, and enjoy playback of media not supported in previous versions.
Sticky Notes Sticky Notes has been promoted from a gadget in Windows Vista to an application in Windows 7. Now
you can format a note’s text, change its color, and more.
Accessibility features The Ease of Access Center offers a variety of new settings and programs, including Magnifier, Narrator,
and On-Screen Keyboard.
HomeGroup HomeGroup is a new networking feature that makes it easy to share files and printers on a network. Home
users can set up a homegroup that shares music, documents, pictures, and other files between all
computers running Windows 7. Business users will find that it is useful for creating a network without
needing a server.
Exercise
• Exercise File: None required.
• Exercise: Review the new features in Windows 7.
The Fundamentals
IT Services, University of Wolverhampton 13
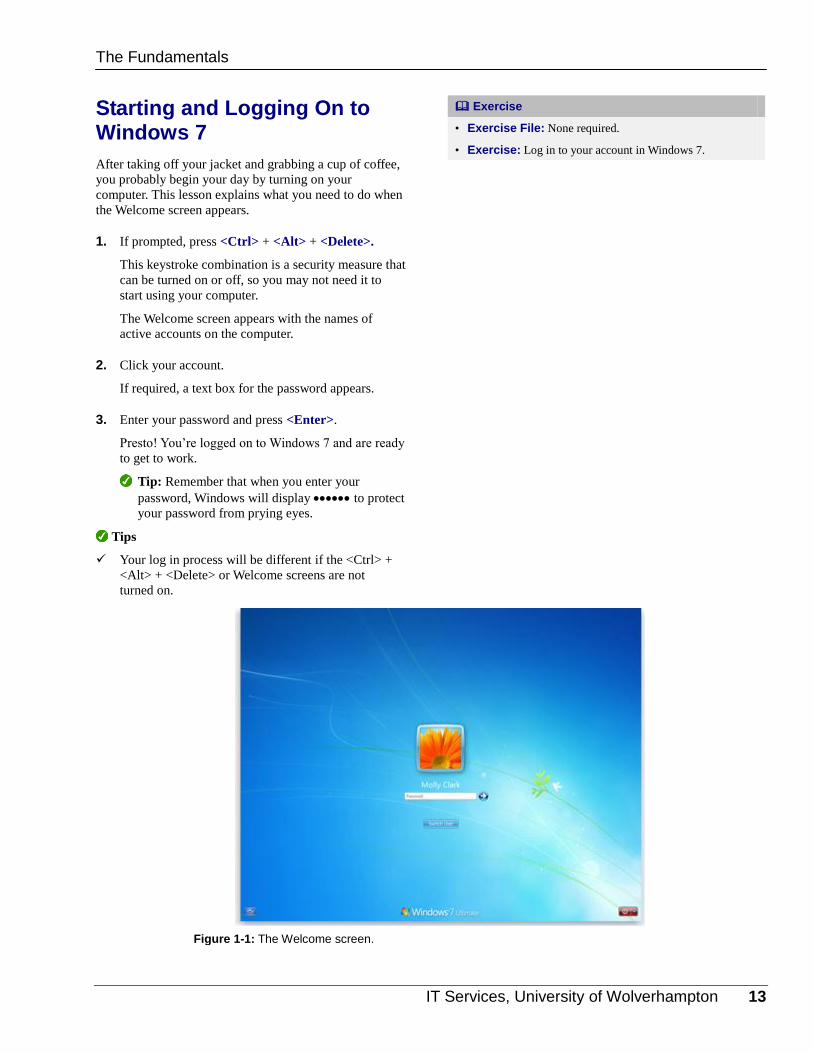
Starting and Logging On to Windows 7
After taking off your jacket and grabbing a cup of coffee,
you probably begin your day by turning on your
computer. This lesson explains what you need to do when
the Welcome screen appears.
1. If prompted, press <Ctrl> + <Alt> + <Delete>.
This keystroke combination is a security measure that
can be turned on or off, so you may not need it to
start using your computer.
The Welcome screen appears with the names of
active accounts on the computer.
2. Click your account.
If required, a text box for the password appears.
3. Enter your password and press <Enter>.
Presto! You’re logged on to Windows 7 and are ready
to get to work.
Tip: Remember that when you enter your
password, Windows will display to protect
your password from prying eyes.
Tips
Your log in process will be different if the <Ctrl> +
<Alt> + <Delete> or Welcome screens are not
turned on.
Exercise
• Exercise File: None required.
• Exercise: Log in to your account in Windows 7.
Figure 1-1: The Welcome screen.
The Fundamentals
14 © 2009 CustomGuide, Inc.
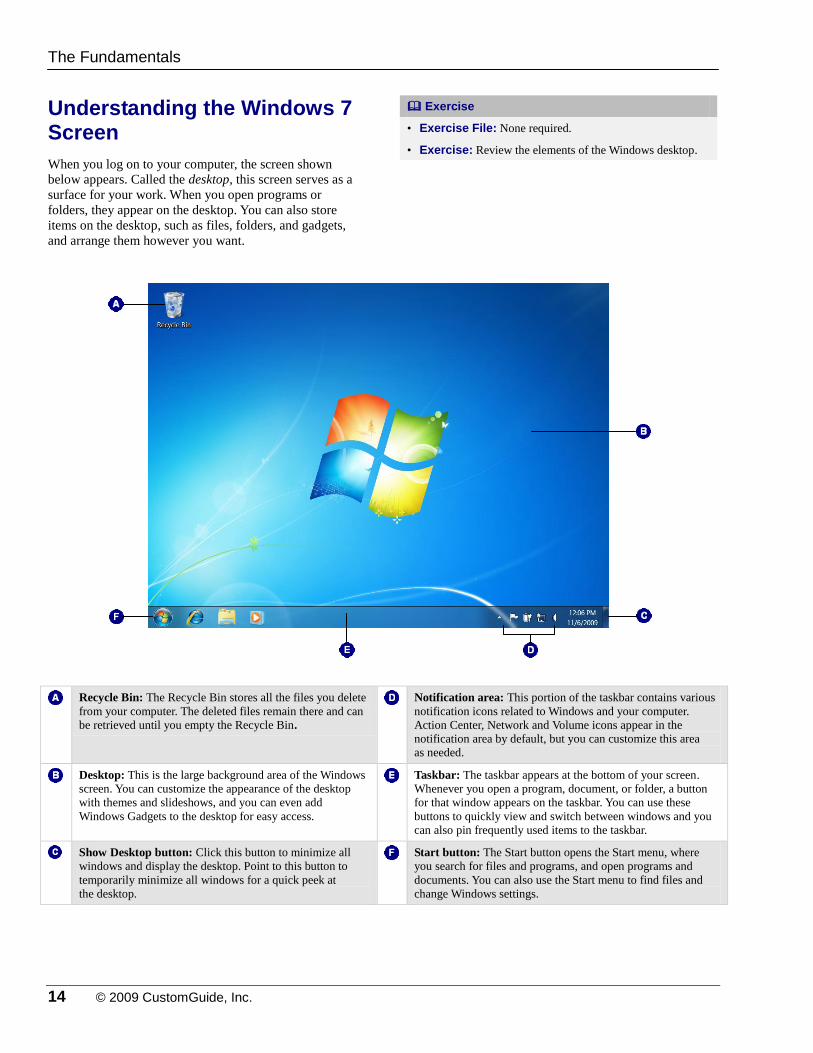
Understanding the Windows 7 Screen
When you log on to your computer, the screen shown
below appears. Called the desktop, this screen serves as a
surface for your work. When you open programs or
folders, they appear on the desktop. You can also store
items on the desktop, such as files, folders, and gadgets,
and arrange them however you want.
Recycle Bin: The Recycle Bin stores all the files you delete
from your computer. The deleted files remain there and can
be retrieved until you empty the Recycle Bin.
Notification area: This portion of the taskbar contains various
notification icons related to Windows and your computer.
Action Center, Network and Volume icons appear in the
notification area by default, but you can customize this area
as needed.
Desktop: This is the large background area of the Windows
screen. You can customize the appearance of the desktop
with themes and slideshows, and you can even add
Windows Gadgets to the desktop for easy access.
Taskbar: The taskbar appears at the bottom of your screen.
Whenever you open a program, document, or folder, a button
for that window appears on the taskbar. You can use these
buttons to quickly view and switch between windows and you
can also pin frequently used items to the taskbar.
Show Desktop button: Click this button to minimize all
windows and display the desktop. Point to this button to
temporarily minimize all windows for a quick peek at
the desktop.
Start button: The Start button opens the Start menu, where
you search for files and programs, and open programs and
documents. You can also use the Start menu to find files and
change Windows settings.
Exercise
• Exercise File: None required.
• Exercise: Review the elements of the Windows desktop.
The Fundamentals

IT Services, University of Wolverhampton 15
Using the Mouse: Pointing, Clicking, and Double-clicking
Just like you control your television set using a remote
control, you control Windows by using the mouse. A
mouse is a palm-sized device that lets you point to, select,
and move objects on your computer screen. The mouse is
linked to the pointer on your computer screen—when you
move the mouse on your desk, the pointer moves on the
computer screen. Think of the mouse as an electronic
extension of your hand. This lesson will show you how to
perform the most basic mouse actions.
Point
Pointing is the most basic action you can do with the
mouse. To point to something, simply place the mouse
pointer over it by moving the mouse.
Move the mouse so that the pointer hovers above the
object.
A screen tip appears with a description of the object.
Click
Clicking means pressing and releasing the left mouse
button. The mouse makes a clicking noise whenever you
press and release one of its buttons, hence the term
“clicking”. The next steps will show you how to open the
Start menu by clicking it. Also, Table 1-4: Click When
You Want To… describes different times when you will
want to click.
1. Point to the object.
2. Press and release the left mouse button.
Tip: Most mice have two buttons. You will
use the left mouse button whenever you see
the words click or double-click. The right
mouse button has its own purpose, which
we’ll discuss in an upcoming lesson.
Exercise
• Exercise File: None required.
• Exercise: Point to the Start button and view its screen tip.
Click the Start button to open the Start menu and close the
menu without selecting anything. Double-click the Recycle
Bin to open it.
Figure 1-2: A screen tip appears when an object is
pointed at with the mouse pointer.
Table 1-4: Click When You Want To…
Select something.
Open a menu.
Press a button on a toolbar or a control in a dialog box.
Move to the area or field you want in a program or dialog box.
The Fundamentals
“Click”
Click Press and release the left mouse button.

16 © 2009 CustomGuide, Inc.
Double-click
Double-clicking means pressing and releasing the mouse
button twice in rapid succession. You will usually open an
object, such as a file or folder, by double-clicking it. See
Table 1-5: Double-click When You Want To… to find out
when you will need to double-click.
Point to the object and click the mouse button twice
in rapid succession.
Tip: A lot of people have problems the first time
they try double-clicking. If your double-click
doesn’t seem to work, it’s probably because
you’re either not holding the mouse steady, or
you’re not clicking fast enough. If you press the
mouse button too hard, you may accidentally slide
the mouse and your double-click won’t register.
Table 1-5: Double-click When You Want To…
Open a file.
Open a folder.
Display the properties or settings for an object (in certain
programs).
The Fundamentals
Double-click Quickly press and release the left mouse button twice, in rapid succession.
“Click” “Click”

IT Services, University of Wolverhampton 17
Using the Mouse: Clicking and Dragging, and Right-clicking
This lesson shows you mouse commands that are a little
more advanced: clicking and dragging, and right-clicking.
Click and drag
You can move items around your computer screen by
clicking and dragging them with the mouse. See Table
1-6: Things You Can Click and Drag to learn about items
you can click and drag.
Point to the object and click. While holding down the
mouse button, drag the object to the desired location
on the screen. Release the mouse button.
Right-click
Whenever you right-click something, it brings up a
shortcut menu that lists everything you can do to the
object. Whenever you’re unsure or curious about what
you can do with an object, point to it and click it with the
right mouse button. A contextual menu will appear with a
list of commands related to the object or area you
right-clicked.
1. Point to the object and click the right mouse button.
A contextual menu of commands that are related to
the object appears.
2. Select a command from the contextual menu with the
left mouse button.
The selected command is issued.
Tip: To close the contextual menu without
selecting a command, click anywhere outside the
contextual menu.
Exercise
• Exercise File: None required.
• Exercise: Right-click the Recycle Bin icon on the desktop
and click Open from the contextual menu. Click the Close
button in the Recycle Bin window to close it. Click and drag
the Recycle Bin icon to the middle of the desktop.
Table 1-6: Things You Can Click and Drag
Do this… By doing this…
Move a window to a
new location on the
screen.
Drag the window by its title bar and
drop it in a new location on the screen.
Move a file to a new
folder.
Drag the file and drop it in the desired
folder.
Change the size of a
window.
Drag the borders or corners of the
window.
Scroll a window to see
something located off-
screen.
Drag the scroll box (the little elevator)
up or down the scroll bar and drop it
in a new location.
Move just about
anything on your
computer’s screen.
Point to the object, click, and hold
down the mouse button, drag the
object to a new place, and then release
the mouse button.
The Fundamentals
Click
Place the pointer over an object and press and hold down the left mouse button.
Drag While you are still holding down the button, move the mouse to where you want to place the object and then release the mouse button.

18 © 2009 CustomGuide, Inc.
Using the Keyboard
Now that you’ve mastered the mouse, it’s time to move
on to the other device that you use to control your
computer: the keyboard. The keyboard may seem more
familiar and easy to use than the mouse at first, but don’t
be fooled! Computer keyboards sneak in some extra keys
that are very useful. This lesson explains what these extra
keys on the keyboard are and when to use them.
Tips
Check the menus of programs for shortcuts. If a letter
is underlined in a menu, that usually means that
pressing the <Alt> key in combination with the
underlined key will have the same effect as clicking
that menu item.
Use a keystroke shortcut
Keystroke shortcuts are alternative ways to give
commands. In many cases, they are much faster and
easier to use than clicking a button or selecting commands
from a menu. For example, the keystroke commands to
copy, cut, and paste are great time savers.
Press and hold down the first key, press the second
key, then release both keys.
The command is given.
Exercise
• Exercise File: None required.
• Exercise: Press <Ctrl> + <Alt> + <Delete> and start the
Task Manager. Close the Task Manager.
The Fundamentals

IT Services, University of Wolverhampton 19
Special keys and their functions
Refer to Table 1-7: Special Keys and Their Functions for
descriptions of some special keys.
Table 1-7: Special Keys and Their Functions
Windows logo key
Press to open the Start menu, and use with other keys to issue commands. Windows 7 has many
timesaving and user-friendly commands that use this key.
Alt
The <Alt> key doesn’t do anything by itself—it needs another key to make things happen. For example,
pressing the <Tab> key while holding down the <Alt> key switches between any programs that are
currently running.
Ctrl
Just like the <Alt> key, the <Ctrl> key doesn’t do anything by itself—you need to press another key
along with it to make things happen. For example, pressing the <X> key while holding down the <Ctrl>
key cuts whatever is selected.
F1
The <F1> key is the Help key for most programs. Pressing it displays helpful information about what
you’re doing and answers your questions about the program.
Esc
The <Esc> (Escape) key is the “Wait, I’ve changed my mind!” key. Its function is the same as clicking
Cancel in a dialog box. For example, if you click something and an unfamiliar dialog box appears, you
can close it by pressing the <Esc> key.
Enter
The <Enter> key is the “Carry out my orders” key. Its function is the same as clicking OK in a dialog
box. For example, after you’ve typed the name of a program you want to run in a dialog box, press
<Enter> to run the program. The <Enter> key also adds new lines and starts new paragraphs if you’re
entering text.
Tab
When you’re in a dialog box, pressing the <Tab> key moves to the next field. When you’re using a word
processor, the <Tab> key works just like you’d think it would: it jumps to the nearest tab stop whenever
you press it.
Arrow Keys
The arrow keys move your computer’s cursor on the screen.
Delete
Nothing surprising here. The <Delete> key deletes or erases whatever you select—files, text, or
graphical objects. If you’re working with text, the <Delete> key erases characters to the right of the
insertion point.
Backspace
Use the <Backspace> key to fix your typing mistakes—it erases characters to the left of the insertion
point.
The Fundamentals

20 © 2009 CustomGuide, Inc.
Understanding the Start Menu
When you want to start working on something, the Start
menu is the first place you will go. As the gateway to your
computer, use the Start menu to access your computer’s
programs, files, and settings.
The Start menu has three important parts:
Left pane The left pane displays a list of commonly used
programs. Click All Programs to view a complete list
of programs installed on your computer.
Search box Allows you to instantly search for files and programs
on your computer. It searches file names and contents
of files that match the search term. The left pane
displays search results as you type.
Right pane Commonly used folders are listed here, such as
Documents and Pictures. You can also access
computer settings and turn off the computer here.
View the Start menu
Click the Start button on the taskbar or press the
< > key.
The Start menu appears.
Exercise
• Exercise File: None required.
• Exercise: Open the Start menu and explore its contents.
Figure 1-3: The Start menu.
The Fundamentals
Windows keeps track of the programs you use most often and makes them available here for easy access. Simply click a program icon to open it.
The right pane of the Start menu gives you quick access to your documents, files, and system settings.
Shut down, sleep, or lock your computer here.
Search box
Click here to view a list of all programs installed on your computer.
IT Services, University of Wolverhampton 21
Table 1-8: Items in the Start Menu
Lef
t p
an
e
Frequently Used
Programs
Gives you quick access to the programs you use most often. If a program doesn’t appear here you will
have to look under “All Programs”.
All Programs Gives you access to all the programs installed on your computer, although you may have to wade
through several submenus in order to find the program you’re looking for.
Search Search your computer for files, folders, or programs.
Rig
ht
pan
e
User Open folders that contain items unique to your account, such as Contacts, Favorites, and My
Documents.
Documents Opens the Documents library.
Pictures Opens the Pictures library.
Music Opens the Music library.
Games Opens Games Explorer.
Computer Provides access to the drives, folders, and files on your computer.
Control Panel Opens the Control Panel.
Devices and Printers Manage the devices and printers connected to your computer.
Default Programs Modify the default programs that handle certain activities on your computer.
Help and Support Opens Windows Help.
Shut down Click the list arrow for other power options, including Log Off and Restart.
The Fundamentals
22 © 2009 CustomGuide, Inc.
Using Help and Support
When you don’t know how to do something in
Windows 7, look up your question in the Help and
Support files. The Help and Support files can answer your
questions, offer tips, and provide help for all of the
features in Windows 7.
Search for help
1. Click the Start button on the taskbar and select Help
and Support from the right pane.
The Help and Support window appears.
Other Ways to Open the Help and Support
Window: Press <F1>. (This only works if no other
programs are open. Otherwise, <F1> will open the
Help files for another program.)
2. Type what you want to search for in the Search Help
box near the top of the window and press <Enter>.
A list of results related to the help topics appears.
3. Click the topic that best matches the topic you’re
trying to learn more about.
Information regarding the selected topic is displayed.
Browse for help
If you’re not totally sure what you’re looking for,
browsing the Help files is a great way to learn more about
your computer.
1. Click the Start button on the taskbar and select Help
and Support from the right pane.
The Help and Support window appears.
There are three categories of help topics that you can
access from the Home page of Help and Support:
How to get started with your computer: Help
topics include features that get you started with
your computer, such as adding users, backing up
files, and personalizing Windows.
Learn about Windows Basics: Includes topics
on basic computer functions, such as hardware
(mouse and keyboard), overviews of the Windows
desktop, and more.
Browse Help topics: Includes all help topics,
organized by related category.
Exercise
• Exercise File: None required.
• Exercise: Search a topic of your desire using Windows
Help and Support, or just browse the files.
Figure 1-4: The Windows Help and Support window.
Table 1-9: Help Buttons
Back
Click here to move back to the
previous help topic.
Forward
Click here to move forward to
the next help topic.
Home
Click here to return to the Help
home page.
Click here to print the current
help topic.
Browse Help
Click here to browse for help
using the Table of Contents.
Learn about
other
support
options
Click here to ask for help
through Remote Assistance or
expand your search.
Options
Click here to change how the
Help window works and is
displayed.
The Fundamentals

IT Services, University of Wolverhampton 23
2. Click a link to view and browse help topics.
Help and Support displays the help topics that you
can browse.
Tips
You can also use the “Ask someone” section of Help
and Support to ask questions of a friend or co-worker
through Remote Assistance, use the resources of
Windows communities, or contact Microsoft
Customer Support.
The Fundamentals

24 © 2009 CustomGuide, Inc.
Turning Off Your Computer
When you’ve finished using your computer, it’s important
to turn it off properly. This ensures that files are saved
correctly and your computer stays secure. It also makes
the process of restarting the computer faster.
Shut down your computer
When you shut down your computer, all programs and
windows are closed, along with Windows. The power to
your computer and display are turned off as well.
1. Click the Start button and click the Shut down
button in the right pane of the Start menu.
Windows automatically closes any files or programs
that are open, and shuts off the power and display.
Power will be restored and Windows will restart
when you press the Power button on your computer.
Tip: Make sure all of your files are saved before
you shut down.
Use sleep mode
Sleep mode is an alternative to shutting down. In sleep
mode, the computer continues to run at a very low power
so you can leave all of your programs and windows open
and immediately pick up where you left off when you
return to your computer.
1. Click the Start button and click the Shut down
button list arrow in the lower-right corner of the
Start menu.
A menu of options appears. Refer to Table 1-10:
Power Modes for more information on the available
power modes.
2. Select Sleep from the menu.
The computer enters sleep mode. When in sleep
mode, your computer is in a very low power setting
that allows you to leave programs and files open.
Tip: Make sure all of your files are saved before
you use sleep mode.
3. Press the power button on your computer to wake
it up.
The computer display appears as it did before you put
your computer into sleep mode.
Exercise
• Exercise File: None required.
• Exercise: Put your computer in sleep mode, then wake it
up and begin using it again.
Figure 1-5: The Shut down button menu in the right pane of the Start menu.
Table 1-10: Power Modes
Switch
User
Allows you to work with several accounts on
the computer at the same time.
Log Off This option appears only if your computer is
connected to a network. This option closes all
your programs and disconnects your computer
from the network, preparing your computer to
be used by someone else
Lock Locks the computer so your password is
required to unlock it.
Restart Shuts down all programs and windows, shuts
down the computer, and restarts it again. Try
this if your computer is acting up.
Sleep This is the default power setting. Keeps all
programs and files open on your desktop so you
can jump in where you left off.
Hibernate Hibernate goes one step further than sleep,
allowing you to keep programs and documents
open while shutting off power completely.
Hibernate saves your desktop status to the hard
disk which allows power to be turned off.
Shut Down Select this option to turn your computer off. It
saves your Windows settings and saves any
information stored in memory to the local disk.
The Fundamentals

IT Services, University of Wolverhampton 25
Tips
Microsoft recommends that you always put your
computer in sleep mode when you are finished using
it. Use Shut Down for when you are installing new
hardware or a device that does not connect to a
USB port.
You may have to log in to your account from the
Welcome screen upon waking up the computer. This
is a security measure.
The Fundamentals

26 © 2009 CustomGuide, Inc.
TThhee FFuunnddaammeennttaallss RReevviieeww
Quiz Questions
1. An operating system: A. Organizes files. B. Controls the computer's hardware. C. Runs the computer's programs. D. All of these.
2. Which of the following is NOT a new feature in Windows 7? A. Jump Lists B. Windows Search C. Aero Peek D. Libraries
3. What does the <Ctrl> + <Alt> + <Delete> screen do? A. It's a defense against hackers or worms that might try to hack into your computer while you're not using it. B. Restarts your computer. C. Logs into a guest user account. D. Opens the Network Security dialog box.
4. What happens when you point at an object? A. The object is selected. B. A screen tip with a description of the object appears. C. The object is opened. D. The object is deleted.
5. You can move an object with click and drag. (True or False?)
6. To display a contextual menu for an object, do the following: A. Point to the object and press <Ctrl> + <C>. B. Right-click the object. C. Touch the object on-screen with your finger. D. Click the object.
7. A keystroke shortcut is: A. A way to lock your computer to prevent unauthorized access. B. Using the keyboard in conjunction with the mouse. C. A type of hopscotch. D. Pressing two or more keys at the same time, like pressing <Shift> with <Tab>.
8. Where are the most commonly used programs in the Start menu? A. Middle B. Right pane C. Search box

IT Services, University of Wolverhampton 27
D. Left pane
9. What key can you press to get help? A. <F1> B. <Home> C. <Ctrl> + <H> D. <Esc>
10. Which of these statements is false? A. When you click the Shut down button in the Start menu, the computer enters sleep mode. B. When you click the Shut down button in the Start menu, the computer shuts down. C. When you shut down the computer, all your windows and programs are closed, and power to the display and
computer is turned off. D. When your computer is asleep, it runs in a low power mode so that windows and programs remain open until you
wake up the computer.
Quiz Answers
1. D. An operating system controls the computer's hardware, runs programs, and organizes files.
2. B. Windows Search is not a new feature in Windows 7.
3. A. The <Ctrl> + <Alt> + <Delete> screen is a defense against hackers or worms that might try to access your
computer while you're not using it.
4. Most of the time, a description is revealed when you point at an object.
5. True. Click and drag an object, like a window or an icon, to move it.
6. B. Right-clicking most objects in Windows displays a list of options for the object.
7. D. A keystroke shortcut is when you press two or more keys at the same time.
8. D. The most commonly used programs are in the left pane of the Start menu.
9. A. Press the <F1> key to open Help and Support.
10. A. When you click the Shut down button in the Start menu, the computer shuts down. You must click the list arrow
and select Sleep to enter sleep mode.
28 © 2009 CustomGuide, Inc.
WWoorrkkiinngg wwiitthh aa
WWiinnddooww
Understanding the Parts of a Window ............. 29
Using Windows Aero ......................................... 31 Aero Peek ................................................ 31 Aero Shake .............................................. 31 Snap......................................................... 32
Using Window Sizing Buttons .......................... 33 Maximize a window .................................. 33 Restore a maximized window .................. 33 Minimize a window ................................... 33 Restore a minimized window ................... 34
Moving and Resizing a Window ....................... 35 Move a window ........................................ 35 Resize a window ...................................... 35
Switching Between Windows ........................... 36 Taskbar buttons ....................................... 36 Flip 3D...................................................... 36 Jump to a window .................................... 37
Arranging Windows Automatically .................. 38 Show the desktop .................................... 38
Closing a Window .............................................. 39
No doubt about it: computers are
sophisticated, complex machines. To
make computers easier to use, Microsoft
designed Windows to operate similar to
how you work at the desk in your office.
When you work at your desk, you spread
everything out, grab a piece of paper,
work on it for a while, and then shuffle
another piece of paper on top of it. That’s
how Windows works, except instead of
working with papers, you work with
windows—boxes that contain programs
and information.
You can shuffle these windows around the
screen just like you shuffle papers on your
desk—which is why the main Windows
screen is called the desktop. Just like your
desk, if you’re working with a lot of
things at the same time, the Windows
desktop can become messy and it can be
very difficult to find things.
This chapter explains how to manage the
windows and programs on your screen.
First, you’ll learn how to open a window.
Next, you’ll discover the parts that
constitute a window (which are A LOT
different than the ones on your house).
Then you’ll learn how to change the size
of a window—minimizing it to a little
button that appears only on the taskbar
and maximizing it so that it fills the entire
screen. You’ll also learn how to “shuffle”
windows around, sending some to the
background and bringing others to the
forefront. Let’s get started!
2

IT Services, University of Wolverhampton 29
Understanding the Parts of a Window
Most windows have the same basic parts, whether they
are displaying a program, file, or folder.
To open a program window, click the Start button,
select All Programs, and click the program you want
to open.
To open Windows Explorer, click the Windows
Explorer button on the taskbar or press < > + <E>.
Take a look at the diagrams below for an overview of
these windows.
Title bar: Displays the name of the program or window,
and the name of the document or file that’s being used. Ribbon: Controls what the program does. The commands
displayed on the Ribbon change from program to program, but
the Ribbon’s location doesn’t—it’s always perched at the top of
a window, right below the title bar.
Minimize button: Hides the window from your screen but
still runs it in your computer’s memory, ready for quick use.
You can minimize a window you’re not using so that it is
still running but is hidden in the taskbar.
Border: Click and drag a border or corner of a window to
change its size.
Maximize/Restore button: Depending on the size of the
window, this button toggles between maximize and restore. Zoom controls: Click and drag the zoom slider to zoom in or
out of the document area.
Close button: Closes the window or program when you’re
finished working with it, removing it from the screen and
the computer’s memory.
Status bar: Displays information about the document, window,
or program being used.
Exercise
• Exercise File: None required.
• Exercise: Open a window and identify its parts.
Working with a Window
Parts of a program window

30 © 2009 CustomGuide, Inc.
Back/Forward buttons: Jump back/forward to locations
you have previously visited. Border: Click and drag a border or corner of a window to
change its size.
Address bar: As you navigate, the file path is shown in the
Address bar. Each location in the path is a link; click the
link to open it in the window.
Details pane: Displays common properties associated with the
selected drive, library, folder, or file.
Folder list: Displays the contents of the selected drive,
library, or folder. Double-click an item to open it. Navigation pane: Displays the drives, libraries, and folders on
your computer. Click the tiny arrow to the left of an item to
expand it, and then click the drive/folder you want to view.
Scroll bar: There are both vertical and horizontal scroll
bars; use them to move around in the window and view
more information.
Command bar: Here you can access common commands
related to the selected drive, library, folder, or file. Options
change according to the item that is selected.
Working with a Window
Parts of the Windows Explorer window
IT Services, University of Wolverhampton 31
Using Windows Aero
The Windows Aero user interface was introduced in
Windows Vista. It returns in Windows 7, but with many
new functions and features.
Tips
Before completing this lesson, check to make sure
Windows Aero is enabled on your system. Right-
click the desktop, select Personalize, and ensure that
the Windows 7 theme, located under Aero Themes, is
selected.
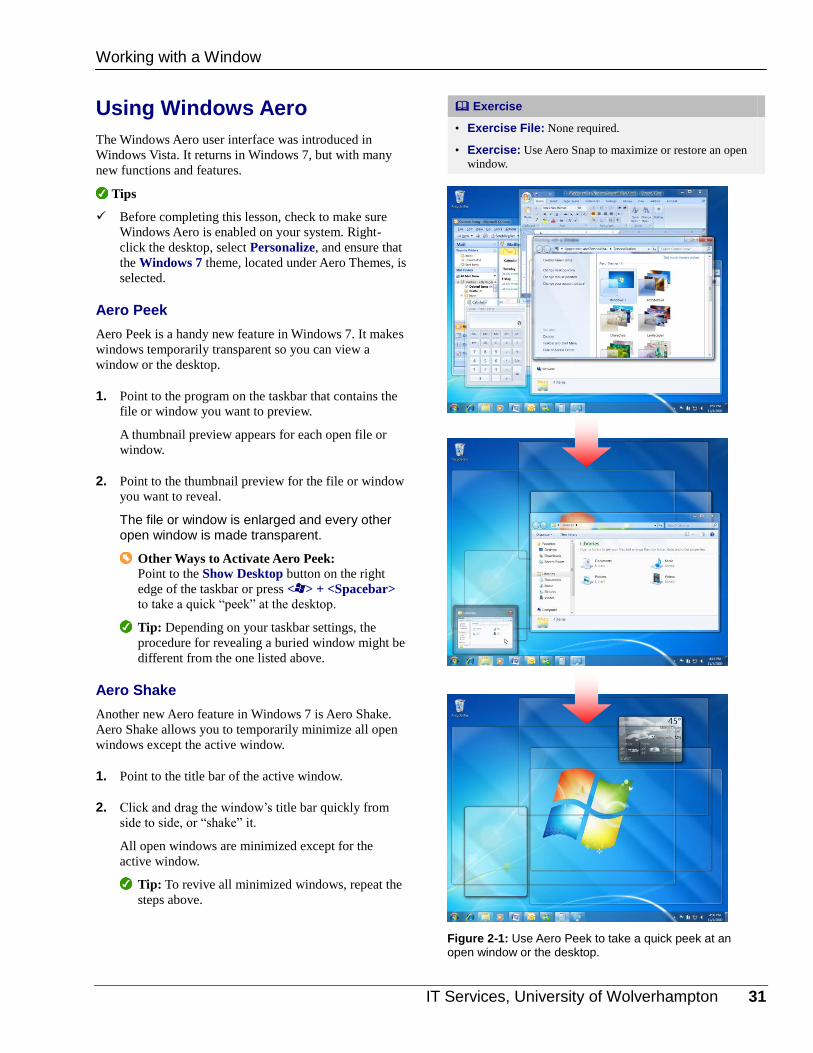
Aero Peek
Aero Peek is a handy new feature in Windows 7. It makes
windows temporarily transparent so you can view a
window or the desktop.
1. Point to the program on the taskbar that contains the
file or window you want to preview.
A thumbnail preview appears for each open file or
window.
2. Point to the thumbnail preview for the file or window
you want to reveal.
The file or window is enlarged and every other open window is made transparent.
Other Ways to Activate Aero Peek: Point to the Show Desktop button on the right
edge of the taskbar or press < > + <Spacebar>
to take a quick “peek” at the desktop.
Tip: Depending on your taskbar settings, the
procedure for revealing a buried window might be
different from the one listed above.
Aero Shake
Another new Aero feature in Windows 7 is Aero Shake.
Aero Shake allows you to temporarily minimize all open
windows except the active window.
1. Point to the title bar of the active window.
2. Click and drag the window’s title bar quickly from
side to side, or “shake” it.
All open windows are minimized except for the
active window.
Tip: To revive all minimized windows, repeat the
steps above.
Exercise
• Exercise File: None required.
• Exercise: Use Aero Snap to maximize or restore an open
window.
Figure 2-1: Use Aero Peek to take a quick peek at an open window or the desktop.
Working with a Window

32 © 2009 CustomGuide, Inc.
Snap
Probably the most useful of the new Aero features, Snap
is a quick way to maximize, compare, and restore open
windows, simply by clicking and dragging.
To Maximize an Open Window: Click and drag
the window’s title bar to the top of the screen, or
double-click the window’s title bar, or press < >
+ <↑>.
To Compare Open Windows Side by Side:
Click and drag the window’s title bar to the left or
right side of the screen, or press < > + <←> or
<→>.
To Restore a Maximized or Compared
Window: Click and drag the window’s title bar
toward the middle of the screen, or double-click
the window’s title bar, or use the < > + <arrow
keys>.
Working with a Window

IT Services, University of Wolverhampton 33
Using Window Sizing Buttons
One of the benefits of Windows is that it enables you to
open and work with several windows at the same time. To
make this easier, you can change the size of the windows.
You can maximize, or enlarge, a window so it takes up the
entire screen; or minimize, or reduce, a window so that it
only appears as a button on the taskbar. This lesson
explains how to change the size of a window by
maximizing, minimizing, and restoring.
Maximize a window
Maximizing a window enlarges the window so that it fills
the entire screen.
Click the Maximize button on the title bar.
The window fills the computer screen.
Tip: If the Maximize button is not available, the
window is already maximized.
Other Ways to Maximize a Window:
Double-click the title bar or press < > + <>.
Restore a maximized window
You can change a maximized window back to its original
size by clicking the Restore button. The Restore button
appears in place of the Maximize button whenever a
window is already in a maximized state.
Click the Restore Down button on the title bar.
The maximized window returns to its original size.
Tip: If the Restore Down button is not available,
the window is not in its maximized state.
Other Ways to Restore a Maximized Window:
Double-click the title bar or press < > + <>.
Minimize a window
You can tuck windows away—keeping them running and
ready for use, yet out of view—by minimizing them.
Click the Minimize button on the title bar.
The window shrinks to a button located on the
taskbar. The window is still open and running—it’s
just hidden from view, ready for future use.
Other Ways to Minimize a Window:
Press < > + <>.
Exercise
• Exercise File: WordPad window.
• Exercise: Maximize the WordPad window then restore it
to its original size. Minimize the WordPad window and
open it again from the taskbar.
Table 2-1: Window buttons
Maximize
Minimize
Restore Down
Figure 2-2: A maximized window fills the entire screen.
Figure 2-3: A window restored to its original size.
Working with a Window

34 © 2009 CustomGuide, Inc.
Restore a minimized window
It’s easy to display a minimized program or window when
you’re ready to use it again.
Click the window’s button on the taskbar.
The window appears on the screen.
Working with a Window
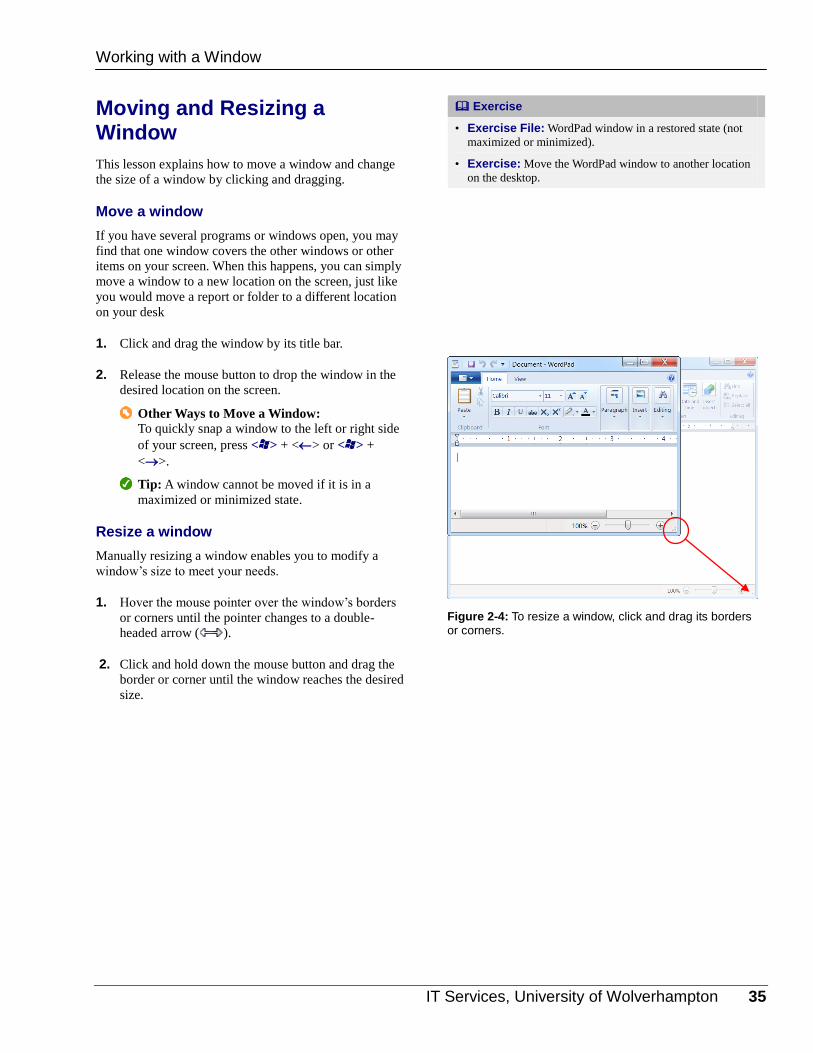
IT Services, University of Wolverhampton 35
Moving and Resizing a Window
This lesson explains how to move a window and change
the size of a window by clicking and dragging.
Move a window
If you have several programs or windows open, you may
find that one window covers the other windows or other
items on your screen. When this happens, you can simply
move a window to a new location on the screen, just like
you would move a report or folder to a different location
on your desk
1. Click and drag the window by its title bar.
2. Release the mouse button to drop the window in the
desired location on the screen.
Other Ways to Move a Window: To quickly snap a window to the left or right side
of your screen, press < > + <> or < > +
<>.
Tip: A window cannot be moved if it is in a
maximized or minimized state.
Resize a window
Manually resizing a window enables you to modify a
window’s size to meet your needs.
1. Hover the mouse pointer over the window’s borders
or corners until the pointer changes to a double-
headed arrow ( ).
2. Click and hold down the mouse button and drag the
border or corner until the window reaches the desired
size.
Exercise
• Exercise File: WordPad window in a restored state (not
maximized or minimized).
• Exercise: Move the WordPad window to another location
on the desktop.
Figure 2-4: To resize a window, click and drag its borders or corners.
Working with a Window

36 © 2009 CustomGuide, Inc.
Switching Between Windows
You can have several programs or windows open and
running simultaneously, but you can only work in one
window at a time. The window you’re working with is
called the active window and always appears on top of
any other windows that you have open. If you think about
it, you do the same thing at your desk. When you want to
work on a piece of paper, you place it on top of
everything else.
This lesson shows you how to manage multiple windows
so you can get to the window you want more quickly.
Taskbar buttons
All open windows are represented by taskbar buttons.
Switching between windows by clicking its taskbar button
is fast and easy.
Click the window’s taskbar button to make it active.
The window becomes the active window.
Other Ways to Activate a Window: Click any part of the window you want to make
active.
Tip: If several windows of the same type are
open, Windows will group them into one taskbar
button to conserve space. For example, if you
have several WordPad documents open, a Live
Preview thumbnail-sized window appears when
you click on or point to the WordPad taskbar
button.
Flip 3D
Flip 3D is a great way to quickly preview all your open
windows. Flip through the stack of windows until the
window you want to make active appears on top.
1. Press the < > + <Tab>.
Flip 3D opens and the windows are shown in a stack.
2. Hold down the < > and press <Tab> to cycle
through the windows.
A preview of the window appears as you cycle
through the stack.
Other Ways to Cycle through Flip 3D: After starting Flip 3D, press the < > key while
rotating the mouse wheel.
Exercise
• Exercise File: Have the WordPad program window, the
Documents folder window, and an Internet Explorer
window open. You may have other windows open as well.
• Exercise: Use the taskbar buttons to make each window
active. Use Flip 3D and flip through the stack of open
windows. Press <Alt> + <Tab> and cycle through the
windows as a list.
Figure 2-5: Working with taskbar buttons.
Working with a Window
Multiple open windows grouped into one taskbar button have a “stacked” appearance.
Click a window thumbnail to open the window.

IT Services, University of Wolverhampton 37
3. Release < > to make the window in front of the
stack active. Or, click a window in the stack to make
it active.
Flip 3D closes and the window is displayed as the
active window on the desktop.
Tips
To keep Flip 3D open without holding down the
Windows logo key, press <Ctrl> + < > + <Tab>.
Use Tab, the mouse wheel, or arrow keys to cycle
through windows. Press <Esc> to close Flip 3D.
Jump to a window
You can also jump to another open window using <Alt> +
<Tab>. This method displays a list and thumbnails of the
open windows on your computer.
1. Press <Alt> + <Tab>.
A list of the open windows appears. Each window is
represented by a thumbnail preview.
2. Hold down the <Alt > key: press <Tab> to cycle
forward through the windows; <Shift> + <Tab> to
cycle backward.
3. Release the <Alt > key to make the selected window
active.
The selected window is displayed as the active
window on the desktop.
Tips
Press <Ctrl> + <Alt> + <Tab> to keep the list open
and use <Tab>, the mouse wheel, or the arrow keys
to cycle through the windows. Press <Enter> to
make the selected window active, press <Esc> to
close without changing windows.
<Alt> + <Tab> and Flip 3D are especially useful
when you use programs that fill the entire computer
screen. When you can’t see the taskbar or any part of
another window, these methods are the only way you
can switch between programs and windows.
Figure 2-6: Pressing <Alt> + <Tab> displays thumbnails of
all open windows.
Working with a Window
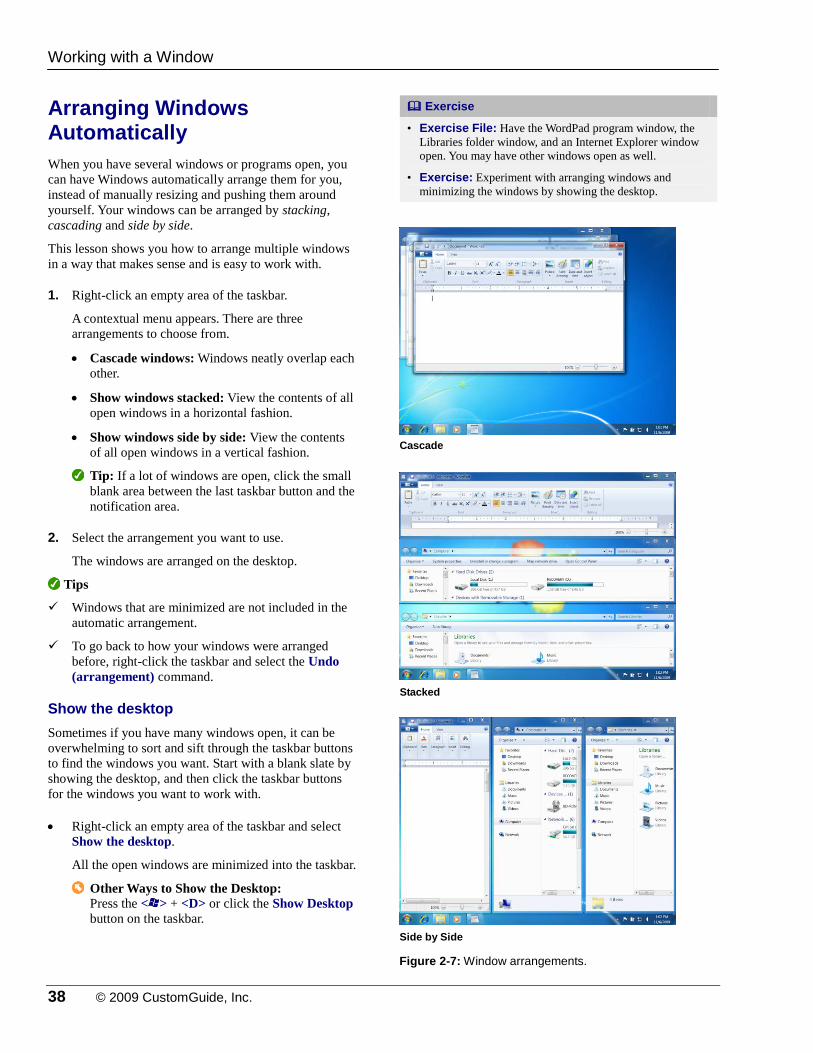
38 © 2009 CustomGuide, Inc.
Arranging Windows Automatically
When you have several windows or programs open, you
can have Windows automatically arrange them for you,
instead of manually resizing and pushing them around
yourself. Your windows can be arranged by stacking,
cascading and side by side.
This lesson shows you how to arrange multiple windows
in a way that makes sense and is easy to work with.
1. Right-click an empty area of the taskbar.
A contextual menu appears. There are three
arrangements to choose from.
Cascade windows: Windows neatly overlap each
other.
Show windows stacked: View the contents of all
open windows in a horizontal fashion.
Show windows side by side: View the contents
of all open windows in a vertical fashion.
Tip: If a lot of windows are open, click the small
blank area between the last taskbar button and the
notification area.
2. Select the arrangement you want to use.
The windows are arranged on the desktop.
Tips
Windows that are minimized are not included in the
automatic arrangement.
To go back to how your windows were arranged
before, right-click the taskbar and select the Undo
(arrangement) command.
Show the desktop
Sometimes if you have many windows open, it can be
overwhelming to sort and sift through the taskbar buttons
to find the windows you want. Start with a blank slate by
showing the desktop, and then click the taskbar buttons
for the windows you want to work with.
Right-click an empty area of the taskbar and select
Show the desktop.
All the open windows are minimized into the taskbar.
Other Ways to Show the Desktop: Press the < > + <D> or click the Show Desktop
button on the taskbar.
Exercise
• Exercise File: Have the WordPad program window, the
Libraries folder window, and an Internet Explorer window
open. You may have other windows open as well.
• Exercise: Experiment with arranging windows and
minimizing the windows by showing the desktop.
Figure 2-7: Window arrangements.
Working with a Window
Cascade
Stacked
Side by Side
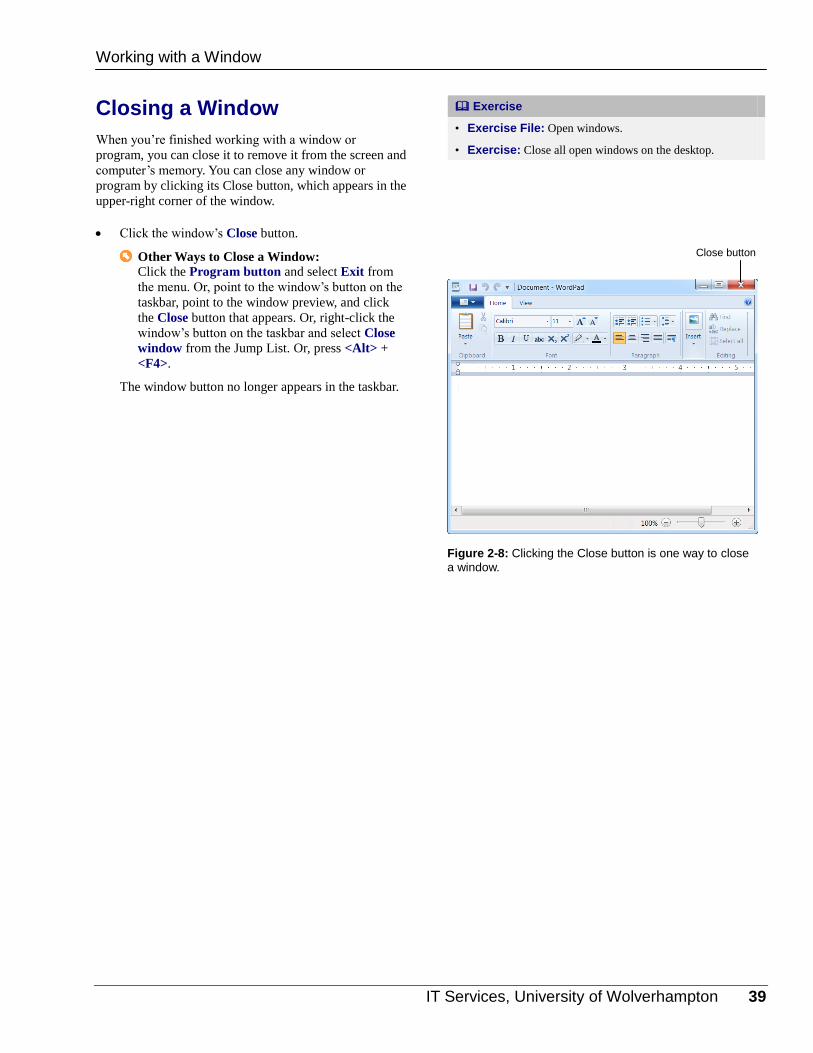
IT Services, University of Wolverhampton 39
Closing a Window
When you’re finished working with a window or
program, you can close it to remove it from the screen and
computer’s memory. You can close any window or
program by clicking its Close button, which appears in the
upper-right corner of the window.
Click the window’s Close button.
Other Ways to Close a Window: Click the Program button and select Exit from
the menu. Or, point to the window’s button on the
taskbar, point to the window preview, and click
the Close button that appears. Or, right-click the
window’s button on the taskbar and select Close
window from the Jump List. Or, press <Alt> +
<F4>.
The window button no longer appears in the taskbar.
Exercise
• Exercise File: Open windows.
• Exercise: Close all open windows on the desktop.
Figure 2-8: Clicking the Close button is one way to close
a window.
Working with a Window
Close button

40 © 2009 CustomGuide, Inc.
WWoorrkkiinngg wwiitthh aa WWiinnddooww RReevviieeww
Quiz Questions
11. The area that displays the program or folder name and is found at the top of a window is called the: A. Windows bar B. Title bar C. Program bar D. Very-top-of-the-window bar
12. Use Aero Snap to: A. Take a quick peek at the desktop. B. Maximize a window. C. Minimize all open windows except the active window. D. None of the above.
13. You start your favorite word processing program to type a letter, but the program appears in a window that's too small
to use. How can you maximize the window so it fills the entire screen? A. Click the Maximize button located in the right side of the window's title bar. B. Select Window > Full Screen from the menu. C. Click the program's button on the taskbar. D. Click the window's title bar.
14. You can restore a minimized window by clicking its button on the taskbar. (True or False?)
15. How do you move a window on the Windows desktop? A. Select the window and use the keyboard arrow buttons to move the window. B. Select File > Move from the menu. C. You can't move a window. D. Click and drag the window by its top border to a new location on the screen.
16. To change the size of a window, click and drag by the window's borders or corners. (True or False?)
17. Which of the following won't allow you to switch between windows? A. Use <Alt> + <Tab> to scroll through a list of open windows. B. Click the program's button on the taskbar. C. Click the window icon in the notification area. D. Use Flip 3D to preview open windows.
18. Cascaded windows are arranged so that you can view the content of all the windows at the same time. (True or False?)
19. When you use the Show the Desktop arrangement, all open windows are closed. (True or False?)
20. Close a window by clicking the Close button. (True or False?)
IT Services, University of Wolverhampton 41
Quiz Answers
11. B. The Title bar appears at the top of a window and displays the name of the program or folder.
12. B. Use Aero Snap to maximize, restore, and compare open windows.
13. A. Clicking the window's Maximize button will maximize the window so it fills the entire screen.
14. True. Clicking the taskbar button of an open window restores the minimized window.
15. D. To move a window, click and drag the window by its top border to a new location on the screen.
16. True. You must click and drag by the window's borders or corners to change the size of a window.
17. C. Clicking the window icon in the notification area is not a way to switch between windows.
18. False. Windows shown stacked or side by side are arranged so that you can view the content of all the windows at the
same time.
19. False. Show the desktop minimizes all open windows to the taskbar; it does not close them.
20. True. The easiest way to close a window is by clicking its Close button.

42 © 2009 CustomGuide, Inc.
WWoorrkkiinngg wwiitthh aa
PPrrooggrraamm
Opening a Program ........................................... 43
Understanding the Program Window .............. 44
Understanding the Ribbon ............................... 45 Tabs ......................................................... 45 Groups ..................................................... 45 Buttons ..................................................... 45
Using the Program Button and Quick Access Toolbar ................................................................ 46
Program button ........................................ 46 Quick Access Toolbar .............................. 46
Understanding Controls.................................... 47
Entering and Editing Text in WordPad ............ 49
Opening a File .................................................... 50
Saving a File ....................................................... 51 Save a new document ............................. 51 Save document changes ......................... 52 Save a document under a different name and/or location ......................................... 52 Save a document as a different file type . 52
Selecting and Replacing Text ........................... 53
Using Undo and Redo ....................................... 55 Undo an action ......................................... 55 Redo an action ......................................... 55
Cutting, Copying, and Pasting Text ................. 56
Previewing and Printing a Document .............. 58
Getting Help ....................................................... 60 Search for help ........................................ 60 Browse for help ........................................ 60
Up until now, we’ve been focusing on
how to use the Windows 7 operating
system. In this chapter, you’ll be working
with a program. This chapter explains
how to control programs using the ribbon.
You’ll also learn what a dialog box is
(you’ll see a lot of them in Windows) and
how to use its controls.
While each program is different, the
procedure for doing things in all programs
is much the same. This chapter explains
these basic tasks using the WordPad
program. You’ll learn how to enter, edit,
and delete text; how to open, save, and
print a file; and how to get help when you
need it. Once you’ve learned these basic
skills in WordPad, you can apply them to
just about every other Windows program.
Let’s get started…
0

IT Services, University of Wolverhampton 43
Opening a Program
In order to work with a program, you have to open—or
launch—it first.
1. Click the Start button.
The Start menu appears.
2. Click All Programs.
The All Programs menu appears, listing all of the
programs that are installed on your computer.
3. Click the name of the program you want to open.
Tip: You may have to open several subfolders in
order to find the program you’re looking for.
Other Ways to Open a Program: The left-hand side of the Start menu contains a list
of recently used/pinned programs. If the program
you want to open appears in this list, click it to
open it.
You can also use a keystroke to start programs by
the order in which they are pinned on the taskbar.
Press < > + <1-9>, with the number
corresponding to the position of the pinned icon
on the taskbar.
Exercise
• Exercise File: None required.
• Exercise: Open the WordPad program (this is located in
the Accessories folder under All Programs).
Figure 3-1: Point to or click All Programs to display a list of all the programs that are installed on your computer.
Working with a Program
Commonly used/pinned programs appear here. If the program you want to open appears in this list, click it to open it.

44 © 2009 CustomGuide, Inc.
Understanding the Program Window
All Microsoft program windows have the same basic
parts. This lesson will help you become familiar with the
most common parts of a program window.
Title bar: Displays the name of the program and the name
of the document or file that’s being used. Ribbon: Controls what the program does. The commands
displayed on the Ribbon change from program to program, but
the Ribbon’s location doesn’t—it’s always perched at the top of
a window, right below the title bar.
Minimize button: Hides the window from your screen but
still runs it in your computer’s memory, ready for quick use.
You can minimize a window you’re not using so that it is
still running but is hidden in the taskbar.
Border: Click and drag a border or corner of a window to
change its size.
Maximize/Restore button: Depending on the size of the
window, this button toggles between maximize and restore. Zoom controls: Click and drag the zoom slider to zoom in or
out of the document area.
Close button: Closes the window or program when you’re
finished working with it, removing it from the screen and
the computer’s memory.
Status bar: Displays information about the document, window,
or program being used.
Exercise
• Exercise File: Have the WordPad program open onscreen.
• Exercise: Understand and experiment with the different
parts of the WordPad window.
Working with a Program

IT Services, University of Wolverhampton 45
Understanding the Ribbon
Many of the programs included with Windows 7 provide
easy access to commands via the ribbon, which replaces
the menus and toolbars found in previous versions of
Windows. The ribbon keeps commands visible while you
work instead of hiding them under menus or toolbars.
The ribbon is made up of three basic components:
Tabs
Commands are organized into tabs on the ribbon. Each
tab contains a different set of commands. There are three
different types of tabs:
Command tabs: These tabs appear by default
whenever you open a program.
Program tabs: If you switch to a different authoring
mode or view, such as Print Preview, program tabs
replace the default command tabs that appear on the
ribbon.
Groups
The commands found on each tab are organized into
groups of related commands. For example, the Font group
contains commands used for formatting fonts.
Buttons
One way to issue a command is by clicking its button on
the ribbon. Buttons are the smallest element of the ribbon
and change color when clicked.
Tips
The ribbon shrinks or expands depending on your
screen resolution and the size of the program
window.
You can hide the ribbon so that only tab names
appear, giving you more room in the program
window. To do this, double-click the currently
displayed command tab. To display the ribbon again,
click any tab.
Exercise
• Exercise File: None required.
• Exercise: Click each tab on the Ribbon to view its
commands.
Figure 3-2: The ribbon as shown in WordPad.
Figure 3-3: Hiding the ribbon gives you more room in the program window.
Working with a Program
Command tab
Program tab
Group Button
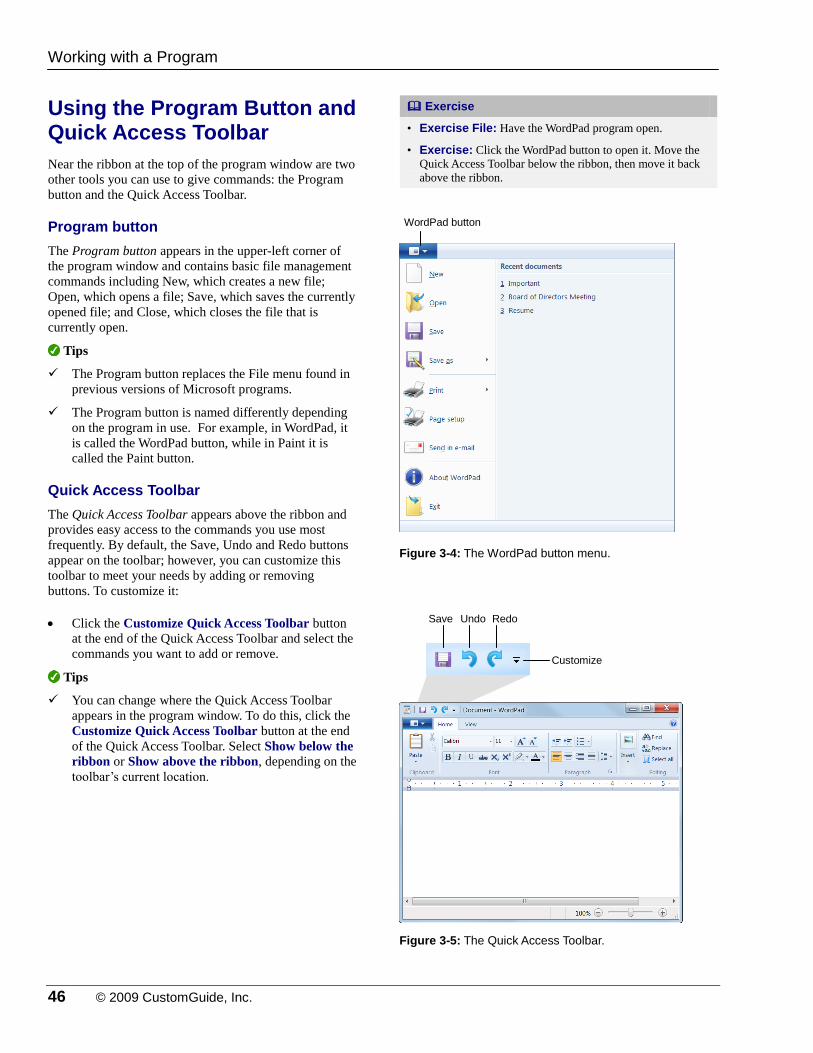
46 © 2009 CustomGuide, Inc.
Using the Program Button and Quick Access Toolbar
Near the ribbon at the top of the program window are two
other tools you can use to give commands: the Program
button and the Quick Access Toolbar.
Program button
The Program button appears in the upper-left corner of
the program window and contains basic file management
commands including New, which creates a new file;
Open, which opens a file; Save, which saves the currently
opened file; and Close, which closes the file that is
currently open.
Tips
The Program button replaces the File menu found in
previous versions of Microsoft programs.
The Program button is named differently depending
on the program in use. For example, in WordPad, it
is called the WordPad button, while in Paint it is
called the Paint button.
Quick Access Toolbar
The Quick Access Toolbar appears above the ribbon and
provides easy access to the commands you use most
frequently. By default, the Save, Undo and Redo buttons
appear on the toolbar; however, you can customize this
toolbar to meet your needs by adding or removing
buttons. To customize it:
Click the Customize Quick Access Toolbar button
at the end of the Quick Access Toolbar and select the
commands you want to add or remove.
Tips
You can change where the Quick Access Toolbar
appears in the program window. To do this, click the
Customize Quick Access Toolbar button at the end
of the Quick Access Toolbar. Select Show below the
ribbon or Show above the ribbon, depending on the
toolbar’s current location.
Exercise
• Exercise File: Have the WordPad program open.
• Exercise: Click the WordPad button to open it. Move the
Quick Access Toolbar below the ribbon, then move it back
above the ribbon.
Figure 3-4: The WordPad button menu.
Figure 3-5: The Quick Access Toolbar.
Working with a Program
Save Undo Redo
Customize
WordPad button

IT Services, University of Wolverhampton 47
Understanding Controls
Some commands are more complicated than others. For
example, saving a file is a simple process—all you have
to do is click the Program Button and select Save from the
menu, or click the Save button on the Quick Access
Toolbar. Other commands are more complex.
Whenever you want to do something relatively
complicated in Windows, you need to fill out a dialog
box. Filling out a dialog box is not much different from
filling out a paper form.
See Table 3-1: Command Controls in Windows 7 for
a description of the various tools you will come
across and how to use them.
Other Ways to Select a Dialog Box Control: Press <Tab> to move to the next control in the
dialog box or <Shift> + <Tab> to move to the
previous control until you arrive at the desired
control. Press <Enter> to choose the control.
Table 3-1: Command Controls in Windows 7
Scroll bars Click on the arrow buttons on either end of the scroll bar to move a small amount at a time.
Click and hold the arrow buttons to scroll continuously. Click and drag on the scroll box to
move quickly through a document. In addition, some input devices (such as a mouse) will
have a wheel that you can turn to scroll up and down a page.
Command buttons When a dialog box appears, you will often need to click a command button to close it or
continue to the next dialog box.
Text boxes Simply type the information directly into the text box at the insertion point. If there is no
insertion point visible, click in the box first.
Drop-down list Click the arrow button in a drop-down list to display a list of options. Use the scroll bar or
the arrow keys to move up and down through the options and click on your selection.
List boxes A list box is similar to a drop-down menu, but the list box displays several options. Again,
use the scroll bar or the arrow keys to move up and down through the options that are not
displayed and click to make a selection.
Exercise
• Exercise File: Have a blank document open in the
WordPad program.
• Exercise: Open the Print dialog box (Ctrl + P) and explore
the various controls that are available.
Figure 3-6: An example of a dialog box and its wide
variety of controls.
Working with a Program

48 © 2009 CustomGuide, Inc.
Table 3-1: Command Controls in Windows 7
Option button Select an option by clicking one of the buttons. A marker will appear in the button once it has
been selected. Only one option button may be selected.
Check box Unlike option buttons, several check boxes may be selected. Select options by clicking in one
or more of the boxes. A check will appear in the box once it has been selected.
Sliders Click the slider control and drag it left and right (or up and down) to select from a range of
options.
Tabs Tabs are separate pages that overlap one another. Click on a tab display its page in front of
the rest.
Working with a Program

IT Services, University of Wolverhampton 49
Entering and Editing Text in WordPad
This lesson explains how to create and edit a document
using the WordPad program.
Enter text
Entering text is as easy as it sounds: all you have to do is
type!
1. Place the insertion point (the blinking bar) in
WordPad by clicking in the WordPad screen.
2. Type your text.
Trap: Don’t press <Enter> when you reach the
end of a line—WordPad will automatically move
the text to the next line for you. This feature is
called word-wrap.
Edit text
After typing a document, you will often discover that you
need to make some changes to your text. Editing a
document by inserting and deleting text is very simple.
1. Move the insertion point by clicking where you want
to remove text.
Other Ways to Move the Insertion Point: Use the arrow keys on your keyboard.
2. Press <Backspace> key to delete the text behind (to
the left of) the insertion point one character at a time.
The text is deleted one character at a time. Press and
hold the key to quickly delete text.
You can quickly delete a large amount of text as well.
Select the text by clicking at the point where you’d
like to start deleting, holding the mouse button and
moving the cursor to the point immediately following
the section you want to delete. Then just press
<Delete> or <Enter>.
Other Ways to Delete Text: The <Delete> key deletes text before (to the right
of) the insertion point one character at a time.
3. Type the text you wish to insert.
Other Ways to Insert Text: When you press the <Insert> key, all text you
enter at the insertion point will automatically
overwrite the text already in place. To turn this
feature off, press the <Insert> key a second time.
Exercise
• Exercise File: A blank document in the WordPad
program.
• Exercise: Type the first paragraph in this lesson, “This
lesson explains how to create a document using the
WordPad program. Actually, there isn’t much to explain. All
you have to do is type!” Then delete the last sentence.
Figure 3-7: The insertion point in a WordPad document.
Working with a Program
Insertion point

50 © 2009 CustomGuide, Inc.
Opening a File
Opening a document lets you work on a document that
you or someone else has previously created and then
saved. This lesson explains how to open a saved
document.
1. Click the WordPad button and click Open.
The Open dialog box appears. Next, you have to tell
WordPad where the file you want to open is located.
Other Ways to Open a Document: Press <Ctrl> + <O>.
2. Navigate to the location of the saved file.
The Open dialog box has several controls that make it
easy to navigate to locations and find files on your
computer:
Address bar: Click a link in the Address bar to
open it. Click the arrow to the right of a link to
open a list of folder within that location. Select a
folder from the list to open it.
Navigation pane: Navigate to other drives,
locations, libraries, and folders on your computer.
Search box: This searches the contents—
including subfolders—of that window for the text
that you type. If a file’s name, file content, tags, or
other file properties match the searched text, it
will appear in the search results. Search results
appear as you enter text in the search box.
3. Select the file you want to open and click Open.
The file is displayed in the program window.
Tips
WordPad and other programs will store the most
recently used documents in the Program button menu
to make them easier to find.
Exercise
• Exercise File: Resume.rtf
• Exercise: Open the Resume.rtf file.
Figure 3-8: The Open dialog box. To open a file, you must first navigate to the folder where it is saved.
Working with a Program
Navigation pane Address bar Search box

IT Services, University of Wolverhampton 51
Saving a File
After you’ve created a document, you need to save it so
that you can use it again. You can even save a copy of a
document by saving it under a new name, in a different
location, or under a different file type.
Save a new document
A document that is being saved for the first time needs a
new name, and you also need to specify where you want
the file to be saved so you can find it again.
1. Click the WordPad button and click Save.
The Save As dialog box appears.
Other Ways to Save: Press <Ctrl> + <S>. Or, click the Save button on
the toolbar.
Trap: The Save As dialog box in WordPad may
open with Folders collapsed. Click Browse
Folders so you can navigate to other locations on
the computer.
2. Navigate to the drive and/or folder where you want to
save your document.
The Save As dialog box has several controls that
make it easy to navigate to locations on your
computer:
Address bar: Click a link in the Address bar to
open it. Click the arrow to the right of a link to
open a list of folders within that location. Select a
folder from the list to open it.
Navigation pane: Navigate to other drives,
locations, libraries, and folders on your computer.
3. Enter the file name in the File name text box.
The file name should indicate the contents of the file.
File names can be up to 255 characters long and
contain letters, numbers, and some symbols. You
can’t use the symbols " \ / : * | < > in a file name.
4. Click Save.
The document is saved.
Exercise
• Exercise File: Resume.rtf
• Exercise: Save the file under the name “Cover Letter”.
Figure 3-9: The Save As dialog box with folders collapsed.
Figure 3-10: The Save As dialog box has controls that
make it easy to navigate through your computer’s drives and folders.
Working with a Program
Navigation pane
Address bar
Click Browse Folders to view controls that allow you to navigate to other locations on your computer.
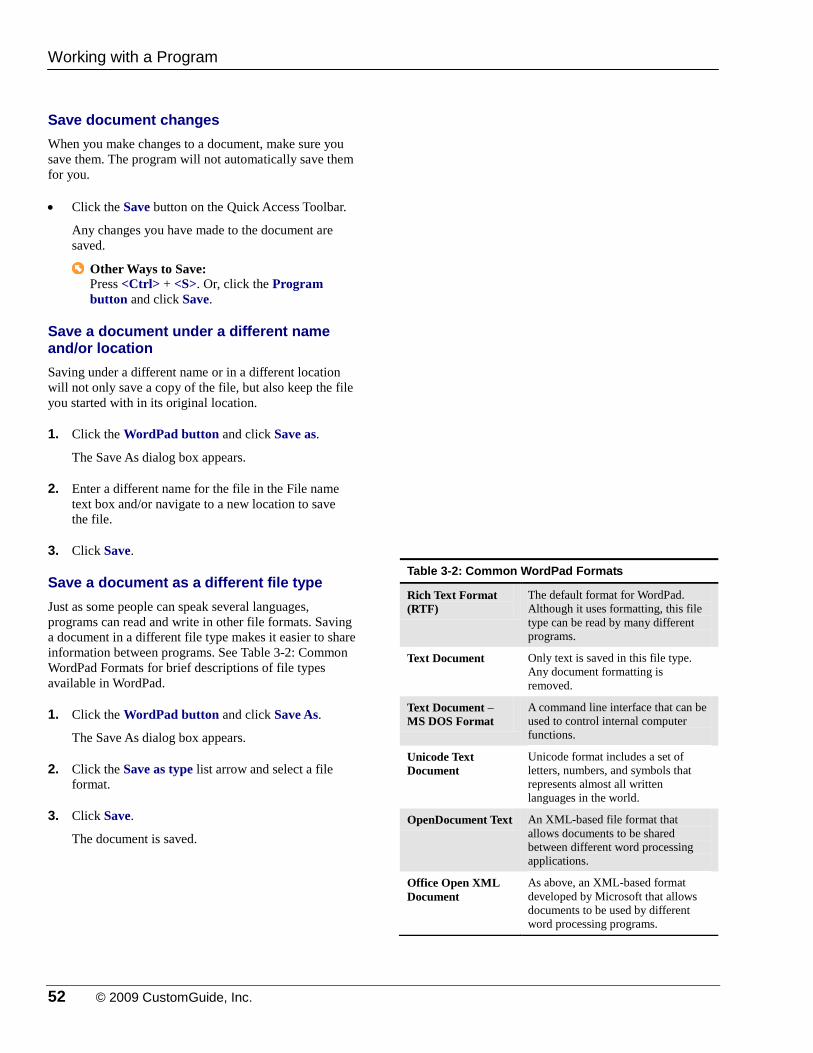
52 © 2009 CustomGuide, Inc.
Save document changes
When you make changes to a document, make sure you
save them. The program will not automatically save them
for you.
Click the Save button on the Quick Access Toolbar.
Any changes you have made to the document are
saved.
Other Ways to Save: Press <Ctrl> + <S>. Or, click the Program
button and click Save.
Save a document under a different name and/or location
Saving under a different name or in a different location
will not only save a copy of the file, but also keep the file
you started with in its original location.
1. Click the WordPad button and click Save as.
The Save As dialog box appears.
2. Enter a different name for the file in the File name
text box and/or navigate to a new location to save
the file.
3. Click Save.
Save a document as a different file type
Just as some people can speak several languages,
programs can read and write in other file formats. Saving
a document in a different file type makes it easier to share
information between programs. See Table 3-2: Common
WordPad Formats for brief descriptions of file types
available in WordPad.
1. Click the WordPad button and click Save As.
The Save As dialog box appears.
2. Click the Save as type list arrow and select a file
format.
3. Click Save.
The document is saved.
Table 3-2: Common WordPad Formats
Rich Text Format
(RTF)
The default format for WordPad.
Although it uses formatting, this file
type can be read by many different
programs.
Text Document Only text is saved in this file type.
Any document formatting is
removed.
Text Document –
MS DOS Format
A command line interface that can be
used to control internal computer
functions.
Unicode Text
Document
Unicode format includes a set of
letters, numbers, and symbols that
represents almost all written
languages in the world.
OpenDocument Text An XML-based file format that
allows documents to be shared
between different word processing
applications.
Office Open XML
Document
As above, an XML-based format
developed by Microsoft that allows
documents to be used by different
word processing programs.
Working with a Program
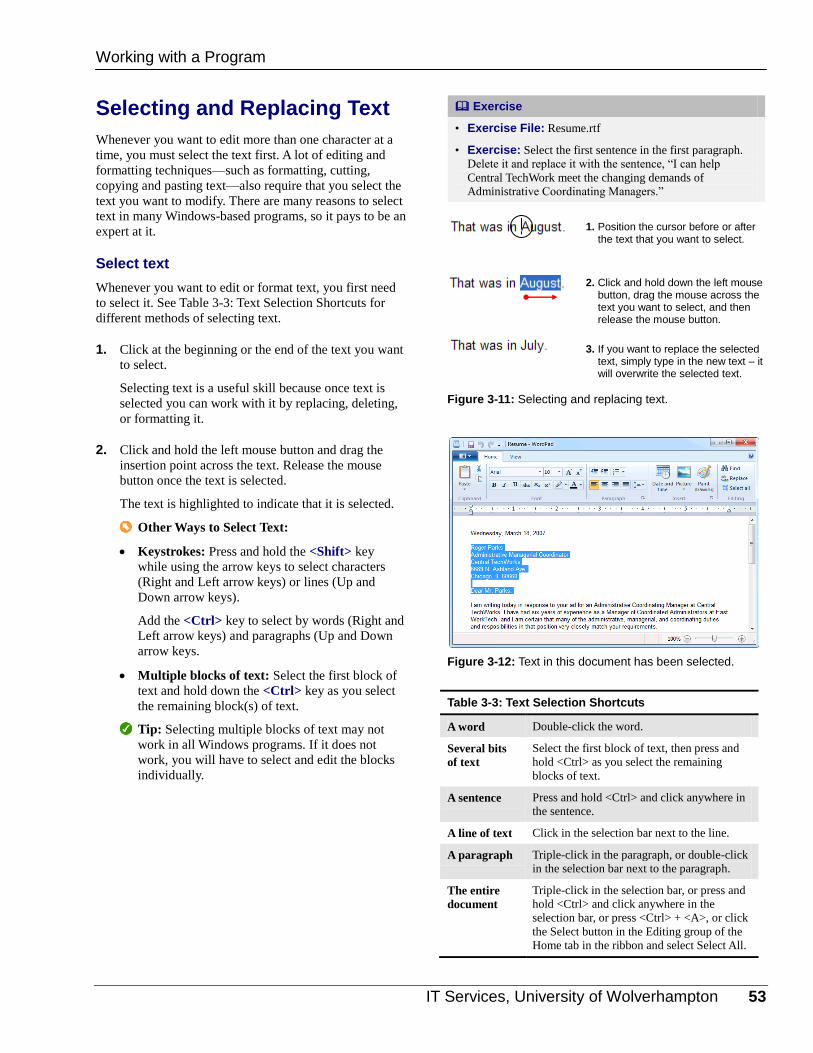
IT Services, University of Wolverhampton 53
Selecting and Replacing Text
Whenever you want to edit more than one character at a
time, you must select the text first. A lot of editing and
formatting techniques—such as formatting, cutting,
copying and pasting text—also require that you select the
text you want to modify. There are many reasons to select
text in many Windows-based programs, so it pays to be an
expert at it.
Select text
Whenever you want to edit or format text, you first need
to select it. See Table 3-3: Text Selection Shortcuts for
different methods of selecting text.
1. Click at the beginning or the end of the text you want
to select.
Selecting text is a useful skill because once text is
selected you can work with it by replacing, deleting,
or formatting it.
2. Click and hold the left mouse button and drag the
insertion point across the text. Release the mouse
button once the text is selected.
The text is highlighted to indicate that it is selected.
Other Ways to Select Text:
Keystrokes: Press and hold the <Shift> key
while using the arrow keys to select characters
(Right and Left arrow keys) or lines (Up and
Down arrow keys).
Add the <Ctrl> key to select by words (Right and
Left arrow keys) and paragraphs (Up and Down
arrow keys.
Multiple blocks of text: Select the first block of
text and hold down the <Ctrl> key as you select
the remaining block(s) of text.
Tip: Selecting multiple blocks of text may not
work in all Windows programs. If it does not
work, you will have to select and edit the blocks
individually.
Exercise
• Exercise File: Resume.rtf
• Exercise: Select the first sentence in the first paragraph.
Delete it and replace it with the sentence, “I can help
Central TechWork meet the changing demands of
Administrative Coordinating Managers.”
Figure 3-11: Selecting and replacing text.
Figure 3-12: Text in this document has been selected.
Table 3-3: Text Selection Shortcuts
A word Double-click the word.
Several bits
of text
Select the first block of text, then press and
hold <Ctrl> as you select the remaining
blocks of text.
A sentence Press and hold <Ctrl> and click anywhere in
the sentence.
A line of text Click in the selection bar next to the line.
A paragraph Triple-click in the paragraph, or double-click
in the selection bar next to the paragraph.
The entire
document
Triple-click in the selection bar, or press and
hold <Ctrl> and click anywhere in the
selection bar, or press <Ctrl> + <A>, or click
the Select button in the Editing group of the
Home tab in the ribbon and select Select All.
Working with a Program
1. Position the cursor before or after the text that you want to select.
2. Click and hold down the left mouse button, drag the mouse across the text you want to select, and then release the mouse button.
3. If you want to replace the selected
text, simply type in the new text – it will overwrite the selected text.
54 © 2009 CustomGuide, Inc.
Deselect text
If you have selected a group of text and decided that you
do not want to make any changes to it, all you need to do
to deselect the text is simply click the mouse.
To deselect text, click anywhere on the computer
screen.
Other Ways to Deselect Text: Press an arrow key to move the insertion point.
Replace text
When you start typing after you select text, the selected
text is automatically deleted and replaced with the new
text you type.
Replace text by first selecting it, then type the new
text.
The selected text is replaced by the new text.
Working with a Program

IT Services, University of Wolverhampton 55
Using Undo and Redo
You don’t need to be afraid of making a mistake because
you can use the Undo feature to erase your actions. The
Undo and Redo commands are very useful when working
with text in a document.
Undo an action
Undo does just that—it undoes actions as though they
never happened.
Click the Undo button on the Quick Access Toolbar.
Your last action is undone. For example, if you had
deleted an item and then decided you wanted to keep
it after all, undo would make it reappear.
Other Ways to Undo: Press <Ctrl> + <Z>.
Tip: Click the Undo button multiple times to
undo multiple actions.
Redo an action
Redo is the opposite of undo: it redoes an action you have
undone. For example, if you decide that you do, after all,
want to delete an item that you have just brought back
with undo, you can redo the action.
Click the Redo button on the Quick Access Toolbar
Your last undone action is redone. For example, if
you decided that you did want to delete it after all,
redo would make it disappear once again.
Other Ways to Redo: Press <Ctrl> + <Y>.
Tip: Press the Redo keystroke multiple times to
redo multiple actions.
Exercise
• Exercise File: Resume.rtf
• Exercise: Delete the first paragraph. Then undo the
deletion.
Figure 3-13: The Undo and Redo Buttons.
Working with a Program
Undo Redo

56 © 2009 CustomGuide, Inc.
Cutting, Copying, and Pasting Text
The Cut, Copy, and Paste commands are very useful when
you work with and edit your text. These commands let
you easily work with and rearrange text in the document.
Tips
You may cut, copy, and paste any item in a document,
such as clip art, a table, or an AutoShape—not just
text.
Cut text
When you cut text, it is removed from its original location
and placed in a temporary storage area called the
Clipboard.
1. Select the text or object you want to cut.
2. Click the Home tab on the ribbon and click the Cut
button in the Clipboard group.
The text is removed from the document and added to
the Clipboard.
Other Ways to Cut Text: Press <Ctrl> + <X>. Or, right-click the selection
and select Cut from the contextual menu.
Copy text
When you copy text, the selected text remains in its
original location and is also added to the Clipboard.
1. Select the text or object you want to copy.
2. Click the Home tab on the ribbon and click the Copy
button in the Clipboard group.
The text is added to the Clipboard. Notice that unlike
cutting, the original text remains in the document.
Other Ways to Copy Text: Press <Ctrl> + <C>. Or, right-click the selection
and select Copy from the contextual menu.
Exercise
• Exercise File: Resume.rtf
• Exercise: Select and cut the first sentence. Paste it after
the last sentence.
Figure 3-14: The Cut, Copy, and Paste commands are located in the Clipboard group on the Ribbon.
Working with a Program
Cut
Copy

IT Services, University of Wolverhampton 57
Paste text
After cutting or copying, move the insertion point to a
new location in a document and paste the item that you
last cut or copied into the document.
1. Click where you want to paste the cut or copied text.
2. Click the Home tab on the ribbon and click the Paste
button in the Clipboard group.
The cut or copied text is inserted in the new location.
Other Ways to Paste Text: Press <Ctrl>> + <V>. Or, right-click where you
want to paste and select Paste from the contextual
menu.
Tips
You may also specify what you want to paste by
using the Paste Special command. Click the arrow
beneath the Paste button and select Paste Special
from the drop-down menu. Select a paste option from
the Paste Special dialog box. Figure 3-15: The Paste Special dialog box.
Working with a Program

58 © 2009 CustomGuide, Inc.
Previewing and Printing a Document
Once you have created a document, you can print a copy
of it—if your computer is connected to a printer. But
before you do this, it’s usually a good idea to preview
how it’s going to look.
Preview a document
1. Click the WordPad button and select Print Print
Preview from the menu.
The document is shown in Preview mode. Refer to
Table 3-4: Print Preview Options for a description of
the options available in this mode.
Tip: Use the commands in Print Preview to adjust
margins and page setup settings. Click the 100%
button to enlarge your view of the document.
2. Click the Close print preview button to return to the
document.
Tip: You can print directly from the Print Preview
window by clicking the Print button in the Print
group on the Print Preview tab.
Quick print a document
Quick printing a document bypasses the Print dialog box
and sends the document directly to the printer.
Click the WordPad button and select Print
Quick print from the menu.
The document is sent to the printer and is printed.
Exercise Notes
• Exercise File: Resume.rtf
• Exercise: Print preview the Resume document and print
two copies of it.
Figure 3-16: A document in Print Preview mode.
Table 3-4: Print Preview Options
Print Click Print to open the Print dialog box and
specify print options before printing.
Page setup Click Page setup to open the Page setup
dialog box and specify page options, like
margins, before printing.
Zoom Click 100% for a larger display. Click One
Page to preview one page at a time, Two
Pages to preview two pages at a time.
Preview Click Previous page and Next page to
navigate between pages. Click Close print
preview to exit Print Preview mode.
Working with a Program

IT Services, University of Wolverhampton 59
Print a document
1. Click the WordPad Button and select Print Print
from the menu.
The Print dialog box appears. Here you can specify
printing options, such as number of copies and which
pages to print.
Other Ways to Print: Press <Ctrl> + <P>.
Tip: If you select text before printing the
document, click the Selection option in the Print
dialog box to print only the selected text. For a
description of the Print dialog box, see Table 3-5:
Sections in the Print Dialog Box.
2. Specify printing options, then click Print.
Table 3-5: Sections in the Print Dialog Box
Select Printer Select which printer to send your document to when it prints. If you are connected to more than one printer, the
currently selected printer is highlighted.
Preferences button: Displays a dialog box with options available to your specific printer. The Properties dialog
box will change according to the type of printer you use, but here are some common print properties:
Tray Selection: Change the type of the paper you’re printing to, or whether pages will be fed into the printer
by hand or run automatically.
Orientation: Change the paper orientation (portrait or landscape) or print on both sides of the sheet.
Color: Print in black and white or choose how you want to print colors in your document.
Page Format: If you’d like to fit more than one page of the document onto a sheet of paper, use this
command to set the page layout.
Print to file: Prints the document to a file instead of sending it to the printer.
Page Range Allows you to specify what pages you want to print. There are several options here:
All: Prints the entire document.
Current Page: Prints only the page you’re currently on.
Selection: Prints only selected document content.
Pages: Prints only the pages you specify. Select a range of pages with a hyphen (5-8) and separate single
pages with a comma (3,7).
Number of copies Specifies the number of copies you want to print. If you print multiple copies you can choose to have them
collated, that is, printed in order all the way through before the second copy begins printing.
Figure 3-17: The Print dialog box.
Working with a Program

60 © 2009 CustomGuide, Inc.
Getting Help
When you don’t know how to do something in WordPad
(or any of the other programs in Windows), look up your
question in the Help and Support files. The Help and
Support files can answer your questions, offer tips, and
provide help for all of WordPad’s features.
Search for help
1. Click the Help button ( ) located in the upper-right
hand corner of the window.
The Help and Support window appears. See Table
3-6: Help Buttons for an explanation of the buttons
that you can use here.
Other Ways to Open Help: Press <F1>.
2. Type what you want to search for in the Search Help
box near the top of the window and press <Enter>.
A list of results related to the help topics appears.
3. Click the topic that most closely addresses the topic
for which you’re searching.
Information regarding the selected topic is displayed.
Browse for help
If you’re not sure what you’re looking for, browsing the
Help files is a great way to learn more about WordPad.
1. Click the Help button ( ) located in the upper-right
hand corner of the window.
The Help and Support window opens.
2. Click the Browse Help button.
Five topics are displayed. Since WordPad is not a
very big program, there aren’t many help topics to
browse here.
3. Click the link you want to browse.
Help and Support displays information regarding the
selected question or sub-topic.
Tip: If you cannot find an answer to your
question, click the back button to browse another
category.
Exercise
• Exercise File: None required.
• Exercise: Explore the Help menu in WordPad.
Figure 3-18: The Windows Help and Support window displays relevant articles about WordPad.
Table 3-6: Help Buttons
Back
Click here to move back to the
previous help topic.
Forward
Click here to move forward to
the next help topic.
Help and
Support
home
Click here to return to the Help
home page.
Click here to print the current
help topic.
Browse Help
Click here to browse for help
using the Table of Contents.
Learn about
other
support
options
Click here to find other sources
for help.
Options
Click here to change how the
Help window works and is
displayed.
Working with a Program

IT Services, University of Wolverhampton 61
WWoorrkkiinngg wwiitthh aa PPrrooggrraamm RReevviieeww
Quiz Questions
21. How do you access the All Programs menu? A. Click the Start button and select Programs > All Programs from the menu. B. Click the Start button and select All Programs. C. Right-click the taskbar and select All Programs. D. Right-click the desktop and select All Programs.
22. The area that displays the name of the program and the name of the file that is being used is called the: A. Windows bar B. Title bar C. Program bar D. Very-top-of-the-window bar
23. The ribbon can be hidden so that only tab names appear. (True or False?)
24. The Program Button contains basic file commands. (True or False?)
25. What is the Quick Access Toolbar? A. There are no toolbars in WordPad. B. What appears when you select text. C. A customizable toolbar of common commands that appears above the ribbon. D. An extension of the Windows taskbar.
26. How do you enter information into a text box? A. Click the box and it will fill in automatically. B. Press <Ctrl> + <E>. C. Click the tabs until the information appears. D. Type text in it with the keyboard.
27. At the end of a line of text, WordPad automatically moves text to the next line. This is called: A. Text-drop B. Word-wrap C. Line-break D. Type-down
28. The Delete key deletes text to the left of the insertion point. (True or False?)
29. Opening a document allows you to work on a document that was previously saved. (True or False?)
30. When you save a document with a different name, the old document is deleted. (True or False?)

62 © 2009 CustomGuide, Inc.
31. Which of these is not a way to select a word? A. Double-click the word. B. Click and drag with the mouse to select the word. C. Click the word and press <Ctrl> + <W>. D. Place the insertion point next to the word, press Shift, and use the arrow keys to highlight the word.
32. What happens when text is selected and you begin to type? A. The selected text is deleted and is replaced with the typed text. B. The text is copied onto the clipboard. C. The text is deselected. D. A new keystroke shortcut is created.
33. Redo reverses the actions of undo. (True or False?)
34. What is a keystroke shortcut that you can use to paste text? A. <Ctrl> + <C> B. <Ctrl> + <V> C. <Ctrl> + <P> D. <Ctrl> + <X>
35. You can cut and paste text between documents. (True or False?)
36. The text or object that was last cut or copied is what appears when you paste. (True or False?)
37. The feature that allows you to see how your printed document will look is called ______. A. Print View B. Print Layout C. Print Sampling D. Print Preview
38. Which of the following is NOT a way to print a document? A. Press <Ctrl> + <P>. B. Select the WordPad button, then Print, then Quick Print. C. Press <Ctrl> + <T>. D. All of these.
39. There are two ways to use a program’s help files: search or browse. (True or False?)
Quiz Answers
21. B. Click the Start button and select All Programs to access the All Programs menu.
22. B. The Title bar appears at the top of every program window and displays the name of the program and the file you are
working on.
23. True. Double-click the currently displayed tab to hide the ribbon, then click any tab to view it once again.
IT Services, University of Wolverhampton 63
24. True. The Program Button contains basic file commands, such as Open, Save, New, and Print.
25. C. The Quick Access Toolbar is a customizable toolbar of common commands that appears above the ribbon.
26. D. Enter information into a text box by typing text with the keyboard.
27. B. Word-wrap drops the text to the next line automatically, so there's no need to press Enter.
28. False. The Backspace key deletes text to the left of the insertion point. The Delete key deletes text to the right of the
insertion point.
29. True. Opening a document allows you to make changes to a file that you or somebody else has created.
30. False. The original document remains intact, with its original name.
31. C. Pressing <Ctrl> + <W> does not select text. You can select a word by double-clicking it or by highlighting it with
the mouse or arrow keys.
32. A. The selected text is deleted and is replaced with the typed text.
33. True. Redo reverses the actions of Undo.
34. B. You would think <Ctrl> + <P> would paste text — but it's <Ctrl> + <V>.
35. True. You can cut and paste text between two documents.
36. True. Typically when you paste, you paste the last item that was cut or copied.
37. D. The Print Preview feature allows you to preview how your printed document will look.
38. C. Pressing <Ctrl> + <T> is not a print command.
39. True. Two of the ways you can use a program’s help files is by doing a search or browsing help topics.

64 © 2009 CustomGuide, Inc.
WWoorrkkiinngg wwiitthh
FFoollddeerrss aanndd
FFiilleess
Understanding What’s in Your Computer ....... 66 Icons ........................................................ 66 Drives, folders, and files .......................... 66 Memory units ........................................... 67
Opening Drives, Folders and Files .................. 68 View an item’s properties ......................... 68
Understanding the Windows Explorer Window ............................................................................. 69
Using Windows Explorer to Navigate Your Computer ............................................................ 70
Address bar ............................................. 70 Favorites .................................................. 70 Back and Forward buttons ....................... 71
Folder and File Basics ...................................... 72 Create a new folder ................................. 72 Rename a folder or file ............................ 72 Delete a folder or file ................................ 73 Restore a deleted folder or file ................ 73
Using and Creating Libraries ........................... 74 Open a library .......................................... 74 Create a new library ................................. 74
Modifying and Deleting Libraries ..................... 75 Add a folder to a library............................ 75 Remove a folder from a library ................ 75 Delete a library ......................................... 76
Selecting Multiple Folders and Files ............... 77 Select multiple items ................................ 77 Select all .................................................. 77
Copying and Moving Folders and Files .......... 78 Copy or move by clicking and dragging ... 79
Changing Window Layout and Views .............. 80
Sorting and Filtering Items ............................... 81 Sort files ................................................... 81 Filter files ................................................. 81
Using Search ...................................................... 83 Windows Explorer .................................... 83 Search filters ............................................ 83
When you work at a desk, unless you
make an effort to stay organized, all your
papers and files begin to pile up and
become disorganized. It takes a little more
time, but the same phenomenon occurs
when working with Windows—the files
you create using your computer start to
become cluttered, and are harder and
harder to find.
In this chapter, you’ll take your first step
beyond the Windows basics and enter the
world of file management. You’ll learn
how Windows stores information in files
and folders, just like a file cabinet does,
and see how the appearance of windows
have changed from previous versions of
Windows. You’ll find that you will need
to clean and organize your files and
folders from time to time, just like you
would the contents of a file cabinet. This
chapter explains how to organize your
computer by creating folders to store
related information, how to move and
copy files between folders, how to delete
and rename files and folders, and how to
retrieve a deleted file if you change your
mind.
4

IT Services, University of Wolverhampton 65
Start menu ............................................... 83
Working with Compressed Folders ................. 85 Create a compressed folder .................... 85 Work with compressed folder files ........... 85
66 © 2009 CustomGuide, Inc.
Understanding What’s in Your Computer
Icons
Everything in the computer is represented by its own
picture, or icon.
A different icon represents each item, as shown in Table
4-1: Common Icons. For example, the icons for disk
drives on your computer look similar, but have details that
distinguish them from each other. Folder icons almost
always look like little manila folders.
Files have more variety, because a different icon is used
for each file type. This makes it easy for you to tell the
difference between documents, photos, and spreadsheets
for example.
Drives, folders, and files
To see what’s in a file cabinet, you simply open a drawer.
You can view the information stored on your computer’s
disk drives in much the same way—by opening the disk
drive you want to access. The contents of your computer
can basically be categorized into three types of items:
Drives are like “drawers” that contain the folders on
your computer. A disk drive is the part of the
computer that reads and writes information to a disk,
whether it is a permanent hard disk like the one
inside your computer, or a removable compact disc
(CD). There are three main types of disk drives that
computers use to store their information, as shown in
Table 4-2: Common Computer Drives
.
Table 4-2: Common Computer Drives
Drive type Drive Letter Description
Local Disk
C Local disks, or hard disks, hide permanently inside your computer. Your computer’s hard disk is
its main filing cabinet—where it stores its programs and files.
CD-ROM, DVD,
or BD-ROM
D or above Compact discs, or CD-ROMs, are like the audio discs you play in your stereo. CD-ROMs are
cheap and can typically store 650 MB of information, which is why they’re used to install
software for games and programs with a lot of multimedia.
DVDs are similar to CDs, but they can hold six times more data. DVDs are the most common
storage device for movies and are often used to install programs and games.
Blue-ray Discs (BD) are like DVDs, but with enormous capacity. BDs can store up to six times
more information than a DVD (over 20 GB) and are typically used for high-definition video and
games.
Table 4-1: Common Icons
Drive
Drives are the devices that store folders and files.
Drives of different types have icons that indicate
the type of drive; for example, the hard disk drive
for your computer is indicated by the Windows
logo.
Folder
Folders are used to organize and contain files and
are stored on drives. Folder views with large icons
allow you to see if a folder contains other folders
or files
File
Files are the items that you actually work with
when you use your computer. Whether it is a
program or a document, the icon that represents a
file indicates its type.
Exercise
• Exercise File: None required.
• Exercise: Locate the disk drives on your computer, and
understand the difference between a byte and a gigabyte.
Working with Folders and Files

IT Services, University of Wolverhampton 67
Table 4-2: Common Computer Drives
Other Drives
D or above There are also other types of drives, including network drives, removable drives, and external
drives. Network drives are drives that are available through the servers on a company’s network.
They have an almost unlimited storage size. Removable storage drives include CD and DVD
drives, and USB flash drives. External hard drives are like having another computer of storage
space: 100 GB or more.
Folders contain other folders and files. Folders allow
you to keep related information in the same place. If
anything happens to a folder—if it is moved or
deleted, for example—everything contained in the
folder goes with it.
Files are the “meat” of your computer: drives and
folders exist to store files. Files cannot contain other
files or folders. Table 4-3: Common Types of Files
displays some of the common types of files you will
encounter.
There are two parts to every file: the file name and the file
extension. The file name distinguishes the file from other
files. Typically, you give the file its name.
The file extension tells Windows what type of file it is.
Windows uses this information to determine which type
of icon is used for the file, and it also tells Windows
which program to use to open the file. The file extension
is assigned to the file by the program in which the file was
created. For example, Notepad always adds the file
extension “.txt” to its files, so when you double-click a
.txt file, Windows knows it has to open the file in
Notepad.
Tips
By default, Windows 7 does not display file
extensions. This can be changed by modifying
Windows folder settings.
Memory units
Just as liquids are measured in quarts and gallons,
computers save their information in units called bytes.
Computers use the metric system, so 1,000 bytes make up
a kilobyte and 1,000,000 (one million) bytes make up a
megabyte. Table 4-4: How Memory is Measured lists
memory units for computers.
Table 4-4: How Memory is Measured
Byte A byte is equivalent to a single character, such as the letter “J” or number “8”. A single character
Kilobyte
(K or KB)
A kilobyte is about 1,000 bytes (1,024 to be exact). A kilobyte is equivalent to a page
of double-spaced typing.
1,024 bytes
Megabyte
(MB)
A megabyte (MB) is about one million bytes. A megabyte is equivalent to an
average-length novel.
1,048,576 bytes
Gigabyte
(GB)
A gigabyte (GB) is about one billion bytes. A gigabyte is equivalent to the text in
several encyclopedia sets.
1,000,000,000 bytes
Table 4-3: Common Types of Files
Application
(.exe)
Application or executable (.exe) files are the
programs that run on your computer. When
you open a program, you are opening an
executable file.
Rich Text
Format
(.rtf)
WordPad creates files of this type: this file
type can hold basic formatting properties and
objects like graphics: it’s not as advanced as a
Microsoft Word (.doc) file, but it’s not as
simple as a Notepad (.txt) file.
JPEG
Most photographs are JPEGs.
Shortcut
Shortcuts point to files and folders elsewhere
on your computer so that you can quickly
open that file, folder, or program without
having to go to its actual location. All of the
programs in the Start menu and some of the
items on your desktop are actually shortcuts
that point to files located elsewhere on your
computer.
Working with Folders and Files

68 © 2009 CustomGuide, Inc.
Table 4-4: How Memory is Measured
Terabyte
(TB)
A terabyte (GB) is about one trillion bytes. A terabyte is equivalent to the text in a
library.
1,000,000,000,000 bytes
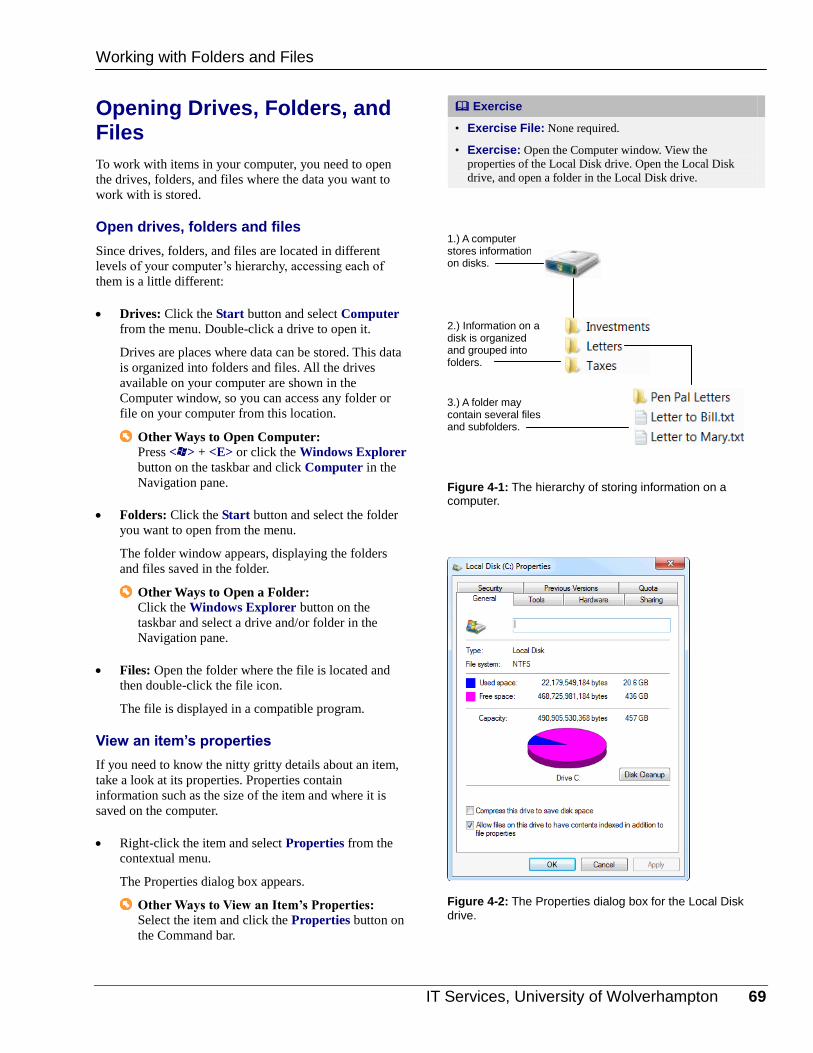
IT Services, University of Wolverhampton 69
Opening Drives, Folders, and Files
To work with items in your computer, you need to open
the drives, folders, and files where the data you want to
work with is stored.
Open drives, folders and files
Since drives, folders, and files are located in different
levels of your computer’s hierarchy, accessing each of
them is a little different:
Drives: Click the Start button and select Computer
from the menu. Double-click a drive to open it.
Drives are places where data can be stored. This data
is organized into folders and files. All the drives
available on your computer are shown in the
Computer window, so you can access any folder or
file on your computer from this location.
Other Ways to Open Computer: Press < > + <E> or click the Windows Explorer
button on the taskbar and click Computer in the
Navigation pane.
Folders: Click the Start button and select the folder
you want to open from the menu.
The folder window appears, displaying the folders
and files saved in the folder.
Other Ways to Open a Folder: Click the Windows Explorer button on the
taskbar and select a drive and/or folder in the
Navigation pane.
Files: Open the folder where the file is located and
then double-click the file icon.
The file is displayed in a compatible program.
View an item’s properties
If you need to know the nitty gritty details about an item,
take a look at its properties. Properties contain
information such as the size of the item and where it is
saved on the computer.
Right-click the item and select Properties from the
contextual menu.
The Properties dialog box appears.
Other Ways to View an Item’s Properties: Select the item and click the Properties button on
the Command bar.
Exercise
• Exercise File: None required.
• Exercise: Open the Computer window. View the
properties of the Local Disk drive. Open the Local Disk
drive, and open a folder in the Local Disk drive.
Figure 4-1: The hierarchy of storing information on a computer.
Figure 4-2: The Properties dialog box for the Local Disk
drive.
Working with Folders and Files
1.) A computer stores information on disks.
2.) Information on a disk is organized and grouped into folders.
3.) A folder may contain several files and subfolders.

70 © 2009 CustomGuide, Inc.
Understanding the Windows Explorer Window
When you open a folder or library in Windows, Windows
Explorer appears. Windows Explorer makes it easy to
view and work with the drives, folders, and files on your
computer.
Click the Start button and select All Programs
Accessories Windows Explorer from the menu.
The Windows Explorer window appears.
Other Way to Open Windows Explorer: Click the Windows Explorer button on the
taskbar or press < > + <E>.
Back/Forward buttons: Jump back/forward to locations
you have previously visited. Details pane: Displays common properties associated with the
selected drive, library, folder, or file.
Address bar: As you navigate, the file path is shown in the
Address bar. Each location in the path is a link; click the
link to open it in the window.
Navigation pane: Displays the drives, libraries, and folders on
your computer. Click the tiny arrow to the left of an item to
expand it, and then click the drive/folder you want to view.
Folder list: Displays the contents of the selected drive,
library, or folder. Double-click an item to open it. Command bar: Here you can access common commands
related to the selected drive, library, folder, or file. Options
change according to the item that is selected.
Exercise
• Exercise File: None required.
• Exercise: Open Windows Explorer and use the
Navigation pane to jump to another location.
Working with Folders and Files
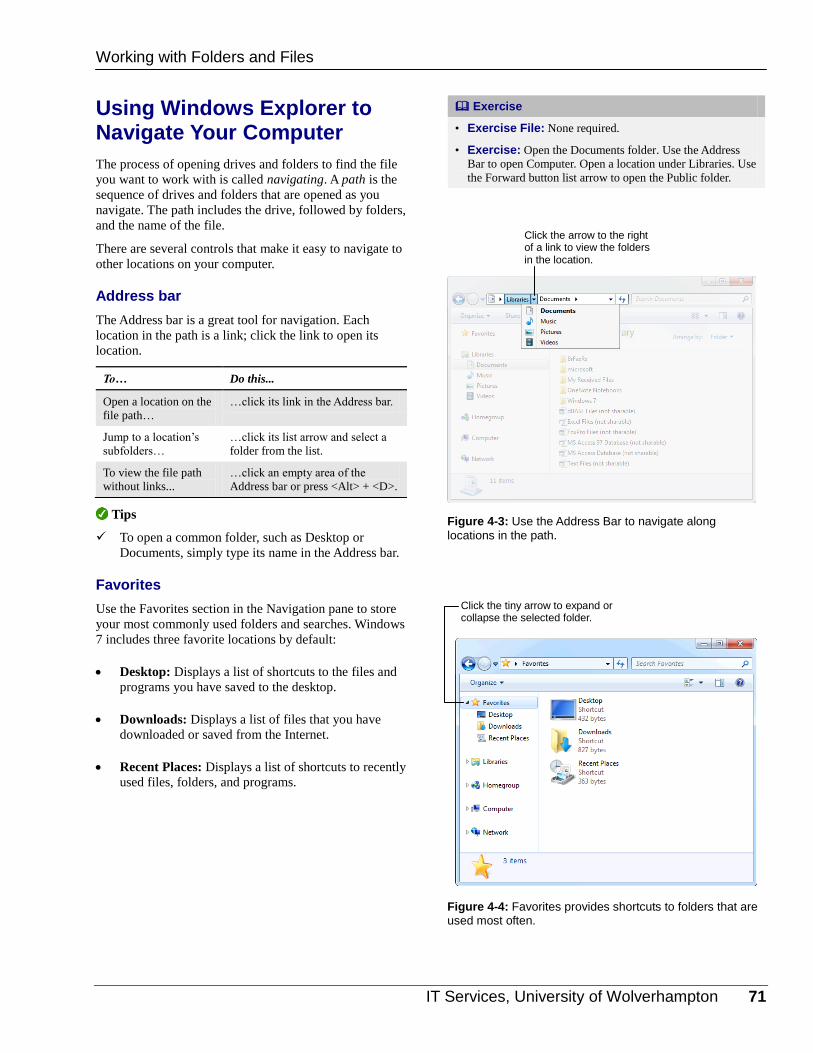
IT Services, University of Wolverhampton 71
Using Windows Explorer to Navigate Your Computer
The process of opening drives and folders to find the file
you want to work with is called navigating. A path is the
sequence of drives and folders that are opened as you
navigate. The path includes the drive, followed by folders,
and the name of the file.
There are several controls that make it easy to navigate to
other locations on your computer.
Address bar
The Address bar is a great tool for navigation. Each
location in the path is a link; click the link to open its
location.
Tips
To open a common folder, such as Desktop or
Documents, simply type its name in the Address bar.
Favorites
Use the Favorites section in the Navigation pane to store
your most commonly used folders and searches. Windows
7 includes three favorite locations by default:
Desktop: Displays a list of shortcuts to the files and
programs you have saved to the desktop.
Downloads: Displays a list of files that you have
downloaded or saved from the Internet.
Recent Places: Displays a list of shortcuts to recently
used files, folders, and programs.
Exercise
• Exercise File: None required.
• Exercise: Open the Documents folder. Use the Address
Bar to open Computer. Open a location under Libraries. Use
the Forward button list arrow to open the Public folder.
To… Do this...
Open a location on the
file path…
…click its link in the Address bar.
Jump to a location’s
subfolders…
…click its list arrow and select a
folder from the list.
To view the file path
without links...
…click an empty area of the
Address bar or press <Alt> + <D>.
Figure 4-3: Use the Address Bar to navigate along
locations in the path.
Figure 4-4: Favorites provides shortcuts to folders that are used most often.
Working with Folders and Files
Click the arrow to the right of a link to view the folders in the location.
Click the tiny arrow to expand or collapse the selected folder.

72 © 2009 CustomGuide, Inc.
Back and Forward buttons
As you navigate your computer, Windows keeps track of
the locations you have visited. Move back or forward in
this list using the Back and Forward buttons.
Click the Back or Forward button.
The contents of the location one step behind or ahead
on the path are displayed.
Tip: Click the Forward button list arrow to
open a list of recently visited locations.
Figure 4-5: Use the Back and Forward buttons to return to
locations you visited while navigating.
Click the Forward button list arrow to see a list of recent locations.
Working with Folders and Files

IT Services, University of Wolverhampton 73
Folder and File Basics
This lesson covers several simple, yet important, tasks in
file management.
Create a new folder
Folders allow you to group related information together.
Here’s how to create a new folder in Windows 7:
1. Open the location where you want to create the new
folder.
2. Click the New Folder button on the command bar.
Other Ways to Create a New Folder: Right-click any empty area in the window and
select New Folder from the contextual menu.
Or, press <Ctrl> + <Shift> + <N>.
3. Type a name for the folder and press <Enter>.
The folder is created.
Rename a folder or file
You might want to rename a folder or file to distinguish it
from other copies of the same file or to change the name
to something that better identifies its contents.
1. Select the folder or file you want to rename.
2. Click the Organize button on the command bar and
select Rename from the menu.
The name of the item becomes highlighted,
indicating you can change the name.
Other Ways to Rename a Folder or File: Right-click the folder or file and select Rename
from the contextual menu. Or, click the file while
it is highlighted.
3. Type a new name for the folder or file and press
<Enter>.
The name of the item is changed.
Trap: If you change the name of a folder, the path
for anything contained in that folder also changes.
For example, a shortcut to an item contained in
the folder will no longer work.
Exercise
• Exercise File: Windows 7 Practice folder
• Exercise: Create a new folder named “Practice Folder.”
Rename the folder to “My Stuff.” Delete the “grocery
list.txt” file, then restore it from the Recycle Bin.
Figure 4-6: Enter a name for the folder or file after it is created, or after selecting the Rename command.
Working with Folders and Files
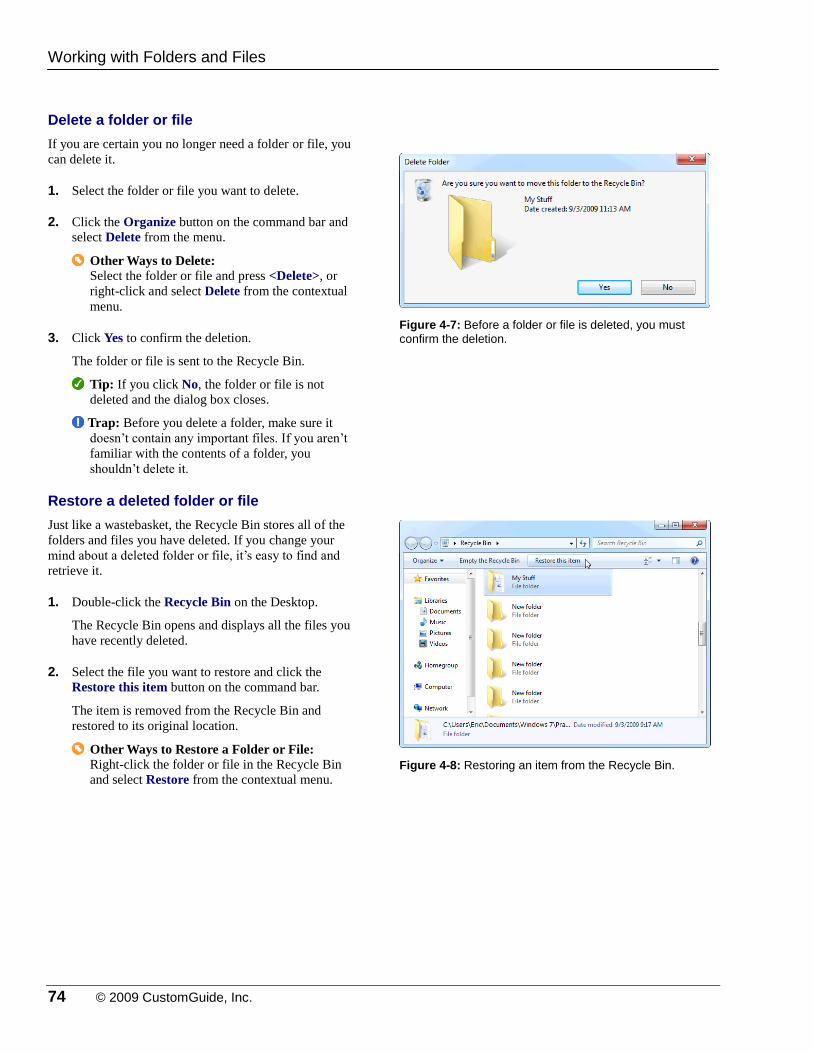
74 © 2009 CustomGuide, Inc.
Delete a folder or file
If you are certain you no longer need a folder or file, you
can delete it.
1. Select the folder or file you want to delete.
2. Click the Organize button on the command bar and
select Delete from the menu.
Other Ways to Delete: Select the folder or file and press <Delete>, or
right-click and select Delete from the contextual
menu.
3. Click Yes to confirm the deletion.
The folder or file is sent to the Recycle Bin.
Tip: If you click No, the folder or file is not
deleted and the dialog box closes.
Trap: Before you delete a folder, make sure it
doesn’t contain any important files. If you aren’t
familiar with the contents of a folder, you
shouldn’t delete it.
Restore a deleted folder or file
Just like a wastebasket, the Recycle Bin stores all of the
folders and files you have deleted. If you change your
mind about a deleted folder or file, it’s easy to find and
retrieve it.
1. Double-click the Recycle Bin on the Desktop.
The Recycle Bin opens and displays all the files you
have recently deleted.
2. Select the file you want to restore and click the
Restore this item button on the command bar.
The item is removed from the Recycle Bin and
restored to its original location.
Other Ways to Restore a Folder or File: Right-click the folder or file in the Recycle Bin
and select Restore from the contextual menu.
Figure 4-7: Before a folder or file is deleted, you must
confirm the deletion.
Figure 4-8: Restoring an item from the Recycle Bin.
Working with Folders and Files

IT Services, University of Wolverhampton 75
Using and Creating Libraries
A library is a virtual folder that gathers files from the
locations you specify and displays these files as a single
collection. For example, you could specify that the
Documents library contain all .doc files from the My
Documents and Important Documents folders.
Open a library
Open a library just like you would any other folder.
1. Click the Windows Explorer button on the taskbar.
The Libraries window appears. Four libraries have
been created by default in Windows 7: Documents,
Music, Pictures, and Videos.
2. Double-click the library you want to view.
The contents of the library appear.
Other Ways to Open a Library: Click the Start button and select a library from
the Start menu, or open any Windows Explorer
window, click Libraries in the Navigation pane,
and double-click the library you want to view.
Create a new library
You can create a new library that contains only the folders
you specify.
1. Click the Windows Explorer button on the taskbar.
The Libraries window appears.
2. Click the New Library button on the command bar.
A new library icon appears.
Other Ways to Create a New Library: Right-click Libraries in the Navigation pane or
an empty area in the Libraries window and select
New Library from the contextual menu.
3. Type a name for the library and press <Enter>.
The new library is created.
Exercise
• Exercise File: None required.
• Exercise: Familiarize yourself with the default libraries
available in Windows 7. Create a new library named
Practice.
Figure 4-9: A library is a compilation of files from folders
you specify.
Figure 4-10: The Libraries window.
Working with Folders and Files
Folder A Folder B
Pictures Library

76 © 2009 CustomGuide, Inc.
Modifying and Deleting Libraries
You don’t always have to create a new library. Save time
by modifying an existing library’s criteria instead.
Add a folder to a library
Libraries gather their content from the folders you specify.
You can include up to 50 folders in one library.
1. Open the library you want to add a folder to.
2. Click the Locations link in the Library pane.
The Library Locations window appears.
3. Click Add.
The Include Folder window appears. Here you need
to find and select the folder you want to include.
4. Navigate to and select the folder you want to include.
5. Click Include folder.
The folder is now included in the library.
Tip: A network folder must be added to the index
or made available offline before it can be included
in a library.
Other Ways to Add a Folder to a Library: Open or select the folder you want to add, click
the Include in Library button on the command
bar, and select the library you want to add it to.
Remove a folder from a library
If you delete an individual item from a library, it will also
be deleted from its original location. To remove an item
from a library without deleting it from its original
location, you have to remove the folder containing the
item.
1. Open the library containing the folder you wish to
remove.
2. Click the Locations link in the Library pane.
The Library Locations window appears.
3. Click the folder you want to remove, and click
Remove.
4. Click OK.
Exercise
• Exercise File: Practice library created in previous lesson.
• Exercise: Delete the Practice library.
Figure 4-11: The Documents Library open in Windows Explorer.
Figure 4-12: The Library Locations window.
Working with Folders and Files
Locations link
IT Services, University of Wolverhampton 77
Delete a library
If you decide you no longer need a library, delete it.
1. Click the Windows Explorer button on the taskbar.
The Libraries window appears.
2. Right-click the library you want to delete, and select
Delete from the contextual menu that appears.
The library is moved to the Recycle Bin.
Tip: Because libraries do not actually contain
files, deleting a library does not delete the files
that are stored there.
Working with Files and Folders

78 © 2009 CustomGuide, Inc.
Selecting Multiple Folders and Files
Before you can do anything with a folder or file, you must
select it first.
Select multiple items
There are several ways to select multiple items:
Click and drag a rectangle around the items you want
to select.
This works best for items that are next to each other,
especially if an icon view is being used.
Click the first item you want to select, press and hold
down the <Shift> key, and click the last item you
want to select.
This works best for items in a list or Details view
because of how items are arranged.
If the items aren’t next to each other, you can select
non-adjacent items by pressing and holding the
<Ctrl> key and clicking the items you want to select.
This method works in any view.
Select all
If you want to work with all of the items in a folder, you
can select all of them at once.
Click the Organize button on the command bar and
select Select All from the menu.
Other Ways to Select All: Press <Ctrl> + <A>.
Tips
Files and folders can be selected at the same time.
If folders and files are grouped or stacked, click the
group heading or the stack to select all the folders
and files in the group or stack.
Exercise
• Exercise File: Windows 7 Practice folder.
• Exercise: Select several files by clicking and dragging a
rectangle around them. Select the Paris.jpg, Accounting
folder, and grocery list.txt items.
Figure 4-13: Click and drag to select multiple files.
Figure 4-14: When you want to select a group of adjacent files, use the <Shift> key.
Figure 4-15: Use the <Ctrl> key when you want to select non-adjacent files.
Working with Folders and Files
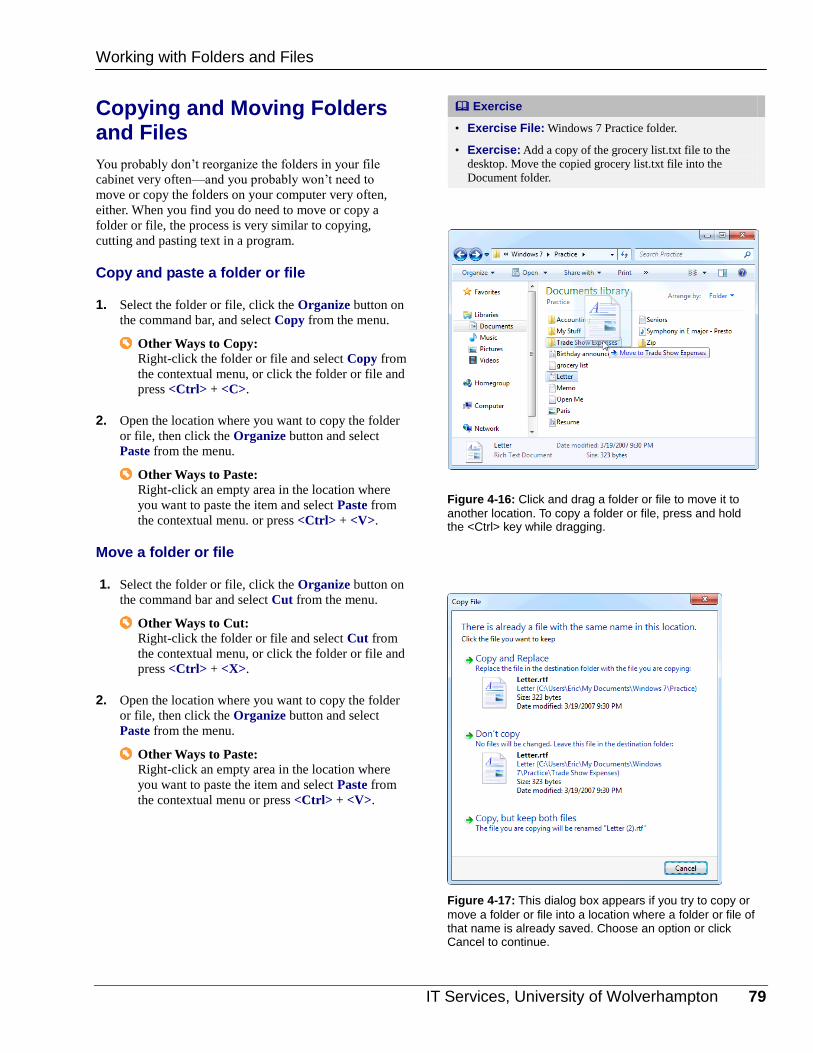
IT Services, University of Wolverhampton 79
Copying and Moving Folders and Files
You probably don’t reorganize the folders in your file
cabinet very often—and you probably won’t need to
move or copy the folders on your computer very often,
either. When you find you do need to move or copy a
folder or file, the process is very similar to copying,
cutting and pasting text in a program.
Copy and paste a folder or file
1. Select the folder or file, click the Organize button on
the command bar, and select Copy from the menu.
Other Ways to Copy: Right-click the folder or file and select Copy from
the contextual menu, or click the folder or file and
press <Ctrl> + <C>.
2. Open the location where you want to copy the folder
or file, then click the Organize button and select
Paste from the menu.
Other Ways to Paste: Right-click an empty area in the location where
you want to paste the item and select Paste from
the contextual menu. or press <Ctrl> + <V>.
Move a folder or file
1. Select the folder or file, click the Organize button on
the command bar and select Cut from the menu.
Other Ways to Cut: Right-click the folder or file and select Cut from
the contextual menu, or click the folder or file and
press <Ctrl> + <X>.
2. Open the location where you want to copy the folder
or file, then click the Organize button and select
Paste from the menu.
Other Ways to Paste: Right-click an empty area in the location where
you want to paste the item and select Paste from
the contextual menu or press <Ctrl> + <V>.
Exercise
• Exercise File: Windows 7 Practice folder.
• Exercise: Add a copy of the grocery list.txt file to the
desktop. Move the copied grocery list.txt file into the
Document folder.
Figure 4-16: Click and drag a folder or file to move it to
another location. To copy a folder or file, press and hold the <Ctrl> key while dragging.
Figure 4-17: This dialog box appears if you try to copy or
move a folder or file into a location where a folder or file of that name is already saved. Choose an option or click Cancel to continue.
Working with Folders and Files

80 © 2009 CustomGuide, Inc.
Copy or move by clicking and dragging
Click and drag the folder or file to the desired
location. Hold down the <Ctrl> key while you drag
to copy the folder or file.
Tip: You can click and drag to a location in the
Navigation pane, or open another window for the
location to which you want to move or copy the
item(s).
Working with Folders and Files
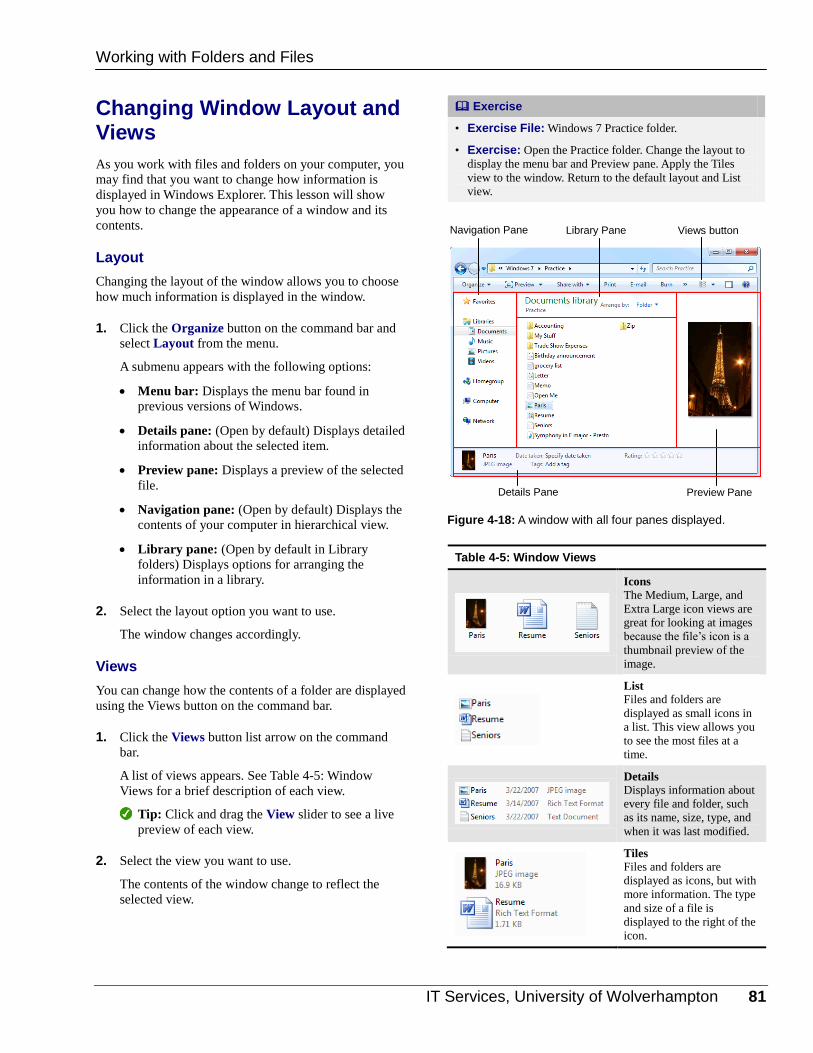
IT Services, University of Wolverhampton 81
Changing Window Layout and Views
As you work with files and folders on your computer, you
may find that you want to change how information is
displayed in Windows Explorer. This lesson will show
you how to change the appearance of a window and its
contents.
Layout
Changing the layout of the window allows you to choose
how much information is displayed in the window.
1. Click the Organize button on the command bar and
select Layout from the menu.
A submenu appears with the following options:
Menu bar: Displays the menu bar found in
previous versions of Windows.
Details pane: (Open by default) Displays detailed
information about the selected item.
Preview pane: Displays a preview of the selected
file.
Navigation pane: (Open by default) Displays the
contents of your computer in hierarchical view.
Library pane: (Open by default in Library
folders) Displays options for arranging the
information in a library.
2. Select the layout option you want to use.
The window changes accordingly.
Views
You can change how the contents of a folder are displayed
using the Views button on the command bar.
1. Click the Views button list arrow on the command
bar.
A list of views appears. See Table 4-5: Window
Views for a brief description of each view.
Tip: Click and drag the View slider to see a live
preview of each view.
2. Select the view you want to use.
The contents of the window change to reflect the
selected view.
Exercise
• Exercise File: Windows 7 Practice folder.
• Exercise: Open the Practice folder. Change the layout to
display the menu bar and Preview pane. Apply the Tiles
view to the window. Return to the default layout and List
view.
Figure 4-18: A window with all four panes displayed.
Table 4-5: Window Views
Icons The Medium, Large, and
Extra Large icon views are
great for looking at images
because the file’s icon is a
thumbnail preview of the
image.
List Files and folders are
displayed as small icons in
a list. This view allows you
to see the most files at a
time.
Details Displays information about
every file and folder, such
as its name, size, type, and
when it was last modified.
Tiles Files and folders are
displayed as icons, but with
more information. The type
and size of a file is
displayed to the right of the
icon.
Working with Folders and Files
Details Pane Preview Pane
Navigation Pane Library Pane Views button

82 © 2009 CustomGuide, Inc.
Sorting and Filtering Items
If you ever need to find an item, such as a file that’s
buried deep inside a folder, you can quickly sort a folder’s
contents by clicking one of its column headings. For
example, clicking the “Date modified” column heading
sorts the file list by the date each file was last modified or
saved.
Sort files
By default, files are sorted alphabetically by name in
ascending order. You can also sort your files by size,
type, or date modified.
First, you need to switch to Details view.
1. Click the View button list arrow on the command
bar and select Details.
The file list is displayed in Details view, and column
headings now appear above the file list.
2. Click the column heading you want to sort by.
The file list is arranged accordingly.
Other Ways to Sort: Right-click an empty area in the file list, select
Sort by from the contextual menu, and select an
option.
Tip: Click the column heading again to toggle
between ascending and descending order.
Filter files
By applying a filter to a folder you can display only the
files that meet your criteria and hide the files that do not.
For example, you could apply a filter that would only
display files that were modified yesterday.
First, you need to switch to Details view.
1. Click the View button list arrow on the command
bar and select Details.
The file list is displayed in Details view, and column
headings now appear above the file list.
2. Point to the column heading you want to filter by
and click the list arrow that appears.
A list of filtering options appears. Filtering options
will vary depending on which column heading is
selected.
Exercise
• Exercise File: Windows 7 Practice folder.
• Exercise: Sort the files by date modified. Filter the view
so that only JPEG images are shown. Remove the filter.
Figure 4-19: Column headings only appear in Details view.
Figure 4-20: You can filter by more than one property.
Working with Folders and Files

IT Services, University of Wolverhampton 83
3. Click the check box next to the property or properties
that you want to filter the file list by.
The file list is rearranged accordingly and a
checkmark appears next to the column heading that is
being filtered.
Tips
To remove a filter, follow the same steps you used to
apply it.
Working with Folders and Files

84 © 2009 CustomGuide, Inc.
Using Search
It’s just as easy to misplace a folder or file on your
computer as it is to misplace your car keys—maybe even
easier! The Search feature is a powerful solution for
finding your lost folders and files.
Windows Explorer
If you have an idea regarding where the folder or file
you’re looking for is located, use the Search box in
Windows Explorer. The Search box appears at the top of
every Windows Explorer window and searches the
contents, including subfolders, of that window for the text
that you type. If a file’s name, content, tags, or other
properties match the searched text, it will appear in the
search results.
1. Open the folder or library where the file you’re
looking for is located.
2. Type a keyword for the file in the Search box.
As you type, items that match the keyword become
highlighted.
Tip: Once the file you want appears, you can stop
typing: there is no need to press <Enter> to
submit your search text.
Search filters
You can quickly refine your searches in Windows 7 with
Search Filters. Use a search filter to display only those
files that meet the criteria you specify.
1. Click in the Search box.
A list of search filters appears.
Tip: The filters available will vary depending on
the contents of the folder.
2. Click the filter you want to use, and then specify the
filter criteria.
The contents of the folder are filtered.
Start menu
The Search box in the Start menu can also be used to
perform a search. Searching from the Start menu finds
files, folders, e-mails, and programs.
1. Click the Start button.
An insertion point appears in the Search box at the
bottom of the Start menu.
Exercise
• Exercise File: Windows 7 Practice folder.
• Exercise: Search the word “expenses” in the Practice
folder. Open the Search folder and search for files modified
on 3/22/07. Search “music” from the Start menu.
Figure 4-21: Search results appear highlighted.
Working with Folders and Files
Search box
Filter options

IT Services, University of Wolverhampton 85
2. Type a keyword in the Search box.
As you type, items that match the keyword appear in
the Start menu.
Tip: Once the item you want appears, you can
stop typing: there is no need to press <Enter> to
submit your search text.
Tips
To clear a search, click the Close button ( ) in the
Search box.
Use the Preview pane to preview your search results
without having to open the actual file. Click the
Preview Pane button on the command bar to display
the Preview pane.
Now you can save your searches and return to them
later. Click the Save search button on the command
bar, enter a name for the search, and click Save.
Figure 4-22: Use the Preview pane to preview search
results without having to open the actual file.
Working with Folders and Files
Preview Pane button

86 © 2009 CustomGuide, Inc.
Working with Compressed Folders
You can reduce the size of a folder and its contents by
using a compressed, or zipped, folder. Working with a
compressed folder and its contents is just like working
with a regular folder.
Create a compressed folder
Compressed folders require less memory, which makes
them easier to transfer and share with other computers.
1. Right-click an empty area on the desktop or in a
folder window and select New Compressed
(zipped) Folder from the contextual menu.
The compressed folder is created.
2. Type a name for the folder.
3. Click and drag items into the compressed folder.
A copy of the item appears inside the zipped folder.
Other Ways to Create a Compressed Folder: Right-click an existing folder or file (or select
multiple folders and files) and select Send To
Compressed (zipped) Folder from the contextual
menu.
Work with compressed folder files
If you open a file directly from the compressed folder, it
will open in read-only format. If you want to work with
and make changes to a file, you need to extract it.
1. Double-click the compressed folder and click the
Extract all files button on the command bar.
The Extract Compressed (Zipped) Folders dialog box
appears.
Other Ways to Extract Files: Click and drag the folders or files out of the
compressed folder. Or, right-click the compressed
folder and select Extract All from the contextual
menu.
2. Click the Browse button and specify where you
would like the extracted files to be located and click
Extract.
The files are extracted to the specified location.
Tips
Extracting a file returns the file to its original size.
Exercise
• Exercise File: Windows 7 Practice folder
• Exercise: Create a compressed folder named “Zip” and
add the Seniors.txt file to it. Extract the file to your
Documents folder.
Figure 4-23: A zipped folder in the Practice folder.
Figure 4-24: Extracting files from a compressed folder.
Working with Folders and Files
A compressed folder has a zipper on the folder icon.
IT Services, University of Wolverhampton 87
WWoorrkkiinngg wwiitthh FFoollddeerrss aanndd FFiilleess
RReevviieeww
Quiz Questions
40. Which of the following computer devices does not store information? A. Hard disk drive B. Discus disks C. Network drive D. Removable disks
41. How much text is equal to a byte? A. A single character B. A novel C. A library D. An encyclopedia set
42. Do this to display the contents of a drive, folder or file: A. Right-click the item. B. Triple-click the item. C. Click the drive or folder while holding down the Alt key. D. Double-click the item.
43. To view an item's properties, right-click the item and select Properties from the contextual menu. (True or False?)
44. Windows Explorer automatically appears when you open a folder or another location on your computer. (True or
False?)
45. You can create a new folder using the <Ctrl> + <N> shortcut. (True or False?)
46. The process for renaming and deleting a folder is the same for a file. (True or False?)
47. Delete a folder or file by clicking it, pressing the Delete key, and confirming the deletion. (True or False?)
48. Which of these will NOT select multiple files or folders? A. Click and drag a rectangle around any adjacent files you want to select. B. Click the first file you want to select, press and hold down the Shift key and click the last file you want to select. C. Hold down the <Ctrl> key and click the files you want to select. D. Click the Organize button and select Select Multiple Files, and then click the files you want to select.
49. If you hold down the <Ctrl> key while clicking and dragging a folder, what happens? A. The folder is copied to where it is dropped. B. The folder is moved to where it is dropped.

88 © 2009 CustomGuide, Inc.
C. The folder is deleted. D. The Organize button is clicked.
50. Which of the following methods is incorrect? A. To copy a file, press and hold down the <Ctrl> key as you click and drag the file to a new location. B. To move a file, click the Organize button and select Move from the menu. C. To copy a file, click the Organize button and select Copy from the menu. D. To move a file, right-click the file and select Cut from the contextual menu.
51. The menu bar appears in windows by default in Windows Vista. (True or False?)
52. Which of these is not a view you can use in a window? A. Picture B. List C. Details D. Tiles
53. You can filter only by one property. (True or False?)
54. You must be in Details view in order to sort or filter items. (True or False?)
55. The compression ratio is the same for all file types. (True or False?)
56. Which of the following is NOT true? A. When a file is moved into a compressed folder, a compressed version of the file is made and the original file is
not effected. B. Compressed files are damanged after being extracted. C. A compressed folder icon is marked with a zipper. D. A compressed folder has a .zip file extension.
Quiz Answers
40. B. The discus is more suited for track and field than a computer.
41. A. A byte is equal to a single character.
42. D. Double-click an item to open it and display its contents.
43. True. You can view any item's properties by right-clicking and selecting Properties.
44. True. Windows Explorer automatically appears when you view the locations on your computer. You don’t need to
launch it from the Accessories folder to browse your computer.
45. False. You can't create a new folder using a keystroke shortcut, but you can right-click a window and select New >
Folder to create a new folder.

IT Services, University of Wolverhampton 89
46. True. If you know how to rename and delete a folder, you know how to rename and delete a file.
47. True.
48. D. Select Multiple Files is not a command under the Organize button.
49. A. A folder is copied if the <Ctrl> key is pressed when the folder is clicked and dragged. The same is true with a file.
50. B. The command to move a file under the Organize button is Cut, not Move.
51. False. If you want to use menus in windows, you must change the layout so that the menu bar is displayed.
52. A. Picture is not a view you can use, but there are several sizes of Icon views you can apply.
53. False. You can filter by several properties; simply click each property you want to filter by.
54. True. You must be in Details view before you can sort or filter items.
55. False. The amount a file can be compressed varies with each file.
56. B. Compressed files are NOT damanged after being extracted. They are quite safe and stable.

90 © 2009 CustomGuide, Inc.
WWoorrkkiinngg wwiitthh
tthhee TTaasskkbbaarr aanndd
DDeesskkttoopp
Customizing the Taskbar .................................. 90 Pin a program to the taskbar ................... 90 Rearrange icons on the taskbar .............. 90
Resizing and moving the Taskbar .................... 91 Resize the taskbar ................................... 91 Move the taskbar ..................................... 91 Hide the taskbar ....................................... 91
Using Jump Lists ............................................... 93 Open a program’s jump list ...................... 93 Pin items to a jump list ............................. 93
Customizing the Start Menu ............................. 94
Working with Desktop Icons ............................ 96 Arrange desktop icons ............................. 96 Create a shortcut ..................................... 96
Using Gadgets ................................................... 97 Add a gadget to the desktop .................... 97 Move a gadget ......................................... 97 Customize a gadget ................................. 98
Starting a Program Automatically with Windows ............................................................. 99
When you turn on your computer and
Windows loads and eventually pops to life
on your screen, the first things you see are
the desktop and taskbar and Start button.
These are the most important parts of
Windows. The taskbar is the control
center for Windows—where you start and
manage all your programs. The desktop is
your workspace—where you actually get
your work done.
Because the taskbar and desktop are so
important, this entire chapter is devoted
just to them. In this chapter, you’ll learn
how to customize the taskbar and desktop
so they work best for you. Customizing
the taskbar and desktop is a lot like
arranging furniture in an empty living
room—there’s no right way to do it; just
do whatever works best for you.
In this chapter, you’ll learn how to move,
resize, and hide the taskbar; how to
customize the Start menu; and how to use
the Windows Sidebar on the desktop.
55
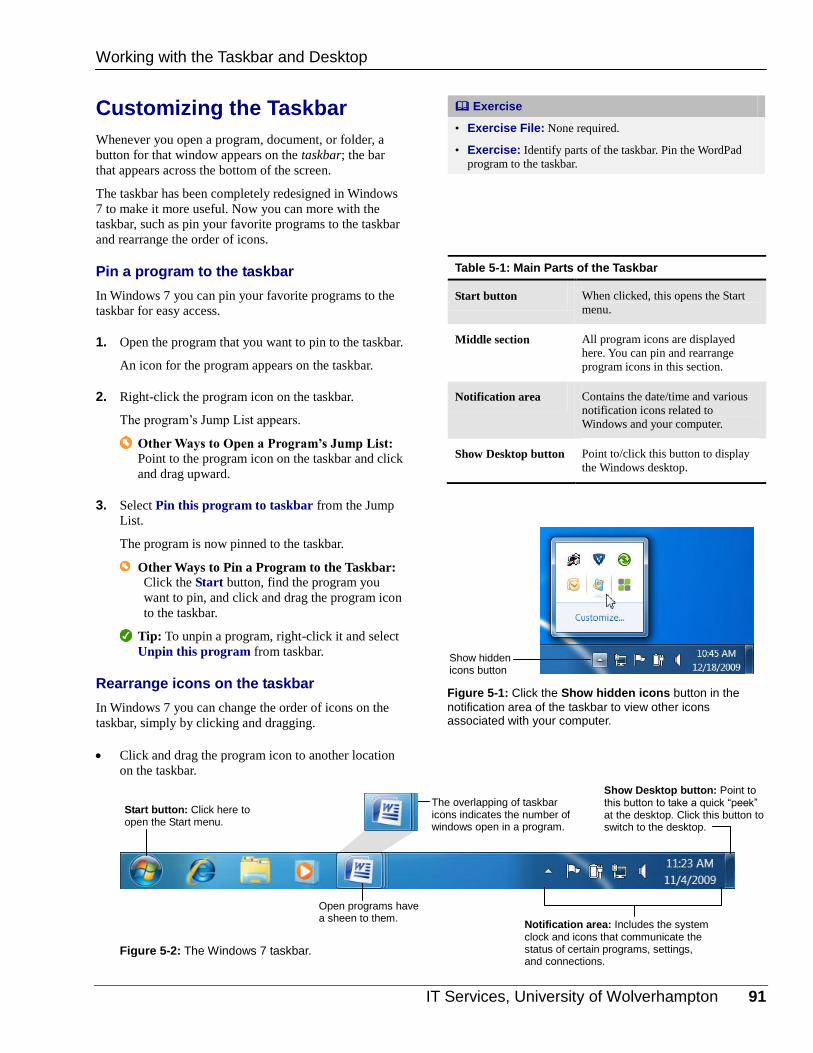
IT Services, University of Wolverhampton 91
Customizing the Taskbar
Whenever you open a program, document, or folder, a
button for that window appears on the taskbar; the bar
that appears across the bottom of the screen.
The taskbar has been completely redesigned in Windows
7 to make it more useful. Now you can more with the
taskbar, such as pin your favorite programs to the taskbar
and rearrange the order of icons.
Pin a program to the taskbar
In Windows 7 you can pin your favorite programs to the
taskbar for easy access.
1. Open the program that you want to pin to the taskbar.
An icon for the program appears on the taskbar.
2. Right-click the program icon on the taskbar.
The program’s Jump List appears.
Other Ways to Open a Program’s Jump List: Point to the program icon on the taskbar and click
and drag upward.
3. Select Pin this program to taskbar from the Jump
List.
The program is now pinned to the taskbar.
Other Ways to Pin a Program to the Taskbar: Click the Start button, find the program you
want to pin, and click and drag the program icon
to the taskbar.
Tip: To unpin a program, right-click it and select
Unpin this program from taskbar.
Rearrange icons on the taskbar
In Windows 7 you can change the order of icons on the
taskbar, simply by clicking and dragging.
Click and drag the program icon to another location
on the taskbar.
Exercise
• Exercise File: None required.
• Exercise: Identify parts of the taskbar. Pin the WordPad
program to the taskbar.
Table 5-1: Main Parts of the Taskbar
Start button When clicked, this opens the Start
menu.
Middle section All program icons are displayed
here. You can pin and rearrange
program icons in this section.
Notification area Contains the date/time and various
notification icons related to
Windows and your computer.
Show Desktop button Point to/click this button to display
the Windows desktop.
Figure 5-1: Click the Show hidden icons button in the
notification area of the taskbar to view other icons associated with your computer.
Figure 5-2: The Windows 7 taskbar.
Working with the Taskbar and Desktop
The overlapping of taskbar icons indicates the number of windows open in a program.
Notification area: Includes the system clock and icons that communicate the status of certain programs, settings, and connections.
Start button: Click here to open the Start menu.
Show Desktop button: Point to this button to take a quick “peek” at the desktop. Click this button to switch to the desktop.
Open programs have a sheen to them.
Show hidden icons button

92 © 2009 CustomGuide, Inc.
Resizing and Moving the Taskbar
The taskbar is the command center for Windows, which is
why it rests along the bottom of the desktop, ready for
use. Still, some people think the taskbar should be located
in a different location on the screen. Others don’t like how
the ever-present taskbar occupies valuable desktop space,
or wish the taskbar were larger so it could display more
icons and buttons.
This lesson will show you how to move the taskbar to a
new location on the screen, change the size of the taskbar,
and hide the taskbar to give you more room on the screen.
Tips
Before you can resize and move the taskbar, you
must unlock it first. To unlock the taskbar, right-click
it and select Lock the taskbar.
Resize the taskbar
When the size of the taskbar is increased, it can display
more program and window icons.
1. Position the pointer over the top border of the taskbar
until it changes to a .
When the pointer changes, the taskbar can be resized.
2. Click and drag the edge of the taskbar upwards.
The taskbar is resized so it can display two rows of
icons, rather than just one.
Move the taskbar
When the taskbar is unlocked, you can move the taskbar
to the top, left, right, or bottom of the desktop.
Position the pointer over a blank area of the taskbar.
Click and drag the taskbar to the top, bottom, left, or
right side of the desktop.
The taskbar is moved accordingly.
Hide the taskbar
If you don’t want the taskbar to take up valuable space on
the desktop, you can hide it so that it only appears when
you need to use it.
1. Right-click a blank area of the taskbar and select
Properties from the contextual menu.
The Taskbar tab of the Taskbar and Start Menu
Properties dialog box appears. See Table 5-2: Taskbar
Exercise
• Exercise File: None required.
• Exercise: Resize the taskbar and then move it to the right
side of the desktop. Move it back to the bottom of the
desktop. Turn on auto-hiding for the taskbar.
Figure 5-3: Click and drag to resize the taskbar.
Figure 5-4: You can move the taskbar to the top, left, right, or bottom of the screen.
Working with the Taskbar and Desktop

IT Services, University of Wolverhampton 93
Appearance Properties for a description of these
properties.
2. Click the Auto-hide the taskbar check box and click
OK.
The taskbar is now hidden. To make it appear again,
simply point to the location on the desktop where the
taskbar is located.
3. Point to the location (bottom, top, side) on the
desktop where the taskbar is located.
The taskbar appears.
Table 5-2: Taskbar Appearance Properties
Lock the
taskbar
Locks the taskbar at its current position on the
desktop so that it cannot be moved to a new
location.
Auto-hide
the taskbar
Hides the taskbar from view. To display the
taskbar, position the mouse pointer near the
bottom of the screen, or wherever the taskbar
is located.
Use small
icons
Shrinks all program icons on the taskbar to
make more room on the taskbar.
Taskbar
location on
screen
Change the location of the taskbar on the
screen. Bottom is selected by default.
Taskbar
buttons
Choose how you want icons to appear on the
taskbar:
Always combine, hide labels: Groups
items of the same type under the program
they were created in (default setting).
Combine when taskbar is full: Only
groups items when the taskbar is full.
Never combine: Never groups items; each
item has its own button on the taskbar.
Figure 5-5: The Taskbar and Start Menu Properties dialog box.
Working with the Taskbar and Desktop
Click here to hide the taskbar.

94 © 2009 CustomGuide, Inc.
Using Jump Lists
Jump lists are new in Windows 7. They contain shortcuts
to popular program commands and recently used files.
Open a program’s Jump List
Jump Lists appear whenever you right-click a program or
icon on the taskbar or in the Start menu.
Right-click the program’s icon on the taskbar.
The Jump List appears.
Other Ways to Open a Program’s Jump List: Point to the program icon on the taskbar and click
and drag upward. You can also work with Jump
Lists from the Start menu. Open the Start menu
and click the program’s list arrow.
Pin items to a Jump List
To give you easy access to related files, you can pin items
to a program’s Jump List.
1. Open the file that you want to pin, in the program
that created it.
2. Right-click the program’s icon on the taskbar.
The program’s Jump List appears.
Other Ways to Open a Program’s Jump List: Point to the program icon on the taskbar and click
and drag upward. Or, click the program’s list
arrow in the Start menu.
3. Point to the item you want to pin.
A tiny button that looks like a pushpin appears, which
you can click to pin the item.
4. Click the Pin to this list button.
The item is now pinned to the program’s Jump List.
Tip: To unpin an item in a Jump List, click the
Unpin from this list button (the tiny pushpin
icon) next to the item. Or, right-click the item and
select Unpin from this list from the contextual
menu.
Exercise
• Exercise File: None required.
• Exercise: Open the WordPad program and view its Jump
List. Close the WordPad program window using the Jump
List.
Figure 5-6: Right-click an icon on the taskbar to open its
Jump List.
Figure 5-7: You can also open a program’s Jump List using the Start menu.
Working with the Taskbar and Desktop
Click here to pin the item to the Jump List.

IT Services, University of Wolverhampton 95
Customizing the Start Menu
This lesson discusses ways to customize the Start menu.
Some of the Start menu’s primary duties—launching
programs, providing shortcuts to frequently used files and
folders—have been added to the taskbar, but you might
still find it useful to continue to customize some of these
settings in the Start menu.
Customize the Start menu
The Start menu displays programs that are used
frequently, and shortcuts to important folders, locations,
and tools on your computer. Customizing the Start menu
lets you control how these links, icons, and menus look
and behave.
1. Right-click the Start button and select Properties
from the contextual menu.
The Start Menu tab of the Taskbar and Start Menu
Properties dialog box appears.
2. Click the Customize button.
The Customize Start Menu dialog box appears.
You can choose how the Start menu looks and
behaves using the options in this dialog box.
Control how icons in the Start menu look and
behave: Here you can select which icons appear
in the Start menu, and how those icons work. For
example, you can specify that an icon open a
menu instead of a window when clicked.
Control the number of recent programs that
appear in the Start menu: Here you can control
the number of recently used programs that appear
in the left pane of the Start menu.
Control the number of recent items that appear
in Jump Lists: Here you can control the number
of recently used items that appear in a Jump List.
This controls Jump Lists in the taskbar and the
Start menu.
3. Select the appropriate options and click OK.
The Start menu is customized accordingly.
Tips
The Classic Start menu, which was available in
Windows XP and Windows Vista, is no longer
available in Windows 7.
Exercise
• Exercise File: None required.
• Exercise: Open the Customize Start Menu dialog box and
display Computer as a menu. Change the number of recent
programs to display to 5 for both the Start menu and
Jump Lists.
Figure 5-8: The Customize Start Menu dialog box.
Working with the Taskbar and Desktop
Control how icons in the Start menu look and behave.
Control the number of recently used programs/items that appear in the Start menu and Jump Lists.

96 © 2009 CustomGuide, Inc.
Pin a program to the Start menu
You can create shortcuts to specific programs by pinning
the program icon to the Start menu.
1. Click the Start button.
The Start menu appears.
2. Select All Programs from the menu.
A list of programs that are available on your
computer appears.
3. Right-click the program icon for the program you
want to pin and select Pin to Start Menu from the
contextual menu.
The program icon appears at the top of the frequently
used programs list the Start menu.
Tip: To unpin a program from the Start menu,
open the Start menu, right-click the program icon,
and select Unpin from Start Menu from the
contextual menu.
Figure 5-9: The Windows 7 Start menu with two programs pinned to it.
Working with the Taskbar and Desktop
Programs that have been pinned to the Start menu appear at the top of the frequently used programs list.

IT Services, University of Wolverhampton 97
Working with Desktop Icons
When a file or folder is saved on the desktop, it is
represented by an icon. This lesson discusses how to
arrange icons that accumulate on the desktop, and how to
create a shortcut for an icon.
Arrange desktop icons
Since the desktop is readily visible, it is a convenient
place to save files that you are currently working on.
However, things can become cluttered quickly, making it
difficult to find what you need.
1. Right-click an empty area of the desktop and select
Sort by from the contextual menu.
A variety of sort options appears, as described in
Table 5-3: Sort Options for Desktop Icons.
2. Select an option from the menu.
The icons on the desktop are arranged accordingly.
Tips
You can also change the size and location of icons on
the desktop. To do this, right-click an empty area of
the desktop, select View, and select an option from
the submenu. See Table 5-4: View Options for
Desktop Icons for a description of these options.
Create a shortcut to the desktop
A shortcut is a quick way to start a program or open a file
or folder without having to go to the location where it is
saved.
1. With the right mouse button, click and drag the
program, file, or folder to the desktop.
Make sure you click and drag with the right mouse
button.
2. Select Create shortcuts here from the contextual
menu that appears when you release the mouse
button.
The shortcut is added to the desktop.
Tips
You can create a shortcut anywhere on your
computer.
Since shortcuts only point to files or folders, moving,
renaming, or deleting a shortcut does not affect the
original program or file.
Exercise
• Exercise File: Trade Show Expenses folder
• Exercise: Create a shortcut to the Trade Show Expenses
folder on the desktop. Hide desktop icons, then show them
again.
Table 5-3: Sort Options for Desktop Icons
Name Arranges icons for folders and files in
alphabetical order.
Size Arranges icons from largest to smallest, or
smallest to largest.
Item type Arranges icons by type, so all folders
would be grouped together, all Word
documents would be together, and so on.
Date modified Arranges icons by the date the file or
folder was last modified.
Table 5-4: View Options for Desktop Icons
Large / Medium /
Small icons
Changes the size of the icons on the
desktop.
Auto arrange icons Arranges desktop icons automatically.
Deselect this option if you want to be
able to click and drag icons where you
want them.
Align icons to grid Aligns all desktop icons evenly along
an invisible grid.
Show desktop icons Show/hide desktop icons.
Show desktop
gadgets
Show/hide desktop gadgets.
Working with the Taskbar and Desktop
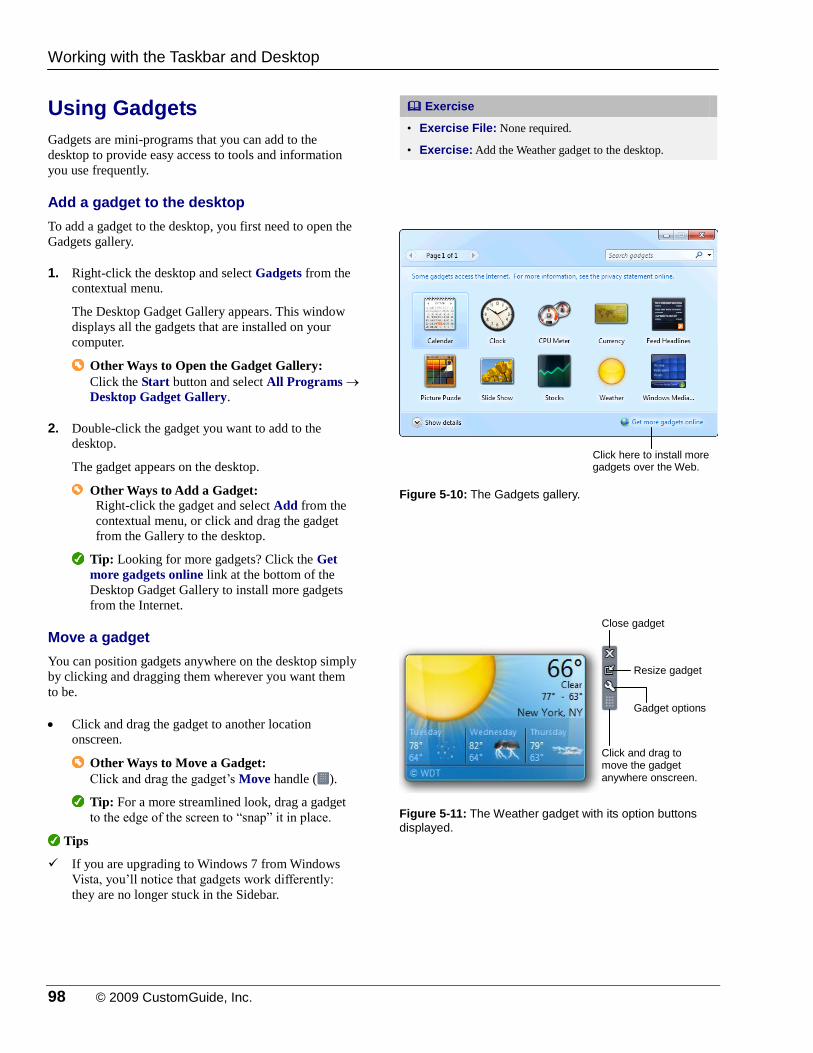
98 © 2009 CustomGuide, Inc.
Using Gadgets
Gadgets are mini-programs that you can add to the
desktop to provide easy access to tools and information
you use frequently.
Add a gadget to the desktop
To add a gadget to the desktop, you first need to open the
Gadgets gallery.
1. Right-click the desktop and select Gadgets from the
contextual menu.
The Desktop Gadget Gallery appears. This window
displays all the gadgets that are installed on your
computer.
Other Ways to Open the Gadget Gallery:
Click the Start button and select All Programs
Desktop Gadget Gallery.
2. Double-click the gadget you want to add to the
desktop.
The gadget appears on the desktop.
Other Ways to Add a Gadget: Right-click the gadget and select Add from the
contextual menu, or click and drag the gadget
from the Gallery to the desktop.
Tip: Looking for more gadgets? Click the Get
more gadgets online link at the bottom of the
Desktop Gadget Gallery to install more gadgets
from the Internet.
Move a gadget
You can position gadgets anywhere on the desktop simply
by clicking and dragging them wherever you want them
to be.
Click and drag the gadget to another location
onscreen.
Other Ways to Move a Gadget:
Click and drag the gadget’s Move handle ( ).
Tip: For a more streamlined look, drag a gadget
to the edge of the screen to “snap” it in place.
Tips
If you are upgrading to Windows 7 from Windows
Vista, you’ll notice that gadgets work differently:
they are no longer stuck in the Sidebar.
Exercise
• Exercise File: None required.
• Exercise: Add the Weather gadget to the desktop.
Figure 5-10: The Gadgets gallery.
Figure 5-11: The Weather gadget with its option buttons
displayed.
Working with the Taskbar and Desktop
Close gadget
Resize gadget
Gadget options
Click and drag to move the gadget anywhere onscreen.
Click here to install more gadgets over the Web.

IT Services, University of Wolverhampton 99
Customize a gadget
Oftentimes you’ll find that you want to customize a
gadget; for example, to change the location of the weather
report. This can be accomplished by changing the
gadget’s options.
1. Point to a gadget.
The gadget’s toolbar appears. The buttons that appear
vary depending on the gadget, but the most common
buttons are:
Options: Settings for the specific gadget. For
example, change the clock’s time zone.
Close: Removes the gadget from the desktop. The
gadget is still saved on the computer if you want
to use it in the future.
Larger / Smaller size: Enlarges or shrinks the
gadget depending on its current settings.
2. Click the Options button and change the gadget
settings as necessary.
The new settings are applied to the gadget.
Working with the Taskbar and Desktop

100 © 2009 CustomGuide, Inc.
Starting a Program Automatically with Windows
If you find that you start the same programs every time
you turn on your computer, you can have Windows 7 start
them automatically.
1. Click the Start button and select All Programs from
the menu.
The list of the programs and program folders that are
available on your computer appears.
2. Right-click the Startup folder and select Open from
the contextual menu.
The Startup folder window appears.
To make a program start automatically with
Windows, add a shortcut to the program in the
Startup folder.
3. Click the Start button and select All Programs from
the menu.
4. Using the right mouse button, click and drag the
program icon to Startup folder window. Select
Create shortcuts here from the menu that appears.
A shortcut to the program is added to the Startup
folder, and the program will now start automatically
when Windows starts.
Other Ways to Add a Shortcut: Open the location where the program is saved
(such as C:\Progam Files). Right-click the
program and select Create Shortcut. Click and
drag the shortcut into the Startup folder.
Tip: Windows 7 may not allow you to create the
shortcut in the same location as the original item.
In this case, Windows will ask if you want the
shortcut to be placed on the Desktop instead.
Click Yes to create the shortcut on your Desktop.
Tips
You can rearrange how items in the All Programs
folder appear by adding folders and clicking and
dragging the program shortcuts into the different
folders.
Exercise
• Exercise File: None required.
• Exercise: Add the Notepad program to the Startup folder.
Figure 5-12: The Startup folder in Windows 7. Any
program that appears in this folder will start automatically when Windows starts.
Working with the Taskbar and Desktop

IT Services, University of Wolverhampton 101
WWoorrkkiinngg wwiitthh tthhee TTaasskkbbaarr aanndd
DDeesskkttoopp RReevviieeww
Quiz Questions
57. Which of the following is NOT part of the taskbar? A. Quick Launch Bar B. Start button C. Notification area D. Show Desktop button
58. Which of the following statements is NOT true? A. You can make the taskbar thicker by dragging its top edge until the taskbar is the size you want. B. If the taskbar is hidden, you must move the pointer to the bottom of the screen to display it. C. You can position the taskbar so that it floats in the middle of the screen. D. In order to move or resize the taskbar, it must be unlocked.
59. Where can you access Jump Lists in Windows 7? A. Start menu and taskbar B. Taskbar only C. Start menu only D. Windows Explorer toolbar
60. Which of these is NOT a way to customize the Start menu? A. Display an item as a menu B. Auto arrange icons C. Remove the item from the Start menu D. Control number of items in Jump Lists
61. You can arrange desktop icons by type. (True or False?)
62. You can only install gadgets that have been included with Windows 7. (True or False?)
63. If you always use the same programs, you can have them start automatically with Windows. (True or False?)
Quiz Answers
57. A. The Quick Launch Bar is NOT part of the Windows 7 taskbar as it was in previous versions.
58. C. You can only move the taskbar to the edges of the screen.

102 © 2009 CustomGuide, Inc.
59. A. Jump Lists can be accessed in the Start menu and from the taskbar.
60. B. There is no auto arrange command in customizing the Start menu.
61. True. You can arrange desktop icons by name, size, type, and date modified.
62. False. You can download and install many more gadgets via the Internet.
63. True. You can have programs start automatically with Windows, although doing so makes it take longer for Windows
to start.

IT Services, University of Wolverhampton 103
PPeerrssoonnaalliizziinngg
WWiinnddoowwss
A Look at the Control Panel ........................... 103
Changing Color and Theme............................ 104 Change window color ............................ 104 Change the theme ................................. 105 Save a theme ......................................... 105
Changing the Desktop Background .............. 106
Using a Screen Saver ...................................... 108
Adjusting Display Settings ............................. 109 Adjust screen resolution ........................ 109 Adjust font size ...................................... 109
Adjusting Sound ............................................... 111 Change system sounds .......................... 111 Adjust system volume ............................ 112
Adjusting the Mouse ....................................... 113 Change mouse pointers ........................ 113 Change mouse properties ..................... 113
Changing the Date and Time .......................... 115 View the date and time .......................... 115 Change the date, time, and time zone ... 115 Add a clock ............................................ 116
Changing Language and Region Options ..... 117 Change region format ............................ 117 Change keyboard language .................. 118
Customizing Folder View Options ................. 119
In the old days, computers had two
settings: on or off. Today, Windows lets
you adjust your computer to work the way
you do.
This chapter will show you how to
customize Windows settings to suit your
needs and tastes. You’ll learn how to give
your computer character by adding your
own custom wallpaper, screensaver,
desktop themes, and screen colors. Once
you’ve decorated Windows with your
personal theme, you’ll want to make sure
it looks as good as possible, so you’ll
learn how to adjust the screen resolution
and the number of colors that appear on
the screen at once. Finally, you’ll learn
how to adjust the date and time on your
computer, the mouse settings so you can
finally slow down that blasted double-
click speed, and the sounds your
computer makes.
66

104 © 2009 CustomGuide, Inc.
A Look at the Control Panel
The Control Panel is the place to go when you want to
change the various settings of Windows. Since this
chapter deals entirely with configuring your computer,
you’ll be seeing a lot of the Control Panel in the
upcoming lessons. That’s why this lesson is a quick
introduction to the Control Panel. No exercises here—just
a guided tour of the Control Panel to help you become
familiar with it.
Click the Start button and select Control Panel from
the menu.
The Control Panel appears, categorized by topic.
Click on one of the categories to view all the settings
under a topic.
Table 6-1: Control Panel describes the controls
available under each category of the Control Panel.
Table 6-1: Control Panel
System and Security Increase space on your hard drive, schedule regular maintenance checks, or configure energy-saving
settings. Also maintain the security settings for your computer, such as Windows Firewall, Windows
Defender, and User Account Control to protect your computer.
Network and Internet Configure network settings, change Internet settings, connect to other computers, and share files.
Hardware and Sound Change the system’s sound scheme or configure the settings for speakers and other sound equipment on
your computer.
Programs Install or remove programs and additional Windows components on your computer.
User Accounts and Family
Safety
Change settings and passwords for individual users.
Appearance and
Personalization
Change display settings, apply a theme or screen saver, or change the desktop background.
Clock, Language, and
Region
Change the date, time, and time zone information on your computer, as well as the language to use and
region-specific display options for numbers, currency, time, and dates.
Ease of Access Adjust settings for an individual user’s vision, hearing, and mobility needs.
Exercise
• Exercise File: None required.
• Exercise: Open the Control Panel.
Figure 6-1: The Control Panel window.
Personalizing Windows
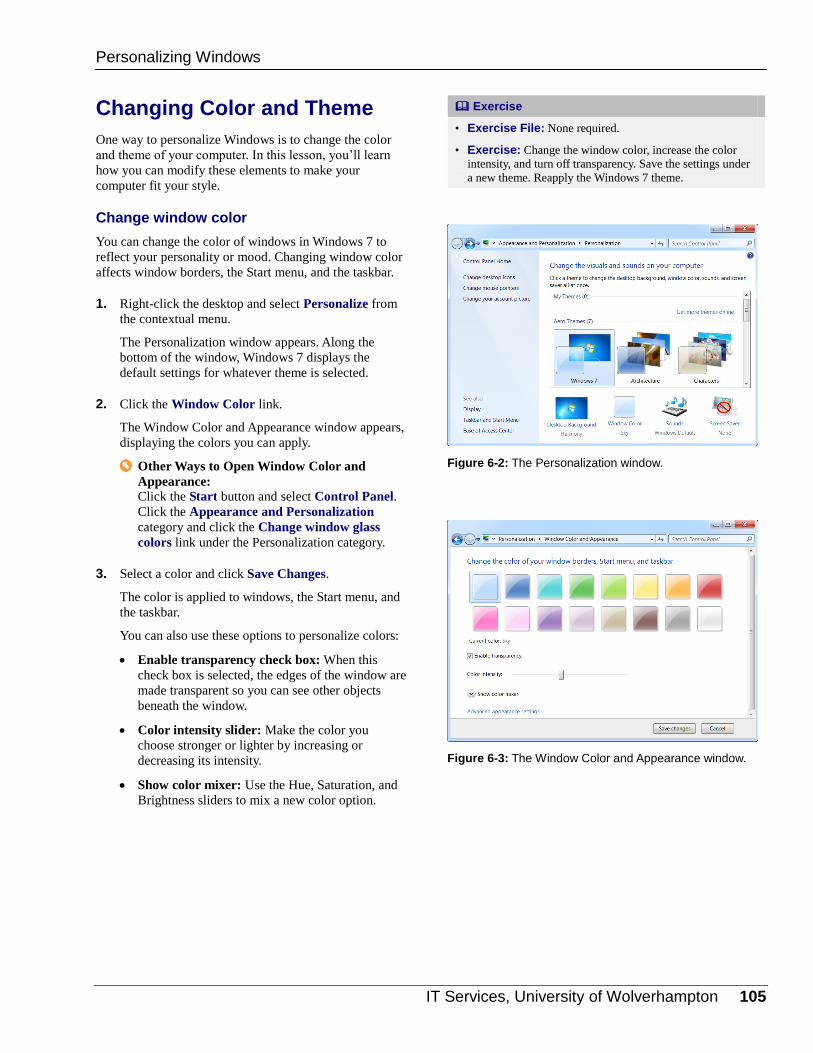
IT Services, University of Wolverhampton 105
Changing Color and Theme
One way to personalize Windows is to change the color
and theme of your computer. In this lesson, you’ll learn
how you can modify these elements to make your
computer fit your style.
Change window color
You can change the color of windows in Windows 7 to
reflect your personality or mood. Changing window color
affects window borders, the Start menu, and the taskbar.
1. Right-click the desktop and select Personalize from
the contextual menu.
The Personalization window appears. Along the
bottom of the window, Windows 7 displays the
default settings for whatever theme is selected.
2. Click the Window Color link.
The Window Color and Appearance window appears,
displaying the colors you can apply.
Other Ways to Open Window Color and
Appearance: Click the Start button and select Control Panel.
Click the Appearance and Personalization
category and click the Change window glass
colors link under the Personalization category.
3. Select a color and click Save Changes.
The color is applied to windows, the Start menu, and
the taskbar.
You can also use these options to personalize colors:
Enable transparency check box: When this
check box is selected, the edges of the window are
made transparent so you can see other objects
beneath the window.
Color intensity slider: Make the color you
choose stronger or lighter by increasing or
decreasing its intensity.
Show color mixer: Use the Hue, Saturation, and
Brightness sliders to mix a new color option.
Exercise
• Exercise File: None required.
• Exercise: Change the window color, increase the color
intensity, and turn off transparency. Save the settings under
a new theme. Reapply the Windows 7 theme.
Figure 6-2: The Personalization window.
Figure 6-3: The Window Color and Appearance window.
Personalizing Windows

106 © 2009 CustomGuide, Inc.
Apply a theme
A theme is a set of items—including the desktop
background, window color, sounds, and screen saver—
that you can apply to personalize your computer..
1. Right-click the desktop and select Personalize from
the contextual menu.
The Personalization window appears, displaying a
variety of different themes. See Table 6-2: Windows
7 Themes for a description of each theme.
Tip: Click the Get more themes online link to
download more Windows 7 themes from the
Internet.
2. Click the theme you want to apply.
The theme is applied.
Other Ways to Change the Theme: Click the Start button and select Control Panel
from the menu. Click the Appearance and
Personalization category, click the Change the
theme link under the Personalization category,
and select a theme.
Save a theme
If you make a lot of customizations to the Windows 7
interface, you can save your changes as a new theme.
1. Right-click the desktop and select Personalize from
the contextual menu.
The Personalization window appears.
Other Ways to Open the Personalization
Window: Click the Start button and select Control Panel
from the menu. Click the Appearance and
Personalization category and click the
Personalization link or the Change the theme
link under the Personalization category.
2. Make changes to the theme.
3. Click the Save Theme link.
The Save Theme As dialog box appears.
4. Name your theme and click Save.
The theme appears in the My Themes section of the
Personalization window.
Table 6-2: Windows 7 Themes
Windows 7
This is the default theme on your
computer. It has one background and no
screen saver.
Architecture
This theme cycles through images of
buildings.
Characters
This theme cycles through scenes of
fictitious characters.
Landscapes
This theme cycles through landscapes
from different climates.
Nature
This theme includes pictures of flowers
and other plants.
Scenes
This theme is a slideshow of whimsical
scenes.
United States
This theme cycles through images from
across the United States.
Basic and High
Contrast Themes
These themes include Windows 7 Basic
and Windows Classic themes. These
themes do not use images or slideshows,
so they are not as graphic-intensive as
the other themes.
Personalizing Windows

IT Services, University of Wolverhampton 107
Changing the Desktop Background
Few people work at an empty desk—we decorate our
desktops with pictures, plants, and calendars. Similarly,
Windows lets you reflect your personal tastes on your
computer desktop.
1. Right-click the desktop and select Personalize from
the contextual menu.
The Personalization window appears.
2. Click the Desktop Background link.
The Desktop Background window appears. First you
need to select the picture location you want to
browse.
Other Ways to Open Desktop Background: Click the Start button and select Control Panel
from the menu. Under the Appearance and
Personalization category, click the Change
desktop background link.
3. Click the Picture location list arrow.
A list of picture locations appears. See Table 6-3:
Desktop Background Picture Locations for a
description of each location.
Tip: If a picture that you want to use is not saved
in any of these locations, click the Browse button
to locate the picture manually.
4. Select a location from the list.
Images or graphics from the selected location appear.
5. Select the images(s) you want to use as your desktop
background.
Tip: If you select more than one image, Windows
will display these images as a desktop slideshow.
To configure slideshow settings, use the Change
picture every and Shuffle commands located at
the bottom of the window.
6. Click the Picture position list arrow and select how
you want the picture to be positioned on the desktop.
There are five options, as shown in Table 6-4:
Desktop Picture Positions.
Tip: Depending on the size of the picture, some
of these options might appear differently than
described.
Exercise
• Exercise File: None required.
• Exercise: Apply a slideshow desktop background from the
Windows Desktop Background collection. Apply a single
picture desktop background from the Windows Desktop
Background collection.
Figure 6-4: The Desktop Background window.
Table 6-3: Desktop Background Picture Locations
Windows
Desktop
Backgrounds
Includes background images that are
formatted specifically for the desktop.
Pictures
Library
Choose a picture saved in one of the folders
you have added to your Pictures Library.
Top Rated
Photos
Windows selects the most popular photos in
your folders and collects them into the Top
Rated Photos collection.
Solid Colors Choose a solid color as the desktop
background.
Personalizing Windows
Click the Browse button to find pictures in other folders.

108 © 2009 CustomGuide, Inc.
7. Click Save Changes.
The background appears on the desktop.
Tips
If you’re surfing the Web and happen to see a picture
you like, you can use it as your desktop background.
Simply right-click the picture and select Set as
Desktop Background from the contextual menu.
Table 6-4: Desktop Picture Positions
Fill
Enlarges and crops the image to fit the
entire desktop background.
Fit
Fits the image to span the screen and fills
empty areas with a background color.
Stretch
Stretches the image so that it fits the entire
desktop background.
Tile
Repeats the image across the desktop
background.
Center
Centers the full size of the image on the
desktop.
Personalizing Windows

IT Services, University of Wolverhampton 109
Using a Screen Saver
A screen saver is a moving image that appears when you
haven’t used your computer for a while. You can add
security to your computer by requiring the logon screen to
appear after the screen saver has started.
1. Right-click the desktop and select Personalize from
the contextual menu.
The Personalization window appears.
2. Click the Screen Saver link at the bottom of the
window.
The Screen Saver Settings dialog box appears.
Other Ways to Open the Screen Saver Settings
Dialog Box: Click the Start button and select Control Panel
from the menu. Click the Appearance and
Personalization category and click the Change
screen saver link under the Personalization
category.
3. Click the Screen saver list arrow and select a screen
saver from the list.
A preview of the screen saver you selected is shown
in the dialog box.
Tip: To view a full-screen preview of the screen
saver, click the Preview button.
4. (Optional) In the Wait text box, specify the amount
of time that must elapse before the screen saver is
displayed.
This will determine the amount of time the computer
sits idle before Windows switches to the screen saver.
5. (Recommended) Click the On resume, display
logon screen check box.
Turning on this option requires you to enter a
password to get back into your computer after the
screen saver has started.
Tip: You can also lock your computer so it is
password protected without having to wait for the
screen saver to turn on. Press < > + <L> to lock
your computer.
6. Click OK.
Exercise
• Exercise File: None required.
• Exercise: Apply a screen saver. Change the wait time for
the screen saver to 10 minutes.
Figure 6-5: The Screen Saver Settings dialog box.
Personalizing Windows
Click here to view more options for the selected screen saver.

110 © 2009 CustomGuide, Inc.
Adjusting Display Settings
You can’t change the size of your monitor, but you can
change how it displays information. These display
settings help you adjust your monitor for your optimum
working conditions.
Adjust screen resolution
Screen resolution determines the amount of information
that displays on your monitor. Windows automatically
sets your screen resolution, but you can change it to fit
your needs. A high resolution can fit a lot of information
on the monitor, but the information looks smaller.
1. Right-click the desktop and select Screen Resolution
from the contextual menu.
The Screen Resolution window appears.
Other Ways to Open Screen Resolution: Click the Start button and select Control Panel
from the menu. Click the Appearance and
Personalization category and click the Adjust
screen resolution link under the Display
category.
2. Click the Resolution list arrow.
A slider for the different resolutions you can apply
appears.
3. Click and drag the Resolution slider to the resolution
you want to use.
The size of the monitor icon changes as you drag the
slider. The resolutions you can display depend on
how much memory is installed on your video card.
Tip: Try to match screen resolution to your
monitor size for best results. A wide screen
monitor looks better with a wide resolution, like
1280 x 760, than 1024 x 768.
4. Click OK.
Adjust font size
While high screen resolutions are great for multitasking
with several windows, they make it difficult to see text.
You can increase the dots per inch (DPI) scaling so that
text is easier to read while still maintaining a high screen
resolution.
1. Right-click the desktop and select Personalize from
the contextual menu.
The Personalization window appears.
Exercise
• Exercise File: None required.
• Exercise: Open the Screen Resolution window and review
its settings. Increase the font size.
Figure 6-6: The Screen Resolution window.
Figure 6-7: The image on top shows the desktop in 1280
x 800 resolution. The image on the bottom shows the desktop in 800 x 600 resolution. Notice that while the images on bottom are larger and easier to read, there isn’t as much space on the desktop as the example on top.
Personalizing Windows
1280 x 800
800 x 600

IT Services, University of Wolverhampton 111
2. Click Display under the See also section of the Tasks
list.
The Display window appears.
Other Ways to Open the Display Window: Click the Start button and select Control Panel
from the menu. Click the Appearance and
Personalization category and click the Make text
and other items larger or small link under the
Display category.
3. Select the setting you want to use.
You have three settings to choose from:
Smaller – 100%: This is the default setting. It
keeps your text and other items on your screen at
their normal size.
Medium – 125%: This setting resizes text and
other items to 125% of their normal size.
Larger – 150%: This setting resizes text and
other items to 150% of their normal size. You will
only see this option if your monitor supports a
resolution of at least 1200 x 900 pixels.
Tip: Some older programs are not optimized for
high DPI. To accommodate these programs, click
Set Custom Text Size (DPI) and adjust the DPI
as needed.
4. Click OK.
To see the changes in DPI, restart the computer.
Figure 6-8: The Display window.
Figure 6-9: The image on the left shows a document window at 100%, the default font size. The image on the right
shows the same document window enlarged to 125%. Notice that the text and commands inside the window on the right are larger and easier to read.
Personalizing Windows

112 © 2009 CustomGuide, Inc.
Adjusting Sound
Sounds alert you to changes in your computer, incoming
e-mails and messages, and more. This lesson shows you
how to control the system sounds on your computer.
Change system sounds
Your computer “speaks” to you by making different
sounds as you work. You can easily change these sounds
to meet your needs.
1. Right-click the desktop and select Personalize from
the contextual menu.
The Personalization window appears.
2. Click the Sounds link.
The Sounds tab of the Sound dialog box appears.
Now you need to select the program event whose
sound you wish to change.
Other Ways to Open the Sound Dialog Box: Click the Start button and select Control Panel
from the menu. Click the Hardware and Sound
category and click the Change system sounds
link under the Sound category.
3. In the Program Events list, select the event whose
sound you wish to change.
Now you need to select the sound you want to apply.
4. Click the Sounds list arrow and select the sound you
want to apply.
The sound icon next to the event changes color,
indicating that the sound scheme has been modified.
Now you need to save the new sound scheme.
Tip: Click the Test button to play a preview the
selected sound.
5. Click the Save As button, enter a name for the new
sound scheme, and click OK.
A new sound scheme is created.
6. Click OK.
Your new sound scheme is saved.
Exercise
• Exercise File: None required.
• Exercise: Listen to the sounds for Windows Default
asterisks and default beep. Adjust the volume on your
computer.
Figure 6-10: The Sound dialog box.
Personalizing Windows
Click here to browse for sounds on your computer.

IT Services, University of Wolverhampton 113
Adjust system volume
Changing the volume can be as simple as changing the
volume control on your computer’s speakers. But if the
system volume control is very low or muted, your
speakers won’t be effective.
1. Click the Speaker button in the notification area.
The Volume slider appears.
Other Ways to Change System Volume: Click the Start button and select Control Panel
from the menu. Click the Hardware and Sound
category and click the Adjust system volume link
under the Sound category.
Tip: To view the Volume Mixer, click the Mixer
link in the Volume slider. You can control the
sounds from specific programs here.
2. Click and drag the volume slider to change the
system volume.
A sound occurs when the volume is changed,
previewing the new volume level.
Tip: To mute system sounds, click the Mute
button below the volume sliders.
Figure 6-11: The Volume slider.
Figure 6-12: The Volume Mixer dialog box.
Personalizing Windows
Click to control the sounds from specific programs.
Mute button
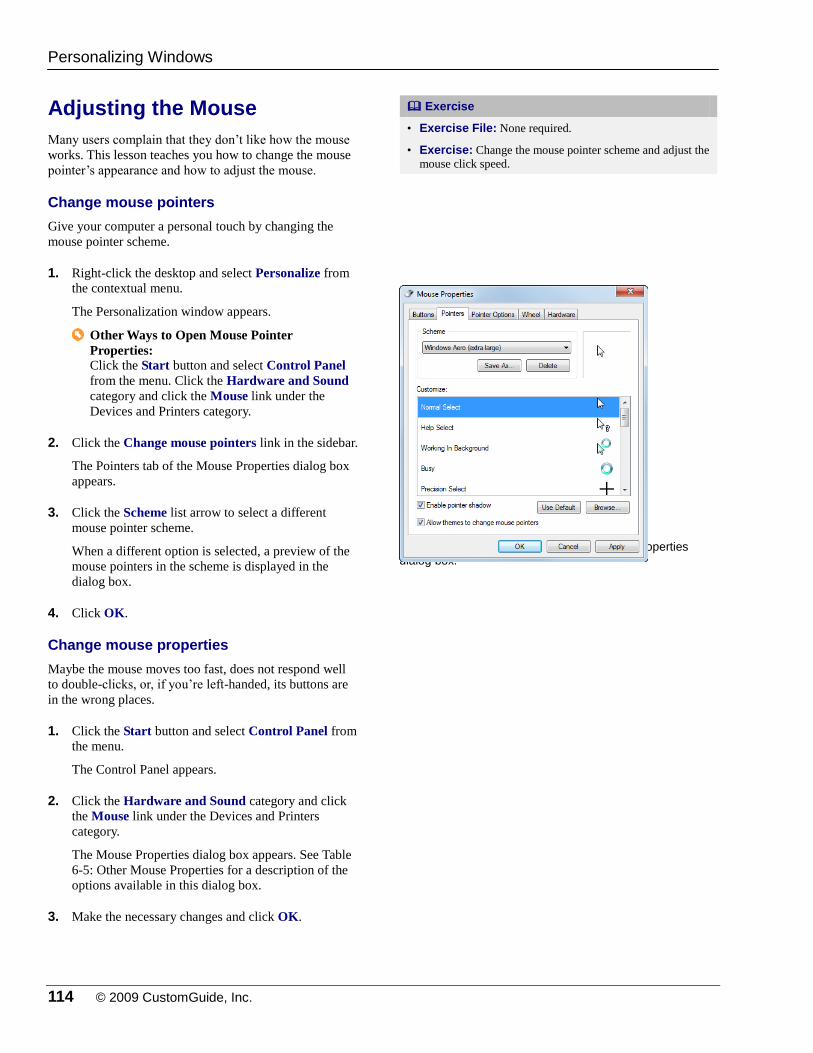
114 © 2009 CustomGuide, Inc.
Adjusting the Mouse
Many users complain that they don’t like how the mouse
works. This lesson teaches you how to change the mouse
pointer’s appearance and how to adjust the mouse.
Change mouse pointers
Give your computer a personal touch by changing the
mouse pointer scheme.
1. Right-click the desktop and select Personalize from
the contextual menu.
The Personalization window appears.
Other Ways to Open Mouse Pointer
Properties: Click the Start button and select Control Panel
from the menu. Click the Hardware and Sound
category and click the Mouse link under the
Devices and Printers category.
2. Click the Change mouse pointers link in the sidebar.
The Pointers tab of the Mouse Properties dialog box
appears.
3. Click the Scheme list arrow to select a different
mouse pointer scheme.
When a different option is selected, a preview of the
mouse pointers in the scheme is displayed in the
dialog box.
4. Click OK.
Change mouse properties
Maybe the mouse moves too fast, does not respond well
to double-clicks, or, if you’re left-handed, its buttons are
in the wrong places.
1. Click the Start button and select Control Panel from
the menu.
The Control Panel appears.
2. Click the Hardware and Sound category and click
the Mouse link under the Devices and Printers
category.
The Mouse Properties dialog box appears. See Table
6-5: Other Mouse Properties for a description of the
options available in this dialog box.
3. Make the necessary changes and click OK.
Exercise
• Exercise File: None required.
• Exercise: Change the mouse pointer scheme and adjust the
mouse click speed.
Figure 6-13: The Pointers tab of the Mouse Properties dialog box.
Personalizing Windows

IT Services, University of Wolverhampton 115
Table 6-5: Other Mouse Properties
Tab Option Description
Buttons Button configuration If you are left-handed, use this command to switch the left and right mouse buttons.
Double-click speed Slow down or speed up the double-click speed to meet your needs.
ClickLock Lets you highlight or drag without having to hold down the mouse button.
Pointer
Options
Motion Change the speed at which the mouse pointer moves and enhance pointer precision.
Snap To Automatically moves the mouse pointer to the default option in a dialog box.
Visibility Display pointer trails (a trail of pointers that follow the mouse pointer, making it easier to see),
hide the mouse pointer while typing, and more.
Wheel Vertical Scrolling Increase or decrease the number of lines scrolled at a time to scroll faster or slower.
Horizontal Scrolling Increase or decrease the number of lines scrolled at a time to scroll faster or slower.
Personalizing Windows

116 © 2009 CustomGuide, Inc.
Changing the Date and Time
Your computer’s clock not only tells you what time it is; it
serves many different purposes, including recording when
you created or modified a file and indicating when you
sent an e-mail. Therefore, it’s important that the date and
time are set correctly on your computer. You can also add
clocks to keep track of time in other parts of the world.
View the date and time
Click the taskbar clock in the notification area.
The Date and Time tool appears.
Change the date, time, and time zone
By default, your computer clock is synchronized with an
Internet time server, ensuring that your clock and date are
accurate. If you need to make changes, follow these steps:
1. Click the taskbar clock in the notification area of the
taskbar.
The Date and Time tool appears.
2. Click Change date and time settings.
The Date and Time tab of the Date and Time dialog
box appears. You have several options here:
Change date and time: Opens the Date and Time
Settings dialog box where you can change date
and time, down to the second.
Change time zone: Opens the Time Zone
Settings dialog box. Click the Time zone list
arrow to select a different time zone.
3. Make the changes to date and time as necessary.
4. Click OK.
Other Ways to Set the Date and Time: Click the Start button and select Control Panel
from the menu. Click the Clock, Language, and
Region category and click the Set the time and
date link or the Change the time zone link under
the Date and Time category.
Tips
You may change the time zone for a clock, but if you
want to apply other settings for a specific time zone,
such as currency, language, or how time appears, you
need to change your computer’s regional and
language settings.
Exercise
• Exercise File: None required.
• Exercise: View the date by hovering over the taskbar
clock in the notification area. Open the Date and Time
dialog box. Add a clock that shows time from a different
time zone. Check the time on the additional clock in the
notification area.
Figure 6-14: Click the taskbar clock to display the Date and Time tool.
Figure 6-15: The Date and time dialog box.
Personalizing Windows
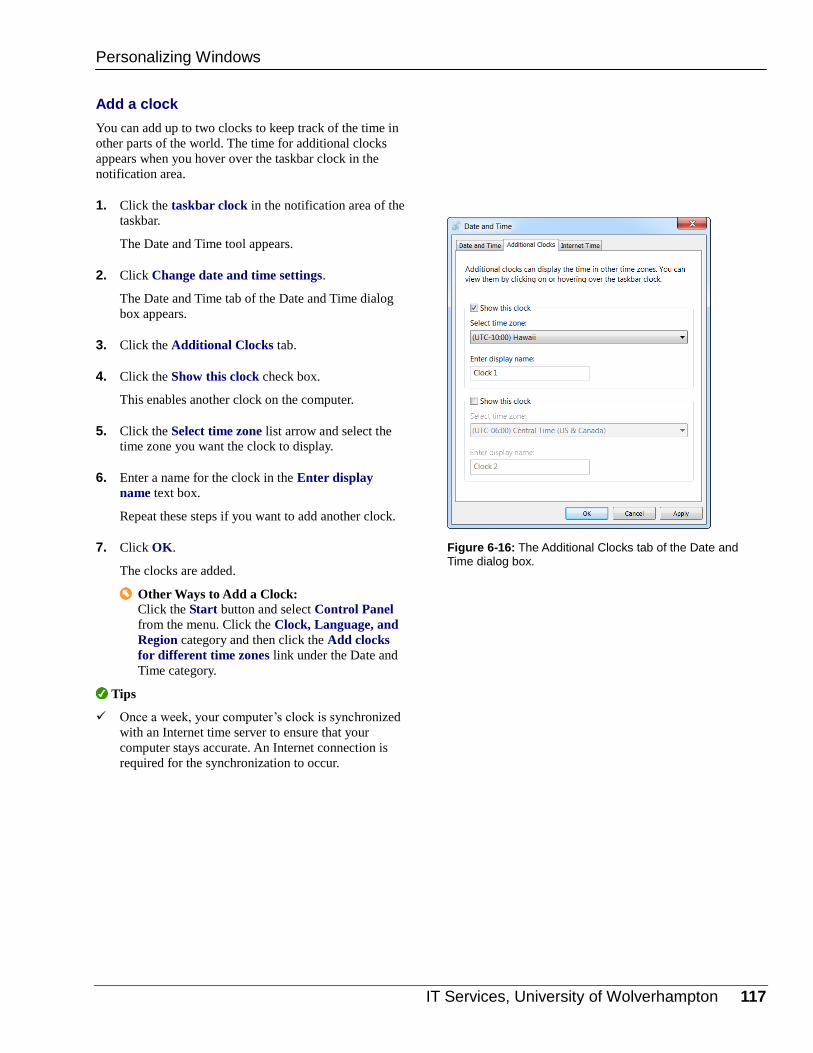
IT Services, University of Wolverhampton 117
Add a clock
You can add up to two clocks to keep track of the time in
other parts of the world. The time for additional clocks
appears when you hover over the taskbar clock in the
notification area.
1. Click the taskbar clock in the notification area of the
taskbar.
The Date and Time tool appears.
2. Click Change date and time settings.
The Date and Time tab of the Date and Time dialog
box appears.
3. Click the Additional Clocks tab.
4. Click the Show this clock check box.
This enables another clock on the computer.
5. Click the Select time zone list arrow and select the
time zone you want the clock to display.
6. Enter a name for the clock in the Enter display
name text box.
Repeat these steps if you want to add another clock.
7. Click OK.
The clocks are added.
Other Ways to Add a Clock: Click the Start button and select Control Panel
from the menu. Click the Clock, Language, and
Region category and then click the Add clocks
for different time zones link under the Date and
Time category.
Tips
Once a week, your computer’s clock is synchronized
with an Internet time server to ensure that your
computer stays accurate. An Internet connection is
required for the synchronization to occur.
Figure 6-16: The Additional Clocks tab of the Date and Time dialog box.
Personalizing Windows
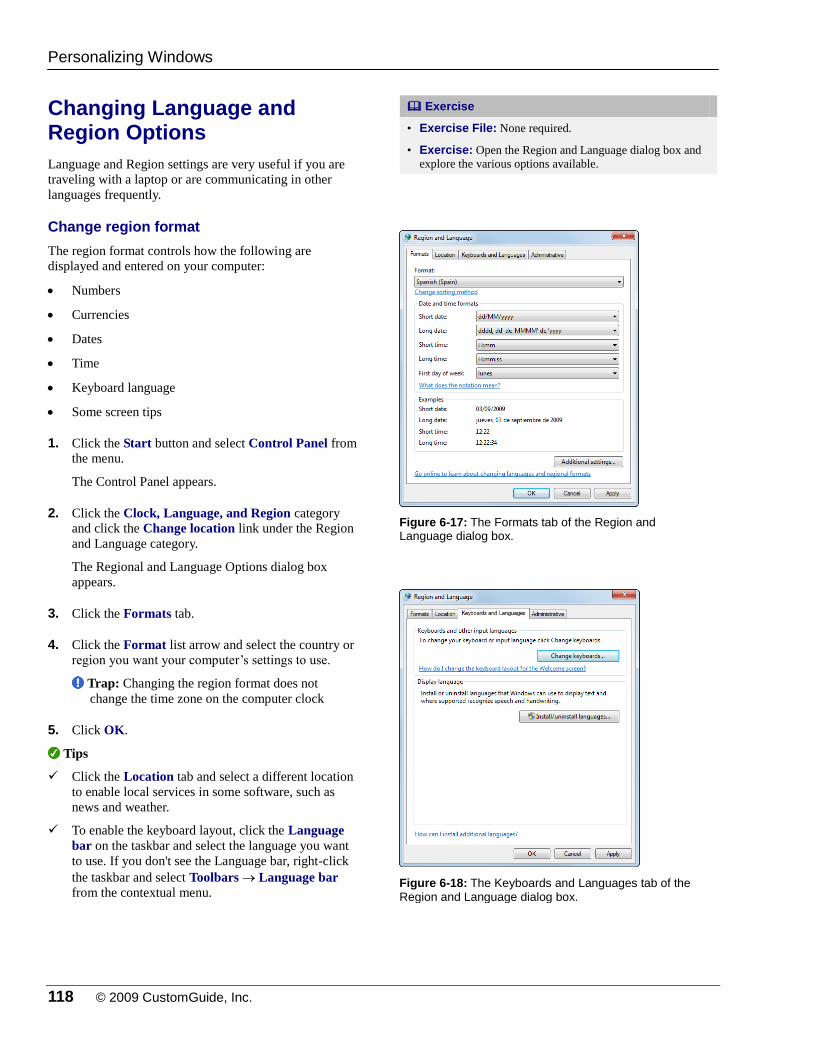
118 © 2009 CustomGuide, Inc.
Changing Language and Region Options
Language and Region settings are very useful if you are
traveling with a laptop or are communicating in other
languages frequently.
Change region format
The region format controls how the following are
displayed and entered on your computer:
Numbers
Currencies
Dates
Time
Keyboard language
Some screen tips
1. Click the Start button and select Control Panel from
the menu.
The Control Panel appears.
2. Click the Clock, Language, and Region category
and click the Change location link under the Region
and Language category.
The Regional and Language Options dialog box
appears.
3. Click the Formats tab.
4. Click the Format list arrow and select the country or
region you want your computer’s settings to use.
Trap: Changing the region format does not
change the time zone on the computer clock
5. Click OK.
Tips
Click the Location tab and select a different location
to enable local services in some software, such as
news and weather.
To enable the keyboard layout, click the Language
bar on the taskbar and select the language you want
to use. If you don't see the Language bar, right-click
the taskbar and select Toolbars Language bar
from the contextual menu.
Exercise
• Exercise File: None required.
• Exercise: Open the Region and Language dialog box and
explore the various options available.
Figure 6-17: The Formats tab of the Region and Language dialog box.
Figure 6-18: The Keyboards and Languages tab of the Region and Language dialog box.
Personalizing Windows
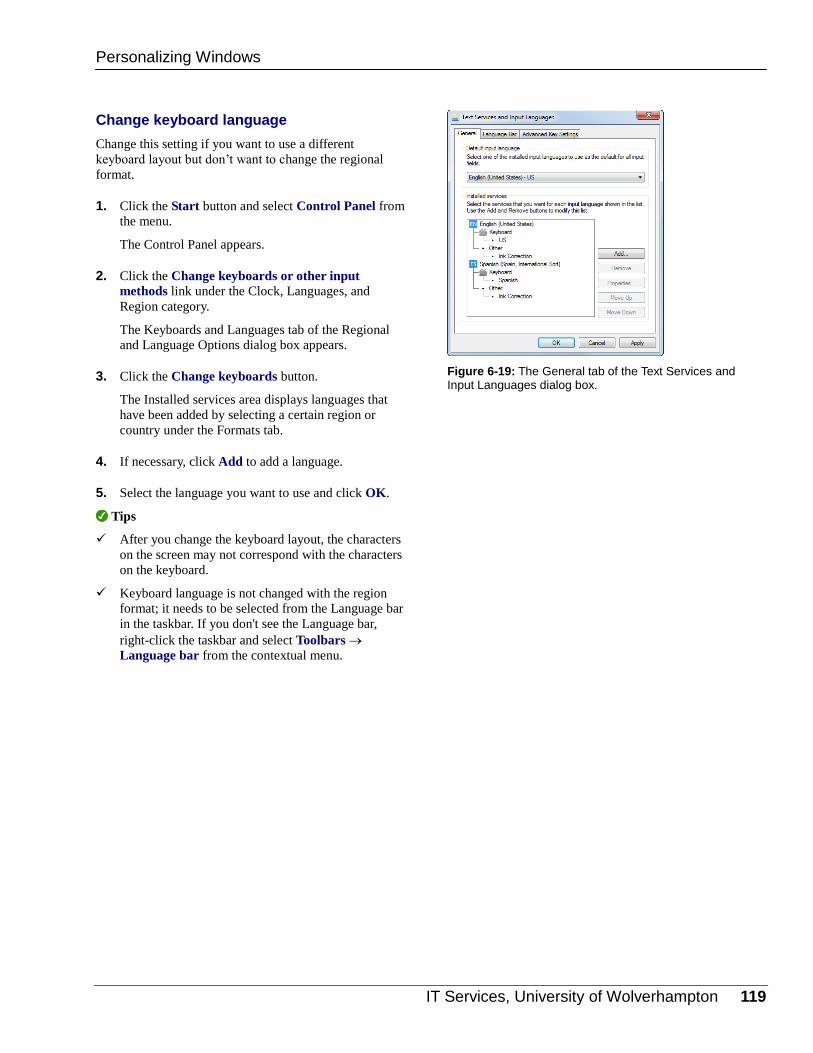
IT Services, University of Wolverhampton 119
Change keyboard language
Change this setting if you want to use a different
keyboard layout but don’t want to change the regional
format.
1. Click the Start button and select Control Panel from
the menu.
The Control Panel appears.
2. Click the Change keyboards or other input
methods link under the Clock, Languages, and
Region category.
The Keyboards and Languages tab of the Regional
and Language Options dialog box appears.
3. Click the Change keyboards button.
The Installed services area displays languages that
have been added by selecting a certain region or
country under the Formats tab.
4. If necessary, click Add to add a language.
5. Select the language you want to use and click OK.
Tips
After you change the keyboard layout, the characters
on the screen may not correspond with the characters
on the keyboard.
Keyboard language is not changed with the region
format; it needs to be selected from the Language bar
in the taskbar. If you don't see the Language bar,
right-click the taskbar and select Toolbars
Language bar from the contextual menu.
Figure 6-19: The General tab of the Text Services and Input Languages dialog box.
Personalizing Windows

120 © 2009 CustomGuide, Inc.
Customizing Folder View Options
In addition to the many options you can customize in
Windows, you can also change how you work with
folders and their contents. For example, by default
Windows hides all file extensions from view. If you don’t
like this, you can change it.
1. Click the Start button and select Control Panel from
the menu.
The Control Panel appears.
2. Click the Appearance and Personalization
category.
The Appearance and Personalization window
appears.
3. Click the Folder Options category.
The Folder Options dialog box appears.
4. Select the folder options you want to use and click
OK.
Refer to Table 6-6: Folder Options for a list of
common folder options and their descriptions.
Table 6-6: Folder Options
Click items as follows Allows you to specify whether or not you want to single-click or double-click to open a file or folder.
Always show icons, never
thumbnails
Allows you to use static icons instead of thumbnails. Use this setting if thumbnail previews are slowing
down your computer’s performance.
Always show menus Gives you access to the classic menus (the menus above the toolbar), which are hidden by default.
Display file size information
in folder tips
Displays the size of a folder in a ScreenTip when you point to a folder with your mouse.
Show hidden files and
folders
Displays files and folders marked as hidden.
Hide extensions for known
file types
File name extensions are hidden by default. Uncheck this option to display file name extensions so that
you can be sure what type of file you are working with.
Show drive letters Show/hide the drive letter of each drive or device in the Computer folder. Use this setting if you only
want to see the name of each drive.
Show pop-up description
for folder and desktop items
Show/hide ScreenTips that appear when you point to files.
Show preview handlers in
preview pane
If you don’t use the Preview pane, turn off this option to improve the performance of your computer.
Use check boxes to select
items
Adds check boxes to file views to make it easier to select several files at once.
Use Sharing Wizard Enables the Sharing Wizard so you can share files with other linked users in your homegroup.
Exercise
• Exercise File: None required.
• Exercise: Change folder options so that file extensions are
visible.
Figure 6-20: The Folder Options dialog box.
Personalizing Windows

IT Services, University of Wolverhampton 121
PPeerrssoonnaalliizziinngg WWiinnddoowwss RReevviieeww
Quiz Questions
64. Used only for advanced networking settings, the Control Panel should never be touched by ordinary users. (True or
False?)
65. The Window Color and Appearance window changes the color of windows, the Start menu, and the taskbar. (True or
False?)
66. Which of the following is NOT an option found in the Screen Saver Settings dialog box? A. How many minutes to wait before displaying the screen saver. B. A list of screen savers you can use. C. Controls to change how your mouse works. D. Options to show the logon screen on resume.
67. The highest resolution you can display depends on what? A. How large your monitor is. B. How much free memory is available on your hard drive. C. The amount of memory on your video card. D. Your version of Windows.
68. The Volume icon appears in the Windows 7 notification area by default. (True or False?)
69. You can change the double-click speed of your mouse by clicking the Mouse link in the Hardware and Sound category
of the Control Panel. (True or False?)
70. To display the current date, simply point to the clock on the taskbar for a few seconds. (True or False?)
71. An additional clock changes the time zone for your computer's clock. (True or False?)
72. What is the Language bar? A. Create other languages in the Language bar. B. Select a different keyboard input language from the Language bar. C. A ribbon that translates languages for you. D. A toolbar that allows you to display information in other languages.
73. What is a file extension? A. Three letters after the file name that identify the file type. B. Something added to a file name to make it longer. C. A feature that appears when working with HTML files. D. Something granted by your boss if you miss a deadline.

122 © 2009 CustomGuide, Inc.
Quiz Answers
64. False. The Control Panel is where you go to make changes to Windows and your computer. While there are a few
technical areas in the Control Panel, most of it is straightforward and easy to understand.
65. True. Changing the window color affects the color of windows, the Start menu, and the taskbar.
66. C. The Screen Saver Settings dialog box doesn't have any mouse options.
67. C. The highest resolution you can display depends on how much memory is installed on your video card.
68. True. The Volume icon appears in the notification area by default.
69. True. The double-click speed is probably one of the first things you should adjust if you're having trouble double-
clicking with the mouse.
70. True. Point to the taskbar clock for a few seconds to display the system date.
71. False. An additional clock is merely a resource that allows you to view the time in another area of the world.
72. B. To change to a different keyboard language, you must select it from the Language bar.
73. A. A file extension is the three letters after a file name that identify the file type.
IT Services, University of Wolverhampton 123
UUssiinngg WWiinnddoowwss
AAcccceessssoorriieess
Calculator ......................................................... 123
Connect to a Projector .................................... 124 Connect to a network projector .............. 124 Connect to a projector ........................... 124
Getting Started ................................................. 125
Notepad ............................................................ 126
Paint .................................................................. 127
Remote Desktop Connection ......................... 129 Find the computer name ........................ 130 Connect to a remote computer .............. 130
Snipping Tool ................................................... 131
Sound Recorder ............................................... 132
Sticky Notes ..................................................... 133
Sync Center ...................................................... 134 Offline files ............................................. 134 Sync your files ....................................... 134
Windows Explorer ........................................... 135
Windows Mobility Center ................................ 136
WordPad ........................................................... 137
Ease of Access ................................................ 138
System Tools.................................................... 139
Table PC Accessories ..................................... 140 Math Input Panel .................................... 140 Other Tablet PC Accessories ................. 140
Windows 7 doesn’t really do much by
itself—you need to run a program
whenever you want to do something with
your computer. But before you rush off to
the local computer store to buy a software
program to let you type a letter or paint a
picture, read this chapter! Microsoft has
included a handful of small but useful
programs with Windows 7.
This chapter explores the programs that
Microsoft tossed in with Windows 7.
You’ll learn what all the “freebie”
programs are, what they do, and if they’ll
work for your purposes.
7

124 © 2009 CustomGuide, Inc.
Calculator
The Calculator accessory is one of the more useful
programs included with Windows. You use the Calculator
just like you would use any other calculator. The only
difference between the two is that instead of pressing the
calculator’s keys with your fingers, you click them with
your mouse. You can also use the number keys or the
numeric keypad on your keyboard to enter numbers into
the Calculator program.
1. Click the Start button and select All Programs
Accessories Calculator from the menu.
The Calculator program window opens.
2. Use the mouse to click the calculator buttons or type
the numbers in with your keyboard.
The numbers are displayed in the calculator’s text
box.
Tips
New in Windows 7 is the History feature. Select
View History or press <Ctrl> + <H> to view and
access past calculations.
The Calendar program has four different modes;
Standard, Scientific, Programmer, and Statistics. To
change modes, click View on the menu bar and select
a mode from the menu.
Exercise
• Exercise File: None required.
• Exercise: Use the Scientific calculator to multiply pi (π)
by 4.
Figure 7-1: New in Windows 7 is the History feature, which lets you view and access past calculations.
Figure 7-2: The Scientific calculator.
Using Windows Accessories
Click a calculation to view its result.
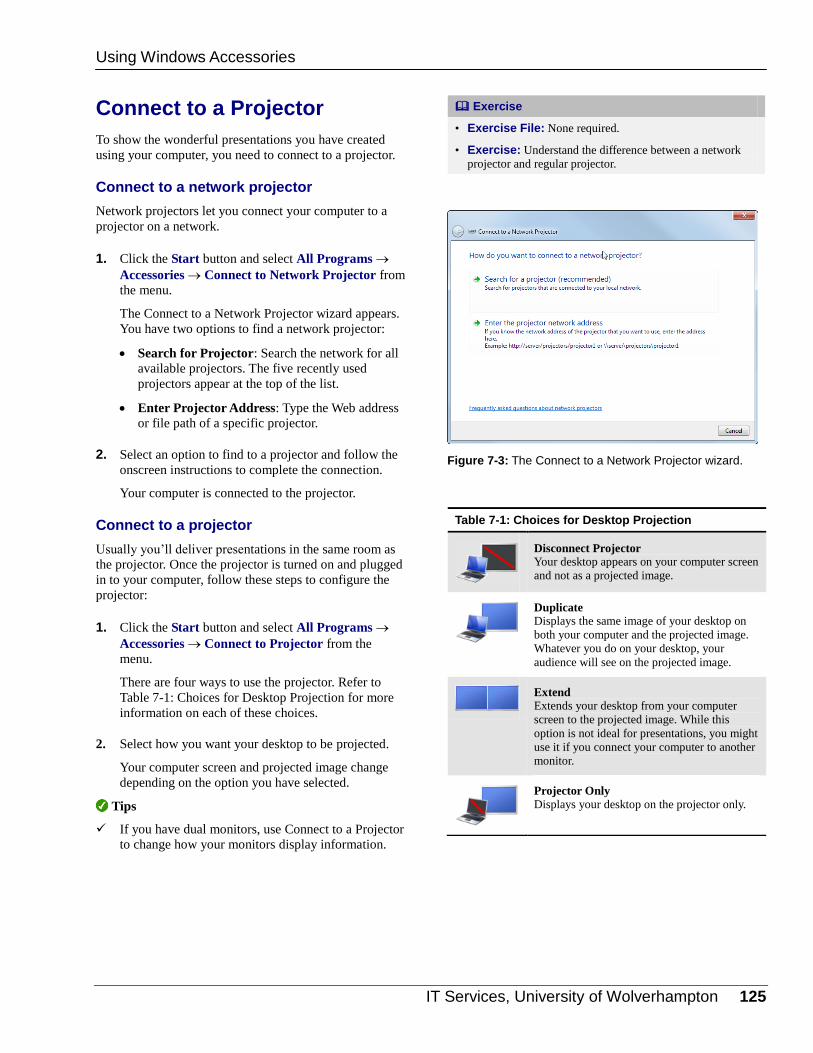
IT Services, University of Wolverhampton 125
Connect to a Projector
To show the wonderful presentations you have created
using your computer, you need to connect to a projector.
Connect to a network projector
Network projectors let you connect your computer to a
projector on a network.
1. Click the Start button and select All Programs
Accessories Connect to Network Projector from
the menu.
The Connect to a Network Projector wizard appears.
You have two options to find a network projector:
Search for Projector: Search the network for all
available projectors. The five recently used
projectors appear at the top of the list.
Enter Projector Address: Type the Web address
or file path of a specific projector.
2. Select an option to find to a projector and follow the
onscreen instructions to complete the connection.
Your computer is connected to the projector.
Connect to a projector
Usually you’ll deliver presentations in the same room as
the projector. Once the projector is turned on and plugged
in to your computer, follow these steps to configure the
projector:
1. Click the Start button and select All Programs
Accessories Connect to Projector from the
menu.
There are four ways to use the projector. Refer to
Table 7-1: Choices for Desktop Projection for more
information on each of these choices.
2. Select how you want your desktop to be projected.
Your computer screen and projected image change
depending on the option you have selected.
Tips
If you have dual monitors, use Connect to a Projector
to change how your monitors display information.
Exercise
• Exercise File: None required.
• Exercise: Understand the difference between a network
projector and regular projector.
Figure 7-3: The Connect to a Network Projector wizard.
Table 7-1: Choices for Desktop Projection
Disconnect Projector Your desktop appears on your computer screen
and not as a projected image.
Duplicate Displays the same image of your desktop on
both your computer and the projected image.
Whatever you do on your desktop, your
audience will see on the projected image.
Extend Extends your desktop from your computer
screen to the projected image. While this
option is not ideal for presentations, you might
use it if you connect your computer to another
monitor.
Projector Only Displays your desktop on the projector only.
Using Windows Accessories

126 © 2009 CustomGuide, Inc.
Getting Started
The Getting Started accessory is like a to-do list for
setting up your computer: it introduces you to Windows 7,
guides you through setting up user accounts, transferring
files, personalizing your computer, and a number of other
tasks.
1. Click the Start button and select All Programs
Accessories Getting Started from the menu.
The Getting Started window appears.
2. Click a link to learn more about Windows 7.
Read the table below, Table 7-2: Getting Started, to
find out more about each link in the Getting Started
window.
Table 7-2: Getting Started
Go online to find out what’s
new in Windows 7
Click this link to go to the Windows 7 Web site. The Windows 7 Web site provides tutorials, information
about hardware and software, and tips and tricks.
Personalize Windows Change your wallpaper, Window color, sound scheme, and screen saver.
Transfer files and settings
from another computer
Move files and folders between computers using an Easy Transfer cable, a network, an external hard
disk, or an USB flash drive.
Use a homegroup to share
with other computers in
your home
Network computers that are running Windows 7. Networking your computers allows you to share files
such as music, documents, and pictures among computers without having to manually transfer files.
Choose to be notified about
changes to your computer
Choose how often you want to be notified about the changes programs make to your computer.
Go online to get Windows
Live Essentials
Previous versions of Windows came with helpful programs like Windows Mail, Messenger, Movie
Maker, and Photo Gallery. Click this link to open the Windows Live Essential Web site and download
these programs and others, for free.
Back up your files Create backup copies of your files. It’s important to back up your files so that if your computer crashes,
you can restore your computer to its most recent settings.
Add new users to your
computer
Create user accounts for everyone logging in to your computer. If you share your computer with
multiple people, you can create a separate user account for each person.
Change the size of the text
on your screen
Make the text and icons on your computer display larger or smaller.
Exercise
• Exercise File: None required.
• Exercise: Explore some of the links in Getting Started.
Figure 7-4: The Getting Started window.
Using Windows Accessories

IT Services, University of Wolverhampton 127
Notepad
You can use Notepad to create or edit simple notes or text
files that do not require any type of formatting. Text
opened in Notepad is stripped of any formatting, making
it a useful tool for transferring text from one program to
another.
Click the Start button and select All Programs
Accessories Notepad from the menu.
The Notepad program window opens.
Tips
Notepad can only open or read files that are less than
64K. If you need to create or edit a file that requires
formatting or is larger than 64K, use WordPad or a
different program.
The Notepad program opens and saves text in ASCII
(text-only) format, thus stripping any formatting that
has been applied in other programs.
Exercise
• Exercise File: Birthday Announcement.rtf
• Exercise: Open the Birthday Announcement.rtf file in
WordPad. Copy all of the text from the document and paste
it into Notepad.
Figure 7-5: Text that is pasted or opened in Notepad is
stripped of any formatting.
Using Windows Accessories

128 © 2009 CustomGuide, Inc.
Paint
Paint is one of the most complex accessories in Windows
7. You can use Paint to create drawings on a blank
drawing canvas or over existing pictures.
1. Click the Start button and select All Programs
Accessories Paint from the menu.
The Paint program window appears, with a blank
drawing canvas displayed.
Tip: New in Windows 7 is the Ribbon; the
command bar that appears across the top of the
window.
2. In the Shapes group on the Home tab, click the shape
you want to insert.
The arrow pointer changes to a cross hair.
Tip: To view all available shapes, click the More
button ( ) in the Shapes group.
3. Click and drag until the shape reaches the desired
size.
Tip: To draw a straight line, perfect square or
circle, or to constrain the dimensions of other
shapes, press and hold down the <Shift> key as
you drag.
4. Release the mouse button.
The shape is inserted onto the drawing canvas. There
are a variety of commands you can use to format a
shape or object, as described in Table 7-3: Paint
Tools.
5. Format the object as desired.
Exercise
• Exercise File: None required.
• Exercise: Draw a box and fill it with a blue color.
Figure 7-6: The Paint program window.
Using Windows Accessories
Brush color, shape outline color.
Fill color, eraser color.
Click here for more color options.

IT Services, University of Wolverhampton 129
Table 7-3: Paint Tools
Tool Name Description Submenu
Select Select part of the image with a frame. Once
you have selected an area, you can cut,
copy, or move it.
Select an area of the image using Free Form or Select. Free
Form lets you use the mouse to draw a freehand outline to
select part of an image, while Select lets you select part of the
image with a rectangular frame.
Crop Cut around the image so all you see is the
area you selected.
None
Resize Resize the area you have selected. Resize an image by percentage or pixels. Skew an image by
degrees.
Rotate Rotate or flip the image you have selected. Rotate the image by 90 degree increments or completely flip
it horizontally or vertically.
Pencil Draw freeform objects with a fine tip, just
as if you were using a real pencil.
None
Fill With
Color
Fill an enclosed area (or the whole frame)
with the selected color from the color
palette.
None
Text Create a box in which you can type and
format text.
The Text Tools contextual tab displays when you insert a text
box into an image. You can choose the font type and size,
opaque or transparent background, and font color.
Eraser Erase portions of the current picture by
replacing it with the background color.
None
Pick
Color
Copy the color of one object to use on
another.
None
Magnifier Zoom in or out of the current image. None.
Brushes Paint freeform objects, just as if you were
using a real paintbrush.
Brushes are available in 9 different styles.
Shapes Draw various shapes, including straight
lines, triangles, rectangles, and stars.
There are 18 different shapes you can choose from.
Outline Select the kind of brush you want to use for
the shape outline.
There are 7 different options for outlines.
Fill Select the kind of brush you want to use to
fill in the shape for the shape.
There are 7 different options for fill.
Size Control the size of whatever tool you use to
draw.
The options vary based on the tool you have selected.
Using Windows Accessories

130 © 2009 CustomGuide, Inc.
Remote Desktop Connection
Remote Desktop Connection lets you log in to a remote
computer from another computer (sometimes called a
client computer).
Before you can use Remote Desktop Connection, several
criteria must be met:
Both the client computer and the remote computer
must be on the same network.
The remote computer must be configured to allow
remote desktop connections.
Allow Remote Desktop connections
Here’s how to enable remote desktop connections:
1. Click the Start button, select Control Panel from the
menu, and click the System and Security link.
The System and Security window appears.
2. Click the Allow remote access link under the System
category.
The Remote tab of the System Properties dialog box
appears. See Table 7-4: Remote Desktop Connection
Options for a description of the options available on
this tab.
3. Select a Remote Desktop option.
Now you need to specify who has permission to view
the computer remotely.
4. Click the Select Users button.
The Remote Desktop Users dialog box appears.
5. Click the Add button.
The Select Users dialog box appears. There are two
ways to add users:
Locations button: Click to browse through and
select the location you want to search.
Enter the object names to select: Type the name
of the user you want to add and then click the
Check Names button to verify the person is in the
correct location.
6. Click OK.
The specified users now have permission to access
the computer remotely.
Exercise
• Exercise File: None required.
• Exercise: Understand how to log in to a remote computer
using Remote Desktop Connection.
Figure 7-7: The System Properties dialog box.
Table 7-4: Remote Desktop Connection Options
Don’t allow
connections to this
computer
Prevents anyone from connecting to
your computer remotely.
Allow connections
from computers
running any
version of Remote
Desktop
Allows people using any version of
Remote Desktop or RemoteApp to
connect to your computer. This is a
good choice if you don’t know the
version of Remote Desktop Connection
that other people are using, but it is not
as secure as the third option.
Allow connections
only from
computers
running Remote
Desktop with
Network Level
Authentication
Allows people with computers running
versions of Remote Desktop or
RemoteApp with Network Level
Authentication to connect to your
computer. Select this option if everyone
that will be connecting to your computer
is running Windows 7.
Using Windows Accessories

IT Services, University of Wolverhampton 131
Find the computer name
In order to connect to a remote computer, you must know
the computer’s name.
1. Click the Start button, right-click Computer and
select Properties from the contextual menu.
The System window appears.
2. Find the computer name under Computer name,
domain, and workgroup settings.
Connect to a remote computer
Once the computer has been configured to allow Remote
Desktop, it is ready for remote connection.
1. Click the Start button and select All Programs
Accessories Remote Desktop Connection from
the menu.
The Remote Desktop Connection dialog box appears.
2. Enter the computer name in the Computer field and
click the Connect button.
The Windows login screen appears.
3. Enter the user name and password for the remote
computer and click OK.
You are now logged in to the remote computer.
Tip: When you are finished using the remote
computer, log off the remote computer.
Tips
In order for a computer to be accessed remotely it
must be turned on and NOT in sleep or hibernate
mode.
When you are finished using a remote computer, log
off the remote computer.
Figure 7-8: Find the name of the remote computer in the System window.
Figure 7-9: The Remote Desktop Connection dialog box.
Using Windows Accessories
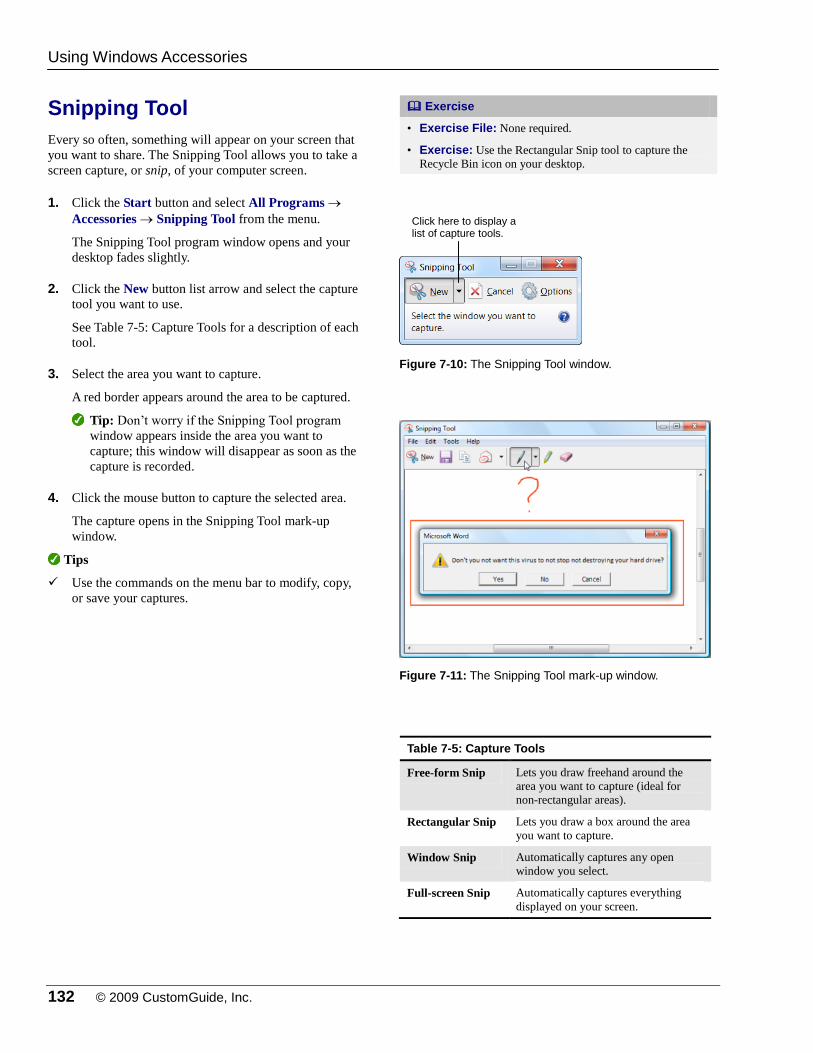
132 © 2009 CustomGuide, Inc.
Snipping Tool
Every so often, something will appear on your screen that
you want to share. The Snipping Tool allows you to take a
screen capture, or snip, of your computer screen.
1. Click the Start button and select All Programs
Accessories Snipping Tool from the menu.
The Snipping Tool program window opens and your
desktop fades slightly.
2. Click the New button list arrow and select the capture
tool you want to use.
See Table 7-5: Capture Tools for a description of each
tool.
3. Select the area you want to capture.
A red border appears around the area to be captured.
Tip: Don’t worry if the Snipping Tool program
window appears inside the area you want to
capture; this window will disappear as soon as the
capture is recorded.
4. Click the mouse button to capture the selected area.
The capture opens in the Snipping Tool mark-up
window.
Tips
Use the commands on the menu bar to modify, copy,
or save your captures.
Exercise
• Exercise File: None required.
• Exercise: Use the Rectangular Snip tool to capture the
Recycle Bin icon on your desktop.
Figure 7-10: The Snipping Tool window.
Table 7-5: Capture Tools
Free-form Snip Lets you draw freehand around the
area you want to capture (ideal for
non-rectangular areas).
Rectangular Snip Lets you draw a box around the area
you want to capture.
Window Snip Automatically captures any open
window you select.
Full-screen Snip Automatically captures everything
displayed on your screen.
Figure 7-11: The Snipping Tool mark-up window.
Using Windows Accessories
Click here to display a list of capture tools.

IT Services, University of Wolverhampton 133
Sound Recorder
The Sound Recorder program works like a computerized
tape recorder, but you need to have the right equipment to
use it. To use the Sound Recorder program, you must
have a sound card, speakers, and a microphone installed
on your computer.
1. Click the Start button and select All Programs
Accessories Sound Recorder from the menu.
The Sound Recorder program window opens.
2. Click the Start Recording button.
The program begins to record sounds into your
computer’s microphone. The green volume level bar
indicates the level of sound being recorded and the
clock to the left of the green bar indicates how long
the recording is.
Trap: If you don’t see a green volume bar, the
program is not recording. Make sure that you have
a sound card and microphone properly installed.
3. Click the Stop Recording button when finished.
The Save As dialog box appears.
4. Select the location where you want to save the
recording, enter the name of the recording, and click
Save.
The Sound Recorder saves the recording in Window
Media Audio File (.wma) format by default. You can
listen to your recording in Windows Media Player or
any other program that supports .wma files.
Exercise
• Exercise File: None required.
• Exercise: Record the first sentence of this lesson: “To use
the Sound Recorder program, you must have a sound card
and speakers installed on your computer.”
Figure 7-12: The Sound Recorder program window.
Using Windows Accessories

134 © 2009 CustomGuide, Inc.
Sticky Notes
Sticky Notes are a convenient way to keep notes on your
screen. The Sticky Notes program has been promoted
from a gadget in Windows Vista to an application in
Windows 7.
1. Click the Start button and select All Programs
Accessories Sticky Notes from the menu.
A yellow sticky note appears on the screen.
2. Type your note.
Tips
To change the color of a sticky note, right-click it and
select a color from the contextual menu.
When you close the Sticky Notes program, all open
notes are saved and will reappear the next time you
open the program.
Exercise
• Exercise File: None required.
• Exercise: Create a sticky note that says, “Send out
Company Newsletter.” Change the color of the sticky note
to Purple.
Figure 7-13: Use sticky Notes for reminders, to-do’s, and often-used text.
Using Windows Accessories
Right-click a note to display different color options.
Click here to create a new note.
Click here to discard the note.

IT Services, University of Wolverhampton 135
Sync Center
Windows 7 uses offline files and the Sync Center to make
working with network files easier. The Sync Center syncs
your offline files with network files. Before we can
understand how to use the Sync Center, we need to
understand offline files.
Offline files
An offline file is a copy of a network file that is stored on
your computer’s hard disk. Offline files allow you to
work on network files when you are not connected to your
network. When you reconnect to your network, these
copies sync with the network files.
Sync your files
The Sync Center lets you manage the syncing process.
When you want to see the results of a recent sync, open
the Sync Center.
Click the Start button and select All Programs
Accessories Sync Center from the menu.
The Sync Center opens. From the Sync Center, you
can view can also create new sync partnerships and
manage your offline files.
Trap: Sync Center can sync files between mobile
devices that support Sync Center. If you have a
mobile device that does not support Sync Center,
you can use Device Stage to sync information
between that device and your computer. Device
Stage automatically appears when you connect a
mobile device to your computer.
Exercise
• Exercise File: None required.
• Exercise: Define offline files and understand how to work
with them using the Sync Center.
Figure 7-14: Manage your offline files and sync settings in
the Sync Center.
Using Windows Accessories

136 © 2009 CustomGuide, Inc.
Windows Explorer
When you open a folder or library in Windows, Windows
Explorer appears. Windows Explorer makes it easy to
view and work with the drives, folders, and files on your
computer.
Click the Start button and select All Programs
Accessories Windows Explorer from the menu.
The Windows Explorer window appears.
Other Way to Open Windows Explorer: Click the Windows Explorer button on the
taskbar or press < > + <E>.
Back/Forward buttons: Jump back/forward to locations
you have previously visited. Details pane: Displays common properties associated with the
selected drive, library, folder, or file.
Address bar: As you navigate, the file path is shown in the
Address bar. Each location in the path is a link; click the
link to open it in the window.
Navigation pane: Displays the drives, libraries, and folders on
your computer. Click the tiny arrow to the left of an item to
expand it, and then click the drive/folder you want to view.
Folder list: Displays the contents of the selected drive,
library, or folder. Double-click an item to open it. Command bar: Here you can access common commands
related to the selected drive, library, folder, or file. Options
change according to the item that is selected.
Exercise
• Exercise File: None required.
• Exercise: Open Windows Explorer and use the
Navigation pane to jump to another location.
Windows Accessories
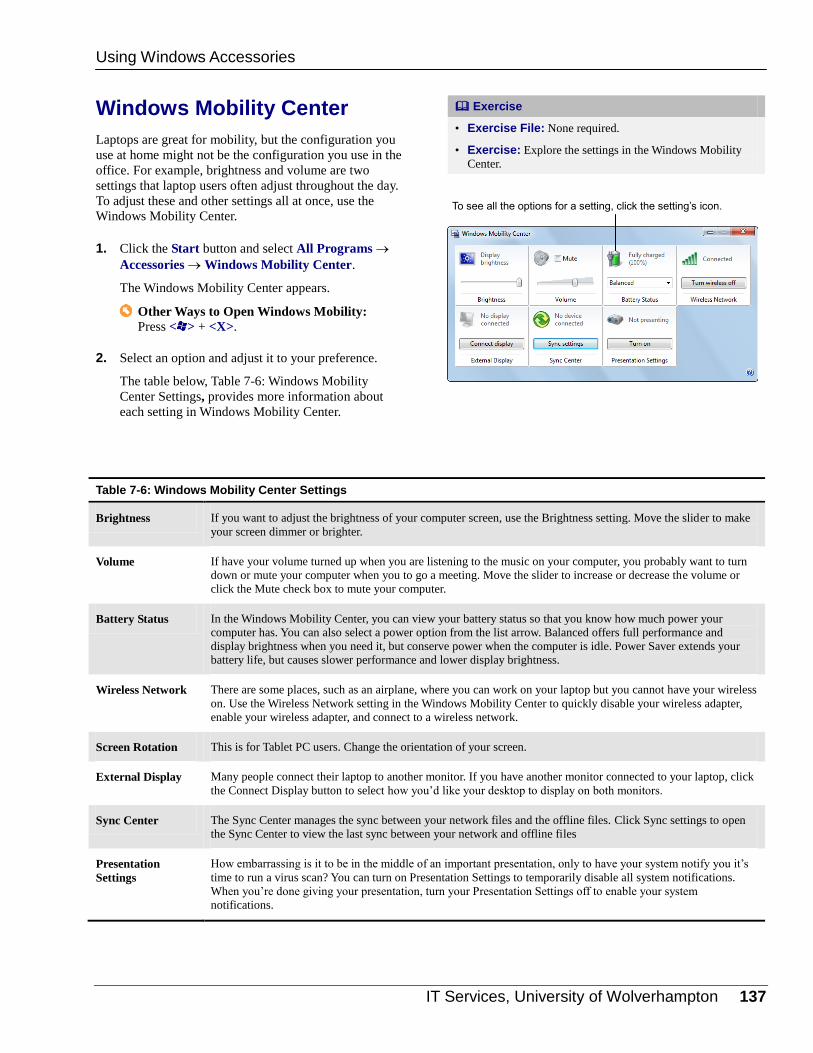
IT Services, University of Wolverhampton 137
Windows Mobility Center
Laptops are great for mobility, but the configuration you
use at home might not be the configuration you use in the
office. For example, brightness and volume are two
settings that laptop users often adjust throughout the day.
To adjust these and other settings all at once, use the
Windows Mobility Center.
1. Click the Start button and select All Programs
Accessories Windows Mobility Center.
The Windows Mobility Center appears.
Other Ways to Open Windows Mobility: Press < > + <X>.
2. Select an option and adjust it to your preference.
The table below, Table 7-6: Windows Mobility
Center Settings, provides more information about
each setting in Windows Mobility Center.
Table 7-6: Windows Mobility Center Settings
Brightness If you want to adjust the brightness of your computer screen, use the Brightness setting. Move the slider to make
your screen dimmer or brighter.
Volume If have your volume turned up when you are listening to the music on your computer, you probably want to turn
down or mute your computer when you to go a meeting. Move the slider to increase or decrease the volume or
click the Mute check box to mute your computer.
Battery Status In the Windows Mobility Center, you can view your battery status so that you know how much power your
computer has. You can also select a power option from the list arrow. Balanced offers full performance and
display brightness when you need it, but conserve power when the computer is idle. Power Saver extends your
battery life, but causes slower performance and lower display brightness.
Wireless Network There are some places, such as an airplane, where you can work on your laptop but you cannot have your wireless
on. Use the Wireless Network setting in the Windows Mobility Center to quickly disable your wireless adapter,
enable your wireless adapter, and connect to a wireless network.
Screen Rotation This is for Tablet PC users. Change the orientation of your screen.
External Display Many people connect their laptop to another monitor. If you have another monitor connected to your laptop, click
the Connect Display button to select how you’d like your desktop to display on both monitors.
Sync Center The Sync Center manages the sync between your network files and the offline files. Click Sync settings to open
the Sync Center to view the last sync between your network and offline files
Presentation
Settings
How embarrassing is it to be in the middle of an important presentation, only to have your system notify you it’s
time to run a virus scan? You can turn on Presentation Settings to temporarily disable all system notifications.
When you’re done giving your presentation, turn your Presentation Settings off to enable your system
notifications.
Exercise
• Exercise File: None required.
• Exercise: Explore the settings in the Windows Mobility
Center.
Using Windows Accessories
To see all the options for a setting, click the setting’s icon.

138 © 2009 CustomGuide, Inc.
WordPad
WordPad is a stripped-down word processor, and it is one
of the best freebies Microsoft included with Windows 7.
You can use WordPad to create letters, memos, and
documents. You can also format your WordPad
documents with various font and paragraph styles.
1. Click the Start button and select All Programs
Accessories WordPad from the menu.
The WordPad program window opens.
2. Enter text using the keyboard.
Tip: Many commonly asked questions about
WordPad can be answered by going into the
WordPad help file. To open the file, click Help
View Help from the toolbar or press <F1>.
3. Click the Save button on the Quick Access Toolbar to
save the document.
WordPad documents can be saved in four different
formats:
Rich Text Format: The default format for
WordPad. Although it uses formatting, this file
type can be read by many different programs.
Text Document: This format is most commonly
used in Notepad and does not allow text
formatting.
Text Document – MS DOS Format: A command
line interface that can be used to control internal
computer functions.
Unicode Text Document: Unicode format
includes a set of letters, numbers, and symbols
that represents almost all written languages in the
world.
Exercise
• Exercise File: None required.
• Exercise: Type your name into the WordPad program.
Save it as Practice.rtf.
Figure 7-15: A document open in the WordPad program.
Using Windows Accessories

IT Services, University of Wolverhampton 139
Ease of Access
Windows 7 offers many settings and tools you can use to
make your computer easier and more comfortable to use.
1. Click the Start button and select All Programs
Accessories Ease of Access from the menu.
A list of accessibility tools appears. See Table 7-7:
Accessibility Tools in Windows 7 for a description of
these tools.
2. Select the tool you want to open.
Other Ways to Access the Accessibility Tools: Click the Start button and click Control Panel.
Click Ease of Access and select the appropriate
option.
Table 7-7: Accessibility Tools in Windows 7
Ease of Access Center The accessibility tools hub. Here you can access all options and settings related to accessibility.
Magnifier Use this tool to enlarge hard-to-see text and pictures on the screen. You have three modes to choose from:
Full-screen mode: Magnifies the entire desktop.
Lens mode: Magnifies only the areas you choose, similar to using a real magnifying glass.
Docked mode: Magnifies only a set portion of the screen, leaving the rest of the desktop in a normal
state.
Even while using the Magnifier tools you can click buttons and input text as you normally would.
Narrator Narrator reads on-screen text aloud and can even describe some events (such as error messages), enabling
you to use your computer without the display.
On-Screen Keyboard Displays a virtual keyboard on the screen that you can click, hover over, or scan to input text. If you have
Windows Touch and the right hardware installed, you can tap directly on the screen.
Windows Speech
Recognition
Speech has been enhanced in Windows 7 to include more programs and features. Now you can start an e-
mail by speaking a recipient’s name, surf the Internet without a keyboard, or dictate your documents.
Exercise
• Exercise File: None required.
• Exercise: Open the Ease of Access Center and familiarize
yourself with the various accessibility tools.
Figure 7-16: The Ease of Access Center window.
Using Windows Accessories

140 © 2009 CustomGuide, Inc.
System Tools
Sometimes it can take a little elbow grease to make sure
your computer runs just the way you want it to. The
System Tools folder is the home of the Disk
Defragmenter, System Restore, and a number of other
programs designed to let you customize your computer
and keep it running smoothly, even letting you bring it
back to life after a computer crash.
Click the Start button and select All Programs
Accessories System Tools from the menu.
The System Tools menu appears. Refer to the table
below for a description of the programs included in
the System Tools menu.
Table 7-8: System Tools Accessories
Character Map Each font has a list of characters and symbols that don’t appear on the keyboard listed in the character
map.
Computer Open a Windows Explorer window with links to system information.
Control Panel An entire menu of programs to help you set preferences in everything from parental controls and
Internet options to input devices and monitor appearance.
Disk Cleanup This program deletes temporary files to free up disk space for other uses.
Disk Defragmenter Files that were split into pieces are regrouped so the computer can access them faster.
Internet Explorer
(No Add-ons)
This is a version of Internet Explorer that has no cookies or add-ons. It should always perform like new.
Private Character
Editor
Create your own characters or edit existing characters and insert them into documents using the
Character Map.
Resource Monitor View information about how your computer is using hardware and software. You can also use Resource
Monitor to troubleshoot non-responsive programs and devices.
System Information Show a snapshot of what’s going on with your computer, including things like model numbers,
directory names, and available memory.
System Restore Use System Restore if your computer is acting buggy. It will revert the system back to what was on it
yesterday, last week, or just before the trouble started.
Task Scheduler Create a schedule for backing up drives, disk defragmenting, automated e-mails, and more.
Windows Easy Transfer
Reports
View reports about all your Windows Easy Transfer files transfers.
Windows Easy Transfer If you need to transfer to a different computer, files, settings and all, use this program to make the
process easy.
Exercise
• Exercise File: None required.
• Exercise: Identify the programs in the System Tools menu.
Using Windows Accessories

IT Services, University of Wolverhampton 141
Tablet PC Accessories
A tablet PC lets you use a use a writing instrument called
a stylus to write and tap directly on a computer screen
instead of using the keyboard or mouse. Windows 7
includes tools for using a tablet PC.
Math Input Panel
The Math Input Panel is a tool for anyone who has tried to
include a mathematical equation, physics derivation, or
chemistry formula in a document. Instead of typing and
formatting these complicated expressions, the Math Input
Panel lets you handwrite and then insert them into a word
processing or computational program that supports
Mathematical Markup Language (MathML).
1. Click the Start button and select All Programs
Accessories Math Input Panel from the menu.
The Math Input Panel appears.
2. Write the expression in the Writing area.
As the expression is written in the Writing area, it
appears in the Preview area. The Preview area shows
how the expression will appear when inserted into a
program.
Tip: You can correct your expression by tapping
the Select and Correct button and then tapping
the incorrect symbol or circling the part of the
expression that was incorrectly read.
3. When the expression is finished, tap the Insert
button.
The expression is inserted into a word processing or
computation program.
Other Tablet PC Accessories
Windows 7 includes three more programs for tablet PC
users: Personalize Handwriting Recognition, Tablet PC
Input Panel, and Windows Journal.
Click the Start button and select All Programs
Accessories Tablet PC.
The Tablet PC menu appears. Refer to Table 7-9:
Other Tablet PC Accessories for descriptions of the
programs included in the Tablet PC menu.
Exercise
• Exercise File: None required.
• Exercise: Explain the differences between the Math Input
Panel, Personalize Handwriting Recognition, the Tablet PC
Input Panel, and Windows Journal.
Figure 7-17: The Math Input Panel.
Using Windows Accessories
Preview area
Writing area
Correction buttons
Insert button

142 © 2009 CustomGuide, Inc.
Table 7-9: Other Tablet PC Accessories
Personalize
Handwriting Recognition
Use Personalize Handwriting Recognition to train your tablet PC to recognize your handwriting. You
can choose to train your tablet PC in two ways:
Target specific recognition errors: Select this option if you notice that your tablet PC is
frequently misreading specific words or characters.
Teach the recognizer your handwriting style: Select this option if you notice frequent issues
with your tablet PC recognizing your writing.
Tablet PC Input Panel Even though you can write directly on a tablet PC, you can’t write directly in a program. The Tablet PC
Input Panel translates your handwriting into typing in a program. After you open a program, open the
Tablet PC Input Panel to start writing.
You can write your text directly into the Tablet PC Input Panel Writing area using the Writing pad. If
you have messy handwriting, you can use the Touch keyboard to tap keys on a standard keyboard on the
computer screen.
Windows Journal The Windows Journal lets you write journal entries in your own handwriting. You can change the kind
of pen you are working with, highlight text, flag entries, draw pictures, erase content, and insert pictures
into your entry.
Using Windows Accessories

IT Services, University of Wolverhampton 143
UUssiinngg WWiinnddoowwss AAcccceessssoorriieess
RReevviieeww
Quiz Questions
74. If you want to perform advanced calculations such as calculating factorials or finding arc tangents, what should you
do? A. Use the Standard calculator. B. Abandon any attempts to perform advanced calculations. C. Use Notepad. D. Use the Scientific calculator.
75. The Standard calculator will only work with numbers less than 1,000. (True or False?)
76. You must be in the same room as a network projector to deliver your presentation. (True or False?)
77. You can do which of the following using Getting Started: A. Add a new user to your computer. B. Change your wallpaper. C. Create a homegroup. D. All of the above.
78. When text is copied from another source and pasted into Notepad: A. Only the text (and not the formatting) is transferred. B. Only the formatting (and no text) is transferred. C. Both formatting and text are transferred. D. An error message appears.
79. Although you can't create a photograph in Paint, you can still view and edit one. (True or False?)
80. Which of the following is NOT true of connecting to a computer using Remote Desktop Connection: A. You can only use Remote Desktop if you are in the same building the remote computer. B. Remote Desktop can be used to work remotely and to troubleshoot issues on a remote computer. C. The remote computer must be turned on and cannot be in sleep or hibernate mode to use Remote Desktop
Connection. D. The remote computer must have Remote Desktop enabled.
81. Once you have created a snip it cannot be changed. (True or False?)
82. A snip is also called a: A. Screen capture B. Freeze frame C. Pictobox D. Highlighter Tool

144 © 2009 CustomGuide, Inc.
83. When you click the Start Recording button: A. Nothing happens unless you say the word Start into the microphone at the same time. B. Sound Recorder starts to record, and the button automatically changes to Stop Recording. C. Sound Recorder starts to record, and automatically records for exactly one minute. D. A menu will appear asking how long the recording should last.
84. If a green volume bar doesn't appear while you are recording, you should: A. Click View > Volume Bar in the menu. B. Restart your computer. C. Make sure that your sound card and microphone are installed properly. D. Abandon your dreams of becoming a recording star.
85. Sticky Notes remain on your desktop until when? A. 7 PM. B. You turn off your computer. C. You delete the note. D. Forever.
86. The Sync Center displays the results of the most recent sync between your network files and your offline files. (True
or False?)
87. Windows Explorer is what is used to view folders, drives, and other locations on your computer. (True or False?)
88. Which of the following is not an option in the Windows Mobility Center? A. Brightness B. Wordpad C. Presentation Settings D. Volume
89. Which of the following cannot be done in WordPad? A. Printing a document. B. Spell-checking a document. C. Saving a document. D. Copying and pasting text in a document.
90. The Character Map only contains proofreaders marks and copyright information. (True or False?)
91. Once a character has been copied to the Character Map clipboard, it can be pasted into other programs, including
WordPad, NotePad, and Microsoft Word. (True or False?)
92. If you wanted to use a tablet PC to insert text into a program, which tablet PC accessory would you use? A. Personalize Handwriting Recognition B. Tablet PC Input C. Windows Journal D. Character Map
IT Services, University of Wolverhampton 145
Quiz Answers
74. D. The Scientific calculator is able to perform more advanced mathematics, including factorials and arc tangents.
75. False. The Standard calculator can perform basic calculations like adding, subtracting, multiplying, and dividing with
large numbers as well as with small numbers.
76. False. If you are connected to a network projector, you can deliver your presentation from anywhere.
77. D. You can add a new user account, change your wallpaper,and create a homegroup from the Getting Started window.
78. A. Notepad strips away the formatting from text that is copied from another source.
79. True. Paint can open drawings and photographs as long as they are saved in a format that Paint recognizes.
80. A. You do not need to be in the same building as a remote computer to connect to it using Remote Desktop.
81. False. You can label a snip with the pen tool or highlight an important area with the highlghter.
82. A. Snips are often referred to as screen captures.
83. B. Sound Recorder will start recording as soon as the Start Recording button is clicked. When the Stop Recording
button is clicked, it will stop.
84. C. If the green volume bar does not appear in Sound Recorder, make sure that your sound card and microphone are
installed properly, and that the sound is loud enough to be picked up by the microphone.
85. C. Sticky Notes remain on your desktop until you delete the note.
86. True. Open the Sync Center to see the result of your most recent sync.
87. True. Windows Explorer is what you use to display folders, drives, and other locations on your computer. You do not
need to open it from the Accessories folder to use it.
88. B. You cannot open Wordpad from the Windows Mobility Center.
89. B. Spell-check is not available in Wordpad.
90. False. The Character Map contains characters for foreign languages, currency notation, fractions, bullets, symbols, and
more.
91. True. Characters taken from the character map can be used in many different word processing programs.
92. B. The Tablet PC Input program lets you write information on a tablet PC and then insert what you wrote into the
program.

146 © 2009 CustomGuide, Inc.
CCoonnnneeccttiinngg ttoo
tthhee IInntteerrnneett
Dial-Up Connections ....................................... 146 Setting up a dial-up connection ............. 146 Connect automatically in Internet Explorer ............................................................... 147
Broadband Connections ................................. 148 Digital Subscriber Line (DSL) ................ 148 Cable Internet access ............................ 149
Mobile Broadband ........................................... 150
Connecting to a Wireless Network ................ 151 Locating a wireless network .................. 151 Connecting to a wireless network .......... 152
Using Windows to Diagnose and Repair a Connection ....................................................... 153
So you feel like you’ve mastered the inner
workings of your computer. You know
how to navigate the folder and file
system. You even know the different
ways you can customize the appearance
of your computer. But now you’re ready
to get into the good stuff! You want to
know how you can get onto the Internet
and see what the hype is all about. You
want to e-mail your friends and family
and share your pictures and videos. To do
that, you’re going to need to find a way to
connect to the Internet.
In this chapter you will learn about the
different ways you can connect to the
Internet using your phone, cable, or even
your cell phone provider. You’ll also learn
how you can get away from your desk and
access the Internet wirelessly from your
laptop. Finally, you’ll learn about some
ways to troubleshoot your Internet
connection should something go wrong.
8

IT Services, University of Wolverhampton 147
Dial-Up Connections
Dial-up is one of the oldest ways to connect to the
Internet. It uses your telephone line to connect to the
Internet. While most users have replaced dial-up
connections with high-speed broadband connections,
dial-up connections are still popular in remote or rural
areas where broadband is unavailable.
You will need the following items in order to use a dial-up
connection:
An Internet Service Provider: An Internet Service
Provider (ISP) is a lot like a phone company. Instead
of letting you make telephone calls to other people,
an ISP lets your computer connect to the Internet.
Just like your telephone company, ISPs charge for
their services. Some popular dial-up services include
NetZero and EarthLink.
A Web Browser: A Web browser is a program that
lets your computer interact with the World Wide Web.
Windows comes with a built-in Web browser—
Internet Explorer.
A modem: A modem is like a telephone for your
computer. It lets your computer talk to other
computers on the Internet. Your ISP provides this
when you sign up for service.
Setting up a dial-up connection
1. Click the Start button and select Control Panel from
the menu.
The Control Panel appears.
2. Click the Network and Internet category.
The Network and Internet window appears.
3. Click the Network and Sharing Center category.
The Network and Sharing Center window appears.
4. Click the Set up a new connection or network link.
The Set up a Connection or Network Wizard begins.
5. Click Set up a dial-up connection and click Next.
Windows detects your modem and the Create a Dial-
up Connection window appears.
6. Enter the Dial-up phone number, User name, and
Password provided by your ISP and click Create.
Your dial-up connection is created.
Exercise
• Exercise File: None required.
• Exercise: Understand how to set up a dial-up connection
on your computer.
Figure 8-1: The Set Up a Connection or Network Wizard.
Figure 8-2: The Create a Dial-up Connection window.
Connecting to the Internet
Click this check box to have Windows automatically enter your password for you.
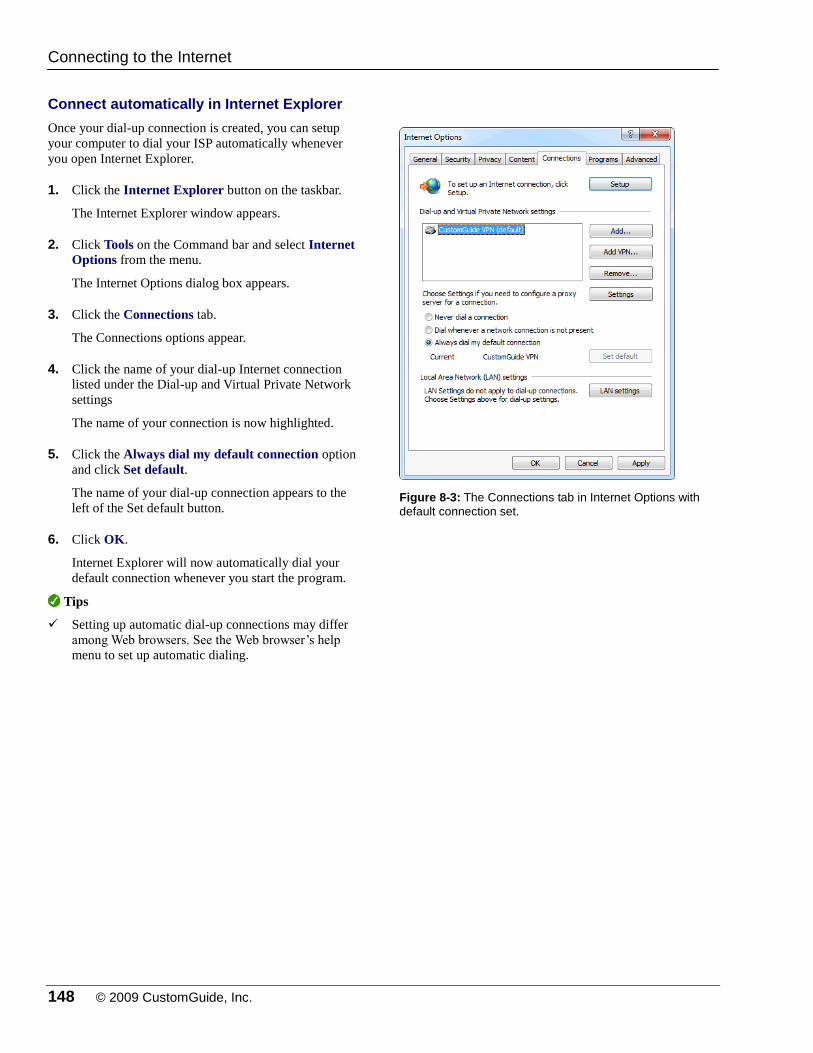
148 © 2009 CustomGuide, Inc.
Connect automatically in Internet Explorer
Once your dial-up connection is created, you can setup
your computer to dial your ISP automatically whenever
you open Internet Explorer.
1. Click the Internet Explorer button on the taskbar.
The Internet Explorer window appears.
2. Click Tools on the Command bar and select Internet
Options from the menu.
The Internet Options dialog box appears.
3. Click the Connections tab.
The Connections options appear.
4. Click the name of your dial-up Internet connection
listed under the Dial-up and Virtual Private Network
settings
The name of your connection is now highlighted.
5. Click the Always dial my default connection option
and click Set default.
The name of your dial-up connection appears to the
left of the Set default button.
6. Click OK.
Internet Explorer will now automatically dial your
default connection whenever you start the program.
Tips
Setting up automatic dial-up connections may differ
among Web browsers. See the Web browser’s help
menu to set up automatic dialing.
Figure 8-3: The Connections tab in Internet Options with
default connection set.
Connecting to the Internet

IT Services, University of Wolverhampton 149
Broadband Connections
Broadband connections are one of the most popular ways
to connect to the Internet. The advantage to using
broadband is that it allows larger chunks of data to be
transmitted at a time. The result is a connection that is
many times faster than dial-up connections.
There are three things you’ll need to connect to the
Internet with a broadband connection:
An Internet Service Provider (ISP): An Internet
Service Provider lets your computer connect to the
Internet. Your broadband ISP is typically also your
cable television provider or your landline telephone
provider.
A Web Browser: A Web browser such as Internet
Explorer.
A Cable or DSL Modem or Other Connection: A
cable or DSL modem lets your computer talk to other
computers on the Internet. Most ISPs provide your
modem for a nominal fee.
We will now review the two most popular types of
broadband connections: digital subscriber line (DSL) and
cable.
Digital Subscriber Line Internet Access
A digital subscriber line (DSL) uses your local telephone
network to transmit digital data at broadband speeds. Your
ISP provides you with the equipment and landline
connection you need to connect your computer to the
Internet. Some ISPs also send out a technician to
complete the installation for you.
1. Connect the DSL modem to the telephone line and
power outlet.
Your DSL modem powers up and attempt to
synchronize with the ISP. You should notice a
flashing light on your DSL modem. Once
synchronization is complete, the light will
stop flashing.
2. Plug an Ethernet or Cat5e cable into your computer
and the DSL modem.
This completes your computer’s physical connection
to the Internet.
3. Closely follow any other instructions provided by
your ISP.
Your computer now has an Internet connection.
Exercise
• Exercise File: None required.
• Exercise: Understand how broadband connections work
with your computer.
Figure 8-4: A DSL or cable modem connects to your computer through an Ethernet cable.
Connecting to the Internet

150 © 2009 CustomGuide, Inc.
Cable Internet Access
Cable Internet uses a cable modem to connect to your
existing cable television line. You can typically get cable
Internet access through your local cable provider.
1. Connect your cable modem to the cable outlet and
power outlet.
Your cable modem will power up and attempt to
synchronize with the ISP. You should notice a
flashing light on your cable modem. Once
synchronization is complete, the light will stop
flashing.
2. Plug an Ethernet or Cat5e cable into your computer
and the cable modem.
This completes your computer’s physical connection
to the Internet.
3. Closely follow any other instructions provided by
your ISP.
Your computer now has an Internet connection.
Tips
Keep your ISP’s technical support phone number
close at hand in case you have problems with your
Internet connection. If your Internet connection fails,
you won’t be able to look the phone number
up online.
Once your broadband connection is established,
Windows 7 will automatically connect to it the next
time you start up your computer.
Connecting to the Internet

IT Services, University of Wolverhampton 151
Mobile Broadband Connections
Mobile broadband is a new technological development. It
allows you to use your mobile phone provider, like
Verizon, AT&T, and Sprint, to connect to the Internet
wirelessly at broadband speeds. The speed of these
networks varies, depending on the type of technology
used in these networks.
Mobile broadband is an excellent option for business
travelers and laptop users who need high-speed Internet
access on the go. However, mobile broadband should not
be an alternative to your DSL or cable broadband
connection for two main reasons:
Coverage: Mobile broadband coverage depends on
the coverage area of the service provider, as is the
case with mobile phones. You probably won’t get
dependable coverage in remote or rural areas.
Coverage and connection speeds in cities may also
vary widely.
Usage Caps: Mobile broadband carriers typically cap
your usage rates on a monthly basis. When you go
above and beyond your limit, expect to be charged
fees by your carrier.
There are several types of devices that one can use to
connect their computer to the Internet:
PC Data Cards: Also known as ExpressCards, these
devices are connected to your computer via the
ExpressCard slot on the side of your laptop.
USB Modems: These are external modems that plug
into any USB slot on your computer.
USB Sticks: Like the USB modems, these devices
plug into your USB port.
Some newer laptops can even be customized to have the
mobile broadband functionality built-in, eliminating the
need for a separate piece of hardware.
Installing mobile broadband on your computer will vary
among the providers, but it most likely involves plugging
in the device and following onscreen instructions.
1. Plug the mobile broadband device into your
computer.
Once plugged in, your computer will detect the
device and begin to install the device software.
2. Install the software for your broadband device.
Follow the instructions provided. When it’s finished,
open your browser to begin using the Web.
Exercise
• Exercise File: None required.
• Exercise: Understand how mobile broadband connections
work.
Table 8-1: A Comparison of U.S. Mobile Broadband (3G) Providers
Carrier Avg.
Download
Speed
Avg.
Upload
Speed
Max.
Download
Speed
Max.
Upload
Speed
AT&T 755kb/s 484kb/s 1.3Mb/s 1.2Mb/s
Sprint 1.4Mb/s 800kb/s 3.1Mb/s 1.8Mb/s
T-
Mobile
n/a n/a 1.0Mb/s n/a
Verizon 1.4Mb/s 800kb/s 3.1Mb/s 1.8Mb/s
Figure 8-5: A mobile broadband card
Table 8-2: Usage Caps for a Typical Mobile Broadband Plan
File type Size of 1 file Files allowed per month
E-mail 3 KB 1,700,000
Digital Photo 500 KB 10,000
Music (1 Song) 3 MB 1,667
Movie 700 MB 7
Connecting to the Internet

152 © 2009 CustomGuide, Inc.
Connecting to a Wireless Network
There may come a time when you want to free yourself
from the wires and cables of your physical connection and
browse the Internet away from your desk. Laptop users in
particular have the freedom to access the Internet where
wireless—or Wi-Fi—networks are available, such as
airport terminals or coffee shops. Other users have
wireless networks set up in their homes. In this lesson,
you will learn how to connect to a wireless router in order
to access the Internet.
You will need three things to connect to a wireless
network:
An Internet connection: A broadband connection is
required to get the most out of your wireless network.
A wireless router: A wireless router provides a
bridge between your computer and the modem.
A wireless networking card: Many laptop
computers have a wireless networking card built-in.
Few desktop computers have wireless networking
cards, but you can purchase and install them to make
wireless networks available.
Locating a wireless network
Windows makes finding a wireless network easy. If you
have a wireless networking card, Windows automatically
searches for available networks in your vicinity.
1. Click the Start button and select Control Panel from
the menu.
The Control Panel appears.
2. Click the Network and Internet category.
The Network and Internet window appears.
3. Click the Network and Sharing Center category.
The Network and Sharing Center appears.
4. Click the Connect to a network link.
A list of available wireless networks appears under
the Wireless Network Connection section.
Other Ways to Locate a Wireless Network: Click the Internet Access icon located in the
notification area of the Windows taskbar.
Exercise
• Exercise File: None required.
• Exercise: Understand how to connect to a wireless
network.
Figure 8-6: The Network and Sharing Center.
Figure 8-7: Windows lists the available wireless network connections.
Connecting to the Internet
Internet Access icon

IT Services, University of Wolverhampton 153
Connecting to a wireless network
Now that you have located all of the available wireless
networks in your area, you may connect to one.
1. Click the name of the wireless network to which you
want to connect.
The Connect button appears
Tip: The number of green bars next to the
network name indicates the signal strength. The
more green bars, the stronger and more reliable
the signal.
2. Click Connect.
If the network is secure, you will be prompted to
enter the network security key.
Tip: If you want your computer to sign-in to the
network automatically, click the Connect
automatically check box.
3. Enter the security key or password and click OK.
You are now connected to the wireless network.
Tip: If you don’t know the network security key,
contact the network administrator.
Trap: Whenever possible, it is advisable to
connect only to security-enabled networks.
Unsecure wireless networks are vulnerable to
eavesdropping. Table 8-3: Wireless Network
Security Type explains the differences between
the types of security used on wireless networks.
Table 8-3: Wireless Network Security Type
Unsecured Unsecured wireless networks do not protect information you send to or receive from the wireless router. As a
result, these networks are vulnerable to eavesdropping. Other users can browse through your folders and files
when you’re connected. Any data you transmit, including passwords, e-mails, and chats, can be captured.
WEP WEP, or Wired Equivalent Privacy, was the first form of data encryption available for wireless networks. It
provides very limited protection for your data. There are several known vulnerabilities to WEP, making it easy
to crack. Connecting to WEP-protected networks may be as risky as connecting to an unsecured network.
WPA WPA, or Wi-Fi Protected Access, was an interim replacement for the WEP protocol. WPA uses an intermediate
level of encryption to protect your data. While some flaws have been found in the encryption method, WPA is
still a good alternative to unsecured networks.
WPA2 WPA2 is the most advanced form of encryption available on wireless networks. WPA2 provides government
grade security by using the AES encryption algorithm. Whenever possible, it is advised to sign in to these types
of networks as they provide the greatest guarantee of data security.
Figure 8-8: Connect to your network of choice.
Figure 8-9: Enter the network security key.
Connecting to the Internet
Select this option to have your computer connect to this network automatically whenever it is within range.

154 © 2009 CustomGuide, Inc.
Using Windows to Diagnose and Repair a Connection
Windows 7 is generally very intuitive when it comes to
setting up Internet connections, but if you are having
trouble, use the troubleshooter in Windows 7 to help
diagnose and fix the problem.
1. Click the Start button and select Control Panel from
the menu.
The Control Panel appears.
2. Click the View network status and tasks link under
the Network and Internet category.
The Network and Sharing Center window appears.
3. Click the Troubleshoot problems link near the
bottom of the window.
The Troubleshoot problems – Network and Internet
window appears.
A list of network and printing items you can
troubleshoot appears.
Other Ways to Start the Network and Internet
Troubleshooter:
Right-click the Internet Access icon ( or ) in
the notification area of the taskbar and select
Troubleshoot problems from the contextual
menu.
4. Select Internet Connections from the menu.
The Internet Connections troubleshooter begins.
5. Click Next.
Windows 7 attempts to detect problems with your
Internet connection. When complete, Windows asks
you which issue it should troubleshoot.
6. Click Troubleshoot my connection to the Internet.
Windows 7 will attempt to connect to the Microsoft
website (http://www.microsoft.com). If Windows
succeeds, the troubleshooter will indicate that
“Troubleshooting couldn’t identify the problem.”
If Windows 7 is unsuccessful, it will try to identify
potential problems and provide you with some
possible solutions.
Exercise
• Exercise File: None required.
• Exercise: Understand how to use Windows to troubleshoot
connection problems.
Figure 8-10: Select the item you wish to troubleshoot in
the Troubleshoot problems – Network and Internet window.
Figure 8-11: Completed Internet Connections
Troubleshooter window showing results of the troubleshooter.
Connecting to the Internet

IT Services, University of Wolverhampton 155
7. Follow the troubleshooter’s instructions.
Windows will try to detect a configuration error on
your computer and ask questions to solve the
problem.
When you’re finished, close the troubleshooter
window.
8. Click Close the troubleshooter.
You are now connected to the Internet.
If Windows can’t fix your problem, the problem may
lie outside your computer. See Table 8-4: Common
Internet Connection Problems for common problems
and their solutions.
Table 8-4: Common Internet Connection Problems
Dia
l-u
p
Can’t connect Make sure you are dialing the correct number.
Make sure you are dialing any outbound access numbers, such as 9.
Make sure the phone number is not busy.
Check the phone line by plugging a phone into the phone line and checking for a dial tone.
Make sure the phone line is plugged into both the wall and the modem correctly.
Disconnecting Call waiting can disrupt dial-up connections. Try disabling it and dialing again.
Make sure your modem is working properly. Check the information that came with the modem or
contact the manufacturer.
ISPs will sometimes automatically disconnect if you leave your connection idle for long periods of
time. Try again.
Make sure no one picked up the phone while you were online.
Bro
ad
ba
nd
(C
ab
le/D
SL
) Can’t connect Make sure that your cable or DSL modem is turned on.
Make sure that the Ethernet, or Cat5e, cable is plugged into the modem and computer correctly.
Some broadband connections can be fixed by unplugging the modem’s power cable, waiting for all
of the lights on the modem to turn off, waiting at least ten seconds after that, and then powering the
modem back up.
Call your ISP and ask if its service is working properly.
Ensure that you have an ISP user account and access.
Some cable and DSL ISPs use Media Access Control address (MAC address) filtering. If you’re
using a new device, your ISP may need to add your new device to its list of approved devices. Your
ISP can walk you through the process of finding your MAC address.
Wir
eles
s
Can’t find or connect Make sure that the wireless networking card in your computer is turned on. Some laptops have a
switch on the front or side of the computer to turn the card on and off.
Make sure that you are close enough to the router or wireless access point. You may also need to
connect an external antenna to your wireless network adapter to enhance your reception of the signal.
If possible, make sure that the wireless router is turned on. If it is turned on, try resetting the wireless
router and trying again.
Make sure that you entered the correct network security key, or password, when you were prompted.
The router or access point may be busy. Too much traffic from too many sources can disrupt
connectivity. If possible, try turning off other computers that use the router as an access point.
Connecting to the Internet

156 © 2009 CustomGuide, Inc.
CCoonnnneeccttiinngg ttoo tthhee IInntteerrnneett RReevviieeww
Quiz Questions
93. Where under the Network and Internet category of the Control Panel can you set up a dial-up Internet connection? A. The Internet Options menu B. The HomeGroup menu C. The Network and Sharing Center D. None of the above. You must always use Internet Explorer.
94. An ISP is: A. An Internet Service Provider, a device inside your computer that connects to the Internet. B. An Internet Service Provider, a company that charges you to connect to the Internet. C. An Information Sending Protocol, an encrypted language that is used to access the Internet. D. An Information Sending Protocol, a device that determines whether your computer uses Dial-up or Broadband
access.
95. The two types of broadband Internet connections are: A. DSL and cable B. Dial-up and cable C. DSL and satellite D. ISP and dial-up
96. Mobile broadband is an excellent alternative to DSL and cable broadband for anyone who wants to access the Internet
from anywhere. (True or False?) True False
97. Which of the following do you need to locate a wireless network? A. A satellite dish B. A wireless router C. A wireless networking card D. A government-issued guidebook listing all available wireless Internet connections.
98. Windows will always automatically connect you to the closest wireless network available. (True or False?) True False
99. Which of these is false? A. If your computer is not connecting to the Internet, make sure your cables are connected and all your devices are
turned on. B. The troubleshooter in Windows 7 can detect and fix problems with your Internet connection. C. The Windows 7 troubleshooter can fix problems with many different types of connections, such as HomeGroup,
and shared folders, D. Your ISP provides a troubleshooter for help when you have connection problems.
IT Services, University of Wolverhampton 157
Quiz Answers
93. C. The Network and Sharing Center gives you the option of setting up a dial-up connection by setting up a new
connection or network.
94. B. ISP stands for Internet Service Provider. It is a company, like a phone company, that charges you to connect to the
Internet.
95. A. The two types of broadband Internet connections are DSL and cable.
96. False. While mobile broadband is convenient for people who need to access the Internet on the go, it is not a good
alternative for typical users due to inconsistent coverage areas and usage caps.
97. C. A wireless networking card is needed to locate wireless networks in your vicinity.
98. False. Windows will only automatically connect you to those wireless networks for which you asked for an automatic
connection.
99. D. Your ISP does not provide a troubleshooter for your connection problems. However, you may call your ISP if the
Windows 7 troubleshooter and other problem-solving methods don’t work.
158 © 2009 CustomGuide, Inc.
WWoorrkkiinngg wwiitthh
HHaarrddwwaarree aanndd
PPeerriipphheerraallss
Understanding Computer Ports ..................... 158
Installing New Hardware ................................. 159 Using the Add Hardware Wizard ........... 160 Installing a USB flash drive .................... 163 Windows ReadyBoost ............................ 164 Disconnect a USB flash drive ................ 163
Troubleshooting New Hardware..................... 165 Using the Device Manager .................... 165
Adding new hardware or peripheral
devices can vastly increase the usefulness
of your computer and keep it up-to-date in
the face of the ever-changing world of
technology.
The difference between hardware and
peripheral devices can be explained
simply. Basically, a peripheral device is
anything that is connected to the outside
of your computer, like digital cameras and
printers. Hardware, on the other hand, is
anything on the inside of your computer
that is needed to make your computer
work, like a video card. In the past,
adding new devices to your computer was
a difficult task almost exclusively
reserved for hardware savvy computer
technicians.
Today, things are much different. With
Plug-and-Play technology, Windows 7
makes adding new hardware and
peripheral devices to your computer very
easy. Now you can add printers, external
hard drives, and even second monitors
without much difficulty. Making great
improvements to your computer can be as
easy as finding the right connection.
In this chapter, you’ll learn how to
identify various ports on your computer,
and how you can add devices like
printers, external hard drives, and digital
cameras.
9
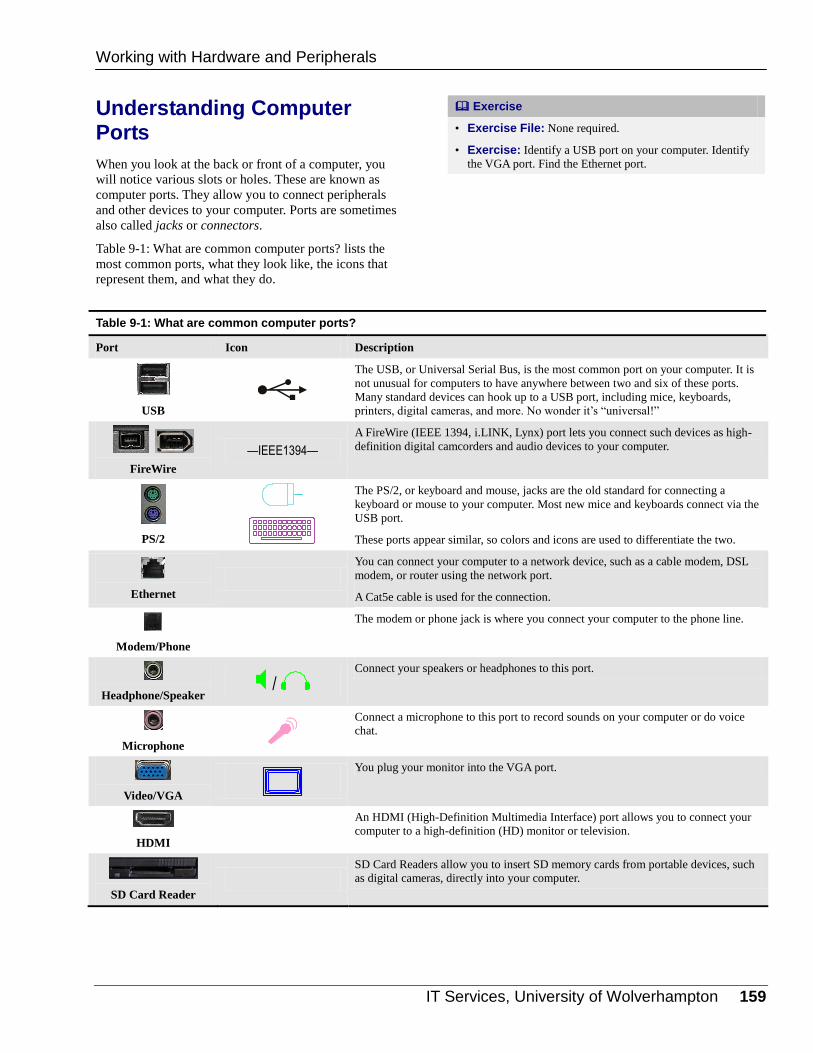
IT Services, University of Wolverhampton 159
Understanding Computer Ports
When you look at the back or front of a computer, you
will notice various slots or holes. These are known as
computer ports. They allow you to connect peripherals
and other devices to your computer. Ports are sometimes
also called jacks or connectors.
Table 9-1: What are common computer ports? lists the
most common ports, what they look like, the icons that
represent them, and what they do.
Table 9-1: What are common computer ports?
Port Icon Description
USB
The USB, or Universal Serial Bus, is the most common port on your computer. It is
not unusual for computers to have anywhere between two and six of these ports.
Many standard devices can hook up to a USB port, including mice, keyboards,
printers, digital cameras, and more. No wonder it’s “universal!”
FireWire
—IEEE1394—
A FireWire (IEEE 1394, i.LINK, Lynx) port lets you connect such devices as high-
definition digital camcorders and audio devices to your computer.
PS/2
The PS/2, or keyboard and mouse, jacks are the old standard for connecting a
keyboard or mouse to your computer. Most new mice and keyboards connect via the
USB port.
These ports appear similar, so colors and icons are used to differentiate the two.
Ethernet
You can connect your computer to a network device, such as a cable modem, DSL
modem, or router using the network port.
A Cat5e cable is used for the connection.
Modem/Phone
The modem or phone jack is where you connect your computer to the phone line.
Headphone/Speaker /
Connect your speakers or headphones to this port.
Microphone
Connect a microphone to this port to record sounds on your computer or do voice
chat.
Video/VGA
You plug your monitor into the VGA port.
HDMI
An HDMI (High-Definition Multimedia Interface) port allows you to connect your
computer to a high-definition (HD) monitor or television.
SD Card Reader
SD Card Readers allow you to insert SD memory cards from portable devices, such
as digital cameras, directly into your computer.
Exercise
• Exercise File: None required.
• Exercise: Identify a USB port on your computer. Identify
the VGA port. Find the Ethernet port.
Working with Hardware and Peripherals
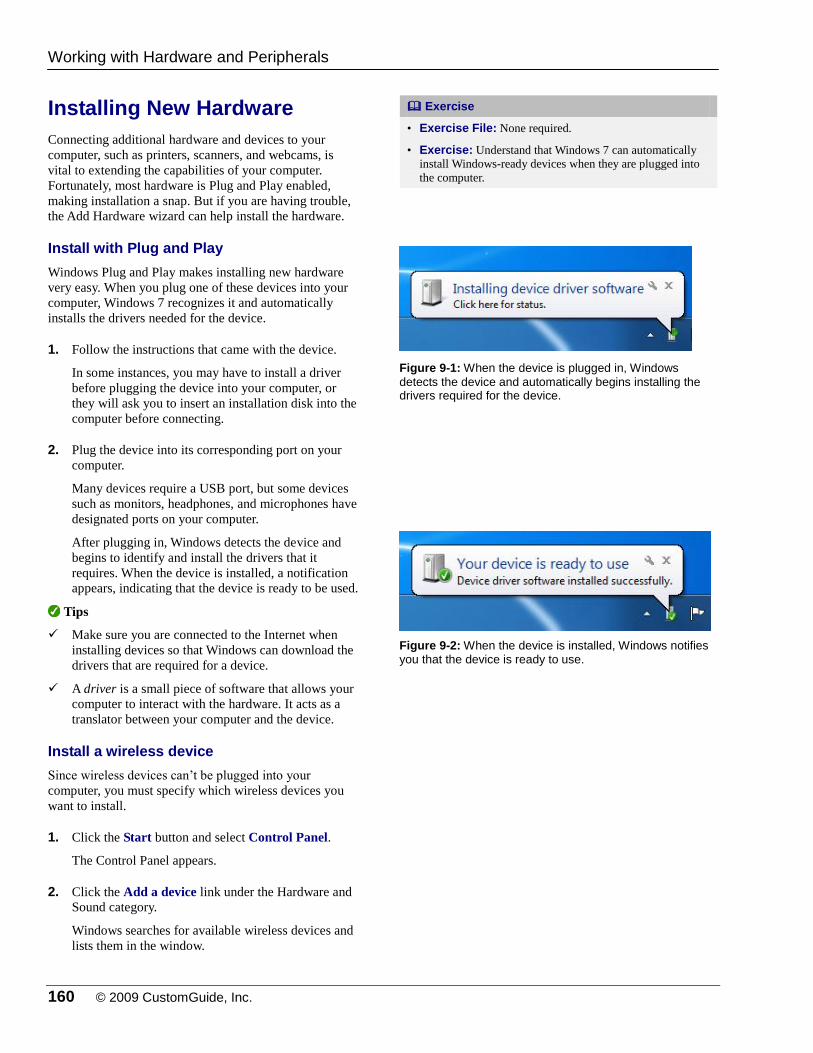
160 © 2009 CustomGuide, Inc.
Installing New Hardware
Connecting additional hardware and devices to your
computer, such as printers, scanners, and webcams, is
vital to extending the capabilities of your computer.
Fortunately, most hardware is Plug and Play enabled,
making installation a snap. But if you are having trouble,
the Add Hardware wizard can help install the hardware.
Install with Plug and Play
Windows Plug and Play makes installing new hardware
very easy. When you plug one of these devices into your
computer, Windows 7 recognizes it and automatically
installs the drivers needed for the device.
1. Follow the instructions that came with the device.
In some instances, you may have to install a driver
before plugging the device into your computer, or
they will ask you to insert an installation disk into the
computer before connecting.
2. Plug the device into its corresponding port on your
computer.
Many devices require a USB port, but some devices
such as monitors, headphones, and microphones have
designated ports on your computer.
After plugging in, Windows detects the device and
begins to identify and install the drivers that it
requires. When the device is installed, a notification
appears, indicating that the device is ready to be used.
Tips
Make sure you are connected to the Internet when
installing devices so that Windows can download the
drivers that are required for a device.
A driver is a small piece of software that allows your
computer to interact with the hardware. It acts as a
translator between your computer and the device.
Install a wireless device
Since wireless devices can’t be plugged into your
computer, you must specify which wireless devices you
want to install.
1. Click the Start button and select Control Panel.
The Control Panel appears.
2. Click the Add a device link under the Hardware and
Sound category.
Windows searches for available wireless devices and
lists them in the window.
Exercise
• Exercise File: None required.
• Exercise: Understand that Windows 7 can automatically
install Windows-ready devices when they are plugged into
the computer.
Figure 9-1: When the device is plugged in, Windows
detects the device and automatically begins installing the drivers required for the device.
Figure 9-2: When the device is installed, Windows notifies you that the device is ready to use.
Working with Hardware and Peripherals
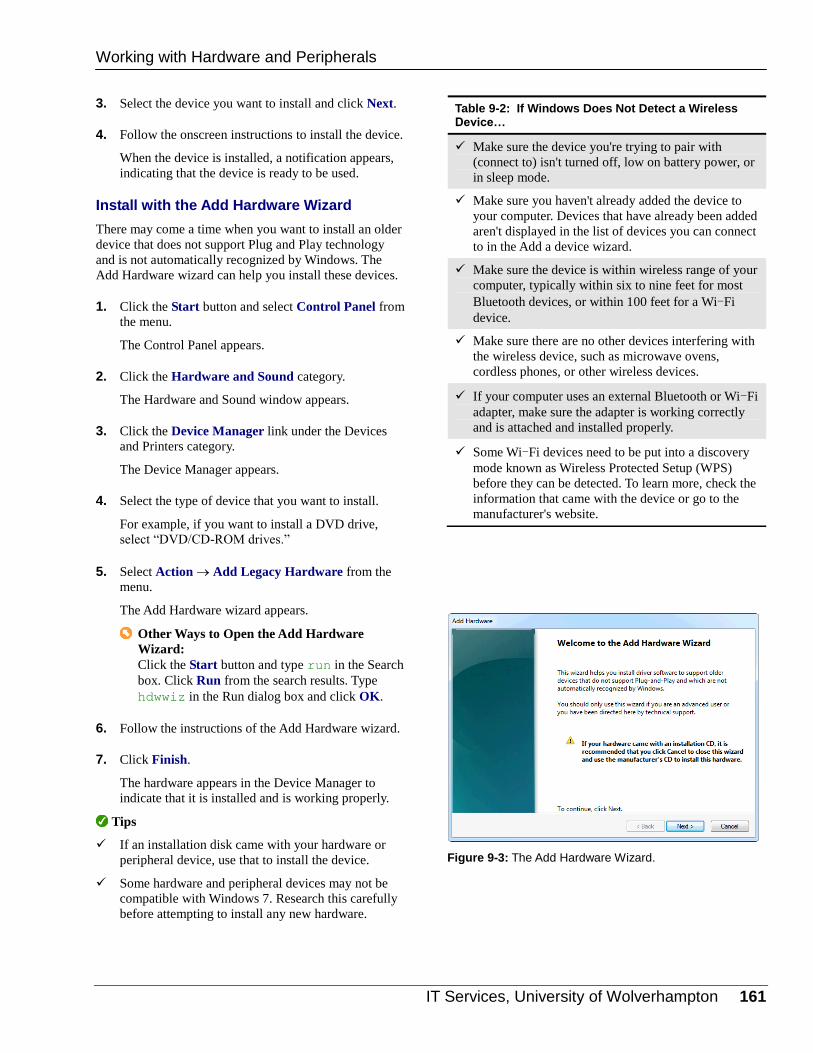
IT Services, University of Wolverhampton 161
3. Select the device you want to install and click Next.
4. Follow the onscreen instructions to install the device.
When the device is installed, a notification appears,
indicating that the device is ready to be used.
Install with the Add Hardware Wizard
There may come a time when you want to install an older
device that does not support Plug and Play technology
and is not automatically recognized by Windows. The
Add Hardware wizard can help you install these devices.
1. Click the Start button and select Control Panel from
the menu.
The Control Panel appears.
2. Click the Hardware and Sound category.
The Hardware and Sound window appears.
3. Click the Device Manager link under the Devices
and Printers category.
The Device Manager appears.
4. Select the type of device that you want to install.
For example, if you want to install a DVD drive,
select “DVD/CD-ROM drives.”
5. Select Action Add Legacy Hardware from the
menu.
The Add Hardware wizard appears.
Other Ways to Open the Add Hardware
Wizard:
Click the Start button and type run in the Search
box. Click Run from the search results. Type
hdwwiz in the Run dialog box and click OK.
6. Follow the instructions of the Add Hardware wizard.
7. Click Finish.
The hardware appears in the Device Manager to
indicate that it is installed and is working properly.
Tips
If an installation disk came with your hardware or
peripheral device, use that to install the device.
Some hardware and peripheral devices may not be
compatible with Windows 7. Research this carefully
before attempting to install any new hardware.
Table 9-2: If Windows Does Not Detect a Wireless Device…
Make sure the device you're trying to pair with
(connect to) isn't turned off, low on battery power, or
in sleep mode.
Make sure you haven't already added the device to
your computer. Devices that have already been added
aren't displayed in the list of devices you can connect
to in the Add a device wizard.
Make sure the device is within wireless range of your
computer, typically within six to nine feet for most
Bluetooth devices, or within 100 feet for a Wi-Fi
device.
Make sure there are no other devices interfering with
the wireless device, such as microwave ovens,
cordless phones, or other wireless devices.
If your computer uses an external Bluetooth or Wi-Fi
adapter, make sure the adapter is working correctly
and is attached and installed properly.
Some Wi-Fi devices need to be put into a discovery
mode known as Wireless Protected Setup (WPS)
before they can be detected. To learn more, check the
information that came with the device or go to the
manufacturer's website.
Figure 9-3: The Add Hardware Wizard.
Working with Hardware and Peripherals
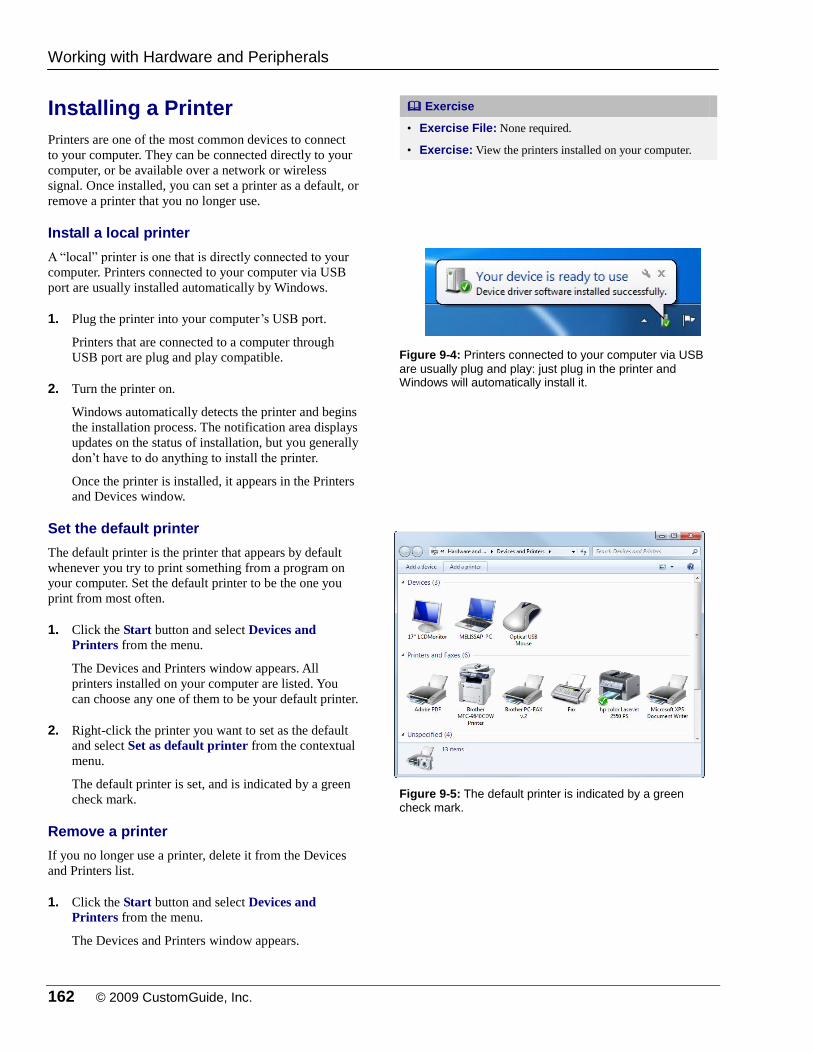
162 © 2009 CustomGuide, Inc.
Installing a Printer
Printers are one of the most common devices to connect
to your computer. They can be connected directly to your
computer, or be available over a network or wireless
signal. Once installed, you can set a printer as a default, or
remove a printer that you no longer use.
Install a local printer
A “local” printer is one that is directly connected to your
computer. Printers connected to your computer via USB
port are usually installed automatically by Windows.
1. Plug the printer into your computer’s USB port.
Printers that are connected to a computer through
USB port are plug and play compatible.
2. Turn the printer on.
Windows automatically detects the printer and begins
the installation process. The notification area displays
updates on the status of installation, but you generally
don’t have to do anything to install the printer.
Once the printer is installed, it appears in the Printers
and Devices window.
Set the default printer
The default printer is the printer that appears by default
whenever you try to print something from a program on
your computer. Set the default printer to be the one you
print from most often.
1. Click the Start button and select Devices and
Printers from the menu.
The Devices and Printers window appears. All
printers installed on your computer are listed. You
can choose any one of them to be your default printer.
2. Right-click the printer you want to set as the default
and select Set as default printer from the contextual
menu.
The default printer is set, and is indicated by a green
check mark.
Remove a printer
If you no longer use a printer, delete it from the Devices
and Printers list.
1. Click the Start button and select Devices and
Printers from the menu.
The Devices and Printers window appears.
Exercise
• Exercise File: None required.
• Exercise: View the printers installed on your computer.
Figure 9-4: Printers connected to your computer via USB
are usually plug and play: just plug in the printer and Windows will automatically install it.
Figure 9-5: The default printer is indicated by a green check mark.
Working with Hardware and Peripherals

IT Services, University of Wolverhampton 163
2. Right-click the printer you want to remove and select
Remove device from the contextual menu.
A dialog box appears, asking to confirm the deletion.
3. Click Yes.
The printer is removed.
Tips
If your printer has more than one function, such as
scanning or faxing, removing the printer does not
affect the other functions.
Working with Hardware and Peripherals
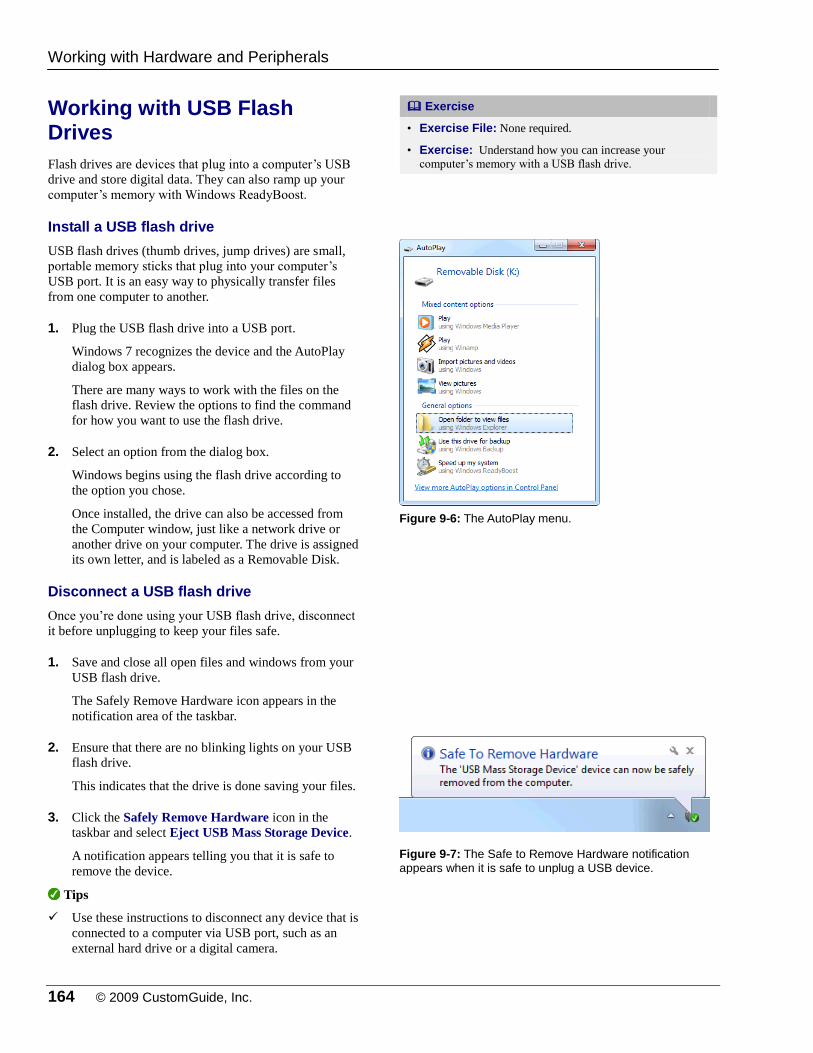
164 © 2009 CustomGuide, Inc.
Working with USB Flash Drives
Flash drives are devices that plug into a computer’s USB
drive and store digital data. They can also ramp up your
computer’s memory with Windows ReadyBoost.
Install a USB flash drive
USB flash drives (thumb drives, jump drives) are small,
portable memory sticks that plug into your computer’s
USB port. It is an easy way to physically transfer files
from one computer to another.
1. Plug the USB flash drive into a USB port.
Windows 7 recognizes the device and the AutoPlay
dialog box appears.
There are many ways to work with the files on the
flash drive. Review the options to find the command
for how you want to use the flash drive.
2. Select an option from the dialog box.
Windows begins using the flash drive according to
the option you chose.
Once installed, the drive can also be accessed from
the Computer window, just like a network drive or
another drive on your computer. The drive is assigned
its own letter, and is labeled as a Removable Disk.
Disconnect a USB flash drive
Once you’re done using your USB flash drive, disconnect
it before unplugging to keep your files safe.
1. Save and close all open files and windows from your
USB flash drive.
The Safely Remove Hardware icon appears in the
notification area of the taskbar.
2. Ensure that there are no blinking lights on your USB
flash drive.
This indicates that the drive is done saving your files.
3. Click the Safely Remove Hardware icon in the
taskbar and select Eject USB Mass Storage Device.
A notification appears telling you that it is safe to
remove the device.
Tips
Use these instructions to disconnect any device that is
connected to a computer via USB port, such as an
external hard drive or a digital camera.
Exercise
• Exercise File: None required.
• Exercise: Understand how you can increase your
computer’s memory with a USB flash drive.
Figure 9-6: The AutoPlay menu.
Figure 9-7: The Safe to Remove Hardware notification
appears when it is safe to unplug a USB device.
Working with Hardware and Peripherals

IT Services, University of Wolverhampton 165
Speed up performance with Windows ReadyBoost
You can also use the extra memory from a USB flash
drive to speed up your computer with the new Windows
ReadyBoost functionality.
1. Plug the USB flash drive into one of your computer’s
USB ports.
Windows 7 recognizes the device and the AutoPlay
dialog box appears.
2. Select Speed up my system under General options.
The ReadyBoost tab of the Removable Disk
Properties dialog box appears.
3. Choose how you want to use the USB flash drive.
There are two ways to use the device to enhance
computer performance:
Dedicate this device to ReadyBoost: The USB
drive will be used exclusively to speed up system
performance. You will not be able to store any
files on the device.
Use this device: Windows will temporarily use
the amount of space that you reserve on the USB
drive. When you choose this option, you can use
the slider below to decide how much space to
reserve for ReadyBoost.
4. Click OK.
Now your computer is prepared to use the USB flash
drive to enhance performance.
Figure 9-8: The Removable Disk Properties dialog box.
Working with Hardware and Peripherals

166 © 2009 CustomGuide, Inc.
Troubleshooting Hardware
You’ve plugged in your new device and it isn’t working
properly. What are you supposed to do now? One possible
problem is that Windows does not have the proper device
driver. A device driver is a small piece of software that
allows your computer to interact with the hardware. It acts
as a translator between your computer and the device.
You can manage your devices and their drivers by using
the Device Manager.
Using the Device Manager
The Device Manager shows you all of the hardware that is
currently connected to your computer. You can also use it
to update the driver software for your devices and check
to see if your devices are working properly.
1. Click the Start button and select Control Panel from
the menu.
The Control Panel appears.
2. Click the Hardware and Sound category.
The Hardware and Sound window appears.
3. Click the Device Manager link under the Devices
and Printers category.
The Device Manager appears. It lists all of the
internal and external devices currently connected to
your computer.
4. Find the device you are attempting to install in the
list and double-click it.
The Properties dialog box appears.
Tip: You may need to expand the device type
heading by clicking on the arrow next to the
device type.
5. Click the Driver tab.
The device driver information appears.
6. Click the Update Driver button and select Search
automatically for updated driver software in the
Update Driver Software Wizard.
Windows attempts to find an updated driver both on
your computer and on the Internet. Once found,
Windows will automatically install the drivers.
Exercise
• Exercise File: None required.
• Exercise: Open the Device Manager and review the
hardware that is connected to your computer.
Figure 9-9: The Device Manager.
Figure 9-10: The Driver tab.
Working with Hardware and Peripherals

IT Services, University of Wolverhampton 167
WWoorrkkiinngg wwiitthh HHaarrddwwaarree aanndd
PPeerriipphheerraallss RReevviieeww
Quiz Questions
100. Which type of port is the most common port on today’s computers? A. FireWire ports B. USB ports C. PS/2 ports D. Ethernet or network ports
101. What does the Plug and Play technology in Windows allow you to do? A. Plug and Play allows you to automatically install new peripherals and hardware. B. Plug and Play allows you to start up your computer by only plugging it in. C. Plug and Play makes you go through a long and tedious installation process for anything you connect to your
computer. D. Plug and Play allows you to plug in a Microsoft Xbox 360 controller to play video games.
102. Which new feature to Windows 7 allows you to speed up your computer with the use of a USB flash drive? A. ReadyFlash B. FlashBoost C. ReadyBoost D. AeroFlash
103. For what can the Device Manager in Windows by used? A. Updating your hardware drivers B. Installing hardware that is not Plug and Play compatible C. Both A and B D. None of the above. The Device Manager is only a list of devices that are connected to your computer.
Quiz Answers
100. B. USB ports. Most new peripheral hardware devices, like printers and digital cameras, connect to your computer via
USB ports.
101. A. Plug and Play allows you to simply and easily install any Windows-ready device by only connecting it to your
computer.
102. C. ReadyBoost technology allows you to use all or part of the memory on a USB flash drive in order to enhance your
system’s performance.
103. C. You can both update your hardware drivers and install hardware.
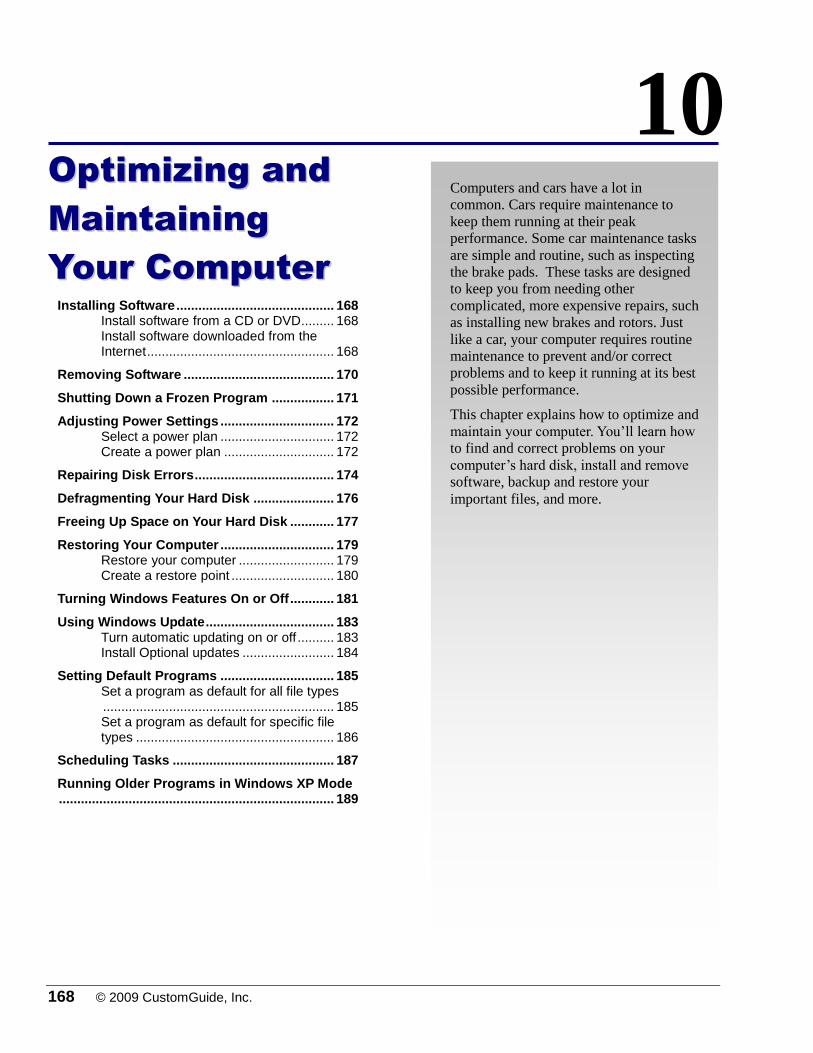
168 © 2009 CustomGuide, Inc.
OOppttiimmiizziinngg aanndd
MMaaiinnttaaiinniinngg
YYoouurr CCoommppuutteerr
Installing Software ........................................... 168 Install software from a CD or DVD ......... 168 Install software downloaded from the Internet ................................................... 168
Removing Software ......................................... 170
Shutting Down a Frozen Program ................. 171
Adjusting Power Settings ............................... 172 Select a power plan ............................... 172 Create a power plan .............................. 172
Repairing Disk Errors ...................................... 174
Defragmenting Your Hard Disk ...................... 176
Freeing Up Space on Your Hard Disk ............ 177
Restoring Your Computer ............................... 179 Restore your computer .......................... 179 Create a restore point ............................ 180
Turning Windows Features On or Off ............ 181
Using Windows Update ................................... 183 Turn automatic updating on or off .......... 183 Install Optional updates ......................... 184
Setting Default Programs ............................... 185 Set a program as default for all file types ............................................................... 185 Set a program as default for specific file types ...................................................... 186
Scheduling Tasks ............................................ 187
Running Older Programs in Windows XP Mode ........................................................................... 189
Computers and cars have a lot in
common. Cars require maintenance to
keep them running at their peak
performance. Some car maintenance tasks
are simple and routine, such as inspecting
the brake pads. These tasks are designed
to keep you from needing other
complicated, more expensive repairs, such
as installing new brakes and rotors. Just
like a car, your computer requires routine
maintenance to prevent and/or correct
problems and to keep it running at its best
possible performance.
This chapter explains how to optimize and
maintain your computer. You’ll learn how
to find and correct problems on your
computer’s hard disk, install and remove
software, backup and restore your
important files, and more.
10

IT Services, University of Wolverhampton 169
Installing Software
Though Windows has many useful programs already
installed, it’s unlikely that these alone will meet all of
your needs. You will need to install software on your
computer that helps do your work. You can install
software from a CD or DVD, or download and install
software from the Internet.
Install software from a CD or DVD
CDs and DVDs hold a lot of information, and they are
ideal for packaging software. These steps walk you
through how to install software from a CD or DVD.
1. Insert the CD or DVD into the computer.
Windows detects the disk, and the AutoPlay dialog
box appears with options for using the disk.
2. Click the Run Setup.exe option.
The User Account Control dialog box appears, asking
if you want to allow the program to make changes to
your computer.
Tip: If you do not have administrative rights on
the computer, the dialog box prompts you to enter
an administrator user name and password.
3. Click Yes in the User Account Control dialog box.
The program’s installation wizard appears.
4. Follow the instructions to install your software.
Tips
Always keep software documentation close by if you
have questions during the installation process.
Install software downloaded from the Internet
You can download many programs, some for free and
some for purchase, from the Internet. Downloading
software from the Internet is convenient because you can
use the software as soon as it is downloaded and installed.
Tips
Be careful when downloading software. Some
downloads include spyware or computer viruses.
Table 10-1: Is this Program Safe to Download? lists
questions to ask before downloading software.
Exercise
• Exercise File: None required.
• Exercise: Understand how to install software from a CD
or DVD and how to download software from the Internet.
Figure 10-1: The AutoPlay dialog box lets you run the
installation file or open a folder to view the files on the disk.
Figure 10-2: Download instructions look different on each Web site.
Optimizing and Maintaining Your Computer

170 © 2009 CustomGuide, Inc.
1. Browse to the Web page with the software you'd like
to download.
Scroll through the Web page until you find the
program’s download instructions. Each Web page
displays downloads differently.
2. Click the link or button to download the program.
The File Download – Security Warning dialog box
appears. You have two options to download the
installation file:
Run: Downloads the software and installs it when
the download is complete.
Save: Downloads the installation file to a specific
location. You must begin the installation later.
Save all your downloads to the same location so
you can easily find them later.
Tip: If you’re concerned about a file’s security,
save the installation file to your computer and
scan it with your anti-virus and/or anti-spyware
software.
3. Click Run or Save to download the installation file.
A dialog box appears, displaying the progress of the
download.
4. When the download is complete, follow the
instructions to install your software, or double-click
the install file and then follow installation
instructions.
When the installation wizard is complete, you can
begin using the program.
Table 10-1: Is this Program Safe to Download?
Do I know this software? The publisher’s Web site usually provides technical information as well as user and professional reviews. If
you want more information, research the software using a search engine. If after researching software you
can’t find any information, that is a sign that the software is unknown and might harm your computer.
Do I know this Web site? Many software publishers have software available for download from their Web sites. For example, you can
download Internet Explorer from Microsoft’s Download Center.
Some Web sites, like CNET.com, serve as hubs to download many different kinds of software. If you are
downloading from a general download site, research the Web site first. Make sure you know who runs it
and how contact the Web site provider or software publisher if you have any problems with the software.
Did I click anything to
download this software?
Most programs ask your permission before downloading; at the very least, you need to click a link or
button to start the download. If a program starts to download without your permission, cancel the download
and leave the Web site. Research the program to make sure it’s safe for your computer. You can always
return to the Web site and restart the download later.
Does the software have a
digital certificate?
A digital certificate verifies that the software you are downloading is from the publisher. Click the
Publisher link in the File Download - Security Warning dialog box to view the digital certificate.
Does the Web site display
a lot of pop ups?
If you notice multiple pop ups on an unfamiliar Web site, beware. Pop ups can contain spyware, and if the
pop ups have spyware, the software you want to download might have spyware too.
Figure 10-3: Decide if you want to download and run the
installation file now or later in the File Download – Security Warning dialog box.
Optimizing and Maintaining Your Computer

IT Services, University of Wolverhampton 171
Removing Software
If you have a lot of software you no longer use on your
computer, you are wasting valuable disk space and
slowing down your computer. You should occasionally
review the programs on your computer and remove
software you no longer use to free up disk space.
1. Click the Start button and select Control Panel from
the menu.
The Control Panel appears.
2. Click the Uninstall a program link under the
Programs category.
The Uninstall or change a program window appears,
listing the programs installed on your computer.
3. Select the program you want to remove and click the
Uninstall button on the toolbar.
Tip: Some programs group the Uninstall and
Change commands on the same button. The
Change button lets you configure or remove
options for a program.
A dialog box appears confirming the uninstall.
4. Click Yes to confirm that you want to remove the
program.
A wizard appears to help you remove the program
from your computer.
5. Follow the instructions to remove your software.
The program is removed from the computer.
If the program still appears after you have followed these
instructions, see Table 10-2: Troubleshooting Removing
Software.
Tips
These steps cannot be used to remove spyware or
computer viruses. To remove malware, you must
download specialty software.
Software designed for older versions of Windows
may not appear in the program list. Review the
documentation included with the software for
information on uninstalling the program.
Exercise
• Exercise File: None required.
• Exercise: Open the “Uninstall or change a program”
window and review the software listed. Understand how to
uninstall software.
Figure 10-4: Buttons for uninstalling and changing a
program appear on the toolbar when a program is selected.
Figure 10-5: Click Yes to confirm that you want to uninstall
the program before beginning the process of uninstalling the program.
Table 10-2: Troubleshooting Removing Software
Uninstall the program again.
Restart Windows in safe mode and uninstall the program
again.
If the program was recently installed, use System Restore
to restore your computer to a date before you installed the
program.
Optimizing and Maintaining Your Computer

172 © 2009 CustomGuide, Inc.
Shutting Down a Frozen Program
Although computers have improved over the years,
you may still find that programs “freeze.” A frozen
program stops working or responding for many reasons:
you might not have enough memory or disk space to run
the program, or there could be an issue with your
computer’s hardware or software. When a program
freezes, don’t give up--shut down the program and try
restarting it.
1. Right-click the taskbar and select Start Task
Manager from the contextual menu.
Other Ways to Open the Task Manager: Press <Ctrl> + <Alt> + <Delete> and select
Start Task Manager from the Welcome screen.
The Applications tab of the Windows Task Manager
appears. The Task column lists all open programs,
and the Status column indicates if the program is
running. A frozen program has a status of “Not
Responding”.
2. Select the program that is not responding and click
the End Task button.
The Program dialog box appears and displays two
options:
Close the program: Force the program to shut
down. You will lose any changes you have made
since your last save.
Wait for the program to respond: Give the
program more time to resolve the problem.
3. Select Close the program.
The program shuts down.
After the program shuts down, you can restart it and
begin to work with it again.
Tips
If you are still experiencing problems after you
have shut down a frozen program, or if multiple
programs freeze, restart your computer.
To prevent any loss of work, make sure to save
your work frequently. If you are working in a
program that has an AutoSave feature, configure
and enable it.
Exercise
• Exercise File: None required.
• Exercise: Open WordPad, and then force WordPad to
close using the Windows Task Manager.
Figure 10-6: Use the Task Manager to check the status of a program and to shut down a frozen program.
Optimizing and Maintaining Your Computer

IT Services, University of Wolverhampton 173
Adjusting Power Settings
Many users want to conserve energy, whether they are
using a laptop or a desktop computer. Windows provides
options that maximize system performance while using a
minimal amount of energy, letting you save dollars and
battery life.
Select a power plan
A power plan is a collection of hardware and system
settings that you can use to manage the amount of energy
your computer uses. Windows includes power plans that
are optimized for performance, energy saving, and
everything in between, and switching between them is
easy.
1. Click the Start button and select Control Panel from
the menu.
The Control Panel appears.
2. Click the Hardware and Sound category and click
the Power Options category.
The Power Options window appears.
Other Ways to Open the Power Options
Window for Laptop Users: Click the battery icon in the notification area, and
then click the More power options link
Windows has three system power plans. Table 10-3:
Available Power Plans describes each plan.
3. Select a power plan and close the window.
You have changed your computer’s power plan.
Tips
Your computer manufacturer may have included
other system power plans on your computer.
Create a power plan
Your power plan determines your computer’s brightness
as well as when your computer dims, your monitor turns
off, and your computer goes to sleep. If you don’t like the
system power plans, you can create a custom power plan.
Tips
If you use your computer to give presentations, it’s a
good idea to create a power plan that keeps your
computer awake an active at all times.
1. Click the Start button and select Control Panel from
the menu.
The Control Panel appears.
Exercise
• Exercise File: None required.
• Exercise: Understand what a power plan is and the
settings it can control. Create a custom power plan and
name it “Practice Power Plan”.
Figure 10-7: The Power Options window without the
additional options displayed.
Table 10-3: Available Power Plans
Balanced Offers full performance when you need it and
saves power during period of inactivity.
Power saver Reduces system performance and screen
brightness in order to save power.
High
performance
Maximizes screen brightness and might
increase the computer’s performance.
Optimizing and Maintaining Your Computer
If a plan does not appear, click the Show additional plans arrow.

174 © 2009 CustomGuide, Inc.
2. Click the Hardware and Sound category and click
the Power Options category.
The Power Options window appears.
Other Ways to Open the Power Options
Window for Laptop Users: Click the battery icon in the notification area, and
then click the More power options link
3. Click Create a power plan in the sidebar.
The Create a power plan window appears.
4. Select a power plan to use as a template.
You may use one of the three system power plans to
begin.
5. Enter a name for the plan in the Plan name text box.
Click Next.
The Edit Plan Settings window appears. Here you can
configure your power plan settings. Read more about
these settings in Table 10-4: Power Plan Settings.
6. Click the list arrows to configure your power plan
and click Create.
Your new power plan appears in the Power Options
window.
Tip: You can delete a custom power plan, but you
cannot delete a system power plan.
Figure 10-8: Configure a custom power plan in the Edit Plan Settings window.
Table 10-4: Power Plan Settings
Dim the display Reduces screen brightness.
Turn off the
display
Turns off the monitor, but leaves the
computer on. If you use your computer
for presentations, select Never to keep
the display turned on during
presentations.
Put the computer
to sleep
Activates sleep mode for your computer.
If you use your computer for
presentations, select the Never for to
keep your laptop awake during
presentations.
Adjust plan
brightness
Increase or decrease your screen’s
brightness.
Optimizing and Maintaining Your Computer

IT Services, University of Wolverhampton 175
Repairing Disk Errors
Over time, errors appear on your comptuer’s hard drive.
These errors affect your computer’s perfomance. While
errors to your hard disk might sound serious, they are not;
a hard drive repair program can easily diagnose and fix
most of these errors.
Windows includes a hard drive repair program called
Error-checking. Error-checking is a preventative
maintenance task that you should do at least once a
month. This lesson shows you how to use Error-checking
to diagnose and repair errors on your computer.
1. Click the Start button and select Computer from the
menu.
The Computer window appears. You can run Error-
checking on any drive connected to your computer,
including external hard disks and flash drives, as well
as your computer’s hard drive.
The drive we want to repair is your computer’s hard
drive. On most computers, this is called Local Disk
(C:), but your hard drive may be called something
different, depending on how your computer is set up.
2. Select the Local Disk (C:) drive and click the
Properties button on the command bar.
The Disk Properties dialog box appears.
Other Ways to Open the Disk Properties Dialog
Box: Select a drive, then right-click it. Select
Properties from the contextual menu.
3. Click the Tools tab and click the Check now button
on the Error-checking area.
The Check Disk dialog box displays two scan
options:
Automatically fix file system errors: Scans the disk
and repairs problems with files and folders. If you do
not select this option, Error-checking still scans the
disks and reports problems, but it does not repair any
problems. You may be required to restart your computer
if you select this option.
Scan for and attempt recovery of bad sectors:
Attempts to find and repair physical errors on the drive.
This option will make the scan and repair take longer.
4. Select the option(s) you wish to use and click Start.
The scan begins.
Trap: If you are logged on your computer, you are
using its hard disk. Windows will alert you that it
cannot run Error-checking because the disk is in
Exercise
• Exercise File: None required.
• Exercise: Understand how Error-checking can help you
monitor your computer’s performance.
Figure 10-9: The Drive Properties dialog box.
Figure 10-10: Select how you want your computer to scan
the disk in the Check Disk dialog box.
Optimizing and Maintaining Your Computer

176 © 2009 CustomGuide, Inc.
use. You can schedule a disk check for another
time.
When the scan is completed, the Results window
appears reporting any errors or bad sectors.
5. Click OK to close the Results window and click OK
to close the Disk Properties dialog box.
Tips
When you schedule a disk check, Error-checking runs
the next time you start your computer. The results
display before the Windows Welcome screen appears.
If Windows reports any bytes in bad sectors, you
have a hardware problem. Back up your disk and run
Error-checking every few days. If subsequent scans
show more bytes in bad sectors, your hardware is
failing. You should not use any hard disk that has bad
sectors.
Optimizing and Maintaining Your Computer

IT Services, University of Wolverhampton 177
Defragmenting Your Hard Disk
A file is usually saved in one location on your hard drive.
However, over time a disk fragments a file and saves the
pieces in several places instead of saving a single file to
one location. When that happens, your computer must
read one file from several different areas of a disk, and
your computer slows down.
The Disk Defragmenter improves your computer’s
performance by consolidating fragmented files in one
location. Follow these steps to defragment your
computer’s hard disk.
1. Click the Start button and select All Programs
Accessories System Tools Disk Defragmenter from the menu.
The Disk Defragmenter appears.
Other Ways to Open the Disk Defragmenter: Click the Start button and select Computer from
the menu. Select a drive, then right-click it. Select
Properties from the contextual menu. Click the
Tools tab in the Disk Properties dialog box, and
then click the Defragment now button in the
Defragmentation area.
The Disk column lists the disks that can be
defragmented. If a disk does not appear, it cannot be
defragmented. See Table 10-5: Reasons a Disk
Cannot be Defragmented to learn why a disk cannot
be defragmented.
Next, analyze the disk to see if defragmenting is
necessary.
2. Select a disk and click the Analyze disk button.
Disk Defragmenter displays the percentage of the
disk that is fragmented in the Last Run column. If the
disk is fragmented at 10 percent or more, you should
defragment the disk.
3. Click the Defragment disk button.
Defragmenting can take minutes or hours depending
on the disk’s size. You can continue to use your
computer while it is defragmenting.
When you are finished, close the Disk Defragmenter.
4. Click Close.
The Disk Defragmenter closes.
Tips
You can defragment external hard disks and flash
drives as well as your computer’s hard drive.
Exercise
• Exercise File: None required.
• Exercise: Understand how to manually defragment a disk.
Figure 10-11: The Disk Defragmenter can analyze a drive to see if it needs to be defragmented.
Table 10-5: Reasons a Disk Cannot be Defragmented
The drive is a network location. You cannot defragment
network locations.
The drive is formatted using a file system other than
NFTS, FAT, or FAT 32.
The drive contains an error. If that is the case, run Error-
checking and try to defragment that drive again.
Optimizing and Maintaining Your Computer

178 © 2009 CustomGuide, Inc.
Freeing Up Space on Your Hard Disk
Any time you work on your computer, you create files in
the background. These background files accumulate on
your hard drive and can slow your computer down. Disk
Cleanup identifies these extra files and deletes them,
making your computer faster.
1. Click the Start button and select All Programs
Accessories System Tools Disk Cleanup from
the menu.
The Disk Cleanup: Drive Selection dialog box
appears.
Other Ways to Start Disk Cleanup: Click the Start button and select Computer from
the menu. Select a drive, then right-click it. Select
Properties from the contextual menu. Click the
Disk Cleanup button on the General tab of the
Disk Properties dialog box.
2. Click the Drives list arrow and select a drive.
Disc Cleanup calculates how much space you can
free up on the drive.
3. Click OK.
The Disk Cleanup for dialog box appears. It lists
types of files you can delete to help your computer
run faster. For more information about these files, see
Table 10-6: Types of Files You Can Delete to Save
Space.
Tips
Click the Clean up system files button to display
the Disk Cleanup for dialog box with the More
Options tab. You can remove programs and delete
restore points from the More Options tab.
4. Select check boxes for the files you want to delete
and click OK.
The Disc Cleanup dialog box appears, confirming
that you want to delete the files permanently.
5. Click the Delete Files button.
The Disc Cleanup dialog box displays the progress of
the cleanup. When Disc Cleanup finishes deleting
files, the dialog box closes.
Tips
You can use Disk Cleanup on external hard disks and
flash drives as well as your computer’s hard drive.
Exercise
• Exercise File: None required.
• Exercise: Use Disk Cleanup to delete your Temporary
Internet Files.
Figure 10-12: Click the Drives list arrow to select the drive you want to clean up.
Figure 10-13: Select the types of files you want to delete in the Disk Cleanup for dialog box.
Optimizing and Maintaining Your Computer

IT Services, University of Wolverhampton 179
Table 10-6: Types of Files You Can Delete to Save Space
Downloaded Program files Small programs downloaded from the Internet and used to view certain Web pages. Deleting these files
does not affect your browser settings.
Temporary Internet Files A collection of Web sites stored on your computer for quicker viewing. Deleting these files does not
affect your browser settings.
Offline Webpages Web pages stored on your computer so you can view them without connecting to the Internet. Deleting
these files does not affect your browser settings.
Recycle Bin Files you have deleted from your computer, but that haven’t been emptied from the Recycle Bin.
Setup Log Files Files created by your computer. These files can be used to troubleshoot installation files.
Temporary files Temporary information stored by programs.
Thumbnails Files used to store thumbnail images for Windows Explorer’s Thumbnail view. You can safely delete
these files.
Per user archived Windows
Error Reports
Files generated by Windows Error Reporting when an application error occurs. These files are saved to
the user profile.
System archived Windows
Error Reports
Files generated by Windows Error Reporting when an application error occurs. These files are saved to
the system.
Optimizing and Maintaining Your Computer

180 © 2009 CustomGuide, Inc.
Restoring Your Computer
Sometimes we make changes that hurt our computer’s
performance. System Restore lets you rewind your
computer to a time when everything worked.
Every time you install software or update your computer,
a restore point is created. Think of a restore point as a
snapshot of your computer at a specific time. Restore
points record system settings, registry files, and installed
programs. Your computer also creates restore points at
scheduled times.
If your computer isn’t working, use System Restore to
return your computer to a specific restore point without
affecting individual files, such as documents and e-mail.
Tips
System Restore does not recover individual files,
such as documents and images. Make sure you
backup your individual files regularly.
Restore your computer
1. Click the Start button and select All Programs
Accessories System Tools System Restore
from the menu.
The System Restore window appears.
2. Click Next.
The System Restore window lists available restore
points. Select a restore point that was created before
you noticed the problem.
3. Select a restore point and click Next.
The “Confirm your restore point” screen appears.
4. Click Finish to restore your computer.
Windows displays a warning telling you that System
Restore cannot be interrupted.
5. Click Yes.
The System Restore dialog box appears and your
computer restarts.
When you log in to your computer, Windows displays
a message informing you that System Restore was
successful.
6. Click Close.
Tips
If the problem is not resolved, open System Restore
and undo the restore or select another restore point.
Exercise
• Exercise File: None required.
• Exercise: Understand how to restore your computer.
Create a restore point.
Figure 10-14: Undo a previous restore or select a new
restore point from the System Restore window.
Figure 10-15: System Restore lists restore points with the
time and date of their creation as well as a description.
Figure 10-16: When you restart your computer, a
message appears letting you know that System Restore was successful.
Optimizing and Maintaining Your Computer

IT Services, University of Wolverhampton 181
Create a restore point
Your computer creates restore points at regular intervals
and whenever Windows detects the beginning of a change
to your computer (such as installing a new program).
However, you can create restore points manually.
Tips
It’s a good idea to create a restore point before you
install new software on your computer. This lets you
restore the computer to a time before the installation
program was downloaded.
1. Click the Start button and select Control Panel from
the menu.
The Control Panel appears.
2. Click the System and Security category and click
the System category.
The System window appears.
3. Click the System protection link on the sidebar.
The System Properties dialog box appears.
4. Click the Create button.
The System Protection window appears.
5. Type a description in the Create a restore point text
box and click Create.
The System Protection window appears. A message
appears when the restore point is created successfully.
6. Click Close.
The restore point saved on your computer.
Trap: Restore points are saved until the disk space
System Restore reserves is full. At that point, old
restore points are deleted as new restore points are
created.
Figure 10-17: The System Properties dialog box.
Figure 10-18: Name your restore point so you remember why you created it.
Optimizing and Maintaining Your Computer

182 © 2009 CustomGuide, Inc.
Turning Windows Features On or Off
Windows features are programs included with your
computer that enhance its capabilities. You’re probably
familiar with at least one Windows feature: Games. But
Windows includes many other useful features. You can
easily turn features on or off as needed in the Windows
Features dialog box.
Tips
Turning off a Windows feature does not uninstall it.
The feature remains on your computer’s hard drive so
you can easily turn it on again.
1. Click the Start button and select Control Panel from
the menu.
The Control Panel appears.
2. Click the Programs category and click the Turn
Windows features on or off link under Programs
and Features.
The Windows Features dialog box appears.
Tip: If you do not have administrative rights on
the computer, the User Account Control dialog
box prompts you to enter an administrator user
name and password.
3. To turn on a feature, select its check box. To turn off
a feature, clear its check box.
After making your selections, confirm the changes in
Windows.
4. Click OK.
The Microsoft Windows dialog box appears. You
may have to wait while Windows configures your
changes.
After the changes have been configured, the
Microsoft Windows dialog box asks you to restart the
computer.
5. Click the Restart Now button.
Your computer restarts, and the changes take effect.
Tip: If you want to restart your computer later,
click the Restart Later button.
Table 10-7: Windows Features describes these features.
Because many of these features are intended for
developers, most users should not need to change the
default settings.
Exercise
• Exercise File: None required.
• Exercise: Understand how to turn Windows features on
and off.
Figure 10-19: The Windows Features dialog box. If a
check box is filled in, only part of the feature is turned on, as in the highlighted example.
Optimizing and Maintaining Your Computer

IT Services, University of Wolverhampton 183
Table 10-7: Windows Features
Co
mm
on
Fea
ture
s
Games Lists all games in Windows, including Internet games.
Indexing Service Locates, indexes, and updates documents to provide full-text searching.
Internet Explorer 8 Adds or removes Internet Explorer from the Start menu and taskbar.
Media Features Adds or removes Windows DVD Maker, Windows Media Center, and Windows Media Player.
Print and Document Services Enables the features associated with printer and scanner sharing.
Tablet PC Components Adds or removes the tablet PC components from the Start menu.
Telnet Client Adds or removes the Telnet client. Telnet is a text-based program that allows you to connect to
another computer using the Internet.
Windows Search Allows you to search the contents of your computer.
XPS Services Allows you to set permissions for and digitally sign XML Paper Specification (XPS) files.
XPS Viewer Allows you to search for and view XPS files.
Dev
elo
per
Fea
ture
s
Internet Information Services Includes Web and FTP support, along with support for transactions, active server pages, and
database connections.
Internet Information Services
Hostable Web Core
Allows you to host IIS core in your own process and serve hyptertext transfer protocol (HTTP)
requests.
Microsoft .NET Framework
3.5.1
Provides a software framework as well as a library of solutions to common programming
problems.
Microsoft Message Queue
(MSMQ) Server
Enables a fast store-and-forward service that lets applications running at different times to
communicate offline.
RAS Connection Manager
Administrator Kit (CMAK)
Lets you create a custom installation package for VPN access.
Remote Differential
Compression
Synchronizes data with a remote source using compression techniques to minimize the amount
of data sent across a network.
RIP Listener Monitors a network for updates sent by routers that use the Routing Information Protocol version
1 (RIPv1).
Services for NFS Enables your computer to share files with UNIX/LINUX computers using the Network File
System (NFS) protocol.
Simple Network Management
Protocol (SNMP)
Lets you manage and configure network computers from a centrally located computer rather than
running network management software.
Simple TCPIP services
(i.e. echo, daytime etc)
Installs the basic TCP/IP services such as echo, daytime, quote, chargen, and discard.
Subsystem for UNIX-based
Applications
Installs a source-compatibility subsystem for compiling and running UNIX-based applications
and scripts in Windows.
Telnet Server Installs a Telnet server on your computer. Turning on this feature without properly configuring it
could pose a significant security risk.
TFTP Client Installs a TFTP client that you can use to download and upload files to and from a TFTP server.
Windows Gadget Platform Provides a platform to develop Windows 7 gadgets.
Windows Process Activation
Service
Manages the activation and lifetime of the worker process that contain applications that host
Windows Communication Foundation (WCF) services.
Windows TIFF IFilter Allows you to search the content of Tagged Image File Format (TIFF) files.
Optimizing and Maintaining Your Computer

184 © 2009 CustomGuide, Inc.
Using Windows Update
Microsoft is constantly making improvements to the
Windows operating system, and they provides these
updates to users through Windows Update. By default,
Windows Update downloads and installs these updates on
your computer automatically. These updates can improve
performance, privacy, security, and reliability.
Tips
There are three types of Windows Updates:
Important, Recommended, and Optional. Read Table
10-8: Types of Windows Updates for more
information about each type.
You must be connected to the Internet to use
Windows Update.
Turn automatic updating on or off
Windows configures your computer to receive certain
updates automatically. However, you can control the
settings for automatic updating and choose how updates
are delivered.
1. Click the Start button and select Control Panel from
the menu.
The Control Panel appears.
2. Click the System and Security category and click
the Turn automatic updating on or off link under
the Windows Update category.
The Change settings window appears. There are four
ways to receive updates:
Install updates automatically: Installs all
important and recommended updates without
notifying you. You can schedule how often and
when Windows downloads and installs these
updates. This is the default setting and is
recommended to keep your computer running at
its best.
Download updates but let me choose to install
them: Notifies you after updates have been
downloaded so that you can review and install
them.
Check for updates but let me choose whether to
download and install them: Notifies you when
updates are available so you can you review the
updates and choose whether or not to download
them.
Never check for updates: Select this option if
you want to manually check for, download, and
install updates. This setting is not recommended.
Exercise
• Exercise File: None required.
• Exercise: Understand how Windows Update can improve
your computer’s security and performance. Turn on
automatic updating.
Table 10-8: Types of Windows Updates
Important Updates that improve your computer’s
security, privacy, and reliability. Windows
Update can automatically install these
updates or notify you when such updates
are available. These updates are critical for
your computer’s health and performance.
Recommended Updates that enhance your computer, but do
not address critical issues. You can choose
to have Windows Update treat these updates
the same as Important updates or you can
download these manually as you do with
Optional updates.
Optional These updates include drivers, language
packs, or new software from Microsoft to
enhance your computing experience. These
updates cannot be downloaded and installed
automatically.
Figure 10-20: Configure Windows Update to notify you or
install updates automatically.
Optimizing and Maintaining Your Computer

IT Services, University of Wolverhampton 185
Trap: If scheduled updates occur when your
computer is offline, Windows checks for updates
the next time you turn on your computer if it is
connected to the Internet.
3. Click the Important updates list arrow, select an
option, and click OK.
If you configured Windows Update to notify you
before installing or downloading updates, the
Windows Update icon will display when updates are
available in the notification area of the taskbar.
Install Optional updates
Even though Windows does not automatically download
Optional updates, you should still manually check for,
download, and install them often.
1. Click the Start button and select Control Panel from
the menu.
The Control Panel appears.
2. Click the System and Security category and click
Check for updates under the Windows Update
category.
The Windows Update window appears and displays
how many of each type of update (Important,
Recommended, Optional) are available.
3. Click the link for the updates you’d like to review.
The “Select updates to install” window appears. The
updates listed depend on the type of update you
selected.
Tip: To learn more about an update, click it and a
brief description appears in the right pane of the
window.
4. Select the update(s) you want to install and click OK.
The Windows Update window appears, displaying a
brief summary of the selected updates.
5. Click the Install updates button.
Windows begins installing the selected updates.
Some software updates may require you to accept
terms of use.
6. If necessary, accept the terms and click the Next
button. When you get to the last set of terms, click
the Finish button.
Windows notifies when the updates are installed.
Figure 10-21: You can check for updates at any time using the Windows Update window.
Figure 10-22: Windows Updates can include new drivers, language packs, and software.
Optimizing and Maintaining Your Computer

186 © 2009 CustomGuide, Inc.
Setting Default Programs
Your computer may have several programs that run the
same files. For example, both Windows Media Player and
iTunes play .mp3 files. But if you open a file, your
computer only opens it in one program. This is because
each type of file is set to open in a certain program by
default.
A default program opens a particular file type. Windows
has already assigned default programs for every file type,
but you can change these defaults anytime using the
Default Programs window.
Set a program as default for all file types
The easiest way to change program defaults is to let a
specific program open every file type it can. For example,
an image could be a JPEG, an PNG, a BMP, or a GIF file.
If you want to open all images in the same program, no
matter what type of file, set that program as default.
1. Click the Start button and select Default Programs
from the menu.
The Default Programs window appears.
2. Click the Set your default programs link.
The Set Default Programs window appears and lists
programs on your computer.
3. Select a program from the list.
Two options appear in the Set Default Programs
window:
Set this program as default: The program will
open all file types it supports.
Choose the defaults for this program: Specify
which file types a program should open.
4. Select the option you wish to use and click OK.
The program is set as default for all supported file
types.
Exercise
• Exercise File: None required.
• Exercise: Understand the difference between setting a
program as default for all file types and setting a program as
default for a specific file type.
Figure 10-23: The Set Default Programs window displays
a list of programs and allows you to set defaults for a whole program or for specific file types.
Figure 10-24: Associate a specific file type with a program in the Set Associations window.
Optimizing and Maintaining Your Computer

IT Services, University of Wolverhampton 187
Set a program as default for specific file types
Some programs, like media players, open many types of
files. Perhaps you want to open videos in Windows Media
Player, but you want to open any other media files in
iTunes. The Set Associations window lets you associate a
specific file type with a program.
Tips
Use these steps if a program is not listed in the Set
Default Programs window.
1. Click the Start button and select Default Programs
from the menu.
The Default Programs window appears.
2. Click the Associate a file type or protocol with a
program link.
The Set Associations window appears listing all
possible file types.
3. Select a file type from the list and click the Change
Program button.
The Open with dialog box appears, displaying all the
programs that can open that specific file type.
4. Select a program and click OK.
The selected program can open that file type.
Figure 10-25: The programs displayed in the Open with dialog box depend on the file type.
Optimizing and Maintaining Your Computer

188 © 2009 CustomGuide, Inc.
Scheduling Tasks
Remembering to run all of the maintenance tasks for
Windows is a hassle. Use the Task Scheduler to run these
tasks automatically at any time, day or night.
1. Click the Start button and select All Programs
Accessories System Tools Task Scheduler from the menu.
The Task Scheduler appears.
Tip: The Summary pane lists tasks that are
scheduled on your computer.
2. Click Create Basic Task in the Actions pane.
The Create Basic Task Wizard appears.
Other Ways to Create a Basic Task: Click Action and select Create Basic Task from
the menu.
3. Type the task’s name and description and click Next.
The Task Trigger screen appears. A task trigger
determines when a task will occur. You can have a
task trigged by a scheduled time or you could have a
task trigged by a specific event, such as turning on
your computer.
See Table 10-9: Task Triggers for more information
about each trigger.
4. Select a trigger and click Next.
The screen to configure trigger criteria appears. The
screen that appears depends on the trigger you
selected. For example, if you selected Monthly, you
would enter the day and time the task should occur
on this screen.
5. Select trigger criteria and click Next.
The Action screen appears. There are three types of
actions:
Start a program: Run a program automatically.
Send an e-mail: Send an e-mail to users.
Display a message: Display a message on this
computer.
6. Select an action and click Next.
Depending on the action selected, the Start a
Program, Send an E-mail, or Display a Message
screen appears.
Exercise
• Exercise File: None required.
• Exercise: Understand how to schedule a task using the
Task Scheduler.
Figure 10-26: The Actions pane of the Task Scheduler displays several options for scheduling tasks.
Table 10-9: Task Triggers
Daily Schedule a task to occur once a day. Specify
the date the task starts, the time it starts, and
how often it recurs.
Weekly Schedule a task to occur once a week.
Specify the date the task starts, the time it
starts, how many weeks it should recur, and
the day of the week on which it should recur
Monthly Schedule a task to occur once a month.
Specify the date the task starts, the time it
starts, and the months and days it should
recur.
One time Schedule a task to occur once. Specify the
date and time for the task to occur.
When the
computer
starts
Schedule a task to occur when you start your
computer. You do not need to specify
anything else.
When I log
on
Schedule a task to occur when your user
account lots on to the computer. You do not
need to specify anything else.
When a
specific event
is logged
Schedule a task to occur when specific event
entries are added to an event log. Specify the
log, the source, and the Event ID.
Optimizing and Maintaining Your Computer
Navigation pane Actions pane Summary pane
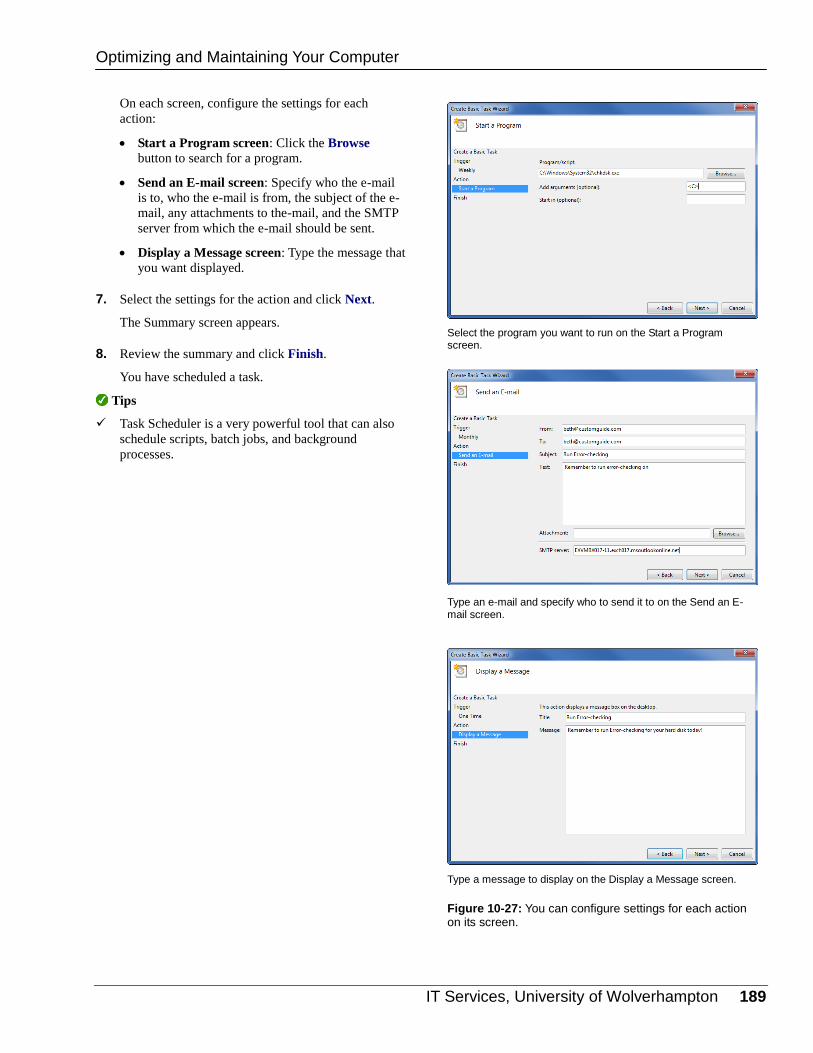
IT Services, University of Wolverhampton 189
On each screen, configure the settings for each
action:
Start a Program screen: Click the Browse
button to search for a program.
Send an E-mail screen: Specify who the e-mail
is to, who the e-mail is from, the subject of the e-
mail, any attachments to the-mail, and the SMTP
server from which the e-mail should be sent.
Display a Message screen: Type the message that
you want displayed.
7. Select the settings for the action and click Next.
The Summary screen appears.
8. Review the summary and click Finish.
You have scheduled a task.
Tips
Task Scheduler is a very powerful tool that can also
schedule scripts, batch jobs, and background
processes.
Figure 10-27: You can configure settings for each action on its screen.
Select the program you want to run on the Start a Program screen.
Type an e-mail and specify who to send it to on the Send an E-mail screen.
Type a message to display on the Display a Message screen.
Optimizing and Maintaining Your Computer

190 © 2009 CustomGuide, Inc.
Running Older Programs in Windows XP Mode
You want your software to work no matter which version
of Windows you use. If you are using software created for
Windows XP or earlier, you might find that it doesn’t
work as well in Windows 7. Before you buy new
software, use the Program Compatibility troubleshooter to
resolve the issue.
Tips
Visit the software manufacturer’s Web site before
using the Program Compatibility troubleshooter.
Manufacturers may provide upgrade instructions as
well as downloads (either for free or for purchase).
Use Windows Update to make sure your Windows 7
software and drivers are current.
1. Click the Start button and select Control Panel from
the menu.
The Control Panel appears.
2. Click the Programs category and click the Run
programs made for previous versions of Windows link under the Programs and Features category.
The Program Compatibility troubleshooter appears.
3. Click Next.
The Program Compatibility troubleshooter appears,
listing the programs installed on your computer.
Tip: If a program is not listed, select Not Listed
and click Next. You can browse to specific file
locations on the next screen.
4. Select a program and click Next.
The Program Compatibility troubleshooter displays
two options for changing the program settings:
Try recommended settings: The Program
Compatibility troubleshooter examines the
program and recommends settings. Use this
option if you do not know what settings will affect
the program.
Troubleshoot program: If you know the specific
compatibility issue, you can change the settings
manually. See the settings that can be changed in
Table 10-10: Program Compatibility Settings.
Exercise
• Exercise File: None required.
• Exercise: Online lesson file.
Exercise
• Exercise File: None required.
• Exercise: Understand the Program Compatibility
troubleshooter.
Figure 10-28: In the Program Compatibility troubleshooter,
select a program from the list of installed programs or select Not Listed to browse to unlisted programs.
Optimizing and Maintaining Your Computer

IT Services, University of Wolverhampton 191
5. Select the Try recommended settings option.
The “Test compatibility settings for the program”
screen appears. The Program Compatibility
troubleshooter tells you the settings it has applied.
6. Click the Start the program button.
The User Account Control dialog box appears
confirming the changes to the computer.
Tip: If you do not have administrative rights on
the computer, the dialog box prompts you to enter
an administrator user name and password.
7. Click Yes.
Test the program to see if the problem is resolved.
8. Select the Program Compatibility troubleshooter and
click Next.
Once you’ve tested the program, select one of the
three following options:
Yes, save these settings for this program: Select
this option if the program worked when you tested
it.
No, try again using different settings: Select this
option if the program did not work when you
tested it. The Program Compatibility
troubleshooter can help you diagnose the problem
and suggest solutions.
No, report the problem to Microsoft and check
online for a solution: Select this option if you
have already tried using different settings, and the
program still does not work.
9. Select an option and follow the instructions to
complete the Program Compatibility troubleshooter.
Click Close.
Tips
You can manually troubleshoot compatibility issues
without the Program Compatibility troubleshooter.
Right-click the program’s icon on the desktop, select
Properties from the contextual menu, click the
Compatibility tab, and select the settings you want
to change.
Table 10-10: Program Compatibility Settings
Compatibility
Mode
Use settings from a previous version of
Windows to run the program. This setting is
useful if you know a program worked in a
specific previous version of Windows.
Run in 256
colors
Older programs might use fewer colors.
Select this setting to use a limited set of
colors in the program.
Run in 640 x
480 screen
resolution
Older programs were designed to run on
smaller screens. This setting runs the
program in a smaller window, which is
perfect if you notice problems viewing the
program.
Disable visual
themes
If you see problems with menus or buttons
on the program’s title bar, select this setting.
It disables themes on the program.
Disable
desktop
composition
Windows 7 includes advanced display
features that may cause program windows
to move erratically or display improperly.
This setting disables those advanced
features for the program.
Disable
display scaling
on high DPI
settings
Large-scale fonts help you read your screen,
but they may affect how older programs
display. This setting turns off automatic
resizing of programs if large-scale font size
is being used.
Privilege level Some programs may only work for users
with administrative rights. If you are
currently logged on the computer as an
administrator, you can run a program using
those rights. This setting is unavailable if
you are not an administrator.
Change
settings for all
users
Lets you select settings that will apply to all
users on this computer.
Optimizing and Maintaining Your Computer

192 © 2009 CustomGuide, Inc.
OOppttiimmiizziinngg aanndd MMaaiinnttaaiinniinngg YYoouurr
CCoommppuutteerr RReevviieeww
Quiz Questions
104. Windows only installs software from a CD or DVD. (True or False?)
105. Which of the following is not a way to remove software from your computer? A. Open the program and type Uninstall somewhere. B. Click the Start button, select Control Panel from the menu, click the Uninstall a program link, select the program
you want to remove, and click the Uninstall button. C. Click the Start button, select the program’s menu group, and select Uninstall Program if it appears. D. Follow the uninstall directions included in the documentation that came with the software.
106. Which of the following statements is NOT true? A. You can shut down a frozen program using the Windows Task Manager. B. When you shut down a frozen program, you automatically save everything you were doing in that program. C. When a program has a status of Not Responding in the Windows Task Manager, the program is frozen. D. You can summon the Windows Task Manager by right-clicking the taskbar and selecting Start Task Manager
from the contextual menu.
107. Which of these is not a power plan included in Windows? A. Eco-friendly B. High performance C. Balanced D. Power saver
108. When you check your disk for errors, you must always repair the errors. (True or False?)
109. How does disk defragmenting help your computer? A. It breaks up large files into smaller parts so your computer can read them faster. B. It consolidates fragmented e-mail attachments into one large file. C. It improves your computer’s performance by putting fragmented files back together in one place. D. It organizes your fragmented Word files.
110. When you remove files using Disk Cleanup, those files are moved to the Recycle Bin. (True or False?)
111. System Restore changes system settings and files without affecting your individual files. (True or False?)
112. When you turn off a Windows feature, what happens? A. The feature is uninstalled. B. The feature is turned off but remains on your computer’s hard disk. C. Windows 7 is immediately uninstalled. D. You cannot turn off Windows features.

IT Services, University of Wolverhampton 193
113. You can set which of the following as Windows Update notification update options? A. Install updates automatically B. Download updates but let me choose to install them C. Check for updates but let me choose whether to download and install them D. All of the above
114. You can designate a program to open specific file types. (True or False?)
115. Which of the following is NOT a task trigger? A. Yearly B. Monthly C. Weekly D. Daily
116. Use the Program Compatibility troubleshooter to fix problems with problems designed for previous versions of
Windows. (True or False?)
Quiz Answers
104. False. You can install software downloaded from the Internet.
105. A. You cannot uninstall a program by typing Uninstall anywhere in the program.
106. B. If you shut a frozen program down using Windows Task Manager, the program does not automatically save the
information you just entered. It will only save the information you most recently saved.
107. A. Windows does not include a power plan called Eco-friendly.
108. False. You can turn off the Automatically fix file system errors option to get a list of file system errors.
109. C. It improves your computer’s performance by putting fragmented files back together in one place.
110. False. When you remove a file using Disk Cleanup, you permanently delete the file.
111. True. System Restore changes system settings and files without affecting your individual files.
112. B. When you turn off a Windows feature, it remains on your hard disk.
113. D. All of the above.
114. True. You can designate a program to open specific file types.
115. A. Yearly is not a task trigger.
116. True. The Program Compatibility troubleshooter helps you resolve problems with programs designed for previous
versions of Windows.

194 © 2009 CustomGuide, Inc.

IT Services, University of Wolverhampton 195
NNeettwwoorrkkiinngg
wwiitthh WWiinnddoowwss 77
Understanding Networks ................................ 195 How networking works ........................... 195 Types of networks .................................. 195 Benefits of networking ........................... 195
Browsing a Network ........................................ 196
Mapping a Network Drive................................ 197
Connecting to a Network Printer ................... 199
Connecting to a Virtual Private Network (VPN) ........................................................................... 201
Set up a VPN connection ...................... 201 Connect to a VPN .................................. 202
Using HomeGroup ........................................... 203 Create a homegroup .............................. 203 Join a homegroup .................................. 204
Sharing Files and Folders............................... 205
A network is a group of computers that
are connected so that they can share
equipment and information. Networks
make working and sharing information
between computers faster and easier.
Many workplaces have them, and home
users can set them up if they have
multiple computers in their home.
Networking is an enormous topic—
network engineers must pass tests that are
every bit as difficult as a CPA or bar
exam. This chapter won’t make you a
Microsoft Certified System Professional,
but it will explain how to perform several
common networking tasks, such as how to
browse the network, connect to a network
printer, share files and folders on your
computer with other users on the network,
and connect to a private network while
away from your desk. We’ll leave the
more complicated networking tasks for
your network administrator.
11

196 © 2009 CustomGuide, Inc.
Understanding Networks
What exactly is a network? A network is a connected
collection of computers, printers, and other devices. When
the network is created, computers and devices can
communicate with each other and share information and
resources such as files and printers.
How networking works
A network router (or a switch or a hub) connects
computers together on a network. Computers can connect
to the router in one of two ways: they can be connected to
the router using Ethernet cables, or they can be connected
wirelessly.
The router links the computers together so they can share
information. The router can also connect to a modem to
provide an Internet connection to all the computers on the
network.
Types of networks
Networks are classified by how the computers connect—
do they connect directly to each other (peer-to-peer) or do
they connect through a central computer (client/server)?
Peer-to-peer (Workgroups) In a peer-to-peer network, everyone stores their files
on their own computer. Anyone on the network can
access files stored on any other computer.
Client/server (Domains) In a client/server network, everyone stores their files
on a central computer called a server. Everyone on
the network can access the files stored on the server.
Benefits of networking
So what are the benefits of networking? There are plenty:
Share information: You can save a file or folder
onto a network and anyone with a network
connection can view that information.
Share equipment: Computers connected to a
network can share equipment, such as printers, to
reduce costs.
Network software: Software designed for networks
lets people send and receive e-mail, schedule
meetings, and share databases with others on the
network.
Exercise
• Exercise File: None required.
• Exercise: Define a network and explain the benefits of
networking computers and devices.
Figure 11-1: Networks connect devices—including computers, modems, and printers—to one another.
Networking with Windows 7
Your office computer is connected to a router.
Router: The router links all the computers on the network together.
Modem: The router connects to a modem, and the modem provides Internet access.
Your colleague’s computer is also connected to the router.
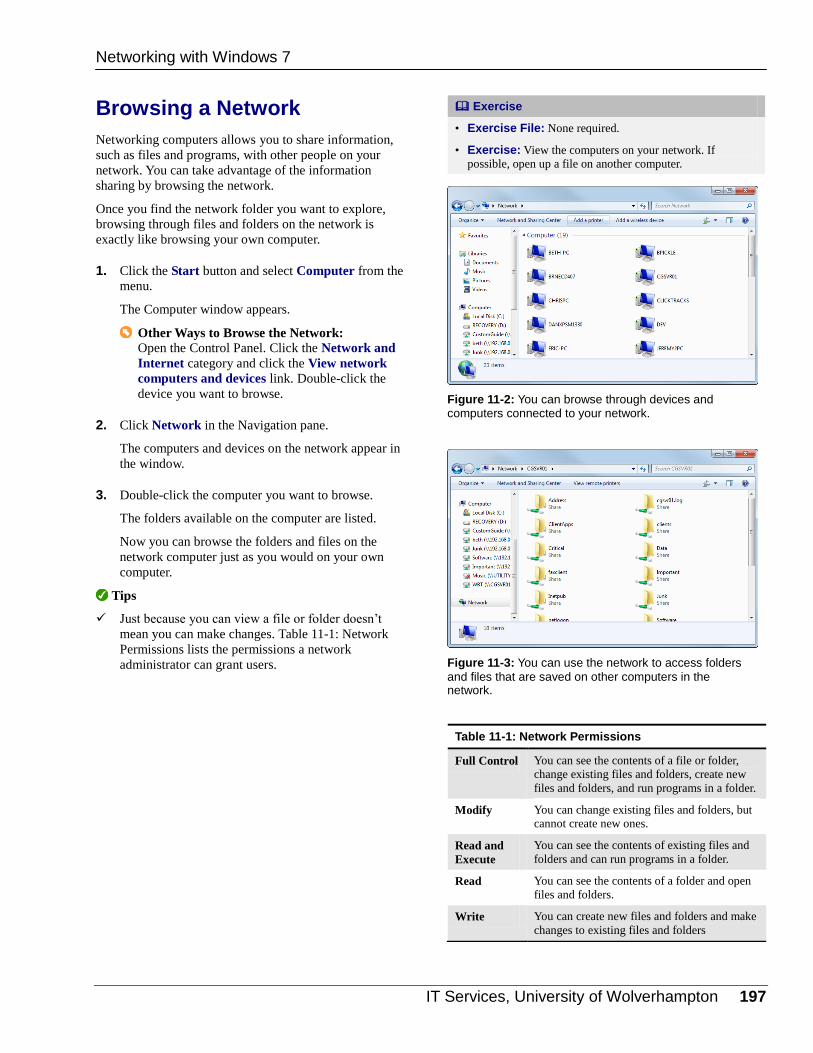
IT Services, University of Wolverhampton 197
Browsing a Network
Networking computers allows you to share information,
such as files and programs, with other people on your
network. You can take advantage of the information
sharing by browsing the network.
Once you find the network folder you want to explore,
browsing through files and folders on the network is
exactly like browsing your own computer.
1. Click the Start button and select Computer from the
menu.
The Computer window appears.
Other Ways to Browse the Network: Open the Control Panel. Click the Network and
Internet category and click the View network
computers and devices link. Double-click the
device you want to browse.
2. Click Network in the Navigation pane.
The computers and devices on the network appear in
the window.
3. Double-click the computer you want to browse.
The folders available on the computer are listed.
Now you can browse the folders and files on the
network computer just as you would on your own
computer.
Tips
Just because you can view a file or folder doesn’t
mean you can make changes. Table 11-1: Network
Permissions lists the permissions a network
administrator can grant users.
Exercise
• Exercise File: None required.
• Exercise: View the computers on your network. If
possible, open up a file on another computer.
Figure 11-2: You can browse through devices and computers connected to your network.
Table 11-1: Network Permissions
Full Control You can see the contents of a file or folder,
change existing files and folders, create new
files and folders, and run programs in a folder.
Modify You can change existing files and folders, but
cannot create new ones.
Read and
Execute
You can see the contents of existing files and
folders and can run programs in a folder.
Read You can see the contents of a folder and open
files and folders.
Write You can create new files and folders and make
changes to existing files and folders
Figure 11-3: You can use the network to access folders
and files that are saved on other computers in the network.
Networking with Windows 7

198 © 2009 CustomGuide, Inc.
Mapping a Network Drive
If you frequently access a specific network folder, you
should consider mapping that network folder to a drive on
your computer. Mapping a network drive creates a
shortcut to the location so it is easily accessible in
Windows Explorer and in the Open and Save dialog boxes
of programs on your computer.
1. Click the Start button and select Computer from the
menu.
The Computer window appears.
2. Click the Map network drive button on the toolbar.
The Map Network Drive dialog box appears.
Other Ways to Map a Network Folder: Right-click the folder and select Map network
drive from the contextual menu.
First, specify the letter that signifies the drive and the
folder you want to connect to here.
3. Click the Drive list arrow and select the letter you
want to use to map the drive.
Choose a letter that does not have a file path next to
it. Drives with file paths next to them are already
mapped.
4. Click the Browse button and select the network
location you want to map.
The file path for the folder to be mapped is shown in
the Folder text box.
Other Ways to Access the Network Location: Type the file path for the folder in the Folder text
box.
5. (Optional) Select connection settings.
There are two options for connection properties in
this window:
Reconnect at logon: Connects your computer to
the mapped drive every time you log on to your
computer.
Connect using different credentials: Allows you
to log on to a mapped drive with credentials not
associated with your own computer. You would
choose this option if you were mapping to a
password-protected drive.
6. Click Finish.
The network drive is mapped to your computer.
Exercise
• Exercise File: None required.
• Exercise: Map a location on your network to a drive on
your computer.
Figure 11-4: The Computer window lists the drives that
are mapped to your computer.
Figure 11-5: The Map Network Drive dialog box.
Networking with Windows 7
Click the Map network drive button to map a drive on your computer.

IT Services, University of Wolverhampton 199
Disconnect a network drive
If you no longer need to be connected to a drive that you
have mapped, you can disconnect it so it no longer
appears in the Computer window.
1. Right-click the drive you want to disconnect and
select Disconnect from the contextual menu.
The drive disappears from the window.
Networking with Windows 7

200 © 2009 CustomGuide, Inc.
Connecting to a Network Printer
At work, you probably share one printer with several
people. This is called network printing. Before you can
take advantage of network printing, you need to connect
your computer to a network printer.
Tips
You may be able to install a network printer by using
the printer’s installation disk. The installation disk
can install driver software and locate network
printers. If that does not work, follow these steps.
1. Click the Start button and select Devices and
Printers from the menu.
The Devices and Printers window appears.
Other Ways to Connect to a Network Printer: Click the Start button and select Control Panel
from the menu. Click the Hardware and Sound
category and click the Add a Printer link.
2. Click the Add a printer button.
The Add Printer wizard appears.
3. Click the Add a network, wireless or Bluetooth
printer link.
A list of available network printers appears.
Tip: If the printer you want isn’t listed, click the
“The printer I want isn’t listed” link. The “Find a
printer by name or TCP/IP address” screen
appears. Use the available options to locate the
printer.
4. Select the printer you want to add and click Next.
5. (Optional) Install additional printer software or
drivers.
Each printer’s driver software is required to make
your computer and printer to communicate. This
software may be available on the network, or you
may also upload it from an installation disk.
6. (Optional) Type a name in the Name your printer
text box.
Most printers already have a name, so you may not
need to type a name for the printer.
Exercise
• Exercise File: None required.
• Exercise: Connect your computer to a network printer.
Figure 11-6: Use the Add Printer wizard to install network
and local printers.
Figure 11-7: The Add Printer wizard lists printers that are found on the network.
Networking with Windows 7
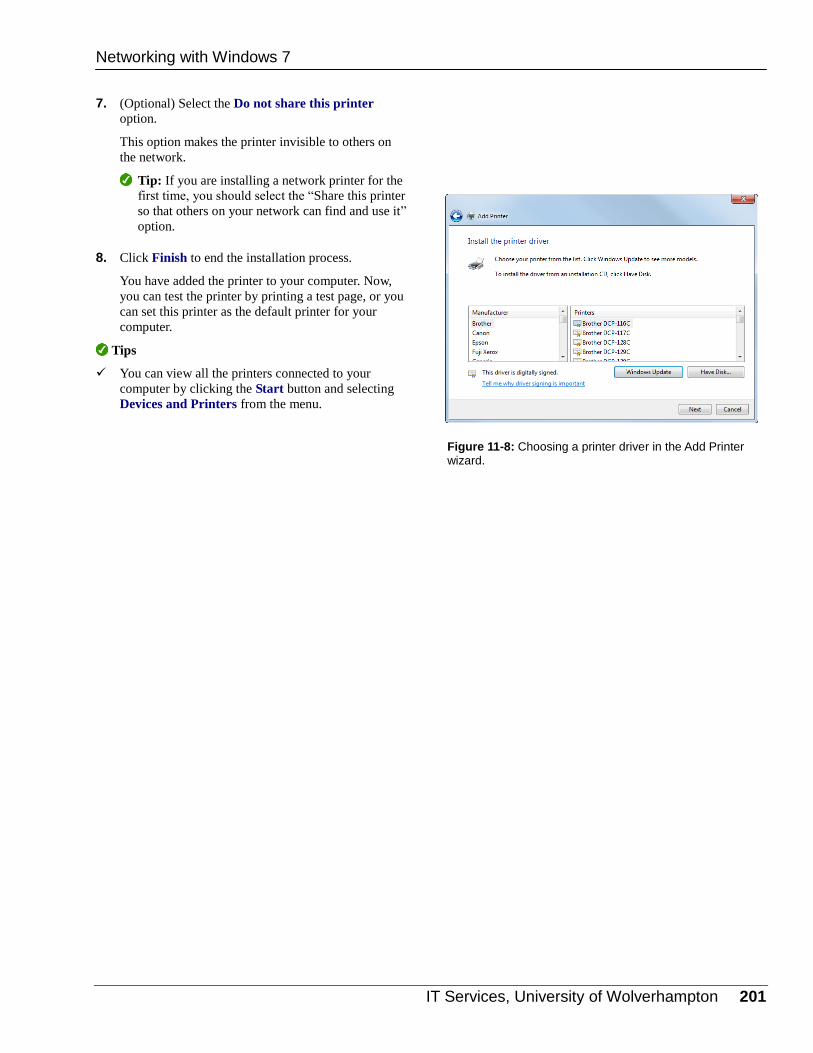
IT Services, University of Wolverhampton 201
7. (Optional) Select the Do not share this printer
option.
This option makes the printer invisible to others on
the network.
Tip: If you are installing a network printer for the
first time, you should select the “Share this printer
so that others on your network can find and use it”
option.
8. Click Finish to end the installation process.
You have added the printer to your computer. Now,
you can test the printer by printing a test page, or you
can set this printer as the default printer for your
computer.
Tips
You can view all the printers connected to your
computer by clicking the Start button and selecting
Devices and Printers from the menu.
Figure 11-8: Choosing a printer driver in the Add Printer wizard.
Networking with Windows 7

202 © 2009 CustomGuide, Inc.
Connecting to a Virtual Private Network (VPN)
A Virtual Private Network (VPN) connection allows you
to connect to a private network remotely while keeping
your folders and files secure. A VPN connection uses the
Internet to communicate with the network along with
additional tunnels and encryption to secure information
sent through the VPN connection.
Set up a VPN connection
Before you set up your VPN connection, talk with your
network administrator to find out the information you
need to connect.
1. Click the Start button and select Control Panel from
the menu.
The Control Panel appears.
2. Click the Network and Internet category.
3. Click the Network and Sharing Center link.
The Network and Sharing Center window appears.
Other Ways to Open the Network and Sharing
Center: Click the Internet Access icon in the taskbar
notification area and click the Open Network
and Sharing Center link.
4. Click the Set up a new connection or network link.
The Set up a Connection or Network window
appears.
5. Select Connect to a workplace and click Next.
The Connect to a Workplace window appears.
6. Select the No, create a new connection option and
click Next.
Now tell the wizard how you want to connect to the
VPN. There are two ways to do this:
Use my Internet connection (VPN): Enter the
address of the VPN so that your computer
connects to the VPN through the Internet.
Dial directly: Enter the phone number of the
VPN so that your computer connects to it directly
through the phone number.
Exercise
• Exercise File: None required.
• Exercise: Explain the difference between a VPN
connection and a standard network connection. Connect
your computer to your company’s VPN if you have one.
Figure 11-9: The Set Up a Connection or Network window.
Figure 11-10: Choose how you want to connect to the
VPN. This information should be provided to you by your network administrator.
Networking with Windows 7

IT Services, University of Wolverhampton 203
7. Click the type of connection you want to create.
The next window asks you to enter information
depending on the type of connection you want to
create, entering either the Internet address or the
phone number of the VPN.
8. Enter the Internet address or phone number of the
VPN connection, and enter the name of the
connection. Click Next.
Next, enter the user name and password you use to
connect to your network.
9. Type in your network user name and password.
There are two additional options that you can use to
set up your connection:
Show characters: This option displays characters
instead of bullets for your password.
Remember this password: This option
remembers your password so you don’t have to
enter it every time you connect to the VPN.
10. Click Create.
The computer connects to the VPN.
When the connection is successful, the “You are
connected” window appears.
Connect to a VPN
After you’ve set up your VPN connection, you can
connect to it any time you’re away from your office. Just
follow these steps:
1. Click the Network icon in the notification area of the
taskbar.
A list of current connections and available
connections appears.
2. Select your VPN network and click the Connect
button.
The Connect to VPN dialog box appears.
If you asked your computer to save your password
when you created your connection, you won’t need to
enter it again here.
3. If necessary, enter your password. Click Connect.
Your computer establishes a connection to the
network and the VPN connection appears in the
Network list.
Figure 11-11: A list of networks connected to the
computer.
Figure 11-12: The Connect VPN dialog box.
Networking with Windows 7
Current connections
VPN connections set up on your computer
Network icon

204 © 2009 CustomGuide, Inc.
Using HomeGroup
In the past, networking computers required significant
investments of knowledge, time, and money. In
Windows 7, the HomeGroup feature allows you to create
a network that shares files and printers quickly and easily.
Create a homegroup
A homegroup can only be created between computers that
run on Windows 7.
1. Click the Start button and select Control Panel from
the menu.
The Control Panel appears.
2. Click the Network and Internet category. Click the
HomeGroup link.
The HomeGroup wizard appears.
3. Click the Create a Homegroup button.
The Create a Homegroup wizard appears.
First, choose what you want to share with others in
the homegroup. Include the libraries you want to
share and exclude the libraries that you would like to
keep private.
4. Make sure libraries you want to share are selected
with a checkmark. Click Next.
The homegroup password is displayed. You can click
the “Print password and instructions” link to print the
password so others can connect to the homegroup.
5. Click Finish.
The homegroup is created.
Tips
You can add computers that are part of a client/server
(domain) network to a homegroup. These computers
can view the files and folders on the homegroup, but
they cannot share files or folders with the
homegroup.
Only computers running Windows 7 can join a
homegroup.
Exercise
• Exercise File: None required.
• Exercise: Understand how the HomeGroup feature works.
Identify situations where this feature would be useful in
your computer use.
Figure 11-13: If your computer does not detect a homegroup, it will prompt you to create one.
Figure 11-14: Choose which libraries you want to share with your homegroup.
Figure 11-15: When you create a homegroup, Windows
generates a password so others can join the homegroup.
Networking with Windows 7

IT Services, University of Wolverhampton 205
Join a homegroup
Joining a homegroup is easy. Two things are required to
join a homegroup: a computer that runs Windows 7, and
“Home” as the network location setting.
1. Click the Start button and select Control Panel from
the menu.
The Control Panel appears.
2. Click the Network and Internet category and click
the HomeGroup link.
If you are in a Home network location that already
has a homegroup, Windows will automatically detect
that homegroup and ask if you want to join.
Trap: Make sure that you set your network
location to home to join a homegroup.
3. Click the Join Now button.
The Join a Homegroup wizard appears.
4. Select the libraries you would like to share with
others in the homegroup and click Next.
Now you can enter the password for the homegroup.
This information should be given to you by someone
already connected to the homegroup.
Tip: You can view the homegroup password from
any computer that has joined the homegroup.
Click the Start button and select the Control
Panel from the menu. Click the Network and
Internet category and click the HomeGroup link.
Click the View or print the homegroup
password link.
5. Type the homegroup password and click Next.
You have joined the homegroup. Each homegroup
user’s libraries are now available in the Navigation
pane of Windows Explorer.
Tips
On computers with multiple accounts, only one
account has to join the homegroup for the computer
to be connected to the homegroup.
Leave a homegroup by clicking the Leave
HomeGroup link in the HomeGroup wizard.
Figure 11-16: When you join a homegroup, it appears in
the Navigation pane.
Networking with Windows 7

206 © 2009 CustomGuide, Inc.
Sharing Files and Folders
The easiest way to share files and folders is by saving
them to a network drive or location that is accessible to
everyone on the network.
But you can also share files and folders that are saved on
your computer. This method of sharing lets you share files
and folders that are saved on your computer with specific
individuals or homegroups.
You can share files with people in your workgroup or
domain, or people in your homegroup.
1. Select the file or folder you want to share.
The file or folder should be saved on your computer;
you cannot share files and folders that are already on
a network.
2. Click the Share with button on the toolbar and select
Specific People from the menu.
The File Sharing wizard appears.
Other Ways to Share Files: Right-click the file or folder and select Share
with Specific People from the contextual
menu.
3. Click the list arrow and select the person with whom
you want to share the file. Or, if you already know
the name of the person you want to share with, enter
it in the text box.
The user’s name appears in the list. Once the user is
added, you can control the level of access the users
have to the shared item. Refer to Table 11-2:
Permissions Levels for information on the
permissions you can assign to a user.
4. Click Add.
The name is added to the list of people and groups
that can share the file or folder. Once the name is
added to the share list, you can control the permission
level. Refer to Table 11-2: Permissions Levels for
information on the permissions you can assign to a
user.
5. Point to the permission level column, click the list
arrow and select a permission level from the list.
The permission level is now set.
Trap: Giving a user Read/write access to a file
also gives that user Read/write access to the folder
that the file is in.
Exercise
• Exercise File: Birthday announcement.rtf
• Exercise: Share the Birthday announcement.rtf with
someone else on your network. The user should be able to
read the document but not make changes.
Figure 11-17: The Share with menu.
Table 11-2: Permissions Levels
Owner Indicates the person who created the file and
who determines permissions.
Read Allows you to view the contents of a folder and
open files and folders, but not make changes.
Read/write Allows you to view and change folders and
files.
Figure 11-18: Share files and folders with homegroups or specific individuals.
Networking with Windows 7

IT Services, University of Wolverhampton 207
6. Click Share.
Now you can let other people know that you have
shared a file or folder with them. There are two ways
to do this:
E-mail: Generate an e-mail with a link to the
shared item that you can send to the person(s) you
are sharing the file with.
Copy and Paste: Copy the path to the clipboard
so you can paste the path into any program.
When you’re finished sharing the file, you can close
the File Sharing wizard.
7. Click Done.
The wizard closes.
Tips
If you are trying to share a file or folder that is saved
on a network location, you will not see the Share with
button. The file or folder is already being shared
through the network.
You can also share a file or folder by moving it to the
Public library of your computer.
To stop sharing a file or folder, select the file or
folder you want to stop sharing. Click the Share with
button on the toolbar and select Nobody from the
menu.
Figure 11-19: From the File Sharing wizard, you can
either e-mail the link to a file or copy and paste the link into another program.
Networking with Windows 7
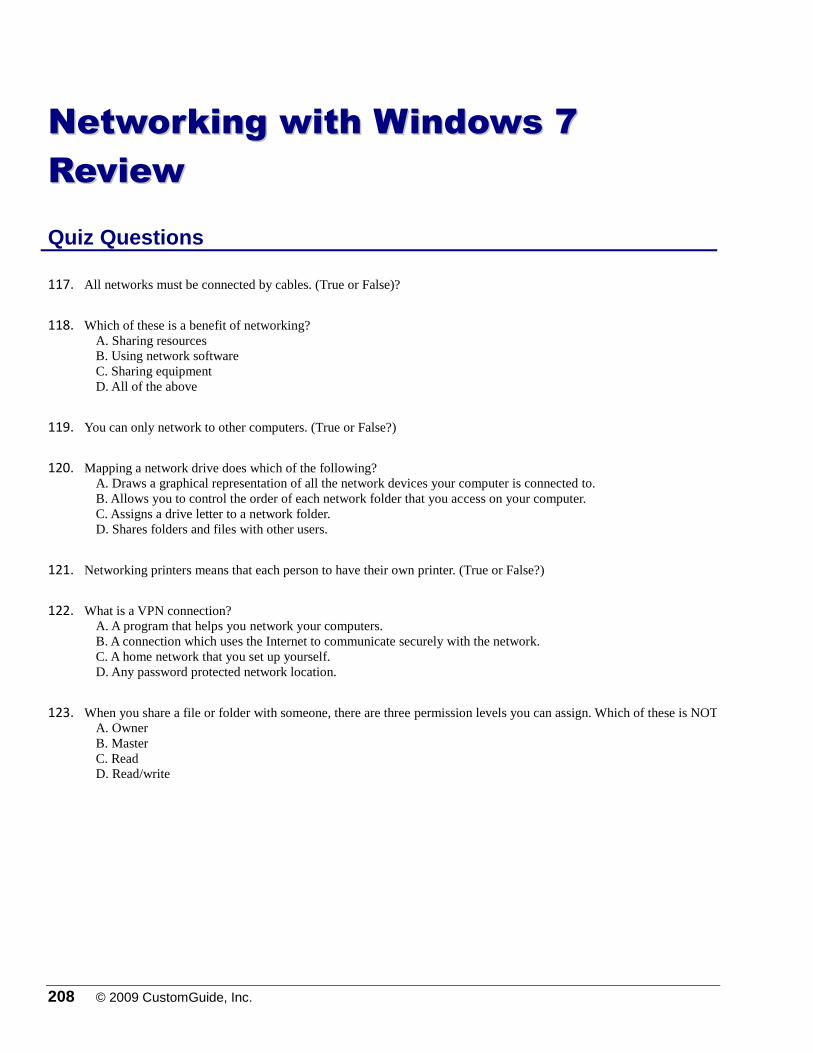
208 © 2009 CustomGuide, Inc.
NNeettwwoorrkkiinngg wwiitthh WWiinnddoowwss 77
RReevviieeww
Quiz Questions
117. All networks must be connected by cables. (True or False)?
118. Which of these is a benefit of networking? A. Sharing resources B. Using network software C. Sharing equipment D. All of the above
119. You can only network to other computers. (True or False?)
120. Mapping a network drive does which of the following? A. Draws a graphical representation of all the network devices your computer is connected to. B. Allows you to control the order of each network folder that you access on your computer. C. Assigns a drive letter to a network folder. D. Shares folders and files with other users.
121. Networking printers means that each person to have their own printer. (True or False?)
122. What is a VPN connection? A. A program that helps you network your computers. B. A connection which uses the Internet to communicate securely with the network. C. A home network that you set up yourself. D. Any password protected network location.
123. When you share a file or folder with someone, there are three permission levels you can assign. Which of these is NOT a permission level you can assign? A. Owner B. Master C. Read D. Read/write

IT Services, University of Wolverhampton 209
Quiz Answers
117. False. Networks can be connected through cables or wireless signals.
118. D. All of the above
119. False. You can network to any device on the network, including printers.
120. C. Assigns a drive letter to a network folder.
121. False. Network printing allows multiple users to share one printer.
122. B. A connection which uses the Internet to communicate securely with the network.
123. B. Master is not a permission level you can assign when sharing a file or folder