Windows 2000 Prof Unattend Installatie
66
Installi ng Windows 2000 Profes sional 1 Chapter 1: Installing Windows 2000 Professional The objective of this chapter is to provide the reader with an understanding of the following: 1. Perform an attended install of Windows 2000 Professional 2. Perform an unattended instal l of Windows 2000 Professional using Remote Installation Services 3. Perform an unatte nded insta ll of Windows 200 0 Professional using the System Preparation Tool 4. Perform an unatte nded install of Windows 200 0 Professional using Setup Manager 5. Perform a n upgrade from a previous version of Windows to Windows 2000 Professional 6. Deploying service packs 7. Troubleshooting failed installations Getting Ready - Question s 1) What are the minimum processor requirements to install Windows 2000 Professional? 2) What are th e recommended RAM requirements f or a Windows 2000 Professional installation? 3) How can you verify that your hardware will support Windows 2000 Professional? 4) Can I upgrade from Windows 3.1 to Windows 2000 Professional? 5) If I create a dual-boot system, with both the Windows 2000 Professional operating system and Windows Millenniu m (Windows ME), will Microsoft still provide me with support?
-
Upload
joosttenbosch -
Category
Documents
-
view
219 -
download
0
Transcript of Windows 2000 Prof Unattend Installatie

8/8/2019 Windows 2000 Prof Unattend Installatie
http://slidepdf.com/reader/full/windows-2000-prof-unattend-installatie 1/66
Installing Windows 2000 Profes sional 1
Chapter 1:
Installing Windows 2000 Professional
The objective of this chapter is to provide the reader with
an understanding of the following:
1. Perform an attended install of Windows 2000 Professional
2. Perform an unattended install of Windows 2000
Professional using Remote Installation Services
3. Perform an unattended install of Windows 2000
Professional using the System Preparation Tool
4. Perform an unattended install of Windows 2000
Professional using Setup Manager
5. Perform an upgrade from a previous version of Windows to
Windows 2000 Professional
6. Deploying service packs
7. Troubleshooting failed installations
Getting Ready - Questions1) What are the minimum processor requirements to install Windows 2000
Professional?
2) What are the recommended RAM requirements for a Windows 2000
Professional installation?
3) How can you verify that your hardware will support Windows 2000
Professional?
4) Can I upgrade from Windows 3.1 to Windows 2000 Professional?
5) If I create a dual-boot system, with both the Windows 2000 Professional
operating system and Windows Millennium (Windows ME), will Microsoftstill provide me with support?

8/8/2019 Windows 2000 Prof Unattend Installatie
http://slidepdf.com/reader/full/windows-2000-prof-unattend-installatie 2/66
2 Chapter 1:Windows 2000 Professional
Getting Ready - Answers1) To install Windows 2000 Professional, you must have, at minimum, 133
MHz 5th generation or better, for example an Intel Pentium MMX or an
AMD K6-2 processor.
2) While you only need 32MB RAM to install Windows 2000 Professional, it is
recommended that you have a minimum of 64MB RAM, with a 4GB
recommended maximum limit.
3) You should always verify your hardware by checking the Hardware
Compatibility List (HCL). If your hardware device is not listed, contact the
manufacturer and check whether a Windows 2000 Professional compatible
driver exists.
4) Unlike the upgrade path to Windows NT 4.0 Workstation, you CANNOT
upgrade from Windows 3.1 to Windows 2000 Professional. A full
installation is required. There is also no upgrade path from Windows NT
Server 3.51 or 4.0 to Windows 2000 Professional.
5) Microsoft did not support dual-boot systems between Windows 9x and
Windows NT 4.0 Workstation. Microsoft will now support dual or multiple
boot systems between Windows 2000 Professional and a number of other
operating systems including: Windows 9x,

8/8/2019 Windows 2000 Prof Unattend Installatie
http://slidepdf.com/reader/full/windows-2000-prof-unattend-installatie 3/66
Installing Windows 2000 Profes sional 3
I Introduction
Windows 2000 Professional is the most reliable and secure desktop operating
system developed to date by Microsoft. Built on NT Technology, Windows
2000 Professional combines and improves upon the stability and security that
exists in Windows NT 4.0 Workstation and the user-friendliness of Windows
98. In 1999, Microsoft hired NSTL, the leading provider of testing services to
developers, corporations, and governments worldwide, to test this new desktop
operating system. The results of these tests, run in real-world customer sites,
state that Windows 2000 Professional was thirty percent (30%) faster than
Windows 98, and thirteen times more reliable.
It was even three times more reliable than Windows NT 4.0 Workstation!Small
wonder then that many corporations are looking at changing their client
desktops to Windows 2000 Professional.
Throughout the course of this chapter, we will examine the key issues
surrounding the installation of Windows 2000 Professional in your work
environment. As you review this material, think of these questions. Are my
systems ready for Windows 2000 Professional? Can I upgrade or should I do a
fresh installation? What method of installation is going to be the most efficient
and effective in my corporate environment? What about service packs? How
can I quickly and effectively troubleshoot problems that may occur?

8/8/2019 Windows 2000 Prof Unattend Installatie
http://slidepdf.com/reader/full/windows-2000-prof-unattend-installatie 4/66
4 Chapter 1:Windows 2000 Professional
II Preparing To Install Windows 2000
ProfessionalWell, the decision has been made. Your work environment is going to Windows
2000 Professional. Nevertheless, before you start the installation process, there
are a number of questions you need answered. Let’s take a look at these issues
one by one.
Minimum Hardware Requirements
As with most operating systems, Windows 2000 Professional has a minimum set
of hardware requirements in order to successfully install. Table 1.1 outlines
both the minimum and the recommended system requirements needed for
installation.
It is important to note that Windows 2000 Professional has advanced power
management, as well as Plug and Play features. On some computers, the BIOS
version may not be compatible with Professional. This is because it may not
have a compliant ACPI BIOS. Without upgrading the BIOS, you won’t be able
to gain full power management functionality, which is ACPI-based. APM
(Advanced Power Management), which is an older technology, is supported,
however extremely limited, as it is only available for notebook computers. If
the BIOS is not upgraded prior to installation, you will need to reinstall
Windows 2000 Professional to gain full power management functionality.
Before installation of Windows 2000 Professional, check the BIOS on the
computer, both portable and desktop, to verify that the BIOS has been updated.
If the system does not have ACPI functionality, the BIOS is not compatible.
You will need to obtain the updated BIOS from the manufacturer. Most
manufacturers carry BIOS updates on their websites.
Remember Know the minimum and recommended hardware requirements
for Windows 2000 Professional

8/8/2019 Windows 2000 Prof Unattend Installatie
http://slidepdf.com/reader/full/windows-2000-prof-unattend-installatie 5/66
Installing Windows 2000 Profes sional 5
Minimum Recommended
Processor 133 MHz 5th generation or
better
Intel Pentium MMX
AMD K6-2
300 MHz 6th generation or
better
Intel Pentium II
AMD Athlon
RAM 32 MB 64 MB (4 GB maximum)
Hard Disk 2 GB with 650 MB free
space
(more if installing over a
network)
2 GB free space
Display VGA with compatible or
higher monitor
SVGA with Plug and Play
Monitor
Removable
Media
CD-ROM or DVD drive
(required for compact disc
installation).
CD-ROM or DVD drive
(12x or faster)
Input Devices Keyboard, mouse or other
pointing device
Keyboard, mouse or other
pointing device
Network Network adapter
(required for network
installation).
Network adapter
Table 1.1: Minimum/Recommended Hardware Requirements

8/8/2019 Windows 2000 Prof Unattend Installatie
http://slidepdf.com/reader/full/windows-2000-prof-unattend-installatie 6/66
6 Chapter 1:Windows 2000 Professional
Hardware and Software Compatibility
The Hardware Compatibility List (HCL) is nothing new to those of you who
have worked with Windows NT products in the past. For those of you who have
not, the HCL is a list of hardware devices that have been extensively tested for
compatibility with NT-based operating systems. When Windows 2000
Professional is installed on a system where the hardware is not compatible,
installation can fail.
Verify all hardware by checking the HCL. A copy is included on the Windows
2000 Operating System CD, which lists all supported hardware at the time of
release. This can be found in the Hcl.txt file in the Support folder. If your
hardware is not on the list supplied on the CD, you can check the most up-to-
date information atHTTP:/ /WWW .MICROSOFT.COM/HCL. You can also use
HTTP:/ /WWW.MICROSOFT.COM/WINDOWS2000/ UPGRADE/ COMPAT/
SEARCH/DEVICES.ASP. This active server page provides a tool that will allow
you to search for hardware devices that are compatible with Windows 2000
Professional. Some manufacturers have included links on the HCL to
downloadable compatible drivers. Other manufacturers have listed the
minimum BIOS requirements to install Windows 2000, and where to get the
update.
If your hardware device is not listed, contact the manufacturer and check
whether a Windows 2000 Professional compatible driver exists.
If your software is using 16-bit drivers, it will be necessary to upgrade these
drivers to the 32-bit equivalents that are Windows 2000 compatible. Check with
the manufacturer to see if these drivers are available.

8/8/2019 Windows 2000 Prof Unattend Installatie
http://slidepdf.com/reader/full/windows-2000-prof-unattend-installatie 7/66
Installing Windows 2000 Profes sional 7
Figure 1.1: Check Upgrade Tool
One way to verify whether your hardware and software will be compatible with
Windows 2000 Professional is to run the “Check Upgrade” tool (Figure 1.1). It
is important to note that this feature will work only if the operating system
presently running on the computer can be upgraded to Windows 2000
Professional. These operating systems include Windows 9x, Windows NT 3.51
and 4.0 Workstation.
From the Run command, run CDROM :\I386\WINNT32
/CHECKUPGRADEONLY. The results of this test will be stored in
%windir%\upgrade.txt if your operating system is Windows 9x, and in
%windir%\win32.log if the operating system is NT-based.
The report generated by this tool will include information such as:
MS-DOS Configuration Autoexec.bat and Config.sys entries that are
incompatible with Windows 2000 Professional. These may be entries that
existed because of older hardware and software that will not work with
Professional

8/8/2019 Windows 2000 Prof Unattend Installatie
http://slidepdf.com/reader/full/windows-2000-prof-unattend-installatie 8/66
8 Chapter 1:Windows 2000 Professional
Plug and Play Hardware
For Hardware that may be incompatible with Windows 2000 Professional:
Check with the HCL
For Software Incompatible with Windows 2000:
Software that may require upgrading before working with Windows 2000
Professional, or older software that may not work with Pro
Software to Reinstall
Software that will require upgrade packs because it uses different settings under
Windows 2000 Professional
Upgrading vs. Clean InstallationAs noted previously, only certain operating systems can be upgraded to
Windows 2000 Professional. These operating systems are Windows 9x and
Windows NT Workstation 3.51 and 4.0.
The advantage to an upgrade is that your exist ing user and application settings
are preserved. Setup will replace only the existing Windows operating system
files. The disadvantage is that some applications might not be compatible with
Windows 2000 Professional. They may not function properly, or at all, after an
upgrade.
Remember: Unlike the upgrade path to Windows NT 4.0 Workstation, you
CANNOT upgrade from Windows 3.1 to Windows 2000 Professional. A full
installation is required. There is also no upgrade path from Windows NT
Server 3.51 or 4.0 to Windows 2000 Professional.
You may choose to do an upgrade to Windows 2000 Professional if:
• You are currently running Windows 9x or Windows NT Workstation 3.51
or 4.0, AND you wish to upgrade your existing operating system with
Windows 2000 Professional;
• You have verified that installed applications are compatible with
Windows 2000 Professional;

8/8/2019 Windows 2000 Prof Unattend Installatie
http://slidepdf.com/reader/full/windows-2000-prof-unattend-installatie 9/66
Installing Windows 2000 Profes sional 9
• You need to retain your existing user and application settings; and
• You wish to keep any local users or groups created under NT
Workstation.
You will need to do a clean installation of Windows 2000 Professional if:
• You currently have no operating system on your computer;
• You are currently running an operating system that does not support
upgrading to Windows 2000 Professional;
• Your operating system supports an upgrade, but it is not necessary to
retain user and application settings; or
• You have multiple partitions and wish to retain the existing operating
system to co-exist with Windows 2000 Professional; that is, you wish to
have a dual-boot system.
Dual/Multiple Booting Systems
Microsoft did not support dual-boot systems between Windows 9x and
Windows NT 4.0 Workstation. This, of course, did not mean it could not be
done. It just meant that if you ran into trouble, calling Microsoft was not going
to get you any sympathy.
Microsoft will support dual or multiple boot systems between Windows 2000
Professional and the following operating systems:
• Windows 9x, Windows ME
• Windows NT Workstation 3.51 or 4.0
• Windows 3.1 or Windows for Workgroups 3.11
• MS-DOS
• OS/2
Again, this is not to say that other operating systems cannot be successfully co-
exist with Windows 2000 Professional. It does mean, however, that you are on
your own if problems occur.

8/8/2019 Windows 2000 Prof Unattend Installatie
http://slidepdf.com/reader/full/windows-2000-prof-unattend-installatie 10/66
10 Chapter 1:Windows 2000 Professional
There are a number of precautions to take into consideration before creating a
multiple-boot system. Some of these are:
• Each operating system must be installed on its own partition. Microsoft
will not support multiple boot systems where Windows 2000 Professional
and another operating system co-exist on the same partit ion.
• The primary partition on a dual-boot system for any operating system
prior to Windows 95 OSR2 must be FAT. Windows 95 OSR2 and newer
releases can have a primary partition that is FAT or FAT32.
• Always install Windows 2000 Professional last on a multiple-boot
system, particularly when dual-booting between MS-DOS or Windows
9x.
• Each operating system will need to have its own installation of software,
such as MS Office. Programs cannot be shared across operating systems.
• If you are using NTFS, and you are dual booting between Windows NT
4.0 Workstation and Windows 2000 Professional, the Windows NT 4.0
Workstation installation must be upgraded to Service Pack 4 or later
before continuing with the Professional install. This is due to the changes
in NTFS (see the Chapter 4 section on File Systems)
There are a number of other precautions to be observed on dual-boot systems
beyond these main ones. Before proceeding with a multiple-boot system, makesure you do your research and check any new information or technical notes on
the Microsoft website.
Backing Up Critical Files
The final consideration before implementing a clean installation of Windows
2000 Professional is, of course, backing up your critical files. All files will be
lost upon installation of the new operating system. How you choose to perform
this backup depends on the operating system currently in use, whether you are
using the built-in backup utility of the operating system or a third-party
application.

8/8/2019 Windows 2000 Prof Unattend Installatie
http://slidepdf.com/reader/full/windows-2000-prof-unattend-installatie 11/66
Installing Wind ows 2000 Profess ional 11
What is important to remember is:
• Data files should always be backed up, verified, and preferably given a
trial restore before installation. This includes any electronic mail that is
not stored on a mail server.
• Application files, operating system files and temporary files do NOT need
to be backed up. Applications will need to be reinstalled, operating
system files will not be necessary reinstalled and temp files are, well,
temp files.
Pop Quiz 1.1
Pop Quiz 1.1 Questions
1.To obtain full power management functionality, what functionality should
your BIOS have?
2.How can you verify if your hardware and software is compatible with
Windows 2000 Professional before performing an upgrade installation?
3. You are currently running Windows NT 3.51 Server. Can you upgrade to
Windows 2000 Professional?
4. You plan on running a dual-boot system, running Windows NT 4.0
Workstation and Windows 2000 Professional, with an NTFS file system.
What additional task must you do?
5. Before implementing a clean installation of Windows 2000 Professional,
which critical files should be backed up?

8/8/2019 Windows 2000 Prof Unattend Installatie
http://slidepdf.com/reader/full/windows-2000-prof-unattend-installatie 12/66
12 Chapter 1:Windows 2000 Professional
Pop Quiz 1.1 Answers
1) To have full power management functionality, which is ACPI-based, your
system must have a compliant ACPI BIOS. APM is supported, but is
limited to notebook computers.
2) Run the "Check Upgrade" tool to verify the compatibility of your hardware
or software. The command is CDROM:\I386\WINNT32
/CHECKUPGRADEONLY, and will work only if the current operating
system can be upgraded to Windows 2000 Professional.
3) No. You cannot upgrade from Windows NT Server 3.51 or 4.0 to
Windows 2000 Professional. A clean installation is required.
4) You must upgrade the NT 4.0 Workstation to Service Pack 4 or later
before continuing with the Professional installation. This is due to changes
in NTFS that were implemented in Service Pack 4.
5) You should always back up data files, including any electronic mail that is
not stored on a server. These files should also be verified and a trial
restore performed before performing the installation. Application files,
operating system files and temporary files do not need to be backed up.

8/8/2019 Windows 2000 Prof Unattend Installatie
http://slidepdf.com/reader/full/windows-2000-prof-unattend-installatie 13/66
Installing Wind ows 2000 Profess ional 13
III Standard Installation
Whew! All that information and we have not even yet begun to do the
installation yet! However, careful pre-planning can lessen or totally eliminate a
lot of installation headaches.
So now that we have done all that preparatory work, let’s install Windows 2000
Professional.
You can configure your disk partitions prior to installat ion or you can create the
partition as part of the setup procedure. It is recommended that Windows 2000
Professional be installed on a 2GB partition.
On a standard clean installation, that is an installation that is not an upgrade or is
unattended, there are four procedures that can be used to proceed:
Four Setup floppy disks
These disks can be created from the Windows 2000 Professional CDROM, by
running the command CDROM :\BOOTDISK\MAKEBOOT.EXE A: where
CDROM is replaced by the drive letter used by your CDROM drive. To begin
installation from the Setup disks, ensure that your system can boot from your
floppy drive. Insert the disk labeled Disk #1 is in your floppy drive before
powering up your computer.
Bootable CD-ROM
If your system supports bootable CD-ROMs, you can insert the CD during the
systems boot sequence, and the installation will proceed. In order to use the
bootable CD-ROM method, your system must allow it to start from a CD in the
BIOS, and be capable of El Torito No Emulation support
CD-ROM
Before rebooting your computer, insert the Windows 2000 Professional CD into
your CDROM. If Windows automatically detects the CD, it will automatically
run the Setup Wizard. If the CD is not automatically detected, you can start the
installation using CDROM :\I386\WINNT32.EXE for Windows 9x and
Windows NT 4.0 Workstation. SelectINSTALL A NEW COPY OF
WINDOWS 2000 for Setup to begin. (Figure 1.2)

8/8/2019 Windows 2000 Prof Unattend Installatie
http://slidepdf.com/reader/full/windows-2000-prof-unattend-installatie 14/66
14 Chapter 1:Windows 2000 Professional
For Windows 3.1, MS-DOS, or systems booted with a DOS boot diskette with
CDROM support, running the commandCDROM :\I386\WINNT.EXE willstart the installation.
Network Connection
You will first have to establish a connection to the shared network folder that
contains the Setup file. This an be done using an MS-DOS or network
installation disk that contains the network client software to enable connection
to the server. It is a good idea to have disk-caching software, such as Smartdrv,
loaded as well. The command is:
\\servername\sharename\i386\winnt.exe .
Figure 1.2: Windows 2000 Setup Wizard
No matter which method you choose, the steps for installation remain the same.
When Setup begins, the Windows 2000 Professional Setup screen appears in
text mode. Setup inspects the computer’s hardware configuration, and then
installs the Setup and driver files. NOTE: If you are using the four Setup disks,
you will be prompted for Disk #2, #3 and #4 at intervals during this time.

8/8/2019 Windows 2000 Prof Unattend Installatie
http://slidepdf.com/reader/full/windows-2000-prof-unattend-installatie 15/66
Installing Wind ows 2000 Profess ional 15
After all files are installed, the Welcome to Windows 2000 Professional Setup
screen appears, still in text mode.
Three choices are given for your selection:
• To setup Windows 2000 Professional now, press ENTER.
• To repair a Windows 2000 Professional installation, press R.
• To quit Setup without installing Windows 2000 Professional, press F3.
To continue with the installation, press ENTER.
The next text screen displays the license agreement. You will need to press
Page Down a few times to read the entire agreement. When you have read the
entire agreement, and are at the bottom of the screen, press F8 if you agree to
the terms outlined and wish to continue with the installation.
The Windows 2000 Professional Setup screen appears, welcoming you to Setup,
and then a second, text-based screen appears with the following options:
• To setup Windows 2000 on the selected partition, press ENTER.
• If you have unpartitioned space on your hard drive, Setup will ask
whether you wish to create a partition. Press C to select this option.
• If you wish to create a new partition, but want to delete the existing
partition first, press D.
NOTE: Any new partition will need to be formatted either as FAT or
NTFS.

8/8/2019 Windows 2000 Prof Unattend Installatie
http://slidepdf.com/reader/full/windows-2000-prof-unattend-installatie 16/66
16 Chapter 1:Windows 2000 Professional
If the partition you select for installation is a FAT partition, Windows Setup will
ask if you wish to leave the current file system intact, convert the existing filesystem to NTFS, or format the partition using the NTFS file system.
Remember: Converting a partition to NTFS leaves any files that presently
exist on the partition intact. Formatting will delete all files on the partition in
the process.
The final step in the text -based mode is for Setup to examine the existing hard
drive or drives. It then copies the files needed to complete the Windows 2000
Professional installation to the hard disk and reboots the computer.
Upon restart, Setup enters the GUI mode. The Windows 2000 GUI mode Setup
Wizard screen appears at this point. Setup detects and installs devices, such as
the mouse and the keyboard.
The next screen is the regional options screen where you customize Windows
2000 Professional to your locale, currency, or number format.
The Personalize your Software screen is next. You are asked to type in your
name and organization.
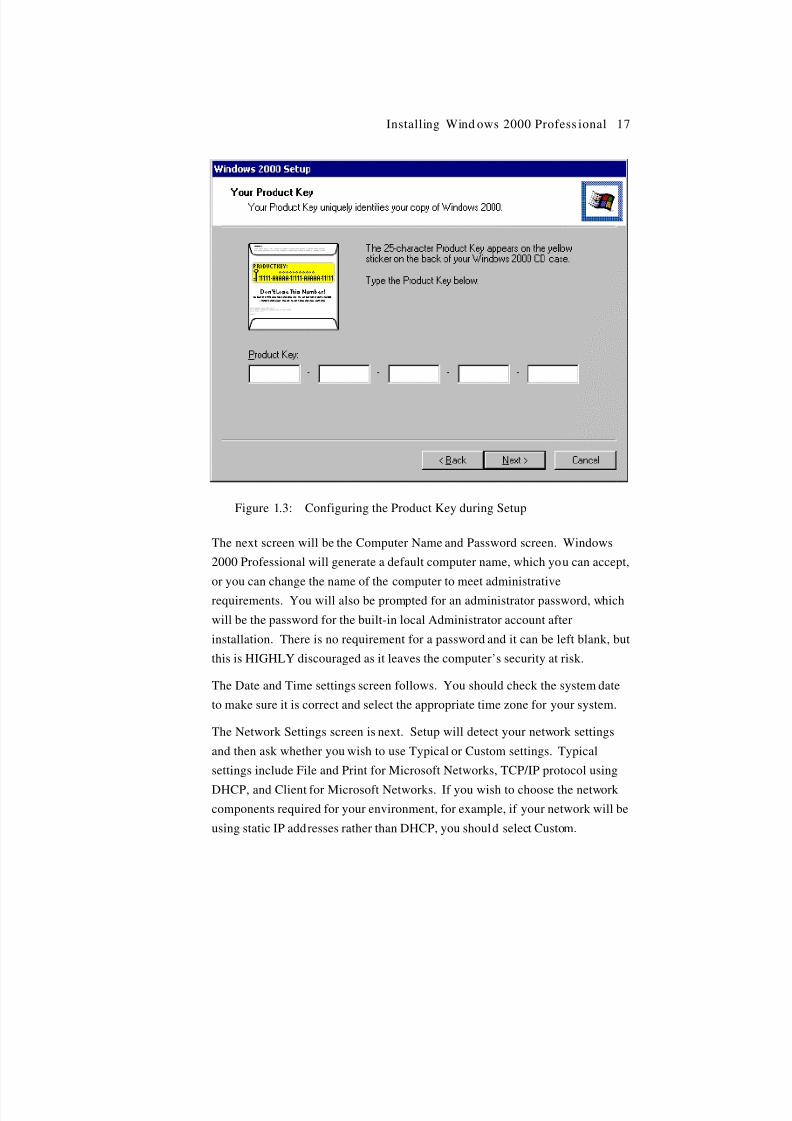
The next screen is the Product ID screen, as displayed in Figure 1.3. You will
need to enter the alphanumeric 25-character product key that is on the CD jewelcase for Windows 2000 Professional.
8/8/2019 Windows 2000 Prof Unattend Installatie
http://slidepdf.com/reader/full/windows-2000-prof-unattend-installatie 17/66
Installing Wind ows 2000 Profess ional 17
Figure 1.3: Configuring the Product Key during Setup
The next screen will be the Computer Name and Password screen. Windows
2000 Professional will generate a default computer name, which you can accept,
or you can change the name of the computer to meet administrative
requirements. You will also be prompted for an administrator password, which
will be the password for the built-in local Administrator account after
installation. There is no requirement for a password and it can be left blank, but
this is HIGHLY discouraged as it leaves the computer’s security at risk.
The Date and Time settings screen follows. You should check the system date
to make sure it is correct and select the appropriate time zone for your system.
The Network Settings screen is next. Setup will detect your network settings
and then ask whether you wish to use Typical or Custom settings. Typical
settings include File and Print for Microsoft Networks, TCP/IP protocol using
DHCP, and Client for Microsoft Networks. If you wish to choose the network
components required for your environment, for example, if your network will be
using static IP addresses rather than DHCP, you should select Custom.

8/8/2019 Windows 2000 Prof Unattend Installatie
http://slidepdf.com/reader/full/windows-2000-prof-unattend-installatie 18/66
18 Chapter 1:Windows 2000 Professional
Next is the Workgroup or Computer Domain screen. You can add your
computer to a workgroup at this point, or join a domain.
The next screen is the Installing Components screen. Setup installs the
operating system components at this point, which can take a few minutes.
The final stage of installation takes place when Windows 2000 Professional
Setup completes the following tasks:
• Installs the Start menu items
• Registers components
• Saves settings
• Removes temporary files.
Congratulations! The standard installation for Windows 2000 Professional is
complete!

8/8/2019 Windows 2000 Prof Unattend Installatie
http://slidepdf.com/reader/full/windows-2000-prof-unattend-installatie 19/66
Installing Wind ows 2000 Profess ional 19
Pop Quiz 1.2
Pop Quiz 1.2 Questions
1.) What four procedures can be used to perform a standard installation of
Windows 2000 Professional?
2) How do you create setup disks?
3) .If your CD-ROM is not automatically detected on boot, how can you start a
clean installation of Windows 2000 Professional on a Windows 95
machine?
4) What takes place on the final stage of installation?

8/8/2019 Windows 2000 Prof Unattend Installatie
http://slidepdf.com/reader/full/windows-2000-prof-unattend-installatie 20/66
20 Chapter 1:Windows 2000 Professional
Pop Quiz 1.2 Answers
1) The four procedures for a standard installation are:
a. Four Setup floppy disks
b. Bootable CD-ROM
c. CD-ROM
d. Network Connection
2) You create the four setup disks by running the following command:
CDROM:\BOOTDISK\MAKEBOOT.EXE.
3) You can start a clean installation by using CDROM:\I386\WINNT32.EXE
and then selecting INSTALL A NEW COPY OF WINDOWS 2000. This
will work on all Windows 9x and Windows NT 4.0 Workstation machines.
4) Windows 2000 Professional Setup will complete the following tasks
during the final stage of installation:
a. It will install the Start Menu items
b. It will register components
c. It will save settings
d. It will remove any temporary files.

8/8/2019 Windows 2000 Prof Unattend Installatie
http://slidepdf.com/reader/full/windows-2000-prof-unattend-installatie 21/66
Installing Wind ows 2000 Profess ional 21
IV Unattended Installations
Well, we now know how to install Windows 2000 Professional on a single
computer. It is more likely that we will have to install Windows 2000
Professional on 50, or 100, or even a 1,000 computers. Now you may be a
patient soul who does not mind installing Professional on 1,000 computers, one
at a time. However, the odds are that business needs will require a faster, more
efficient way of completing the task at hand. So, let us take a look at some of
the choices provided by Windows 2000 Professional to do a large numbers of
installations.
Remote Installation Services
Remote Installation Services (RIS) is used to install a copy of Windows 2000Professional on local computers from remote locations. Using this technology, a
workstation can startup, contact a DHCP server to obtain an IP address of a RIS
Server and then contacts the RIS Server to install the operating system.
There are several advantages to using RIS for the installation of Windows 2000
Professional. These include:
• The ability to remotely install Windows 2000 Professional
• The simplification of server management by allowing access to the
Windows 2000 distribution files and using Plug-and-Play for hardware
detection during the installation process
• The ability to quickly recover the operating system in the event of failure
• The retention of Windows 2000 security when you restart the destination
computer
This section is not intended as a definitive guide for using RIS technology, but
rather to outline the process and the conditions for use. For detailed information
on RIS, Microsoft has provided a guide “Technical Guide to Remote Installation
Services - Microsoft Product Support Services White Paper” which is free for
download at: HTTP:/ /WWW.MICROSOFT.COM/WINDOWS2000/
LIBRARY/ OPERATIONS/MANAGEMENT/REMOSADMIN.ASP

8/8/2019 Windows 2000 Prof Unattend Installatie
http://slidepdf.com/reader/full/windows-2000-prof-unattend-installatie 22/66
22 Chapter 1:Windows 2000 Professional
There are some things of which you should be aware before you choose RIS as
the method for installing Windows 2000 on your network:
• At present, only a clean install of Windows 2000 Professional is
supported by RIS. This method cannot be used for upgrade installations,
nor can it be used to install any other operating system, including
Windows 2000 Server.
• You need to have a Windows 2000 Server to act as the RIS Server. This
server must have at least two disk partitions, one for its operating system,
and one for RIS images. The partition that holds the RIS images must be
at least 2GB in size and must be formatted as NTFS. The server must
also either be running the following services, or have these services be
accessible to the RIS server from another network server:
DHCP Server
used to assign IP addresses to RIS clients
DNS Server
used to locate Active Directory
Active Directory
used to locate RIS servers, clients, and to manage configuration settings and
client installation options
The RIS Server
As part of the server installation (Figure 1.4), four services critical to the remote
installation process are added to the Windows 2000 Server:
Boot Information Negotiation Layer (BINL) Service
Used to respond to client requests.
Single Instance Store (SIS) Service
Used to reduce the storage requirements needed to store images by combining
duplicate files.

8/8/2019 Windows 2000 Prof Unattend Installatie
http://slidepdf.com/reader/full/windows-2000-prof-unattend-installatie 23/66
Installing Wind ows 2000 Profess ional 23
SIS Groveler Service
Scans the SIS volume for identical files when the system is idle. It will perform
a series of tests to compare files to ensure they are identical and then copy them
to a volume reserved by the SIS service. A link will be provided to the original
files.
Trivial File Transfer Protocol (TFTP) Service
Part of the TCP/IP suite, the file transfer protocol used to download the Client
Installation Wizard from the RIS Server to the client.
Figure 1.4: Windows Components Wizard

8/8/2019 Windows 2000 Prof Unattend Installatie
http://slidepdf.com/reader/full/windows-2000-prof-unattend-installatie 24/66
24 Chapter 1:Windows 2000 Professional
Figure 1.5: Windows Components Wizard
After installation, configuration of the RIS server is done through the Remote
Installation Services Setup Wizard (risetup.exe). This wizard (Figure 1.5) can
be called in two ways. When you first start or restart the server, click Finish
Setup in the Configure Your Server dialog box. This starts the Add/Remove
Programs tool. In the Set Up Servers area, click Configure Remote
Installation Services to run Risetup.exe. You can also initiate the Setup Wizard
by using the Start | Run RISETUP.EXE command.
The first step will be for you to state the location of the RIS installation image
files that will be used to install your clients. Although the default directory will
be the first available NTFS volume that does not contain the system or boot
partitions, any NTFS volume on the server can be used, with the exception of
the system and boot partitions.
The next step will be to configure the RIS Server to respond to all client requests
or only those who have known client accounts (Machine Account Object) in
Active Directory.

8/8/2019 Windows 2000 Prof Unattend Installatie
http://slidepdf.com/reader/full/windows-2000-prof-unattend-installatie 25/66
Installing Wind ows 2000 Profess ional 25
The third step requests that you specify the folder in which you want to store the
files for the image that Risetup.exe copies.
The final step of the Wizard asks to you give a user-friendly name for the
operating system package and associated help text. This will allow users to
select the correct package for their systems.
Each RIS server must be authorized in the Active Directory tree before RIS can
service or respond to client requests. This is done through the DHCP Manager.
Remember: Only members of the Enterprise Administrators group have
the necessary rights to authorize RIS servers. If you want to give other users
or groups this ability, you must give them the permission to authorize DHCPservers in Active Directory.
RIS Client Installation
Before you can use RIS to install to a client, certain conditions must be met for
the client and for the network.
The client computer must have:
• It must also meet the hardware requirements for the installation of
Professional including a network adapter card.
• The BIOS load boot order must boot the network before booting the hard
disk.
• Network capabilities through one of the following:
A PXE-based boot ROM with a BIOS that supports starting the computer with
that ROM; or
A network adapter that supports PXE and can be used with a RIS boot disk; or
The ability to follow the Net PC standard, which supports the ability to boot to
the network, prevent users from changing hardware and o/s configuration, and
manage upgrades.

8/8/2019 Windows 2000 Prof Unattend Installatie
http://slidepdf.com/reader/full/windows-2000-prof-unattend-installatie 26/66
26 Chapter 1:Windows 2000 Professional
The network providing RIS services must have:
• An active DHCP Server on the network so that the client can obtain an IP
address.
• A RIS Server with the appropriate images prepared
As well, users must have the right to create computer accounts on the network,
or in their OU. If this right is not given, then the account must be created in
Active Directory prior to RIS client installation.
What is PXE? PXE (Pre-Boot Execution Environment) is defined on
industry-standard Internet protocols and services --TCP/IP, DHCP, and TFTP.
On computer startup, the client sends out a DHCP discover packet that
indicates that it is using the PXE protocol. The IP address that is supplied is
that of the RIS Server. The client may, but does not need to, request an IP
address for itself during the same process. The client then uses TFTP to
download the install package from the RIS Server.
When the system is powered on, the network boot option is selected, the MAC
address of the client is displayed, and the system begins to request an IP address
and locate a boot server. When a server is found, the user is told to pressF12
for a network service boot.
The Client Installation Welcome screen is displayed. The user will need to press
ENTER to continue. Next, the Windows 2000 Logon dialog box appears. The
user needs to supply a valid username and password for the domain. The next
menu will have choices for:
Automatic Setup
The client is setup with default values
Custom Setup
The user can type in a computer name and OU (if nothing is supplied, default
values are used)
8/8/2019 Windows 2000 Prof Unattend Installatie
http://slidepdf.com/reader/full/windows-2000-prof-unattend-installatie 27/66
Installing Wind ows 2000 Profess ional 27
Restart a previous Setup attempt
If setup has failed before the GUI stage, Setup can be restarted without the user
going through all the screens again
Maintenance and Troubleshooting
Provides access to diagnostics and maintenance tools created by third-party
manufacturers, such as BIOS updates
NOTE: The second, third and fourth options will be displayed ONLY
if Group Policy allows. Otherwise, the default will be Automatic Setup.
If there is only one RIS image, it will be automatically installed; otherwise, the
user will see a menu of RIS images to choose from. After selection, the remote
installation process will begin. If answer files have been provided, there may
be no further need for user interaction.
Creating a RIS Boot Disk
RIS Boot Disks can be created on a Windows 2000 Professional workstation
that is connected on the same network as the RIS Server. This is done by the
Start | Run command line:
\\RISSERVER \REMINST\ADMIN\I386\RBFG.EXE . This will call the
Windows 2000 Boot Disk Generator wizard, which will allow you to create oneor many RIS Boot Disks simply by clicking the Create Disk button.
System Preparation Tool
The System Preparation Tool (Sysprep) is used to prepare disk images that will
be duplicated using a third-party manufacturer’s imaging utility. Some
examples of third-party tools that you can use to deploy the image are
Symantec's Norton Ghost, Altiri’s RapiDeploy, Powerquest's DriveImage
Professional, and Micro House's Imagecaster. Disk imaging is an excellent
choice for automatic deployment of Windows 2000 Professional, when you have
a large number of computers with similar configuration requirements. Sysprep
eliminates some of the problems encountered in the past using disk imaging
tools, such as duplicate Security IDs (SID).

8/8/2019 Windows 2000 Prof Unattend Installatie
http://slidepdf.com/reader/full/windows-2000-prof-unattend-installatie 28/66
28 Chapter 1:Windows 2000 Professional
To use the System Preparation Tool, the source and client computers must have
identical Hardware Abstraction Layers (the same processor type), AdvancedConfiguration and Power Interface (ACPI) support, and mass storage controller
devices (SCSI or IDE). The hard drive on the client computer must have the
same or greater capacity as that on the source computer. Windows 2000 will
detect automatically any Plug and Play devices, and Sysprep will redetect and
evaluate the devices on the system when the computer is turned on. In other
words, any Plug and Play devices (network cards, modems, video and sound
cards) do not have to be the same on the source and client computers, as long as
the drivers are available.
The first step in preparing for a disk image installation is to create a master or
source computer. Windows 2000 Professional should be installed on this
computer with the standard configuration requirements, such as browser
settings, printer settings, and desktop settings. Any applications that will be
standard can also be installed on the source computer, provided you have a legal
license for each instance of duplication of the software.
Once the source computer is configured correctly, you are ready to run the
System Preparation Tool. Start Setup Manager on the source computer to create
a Sysprep.inf file. This will allow you to completely automate the installation
except for the computer name. Choose the first option, Create a New Answer
File. When prompted, choose the Sysprep Install answer file.
You can allow the user to supply the computer name when Windows 2000
Professional is started for the first time, or you can supply the Sysprep.inf file
for each machine on a floppy disk, and include a unique computer name for each
Sysprep.inf file.
Setup Manager allows you the option to create the Sysprep directory (Figure
1.6), which allows you to customize the Sysprep installation.
You are then ready to run the setup. At the command prompt, enter:
CD SYSPREP
SYSPREP –REBOOT
By adding the “-reboot” switch, the source computer will automatically reboot
after Sysprep has completed.

8/8/2019 Windows 2000 Prof Unattend Installatie
http://slidepdf.com/reader/full/windows-2000-prof-unattend-installatie 29/66
Installing Wind ows 2000 Profess ional 29
Figure 1.6: Setup Manager Wizard
What has happened during this process is that the System Preparation tool has
removed information that has to be unique on each computer running Windows
2000 Professional, such as the SID (security ID) and computer name.
You are now ready to use a third-party tool to create your image.
Deployment of the image can be done in a number of ways:
• Bootable CD
• Network Download (requires a boot floppy to gain access to the network)
• Hard disk replication
• Transportable media (such as ZIP)
Unattended Answer Files
Create unattended answer files by using Setup Manager to automate the
installation of Windows 2000 Professional.

8/8/2019 Windows 2000 Prof Unattend Installatie
http://slidepdf.com/reader/full/windows-2000-prof-unattend-installatie 30/66
30 Chapter 1:Windows 2000 Professional
If you have a large number of computers to install, and the computers are not
PXE-compliant, using an unattended installation process with a distributionserver may prove to be the easiest way to deploy Windows 2000 Professional.
A distribution server contains all Windows 2000 Professional files needed for
installation. How to set up a distribution server is beyond the scope of this
section, however, detailed information may be obtained at:
HTTP:/ /WWW.MICROSOFT.COM/TECHNET/W IN2000/DGUIDE/CHAPT-
25.ASP
When using a distribution server for an unattended installation, it can be helpful
to develop answer files. Answer files are installation scripts that respond to
prompts that normally require user input. Setup Manager, included with theWindows 2000 Deployment Tools on the Windows 2000 Professional CD, will
help you create answer files so that installation can be fully automated, or
“silent”.
NOTE: Answer files can also be used for RIS and Sysprep
installations.
On a Windows 2000 Professional computer, on which you have installed the
Windows 2000 deployment tools, use the Start | Run command to execute
SETUPMGR.EXE. This starts the Setup Manager Wizard. A welcome screen
appears. After the welcome screen, a dialog box appears entitled “New or
Existing Answer File”. This dialog box allows you to create a new answer file,
create an answer file that will duplicate the computer on which you are running
Setup Manager, or modify an existing answer file.
Presuming that we are creating a new answer file, the Product to Install page
appears. The choices are for RIS, Sysprep, or Unattended Installation. Because
we are examining answer files for unattended installations, we will follow this
path.

8/8/2019 Windows 2000 Prof Unattend Installatie
http://slidepdf.com/reader/full/windows-2000-prof-unattend-installatie 31/66
Installing Wind ows 2000 Profess ional 31
Figure 1.7: Setup Manager Wizard
The User Interaction Level page follows (Figure 1.7). This page allows us to
choose the amount of interaction we will allow with the user.
Provide Defaults
This will allow you to provide default answers to the prompts. The user can
choose to accept the default answer, or change it to suit their needs.
Fully Automated
This will use all of the answers you supply in the answer file and will not
prompt for any user interaction.
Hide Pages
This will run the Wizard invisibly provided you have provided al l the answers to
required prompts.
Read Only

8/8/2019 Windows 2000 Prof Unattend Installatie
http://slidepdf.com/reader/full/windows-2000-prof-unattend-installatie 32/66
32 Chapter 1:Windows 2000 Professional
This will display the Setup Wizard to the user, but will not allow the user to
make changes.
GUI Attended
This requires user interaction once the text -mode portion of Setup has been
completed. Answers must be supplied for the text -mode portion.
Once you have chosen an installation method, you then continue through many
screens:
Set Default User Information
Allows you to specify a username and organization.
Define Computer Names
Allows you to enter multiple names, which Setup Manager will use to create the
UDF (uniqueness database file) that is needed to add a unique name to each
system during setup.
Administrator Password
Allows you to prompt the user for a password, or supply the password yourself.
You can also choose to have the Administrator logon automatically.
Display Settings
Allows you to configure colors, screen area, refresh frequency and customsettings.
Network Settings
Allows you to choose “Typical Sett ings” (TCP/IP, DHCP-enabled, Client for
Microsoft Networks) or “Custom Settings” (where you can choose network
settings and services)
Time Zone
Allows you to choose the time zone appropriate for the client computer.
Additional Settings
Allows you to edit telephony settings, regional settings, languages, browser
settings, the installation folder, the printer installation, and even a command,
such as a program, that will run the first time a user logs on.

8/8/2019 Windows 2000 Prof Unattend Installatie
http://slidepdf.com/reader/full/windows-2000-prof-unattend-installatie 33/66
Installing Wind ows 2000 Profess ional 33
; UNATTENDED.TXT SAMPLE FILE
[Data]
Unattend ed install = Yes
Msdo sinitiated = "0"
AutoPar tition = 1
[Unattended]
Unattend Mode = FullUnattend ed
Oe mPre install = Yes
Targ etPath = Winpr o
FileSystem = Le ave Alone
Oe mSkipEula = Ye s
[GuiUnattended]
Time Zone = "Your Time Zone "
AdminPassword = AdminPassword
AutoLog on = Ye s
AutoLog onCount = 1
OemSkipWe lcome = 1
Oe mSkipRegiona l = 1
[UserData]
FullName = "Your us er name "
Org Name = "Your org anization name "
Compute rName = "YourComp uter_name"
Prod uctId = "Your p rod uct ID"
[Display]
BitsPer Pel = 8
XResolution = 800
YRe solution = 600
VRe fre sh = 60
[Networking]
InstallDefaultCompon en ts = Yes
Figure 1.8: Sample Unattended.txt file

8/8/2019 Windows 2000 Prof Unattend Installatie
http://slidepdf.com/reader/full/windows-2000-prof-unattend-installatie 34/66
34 Chapter 1:Windows 2000 Professional
Figure 1.8 is a sample answer file that will show you an approximation of what
will be generated by Setup Manager. This particular answer file will installWindows 2000 Professional from a CD-ROM. The information in italics would
be replaced by the information you provided as you worked through Setup
Manager.
[UniqueIDs]
UserID1 = Userdata,GuiUnattended,Network
UserID2 = Userdata,GuiUnattended,Network
[UserID1:UserData]
FullName = "User ID-1"
ComputerName = "MACHINE-1"
[UserID1:GuiUnattended]
TimeZone = " (GMT-05:00) Eastern Time (US & Canada)"
[UserID1:Network]
JoinDomain = "DomainEast"
[UserID2:UserData]
FullName = "User ID-2"
ComputerName = "MACHINE-2"
[UserID2:GuiUnattended]
TimeZone = "(GMT-06:00) Central Time (US & Canada)"
[UserID2:Network]
JoinDomain = "DomainCentral"
Figure 1.9: Sample Uniqueness Difference File
Figure 1.9 shows an example of a UDF (Uniqueness Database File) that can be
created.
For more explanation on all available options in the setup file, refer to Appendix
on Unattended Installs

8/8/2019 Windows 2000 Prof Unattend Installatie
http://slidepdf.com/reader/full/windows-2000-prof-unattend-installatie 35/66
Installing Wind ows 2000 Profess ional 35
Pop Quiz 1.3
Pop Quiz 1.3 Questions
1) What requirements are needed on the Windows 2000 RIS Server to perform a
clean installation of Windows 2000 Professional?
2) How do you create a RIS boot disk?
3) What is Sysprep used for?
4) What switch should you add, when running the System Preparation setup, so
that the source computer reboots after completion of the task?

8/8/2019 Windows 2000 Prof Unattend Installatie
http://slidepdf.com/reader/full/windows-2000-prof-unattend-installatie 36/66
36 Chapter 1:Windows 2000 Professional
Pop Quiz 1.3 Answers
1) The server must have two partitions - one for the operating systems and
one for the RIS images. The partition containing the RIS images must be,
at minimum, 2GB and formatted NTFS. The server must be running, or
have available to it, a DHCP Server, a DNS Server and Active Directory.
2) A RIS Boot Disk can be created on a Windows 2000 Professional
workstation that is on the same network as the RIS Server. The command
is \\RISSERVER\REMINST\ADMIN\I386\RBFG.EXE.
3) Sysprep (System Preparation Tool) is used to prepare disk images that
will be duplicated using a third-part imaging tool.
4) The switch -REBOOT should be added to the end of the command
SYSPREP, so that the source computer reboots after SYSPREP has
completed.

8/8/2019 Windows 2000 Prof Unattend Installatie
http://slidepdf.com/reader/full/windows-2000-prof-unattend-installatie 37/66
Installing Wind ows 2000 Profess ional 37
V Upgrading To Windows 2000 Professional
Earlier in this chapter, we examined the differences between a clean installation
of Windows 2000 Professional and an upgrade installation, and the reasons you
may choose one method over the other.
Let’s review what we have covered. When considering an upgrade installation
of Windows 2000 Professional, you must remember that only certain operating
systems can be upgraded. These are:
• Windows 95, 98, ME
• Windows NT 3.51 Workstation
• Windows NT 4.0 Workstation
If, for example, you were currently running Windows NT Workstation 3.5, you
would need to first upgrade to Workstation 3.51 or 4.0 before you could
successfully upgrade to Windows 2000 Professional.
An important benefit when choosing an upgrade installation is that an upgrade
retains the existing applications, preferences and local users and group (under
NT).
That being said, let’s look at the upgrade path from Windows 9x to Windows
2000 Professional.
Preparing for UpgradeThere are some tasks you should perform prior to implementing an upgrade
installation from Windows 9x or Windows NT to Windows Professional 2000.

8/8/2019 Windows 2000 Prof Unattend Installatie
http://slidepdf.com/reader/full/windows-2000-prof-unattend-installatie 38/66
38 Chapter 1:Windows 2000 Professional
Table 1.2 is a checklist you should follow while preparing for your installation.
1. Back up all data and configuration files. Verify the backup and perform a
trial restore.
2. Delete or uninstall any unneeded files, applications and program groups
3. Decompress any partitions that have been compressed with DoubleSpace,
DriveSpace, or any other incompatible 3rd party product.
4. Verify that the hardware meets minimum requirements and is on the HCL
5. Obtain any device drivers that will be necessary for Windows 2000
Professional.
6. Perform a disk scan, a defragmentation, and a virus scan.
7. Document the current configuration, including applications, hardware,
services, and policies.
Table 1.2: Upgrade Installation Checklist
Upgrading from Windows 9x
The process of upgrading from Windows 9xàWindows 2000 Professional is
not as smooth as the Windows NTàWindows 2000 path. Because Windows
2000 Professional is based on NT Technology, there are fewer considerations
when upgrading.
There are some situations (hardware or software related) under Windows 9x that
are not supported under Professional, even though the operating system can beupgraded. These are:
• Applications des igned for Windows 9x, and not NT, that use file -system
filters. Anti-virus software and some disk-quota management software
fall under this category.
• Custom power-management tools (Windows 2000 Professional provides
its own!)
• Custom Plug-and-Play solutions
• Applications designed for Windows 9x that support compressed drives,
disk defragmenters and disk utilities.
• Utilities and applications that use virtual device drivers or 386 drivers.
• Applications that directly access the hardware.

8/8/2019 Windows 2000 Prof Unattend Installatie
http://slidepdf.com/reader/full/windows-2000-prof-unattend-installatie 39/66
Installing Wind ows 2000 Profess ional 39
Upgrading from Windows NT
As Windows 2000 Professional is based on NT technology, the upgrade
procedure is fairly painless. The process will migrate the existing user profiles
and configuration. There are some third-party software packages that worked
under NT that will not function with Windows 2000 without an upgrade. One
example is Executive Software’s Diskeeper for NT 3.51.
Performing the Upgrade
To perform the upgrade from Windows 9x or Windows NT, from the
installation source (e.g. the Windows 2000 Professional CD) you start the
execution by running the command: CDROM :\I386\WINNT32.EXE. With
the CD, the system may AutoRun this application for you, first prompting youwhether or not you wish to install a new version of Windows on your computer.
In either case, the Windows 2000 Setup Wizard is displayed (Figure 1.10).
Upgrade Path from Windows 9x
Figure 1.10: Windows 2000 Setup Wizard
The first screen prompts you as to install a new copy of Windows 2000, or
perform an upgrade. Select Upgrade to Windows 2000.

8/8/2019 Windows 2000 Prof Unattend Installatie
http://slidepdf.com/reader/full/windows-2000-prof-unattend-installatie 40/66
40 Chapter 1:Windows 2000 Professional
The next step you will see is the License Agreement screen (Figure 1.11). You
must accept the agreement to continue with the upgrade installation. Notaccepting the agreement will abort the upgrade.
At this point, the upgrade procedures diverge, depending on whether you are
upgrading from Windows 9x or Windows NT Workstation.
Figure 1.11: License Agreement
After the License Agreement screen, you see the Windows 2000 Professional
Upgrade Preparation screen, shown in Figure 1.12.

8/8/2019 Windows 2000 Prof Unattend Installatie
http://slidepdf.com/reader/full/windows-2000-prof-unattend-installatie 41/66
Installing Wind ows 2000 Profess ional 41
Figure 1.12: Preparing to Upgrade from Windows 9x
The next step will be the prompt for the product key, which is on the jewel case
for the Windows 2000 Professional CD. The product key is alphanumeric and
25 characters in length. Without a valid product key, installation cannot
continue.
The next stage is the hardware detection phase of Setup. When the detection is
completed, you will be prompted to provide update packs. We will be
discussing update packs in detail shortly. If you need to provide update packs,
selecting YES will allow you to add them at this point in the installation.
The next screen will allow you the opportunity to upgrade to the NTFS file
system. This conversion upgrade is only for FAT or FAT32 drives and will only
apply to the drive where the operating system files reside. Any other drives will
have to be converted after installation.
NOTE: It is at this point in the installation that non-compatible
hardware and software can cause problems. A warning will be displayed in
this case, notifying you that one or more devices or programs will be disabled
if the installation proceeds.

8/8/2019 Windows 2000 Prof Unattend Installatie
http://slidepdf.com/reader/full/windows-2000-prof-unattend-installatie 42/66
42 Chapter 1:Windows 2000 Professional
The installer now copies the necessary files to the computer’s hard drive. The
computer will then restart, with a new item in the Boot Manager startup menu,and several text -mode screens.
Upgrade Path From Window NT Workstation
Figure 1.13: Copying Installation Files
A blue text mode screen appears, and then Setup begins to load drivers, search
for earlier versions of the Windows operating system, and copy the remaining
Setup files to the installation folders. When this is complete, the system is again
restarted.

8/8/2019 Windows 2000 Prof Unattend Installatie
http://slidepdf.com/reader/full/windows-2000-prof-unattend-installatie 43/66
Installing Wind ows 2000 Profess ional 43
At this point, the GUI setup process begins. This process is almost identical to
the steps taken at the GUI setup process on a clean installation, with theexception that prompts will not appear for the portions of the setup where
retained settings are used.
Update packs
One of the reasons you choose to do an upgrade installation is the retention of
application settings. In a perfect world, all applications will function on the
upgraded operating system just as smoothly as they did on the original o/s.
However, the world is not a perfect one, and sometimes applications cease to
operate after the upgrade. This is especially true in the case of a Windows 9x
application that makes direct calls to the hardware. Windows 2000 Professional
will not allow applications to access hardware directly. It is one of the features
that provides the extra stability and security to Windows 2000 Professional.
In such a case, the application will have to be updated to a version that is
Windows 2000 compliant.
What exactly are update packs? They are, essentially, migration DLLs that
allow applications to function in a Windows 2000 Professional environment that
normally would fail. The application developers or manufacturers supply these.
Pop Quiz 1.4
Pop Quiz 1.4 Questions
1.Which operating systems can be upgraded to Windows 2000 Professional?
2.You are using an anti-virus software with your Windows 98 workstation. Can
an upgrade be performed? Will the anti-virus software work under
Windows 2000 Professional?
3.You are running a Windows 3.51 Workstation and are upgrading to Windows
2000 Professional. You are currently using Diskeeper. Will you be able to
use this software after the upgrade?
4.When do you use an upgrade pack?

8/8/2019 Windows 2000 Prof Unattend Installatie
http://slidepdf.com/reader/full/windows-2000-prof-unattend-installatie 44/66
44 Chapter 1:Windows 2000 Professional
Pop Quiz 1.4 Answers
1) Only certain operating systems can be upgraded. These are Windows 9x,
Millennium (ME), NT 3.51 and 4.0 Workstation.
2) While the operating system can be upgraded, the anti-virus software will
not work under Professional, because it uses file-system filters. You will
need to obtain an anti-virus software that is compatible with Windows
2000.
3) While the upgrade procedure from NT to Professional is smooth, certainsoftware packages that worked under Windows NT will not operate under
Windows 2000 without an upgrade. Executive Software's Diskeeper for
NT 3.51 is an example of this.
4) An upgrade pack is a migration DLL, supplied by the application
developer or manufacturer, that will allow an application to function in a
Windows 2000 environment.

8/8/2019 Windows 2000 Prof Unattend Installatie
http://slidepdf.com/reader/full/windows-2000-prof-unattend-installatie 45/66
Installing Wind ows 2000 Profess ional 45
VI Service Packs
Service packs are used to deliver new features to the operating system as they
are developed. They are also used to correct “hidden features” – those nasty
bugs and security holes t hat are discovered after release.
In Windows NT, service packs needed to be reapplied every time a new service
was added to the operating system. For example, if you had been using a static
IP address and were now moving to DHCP, after installing the DHCP Service,
you would need to reapply the latest service pack. This was because parts of the
service pack would be overwritten when the service was installed.
Windows 2000 Professional is using slipstream technology, which allows you to
add new services without overwriting the service pack.
You can check which service pack is currently installed by using the WINVER
command at the command prompt.

8/8/2019 Windows 2000 Prof Unattend Installatie
http://slidepdf.com/reader/full/windows-2000-prof-unattend-installatie 46/66
46 Chapter 1:Windows 2000 Professional
VII Troubleshooting Failed Installations
Most installation errors occur because of hardware and driver incompatibility.
By ensuring your hardware is on the HCL and all drivers are valid and present,
many errors can be eliminated.
The following are a number of common errors that may occur during the
installation process.
Media Errors
Setup cannot read the floppy disk or CD, so it cannot proceed with the
installation. If your Setup disks have failed, create a new set using the
cdrom:\bootdisk\Makeboot.exe a: command. Check the CD for dirt and
scratches. If the CD is unreadable, a new one can be obtained from Microsoft.
Insufficient Disk Space
Even though the minimum hard disk space requirement for Windows 2000
Professional is 650mb, Setup needs at least 1GB of free space to run properly.
Not Enough Memory
Windows 2000 Professional needs a minimum of 64mb of RAM, and more is
always better. If you have insufficient RAM, the installation may fail. There is
always the possibility that installation will appear to be successful, but the
system may “blue screen” after the installation has completed.
Insufficient Processing Power
If the minimum requirements for processor are not met, the Windows 2000
Professional may fail, or blue screen errors will occur after installation is
completed.
Incompatible hardware
Always make sure that your hardware is on the HCL, or the device may fail to
start after installation.
No valid driver
If the hardware does not have a valid driver, Windows 2000 Professional will
not recognize it.

8/8/2019 Windows 2000 Prof Unattend Installatie
http://slidepdf.com/reader/full/windows-2000-prof-unattend-installatie 47/66
Installing Wind ows 2000 Profess ional 47
Poorly configured hardware
Windows 2000 Professional should configure your Plug and Play hardware
correctly. However, non-Plug and Play hardware will need to be manually
configured as per manufacturer’s instructions.
Incorrect CD Key
Without a valid product key, you cannot continue installation. Don’t lose that
CD jewel case! Reme mber as well that a twenty-five alphanumeric product key
is prone to human error. Double check what has been typed with what is on the
CD case.
Other problems that can occur during installation are directly related to network
connectivity.
Failure to access TCP/IP Network Resources
On a typical Windows 2000 Professional installation, the client is set up to use
DHCP. If no DHCP server is available, or the client cannot find the DHCP
server, no IP address will be given to the client. No IP Address means no
network communication!
Another problem that can occur is the assignment of the incorrect IP Address,
refer to Chapter 6 for more information
Failure to find a Domain Controller when joining a domain
This can be frustrating to troubleshoot because it can be a number of different
things. The first thing to check is “connectivity”. Simply put, is the network
cable plugged into the NIC? No cable, and you won’t ever find that domain
controller! Verify that you have entered the correct domain name; again, bad
typing can cause a failure. Make sure your network settings are correct. Is a
domain controller available? If you cannot find the problem, configure the
computer to join a workgroup and worry about joining the domain AFTER
installation is completed.
Setup generates a number of log files during the installation process. Examining
these logs may help you narrow down the reason (or reasons) that installation isfailing. The Error log (setuperr.log) will include all errors that occurred during
the installation, including non-fatal errors. The Action log (setupact.log) will
list and describe all actions performed during the setup process.

8/8/2019 Windows 2000 Prof Unattend Installatie
http://slidepdf.com/reader/full/windows-2000-prof-unattend-installatie 48/66
48 Chapter 1:Windows 2000 Professional
VIII Chapter 1: Summary
We have now completed our chapter on installing Windows 2000 Professional.
You should now feel comfortable with the following concepts:
• Performing an attended installation of Windows 2000 Professional.
• Performing an unattended installation of Windows 2000 Professional
using three different methodologies
Windows 2000 Server Remote Installation Services (RIS)
System Preparation Tool
Setup Manager and unattended answer files
• Perform and upgrade from a previous version of Windows to Windows
2000 Professional.
• Deployment of service packs.
• Troubleshooting of failed installations .

8/8/2019 Windows 2000 Prof Unattend Installatie
http://slidepdf.com/reader/full/windows-2000-prof-unattend-installatie 49/66
Installing Wind ows 2000 Profess ional 49
IX Chapter 1: Review Questions
( Answers appear in Appendix A.)
1) You are doing a network installation of Windows 2000 Professional) Before
installation, what steps must be performed?
2) Management has requested that you deploy 100 Windows 2000 Professional
workstations as soon as possible) The computers all have the same hardware
configurations, with the exception of some video cards) What installation
method should you use to meet management's requirements?
3) While performing an unattended upgrade from Windows NT 4.0 Workstation
to Windows 2000 Professional, you have run into a problem) You have
started the installation using the Windows 2000 CD-ROM, and inserted thefloppy disk with the UNATTEND.TXT file after boot) You set the user
interaction level of full unattended mode) However, you keep being
prompted for all parameters) What two things should you do to resolve this
problem?
4) You are about to perform a RIS installation on ten new, hardware compliant,
workstations) You have configured a Windows 2000 Server to act as the
RIS Server and have a separate partition that contains the RIS images) The
Server is running DNS Services and Active Directory) However, you find
that the workstations cannot connect to the server) What do you need to do?
5) You are attempting to perform a RIS installation on thirty hardware
compatible workstations) Ten of these workstations are PXE compliant andtwenty are not) When you start the computers, you note that only the PE
compliant computers can connect to the RIS Server) What can you do to
remedy this situation?
6) You have created a dual boot system using NT 4.0 Workstation and Windows
2000 Professional, from their original CDs) You are using NTFS as the file
formatting system; however, you run into problems doing the Professional
installation) What have you forgotten to do?
7) If you have a variety of Plug and Play devices that are available, do you have
to create separate distribution folders or images when using Sysprep?
8/8/2019 Windows 2000 Prof Unattend Installatie
http://slidepdf.com/reader/full/windows-2000-prof-unattend-installatie 50/66
50 Chapter 1:Windows 2000 Professional
1. When doing an install of Windows 2000 from a local source, the installation
source directory should be changed to:
A. I386
B. I486
C. I586
D. I686
E. Alpha
2. After the default setup commands have loaded and the computer is restarted
what box appears?
A. Windows 2000 Setup dialog box
B. Windows 2000 Configuration dialog boxC. Windows Install dialog box
D. Windows 2000 Install Help Guide
E. 2000 Intro dialog box
3. During setup, where are the install files placed during the rebooting process?
A. Temporary folder
B. beginning
C. Install
D. SAVE
E. setup
4. Which of these need to be launched in order to set up Windows 2000?
A. Launch NWSERVER
B. Launch NTFS
C. Launch 2000STP
D. Launch WINNT
E. Launch NTSETUP

8/8/2019 Windows 2000 Prof Unattend Installatie
http://slidepdf.com/reader/full/windows-2000-prof-unattend-installatie 51/66
Installing Wind ows 2000 Profess ional 51
5. What utility is used to create an unattended installation?
A. Setup ManagerB. Deployment Tools
C. Winnt
D. Winnt32
E. Installation Manager
6. Can the level of user interaction be specified in the installation script?
A. Always
B. Never
C. Yes, but the user can override the default installation settings
D. No, but the user can override the administrators Login settings
7. You want to dual boot a system to have both Windows 2000 Professional and
Windows 98. It has three 8 GB hard drives; Disk 0, Disk 1 and Disk 2. Each
hard drive needs to have one 8 GB partition. Disk 0 will contain Windows
98, and Disk 1 will contain Win2000 Professional. Other files are to be
stored on Disk 2. Disk 1 needs to have File Level Security. Other files need
to be accessed by either operating system. What should you do? (Select and
Place)
A. Disk 0 FAT32
Disk 1 FAT32
Disk 2 FAT32
B. Disk 0 NTFS
Disk 1 FAT32
Disk 2 NTFS
C. Disk 0 FAT32
Disk 1 NTFS
Disk 2 FAT32
D. Disk 0 NTFS
Disk 1 FAT32
Disk 2 FAT32
E. Disk 0 NTFS
Disk 1 NTFSDisk 2 NTFS

8/8/2019 Windows 2000 Prof Unattend Installatie
http://slidepdf.com/reader/full/windows-2000-prof-unattend-installatie 52/66
52 Chapter 1:Windows 2000 Professional
8. Your job requires you to upgrade several computers from Windows NT
Workstation 4.0 to Windows 2000 Professional. You place
UNATTEND.TXT onto a floppy disk using Setup Manager, and then start
installing on a test computer with the Windows 2000 Professional CD-ROM,
inserting the floppy after the computer starts. The setup prompts you for all
required parameters, despite the fact that you set user interaction level to full
unattended mode. What should you do to make sure that the installation will
not prompt users for input? (Choose two)
A. Rename UNATTEND.TXT on the floppy disk to WINNT.TXT.
B. Add a [Data] section to the UNATTEND.TXT and set the unattended
install parameter to YES.
C. Rename UNATTEND.TXT on the floppy disk to WINNT.SIF.
D. Rename UNATTEND.TXT on the floppy disk to UNATTEND.SIF.
E. Add a [Unattend] section to the unattend.txt and set the unattended install
parameter to YES.
9. You have been asked by a friend to install Windows 2000 onto 20 brand new,
PXE compliant computers that currently have no operating systems. You
have already created the RIS image and loaded it onto a server. After starting
up the new computers, you see that they cannot connect to the RIS server.
Computers already on the network are able to connect to the network server
though. What is required for the RIS installation to work? (Select and Place)
A. IIS Server is required for RIS.
B. WINS Server is required for RIS.C. DNS Server is required for RIS.
D. DHCP Server is required for RIS.
E. FTP server is required for RIS
10. When installing a computer onto a domain, what must be present on the
network?
A. At least one DNS Server.
B. At least one domain controller.
C. At least one WINS Server.
D. At least one DHCP Server.E. At least one SMTP Server.

8/8/2019 Windows 2000 Prof Unattend Installatie
http://slidepdf.com/reader/full/windows-2000-prof-unattend-installatie 53/66
Installing Wind ows 2000 Profess ional 53
11. You are upgrading computers on your company network and you want to
deploy a Windows 2000 Professional service pack. You first create the
Windows Installer Package and successfully install the service pack to other
computers in your domain. You then assign the installer package file to the
Development OU, and after the installation, you realize that nothing was
installed on any of the ten computers. You want to make sure that this
installation will work properly. What ought you do?
A. Remove the user accounts from the DACL and add them to the
Development OU
B. Grant the user accounts Read permission to the service pack deployment
directory.
C. Add the user accounts from the Development OU to the DACL.
D. Grant the user accounts Change permission to the service pack
deployment directory.
E. Grant the user accounts Full Access permission to the service pack
deployment directory.
12. If you are installing Windows 2000 Professional or Server on a low-end
Intel-based computer, what is the minimum processor specification that
Windows will support?
A. P75
B. P133
C. P266
D. P233E. P300
13. When performing the default installation of Windows 2000 on an Intel-
based system, what directory is used as the destination for Windows?
A. WNTSRV
B. WINDOWS
C. WINNT
D. WTSRV
E. INTELNT

8/8/2019 Windows 2000 Prof Unattend Installatie
http://slidepdf.com/reader/full/windows-2000-prof-unattend-installatie 54/66
54 Chapter 1:Windows 2000 Professional
14. You are interested in using the Remote Installation Service (RIS) to install
Windows 2000 Professional on a client PC. What services must be installed
on the server?
A. DHCP Server
B. DNS Server
C. Active Directory
D. WINS Server
E. NNTP Server
15. You are creating the UNATTEND.TXT file to decrease the time it takes to
install Windows 2000 on your network. You want the Regional Settings
screen to be slipped during setup. In the [GUIUnattended] section of this file,
what parameter will you use to do this?
A. OEMRegional
B. OEMSkip
C. OEMSkipRegional
D. SkipRegional
E. RegionalSkip
16. During a Windows 2000 CD-ROM boot pre-installation, what entry is
required in the [Data] section of the .SIF file?
A. [Data] Unattendedinstall=true Msdosinitiated =0 Autopartition =1
B. [Data] Unattendedinstall=yes Msdosinitiated =1 Autopartition =1
C. [Data] Unattendedinstall=yes Msdosinitiated =1 Autopartition =1
D. [Data] Unattendedinstall=yes Msdosinitiated =0 Autopartition =1
E. [Data] Unattendedinstall=yes Msdosinitiated =0 Autopartition =0
17. To specify the file name of a setup information file, what command line
parameter is used with WINNT.EXE?
A. WINNT.EXE /I
B. WINNT.EXE /F
C. WINNT.EXE /X
D. WINNT.EXE /SIFE. WINNT.EXE /OX
8/8/2019 Windows 2000 Prof Unattend Installatie
http://slidepdf.com/reader/full/windows-2000-prof-unattend-installatie 55/66
Installing Wind ows 2000 Profess ional 55
18. You have installed Windows 2000 Professional on ten PXE-compliant
computers, all of which are identical. The current network contains
mainly Windows NT Workstation 4.0 computers. So far, you have
successfully deployed ten PXE computers using a RIS image. The
additional computers will not deploy correctly. What is likely to be the
cause?
A. Restart the Domain Controllers.
B. Configure the DHCP scope to add additional IPX addresses.
C. Configure the DHCP scope to add additional IP addresses.
D. Configure the DHCP scope to add additional DNS Servers.
E. Restart the DNS Server.
19. You are trying to create an easy way to install Windows 2000 Professionalon several computers that have different hardware configurations. Do this,
you create a standard installation image by installing Windows 2000
Professional and other standard software on one of the machines. You
proceed to logon as the local Administrator and after finalizing
configurations, you run Setup Manager and create the Stsprep.inf file. You
copy Sysprep.exe and Setupcl.exe to the \Sysprep folder. You proceed to run
both Sysprep.exe and your third party disk imaging software. You then copy
the image to several test computers and allow them to reboot. Some of the
computers will not boot, and on those that do, some of the desktop settings
are different than was displayed on the original computer. What should you
do at this point? (choose the two best answers)
A. Include the -pnp parameter for the Sysprep.exe when you rerun that
utility.
B. Copy the Adminis trator profile to the Default User profile.
C. Copy the Administrator profile to the any user's profile.
D. Grant permissions to the Everyone group to use the profile.
E. Include the -pxe parameter for the Sysprep.exe when you rerun that
utility.

8/8/2019 Windows 2000 Prof Unattend Installatie
http://slidepdf.com/reader/full/windows-2000-prof-unattend-installatie 56/66
56 Chapter 1:Windows 2000 Professional
X Chapter 1: Exercises
Lab 1.1 – Installing Windows 2000 Professional
Goal:
In this exercise, you will install Windows 2000 Professional onto
your desktop computer.
Task Step-by-Step Procedure
Prepare to install
Windows 2000
Professional.
• I386 directory is
already on the
computer.
• Use defaults.
1. From the DOS prompt, change the directory to
I386.
2. Launch WINNT
3. The Windows 2000 Setup dialog box appears.
Press ENTER to accept the default. The Setup files
are copied to your disk.
4. Once the Setup files are copied, you are prompted
to restart your computer.
5.
Perform the text-
based portion of
Windows 2000
Professional Setup
• File system –
FAT
• Default folder
name.
1. The Windows 2000 Setup dialog box appears.
Press ENTER to setup Windows.
2. The Windows 2000 License Agreement dialog box
appears. Read the agreement and press F8 to accept
the agreement.
3. The next dialog box asks you which partition you
want to use to set up Windows 2000. Select the
partition where the I386 directory is located. Leave
the file system as FAT. Use the default folder name,
WINNT.
The Windows installation files are copied to the

8/8/2019 Windows 2000 Prof Unattend Installatie
http://slidepdf.com/reader/full/windows-2000-prof-unattend-installatie 57/66
Installing Wind ows 2000 Profess ional 57
Task Step-by-Step Procedure
temporary installation folders. The computer
automatically reboots.
Perform the GUI-
based portion of
Windows 2000
Professional Setup.
• Use RBDC9
VTRC8 D7972
J97JY PRVMG
as the product
key.
• Computer name
– STUDENT x
where x is your
student number.
• Administrator
password is
“password”.
• IP address -
192.168.0.x
where x is your
student number.
• Subnet mask -
255.255.255.0.
• Workgroup
name -
WIN2KPRO.
1. The GUI Windows 2000 Setup Wizard starts
automatically. The wizard begins by detecting and
installing device drivers. This may take a few
minutes. The Regional Settings dialog box appears.
Accept the default settings.
2. The Personalize Your Software dialog box
appears. Fill in your name and organization.
3. The Product Key dialog box appears. In the boxes
at the bottom of the dialog box you would normally
enter the 25-character product key, which is found on
the back of your Windows 2000 Professional CD
jewel case. Enter the following into the product key
boxes:
RBDC9 VTRC8 D7972 J97JY PRVMG
4. The Computer Name and Administrator Password
dialog box appears. Call your computer STUDENT x
where x is the your student number. Create the
Administrator password as password.
5. If you have a Plug and Play modem installed, you
will see the Modem Dialing Information dialog box.
Here you can specify your country/region, area code,
whether you dial a number to get an outside line, and
whether the telephone system uses tone dialing or
pulse dialing.
6. The Date and Time Settings dialog box appears.
Specify Eastern Standard Time and configure the

8/8/2019 Windows 2000 Prof Unattend Installatie
http://slidepdf.com/reader/full/windows-2000-prof-unattend-installatie 58/66
58 Chapter 1:Windows 2000 Professional
Task Step-by-Step Procedure
computer to adjust for daylight savings time.
Confirm that the date is correct. If it is not, change it
to the correct date.
7. The Network Settings dialog box appears. Select
Custom Settings. Leave everything as default except
for automatic configuration of IP address. Select
Manual Configuration, and give yourself the IP
address of 192 .168.0. x where x is your student
number. The subnet mask is 255.255.255.0 . Leave
the default gateway blank.
8. The next dialog box, Workgroup or Computer
Domain, configure your computer to be part of a
Workgroup. Name the Workgroup WIN2KPRO.
9. The computer will perform the final tasks,
including installing Start Menu items, registering
components, saving settings and removing temporaryfiles. This will take several minutes. On completion,
you will see the Completing Windows 2000 Setup
Wizard dialog box. Click the Finish button to restart
your computer.

8/8/2019 Windows 2000 Prof Unattend Installatie
http://slidepdf.com/reader/full/windows-2000-prof-unattend-installatie 59/66
Installing Wind ows 2000 Profess ional 59
Notes

8/8/2019 Windows 2000 Prof Unattend Installatie
http://slidepdf.com/reader/full/windows-2000-prof-unattend-installatie 60/66
60 Chapter 1:Windows 2000 Professional
Lab 1.2 – Creating an Answer File Using Setup
Manager
Goal:
In this exercise, you will create an answer file for an unattended
installation using Setup Manager.
Task Step-by-Step Procedure
1. Set up computer to
access deploymenttools.
2. Name folder for
tools Deployment
Tools
1. Logon to your Windows 2000 computer as
Administrator
2. Use Windows Explorer to create a folder
on the C: drive named Deployment Tools.
3. Copy the file Deploy.cab from your
Support subdirectory to the new folder.
4. Double-click the Deploy.cab file to display
the contents of the CAB file. Select all files.
5. Under the File menu, choose Extract.
6. The Browse for Folder dialog box will
appear. Select Local Disk (C:) and
Deployment Tools. Click OK.
7. Eight items should appear in the
Deployment Tools folder, including the CABfile.

8/8/2019 Windows 2000 Prof Unattend Installatie
http://slidepdf.com/reader/full/windows-2000-prof-unattend-installatie 61/66
Installing Wind ows 2000 Profess ional 61
Task Step-by-Step Procedure
Set up deployment tools 1. Logon to your Windows 2000 computer as
Administrator
2. Use Windows Explorer to create a folder on
the C: drive named Deployment Tools .
3. Copy the file Deploy.cab from your
Support subdirectory to the new folder.
4. Double-click the Deploy.cabfile to display
the contents of the CAB file. Select all files.
5. Under the File menu, choose Extract.
6. The Browse for Folder dialog box will
appear. Select Local Disk (C:) and
Deployment Tools. Click OK.
7. Eight items should appear in the
Deployment Tools folder, including the CAB
file.
Create an answer file for
remote installation using
Setup Manager with
defaults.
• Eastern
Standard
Time
• Description
Text is
1. Select Start | Run and click the Browse
button. Select the Setupmgr program in the
Deployment Tools folder. Click the OK
button.
2. The Windows 2000 Setup Manager Wizard
starts . Click the Next button.
3. The New or Existing Answer File dialog

8/8/2019 Windows 2000 Prof Unattend Installatie
http://slidepdf.com/reader/full/windows-2000-prof-unattend-installatie 62/66
62 Chapter 1:Windows 2000 Professional
Task Step-by-Step Procedure
Student x
(where x is
your
Student
Number)
Informatio
n File
• Answer
filename:
Win2KDist
\remboot.t
xt
box appears. Select Remote Installation
Services , and then click Next.
4. The User Interaction Level dialog box
appears. Select the Provide Defaults option,
and then click Next.
5. The Administrator Passworddialog box
appears. Enter the Administrator password
password and confirm it. Click the Next
button.
6. The Display Settings dialog box appears.
Click Next to accept the default
configuration.
7. The Network Settings dialog box appears.
Select Typical Settings and then the Next
button.
8. The Time Zone Box appears. Select
Eastern Standard Time from the list and
click Next.
9. The Additional Settings box appears.
These include telephony, regional settings,
languages, browser settings, installation
folder, and printer installation. Click theNext button to accept the default selection of
No, Do Not Edit the Additional Settings.
10. The Setup Information File Text
dialog box appears. Enter Student x (where

8/8/2019 Windows 2000 Prof Unattend Installatie
http://slidepdf.com/reader/full/windows-2000-prof-unattend-installatie 63/66
Installing Wind ows 2000 Profess ional 63
Task Step-by-Step Procedure
x is your Student Number) Information File
in the Description String text box and some
help text in the Help Text string box. Click
the Next button to continue.
11. The Answer File Name dialog box
appears. Click the Browse button. Select
Local Disk (C:) and click on the Create
New Folder icon. Create a new folder
named Win2KDist and click the Open
button. In the Save As dialog box, accept
the default name of remboot.txt and click the
Save button. Click the Next button.
12. The Completing Windows 2000 Setup
Manager Wizard dialog box appears. Click
the Finish button.
Verify your results. 1. Open Windows Explorer and locate the
Win2KDist folder. Verify that the file
remboot.txt file is there. You may find that
the .txt extension is missing. This is because
Windows Explorer will hide file extensions
for known file types by default. To view the
file extension, go to Tools | Folder Options .
Select the View tab. Uncheck the Hide File
Extensions for known file types option.
Press OK to confirm your changes.
2. Right-click the remboot.txt file. A
shortcut menu opens. Select Open . This will

8/8/2019 Windows 2000 Prof Unattend Installatie
http://slidepdf.com/reader/full/windows-2000-prof-unattend-installatie 64/66
64 Chapter 1:Windows 2000 Professional
Task Step-by-Step Procedure
launch Notepad. Review the answer file you
have just created.

8/8/2019 Windows 2000 Prof Unattend Installatie
http://slidepdf.com/reader/full/windows-2000-prof-unattend-installatie 65/66
Installing Wind ows 2000 Profess ional 65
Notes

8/8/2019 Windows 2000 Prof Unattend Installatie
http://slidepdf.com/reader/full/windows-2000-prof-unattend-installatie 66/66