
Windows 10 performance tips and tweaks By: TheBen · o Right Click on “Windows Search” from the...
26
Windows 10 performance tips and tweaks By: TheBen 02022019 Index: 1. Disabling the Search Indexing Feature in Windows 10 ........................................................... 3 2. Control which apps run the background .................................................................................. 3 3. Temporarily config autoupdate for drivers ............................................................................... 3 4. Remove default installed Windows Apps ................................................................................ 4 5. Clean drivers and free disk space ........................................................................................... 4 6. Update your drivers ................................................................................................................. 4 7. Disable the Aero Theme on Windows 10 ................................................................................ 5 8. Disabling the Unwanted Visual Effects .................................................................................... 6 9. Disable Windows autoupdate .................................................................................................. 6 10. Disabling the Unwanted Services to Speed up Windows.................................................... 7 11. Disable the User account control (UAC) Feature ................................................................ 8 12. Set Up the Windows 10 Ready Boost Service for an Extra Speed Boost ........................... 8 13. Turn off Unused Windows 10 Features ............................................................................... 8 14. Remove default Windows 10 apps ...................................................................................... 9 15. Disable the Windows 10 Sidebar (Actually the Gadgets) .................................................. 10 16. Disable the Aero Peek and Aero Snap features in Windows 10 ....................................... 10 17. Change the Power Plan To Maximum Performance ......................................................... 11 18. Disable the Thumbnail Preview Feature............................................................................ 11 19. Turn OFF Windows 10 Password Protection .................................................................... 11 20. Turn OFF Windows 10 Screen Saver and Wallpaper ....................................................... 12 21. Disable Unwanted Start Up Items and Speed Up Windows 10 Start Up ........................ 12 22. Disable Unwanted System Sounds in Windows 10 ........................................................... 12 23. Anti-virus setting ................................................................................................................ 13 24. Relocate the Swap/page file or Virtual Memory file ........................................................... 13 25. Windows 10 Disk Clean up ................................................................................................ 13 26. Run Error-Checking on disks............................................................................................. 13 27. Disable Windows Defender ............................................................................................... 14 28. Compatibility of drivers and programs ............................................................................... 14 29. Enable or Disable Windows 10 Program Compatibility Assistant .................................. 14 30. Enable write caching for storage devices .......................................................................... 14 31. Disk defragmenter ............................................................................................................. 15 32. Remove RDC to improve Windows 10 Network ................................................................ 15 33. Remove IPv6 ..................................................................................................................... 15 34. Enable or Disable Hibernate .............................................................................................. 16 35. Sync Centre Synchronization ............................................................................................ 17
Transcript of Windows 10 performance tips and tweaks By: TheBen · o Right Click on “Windows Search” from the...

Windows 10 performance tips and tweaks By: TheBen
02022019
Index: 1. Disabling the Search Indexing Feature in Windows 10 ........................................................... 3
2. Control which apps run the background .................................................................................. 3
3. Temporarily config autoupdate for drivers ............................................................................... 3
4. Remove default installed Windows Apps ................................................................................ 4
5. Clean drivers and free disk space ........................................................................................... 4
6. Update your drivers ................................................................................................................. 4
7. Disable the Aero Theme on Windows 10 ................................................................................ 5
8. Disabling the Unwanted Visual Effects .................................................................................... 6
9. Disable Windows autoupdate .................................................................................................. 6
10. Disabling the Unwanted Services to Speed up Windows.................................................... 7
11. Disable the User account control (UAC) Feature ................................................................ 8
12. Set Up the Windows 10 Ready Boost Service for an Extra Speed Boost ........................... 8
13. Turn off Unused Windows 10 Features ............................................................................... 8
14. Remove default Windows 10 apps ...................................................................................... 9
15. Disable the Windows 10 Sidebar (Actually the Gadgets) .................................................. 10
16. Disable the Aero Peek and Aero Snap features in Windows 10 ....................................... 10
17. Change the Power Plan To Maximum Performance ......................................................... 11
18. Disable the Thumbnail Preview Feature............................................................................ 11
19. Turn OFF Windows 10 Password Protection .................................................................... 11
20. Turn OFF Windows 10 Screen Saver and Wallpaper ....................................................... 12
21. Disable Unwanted Start Up Items and Speed Up Windows 10 Start Up ........................ 12
22. Disable Unwanted System Sounds in Windows 10 ........................................................... 12
23. Anti-virus setting ................................................................................................................ 13
24. Relocate the Swap/page file or Virtual Memory file ........................................................... 13
25. Windows 10 Disk Clean up ................................................................................................ 13
26. Run Error-Checking on disks ............................................................................................. 13
27. Disable Windows Defender ............................................................................................... 14
28. Compatibility of drivers and programs ............................................................................... 14
29. Enable or Disable Windows 10 Program Compatibility Assistant .................................. 14
30. Enable write caching for storage devices .......................................................................... 14
31. Disk defragmenter ............................................................................................................. 15
32. Remove RDC to improve Windows 10 Network ................................................................ 15
33. Remove IPv6 ..................................................................................................................... 15
34. Enable or Disable Hibernate .............................................................................................. 16
35. Sync Centre Synchronization ............................................................................................ 17

36. Turn off all unnecessary animations .................................................................................. 17
37. Adjust Windows for best performance ............................................................................... 17
38. Shorten shutdown time of Windows Operating System .................................................... 17
39. How to Turn System Protection On or Off ......................................................................... 18
40. Speed up Windows boot process ...................................................................................... 20
41. Remove unused Windows components ............................................................................ 20
42. Disabling boot Animation in Windows ............................................................................... 20
43. Enable Windows GodMode ............................................................................................... 20
44. Disable the user interface in Windows boot process ......................................................... 21
45. Group policy settings in VDI environments ....................................................................... 21
46. Clean out your TEMP folder .............................................................................................. 22
47. Registry Tweaks to Speed Up Windows 10 ...................................................................... 22

1. Disabling the Search Indexing Feature in Windows 10
o Right Click the “Computer” Icon in the desktop and select “Manage”.
o Click “Services and Applications” in the “Computer Management” window.
o Click on “Services”.
o You can see a lot of services listed there. Look for “Windows Search” in that.
o Right Click on “Windows Search” from the list and choose “Properties”.
o The “Windows Search Properties Window” will open up. Stop de service and from
“Startup type” click on the drop down menu and choose “Disabled”.
o Click “Apply” then “OK” and that’s it. The Windows 10 Search Indexing Feature is
now disabled.
If you want to completely disable the search indexing feature in Windows 10 you can set the
Search Indexing Service to Manual (See the above method about disabling unwanted services).
Open Windows File Explorer as Administrator. Click on your SSD and right click on it. Click properties then uncheck “Allow files on this drive to have contents indexed in addition to file properties“. Click apply then click OK.
2. Control which apps run the background 1. Click Windows Start button on the left >> 2. goto Settings >> 3. goto Privacy >> 4. goto Background Apps 5. Switch off all apps running in your background.
3. Temporarily config autoupdate for drivers
A drivers is a tiny program that communicates between the hardware in your system. The right version of the drivers is essential for stable and fast running of the system. Therefore, scan and update for the latest versions of drivers in the system. Goto control panel > Devices and Printers > right click your PC > Device installation settings. Switch the radio button to Yes for auto update. Start Windows update, install the updates and reboot the system. Then switch the radio button to No.

4. Remove default installed Windows Apps In the default Windows 10 installation, a lot of applications are installed by default. You can manually remove these apps, but more easy is with Powershell. Press on the Windows button of your keyboard en type: Powershell Select the Powershell_ise, rightmouse click on it and run as Administrator !! Behind 1., paste these lines: Get-AppxPackage *3d* | Remove-AppxPackage Get-AppxPackage *camera* | Remove-AppxPackage Get-AppxPackage *communi* | Remove-AppxPackage Get-AppxPackage *bing* | Remove-AppxPackage Get-AppxPackage *zune* | Remove-AppxPackage Get-AppxPackage *people* | Remove-AppxPackage Get-AppxPackage *phone* | Remove-AppxPackage Get-AppxPackage *photo* | Remove-AppxPackage Get-AppxPackage *solit* | Remove-AppxPackage Get-AppxPackage *soundrec* | Remove-AppxPackage Get-AppxPackage *xbox* | Remove-AppxPackage Press the F5 button and run the script, this will uninstall all these apps from your Window 10. To get a list of all installed apps, give in this command in Powershell: Get-AppxPackage this will give you a detailed list of all installed Apps. A more friendly to read list is: Get-AppxPackage | Select Name, PackageFullName Manually Remove Apps: Get-AppxPackage -allusers PackageFullName | Remove-AppxPackage
For example: Get-AppxPackage -allusers *3dbuilder* | Remove-AppxPackage OR For example: Get-AppxPackage -allusers *3d* | Remove-AppxPackage
5. Clean drivers and free disk space During installation, updates or upgrades, the driver store will be polluted. To clean the driverstore you can first find out what disk space will be used. Open Explorer > Windows > System32 > DriverStore and right mouse click on it. Click on properties and see the size of it. It should be < 1Gb !! To optimize the driverstore, download a little help tool, called RAPR. This can be downloaded from the website > https://driverstoreexplorer.codeplex.com/ This tool is not an installation, so simple download it, extract it and run it as Administrator !!. Click on Enumerate >> look for double drivers, select the line and delete package. Do not select Force Deletion !!
6. Update your drivers To update your drivers to the most up to date version, I prefer using Driver Booster 3 or “Advanced System Optimizer”. It proven that the most up to date drivers will increase speed of your system.

7. Disable the Aero Theme on Windows 10
o Right Click on your Desktop and select ” Personalize ” click the Window Color
Tab.
o Uncheck the Box saying ” Enable Transparency ” and then click on ” Open classic
appearance properties for more color options”.
o Then a window will open up. Apply a Standard or Basic theme from it. The
Standard Windows 10 theme is more preferred.
The aero user interface certainly adds some ” Eyecandy ” to Windows 10 but certainly is a
resource hog especially when, what you expect from Windows 10 is more performance juice.
Aero user interface squeezes your graphics or video card to its maximum. So why dont we
just avoid the Windows 10 aero? if we care more about speed and performance in Windows
10. So Disabling the Aero in Windows 10 certainly adds an extra speed boost to it.
Disabling the aero theme alone in Windows 10 will really speed things up. You can know this
by looking into the memory consumption when aero is turned on and off.

8. Disabling the Unwanted Visual Effects
For this right click on ” Computer” and select “Properties” from the right click menu.
Click on ” Advanced System Settings ” from the left pane to open up the ” System
Properties ” window.
Select the “Advanced” tab from it. Then Under ” Performance ” click ” Settings “.
Choose ” Custom: ” Options From it.
Now un tick all the options and select only the last four options (actually three only
needed; you can un tick the second option from the last four). See the screen shot if
you have any doubt.
Now just logoff your system and turn logon.
Even though we have tuned off the aero effects in Windows 10 still there are many unwanted
visual effects that can be safely disabled to speed up Windows 10 even more.
9. Disable Windows autoupdate
Open Start menu, right-click on Computer and click Properties. This will open System dialog box that will show basic information about your computer. On the left sidebar, under See also heading, you will find Windows Update. Clicking it will bring you to the Windows Update dialog box, now on the left sidebar click on Change Settings. You will notice that Windows has enabled option as default, to disable it, simply select Never check for updates.
Or:
Start Group Policy Editor (GPE), and load the desired Group Policy Object (GPO).
Expand User Configuration, Administrative Templates, Start Menu and Taskbar.
Double-click "Disable and Remove Links to Windows Update" (Windows 2000) or "Remove links and access to Windows Update" (Windows XP).
Select Enabled and click OK. Close GPE.
Or:
Start regedit.exe on the machine where you want to disable Windows Update.
Go to HKEY_CURRENT_USER\Software\Microsoft\Windows\CurrentVersion\Policies\Explorer.
From the Edit menu, select New, DWORD value.
Enter a name of NoWindowsUpdate, and press Enter.
Double-click NoWindowsUpdate, and set it to 1.
Close regedit.

10. Disabling the Unwanted Services to Speed up Windows There are many services in Windows 10 that we dont require for our daily use. There are some exceptional cases though. Services such as “print spooler” is only needed when we use a printer. If we use a printer only occasionally we can safely turn off that service in Windows 10 and turn it on only when we need to take a print.
1) Application Experience 2) Background Intelligent Transfer Service 3) Computer Browser (If your PC does not connect to any network) 4) Desktop Window Manager Session Manager (If you don’t want the aero effects) 5) Diagnostic Policy Service 6) Distributed Link Tracking Client 7) Downloaded Maps Manager 8) Function Discovery Resource Publication 9) Home Group listener 10) Home Group Provider 11) Indexing Service 12) IP Helper 13) Offline Files 14) Portable Device Enumerator Service 15) Print Spooler (If you do not use Printer) 16) Program Compatibility Assistant Service 17) Protected Storage 18) Remote Registry (You can safely disable it for more Security) 19) Secondary Logon 20) Security Center 21) Server (If your computer do not connect with any network) 22) Smart Card 23) SuperFetch 24) System Restore 25) Tablet PC Input Service 26) TCP/IP NetBIOS Helper 27) Themes ( If you want any aero and good visual appearence (classic theme will be
applied)) 28) Windows Biometric Service 29) Windows Error Reporting Service 30) Windows Defender 31) Windows Media Center Service Launcher 32) Windows Media Player Sharing Service 33) Windows Search (If you rarely use Windows Search feature ) 34) Windows Time (If you do not want to synchronize system time with internet time
automatically) Use Powershell to automate this, example: get-wmiobject win32_service -filter "name = 'Service_name'" set-service Service_name -startuptype disabled Example: get-wmiobject win32_service -filter "name = 'Sysmain'" set-service Sysmain -startuptype disabled

11. Disable the User account control (UAC) Feature
o From the Control Panel open the ” User Accounts and Family Safety ” > User
Account.
o Click the User Account Control settings link.
o Now just Drag the Slider towards “Never Notify”.
o Click “OK” and Reboot your system.
The User account control (UAC) feature in Windows 10 is very annoying though it says it can
protect your computer from harmful virus activity etc. But if you are a daily user of your computer
this Windows 10 feature will be a total nuisance to you.
To Disable and Turnoff UAC in Windows 10
Disabling UAC is for advanced users only it is not recommend doing it if not.
12. Set Up the Windows 10 Ready Boost Service for an Extra Speed Boost
o To configure the Ready Boost Feature in Windows 10 you need to have a High Speed Flash/USB or Pendrive with you which is ready boost compatible.
o After plugging you pendrive, open “Computer” > Right-click the on USB Drive/Pendrive > select “Ready Boost” tab > tick the “Use this device” checkbox.
o You can configure how much space on your USB drive/ Pendrive to be used as Ram. The ready boost feature in Windows 10 will help you to use your flash drive or pendrive or USB drive as Ram there by improving the performance and speed of Windows 10 greatly. You can certainly experience it when launching bulky applications such as Adobe Photoshop etc.
13. Turn off Unused Windows 10 Features
o Open up ” Programs and Features ” from Control Panel.
o Click the ” Turn Windows features on or off ” from the left pane.
o Now uncheck all the Feature that you don’t use in Windows 10 and restart the
system for the changes to take effect.
There are many feature in Windows 10 that we often don]t use. Disabling these unused features in Windows 10 will really help in speeding things up.

14. Remove default Windows 10 apps Run the following command to get a list of all installed apps in Windows 10 Get-AppxPackage This command will display all the installed apps with all their specific details and their full names which we require to uninstall them. We need the PackageFullName of the relevant apps so we run the following command to find out their names.
Full syntax is: Get-AppxPackage | Select Name , PackageFullName
To remove all built in app from all user accounts in win 10 Get-AppxPackage -AllUsers | Remove-AppxPackage To remove all modern apps from system account Get-AppXProvisionedPackage -online | Remove-AppxProvisionedPackage -online Stukje code om te importeren in Powershell get-appxpackage *3dbuilder* | remove-appxpackage # Uninstall 3D Builder get-appxpackage *alarms* | remove-appxpackage # Uninstall Alarms & Clock get-appxpackage *appconnector* | remove-appxpackage # Uninstall App Connector get-appxpackage *calculator* | remove-appxpackage # Uninstall Calculator get-appxpackage *camera* | remove-appxpackage # Uninstall Camera get-appxpackage *communicationsapps* | remove-appxpackage # Uninstall Calendar and Mail apps together get-appxpackage *getstarted* | remove-appxpackage # Uninstall Get Started get-appxpackage *zunemusic* | remove-appxpackage # Uninstall Groove Music get-appxpackage *zune* | remove-appxpackage # Uninstall Groove Music and Movies & TV apps together get-appxpackage *holographic* | remove-appxpackage # Uninstall Windows Holographic get-appxpackage *maps* | remove-appxpackage # Uninstall Maps get-appxpackage *bingfinance* | remove-appxpackage # Uninstall Money get-appxpackage *bing* | remove-appxpackage # Uninstall Money, News, Sports and Weather apps together get-appxpackage *zunevideo* | remove-appxpackage # Uninstall Movies & TV get-appxpackage *bingnews* | remove-appxpackage # Uninstall News get-appxpackage *officehub* | remove-appxpackage # Uninstall Get Office get-appxpackage *onenote* | remove-appxpackage # Uninstall OneNote get-appxpackage *people* | remove-appxpackage # Uninstall People get-appxpackage *commsphone* | remove-appxpackage # Uninstall Phone get-appxpackage *windowsphone* | remove-appxpackage # Uninstall Phone Companion get-appxpackage *phone* | remove-appxpackage # Uninstall Phone and Phone Companion apps together get-appxpackage *photos* | remove-appxpackage # Uninstall Photos get-appxpackage *solitaire* | remove-appxpackage # Uninstall Microsoft Solitaire Collection Get-AppxPackage *soundrecorder* | Remove-AppxPackage # Uninstall Voice Recorder get-appxpackage *bingsports* | remove-appxpackage # Uninstall Sports get-appxpackage *messaging* | remove-appxpackage # Uninstall Skype app get-appxpackage *skypeapp* | remove-appxpackage # Uninstall Get Skype get-appxpackage *windowsstore* | remove-appxpackage # Uninstall Windows Store get-appxpackage *sway* | remove-appxpackage # Uninstall Sway get-appxpackage *soundrecorder* | remove-appxpackage # Uninstall Voice Recorder get-appxpackage *bingweather* | remove-appxpackage # Uninstall Weather get-appxpackage *xbox* | remove-appxpackage # Uninstall Xbox

15. Disable the Windows 10 Sidebar (Actually the Gadgets)
o Right click on the sidebar and select ” Properties “.
o On the properties windows untick the check box showing ” Start sidebar when
Windows Starts “
o From now on windows sidebar won’t start when Windows 10 start up.
Disabling the window 7 sidebar is definitely help you to to gain a few seconds during start up time. There are many useful utilities such as the RocketDock etc. which are good application launchers.
16. Disable the Aero Peek and Aero Snap features in Windows 10
o Open the Windows 10 ” Control Panel ” and double-click on ” Ease of Access
Center ” icon.
o Now click on the ” Make it easier to focus on tasks ” seen at the bottom in
there
o Now untick the check box saying ” Prevent windows from being automatically
arranged when moved to the edge of the screen ” .
o Right click on the Windows 10 taskbar and select ” Properties “.
o Now untick the ” Use Aero Peek to preview the desktop ” option from there.
To disable Aero Snap Feature in Windows 10, That will now disable the Aero Snap in Windows 10. Now To Disable the Aero Peek feature in Windows 10 The Aero Peek feature in Windows 10 helps you to peek through all open windows by hiding all other windows and showing only the outlines of all windows. Aero Peek is similar to the ” Show Desktop ” Feature in XP and Vista. If you have followed step 3 then Aero Peek will be automatically disabled. If not, the aero peek feature will now be disabled in Windows 10.

17. Change the Power Plan To Maximum Performance
o Double click the ” Power Options ” in the Control panel.
o Click the down arrow showing ” Show Additional Plans ” to see the ” High
Performance ” power plan
o Now just activate the ” High Performance ” plan and that’s it.
o You may go for the advanced settings for further tweaking if you want.
The Power settings in Windows 10 is not automatically set for maximum performance. By default the power plan in Windows 10 is set for a balanced performance with energy consumption on hardware. So you may not get the optimal performance from Windows 10 if this is the case. So we need to change the power plan to High Performance Mode.
18. Disable the Thumbnail Preview Feature To speed up File browsing in Windows 10
o Double Click on ” Computer ” >click on the “Organize” drop-down menu and
select the “Folder and Search options”
o Under ‘Files and Folders’ section, go to the “View” tab and tick the check box
showing “Always show icons, never thumbnails” checkbox.
The thumbnail preview feature in Windows 10 will show the small thumbnails of the contents of a folder instead of showing it’s icon. But this feature really do take up some system resources. So by disabling the Thumbnail Preview feature in Windows 10 the file browsing in Windows 10 explorer can be speed up.
19. Turn OFF Windows 10 Password Protection If you have set a password for accessing your user account in Windows 10, then you need to enter it each and every time you logon to windows. Logging into windows automatically without entering any password will save you a few seconds more. If you are the only person who use your computer then i would recommend to turn this off. If that is not the case you can skip this step.

20. Turn OFF Windows 10 Screen Saver and Wallpaper
o Right click on desktop and choose “Personalize”.
o Click the Screen Saver link ” From the Screen Saver drop down menu, Set it
to “None” and click “Apply” and then “OK”.
o Now click on “Desktop Background” link.
o From the “Location” drop down menu select “Solid Colors” and pick one color
and click “OK”.
In order to display the wallpaper and screen saver the system needs some memory. So by disabling those two we can save a few Mega Bytes of memory.
21. Disable Unwanted Start Up Items and Speed Up Windows 10 Start Up
o Type ” msconfig ” in the “RUN” option from start menu press [Enter] to open
up the System Configuration Utility.
o Now navigate to the “StartUp” tab.
o Untick the Entries which are not needed
This really matters when you have installed a lot of softwares on your PC. Many software such as AcdSee will run services such as device detector etc during the system start up. These are of no use actually for most windows users. So preventing such services from starting up during the start up of Windows 10 can result in quicker start Ups. This will actually save some seconds during Windows 10 start up.
22. Disable Unwanted System Sounds in Windows 10
o Type mmsys.cpl in RUN From the Windows 10 Startmenu search box and
press [Enter].
o Navigate to the “Sounds” tab.
o Now from under “Sound Scheme:” select “No Sounds” > Click “Apply” > “OK”.
o You can keep some of your favorite sounds turned on if you want, but sounds
played during the Windows 10 start up, shutdown, Logon, logoff, start
navigation etc should be set to none if you want some real speed boost.
In order to play the sounds you hear in Windows 10, system resources are being utilized. So if you can disable these sound affects you can gain some speed and also free some system resources too.

23. Anti-virus setting Make some exclusions in the anti-virus software. Like
o Page file o Database files o Shares
24. Relocate the Swap/page file or Virtual Memory file These files are hidden and are usually located on the Windows drive (usually “C:”) If there is a second physical hard drive in the system, consider moving to the secondary drive. Ideally, these files work best when located on the fastest and largest (in terms of free space) drive in the system. Be sure that the page file is well configured. After a clean, from cd-rom or so, installation, the default setting is not optimal for maximum performance. Change these settings for better performance
o Start > Computer > right click > Properties o Advanced system setting > select tab Advanced o Select settings in line performance o Select, adjust for best performance > apply o Select sub tab Advanced >> Virtual Memory >> change o Standard, automatic manage is enabled, remove the check mark o Now the pagefile settings can be managed o Configure the pagefile size for both sizes the same. For physical systems 1,5 x total
physical memory and for virtual systems as small as possible but always 1250Mb o Click on set > ok > ok > ok
25. Windows 10 Disk Clean up Remove unwanted and temporary files on your Windows 10 disks. It reduces access time on system and your files to make Windows 10 faster.
o Right click on each disk, go to properties and press Disk Cleanup button. o In next screen you can select file types to delete and start clean up.
26. Run Error-Checking on disks This is another method to improve performance of disk. It will check and correct any system files or physical disk errors on Windows 10 computer.
o Select Error-check under tools in each disk with both options selected. o If the particular partition is a system, boot or having paging file then error-checking will
start in next boot.

27. Disable Windows Defender When you use third party protection software such as Norton, AVG, MacAfee…etc, then disable windows defender. It does almost the same job. So it’s not required to run two similar programs in same time which is a unwanted system load for Windows 10. You can disable Windows defender in control panel.
28. Compatibility of drivers and programs Before install any drives or programs make sure it’s compatible with Windows 10. It should be officially supported for Windows 10. Installing non compatible drivers and programs on Windows 10 may cause problem with system performance and crash your system.
29. Enable or Disable Windows 10 Program Compatibility Assistant
Through the Local Group Policy Editor
o Open the all users, specific users or groups, or all users except administrators Local Group Policy Editor for how you want this policy applied
o In the left pane, click on to expand User Configuration, Administrative Templates, Windows Components, and Application Compatibility
o In the right pane, right click on Turn off Program Compatibility Assistant and click on Edit o To Enable Program Compatibility Assistant o Select (dot) either Not Configured or Disabled o Click on OK o Close the Local Group Policy Editor window.
To Disable Program Compatibility Assistant Through the Local Group Policy Editor
o Open the all users, specific users or groups, or all users except administrators Local Group Policy Editor for how you want this policy applied
o In the left pane, click on to expand User Configuration, Administrative Templates, Windows Components, and Application Compatibility
o In the right pane, right click on Turn off Program Compatibility Assistant and click on Edit o To Enable Program Compatibility Assistant o Select (dot) Enabled. o Click on OK o Close the Local Group Policy Editor window.
30. Enable write caching for storage devices
This option is usuallu he best choise for storage devices that must provide the highest possible performance and that you intend to not remove from the system frequently, such as internal hard disk drives.
o Open the control panel o In device manager, double click on disk drives to expand them o Double click on the listed storage device that you want to disable write caching for. o On the policies tab, under the upper removal policy section, select a dot, Better
performance. o By default, enable write caching on the device is also checked, if not, then check in on as
well

31. Disk defragmenter First start with how to turn the Windows 10 disk defragmenter schedule on or off. Disk defragmenter is set to run on an automatic schedule by default in Windows 10. The executable for disk defragmenter is c:\windows\system32\dfrgui.exe Solid State Drives (SSD) do not need to be defragmented. Doing so may shorten the lifetime of the SSD drive !!! Check SSD, slide your mouse cursor to the top right corner of your screen and click search. Type “Defragment” and click “Defragment and Optimize your drives”. On the “Defragment and Optimize your drives” window. Make sure that your SSD drive is categorized as an SSD!!! How to start to turn the Windows 10 disk defragmenter schedule on or off.
o Start > all programs > accessories > system tools > disk defragmenter o Or: open Windows explorer > right click on drive to be defragmented > properties o Select tab tools. o Select Defragment now o Here you can turn on or off the schedule
If the schedule is turned on, turn it off to get more performance during the scheduled task.
o Click on the the button Configure Schedule o Uncheck the run on a scheduele o Click ok o Click on the close button
32. Remove RDC to improve Windows 10 Network This feature introduced with Windows Vista to transfer data over network in compressed format. The same RDC feature continued in Windows 10 also. Since most of the old operating systems came before vista do not support this RDC feature, it slows down network data transfer in Windows 10. You can remove this RDC (Remote Differential Compression) in Windows 10 by visiting control panel and programs and features. Click on ‘Turn Windows features on or off’
33. Remove IPv6 Remove IPv6 from Windows 10 network adapter settings if it’s not required. If you are not using IPv6 in internal or external networks then remove IPv6 to improve Windows 10 network performance. How to remove IPv6 on the system?
o Start > control panel > Network and Internet o Network and sharing center o Change adapter settings o Right click on the adapter and select properties o Remove check mark in the line Internet Protocol Version 6(TCP-IPv6) o Also Link Layer Topology Discovery Mapper I/O Driver and Link Layer Topology
Discovery can be unchecked

34. Enable or Disable Hibernate For better performance, disable hibernate. Disk space, time and memory will be won. There are several options how to do this. Take a good look and be careful. OPTION ONE To Enable or Disable Hibernate in an Elevated Command Prompt To Enable Hibernate NOTE: This step will restore the hiberfil.sys file, and the Allow hybrid sleep and Hibernate after Power Options under Sleep.
o Open a Command Prompt. o In the command prompt, type powercfg -h on and press Enter. o Close the command prompt o Open the Advanced Power Plan Settings for your power plan. Start > Control Panel >
Hardware and Sound > Power Options > change plan settings o Expand Sleep and edit the computer to sleep time o Under Hibernate after, set the Setting (Minutes) to how many minutes you want your
computer to sit idle for before it goes into hibernation. To Disable Hibernate This step will disable hibernation, delete the hiberfil.sys file, and remove the Allow hybrid sleep and Hibernate after Power Options under Sleep.
o Open a Command Prompt o In the command prompt, type powercfg -h off and press Enter o Close the command prompt
OPTION TWO - To Enable or Disable Hibernate 1. To Enable Hibernate NOTE: This step will restore the hiberfil.sys file, and the Allow hybrid sleep and Hibernate after Power Options under Sleep.
o Start > run > type regedit o Goto HKEY_LOCAL_MACHINE > SYSTEM > CurrentControlSet > Control > Power >
HibernateEnabled o The dword value must be: 00000001 o After changing the registry, the computer has to be rebooted to effect the changes
2. To Disable Hibernate NOTE: This step will disable hibernation, delete the hiberfil.sys file, and remove the Allow hybrid sleep and Hibernate after Power Options under Sleep.
o Start > run > type regedit o Goto HKEY_LOCAL_MACHINE > SYSTEM > CurrentControlSet > Control > Power >
HibernateEnabled o The dword value must be: 00000000 o After changing the registry, the computer has to be rebooted to effect the changes
OPTION THREE - To Turn Hibernate Off in Power Options
o Open the Advanced Power Plan Settings for your power plan, and expand Sleep

o Under Hibernate after, set the Setting (Minutes) to Never o Under Allow hybrid sleep, set Setting to Off o When finished, click on OK
35. Sync Centre Synchronization
If any network shares set to sync with your Windows 10 and while it’s happening in background it affects your system very much. During this time network and disk activity will be very high and you can’t make it out. Two options are available to avoid this issue.
o Remove the sync partnership. o Let synchronization complete fully without any errors. o Sync Center is located in Control panel
36. Turn off all unnecessary animations
o Open the Control Panel (icons view), and click on the Ease of Access Center icon. o In the Ease of Access Center, click on one of the links below. (see screenshot below)
o Use the computer without a display o Make the computer easier to see o Make it easier to focus on tasks
o To Turn Off All Unnecessary Animations Check the Turn off all unnecessary animations (when possible) box, and
click on OK. (see screenshot below step 4) o To Allow Unnecessary Animations to be Used
Uncheck the Turn off all unnecessary animations (when possible) box, and click on OK. (see screenshot below)
37. Adjust Windows for best performance
o Click on start > computer o Right mouse click > properties o Click on Advanced System Settings o Click tab Advanced o Performance click on settings o Adjust for best performance and leave all selection options open o Close with click on OK and again ok
38. Shorten shutdown time of Windows Operating System
o Manually in Registry Editor > Open the Start Menu o In the run box, type regedit and press Enter o Go to HKEY_LOCAL_MACHINE > SYSTEM > CurrentControlSet >Control o In the right pane, right click on WaitToKillServiceTimeout and click on Modify o Type in a number between 2000-20000 (2-20 seconds) NOTE: The default time is
12000. I use 2000 (2 seconds) and have not had any problems. Your experience may vary.

o Click on OK o Close the register editor
NOTE: If you have problems with programs from your computer shutting down too quickly, then repeat the above steps and increase the time a bit.
39. How to Turn System Protection On or Off Information: System Restore regularly tracks changes to your computer's system files, and uses a feature called System Protection to create restore points of selected hard disks in your computer. System Protection is turned on by default for the Windows 10 hard disk or partition on your computer. This will show how to turn System Protection On or Off for creating System Restore Points for system settings and previous versions (shadow copies) of files in Windows 10. By default, System Protection is turned on for the hard disk or partition that Windows 10 is installed on. You could also use previous versions (shadow copies) to restore older copies of files and folders. You can select which disks have System Protection turned on for. !! Note !! - It is not recommended to turn off system protection for your C: system drive (Windows 10) since it is a great tool to easily undo a mistake, for example one that may have crippled Windows 10, by just doing a system restore to go back to a previous restore point of your system dated before the mistake. Warning System Restore doesn't protect FAT32 and other FAT disks because FAT disks don't support the use of shadow copies. Shadow copies contain information about changes to documents and system files. Shadow copies require the NTFS file system. Windows 10 uses the NTFS file system. Turning off System Protection for a disk deletes all restore points for that disk. You cannot restore the disk until you turn on System Protection again and a restore point is created for that disk. How to execute:
o Open the Control Panel o Click on the System icon o If prompted by UAC, then click on Yes if administrator or type in the adminstrator's
password if standard user o Click on the available hard disk drive or partition, that you want to turn System Protection
on or off for, to select it NOTE: Windows 10 should be the C: drive with (System). Under the Protection column, you will see if System Protection is turned On or Off for the available disk.
o Click on the Configure button o To Turn On System Protection for System Settings and Previous Versions of Files Dot
Restore system settings and previous versions of files NOTE: This turns on creating restore points and Previous Versions for the selected drive
o To Turn On System Protection for Only Previous Versions of Files o Dot Only restore previous versions of files
NOTE: This turns on only Previous Versions for the selected drive
o To Turn Off System Protection for the Selected Disk o Dot Turn off system protection
NOTE: This turns off both creating restore points and Previous Versions for the selected drive in
o Click on OK

o Repeat steps 5 to 10 if you want to turn on System Protection for another available listed disk drive
o Click on OK

40. Speed up Windows boot process
o Click on start > run o Type msconfig o Goto tab Computer o Click on advanced options o Check the number of processors and cores in the system
Core duo = 2 and Quad core = 4 o Click OK and apply o Reboot computer to effect changes
41. Remove unused Windows components
o Windows Media Center o DVD Maker o Tablet Components
42. Disabling boot Animation in Windows Caution: You can deploy the Hide Boot Screens feature in off-line mode. The command to remove the Hide Boot Screens feature in online mode is Dism /online /remove-package /packagename:<name of hide boot screen package>. This command removes the Hide Boot Screen feature after reboot, but does not update the BCD store. Use the following commands to update the BCD store.
o Disable this feature: bcdedit /set bootux disabled
43. Enable Windows GodMode GodMode is a term devised by the Microsoft development team, which provides a single place to access all Windows settings without needing to browse options and folders in the Control Panel. Instruction: o Create a new folder on the desktop o Rename the folder to: GodMode.{ED7BA470-8E54-465E-825C-99712043E01C} o The folder icon will change — double click it to show the GodMode window. Note: you can change the “GodMode” text, but the following 'period' and code number are essential. WARNING: The trick appears to work on both the 32 and 64-bit versions of Windows 10. Vista 32-bit and Windows Server 2008 32-bit should also work. However, it is known to crash 64-bit versions of Vista — and you may need to boot in safe mode or to the command line to delete the folder.

44. Disable the user interface in Windows boot process To boot the Windows operating system a little faster is by disabling the graphical Windows logo. Go to start, click on run and type in: msconfig Go to tab Computer starting/boot and select boot without user interface, click OK to close and exit.
45. Group policy settings in VDI environments
Item Path (Computer Configuration)
Justification
Error Reporting Administrative Templates – Windows Components – Windows Error Reporting Disable Windows Error Reporting: Enabled
Generates application crash dumps to be sent to Microsoft. Should be safe to disable unless troubleshooting application.
Windows Update Administrative Templates – Windows Components – Windows Updates Configure Automatic Updates: Disabled
Windows updates should only be done on the base desktop image and not by users.
System Restore Administrative templates – System – System Restore Turn off System Restore: Enabled
Not needed due to the nature of desktop virtualization and single image management.
Screensaver Administrative Templates – Control
Panel – Personalization Enable screen saver: Enabled Prevent changing screen saver: Enabled Password protect screen saver: Enabled Screen saver timeout: Enabled – 600 seconds Force specific screen saver: Enabled – scrnsave.scr
Utilizing complex screen savers wastes resources. Instead, the blank screen saver should be used to secure the environment without impacting resources.

46. Clean out your TEMP folder If you have a lot of files in your TEMP folder, it can slow PowerPoint (and other programs) down dramatically. So you'll want to periodically check and delete excess files in your TEMP folder. To find your TEMP folder, do the following:
1. Close PowerPoint and all other programs you are using. 2. Click Start. 3. Click Run. 4. In the Open box, type %temp%. 5. Click OK. 6. Select the excess .tmp files, and then press DELETE.
NOTE You can usually delete any files that you find in your TEMP folder. If you get an "access error" message, it's most likely because you're attempting to delete a file that is in use.
47. Registry Tweaks to Speed Up Windows 10 Here are some registry teaks that can be used to speed up Windows 10 even more. I have complied only the safest tweaks that can be applied to your PC. Apart from speeding up Windows 10 they will also add some functionality in windows like adding Copy to / Move to in right click context menu to speed up your daily tasks. Be sure you have a restore CD-rom and a proper backup!
Make start menu perform faster: Start >> Run >> REGEDIT >> goto [HKEY_CURRENT_USER\Control Panel\Desktop] Change following to "MenuShowDelay"="200" "HungAppTimeout"="4000" "WaitToKillAppTimeout"="5000" This tweak is required. Improves disk performance (prevent unnecessary defrag actions Disable Disk Defragmentation BootOptimizeFunction HKEY_LOCAL_MACHINE\SOFTWARE\Microsoft\Dfrg\BootOptimizeFunction "Enable"="N"
Disable Background Layout Service HKEY_LOCAL_MACHINE\SOFTWARE\Microsoft\Windows\CurrentVersion\OptimalLayout "EnableAutoLayout"=dword:00000000
Disable System Restore HKEY_LOCAL_MACHINE\SYSTEM\CurrentControlSet\Services\sr "Start"=dword:00000004 HKEY_LOCAL_MACHINE\SYSTEM\CurrentControlSet\Services\srservice "Start"=dword:00000004 HKEY_LOCAL_MACHINE\SOFTWARE\Microsoft\Windows NT\CurrentVersion\SystemRestore "DisableSR"=dword:00000001
The Last Access Time as it suggests is the time a File or a Folder is accessed the last time. This is quite useful and helps identify document age and status. This is disabled by default in Windows Vista and Windows 10 by default as this can add to the overhead of Disk I/O and performance although with the newer hardware this can be anything close to negligible.

Using FSUTIL (not for Windows 2000) From the command prompt as an Administrator run the following command: (In Windows 10/Vista/2008, click Start – search for cmd. Right-click and choose “Run as Administrator” to run Command Prompt with elevated privileges) fsutil behavior set disablelastaccess 0 This enables the Last Access Time recording.
Later if you need to disable, run the following command: fsutil behavior set disablelastaccess 1
Speed Up Application Launch at Boot For Windows 8, Microsoft commissioned a dedicated team to reengineer the Windows boot experience. One of their strategies to make the boot time appear faster was to delay the launch of applications. This start-up delay persists in Windows 10. If you run Windows 10 on a high end machine and have experienced super fast boot times, but are annoyed by apps not being available immediately, you might benefit from disabling this startup delay.
Press Windows + R to launch the Run menu. Type regedit, hit Enter or click OK to launch the Windows Registry, then open the following Registry key: HKEY_CURRENT_USER\Software\Microsoft\Windows\CurrentVersion\Explorer\Serialize
If you can’t find the Serialize key, right click Explorer, select New > Key, and name it Serialize. Under this key, create a new DWORD value called StartupDelayInMSec and set it to 0.
In case you notice longer boot times after adding this key, you could increase the delay to 1 or 2 milliseconds or delete the Serialize key to restore default settings.
Configuration Optimizer Registry Modification (in REG format) Disable Last Access Timestamp Y
es
[HKEY_LOCAL_MACHINE\SYSTEM\CurrentControlSet\Control\FileSystem] "NtfsDisableLastAccessUpdate"=dword:00000001
Disable Large Send Offload No [HKEY_LOCAL_MACHINE\SYSTEM\CurrentControlSet\Services\BNNS\Parameters] "EnableOffload"=dword:00000000
Disable TCP/IP Offload No [HKEY_LOCAL_MACHINE\SYSTEM\CurrentControlSet\Services\Tcpip\Parameters] "DisableTaskOffload"=dword:00000001
Increase Service Startup Timeout No [HKEY_LOCAL_MACHINE\SYSTEM\CurrentControlSet\Control] "ServicesPipeTimeout"=dword:0002bf20
Hide Hard Error Messages No [HKEY_LOCAL_MACHINE\SYSTEM\CurrentControlSet\Control\Windows] "ErrorMode"=dword:00000002
Disable CIFS Change Notifications No [HKEY_LOCAL_MACHINE\SOFTWARE\Microsoft\Windows\CurrentVersion\Policies\Explorer] "NoRemoteRecursiveEvents"=dword:00000001
Disable Logon Screensaver No [HKEY_USERS\.DEFAULT\Control Panel\Desktop] "ScreenSaveActive"="0"
Disable CrashDump: HKEY_LOCAL_MACHINE\SYSTEM\CurrentControlSet\Control\CrashControl "CrashDumpEnabled"=dword:00000000 "LogEvent"=dword:00000000 "SendAlert"=dword:00000000
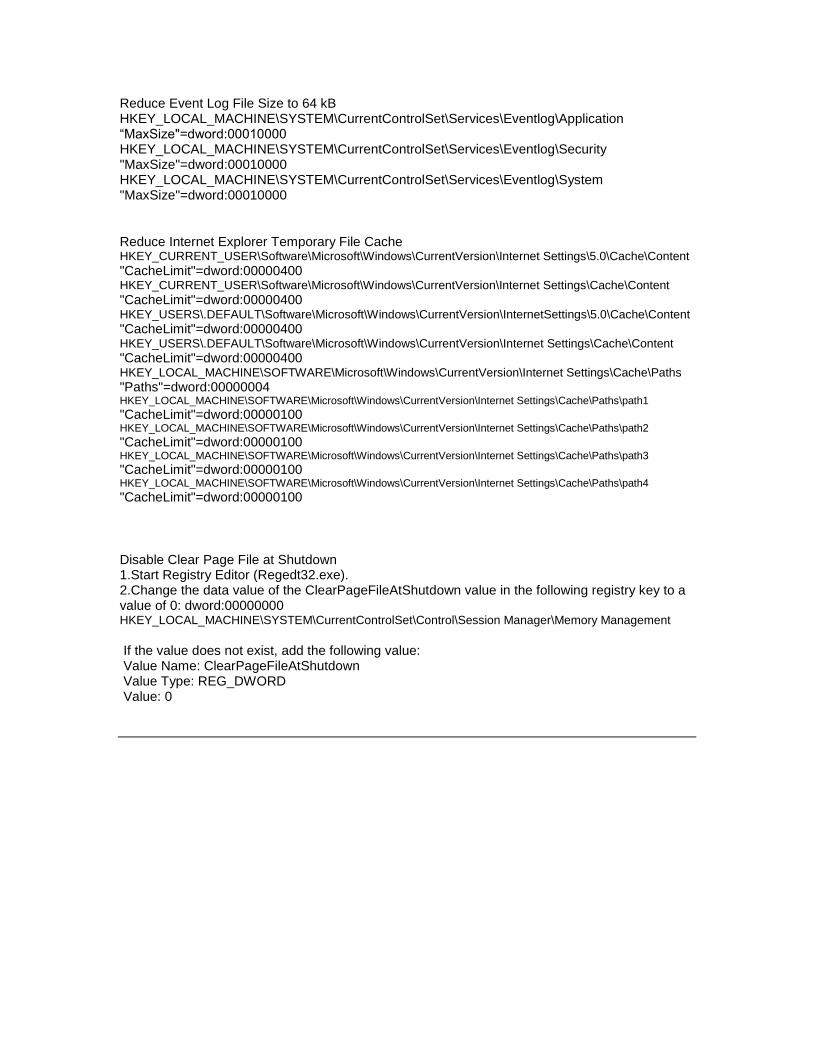
Reduce Event Log File Size to 64 kB HKEY_LOCAL_MACHINE\SYSTEM\CurrentControlSet\Services\Eventlog\Application “MaxSize"=dword:00010000 HKEY_LOCAL_MACHINE\SYSTEM\CurrentControlSet\Services\Eventlog\Security "MaxSize"=dword:00010000 HKEY_LOCAL_MACHINE\SYSTEM\CurrentControlSet\Services\Eventlog\System "MaxSize"=dword:00010000
Reduce Internet Explorer Temporary File Cache HKEY_CURRENT_USER\Software\Microsoft\Windows\CurrentVersion\Internet Settings\5.0\Cache\Content
"CacheLimit"=dword:00000400 HKEY_CURRENT_USER\Software\Microsoft\Windows\CurrentVersion\Internet Settings\Cache\Content
"CacheLimit"=dword:00000400 HKEY_USERS\.DEFAULT\Software\Microsoft\Windows\CurrentVersion\InternetSettings\5.0\Cache\Content
"CacheLimit"=dword:00000400 HKEY_USERS\.DEFAULT\Software\Microsoft\Windows\CurrentVersion\Internet Settings\Cache\Content
"CacheLimit"=dword:00000400 HKEY_LOCAL_MACHINE\SOFTWARE\Microsoft\Windows\CurrentVersion\Internet Settings\Cache\Paths
"Paths"=dword:00000004 HKEY_LOCAL_MACHINE\SOFTWARE\Microsoft\Windows\CurrentVersion\Internet Settings\Cache\Paths\path1
"CacheLimit"=dword:00000100 HKEY_LOCAL_MACHINE\SOFTWARE\Microsoft\Windows\CurrentVersion\Internet Settings\Cache\Paths\path2
"CacheLimit"=dword:00000100 HKEY_LOCAL_MACHINE\SOFTWARE\Microsoft\Windows\CurrentVersion\Internet Settings\Cache\Paths\path3
"CacheLimit"=dword:00000100 HKEY_LOCAL_MACHINE\SOFTWARE\Microsoft\Windows\CurrentVersion\Internet Settings\Cache\Paths\path4
"CacheLimit"=dword:00000100
Disable Clear Page File at Shutdown 1.Start Registry Editor (Regedt32.exe). 2.Change the data value of the ClearPageFileAtShutdown value in the following registry key to a value of 0: dword:00000000 HKEY_LOCAL_MACHINE\SYSTEM\CurrentControlSet\Control\Session Manager\Memory Management
If the value does not exist, add the following value: Value Name: ClearPageFileAtShutdown Value Type: REG_DWORD Value: 0

Configuration Optimizer Registry Modification (in REG format)
Disable Offline Files Yes [HKEY_LOCAL_MACHINE\SOFTWARE\Microsoft\Windows\CurrentVersion\NetCache] "Enabled"=dword:00000000
Disable Background Defragmentation
Yes [HKEY_LOCAL_MACHINE\SOFTWARE\Microsoft\Dfrg\BootOptimizeFunction] "Enable"="N"
Disable Background Layout Service Yes [HKEY_LOCAL_MACHINE\SOFTWARE\Microsoft\Windows\CurrentVersion\OptimalLayout] "EnableAutoLayout"=dword:00000000
Disable Bug Check Memory Dump Yes [HKLM\SYSTEM\CurrentControlSet\Control\CrashControl] "CrashDumpEnabled"=dword:00000000 "LogEvent"=dword:00000000 "SendAlert"=dword:00000000
Disable Hibernation Yes [HKEY_LOCAL_MACHINE\SYSTEM\CurrentControlSet\Control\Session Manager\Power] "Heuristics"=hex:05,00,00,00,00,01,00,00,00,00,00,00,00,00,00,00,3f,42,0f,00
Disable Memory Dumps Yes [HKEY_LOCAL_MACHINE\SYSTEM\CurrentControlSet\Control\CrashControl] "CrashDumpEnabled"=dword:00000000 "LogEvent"=dword:00000000 "SendAlert"=dword:00000000
Disable Mach. Acct. Password Changes
Yes [HKEY_LOCAL_MACHINE\SYSTEM\CurrentControlSet\Services\Netlogon\Parameters] "DisablePasswordChange"=dword:00000001
Redirect Event Logs No HKLM\SYSTEM\CurrentControlSet\Services\Eventlog\Application] "File"="D:\EventLogs\Application.evtx" [HKLM\SYSTEM\CurrentControlSet\Services\Eventlog\Security] "File"="D:\EventLogs\Security.evtx" [HKLM\SYSTEM\CurrentControlSet\Services\Eventlog\System] "File"="D:\EventLogs\System.evtx"
Reduce Event Log Size to 64K Yes HKLM\SYSTEM\CurrentControlSet\Services\Eventlog\Application] "MaxSize"=dword:00010000 [HKLM\SYSTEM\CurrentControlSet\Services\Eventlog\Security] "MaxSize"=dword:00010000 [HKLM\SYSTEM\CurrentControlSet\Services\Eventlog\System] "MaxSize"=dword:00010000
Force Offscreen Composition for Yes [HKEY_CURRENT_USER\Software\Microsoft\Internet
Internet Explorer Explorer\Main] "Force Offscreen Composition"
=dword:00000001
Reduce Menu Show Delay Yes [HKEY_CURRENT_USER\Control Panel\Desktop]
"MenuShowDelay"="150" Disable all Visual Effects except Yes HKEY_CURRENT_USER\Software\Microsoft\
"Use common tasks in folders" and Windows\CurrentVersion\Explorer\VisualEffects]
"Use visual styles on windows and buttons" "VisualFXSetting"=dword:00000003
[HKEY_CURRENT_USER\ControlPanel\ Desktop\WindowMetrics]
"MinAnimate"="0" [HKEY_CURRENT_USER\Software\Microsoft\Windows\CurrentVersion\Explorer\Advanced] "ListviewAlphaSelect"=dword:00000000 "TaskbarAnimations"=dword:00000000 "ListviewWatermark"=dword:00000000 "ListviewShadow"=dword:00000000 [HKEY_CURRENT_USER\Control Panel\Desktop] "DragFullWindows"="0" "FontSmoothing"="0" "UserPreferencesMask"=binary:90,12,01,80 ,10,00,00,00
This change does not take effect until you restart the computer.

Next text can be copied and pasted in a notepad script, with an extention .reg
Windows Registry Editor Version 5.00 [HKEY_CURRENT_USER\Software\Microsoft\Windows\CurrentVersion\Policies\Explorer] "NoLowDiskSpaceChecks"=dword:00000001 "LinkResolveIgnoreLinkInfo"=dword:00000001 "NoResolveSearch"=dword:00000001 "NoResolveTrack"=dword:00000001 "NoInternetOpenWith"=dword:00000001 [HKEY_CLASSES_ROOT\AllFilesystemObjects\shellex\ContextMenuHandlers\Copy To] @="{C2FBB630-2971-11D1-A18C-00C04FD75D13}" [HKEY_CLASSES_ROOT\AllFilesystemObjects\shellex\ContextMenuHandlers\Move To] @="{C2FBB631-2971-11D1-A18C-00C04FD75D13}" [HKEY_CURRENT_USER\Control Panel\Desktop] "AutoEndTasks"="1" "HungAppTimeout"="1000" "MenuShowDelay"="8" "WaitToKillAppTimeout"="2000" "LowLevelHooksTimeout"="1000" [HKEY_LOCAL_MACHINE\SYSTEM\CurrentControlSet\Control] "WaitToKillServiceTimeout"="1000" [-HKEY_LOCAL_MACHINE\SOFTWARE\Microsoft\Windows\CurrentVersion\Explorer\RemoteComputer] [HKEY_CLASSES_ROOT\*\shell\runas] @="Take Ownership" "NoWorkingDirectory"="" [HKEY_CLASSES_ROOT\*\shell\runas\command] @="cmd.exe /c takeown /f \"%1\" && icacls \"%1\" /grant administrators:F" "IsolatedCommand"="cmd.exe /c takeown /f \"%1\" && icacls \"%1\" /grant administrators:F" [HKEY_CLASSES_ROOT\Directory\shell\runas] @="Take Ownership" "NoWorkingDirectory"="" [HKEY_CLASSES_ROOT\Directory\shell\runas\command] @="cmd.exe /c takeown /f \"%1\" /r /d y && icacls \"%1\" /grant administrators:F /t" "IsolatedCommand"="cmd.exe /c takeown /f \"%1\" /r /d y && icacls \"%1\" /grant administrators:F /t" ; Registry hack that makes Aero Peek instant. [HKEY_CURRENT_USER\Software\Microsoft\Windows\CurrentVersion\Explorer\Advanced] "DesktopLivePreviewHoverTime"=dword:00000000 ; Registry hack that restores Aero Peek delay to normal. [HKEY_CURRENT_USER\Software\Microsoft\Windows\CurrentVersion\Explorer\Advanced] "DesktopLivePreviewHoverTime"=dword:000001f4
![[MS-WSP]: Windows Search ProtocolMS-WSP].… · 1 / 243 [MS-WSP] - v20200304 Windows Search Protocol Copyright © 2020 Microsoft Corporation Release: March 4, 2020 [MS-WSP]: Windows](https://static.fdocuments.net/doc/165x107/5f1017a27e708231d447683e/ms-wsp-windows-search-protocol-ms-wsp-1-243-ms-wsp-v20200304-windows.jpg)


