What’s Fundus photography’s purpose? - c.ymcdn.comc.ymcdn.com/sites/ · PDF...
11
11/3/2014 1 What’s Fundus photography’s purpose? To document the retina Photographers role to show the retina Document other ocular structures Why do we take them? We as photographers help the MD with documenting diseases and aiding in treatment Why do we do it? Providing a baseline image and documenting the disease process throughout follow-up Why do we do it? We can provide pre and post treatment images for the physicians Images provided by Laura Savage Why do we do it? Can provide education Legal Documentation Images for publication
Transcript of What’s Fundus photography’s purpose? - c.ymcdn.comc.ymcdn.com/sites/ · PDF...

11/3/2014
1
What’s Fundus
photography’s purpose?
To document the retina
Photographers role to show the retina
Document other ocular structures
Why do we take them?
We as photographers help the MD with documenting
diseases and aiding in treatment
Why do we do it?
Providing a baseline image and documenting the
disease process throughout follow-up
Why do we do it?
We can provide pre and post treatment images for the
physicians
Images provided by Laura Savage
Why do we do it?
Can provide
education
Legal
Documentation
Images for
publication

11/3/2014
2
The parts of a fundus
camera
Image courtesy of ophthalmic photography:Saine,Patrick, Tyler,Marshall
Subject plane
Receiving plane
Filters
Flash and viewing lamp
Mirror
The anatomy of the Eye
* Ophthalmic Photography. Saine, Patrick, Tyler, Marshall. Image used with permission
Some retinal landmarks
* Ophthalmic Photography. Saine, Patrick, Tyler, Marshall. Image used with permission
Documenting Seven
Standard Fields
*Textbook of Ophthalmic Photography. Wong, Don.
What are the retinal layers?
* Ophthalmic Photography. Saine, Patrick, Tyler, Marshall. Image used with permission
Following photography
procedures
Determine what the doctor ordered
Look through the patient’s chart
Look for past photo history
Obtain the patient’s information

11/3/2014
3
Determine the plan
See what images you need to take
Is one magnification better than the other
20,30,50 degree?
Determine the plan
What are the images you should take?
Do you know what area of the retina?
Do you need more than one image to tell the story
Make your plans based on the disease
Focusing your eyepiece
Turn eyepiece all the way to the left
Relax accommodation(stare at infinity)
Now turn eyepiece slowly to right until
reticle is SHARP!
Make note of the mark
Redo this 3 times
Documenting the procedure
Prepare your camera
Set the eyepiece
Check the filters
Set your magnification
Eyepiece
Magnification
Filters
Prepare your patient
Make sure your patient is adequately dilated
Wait at least 30 minutes for dilation
Use a second set if needed

11/3/2014
4
Prepare your patient
Put patient in a
comfortable
position
Prepare your patient
Explain what you are doing to the patient
Recheck the orders from the physician
Adjust your plan
Lining up your camera
Put your patient into the
chinrest
Center the donut of light on
the patient’s lid
Have your patient open the eye
Using fixation
Present the internal OR external target to the patient
Which is going to work better?
Depends on patient
Do they have a prosthetic eye?
Internal fixation
External
Fixation
Aligning camera position
Moving in vs moving out Left vs Right
*Textbook of Ophthalmic Photography. Wong, Don.
Align Camera Position
Moving up and down
Lining up images vertically
Image courtesy of Laura Savage
We can review in workshop
what to look for too!

11/3/2014
5
Aligning the camera
Here is even illumination
When focusing on the
retina
Use the illumination until you can just see retinal
landmarks
Inform patient light will get brighter
After focus is complete turn light back down for comfort
A happy patient is a compliant patient!
Focus the retina
Focus on the appropriate layer of the retina
* Ophthalmic Photography. Saine, Patrick, Tyler, Marshall. Image used with permission
Make some adjustments
Is diopter compensation necessary?
High refractive error
Aphakic patients
Focusing on vitreous or anterior chamber
Make adjustments
Is the media clear?
Corneal issues( cataract, scar)
Vitreous Issues( asteroid, vitreous hemorrhage)
Make adjustments
Does patient have an astigmatism?
Image courtesy of Laura
Savage

11/3/2014
6
Make adjustments
Small pupil setting needed?
Make adjustments
Is the fundus very
dark or very light?
Use flash to
increase or
decrease
exposure
Take a picture now!!
Everything is ready
Recheck alignment
Tell the patient “blink,
then open real wide!”
Press the trigger!
Repeat
In digital photography setting
Evaluate image on screen
Adjust the settings
Shoot until you have completed the order
Follow up on the other eye
Repeat
On film
Shoot extra frames!!!
Try to bracket the exposures
Evaluate quality when slides are returned
Presenting the images

11/3/2014
7
Stereo Photography
Shooting two images from slightly different points of
view to fuse them together creating a 3D image
Stereo Technique
Ensure maximum dilation
Move laterally on the same plane
Stereo Technique
Line up as you normally would
Focus on the central retina
Move joy stick to the side until the crescent appears
Move through the crescent until it disappears and the
images is dimmer but still evenly illuminated
The crescent
* Ophthalmic Photography. Saine, Patrick, Tyler, Marshall. Image used with permission
Take Note
Patient must maintain fixation for both images
Digital is Left to Right
Film is Right to Left
Photographing the
Peripheral Retina
Images can be obtained by a combination of
movements of the camera and having patient fixate off
center Tilt camera up
Move fixation target
Which way do
they look? Superior - looks up
Inferior - looks down
OD Nasal - looks Left
OS Nasal - looks Right
OD temporal - looks Right
OS Temporal - looks Left
* Ophthalmic Photography. Saine, Patrick, Tyler, Marshall. Image used with permission

11/3/2014
8
Adjust height of camera and
vertical and horizontal
movement
Superior - Lower the camera
and point up
Inferior - Raise camera and
point down
Right and Left - swing camera
from side to side
* Ophthalmic Photography. Saine, Patrick, Tyler, Marshall. Image used with permission
Using filters
Black and white imaging(red frees)
Green, blue and red filters can be
used
Filters lighten own color and darken
the complementary color
Filter wheel
How filters work
Varying wavelengths of light
penetrate the retina at different
depths
* Ophthalmic Photography. Saine, Patrick, Tyler, Marshall. Image used with permission
Monochromatic Green
“Red Free”
Highlights vasculature
and blood
Focus on central
retina
Blue filter
The fluorescein exciter
filter
Shows the nerve fiber
layer
Focus on uppermost
layer of the retina
Image provided by Laura Savage
Monochromatic Red
Highlights details in choroid
Images provided by Laura Savage
11/3/2014
9
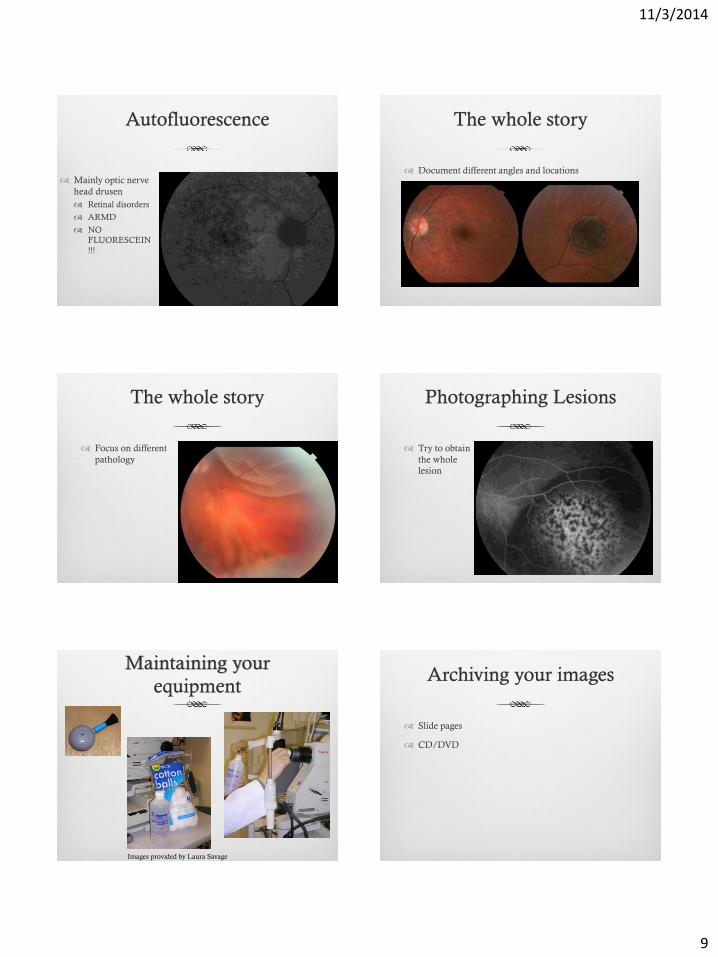
Autofluorescence
Mainly optic nerve
head drusen
Retinal disorders
ARMD
NO
FLUORESCEIN
!!!
The whole story
Document different angles and locations
Images provided by Laura Savage
The whole story
Focus on different
pathology
Photographing Lesions
Try to obtain
the whole
lesion
Maintaining your
equipment
Images provided by Laura Savage
Archiving your images
Slide pages
CD/DVD

11/3/2014
10
Special Tips
Lids and Lashes
Use a qtip to move the lids up or down out of the way
Use your finger and pull the lid up
Tape the lids(takes longer, keep cornea lubricated often)
Ask a coworker for help
Pull the lower lid down!
Special Tips
Small Pupils
Use small pupil setting
Make the camera off center
Use different angle of view (30 degree helps)
Brighten the illumination to see it better
Special Tips
The difficult patient
A patient technician!
Being empathetic
Explaining
Laughter works!
Special Tips
The Hearing Impaired
Talk to patient in lit conditions first
Use touch codes in dark
Do they have an interpreter?
Special Tips
Children
Make them at ease,
Explain
Let them take a picture!
Stand on stool, in parents lap
Try to get the ONE shot you need!
Image courtesy of clipart
Last but not least…
Get perfection if it is obtainable!
If it’s not perfect document it
(blinking, small pupils, compliance, light sensitive)
Take an anterior segment photo if view into retina is
compromised

11/3/2014
11
Questions???
Thank you!
Special thanks to Laura Savage, COMT,CRA
Special thanks to Sarah Moyer, CRA, OCT-C