What to do after accidentally marked c drive active
12
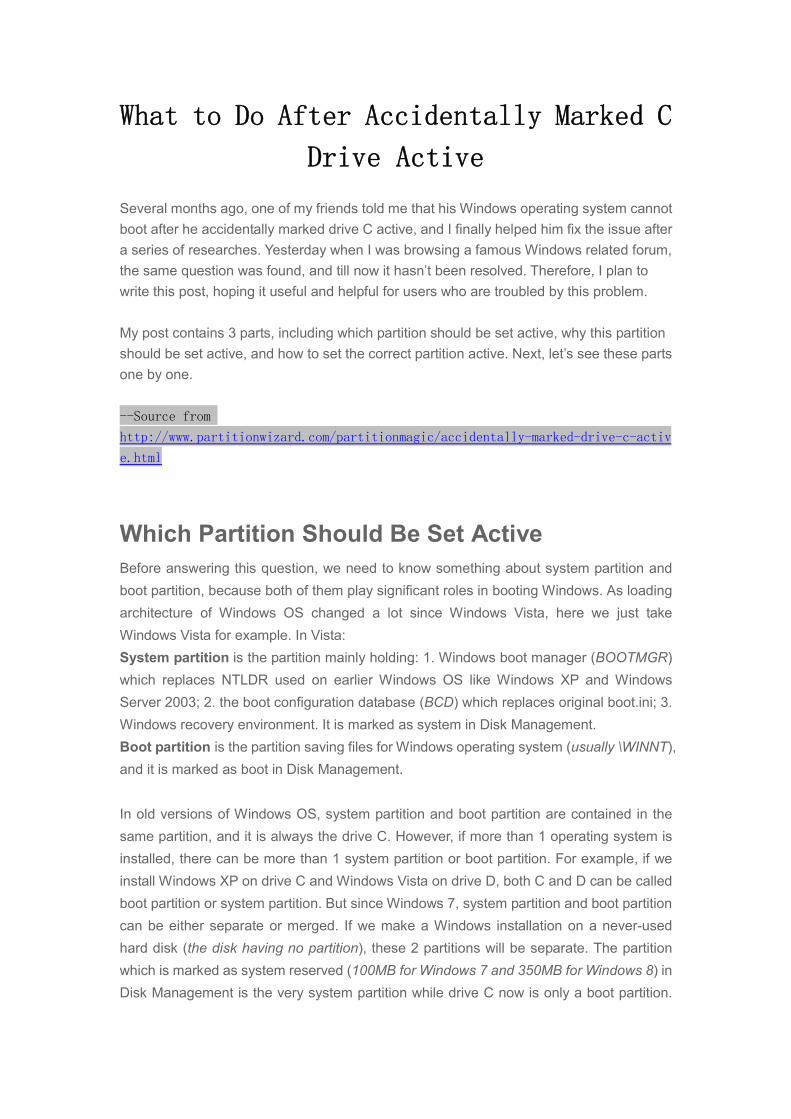
What to Do After Accidentally Marked C Drive Active Several months ago, one of my friends told me that his Windows operating system cannot boot after he accidentally marked drive C active, and I finally helped him fix the issue after a series of researches. Yesterday when I was browsing a famous Windows related forum, the same question was found, and till now it hasn’t been resolved. Therefore, I plan to write this post, hoping it useful and helpful for users who are troubled by this problem. My post contains 3 parts, including which partition should be set active, why this partition should be set active, and how to set the correct partition active. Next, let’s see these parts one by one. --Source from http://www.partitionwizard.com/partitionmagic/accidentally-marked-drive-c-activ e.html Which Partition Should Be Set Active Before answering this question, we need to know something about system partition and boot partition, because both of them play significant roles in booting Windows. As loading architecture of Windows OS changed a lot since Windows Vista, here we just take Windows Vista for example. In Vista: System partition is the partition mainly holding: 1. Windows boot manager (BOOTMGR) which replaces NTLDR used on earlier Windows OS like Windows XP and Windows Server 2003; 2. the boot configuration database (BCD) which replaces original boot.ini; 3. Windows recovery environment. It is marked as system in Disk Management. Boot partition is the partition saving files for Windows operating system (usually \WINNT), and it is marked as boot in Disk Management. In old versions of Windows OS, system partition and boot partition are contained in the same partition, and it is always the drive C. However, if more than 1 operating system is installed, there can be more than 1 system partition or boot partition. For example, if we install Windows XP on drive C and Windows Vista on drive D, both C and D can be called boot partition or system partition. But since Windows 7, system partition and boot partition can be either separate or merged. If we make a Windows installation on a never-used hard disk (the disk having no partition), these 2 partitions will be separate. The partition which is marked as system reserved (100MB for Windows 7 and 350MB for Windows 8) in Disk Management is the very system partition while drive C now is only a boot partition.
Transcript of What to do after accidentally marked c drive active
What to Do After Accidentally Marked C
Drive Active
Several months ago, one of my friends told me that his Windows operating system cannot
boot after he accidentally marked drive C active, and I finally helped him fix the issue after
a series of researches. Yesterday when I was browsing a famous Windows related forum,
the same question was found, and till now it hasn’t been resolved. Therefore, I plan to
write this post, hoping it useful and helpful for users who are troubled by this problem.
My post contains 3 parts, including which partition should be set active, why this partition
should be set active, and how to set the correct partition active. Next, let’s see these parts
one by one.
--Source from
http://www.partitionwizard.com/partitionmagic/accidentally-marked-drive-c-activ
e.html
Which Partition Should Be Set Active
Before answering this question, we need to know something about system partition and
boot partition, because both of them play significant roles in booting Windows. As loading
architecture of Windows OS changed a lot since Windows Vista, here we just take
Windows Vista for example. In Vista:
System partition is the partition mainly holding: 1. Windows boot manager (BOOTMGR)
which replaces NTLDR used on earlier Windows OS like Windows XP and Windows
Server 2003; 2. the boot configuration database (BCD) which replaces original boot.ini; 3.
Windows recovery environment. It is marked as system in Disk Management.
Boot partition is the partition saving files for Windows operating system (usually \WINNT),
and it is marked as boot in Disk Management.
In old versions of Windows OS, system partition and boot partition are contained in the
same partition, and it is always the drive C. However, if more than 1 operating system is
installed, there can be more than 1 system partition or boot partition. For example, if we
install Windows XP on drive C and Windows Vista on drive D, both C and D can be called
boot partition or system partition. But since Windows 7, system partition and boot partition
can be either separate or merged. If we make a Windows installation on a never-used
hard disk (the disk having no partition), these 2 partitions will be separate. The partition
which is marked as system reserved (100MB for Windows 7 and 350MB for Windows 8) in
Disk Management is the very system partition while drive C now is only a boot partition.
Once a system reserved partition is created, there can only be one system partition on this
disk no matter how many operating systems are installed, because boot programs of all
installed Windows operating systems will be saved to this partition automatically. However,
there may be multiple boot partitions. Let’s see a specific example. Firstly, we install
Windows 7 to create a hidden system reserved partition as well as a boot partition (drive
C), and then install Windows 8 to drive D. At this time, system reserved partition is the
unique system partition while drive C and drive D are boot partitions. However, if we install
Windows to a hard disk where partitions have been created, system partition and boot
partition will be contained in one partition like the old versions of Windows OS.
Summary: partitions saving Windows boot programs like BOOTMGR and BCD or NTLDR
and boot.ini is called system partition, not limited to drive C. That is to say sometimes it is
the system reserved partition, and sometimes it is the drive C. And generally, system
partition should be set active to make Windows boot successfully. If there are multiple
system partitions on one disk, which means there are equal Windows operating systems,
we need to set the needed one active. Well then, why should we set system partition
rather than any other partition like boot partition active? Let’s see the specific reasons.
Why System Partition Should Be Set Active
If system partition is not set active, Windows will be unbootable. Why? To get the answer,
let’s see how Windows is loaded on a MBR disk.
Once we switch on the power button of the computer, booting process begins. After a
series of Power-On-Self-Test (known as POST), BIOS will find and pass boot control to
Master Boot Record (MBR). Then, MBR reads master partition table to find the primary
partition which is marked as active, and next reads partition boot record of the active
partition to locate Windows boot manager (BOOTMGR) and then passes boot control to
BOOTMGR. BOOTMGR reads the file \boot\bcd (boot configuration database) which
contains the menu entries that are presented by the BOOTMGR, and these entries can be:
Options to boot Windows by invoking winload.exe, Options to resume Windows from
hibernation by invoking winresume.exe, etc. If there are multiple Windows OS, we are
able to choose which Windows to boot. After a Windows OS is selected, BOOTMGR will
invoke winload.exe to load the corresponding Windows kernel as well as the core device
drivers so as to boot Windows.
From the boot process above we know only setting the system partition active can MBR
visit the very partition to find Windows boot programs BOOTMGR and Boot Configuration
Database. If these boot programs cannot be located, Windows cannot be loaded, and
errors like BOOTMGR is missing or NTLDR is missing may emerge.
Therefore, when drive C is not the system partition but we accidentally marked it active,
Windows consequently will be unbootable. Under this situation, to set the real system
partition active can fix the issue, but how can we complete this change when Windows
refuses to boot? Let’s see solutions.
Here Are 3 Solutions after Accidentally Marking
Drive C Active
1.Mark Correct Partition Active with Windows PE
Firstly, we need to create a Windows PE bootable CD, DVD, or USB flash drive. Please
see WinPE: Create a Boot CD, DVD, ISO, or VHD and WinPE: Create USB Bootable
drive of Microsoft to get detailed steps. If you have such a bootable disc, just ignore this
step.
Then, boot computer via WinPE bootable disc and press a key to enter BIOS setup during
boot process. Different computer requires different key, but there is always a prompt like
this:

Tip: there are only few seconds to make this operation. If you missed this chance unluckily,
just reboot computer again. After entering BIOS successfully, we need to set boot order,
namely setting the CD-ROM (bootable CD or DVD disc) or Removable Device (bootable
USB flash drive) as the first boot device by making use of keys like “↑”, “↓”, and “Enter”.
After the setting is done, we need to press on “F10” to save changes and exit from BIOS
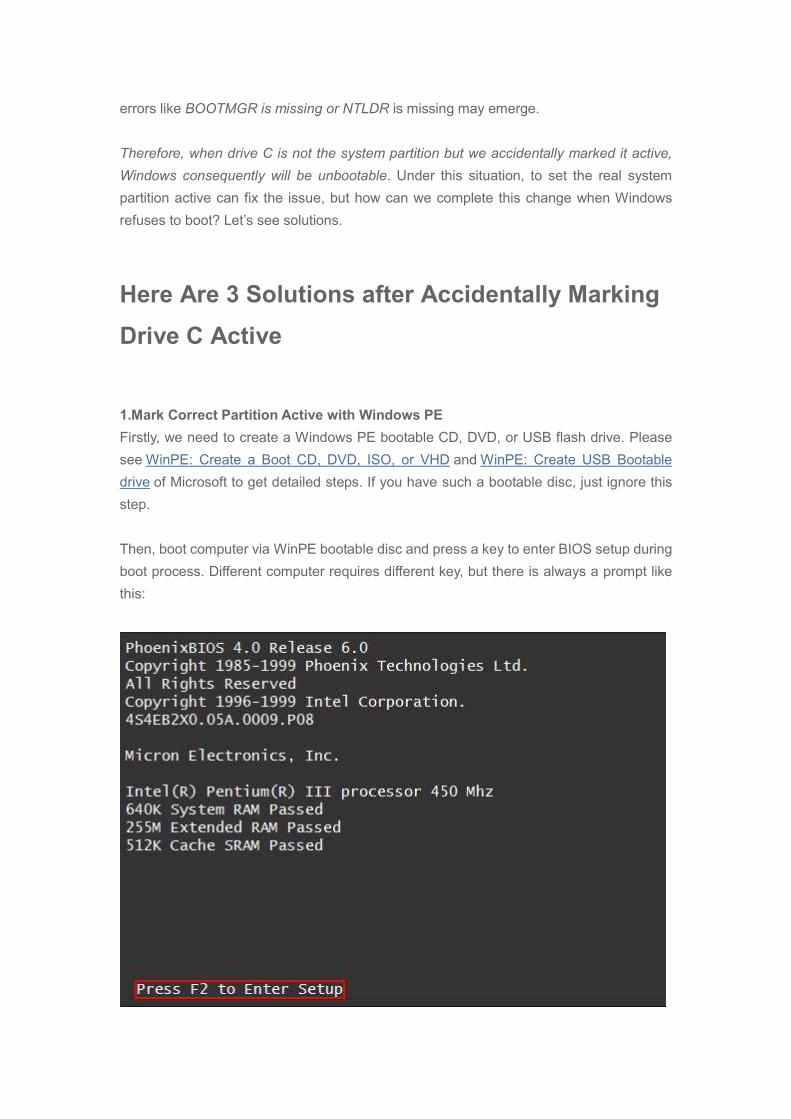
setup utility, and then our computer will boot from the Windows PE bootable disc. After
Windows PE starts successfully, we can see the desktop:
Now we need to run Diskpart, which is a Windows built-in powerful partitioning tool. Type
diskpart in searching box, right click the program and run it as administrator. Tip: if we do
not run it as a administrator, partitioning operations may be not allowed. After successful
running, we can see the following window:

Here we need to set drive C inactive at first, and then mark the system partition active.
Detailed steps are as follows:
Type list disk and press on Enter.
Type select disk n (n is the number of the disk you will operate) and press on
Enter.
Type list partition and press on Enter.
Type select partition n (now n is the number of drive C) and press on Enter.
Type inactive and press on Enter.
Type select partition n (n is the number of the correct system partition) and press
on Enter.
Type active and press on Enter.
Type exit and press on Enter to safely quit from diskpart.
After these operations, we are able to boot our Windows OS, but we had better set the
original hard disk as the first boot device in BIOS in advance.
However, if you think it difficult to create a Windows PE bootable disc and there is a
Windows installation CD or DVD, take the second solution, which is easier than the first
solution since there is no need to create Windows PE bootable disc.
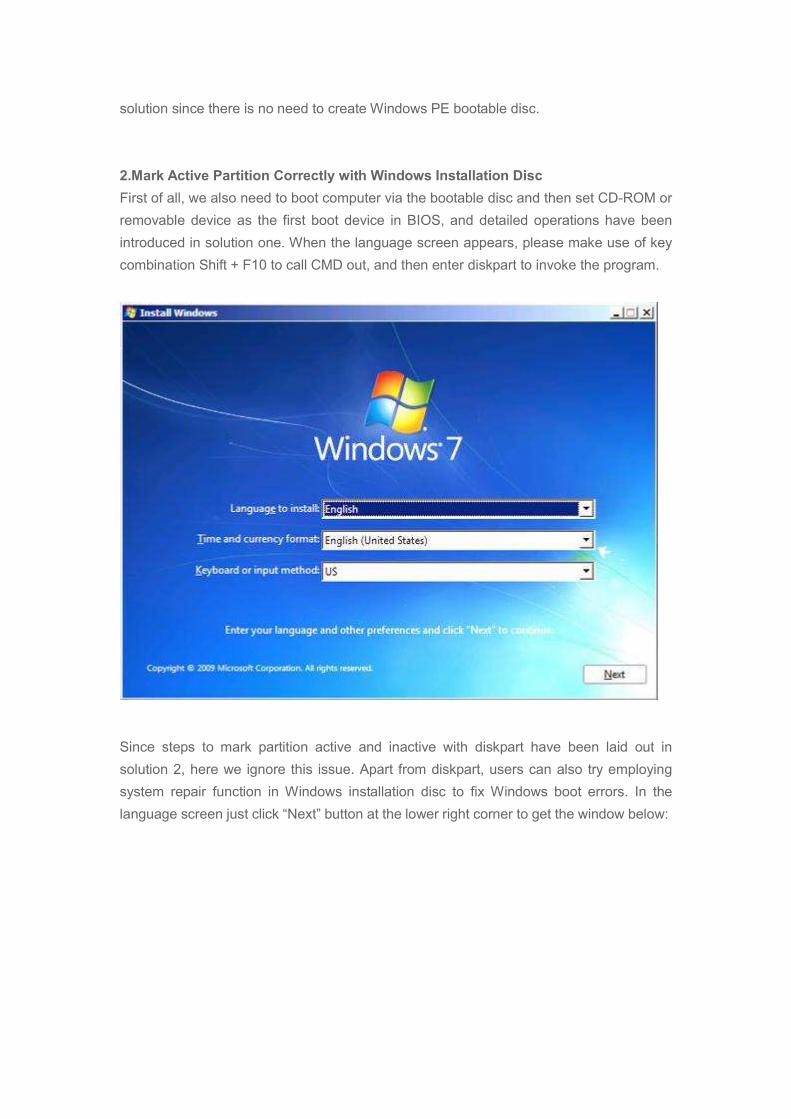
2.Mark Active Partition Correctly with Windows Installation Disc
First of all, we also need to boot computer via the bootable disc and then set CD-ROM or
removable device as the first boot device in BIOS, and detailed operations have been
introduced in solution one. When the language screen appears, please make use of key
combination Shift + F10 to call CMD out, and then enter diskpart to invoke the program.
Since steps to mark partition active and inactive with diskpart have been laid out in
solution 2, here we ignore this issue. Apart from diskpart, users can also try employing
system repair function in Windows installation disc to fix Windows boot errors. In the
language screen just click “Next” button at the lower right corner to get the window below:
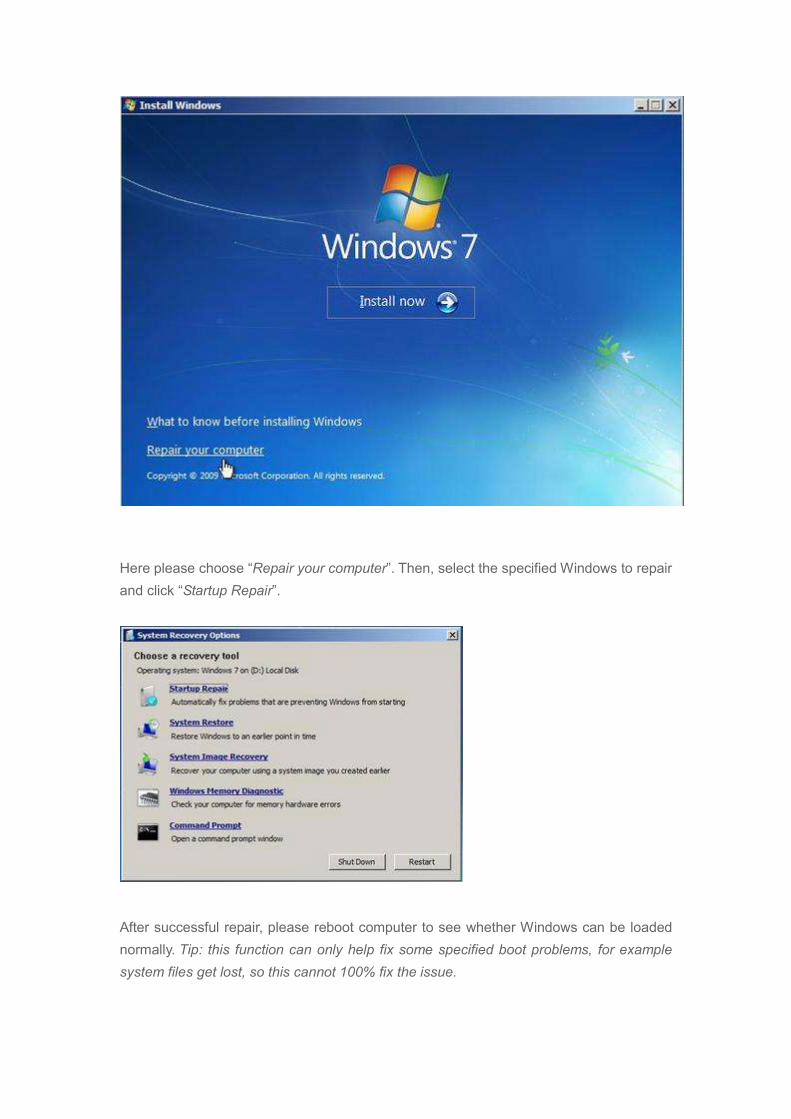
Here please choose “Repair your computer”. Then, select the specified Windows to repair
and click “Startup Repair”.
After successful repair, please reboot computer to see whether Windows can be loaded
normally. Tip: this function can only help fix some specified boot problems, for example
system files get lost, so this cannot 100% fix the issue.

Nevertheless, if you are unwilling to use Windows PE and there is no Windows installation
CD or DVD, try the third solution: ask third party bootable partitioning tool for help. Here,
we take MiniTool Partition Wizard Bootable CD for example since it is a piece of freeware
with powerful functions. And only several simple operations are needed.
Important: this program is free for Windows XP, Windows Vista, Windows 7, and Windows
8 users only. If you are running a Windows server, please purchase the bootable disc
builder which is for server. Please see Buy MiniTool Partition Wizard Online to get details.
3.Mark System Partition Active with MiniTool Partition Wizard Bootable CD
MiniTool Partition Wizard Bootable CD is just an iso file, so we need to burn it to CD or
DVD after downloading, and the burning should be done in another computer. Both
Windows built-in burner and third party burner like nero can do it. After successful burning,
please boot computer via the bootable disc to get the following window:
However, if the screenshot above does not emerge, the most probable reason may be
that CD-ROM is not the first boot device, and you need to make corresponding settings in
BIOS. In the welcome interface of Partition Wizard, we need to choose one of boot modes
from 4. If we do not make a choice, the first mode namely “Boot from MiniTool Partition

Wizard” will be chosen by default. However, if the mouse or keyword cannot be used after
boot, please restart computer and choose "Boot from MiniTool Partition Wizard (Safe
Mode)". If Partition Wizard does not function, choose “Compatible Mode” to fix the issue.
Then, select a display resolution and press on Enter to get the main interface of the
program shown below:

Now we can see the 24.12GB boot partition is set active while the 350MB system
reserved partition is inactive. Firstly, we need mark the boot partition inactive: select the
boot partition and choose “Set Inactive” feature from the left action panel.
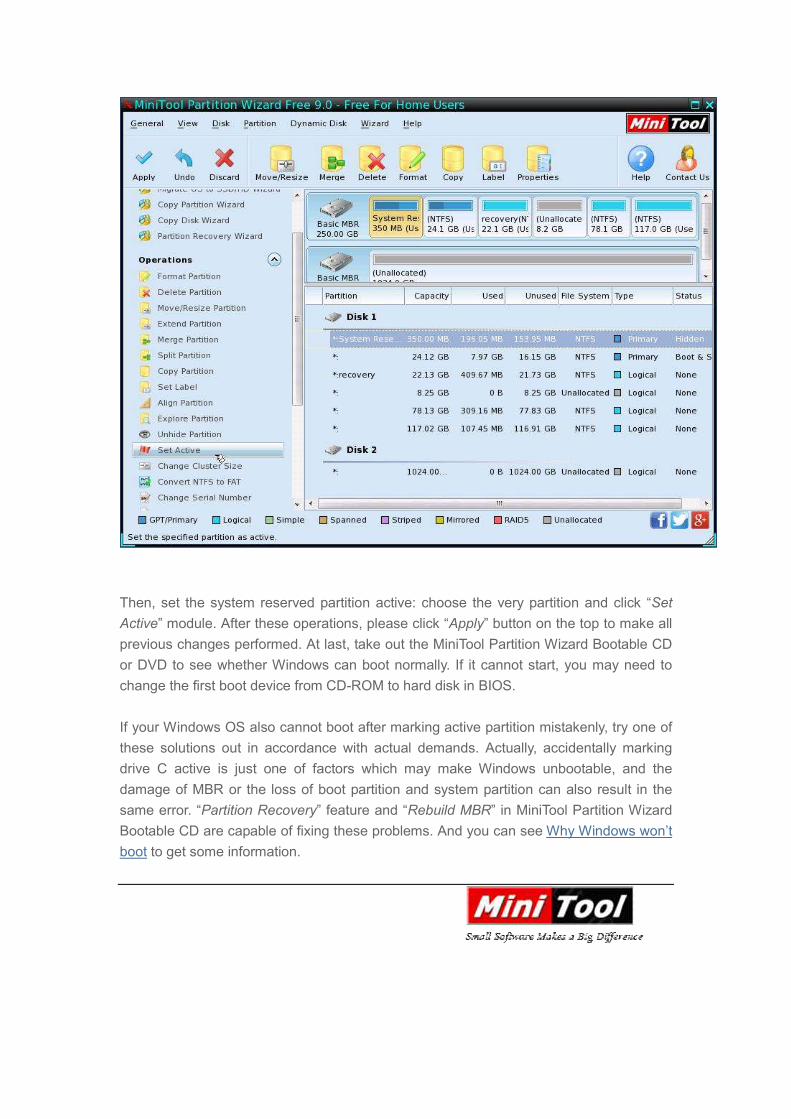
Then, set the system reserved partition active: choose the very partition and click “Set
Active” module. After these operations, please click “Apply” button on the top to make all
previous changes performed. At last, take out the MiniTool Partition Wizard Bootable CD
or DVD to see whether Windows can boot normally. If it cannot start, you may need to
change the first boot device from CD-ROM to hard disk in BIOS.
If your Windows OS also cannot boot after marking active partition mistakenly, try one of
these solutions out in accordance with actual demands. Actually, accidentally marking
drive C active is just one of factors which may make Windows unbootable, and the
damage of MBR or the loss of boot partition and system partition can also result in the
same error. “Partition Recovery” feature and “Rebuild MBR” in MiniTool Partition Wizard
Bootable CD are capable of fixing these problems. And you can see Why Windows won’t
boot to get some information.


![Abstract arXiv:1810.10551v1 [cs.CV] 24 Oct 2018in the attention evaluation. Intersecting cells will be marked as active crops for the final evaluation. The number of active crops](https://static.fdocuments.net/doc/165x107/5fbe6813f987df29fb2cf562/abstract-arxiv181010551v1-cscv-24-oct-2018-in-the-attention-evaluation-intersecting.jpg)