What is Multi-Factor Authentication?€¦ · Multi-Factor Authentication (MFA) or sometimes called...
16
What is Multi-Factor Authentication? Multi-Factor Authentication (MFA) or sometimes called two-step verification, is an advanced security layer included with Office 365 that makes it more difficult for hackers to get access and gain control of your account. MFA verifies your identity through a two-step process before granting you access to online applications. You may already be using MFA to protect online services such as Gmail or Facebook. The two verification methods that are usually required to prove your identity are: • Things you know (knowledge), such as a password or PIN • Things you have (possession), such as a badge or smartphone • Things you are (inheritance), indicated through biometrics, like fingerprints or voice recognition When logging in with MFA, you must supply your username/password AND prove that you are in possession of a trusted device (i.e. phone.) Why MFA? Data breaches are becoming more prevalent in today’s always-connected world. It is getting harder to recognize the difference from a legitimate login screen and one that is setup as a phishing scheme to steal your username and password. Using MFA provides an additional layer of protection for your user account. Should someone guess your password or trick you into providing it by posing as a legitimate source, an attacker will still have an additional barrier preventing them access to company data. Only the user of a registered trusted device can lift this barrier, making MFA the preferred security method. How Does It Work? With MFA, you will need to provide an additional verification method to prove you have access to a trusted device. When logging into company online resources, you will be required to enter your username and password like normal. Then, you may also need to prove that you have access to a trusted device/phone that you previously registered. Only after completing the additional verification step using your trusted device will you be granted access.
Transcript of What is Multi-Factor Authentication?€¦ · Multi-Factor Authentication (MFA) or sometimes called...
What is Multi-Factor Authentication? Multi-Factor Authentication (MFA) or sometimes called two-step verification, is an
advanced security layer included with Office 365 that makes it more difficult for hackers to get
access and gain control of your account. MFA verifies your identity through a two-step process
before granting you access to online applications. You may already be using MFA to protect
online services such as Gmail or Facebook. The two verification methods that are usually
required to prove your identity are:
• Things you know (knowledge), such as a password or PIN
• Things you have (possession), such as a badge or smartphone
• Things you are (inheritance), indicated through biometrics, like fingerprints or voice
recognition
When logging in with MFA, you must supply your username/password AND prove that you
are in possession of a trusted device (i.e. phone.)
Why MFA? Data breaches are becoming more prevalent in today’s always-connected world. It is getting
harder to recognize the difference from a legitimate login screen and one that is setup as
a phishing scheme to steal your username and password. Using MFA provides an additional
layer of protection for your user account. Should someone guess your password or trick you
into providing it by posing as a legitimate source, an attacker will still have an additional barrier
preventing them access to company data. Only the user of a registered trusted device can lift this
barrier, making MFA the preferred security method.
How Does It Work? With MFA, you will need to provide an additional verification method to prove you have access
to a trusted device. When logging into company online resources, you will be required to enter
your username and password like normal. Then, you may also need to prove that you have access
to a trusted device/phone that you previously registered. Only after completing the additional
verification step using your trusted device will you be granted access.
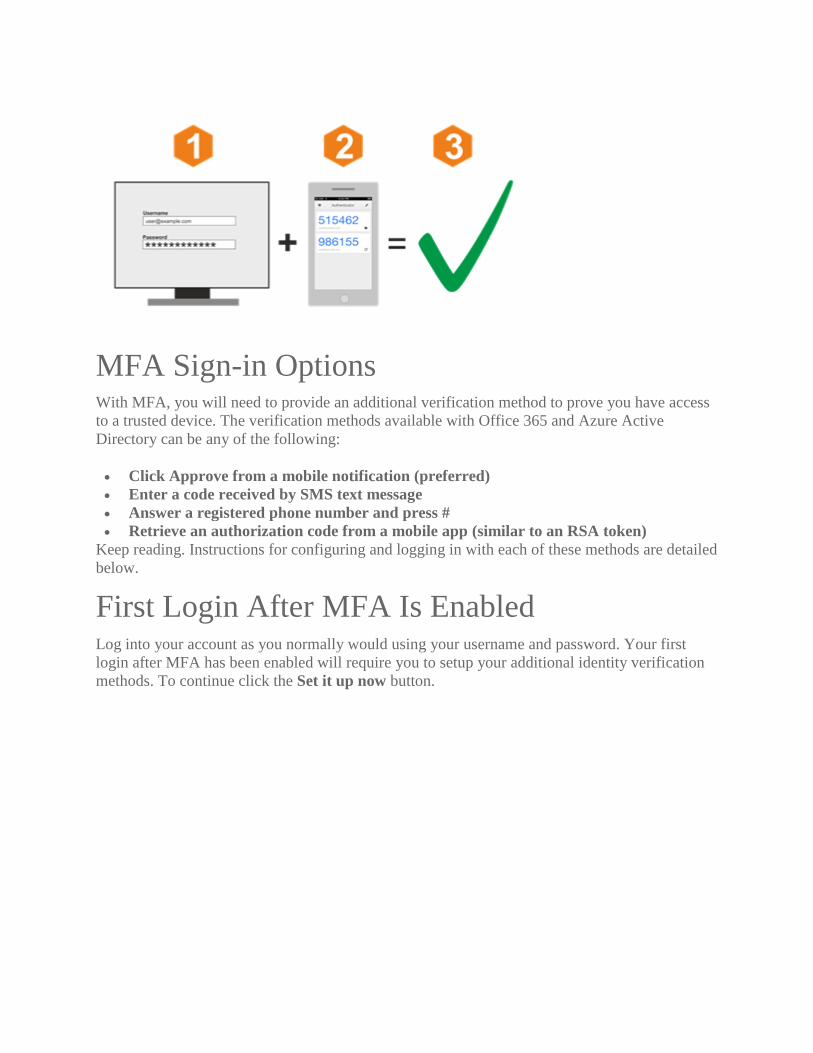
MFA Sign-in Options With MFA, you will need to provide an additional verification method to prove you have access
to a trusted device. The verification methods available with Office 365 and Azure Active
Directory can be any of the following:
• Click Approve from a mobile notification (preferred)
• Enter a code received by SMS text message
• Answer a registered phone number and press #
• Retrieve an authorization code from a mobile app (similar to an RSA token)
Keep reading. Instructions for configuring and logging in with each of these methods are detailed
below.
First Login After MFA Is Enabled Log into your account as you normally would using your username and password. Your first
login after MFA has been enabled will require you to setup your additional identity verification
methods. To continue click the Set it up now button.
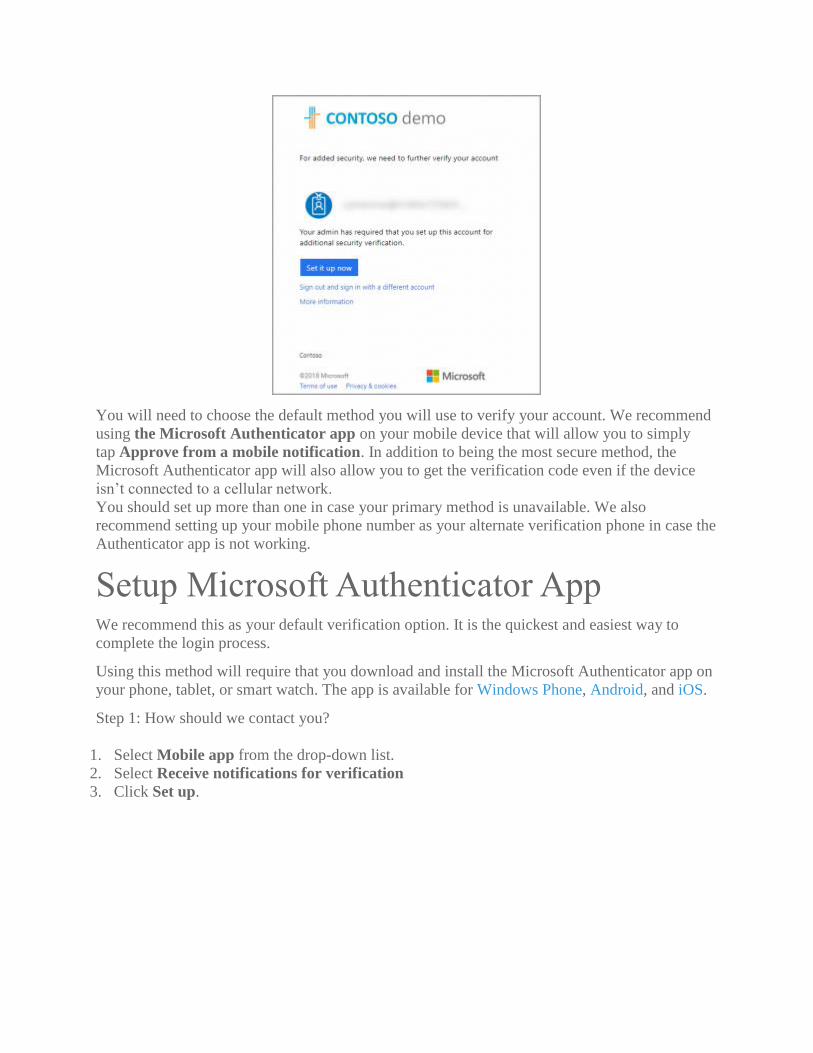
You will need to choose the default method you will use to verify your account. We recommend
using the Microsoft Authenticator app on your mobile device that will allow you to simply
tap Approve from a mobile notification. In addition to being the most secure method, the
Microsoft Authenticator app will also allow you to get the verification code even if the device
isn’t connected to a cellular network.
You should set up more than one in case your primary method is unavailable. We also
recommend setting up your mobile phone number as your alternate verification phone in case the
Authenticator app is not working.
Setup Microsoft Authenticator App We recommend this as your default verification option. It is the quickest and easiest way to
complete the login process.
Using this method will require that you download and install the Microsoft Authenticator app on
your phone, tablet, or smart watch. The app is available for Windows Phone, Android, and iOS.
Step 1: How should we contact you?
1. Select Mobile app from the drop-down list.
2. Select Receive notifications for verification
3. Click Set up.

4. On your phone or tablet, open the Authenticator app and add an account.
5. Specify that you want to add a work or school account. You may need to allow the
Authenticator app permission to take pictures and record video. The QR code scanner within
the app will then open. If your camera is not working properly, you can select to enter your
company information manually.
•

•
6. With your mobile device, scan the QR code displayed on your computer’s screen to register
the mobile app.
7. Tab Finish in the mobile app. You should now see an item with a 6-digit code displayed.
8. Click Next to close the set-up screen.
9. Ensure that the text next to the Set-up button now displays Mobile app has been configured
for notifications and verification codes.
10. Select Next.
Step 2: Let’s make sure that we can reach you on your Mobile App device
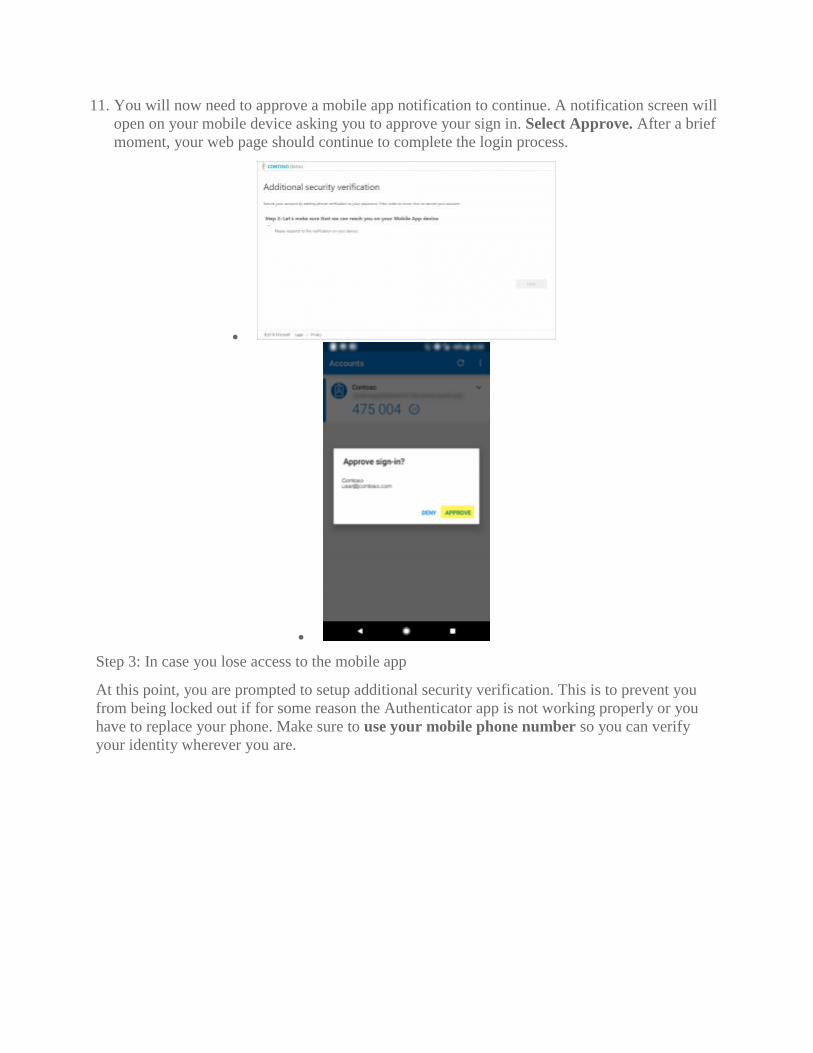
11. You will now need to approve a mobile app notification to continue. A notification screen will
open on your mobile device asking you to approve your sign in. Select Approve. After a brief
moment, your web page should continue to complete the login process.
•
•
Step 3: In case you lose access to the mobile app
At this point, you are prompted to setup additional security verification. This is to prevent you
from being locked out if for some reason the Authenticator app is not working properly or you
have to replace your phone. Make sure to use your mobile phone number so you can verify
your identity wherever you are.
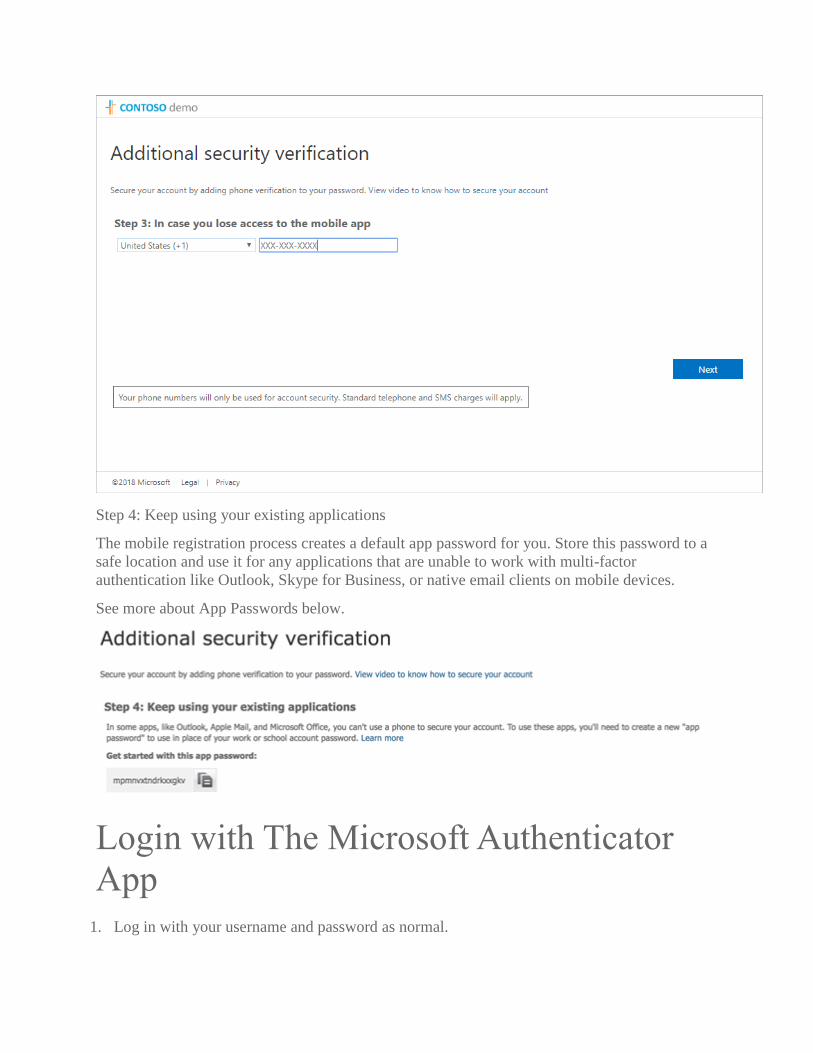
Step 4: Keep using your existing applications
The mobile registration process creates a default app password for you. Store this password to a
safe location and use it for any applications that are unable to work with multi-factor
authentication like Outlook, Skype for Business, or native email clients on mobile devices.
See more about App Passwords below.
Login with The Microsoft Authenticator
App
1. Log in with your username and password as normal.

2. The next screen will notify you that a notification has been sent to your mobile device to
approve your sign-in.
3. On your mobile device, a notification will appear in the notification panel from the Microsoft
Authenticator app asking you to approve the sign-in. Select Approve.
4. You have now successfully signed into your account.
If your mobile device with the Authenticator app is not available, you can select Sign in another
way to choose an alternate verification method.
Login with Verification Code from Mobile
App The Microsoft Authenticator will display a 6-digit verification code that changes every 30
seconds. This is useful when your mobile device does not have a data connection or is unable to
receive text messages.

1. Open the Authenticator app on your mobile device.
2. Enter the current code displayed in the app and click Verify. Make sure to leave yourself
plenty of time to enter the code and click verify before the code changes. Otherwise, you may
wait until the next code rotation.
3. If successful the login will complete.
•
•
Login with Phone Authentication Phone authentication can either send an SMS text message or call your phone to complete the
sign in verification. The next screen will notify you that a text or a phone call has been sent to
your phone to approve your sign in.
SMS Code Verification. To verify by phone call, see below.

1. Log in with your username and password as normal.
2. The next screen will notify you that a text has been sent to your phone to approve your sign
in.
3. Once you receive the SMS text message on your mobile device, enter the code and
click Verify.
4. If successful the login will complete.
•
•
Phone Call Verification. To verify by SMS code, see above.
1. Log in with your username and password as normal.
2. The next screen will notify you that a call is being placed to your phone for sign in
verification.
3. Answer the phone when it rings and press # when prompted.
4. If successful the login will complete.
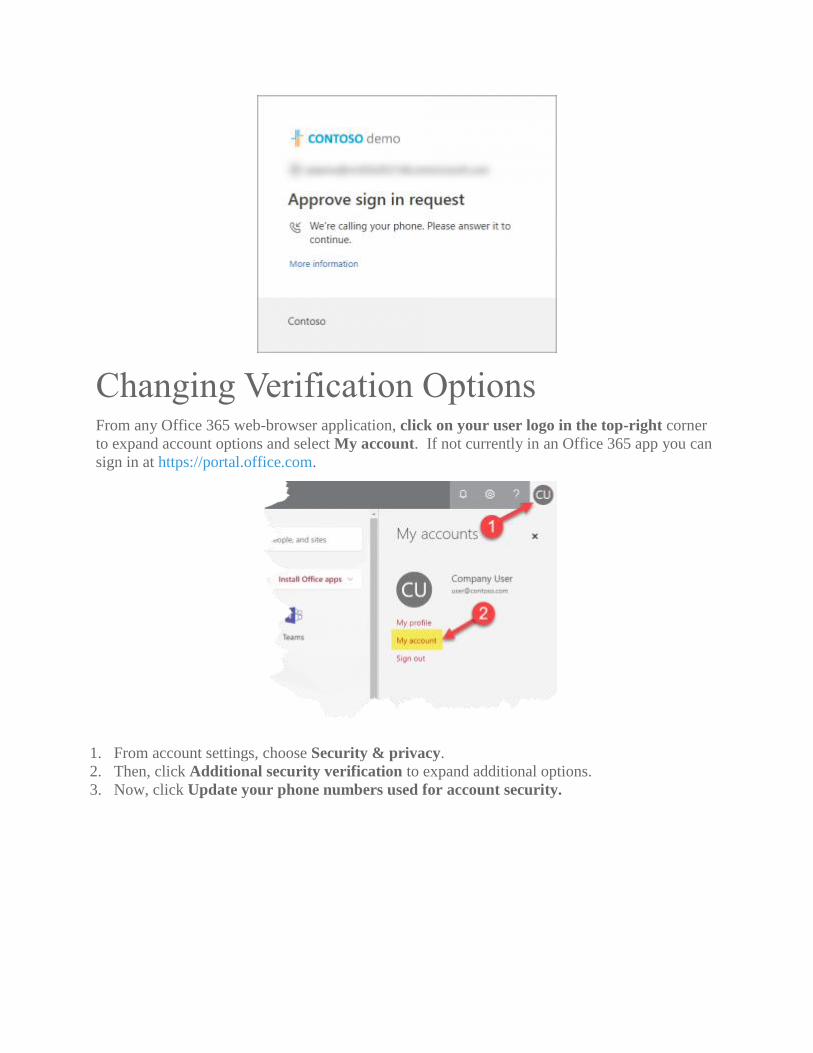
Changing Verification Options From any Office 365 web-browser application, click on your user logo in the top-right corner
to expand account options and select My account. If not currently in an Office 365 app you can
sign in at https://portal.office.com.
1. From account settings, choose Security & privacy.
2. Then, click Additional security verification to expand additional options.
3. Now, click Update your phone numbers used for account security.
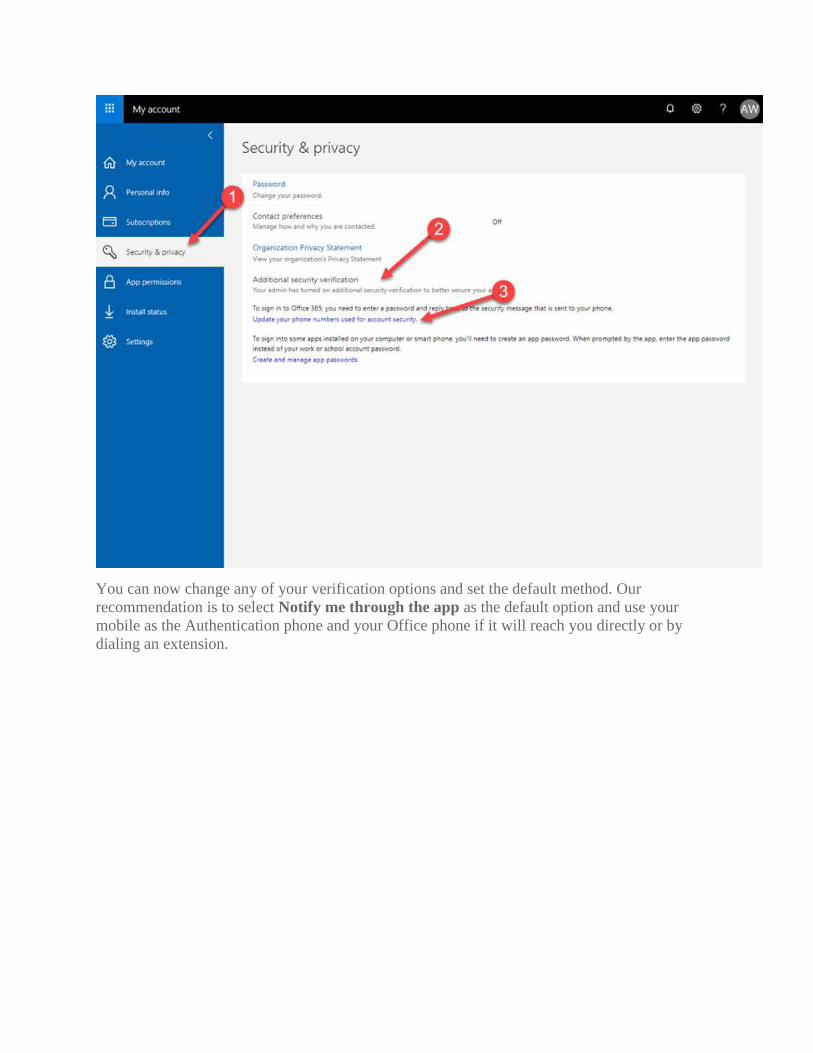
You can now change any of your verification options and set the default method. Our
recommendation is to select Notify me through the app as the default option and use your
mobile as the Authentication phone and your Office phone if it will reach you directly or by
dialing an extension.

App Passwords App passwords are a special type of password that when used does not require multi-factor
authentication. They should only be used with applications that cannot launch a browser
window as part of the sign-in process to perform the additional security verification. For
example, the native email applications on Android or iOS phones do not work with multi-factor
authentication.
Outlook and Skype for Business on the desktop do not work with multi-factor
authentication by default. Unless your administrator has taken additional steps to work
with single sign-on and multi-factor authentication you will need to use an app password
for both Outlook and Skype for Business.
When using app passwords, we recommend creating a single app password per device you use.
That way if the device is ever lost you can revoke the app password for that device without
affecting any of your other devices.
To create or delete an app password, follow the instructions in Changing Verification Options
above to change app passwords. Then, click the App Passwords link at the top of the page.

Alternatively, you can browse directly
to https://account.activedirectory.windowsazure.com/AppPasswords.aspx
You can now create or delete app passwords.
Important: The app password is only shown once when you first create it. Please take note
and keep it in a safe place as it will not be shown again. If you forget it, you will need to
create another app password.

If you run into problems, you can attempt the following self-help troubleshooting steps. If these
do not solve your problem, please reach out for help.
• iPhones
o The native mail app supports Modern Authentication on iOS version is 11.x or
newer
o The Microsoft Outlook App supports Modern Authentication on iOS version 10.x
and greater
▪ How to Check your iOS Version: https://support.apple.com/en-
us/HT201685
▪ How to update your iOS Device: https://support.apple.com/ios/update
• Android
o There are no native Android mail applications that support Modern
Authentication
o Thiel College can only support the Microsoft Outlook client for Android, others
that have support (Nine, Bluemail)

• Remove and Re-add your Office 365 account
o iOS Mail App: https://support.office.com/en-us/article/set-up-email-using-the-
ios-mail-app-7e5b180f-bc8f-45cc-8da1-5cefc1e633d1
o Android: Note that many android devices do not support MFA build-in. If you
have problems, see below for using the Outlook
App. https://support.office.com/en-us/article/set-up-email-in-android-email-app-
71147974-7aca-491b-978a-ab15e360434c?ui=en-US&rs=en-US&ad=US
• Install and use the free Outlook App
o If unsure or experiencing problems, go ahead and install the Outlook App. If
already using this, you should simply receive an MFA prompt on next use.
o iOS: https://support.office.com/en-us/article/set-up-email-in-outlook-for-ios-
mobile-app-b2de2161-cc1d-49ef-9ef9-81acd1c8e234?ui=en-US&rs=en-
US&ad=US
o Android: https://support.office.com/en-us/article/set-up-email-in-the-outlook-for-
android-app-886db551-8dfa-4fd5-b835-f8e532091872
• Further Information on Office 365 MFA
o https://docs.microsoft.com/en-us/azure/active-directory/user-help/multi-factor-
authentication-end-user-first-time