
Welder Training Program - BC Trades Modules€¦ · WelDer TrAInInG PrOGrAM — level C 9 Mo d u l...
70
WELDER TRAINING PROGRAM LEVEL C P2: Oxy-Fuel Gas Cutting (OFC) Practical Competencies
Transcript of Welder Training Program - BC Trades Modules€¦ · WelDer TrAInInG PrOGrAM — level C 9 Mo d u l...

Welder Training Programlevel C
P2: oxy-Fuel gas Cutting (oFC)Practical Competencies

Acknowledgements & Copyright Permission
The Industry Training Authority of British Columbia would like to acknowledge the Welding Articulation Committee and Open School BC, a division of the Queen’s Printer as well as the following individuals and organizations for their contributions in updating the Welder Training modules:
Welding Articulation Committee (WAC) Members and Consultants—“The Working Group”Jim Carson (Welding Articulation Committee Chair), University of the Fraser Valley (writer and senior reviewer)
Peter Haigh (Welding Curriculum Review Committee Chair), Northwest Community College (writer and senior reviewer)
Sheldon Frank, University of the Fraser Valley (writer and reviewer)
Greg Burkett, Okanagan College (writer and reviewer)
Randy Zimmerman (writer and reviewer)
John H.P. Little (reviewer)
Resource Training Organization (RTO)
BC Council on Admissions and Transfer (BCCAT)
The Queen’s PrinterThe Queen’s Printer, through its Open School BC unit, provided project management and design expertise in updating the Welder Training Level C print materials.
Open School BCSolvig Norman, Senior Project ManagerEleanor Liddy, Director/AdvisorDennis Evans, Production Technician (print layout, graphics & photographs)Christine Ramkeesoon, Graphics Media CoordinatorKeith Learmonth, EditorMargaret Kernaghan, Graphic Artist
Publishing ServicesSherry Brown, Director of Publishing Services
Intellectual Property Program Ilona Ugro, Copyright Officer, Ministry of Citizens’ Services, Province of British Columbia
Copyright Permission
The following suppliers have kindly provided copyright permission for selected product images:
Acklands-Grainger Inc.The Crosby GroupJ. Walter Company Ltd.Lincoln Electric CompanyNDT Systems, Inc.Praxair, Inc.Thermadyne Canada (Victor Equipment)The Miller Electric Mfg. Co.ESAB Welding & Cutting Products
Photo of welder walks the high steel at a construction site, Kenneth V. Pilon, copyright 2010. Used under license from Shutterstock.com
A special thank you to Lou Bonin and Jim Stratford at Camosun College (Welding department) for assisting us with additional photographs. An additional thank you to Richard Smith from England, for allowing us to use photographs of hydrogen bubbles.
ForewordThe Industry Training Authority (ITA) is pleased to release this major update of learning resources to support the delivery of the BC Welder Program. It was made possible by the dedicated efforts of the Welding Articulation Committee of BC (WAC).
The WAC is a working group of welding instructors from institutions across the province and is one of the key stakeholder groups that support and strengthen industry training in BC. It was the driving force behind the update of the welding learning modules supplying the specialized expertise required to incorporate technological, procedural and industry-driven changes. The WAC plays an important role in the province’s post-secondary public institutions as discipline specialists that share information and engage in discussions of curriculum matters, particularly those affecting student mobility.
ITA would also like to acknowledge the Resource Training Organization (RTO) which provides direction for improving industry training in the resource sector and which led consultation on changes related to the BC welder training program.
We are grateful to WAC and RTO for their contributions to the ongoing development of BC Welder Training Program Learning Resources (materials whose ownership and copyright are maintained by the Province of British Columbia through ITA).
Industry Training AuthorityAugust 2010
DisclaimerThe materials in these modules are for use by students and instructional staff and have been compiled from sources believed to be reliable and to represent best current opinions on these subjects. These manuals are intended to serve as a starting point for good practices and may not specify all minimum legal standards. No warranty, guarantee or representation is made by the British Columbia Welding Articulation Committee, the British Columbia Industry Training Authority or the Queen’s Printer of British Columbia as to the accuracy or sufficiency of the information contained in these publications. These manuals are intended to provide basic guidelines for welding trade practices. Do not assume, therefore, that all necessary warnings and safety precautionary measures are contained in this module and that other or additional measures may not be required.


WelDer TrAInInG PrOGrAM — level C 5
P2: Oxy-Fuel Gas Cutting (OFC)Practical Competencies
Table of Contents
Practical Competency P2-4: Freehand and guided oxy-fuel gas cutting and gouging operations on low-carbon steel 7
P2-4 Learning Task 1: Assemble, ignite and shut down a portable oxy-fuel gas unit . . . . 11
Procedure P2-4-1A: Assemble and shut down a portable oxy-fuel gas unit . . . . . . . 12
Procedure P2-4-1B: Ignite and adjust oxy-fuel gas cutting torches and heating torches 14
P2-4 Learning Task 2: Maintain oxy-fuel gas cutting equipment . . . . . . . . . . . . . . 17
Procedure P2-4-2A: Clean oxy-fuel gas cutting tips . . . . . . . . . . . . . . . . . . 18
Procedure P2-4-2B: Repair oxy-fuel gas hose connections . . . . . . . . . . . . . . . 19
P2-4 Learning Task 3: Freehand square cuts on low-carbon steel plate and low-carbon steel sheet . . . . . . . . . . . . . . . . . . . . . . . . . . . . . . . . . . 21
Procedure P2-4-3A: Freehand square cuts on low-carbon steel plate . . . . . . . . . . 22
Procedure P2-4-3B: Freehand square cuts on low-carbon steel sheet. . . . . . . . . . 24
Procedure P2-4-3C: Freehand bevel cuts on low-carbon steel plate . . . . . . . . . . 26
P2-4 Learning Task 4: Pierce holes in low-carbon steel plate . . . . . . . . . . . . . . . . 29
Procedure P2-4-4: Pierce holes in low-carbon steel plate. . . . . . . . . . . . . . . . 30
P2-4 Learning Task 5: Freehand cuts on structural shapes and on round bar . . . . . . . . 33
Procedure P2-4-5A: Freehand square cuts on angle, channel and S-beam . . . . . . . 34
Procedure P2-4-5B: Freehand square cuts on round bar . . . . . . . . . . . . . . . . 38
P2-4 Learning Task 6: Guided cuts on low-carbon steel plate and sheet . . . . . . . . . . 41
Procedure P2-4-6A: Guided square cuts on low-carbon steel plate and sheet . . . . . 42
Procedure P2-4-6B: Guided bevel cuts on low-carbon steel plate . . . . . . . . . . . 44
Procedure P2-4-6C: Guided circular cuts on low-carbon steel plate . . . . . . . . . . 46
P2-4 Learning Task 7: Wash nuts off bolts and gouge weldments . . . . . . . . . . . . . 49
Procedure P2-4-7A: Wash nuts off bolts . . . . . . . . . . . . . . . . . . . . . . . . 50
Procedure P2-4-7B: Gouge weldments . . . . . . . . . . . . . . . . . . . . . . . . 52
P2-4 Learning Task 8: Freehand cuts on low-carbon steel pipe . . . . . . . . . . . . . . . 55
Procedure P2-4-8A: Freehand square cuts on low-carbon steel pipe . . . . . . . . . . 56
Procedure P2-4-8B: Freehand bevel cuts on low-carbon steel pipe . . . . . . . . . . . 58
Practical Competency P2-5: Cuts with cutting machines using oxy-fuel gas 61
P2-5 Learning Task 1: Cuts with a straight-line cutting machine using oxy-fuel gas . . . . 65
P2-5 Learning Task 2: Cuts with a shape-cutting machine using oxy-fuel gas . . . . . . . 67
P2-5 Learning Task 3: Cuts with a pipe-bevelling machine using oxy-fuel gas . . . . . . . 69


Practical comPetency P2-4:Freehand and guided oxy-fuel gas cutting and gouging operations on low-carbon steel
P2
-4


WelDer TrAInInG PrOGrAM — level C 9
Module P2 Practical coMPetency P2-4
OutcomesTo protect yourself, your fellow workers and the oxy-fuel gas equipment, it is important that you thoroughly understand the correct procedures and safety precautions to use when assembling, testing, lighting, adjusting, shutting down and disassembling a portable oxy-fuel gas unit. The procedures are not complicated, but the steps must be followed precisely and in the correct order. You should understand the potential hazards of oxy-fuel gases and the importance of following these steps.
You should also know how to perform minor maintenance of oxy-fuel gas equipment, in order to ensure safer and more efficient operation of the equipment.
When you have completed the procedures in this Practical Competency, you will be able to:
assemble, ignite and shut down a portable oxy-fuel gas unit•maintain oxy-fuel gas equipment•perform freehand square cuts on low-carbon steel plate•perform freehand square cuts on low-carbon steel sheet•perform freehand bevel cuts on low-carbon steel plate•pierce holes in low-carbon steel plate•perform freehand cuts on structural shapes •perform freehand cuts on round bar•perform guided cuts on low-carbon steel plate and sheet•wash nuts off bolts•gouge weldments•perform freehand cuts on low-carbon steel pipe•
evaluationYou will be required to do the following:
assemble a portable oxy-fuel gas unit•test an oxy-fuel gas unit for leaks•set oxy-fuel gas working pressures•ignite, adjust and extinguish a one-piece oxy-fuel gas torch•ignite, adjust and extinguish a two-piece combination oxy-fuel gas torch•install, ignite and adjust an oxy-fuel gas heating torch (rosebud)•assemble the appropriate oxyacetylene cutting equipment, set gas pressures, •light and adjust the cutting torchuse safe work practices•use safe procedures and techniques•make freehand and guided cuts on low-carbon steel plate and low-carbon steel sheet•make freehand cuts on structural shapes and solid round stock•wash nuts off bolts•gouge weldments•pierce holes•
10 WelDer TrAInInG PrOGrAM — level C
Module P2 Practical coMPetency P2-4
MaterialsEach Practical Competency identifies the materials you will need to complete the assigned procedure. Your instructor will arrange for these materials to be available to you.
WARNING!
If a Practical Competency procedure requires that you use a tool or piece of equipment that you have not previously operated—or you feel unsure about the operation of any tools or equipment—ask your instructor to demonstrate the correct procedures for the tool or piece of equipment before you use it.
Use of materialsWelding is a very expensive trade. The cost of steel, filler metal and other consumables can rise or fall, depending on the marketplace. The only area in which there can be significant potential savings is in how we use steel. Steel is the largest single consumable cost. This is true in both training and industry.
Training institutions often have to buy scrap material to practise on. Therefore, steel used for practice might not be the exact size or thickness laid out in the Practical Competencies. This will not affect your learning. In fact, it might even better reflect the reality of the real welding world, where it is common practice to substitute material sizes.
When cutting new steel or steel crops, always strive for maximum use and minimum waste. Cut pieces from one end of plate so as to leave the largest possible area untouched for later use. Assemble lap joints and tee joints in a way that will reduce waste and maximize the size of off-cuts after welding.
General procedures for all welding Practical Competencies1. Arrange with your instructor for a demonstration of all procedures and for the
tools and equipment you will need.
2. Follow all safety precautions, wear all personal protective clothing and use all personal protective equipment. Review P1-2: Use Safe Work Practices.
Clean the base metal, if necessary. Remove any rust, mill scale or paint.3.
4. You will be required to repeat procedures until you receive an acceptable evaluation from your instructor.
notes
Module P2 Practical coMPetency P2-4
WelDer TrAInInG PrOGrAM — level C 11
P2-4 learning Task 1:Assemble, ignite and shut down a portable oxy-fuel gas unitTo complete this Learning Task, you must perform the following procedures:
Procedure A: Assemble and shut down a portable oxy-fuel gas unit•Procedure B: Ignite and adjust oxy-fuel gas cutting and heating torches•
It is extremely important that you learn the correct steps in assembling, igniting and shutting down an oxy-fuel gas unit. Failure to learn the safe procedures could result in a fire, explosion or personal injury. Your instructor will supervise you until you have successfully mastered these procedures.

notes
Module P2 Practical coMPetency P2-4
12 WelDer TrAInInG PrOGrAM — level C
Procedure P2-4-1A:Assemble and shut down a portable oxy-fuel gas unit
I Assemble a portable oxy-fuel gas unitDirections
Read and follow the “General procedures for all welding Practical 1. Competencies” as outlined at the beginning of this Practical Competency.
2. Ask your instructor for directions.
Secure the oxygen and fuel-gas cylinders upright in a cylinder cart using 3. a safety chain or other acceptable method.
Remove the cylinder protective caps.4.
Crack the oxygen and fuel-gas cylinder valves. Remember to stand to 5. the side of the cylinder valve outlets and have them pointing in a safe direction.
Attach the cylinder pressure regulators to the cylinder valves.6.
Connect the flashback arrestors to the cylinder pressure regulators. 7. Remember to check the direction of flow for the flashback arrestors.
Connect the oxygen and fuel-gas hoses to the flashback arrestors on the 8. cylinder pressure regulators.
Turn the cylinder pressure regulator pressure-adjusting screws out 9. (counter-clockwise) to close the regulators.
Open the fuel-gas cylinder valve 1 to 1½ turns.10.
Open the oxygen cylinder valve slowly; then open it completely. 11. Remember that the oxygen valve is double seating and has to be fully open to seal the valve stem.
Turn the fuel-gas cylinder pressure regulator working pressure–adjusting 12. screw in (clockwise) to purge the regulator and fuel gas hose. Back the working pressure–adjusting screw off (counter-clockwise) after the hose has been purged.
Turn the oxygen cylinder pressure regulator working pressure–adjusting 13. screw in (clockwise) to purge the regulator and oxygen hose. Back the working pressure–adjusting screw off (counter-clockwise) after the hose has been purged.
Attach flashback arrestors to the torch handle (check with your instructor 14. to see if they are required).

notes
Module P2 Practical coMPetency P2-4
WelDer TrAInInG PrOGrAM — level C 13
Attach the oxygen and fuel-gas hoses to the torch flashback arrestors.15.
Close the torch handle valves.16.
Check the equipment manufacturer’s cutting tip chart for the correct 17. cutting tip size and oxy-fuel gas pressures.
Install the appropriate size cutting tip and set the oxy-fuel gas working 18. pressures.
Test the system for leaks.19.
II Shut down and disassemble a portable oxy-fuel gas unitDirections
Bleed the system. First, close (clockwise) the acetylene and oxygen 1. cylinder valves. Second, open (counter-clockwise) the torch handle valves to bleed the system. Finally, turn the cylinder pressure regulator working pressure–adjusting screws out (counter-clockwise) to close the regulators.
Disconnect the cutting torch and remove the cutting tip.2.
Remove the flashback arrestors from the torch handle (if installed).3.
Disconnect the hoses from the cylinder pressure regulators and coil them 4. up (tie the coil up with string or something appropriate if they are going into storage).
Remove the flashback arrestors from the cylinder pressure regulators. 5.
Disconnect the cylinder pressure regulators from the cylinder valves.6.
Cover the cylinder valves with their protective caps. Be sure to only 7. hand-tighten the protective caps.
You will be required to repeat the procedure until your work receives an acceptable evaluation from your instructor. When your instructor indicates that you have successfully mastered this procedure, continue with Procedure B.

notes
Module P2 Practical coMPetency P2-4
14 WelDer TrAInInG PrOGrAM — level C
Procedure P2-4-1B:Ignite and adjust oxy-fuel gas cutting torches and heating torches
I Ignite and adjust a one-piece oxy-fuel gas cutting torchDirections
Read and follow the “General procedures for all welding Practical 1. Competencies” as outlined at the beginning of this Practical Competency.
Read and follow Procedure A to assemble and pressurize the oxy-fuel gas 2. station you are using. Install a one-piece cutting torch.
3. Ask your instructor for a demonstration and directions.
Follow the steps below to ignite and adjust your oxy-fuel gas cutting torch:4.
Fuel gas (acetylene):Open the cutting torch preheat flame fuel-gas valve no more •than ½ turn.
Using a striker, ignite the fuel gas coming from the torch tip.•
Adjust the flame until the black smoke disappears.•
Oxygen:Open the cutting torch preheat flame oxygen valve ¼ turn.•
Adjust the torch preheat flame oxygen valve to achieve a neutral flame.•
Depress the cutting oxygen lever valve until it is fully open.•
Readjust the torch preheat flame oxygen valve to achieve a neutral flame.•
Adjust the torch a number of times to identify carburizing, oxidizing 5. and neutral flames. Continue to practise until you can easily and quickly adjust to a neutral flame.
Extinguish the flame by first closing the torch preheat flame fuel-gas 6. valve and then closing the torch preheat flame oxygen valve.
Read and follow Procedure A to shut down and disassemble the oxy-fuel 7. gas station you are using.
You will be required to repeat the procedure until your work receives an acceptable evaluation from your instructor.

notes
Module P2 Practical coMPetency P2-4
WelDer TrAInInG PrOGrAM — level C 15
II Ignite and adjust a two-piece oxy-fuel gas cutting torchDirections
Read and follow the “General procedures for all welding Practical 1. Competencies” as outlined at the beginning of this Practical Competency.
Read and follow Procedure A to assemble and pressurize the oxy-fuel gas 2. station you are using. Install a two-piece cutting torch. Remember that a two-piece oxy-fuel gas cutting torch is called a “combination torch” because it can be used with a welding torch attachment or a cutting torch attachment. The torch attachment uses seals and only needs to be hand-tightened.
3. Ask your instructor for a demonstration and directions.
Follow the steps below to ignite and adjust your oxy-fuel gas cutting torch:4.
Torch handle oxygen valve:Fully open the torch handle oxygen valve. Remember that when you •are using a cutting torch attachment, the torch handle oxygen valve must be fully open. This will supply oxygen to the oxygen preheat flame valve and to the oxygen cutting lever valve.
Fuel gas (acetylene):Open the cutting torch preheat flame fuel-gas valve no more than ½ turn.•Using a striker, ignite the fuel gas coming from the torch tip.•Adjust the flame until the black smoke disappears.•
Oxygen:Open the cutting torch preheat flame oxygen valve • 1⁄4 turn.
Adjust the cutting torch preheat flame oxygen valve to achieve a •neutral flame.
Depress the cutting oxygen lever valve until it is fully open.•
Readjust the torch preheat flame oxygen valve to achieve a neutral flame.•
Adjust the torch a number of times to identify carburizing, oxidizing 5. and neutral flames. Continue to practise until you can easily and quickly adjust to a neutral flame.
Extinguish the flame by closing the torch preheat flame fuel-gas valve 6. first and then closing the torch preheat flame oxygen valve. Remember that you also have to close the oxygen valve on the torch handle before you remove the cutting torch attachment. Check equipment manufacturer's recommendation. You may be required to close the torch pre-heat flame oxygen valve first.

notes
Module P2 Practical coMPetency P2-4
16 WelDer TrAInInG PrOGrAM — level C
Read and follow Procedure A to shut down and disassemble the oxy-fuel 7. gas station you are using.
You will be required to repeat the procedure until your work receives an acceptable evaluation from your instructor.
III Ignite and adjust an oxy-fuel gas heating torch (rosebud)Directions
Read and follow the “General procedures for all welding Practical 1. Competencies” as outlined at the beginning of this Practical Competency.
Read and follow Procedure A to assemble and pressurize the oxy-fuel gas 2. station you are using. Install a heating torch attachment. Remember that the torch attachment uses seals and only needs to be hand-tightened.
3. Ask your instructor for a demonstration and directions.
Follow the steps below to ignite and adjust your oxy-fuel gas 4. heating torch:
Fuel gas (acetylene):Open the torch handle fuel-gas valve no more than ½ turn.•Using a striker, ignite the fuel gas coming from the torch tip.•Adjust the flame until the black smoke disappears.•
Oxygen:Open the torch handle oxygen valve ¼ turn.•Adjust the oxygen to achieve a neutral flame.•
Adjust the torch a number of times to identify carburizing, oxidizing 5. and neutral flames. Continue to practise until you can easily and quickly adjust to a neutral flame.
Extinguish the flame by first closing the torch handle fuel-gas valve 6. and then closing the torch handle oxygen valve. Check equipment manufacturer's recommendation. Heating tips may require closing the torch handle oxygen valve first.
Read and follow Procedure A to shut down and disassemble the oxy-fuel 7. gas station you are using.
You will be required to repeat the procedure until your work receives an acceptable evaluation from your instructor.
notes
Module P2 Practical coMPetency P2-4
WelDer TrAInInG PrOGrAM — level C 17
P2-4 learning Task 2:Maintain oxy-fuel gas cutting equipmentTo complete this Learning Task, you must perform the following procedures:
Procedure A: Clean oxy-fuel gas cutting tips•Procedure B: Repair oxy-fuel gas hose connections•
The two most common maintenance chores on a cutting station are cleaning the cutting tips to remove any slag, and repairing fuel-gas hoses that might have been damaged by molten slag or falling metal.

notes
Module P2 Practical coMPetency P2-4
18 WelDer TrAInInG PrOGrAM — level C
Procedure P2-4-2A:Clean oxy-fuel gas cutting tipsequipment
oxy-fuel gas station with a cutting torch attached•tip cleaning needles (tip cleaner)•
Directions
Read and follow the “General procedures for all welding Practical 1. Competencies” as outlined at the beginning of this Practical Competency.
2. Ask your instructor for directions.
Using the scraper in the tip cleaner, scrape the cutting tip to remove any 3. slag. If there are any worn areas, you will need to use a file or tip dresser (tip nip).
Choose the correct size of tip cleaner needle for the preheat holes. 4. Remember that the tip cleaner should be one size smaller than the hole, as they are not meant to be used as a file or tip dresser.
Use a straight up-and-down motion in each of the preheat holes 5. (Figure 1). Never bend the needle or use a circular or sideways motion.
Clean the preheat holes and cutting oxygen holeFigure 1—
Repeat both the tip needle selection and the cleaning process for the 6. cutting oxygen hole.
Inspect all the openings to make sure they are clear of slag and other 7. debris.

notes
Module P2 Practical coMPetency P2-4
WelDer TrAInInG PrOGrAM — level C 19
Procedure P2-4-2B:repair oxy-fuel gas hose connectionsequipment
oxy-fuel gas hose in need of repair•oxy-fuel gas hose fittings and ferrules•ferrule crimping tool•
Directions
Read and follow the “General procedures for all welding Practical 1. Competencies” as outlined at the beginning of this Practical Competency.
2. Ask your instructor for directions.
Remove the hose ferrule and fitting. You will have to cut the old ferrule 3. off with a hacksaw or bench grinder. Be careful not to damage the fitting when cutting the ferrule.
Even and square-up the end of the hose with a utility knife.4.
Choose the correct type and size of ferrule, nut and compression fitting 5. (Figure 2).
Insert the ferrule over the end of the hose.6.
Assemble the nut and compression fitting then insert the fitting into the 7. end of the hose.
Make sure the fitting is the correct size for the hose.•Make sure the fitting is pushed all the way into the hose. •The fitting should be a tight fit. If necessary, use water as a lubricant. •
Never use oil or grease as a lubricant.
Hose, ferrule, nut and compression fittingFigure 2—

notes
Module P2 Practical coMPetency P2-4
20 WelDer TrAInInG PrOGrAM — level C
Position the ferrule crimping tool squarely over the ferrule and crimp it 8. firmly.
Visually inspect the crimped ferrule and fitting. Make sure that the ferrule 9. is correctly positioned and firmly crimped.
If you are making a hose splice, repeat the crimping procedure on the 10. other end of the fitting.
11. Have your instructor inspect your work.

notes
Module P2 Practical coMPetency P2-4
WelDer TrAInInG PrOGrAM — level C 21
P2-4 learning Task 3:Freehand square cuts on low-carbon steel plate and low-carbon steel sheetTo complete this Learning Task, you must perform the following procedures:
Procedure A: Freehand square cuts on low-carbon steel plate•Procedure B: Freehand square cuts on low-carbon steel sheet•Procedure C: Freehand bevel cuts on low-carbon steel plate•

notes
Module P2 Practical coMPetency P2-4
22 WelDer TrAInInG PrOGrAM — level C
Procedure P2-4-3A:Freehand square cuts on low-carbon steel plate
Materials
Base metal
6 mm to 25 mm (1⁄4" to 1") thick, low-carbon steel plate from shop scrap
Directions
Read and follow the “General procedures for all welding Practical 1. Competencies” as outlined at the beginning of this Competency.
Using your combination square and soapstone, lay out cut lines 10 mm 2. (3⁄8 in.) apart on your base metal (Figure 3), or as directed by your instructor. These lines will act as a guide so your cuts are straight.
layout of cut lines on plateFigure 3—
Check the equipment manufacturer’s cutting tip chart for the correct tip 3. size and oxy-fuel gas pressures.
Install the appropriate size of cutting tip and set the oxy-fuel gas working 4. pressures.
Clean the cutting tip.5.
6. Put on your personal protective clothing (leather jacket, gloves, welding hat, etc.) and your personal protective equipment (cutting goggles, etc.).
Using your striker, ignite the cutting torch preheat flame and adjust it to 7. produce a neutral flame.
Begin your first cut at the end of the plate along your first marked line. 8. Proceed to cut with a smooth, steady travel speed. Keep the preheat flame cones at a constant distance from the workpiece. Be sure to hold the torch tip perpendicular to the workpiece (Figure 4).

notes
Module P2 Practical coMPetency P2-4
WelDer TrAInInG PrOGrAM — level C 23
Cutting positionFigure 4—
9. After you have finished your cut, extinguish the flame and examine your cut for defects. If your cut quality is acceptable, continue on to step 10. If your cut quality is not acceptable, make the appropriate changes or ask your instructor for assistance, then continue on to step 10.
Continue cutting along the remaining 10. cut lines, repeating steps 8 and 9 for each cut. Remember to cool your base metal after every second cut so that it doesn’t get too hot.
11. When you feel that you are able to make cuts of acceptable quality every time, show your work to your instructor. He/she will evaluate your work for the following:
top edge is sharp (not rounded)•slag is minimal and easily removed•cut is consistently square (90°, not bevelled)•draglines are perpendicular and not too pronounced•cut surface is flat and not rounded or concave•bottom edge is sharp (not rounded)•the cut is straight (you followed your cut line)•
notes
Module P2 Practical coMPetency P2-4
24 WelDer TrAInInG PrOGrAM — level C
Procedure P2-4-3B:Freehand square cuts on low-carbon steel sheet
Materials
Base metal
3 mm (1⁄8") thick or less, low-carbon steel sheet from shop scrap
Directions
Read and follow the “General procedures for all welding Practical 1. Competencies” as outlined at the beginning of this Practical Competency.
Using your combination square and soapstone, lay out cut lines 10 mm 2. (3⁄8 in.) apart on your base metal, or as directed by your instructor. These lines will act as a guide so your cuts are straight.
Check the equipment manufacturer’s cutting tip chart for the correct tip 3. size and oxy-fuel gas pressures.
Install the appropriate size of cutting tip and set the oxy-fuel gas working 4. pressures.
Clean the cutting tip.5.
6. Put on your personal protective clothing (leather jacket, gloves, welding hat, etc.) and your personal protective equipment (cutting goggles, etc.).
Using your striker, ignite the cutting torch preheat flame and adjust it to 7. produce a neutral flame.
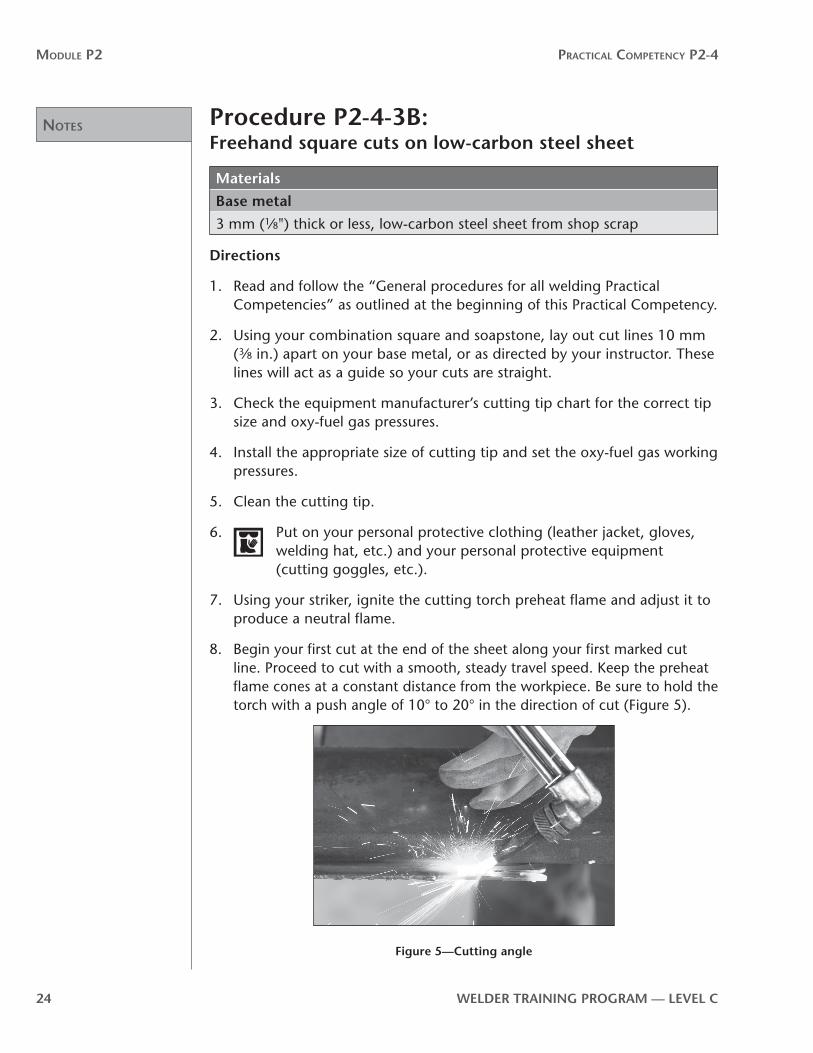
Begin your first cut at the end of the sheet along your first marked cut 8. line. Proceed to cut with a smooth, steady travel speed. Keep the preheat flame cones at a constant distance from the workpiece. Be sure to hold the torch with a push angle of 10° to 20° in the direction of cut (Figure 5).
Cutting angleFigure 5—
notes
Module P2 Practical coMPetency P2-4
WelDer TrAInInG PrOGrAM — level C 25
After you have finished your cut, extinguish the flame and examine your 9. cut for defects. If your cut quality is acceptable, continue on to step 10. If your cut quality is not acceptable, make the appropriate changes or ask your instructor for assistance, then continue on to step 10.
Continue cutting along the remaining cut lines, repeating steps 8 and 9 10. for each cut. Remember to cool your base metal after every second cut so that it doesn’t get too hot.
11. When you feel that you are able to make cuts of acceptable quality every time, show your work to your instructor. He/she will evaluate your work for the following:
top edge is sharp (not rounded)•slag is minimal and easily removed•cut is consistently square (90°, not bevelled) •draglines are at 10° to 20° and not too pronounced•cut surface is flat and not rounded or concave•bottom edge is sharp (not rounded)•the cut is straight (you followed your cut line)•

notes
Module P2 Practical coMPetency P2-4
26 WelDer TrAInInG PrOGrAM — level C
Procedure P2-4-3C:Freehand bevel cuts on low-carbon steel plate
Materials
Base metal
6 mm to 25 mm (1⁄4" to 1") thick, low-carbon steel plate from shop scrap
Directions
Read and follow the “General procedures for all welding Practical 1. Competencies” as outlined at the beginning of this Practical Competency.
Using your combination square and soapstone, lay out lines 10 mm 2. (3⁄8 in.) apart on your base metal, or as directed by your instructor. These lines will act as a guide so your cuts are straight.
Check the equipment manufacturer’s cutting tip chart for the correct 3. tip size and oxy-fuel gas pressures. You might need a larger cutting tip because the depth of a bevel cut is greater than that of a square cut.
Install the appropriate size of cutting tip and set the oxy-fuel gas working 4. pressures.
Clean the cutting tip.5.
6. Put on your personal protective clothing (leather jacket, gloves, welding hat, etc.) and your personal protective equipment (cutting goggles, etc.).
Using your striker, ignite the cutting torch preheat flame and adjust it to 7. produce a neutral flame.
Begin your first cut at the end of the plate along your first marked line. 8. Proceed to cut with a smooth, steady travel speed. Keep the preheat flame cones at a constant distance from the workpiece. Be sure to hold the torch at an angle (60°) that will produce a 30° bevel angle (Figure 6). More preheat is necessary because the angle of the torch causes much of the heat to be deflected off the plate.
After you have finished your cut, extinguish the flame and examine your 9. cut for defects. If your cut quality is acceptable, continue on to step 10. If your cut quality is not acceptable, make the appropriate changes or ask your instructor for assistance, then continue on to step 10.

notes
Module P2 Practical coMPetency P2-4
WelDer TrAInInG PrOGrAM — level C 27
Continue cutting along the remaining cut lines, repeating steps 8 and 9 10. for each cut. Remember to cool your base metal after every second cut so that it doesn’t get too hot.
11. When you feel that you are able to
30º bevel angleFigure 6—
make cuts of acceptable quality every time, show your work to your instructor. He/she will evaluate your work for the following:
top edge is sharp (not rounded)•slag is minimal and easily removed•cut has a consistent bevel angle •of 30°draglines are perpendicular and not •too pronouncedcut surface is flat and not rounded or •concavebottom edge is sharp (not rounded)•the cut is straight (you followed your •cut line)

notes
Module P2 Practical coMPetency P2-4
28 WelDer TrAInInG PrOGrAM — level C
notes
Module P2 Practical coMPetency P2-4
WelDer TrAInInG PrOGrAM — level C 29
P2-4 learning Task 4:Pierce holes in low-carbon steel plateTo complete this Learning Task, you must perform the following procedure:
Procedure 4: Pierce holes in low-carbon steel plate•

notes
Module P2 Practical coMPetency P2-4
30 WelDer TrAInInG PrOGrAM — level C
Procedure P2-4-4: Pierce holes in low-carbon steel plate
Materials
Base metal
6 mm to 25 mm (1⁄4" to 1") thick, low-carbon steel plate from shop scrap
Directions
Read and follow the “General procedures for all welding Practical 1. Competencies” as outlined at the beginning of this Practical Competency.
Ask your instructor for directions, then use your combination square and 2. soapstone to lay out your base metal for piercing holes.
Check the equipment manufacturer’s cutting tip chart for the correct tip 3. size and oxy-fuel gas pressures.
Install the appropriate size of cutting tip and set the oxy-fuel gas working 4. pressures.
Clean the cutting tip.5.
6. Put on your personal protective clothing (leather jacket, gloves, welding hat, etc.) and your personal protective equipment (cutting goggles, etc.).
Using your striker, ignite the cutting torch preheat flame and adjust it to 7. produce a neutral flame.
Be sure to carefully follow the following sequence, otherwise the tip 8. orifices will become clogged with slag during cutting:
Preheat the marked area to a red colour, keeping the preheat flame •cones about 3 mm (1⁄8 in.) above the surface of the plate.
Lift the cutting tip until the preheat flame cones are about 13 mm •(1⁄2 in.) above the plate and slowly depress the cutting oxygen control lever on the torch. You will see the metal start to burn and slag will blow away from the preheated area. On thicker metal, the torch should be angled slightly to direct the slag away from the cutting tip and prevent slag from clogging the orifices in the tip.

notes
Module P2 Practical coMPetency P2-4
WelDer TrAInInG PrOGrAM — level C 31
Use a slow, circular motion over the area of the hole until the cutting •oxygen jet has passed through the metal. After the cut penetrates the metal, lower the cutting tip back down so the preheat flames cones are 3 mm (1⁄8 in.) above the plate. Continue to cut around the marked hole until it is the desired size. Be sure to keep the cutting tip perpendicular (90°) to the base metal so that your cut is perpendicular to the surface of the base metal around the entire circumference of the hole.
After you have finished your cut, extinguish the flame and examine your 9. cut for defects. If your cut quality is acceptable, continue on to step 10. If your cut quality is not acceptable, make the appropriate changes or ask your instructor for assistance, then continue on to step 10.
Continue cutting along the remaining cut lines, repeating steps 8 and 9 10. for each cut. Remember to cool your base metal after every second cut so that it doesn’t get too hot.
11. When you feel that you are able to make cuts of acceptable quality every time, show your work to your instructor. He/she will evaluate your work for the following:
top edge is sharp (not rounded)•slag is minimal and easily removed•cut is consistently square (90°, not bevelled)•draglines are perpendicular and not too pronounced•cut surface is flat and not rounded or concave•bottom edge is sharp (not rounded)•holes are desired size and round (you followed your cut line)•

notes
Module P2 Practical coMPetency P2-4
32 WelDer TrAInInG PrOGrAM — level C

notes
Module P2 Practical coMPetency P2-4
WelDer TrAInInG PrOGrAM — level C 33
P2-4 learning Task 5:Freehand cuts on structural shapes and on round barTo complete this Learning Task, you must perform the following procedures:
Procedure A: Freehand square cuts on angle, channel and S-beam•Procedure B: Freehand square cuts on round bar•
All low-carbon steel structural shapes can be easily cut with oxy-fuel gas. But some shapes require a particular cutting sequence or slightly different starting procedures.
notes
Module P2 Practical coMPetency P2-4
34 WelDer TrAInInG PrOGrAM — level C
Procedure P2-4-5A:Freehand square cuts on angle, channel and S-beam
Materials
Base metal
angle, channel and S-beam from shop scrap
Directions
Read and follow the “General procedures for all welding Practical 1. Competencies” as outlined at the beginning of this Practical Competency.
You will need to know the correct sequence of cuts for each of these 2. structural members:
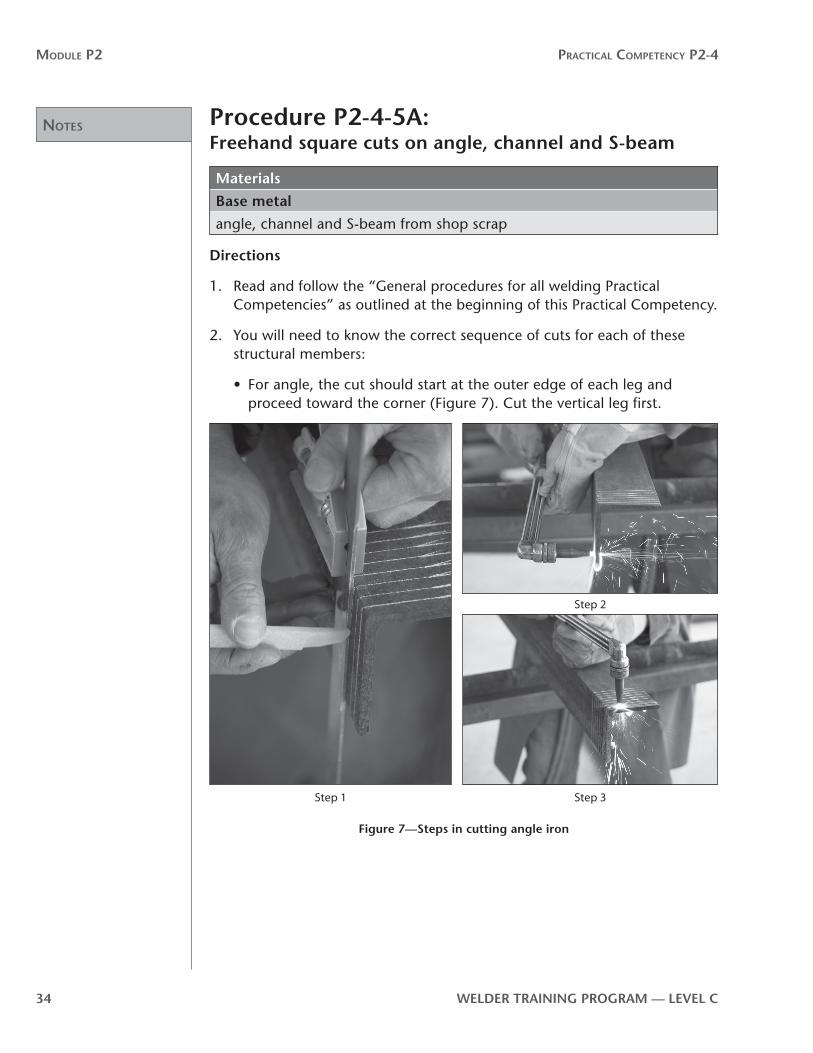
For angle, the cut should start at the outer edge of each leg and •proceed toward the corner (Figure 7). Cut the vertical leg first.
Step 1 Step 3
Step 2
Steps in cutting angle ironFigure 7—
notes
Module P2 Practical coMPetency P2-4
WelDer TrAInInG PrOGrAM — level C 35
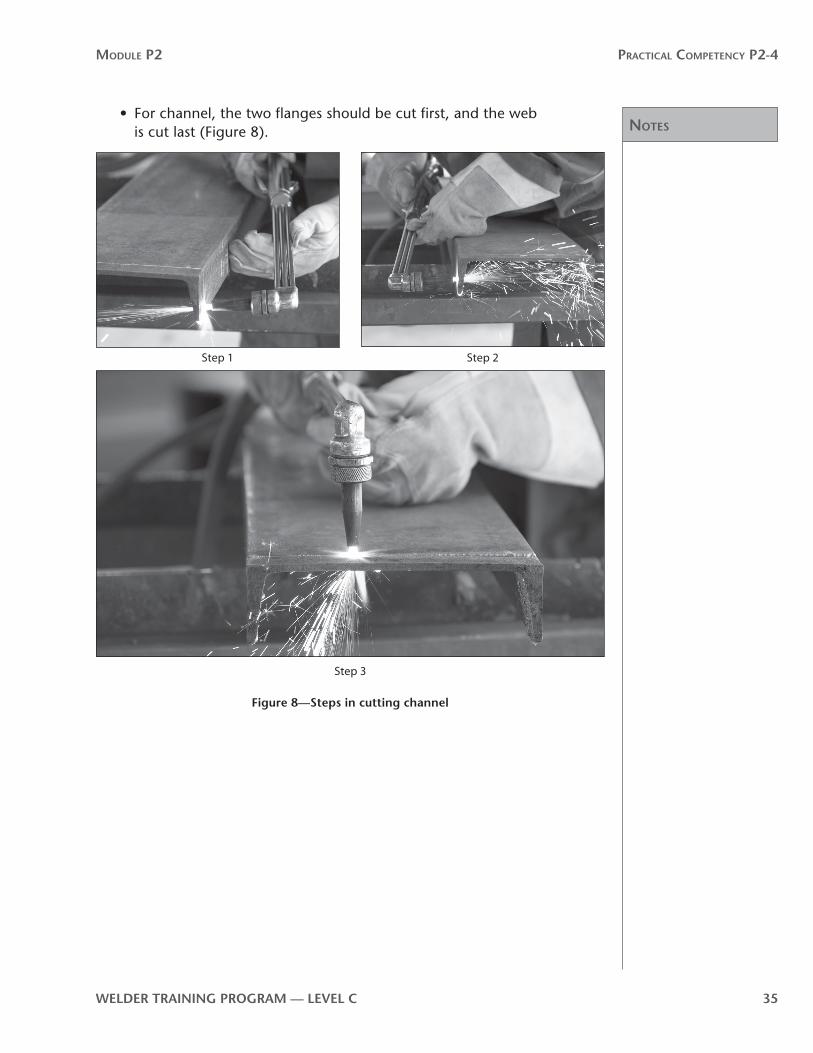
For channel, the two flanges should be cut first, and the web •is cut last (Figure 8).
Step 1 Step 2
Step 3
Steps in cutting channelFigure 8—

notes
Module P2 Practical coMPetency P2-4
36 WelDer TrAInInG PrOGrAM — level C
For S-beam, the two flanges are cut completely and the web is cut last •(Figure 9).
Step 1 Step 2
Step 3
Steps in cutting an S-beamFigure 9—
Using your combination square and soapstone, lay out cut lines 10 mm 3. (3⁄8 in.) apart on your base metal, or as directed by your instructor. These lines will act as a guide so your cuts are straight.
Check the equipment manufacturer’s cutting tip chart for the correct tip 4. size and oxy-fuel gas pressures.
notes
Module P2 Practical coMPetency P2-4
WelDer TrAInInG PrOGrAM — level C 37
Install the appropriate size cutting tip and set the oxy-fuel gas working 5. pressures.
Clean the cutting tip.6.
7. Put on your personal protective clothing (leather jacket, gloves, welding hat, etc.) and your personal protective equipment (cutting goggles, etc.).
Using your striker, ignite the cutting torch preheat flame and adjust it to 8. produce a neutral flame.
Begin your first cut at the edge of the flange along your first marked cut 9. line. Proceed to cut with a smooth, steady travel speed. Keep the preheat flame cones at a constant distance from the workpiece. Be sure to hold the torch perpendicular (90°) to the workpiece.
After you have finished your cut, extinguish the flame and examine your 10. cut for defects. If your cut quality is acceptable, continue on to step 11. If your cut quality is not acceptable, make the appropriate changes or ask your instructor for assistance, then continue on to step 11.
Continue cutting along the remaining cut lines, repeating steps 9 and 10 11. for each cut. Remember to cool your base metal after every second cut so that it doesn’t get too hot.
12. When you feel that you are able to make cuts of acceptable quality every time, show your work to your instructor. He/she will evaluate your work for the following:
top edge is sharp (not rounded)•slag is minimal and easily removed•cut is consistently square (90°, not bevelled)•draglines are perpendicular and not too pronounced•cut surface is flat and not rounded or concave•bottom edge is sharp (not rounded)•the cut is straight (you followed your cut line)•you followed the correct cutting sequence •
13. Repeat this procedure to cut channel and S-beam using the correct cutting sequence.

notes
Module P2 Practical coMPetency P2-4
38 WelDer TrAInInG PrOGrAM — level C
Procedure P2-4-5B:Freehand square cuts on round bar
Materials
Base metal
38 mm (1 1⁄2") diameter or larger, low-carbon steel round bar from shop scrap
Directions
Read and follow the “General procedures for all welding Practical 1. Competencies” as outlined at the beginning of this Practical Competency.
Using your soapstone, lay out cut lines 10 mm (2. 3⁄8 in.) apart on your base metal, or as directed by your instructor.
Check the equipment manufacturer’s cutting tip chart for the correct tip 3. size and oxy-fuel gas pressures.
Install the appropriate size of cutting tip and set the oxy-fuel gas working 4. pressures.
Clean the cutting tip.5.
6. Put on your personal protective clothing (leather jacket, gloves, welding hat, etc.) and your personal protective equipment (cutting goggles, etc.).
Using your striker, ignite the cutting torch preheat flame and adjust it to 7. produce a neutral flame.
Hold the torch tip perpendicular to the surface of the round bar. Point 8. the preheat flame toward the centre of the round bar and heat the metal. When the preheat spot is cherry red, rotate the torch and begin the cut, keeping the tip vertical to the surface (Figure 10). Move the torch across the bar to complete the cut.

notes
Module P2 Practical coMPetency P2-4
WelDer TrAInInG PrOGrAM — level C 39
Step 1
Step 3 Step 2
Steps in cutting round barFigure 10—
On larger diameters of round bar, another method that can be used to ease the start of the cut is to make a notch with a hammer and cold chisel on the side of the round (Figure 11). This notch provides an edge for starting the cut.
Alternate method for starting a cutFigure 11—
notes
Module P2 Practical coMPetency P2-4
40 WelDer TrAInInG PrOGrAM — level C
After you have finished your cut, extinguish the flame and examine your 9. cut for defects. If your cut quality is acceptable, continue on to step 10. If your cut quality is not acceptable, make the appropriate changes or ask your instructor for assistance, then continue on to step 10.
Continue cutting along the remaining cut lines, repeating steps 8 and 9 10. for each cut. Remember to cool your base metal after every second cut so that it doesn’t get too hot.
11. When you feel that you are able to make cuts of acceptable quality every time, show your work to your instructor. He/she will evaluate your work for the following:
top edge is sharp (not rounded)•slag is minimal and easily removed•cut is consistently square (90°, not bevelled)•draglines are perpendicular and not too pronounced•cut surface is flat and not rounded or concave•bottom edge is sharp (not rounded)•the cut is straight (you followed your cut line)•

notes
Module P2 Practical coMPetency P2-4
WelDer TrAInInG PrOGrAM — level C 41
P2-4 learning Task 6:Guided cuts on low-carbon steel plate and sheetTo complete this Learning Task you must perform the following procedures:
Procedure A: Guided square cuts on low-carbon steel plate and sheet•Procedure B: Guided bevel cuts on low-carbon steel plate•Procedure C: Guided circular cuts on low-carbon steel plate•
Mechanical guides help control the position of the cutting torch and produce a cut that is more accurate. They do not control the speed of the cut, and the Welder must be skilled or the cuts will be rough and ragged.
notes
Module P2 Practical coMPetency P2-4
42 WelDer TrAInInG PrOGrAM — level C
Procedure P2-4-6A:Guided square cuts on low-carbon steel plate and sheet
Materials
Base metal
3 mm (1⁄8") thick or less, low-carbon steel sheet from shop scrap
6 mm to 25 mm (1⁄4" to 1") thick, low-carbon steel plate from shop scrap
Directions
Read and follow the “General procedures for all welding Practical 1. Competencies” as outlined at the beginning of this Practical Competency.
Using your combination square and soapstone, lay out cut lines 10 mm 2. (3⁄8 in.) apart on your base metal, or as directed by your instructor. These lines will act as a guide so your cuts are straight.
Check the equipment manufacturer’s cutting tip chart for the correct tip 3. size and oxy-fuel gas pressures.
Install the appropriate size of cutting tip and set the oxy-fuel gas working 4. pressures.
Clean the cutting tip.5.
6. Put on your personal protective clothing (leather jacket, gloves, welding hat, etc.) and your personal protective equipment (cutting goggles, etc.).
Using your striker, ignite the cutting torch preheat flame and adjust it to 7. produce a neutral flame.
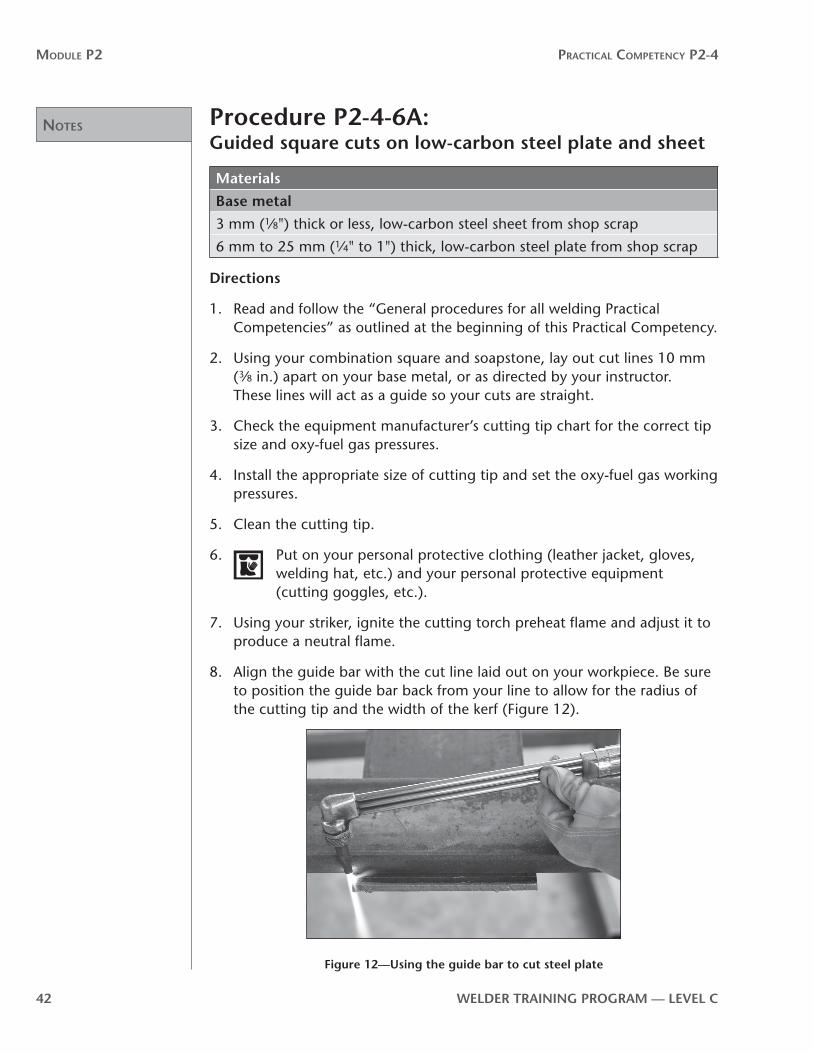
Align the guide bar with the cut line laid out on your workpiece. Be sure 8. to position the guide bar back from your line to allow for the radius of the cutting tip and the width of the kerf (Figure 12).
Using the guide bar to cut steel plateFigure 12—
notes
Module P2 Practical coMPetency P2-4
WelDer TrAInInG PrOGrAM — level C 43
Begin your cut. Keep the cutting tip in contact with the guide bar as you 9. move the torch along the cut line. Proceed to cut with a smooth, steady travel speed. Keep the preheat flame cones at a constant distance from the workpiece. Position yourself so you are able to watch the kerf and the line of the cut.
After you have finished your cut, extinguish the flame and examine your 10. cut for defects. If your cut quality is acceptable, continue on to step 11. If your cut quality is not acceptable, make the appropriate changes or ask your instructor for assistance, then continue on to step 11.
Continue cutting along the remaining cut lines, repeating steps 9 and 10 11. for each cut. Remember to cool your base metal after every second cut so that it doesn’t get too hot.
12. When you feel that you are able to make cuts of acceptable quality every time, show your work to your instructor. He/she will evaluate your work for the following:
top edge is sharp (not rounded)•slag is minimal and easily removed•cut is consistently square (90°, not bevelled)•draglines are perpendicular and not too pronounced•cut surface is flat and not rounded or concave•bottom edge is sharp (not rounded)•the cut is straight (you followed your cut line)•
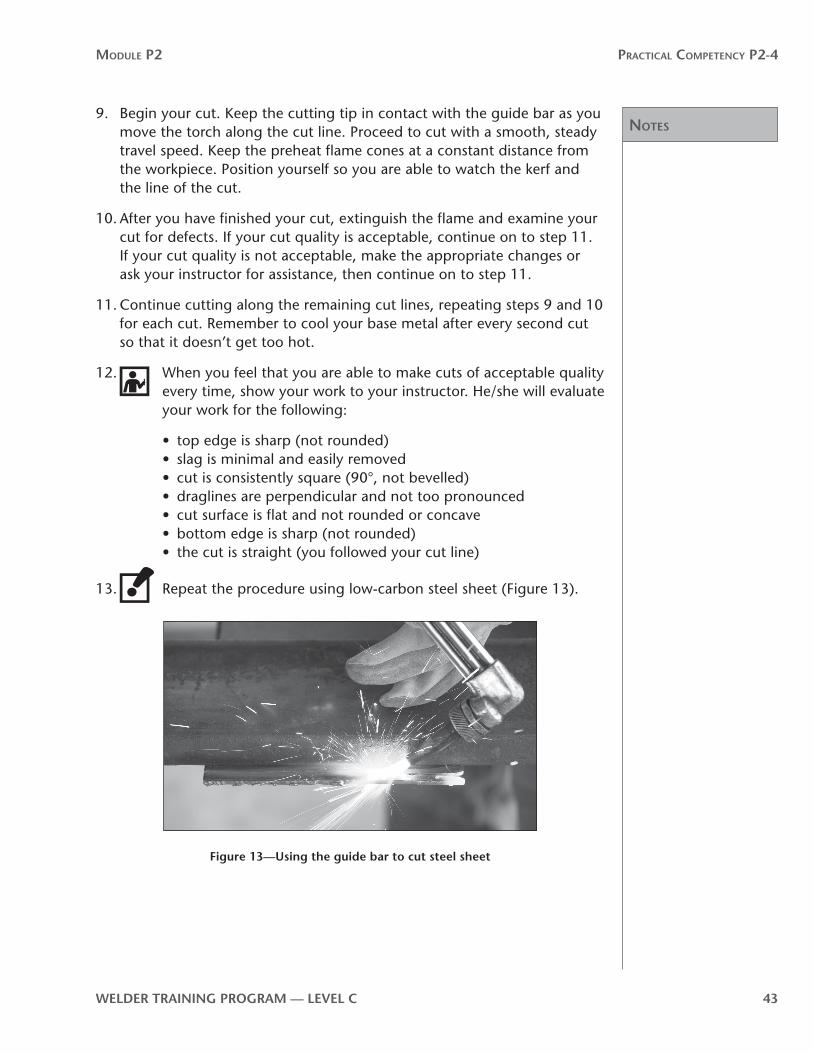
13. Repeat the procedure using low-carbon steel sheet (Figure 13).
Using the guide bar to cut steel sheetFigure 13—

notes
Module P2 Practical coMPetency P2-4
44 WelDer TrAInInG PrOGrAM — level C
Procedure P2-4-6B:Guided bevel cuts on low-carbon steel plate
Materials
Base metal
6 mm to 25 mm (1⁄4" to 1") thick, low-carbon steel plate from shop scrap
Directions
Read and follow the “General procedures for all welding Practical 1. Competencies” as outlined at the beginning of this Practical Competency.
Using your combination square and soapstone, lay out cut lines 10 mm 2. (3⁄8 in.) apart on your base metal, or as directed by your instructor. These lines will act as a guide so your cuts are straight.
Check the equipment manufacturer’s cutting tip chart for the correct 3. tip size and oxy-fuel gas pressures. You might need a larger cutting tip because the depth of a bevel cut is greater than that of a square cut.
Install the appropriate size of cutting tip and set the oxy-fuel gas working 4. pressures.
Clean the cutting tip.5.
6. Put on your personal protective clothing (leather jacket, gloves, welding hat, etc.) and your personal protective equipment (cutting goggles, etc.).
Using your striker, ignite the cutting torch preheat flame and adjust it to 7. produce a neutral flame.
Align the guide bar with the cut line laid out on your workpiece. Be sure 8. to position the guide bar back from your line to allow for the radius of the cutting tip and the width of the kerf.
Begin your cut. Keep the cutting tip in contact with the guide bar as you 9. move the torch along the cut line. Proceed to cut with a smooth, steady travel speed. Keep the preheat flame cones a constant distance from the workpiece. Position yourself so you are able to watch the kerf and the line of the cut. Be sure to hold the torch at an angle (60°) that will produce a 30° bevel angle. More preheat is necessary because the angle of the torch causes much of the heat to be deflected off the plate.
After you have finished your cut, extinguish the flame and examine your 10. cut for defects. If your cut quality is acceptable, continue on to step 11. If your cut quality is not acceptable, make the appropriate changes or ask your instructor for assistance, then continue on to step 11.
notes
Module P2 Practical coMPetency P2-4
WelDer TrAInInG PrOGrAM — level C 45
Continue cutting along the remaining cut lines, repeating steps 9 and 10 11. for each cut. Remember to cool your base metal after every second cut so that it doesn’t get too hot.
12. When you feel that you are able to make cuts of acceptable quality every time, show your work to your instructor. He/she will evaluate your work for the following:
top edge is sharp (not rounded)•slag is minimal and easily removed•cut has a consistent bevel angle of 30°•draglines are perpendicular and not too pronounced•cut surface is flat and not rounded or concave•bottom edge is sharp (not rounded)•the cut is straight (you followed your cut line)•

notes
Module P2 Practical coMPetency P2-4
46 WelDer TrAInInG PrOGrAM — level C
Procedure P2-4-6C:Guided circular cuts on low-carbon steel plate
Materials
Base metal
6 mm to 25 mm (1⁄4" to 1") thick, low-carbon steel plate from shop scrap
Directions
Read and follow the “General procedures for all welding Practical 1. Competencies” as outlined at the beginning of this Practical Competency.
Using your combination square and soapstone, lay out centre line 2. locations to allow for 50-mm (2-in.) diameter circles on your base metal, or as directed by your instructor. The intersecting lines will act as a guide so you can use a hammer and centre punch to make a punch-mark for centring the circle cutter.
Install the circle-cutter attachment on the cutting torch. Circle-cutters 3. attach in different ways, depending on the manufacturer’s design.
Adjust the radius of the circle-cutter attachment to match the diameter of •the circle you are cutting. Do not forget to allow for the width of the kerf.
Adjust for preheat flame cone-to-work distance.•
Check the equipment manufacturer’s cutting tip chart for the correct tip 4. size and oxy-fuel gas pressures.
Install the appropriate size of cutting tip and s5. et the oxy-fuel gas working pressures.
Clean the cutting tip.6.
7. Put on your personal protective clothing (leather jacket, gloves, welding hat, etc.) and your personal protective equipment (cutting goggles, etc.).
Using your striker, ignite the cutting torch preheat flame and adjust it to 8. produce a neutral flame.
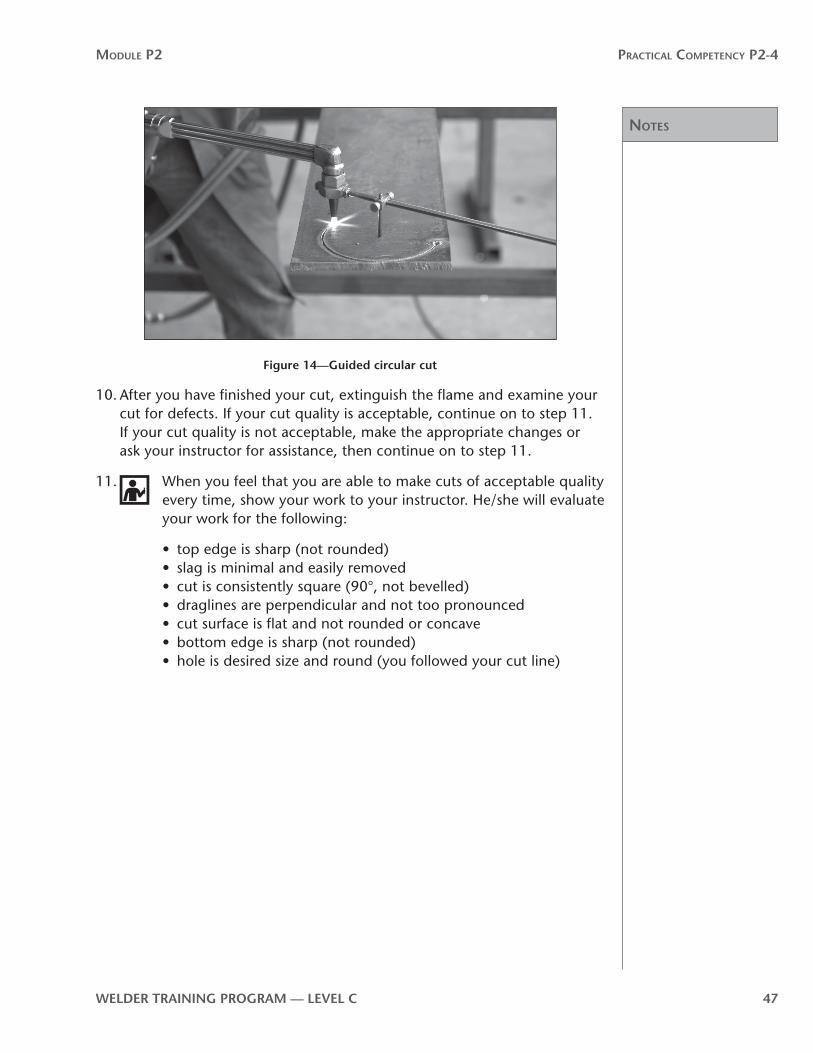
Put the circle-cutter’s adjustable centre pivoting point into the punch-9. mark indent you have made on your base metal. Following the recommended procedure for piercing holes (Practical Competency P2-4-4), pierce a hole in the base metal. Proceed to cut with a smooth, steady travel speed. Keep the preheat flame cones a constant distance from the workpiece (Figure 14). Be sure to keep the cutting tip perpendicular (90°) to the base metal so that your cut is square around the entire circumference of the hole.
notes
Module P2 Practical coMPetency P2-4
WelDer TrAInInG PrOGrAM — level C 47
Guided circular cutFigure 14—
After you have finished your cut, extinguish the flame and examine your 10. cut for defects. If your cut quality is acceptable, continue on to step 11. If your cut quality is not acceptable, make the appropriate changes or ask your instructor for assistance, then continue on to step 11.
11. When you feel that you are able to make cuts of acceptable quality every time, show your work to your instructor. He/she will evaluate your work for the following:
top edge is sharp (not rounded)•slag is minimal and easily removed•cut is consistently square (90°, not bevelled)•draglines are perpendicular and not too pronounced•cut surface is flat and not rounded or concave•bottom edge is sharp (not rounded)•hole is desired size and round (you followed your cut line)•

notes
Module P2 Practical coMPetency P2-4
48 WelDer TrAInInG PrOGrAM — level C

notes
Module P2 Practical coMPetency P2-4
WelDer TrAInInG PrOGrAM — level C 49
P2-4 learning Task 7:Wash nuts off bolts and gouge weldmentsTo complete this Learning Task, you must perform the following procedures:
Procedure A: Wash nuts off bolts•Procedure B: Gouge weldments•

notes
Module P2 Practical coMPetency P2-4
50 WelDer TrAInInG PrOGrAM — level C
Procedure P2-4-7A:Wash nuts off bolts
Materials
Base metal
6 mm to 25 mm (1⁄4" to 1") thick, low-carbon steel plate from shop scrap
13 mm (1⁄2") or larger diameter, machine bolt with nut
Directions
Read and follow the “General procedures for all welding Practical 1. Competencies” as outlined at the beginning of this Practical Competency.
2. Ask your instructor for directions.
Check the equipment manufacturer’s cutting tip chart for the correct tip 3. size and oxy-fuel gas pressures.
Install the appropriate size of cutting tip and set the oxy-fuel gas working 4. pressures.
Clean the cutting tip.5.
Place the bolt in a pierced, drilled or punched hole and tighten 6. the nut firmly.
7. Put on your personal protective clothing (leather jacket, gloves, welding hat, etc.) and your personal protective equipment (cutting goggles, etc.).
Using your striker, ignite the cutting torch preheat flame and adjust it to 8. produce a neutral flame.
Be sure to carefully follow the following sequence, otherwise the tip 9. orifices will become clogged with slag during cutting or the bolt and base metal will be damaged:
Preheat the nut on one side to a cherry red colour, keeping the •preheat flame cones about 3 mm (1⁄8 in.) above the surface of the nut (Figure 15, Step 1).
Back the tip away until the preheat flame cones are about 13 mm •(1⁄2 in.) from the nut and slowly depress the cutting oxygen control lever on the torch. You will see the metal start to burn and slag will blow away from the preheated area.
Use a slow washing motion down the side of the nut. Continue washing •the side of the nut away without cutting into the threads of the bolt. Proceed very carefully so you do not damage the bolt or the plate surface.

notes
Module P2 Practical coMPetency P2-4
WelDer TrAInInG PrOGrAM — level C 51
When you have removed one side of the nut, repeat the process on •the other side of the nut (Figure 15, Step 2).
This sequence must be done quickly so the bolt and base metal do not •get hot enough to cut.
The nut should fall off when cutting is complete. The bolt and base •metal should not have any burn marks in them.
Step 1
Step 2Step 3
Washing a nutFigure 15—
After you have finished your cut, extinguish the flame and examine 10. your cut for defects. (Figure 15, Step 3) If your cut quality is acceptable, continue on to step 11. If your cut quality is not acceptable, make the appropriate changes or ask your instructor for assistance, then continue on to step 11.
11. When you feel that you are able to make cuts of acceptable quality every time, show your work to your instructor. He/she will evaluate your work for the following:
cut quality•slag is minimal and easily removed•no damage to the bolt•no damage to the plate surface•
notes
Module P2 Practical coMPetency P2-4
52 WelDer TrAInInG PrOGrAM — level C
Procedure P2-4-7B:Gouge weldments
Materials
Base metal
6 mm to 25 mm (1⁄4" to 1") thick, low-carbon steel plate with welded joints from shop scrap
Directions
Read and follow the “General procedures for all welding Practical 1. Competencies” as outlined at the beginning of this Practical Competency.
2. Ask your instructor for directions.
Check the equipment manufacturer’s gouging tip chart for the correct 3. tip size and oxy-fuel gas pressures.
Install the appropriate size of gouging tip and set the oxy-fuel gas 4. working pressures.
Clean the gouging tip.5.
6. Put on your personal protective clothing (leather jacket, gloves, welding hat, etc.) and your personal protective equipment (cutting goggles, etc.).
Using your striker, ignite the gouging torch preheat flame and adjust it 7. to produce a neutral flame.
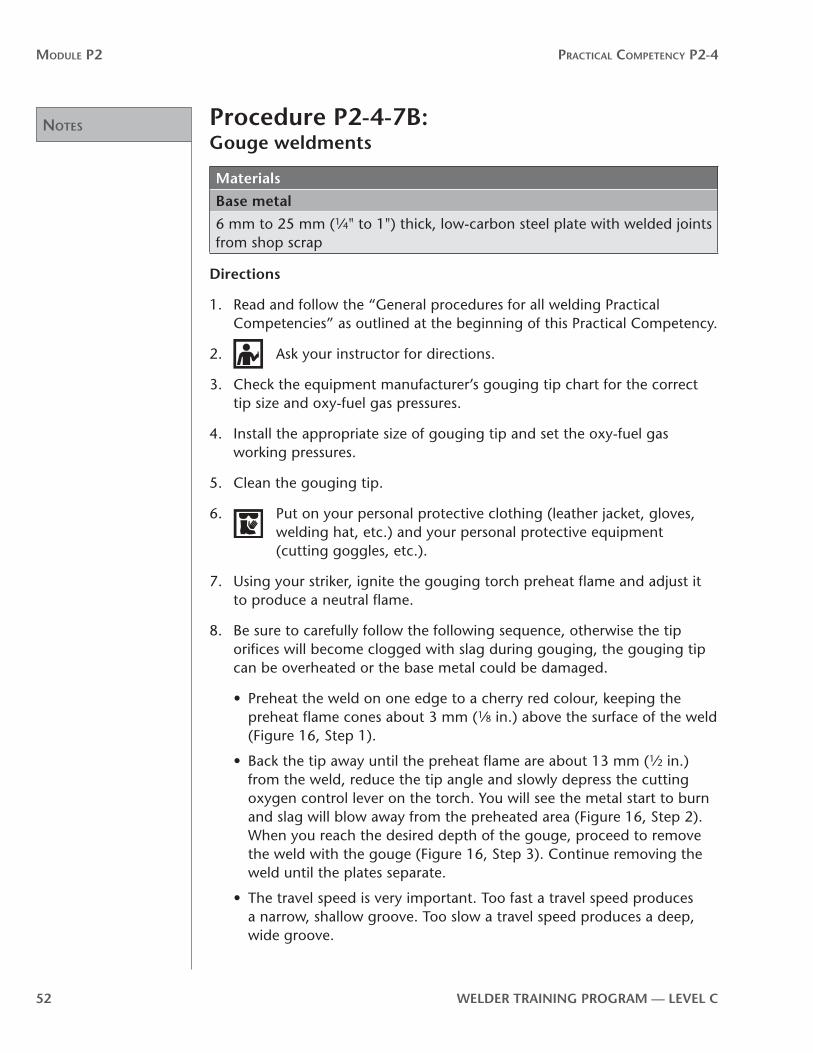
Be sure to carefully follow the following sequence, otherwise the tip 8. orifices will become clogged with slag during gouging, the gouging tip can be overheated or the base metal could be damaged.
Preheat the weld on one edge to a cherry red colour, keeping the •preheat flame cones about 3 mm (1⁄8 in.) above the surface of the weld (Figure 16, Step 1).
Back the tip away until the preheat flame are about 13 mm (• 1⁄2 in.) from the weld, reduce the tip angle and slowly depress the cutting oxygen control lever on the torch. You will see the metal start to burn and slag will blow away from the preheated area (Figure 16, Step 2). When you reach the desired depth of the gouge, proceed to remove the weld with the gouge (Figure 16, Step 3). Continue removing the weld until the plates separate.
The travel speed is very important. Too fast a travel speed produces •a narrow, shallow groove. Too slow a travel speed produces a deep, wide groove.

notes
Module P2 Practical coMPetency P2-4
WelDer TrAInInG PrOGrAM — level C 53
Step 1 Step 2
Step 3
Gouging sequenceFigure 16—
After you have finished your gouge, extinguish the flame and examine 9. your gouge for defects. If your gouge quality is acceptable, continue on to step 10. If your gouge quality is not acceptable, make the appropriate changes or ask your instructor for assistance, then continue on to step 10.
10. When you feel that you are able to make gouges of acceptable quality every time, show your work to your instructor. He/she will evaluate your work for the following:
gouge quality with plates cleanly separated•slag is minimal and easily removed•gouge is consistent in width•gouge is consistent in depth•minimal damage to plate surfaces•

notes
Module P2 Practical coMPetency P2-4
54 WelDer TrAInInG PrOGrAM — level C

notes
Module P2 Practical coMPetency P2-4
WelDer TrAInInG PrOGrAM — level C 55
P2-4 learning Task 8:Freehand cuts on low-carbon steel pipeTo complete this Learning Task, you must perform the following procedures:
Procedure A: Freehand square cuts on low-carbon steel pipe•Procedure B: Freehand bevel cuts on low-carbon steel pipe•

notes
Module P2 Practical coMPetency P2-4
56 WelDer TrAInInG PrOGrAM — level C
Procedure P2-4-8A:Freehand square cuts on low-carbon steel pipe
Materials
Base metal
100 mm (4") diameter or greater, low-carbon steel pipe from shop scrap
Directions
Read and follow the “General procedures for all welding Practical 1. Competencies” as outlined at the beginning of this Practical Competency.
Using a wraparound and soapstone, lay out lines 10 mm (2. 3⁄8 in.) apart on your pipe, or as directed by your instructor (Figure 17). These lines will act as a guide so your cuts are straight.
Using a wraparound on pipeFigure 17—
Check the equipment manufacturer’s cutting tip chart for the correct tip 3. size and oxy-fuel gas pressures.
Install the appropriate size of cutting tip and set the oxy-fuel gas working 4. pressures.
Clean the cutting tip.5.
6. Put on your personal protective clothing (leather jacket, gloves, welding hat, etc.) and your personal protective equipment (cutting goggles, etc.).
Using your striker, ignite the cutting torch preheat flame and adjust it to 7. produce a neutral flame.
Before starting the cut, you must first pierce a hole in the waste portion 8. of the pipe. Follow the recommended procedure for piercing holes (Practical Competency P2-4-4).

notes
Module P2 Practical coMPetency P2-4
WelDer TrAInInG PrOGrAM — level C 57
Begin the cut at the 3 o’clock position (Figure 18, Step 1) and cut 9. toward the 12 o’clock position (Figure 18, Step 2). This prevents slag from interfering with the cut. When you reach the 12 o’clock position, stop the cut and rotate the pipe a quarter turn (Figure 18, Step 3). Cut the next quarter section. Stop, rotate the pipe another quarter turn and continue the cut. Proceed in this way until the cut is complete.
Step 3Step 2
Step 1
Cutting sequence for square cuts on pipeFigure 18—
After you have finished your cut, extinguish the flame and examine your 10. cut for defects. If your cut quality is acceptable, continue on to step 11. If your cut quality is not acceptable, make the appropriate changes or ask your instructor for assistance, then continue on to step 11.
11. When you feel that you are able to make cuts of acceptable quality every time, show your work to your instructor. He/she will evaluate your work for the following:
top edge is sharp (not rounded)•slag is minimal and easily removed•cut is consistently square (90°, not bevelled) •draglines are at 10° to 20° and not too pronounced•cut surface is flat and not rounded or concave•bottom edge is sharp (not rounded)•the cut is straight (you followed your cut line)•

notes
Module P2 Practical coMPetency P2-4
58 WelDer TrAInInG PrOGrAM — level C
Procedure P2-4-8B:Freehand bevel cuts on low-carbon steel pipe
Materials
Base metal
100 mm (4") diameter or greater, low-carbon steel pipe from shop scrap
Directions
Read and follow the “General procedures for all welding Practical 1. Competencies” as outlined at the beginning of this Practical Competency.
Using a wraparound and soapstone, lay out cut lines 10 mm (2. 3⁄8 in.) apart on your pipe, or as directed by your instructor. These lines will act as a guide so your cuts are straight.
Check the equipment manufacturer’s cutting tip chart for the correct tip 3. size and oxy-fuel gas pressures.
Install the appropriate size of cutting tip and set the oxy-fuel gas working 4. pressures.
Clean the cutting tip.5.
6. Put on your personal protective clothing (leather jacket, gloves, welding hat, etc.) and your personal protective equipment (cutting goggles, etc.).
Using your striker, ignite the cutting torch preheat flame and adjust it to 7. produce a neutral flame.
Before starting the cut, you must first pierce a hole in the waste portion 8. of the pipe. Follow the recommended procedure for piercing holes (Practical Competency P2-4-4).
Begin the cut at the 2 o’clock position and cut over the 12 o’clock to the 9. 11 o’clock position (Figure 19). This prevents slag from interfering with the cut. When you reach the 11 o’clock position, stop the cut and rotate the pipe a quarter turn. Cut the next quarter section. Stop, rotate the pipe another quarter turn and continue the cut. Proceed in this way until the cut is complete. Be sure to hold the torch at an angle (60°) that will produce a 30° bevel angle. More preheat is necessary because the angle of the torch causes much of the heat to be deflected off the pipe.

notes
Module P2 Practical coMPetency P2-4
WelDer TrAInInG PrOGrAM — level C 59
Step 1
Step 2 Step 3
Cutting sequence for bevel cuts on pipeFigure 19—
After you have finished your cut, extinguish the flame and examine your 10. cut for defects. If your cut quality is acceptable, continue on to step 11. If your cut quality is not acceptable, make the appropriate changes or ask your instructor for assistance, then continue on to step 11.
11. When you feel that you are able to make cuts of acceptable quality every time, show your work to your instructor. He/she will evaluate your work for the following:
top edge is sharp (not rounded)•slag is minimal and easily removed•cut has a consistent bevel angle of 30°•draglines are perpendicular and not too pronounced•cut surface is flat and not rounded or concave•bottom edge is sharp (not rounded)•the cut is straight (you followed your cut line)•

notes
Module P2 Practical coMPetency P2-4
60 WelDer TrAInInG PrOGrAM — level C

Practical comPetency P2-5:Cuts with cutting machines using oxy-fuel gas
P2
-5

WelDer TrAInInG PrOGrAM — level C 63
Module P2 Practical coMPetency P2-5
OutcomesIn this Practical Competency you will perform cuts with a variety of cutting machines that use oxy-fuel gas. Make sure you follow all the safety precautions for using these machines and that you fully understand how to operate these machines before trying to do so. Because each machine might have different setup and operating instructions, you will be required to attend a demonstration.
When you have completed the procedures in this Practical Competency, you will be able to:
set up and operate an oxy-fuel gas straight-line cutting machine•
produce high-quality straight and bevel cuts with an oxy-fuel gas straight-line •cutting machine
set up and operate an oxy-fuel gas shape-cutting machine•
produce high-quality shape cuts with an oxy-fuel gas shape-cutting machine•
set up and operate an oxy-fuel gas pipe-bevelling machine•
produce high-quality straight and bevel cuts with an oxy-fuel gas pipe-bevelling •machine
evaluationYou will be required to:
set up and operate a variety of cutting machines•produce high-quality square and bevel cuts safely•
MaterialsEach Practical Competency identifies the materials you will need to complete the assigned procedure. Your instructor will arrange for these materials to be available to you.
WARNING!
If a Practical Competency procedure requires that you use a tool or piece of equipment that you have not previously operated—or you feel unsure about the operation of any tools or equipment—ask your instructor to demonstrate the correct procedures for the tool or piece of equipment before you use it.
Use of materialsWelding is a very expensive trade. The cost of steel, filler metal and other consumables can rise or fall, depending on the marketplace. The only area in which there can be significant potential savings is in how we use steel. Steel is the largest single consumable cost. This is true in both training and industry.

64 WelDer TrAInInG PrOGrAM — level C
Module P2 Practical coMPetency P2-5
Training institutions often have to buy scrap material to practise on. Therefore, steel used for practice might not be the exact size or thickness laid out in the Practical Competencies. This will not affect your learning. In fact, it might even better reflect the reality of the real welding world, where it is common practice to substitute material sizes.
When cutting new steel or steel crops, always strive for maximum use and minimum waste. Cut pieces from one end of plate so as to leave the largest possible area untouched for later use. Assemble lap joints and tee joints in a way that will reduce waste and maximize the size of off-cuts after welding.
General procedures for all welding Practical Competencies1. Arrange with your instructor for a demonstration of all procedures and for the
tools and equipment you will need.
2. Follow all safety precautions, wear all personal protective clothing and use all personal protective equipment. Review P1-2: Use Safe Work Practices.
Clean the base metal, if necessary. Remove any rust, mill scale or paint.3.
4. You will be required to repeat procedures until you receive an acceptable evaluation from your instructor.

notes
Module P2 Practical coMPetency P2-5
WelDer TrAInInG PrOGrAM — level C 65
P2-5 learning Task 1:Cuts with a straight-line cutting machine using oxy-fuel gasMaterials
Base metal
6 mm to 25 mm (1⁄4" to 1") thick, low-carbon steel plate from shop scrap
Directions
Read and follow the “General procedures for all welding Practical 1. Competencies” as outlined at the beginning of this Practical Competency.
Using your combination square and soapstone, lay out cut lines 10 mm 2. (3⁄8 in.) apart on your base metal, or as directed by your instructor. These lines will act as a guide so you won’t waste metal.
Check the equipment manufacturer’s cutting tip chart for the correct tip 3. size and oxy-fuel gas pressures.
Install the appropriate size of cutting tip and set the oxy-fuel gas working 4. pressures.
Clean the cutting tip.5.
6. Put on your personal protective clothing (leather jacket, gloves, welding hat, etc.) and your personal protective equipment (cutting goggles, etc.).
Follow the cutting machine setup and operating instructions. Although 7. these procedures will vary somewhat depending on the type of machine, you should remember to:
make sure your base metal is positioned in the machine correctly•set the torch angle for a square cut (90°)•centre the cutting tip so the cutting orifice is over the intended line of cut•ignite and adjust the cutting torch to achieve a neutral flame•adjust the preheat flame-to-work distance•start the cut and adjust the machine for the correct cutting speed•complete the cut and follow the machine shutdown instructions•
Repeat the cutting process on various thicknesses of plate or as directed 8. by your instructor until you are thoroughly familiar with the operation of the machine, and you are making good-quality cuts.

notes
Module P2 Practical coMPetency P2-5
66 WelDer TrAInInG PrOGrAM — level C
9. When you feel that you are able to make cuts of acceptable quality every time, show your work to your instructor. He/she will evaluate your work for the following:
top edge is sharp and square•slag is minimal and easily removed•cut is consistently square (90°) or bevelled (37.5° or 30°), •as per directionsdraglines are vertical and not too pronounced•cut surface is flat and not rounded or concave•bottom edge is sharp and square•the cut is straight (you followed your cut line)•you followed the correct cutting sequence•
10. Extinguish the flame and adjust the cutting machine for a:
37.5° bevel cut. Repeat steps 1 through 9 to cut 37.5° bevels •using the correct cutting sequence, or as directed by your instructor.
30° bevel cut. Repeat steps 1 through 9 to cut 30° bevels using •the correct cutting sequence, or as directed by your instructor.

notes
Module P2 Practical coMPetency P2-5
WelDer TrAInInG PrOGrAM — level C 67
P2-5 learning Task 2:Cuts with a shape-cutting machine using oxy-fuel gas
Materials
Base metal
6 mm to 25 mm (1⁄4" to 1") thick, low-carbon steel plate from shop scrap
Directions
Read and follow the “General procedures for all welding Practical 1. Competencies” as outlined at the beginning of this Practical Competency.
Check the equipment manufacturer’s cutting tip chart for the correct tip 2. size and oxy-fuel gas pressures.
Install the appropriate size of cutting tip and set the oxy-fuel gas working 3. pressures.
Clean the cutting tip.4.
5. Put on your personal protective clothing (leather jacket, gloves, welding hat, etc.) and your personal protective equipment (cutting goggles, etc.).
Follow the cutting machine setup and operating instructions. Although 6. these procedures will vary somewhat depending on the type of machine, you should remember to:
install the template or drawing correctly•make sure that the base metal is positioned in the machine correctly•centre the cutting tip so the cutting orifice is over the intended line of cut•ignite and adjust the cutting torch to achieve a neutral flame•adjust the preheat flame-to-work distance•start the cut and adjust the machine for the correct cutting speed•complete the cut and follow the machine shutdown instructions•
Repeat the cutting process on various thicknesses of plate or as directed 7. by your instructor until you are thoroughly familiar with the operation of the machine and you are making good-quality cuts.

notes
Module P2 Practical coMPetency P2-5
68 WelDer TrAInInG PrOGrAM — level C
8. When you feel that you are able to make cuts of acceptable quality every time, show your work to your instructor. He/she will evaluate your work for the following:
top edge is sharp and square•slag is minimal and easily removed•cut is consistently square (90°)•draglines are vertical and not too pronounced•cut surface is flat and not rounded or concave•bottom edge is sharp and square•workpiece is cut to the intended dimensions and specifications •you followed the correct cutting sequence•
notes
Module P2 Practical coMPetency P2-5
WelDer TrAInInG PrOGrAM — level C 69
P2-5 learning Task 3:Cuts with a pipe-bevelling machine using oxy-fuel gasMaterials
Base metal
100 mm (4") or larger diameter, schedule 40 or heavier (thicker wall) low-carbon steel pipe from shop scrap
Directions
Read and follow the “General procedures for all welding Practical 1. Competencies” as outlined at the beginning of this Practical Competency.
Using your soapstone, lay out cut lines 10 mm (2. 3⁄8 in.) apart on your pipe, or as directed by your instructor. These lines will act as a guide so you won’t waste metal.
Check the equipment manufacturer’s cutting tip chart for the correct tip 3. size and oxy-fuel gas pressures.
Install the appropriate size of cutting tip and set the oxy-fuel gas working 4. pressures.
Clean the cutting tip.5.
6. Put on your personal protective clothing (leather jacket, gloves, welding hat, etc.) and your personal protective equipment (cutting goggles, etc.).
Follow the cutting machine setup and operating instructions. Although 7. these procedures will vary somewhat depending on the type of machine, you should remember to:
make sure your pipe is positioned on the machine correctly•set the torch angle for a square cut (90°) or bevelled cut (37.5° or 30°), •as per directionscentre the cutting tip so the cutting orifice is over the intended line of cut•ignite and adjust the cutting torch to achieve a neutral flame•adjust the preheat flame-to-work distance•start the cut and adjust the machine for the correct cutting speed•complete the cut and follow the machine shutdown instructions•
Repeat the procedure several times until you are thoroughly familiar with 8. the operation of the machine.
notes
Module P2 Practical coMPetency P2-5
70 WelDer TrAInInG PrOGrAM — level C
9. When you feel that you are able to make cuts of acceptable quality every time, show your work to your instructor. He/she will evaluate your work for the following:
top edge is sharp and square•slag is minimal and easily removed•cut is consistently square (90°) or bevelled (37.5° or 30°), as per •directionsdraglines are vertical and not too pronounced•cut surface is flat and not rounded or concave•bottom edge is sharp and square•the cut is straight (your preheat flame-to-work distance was the •same all around the pipe)you followed the correct cutting sequence•
10. Extinguish the flame and adjust the cutting machine for a:
37.5° bevel cut. Repeat steps 1 through 9 to cut 37.5° bevels •using the correct cutting sequence, or as directed by your instructor.
Extinguish the flame and adjust the cutting machine for a 30° •bevel cut. Repeat steps 1 through 9 to cut 30° bevels using the correct cutting sequence, or as directed by your instructor.