Welcome to GuestCenter - Amazon S3...Now Seat a walk-in Not sure if you have space for a walk-in...
41
Welcome to GuestCenter By upgrading, you’re joining the majority of restaurants in our network who benefit from all of the new and improved features in GuestCenter.
Transcript of Welcome to GuestCenter - Amazon S3...Now Seat a walk-in Not sure if you have space for a walk-in...

Welcome to GuestCenterBy upgrading, you’re joining the majority of restaurants in our network who benefit from all of the new and improved features in GuestCenter.

Purpose of this GuideGuestCenter has all the essential functions you depended on in your previous reservation system (Electronic Reservation Book). However, GuestCenter is different. You’ll discover a modern look and feel, and new functionality that we’ve added to better your operations and business overall. This guide is intended to help you discover those tried and true functions, as you learn more and more about GuestCenter.

Table of Contents
Basics5. Basic Layout
6. Navigation8. Reservation List9. Reservation Details10. Notes and Codes11. Cover Count
12. Shift Notes14. Reservation Status15. Table Status16. Reservation Flags & Upcoming Reservations17. Floor Timers
Actions19. Assign a Table20. Seat a Reservation21. Making a Reservation23. Seat a Walk-In25. Add a Party to the Waitlist
26. Block a Table27. Servers & Sections28. Server Rotation29. Problem Reservations
Admin31. Assignment Conflicts
32. Blocking Online Reservations (Current Shift)33. User Admin35. User Name Requirements36. Reservation Reports38. Offline Mode
39. Credit Card Administration

Basics

Basic Layout
1. Navigation Bar / Application Menu2. Shift & Date Selector3. Go to Current Shift4. Floor Plan Selector5. Reservation List
Then Now
6. Waitlist7. Make a Reservation Button8. Seat & Move Buttons / Seat or Pre-Assign Buttons9. Walk-In Button
1
2 3
4 5 6
7 9
12
3
4
5
6
7
8
9
8
Return to Table of Contents

Then Now
Navigation Tool Bar
1. Grid / Timeline2. Floor Plan View3. Guestbook
4. Shift Notes5. User & Chit Printer Admin6. Software Version / App Version
Continued on next page >
The ability to adjust your reservation availability (i.e. Floor Plans and Shifts), is available in GuestCenter Web.
1
2
3
45
6
12
34
56
Return to Table of Contents

Then Now
Navigation Tool Bar
1. In-Shift Alerts / Notifications2. Waitlist3. Make a Reservation4. Shift Notes
Sheet View not available in GuestCenter
1
2
34
1
2
34
Future Feature not available in GuestCenter
Return to Table of Contents

Then Now
Reservation List
1. Notes & Codes Flag /Notes & Tags Icons
2. Web Booking Indicator
3. Server Assignment & Rotation*4. Show-Hide Server Sections*5. Show-Hide System Table Assignments*
*in GuestCenter iPad Only
1
2
3 4 5
1
2
3
45
Return to Table of Contents

Then Now
Reservation Details
Previously, to see the reservation details, you needed to select the reservation in the listing and the details would appear at the bottom of the screen.
Similarly, in GuestCenter, you simply select the reservation you would like to view in the listing, and the Reservation Details Card will pop-up on the right.
From this view in GuestCenter you can also: ● Change the Date and/or
Time of the Reservation● Update the Party Size● Edit the Party Turn Time● Change the Party Status
● Update the Guest Profile● Review Reservation Changes or Guest Visit History● Print a Reservation Chit● Add a Credit Card to a Reservation (If Enabled)
Return to Table of Contents

Now
Visit Tags Dietary Needs Special Events & Promos
Guest Tags & Categorized Guest Notes Special Guests / Special Relationship Seating Requests / Preferences Food & Drink Preferences
Notes Visit Notes & General Guest Notes Guest Note categories allow you to better organize your guest information so you can easily find the most important and relevant details.
Notes & Codes
Codes v. Tags: New in GuestCenter is the introduction of Tags. Tags work the same way as Codes, with the slight difference that all Tags appear together, regardless if they are Guest or Visit Tags.
In addition, there are new correlating icons that will appear throughout the application. These icons correlate to one of four Tag categories, or one of three Guest Note categories.
Return to Table of Contents

Then Now
Cover Count
The cover and party details in the shift overview screen are updated in real-time
New views in GuestCenter: • Bookings by party size• Covers by channel (Web, Phone, Walk-in)• POS Details (iPhone Only)
1
1
Return to Table of Contents

Then Now
Shift Notes
Keep your staff in the know like never before.
The pop-up is designed to alert your employees of existing notes, but not disrupting their ability to continue to serve guests. The pop-up displays Special Occasion/Event note headlines, and highlights the number of large parties or general notes in the shift.
Continued on next page >
Shift Note Appearance Shift Note Pop-Up from Floor Plan
Return to Table of Contents

Now
Special Occasion/Event notes Can be see in the reservation booking flow, so you can provide necessary details to guest as you make reservations.
General notes Can be used to communicate details for a specific shift or all day long. Leave important notes for the staff coming in tonight, or give a heads up to the manager working breakfast tomorrow.
Shift NotesReturn to Table of Contents

Then Now
Reservation Status
You should find the flow for statusing a reservation very familiar. The main difference here is that the status button is found within the reservation you select.
Note: No Answer, Wrong Number and Paged 1 - Paged 3 status do not exist in GuestCenter.
1. Tap the Reservation2. Tap the Status Button3. Select the new Status
1
2
3
1
2
3
Return to Table of Contents

Then Now
Table Status
Similar to reservation statusing, the steps in GuestCenter remain the same. Again, the status button can be found in the Table Details card that appears.
Seated statuses are also accessible from the reservation details card.
Cleared status does not exist in GuestCenter.
1. Tap the Table2. Tap the Status Button3. Select the new Status
1
2
3
1
2
3
Return to Table of Contents

Then Now
Reservation Flags & Upcoming Reservations
In GuestCenter, reservation flags identify the next upcoming reservation assigned to a table. If you would like to see all of the reservations planned for a particular table, you can do so by tapping the table and viewing the table details card. You can also expand the table schedule to see additional information for these upcoming reservations.
Reservation Flags Table Reservation Details
Table Details Card
Table Schedule Drop Down
Reservation Flags
Return to Table of Contents

Then Now
Floor Timers
Say goodbye to the old cluttered floor views. New to GuestCenter are Table Status Bars. The Seated Timers count up and the Status Bar reflects the turn time for the party size.
The status bar is neatly displayed on each table, giving you a full, decluttered view of the dining room floor. At a glance you can quickly assess which tables were just sat, and which tables should be finishing up soon.
Looking for greater detail? Select a table to view how long a party has been seated.
Return to Table of Contents

Actions

Then Now
Assign a Table
The new action button in the the reservation listing allows you to pre-assign or seat a reservation.
In this view, you can select as many tables as you like and finalize the selection by choosing the Seat Now or Pre-Assign button.
1. Tap the Reservation2. Tap Move3. Tap the Table
1. Tap the Seat/Assign Button2. Tap the Table3. Tap Pre-Assign4. Confirm the Assignment
12
3
4
1
23
Return to Table of Contents

Then Now
Seat a Reservation
New in GuestCenter: After seating the party you will see the reservation time will update to the seated time in the reservation listing.
Seated Time
1. Tap the Reservation2. Tap Seat3. Tap the Table
1. Tap the Seat/Assign Button2. Tap the Table3. Tap Seat Now
1
12
3
2
3
Return to Table of Contents

Then Now
Making a reservation
Continued on next page >
In GuestCenter: At a glance, see real-time data of cover counts to help you guide diners to the times you need them the most. There are clear call outs for when you have exceeded your pacing, or when you no longer have any tables available, which empowers you to override your booking rules when you see fit. Intelligent prompts alert you when you do override your settings. These overrides can be passcode protected and are logged in the party’s history.
Reserve ScreenBooking Flow
1 1
Return to Table of Contents

Then Now
Making a reservation
Booking from the GridBooking on a Table
Booking from the Timeline
Booking on a Table
1. Tap the Table or the Slot on the Grid/Timeline2. Tap Make Res/Make Reservation
1
2
1
1
1
2
Return to Table of Contents

Then Now
Seat a walk-in
Continued on next page >
Seating a walk-in is still quick and easy in GuestCenter. There are two ways to add a walk-in, either by seating them directly on a table or via the Waitlist/Walk-in Flow.
1. Tap Walk-in2. Select the Party Size3. Tap OK4. Tap the Table
1. Tap the Table2. Tap Seat Walk-In3. Select the Party Size
1
24
3
1
23
Return to Table of Contents

Now
Seat a walk-in
Not sure if you have space for a walk-in right now? GuestCenter can help.
Use the Waitlist/Walk-in Flow to determine if you can seat a guest now, and the seating spotlights on the floor plan will guide you to tables that are open for the party’s turn time.
1. Tap the Walkist/Walk-in Button2. Select Seat Now in the Flow3. View spotlight availability and select a Table4. Tap Seat Now
1
2 34
Return to Table of Contents

Then Now
Add a Party to the Waitlist
Adding parties to the waitlist is easy and accurate in GuestCenter.
GuestCenter will suggest a wait quote based on your table availability and current bookings.
When you add a mobile phone number for the guest, they are immediately notified via text. If a waitlist guest decides to remove themselves from the list via text, their entry in the waitlist is automatically updated and you are always in the know.
12
1
Return to Table of Contents

Then Now
Block a Table
Blocking tables in GuestCenter is very similar to your previous system, but with a few additional perks: ● Block multiple tables at once● Block an individual table multiple times throughout the day● Create all day blocks that cross over multiple shifts
1. Tap the Table2. Tap Block Table3. Select the Start and End Time/Resume Time4. Select Block Table/Confirm Block
1
2
3
4
1
2
3
4
Return to Table of Contents

Then Now
Servers & Sections
Assigning servers for the shift has never been easier. There is no need to head to your admin section to add servers to the list. In GuestCenter you can choose from your list of servers right from the floor plan and immediately assign them to sections.
1. Tap Admin2. Tap Servers3. Assign Servers to the Shift4. Tap the Server Button5. Tap a Server and Assign Tables6. Tap Save
1. Tap the Server Button2. Tap a Server and Assign Tables3. Tap Done Assigning
12
3
46
5
1
2
3
Return to Table of Contents

Then Now
Server Rotation
No one likes getting triple sat. GuestCenter allows you to manage section seatings by covers or tables. The best news, these stats are all in one place, which can be shown or hidden on the Floor Plan at any time.
Cover counts only, and no indication of who was sat last
Pop-up window to view table counts and last seated time
The self-rotating list makes it clear who was last sat and who is up next in the rotation, and the last sat timestamps help you ensure enough breathing space between seatings.
Return to Table of Contents

Then Now
Problem Reservations At booking, every reservation is assigned to space in the dining room. These table assignments, referred to as System Recommended Assignments, hold inventory space for the party, keeping availability current and accurate.
Problem Reservations are reservations that are not assigned to a table and hence are not impacting table availability. The Problem Reservation view in GuestCenter immediately alerts you when Problems exist so that you can quickly assign them to tables and avoid double bookings.
Problem Reservation in the Reservation Listing
Problem Reservation on the Grid
Problem Reservation in the Reservation Listing
Problem Reservation on the Timeline (iPad Only)
Problem Reservations view
Return to Table of Contents

Admin

Then Now
Assignment Conflicts
We’ve improved how assignment conflicts are highlighted in GuestCenter. Now, not only will overlapping assignments appear in red on the timeline view, but a new flag has been added to the reservation listing to alert you when two reservations are assigned to the same table at the same time.
No Conflict Flag in the Reservation Listing
Assignment Conflict on the Grid
Assignment Conflict in the Reservation Listing
Assignment Conflict on the Timeline (iPad Only)
Return to Table of Contents

Now
Blocking Online Reservations (Current Shift)
No matter how much you prepare and plan, the reality is, sometimes things happen that you can’t expect. The Block Reservation feature was designed for those moments. Now, you can block incoming web reservation for as little or as much time as you need to get back to normal operations (and it’s only available in GuestCenter). Plus, the Block Reservation feature can be passcode-protected, so only those with authority can enable or disable the block.
The online block can be added or removed at anytime during the shift, and never hinders your ability to assign and seat guests.
Active Block Appearance
1
2
35
4
Return to Table of Contents

Then Now
User Admin
The only way to add or update users in the old system is in the reservation window
Continued on next page >
1. In the reservation window, touch Edit2. Tap Add3. Enter the User Info4. Tap Save
1. Under the Application Menu, Tap Settings2. Tap User Management3. Tap +Add User4. Enter the User Info5. Tap the arrow to save
1
2
3
4
1
2
3
45
Return to Table of Contents

Then Now
Server Admin
1. Tap Admin2. Tap Server3. Tap Add4. Enter Server Info5. Select Save
1. Follow the same steps as adding a user, but in addition select the Servercheckbox in the Edit User window.
1
2
34
5
1
2
3
46
5
Return to Table of Contents

Then Now
User Name Requirements
With User Action Logging in GuestCenter, you can still track which users add, change, or cancel reservations. However, these broad categories have been split into specific actions to focus on the updates you care about most.
12 3
1
23
Return to Table of Contents
Then Now
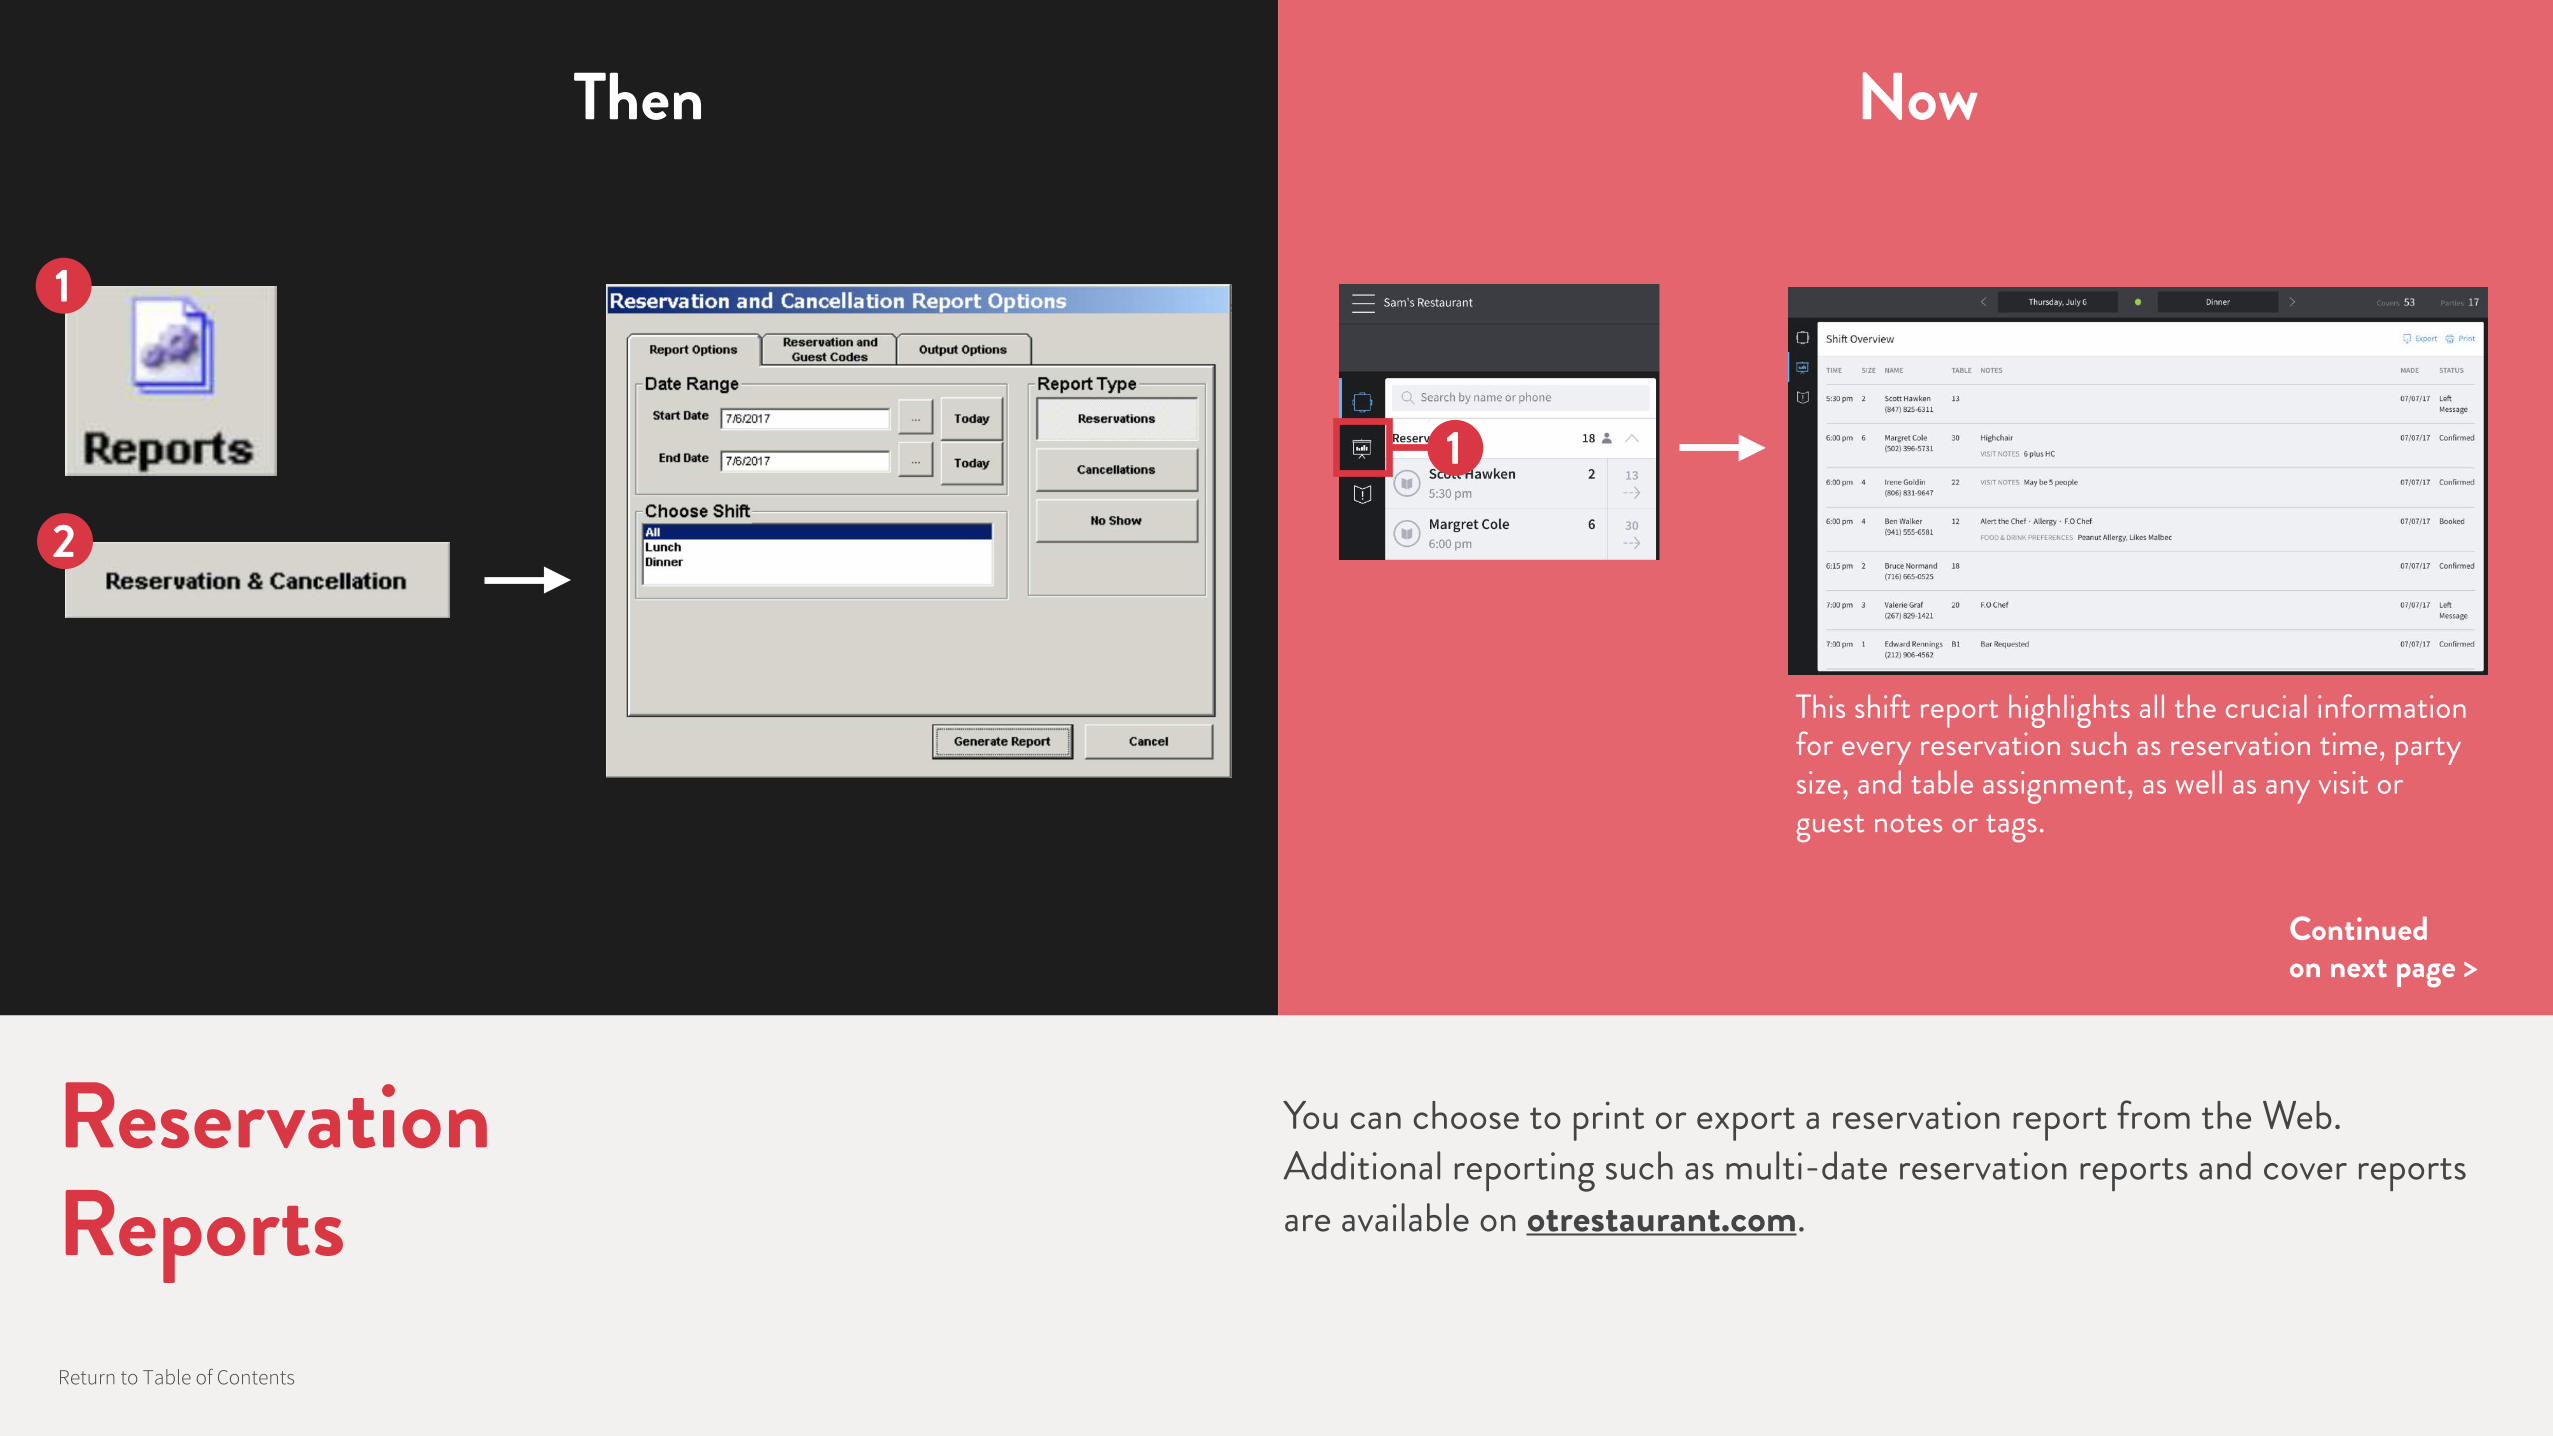
Reservation Reports
You can choose to print or export a reservation report from the Web. Additional reporting such as multi-date reservation reports and cover reports are available on otrestaurant.com.
This shift report highlights all the crucial information for every reservation such as reservation time, party size, and table assignment, as well as any visit or guest notes or tags.
Continued on next page >
1
2
1
Return to Table of Contents

Then Now
Reservation Reports
For a concise view of your most important reservations and shift notes, refer to the Shift Overview.
Return to Table of Contents

Then Now
Offline Mode
Offline mode enables you and your team to use GuestCenter in-service despite any internet connectivity issues you may experience. While you’re in offline mode, you will be able to see your floor plan and look up information about reservations and guests, and diners can still book reservations online. When your connectivity is restored, your iPad will sync any changes with the cloud. For more detail about offline mode visit community.otrestaurant.com.
Warning icons and prompts will alert you if your system goes offline.
11
1
Return to Table of Contents

Then Now
Credit Card Administration
Reservation appearance with credit card
Warning message when adding credit cards to notes
Credit Card numbers are only visible at the time of entry. Once the number is entered, the last four digits of the stored credit card will appear in the reservation.
For additional protection, GuestCenter will not allow credit card numbers to be insecurely stored in Guest or Visit notes. If someone attempts to add a credit card in the notes, the number will immediately be removed.
If you previously required a credit card for reservation bookings, you can continue to do so with GuestCenter. Unlike your previous system, GuestCenter allows you to securely store credit card information via a 3rd party provider, Stripe. Once the credit card is entered, Stripe will verify the authenticity of the card, and save the credit card to the reservation.
Continued on next page >
Return to Table of Contents

Now
Charging Guests
If it is necessary to charge a guest a late cancellation or no-show fee, this can be done within the reservation in GuestCenter Web.
1
2
3
Return to Table of Contents

We offer a variety of ways to help get you acclimated. You can watch video tutorials about the app, sign up for weekly interactive webinars about GuestCenter, take certification courses, and more.
LEARN MORE
More GuestCenter Training Resources