Welcome Parents, Jackie Lee - Welcome to NYC.gov | … Part 1: Introducing “Welcome Parents”...
24
1 Education Topics This packet includes… Complete lesson set on “Welcome Parents,” including: • Questioning skills • Problem-solving activities • Interviews on websites • Reviewing websites with certain criteria • Researching resources for parents • How students can create a handbook of resources for parents This material was created by… Seungyeon (Jackie) Lee She teaches at… Center for Immigrant Education and Training, LaGuardia Community College She can be contacted at… [email protected]
Transcript of Welcome Parents, Jackie Lee - Welcome to NYC.gov | … Part 1: Introducing “Welcome Parents”...

1
Education Topics This packet includes…
Complete lesson set on “Welcome Parents,” including:
• Questioning skills • Problem-solving activities • Interviews on websites • Reviewing websites with certain criteria • Researching resources for parents • How students can create a handbook of
resources for parents
This material was created by…
Seungyeon (Jackie) Lee
She teaches at…
Center for Immigrant Education and Training, LaGuardia Community College
She can be contacted at…

2
We Are New York: “Welcome Parents”
Lessons for Creating a Special Project:
The Parent Handbook
Developed by Seungyeon (Jackie) Lee, Instructor [email protected]
Center for Immigrant Education and Training LaGuardia Community College, CUNY for the CUNY Adult Literacy Programs
Fall 2009

3
Thanks to:
Hillary Gardner for guidance and support
Paula Michelin for brainstorming
John Hunt and Suma Kurien for encouragement

4
Table of Contents
Introduction Page 4 Part I Introducing “Welcome Parents” Page 5 Part II Preparing for “The Parent Handbook” Page 15 Part III Creating “The Parent Handbook” Page 19 Appendix Page 23
Introduction The Purpose The main purpose of this project is to provide students (adult learners who are also parents of school aged children) with opportunities to develop research skills by creating a parent handbook for themselves and other immigrant parents. Such skills are required not only for academic purposes, but also for these students’ everyday lives. For parents, in particular, these are must-have skills. They have to ask questions all the time to find better services for their children’s education such as “free tutoring programs” or “homework help.” While doing this project, students ask questions about their children’s schools, learn how to locate resources that they need to support their children’s education, and learn where to go to ask for help while building confidence in communicating in English. “The Parent Handbook” These lessons consist of three parts: introducing the episode “Welcome Parents” (Part 1); preparing for “The Parent Handbook” project (Part 2); and creating it in computer lab (Part 3). Each part is composed of a set of activities that help students build up the skills required to complete “The Parent Handbook.” The parent handbook is designed to include common school-related problems immigrant parents face in the school system, and possible solutions to those problems that come from their own experiences and research and interviews. Additionally, short dialogues for the handbook that they

5
might need to communicate the problems as well as resources that are necessary to help their children succeed in school, such as homework help and programs for children. Class Level & Length of the Project These lessons are designed for low-intermediate students (NRS Levels 3+). However, this project can be adapted for low-level students with more modeling. Approximately 16 hours of classroom instruction and 10 hours of computer lab are projected to complete this project. Reflection & Celebration One way of measuring the success of this project is to conduct a class survey, which allows students to see how they have changed since the start of the project. Students conduct the same class survey, referred to as One Question Interview (See Day 1), both in the beginning and at the end of the project and compare the results of the survey. Do not forget to celebrate the completion of the project. The class can hold a “book tour” for other classes, introducing the parent handbook to other students and taking their questions and suggestions. If multiple copies can be easily made on your campus, encourage students to share the parent handbook with their peers outside of the classroom. Application This project is purposely designed to help parents who have children in New York City public schools solve school-related problems and find resources that are necessary to support their children’s education. However, the skeleton of this project is applicable to other common problems of our lives such as work, health, money, etc. The activities described in these lessons allow students opportunities to ask questions about what they would like or need to know and guide them to find the answers/resources and to practice the language that they need in the course of doing their research.

6
Part 1: Introducing “Welcome Parents” Lesson Objectives: By the end of these lessons, students will be able to:
• Ask and answer questions about their children’s education. • Identify characters in the episode of “Welcome Parents.” • Ask and answer about “Welcome Parents.” • Talk about the main character’s problems and how they were solved. • Formulate questions to ask at parent-teacher conferences. • Use vocabulary and expressions from “Welcome Parents” in dialogues.
Day 1 (1.5 hours): One Question Interview Materials: parent survey (See Handout 1), questions on slips of paper (See Handout 2. These are the same questions in the parent survey.), one question interview form (See Handout 3)
Teacher’s Note:
This one question interview aims to achieve two objectives. One is to introduce the theme of “Welcome Parents” and get students engaged in the conversation of “their children’s schools.” The other is to use the results of this one question interview as an assessment tool. That is, you can do the same One Question Interview at the end of project to see the impact the Parent Handbook project has brought to them. This activity may take a long time but it is a wonderful activity for students to practice speaking, listening, note taking, and getting to know each other.
Steps: Pre-activity:
• Give out a copy of the parent survey (See Handout 1) to each student. This survey contains questions about New York City public schools. Tell them that the questions in the survey are about their children’s education. Class reads each question in unison and answers it individually. Tell them that it is OK to say “No” to any of those questions. Completing this parent survey will allow them to understand all the questions before they conduct the one question interview.
• Prepare the same questions in the parent survey on slips of paper, one question on
one slip of paper (See Handout 2). Tell class that they are the same questions they have just answered and they are going to pick one slip of paper.

7
• Then distribute the one question interview form (See Handout 3). Tell students to copy the question they have picked in the line that says “question” and their names on the top of the form.
• Explain to the class how to conduct one question interview. They will have to
GET UP. Don’t let them stay sitting and ask their questions for their neighbors. Tell them to come out to the center of the classroom and ask EVERYONE in the room their question. Ask class how many students there are in the class and how many times they have to ask their question. They must take notes on the person’s name, country of origin, and response to the question.
During-activity:
• Monitor if students are recording the responses properly. Assist them to find an interviewee. Allow about 20 minutes to conduct the one question interview for a class size of 20. When everyone is finished, they can go back to their seats.
Post-activity:
• Tell students that they are going to share the responses with class. Use yes/no questions exclusively or include wh-questions that can be answered in short forms to make this part easier and simpler for students. Write on the board:
Count how many people you interviewed and how many “yes”es and “no”es and "short responses” you got. Then write them on the bottom of the form. Also, write down interesting responses if any.
• Model how to report back what they learned. For example, write on the board:
My question is Do you know who the Parent Coordinator is? I asked 15 people. 5 people answered yes and 15 people answered no. Many people don’t know about the Parent Coordinator. • Students will share the results of their interviews with a partner in Concentric
Circles (See page 7 to learn how to form Concentric Circles) or through a poster session where all one interview forms with summaries are posted around the walls and have students walk around and read the summaries. Collect the one question interview forms if you would like to compare the results of a post one question interview.
Day 2 (2 hours):
Warm-up Materials: n/a Steps:

8
• Write on the board: “Why did you come to the United States?” “What do you know about New York City public schools?” Elicit the answers from a few students and write them down on board. Students form Concentric Circles and share their answers with a partner.
The description of Concentric Circles below is derived from the Jesse’s Story lesson set
developed by Kyra Cubukcuoglu and Moira Taylor, ESOL Staff Developers (City University of New York, Adult Literacy Program, Summer 2006)
What is “Concentric Circles”?
“Concentric Circles” is an unstructured conversation in English between two students. The activity is valuable because it allows students to have time to “just talk” and express themselves. Additionally, the exercise allows students to discover more about their classmates, so it’s a community building activity. Students can also be working on their accuracy, awareness of their own language learning, and self-correction.
• Forming Concentric Circles:
Your goal is to make two circles, inner and outer. Imagine a doughnut. 1. Tell students to stand in a circle. 2. Have them call off by 2. 3. Tell Student 1s to step forward and then turn around to face Student 2s. 4. Tell them the person they are facing is their partner. To make sure each person in the circle has a partner directly in front of him/her and they know who their partners are, ask a few students “Who is your partner?” Switching partners in Concentric Circles: Make sure you decide BEFORE you tell the students what direction they will go. The key element in switching is that only ONE circle moves. 1. Tell students that they are going to change partners. Remind them of who are 1s
and 2s. 2. Tell Student 1s NOT to move. 3. Tell Student 2s to move one person to their right.
Character Map Materials: character map (See Handout 4)
Only one circle moves, either outer or inner.

9
Steps: • Tell students that they are going to watch one of the We Are New York TV
episodes. Review vocabulary: title, characters, and main characters. Elicit those words from class by asking “What is the name of a TV episode called?” “What do you call people who are in a TV episode or a story?” and “What do you call people who are important characters in a TV episode?”
• Write on the board: “Welcome Parents.” Give a copy of the character map (See Handout 4) to each student. Tell students to list the names and roles of all characters while they are watching. Model how to complete the character map. Students will fill in the names of all characters in circles, one circle for one character. Play “Welcome Parents” (25 minutes).
• After watching the episode, ask them to compare their character maps with their neighbors and complete their maps if any characters are missing.
• Draw the character map on the board. Have volunteers come up to the board and fill in the circles with characters’ names and roles. Make sure that they have an apostrophe to describe the relationships among characters. For example: Lupe: Carmen’s daughter.
Barometer Materials: True or False statements & signs labeled True / False (See Handout 5) Steps:
• Prepare 10-15 True or False statements (See Handout 5) about “Welcome Parents.”
• Divide the classroom into two parts from the middle and designate True and
False for each. Post a “True” sign on one side of the room and “False” on the other side. Tell them the middle of the room is for “Not Sure.”
• Tell students to get up. Teacher will read each statement loud. Students listen
to each statement and move to the section named True or False accordingly. If they are not sure whether it’s true or false, they can stand in the middle. Ask students why it’s false.
Teacher’s Note:
Include negative statements in this activity. Students tend to have a difficulty understanding them. You may want to make clear how many times you will repeat the statement BEFORE you start. Usually saying it at a normal speed at first and then faster for the second time works well.
Day 3 (2 hours): The Wheel of Questions Materials: game boards for “The Wheel of Questions” (one game board per group, See Handout 6), sets of question cards (one set of question cards per group, See Handout 7),

10
game money ($1, 5, 10, 20 bills, ten bills of each per group), paper clips (one paper clip per group), pencils (one pencil per group) Steps:
• See the materials above to prepare “The Wheel of Questions” game. The Wheel of Questions is a game board with a drawing of a wheel divided into six pieces of a pie. Each pie is named as follows: Why, What, Who, Do You Agree? and What About You? and has its dollar value.
• Tell class that they are going to practice answering questions about “Welcome Parents.” Ask for two volunteers to demonstrate the game. Explain to students how to play the game.
1. Place the game board in the middle of the desk. 2. Put game money next to the game board and call it “a bank.” 3. Place a paper clip in the center of the game board and a pencil standing
inside the clip. 4. Holding onto the top of the pencil with one hand, spin the paper clip with
the other hand. 5. Read what the pie the paper clip is pointing to says. For example: if it says
“Why $10 Pick a card!” pick a question card from the deck of why-questions and answer it. If the answer is correct, take $10 from the bank.
6. Group members judge the answer and if they are not sure, ask teacher for help. The person who earned the most money wins the game.
• Monitor each group. Allow 20 minutes to play the game. Role Play Materials: a list of situations for role plays (See Handout 8) Steps:
• Prepare a list of situations from “Welcome Parents” for role- plays. Write one situation on the board, for example, “Lupe is having trouble reading in school.” Tell students that they are going to have a conversation about this. Ask class: Who should be in the conversation? What is the problem? and What could be the solution?
• Put them in pairs. Ask each pair to pick a situation from the list and discuss three questions above. Then tell each pair to do a role play of it. Allow 20 minutes. Do not allow them to write a script of it.
• Pairs present their role plays to pairs. Allow 10 minutes. Ask for a few volunteer pairs to do role-plays to class.
Day 4 (2 hours): Carmen’s Problems

11
Materials: newsprint (one sheet per group), markers, tape, sets of discussion questions (one set per group) (See Handout 9) Steps:
• Prepare a list of discussion questions below about the episode on slips of paper:
What problems did Carmen have in this episode? How were the problems solved? Who/what resources helped her solve the problem? What do you do when you have a problem? (Everybody in each group writes their own answers.)
• Put students in groups of 4-5 and give out a sheet of newsprint to each group. Each group answers the questions on newsprint. Take 20 minutes. Once finished, tell them to prepare to present their answers to class. For example, everyone in each group is responsible to read one question and the answers aloud to class on behalf of her/his group. Then tell class to gather around the group that is ready to present first. The group presents their answers to class and class moves to the next group.
Scrambled Questions Materials: sets of scrambled questions cut up on slips of paper in envelopes (one set per group) (See Handout 10), The Question Hand (See Handout 11), a poster of the Question Hand to hang on the board.
• Prepare sets of scrambled questions on slips of paper cut up in envelopes. Use the questions asked at the parent-teacher conference in “Welcome Parents.” Tell the class that in each envelope there are questions asked at the parent-teacher conference in “Welcome Parents” and they are going to put them in order. Put students in groups and give out one envelope to each group. Take 15 minutes.
• Ask for volunteers to write the questions on the board. Give out a copy of the
Question Hand to each student. (See Handout 11) Review the Question Hand. See pages 11-13 to learn how to use the Question Hand as a self-correction tool. Go over parts of each question: question word, auxiliary verb, subject, main verb and everything else. If you introduce the Question Hand to your students for the first time, allow about one and a half hours.
Continued on page 14

12
The description of the Question Hand below is derived from the Breathing Room lesson
set developed by Kyra Cubukcuoglu and Moira Taylor, ESOL Staff Developers (City University of New York, Adult Literacy Program)
“What Is the Question Hand?”
Materials: interesting pictures for generating questions (one for each group), prepared outline of a hand on newsprint Steps:
• Hang up a picture. Ask: Do you know everything about this picture? Indicate to the students that they should make questions about the picture. Elicit the question words and write them on the blackboard. Then elicit a few questions and write them on the board or have the students write them.
• Give each group a picture. In groups of three, students generate questions and write them on newsprint.
• Teacher elicits generated questions and writes them on the board in such a way that they can later be divided into the columns.*
Where do they live? How many people are there in the
room? Is the girl skipping rope? How long has the family been sitting there?
• When enough questions with different forms have been written on the board,
teacher draws lines to make columns.
• Point to each item in the first column, have the students read, then ask: What kinds of words are these? Elicit: Question words.
• Teacher asks: What is the first part of a question? Elicit: Question Word. Teacher writes that above the column. Do the same for Helping/Auxiliary verb/x-word, Subject (takes a little longer to elicit, don’t give up), Main Verb, Everything else. Remember to point the words in the columns and have the students say them.
* When you get a subject question, just write it at the bottom of the board or on the side. When students ask, you can say that these are subject questions, i.e., the question word is also the subject but that this is a small percentage of questions in English and students don’t make mistakes with them. I say that only 5% of questions are subject questions. (I don’t know if that is true.)
13
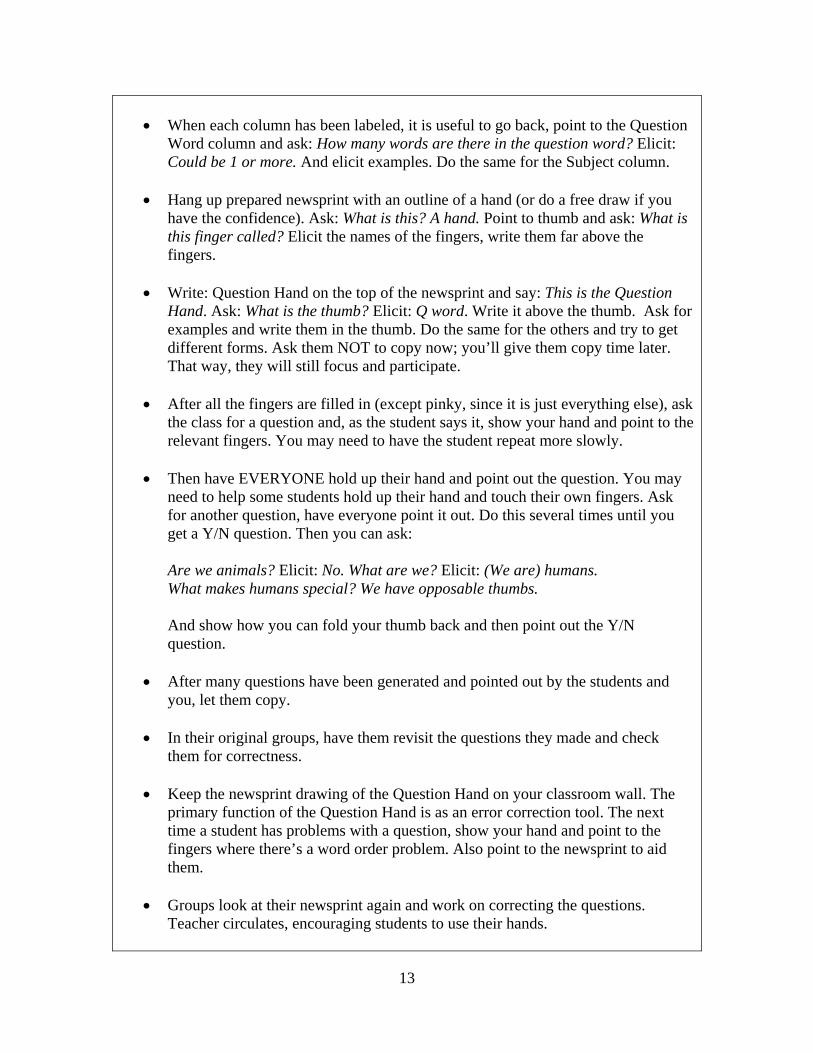
• When each column has been labeled, it is useful to go back, point to the Question
Word column and ask: How many words are there in the question word? Elicit: Could be 1 or more. And elicit examples. Do the same for the Subject column.
• Hang up prepared newsprint with an outline of a hand (or do a free draw if you have the confidence). Ask: What is this? A hand. Point to thumb and ask: What is this finger called? Elicit the names of the fingers, write them far above the fingers.
• Write: Question Hand on the top of the newsprint and say: This is the Question Hand. Ask: What is the thumb? Elicit: Q word. Write it above the thumb. Ask for examples and write them in the thumb. Do the same for the others and try to get different forms. Ask them NOT to copy now; you’ll give them copy time later. That way, they will still focus and participate.
• After all the fingers are filled in (except pinky, since it is just everything else), ask the class for a question and, as the student says it, show your hand and point to the relevant fingers. You may need to have the student repeat more slowly.
• Then have EVERYONE hold up their hand and point out the question. You may need to help some students hold up their hand and touch their own fingers. Ask for another question, have everyone point it out. Do this several times until you get a Y/N question. Then you can ask: Are we animals? Elicit: No. What are we? Elicit: (We are) humans. What makes humans special? We have opposable thumbs. And show how you can fold your thumb back and then point out the Y/N question.
• After many questions have been generated and pointed out by the students and you, let them copy.
• In their original groups, have them revisit the questions they made and check them for correctness.
• Keep the newsprint drawing of the Question Hand on your classroom wall. The primary function of the Question Hand is as an error correction tool. The next time a student has problems with a question, show your hand and point to the fingers where there’s a word order problem. Also point to the newsprint to aid them.
• Groups look at their newsprint again and work on correcting the questions. Teacher circulates, encouraging students to use their hands.

14
Thumb
Middle finger
Ring finger
Pinky
Question Word What Where
When Who
Why How
Which How many
What time
Auxiliary
Verb is
am are
was were does
do did can will
should …
Subject Pat I
you she he
they we it
there your family
…
Main Verb look think reading doing had learned
…
Everything Else in the room the letter …
Index finger
The Question Hand
Follow Up: Scrambled Questions

15
Materials: newsprint (one sheet per group), markers, tape • Ask students: When is your parent-teacher conference? What questions do you want
to ask the teacher? Tell each group to make three additional questions they would like to ask at a parent-teacher conference on newsprint besides the scrambled questions. Take 20 minutes.
• Monitor and encourage students to use the Question Hand to self-correct. Each group presents the questions they have created to class. Tell them to copy the questions in their notebooks and save the sheets. Students will type the questions for the Parent Handbook in computer lab.
Day 5 (1.5 hours): Vocabulary Materials: vocabulary list (Handout 12), newsprint (one sheet per group), markers, tape Steps:
• Prepare a list of vocabulary from “Welcome Parents.” Give out a copy of the vocabulary list (See Handout 12) to each student.
• Tell students to read the list and circle new words. Put students in groups of 4-5 and tell them to ask other students if they know the words. Have groups meet groups to ask about the words they don’t know. Allow for 10 minutes.
• Ask students to sit. Respond to their questions about the words they haven’t understood yet.
• Then put students in pairs. Tell them to make sentences or short dialogues with new words/phrases on newsprint. Allow 15 minutes. Go over the sentences. If a pair finishes earlier than other pairs, have them work on another word/phrase or another sentence with the same new word.
• Ask each pair to present the sentences to the class. Ask students to copy the sentences in their notebooks.
Part II: Preparing for the Parent Handbook Lesson Objectives:

16
By the end of these lessons, students will be able to:
• Pose a question about their children’s education. • Make suggestions for peer parents’ problems. • Find answers to the question they have posed. • Present the findings of their research to class. • Request a return call. • Do a role play of discussing a school-related problem with school personnel. • Rate educational websites.
Teacher’s Note:
Every class’s parent handbook might cover slightly different contents since the contents of the parent handbook are based on students’ needs. However, common topics that are of interest to parents may include “how to help my child with homework,” “where I can find sports and art programs/tutoring programs for my child,” and “how to communicate with the teacher,” etc. See Handout 13 for examples of common school-related problems. It is recommended that teachers save and make photocopies of students’ work during the project in case they lose their work needed for computer lab sessions.
Day 6 (2 hours): Posing Questions Materials: examples of common school-related problems (See Handout 13), research worksheet (See Handout 14) Steps:
• Debrief the episode “Welcome Parents” by asking questions: What problems did Carmen have? How did she solve them? Who/what resources helped Carmen solve them? Write the answers on the board as eliciting the answers from students.
• Post the examples of common school-related problem cards around the walls. Tell
class to get up and wall around to read all of the cards. Once finished, they can sit.
• Ask students to write their own questions about their children or their children’s schools. Remind students of the Question Hand. Give out a copy of the research worksheet to each student (See Handout 14). Students write questions individually. Tell them not to do Number 3 of checking off things they will do to find answers to their questions. Allow 10 minutes.

17
• Tell students that they are going to (1) read their questions to their groups and (2) discuss who they should see about the problem they have posed and then (3) check off things they will do to find answers to their questions. Put students in small groups by child’s grade. If you have many students from one particular grade, you can form more than one group for the grade by the similar problem. Ask class: What are you going to do? Make sure they understand the three tasks.
Teacher’s Note:
If students are low-level, they can copy an example of a common school-related problem that is relevant to them or work in pairs or small groups to write questions. See Handout 13.
Wall Walk Materials: blank print paper (a sheet per student), tape, markers
Teacher’s Note: This activity allows the opportunity for students to read their classmates’ problems and write suggestions for them. Some of their questions might be answered by other students. If that’s the case, encourage them to find further resources.
Steps:
• Pass out a copy of print copy paper to each student. Tell students to take out the research question worksheets. Ask them to post both of them around the walls. Tell students that they are going to read their classmates’ problems and write their suggestions for them. If their suggestion has been written by someone else, do not duplicate it.
• Put them in pairs. Tell each pair to go to one of the problems posted around the walls. For their first problems, allow 10 minutes to write their suggestions. Then, cue them to move along to the next problem until they have made their suggestions for every problem. Estimate 3-5 minutes per problem.
• Ask students to take down their research question worksheet and the paper with
suggestions written on. Tell students to sit, read the suggestions and pick three suggestions they would like to try. Collect the research question worksheets and the papers with suggestions on to consolidate.
Day 7 (2 hours): Cast Your Vote Materials: dot stickers (5 dot stickers per student), problems posed by your students in large print

18
Steps: • Hang students’ problems in large print around the walls. Tell class to read all of
them and pick five common problems to them. Give out five dot stickers to each student. Put one dot per problem. Take 10 minutes.
• Tally the votes and select the five or six most common problems.
Parents’ Dialogues Materials: newsprint (one sheet per group), markers, tape, examples of common problems posed by your students, examples of parents’ dialogues (See Handout 15) Steps:
• See Handout 15 for examples of parents’ dialogues for your reference. Post the common problems for parents from the activity “Cast Your Vote” on the board. Tell students that they are going to create dialogues of parents’ communicating with school staff to solve the problems. Go over who should be in the dialogue, what the problem is and where the dialogue will possibly happen. Ask them to pick one problem they would like to create a dialogue of. Form groups by problem.
• Give out a sheet of newsprint to each group. Allow 20 minutes. Encourage them
to self-correct the dialogues and provide help if necessary.
• Once all the dialogues are reviewed, tell each group to practice the dialogue in pairs. Take 10 minutes for pair practice. Then ask each pair to present the dialogue to class. Tell them to copy the dialogues in their notebooks.
Day 8 (2.5 hours): Request a Return Call (Optional) Materials: a digital camera with a camcorder function, a TV, script of requesting a return call (See Handout 16)
Teacher’s Note: Often students write or say telephone numbers in a non-U.S. standard way. For example, add “1” before the area code or say it with two or four-digit numbers separately. This activity allows them to reinforce saying phone numbers clearly in the U.S. standard way, which is reading three, three and four digits together, respectively.
Steps:

19
• Tell class that sometimes parents need to leave a phone message for their children’s teachers. Ask them if they have left a message for the teacher. Elicit from students what to include in a phone message. Write them on the board. Give out a copy of the script of requesting a return call to each student (See Handout 16). Students will practice saying their telephone numbers, requesting a return call. Allow 10 minutes.
• When students are ready, they take turns to say the phone message without looking at the script and teacher will videotape it. While the student is leaving a phone message, the rest of the class will listen and write down the phone number in their notebooks.
• Then play back for reviews and check if students have written down and said the phone numbers correctly. Go over pronunciation of numbers students had trouble with. Point out possible problematic numbers: 0, 6 and 8 and an alternative pronunciation for “0” [ou].
Report Back to Class Materials: research worksheet with students’ question and possible answers to the questions, a copy of the NYC Family Guide Steps:
• Tell students that they are going to report the answers that they have found to class.
• Put students in groups. Report back to groups: their questions and the answers they have found. Allow 20 minutes.
• Tell them to take out the NYC Family Guide. Have them take a look at it for a
few minutes. Tell them that they are going to create their own parent handbook including common school-related problems & possible solutions and resources for immigrant parents.

20
Part III: Creating the Parent Handbook in Computer Lab Lesson Objectives: By the end of these computer lab lessons, students will be able to create a parent handbook by developing the following skills: • Use e-mail (write, send, open, attach/download documents). • Use Microsoft Word (type, save, open, change font and font size, align left, center,
right). • Rate educational websites.
Teacher’s Note: 1. The parent handbook will include:
1) Questions to Ask Teachers at Parent-Teacher Conferences (See Activities “Scrambled Questions” and “Follow Up” on pages 10 and 14)
2) Common School-Related Problems & Possible Solutions (See Activities “Posing Questions” and “Wall Walk” on pages 15-16)
3) Parents’ Dialogues (See Activity “Parents’ Dialogues” on page 17)
4) Websites for Parents Reviewed by Parents (See Handout 18 “Website Rating Form” and Handout 20 “ARIS Parent Link Log-in Organizer”)
5) Websites for Children Used by Our Children (See Activity “Interview Your Child” on page 21 and Handout 17)
2. You or your class could decide what to include in the parent handbook, based on your students’ needs.
3. Make sure that every student has an e-mail account and completes the ARIS Parent Link Log-In Organizer before they do the activity “Rate the Website.” Allow about 7-10 days for them to get their children’s IDs and temporary passwords ready.
4. Set a deadline, based on when to send the final draft of the parent handbook to a print
center if you would like to publish it and plan out computer lab sessions backward. 5. Using E-mail:
Ways of storing student work are various. However, using e-mail is a relatively safe way of keeping track of students work, compared to a flash drive or floppy disks. Every time students work on their project, they send their work in a Microsoft Word attachment to the teacher. Attachments are scanned for viruses before downloading and you don’t need to worry about the malfunction of floppy disks or losing students’ work. This is recommended especially for higher level students.

21
If more than half of the class already uses e-mail, ask for volunteer students to help those who don’t have an e-mail account open one. If the opposite is the case, turn this into a lesson on using e-mails. Students refer to the computer handouts of using e-mails.
6. Using Microsoft Word:
Students will start learning to type. Typing can be done individually or in pairs by having students rotate to type. For example, time 15 minutes for each student and then have them switch. Students refer to the computer handouts of using Microsoft Word.
Student Task List: Every student should have the following ready:
Computer lab handouts Their own e-mail addresses ARIS Parent Link log-in organizer My research question & suggestions from peer parents Websites for school work and fun (Students will interview their children) Website ratings Parents’ dialogues (group work) Our questions to ask for teacher at parent-teacher conferences (group work)
Planning for Computer Lab Sessions:
Tasks Session 1 (90 minutes)
Students will: • Rate the Websites. • Practice typing. Use the South-Western Keyboarding Pro if available. • Help students who don’t have e-mail accounts create one.
Session 2 (90 minutes)
Students will: • Rate the Websites. • Practice typing.
Session 3 (90 minutes)
Students will: • Type “Common School-Related Problems & Possible Solutions.” • Send the work to the teacher through e-mail.
Session 4 (90 minutes)
Students will: • Send a list of “Websites for Children Used by Our Children” to the
teacher through e-mail. Session 5 (90 minutes)
Divide the work listed below into the number of volunteer students who want to type. For example, you have created six dialogues. Ask for six volunteers to type each dialogue.
Students will: • Type “Questions to Ask for Teachers at Parent-Teacher Conferences.” • Type “Our Dialogues”

22
• Type “Websites for Parents Reviewed by Parents.” • Send the work to the teacher through e-mail.
Interview Your Child Materials: interview form (See Handout 17) Steps:
• Tell students that they are going to gather web resources their children use for school work or for fun and share with class. Give out a copy of the interview form to each student (See Handout 17). Students ask their children: What website do you use for school work? What is this website for?
• Ask them to send the list of the websites to the teacher through e-mail. Add the web resources to the parent handbook.
Preparing for “Rate Websites” Materials: website rating form (Handout 18), a list of suggested websites compiled by students (See Handout 19), ARIS Parent Link log-in organizer (See Handout 20)
Teacher’s Note: Before you do this activity with your students, first, it is required to have students’ ARIS Parent Link log-in organizer completed because it is one of the websites they are going to visit during this activity. Second, it is recommended to have students visit no more than three websites at one computer lab session. Third, make sure they have the language they can use to rate the websites. If not, provide it for them. Last, tell students that they should spend at least 10 minutes on each website. Model how to navigate the websites such as clicking menus, opening PDF attachments, etc.
Steps:
• Brainstorm vocabulary students can use to rate websites. List them on the board. For example:
It is easy to find information. It is well-organized. It has good visuals. It offers useful information for parents. It is interesting. I recommend this website for others.
…
• Before computer lab, compile web resources students have gathered, or the teacher can prepare a list of websites that help parents support their children’s

23
education. See Handout 19. Give out the website rating form (See Handout 18) to students. Tell students to visit the websites listed and rate the websites in the range of from one star to five and make a short note of why they gave it that rating. Collect the website rating form from students.
Review Our Ratings Materials: newsprint (a sheet per website), markers, tape Steps: • Prepare sheets of newsprint to post around the walls, one sheet per website with
stars and labeled 1-5. Tell students that they are going to mark their ratings and write why each website got the rating on the newsprint. Ask them to take out the website rating form and give out a marker to each student. Allow 15 minutes.
• Tell students to circulate and read the reviews and tally how many stars each website got and why.
24
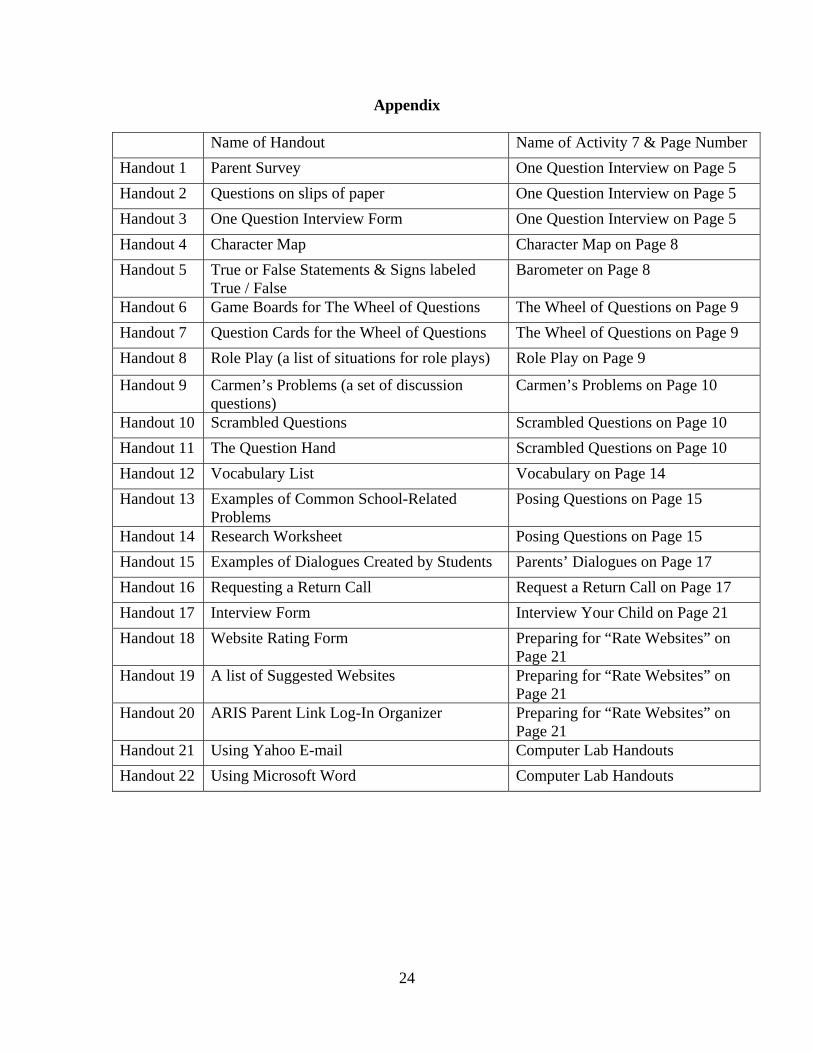
Appendix Name of Handout Name of Activity 7 & Page Number Handout 1 Parent Survey One Question Interview on Page 5 Handout 2 Questions on slips of paper One Question Interview on Page 5 Handout 3 One Question Interview Form One Question Interview on Page 5 Handout 4 Character Map Character Map on Page 8 Handout 5 True or False Statements & Signs labeled
True / False Barometer on Page 8
Handout 6 Game Boards for The Wheel of Questions The Wheel of Questions on Page 9 Handout 7 Question Cards for the Wheel of Questions The Wheel of Questions on Page 9 Handout 8 Role Play (a list of situations for role plays) Role Play on Page 9
Handout 9 Carmen’s Problems (a set of discussion questions)
Carmen’s Problems on Page 10
Handout 10 Scrambled Questions Scrambled Questions on Page 10 Handout 11 The Question Hand Scrambled Questions on Page 10 Handout 12 Vocabulary List Vocabulary on Page 14 Handout 13 Examples of Common School-Related
Problems Posing Questions on Page 15
Handout 14 Research Worksheet Posing Questions on Page 15 Handout 15 Examples of Dialogues Created by Students Parents’ Dialogues on Page 17 Handout 16 Requesting a Return Call Request a Return Call on Page 17 Handout 17 Interview Form Interview Your Child on Page 21 Handout 18 Website Rating Form
Preparing for “Rate Websites” on Page 21
Handout 19 A list of Suggested Websites Preparing for “Rate Websites” on Page 21
Handout 20 ARIS Parent Link Log-In Organizer Preparing for “Rate Websites” on Page 21
Handout 21 Using Yahoo E-mail Computer Lab Handouts Handout 22 Using Microsoft Word Computer Lab Handouts