energy.concord.orgenergy.concord.org/energy3d/projects/SolarizeHome/G… · Web viewSolar...
4
To properly solarize your home, use Google Earth to make your Energy3D model as accurate as possible. House Styles and Rooftop Structures 1. Google Earth should already be downloaded onto your computer and can be accessed by double-clicking its icon on your desktop. Close the “Start-up Tip” page pop-up. Meanwhile, keep Energy3D open to quickly switch back and forth between the two apps. 2. Enter in your address into the Search field at the top of the page. Google Earth will zoom to your home. You may need to pan over and zoom in and out to find your house. Once you have identified your home, use the scrollbar on the far right of the screen to zoom in as close as you can without switching to Street View. If you enter into the Street View, click Exit Street View at the top right of the screen to go back Ground Level View. To pan: Hold Left Click>Scroll using your mouse pad. To rotate or zoom: Hold Right Click>Scroll using your mouse pad. 3. Only certain areas have 3D images in Google Earth. In the Layers box in the lower left-hand side check the box next to 3D Buildings to see if it is available in your area. 4. Take a screenshot of your home in 3D view to include in your Solar Assessment Report. 5. Go to Energy3D>Templates and select a template that most resembles your home. 6. Take note of any rooftop structures such as skylights, chimneys, dormers, lower roof tops, shed dormers, and existing solar arrays. 7. Go to “SmartCARD1: How do I add a wing?” and “SmartCARD2: How do I add a dormer/ chimney?” Or watch SkylightChimneys Dormers Lower Roof Shed Dormers Existing Solar Panels Google Earth Checklist: □ Screenshot of home in 3D and 2D □ Wall measurements □ Azimuth of roof ridgeline GOOGLE EARTH INSTRUCTION SHEET
Transcript of energy.concord.orgenergy.concord.org/energy3d/projects/SolarizeHome/G… · Web viewSolar...
To properly solarize your home, use Google Earth to make your Energy3D model as accurate as possible.
House Styles and Rooftop Structures1. Google Earth should already be downloaded onto your computer and can be accessed by double-clicking its icon on your desktop. Close the “Start-up Tip” page pop-up. Meanwhile, keep Energy3D open to quickly switch back and forth between the two apps.
2. Enter in your address into the Search field at the top of the page. Google Earth will zoom to your home. You may need to pan over and zoom in and out to find your house. Once you have identified your home, use the scrollbar on the far right of the screen to zoom in as close as you can without switching to Street View. If you enter into the Street View, click Exit Street View at the top right of the screen to go back Ground Level View.
To pan: Hold Left Click>Scroll using your mouse pad. To rotate or zoom: Hold Right Click>Scroll using your mouse pad.
3. Only certain areas have 3D images in Google Earth. In the Layers box in the lower left-hand side check the box next to 3D Buildings to see if it is available in your area.
4. Take a screenshot of your home in 3D view to include in your Solar Assessment Report.
5. Go to Energy3D>Templates and select a template that most resembles your home.
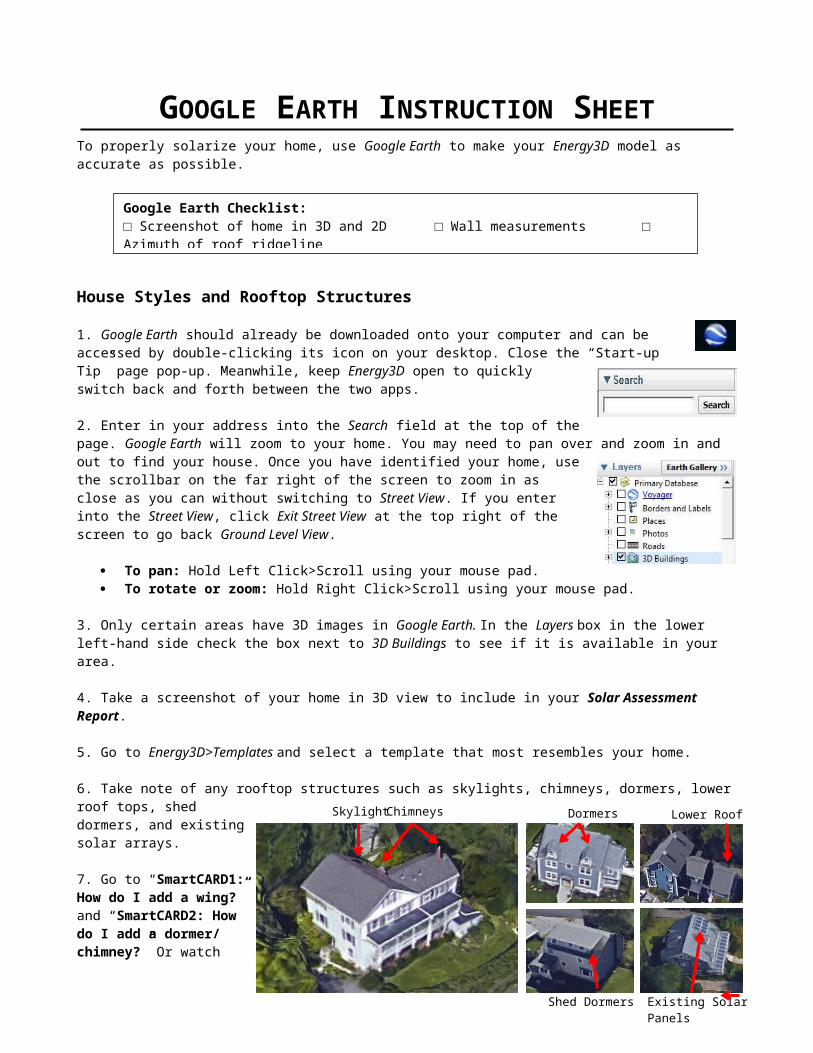
6. Take note of any rooftop structures such as skylights, chimneys, dormers, lower roof tops, shed dormers, and existing solar arrays.
7. Go to “SmartCARD1: How do I add a wing?” and “SmartCARD2: How do I add a dormer/ chimney?” Or watch the SmartVIEW1 video tutorial to recreate these roof top structures of your home in Energy3D.
Existing Solar Panels
Shed Dormers
Lower RoofDormersChimneysSkylight
Google Earth Checklist:□ Screenshot of home in 3D and 2D □ Wall measurements □ Azimuth of roof ridgeline□ Identify rooftop structures □ Wall height and rise □ Tree locations
GOOGLE EARTH INSTRUCTION SHEET

Roof Rise
1. If Google Earth has 3D view for your house, you can calculate the heights of the walls, roof, chimney(s), surrounding trees, etc. directly using the elevation data. The status bar at the bottom right-hand corner of the screen shows the latitude, longitude, elevation of the point where your mouse points. To find the height of a house structure or a tree, you can subtract the elevation of the ground from its elevation. See an example to the right.
2. Go to “SmartCARD3: How to get exact dimensions?” or watch the SmartVIEW2 video tutorial to learn to set your house model to its correct size.
House Orientation1. In the Layers box in the lower left-hand side of the screen in the Primary Database turn off 3D Buildings by unchecking the box.
2. The azimuth is the angle your home faces relative to true north. The default orientation for Google Earth view is 0° (facing north). Click N in the top rotating view tool to reset to north if it is not already so.
3. Take a screenshot of the Google Earth view of your home in 2D for your Solar Assessment Report.
4. Arrange the Google Earth view and your Energy3D model so they are side by side. By default, Energy3D templates are oriented to an azimuth of 0°. Rotate your Energy3D home until it approximately matches the Google Earth view of your home.
2
To rotate the whole house make, sure nothing is selected by clicking away from the house and then click this button.
To check the azimuth of the house, click the foundation where the main part of the house is located. A white arrow will appear that tells you the direction of the
NW315°
W270°SW
225°S
180°
SE135°
E90°
NE45°
N0°
270°
180°
90°
0°
Azimuth 0°
Azimuth 236°
270°
180°
90°
0°
Roof ridge elevation 70ft - Wall height elevation 58ft = Roof rise 12ftConvert to meters for Energy3D12ft * 0.3048m =3.7m
Wall height elevation 58ft - Ground elevation 33ft = Wall height 25ftConvert to meters for Energy3D1ft = 0.3048m25ft * 0.3048m =7.6m
33ft

5. Click on the ruler icon in the tool bar menu of Google Earth and set the Map Length units to Degrees. Measure the same direction in Google Earth as you are measuring in Energy3D. Rotate your Energy3D home until the azimuth is the same as measured in Google Earth. See the examples to the right.
6. Watch the SmartVIEW3 video tutorial to orient your house correctly.
Wall Length1. To measure the length of your walls and change the Map Length units to Meters.
2. Have paper handy to write down the measurement for every wall of your house by clicking and dragging a line along the outside perimeter of the roofline until the wall ends. Clear the line after you have recorded your measurements for one wall. If you have a rectangular house, you only have to take two measurements, length and width.
3. Go to “SmartCARD3: How do I get exact dimensions?” or watch the SmartVIEW2 video tutorial.
Trees
1. Choose an easily identifiable reference point on your roof and then measure both the ground length and direction from that point to the canopy center of every nearby tree that is taller than your roof (don’t include small trees or bushes). If you turn on 3D Buildings you can also get the approximate height relative to the ground by using the elevation data in the status bar (remember to convert feet to meters for Energy3D 1ft=0.3048m). Record your data in the table provided for you below:
3
Tree #
Distance (Ground Length)
from Origin
Azimuth(Heading)
Approximate Height
Type (Deciduous
or Evergreen)
12345678

2. In the 2D Top View of Energy3D, use the arrow keys on your keyboard to move your house so that the identified reference point on the roof is lined up with the origin (the intersection between the red line and the green line whose coordinates are (0, 0), as shown by the red circle in the image to the right). This is needed since it helps you to position trees more conveniently in the step to follow.
3. Use the recorded tree information to position trees in Energy3D. For example, in the image below, the ground length and heading of a tree from the original point are 5.14 m and 314.26 degrees. This is a deciduous tree and its height is around 16 m (based on the difference between the ground and the tree top elevation). In Energy3D, you would plant an oak, since it is deciduous and its height is set to be 16 m. And since Energy3D provides the ground length and heading from its origin to the tree (as shown in the red box in the picture below), we can easily move the tree to the right location.
4. Watch SmartVIEW4 if you still have questions on how to place trees in Energy3D.
4
Origin (0,0)