WEB TUTORIALS - Avfuel
34
WEB TUTORIALS
Transcript of WEB TUTORIALS - Avfuel

WEB TUTORIALS

Process an Aviation Card Refund
Aviation Cards
AIR Card® Multi Service Aviation
Avcard

THE AVFUEL HUB
To begin, select “Refund” from the “Transactions” menu in the top navigation bar or the “Transactions” button from the main menu button options.

Select “Refund”
To begin, select “Refund” from the “Transactions” menu in the top navigation bar or the “Refund” button from the “Transactions” menu button options.

Select Payment Method To Refund
Note the word REFUND will appear throughout the process and serves to remind you that you are creating a refund transaction.

Select Payment Method To Refund
To process an Aviation card Refund, select the “Aviation Cards” button.
Avfuel Cards, Bank Cards, AVTRIP and Cash transactions can also be processed by selecting those options. Please refer to those specific sections of the manual for instructions. Note

Swipe the card or manually key the number. Enter expiration date as MM YY if applicable.
Once the card information has been properly entered, select “Begin Transaction”.
Enter Payment Details

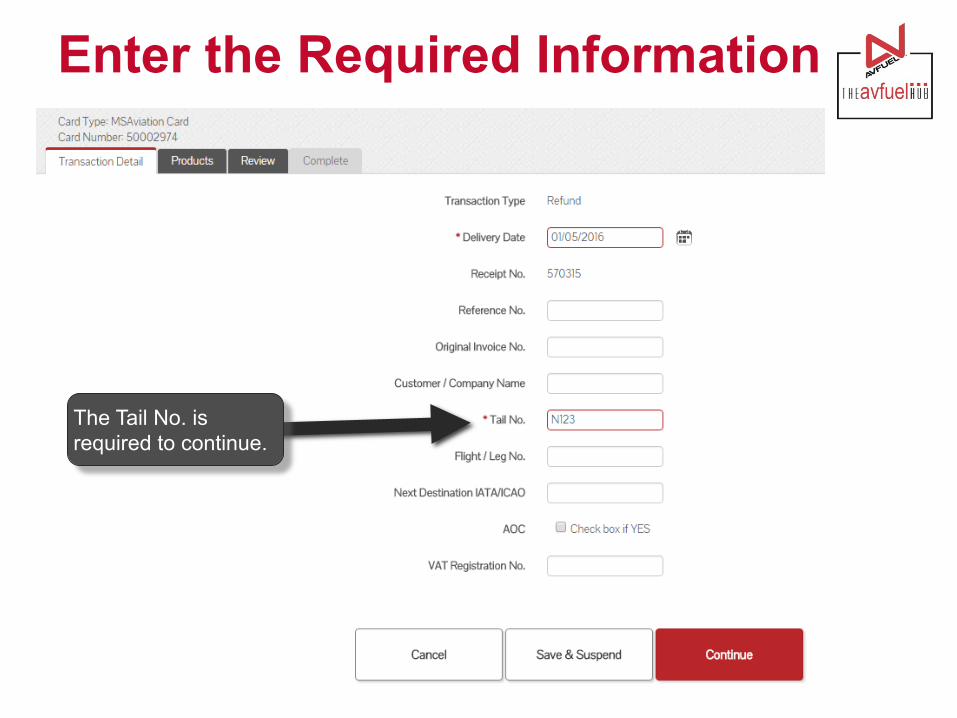
Enter the Required Information
The card type being processed is indicated here.

Enter the Required Information
Transaction type will be listed as “Refund”.

Enter the Required Information
The delivery date is auto-populated with today’s date. To change it, click on the calendar to select the correct delivery date or type the date in the field – MM/DD/YYYY.
If the credit is to reverse a previous transaction, ensure all details entered match the previous transaction. The previous invoice number may be added as the “Original Invoice No.” though not required. Note
Enter the Required Information
The Tail No. is required to continue.

Enter the Required Information
To cancel the transaction completely, select “Cancel”. The transaction can be saved to be completed later by selecting “Save & Suspend”. Saved transactions can be accessed by selecting “Pending” in the “Transactions” top navigation bar.

Enter the Required Information
Once all necessary information has been entered, select “Continue”.

Enter Products
Products are added to the transaction in this screen.
If you need to return to a prior screen, use the “Go Back” button. To cancel the transaction completely, select “Cancel”. The transaction can be saved to be completed later by selecting “Save & Suspend”. Saved transactions can be accessed by selecting “Pending” in the “Transactions” top navigation bar.

Enter Products
Products are added to the transaction by selecting the appropriate products from the dropdown box.

Enter Products
Enter the quantity by typing in the correct value. The unit price will auto-populate.
The unit price is auto-populated if a price was created in the Products menu. The price can be added on this screen or updated if the auto-populated price is not correct. Note

Enter Products
Products added will appear here. All refunds will appear in red.
Select “Add To Transaction”.

Enter Products
Additional charges and services may be added.
The unit price is auto-populated if a price was created in the “Manage Products” menu. The price can be added on this screen or updated if the auto-populated price is not correct. Note

View Product Details
If taxes were exempt on the original transaction, they should be exempt for the refund. Please refer to that specific section of the manual. Exempt taxes will be shown as such on the invoice. Note
Taxes are automatically applied to the sale when set up in the Tax Profiles. To view all product details, select “Expand All” or view details of an individual product by clicking the “+”. To return to original view, select “Collapse All” or click the “-” next to the expanded product.

Edit or Delete Product Details
Products can be deleted by selecting the “X” or edited by clicking “Edit”.

Edit or Delete Product Details
Selecting “Edit” will allow you to edit the quantity and unit price of the product. Enter new values and click “Save”.

Enter More Products
Once all products are added, select “Complete Transaction”.
Repeat the process to add other products to the transaction.

Generate an Invoice
Once the transaction is complete, the invoice can be printed or emailed to the cardholder. Documents such as signed delivery receipts can also be attached to the transaction.

Email the Invoice
To send a copy of the invoice via email, select “Email Invoice”.

Email the Receipt
Enter the email address of the recipient and select “Add”.

Email the Receipt
An invoice may be sent to more than one recipient. Add additional email addresses if necessary by entering the email address and selecting “Add”.

Email the Receipt
To delete an email address, check the box next to the address to be removed and select “Delete”.

Email the Receipt
To send invoices, select “Email Invoice”.

Print the Receipt
To print a receipt, select “Print Receipt”.

Print the Receipt
The receipt will be displayed as either a thermal paper receipt or a full invoice. Click “Print Receipt”. Your printer dialog box will open. Follow the normal print commands. Print two copies if desired – one for the customer and one with a signature for your records.

Print the Receipt
The receipt can also be emailed from this screen by selecting “Email Receipt”.

Upload a Document
To upload a document such as the signed delivery ticket to the transaction history, select “Attach Document”.

Attach Document
The document must be previously saved to the computer. To upload it, select the file by clicking “Choose File” and click “Attach”.

Return to Main Menu
Once the activity for this transaction is complete, use the top navigation bar to return to a new sales screen or select from other menu options.