Web-Select VAV Selection/Pricing Quick Start User...
14
Web-Select VAV Selection/Pricing Quick Start User Guide Page 1 Web-Select VAV Selection/Pricing Quick Start User Guide for Manufacturer Rep Users To Select, Price, Quote, Generate submittals and order VAV products, following the following process: Table of Contents Step 1 - Start a New Project ................................................................................................ 2 Step 2 - Selecting the First VAV Box in a Project ............................................................. 4 Step 3 – Select More VAV boxes ....................................................................................... 9 Step 4 – Editing / Changing / Refining the Project Schedule ........................................... 10 Step 5 - Creating Quotes and Orders ................................................................................ 12 Step 6 - Printing Schedules and Submittals ...................................................................... 13 Step 7 – Releasing Orders to Factory ............................................................................... 14 Note: Currently, the tool allows you to select Single Duct “TSS” and “TSL” products only. The other VAV product families of Fan Powered “Series” and “Parallel” and Dual duct will be added in future months. Until then, use the old selection tool to select, price, and order Fan Powered and Dual duct VAV Terminal products.
Transcript of Web-Select VAV Selection/Pricing Quick Start User...

Web-Select VAV Selection/Pricing Quick Start User Guide Page 1
Web-Select VAV Selection/Pricing Quick Start User Guide
for Manufacturer Rep Users
To Select, Price, Quote, Generate submittals and order VAV products, following the
following process:
Table of Contents
Step 1 - Start a New Project ................................................................................................ 2
Step 2 - Selecting the First VAV Box in a Project ............................................................. 4
Step 3 – Select More VAV boxes ....................................................................................... 9
Step 4 – Editing / Changing / Refining the Project Schedule ........................................... 10
Step 5 - Creating Quotes and Orders ................................................................................ 12
Step 6 - Printing Schedules and Submittals ...................................................................... 13
Step 7 – Releasing Orders to Factory ............................................................................... 14
Note: Currently, the tool allows you to select Single Duct “TSS” and “TSL” products
only. The other VAV product families of Fan Powered “Series” and “Parallel” and
Dual duct will be added in future months. Until then, use the old selection tool to select,
price, and order Fan Powered and Dual duct VAV Terminal products.

Web-Select VAV Selection/Pricing Quick Start User Guide Page 2
Step 1 - Start a New Project
1. Log in to Web-Select from the website, (link) webselect.johnsoncontrols.com and
go to the Web-Select link to sign into the program. If you are having trouble
logging in, then contact your Sales Manager.
2. After logging in, you will see the Project list. Add a new project by typing in
your Project Name, and click Add
3. On the Project list, click View Schedule
4. Select Product Type to VAV Terminals. (If you see Fan Coil Units as shown
below, change it to VAV Terminals). If you do not see VAV Terminals in the
Product Type list, then your user account is not set up for that product line and
you should contact your Sales Manager.
5. Select the Model Type –Single Duct Terminals will be defaulted are currently the
only option, but fan powered and dual duct terminals will be added in the future.
6. Add a line item by selecting the “Add New Line(s)” menu bar. We strongly
recommend you leave Qty = 1 for the first line item of a project. See Note below.
Web-Select VAV Selection/Pricing Quick Start User Guide Page 3
Note: The most efficient way to use the tool is to select the sound attenuation method and
all the known options on the first line item completely. Why? Because whatever you
select on the first line item will be copied to all subsequent line items of the same model you add the job.
You have the option to makes changes using the Global Option feature, but completing
all known information on the first line item saves significant amounts of time.
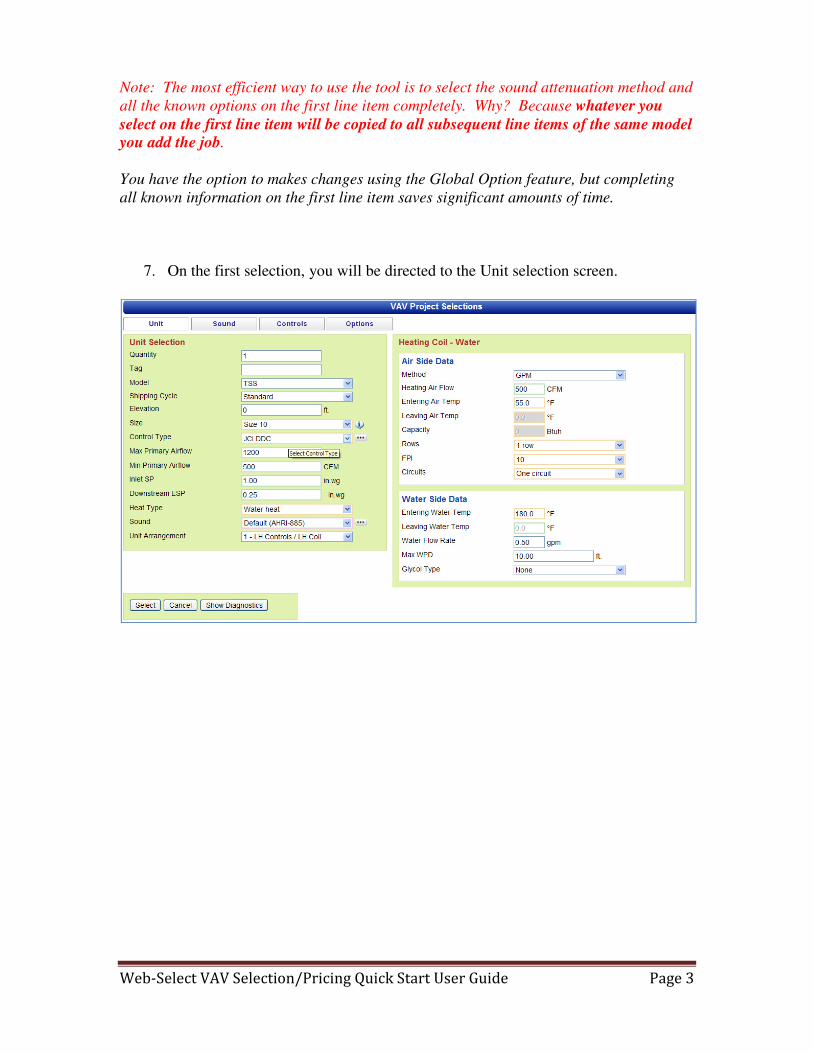
7. On the first selection, you will be directed to the Unit selection screen.

Web-Select VAV Selection/Pricing Quick Start User Guide Page 4
Step 2 - Selecting the First VAV Box in a Project
Note: The program selects, configures, and prices VAV boxes all at once so when you
price a box, the engineering rules are checked at the same time.
1. On the Unit screen, visually scan each input field and enter those fields that are
blank. You can also edit/change any of the default field values that appear.
Remember, values you enter on the first selection will carry over to all subsequent
line items.
a. Pick your Shipping Cycle (this will affect the options that are available)
b. For Size, you can pick a specific box inlet size, or you enter “Select All
Sizes” and let the program show you a choice of sizes for the airflows and
pressures you entered.
c. Next enter both Max and Min Primary airflows. These are required to
perform selections, calculate pressure drops, and perform sound
calculations.
d. Enter the Inlet and Downstream ESP pressures. VAV systems are
typically designed by engineers with the same inlet pressure drop for all
VAV boxes. Typical values are 1.0 or 0.75. Sometimes, the engineer
schedules a maximum pressure drop of 0.50 rather than an inlet and
downstream pressure, you can enter an Inlet Pressure of 0.75 and a
downstream of 0.25 (0.75 – 0.25 = 0.50) to achieve the same result.
e. Select Control Type (it affects the available options and control
sequences required for pricing).
f. Select Heat Type if you have an electric or hot water heater. Additional
fields related to the heat type selected will appear. The input fields are self
explanatory.
i. Electric Heat Tips for Reps: Typically, the engineer will specify
the desired kW (kilowatts) and LAT (leaving air temperature).
Choose the Method = kW. The program will choose the entered
kW or the next higher available kW and calculate the related LAT
temperatures.
ii. Hot Water Tips for Reps: Typically the engineer would like you
to match their water flow and capacity. In this case, choose
Method = GPM and enter the desired GPM. Pick Rows and
Circuits = “Pgm Selects”(program selects) and the program will
show the various combinations of resulting capacities available to
choose from for the specific box and coil combinations.

Web-Select VAV Selection/Pricing Quick Start User Guide Page 5
g. Unit Arrangement is required for pricing, and can be changed later prior
to ordering by using the “Global Options” feature.
h. Liner Options is required for pricing, and can be changed later prior to
ordering using the “Global Options” feature.
2. Click Next to go to the Sound Screen (see Figure 1) below.
a. Select Method.
i. The “Default” sound method follows AHRI-885E which is the
industry standard for VAV box attenuation. Normally, you would
use these defaults unless the consulting engineer specifies different
attenuation factors for the job (typically specified at the bottom of
their schedule or in their specifications).
ii. The “Calculate” method allows you to fill in exact attenuation
factors to calculate the attenuation (this feature is mainly designed
for consulting engineers that have a have special attenuation
requirements for reading rooms, classrooms, or sound booths).
iii. “None” sets the attenuation values to zero (which would be used
for placing the box in a room with no ceiling and no discharge
ductwork and will result in higher room NC).
iv. “Manual” will allow you to edit each attenuation number on this
screen. Use this method if the engineer specifies fixed attenuation
numbers in their specification or schedule.

Web-Select VAV Selection/Pricing Quick Start User Guide Page 6
Figure 1.0: Sound Screen Example
3. Click Next to go to the Controls Screen
a. Select a Controls Type on the Unit or Control Screen.
b. For “JCI DDC”, “Mount & Wire in factory”, “Pneumatic” or “Analog
Electric” control types, you must select a control sequence to properly
configure a unit and obtain a price. Select the options on the left and
click Get Sequences to help you select the desired control sequence. For
“Electronic field mounted controls” or “Pneumatic field mounted
controls”, you do not need to select a sequence and no price will be added
for providing a sequence.
4. Click Next to go to the Options Screen (see Figure 2.0)
a. Select one or more options you desire for the selection. Many times, these
options are specified in the engineering specifications and in the
engineer’s schedule.
b. Click Validate Options button to check if the options selected are valid.
Read the diagnostic message results and make changes if necessary. A set
of options is valid when “Options Valid” is shown in the results. Again,
the options you select here will be copied to other boxes of the same
model automatically so pick the options on this first selection.
c. Once you get valid options, click Select

Web-Select VAV Selection/Pricing Quick Start User Guide Page 7
Figure 2.0: Options Screen Example
5. Once Select is clicked, the program will perform the engineering calculations,
configuration, and pricing calculations.
a. If a Unit size is selected, you will see the results if valid
b. If Unit Size = “Program Selects” is selected, then each VAV box size
will be attempted to meet the entered parameters. Those box sizes that
pass the selection rules (airflow and pressure drop calculations), will be
displayed as possible selections.
c. Hover your mouse over the information icon “ ” to see the color code
of the results. A “Green” circle indicates “performance and options are
valid”.

Web-Select VAV Selection/Pricing Quick Start User Guide Page 8
See color legend below for other color circles and their indications (see below).
6. If resulting box selections and output parameters meet your specification, then
user would check the box to left of specific selection and next click Save and
New to add the VAV box to the users project schedule and begin entries for the
next VAV box on your schedule.
Note: Save and New, will save your current selection and open up to the Unit
Screen for the next box selection.
Save – will save your selection
Save and Return to Schedule – will save your current schedule and next take
you to the summary schedule screen.

Web-Select VAV Selection/Pricing Quick Start User Guide Page 9
Step 3 – Select More VAV boxes
After the first selection is made, you can add more boxes to the job by continuing to enter
them in the Unit input screens or on the Project Schedule view screen.
1. Enter the airflow, size (or Program Selects), and Heat Capacity (or GPM) for all
subsequent boxes in the job on the Unit Screen. All the other choices will be the
same as your previous selection.
Note: After the first selection is selected, the VAV tool is designed to only require a
couple of inputs on the Unit screen (such as the Airflows, Size, and Heat capacity) and
then click Select. Therefore, you typically do not need to click the Control, Sound, or
Option screen on subsequent selections unless these options change by box (they typically
do not).
It may take a couple of minutes to make all the choices on the first box, but it will take
only a couple of seconds for adding more box selections.
You can also change the Arrangement later (just prior to ordering) using the Global
Options feature.

Web-Select VAV Selection/Pricing Quick Start User Guide Page 10
Step 4 – Editing / Changing / Refining the Project Schedule
Displaying Data Using the VAV Project Schedule
There are different display options for the project schedule
1. Product Type displays the line items associated with Fan Coil Units, Belt Drive
Blower Coils, or VAV Terminals.
2. Model Group displays the line items associated with Single Duct, Series Fan
Powered, Parallel Fan Powered, or Dual Duct boxes.
3. Selecting a Heat Type will filter the line items based upon their heat types. The
selection of “All” will display all heat types.
4. View
a. Summary view is designed for the basic information and to see what
quotes and orders line items are assigned to.
b. Takeoff View is designed to view more engineering data as well as
displaying some additional common options.
i. Quick is for minimal input – note – the program is just picking
defaults in the background.
ii. Full is to display the full engineering schedule and allow the user
with additional detailed editing.
c. Controller View displays fields related to help you view/edit the
Arrangement and location of the VAV box (typically specified just prior
to ordering units)
Editing Inputs Using the VAV Project Schedule
Once you have built your schedule using the steps above, you can add/edit/update line
items within the grid without having to go to the input screens. You may find it best to
pick the View as “Takeoff View”, pick Level as “Full” and select a heat type.
1. For editing most engineering inputs and some common options, click the Edit
icon. (Move your mouse over the icons to see a pop-up description of each icon).
After you make your changes to that line item, click the Save icon to save the
changes, perform the selection, and check the rules.

Web-Select VAV Selection/Pricing Quick Start User Guide Page 11
2. For editing most options for multiple line items at once, select the line items you
wish to change (or do not select any for all), and click the Global Options button
above the grid.
Copying, Deleting, Moving Line Items
Select the line items you wish to copy, delete or move by clicking the leftmost checkbox
on the VAV Project Schedule. To select all, click the check box at the top of the line
items.
1. Copy To � – You may copy one or more line items to create new line items in
this project. You may also copy line items to another active project (great for
copying a template project to a new project)
2. Move To � You may move line items from one project to another project
3. Delete will permanently delete the selected line items from this project. You
cannot delete line items that have been added to an order. You must remove them
from the Order, and then delete them. Once the order is released, the line items
cannot be deleted.
4. Auto Tag allows you to select one existing line item, and create duplicates of that
line item. Sales reps will do this when an engineer specifies one (1) VAV-01 on
their schedule, but there are, say 10 VAV-01’s on the job. The sales rep can
create a small schedule for take-off and pricing purposes, then use Auto tag to
copy the (1) VAV-01 ten (10) times while specify the location of many boxes for
ordering purposes.

Web-Select VAV Selection/Pricing Quick Start User Guide Page 12
Step 5 - Creating Quotes and Orders
You may create a quote prior to creating an order, or just create an order directly without
creating a quote.
To create a quote, select the line items to add to the quotes (or select all), and click the
Quote button below the grid. A default quote name will be assigned. If you do not
select any line items, the program assumes you wanted all line items that are not already
assigned to a quote.
You may have more than one quote per job, but a line item can only belong to one quote.
Enter your multiplier and other quoting information on the Quote Worksheet. You may
combine FCU and blower coil units on a single quote.
Click Save/Calculate to save the quote for later editing. You may re-select and re-price
line items in a quote. The quote amount will adjust the next time you save the quote.
Click View Summary / Create Order to review the quote line items and Create the
Order. You cannot combine FCUs and VAV Terminals in a single order.
To print a quote or order, click the Submittal/Other Documents button (see below).
Additional help is found by clicking the question mark icons on the quoting and ordering
forms

Web-Select VAV Selection/Pricing Quick Start User Guide Page 13
Step 6 - Printing Schedules and Submittals
Click Print Schedule to print engineering project schedules and export to Excel. The line
items will be grouped by Model type and heat type, resulting in multiple schedule files.
These Excel spreadsheets can be then imported into Autocad drawings by consulting
engineers and contractors.
Click Submittal/Other Documents to create job submittals, quote summary, and ordering
reports can be created.
Note: Submittals, Quoting and Ordering forms can take several minutes to generate
because they are re-checking the configuration and pricing on the line items for you.
Please be patient. You may minimize your browser window while this work is being done
by the server.
You are not required to print your orders. Orders will be processed electronically by the
Order Entry department when you complete Step 7.
Also, Pick One. Do not select Submittals, Quoting, and Ordering at the same time and
click Preview. This will take significant amount of processing time (up to 30 minutes) to
generate all these reports and may slow the tool for other users.

Web-Select VAV Selection/Pricing Quick Start User Guide Page 14
Step 7 – Releasing Orders to Factory
To Release an Order to the factory, create an Order as described in Step 5, fill in the
Order form, click Save/Hold for Release button.
Now select the line items to be release to the factor and click Release Selected Line
Items button (see below) to preview the release.
The final step to submitting your order for production is to click Submit Release to JCI
button at the bottom of the release screen.
Clicking this will send an email to the order entry department and a confirming email to
your Web-Select email account on file. The Order Entry department will process your
order. Note that you can create more than one release for a given order form
If you would like a PDF or paper copy of your order for your files, you can click the
Preview Consolidated Order button or see Step 6 instructions for printing order forms.
There is no need to email or fax this order form to the factory.