Web: Appliqué
8
Layout Designed by: Designed by Brad and Judy Niemeyer Papers Designed and Published by: Quiltworx.com NOTE: This package includes appliqué to make a (4) corner appliqué set that can fit a number of Quiltworx Paerns, most notably, the Bridal Bouquet Mixer border and Valley Blossoms quilt in the Meadow Star Mixers. But, it is also compable with the Diamond Wedding Ring, Flowers For My Wedding Ring, and would even look great on our Queen Star Mixer Quilts or Caail Mixer Quilts. Anything that has large open spaces on the corners would work with this set of appliqué pieces. A compable Digized Appliqué Embroidery Design from Fabric Confe is also available. Appliqué 4 Corners IBBBJNQ01 © Copyright February 2019 All rights reserved. No part of this paern can be reproduced in any form for any commercial pur- pose without the expressed wrien permission of Judy Niemeyer Quilng. The wrien instrucons, foundaon papers, graphics, and photographs for Bridal Bouquet Appliqué were designed as a pack- age for the purpose of retail sales and as a result fall under the protecon of the federal copyright laws of the United States of America. E-mail: [email protected] Web: www.quiltworx.com Bridal Bouquet Appliqué Visit us on: LP59, 1 Sheet(s) LP60, 1 Sheet(s) (20) Applique Sheets NEWSPRINT INVENTORY NUMBERS: QUILTWORX IMPRESSIONS
Transcript of Web: Appliqué

Layout Designed by: Designed by Brad and Judy NiemeyerPapers Designed and Published by: Quiltworx.com
NOTE: This package includes appliqué to make a (4) corner appliqué set that can fit a number of Quiltworx Patterns, most notably, the Bridal Bouquet Mixer border and Valley Blossoms quilt in the Meadow Star Mixers. But, it is also compatible with the Diamond Wedding Ring, Flowers For My Wedding Ring, and would even look great on our Queen Star Mixer Quilts or Cattail Mixer Quilts. Anything that has large open spaces on the corners would work with this set of appliqué pieces. A compatible Digitized Appliqué Embroidery Design from Fabric Confetti is also available.
Appliqué
4 Corners
IBBBJNQ01
© Copyright February 2019All rights reserved. No part of this pattern can be reproduced in any form for any commercial pur-pose without the expressed written permission of Judy Niemeyer Quilting. The written instructions, foundation papers, graphics, and photographs for Bridal Bouquet Appliqué were designed as a pack-age for the purpose of retail sales and as a result fall under the protection of the federal copyright laws of the United States of America.
E-mail: [email protected]: www.quiltworx.com
Bridal Bouquet Appliqué
Visit us on:
LP59, 1 Sheet(s)LP60, 1 Sheet(s) (20) Applique
Sheets
NEWSPRINT INVENTORY NUMBERS:
QUILTWORX IMPRESSIONS

Page 2
█ TURN UNDER APPLIQUÉ INSTRUCTIONSAppliqué: The Laser cut appliqué pieces in this package were designed for turn under appliqué using a stabilizer called Stitch-N-Peel. *Product Notation Below. This product is not a fusible iron on stabilizer.
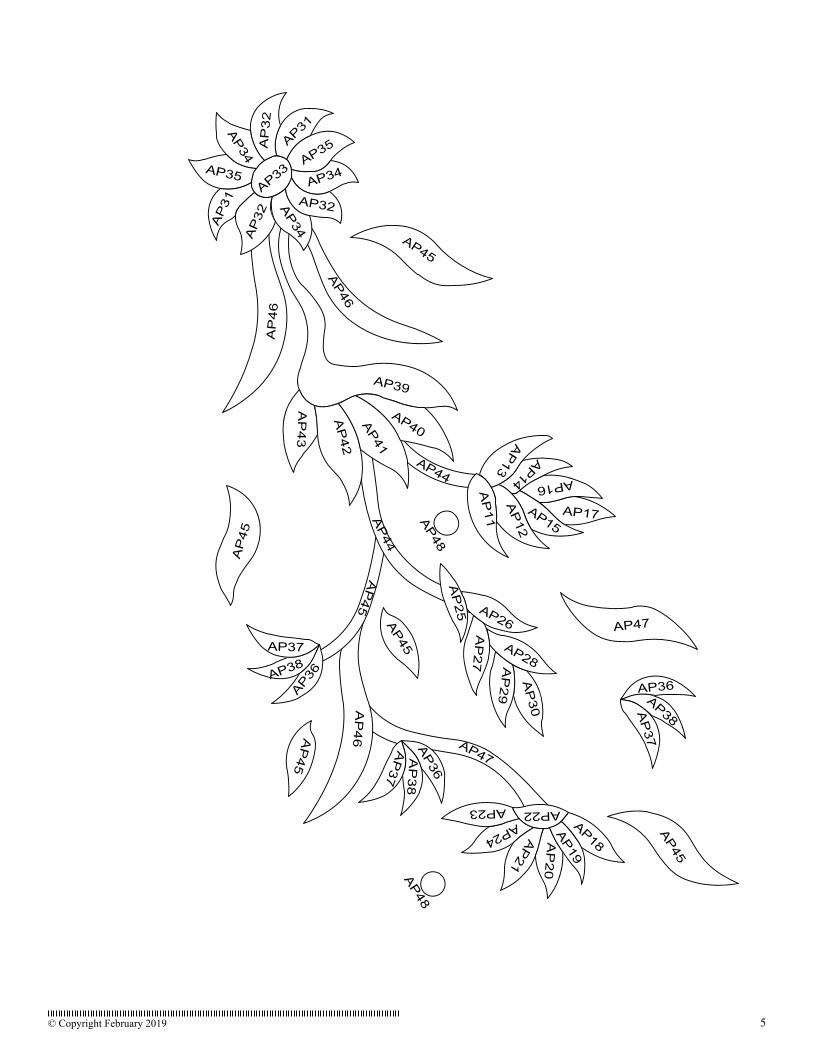
LP 59 and 60, Appliqué Layouts: This package includes enough appliqué pieces to complete (4) of the Group Layouts shown below. These layout sheets are very important as they include the Fabric References, the layout for each Appliqué piece, the NAME of each Appliqué Piece, and the positioning of each appliqué sheet on your Quilt top. Note the Reference lines, including the edge of the quilt, the diagonal edge of your border pieces, the curved seam, and the paper pieced seams. When you are ready to place the appliqué, place the layout sheet on a light table, align the seams and edges up, and then begin placing your appliqué pieces, prepared as described on the following pages. Secure each pieces with Roxanne’s Basting Glue. Then, use the recommended Turn Under Appliqué.
Appliqué Cutout Sheets: Included in this package are (20) 8-1/2” by 11” sheets of pre-cut template pieces held together with small tabs, (4) of each sheet shown. You will need to complete the cutting of each individual flower and stem, but please wait until you are ready to start your appliqué. Graphics of each page are shown below with the flowers and stems labelled. These match the labels that are on LP 59 and 60. It might help to actually write on the pieces, which leaf/flower you are working with. That way, when you begin to cut them out of your sheets, you can keep track of which pieces go where.
█ TURN UNDER APPLIQUÉ: SUPPLIES• Laser Cut Pre-cut Template Package• Fabric Glue Pen or UHU Glue Stic• Schmitz Sewing Needles,(60/8) (Sharps Microtex)• ‘Roxanne ‘Glue-Baste-It• Purple Thang• Size 60, 80, or 100 Weight Appliqué Thread• Small Embroidery Scissors• Light Table or Light Source
█ ESTIMATED YARDAGE FOR APPLIQUÉOn the following page, there are tables that require (49) different fabrics to complete the appliqué. In most cases, a minimum of 1/8 yard cut is required, with a few fabrics for the stems requiring more. However, feel free to use smaller scraps or left over fabrics if desired, which will cut down yardage if you don’t want as many different fabrics as we chose.
Use the fabrics chart to keep your fabrics organized. To see where each fabric goes, references the Color Layouts on the following pages, which is also shown on LP 59 and 60.
Product Notation: Stitch-N-Peel is a light weight cellulose-based stabilizer used for machine appliqué. It is not a fusible product, but meant for turn under appliqué. The stabilizer remains in the quilt after the appliqué is completed. Over time the stabilizer will break down and soften as you use the quilt. If and when the quilt is washed, the stabilizer will soften and dissolve into little fibers that will become part of your quilt. The appliqué templates are cut with a paper backing that is peeled off just before placing it onto your fabric. After the paper backing is removed the pieces are placed sticky side down, on the wrong-side of your fabric. If you make a mistake when placing the pieces onto your fabrics, simply peel it off, and reposition.
► LP 59
► LP 60
Blue Bonnet
Lupine
Lily Patch Leaf Right
Lily Patch Leaf Right
Daisy
Bird of Paradise Left
Lily Patch Leaf Right
Leaf #8
Stem #10
Bird
of P
arad
ise
Righ
t
Lily Patch Leaf Right
Lily Patch Leaf Right
Lily
Lily
Leaf #1 Left
Stem #2
Leaf #4L
LupineFlip Lupine Tip
Daisy Lily Patch Leaf Left
Leaf #4R
Leaf #2
Stem #4
Bitterroot
Stem #3
Stem #10 Stem #1
Leaf #1 RightLeaf #1 Right
Leaf #5 Leaf #4R
Leaf #2Stem #6Stem #5Stem #1
Leaf #4LLeaf #4L
Leaf #7

Page 3
FABRIC AND BLOCK REFERENCE
ALL STRIPS ARE WOF (42”)
FABRIC SWATCHES
AP1 (1) 4-1/2” Strip Fabric Swatch
AP2 (1) 4-1/2” Strip Fabric Swatch
AP3 (1) 4-1/2” Strip Fabric Swatch
AP4 (1) 4-1/2” Strip Fabric Swatch
AP5 (1) 4-1/2” Strip Fabric Swatch
AP6 (1) 9” Strip Fabric Swatch
AP7 (1) 4-1/2” Strip Fabric Swatch
AP8 (1) 4-1/2” Strip Fabric Swatch
AP9 (1) 4-1/2” Strip Fabric Swatch
AP10 (1) 4-1/2” Strip Fabric Swatch
AP11 (1) 4-1/2” Strip Fabric Swatch
AP12 (1) 9” Strip Fabric Swatch
AP13 (1) 4-1/2” Strip Fabric Swatch
AP14 (1) 4-1/2” Strip Fabric Swatch
AP15 (1) 4-1/2” Strip Fabric Swatch
AP16 (1) 4-1/2” Strip Fabric Swatch
AP17 (1) 4-1/2” Strip Fabric Swatch
AP18 (1) 4-1/2” Strip Fabric Swatch
AP19 (1) 4-1/2” Strip Fabric Swatch
AP20 (1) 4-1/2” Strip Fabric Swatch
AP21 (1) 4-1/2” Strip Fabric Swatch
AP22 (1) 4-1/2” Strip Fabric Swatch
AP23 (1) 4-1/2” Strip Fabric Swatch
AP24 (1) 4-1/2” Strip Fabric Swatch
AP25 (1) 4-1/2” Strip Fabric Swatch
FABRIC AND BLOCK REFERENCE
ALL STRIPS ARE WOF (42”)
FABRIC SWATCHES
AP26 (1) 4-1/2” Strip Fabric Swatch
AP27 (1) 4-1/2” Strip Fabric Swatch
AP28 (1) 4-1/2” Strip Fabric Swatch
AP29 (1) 4-1/2” Strip Fabric Swatch
AP30 (1) 4-1/2” Strip Fabric Swatch
AP31 (1) 4-1/2” Strip Fabric Swatch
AP32 (1) 4-1/2” Strip Fabric Swatch
AP33 (1) 4-1/2” Strip Fabric Swatch
AP34 (1) 4-1/2” Strip Fabric Swatch
AP35 (1) 4-1/2” Strip Fabric Swatch
AP36 (1) 4-1/2” Strip Fabric Swatch
AP37 (1) 4-1/2” Strip Fabric Swatch
AP38 (1) 4-1/2” Strip Fabric Swatch
AP39 (1) 9” Strip Fabric Swatch
AP40 (1) 4-1/2” Strip Fabric Swatch
AP41 (1) 4-1/2” Strip Fabric Swatch
AP42 (1) 4-1/2” Strip Fabric Swatch
AP43 (1) 4-1/2” Strip Fabric Swatch
AP44 (1) 15” Strip Fabric Swatch
AP45 (1) 9” Strip Fabric Swatch
AP46 (1) 9” Strip Fabric Swatch
AP47 (1) 9” Strip Fabric Swatch
AP48 (1) 4-1/2” Strip Fabric Swatch
AP49 (1) 4-1/2” Strip Fabric Swatch

Page 4
AP
45
AP44
AP44
AP47
AP5
AP6
AP6A
P6
AP6
AP6
AP6
AP37A
P38
AP
36
AP22AP23AP
24
AP
21
AP20AP19
AP39
AP
1
AP
2 AP
3 AP4
AP46
AP
44
AP49
AP
48
AP
45
AP10AP10AP10
AP27
AP
25
AP
26
AP28
AP
29A
P30
AP9
AP8
AP7
AP
5A
P6AP
6AP6AP6
AP6A
P6
AP49
AP
37
AP
38
AP
36
AP47
AP
46
AP44
AP
45A
P44
AP
11A
P12
AP15AP17
AP16
AP14A
P13
AP
46
AP
46
AP
43
AP
42A
P41
AP40
AP39
AP33AP35
AP34
AP32AP
34AP
32AP
31
AP35
AP
34
AP
32
AP31
AP
48A
P48
AP
27
AP
25 AP26
AP28AP
29
AP
30
AP
45
AP22AP23AP24 A
P21
AP
20
AP
19
AP18
AP
45AP37
AP38
AP36
AP
37
AP38
AP36
AP
45
AP47
AP45A
P45
5© Copyright February 2019

Leaf
#1
Righ
t
Leaf
#1
Righ
t
Leaf
#5
Leaf
#4R
Leaf
#2
Stem
#6
Stem
#5
Stem
#1
Leaf #4LLeaf #4L
6 Published by Quiltworx.com
► Cutting out your Appliqué TemplatesPrepare (3) Bags. Label as Stems, Leaves, & Flowers.
Cutting the Stems and Leaves: Stack the duplicate Sheets together before cutting. Starting with your Stems, use your rotary cutter and cut the tiny tabs that hold the template pieces into the 8-1/2” x 11” Cutout Sheets. Note: If you are careful, you should be able cut the duplicate sheets at the same time. When you are done cutting out the stems, clip the like pieces together and place them into the bag marked: Stems. Reference the labels on Page 2 for
which pieces are Stems versus Leaves and flowers.
Leaves: The leaves are cutout, sorted into like groups and placed into the bag labelled: Leaves.
Flowers: The Flowers are cut out as a complete unit, so only clip the tabs around the outside perimeter of each flower
group. The petals are not separated at this time. Clip your flower groups
together for each design and place with the bag set aside for the Flowers.
► Turn-Under Appliqué InstructionsRemoving the paper on the Stitch-N-Peel Templates: Just prior to adhering each template piece to your fabric, the shiny paper is removed off the backside of each template piece. At this time the sticky side of the template is placed against the wrong side of your fabric. Leave at least 1/4” between each template to cut the turn under edges. When cutting the flowers, each template is cut and place onto the fabric of your choice.
Trimming Around the Templates: Cut around the outer edge of each template piece, leaving about 3/16” of fabric for the turn-under on the backside of each template.
Gluing the Edges: Using your glue pen apply a small amount of glue on the backside of the fabric, along the edge of the template
where the fabric is turned-
under.
NOTE - The edges and ends that are tucked under another template are not
turned under. These are best left flat to reduce bulk. The seam allowances shown between the arrows on each of the template pieces are referred to as the (No Turn Zone).
Turning Under the Edges: Use the flat end of your Purple Thang, gently fold and press the seam allowance over the edge of the template, pressing the fabric into the glue on the backside of the stabilizer.
3
4
5
Step 3
Step 4
Step 5
2
1
3
4
5
2
Step 2
Step 1
11
2
3
4

7© Copyright February 2019
Clipping: You will need to clip the fabric along each inside curve on occasion to allow the fabric to roll smoothly over the edge of the inside curve. An outside curve does not need to be clipped. If your seam allowance is 3/16” then your clips should only be 1/8” deep.
Folding over the Tips: The fabric is folded along the first edge of your stem. When you reach the tip of the point, continue folding the fabric over on top of itself. When you start down the second side the fabric is folded back over itself bringing the fold all the way to the edge of the paper template.
Cleaning off the Tip: Using a sharp pair of scissors lift the folded fabric under the tip and clip off the excess fabric.
Building the Flowers: Position the layout sheet onto a light table. You can prebuild your flowers if you want, placing the flower pieces together, and where there is some overlap of pieces, a glue pen is used to glue the pieces together along the raw edges of the no sew zone where the fabrics overlap.
After the glue has dried for a couple minutes, you can move the entire flower and assemble the rest. Once all the flowers are assembled, position your background units on top of the layout sheets. Line up the seams and edges to the lines on the layout sheet. Begin placing the stems and flowers and leaves in place. The light table should make it easy to see where everything goes. The appliqué pieces are glued onto your fabrics using a basting glue. The basting glue is very strong once it has dried, keeping the pieces from moving until they can be machine appliquéd on. Roxanne’s Baste-it is a very popular product and is normally the one I use.
Assembly of the Quilt: Note that there are a few pieces, like the Bitterroot flowers and a few leaves and stems that overlap the diagonal stem once the border is sewn together and your border pieces are not sewn together. Do not add these pieces to the sew down at this time. Instead, complete all the machine appliqué on the pieces you can, then go to the Introduction booklet and assemble the quilt. Come back and add and stitch down the last couple pieces once the quilt is assembled. This will help you avoid half seams or Y-seams during assembly of your quilt, but still allow you to machine appliqué most of the pieces down on the smaller border elements, which are much easier to work with at the sewing machine.
█ MACHINE APPLIQUÉThe pieces can be sewn onto the blocks by machine or by hand. The instructions in this booklet are for Machine Appliqué.
1. Clean and Oil: It is highly recommended to do this with your machine before you start.
2. Needles: Install a new needle. A good stitch requires a sharp needle. I normally use a size 60/8 Microtex Sharp. Your needle size however should be adjusted to the size of thread you have selected to use.
NOTE - A Little Advice: Generally, the smaller the thread, the smaller the needle, the smaller the stitch, the better it looks. But, remember that following someone else’s advice (in this case, mine) is not always the right solution. If you are not comfortable going smaller, a larger stitch may be the right choice for you. Experiment a little on a different piece of fabric if
you are new to Machine Appliqué, until you have some confidence!
3. Selecting Thread: I normally use the lighter weight threads, 60 weight and smaller. I have used cotton, polyester, rayon, and silk.
NOTE - My Advice!: Use what you like. We are lucky to have a lot of great options, so pick a thread and be happy. I normally match the thread color to the fabric. I generally use the same thread in the bobbin as I use on the top.
4. Stitches and Stitch Setting: My appliqué is normally done with a very small zigzag or a very small blanket stitch. Decorative stitches are also becoming very popular. So pick your stitch. Play around a bit on your machine. Once you find the stitch you want, play around with the length and width. When you are happy then you can begin the appliqué process.
► General Setting for Invisible Machine Appliqué:
Blanket Stitch: Width (.07-1.2) Length, (1.7-2.1)
Zigzag: Width (.05-.09) Length, (1.3-1.5)
5. Appliqué Foot: An Open Toe Embroidery Foot is the most common foot used for Machine Appliqué.
6. Object Placement: When you begin stitching, the needle position should be set so it jumps on and off the folded-edge of the appliqué pieces.
█ DIGITIZED EMBROIDERY APPLIQUÉ FROM FABRIC CONFETTI (VANESSA FROMM)
If you have chosen to do the Digitized Embroidery, please follow the assembly instructions on your Bridal Bouquet Pattern Instructions before completing the appliqué. If you are placing this appliqué on a different pattern, do your best to assemble as much of your border as possible to fit the appliqué, then follow Vanessa Fromm’s instructions for placing the appliqué.
There are two options for preparing your shapes. Option 1 is to cut out your appliqué shapes, then positioning the pieces on the back side of your fabric (Vanessa adds an iron on stabilizer to her strips before she cuts out the shapes and the Stitch-N-Peel simply sticks to the fusible, then easily pulls away), and trimming around them with a rotary cutter or scissors, just make very sure to cut right up to the edge of the shape with a nice, clean cut. Accuracy is very important. With the turn under approach, you leave the Stitch-N-Peel in the turn under piece. For digitized embroidery, pull the Stitch-N-Peel off, then either reposition it or use one of the other shapes. You may actually be able to reuse the shapes and for future projects, reuse the appliqué pieces with this technique if you like.
Option 2, involves the use of a cutting machine. Vanessa provides the .svg files for the shapes if you have a cutter as well. Preserve the appliqué sheets for other projects if desired.
Follow Vanessa’s directions to use the digitized embroidery files with your embroidery machine. It will take some time to complete the appliqué, but it is beautiful when complete!

8 Published by Quiltworx.com
Print Date: 05-08-20
Quiltworx.com has collaborated with a new company called Quiltster to bring you a fabric auditioning mobile application for our designs. Quiltster includes a layout for the Meadow Star Mixer Border, Queen Star Medallion, and Valley Blossoms. Over time, we will also release it to test on other compatible layouts. So, watch for this. There, you can color your appliqué to determine your favorite color combination with applicable strip sets! To learn more, visit Quiltster.com!
► Quiltster Compatible
Bridal Bouquet Appliqué