WeatherForce LED - Welcome to the Thorn Lighting … the diffuser and gear tray Product application...
2
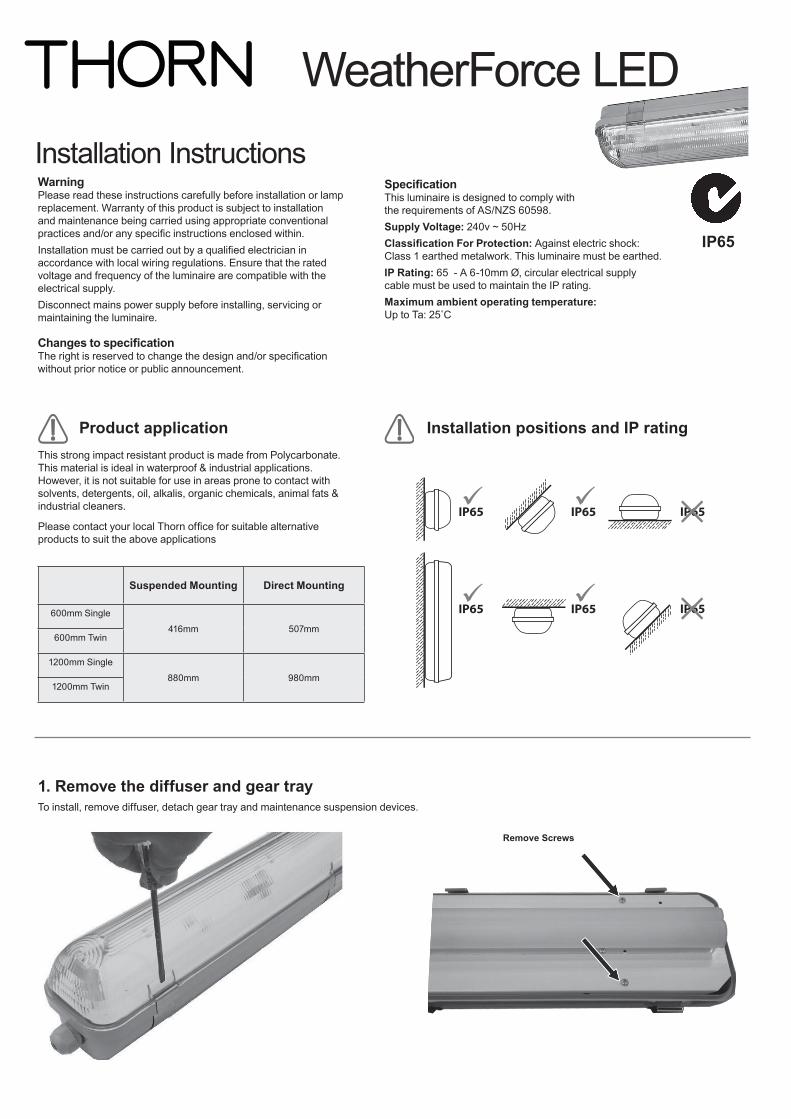
IP65 IP65 IP65 IP65 IP65 IP65 WeatherForce LED Installation Instructions Warning Please read these instructions carefully before installation or lamp replacement. Warranty of this product is subject to installation and maintenance being carried using appropriate conventional practices and/or any specific instructions enclosed within. Installation must be carried out by a qualified electrician in accordance with local wiring regulations. Ensure that the rated voltage and frequency of the luminaire are compatible with the electrical supply. Disconnect mains power supply before installing, servicing or maintaining the luminaire. Changes to specification The right is reserved to change the design and/or specification without prior notice or public announcement. Specification This luminaire is designed to comply with the requirements of AS/NZS 60598. Supply Voltage: 240v ~ 50Hz Classification For Protection: Against electric shock: Class 1 earthed metalwork. This luminaire must be earthed. IP Rating: 65 - A 6-10mm Ø, circular electrical supply cable must be used to maintain the IP rating. Maximum ambient operating temperature: Up to Ta: 25�C 1. Remove the diffuser and gear tray Product application IP65 To install, remove diffuser, detach gear tray and maintenance suspension devices. Installation positions and IP rating This strong impact resistant product is made from Polycarbonate. This material is ideal in waterproof & industrial applications. However, it is not suitable for use in areas prone to contact with solvents, detergents, oil, alkalis, organic chemicals, animal fats & industrial cleaners. Please contact your local Thorn office for suitable alternative products to suit the above applications Remove Screws Suspended Mounting Direct Mounting 600mm Single 416mm 507mm 600mm Twin 1200mm Single 880mm 980mm 1200mm Twin
Transcript of WeatherForce LED - Welcome to the Thorn Lighting … the diffuser and gear tray Product application...
IP65
IP65
IP65 IP65
IP65 IP65
WeatherForce LEDInstallation InstructionsWarningPlease read these instructions carefully before installation or lamp replacement. Warranty of this product is subject to installation and maintenance being carried using appropriate conventional practices and/or any specific instructions enclosed within. Installation must be carried out by a qualified electrician in accordance with local wiring regulations. Ensure that the rated voltage and frequency of the luminaire are compatible with the electrical supply.Disconnect mains power supply before installing, servicing or maintaining the luminaire.
Changes to specificationThe right is reserved to change the design and/or specification without prior notice or public announcement.
SpecificationThis luminaire is designed to comply with the requirements of AS/NZS 60598.Supply Voltage: 240v ~ 50HzClassification For Protection: Against electric shock: Class 1 earthed metalwork. This luminaire must be earthed.IP Rating: 65 - A 6-10mm Ø, circular electrical supply cable must be used to maintain the IP rating. Maximum ambient operating temperature: Up to Ta: 25�C
1. Remove the diffuser and gear tray
Product application
IP65
To install, remove diffuser, detach gear tray and maintenance suspension devices.
Installation positions and IP ratingThis strong impact resistant product is made from Polycarbonate. This material is ideal in waterproof & industrial applications. However, it is not suitable for use in areas prone to contact with solvents, detergents, oil, alkalis, organic chemicals, animal fats & industrial cleaners.
Please contact your local Thorn office for suitable alternative products to suit the above applications
Remove Screws
Suspended Mounting Direct Mounting
600mm Single
416mm 507mm600mm Twin
1200mm Single
880mm 980mm1200mm Twin

Green/Yellow Earth
Brown Active
Blue Neutral1
2
3
SAP No: 96540006 Rev: A 1/2013
thn_
wea
ther
forc
e_01
13
Thorn Lighting Pty Limited (ABN 74 060 142 501)Head Office: 43 Newton Road, Wetherill Park NSW 2164
Ph. 1300 139 965 Fax. 1300 139 953 www.thornlighting.com.au
Attach the gear tray to the base. Tighten screws firmly.
Fit the fluorescent lamp (ordered separately).
Attach the diffuser to the base. Ensure the diffuser is locked in place.
Mounting kits suitable for surface mounting, or suspension mounting are available to order.
Order reference: Single - 96039252, Twin - 96039253.
5. Secure the gear tray to the base
8. Attach the diffuser
Mounting kits
Make the electrical connections at the terminal block.
4. Make the electrical connectionsThe WeatherForce can be mounted by direct screw fixing through the housing. It should only be drilled at the appropriate marked points where the housing is suitably reinforced. Do not use oil.
Note: Fixing screws and washers are NOT supplied.
It is recommended drill bits specifically designed for plastic are used. Standard metal or timber twist drills may be used but if not properly prepared for plastic they can instigate stress cracking which may spread under load.
Do not overtighten any screws into or in contact with the plastic housing. Permanent damage may occur even if not immediately obvious. Recommended maximum torque 1.5Nm
It is recommended that installation is made using the end entry and gland kit provided with the fitting.
Warning: If the housing is pierced for back entry of cabling, do not run mains cabling past ballast, Temperatures exceed 100°C.
Fit the electrical supply cable, conduit and cable gland to the entry point on the base. Ensure the cable gland is tightened firmly.
Note: If not suitably sealed with appropriate washers, glands or proprietary sealing kits any piercing of the housing will interfere with the IP rating of the product.
2. Mount the luminaire
3. Attach conduit, cable glands and electrical supply cable to fitting.
Mounting point
Mounting screws
Cable gland
Suspension mounting kit
Surface mounting kit
Screw
Washer


![Klimaoprema katalog PPZEN DIFFUSER SLOT DIFFUSER ... Selection diagrams ... - Air velocity between two diffusers L [m] - Diffuser length B min](https://static.fdocuments.net/doc/165x107/5a9ff9c87f8b9a71178d6c6b/pdfklimaoprema-katalog-diffuser-slot-diffuser-selection-diagrams-air.jpg)