Weather Station QuickStartGuide_English_I300_I600_I900
1
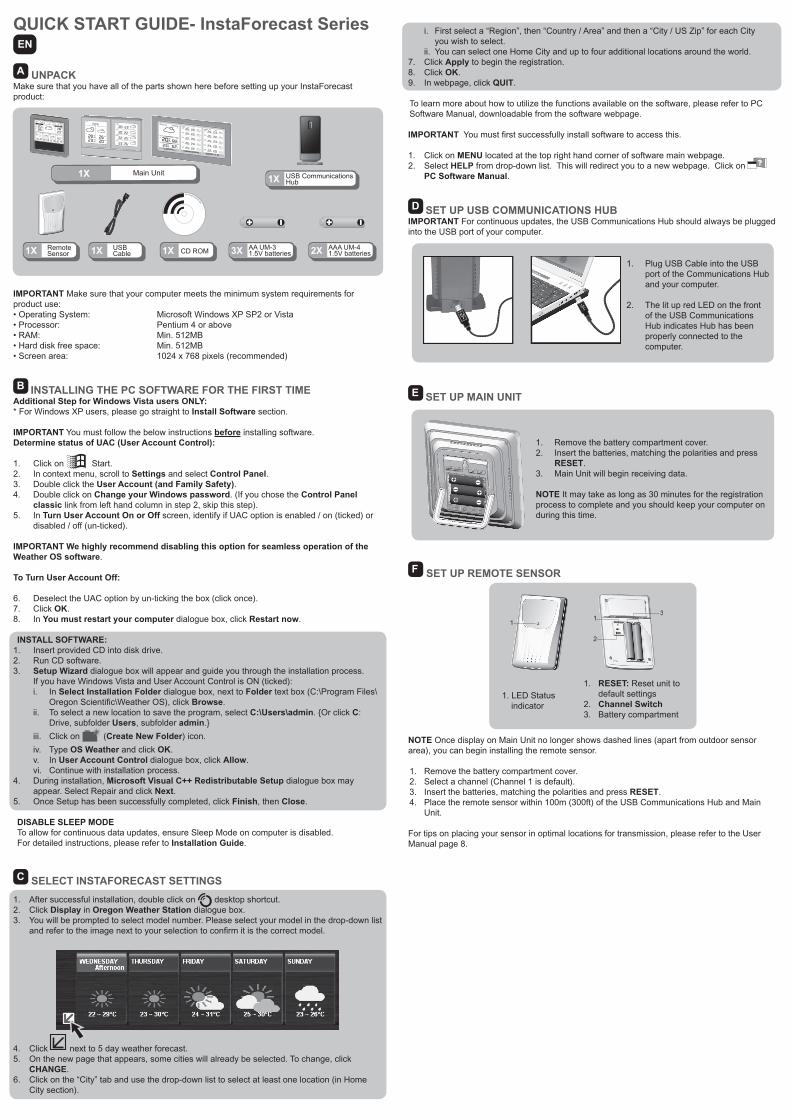
QUICK START GUIDE- InstaForecast Series EN A UNPACK Make sure that you have all of the parts shown here before setting up your InstaForecast product: 1X Main Unit 1X USB Communications Hub 1X Remote Sensor 1X USB Cable 1X CD ROM 3X AA UM-3 1.5V batteries 2X AAA UM-4 1.5V batteries IMPORTANT Make sure that your computer meets the minimum system requirements for product use: • Operating System: Microsoft Windows XP SP2 or Vista • Processor: Pentium 4 or above • RAM: Min. 512MB • Hard disk free space: Min. 512MB • Screen area: 1024 x 768 pixels (recommended) B INSTALLING THE PC SOFTWARE FOR THE FIRST TIME Additional Step for Windows Vista users ONLY: * For Windows XP users, please go straight to Install Software section. IMPORTANT You must follow the below instructions before installing software. Determine status of UAC (User Account Control): 1. Click on ˇ Start. 2. In context menu, scroll to Settings and select Control Panel. 3. Double click the User Account (and Family Safety). 4. Double click on Change your Windows password. (If you chose the Control Panel classic link from left hand column in step 2, skip this step). 5. In Turn User Account On or Off screen, identify if UAC option is enabled / on (ticked) or disabled / off (un-ticked). IMPORTANT We highly recommend disabling this option for seamless operation of the Weather OS software. To Turn User Account Off: 6. Deselect the UAC option by un-ticking the box (click once). 7. Click OK. 8. In You must restart your computer dialogue box, click Restart now. INSTALL SOFTWARE: 1. Insert provided CD into disk drive. 2. Run CD software. 3. Setup Wizard dialogue box will appear and guide you through the installation process. If you have Windows Vista and User Account Control is ON (ticked): i. In Select Installation Folder dialogue box, next to Folder text box (C:\Program Files\ Oregon Scientific\Weather OS), click Browse. ii. To select a new location to save the program, select C:\Users\admin. {Or click C: Drive, subfolder Users, subfolder admin.} iii. Click on (Create New Folder) icon. iv. Type OS Weather and click OK. v. In User Account Control dialogue box, click Allow. vi. Continue with installation process. 4. During installation, Microsoft Visual C++ Redistributable Setup dialogue box may appear. Select Repair and click Next. 5. Once Setup has been successfully completed, click Finish, then Close. DISABLE SLEEP MODE To allow for continuous data updates, ensure Sleep Mode on computer is disabled. For detailed instructions, please refer to Installation Guide. C SELECT INSTAFORECAST SETTINGS 1. After successful installation, double click on desktop shortcut. 2. Click Display in Oregon Weather Station dialogue box. 3. You will be prompted to select model number. Please select your model in the drop-down list and refer to the image next to your selection to confirm it is the correct model. 4. Click next to 5 day weather forecast. 5. On the new page that appears, some cities will already be selected. To change, click CHANGE. 6. Click on the “City” tab and use the drop-down list to select at least one location (in Home City section). i. First select a “Region”, then “Country / Area” and then a “City / US Zip” for each City you wish to select. ii. You can select one Home City and up to four additional locations around the world. 7. Click Apply to begin the registration. 8. Click OK. 9. In webpage, click QUIT. To learn more about how to utilize the functions available on the software, please refer to PC Software Manual, downloadable from the software webpage. IMPORTANT You must first successfully install software to access this. 1. Click on MENU located at the top right hand corner of software main webpage. 2. Select HELP from drop-down list. This will redirect you to a new webpage. Click on PC Software Manual. D SET UP USB COMMUNICATIONS HUB IMPORTANT For continuous updates, the USB Communications Hub should always be plugged into the USB port of your computer. 1. Plug USB Cable into the USB port of the Communications Hub and your computer. 2. The lit up red LED on the front of the USB Communications Hub indicates Hub has been properly connected to the computer. E SET UP MAIN UNIT 1. Remove the battery compartment cover. 2. Insert the batteries, matching the polarities and press RESET. 3. Main Unit will begin receiving data. NOTE It may take as long as 30 minutes for the registration process to complete and you should keep your computer on during this time. F SET UP REMOTE SENSOR 1 1 3 2 1. LED Status indicator 1. RESET: Reset unit to default settings 2. Channel Switch 3. Battery compartment NOTE Once display on Main Unit no longer shows dashed lines (apart from outdoor sensor area), you can begin installing the remote sensor. 1. Remove the battery compartment cover. 2. Select a channel (Channel 1 is default). 3. Insert the batteries, matching the polarities and press RESET. 4. Place the remote sensor within 100m (300ft) of the USB Communications Hub and Main Unit. For tips on placing your sensor in optimal locations for transmission, please refer to the User Manual page 8.
description
weerstation via USB, vier dagen voorspelling
Transcript of Weather Station QuickStartGuide_English_I300_I600_I900
QUICK START GUIDE- InstaForecast SeriesEN
A UNPACKMake sure that you have all of the parts shown here before setting up your InstaForecast product:
1X Main Unit1X USB Communications
Hub
1X Remote Sensor 1X USB
Cable 1X CD ROM 3X AA UM-31.5V batteries 2X AAA UM-4
1.5V batteries
IMPORTANT Make sure that your computer meets the minimum system requirements for product use:• Operating System: Microsoft Windows XP SP2 or Vista• Processor: Pentium 4 or above• RAM: Min. 512MB• Hard disk free space: Min. 512MB• Screen area: 1024 x 768 pixels (recommended)
B INSTALLING THE PC SOFTWARE FOR THE FIRST TIMEAdditional Step for Windows Vista users ONLY:* For Windows XP users, please go straight to Install Software section.
IMPORTANT You must follow the below instructions before installing software.Determine status of UAC (User Account Control):
1. Click on ˇ Start.2. In context menu, scroll to Settings and select Control Panel.3. Double click the User Account (and Family Safety).4. Double click on Change your Windows password. (If you chose the Control Panel classic link from left hand column in step 2, skip this step).5. In Turn User Account On or Off screen, identify if UAC option is enabled / on (ticked) or
disabled / off (un-ticked).
IMPORTANT We highly recommend disabling this option for seamless operation of the Weather OS software.
To Turn User Account Off:
6. Deselect the UAC option by un-ticking the box (click once).7. Click OK.8. In You must restart your computer dialogue box, click Restart now.
INSTALL SOFTWARE:1. Insert provided CD into disk drive.2. Run CD software.3. Setup Wizard dialogue box will appear and guide you through the installation process. If you have Windows Vista and User Account Control is ON (ticked): i. In Select Installation Folder dialogue box, next to Folder text box (C:\Program Files\
Oregon Scientific\Weather OS), click Browse. ii. To select a new location to save the program, select C:\Users\admin. {Or click C:
Drive, subfolder Users, subfolder admin.}
iii. Click on (Create New Folder) icon.
iv. Type OS Weather and click OK. v. In User Account Control dialogue box, click Allow. vi. Continue with installation process.4. During installation, Microsoft Visual C++ Redistributable Setup dialogue box may appear. Select Repair and click Next.5. Once Setup has been successfully completed, click Finish, then Close.
DISABLE SLEEP MODETo allow for continuous data updates, ensure Sleep Mode on computer is disabled.For detailed instructions, please refer to Installation Guide.
C SELECT INSTAFORECAST SETTINGS
1. After successful installation, double click on desktop shortcut.2. Click Display in Oregon Weather Station dialogue box.3. You will be prompted to select model number. Please select your model in the drop-down list
and refer to the image next to your selection to confirm it is the correct model.
4. Click next to 5 day weather forecast.5. On the new page that appears, some cities will already be selected. To change, click
CHANGE.6. Click on the “City” tab and use the drop-down list to select at least one location (in Home City section).
i. First select a “Region”, then “Country / Area” and then a “City / US Zip” for each City
you wish to select. ii. You can select one Home City and up to four additional locations around the world.7. Click Apply to begin the registration.8. Click OK.9. In webpage, click QUIT.
To learn more about how to utilize the functions available on the software, please refer to PC Software Manual, downloadable from the software webpage.
IMPORTANT You must first successfully install software to access this.
1. Click on MENU located at the top right hand corner of software main webpage.2. Select HELP from drop-down list. This will redirect you to a new webpage. Click on
PC Software Manual.
D SET UP USB COMMUNICATIONS HUBIMPORTANT For continuous updates, the USB Communications Hub should always be plugged into the USB port of your computer.
1. Plug USB Cable into the USB port of the Communications Hub and your computer.
2. The lit up red LED on the front of the USB Communications Hub indicates Hub has been properly connected to the
computer.
E SET UP MAIN UNIT
1. Remove the battery compartment cover.2. Insert the batteries, matching the polarities and press
RESET.3. Main Unit will begin receiving data.
NOTE It may take as long as 30 minutes for the registration process to complete and you should keep your computer on during this time.
F SET UP REMOTE SENSOR
11
3
2
1. LED Status indicator
1. RESET: Reset unit to default settings
2. Channel Switch3. Battery compartment
NOTE Once display on Main Unit no longer shows dashed lines (apart from outdoor sensor area), you can begin installing the remote sensor.
1. Remove the battery compartment cover.2. Select a channel (Channel 1 is default).3. Insert the batteries, matching the polarities and press RESET.4. Place the remote sensor within 100m (300ft) of the USB Communications Hub and Main
Unit.
For tips on placing your sensor in optimal locations for transmission, please refer to the User Manual page 8.