WATER SUMMARY CARD - Stiftung Haus der kleinen …...exploration cards, two inquiry cards offer more...
22
Without water there is no life. Water is everywhere: We drink it, we wash in it, it rains on us, it flows past us as a river. The children jointly make a list of occasions when they encounter water throughout the day. How do they perceive water? What does water look and feel like? Can you hear it, taste it, or even smell it? During inquiry activities, we use all our senses. With this set of cards, the “Haus der kleinen Forscher” Foundation gives you some ideas on how you can explore and investigate the element of water with the children in many different ways. On the seven exploration cards you will find suggestions for helping the children to experience wa- ter in its three states of aggregation – solid, liquid and gas. Further explorations include special properties of water, for example solubility and surface tension. There is no prescribed sequence, but it makes sense to start with the exploration card “Water with all your senses”. Following on from the basic experiences facilitated by the exploration cards, two inquiry cards offer more in-depth learning experiences. The “Inquiry Cycle” method allows the children to pursue their own questions. In this way, they are able to practise using a scientific ap- proach: They observe and describe things precisely; they compare things; they make and test assumptions; and they draw conclusions. EXPLORATION CARD WATER WITH ALL YOUR SENSES The children experience water in numerous ways, and their senses become tuned to liquids. They find verbal descriptions of how water feels, smells and tastes. They discover that you can see through water, and they experience the sounds that water can make. A BRIEF OVERVIEW OF THE INDIVIDUAL CARDS: EXPLORATION CARD WATER IS A LIQUID During these inquiry activities, the children consciously experience the special properties of water in its liquid state. They discover that water flows downwards like all liquids and spreads out in all directions until it hits a barrier. The children find out that, unlike solid objects, water doesn’t have a shape of its own but rather adapts to the shape of the container that holds it or to the boundaries of the natural environment. EXPLORATION CARD A STONE MADE OF WATER The children touch ice in various forms, perceive it with all their senses, and explore its properties. They discover that ice slowly turns to water in their hands or in a warm room, that water turns to ice on a frosty winter’s night just as it does in the freezer, and that frozen water takes up more space than liquid water. SUMMARY CARD WATER Note on working with different age groups You will sometimes find this symbol on these cards. The “ladder” indicates that the inquiry activity in question, or the entire card, presupposes that children have already had certain basic experiences and/or developed certain skills (e.g., in the area of perception, cognition or motor development). As a rule, these experiences and/or skills are not acquired until children are of primary school age (i.e., between the ages of six and ten). Ideas and inquiry activities that do not bear this symbol are suitable for children of all ages. 03/2013
Transcript of WATER SUMMARY CARD - Stiftung Haus der kleinen …...exploration cards, two inquiry cards offer more...

Without water there is no life. Water is everywhere: We drink it, we wash in it, it rains on us, it flows past us as a river. The children jointly make a list of occasions when they encounter water throughout the day. How do theyperceive water? What does water look and feel like? Can you hear it, taste it, or even smell it? During inquiry activities, we use all our senses.
With this set of cards, the “Haus der kleinen Forscher” Foundation gives you some ideas on how you can explore and investigate the element of water with the children in many different ways. On the seven exploration cards you will find suggestions for helping the children to experience wa-ter in its three states of aggregation – solid, liquid and gas.Further explorations include special properties of water, for examplesolubility and surface tension. There is no prescribed sequence, but it makes sense to start with the exploration card “Water with all your senses”. Following on from the basic experiences facilitated by the exploration cards, two inquiry cards offer more in-depth learning experiences.
The “Inquiry Cycle” method allows the children to pursue their ownquestions. In this way, they are able to practise using a scientific ap-proach: They observe and describe things precisely; they comparethings; they make and test assumptions; and they draw conclusions.
EXPLORATION CARD WATER WITH ALL YOUR SENSESThe children experience water in numerous ways, and their sensesbecome tuned to liquids. They find verbal descriptions of how waterfeels, smells and tastes. They discover that you can see through water, and they experience the sounds that water can make.
A BRIEF OVERVIEW OF THE INDIVIDUAL CARDS:
EXPLORATION CARDWATER IS A LIQUID
During these inquiry activities, the children consciouslyexperience the special properties of water in its liquid state. They
discover that water flows downwards like all liquids and spreadsout in all directions until it hits a barrier. The children find out
that, unlike solid objects, water doesn’t have a shape of its ownbut rather adapts to the shape of the container that holds it or to
the boundaries of the natural environment.
EXPLORATION CARD A STONE MADE OF WATERThe children touch ice in various forms, perceive it with all their senses, and explore its properties. They discover that ice slowly turns to water in their hands or in a warm room, that water turns to ice on a frosty winter’s night just as it does in the freezer, and that frozen water takes up more space than liquid water.
SUMMARY CARDWATER
Note on working with different age groups
You will sometimes find this symbol on these cards. The
“ladder” indicates that the inquiry activity in question, or
the entire card, presupposes that children have already
had certain basic experiences and/or developed certain
skills (e.g., in the area of perception, cognition or motor
development). As a rule, these experiences and/or skills
are not acquired until children are of primary school age
(i.e., between the ages of six and ten). Ideas and inquiry
activities that do not bear this symbol are suitable for
children of all ages.
03/2
013

Imprint: © 2013 “Haus der kleinen Forscher” Foundation, Berlin | Publisher: “Haus der kleinen Forscher” Foundation | Project Manager: Dr. Mareike Wilms | Concept and Editing: Dr. Maria Ploog , Dr. Wei Wang Production Manager: Dana Schumacher | Photos: “Haus der kleinen Forscher” Foundation, Berlin; Thomas Ernst, Berlin; Christoph Wehrer, Berlin; Frank Bentert, Berlin; Dr. Nina Böhme, Bergisch Gladbach Design: www.sign-grafikdesign.de, Berlin
EXPLORATION CARD WATER EVAPORATION AND VAPORISATIONIn different everyday situations, the children observe the way waterevaporates and vaporises. They discover that evaporation also takes placeat room temperature and that it can be accelerated by heating the water. The children realise that water vapour can become a liquid again.
EXPLORATION CARDWATER DISSOLVES – WATER MIXES
Using different types of sugar, the children discover thatsubstances dissolve in water at different rates. By testingother solids, they observe that some substances dissolve
well in water, while others do not.
EXPLORATION CARD DROPS OF WATER
The children investigate the shape and behaviour ofwater drops and get to know the phenomenon of
surface tension.
INQUIRY CARD HOW MUCH SUGAR CAN BE
DISSOLVED IN WATER?The children test how much sugar can be dissolved in a
certain amount of water. Can water dissolve an unlimitedamount of sugar or does the dissolution process come to
an end at some point?
EXPLORATION CARDMAKING IT CLEAN AGAINThe children learn how dirty water can be cleanedagain. They use different sieves and filters and build awater purification plant.
INQUIRY CARDFROM ICE TO WATERThe children investigate the conditions under whichice melts faster. They test their ideas and documentthe results.
WAter
What it’s all about
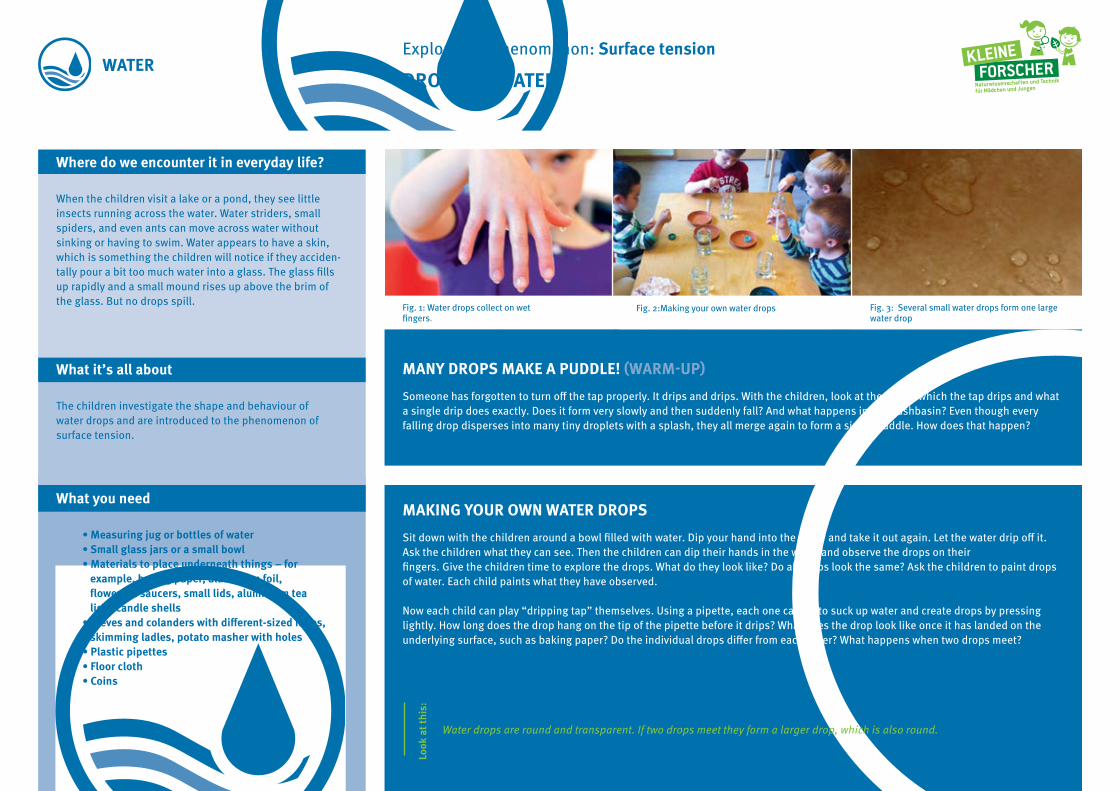
The children investigate the shape and behaviour ofwater drops and are introduced to the phenomenon ofsurface tension.
Where do we encounter it in everyday life?
When the children visit a lake or a pond, they see littleinsects running across the water. Water striders, smallspiders, and even ants can move across water without sinking or having to swim. Water appears to have a skin, which is something the children will notice if they acciden-tally pour a bit too much water into a glass. The glass fills up rapidly and a small mound rises up above the brim of the glass. But no drops spill.
Explore the phenomenon: Surface tension
DrOPS OF WAter
Fig. 2:Making your own water drops Fig. 3: Several small water drops form one large water drop
Fig. 1: Water drops collect on wet fingers.
03/2
013
What you need
• Measuring jug or bottles of water• Small glass jars or a small bowl• Materials to place underneath things – for example, baking paper, aluminium foil, flowerpot saucers, small lids, aluminium tea light candle shells• Sieves and colanders with different-sized holes, skimming ladles, potato masher with holes• Plastic pipettes• Floor cloth• Coins
Water drops are round and transparent. If two drops meet they form a larger drop, which is also round.
Look
at t
his:
MANY DROPS MAKE A PUDDLE! (wARM-UP)Someone has forgotten to turn off the tap properly. It drips and drips. With the children, look at the way in which the tap drips and what a single drip does exactly. Does it form very slowly and then suddenly fall? And what happens in the washbasin? Even though every falling drop disperses into many tiny droplets with a splash, they all merge again to form a single puddle. How does that happen?
MAKING YOUR OwN wATER DROPSSit down with the children around a bowl filled with water. Dip your hand into the water and take it out again. Let the water drip off it.Ask the children what they can see. Then the children can dip their hands in the water and observe the drops on theirfingers. Give the children time to explore the drops. What do they look like? Do all drops look the same? Ask the children to paint dropsof water. Each child paints what they have observed.
Now each child can play “dripping tap” themselves. Using a pipette, each one can try to suck up water and create drops by pressinglightly. How long does the drop hang on the tip of the pipette before it drips? What does the drop look like once it has landed on theunderlying surface, such as baking paper? Do the individual drops differ from each other? What happens when two drops meet?

WAter
Interested Adults MIght
lIke to know
The smallest water particles form loose
bonds with each other. The water particles
at the surface have neighbouring water
particles beside them and below them.
Above them, they encounter air particles.
However, because the water particles seek
to bond with their own kind, they hold
onto their neighbours at the surface of the
water and within the liquid. Their neigh-
bours at the surface surround them and
hold onto them from all sides. However,
the pull from below is not counterbalanced
by a pull from above. Hence, the strongest
pull on the particles at the surface of the
water is exerted from below. That is why
drops of water are round: All the outer
particles have “internal” cohesion.
THE wOBBLY MOUND OF wATERThe children fill a jar to the brim with water. Now they can add additional drops using the pipette. Discuss with them when the water is likely to overflow. The high-er the level water in the jar, the more carefully the drops should be added using the pipette. How many drops will still fit in? Look at the brim of the jar together at eye level; it may be necessary to squat down. A mound of water is actually growing upwards above the brim. Encourage the children to make the mound as high as possible – until it eventually overflows. Then, in a second step, the children can pipette drops onto coins and watch how the water spreads across the coins and how many drops fit on a coin.
wATER IN SIEVESShow the children sieves and/or colanders with different-sized holes. Skimming ladles or potato mashers with holes are also suitable. The children look at these kitchen utensils and feel the different mesh sizes. What happens to the water when it passes through the sieve/colander. Look at the holes in the sieve/colander together. Some water remains hanging between the meshes. Why doesn’t it fall through? How do you know that it’s water and not air that is still in the holes – both are transparent aren’t they?
Fig. 5: Water also sticks together in the meshes of sieve.
Look
at t
his:
Water can also stay together in holes. It doesn’t drip out. The water droplets that are still in the sieve are transparent, but if you look really closely you can see the upside-down reflection of the surroundings in them.
Water can form a mound in a full glass of water or on a coin before it spills over.
Look
at t
his
Fig. 4: Does one more drop of water fit on the coin?

WAter
What it’s all about
The children touch ice in various forms, perceive it with alltheir senses, and investigate its properties. They discoverthat ice slowly turns to water in their hands and in a warmroom. They experience that water turns to ice on a frostywinter’s night just as it does in a freezer, and that frozenwater takes up more space than liquid water.
Where do we encounter it in everyday life?
Water ices (“freeze pops”) are a delicious refreshment insummer. In countries with very cold winters, children seethat puddles, ponds, or even lakes freeze over. They aresmooth and transparent like panes of glass. Icicles hangfrom gutters and street lamps. Ice flowers form on win-dows. But how does ice form?
Explore the phenomenon: States of aggregation
A StONe MADe OF WAter
Fig. 2: Ice cubes melting in the hand Fig. 3: How do you get the dinosaur out of the ice?Fig. 1: Ice cubes are like stones made of water.
03/2
013
What you need
• Freezer• Water• Ice cubes• Pre-prepared blocks of ice: Put small objects (such as buttons, stones, action figures) in yogurt pots filled with water and freeze them.• Unfrozen freeze pops in plastic sleeves• Shallow dish• Different tools: spoons, forks, small hammers• Hand towels, kitchen paper• Magnifying glasses• Salt, sand
Ice is a cold solid – it’s as smooth as glass, it can be white or transparent. Ice melts in your hand and becomes a liquid. The warmer your hand is, the faster that happens.
Look
at t
his:
ICY TIMES (WarM-UP)Use a visit to an ice cream parlour or the first frost of winter as an occasion to start talking to the children about when and where they come across ice in their daily lives. The children can then report their own experiences with ice, for example on frozen ponds or lakes. Ask the children what ice actually is and how they recognise it. Especially in winter, you can set off with the children in search of ice. In countries with cold winters, the children discover frozen puddles, ice blocks in watering cans, icicles hanging from gutters, or ice flowers on window panes. They examine these places more closely and describe what they observe. Are the puddles really completely frozen? Can the ice be removed from the watering can? How do icicles get their shape? What do ice flowers look like through a magnifying glass?.
A StONe MADe OF WAter Place a block of ice in which small surprises (e.g., buttons, crêpe paper, stones, or even small plastic toys) are frozen on a shallow plastic dish in the middle of the group. The children examine the ice closely, with and without a magnifying glass. What does the surface look like? They touch the ice and listen to it. How ever did the little surprises get into the ice? Challenge the children to get them out. They will first attempt to free the toys from the ice with various tools such as spoons, forks or even hammers. They will notice that ice is a solid material and that not only tools transform the ice but that their warm hands and the warmth in the room cause it to melt. However, they can see that this takes quite a long time. What possibilities are there to accelerate the process?

WAter
Interested Adults MIght
lIke to know
Water freezes to ice when the tempera-
ture drops below freezing point (O°C).
The smallest particles of water, which in
liquid water were loosely bound to each
other and were able to move around freely,
arrange themselves in a regular structure
and hold on to each other tightly – liquid
water becomes solid ice. This structure
is very spacious – that is, there are many
spaces between the particles. Therefore
water expands when it freezes, and ice
needs more space than water. If water is
trapped, for example in a bottle, when it
freezes, the ice may even burst the con-
tainer. This happens in the natural world
when water seeps into crevices in rocks
and freezes. At some point, the rock is
unable to withstand the pressure of the ice
and it breaks apart.
FrOM WaTEr TO ICE = FrEEZE POPS(Almost ) all children love ice cream and freeze pops. Examine unfrozen freeze pops in theirplastic sleeves with the children. Let the children hold the colourful sleeves and describe them.What do you have to do to turn the water into ice? The children place the liquid freeze pops inthe freezer. Once or twice every hour, they check to see whether anything has changed. Let them touch and describe the sleeves each time. The ice will be completely frozen after about four hours. What does it look like? What can the children see and feel? Encourage them to lookclosely at the outside of the packaging and to pay close attention when tasting the ice. And what happens when you hold the freeze pop in your hand for a long time? Is there any way to prevent the ice from melting, or to speed up the melting process?
SaLT ON ICEDid you know that people spread salt on icy roads? Why would they do that? The children placetwo ice cubes in a bowl or on a sheet of kitchen paper. They sprinkle a pinch of salt on the top of one of the ice cubes. Using a magnifying glass, they observe closely what happens. Have thechildren describe what they see and compare this to the ice cube without salt. What effect can be observed when sand is sprinkled on the ice?
Fig. 5: Salt on ice
Look
at t
his:
The ice melts where the grains of salt are lying on the ice cube, and the salt dissolves inthe melted water. The sand stays on the ice and makes the surface rough.
The ice feels cold and your fingers stick to the packaging. The water expanded when itfroze. The wobbly package is now absolutely full. The ice melts again in the warmth ofyour hand.Lo
ok a
t thi
s
Fig. 4: Unfrozen and frozen freeze pops

WAter
What it’s all about
The children observe different everyday situations wherewater evaporates and vaporises. They learn that thisprocess also takes place at room temperature and that itcan be accelerated by heating the water. The childrenrealise that water vapour can become a liquid again.
Where do we encounter it in everyday life?
The children can observe how water boils during cookingand how steam rises from the pot and disappears into theair. After rain, it doesn’t take long for the ground to dryout. The puddles also get smaller and smaller. Wetwashing dries more quickly when the sun is shining andthere is a light breeze. In summer, children also notice thatthey don’t need to dry themselves after swimming as theirhair and skin dries in the air. In winter, on the other hand,they have to dry their hair with a hair dryer before headingout into the cold air.
Explore the phenomenon: States of aggregation
WAter eVAPOrAtION AND VAPOrISAtION
Fig. 2: Damp clothes drying in the wind Fig. 3: Boiling water in the kettle evaporates.Fig. 1: Stones mark the size of the puddle.
03/2
013
What you need
• Pavement chalk• Basket of wet washing• Washing line or clothes horse and pegs• Handkerchiefs• Water• Food colouring• Pipettes• Several glass dessert bowls• Cling wrap• Hotplate• Pot of water with lid• Pot holders• Thermometer up to 100°C• Waterproof pen
Wet washing dries with time, and the water disappears. The warmer the location and the stronger the wind, the more quicklythe washing dries. Washing that is spread out dries faster than washing that is all bunched up.
Look
at t
his:
PUDDLES UNDER OBSERVATION (WArm-uP)
Go outdoors with the children after a shower of rain and look around. What does the ground look like? The children look for places thathave been dampened by the rain. What places are particularly wet and what places are perhaps still dry? Will it stay wet forever or whatwill happen to the moisture? Collect ideas from the group. The children can now see how the wetness of the ground changes over time.They can outline the puddles using pavement chalk or small stones. What does the ground look like after one, two, or three hours?How do the puddles change? What happens to them?
DRYING WET WASHING
A basket full of wet washing gives the children a reason to think about drying clothes. The children hang out the washing together.Watch the children doing this: Some will use clothes pegs; others won’t; still others will spread out the washing carefully.Ask the children their reasons for doing this. What will happen to the washing on the line now?
As a group, think about where the washing is likely to dry fastest. The children test their ideas using small, wet cloths, which theyput in different places: over the washing line, in a bucket, on a radiator, in the sun, in the shade, in a cupboard, and even in the fridge.After about 30 minutes, compare the state of the various cloths.

Water
Interested Adults MIght
lIke to know
If water is heated to 100°C, it begins to
boil. The liquid water turns into a gas
(steam) and mixes with the surrounding
air. The hotter the water is, the faster the
smallest particles of water move. This
movement of water particles is known as
random thermal movement or Brownian
motion. The more the particles move,
the more space they need to do so. At
100°C, the water particles are moving so
vigorously that the liquid water makes the
transition to the gaseous state and turns
into steam. This point is known as boiling
point.
However, even below boiling point, water
particles detach themselves from their
compound and escape into the air. This
process, which allows wet washing to
dry gradually, is called evaporation. The
amount of water in the washing becomes
smaller and smaller, especially when the
water particles are carried away by the
wind. The larger the surface area from
which the water particles can escape, the
faster the water evaporates. Consequently,
flat puddles dry out faster than deep ones.
COLOURFUL PUDDLES
The children mix food colouring with water and transfer a lot of coloured water to a small bowl using a pipette so that a small puddle is created. They then put the bowl on a radiator or a sunny window sill. By way of comparison, the children pipette some coloured water into another small bowl, but cover it with cling wrap before placing it next to the first bowl. The children check the bowls after a couple of hours: What has happened to the water? Where do the water droplets on the cling wrap come from?
BOILING WATER
Use cooking pasta or boiling eggs as an opportunity to observe closely with the children whathappens when water is heated. The children fill a pot with water and put it on the stove – or better still on a portable hotplate, which the whole group can sit around. They mark the water level inside the pot using a waterproof marker. Point out to the children that it can get hot now so they must not touch the hotplate, the pot, or the water. Then the show begins: At first small bubbles rise up from the bottom of the pot and then bigger ones. Steam starts to rise and the water bubbles furiously – it is boiling. With older children, you can monitor the increasing temperature using a thermometer. Have the children describe in detail what they see. What sort of bubbles are those? Where does the steam come from, and where does it go? Now and then you can take the pot off the stove and check the water with the children. Has anything changed? Then – protected by pot holders – one child can hold the lid of the pot in the steam. What happens now?
Fig. 5: Observing water being heated
Look
at t
his:
The hotter the water becomes, the more steam rises. At some point in time, the waterbegins to boil and large bubbles form. If you hold the lid of the pot over the boilingwater, small water droplets form on the lid.
The puddle in the bowl without the cling wrap has disappeared and the colouring hasdried out. The bowl with the cling wrap still contains some coloured water. Furthermore,the cling wrap is covered with small colourless water droplets.
Look
at t
his:
Fig. 4: The cling wrap does not allow the water to evaporate.

WAter
What it’s all about
The children learn how dirty water can be cleaned.They use different sieves and filters and build a waterpurification plant.
Where do we encounter it in everyday life?
A heavy shower of rain cleans the streets and washes thedirt into the sewers. Water seeps into the soil in gardens,forests and fields, passing through many layers of “dirt”.And yet, clean water comes out of the tap again. Whathappens to the water on its way to the tap? The children are already aware of some situations where water is sepa-rated from its contents: Pasta is collected in a sieve after it has been boiled, and coffee grounds remain in the filter after the hot water has passed through them.
Explore the phenomenon: Water purification
MAKING It CLeAN AGAIN
Fig. 2: Water running down the drain Fig. 3: How can dirty water be cleaned again?Fig. 1: Contact with water in the course of the day
03/2
013
What you need
• Water• Jars• Bucket/s• Earth, grass, leaves, twigs• Plastic bottle, nylon stocking• Fine sand, fine-grained and coarse-grained gravel• Coal briquettes, activated charcoal, charcoal tablets• Filter paper, funnels, different sieves• Large sheet of cardboard, pencils, spoons
Dirty water can be cleaned again. Floating materials can be scooped off. If the dirt has settled at the bottom, you can pourout the water. Suspended particles can be filtered using a sieve. The smaller the holes in the sieve, the cleaner the water will be, but the longer the process will take.
Look
at t
his:
CHeCKING tHe WAter CLOCK (Warm-uP)Draw a large clock face on a big piece of cardboard. Talk to the children about when they use or encounter water in the course of the day.Have the children stick photos or pictures they have drawn onto the different times. Some pictures will appear only once; others willappear frequently – for example, we wash our hands and use the toilet numerous times a day. Talk to the children about the amount ofwater each person needs and uses every day. Where does the clean water come from? Where does the dirty water go? And can it be made clean again?
DIrtY WAter IS MADe CLeAN AGAIN Draw the children’s attention to the drains at the side of the road on a rainy day. Where does the water flow to? How is it made clean again? Make dirty water together. The children mix soil, twigs, pebbles and withered leaves in a bucket of water. Look at the dirty water together. What can the children see? Does the dirt float? Has it settled at the bottom of the bucket? Or has it spread out in the water? Ask the children how they would get the dirt out of the water again. Can they use a spoon to lift the dirt out of the water? Is it possible to pour the water out in such a way that the earth stays on the bottom of the bucket and the suspended particles are filtered out? With the children, examine the various sieves and filter papers. What do they notice? The children clean a small portion of the dirty water with the different sieves and filter papers. Observe the speed at which the water flows through the devices and compare the different results of the separation.

WAter
Interested Adults MIght
lIke to know
Rainwater and wastewater are purified in
wastewater treatment plants. This is done
in several stages, employing physical,
biological, and mechanical processes.
The physical separation processes
are of a mechanical nature. Raked bar
screens are used to remove large objects.
Smaller objects are restrained by filters,
and even smaller impurities that are no
longer visible to the naked eye are bound
by activated charcoal. The principle of
activated charcoal is based on the fact
that pollutants lodge in the fine pores of
the charcoal. The medical application of
charcoal to treat gastrointestinal disorders
works in the same way. Charcoal tablets
help to bind toxic substances in the body.
WaTEr PurIFICaTION PLaNTCut the bottom off a plastic bottle and turn the bottle upside down with its cap still on. Now have the children insert a nylon stocking or a coffee filter paper into the bottle and press it against the sides. Then fill this with three layers – first with fine sand, then with fine-grained gravel, and finally with a top layer of coarse-grained gravel. The water purification plant is ready. Now the children slowly pour some of the muddied water out of a jar and into the filled plastic bottle. Remove the screw cap and have the children hold an empty glass under the bottle. After a little while, the filtered water will drip out of the bottle opening. What does the water look like compared to before? What material other than sand might be suitable for filtering dirty water?
DIrt CLeANS tHe WAterNot all pollutants in water can be removed with filters.Wastewater treatment plants use activated charcoal to free thewater of contaminants. Coal for cleaning? Try it out with thechildren: The children use ink to dye a glass of water. Thenthey sprinkle in finely crushed coal and stir it. Finally, thechildren pour the mixture through filter paper and separate the coal from the water again. What do they observe? Have thechildren compare the water filtered in this way with theoriginal water with the ink. Did the length of stirring timeaffect the cleanliness of the water?
Look
at t
his:
Coal binds the ink and the water becomes clear again.
Coarse-grained gravel filters large dirt particles, while fine-grained gravelremoves small dirt particles from the dirty water
Look
at t
his:
Fig. 5: Materials
Fig. 6: Coal binds ink and pollutants in the water.
Fig. 4: A self-made water purification plant

WAter
What it’s all about
Using different types of sugar, the children discover thatsubstances dissolve in water at different rates. By testingother solids, they see that some substances dissolve well in water while others do not.
Where do we encounter it in everyday life?
When you boil pasta or potatoes, you stir some salt intothe water. Children sweeten their tea with sugar; adults use sugar to sweeten their coffee. Milk tastes like choco-late when you add cocoa powder. Quite automatically and without paying much attention to it, children and adults put solids into liquids. Stirring dissolves the solids and they seem to disappear. But they obviously haven’t disap-peared completely as you can still taste them in the water. On the other hand, some things clearly don’t dissolve in water. For example, sand remains on the seabed.
Explore the phenomenon: Water as a solvent
WAter DISSOLVeS – WAter MIXeS
Fig. 2: Solubility of different types of sugarFig. 3: The smaller the sugar crystals, the quicker they dissolve in water.Fig. 1: Water with and without flavour
03/2
013
Das wird gebraucht
• Glass jars• Drinks: Lemonade, iced tea, unsweetened tea, and water• Different types of sugar: Icing sugar, granulated sugar, sugar cubes, decorating sugar (nib sugar), white and brown rock sugar• Magnifying glasses• Plates• Powdery or granular solids such as salt, flour, baking powder, rice, sand, pebbles• Liquids such as milk, juice, ink, vegetable oil• Spoons• Brushes• Thick black paper
Sugar dissolves in water. The smaller the sugar crystals, the quicker they dissolve.
Look
at t
his:
THAT TASTES SO GOOD! (wArM-uP)Use a group setting such as the morning circle as an opportunity to conduct a drink tasting session with the children: They take small sips of several different drinks such as lemonade, iced tea, unsweetened tea and water, After each sip, they say what the drink tastes like (e.g., sour, sparkling, sweet, or just tasteless). Where does the taste come from? Is it possible to change it? What can the children add to a cup of tea, for example, to make it sweeter?
SwEETENING TEA Discuss with the children what makes tea or water sweeter. What ideas do they have? Sugar is available as loose granules and sugar cubes. Most of the children will be familiar with icing sugar from baking, but does it taste good in tea as well? Have the children ever seen rock sugar? Go shopping for different types of sugar with the children and give them time to explore the different kinds of sugar with all their senses. What do the individual sugar crystals look like under a magnifying glass? Let the children feel all the crystals, smell them, and – with prior approval – lick them. What similarities and differences can the children find?Which type of sugar would the children like to sweeten their tea with? Observe together what happens when they put the sugar intothe tea. Let the children taste it again. Has the taste changed?
What you need

WAter
Interested Adults MIght
lIke to know
Whether or not a substance dissolves in
water depends on its internal structure.
Table salt (sodium chloride) comprises
positively and negatively charged ions.
An ion is an electrically charged particle.
The table salt ions are arranged in a lattice
structure and bond together to form visible
salt crystals. Water consists of water
molecules in which the two hydrogen
atoms and the oxygen atom ensure that
the charge in the molecule is unevenly
distributed: One side is positive, the other
side is negative. As a result of this uneven
distribution of charge, the water particles
interact with the salt ions. The water parti-
cles pull one ion after the other out of the
crystal compound, the particles mix, and
eventually the salt crystal is completely
dissolved. If the water in such a solution
evaporates, salt crystals remain.
In the case of solids such as sand, the
bonds between the smallest particles are
so strong that the water particles cannot
pull them away. Such a material is not wa-
ter soluble. On the other hand, although
oil is a liquid, the uncharged particles
cannot interact with the water particles.
Therefore, the two liquids do not mix.
SOME THINGS DISSOLVE, SOME DON’TAre all substances as soluble as sugar? Are there substances that do not dissolve? Test othersubstances with the children, for example salt, flour, baking powder, rice, sand, and evenstones. The children first observe and describe the substances precisely and then put theminto a glass of water. What happens? What does the water look like now? Does the substancechange? What happens when you stir it with a spoon? Do you even need a spoon? Somechildren would like to give the investigation more time. Perhaps the stone needs a week to dissolve. Let the children undertake a longitudinal study where they check every day to see whether the substance has dissolved already or hasn’t even started to dissolve. Have the child-ren test different liquids as well as solids. For example, can oil be dissolved in water?
SALT PICTurESWhat happens to the substances that have dissolved in the water? Have they disappeared? Canyou get them back? The children dissolve three or four tablespoons of table salt in a glassof water. They can see how the salt crystals slowly dissolve and soon cannot be seen at all. Then, the children write secret messages or paint invisible pictures with the transparent salty water on the thick black paper with a brush. They can be quite generous with the water. When the water evaporates overnight there won’t be anything left of the message to see – or will there? Next morning, the painted surfaces are white. The children examine the many salt crystals through a magnifying glass and compare them with the salt crystals from the packet.
Fig. 5: Salt that has been dissolved in water reappears as soon as the water evaporates.
Look
at t
his:
Salt that has been dissolved in water reappears as soon as the water evaporates.
Some substances dissolve in water, while others settle on the bottom of the containerand do not dissolve at all. Some liquids mix with water, but oil does not. Instead, it forms a separate layer on top of the water.
Look
at t
his:
Fig. 4: Some substances do not dissolve in water.

WAter
What it’s all about
During these inquiry activities, the children consciouslyexperience the special properties of water in its liquid form. They experience how water flows downward like all liquids and spreads out in all directions until it hits a bar-rier. The children find out that, unlike solid objects, water doesn’t have its own specific shape but moulds itself to fit the shape of a container or the boundaries of the natural environment.
Where do we encounter it in everyday life?
Very early in life – for example when splashing, washing,or bathing – children discover that water is not a solidobject, such as a building block or a stone. It cannot begrasped or held. When you come out of the swimming pool,the water flows out of your hair and down your body,forming small puddles at your feet. If a glass of water fallson the floor, the water spreads out in all directions very quickly.
Explore the phenomenon: States of aggregation
WAter IS A LIQUID 03
/201
3
What you need
• Pebbles, sand, water• Chalk• Bucket/s, bowls, flowerpot saucers• Large tub filled with water• Different objects such as skimming ladles, pots, vases, bottles, watering cans, deep plates and dinner or tea plates, sieves, plastic bags, cloth bags, balloons• Glass of water• Food colouring• Paper handkerchiefs, kitchen paper or facecloths• Thick cotton thread
Fig. 2: Water spreads out in all directions. Fig. 3:Water behaves differently than sand.Fig. 1: Liquid water trickles through your fingers.
The pebbles and the sand form a mound and therefore stay inside the circle. The water can’t be piled up and quickly spreadsout in all directions.
Look
at t
his:
Water flows through your fingers when you try to grasp it. But if you cup your hands, you can fill them with water and carry it.
Look
at t
his:
WILFUL WATER (WARm-UP)
Organise a competition with the children that is best held outside: The children first carry pebbles in their hands from one place toanother, then sand, and finally water. The aim is for the children to lose as little as possible when doing so. What is the best way to holdthe three substances in their hands? Which substance is easy to carry and which one poses the greatest challenge for the children? And why do they think this is so?
WAYWArD WAter
Draw three circles of the same size on asphalt with chalk. Ask the children to empty a bucket of pebbles into the first circle, a bucket ofsand into the second circle, and a bucket of water into the third circle. Tell them that none of the pebbles, sand, and water is allowed toleave the circle. Observe with the children whether all three materials remain inside their respective circles. What happens to the waterafter the children have tipped it onto the ground? Do the children have any idea how they can prevent the water from spreading?

WAter
Interested Adults MIght
lIke to know
Water is the only element that occurs
naturally on Earth in all three states:
as liquid water, solid ice, and gaseous
steam.
In liquid water, the smallest particles
are very close together, but the bonds bet-
ween them are so loose that the particles
can move around each other. Thus, they
can swap places, separate from each
other, and come together again. There-
fore, liquids do not have a fixed shape but
rather take on the shape of their contai-
ner. They can be poured, they move out
of the way when you dip your hand into
them, and they have a horizontal surface.
When two drops of water come together,
they form a single drop. Solids behave
differently: Two ice cubes remain two
separate ice cubes.
Because the smallest particles of liquid
water can move around freely, they can
also be soaked up by sponges and paper.
SCOOPING UP WATER
With the children, think about how water can best be transported. Ask the children to collect differentthings from the kitchen, bathroom, and garden that they think they can use to transport water. Have some objects ready that are of limited use for this purpose (dinner plates, etc.) or that won’t work at all (sieves, cloth bags, etc.) The children try out different things and observe closely how the water behaves. They scoop the water up with a mug and tip it out again; they try to scoop it up with a sieve; they use a ladle, bottles, balloons, deep plates and dinner plates; they pour water into paper-, cloth-, and plastic bags and compare what happens. Then ask the children to sort the objects according to how well they can hold water. What characteristics should a good water container have?
Look
at t
his:
Water adapts to the shape of the container. Consequently, in order to hold water a container must be as deep as possible and not have any holes.
WATER ON THE WAY UP
Once it has been released, water flows downwards in the same way that a building block fallsdownwards. Have the children ever experienced situations where water has actually climbedupwards? The children fill a flowerpot saucer with water and dye the water with lots of foodcolouring. Then they dip one corner of a piece of cloth (a handkerchief, facecloth, etc.) or a sheet ofkitchen paper into the water. What can the children observe? What does the material feel like after a short time? Are there differences between the various materials?
The children can also build a water stairway. To do so, they place half a glass of water on a smallplatform and an empty glass next to the platform. They then dangle a thick cotton thread into theglass of water and place the other end of the thread over the edge of the lower glass.
Look
at t
his:
Cloth, kitchen paper, and sponges soak up water. In doing so, they can also draw it upwards. The water also uses the water stairway to climb up the cotton thread.
Fig. 4: Scooping up water
Fig. 5: Fabric soaking up water

WAter
What it’s all about
The children experience the element of water innumerous ways and their senses become tuned toliquids. They find verbal descriptions of how waterfeels, smells, and tastes. They discover that you can seethrough water, and they learn the sounds that watercan make.
Where do we encounter it in everyday life?
We come across water many times in the course of anormal day. We wash our face in the morning. The waterdrips or runs from the tap, the facecloth soaks it up, andwe squeeze it out. Adults boil water to make tea, coffee,and hot chocolate – it bubbles and creates steam. A look out of the window tells us we need our wet weather gear:Raindrops are splashing onto the ground. What makes water what it is? How do we recognise it?
Explore the phenomenon: Perceiving water
WAter WItH ALL YOUr SeNSeS03
/201
3
What you need
• Tap water, rainwater, non-carbonated mineral water• Magnifying glass• Paintbrushes, white paper• Salt, sugar, flour, cocoa• Tumblers, small jars with screw caps, different containers such as bottles, jars, jugs, watering cans, tin cans, plastic bowls• Pictures of bodies of water (sea, lake, waterfall, puddle)
Fig. 1: What does water taste and smell like? Fig. 2: What does water look like?Fig. 3: What does water feel like?.
Water feels wet, sometimes warm, sometimes cold. When you put your hand into it, it separates and leaves a softfeeling. But water can also feel hard if you hit its surface.
Look
at t
his:
WAter IS … ! (warM-uP)Water is everywhere – but how can you actually recognise it? A flower smells nice, a brick is big and heavy, and sandpaper is reallyrough to touch. Sit down with the children in a big circle. Place a transparent bowl filled with water in the middle of the circle. Ask the children what they can see and how they know what they are looking at. How do the children describe the water? What words and expressions do they use and what properties of water are important to them when describing it?
FeeLING WAterHave one child dip his/her hand into the water. What does he/she feel? Is it hot or cold, hard or soft? What happens when the child pulls his/her hand out? The child can shake the water from his/her hand and splash the hands of the other children. What do the splashes of water feel like?Wait for the children to answer. Some children will talk about the temperature, others will find the water soft and silky, still others willrefer to its wetness. Take up their answers and discuss them with the children – for example, why water feels soft or what it meanswhen something is wet. Provide the children with water of different temperatures and let them feel the difference.

WAter
Interested Adults MIght
lIke to know
IIf you look at the Earth from outer space,
it appears to consist mainly of water. In
fact, 70% of the Earth’s surface is covered
by water. Water is as vital to human
existence as the air that we breathe.
Two-thirds of the human body is made up
of water; we cannot survive for more than
four days without fluids. Water is a special
element: Light can pass through it almost
unhindered, which is why it appears to be
transparent and colourless. It is only when
water gets deeper that it absorbs more
and more sunlight – until at some point it
appears blue and dark. The colour of water
is also influenced by the substances it con-
tains. Algae can sometimes make the sea
appear green. Pure water is supposed to
be odourless and tasteless. However, even
in pure water, substances such as natural
minerals can cause noticeable changes
SeeING WAterWhere do children encounter water? Go looking with them. Have the children photograph the waterwhere they find it or have them collect it in small containers. The children can also bring water samplesfrom home or even back from their holidays. Little by little, a whole water exhibition can be created. The children show their water samples and explain where they found them. Did they come from the tap in the bathroom, or from a puddle, a bottle in the kitchen, a swimming pool, a gutter, a lake, or the sea? What did the water look like at the place where it was found and what does it look like now in the container? Does the water have any colour? Have the children look closely at the water – even through a magnifying glass – and have them describe it. The children can paint with their water sample on a sheet of white paper. What do they see when the water dries out?
LISteN tO WAterWith the children, think about occasions when water makes a noise andwhat it sounds like. Do the children recognise water with their eyesclosed? Using the example of a tap, can the group discover different water noises – a loud rushing sound, or the sound made by individual drops.
What do drops of water sound like on a can, a piece of paper, or a largeempty plastic bowl? Create a water orchestra with the children, taking all the sounds described by the children into account. Use containers with narrow and wide spouts or openings. How do the sounds change when the water drips quickly or slowly?
SMELL aND TaSTE waTErCarry out a water-smelling test with the children, followed by a watertasting session. Provide non-carbonated water and glasses. The childrenpour the water and smell it first. What does it smell like? Have the children drink a sip from the glass. How do they describe the taste? Does water always taste like this? Have the children add a little bit of salt to their water. Each child can now smell and taste their water. Does anyonerecognise the taste? What other ways do the children find to change the taste of the water?
Look
at t
his:
Water has to move in order for us to hear it. Water can drip,gurgle, splash, pound, rush, and much more besides.
Look
at t
his:
Pure water has no taste or smell. The taste and smell can bechanged by adding substances such as salt, for instance.
You can see through water. It is colourless. Substances in the water can give it colour.
Look
at t
his:
Fig. 4: Collecting water samples

TRY THINGS OUT AND CONDUCT INQUIRYACTIVITIES
The children put their estimated amount of sugar into jars, each of which contains the same amount of water, and they observe exactly what happens.
Let the children decide by themselves whether they want to put the sugar cubes in all together or one by one. Do they just want to watch the dissolution process or do they want to accelerate it, for example by stirring?
Once the quantity of sugar has dissolved in the jar, the children can estimate and test again how many more sugar cubes can still be dissolved in the water. They repeat the process until no more sugar dissolves in the water.
TRY THINGS OUT ANDCONDUCT INQUIRYACTIVITIES
COLLECT IDEAS ANDASSUMPTIONS
With the children, think about what happens to the sugar when it dissolves in water. Where does it go? Has it disappeared or is it just invisible? Can you keep dissolving sugar forever or is there a limit to the amount of sugar that can fit in the water?Each child places the quantity of sugar cubes in front ofhim/her that he/she thinks will dissolve in the water and writes down or draws the number. Will it make a difference if they put them all in at once or one after the other?
With the children, think about what will happen when the sugar no longer dissolves. Will it sink to the bottom or float in the water? Will the water look different? Will it remain liquid, or will the sugar make it hard?
Investigate the phenomenon: Saturating water with sugarHOW MUCH SUGAR CAN BE DISSOLVED IN WATER?
ASK QUESTIONS ABOUT THENATURAL ENVIRONMENT
People put sugar in their tea to sweeten it.
But how much sugar can you dissolve in a cup of tea?
Is there a limit?
WATER03
/201
3

DISCUSS RESULTS
Collect the results from the children: Who put what amount of sugar into the jar until it didn’t dissolve anymore? Are the results the same for all the children?
Remind the children of their estimate at the beginning. Does the actual amount of sugar in the jar match the original estimate?
Talk to the children about what has happened to the sugar. Where is it when it “disappears” in the water? Why is there a point where it no longer “disappears”?
Together with the children, think about what will happen when the inquiry activity is repeated with more water or less. Will the same amount of sugar still dissolve?
DOCUMENT RESULTS
The children count the number of sugar cubes they put into the jar: Younger children can place a dried pea into a second jar for each sugar cube they put into the water. At the end, they compare the number of peas in their jars. Older children colour in a square on squared paper for each sugar cube they have put into the water. If these squares are coloured in directly under each other, this creates a snake made of squares. The children can then compare the length of their snakes with each other.
For the second and further rounds (i.e. adding more sugar after the estimated number of cubes has been dissolved), suggest to the children that they draw a line under the first lot of squares and then colour in the additional squares under this line. In this way, they can see at the end the number of rounds of inquiry they have conducted.
OBSERVE AND DESCRIBE
Ask the children to observe and describe the water and the sugar during the inquiry activity: What does the sugar look like before it is put into the water? Does the sugar change as soon as it is in the water? What happens to its size and colour?
Does the dissolution process change when more sugar has dissolved in the water? Does the water change? Can the sugar water still be stirred easily or does it eventually become more viscous?
Materials:• Glass jars• Sugar cubes• Spoons• Jars and dried peas or pen and paper for documentation purposes

TRY THINGS OUT AND CONDUCT INQUIRYACTIVITIES
Discuss with the children how they can measure the melting time. Are the children already familiar with egg timers and stop watches? Then jointly agree on the time when the measurement is to stop. The most obvious time to stop measuring is when the ice has completely melted. The children should use ice cubes of the same size in order to be able to compare the results properly.
Then things get going: The children independently try out as many of their own ideas as possible. Have them explain to you beforehand what they plan to do. Give them the appropriate materials and discuss any safety issues. For instance, the children should not be working alone with hot water, a teapot warmer, a candle, or a hotplate.
TRY THINGS OUT ANDCONDUCT INQUIRYACTIVITIES
COLLECT IDEAS ANDASSUMPTIONS
With the children, think about the situations where ice melts. What have the children experienced in the past? How do you know that ice is beginning to melt?
Consider with the children what might make ice melt quickly. Collect ideas and hunches from the group.For example, the children might have the following suggestions: hold it tightly in your hand, rub it between your hands, stick it in your mouth, put it on the heater, place it on a hotplate or in the sun, put it in cold or hot water, hold it over a candle or a small teapot warmer, blow it with a hairdryer, cut it up, etc.
Investigate the phenomenon: States of aggregation FROM ICE TO WATER
ASK QUESTIONS ABOUT THENATURAL ENVIRONMENT
In cold countries, there comes a time at the end of the winter when the ice and snow begin to melt and snowmen lose their shape. Ice cream in a cone sometimes melts faster than you can eat it. Talk to the children about mel-ting ice:
How can you make ice melt as fast as possible?
WATER03
/201
3
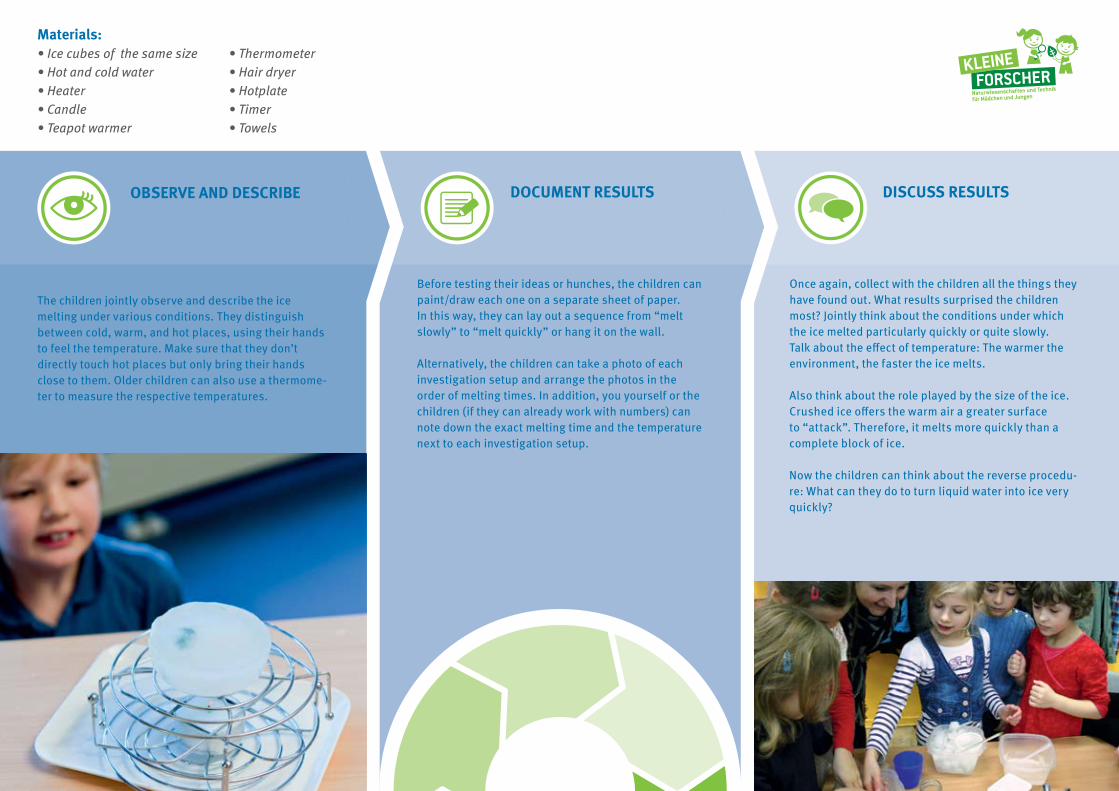
DISCUSS RESULTS
Once again, collect with the children all the things they have found out. What results surprised the children most? Jointly think about the conditions under which the ice melted particularly quickly or quite slowly. Talk about the effect of temperature: The warmer the environment, the faster the ice melts.
Also think about the role played by the size of the ice.Crushed ice offers the warm air a greater surface to “attack”. Therefore, it melts more quickly than a complete block of ice.
Now the children can think about the reverse procedu-re: What can they do to turn liquid water into ice very quickly?
DOCUMENT RESULTS
Before testing their ideas or hunches, the children can paint/draw each one on a separate sheet of paper. In this way, they can lay out a sequence from “melt slowly” to “melt quickly” or hang it on the wall.
Alternatively, the children can take a photo of each investigation setup and arrange the photos in the order of melting times. In addition, you yourself or the children (if they can already work with numbers) can note down the exact melting time and the temperature next to each investigation setup.
OBSERVE AND DESCRIBE
The children jointly observe and describe the ice melting under various conditions. They distinguish between cold, warm, and hot places, using their hands to feel the temperature. Make sure that they don’t directly touch hot places but only bring their hands close to them. Older children can also use a thermome-ter to measure the respective temperatures.
Materials:• Ice cubes of the same size • Thermometer• Hot and cold water • Hair dryer• Heater • Hotplate• Candle • Timer• Teapot warmer • Towels

INFORMATION CARDInformation and tips for teachers and educators
EXPLORE TOGETHER – INVESTIGATE TOGETHER
Promote the children’s observation skills and allow them time to reflect and to repeat things.
11/2
012
Both the children’s life-world and interests and your own inquisitiveness should determine what natural phenomena you explore with them. Only when you as a teacher or educator are just as enthusiastic about a topic or phenomenon as the children are, will everyone involved have fun engaging with science topics.
Please see yourself as someone who not only allows the children to undertake investigations, but who also actively accompanies and supports them. Supplement the topic by planning and conducting further activities (e.g., excursions, pictures, songs). The aim is to open up as many different entry points to the topics as possible and to establish connections. As a facilitator of learning you are not required to have an answer and/or solution ready for every foreseeable question and minor problem. Be open to the “research” adventure! The outcome of an inquiry activity cannot be wrong but only different from what was anticipated.
The exploration and inquiry cards offer ideas, stimuli and encouragement regarding selected core topics. Don’t think of the cards as “recipes” that must be followed meticulously. Motivate the children to modify or expand the inquiry activities. Let them pursue their own ideas and interests.
Give the children the opportunity to formulate assumptions about the outcome of an inquiry activity and to compare their assumptions with the results. Let them find their own explanations for the phenomenon observed and jointly discuss these explanations.
Talk to the children about the learning process. Help them to reflect on the fact that they are learning, on the way in which they are learning, and on what they are learning. Documenting the activities (e.g., with pictures they painted themselves, photos, their own investigation notebooks) supports the children’s learning process.
Enth
usia
smSu
ppor
tRe
flect
ion
Stim
ulat
ing
mat
eria
lsAs
sum
ptio
ns
and
expl
anat
ions
Tim
e
03/2
013

INFORMATION CARD
We recommend that you develop inquiry activity rules and rules of conduct with the children and agree on them. For example, the rules could be written on a poster-sized sheet of cardboard and illustrated by the children. Small pictograms illustrate the rules again for the children in different age groups. Develop sensible rules, for example:
When the poster is displayed in a very visible position it is a good way of reminding everyone about the rules.
Use all utensils employed in inquiry activities for their designated purpose only. Inform the children about the correct use of potenti-ally dangerous materials and substances. To prevent any mix-ups, powders, fluids, and other substances should be stored only in the containers designated for that purpose, and any alternative containers must be labelled precisely. Store all chemicals safely in a location where the children cannot gain access to them.
Some inquiry activities require participants to wear tight or protective clothing and to tie back long hair.
Where appropriate, instruct the children that they are forbidden to eat or drink during a particular inquiry activity. The children should always wash their hands after inquiry activities.
> We listen to each other> We help each other> We do not eat or drink during an inquiry activity.
> We clean the dirty materials we use for the inquiry activities.> We clean up our inquiry activity area.> We wash our hands after the inquiry activity.
Mat
eria
ls fo
r inq
uiry
ac
tiviti
es a
nd h
azar
-do
us s
ubst
ance
sCl
othi
ngFo
od a
nd d
rink
Information and tips for teachers and educators
INQUIRY ACTIVITY RULESFo
rmul
ate
sens
ible
rule
s