WATER -...
33
WATER
Transcript of WATER -...

WATER
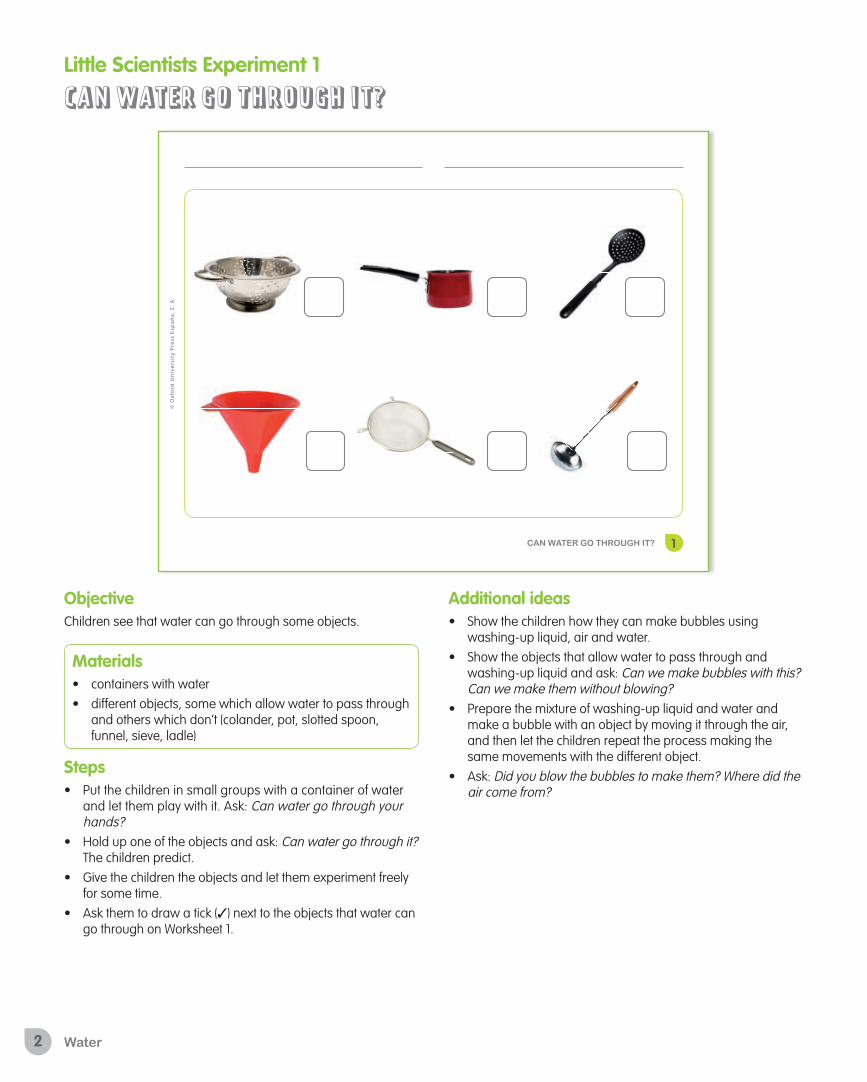
Little Scientists Experiment 1
CAN WATER GO THROUGH IT?
ObjectiveChildren see that water can go through some objects.
Materials• containers with water• different objects, some which allow water to pass through
and others which don’t (colander, pot, slotted spoon, funnel, sieve, ladle)
Steps• Put the children in small groups with a container of water
and let them play with it. Ask: Can water go through your hands?
• Hold up one of the objects and ask: Can water go through it? The children predict.
• Give the children the objects and let them experiment freely for some time.
• Ask them to draw a tick (✓) next to the objects that water can go through on Worksheet 1.
Additional ideas• Show the children how they can make bubbles using
washing-up liquid, air and water. • Show the objects that allow water to pass through and
washing-up liquid and ask: Can we make bubbles with this? Can we make them without blowing?
• Prepare the mixture of washing-up liquid and water and make a bubble with an object by moving it through the air, and then let the children repeat the process making the same movements with the different object.
• Ask: Did you blow the bubbles to make them? Where did the air come from?
Water14
© O
xfo
rd U
niv
ers
ity
Pre
ss E
spa
ña
, S
. A
.
1CAN WATER GO THROUGH IT?
01-12_water.indd 3 21/04/16 11:53
2 Water

Water 15
Extra Experiment
WHICH WAY WILL THE WATER GO? ObjectiveChildren discover that water does not always flow straight down and can be attracted to other objects.
Materials• plastic cups • water • food colouring• string (cotton or a natural, absorbent fibre)• sticky tape• trays or bowls to collect the water
How to start: Remind the children of what they learnt in the previous experiment. Hold up the objects from the experiment and ask: Can water go through it? Then hold up a plastic cup and ask: Can the water go through the cup? No, it can't.
Steps• Put the children into pairs, give them a cup each and pour
water into one of them. Place a bowl underneath.• Ask them to pour the water from one cup into their partner’s
empty cup. Allow them to experiment for some time. Afterwards, holding the full cup above the other, ask: Which way does the water go, up or down?
• Then, move the second cup so that it is not directly underneath, but at a diagonal from the top cup. Ask them: Which way will the water go, up or down? The children point.
• Tape one end of the string to the middle on the inside of the cup. Fill the other cup with water and add a drop of food colouring. Hold the loose end of the string in the cup with the water in and hold the empty cup diagonally below.
• Pull the string tight and pretend to pour the water.• Ask: Which way will the water go? The children point.• Pour the water slowly and steadily. The water should travel
along the string diagonally and fill the empty cup.
EXTRA RESOURCESExperiment video
NOTES
Water 3

Water 17
Little Scientists Experiment 2
DOES IT FLOAT?
Stickers
ObjectiveChildren begin to understand why some things float.
Materials• containers with water• wooden peg, plastic peg, metal spoon, plastic spoon,
rubber ball, glass balls (marble)
Listen to the song! Track 4
The water song
Listen to the song and do actions to represent sinking and floating.
Steps• Present the materials and say: Two pegs, two spoons, two
balls. Using actions, teach float and sink.• Children take turns to choose an object and ask the class:
Does it float? They put the objects into two groups: float or sink.• Then, let them experiment freely for some time.• Ask the children to stick the stickers at the top or bottom of
the fish tank depending on whether they float or sink on Worksheet 2.
Additional ideas
Does paper always float?
Children apply knowledge about sinking and floating from the previous experiment.• Give out containers with water in and square pieces of paper
and ask: Does the paper sink if we put it in water? And if we make a ball? And if we scrunch it up?
• Make a paper boat and check to see if the unfolded paper, the scrunched up piece, and the boat, sink. Discuss what has happened and take photographs of the process.
© O
xfo
rd U
niv
ers
ity
Pre
ss E
spa
ña
, S
. A
.
2DOES IT FLOAT?
01-12_water.indd 5 21/04/16 11:53
4 Water
Water18
Extra Experiment
WHY DOES IT FLOAT? ObjectiveThe children discover that adding salt to water can change its properties.
How to start: Introduce the idea that the sea is salty. Ask: Have you ever tasted sea water? How did it taste? Show pictures from the Internet of people floating in the Dead Sea and explain that it is a salt lake and that it’s very salty, saltier than the sea (nine times saltier!). Explain that salt water has different properties than normal water.
Materials• 2 tall glasses or glass containers• 2 eggs• salt• a large jug of water
Steps• Get the materials prepared, and fill the first glass with water.
Hold up an egg and ask: Will this egg sink or float? Place the egg in the water and watch it sink.
• Fill the second glass with water and about six tablespoons of salt, and stir until the salt has dissolved.
• Hold up the second egg, and ask the children again if they think it will sink or float.
• Place the egg in the water. It should float near the top of the glass. Ask: Why does the egg float?
• (Optional) Repeat experiment from Experiment 2 with salt water.
EXTRA RESOURCESExperiment video
NOTES
Water 5

Little Scientists Experiment 3
CAN WE SEPARATE IT?
Stickers
ObjectiveChildren see that we can separate some mixtures but not others.
Materials• transparent plastic cups with water• plastic spoons and plates• sieve• chocolate powder, rice, lentils, paprika
Steps• Present the materials. Add the lentils to the water. Stir the
mixture.• Show the children the sieve. Ask: Can we separate the lentils?
© O
xfo
rd U
niv
ers
ity
Pre
ss E
spa
ña
, S
. A
.
3CAN WE SEPARATE IT?
01-12_water.indd 7 21/04/16 11:53
Water20
• Pour the mixture through the sieve and show them the lentils. Ask again: Can we separate the lentils? Do a thumbs up action.
• The children do the same with the other substances.• Ask the children to stick a thumbs up sticker in the circle if
they can separate it and thumbs down sticker if they can’t on Worksheet 3.
Additional ideasTry the experiment without water. Ask: Can we separate rice and lentils? And chocolate powder and paprika? Give the children chocolate powder, rice, lentils and paprika, plates, cups and sieves, and other types of filters.
6 Water

Water 21
Extra Experiment
CAN WE SEPARATE SAND AND SALT?ObjectiveChildren discover how to separate sand and salt from water.
Materials• two cups• sand• salt• water• plastic or glass containers• sieve• coffee filters
Steps• Half fill the cups with water. Add the sand to one of the cups,
and hold it up to show the class. Ask: Can we separate the sand with the sieve?
• Pour the mixture through the sieve into the bowl and show that you can’t. Pour the water and sand back into the glass.
• Hold up the coffee filter and ask: Can we separate the sand with a filter?
• Pour the mixture through the filter and show that you can.• Add the salt to the other cup and stir until dissolved,
showing the children. Ask them the same question with the sieve and the filter: Can we separate the salt with the sieve?
• Pour the saltwater first through the sieve, and then through the coffee filter. Explain that the salt has dissolved.
What happens to salt in water?
• Take the cup of salt water and pour it into a wide, shallow vessel. Leave in a sunny or warm place, such as a windowsill, for a day or two.
• When the water has evaporated, remind the children of the experiment. Ask: What do you think has happened to the water in the tray? Will the water still be there? Will the salt still be there?
• Show the tray to the children and Ask: Where has the water gone? Explain that the water turned into a gas that we can't see.
• Ask: What can you see in the tray? Pass the tray around the class for everyone to look at the salt. Let them dip a finger in to taste it!
• Explain that this is the salt that we put into the water. Now that the water has gone, the salt is left in the tray.
EXTRA RESOURCESWeblink 3
NOTES
Water 7

Water 23
Little Scientists Experiment 4
WHAT HAPPENS TO THE WATER?
ObjectiveChildren predict and test how liquids behave.
Materials• plastic bottle with lid, half-filled with water• block• dye to make the water more visible (optional)
Steps• Ask the children to look at the three bottles of water at
the top of Worksheet 4. Using actions, say: This bottle is standing up, this bottle is lying down and this bottle is leaning on its side.
• The children make a prediction. Say: Look at the water. Is it correct? Think. Using actions, say: Draw a tick (✓) or a cross (✗).
• Present the materials and then let them experiment freely.• Ask them to draw their findings in the empty bottles at the
bottom of Worksheet 4. Say: Now, draw the water.
Additional ideasHow should we place the bottles?
Children manipulate and experiment to check their previous predictions:
• Prepare the same materials as in the previous activity: Clear bottles and building blocks.
• Encourage the students to play with the bottles and building blocks, putting the bottles in different positions with the aim of observing what happens to the water level. Ask: How have you arranged the bottle? And what is the water like? If you change the position of the bottle, will the water change too? Can we use the building blocks to hold the bottles in different positions?
• Let them manipulate the bottles and change their positions using the building blocks. Ask: After you moved the bottle, did the water change position?
• Take photographs of the bottles in different positions and show them on the class computer or using the IWB. Discuss the water level in each photo.
© O
xfo
rd U
niv
ers
ity
Pre
ss E
spa
ña
, S
. A
.
4WHAT HAPPENS TO THE WATER?
01-12_water.indd 9 21/04/16 11:53
8 Water
Extra Experiment
WHAT SHAPE IS THE WATER?ObjectiveChildren observe that water takes the shape of its container.
Materials• jug of water• food colouring• glass bowls, vases and jars of various sizes and shapes• a measuring jug• masking tape
Preparation: Stick the masking tape length-ways along the side of the jug (to mark the water level later with a pen).
How to start: Put all of the glass containers in a row. Fill them with water mixed with food colouring. The children observe the different vessels and then draw the shape of the water that is in them. Ask: What have you noticed about the water in these glasses? Does it stay the same shape?
Steps• Pour two cups of water into each container (make sure the
children can’t see how much you are adding).• Place the containers side-by-side where everyone can see
them. Ask: Which container has the most water in it? and Which container has the least water in it?
• Pour the water from the first container into the measuring jug. Mark the water level onto the masking tape with a pen. Empty the jug.
• Repeat with each container, showing each time that the water level is the same. Ask: Did the glasses contain the same amount of water, or different amounts of water?
EXTRA RESOURCESWeblink 4
NOTES
Water24 Water 9

Water26
Little Scientists Experiment 5
HOW CAN WE MAKE BIG BUBBLES?
ObjectiveChildren see that the size of bubbles depends on what we use to make them.
Materials• a container with washing-up liquid and a little water• funnel, wire circle, cone, bubble wand
Steps• Show the children how to make bubbles. Make a small
bubble. Ask: Is this a small bubble or a big bubble? Make a big bubble. Ask again: Is this a small bubble or a big bubble?
• Present the materials. Say to a child: Make a big bubble. They choose the funnel or the wire circle. Then, this child gives an instruction to the next child.
• Ask the children to circle the objects that make big bubbles on Worksheet 5.
Additional ideasCan we put two bubbles together?
• Children apply what they learnt in the previous session and they predict if they can put two bubbles together without them popping.
• Show the children the materials from the experiment. Ask: Do you remember that we can make bubbles with the funnel?
• Fill each tray with water, soap and different-sized funnels.
• Ask the children: Were all the bubbles the same? Which funnel made bigger bubbles? What will happen if two bubbles touch each other?
• Give out the funnels and ask the children to get into pairs. Then, ask everyone to make a bubble and see what happens when their bubble touches their partner's bubble.
• Let them experiment and discuss what they have found.
© O
xfo
rd U
niv
ers
ity
Pre
ss E
spa
ña
, S
. A
.
5HOW CAN WE MAKE BIG BUBBLES?
01-12_water.indd 11 21/04/16 11:53
10 Water

Water 27
Extra Experiment
HOW CAN WE MAKE EVEN BIGGER BUBBLES? ObjectiveThe children discover that there are many different ways to make bubbles, and learn to make hypotheses and compare them with their results.
MaterialsBubble mixture:• a large bucket or container• 6 cups of water • 1 cup of washing-up liquid• 1 tablespoon of glycerine
or 1/4 cup of corn syrup
Preparation: the bubble mixture and loops can be made in advance, or it can be an activity for the children.
How to start: Ask the children: How big can we make our bubbles? As big as our heads? As big as the classroom?
Write some ideas on the board.
StepsHow to make the bubble mixture:• Pour all the ingredients together into the container.• Stir it slowly to avoid making bubbles until combined.
How to make the bubble loops:• Cut one metre of string.• Thread two straws on.• Tie up the string to make a loop with two (straw) handles.
Do this activity outside because it is very messy!• Dip the bubble loop in the mixture. • Use the handles to open it out and move it or let the breeze
create a large bubble.• Experiment for a while.• Get cleaned up and return to the classroom.• Compare your findings with your hypotheses from earlier
(the list of answers about how big you can make bubbles). Ask: Did you guess correctly? Were the bubbles bigger than you thought? Draw your bubbles.
EXTRA RESOURCESExperiment video
NOTES
Bubble loop:• cotton string or shoe
lace• straws
Water 11

MATERIALS
12 Materials

Materials36
© O
xfo
rd U
niv
ers
ity
Pre
ss E
spa
ña
, S
. A
.
6IS IT SOFT OR HARD?
soft hard
13-22_materials 4A.indd 13 21/04/16 11:59
Little Scientists Experiment 6
IS IT SOFT OR HARD?
Stickers
6
7
Little Scientists A - Materials
© O
xfor
d U
nive
rsity
Pre
ss E
spañ
a, S
. A.
ObjectiveChildren classify materials according to their characteristics.
Materials• two containers• soft and hard materials (sponge, foam ball, cuddly toy,
pencil, wooden block, plastic block)
Steps• Present all the materials to the children. Using actions, ask:
Which materials can we squash? Which materials can’t we squash?
• Give out the materials and let the children experiment freely for some time in groups. Say: Try to squash it. The children take turns. Ask: Is it hard? Or is it soft?
• Then they organise the materials into the correct container.• Ask the children to put the stickers in the correct place on
Worksheet 6.
Additional ideasDivide the class into two groups and ask one group to look around the classroom for objects that change shape when you press them (soft materials). Ask the other group to look for objects that are made from hard materials.
Get everyone together again and encourage some volunteers from each group to show the rest of the class the objects and to explain if they are soft or hard, and how they know this.
Take photos of the objects, print the images and prepare a mural with two columns that have the headings hard and soft. Ask everyone to help stick the photos in the correct column.
Materials 13

Materials 37
Extra Experiment
WHAT’S IN THE BOX?NOTESObjective
Children practice matching different materials by their tactile qualities.
Materials• empty tissue boxes• various fabrics such as: silk, wool, denim.• objects of different textures (wire wool, wood, sponge,
stone, etc.)
How to start: Prepare the feely boxes by putting the objects inside the tissue boxes before the class.
Steps• Ask them: How do we know soft and hard? Explain that our
sense of touch gives us information. • Say: Let’s feel what’s inside the boxes.• Ask the children to put their hands in the boxes. Say: What
does it feel like? Is it hard or soft? Is it smooth or rough?• Display the objects in a line-up. They point to the object that
they think they are touching. If they find it difficult, they can also touch objects in the line-up.
EXTRA RESOURCESWeblink 6
14 Materials

Materials 39
© O
xfo
rd U
niv
ers
ity
Pre
ss E
spa
ña
, S
. A
.
7DOES IT BEND?
13-22_materials 4A.indd 15 21/04/16 11:59
Little Scientists Experiment 7
DOES IT BEND?
Stickers
6
7
Little Scientists A - Materials
© O
xfor
d U
nive
rsity
Pre
ss E
spañ
a, S
. A.
Objective Children see the behaviour of some materials when we apply forces.
Materials• stone• rubber• plasticine• dough (flour, water and oil)• toilet roll tube
Steps • Present each material. Using actions, ask: Does it bend? The
children predict.• Give the children the materials and ask them to experiment.
Say: Try to bend it.
• When they have finished, ask them to present the materials. Say: Show me materials that bend. Show me materials that don’t bend.
• Ask the children to put a sticker on the materials that bend on Worksheet 7.
Listen to the song! Track 5
The materials song
Listen and move.
Play the music while the children experiment.
Additional ideasContinue exploring plasticity using clay or plasticine. Give out pieces of clay or plasticine, along with rolling pins and cutters. Ask the children to make a flat piece of clay that’s the same shape as the cutter. Allow them to experiment for a while and then ask: Why is it difficult to get the clay out of the cutter? If the clay is thinner, is it easier?Show them that they need to place the cutter on a flat surface to be able to cut out the clay properly. Ask: Can we make the clay flat? How can we do this?Let them try this with their hands, with the rolling pins, and finally encourage them to experiment and make whatever shapes they like.
Materials 15

Materials40
Extra Experiment
DOES IT SNAP?NOTESObjective
Children observe the behaviour of some different materials when we apply forces.
Materials• breadsticks• cardboard tube• cutlery (forks or spoons)• spaghetti• string• wooden skewers
How to start: Using gestures, remind the children how some objects bend. Say: Some objects don’t bend, they snap!
Steps• Present the materials. Ask: Can we snap it? The children
predict.• Give the children the materials and ask them to experiment.
Say: Try to snap it.• When they have finished, ask them to present the materials.
Say: Show me materials that snap. Show me materials that don’t snap.
EXTRA RESOURCESWeblink 7
16 Materials

Materials42
Little Scientists Experiment 8
IS IT TRANSPARENT?
Additional ideasExplore transparency further. Prepare a variety of materials (cellophane, tissue paper, crepe paper) and three boxes. Cut the paper into sheets that will fit nicely into the boxes. The children should hold the paper up to the light and decide if they can see through it or not. Then ask the children to organise the paper into the three boxes, one box for transparent (allowing light through), one for translucent (allowing some light through) and one for opaque (not allowing any light through). Sit in a circle and discuss the different types of paper, and why they chose to put it in a particular box. You can use a torch to check the results.
Objective Children see how different materials respond to light.
Materials• four different types of bottles: transparent plastic bottle,
opaque plastic bottle, transparent glass bottle and coloured glass bottle (or simply coloured plastic instead of glass)
• torch (optional)
Steps• Present the materials to the children. Pass them around and
ask: How many plastic bottles? How many glass bottles?• Show them that the window is transparent but the blind is
not. Put your hand behind it and ask: Can you see my hand? Yes, the window is transparent!
• Now ask them to predict with the bottles. Ask: Is this bottle transparent? Give the materials to the children and let them experiment.
• Ask the children to look at the bottles on Worksheet 8 and draw a tick (✔) or a cross (✘) in the box next to it.
© O
xfo
rd U
niv
ers
ity
Pre
ss E
spa
ña
, S
. A
.
8IS IT TRANSPARENT?
13-22_materials 4A.indd 17 21/04/16 11:59
Materials 17

Materials 43
Extra Experiment
CAN WE MAKE A RAINBOW? NOTESObjective
Children discover how to manipulate light using a mirror and water to make a rainbow
Materials• shallow bowl filled with water• small mirror• water• sheet of white paper• torch
Steps• Ask the children: Have you ever seen a rainbow? Can we
make a rainbow with a torch, a mirror and a bowl of water?• Present the materials to the children and then fill the shallow
bowl with water. • Place the mirror at an angle in the bowl, half submerged in
the water.• Ask for two volunteers to help you hold the mirror and point
the torch at it. Hold the paper above the mirror so that they can see the reflected rainbow. Ask: Can you see the rainbow? What colours are there? The colours of the rainbow are red, orange, yellow, green, blue, indigo and violet.
EXTRA RESOURCESExperiment video
18 Materials
Materials 45
© O
xfo
rd U
niv
ers
ity
Pre
ss E
spa
ña
, S
. A
.
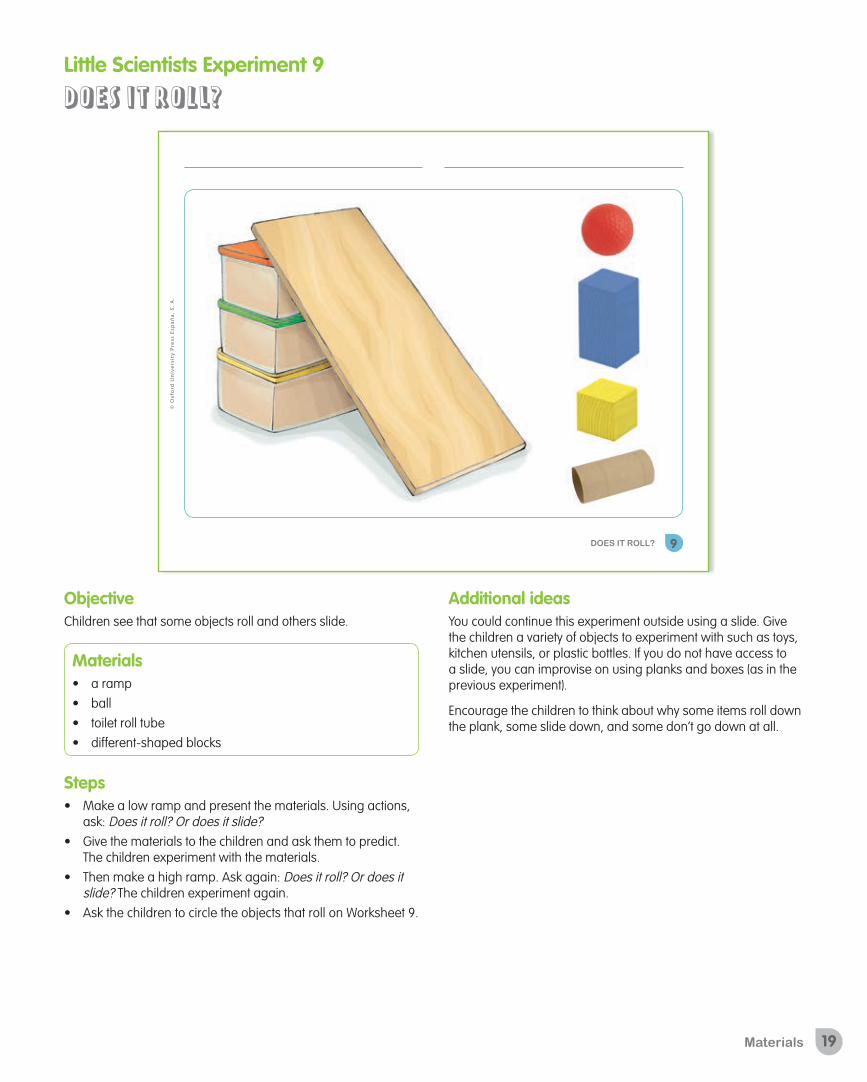
9DOES IT ROLL?
13-22_materials 4A.indd 19 21/04/16 11:59
Little Scientists Experiment 9
DOES IT ROLL?
Additional ideasYou could continue this experiment outside using a slide. Give the children a variety of objects to experiment with such as toys, kitchen utensils, or plastic bottles. If you do not have access to a slide, you can improvise on using planks and boxes (as in the previous experiment).
Encourage the children to think about why some items roll down the plank, some slide down, and some don’t go down at all.
Objective Children see that some objects roll and others slide.
Materials• a ramp• ball• toilet roll tube• different-shaped blocks
Steps• Make a low ramp and present the materials. Using actions,
ask: Does it roll? Or does it slide?• Give the materials to the children and ask them to predict.
The children experiment with the materials.• Then make a high ramp. Ask again: Does it roll? Or does it
slide? The children experiment again. • Ask the children to circle the objects that roll on Worksheet 9.
Materials 19

Materials46
Extra Experiment
DOES IT BOUNCE? NOTESObjective
The children discover that balls made from different materials have different properties.
Materials• different types of ball (football, basketball, wooden bead,
bouncy ball, marble, plastic ball from a ball pit• a solid floor
Steps • Present all of the balls to the children and say: Are these
balls all the same? What are the differences?• Encourage comparison between different balls, using words
like: big, small, heavy, light.• Ask: What happens when we drop a ball? Introduce the idea
that it might bounce. • One at a time, drop a ball on to the floor and see if it
bounces. Ask: Does it bounce?• Encourage the children to answer:
1. Yes, it bounces.2. No it doesn’t bounce. 3. A little.
• Ask the children to order the balls according to how much they bounce.
EXTRA RESOURCESExperiment video
20 Materials

Materials48
© O
xfo
rd U
niv
ers
ity
Pre
ss E
spa
ña
, S
. A
.
nº
© O
xfo
rd U
niv
ers
ity
Pre
ss E
spa
ña
, S
. A
.
10CAN WE DRY THINGS WITH IT?
13-22_materials 4A.indd 21 21/04/16 11:59
Little Scientists Experiment 10
CAN WE DRY THINGS WITH IT?
Objective Children see that some objects roll and others slide.
Materials• sponge • foam ball• towel• plastic bag• plasticine• a tray and some water
Steps• Present the materials. Pass the materials around and ask the
children to look, touch and describe them. Ask: Is the towel soft or hard?
• Show them the wet tray and say: It’s wet! Using actions, ask: Can I dry it with the plastic bag?
• Then let the children experiment freely with the materials for some time.
• Ask the children to match the absorbent materials to the wet tray on Worksheet 10.
Additional ideasDivide the class into groups of four or five children and give each group small pieces of different materials, for example, aluminium foil, dishcloth, kitchen paper, cardboard, crepe paper, cellophane or tissue paper. Give each group a plastic plate filled with water and allow them to experiment with their materials. In a corner of the classroom, place two boxes. Explain that one box is for materials that can absorb water, and the other is for materials that cannot. The children test their materials by dipping them in the water, observing what happens and then classifying them in one box or the other.
Materials 21

Materials 49
Extra Experiment
DOES IT CHANGE COLOUR?ObjectiveThe children observe absorption of food colouring in tissue and the ways that pigments combine.
Materials• plastic cups filled with water• red, blue and yellow food colouring• paper towels folded into strips
Steps• Give the children plastic cups filled with water and put a few
drops of food colouring in each, so that everyone has access to a red, blue, and yellow cup.
• Present the paper towel strips. Ask: Can we make these change colour?
• Show the children that you can dip the tissue into the coloured water, and it will absorb the water and the dye.
• Distribute the strips of paper towel and encourage the children to experiment. Show them that dipping one strip in two different colours results in a third colour.
EXTRA RESOURCESWeblink 10
NOTES
22 Materials

LIVING THINGS

Living things58
© O
xfo
rd U
niv
ers
ity
Pre
ss E
spa
ña
, S
. A
.
11WHERE DO THEY LIVE?
23-32_living-things 4A.indd 23 21/04/16 12:01
Little Scientists Experiment 11
WHERE DO THEY LIVE?
Stickers
Objective Children see that animals live in different places.
Materials• pictures of animals with tape or sticky tack to stick them
Steps• On the board, draw a natural habitat with land and water.
Point to the different areas and say: Look! There’s grass, rocks, trees and water.
• Pick one of the animal pictures, show it, say the name and ask: Where do they live? The children answer and a
volunteer sticks the animal picture on the natural habitat on the board. This child can choose the next picture and ask the other children the same question: (Fish) Where do they live?
• Move the animal pictures to different places and ask: Can it live here?
• Ask the children to stick the frog, snail, fish, dragonfly, and duck stickers on Worksheet 11.
Additional ideasThe children can continue to research aquatic. Ask the children to bring sources of information (books, magazines or photos) of animals that live in aquatic environments to class. Find a place in the classroom to organise an information corner. Ask: What other animals do we know that live in the water?
As the children bring in information about aquatic animals, ask them to explain to their classmates what they know about the animals that appear in it.
Place the books, magazines and photos in the information corner. Children can consult the information whenever they want to, but must use them respecting rules, such as: make sure your hands are clean and dry, sit down to look at the books, treat the books with respect and return them to their place afterwards. Books may be brought from the library or from the children’s homes so they must be treated with care.
24 Living things

Living things 59
Extra Experiment
WHERE CAN THEY LIVE?NOTESObjective
The children see that certain animals live in particular climates.
How to start: Ask the children: Where do you live? Do you live in the snow? Or in the desert? Or under the sea? Think about the different animals that life in different places.
Materials• four plastic trays to make different model habitats:
1. sand2. water (with a few drops of blue food colouring, maybe
some small stones or seashells.)3. soil (and also leaves and twigs)4. ice cubes (or freeze water in the tray overnight)
• small plastic animals (penguins, snakes, camels, squirrels, deer, dolphins.
• printed images of typical features of the four landscapes (cactus, coral, trees, snowy mountain)
Steps• Before the class:
1. First prepare the model habitats. Print and then cut out some plants and features of the four habitats. Stick them to the plastic trays so that they look like part of the mini landscape.
2. Take the four trays and fill them with the separate materials (place the sand in the tray with the cactus picture).
• Show the children your four habitats. Hold each tray so that they can see what’s inside and say: Look! Sand! What habitat is this? This is a desert! Repeat with each tray.
• Then show the children the plastic animals and say: We have different types of animals. Which do we ones have? The children name the animals that they know.
• Say: Let’s put them in their homes! Give out one or two animals per child. One by one, the children come up to the front of the class with and decide where their animal lives.
EXTRA RESOURCESPrintable 1
Living things 25

Living things 61
Little Scientists Experiment 12
HOW MANY LEGS DO THEY HAVE?
Listen to the song! Track 6
The living things song
Listen and move. Play the music while the children move like animals.
Additional ideasActivity to consolidate and what the children have learnt about animals that live in the water. Give out plastic figurines of animals that live in water. Ask each child what animal they have and to describe their animal. Then ask the children to get into groups according to what animal they have:
• animals with four legs• animals with fewer than four legs• animals that don’t have legs.
Once you have done this, encourage the children to think of new criteria to group their animals.
Objective Children see that some animals have legs and others don’t and begin to understand that they move in different ways.
Materials• pictures of animals
Steps• Present the pictures to the children and say the names. • Using actions, ask: How do (elephants) move? Do they walk,
jump, swim, or slither? • Show a child one of the animal pictures and ask them to
imitate it. Ask the other children: Do they walk, jump, swim, or slither?
• Show the picture. Ask: How many legs? • Ask children to write the number of legs each animal has on
Worksheet 12.
© O
xfo
rd U
niv
ers
ity
Pre
ss E
spa
ña
, S
. A
.
12HOW MANY LEGS DO THEY HAVE?
23-32_living-things 4A.indd 25 21/04/16 12:01
26 Living things
Living things62
Extra Experiment
WHO CAN FLY?NOTESObjective
Children discover that not all birds can fly, and that certain insects can fly.
Materials• printed pictures of insects and birds that can and can’t fly
How to start: Remind the children how animals move differently. Some have legs and some do not. Some even move through the air! Ask: Which animals can fly? Use gestures to copy animals that fly, while the children guess which animal you are (e.g. bird, bat, bee).
Steps• Before the class:
1. Project an image of a landscape onto the board (with the sky and the ground both visible), or draw a landscape where there is both sky and ground.
2. Print out images of birds and insects. Cut out the birds and insects on the answer sheet.
• Present the pictures to the children and say the names of the creatures on them.
• Look at each animal on the sheet in turn and decide which ones can fly.
• Show the animals that you have printed out. When the children have guessed if it can fly, tell them the correct answer.
• Stick the animal to the landscape on the board: in the sky if it can fly, and on the ground if it does not fly.
EXTRA RESOURCESPrintable 2
Living things 27

Living things64
Little Scientists Experiment 13
WHAT LIVES IN THE WATER?
Additional ideasReuse the plastic figurines of animals that live in water from the previous experiment extension. Give out one to each child and ask: Where do you think your animal lives? Suggest building a habitat for their plastic animals and ask: What should it be like? What does it need? How can we make it? Ask the children to suggest materials that you could use to create this habitat.
Create an aquatic environment using a fish tank or washing-up bowl. Ask the children bringing the materials that they think their animal needs to live. Place the plastic figurines in the habitat and invite children and teachers from other classes to come and visit it.
Objective Children identify plants, as well as animals, as living things.
Materials• plants• pictures of animals• rock
Steps• Before the class, put the materials around the classroom. • Using actions say: Living things grow. Ask the children to
move around the classroom and find living things. Say: Let’s look for things that grow!
• Then, the children present all the things they have found. Ask: Does it grow? Yes, it’s a living thing.
• Show the children the rock. Say: It doesn’t grow, it isn’t a living thing. Ask the children to name other things in the classroom that aren’t living things.
• Ask the children to circle the living things on Worksheet 13.
© O
xfo
rd U
niv
ers
ity
Pre
ss E
spa
ña
, S
. A
.
13WHAT LIVES IN THE WATER?
23-32_living-things 4A.indd 27 21/04/16 12:01
28 Living things
Living things 65
Extra Experiment
WHO LIVES IN THE TREE?NOTESObjective
The children find that trees (even dead ones) are the perfect habitat for many plants and creatures.
Materials• printed images of creatures and plants that live in trees• sticky tack• magnifying glasses (for nature walk)
How to start: Remind the children of what they have learnt about creatures that live in trees. Try to get them to remember or think of as many animals and plants as possible that live in trees.
Steps• Draw a large tree onto the board (or project a large image of
a tree). Ask: Who lives in the tree?• Give out printed pictures of creatures and plants that live in
trees.• One by one, the children come to the tree with their picture.
Ask: Do you have a plant? Or an animal?• The child sticks the animal or plant on the part of the tree
where it lives.• When everyone has put up their picture, say: Trees are full of
life! Ask: How many animals and plants can you see?
Additional ideas• If you have access to outdoor space or woodland, organise
a little walk with the children. Take magnifying glasses with you.
• Find a big tree and ask: What lives in this tree? Say: Look, but don’t touch! Encourage respect for natural environments.
• See what you can see living on the tree. Use the magnifying glasses to look for insects, and see if you can hear or see birds or squirrels.
• Identify any other plants that grow on the tree, such as moss or ivy.
EXTRA RESOURCESPrintable 5
Living things 29

Living things 67
© O
xfo
rd U
niv
ers
ity
Pre
ss E
spa
ña
, S
. A
.
14WHAT DO THEY EAT?
23-32_living-things 4A.indd 29 21/04/16 12:01
Little Scientists Experiment 14
WHAT DO THEY EAT?
Stickers
Objective Children begin to understand animal nutrition and food chains.
Materials• foods from plants (lettuce, olives, banana, nuts)• foods from animals (ham, tuna, milk)• pictures of animals that eat these foods
Steps• Before the class, ask the children to bring a piece of food
from home, or provide the materials listed.• Present the materials. Ask: Where does tuna come from?
And olives? And ham? And milk?
• Ask the children to classify the foods. Say: Which foods come from plants? And from animals? We eat plants and animals.
• Ask: What do animals eat? Give the children the pictures. They present their animal.
• Say: It’s lunchtime! Pick up a food and ask: Who eats (nuts)? Children show their pictures if they think their animal eats it. Choose a child to tell the other children: The bird eats nuts.
• Ask the children to stick the correct food sticker on the animal’s plate on Worksheet 14.
• Have a class picnic.
Additional ideasHave the children sit in a semicircle around the board and give each child a photograph of a type of plant-based food, or an insect, and place a basket in the middle. Show a picture of a duck and ask the children: What can we feed the duck? Put his food in the basket! If the children think that the duck could eat their food, they place it in the basket (ducks are omnivores).
Empty the basket and see if the food in there would be appropriate for the duck, encouraging discussion with the children. Repeat the process with a picture of a frog and then a snail (most frogs are omnivores and most are snails herbivores.) At the end, have a more general discussion about the animals that the children can name and what they eat.
30 Living things
Living things68
Extra Experiment
BIRDFEEDER NOTESObjective
Children discuss and observe how birds eat and make their own bird feeder.
Materials• pipe cleaners• o-shaped cereal• bowls
How to start: Remind the children of what they learned about animals and what they eat. Then ask: What do birds eat? Have you ever seen a bird eating?
Steps• Show the children videos of birds eating from bird feeders
from the Internet. Ask: What is the bird doing?• Talk about the different foods that birds can eat. Say: We are
going to feed the birds!• Give out the pipe cleaners (at least one per child), and place
some cereal in the bowls and place them on tables around the classroom.
• Say: Put the ‘O’s on the pipe cleaner’. Show them how to thread the pieces of cereal onto a pipe cleaner, and how to make a loop by twisting the ends together.
• The children compare their bird feeders. They can take them home, or hang them outside the classroom in a quiet place (near or in a tree).
Living things 31

Living things70
Little Scientists Experiment 15
WHOSE EGGS ARE THEY?
Stickers
Objective Children see that some animals are oviparous.
Materials• different types of eggs (chicken eggs, quail eggs, fish eggs)• pictures of animals
Steps• Show the eggs to the children and say: Look! What colour
are they? Are they big or small? How many are there? The children talk about the eggs.
• Ask the children to guess whose eggs they are. Then explain. Say: Birds, fish and insects lay eggs.
• Then, hand out the pictures of animals. Ask children to make two groups: eggs or no eggs.
• Ask children to look at the stickers for Worksheet 15 and say: Are (snail)’s eggs big or small? Are (snail)’s eggs in water or on land?
• Ask the children to stick the correct animal with its eggs on Worksheet 15.
Additional ideasShow picture of the eggs of snails, ducks, fish, crocodiles and turtles, and ask: What are these? What colour are they? What animal do you think they are from?
Then show photographs of a fish, a crocodile, a turtle, a snail, and a duck and ask again: What will their eggs be like? Big? Small? Will they be in water or on land? In a tree? Share out some plasticine between the children and ask them to make some eggs. Ask: Which animal do they belong to? Adjust the eggs according to their characteristics.
© O
xfo
rd U
niv
ers
ity
Pre
ss E
spa
ña
, S
. A
.
15WHOSE EGGS ARE THEY?
23-32_living-things 4A.indd 31 21/04/16 12:01
32 Living things

Living things 71
Extra Experiment
WHOSE BABIES ARE THEY?NOTESObjective
Children develop a concept of animal reproduction.
Materials• printable pictures of adult and baby animals
How to start: Remind the children of what they learned about eggs. Then ask: Do all animals lay eggs? What happens when eggs hatch?
Steps• Before class, print out the pictures of baby and adult animals
and cut them out.• Give a picture to each child, and ask: What animal do you
have? Tell me about your animal.• Say: Some of you have baby animals, and some of you
have grown-up animals. The children must find their partner (either the baby or mother animal that corresponds with their picture card).
• When everyone is in their pairs, some of the children talk about their animal, saying what it is (if they know) and its colours, how many legs it has, if it is big or small, etc.
• Explain to the children how every animal grows until it is an adult. Ask: What will you look like when you’re a grown-up?
EXTRA RESOURCESPrintable 4
Living things 33