
W100 manual 1 - Auvidea 1.2 TECHNICAL REFERENCE MANUAL W100 Configuration ! LuCI web interface The...
11
VERSION 1.2 TECHNICAL REFERENCE MANUAL W100 Technical Reference Manual W100 Version 1.2 W100 add-on to E1xx December 2014 Auvidea GmbH Kellerberg 3 D-86920 Denklingen Tel: +49 8243 7714 622 [email protected] www.auvidea.com 1 W100 ADD-ON MODULE AUVIDEA GMBH
Transcript of W100 manual 1 - Auvidea 1.2 TECHNICAL REFERENCE MANUAL W100 Configuration ! LuCI web interface The...

VERSION 1.2 TECHNICAL REFERENCE MANUAL W100
!!Technical Reference Manual
W100 Version 1.2
!W100 add-on to E1xx
December 2014
!!
Auvidea GmbH Kellerberg 3
D-86920 Denklingen
Tel: +49 8243 7714 622 [email protected] www.auvidea.com
!1W100 ADD-ON MODULEAUVIDEA GMBH
VERSION 1.2 TECHNICAL REFERENCE MANUAL W100
Copyright Notice !!!!!!!!!!!!!!!!!!!!!!© Auvidea GmbH 2014 !All Rights Reserved
No part of this document or any of its contents may be reproduced, copied, modified or adapted, without the prior written consent of the author, unless otherwise indicated for stand-alone materials.
You may share this document by any of the following means: this PDF file may be distributed freely, as long as no changes or modifications to the document are made.
For any other mode of sharing, please contact the author at the email below. [email protected]
Commercial use and distribution of the contents of this document is not allowed without express and prior written consent of Auvidea GmbH.
!2W100 ADD-ON MODULEAUVIDEA GMBH

VERSION 1.2 TECHNICAL REFERENCE MANUAL W100
!Introduction
!W100 Compact and low cost WLAN add-on module for the E110. The W100 is a fully open system and its functionality may be customized by the user. It may be used for various tasks. Also a toolchain and packet manager is available for custom software development and installation. Please check www.openwrt.org for further details.
!Key functions • WLAN interface for E110 (may be disabled in software) • networking functions (openWRT based router with 3 ports) • video transmuxing (e.g. RTSP to RTMP) !Technical details • 400 MHz MPIS Processor • 64 MB DDR2 RAM • 16 MB on board Flash • USB-2 (480 Mbit/s) type A • 2x 10/100 Mbit Ethernet (RJ45) (LAN to E110, WAN to RJ45) • 2.4 GHz WLAN interface (U.FL connector) • extent flash storage by mounting E110 flash via davfs !!
!3W100 ADD-ON MODULEAUVIDEA GMBH
VERSION 1.2 TECHNICAL REFERENCE MANUAL W100
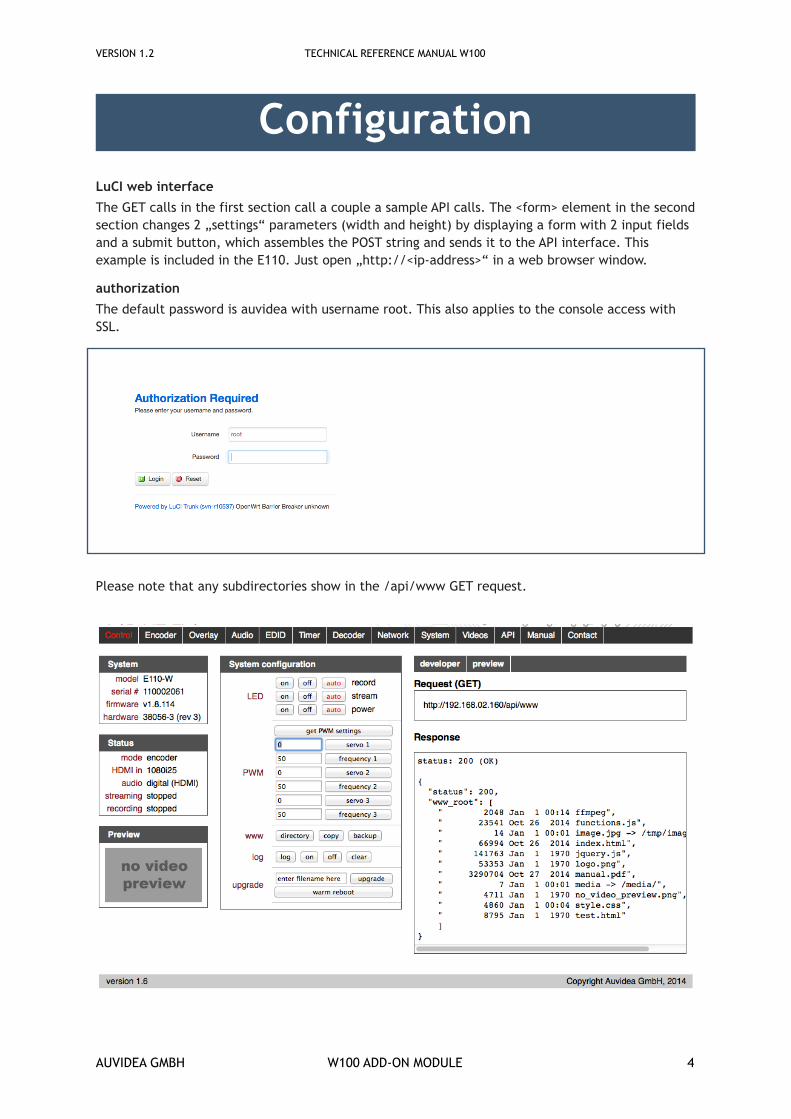
Configuration !LuCI web interface
The GET calls in the first section call a couple a sample API calls. The <form> element in the second section changes 2 „settings“ parameters (width and height) by displaying a form with 2 input fields and a submit button, which assembles the POST string and sends it to the API interface. This example is included in the E110. Just open „http://<ip-address>“ in a web browser window.
authorization
The default password is auvidea with username root. This also applies to the console access with SSL.
!!Please note that any subdirectories show in the /api/www GET request.
!!4W100 ADD-ON MODULEAUVIDEA GMBH
VERSION 1.2 TECHNICAL REFERENCE MANUAL W100
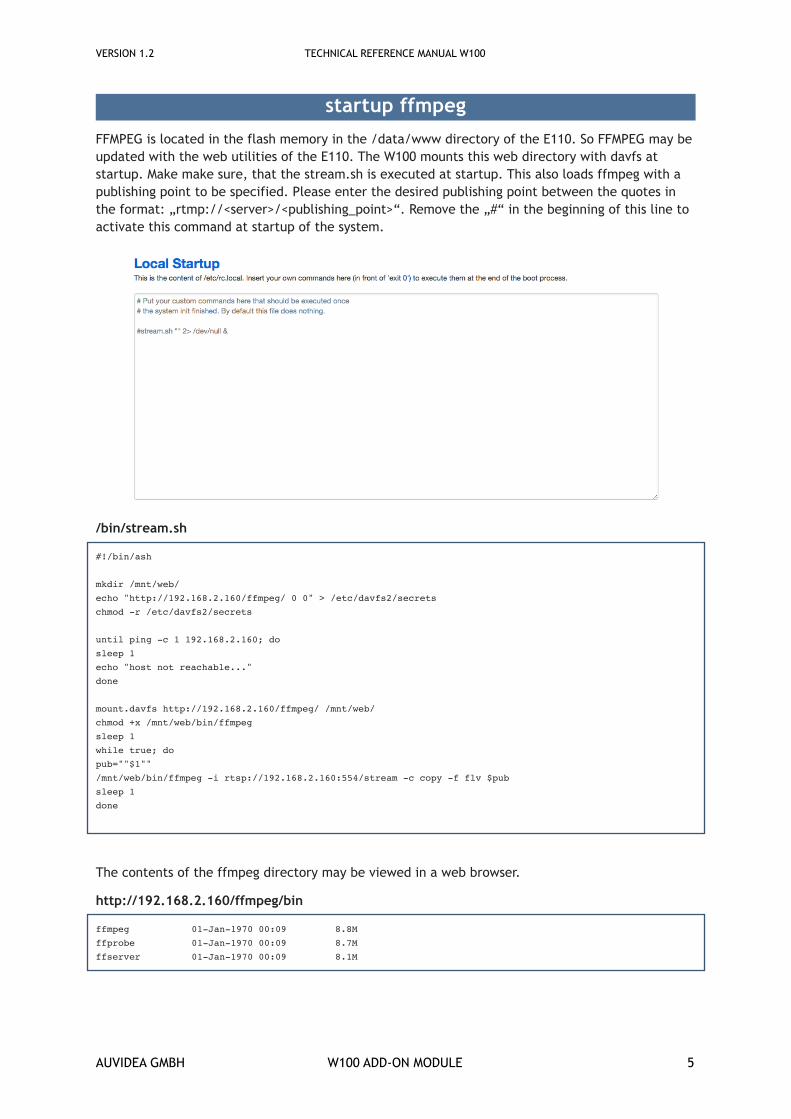
startup ffmpeg
FFMPEG is located in the flash memory in the /data/www directory of the E110. So FFMPEG may be updated with the web utilities of the E110. The W100 mounts this web directory with davfs at startup. Make make sure, that the stream.sh is executed at startup. This also loads ffmpeg with a publishing point to be specified. Please enter the desired publishing point between the quotes in the format: „rtmp://<server>/<publishing_point>“. Remove the „#“ in the beginning of this line to activate this command at startup of the system.
/bin/stream.sh
#!/bin/ash!!mkdir /mnt/web/!echo "http://192.168.2.160/ffmpeg/ 0 0" > /etc/davfs2/secrets!chmod -r /etc/davfs2/secrets!!until ping -c 1 192.168.2.160; do!sleep 1!echo "host not reachable..."!done!!mount.davfs http://192.168.2.160/ffmpeg/ /mnt/web/!chmod +x /mnt/web/bin/ffmpeg!sleep 1!while true; do!pub=""$1""!/mnt/web/bin/ffmpeg -i rtsp://192.168.2.160:554/stream -c copy -f flv $pub!sleep 1!done!!!The contents of the ffmpeg directory may be viewed in a web browser.
http://192.168.2.160/ffmpeg/bin
ffmpeg! ! 01-Jan-1970 00:09!! 8.8M!ffprobe! ! 01-Jan-1970 00:09!! 8.7M!ffserver!! 01-Jan-1970 00:09!! 8.1M!
!
!5W100 ADD-ON MODULEAUVIDEA GMBH
VERSION 1.2 TECHNICAL REFERENCE MANUAL W100
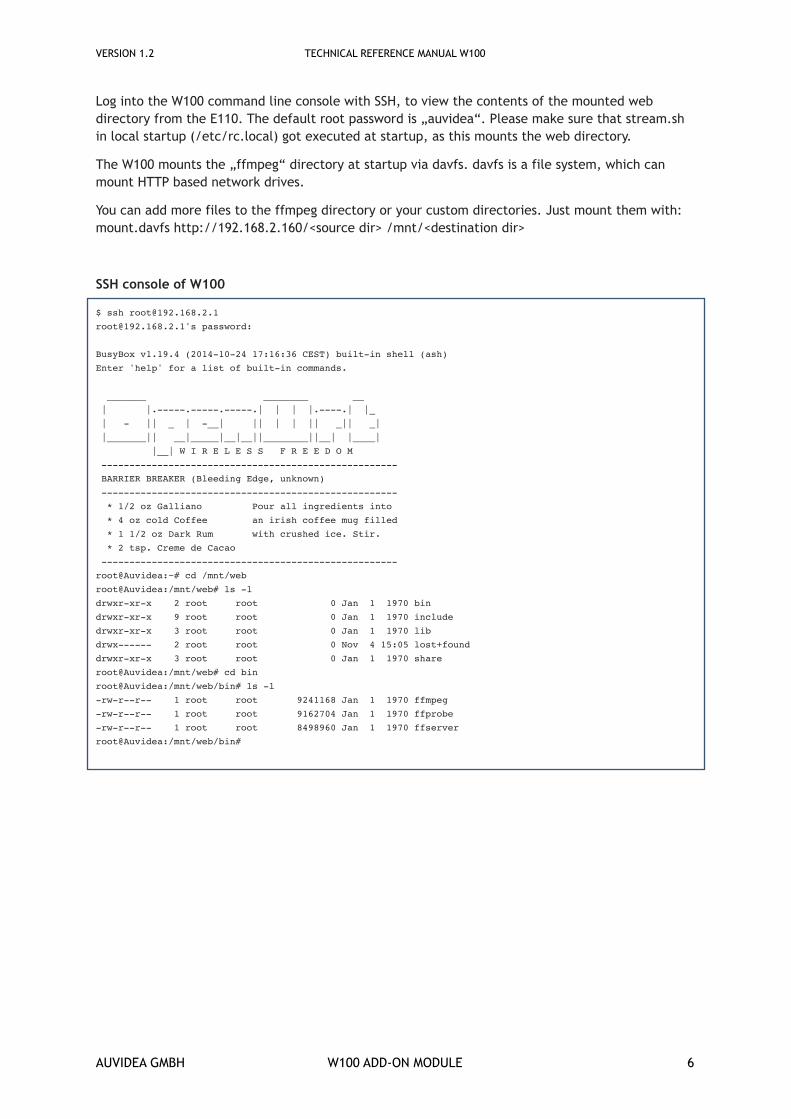
Log into the W100 command line console with SSH, to view the contents of the mounted web directory from the E110. The default root password is „auvidea“. Please make sure that stream.sh in local startup (/etc/rc.local) got executed at startup, as this mounts the web directory.
The W100 mounts the „ffmpeg“ directory at startup via davfs. davfs is a file system, which can mount HTTP based network drives.
You can add more files to the ffmpeg directory or your custom directories. Just mount them with:mount.davfs http://192.168.2.160/<source dir> /mnt/<destination dir>
!SSH console of W100
$ ssh [email protected][email protected]'s password: !!BusyBox v1.19.4 (2014-10-24 17:16:36 CEST) built-in shell (ash)!Enter 'help' for a list of built-in commands.!! _______ ________ __! | |.-----.-----.-----.| | | |.----.| |_! | - || _ | -__| || | | || _|| _|! |_______|| __|_____|__|__||________||__| |____|! |__| W I R E L E S S F R E E D O M! -----------------------------------------------------! BARRIER BREAKER (Bleeding Edge, unknown)! -----------------------------------------------------! * 1/2 oz Galliano Pour all ingredients into! * 4 oz cold Coffee an irish coffee mug filled! * 1 1/2 oz Dark Rum with crushed ice. Stir.! * 2 tsp. Creme de Cacao! -----------------------------------------------------!root@Auvidea:~# cd /mnt/web!root@Auvidea:/mnt/web# ls -l!drwxr-xr-x 2 root root 0 Jan 1 1970 bin!drwxr-xr-x 9 root root 0 Jan 1 1970 include!drwxr-xr-x 3 root root 0 Jan 1 1970 lib!drwx------ 2 root root 0 Nov 4 15:05 lost+found!drwxr-xr-x 3 root root 0 Jan 1 1970 share!root@Auvidea:/mnt/web# cd bin!root@Auvidea:/mnt/web/bin# ls -l!-rw-r--r-- 1 root root 9241168 Jan 1 1970 ffmpeg!-rw-r--r-- 1 root root 9162704 Jan 1 1970 ffprobe!-rw-r--r-- 1 root root 8498960 Jan 1 1970 ffserver!root@Auvidea:/mnt/web/bin# !!!
!6W100 ADD-ON MODULEAUVIDEA GMBH

VERSION 1.2 TECHNICAL REFERENCE MANUAL W100
Firmware installation
Please get the latest firmware for the W100. The firmware consists of two parts.
1. bin file to upgrade the firmware
2. tar file to restore the settings
!Use a computer with 2.4GHz Wifi (DHCP). By default the W100 is configured as DHCP server.SSID: auvidea password: auvidea12
Open the LuCI interface of the W100. The default IP address is 192.160.2.1.user: root password: auvidea
Go to the menu item „system/backup“ and install the supplied bin file (flash firmware). Next go to the tab „system/backup“ again and install the supplied tar file (backup/restore).
Go to the menu item „system/reboot“ and perform a warm reboot.
Go to the menu item „system/startup“ and specify the task to perform at each startup:
1. put a „#“ in front of the „stream.sh“ line, to disable the custom startup functions.
2. put the publishing point address in quote after „stream.sh“ to enable transmuxing from RTSP to RTMP.
!
!7W100 ADD-ON MODULEAUVIDEA GMBH

VERSION 1.2 TECHNICAL REFERENCE MANUAL W100
Attaching serial console and servos
Serial console
For low level system access to the W100 a serial console may be attached. Please use a USB to TTL converter cable. The 3 TTL leads are connected to a 2.54mm pin header on the W100 module. The leads are:
• receive (RX) - top pin in red box • transmit (TX) - middle pin • ground (GND) - bottom pin !If you are not able to get a connection, then please swap the receive and transmit leads.
By default the 3 pin header (J13) is not populated. Please get a 3 pin pin header with 2.54mm (0.1“) pitch. If you would also connect to the 3 servo ports on J13, please install a 2x6 pin header of the same pitch.
Servo control
The firmware of the E110 (web GUI and http request API) can control up to 3 servos. These are marked with 3 red boxes on the right. GND is the bottom pin. The middle pin carries the 5 Volt power supply for the servo. Please make sure to limit power usage. The top pin is the servo signal (5V PWM signal).
The PWM signal may also be used for custom functions. Pulse width, duty cycle and frequency may be fully controlled. For standard servos, the frequency must be 50 Hz.
Please note, that the 3 LEDs for record, stream and power on the W100 module are also controlled by the 3 PWM signals.
!8W100 ADD-ON MODULEAUVIDEA GMBH

VERSION 1.2 TECHNICAL REFERENCE MANUAL W100
Default network configuration
Default configuration
The W100 default network configuration is stored in the file /etc/config/network. Please reset this file to its default status, if you experience network issues which you cannot resolve in the LuCI web interface. Swap eth0 and eth1 in this file to swap the 2 Ethernet interfaces of the W100.
/etc/config/network
config interface 'loopback'!! option ifname 'lo'!! option proto 'static'!! option ipaddr '127.0.0.1'!! option netmask '255.0.0.0'!!config interface 'lan'!! option ifname 'eth1'!! option type 'bridge'!! option proto 'static'!! option netmask '255.255.255.0'!! option ipaddr '192.168.2.1'!!config interface 'wan'!! option ifname 'eth0'!! option proto 'dhcp'!!config switch!! option name 'eth1'!! option reset '1'!! option enable_vlan '1'!!config switch_vlan!! option device 'eth1'!! option vlan '1'!! option ports '0 1 2 3 4'!!!
!9W100 ADD-ON MODULEAUVIDEA GMBH

VERSION 1.2 TECHNICAL REFERENCE MANUAL W100
Router configuration
Default configuration
WLAN interface: DHCP master default IP address: 192.168.2.1 default IP address of E110: 192.168.2.160 SSID: auvidea (password: auvidea12) root password for SSH access: auvidea
WAN interface (eth0 - RJ45 connector on the W100 module): DHCP slave
Only the W100 can be reached via this interface. However this may be reconfigured, so that both devices (W100 and E110) are mapped to the same IP address provided by your DHCP server..
Sample firewall configuration for the WAN interface
In the example below the IP address retrieved via DHCP is: 192.168.0.80. This may vary depending on your network.
192.168.0.80:80! ! Web interface of W110 (HTTP) - :80 may be omitted!192.168.0.80:22! ! SSH access to W100!192.168.0.80:8080!! Web interface of E110 (HTTP)!192.168.0.80:88! ! SSH access to E110 (must be enabled first - see E110 manual)!192.168.0.80:554!! RTSP streaming!
!First configure the WAN interface for the wan firewall mode (in the LuCI interface). Please go to Network/Interfaces/WAN/Edit/Firewall settings and check „wan“.
Next configure the firewall settings in Network/Firewall/Port forward:
!
!10W100 ADD-ON MODULEAUVIDEA GMBH

VERSION 1.2 TECHNICAL REFERENCE MANUAL W100
Power
12V power input
The E110-W may be either powered by its main 12V power input. Alternatively it may be powered by the 12V power input on the W100 module (J12).
Connector
By default the power connector J12 is not populated on the W100 module (type: TE 292207-2)
Power cable
The power cable is: TE 2058943-1. It is available at digikey.com. Standard length: 158mm.
!11W100 ADD-ON MODULEAUVIDEA GMBH


![HKSF-W100 E[1] Auma](https://static.fdocuments.net/doc/165x107/55cf9caf550346d033aaad55/hksf-w100-e1-auma.jpg)


