VR Volume Rendering
6
VR Volume Rendering Ray Marching for VR Medical Imaging NGUYEN DUC DUONG, XIAO LIANG, and JEFFERY TIAN, University of Washington Fig. 1. Ordered from leſt to right. Fig. 1.1. To test out our volume rendering algorithm, we developed a program to take a 3D dataset and generate an image that is a rendering of the volume. The first image from the leſt is an image outpued by the program, rendering the volume facing in the negative z direction. Fig. 1.2-14. Application demos that does slicing, highlighting, and sampling to the volume rendered. Volume rendering is a pivotal technology in the realm of medical imaging. With VR being a brand new technology, there is room for medical imaging technology to be developed for virtual reality. Our goal is to create an experience in which radiologists and other healthcare professionals can view an accurate representation of MRI scans with intuitive controls. In order to reach our goal, we found an open-source volume renderer using Unity. We were able to convert the renderer into a VR renderer, loading in our own data, and modifying the shader, along with creating a suite of controls to suit our needs to create a medical imaging virtual reality experience. 1 INTRODUCTION 3D medical imaging is a relatively new field, giving radiologists a new way of visualizing 3D scans. Medical images are stored us- ing the Digital Imaging and Communications in Medicine(DICOM) standard. This stores data taken from medical scans in slices and DICOM readers often display the images in slices, the data stored in a specific plane of the volume [Pianykh 2012]. With more advanced computer graphics, with technologies such as raymarching, medical images can capture detail in separate planes, increasing the amount of detail in each image, seeing tissue that is not completely opaque. Implementing these computer graphic technologies with VR, medi- cal professionals view medical data in the 3D and interact with the volume intuitively. In order to create the VR program we intended, we found an open-source volume rendering project using Unity [Mattatz]. This gave us the inspiration for how to render and create controls for our VR experience. We then learned about raymarching by viewing the lecture slides from Ohio State University’s computer graphics class. With these two resources, we were able to get started on developing two programs, the first of which tested our raymarching algorithm, Authors’ address: Nguyen Duc Duong, [email protected]; Xiao Liang, [email protected]; Jeffery Tian, jeff[email protected], University of Washington. outputting figure 1.1. The second program was our final project, a Unity-based VR game in which we implemented raymarching with our own controls. Upon development, ray marching was implemented, running se- quentially on the CPU, generating volume-rendered images of an MRI scan of a body. With this raymarching algorithm, the shader in Unity was implemented, running raymarching for each pixel on a separate GPU core, speeding calculations up so that it can be displayed on a VR headset at a reasonable frame rate. In Unity, we were then able to implement controls to provide features to view the volume in different ways, slicing the volume according to certain planes, highlighting certain areas in the volume, and breaking the volume into smaller parts, shown by figures 1.2-1.4 1.1 Contributions Our contributions to this project are: • We found, prepared, and loaded a 3D volume, stored as a 3d array of densities, mapping each of the densities stored in the volume to a corresponding color and opacity. • We implemented a shader to perform ray marching in order to render our volume inside a VR experience, taking in the data that was previously loaded into the program and rendering it in stereo for VR. • We implemented a number of different controls for the user to use, including slicing the image, increasing the intensity in certain areas for greater detail, and sampling the volume in smaller parts.
Transcript of VR Volume Rendering

VR Volume RenderingRay Marching for VR Medical Imaging
NGUYEN DUC DUONG, XIAO LIANG, and JEFFERY TIAN, University of Washington
Fig. 1. Ordered from left to right. Fig. 1.1. To test out our volume rendering algorithm, we developed a program to take a 3D dataset and generate an imagethat is a rendering of the volume. The first image from the left is an image outputted by the program, rendering the volume facing in the negative z direction.Fig. 1.2-14. Application demos that does slicing, highlighting, and sampling to the volume rendered.
Volume rendering is a pivotal technology in the realm of medical imaging.With VR being a brand new technology, there is room for medical imagingtechnology to be developed for virtual reality. Our goal is to create anexperience in which radiologists and other healthcare professionals canview an accurate representation of MRI scans with intuitive controls. Inorder to reach our goal, we found an open-source volume renderer usingUnity.Wewere able to convert the renderer into a VR renderer, loading in ourown data, and modifying the shader, along with creating a suite of controlsto suit our needs to create a medical imaging virtual reality experience.
1 INTRODUCTION3D medical imaging is a relatively new field, giving radiologists
a new way of visualizing 3D scans. Medical images are stored us-ing the Digital Imaging and Communications in Medicine(DICOM)standard. This stores data taken from medical scans in slices andDICOM readers often display the images in slices, the data stored ina specific plane of the volume [Pianykh 2012]. With more advancedcomputer graphics, with technologies such as raymarching, medicalimages can capture detail in separate planes, increasing the amountof detail in each image, seeing tissue that is not completely opaque.Implementing these computer graphic technologies with VR, medi-cal professionals view medical data in the 3D and interact with thevolume intuitively.
In order to create the VR program we intended, we found anopen-source volume rendering project using Unity [Mattatz]. Thisgave us the inspiration for how to render and create controls for ourVR experience. We then learned about raymarching by viewing thelecture slides from Ohio State University’s computer graphics class.With these two resources, we were able to get started on developingtwo programs, the first of which tested our raymarching algorithm,
Authors’ address: Nguyen Duc Duong, [email protected]; Xiao Liang,[email protected]; Jeffery Tian, [email protected], University ofWashington.
outputting figure 1.1. The second program was our final project, aUnity-based VR game in which we implemented raymarching withour own controls.
Upon development, ray marching was implemented, running se-quentially on the CPU, generating volume-rendered images of anMRI scan of a body. With this raymarching algorithm, the shaderin Unity was implemented, running raymarching for each pixelon a separate GPU core, speeding calculations up so that it can bedisplayed on a VR headset at a reasonable frame rate. In Unity, wewere then able to implement controls to provide features to view thevolume in different ways, slicing the volume according to certainplanes, highlighting certain areas in the volume, and breaking thevolume into smaller parts, shown by figures 1.2-1.4
1.1 ContributionsOur contributions to this project are:
• We found, prepared, and loaded a 3D volume, stored as a 3darray of densities, mapping each of the densities stored in thevolume to a corresponding color and opacity.
• We implemented a shader to perform raymarching in order torender our volume inside a VR experience, taking in the datathat was previously loaded into the program and rendering itin stereo for VR.
• We implemented a number of different controls for the userto use, including slicing the image, increasing the intensityin certain areas for greater detail, and sampling the volumein smaller parts.

2 • Nguyen Duc Duong, Xiao Liang, and Jeffery Tian
2 RELATED WORKVolume rendering has been really popular and there are a lot
of algorithms that have certain advantages and disadvantages ac-cording to data sets and visual effect expected, which will be dis-cussed further more later in this report. We use one of the mostcommonly accepted algorithm, Ray Marching, to implement ourvolume rendering. This github repository by Mattatz implementsVolume Rendering with ray marching in Unity offers as a lot of helpin learning shading Unity and Volume Rendering in general: weinherit mesh building, ray intersects detection, and slicing from it.Here is a more complete comparison:
ComparisonFeatures VR Volume Render-
ingunity-volume-rendering
Object spaceraymarching
Yes Yes
Shader HLSL HLSLVR support Yes NoManipulation MRTK support (ro-
tation, translation,and scaling)
On-Axis Rotation
Slicing Free slicing on anyangle
On-Axis
Classificationby colors
Yes no
Data used .dat file withcolor&opacitylookup
.raw file, uti-lizing Unity’sAssetBuilder
UI VR Interfacewith controllermapping
Text Interface withscroll bars
VR Volume Rendering also have additional functionalities of sam-pling and highlighting.
3 METHODThe core logic behind volume rendering is ray marching. Medical
scans capture the density of a volume at discrete points in thevolume. When rendering, we map certain densities to specific colorsand opacities. Once the data is stored as a 3D array of colors andopacities, ray marching is performed from the location of the screenin world space. Each pixel of the screen matches a ray. Each raytravels until it has exited the bounds of the volume, integrating thecolors and opacities at sample points on the volume. Figure 2 showsa ray from the screen. As the ray enters the volume, the locationis incremented by the direction by a magnitude of a certain stepsize. These locations give sample locations. At each of these samplelocations, the colors and opacities are integrated with the followingequations [Crawfis 2011]:
color 𝑐 = 𝑐𝑠 · 𝛼𝑠 (1 − 𝛼) + 𝑐opacity 𝛼 = 𝛼𝑠 (1 − 𝛼) + 𝛼
Once the opacity is greater than a certain threshold, the ray can beterminated [Parent 2011]. The opacity allows for translucent tissueto be seen but not obscure the material behind it, creating a more
Fig. 2. 2D Ray marching sample points
realistic view. In 3D, these sample locations are basic blocks in 3D,called voxels. Since sample locations may not land on the corners
Fig. 3. 3D Ray Marching with Voxels
of voxels, as shown in Figure 3, the locations where densities arestored in our datasets, we use trilinear interpolation of the verticesof the voxel to get the colors and opacities at locations not on thediscrete locations in data. This gives even more accuracy in termsof the image rendered. Once the ray tracing is done for every valuepixel in the screen, the image is generated.
4 IMPLEMENTATION DETAILS
4.1 Hardware & SoftwareThe main application is developed and tested on a Windows per-
sonal computer that has 16GB ram, Intel Core i7, and GeForce GTX1060. For a HMD, we used Acer Windows Mixed Reality Headset. A
VR Volume Rendering • 3
testing program is developed in C++, and we used Unity and VisualStudio for the application.
4.2 External Resources (Talking about MRTK and Github) -Nguyen
A few external resources that were used for this application. Forthe main volume rendering system, our application built on top ofthis github repository by Mattatz implements Volume Renderingwith ray marching in Unity. We extended the original repository byimplemented new shader features like point light source, volumeplane slicing, color classification for different organs parts. We arealso using our own 3D volume data provided by Liqun Fu(*). Lastlyand most important resource is Mixed Reality Tookit(MRTK). Withthe help of MRTK, we are able to incorporate VR features for ourapplication, allowed for better virtual experience to control andanalyze volume image.
4.3 C++ ProgramIn order to test our understanding of ray marching, we developed
a C++ program that would create images of the volume rendereddata. This would test loading in the data, our color mapping, and ifa ray marching is a viable way of rendering the volume. Followingthe method described in Section 3 of this report, we were able torender images such as what is shown in Figure 1.1. We set the imageto be facing the volume’s xy face and ray marched for each pixelin the image until either the opacity reached a certain thresholdor the ray exited the volume. Running this program proved to beparticularly expensive, taking 45 seconds to render a 512x406 pximage. While this poses possible improvements in the future, whichwill be mentioned in Section 7, this was enough for us to considerimplementing the algorithm, along with loading data and colors,into our Unity program.
4.4 Application DesignIn order to build a VR enable Volume Rendering application, there
are a few aspects we need to keep in mind for our design decision.We need to be able to read in the volume data, display the datathough VR interface, support user input, and a main application tohandle all system state. We believe that using MVC design patterncan help us build this application much more efficiently.Our application is split up into 4 main parts: State Controller,
Volume Render Application, VR interface, and Data Reader. We willdiscuss each section in more detail below.
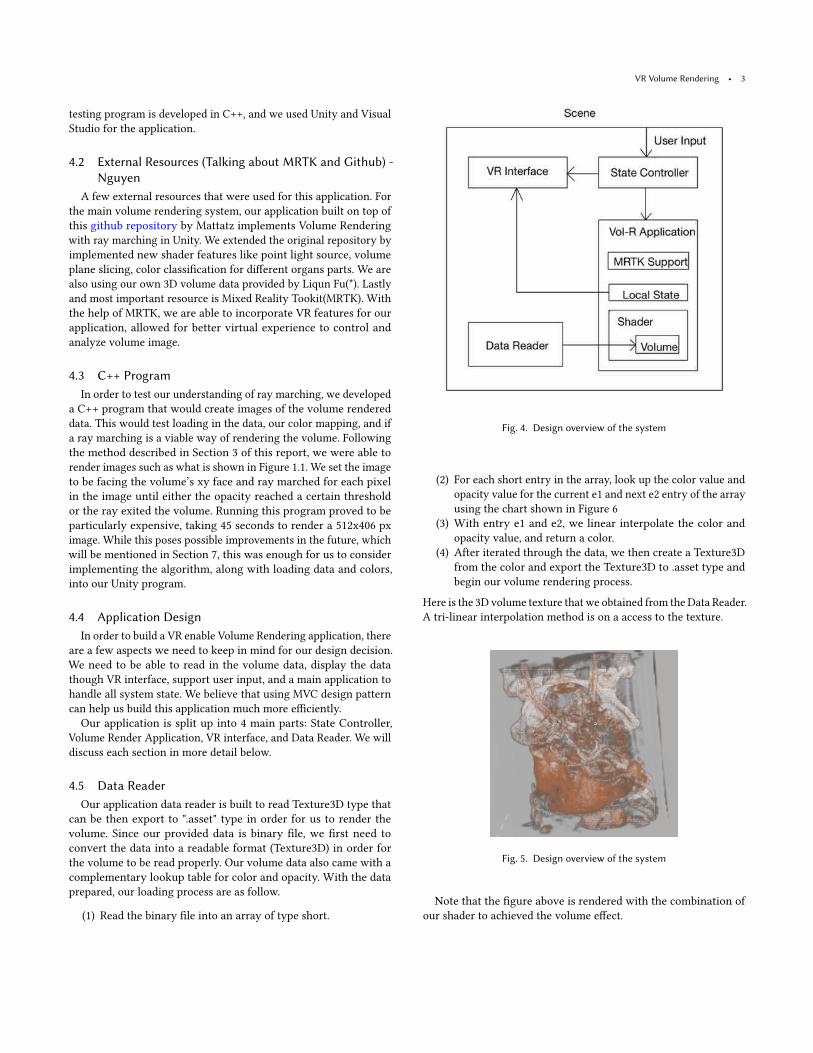
4.5 Data ReaderOur application data reader is built to read Texture3D type that
can be then export to ".asset" type in order for us to render thevolume. Since our provided data is binary file, we first need toconvert the data into a readable format (Texture3D) in order forthe volume to be read properly. Our volume data also came with acomplementary lookup table for color and opacity. With the dataprepared, our loading process are as follow.
(1) Read the binary file into an array of type short.
Fig. 4. Design overview of the system
(2) For each short entry in the array, look up the color value andopacity value for the current e1 and next e2 entry of the arrayusing the chart shown in Figure 6
(3) With entry e1 and e2, we linear interpolate the color andopacity value, and return a color.
(4) After iterated through the data, we then create a Texture3Dfrom the color and export the Texture3D to .asset type andbegin our volume rendering process.
Here is the 3D volume texture that we obtained from the Data Reader.A tri-linear interpolation method is on a access to the texture.
Fig. 5. Design overview of the system
Note that the figure above is rendered with the combination ofour shader to achieved the volume effect.

4 • Nguyen Duc Duong, Xiao Liang, and Jeffery Tian
Fig. 6. Lookup table relating images to their opacity and colors
4.6 ApplicationThe main application responsible for managing the state of the
system. This component ensure data volume is loaded with thecorrect shader setup. Ensure for VR headset and controller to setupcorrect and can interact with the volume object. At the moment,our application support 6 different modes for user to interact withvolume object:
• Mode 1: VR Object interaction• Mode 2: Point Light controller• Mode 3: Plane Scanning• Mode 4: Plane Slicing• Mode 5: Volume Slicing• Mode 6: Small Volume Sampling
Mode 1: VR Object interaction: This mode allows for basic VRsupport from MRTK. With this mode enabled, user can control theobject on-screen through the VR controller. Some basic operationinclude translation, rotation, scaling.Mode 2: Point Light controller This mode allows for user to high-
light part of the volume with user defines intensity through vrcontroller. The highlighting is done through shader. The processincludes finding the controller position and convert it to volumeobject space. Then adding extra intensity constant to the renderlocation of the volume.Mode 3: Plane Scanning: This mode allows the user to highlight
a certain plane section of the volume. Users can move and orientthe plane base on the controller movement. This process is doneby finding the quaternion of the controller, and an initial normalvector for a plane. Then based on the position and orientation ofthe quaternion, we can enable extra intensity for a plane section inthe volume.Mode 4: Plane Slicing: Plane Slicing mode is a combination of the
previous Plane Scanning and new slicing feature. With this mode,user can look through the volume based on the plane sliced fromthe controller orientation. The process is done through two majorsteps. First finding the plane position and orientation. Second, basedon a plane normal, we can then disable the pixel color which allowsfor slicing effect.Mode 5: Volume Slicing: Volume Slicing mode allows users to
define 6 constant values for XYZ min and max render distance.This mode can help the user adjust volume size and allow for morefreedom for observing the volume.Mode 6: Small Volume Sampling: Small sampling mode allows
the user to pick out part of the larger volume. The smaller volumeenables the user to have better precision for analyzing differentdiscrete samples of the larger volume. There are multiple ways to
implement this feature, we have tried 2 ways and each with its prosand cons. The simple way was to clone the bigger volume withthe same mesh size. Then adjust the XYZ min-max value to createthe illusion of smaller volume. This method is simple, but we raninto the problem where smaller volume still has the mesh size ofthe big volume which obstructs the volume behind it. The secondapproach was to adjust the mesh size directly which can help withthe obstruction problem.
4.7 State Controller and VR InterfaceState controller and VR interface are implemented relatively sim-
ple for the moment. The component state controller allow for inputprocessing from the user. Controller has the mapping between userinput and the functionality for each mode we created. Right nowonly right controller are mapped with the application, and certainmode switching are done through the keyboard numbers. In thefuture, we will expand on the input system and allow for full VRcontrol support.VR Interface is also another relatively simple component. This
interface allow for stereo image render in VR and text display toindicate which mode and application state.
4.8 ShaderOur shader plays the most important role in the application: it
not only implements the basic volume rendering with raycastingbut also empowers abilities such as slicing and highlighting on thevolume.For the basic volume rendering algorithm, our shader will gener-ate a vector ray at each fragment in the direction from the viewcamera to that fragment. Because the mesh in which we renderour data is a cube, we can view it as an Axis-Align Bounding Box.Therefore we can easily calculate a coordinate where a ray exits therendering body, which informs the shader when to stop a ray asan optimization. when a ray is casting, sample points are collectedat a reasonable distance. At each sample point, an RGBA value isreturned from a 3D texture and we add it to the integral functionof the current ray. Follow this procedure, the shader has an RGBAvalue returned for every fragment that we can see from a viewpoint.Noticeably, fragments that are not in the view of the camera are notrendered thanks to HLSL’s cull back command.Additional functionalities are implemented by manipulating an
intensity scalar during the raycasting. This report won’t go overevery detail of each functions but will illustrate it with two high-lighting schemes. The first one allows the VR controller to becomea point light source that highlights its surrounding volume. Duringthe sampling stage in raycasting, the shader calculates a distancefrom the sample point to the controller’s coordinate and apply an at-tenuation function to the light’s intensity. Changes in intensity willbe later reflected by the integral function of fragments. Highlightingan entire plane is done in the same manner, but this time instead ofa point, a program will consistently calculate a plane equation froma VR controller’s quaternion. Any sample point that falls within adistance to the plane will add an intensity scalar to its ray’s integral.Some limitations induced by the methods above, such as blocking,will be further discussed in the later section.

VR Volume Rendering • 5
4.9 Mesh ManipulationThis section will propose and discuss an alternative to implement
user control. We have demonstrated how to take user input andshow visual effects in the shader. This is actually the most efficientway to update the volume because although it introduces extra com-putation to every fragment, a GPU that allows parallel processingcan still compute it very fast, and it works really well with single asingle volume. However, when there is a user interface or clones ofthe volume, the user will sometimes find an object gotten blockedby another colorless, which is, in fact, a mesh of other volumesin the scene because in the colorless mesh rays hit no texture andare forced to stop when exiting the mesh. This problem is particu-larly common during slicing operation. Another limitation is thatnothing will be displayed when the camera gets into the volume asfragments are only on the surface of a mesh.Both of these issues can be resolve by simply changing the coordi-nates of vertices: if there is no fragment gotten assigned null color,there will be no blocking, and if we dynamically change the sizeof the mesh when the camera gets closer to the volume, we canmake sure the camera never get inside the volume and always seessomething. We can only achieve this outside the shader where lesscomputation is down in parallel and create a bottle-neck. Moreover,implementing mesh manipulation is not easy when slicing in donenot along an axis.
5 RESULT AND EVALUATIONIn general, our application has a very promising result. The most
we care about is the latency issue when increasing the number ofsample points for higher rendering quality. The final product wehave can render a volume with elaborated details at averagely 50-60fps in a short time(10 minutes). However, the frame rate will drop toas low as 10 fps in a long run especially when a user is interactingwith the volume. This is definitely a problem considering our usersprobably require a long time examination of the volume, and weare expecting it to be addressed in the future.
It provides users several benefits. One motivation for this projectis to free users from using a mouse and keyboard to exam a volume.With HMD and controllers, manipulation becomes intuitive andrealistic. Our visual effects we implemented also make the volumetell more useful information to users.Limitations exist. One failure case is that the application might
have faulty behaviors when the scale of volume mesh changes. Theeffect is particularly devastating when we use the mesh manipula-tion mechanism discussed in previous sections. This will be easyto fix with more math once we have more time. Sadly, our volumerendering only works for a specific format of data. To be broadlyused, we need to implement several more data interpreters in thefuture. Although we saw a decent performance on our own data set,we have not tested our application with other data that is bigger orhas more noise. This makes it far from being sophisticated.
6 FUTURE WORKOur resultant VR experience loads a specific dataset into the pro-
gram. Our program works well with the dataset we have alreadycreated but it is imperative that there is more flexibility in the data
the program can use in the future in order to make the programusable for visualizing user selected data. This program is potentiallythe skeleton to VR being used in medical imaging. In order to moti-vate the transition from previously used medical imaging software,the software must be able to pass in any scanned data, not the datawe have already loaded into the program.
Along with more widespread data being rendered, future devel-opments call for a greater number of features. We have been able toslice the volume and look at cross sections. Another useful featurewould be to isolate certain tissue densities in the scan so that radiol-ogists and other medical professionals can ignore obstructing tissue,focusing on potential tumors, or abnormal tissue growth. We arecomputer scientists, so input from medical professionals about thelacking areas in current medical imaging technology could create abetter and more useful experience.
To further improve the user experience, frame rate is an importantfactor to consider in VR. Implementing a shader in Unity allowed forthe ray marching algorithm to be run in parallel on the GPU cores.If VR is to be more widely used in medical imaging, processingpower needs to be considered. GPUs have a significant cost so ourapplication should have as much software optimization as possible,so as to create a usable experience with as little processing poweras possible. One possible approach to this is to implement cacheaware programming on the CPU. Using the example of our test C++program, the full ray was calculated for each pixel before moving onto the next pixel. Rather than processing each ray individually, theconcepts of spatial and temporal locality can be employed, calculat-ing slices of the image that may be brought into the cache together.Another approach would be to optimize the program for certainhardware. For example, creating this program using the CUDA APIto optimize for performance specifically on NVIDIA GPUs. Thiscould cut out background processes that Unity uses, developing theprogram specifically suited for its application.
7 CONCLUSIONThis paper described our implementation on VR volume render-
ing application, which allow for loading volume image, renderingvolume image using ray marching technique, and multiple userinteraction modes for full VR experience. VR has shown potential increating a new, immersive, and accurate view for 3D medical imag-ing with intuitive controls, complementing with current imagingtechnology.
ACKNOWLEDGMENTSWe would like to thank Douglas Lanman, Kirit Narain, and Ethan
Gordon for mentoring us through this project. We would also liketo thank Liqun Fu for providing the data we rendered along withproviding a few resources to consider when implementing our vol-ume renderer. Another thanks to the UW Reality Labs for providingthe head mounted display with which we tested our program.
8 REFERENCESOleg S. Pianykh. 2010. Digital Imaging and Communications
in Medicine (DICOM): A Practical Introduction and SurvivalGuide (1st. ed.). Springer Publishing Company, Incorporated.

6 • Nguyen Duc Duong, Xiao Liang, and Jeffery Tian
Mattatz. 2018. mattatz/unity-volume-rendering. (November 2018).Retrieved February 25, 2020 fromhttps://github.com/mattatz/unity-volume-rendering
John Pawasauskas. Volume Visualization With Ray Casting. Re
trievedMarch 3, 2020 fromhttps://web.cs.wpi.edu/matt/courses/cs563/talks/powwie/p1/ray-cast.htm
Parent, R., 2011. Volume Rendering.