VPN RSA Cisco3000 - Manual and Brochures - www ...€¦ · The Cisco VPN 3000 Concentrator can be...
45
______________________________________________________________________________ www.support.avaya.com , Page: 1 11/4/2009 Avaya Inc. – Proprietary. Use pursuant to Company Instructions. ______________________________________________________________________________ Avaya CAD-SV Configuring Cisco VPN Concentrator to Support Avaya 96xx Phones – Issue 1.0 Issue 1.0 30th October 2009 ABSTRACT These Application Notes describe the steps to configure the Cisco VPN 3000 Concentrator to support IPSec tunnel termination and XAUTH authentication of the Avaya 96xx Phone using RSA SecureID.
Transcript of VPN RSA Cisco3000 - Manual and Brochures - www ...€¦ · The Cisco VPN 3000 Concentrator can be...

______________________________________________________________________________ www.support.avaya.com, Page: 1 11/4/2009 Avaya Inc. – Proprietary. Use pursuant to Company Instructions. ______________________________________________________________________________
Avaya CAD-SV Configuring Cisco VPN Concentrator to Support Avaya 96xx Phones – Issue 1.0
Issue 1.0 30th October 2009
ABSTRACT These Application Notes describe the steps to configure the Cisco VPN 3000 Concentrator to support IPSec tunnel termination and XAUTH authentication of the Avaya 96xx Phone using RSA SecureID.

______________________________________________________________________________ www.support.avaya.com, Page: 2 11/4/2009 Avaya Inc. – Proprietary. Use pursuant to Company Instructions. ______________________________________________________________________________
________________________________________________________________________
TABLE OF CONTENTS ________________________________________________________________________ 1. Introduction. ........................................................................................................... 3
1.1 Avaya 96xx Phone Startup Events....................................................................... 3
2. Network Topology. ................................................................................................ 4 2.1 Network Topology. .................................................................................................. 4
3. Equipment and Software Validated.................................................................... 6 4. Cisco VPN 3000 Concentrator Configuration Access. .................................... 7
4.1 Save Configuration ................................................................................................. 9
5. Ethernet Interfaces.............................................................................................. 10 6. Default Gateway. ................................................................................................. 14 7. Authentication Server. ........................................................................................ 18 8. Native RSA SecureID Configuration. ............................................................... 19 9. Radius Server Configuration. ............................................................................ 22 10. Group Configuration. .......................................................................................... 23 11. Security Associations. ........................................................................................ 26 12. IP Pools................................................................................................................. 34 13. Network Lists. ...................................................................................................... 40 14. Avaya 96xx IP phone Configuration................................................................. 43
15.1 96xx Phone Firmware .......................................................................................... 43
15.2 Configuring Avaya 96xx Phone .......................................................................... 43
15.3 Avaya 96xx Phone Configuration ....................................................................... 43
15.4 Manual phone configuration ................................................................................ 43
15.5 During Telephone Operation:.............................................................................. 44
15. Additional References. ....................................................................................... 45

______________________________________________________________________________ www.support.avaya.com, Page: 3 11/4/2009 Avaya Inc. – Proprietary. Use pursuant to Company Instructions. ______________________________________________________________________________
______________________________________________________________________________
1. Introduction. ______________________________________________________________________________ These Application Notes describe the steps to configure the Cisco VPN 3000 Concentrator to support IPSec tunnel termination and XAUTH authentication of the Avaya 96xx Phone. The Avaya 96xx Phone is software based IPSec Virtual Private Network (VPN) client integrated into the firmware of an Avaya IP 9600 Series Telephone. This capability allows the Avaya IP Telephone to be plugged in and used over a secure IPSec VPN from any broadband Internet connection. End users experience the same IP telephone features as if they were using the telephone in the office. Avaya IP Telephone models supporting the Avaya 96xx Phone firmware include the 9620, 9630, 9640, 9650 and 9670. Please note that the above models are H.323 based models and VPN is not supported on SIP based 96xx Models. Release 3.1 of the Avaya 96xx Phone firmware, used in these Application Notes, extends the support of head-end VPN gateways to include Cisco security platforms. The configuration steps described in these Application Notes utilize a Cisco VPN 3000 Concentrator. Avaya 96xx 3.1 IP phones are supported by Avaya Communication Manager version 3.1, Build 4.0 and above. The Avaya 96xx Phone utilizes the Internet Key Exchange (IKE) protocol, Extended Authentication (XAUTH) and pre-shared key for IPSec tunnel establishment and authentication with the Cisco VPN Concentrator. XAUTH allows security gateways to perform user authentication in a separate phase after the IKE authentication phase 1 exchange is complete. The 96xx Phone uses the RSA SecureID key to authenticate with the Cisco VPN Concentrator and create a temporary secure path to allow the 96xx Phone end user to present credentials to the Cisco VPN Concentrator. After user authentication is successful, the VPN Concentrator sends an IP address from a pre-configured IP Address Pool, the IP address of the DNS server and the Welcome Banner.
1.1 Avaya 96xx Phone Startup Events The steps shown in Figure 1 below describe the high level events that take place during the startup of a 96xx phone. The focus of these Application Notes is on the configuration of the Avaya 96xx Phone and the Cisco VPN 3000 Concentrator functioning as the IPSec VPN head-end.
1. The 96xx Phone establishes an IPSec VPN tunnel upon boot up with the designated IPSec VPN head-end.
2. The 96xx Phone initiates a HTTP session with the phone configuration file server for configuration file download. (96xx upgrade.txt, 46xxsettings.txt).

______________________________________________________________________________ www.support.avaya.com, Page: 4 11/4/2009 Avaya Inc. – Proprietary. Use pursuant to Company Instructions. ______________________________________________________________________________
3. The 96xx Phone registers with Avaya Communication Manager and is ready for service.
CHAPTER 1.
______________________________________________________________________________
2. Network Topology. ______________________________________________________________________________
2.1 Network Topology. The sample network implemented for these Application Notes is shown in Figure 2. The Main Campus location contains the Cisco VPN Concentrator functioning as perimeter security device and VPN head-end. The Avaya S8710 Media Server, Avaya G650 Media Gateway and RSA Authentication Server are also located at the Main Campus. The Main Campus is mapped to IP Network Region 1 in Avaya Communication Manager. The Avaya 96xx Phones are located in the public network and configured to establish an IPSec tunnel to the Public IP address of the Cisco VPN Concentrator. The Cisco VPN Concentrator will assign IP addresses to the 96xx Phones upon successful authentication procedure. The assigned IP addresses, also known as the inner addresses, will be used by the 96xx Phones when communicating inside the IPSec tunnel and in the private corporate network to Avaya Communication Manager. Avaya Communication Manager maps the 96xx Phones to the appropriate IP Network Region using this inner IP address and applies the IP Network Region specific parameters to the 96xx Phone. In these Application Notes, the G.729 codec with three 10ms voice samples per packet is assigned to the 96xx Phones.

______________________________________________________________________________ www.support.avaya.com, Page: 5 11/4/2009 Avaya Inc. – Proprietary. Use pursuant to Company Instructions. ______________________________________________________________________________

______________________________________________________________________________ www.support.avaya.com, Page: 6 11/4/2009 Avaya Inc. – Proprietary. Use pursuant to Company Instructions. ______________________________________________________________________________
CHAPTER 2. ______________________________________________________________________________
3. Equipment and Software Validated. ______________________________________________________________________________ Table 1 lists the equipment and software/firmware versions used in the sample configuration provided.
Equipment Software Version Avaya S8710 Media Server Avaya (R013x.01.2.632.1) Communication
Manager 3.1, Build 4.0 +. Avaya G650 Media Gateway C-LAN (TN799DP) MedPro (TN2302AP)
FW 016 (HW1) FW 108 (HW12)
Avaya 9620(IP Telephones) R3.1 – Release 1 RSA Authentication Manager 7.1

______________________________________________________________________________ www.support.avaya.com, Page: 7 11/4/2009 Avaya Inc. – Proprietary. Use pursuant to Company Instructions. ______________________________________________________________________________
CHAPTER 3. ______________________________________________________________________________
4. Cisco VPN 3000 Concentrator Configuration Access. ______________________________________________________________________________ These Application Notes assume the Cisco VPN 3000 Concentrator “Quick Configuration” steps have been performed to configure the Ethernet 1 (Private) network interface, as outlined in [7].
1. From a web browser, enter the URL of the Cisco VPN 3000 Concentrator Ethernet 1 (Private) interface, http://<IP address of the 3000 Concentrator>/admin, and the following Cisco VPN Concentrator Manager login screen appears. Log in using a user name with administrative privileges.

______________________________________________________________________________ www.support.avaya.com, Page: 8 11/4/2009 Avaya Inc. – Proprietary. Use pursuant to Company Instructions. ______________________________________________________________________________
2. The Cisco VPN Concentrator Manager main page appears upon successful login.
From the left navigation menu, select Monitoring System Status. Note the Cisco VPN Concentrator software version and compare to the version listed in Table 1.

______________________________________________________________________________ www.support.avaya.com, Page: 9 11/4/2009 Avaya Inc. – Proprietary. Use pursuant to Company Instructions. ______________________________________________________________________________
4.1 Save Configuration The Cisco VPN Concentrator Manager immediately applies any changes made to the running configuration of Cisco VPN Concentrator. However, these changes are NOT saved to the boot image and will NOT sustain a power cycle of the Cisco VPN Concentrator. The active running configuration must be saved to the boot configuration by executing the steps below. Note: When the icon is displayed in the upper right corner of the Cisco VPN Concentrator Manager, these steps should be executed. 1. Select the Save Needed icon in the upper right corner of the Manager window.
2. Select the OK button from the confirmation pop-up window.

______________________________________________________________________________ www.support.avaya.com, Page: 10 11/4/2009 Avaya Inc. – Proprietary. Use pursuant to Company Instructions. ______________________________________________________________________________
CHAPTER 4. ______________________________________________________________________________
5. Ethernet Interfaces. ______________________________________________________________________________ The Cisco VPN 3000 Concentrator has three built-in Ethernet interfaces. These interfaces are designated as Ethernet 1 (Private), Ethernet 2 (Public) and Ethernet 3 (External). The steps below configure the Ethernet 2 (Public) interface with a public IP address facing the public Internet. Ethernet 3 (External) is not used in the sample configuration. The Avaya 96xx Phone will interact with the Ethernet 2 (Public) interface when establishing an IPSec tunnel. As mentioned in Section 4.1, these Application Notes assume the Ethernet 1 (Private) network interface has been configured using the Cisco VPN Concentrator “Quick Configuration” steps. 1. From the left navigation menu, select Configuration Interfaces. The network interfaces
list page appears similar to the screen below. The Ethernet 1 (Private) interface shows a status of UP. Select Ethernet 2 (Public) to configure the Internet facing interface.

______________________________________________________________________________ www.support.avaya.com, Page: 11 11/4/2009 Avaya Inc. – Proprietary. Use pursuant to Company Instructions. ______________________________________________________________________________

______________________________________________________________________________ www.support.avaya.com, Page: 12 11/4/2009 Avaya Inc. – Proprietary. Use pursuant to Company Instructions. ______________________________________________________________________________
2. Configure the highlighted fields shown below. All remaining fields can be left at the default values. Select Apply to save.

______________________________________________________________________________ www.support.avaya.com, Page: 13 11/4/2009 Avaya Inc. – Proprietary. Use pursuant to Company Instructions. ______________________________________________________________________________
3. The network interface configuration page, shown below, now shows the status of both the Ethernet 1 (Private) interfaces and the Ethernet 2 (Public) interface as UP.

______________________________________________________________________________ www.support.avaya.com, Page: 14 11/4/2009 Avaya Inc. – Proprietary. Use pursuant to Company Instructions. ______________________________________________________________________________
CHAPTER 5. ______________________________________________________________________________
6. Default Gateway. ______________________________________________________________________________ This section configures the default gateway for IP routing. The default gateway is applied to the public interface. 1. From the left navigation menu, select Configuration System IP Routing Default
Gateways. The default gateway configuration page appears similar to the screen below. Configure the highlighted fields shown below. All remaining fields can be left at the default values. Select Apply to save.

______________________________________________________________________________ www.support.avaya.com, Page: 15 11/4/2009 Avaya Inc. – Proprietary. Use pursuant to Company Instructions. ______________________________________________________________________________

______________________________________________________________________________ www.support.avaya.com, Page: 16 11/4/2009 Avaya Inc. – Proprietary. Use pursuant to Company Instructions. ______________________________________________________________________________
2. Once configured, the default gateway IP address appears in the Static Routes list as shown below. To display the Static Routes list, select Configuration System IP Routing Static Routes from the left navigation menu.

______________________________________________________________________________ www.support.avaya.com, Page: 17 11/4/2009 Avaya Inc. – Proprietary. Use pursuant to Company Instructions. ______________________________________________________________________________
3. The default gateway IP address also appears in the Interfaces list as shown below. To display the Interfaces list, select Configuration Interfaces from the left navigation menu.

______________________________________________________________________________ www.support.avaya.com, Page: 18 11/4/2009 Avaya Inc. – Proprietary. Use pursuant to Company Instructions. ______________________________________________________________________________
CHAPTER 6. ______________________________________________________________________________
7. Authentication Server. ______________________________________________________________________________ The Cisco VPN 3000 Concentrator can be configured to authenticate 96xx Phones using the RSA SecureID. To facilitate communication between the Cisco VPN 3000 Series Concentrator and the RSA Authentication Manager / RSA SecurID Appliance, an Agent Host record must be added to the RSA Authentication Manager Database and RADIUS Server database if using RADIUS. The Agent Host record identifies the Cisco VPN 3000 Series Concentrator within its database and contains information about communication and encryption. To create the Agent Host record, you will need the following information.
• Hostname • IP Addresses for all network interfaces • RADIUS Secret (When using RADIUS Authentication Protocol)
When adding the Agent Host Record, you should configure the Cisco VPN 3000 Series Concentrator as Communication Server. This setting is used by the RSA Authentication Manager to determine how communication with the Cisco VPN 3000 Series Concentrator will occur.

______________________________________________________________________________ www.support.avaya.com, Page: 19 11/4/2009 Avaya Inc. – Proprietary. Use pursuant to Company Instructions. ______________________________________________________________________________
CHAPTER 7. ______________________________________________________________________________
8. Native RSA SecureID Configuration. ______________________________________________________________________________ The Cisco VPN 3000 has native support for RSA SecurID authentication and does not require a RADIUS proxy/server to authenticate. In the Configuration System Servers Authentication Add the following: Server Type SDI (SDI is an older way to refer to RSA
SecurID authentication) Authentication Server hostname or IP address of RSA
Authentication Manager SDI Server Version 5.0 or Pre-5.0 Server Port 5500

______________________________________________________________________________ www.support.avaya.com, Page: 20 11/4/2009 Avaya Inc. – Proprietary. Use pursuant to Company Instructions. ______________________________________________________________________________

______________________________________________________________________________ www.support.avaya.com, Page: 21 11/4/2009 Avaya Inc. – Proprietary. Use pursuant to Company Instructions. ______________________________________________________________________________
SDI Version pre-5.0: SDI versions prior to 5.0 use the concept of a master and a slave server, which share a single node secret file (SECURID). On the VPN Concentrator you can configure one pre-5.0 SDI master server and one SDI slave server globally, and one SDI master and one SDI slave server per each group. SDI Version 5.0: SDI version 5.0 uses the concepts of a primary and replica servers. A version 5.0 SDI server that you configure on the VPN Concentrator can be either the primary or any one of the replicas. You can have one primary server, and up to 10 replicas, use the SDI documentation for configuration instructions. The primary and all the replicas can authenticate users. Each primary and its replicas share a single node secret file. The node secret file has its name based on the hexadecimal value of the RSA Authentication Manager IP address with .SDI appended. The VPN Concentrator obtains the server list when the first user authenticates to the configured server, which can be either a primary or a replica. The VPN Concentrator then assigns priorities to each of the servers on the list, and subsequent server selection derives at random from those assigned priorities. The highest priority servers have a higher likelihood of being selected.
• To configure a Slave server for use with versions of RSA Authentication Manager prior to 5.0, simply add an additional SDI Authentication Server.

______________________________________________________________________________ www.support.avaya.com, Page: 22 11/4/2009 Avaya Inc. – Proprietary. Use pursuant to Company Instructions. ______________________________________________________________________________
CHAPTER 8. ______________________________________________________________________________
9. Radius Server Configuration. ______________________________________________________________________________ The Cisco VPN 3000 can also support RADIUS authentication to authenticate. In the Configuration System Servers Authentication Click add tab and enter: Server Type RADIUS Authentication Server Hostname or IP address of RADIUS Server Server Port Usually 1645 or 1812 by default Server Secret Server secret set in the RADIUS server

______________________________________________________________________________ www.support.avaya.com, Page: 23 11/4/2009 Avaya Inc. – Proprietary. Use pursuant to Company Instructions. ______________________________________________________________________________
CHAPTER 9. ______________________________________________________________________________
10. Group Configuration. ______________________________________________________________________________ Create a group and set its Authentication Type to SDI for RSA SecurID authentication or RADIUS for RADIUS. This is done under Configuration User Management Groups. Click add tab to add a new group to be RSA SecurID challenged.

______________________________________________________________________________ www.support.avaya.com, Page: 24 11/4/2009 Avaya Inc. – Proprietary. Use pursuant to Company Instructions. ______________________________________________________________________________
Give the group a name and a password.

______________________________________________________________________________ www.support.avaya.com, Page: 25 11/4/2009 Avaya Inc. – Proprietary. Use pursuant to Company Instructions. ______________________________________________________________________________
Then click the IPSec tab. Set the Tunnel Type to Remote Access and the Authentication Type to SDI for RSA SecurID authentication or RADIUS for RADIUS. RSA SecurID authentication is shown in this example.

______________________________________________________________________________ www.support.avaya.com, Page: 26 11/4/2009 Avaya Inc. – Proprietary. Use pursuant to Company Instructions. ______________________________________________________________________________
CHAPTER 10. ______________________________________________________________________________
11. Security Associations. ______________________________________________________________________________ Security Associations are used by IPSec tunnels during tunnel establishment. The Security Associations are negotiated by the two tunnel endpoints, the Cisco VPN Concentrator and the Avaya 96xx Phone in this case. IPSec tunnels consist of two Security Association phases.
• Phase 1 determines how the Avaya 96xx Phone and the Cisco VPN Concentrator will securely negotiate and handle the building of the IPSec tunnel.
• Phase 2 determines how the data passing through the tunnel will be encrypted at one end and decrypted at the other. This process is carried out on both sides of the tunnel.
The steps below describe the creation of a Security Association on the Cisco VPN Concentrator to be used when creating IPSec tunnels with the Avaya 96xx Phone. Table 2 below provides the Security Association proposals used between the Avaya 96xx Phone and the Cisco VPN Concentrator in these Application Notes.
Phase Encryption/
Authentication Method
Diffie- HellmanGroup
EncryptionAlgorithm
Hash Algorithm
Life Time (sec)
VPN Concentrator
Proposal Name
P1 - IKE Pre-Shared Key 2 AES-128 SHA-1 86400 IKE-AES128- SHA
P2 - IPSec ESP 2 AES-128 SHA-1 86400
Table 2 –P1 /P2 Proposals
1. Verify the IKE proposal:

______________________________________________________________________________ www.support.avaya.com, Page: 27 11/4/2009 Avaya Inc. – Proprietary. Use pursuant to Company Instructions. ______________________________________________________________________________
From the left navigation menu, select Configuration Tunneling and Security IPSec IKE Proposals. Verify the IKE proposal to be used for 96xx Phones is in the Active list. IKE-AES128-SHA was used for these Applications Notes. Select IKE-AES128-SHA and then the Modify button to view.

______________________________________________________________________________ www.support.avaya.com, Page: 28 11/4/2009 Avaya Inc. – Proprietary. Use pursuant to Company Instructions. ______________________________________________________________________________
2. The screen below shows the default settings of the IKE-AES128-SHA proposal used for these Applications Notes.

______________________________________________________________________________ www.support.avaya.com, Page: 29 11/4/2009 Avaya Inc. – Proprietary. Use pursuant to Company Instructions. ______________________________________________________________________________
3. From the left navigation menu, select Configuration Policy Management Traffic Management SAs. The Security Associations list page similar to the screen below is displayed. Select Add to create a new Security Association for 96xx Phones.

______________________________________________________________________________ www.support.avaya.com, Page: 30 11/4/2009 Avaya Inc. – Proprietary. Use pursuant to Company Instructions. ______________________________________________________________________________
4. The Security Associations configuration page similar to the screen below is displayed. The configuration options of this page related to the 96xx Phone are highlighted below. All remaining fields can be left at default values. Select Apply when complete. The 96xx Phone offers an IKE Rekey time interval of 3600 seconds to the VPN head-end by default. This value is configurable as of the firmware release used in these Application Notes. The Cisco VPN Concentrator can override this value to a lower value with the Time Lifetime parameter. Any Time Lifetime value greater than 86400 will be ignored by the 96xx Phone and the default 86400 offered by the 96xx Phone will be used.
1. The group Identity Parameters configuration page is displayed similar to the screen shown
below. The configuration options of this page needed for the 96xx phone are described and highlighted below.
Group Name: Set Group name as SecureID on phone. This group name is used for these Application Notes. Password: Enter a group password to be used by all 96xx Phones associated with this user group.

______________________________________________________________________________ www.support.avaya.com, Page: 31 11/4/2009 Avaya Inc. – Proprietary. Use pursuant to Company Instructions. ______________________________________________________________________________
Type: Select the RADIUS group type if authentication is to be done with an external RADIUS server or Internal if authentication is to be done locally within the Concentrator. Note: The Password entered above must match the Group PSK set on the 96xx Phones. See Section 5.2 for additional information on 96xx Phone parameters.

______________________________________________________________________________ www.support.avaya.com, Page: 32 11/4/2009 Avaya Inc. – Proprietary. Use pursuant to Company Instructions. ______________________________________________________________________________
2. Select the General tab. The group General Parameters page is displayed similar to the screen shown below. The configuration options of this page needed for the 96xx phone are described and highlighted below. All remaining fields can be left at the default values.
Simultaneous Logins: The number entered here must be equal to or greater than the number of 96xx Phones that could be simultaneously connected to the Cisco VPN Concentrator. Tunneling Protocols: Tunneling protocols enabled for this group. The 96xx Phone supports the IPSec Tunneling protocol. Scroll to the bottom of the Group General Parameters page to display additional configuration options as shown below.

______________________________________________________________________________ www.support.avaya.com, Page: 33 11/4/2009 Avaya Inc. – Proprietary. Use pursuant to Company Instructions. ______________________________________________________________________________
3. Select the IPSec tab. The group IPSec Parameters page is displayed similar to the screen shown below. The configuration options of this page needed for the 96xx phone are described and highlighted below. All remaining fields can be left at the default values. Select Apply to save.
IPSec SA: Choose the IPSec security association created in Section 4.6 to be used by 96xx Phones when accessing the Cisco VPN Concentrator. IKE Keepalives: If a 96xx Phone is abruptly disconnected from the network (e.g. 96xx Phone loses power) the Cisco VPN Concentrator is not notified and maintains the security associations for the disconnected 96xx Phone. Enabling this option allows the Cisco VPN Concentrator to determine if an IPSec tunnel to a 96xx Phone is active and remove security associations when no response to received to the keepalive. Confidence Interval: Determines how often, in seconds, the Cisco VPN Concentrator sends an IKE Keepalive to the 96xx Phone. The default is 300 seconds. Scroll to the bottom of the IPSec Parameters page to display additional configuration options as shown above. The new SecureID group is now displayed in the Groups list page.
______________________________________________________________________________ www.support.avaya.com, Page: 34 11/4/2009 Avaya Inc. – Proprietary. Use pursuant to Company Instructions. ______________________________________________________________________________
CHAPTER 11. ______________________________________________________________________________
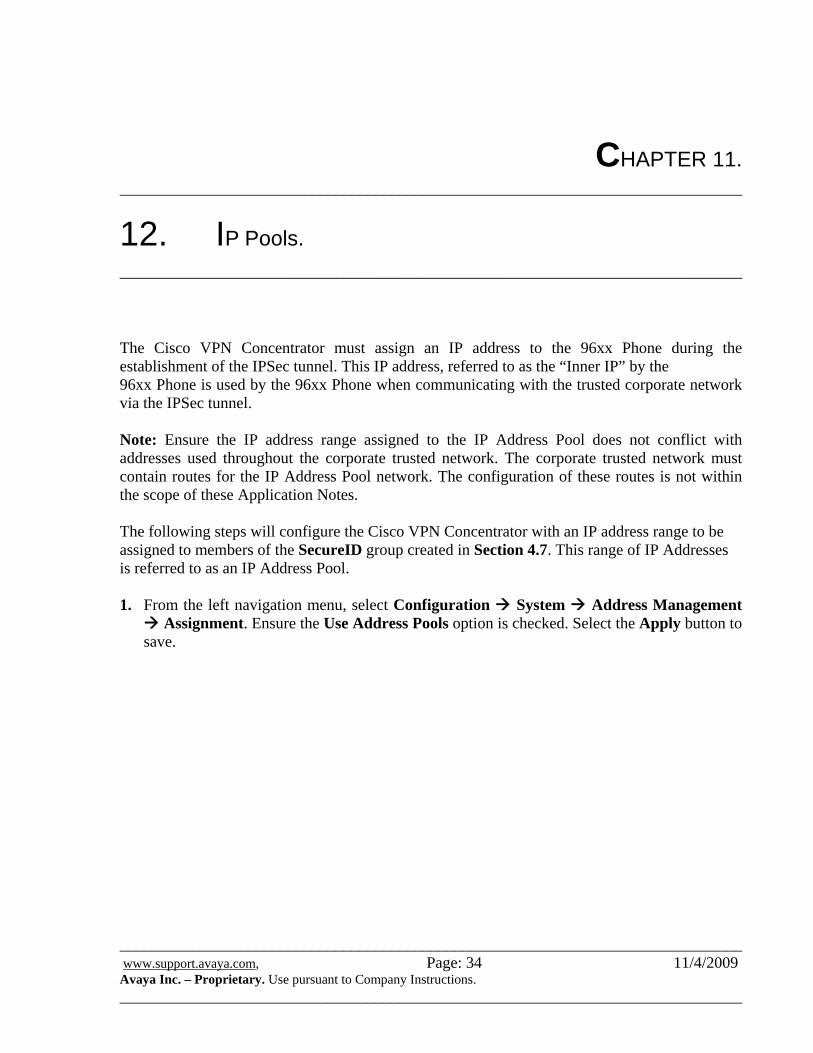
12. IP Pools. ______________________________________________________________________________ The Cisco VPN Concentrator must assign an IP address to the 96xx Phone during the establishment of the IPSec tunnel. This IP address, referred to as the “Inner IP” by the 96xx Phone is used by the 96xx Phone when communicating with the trusted corporate network via the IPSec tunnel. Note: Ensure the IP address range assigned to the IP Address Pool does not conflict with addresses used throughout the corporate trusted network. The corporate trusted network must contain routes for the IP Address Pool network. The configuration of these routes is not within the scope of these Application Notes. The following steps will configure the Cisco VPN Concentrator with an IP address range to be assigned to members of the SecureID group created in Section 4.7. This range of IP Addresses is referred to as an IP Address Pool. 1. From the left navigation menu, select Configuration System Address Management
Assignment. Ensure the Use Address Pools option is checked. Select the Apply button to save.

______________________________________________________________________________ www.support.avaya.com, Page: 35 11/4/2009 Avaya Inc. – Proprietary. Use pursuant to Company Instructions. ______________________________________________________________________________
2. From the left navigation menu, select Configuration User Management Groups. The
group configuration page similar to the screen below is displayed. Select the SecureID group and then the Address Pools button.
Note: IP Address Pools can also be created from the Configuration System Address Management Pools menu option. IP Address Pools created using this method are available to any VPN user of any group. The method described in these configuration steps creates an IP Address Pool to be used only by the group SecureID which only 96xx Phones can authenticate against.

______________________________________________________________________________ www.support.avaya.com, Page: 36 11/4/2009 Avaya Inc. – Proprietary. Use pursuant to Company Instructions. ______________________________________________________________________________

______________________________________________________________________________ www.support.avaya.com, Page: 37 11/4/2009 Avaya Inc. – Proprietary. Use pursuant to Company Instructions. ______________________________________________________________________________
3. The IP Address Pool configuration page similar to the screen below is displayed. Select the Add button to create an IP Address Pool.

______________________________________________________________________________ www.support.avaya.com, Page: 38 11/4/2009 Avaya Inc. – Proprietary. Use pursuant to Company Instructions. ______________________________________________________________________________
4. The IP Address Pool Add page similar to the screen below is displayed. Enter the start and end IP address range to be used for 96xx Phones. Select Add to save.
Note: It is recommended to create an IP Network Region within Avaya Communication Manager for 96xx Phones. This allows Avaya Communication Manager to have the flexibility to assign the 96xx Phones with parameters (i.e. G.729 codec with 30ms frame size) to accommodate the network environments 96xx Phones are likely to be installed in. See Section 6 for additional information.

______________________________________________________________________________ www.support.avaya.com, Page: 39 11/4/2009 Avaya Inc. – Proprietary. Use pursuant to Company Instructions. ______________________________________________________________________________
5. The new IP Address Pool for the SecureID group is now displayed in the Address
Group: Select the user group created in Section 4.7. The 96xx Phone default group name of SecureID is used in these Application Notes.

______________________________________________________________________________ www.support.avaya.com, Page: 40 11/4/2009 Avaya Inc. – Proprietary. Use pursuant to Company Instructions. ______________________________________________________________________________
CHAPTER 12. ______________________________________________________________________________
13. Network Lists. ______________________________________________________________________________ The Cisco VPN Concentrator Network Lists page consists of a list of the private networks on the Ethernet 1 (Private) side of the Cisco VPN Concentrator which VPN remote clients can access once a tunnel is established. The default network list VPN Client Local LAN (Default) was used for these Application Notes with a network and mask of 0.0.0.0/0.0.0.0 which gives the 96xx Phones access to all private networks. 1. From the left navigation menu, select Configuration Policy Management Traffic
Management Network Lists. The Network List configuration page similar to the screen below is displayed. Select VPN Client Local LAN (Default) followed by the Modify button.

______________________________________________________________________________ www.support.avaya.com, Page: 41 11/4/2009 Avaya Inc. – Proprietary. Use pursuant to Company Instructions. ______________________________________________________________________________
2. Enter the network and wildcard mask of networks the 96xx Phone need access in the
Network List field. Select the Apply button when done. Note: Optionally the Generate Local List button can be selected to automatically generate a list of private networks from the routing table if the RIP or OSPF routing protocols are being used

______________________________________________________________________________ www.support.avaya.com, Page: 42 11/4/2009 Avaya Inc. – Proprietary. Use pursuant to Company Instructions. ______________________________________________________________________________

______________________________________________________________________________ www.support.avaya.com, Page: 43 11/4/2009 Avaya Inc. – Proprietary. Use pursuant to Company Instructions. ______________________________________________________________________________
CHAPTER 13. ______________________________________________________________________________
14. Avaya 96xx IP phone Configuration. ______________________________________________________________________________
15.1 96xx Phone Firmware The Avaya 96xx Phone firmware must be installed on the phone prior to the phone being deployed in the remote location. The firmware version of Avaya IP telephones can be identified when phone is operational by selecting the A-Menu About Avaya one-X.
15.2 Configuring Avaya 96xx Phone The Avaya 96xx Phone configuration can be administered centrally from an HTTP server or locally on the phone. These Application Notes utilize the local phone configuration method. Note: The script should have following command: SET VPNPROC 2 to enable editing of VPN parameters. There are two methods available to access the VPN Configuration Options menu from the 96xx Phone.
15.3 Avaya 96xx Phone Configuration The Avaya 96xx Phone ion describes configuration of the phone manually or through settings file. The variables of the 46xxsetting.txt configuration file are specific to digital certificates. This section assumes the Avaya 96xx vpn enabled Phone firmware has already been loaded on the phone. See Section 8 for addition documentation on installed the Avaya 96xx Phone firmware.
15.4 Manual phone configuration Avaya phone must be configured either manually or through the settings file. To configure the phone manually, reboot the phone, press ‘*’ followed by vpncode (i.e. default 876). User Right Navigation key to go to the next screen options. (Note that the values will not be saved until Right-Navigation key is pressed). The External addresses will be reflected only after rebooting the phone.

______________________________________________________________________________ www.support.avaya.com, Page: 44 11/4/2009 Avaya Inc. – Proprietary. Use pursuant to Company Instructions. ______________________________________________________________________________
15.5 During Telephone Operation: While the 96xx Phone is in an operational state, e.g. registered with Avaya Communication Manager, press the following key sequence on the telephone to enter VPN configuration mode: Mute-VPNCODE (default 876) - # (Mute-8-7-6-#). The VPN configuration options menu is displayed. For detailed description of each VPN configuration option, refer to [1] and [2]. The configuration values of one of the 96xx Phones used in the sample configuration are shown below. No. Option Value 1 VPN : Enabled 2 VPN Vendor: Cisco
3 Gateway Address: 195.10.26.56 (External interface IP address of VPN gateway)
4 External Router: 192.168.1.1 (Or provided by DHCP from home Network).
5 External Phone IP Address: 192.168.1.2 (Or Same as above).
6 External Subnet Mask: 255.255.255.0 (Or Same as above).
7 External DNS Server: (Provided by Service provider)
8 Encapsulation : 4500-4500 9 Copy TOS: No 10 Auth. Type: PSK With XAUTH 11 VPN User Type: Any 12 VPN User: (VPN username) 13 Password Type: Numeric OTP
14 IKE ID (Group Name): (Group name i.e. SecureID as per our notes).
15 Pre-Shared Key (PSK) Group Password 16 IKE ID Type: Key-ID 17 IKE Xchg Mode: ID-Protect 18 IKE DH Group: 2 19 IKE Encryption Alg: Any 20 IKE Auth. Alg. : Any 21 IKE Config. Mode: Enabled 22 IPsec PFS DH Group: 2 23 IPsec Encryption Alg: Any 24 IPsec Auth. Alg.: Any 25 Protected Network: 0.0.0.0/0 26 IKE Over TCP: Never

______________________________________________________________________________ www.support.avaya.com, Page: 45 11/4/2009 Avaya Inc. – Proprietary. Use pursuant to Company Instructions. ______________________________________________________________________________
______________________________________________________________________________
15. Additional References. ______________________________________________________________________________ [1] Avaya 96xx for the 4600 Series IP Telephones Release 2.0 Administrator Guide. [2] 96xx for 46xx Series IP Telephone Installation and Deployment Guide. [3] Administrators Guide for Avaya Communication Manager. [4] RSA SecureID Ready Implementation Guide. [5] Cisco VPN 3000 Series Concentrator Getting Started, Release 4.7. ===================================================================== ©2007 Avaya Inc. All Rights Reserved. Avaya and the Avaya Logo are trademarks of Avaya Inc. All trademarks identified by ® and ™ are registered trademarks or trademarks, respectively, of Avaya Inc. All other trademarks are the property of their respective owners. The information provided in these Application Notes is subject to change without notice. The configurations, technical data, and recommendations provided in these Application Notes are believed to be accurate and dependable, but are presented without express or implied warranty. Users are responsible for their application of any products specified in these Application Notes.
=====================================================================