Volvo 850 a/c: Under the Hood Refurb 07.2017 By JimBee
16
Volvo 850 a/c: Under the Hood Refurb 07.2017 By JimBee The first time I tried to change the dryer on my base 96 850 I gave up and took it to the local general repair shop. They got it done, but the system leaked down by the following spring. They also vacuumed and charged my other 96 a/c system, but that one leaked flat after a couple of months. Trying to recharge one of them, not sure what I did but the compressor seized. Not enough oil? I don't know, but in any case it had to be replaced. Now into June, I had no working a/c on either car. I could see some green dye around a couple of pipe joints and on the back end of one of the compressors. An a/c shop estimated several hundred dollars to clean things up, change the dryer, fix leaks and recharge a system. That was for one system and I had two needing service—the second one needing its compressor replaced. I had a used one in inventory. After some discussion with an MVS mod I decided to tackle it all myself. The first one would be the learning curve, the second should go quicker. It did actually work out that way. First I removed everything that was in the way. Cooling fan/shroud, ECU box and elements (secured a cover over the open sockets), top radiator hose, alternator. The systems had completely leaked flat, so no need to have them evacuated. Shown and explained later, I also removed the a/c compressor and compressor / alternator mount bracket. BEFORE DISCONNECTING ANYTHING YOU NEED TO BE SURE THERE IS NO PRESSURE IN YOUR SYSTEM. IF THERE IS IT MUST BE PROFESSIONALLY VACUUMED. The bolts that secure the pipe unions with o-rings are 6 mm hex (not Torx). Youʼll need a good quality brand bit. Itʼs going to be used a lot. There are two lengths of this bolt. The pipe flanges-to-compressor use the shorter one. If you use the longer one it will bottom out before the flange is tight on the compressor. I used corks (3/8" x 1/2") to plug open pipes, and ports on the condenser, available at big box hardware stores. It's helpful to have half a dozen on hand. Pipes from front of engine bay, and compressor, removed.
Transcript of Volvo 850 a/c: Under the Hood Refurb 07.2017 By JimBee
Volvo 850 a/c: Under the Hood Refurb 07.2017By JimBee
The first time I tried to change the dryer on my base 96 850 I gave up and took it to the local general repair shop. They got it done, but the system leaked down by the following spring. They also vacuumed and charged my other 96 a/c system, but that one leaked flat after a couple of months. Trying to recharge one of them, not sure what I did but the compressor seized. Not enough oil? I don't know, but in any case it had to be replaced.
Now into June, I had no working a/c on either car. I could see some green dye around a couple of pipe joints and on the back end of one of the compressors. An a/c shop estimated several hundred dollars to clean things up, change the dryer, fix leaks and recharge a system. That was for one system and I had two needing service—the second one needing its compressor replaced. I had a used one in inventory.
After some discussion with an MVS mod I decided to tackle it all myself. The first one would be the learning curve, the second should go quicker. It did actually work out that way.
First I removed everything that was in the way. Cooling fan/shroud, ECU box and elements (secured a cover over the open sockets), top radiator hose, alternator. The systems had completely leaked flat, so no need to have them evacuated. Shown and explained later, I also removed the a/c compressor and compressor / alternator mount bracket.
BEFORE DISCONNECTING ANYTHING YOU NEED TO BE SURE THERE IS NO PRESSURE IN YOUR SYSTEM. IF THERE IS IT MUST BE PROFESSIONALLY VACUUMED.
The bolts that secure the pipe unions with o-rings are 6 mm hex (not Torx). Youʼll need a good quality brand bit. Itʼs going to be used a lot. There are two lengths of this bolt. The pipe flanges-to-compressor use the shorter one. If you use the longer one it will bottom out before the flange is tight on the compressor. I used corks (3/8" x 1/2") to plug open pipes, and ports on the condenser, available at big box hardware stores. It's helpful to have half a dozen on hand.
Pipes from front of engine bay, and compressor, removed.
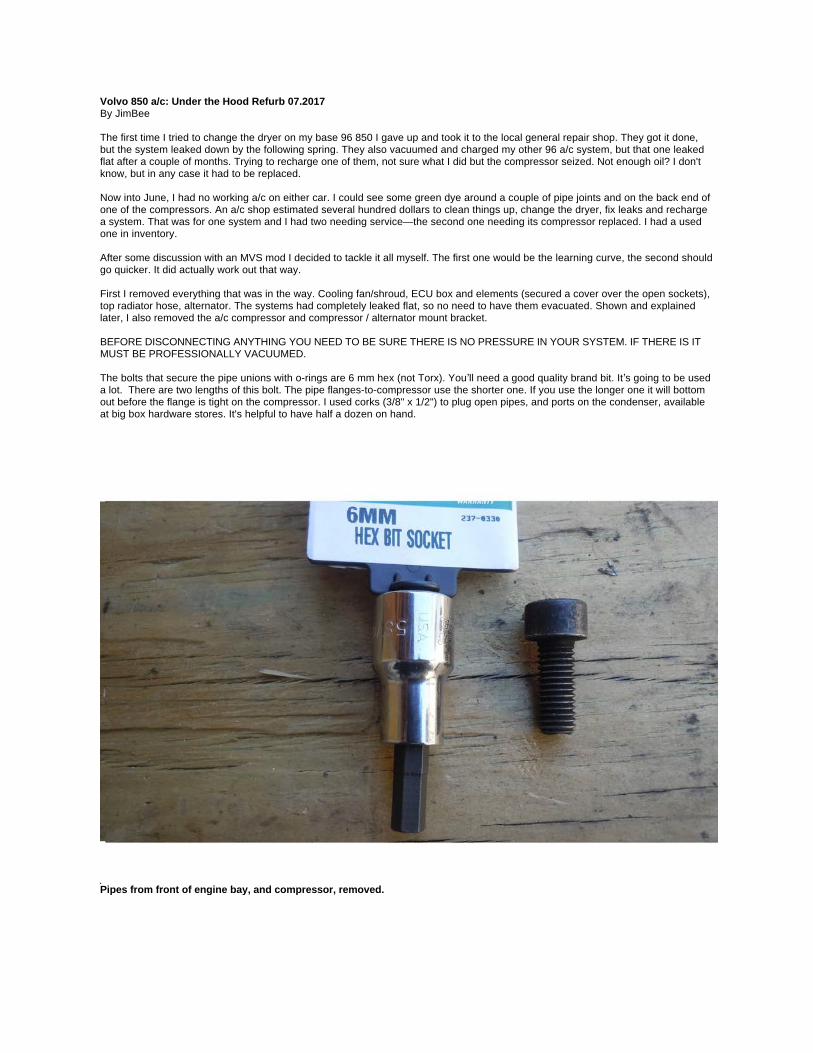
The most troublesome part of this project is removing the old dryer, which defeated me the first time around the previous year.
This time, after running into the same rusty springlock connector, I decided to do surgery. The problem is thereʼs no room to swing the dryer side-to-side to work its gooseneck connector apart, even after dousing the springbuck with PB Blaster the day before and while using the release tool. Sure, give it a try, but if you canʼt get them loose, get more aggressive.
The solution is cut the gooseneck, ideally close to the top of the dryer canister to keep filings away from the springlock union.
I strongly recommend against doing it as shown. If you do, proceed at your own risk and use a short hacksaw blade. Of course, this is a two-handed task; here, the saw is off as I was shooting a picture with the other hand.
It would be safer to use a manual hacksaw. If you're removing a replacement dryer, itʼs probably made of aluminum, as one of mine was. For that one, I got my ratchet pruner in there and snipped the gooseneck quite easily.
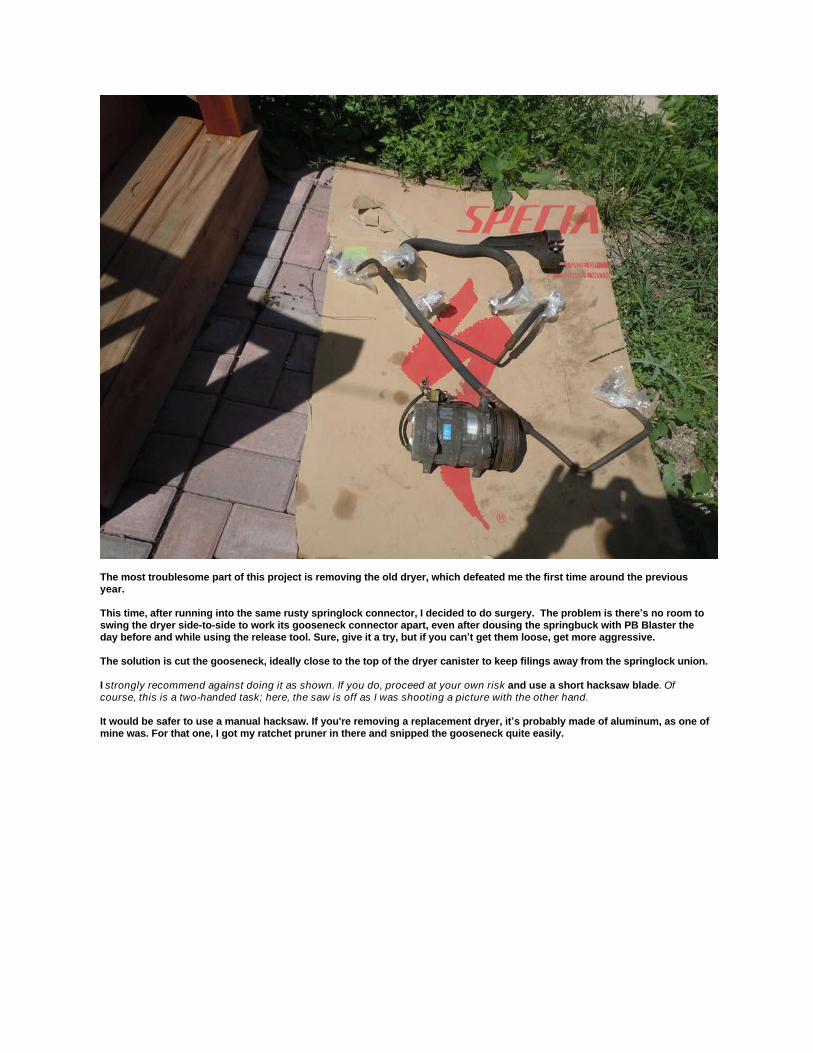
Remove the dryer after cutting the gooseneck.On the back of the compressor, remove the hex bolt that connects the large hose from the dryer. I used a short 3/8 extension with the hex bit. If your car has an oil cooler, you need to get a path through the hoses. I unbolted the bracket that holds the oil cooler pipes to the engine block to get a little more flexibility in there.There's a 10 mm bolt behind the p.s. headlight that secures the dryer bracket. Don't try to loosen the cinch bracket around the middle of the dryer canister while its still installed—just pull the whole thing, hose bracket and all. (Note for reinstallation: if you have a splash guard under the radiator, make sure the new dryer is secured high enough to clear the splash guard. Make sure your new dryer has the same dimensions as the original.)
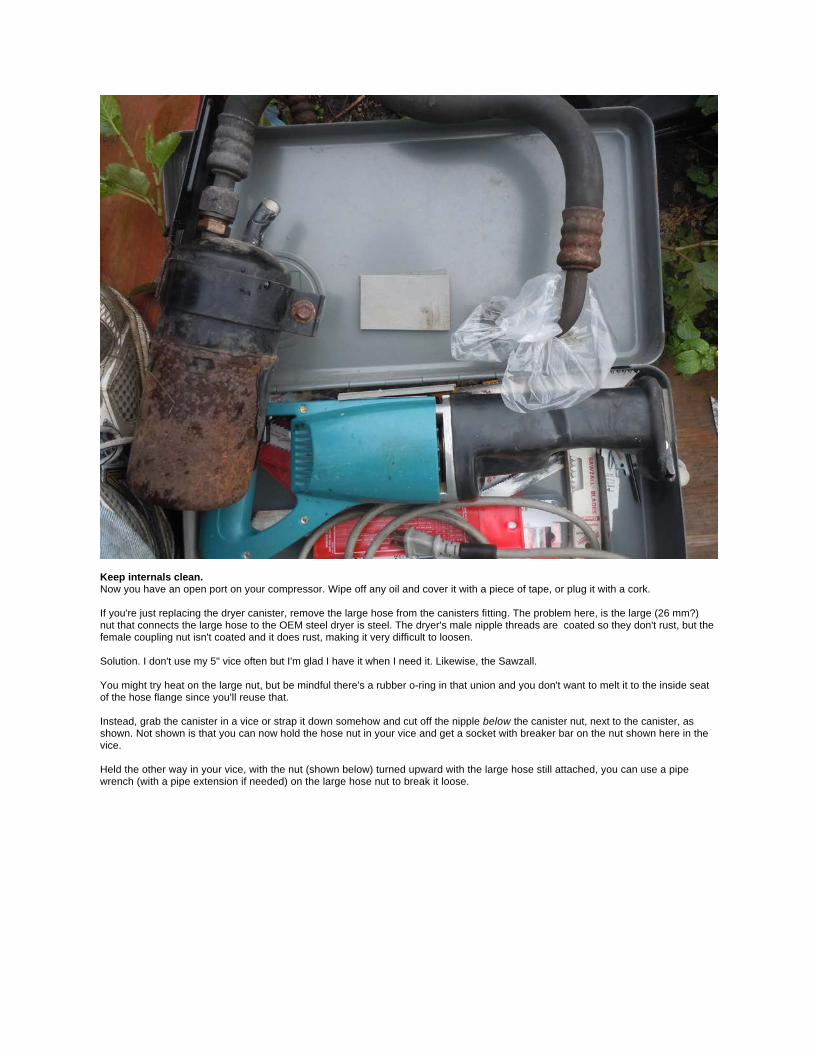
Keep internals clean.Now you have an open port on your compressor. Wipe off any oil and cover it with a piece of tape, or plug it with a cork.
If you're just replacing the dryer canister, remove the large hose from the canisters fitting. The problem here, is the large (26 mm?) nut that connects the large hose to the OEM steel dryer is steel. The dryer's male nipple threads are coated so they don't rust, but the female coupling nut isn't coated and it does rust, making it very difficult to loosen.
Solution. I don't use my 5" vice often but I'm glad I have it when I need it. Likewise, the Sawzall.
You might try heat on the large nut, but be mindful there's a rubber o-ring in that union and you don't want to melt it to the inside seat of the hose flange since you'll reuse that.
Instead, grab the canister in a vice or strap it down somehow and cut off the nipple below the canister nut, next to the canister, as shown. Not shown is that you can now hold the hose nut in your vice and get a socket with breaker bar on the nut shown here in the vice.
Held the other way in your vice, with the nut (shown below) turned upward with the large hose still attached, you can use a pipe wrench (with a pipe extension if needed) on the large hose nut to break it loose.

Rework threads on the dryer nipple.Keep the scrap nut to rework the threads in the hose nut. Taking care not to get solvent inside the hose, use some solvent on the threads and work the nuts together until the threads turn freely. The hosenut threads on mine were very rusty. I did both 850's. One of them has a very slight leak at this point, meaning it wasn't tightened enough—though it felt very tight— so I'll probably redo it. If the nuts screw together very hard, you cant know when you've bottomed on the new o-ring, so it's worth taking some extra time on those threads.
With the threads cleaned up, you still need to remove the dryer gooseneck stub that's still connected to the springbuck union. With the dryer out of the way, you can more easily use a couple of tools to remove the stub.
Removing the gooseneck stub. In the next picture, the springlock is already parted; you can see the flare end that had been captured inside the cage by the garter spring.
To separate the springlocked coupling, after adding more PB Blaster, I used Channellock pliers to force the plastic release tool into the cage to cause the garter spring to ride up on the flare, "unlocking" the flare end of the female tubing. But the flare doesn't just pop out of the cage.
While holding the tool in place, with the garter spring "opened" (stretched up and over the flare), the gooseneck stub can be easily rotated and pulled off the male pipe. My dryers came with new o-rings and a garter spring for this union. When you remove the female tube with the flare-end, you'll see there are two o-rings on the male part. The springlock connector just holds the two pipes together while the o-rings seal the pipes.
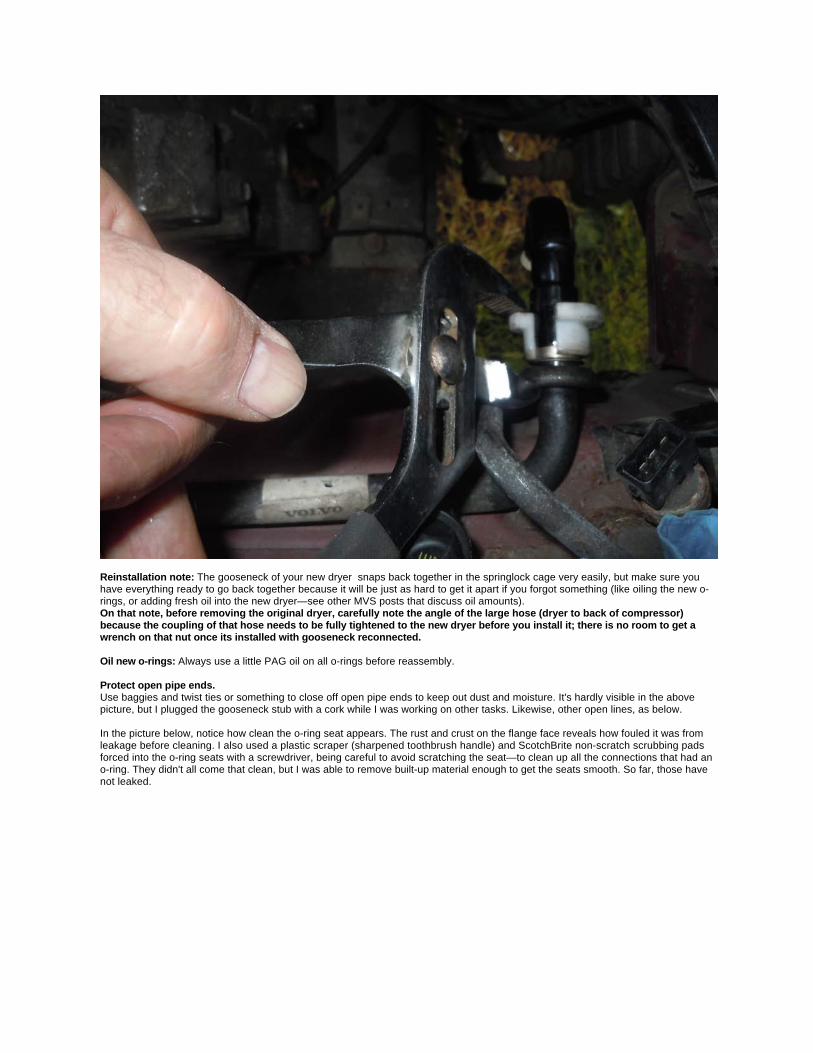
Reinstallation note: The gooseneck of your new dryer snaps back together in the springlock cage very easily, but make sure you have everything ready to go back together because it will be just as hard to get it apart if you forgot something (like oiling the new o-rings, or adding fresh oil into the new dryer—see other MVS posts that discuss oil amounts). On that note, before removing the original dryer, carefully note the angle of the large hose (dryer to back of compressor) because the coupling of that hose needs to be fully tightened to the new dryer before you install it; there is no room to get a wrench on that nut once its installed with gooseneck reconnected.
Oil new o-rings: Always use a little PAG oil on all o-rings before reassembly.
Protect open pipe ends.Use baggies and twist ties or something to close off open pipe ends to keep out dust and moisture. It's hardly visible in the above picture, but I plugged the gooseneck stub with a cork while I was working on other tasks. Likewise, other open lines, as below.
In the picture below, notice how clean the o-ring seat appears. The rust and crust on the flange face reveals how fouled it was from leakage before cleaning. I also used a plastic scraper (sharpened toothbrush handle) and ScotchBrite non-scratch scrubbing pads forced into the o-ring seats with a screwdriver, being careful to avoid scratching the seat—to clean up all the connections that had an o-ring. They didn't all come that clean, but I was able to remove built-up material enough to get the seats smooth. So far, those have not leaked.
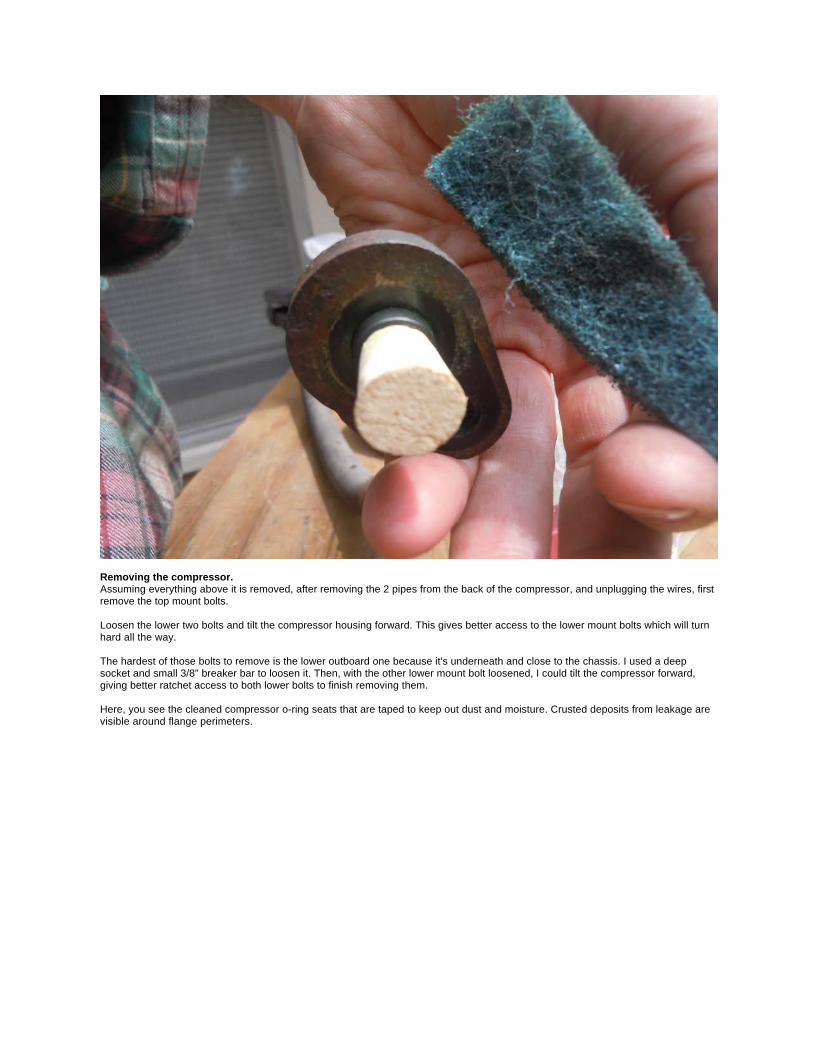
Removing the compressor.Assuming everything above it is removed, after removing the 2 pipes from the back of the compressor, and unplugging the wires, first remove the top mount bolts.
Loosen the lower two bolts and tilt the compressor housing forward. This gives better access to the lower mount bolts which will turn hard all the way.
The hardest of those bolts to remove is the lower outboard one because it's underneath and close to the chassis. I used a deep socket and small 3/8" breaker bar to loosen it. Then, with the other lower mount bolt loosened, I could tilt the compressor forward, giving better ratchet access to both lower bolts to finish removing them.
Here, you see the cleaned compressor o-ring seats that are taped to keep out dust and moisture. Crusted deposits from leakage are visible around flange perimeters.
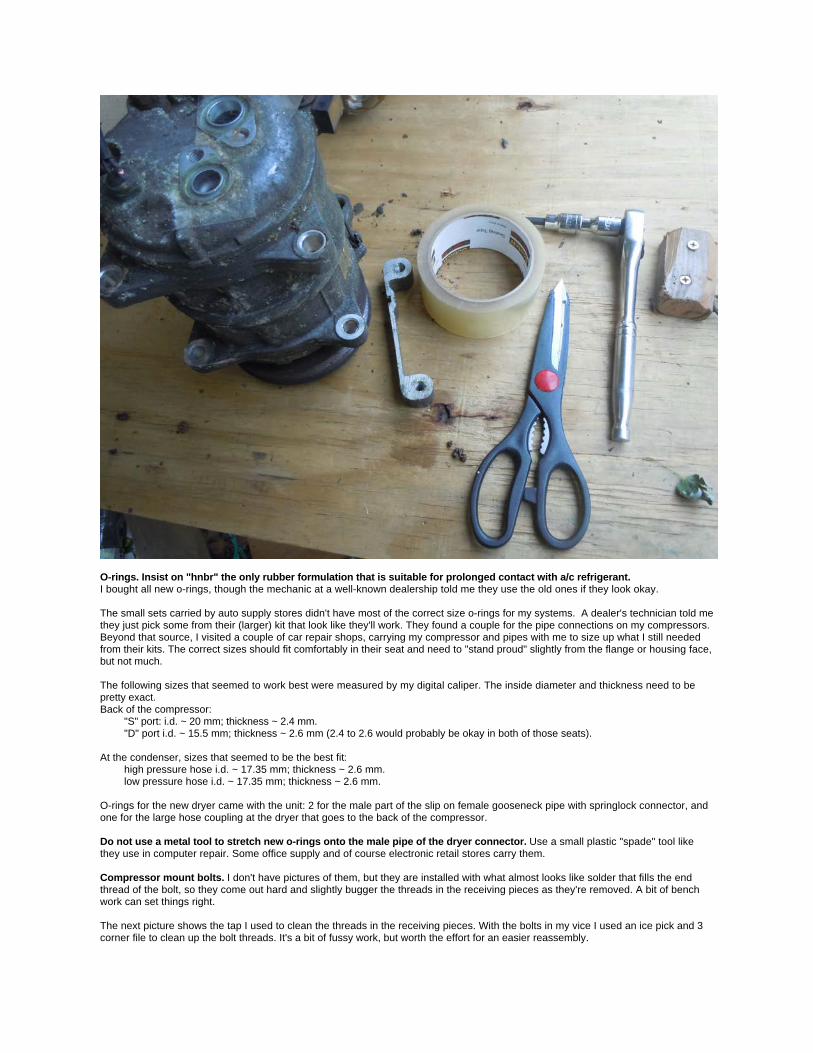
O-rings. Insist on "hnbr" the only rubber formulation that is suitable for prolonged contact with a/c refrigerant.I bought all new o-rings, though the mechanic at a well-known dealership told me they use the old ones if they look okay.
The small sets carried by auto supply stores didn't have most of the correct size o-rings for my systems. A dealer's technician told me they just pick some from their (larger) kit that look like they'll work. They found a couple for the pipe connections on my compressors. Beyond that source, I visited a couple of car repair shops, carrying my compressor and pipes with me to size up what I still needed from their kits. The correct sizes should fit comfortably in their seat and need to "stand proud" slightly from the flange or housing face, but not much.
The following sizes that seemed to work best were measured by my digital caliper. The inside diameter and thickness need to be pretty exact.Back of the compressor:
"S" port: i.d. ~ 20 mm; thickness ~ 2.4 mm."D" port i.d. ~ 15.5 mm; thickness ~ 2.6 mm (2.4 to 2.6 would probably be okay in both of those seats).
At the condenser, sizes that seemed to be the best fit:high pressure hose i.d. ~ 17.35 mm; thickness ~ 2.6 mm.low pressure hose i.d. ~ 17.35 mm; thickness ~ 2.6 mm.
O-rings for the new dryer came with the unit: 2 for the male part of the slip on female gooseneck pipe with springlock connector, and one for the large hose coupling at the dryer that goes to the back of the compressor.
Do not use a metal tool to stretch new o-rings onto the male pipe of the dryer connector. Use a small plastic "spade" tool like they use in computer repair. Some office supply and of course electronic retail stores carry them.
Compressor mount bolts. I don't have pictures of them, but they are installed with what almost looks like solder that fills the end thread of the bolt, so they come out hard and slightly bugger the threads in the receiving pieces as they're removed. A bit of bench work can set things right.
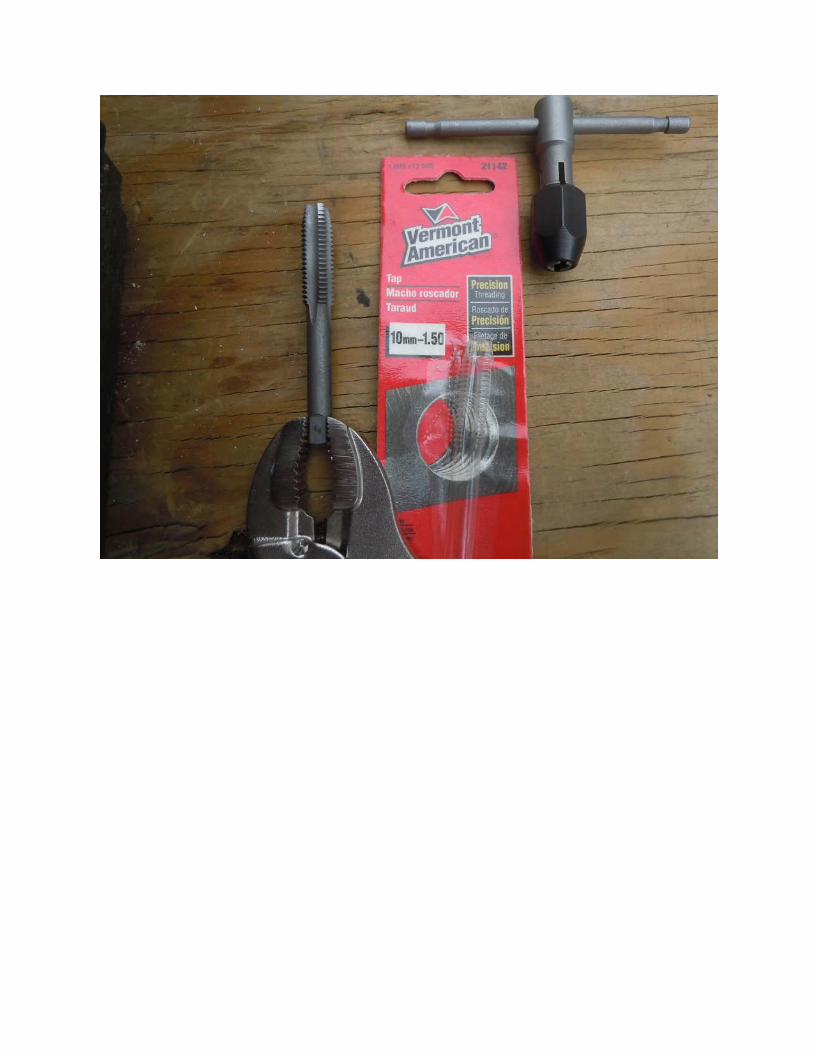
The next picture shows the tap I used to clean the threads in the receiving pieces. With the bolts in my vice I used an ice pick and 3 corner file to clean up the bolt threads. It's a bit of fussy work, but worth the effort for an easier reassembly.
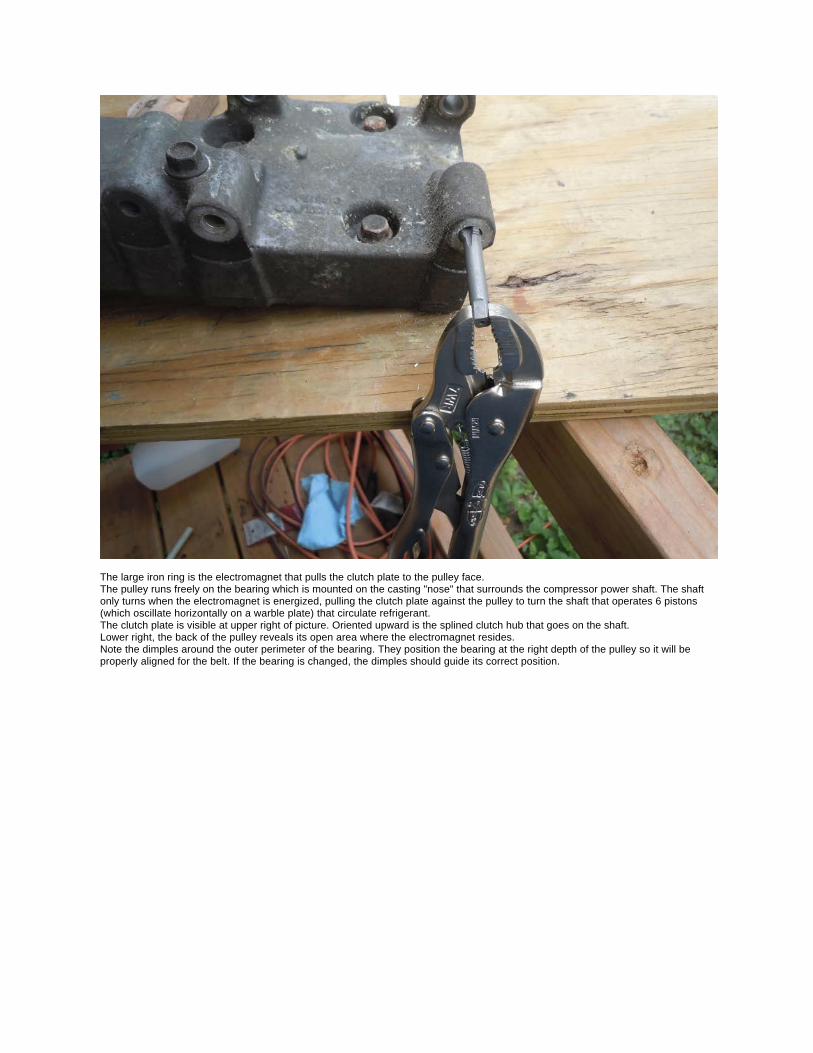
The large iron ring is the electromagnet that pulls the clutch plate to the pulley face.The pulley runs freely on the bearing which is mounted on the casting "nose" that surrounds the compressor power shaft. The shaft only turns when the electromagnet is energized, pulling the clutch plate against the pulley to turn the shaft that operates 6 pistons (which oscillate horizontally on a warble plate) that circulate refrigerant.The clutch plate is visible at upper right of picture. Oriented upward is the splined clutch hub that goes on the shaft.Lower right, the back of the pulley reveals its open area where the electromagnet resides.Note the dimples around the outer perimeter of the bearing. They position the bearing at the right depth of the pulley so it will be properly aligned for the belt. If the bearing is changed, the dimples should guide its correct position.
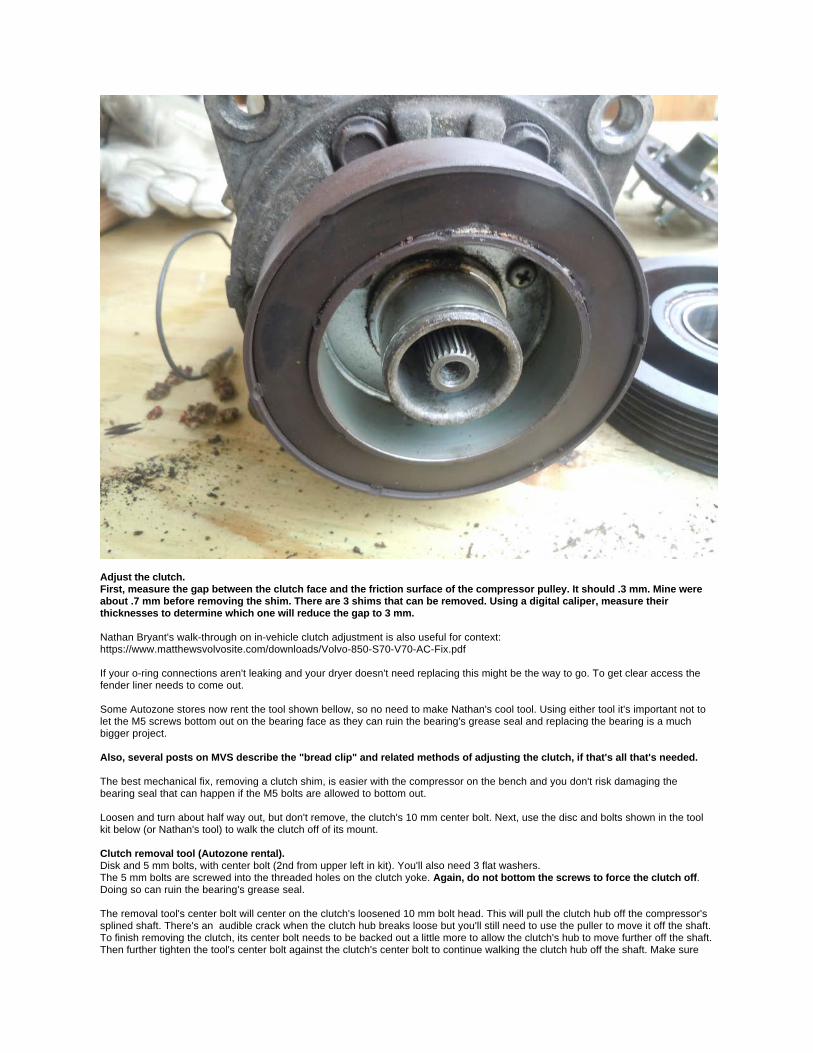
Adjust the clutch.First, measure the gap between the clutch face and the friction surface of the compressor pulley. It should .3 mm. Mine were about .7 mm before removing the shim. There are 3 shims that can be removed. Using a digital caliper, measure their thicknesses to determine which one will reduce the gap to 3 mm.
Nathan Bryant's walk-through on in-vehicle clutch adjustment is also useful for context:https://www.matthewsvolvosite.com/downloads/Volvo-850-S70-V70-AC-Fix.pdf
If your o-ring connections aren't leaking and your dryer doesn't need replacing this might be the way to go. To get clear access the fender liner needs to come out.
Some Autozone stores now rent the tool shown bellow, so no need to make Nathan's cool tool. Using either tool it's important not to let the M5 screws bottom out on the bearing face as they can ruin the bearing's grease seal and replacing the bearing is a much bigger project.
Also, several posts on MVS describe the "bread clip" and related methods of adjusting the clutch, if that's all that's needed.
The best mechanical fix, removing a clutch shim, is easier with the compressor on the bench and you don't risk damaging the bearing seal that can happen if the M5 bolts are allowed to bottom out.
Loosen and turn about half way out, but don't remove, the clutch's 10 mm center bolt. Next, use the disc and bolts shown in the tool kit below (or Nathan's tool) to walk the clutch off of its mount.
Clutch removal tool (Autozone rental).Disk and 5 mm bolts, with center bolt (2nd from upper left in kit). You'll also need 3 flat washers.The 5 mm bolts are screwed into the threaded holes on the clutch yoke. Again, do not bottom the screws to force the clutch off. Doing so can ruin the bearing's grease seal.
The removal tool's center bolt will center on the clutch's loosened 10 mm bolt head. This will pull the clutch hub off the compressor's splined shaft. There's an audible crack when the clutch hub breaks loose but you'll still need to use the puller to move it off the shaft. To finish removing the clutch, its center bolt needs to be backed out a little more to allow the clutch's hub to move further off the shaft. Then further tighten the tool's center bolt against the clutch's center bolt to continue walking the clutch hub off the shaft. Make sure

the original center bolt is at least 4-5 threads into the shaft end; you don't want to strip threads on either piece. I used a longer 10 mm bolt than the original to finish pulling the clutch hub.
NOTE: When the clutch hub comes loose hold it with hub opening up so the shims don't fall out. I used a magnetic retrieval tool to pick the top shim out.
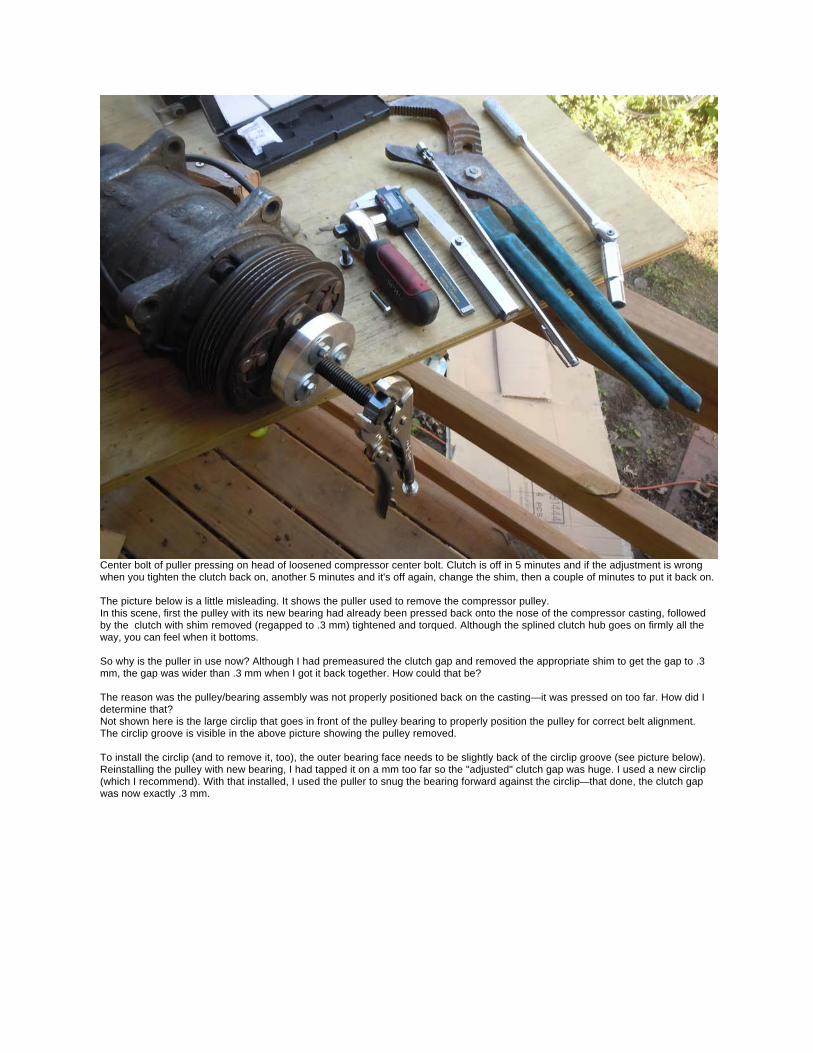
Center bolt of puller pressing on head of loosened compressor center bolt. Clutch is off in 5 minutes and if the adjustment is wrong when you tighten the clutch back on, another 5 minutes and it's off again, change the shim, then a couple of minutes to put it back on.
The picture below is a little misleading. It shows the puller used to remove the compressor pulley. In this scene, first the pulley with its new bearing had already been pressed back onto the nose of the compressor casting, followed by the clutch with shim removed (regapped to .3 mm) tightened and torqued. Although the splined clutch hub goes on firmly all the way, you can feel when it bottoms.
So why is the puller in use now? Although I had premeasured the clutch gap and removed the appropriate shim to get the gap to .3 mm, the gap was wider than .3 mm when I got it back together. How could that be?
The reason was the pulley/bearing assembly was not properly positioned back on the casting—it was pressed on too far. How did I determine that?Not shown here is the large circlip that goes in front of the pulley bearing to properly position the pulley for correct belt alignment. The circlip groove is visible in the above picture showing the pulley removed.
To install the circlip (and to remove it, too), the outer bearing face needs to be slightly back of the circlip groove (see picture below). Reinstalling the pulley with new bearing, I had tapped it on a mm too far so the "adjusted" clutch gap was huge. I used a new circlip (which I recommend). With that installed, I used the puller to snug the bearing forward against the circlip—that done, the clutch gap was now exactly .3 mm.
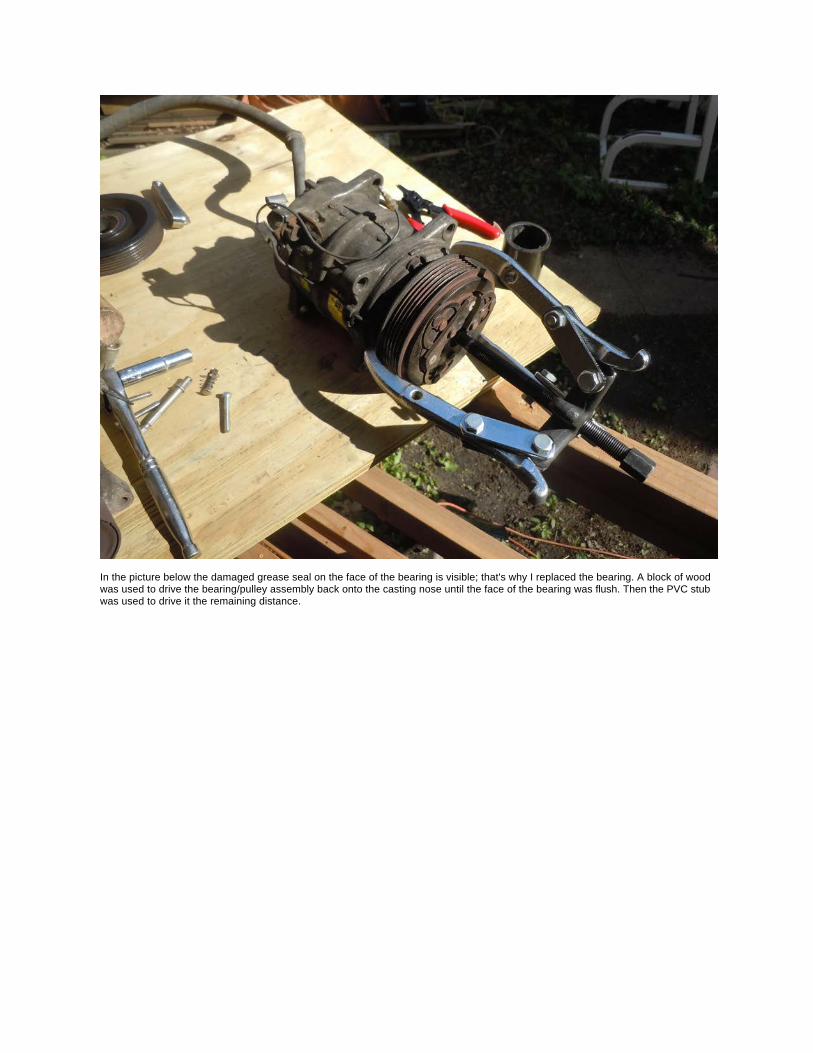
In the picture below the damaged grease seal on the face of the bearing is visible; that's why I replaced the bearing. A block of wood was used to drive the bearing/pulley assembly back onto the casting nose until the face of the bearing was flush. Then the PVC stub was used to drive it the remaining distance.
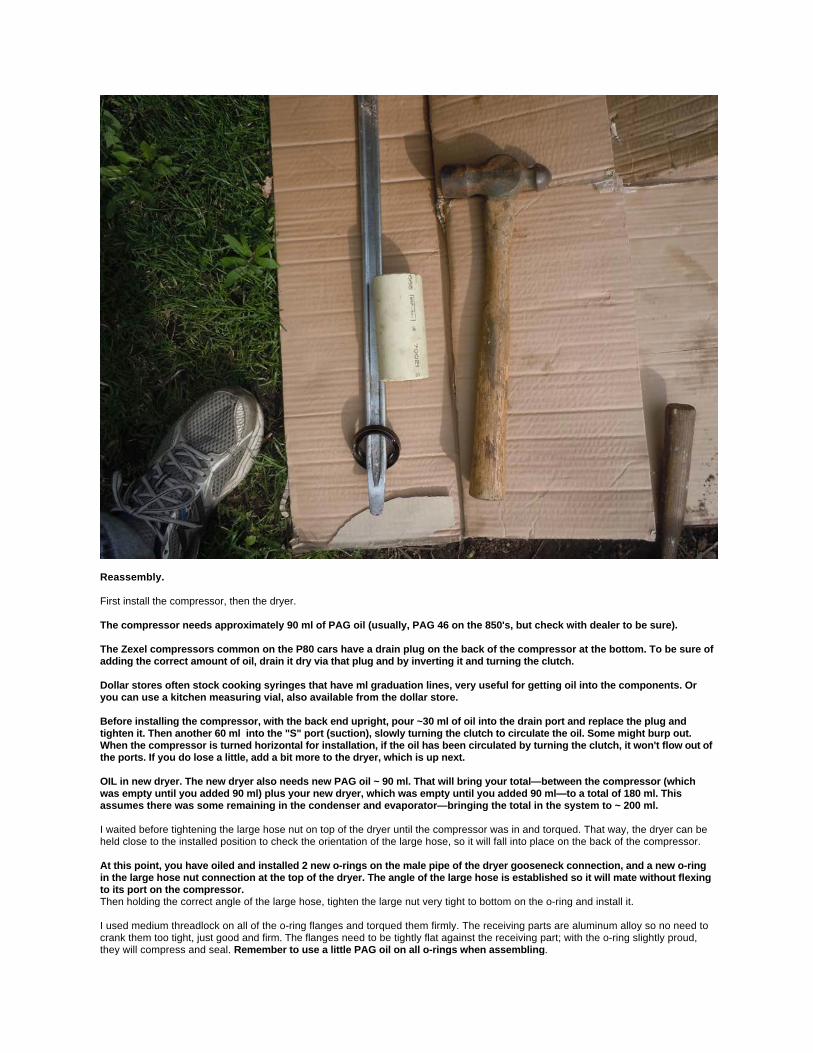
Reassembly.
First install the compressor, then the dryer.
The compressor needs approximately 90 ml of PAG oil (usually, PAG 46 on the 850's, but check with dealer to be sure).
The Zexel compressors common on the P80 cars have a drain plug on the back of the compressor at the bottom. To be sure of adding the correct amount of oil, drain it dry via that plug and by inverting it and turning the clutch.
Dollar stores often stock cooking syringes that have ml graduation lines, very useful for getting oil into the components. Or you can use a kitchen measuring vial, also available from the dollar store.
Before installing the compressor, with the back end upright, pour ~30 ml of oil into the drain port and replace the plug and tighten it. Then another 60 ml into the "S" port (suction), slowly turning the clutch to circulate the oil. Some might burp out. When the compressor is turned horizontal for installation, if the oil has been circulated by turning the clutch, it won't flow out of the ports. If you do lose a little, add a bit more to the dryer, which is up next.
OIL in new dryer. The new dryer also needs new PAG oil ~ 90 ml. That will bring your total—between the compressor (which was empty until you added 90 ml) plus your new dryer, which was empty until you added 90 ml—to a total of 180 ml. This assumes there was some remaining in the condenser and evaporator—bringing the total in the system to ~ 200 ml.
I waited before tightening the large hose nut on top of the dryer until the compressor was in and torqued. That way, the dryer can be held close to the installed position to check the orientation of the large hose, so it will fall into place on the back of the compressor.
At this point, you have oiled and installed 2 new o-rings on the male pipe of the dryer gooseneck connection, and a new o-ring in the large hose nut connection at the top of the dryer. The angle of the large hose is established so it will mate without flexing to its port on the compressor. Then holding the correct angle of the large hose, tighten the large nut very tight to bottom on the o-ring and install it.
I used medium threadlock on all of the o-ring flanges and torqued them firmly. The receiving parts are aluminum alloy so no need to crank them too tight, just good and firm. The flanges need to be tightly flat against the receiving part; with the o-ring slightly proud, they will compress and seal. Remember to use a little PAG oil on all o-rings when assembling.

If you're just cleaning things up, installing a new dryer (~$25.00), installing new o-rings (~ less than $15.00) adjusting the compressor clutch (~$0.00) doing this job yourself will save you at least $400.00, maybe a lot more. Add in a new compressor, MVS threads on this discuss different brands, but some are available for ~$125.00 (less than $50.00 used). Total with new compressor done by a shop would probably rival $ value of the car. The evaporator is a big project, I haven't had to do mine, but probably would if needed on both of my 850's that got these fixes b/c they have plenty of miles left in them otherwise. And for those, the miles are summer miles. It was really nice to have auto a/c last summer.