
Voicemail Pro Installation - Avaya Support · Windows 2003 ... 285 Voicemail Pro Dial by Name ......
360
IP Office 3.1 Voicemail Pro Installation and Maintenance Issue 14f (28th September 2005)
Transcript of Voicemail Pro Installation - Avaya Support · Windows 2003 ... 285 Voicemail Pro Dial by Name ......
IP Office 3.1 Voicemail Pro Installation and Maintenance
Issue 14f (28th September 2005)

Voicemail Pro Installation and Maintenance Page iii IP Office 3.1 Issue 14f (28th September 2005)
Table of Contents Voicemail .................................................................................................................................. 11 Overview of Voicemail Pro ....................................................................................................................... 11 What Was New in Voicemail Pro 3.0........................................................................................................ 12 Voicemail Pro Features ............................................................................................................................ 13 Voicemail Pro Components ...................................................................................................................... 14 Number of Simultaneous Voicemail Users ............................................................................................... 15 User, Group and Mailbox Names ............................................................................................................. 16 Language Support .................................................................................................................................... 17 The Voicemail Console............................................................................................................................. 18 Planning Forms ........................................................................................................................................ 19
System Planning Form......................................................................................................................... 19 Voicemail Pro Installation ....................................................................................................... 25 Installation Requirements ......................................................................................................................... 25
General Requirements......................................................................................................................... 25 PC Specification................................................................................................................................... 26 Network................................................................................................................................................ 27 Disk Space........................................................................................................................................... 27 Web Server Operation ......................................................................................................................... 27 Voicemail Email Connection ................................................................................................................ 28 IMS Pro Connection............................................................................................................................. 28 ContactStore (VRL) Operation............................................................................................................. 28
Voicemail Pro Licenses ............................................................................................................................ 29 Upgrading from Voicemail Lite ................................................................................................................. 30 Upgrading an Existing Voicemail Pro System .......................................................................................... 31
1. Export the Voicemail Pro Database ................................................................................................. 31 2. Backup the Voicemail Pro Registry.................................................................................................. 31 3. Uninstall Voicemail Pro .................................................................................................................... 31 4. Restoring the Voicemail Pro Registry .............................................................................................. 32 5. Upgrade Installation ......................................................................................................................... 32 6. Restoring the Voicemail Pro Database & Registry .......................................................................... 32
Voicemail Pro Installation Types .............................................................................................................. 33 Basic/Typical Installation ........................................................................................................ 35 Basic Voicemail Pro (Compact) Software Installation .............................................................................. 35 Voicemail Pro with Web Campaigns (Typical) Software Installation ........................................................ 41
Voicemail Pro Install ............................................................................................................................ 41 Windows 2003 ..................................................................................................................................... 47
Starting the Voicemail Pro Server ............................................................................................................ 48 Running the Service as a Console ........................................................................................................... 50 Voicemail Email Installation.................................................................................................... 51 Overview of Voicemail Email Installation.................................................................................................. 51 Installing Voicemail Pro for SMTP Voicemail Email.................................................................................. 52 Installing Voicemail Pro for MAPI Voicemail Email as a Domain Member ............................................... 53
Creating a Voicemail Domain Account ................................................................................................ 53 Configuring Outlook ............................................................................................................................. 54 Installing the Voicemail Pro Software .................................................................................................. 55
Installing Voicemail Pro for MAPI Voicemail Email as a Work Group Member ........................................ 56 Create a Voicemail User Account ........................................................................................................ 56 Configuring Outlook Express for Internet Mail ..................................................................................... 56 Configuring Outlook for Internet Mail ................................................................................................... 57 Configuring Outlook for Exchange Server ........................................................................................... 58 Installing the Voicemail Pro Software .................................................................................................. 59 Switching the Voicemail Pro to MAPI Operation.................................................................................. 59
Changing SMTP and MAPI Settings ........................................................................................................ 60 Switching Between MAPI and SMTP/Entering MAPI Settings............................................................. 60

Voicemail Pro Installation
Voicemail Pro Installation and Maintenance Page iv IP Office 3.1 Issue 14f (28th September 2005)
Changing the SMTP Email Account Settings....................................................................................... 61 Voicemail Email User and Group Configuration ....................................................................................... 62
Manager Settings................................................................................................................................. 63 User Configuration ............................................................................................................................... 64 Play Configuration Menu Action........................................................................................................... 64
What Voicemail Email Messages Look Like............................................................................................. 65 The Voicemail Pro Email Action ............................................................................................................... 66 IMS Installation......................................................................................................................... 67 Integrated Messaging Service (IMS) ........................................................................................................ 67
IMS Limitations .................................................................................................................................... 68 IMS Components ................................................................................................................................. 68 IMS Installation Alternatives................................................................................................................. 69
1. Before Installing IMS ............................................................................................................................ 70 2. Installing the IMS & Voicemail Pro Software ........................................................................................ 71 3. Switching Voicemail Pro to MAPI ......................................................................................................... 78 4. Associating Voice Mailboxes to Email Addresses ................................................................................ 79 5. Installing the IMS Client Software......................................................................................................... 80
5a. IMS Client PC Requirements ......................................................................................................... 80 5b. Installation Process........................................................................................................................ 81
6. Checking & Observing IMS Operation.................................................................................................. 82 Networked Messaging Install (VPNM) .................................................................................... 83 Voicemail Pro Networked Messaging....................................................................................................... 83 Requirements for VPNM........................................................................................................................... 84 Installing Voicemail Pro Software with VPNM Support............................................................................. 85 Configuring VPNM Accounts on Voicemail Pro........................................................................................ 91 Test Setup ................................................................................................................................................ 92 IP Office to Avaya Interchange................................................................................................................. 93
Configure the Avaya Intuity Audix........................................................................................................ 93 Configure the Avaya Interchange ........................................................................................................ 94 Configure a DNS Server ...................................................................................................................... 97 Verification & Troubleshooting ............................................................................................................. 98
Centralized Voicemail Installation ........................................................................................ 101 Centralized Voicemail Pro ...................................................................................................................... 101
Planning Requirements...................................................................................................................... 102 Restrictions ........................................................................................................................................ 102 Licensing............................................................................................................................................ 103 Additional Notes................................................................................................................................. 103
Setting Up Centralized Voicemail Pro .................................................................................................... 104 Text to Speech Installation.................................................................................................... 105 Text to Speech ....................................................................................................................................... 105 Installing Generic Text to Speech........................................................................................................... 106 Installing Avaya Text to Speech ............................................................................................................. 106 Configuring TTS Speech ........................................................................................................................ 106 Using the Speak Text Action .................................................................................................................. 107 TTS SAPI Controls ................................................................................................................................. 108
Entering XML Tags ............................................................................................................................ 108 Example SAPI XML Tags .................................................................................................................. 109
Email Reading ........................................................................................................................................ 111 Voicemail Pro Configuration................................................................................................. 113 System Preferences ............................................................................................................................... 113
Within the Voicemail Pro Client.......................................................................................................... 113 Within the Windows Control Panel..................................................................................................... 113
Control Panel Options ............................................................................................................................ 114 System Settings ................................................................................................................................. 114 Path Setting ....................................................................................................................................... 114

Table Of Contents
Voicemail Pro Installation and Maintenance Page v IP Office 3.1 Issue 14f (28th September 2005)
Email Settings .................................................................................................................................... 115 SMTP Email Settings ......................................................................................................................... 116 User Management ............................................................................................................................. 117
System Preferences ............................................................................................................................... 118 System Preferences: General............................................................................................................ 118 System Preferences: Directories ....................................................................................................... 119 MAPI System Preferences................................................................................................................. 120 System Preferences: Housekeeping.................................................................................................. 121 SNMP Alarm ...................................................................................................................................... 122 VPNM Preferences ............................................................................................................................ 123
IP Office Configuration .......................................................................................................... 125 IP Office Configuration ........................................................................................................................... 125 System Configuration ............................................................................................................................. 126 Using Voicemail to Give Error Messages ............................................................................................... 127 User Configuration................................................................................................................. 129 User Configuration.................................................................................................................................. 129 User Source Number Configuration ....................................................................................................... 130 Voicemail Reception/Operator................................................................................................................ 130 Routing Calls to Voicemail.................................................................................................... 131 Transferring Callers to Voicemail ........................................................................................................... 131 Routing User Calls to Voicemail ............................................................................................................. 131 Transfer Calls to Voicemail..................................................................................................................... 132 Using Short Codes to Access Voicemail ................................................................................................ 133 Using VM: to Access Voicemail .............................................................................................................. 134
VM: versus Short Codes? .................................................................................................................. 134 Voicemail Telephone Numbers .............................................................................................................. 135
Voicemail Lite and Pro ....................................................................................................................... 135 Voicemail Pro Start Points ................................................................................................................. 135
Example Call Flow: SelfSelect Module................................................................................................... 136 The Voicemail Pro Module................................................................................................................. 136 Creating a Matching Short Code........................................................................................................ 137 Using the Module ............................................................................................................................... 137
Accessing Voicemail Remotely ............................................................................................ 139 Overview of Remote Access .................................................................................................................. 139 Access Voicemail from Another Extension............................................................................................. 139 Access from Any Extension for All Users ............................................................................................... 139 Access from Any Extension for a Specific User ..................................................................................... 140 Access from a Trusted Extension........................................................................................................... 140 Accessing Voicemail from an External Location..................................................................................... 140 Direct Access from a Trusted External Location .................................................................................... 140 Voicemail Pro Callback (Outbound Alert) ............................................................................................... 141
1. Setting Up the Callback Call Flow.................................................................................................. 141 2. Setting the User's Callback Number .............................................................................................. 142
Using a Play Configuration Menu Action ................................................................................................ 142 Hunt Groups ........................................................................................................................... 143 Hunt Group Voicemail ............................................................................................................................ 143 Hunt Group Configuration....................................................................................................................... 144 Hunt Group Message Waiting Indication ................................................................................................ 145 Hunt Group Message Waiting Indication ................................................................................................ 146 Configuring Group Broadcast ................................................................................................................. 147 Accessing Hunt Group Voicemail Using a Short Code........................................................................... 148 Out of Hours Operation .......................................................................................................................... 149 Hunt Group Queuing .............................................................................................................................. 150 Customizing Queuing ............................................................................................................................. 151
Changing the Greetings ..................................................................................................................... 151

Voicemail Pro Installation
Voicemail Pro Installation and Maintenance Page vi IP Office 3.1 Issue 14f (28th September 2005)
Call Flow Customization .................................................................................................................... 151 Example Call Flow Using $POS ............................................................................................................. 152 Using the Voicemail Pro Client ............................................................................................. 153 Overview of Voicemail Pro ..................................................................................................................... 153 The Voicemail Pro Screen...................................................................................................................... 154 Starting Voicemail Pro ............................................................................................................................ 154 Toolbar Icons.......................................................................................................................................... 155 Start Points ............................................................................................................................................. 156
Adding a Start Point ........................................................................................................................... 157 Short Code Start Points ..................................................................................................................... 157 Editing a Start Point ........................................................................................................................... 157 Deleting a Start Point ......................................................................................................................... 157 Renaming a User, Group or Short Code............................................................................................ 157
Default Start Points................................................................................................................................. 158 Actions.................................................................................................................................................... 159
Adding an Action................................................................................................................................ 159 Editing an Action ................................................................................................................................ 159 Deleting an Action.............................................................................................................................. 159
Connections............................................................................................................................................ 160 Adding a Connection.......................................................................................................................... 160 Deleting a Connection........................................................................................................................ 160
Saving and Making Live ......................................................................................................................... 161 Importing and Exporting ......................................................................................................................... 161 Including Other Files............................................................................................................................... 161 Viewing As Text...................................................................................................................................... 161 User Defined Variables........................................................................................................................... 162 System Variables.................................................................................................................................... 163
Using Variables.................................................................................................................................. 163 Recording Prompts................................................................................................................................. 164
Recording Prompts ............................................................................................................................ 164 Wave Editor ....................................................................................................................................... 164
Voicemail Pro Actions ........................................................................................................... 165 Overview of Actions................................................................................................................................ 165 Available Actions .................................................................................................................................... 166 Standard Action Tabs ............................................................................................................................. 169
General Tab ....................................................................................................................................... 169 Entry Prompts Tab ............................................................................................................................. 169 Specific Tab ....................................................................................................................................... 169 Reporting Tab .................................................................................................................................... 170 Results Tab........................................................................................................................................ 170
Basic Actions .......................................................................................................................................... 171 Generic Action ................................................................................................................................... 171 Speak Text Action.............................................................................................................................. 171 Menu Action ....................................................................................................................................... 172 Goto Action ........................................................................................................................................ 172 Disconnect Action .............................................................................................................................. 172 Home Action ...................................................................................................................................... 173 Module Return Action ........................................................................................................................ 173
Mailbox Actions ...................................................................................................................................... 174 Get Mail Action................................................................................................................................... 174 Leave Mail Action............................................................................................................................... 174 Listen Action ...................................................................................................................................... 175 Voice Question Action........................................................................................................................ 175 Campaign Action................................................................................................................................ 176
Configuration Actions ............................................................................................................................. 176 Edit Play List Action ........................................................................................................................... 176 Record Name Action.......................................................................................................................... 176
Table Of Contents
Voicemail Pro Installation and Maintenance Page vii IP Office 3.1 Issue 14f (28th September 2005)
Play Configuration Menu Action......................................................................................................... 177 Select System Prompt Language Action ........................................................................................... 177
Telephony Actions .................................................................................................................................. 178 CLI Routing Action ............................................................................................................................. 178 Route Incoming Call Action................................................................................................................ 178 Route by Call Status .......................................................................................................................... 178 Transfer Action................................................................................................................................... 178 Whisper Action................................................................................................................................... 179 Call List Action ................................................................................................................................... 179 Dial by Name Action .......................................................................................................................... 180 Conferencing Center Action............................................................................................................... 181 Assisted Transfer Action .................................................................................................................... 181 Alphanumeric Action .......................................................................................................................... 182
Miscellaneous Actions ............................................................................................................................ 183 eMail Action ....................................................................................................................................... 183 Open Door Action .............................................................................................................................. 183 Alarm Set Action ................................................................................................................................ 183 Clock Action ....................................................................................................................................... 183 Post Dial Action.................................................................................................................................. 184 VB Script Action ................................................................................................................................. 184 Remote Call Flow............................................................................................................................... 185
Condition Actions.................................................................................................................................... 186 Test Condition Action......................................................................................................................... 186 Set User Variable Action.................................................................................................................... 186 Test User Variable Action .................................................................................................................. 186 Check Digits Action............................................................................................................................ 187
Database Actions ................................................................................................................................... 188 Database Open Action....................................................................................................................... 188 Database Execute Action................................................................................................................... 189 Database Get Data Action ................................................................................................................. 189 Database Close Action ...................................................................................................................... 190
Queue Actions ........................................................................................................................................ 191 Queue ETA Action ............................................................................................................................. 191 Queue Position Action ....................................................................................................................... 191
Using Modules ....................................................................................................................... 193 Introduction to Modules .......................................................................................................................... 193
Creating a Module.............................................................................................................................. 193 Adding a Module to a Start Point ....................................................................................................... 193 Importing and Exporting Modules ...................................................................................................... 193
Running a Module Directly from a Short Code ....................................................................................... 194 Running a Module Directly from an External Call ................................................................................... 194 Conditions Editor................................................................................................................... 195 Conditions............................................................................................................................................... 195 Using the Conditions Editor .................................................................................................................... 196
Adding a Condition............................................................................................................................. 196 Adding Elements to a Condition......................................................................................................... 196 Editing Elements and Conditions ....................................................................................................... 196 Changing a Condition's Logical Setting ............................................................................................. 196 Deleting Elements and Conditions..................................................................................................... 196
Available Condition Elements................................................................................................................. 197 Calendar ............................................................................................................................................ 197 Week Planner .................................................................................................................................... 197 Condition............................................................................................................................................ 197 Compare ............................................................................................................................................ 197
Campaigns.............................................................................................................................. 199 Introduction to Campaigns...................................................................................................................... 199 Campaign Web Access .......................................................................................................................... 199

Voicemail Pro Installation
Voicemail Pro Installation and Maintenance Page viii IP Office 3.1 Issue 14f (28th September 2005)
Adding, Modifying & Deleting Campaigns .............................................................................................. 200 Customer Prompts.................................................................................................................................. 200 Customer Menu ...................................................................................................................................... 201 Campaign Identification .......................................................................................................................... 201 Accessing a Campaign........................................................................................................................... 202 Recording Calls...................................................................................................................... 203 Recording Calls ...................................................................................................................................... 203 Switching the Recording Warning On/Off ............................................................................................... 204 Changing the Maximum Recording Length ............................................................................................ 204 Manual Call Recording ........................................................................................................................... 205
Setting the Destination for User Recordings...................................................................................... 205 Triggering Manual Call Recording ..................................................................................................... 206 Customizing Manual Recording ......................................................................................................... 208
Automatic Call Recording ....................................................................................................................... 209 Setting the Record Times, Frequency and Destination ..................................................................... 209 Hide Auto Record Indication .............................................................................................................. 210 Customizing Auto Recording ............................................................................................................. 211
Voice Recording Library (VRL)............................................................................................................... 212 Fax Operation......................................................................................................................... 213 Voicemail Pro Fax Operation.................................................................................................................. 213 Setting the Voicemail Pro System Fax Number ..................................................................................... 213 Setting a Mailbox Fax Number ............................................................................................................... 214 Routing Fax Calls Using a Menu Action ................................................................................................. 214 Fax Servers ............................................................................................................................................ 215
Introduction ........................................................................................................................................ 215 IP Office Configuration....................................................................................................................... 216 Voicemail Pro Configuration .............................................................................................................. 217 Domain User Account Requirements................................................................................................. 218 GFI FaxMaker .................................................................................................................................... 219 Faxination .......................................................................................................................................... 231 Zetafax ............................................................................................................................................... 243 RightFax............................................................................................................................................. 255
IVR Database Connection ..................................................................................................... 267 IVR: Connecting Voicemail Pro to a Database....................................................................................... 267 Example.................................................................................................................................................. 268
Example Database Scenario ............................................................................................................. 268 1. Retrieving Data from the Database................................................................................................ 269 2. Returning Data from the Database ................................................................................................ 273 Enter Details into the Database ......................................................................................................... 275
Mailbox User Controls ........................................................................................................... 277 Mailbox User Controls ............................................................................................................................ 277 Telephony Operation Mode .................................................................................................................... 278 Automatic Message Deletion - Housekeeping........................................................................................ 279 Personal Distribution Lists ...................................................................................................................... 280 TTY Support ........................................................................................................................... 281 Voicemail Pro TTY Prompts ................................................................................................................... 281
Installing Voicemail Pro TTY Prompts ............................................................................................... 281 User Configuration.................................................................................................................................. 282
Changing the User Locale ................................................................................................................. 282 Mailbox Access .................................................................................................................................. 282
Voicemail Pro Customization.................................................................................................................. 283 Simple Mailbox Customization........................................................................................................... 283 Complex Mailbox Customization........................................................................................................ 284
Dial by Name .......................................................................................................................... 285 Voicemail Pro Dial by Name................................................................................................................... 285

Table Of Contents
Voicemail Pro Installation and Maintenance Page ix IP Office 3.1 Issue 14f (28th September 2005)
Example Dial by Name Call Flow ........................................................................................................... 286 Adding a Record Name Module ............................................................................................................. 287 Using the Name Table............................................................................................................................ 288 Changing Full Names ............................................................................................................................. 288 Language Switching .............................................................................................................. 289 Voicemail Pro Language Switching ........................................................................................................ 289 Automatic Fallback Language Selection ................................................................................................ 290 Using the Select System Prompt............................................................................................................ 291 Switching Custom Prompts - Using $LOC.............................................................................................. 292 VBScript.................................................................................................................................. 293 VB Script Action...................................................................................................................................... 293 Properties ............................................................................................................................................... 294 VBScript Properties ................................................................................................................................ 295
CallingParty Property ......................................................................................................................... 295 EstimatedAnswer Property ................................................................................................................ 295 LastAccessedMsg Property ............................................................................................................... 295 Locale Property.................................................................................................................................. 296 Name Property................................................................................................................................... 296 NewMsgs Property............................................................................................................................. 296 OldMsgs Property .............................................................................................................................. 297 PositionInQueue Property.................................................................................................................. 297 Result Property .................................................................................................................................. 297 SavedMsgs Property.......................................................................................................................... 298 SavedResult Property ........................................................................................................................ 298 Variable Property ............................................................................................................................... 298
VBScript Methods................................................................................................................................... 299 ForwardMsg Method .......................................................................................................................... 299 ForwardMsgToMailbox Method ......................................................................................................... 300 FullFilename Method ......................................................................................................................... 300 GetCallingParty Method..................................................................................................................... 301 GetDTMF Method .............................................................................................................................. 301 GetEstimatedAnswer Method ............................................................................................................ 301 GetExtension Method ........................................................................................................................ 302 GetLocale Method.............................................................................................................................. 302 GetMailbox Method............................................................................................................................ 302 GetMailboxMessage Method ............................................................................................................. 303 GetMailboxMessages Method ........................................................................................................... 303 GetMessagePriority Method .............................................................................................................. 303 GetMessagePrivate Method .............................................................................................................. 304 GetMessageStatus Method ............................................................................................................... 304 GetName Method............................................................................................................................... 304 GetNewMsgs Method ........................................................................................................................ 305 GetOldMsgs Method .......................................................................................................................... 305 GetPositionInQueue Method.............................................................................................................. 305 GetRegister Method........................................................................................................................... 305 GetResult Method .............................................................................................................................. 306 GetSavedMsgs Method ..................................................................................................................... 306 GetSavedResult Method.................................................................................................................... 306 GetVariable Method ........................................................................................................................... 306 MessageCLI Method.......................................................................................................................... 307 MessageDisplay Method.................................................................................................................... 307 MessageLength Method .................................................................................................................... 307 MessageTime Method ....................................................................................................................... 308 PlayDigits Method .............................................................................................................................. 308 PlayLocaleWav Method ..................................................................................................................... 309 PlayWav Method................................................................................................................................ 310 RecordMsg Method............................................................................................................................ 312

Voicemail Pro Installation
Voicemail Pro Installation and Maintenance Page x IP Office 3.1 Issue 14f (28th September 2005)
RecordRegister Method ..................................................................................................................... 313 Register Method................................................................................................................................. 314 SetLocale Method .............................................................................................................................. 315 SetMailboxMessage Method.............................................................................................................. 315 SetRegister Method ........................................................................................................................... 316 SetResult Method .............................................................................................................................. 316 SetSavedResult Method .................................................................................................................... 316 SetVariable Method ........................................................................................................................... 317 Speak Method.................................................................................................................................... 317
Appendix A: Prompts ............................................................................................................ 319 US English Intuity Prompts..................................................................................................................... 319 English Non-Intuity Prompts ................................................................................................................... 331 Index........................................................................................................................................ 339

Voicemail Pro Installation and Maintenance Page 11 IP Office 3.1 Issue 14f (28th September 2005)
Voicemail Overview of Voicemail Pro This document covers the installation and administration of Voicemail Pro on IP Office. Currently this includes the following:
• Voicemail Pro This voicemail program requires an IP Office licence key to run. It builds on Voicemail Lite by offering a high degree of customization for any mailbox. Voicemail Pro consists of both a server program and a client for administration of the server.
• Unlicensed Voicemail Pro will run for two hours in order to allow demonstration and testing. A license is required for continuous operation.
• Voicemail Email The Voicemail Pro can use SMTP or MAPI to send email alerts when a user has new messages within their mailbox.
• IMS: Integrated Messaging System Included within Voicemail Pro software but requires its own IP Office license key. Works with a customer's Microsoft Exchange server to provide synchronized voicemail and email mailbox operation.
• Centralized Voicemail Pro Within an IP Office small community network (SCN), Voicemail Pro can be used to provide mailbox services to remote IP Office systems.
• Database Connection The Voicemail Pro can be licensed to read and write data to databases. The values of data returned can be used to alter the call flow.
• Text to Speech (TTS) The Voicemail Pro server can speak text, entered within the call flow or contained within variables. Combined with database operation this allows the development of IVR applications.
Note: The IP Office can only interact with one voicemail server at any time. If more than one voicemail server is installed on a network this may cause problems.
Voicemail
Voicemail Pro Installation and Maintenance Page 12 IP Office 3.1 Issue 14f (28th September 2005)
What Was New in Voicemail Pro 3.0 The following is a listing of the major features that were added in Voicemail Pro 3.0.
• IP Office Wizard Interaction Call flows created on the IP Office Wizard can be added to the Voicemail Pro's call flows.
• To achieve this two new items has been added. VMPro User Management is used to define user name and password control for access to the server from the IP Office Wizard application.
• The Remote Call Flow Action is used to define where the Wizard call flow is used.
• Personal Distribution Lists (also called Mailing Lists) These allow Intuity mode mailbox users to create mailbox distribution lists for use when forwarding or sending a message. Each mailbox can have up to 20 distribution lists, each containing up to 360 mailbox destinations. Lists marked as public can be used by other mailbox users.
• Group Broadcast Messaging If selected, when a hunt group mailbox receives a new message, that message is copied and forwarded to the individual mailbox of all group members.
• Voice Recording Library The Voicemail Pro supports the transfer of call recordings to a third-party Voice Recording Library (VRL) application, currently Contact Store for IP Office. This application maintains a searchable library of recordings and can archive recordings onto DVD. Installation and operation of VRL is licensed. See Voice Recording Library. Changes are:
• VRL can be selected as a destination for Leave Mail actions.
• A Max. Record Time (secs) setting is available on the General tab of System Preferences.
• Within the IP Office, VRL can be selected as the destination for automatic and/or manual recording of a user's calls.
• SNMP Alarm In cases where the IP Office has been configured to send SNMP Alarms, the Voicemail Pro can inform the IP Office to send an alarm when its remaining disk space passes below a set threshold. See SNMP Alarm.
• Post Dial Group Page The Post Dial action can now be used to play a .wav file to a group extension number.
• Combined CCC/Voicemail Pro Server Operation Both the CCC and Voicemail Pro server have been tested and are now supported on the same server. This is for a maximum of 20 CCC agents and 8 voicemail ports only. The PC requirement is a Windows 2000/2003 Server OS on a Pentium 4 2.8GHz with 512MB RAM and 10GB hard-disk minimum.
Voicemail Pro Features
Voicemail Pro Installation and Maintenance Page 13 IP Office 3.1 Issue 14f (28th September 2005)
Voicemail Pro Features Voicemail Pro is a licensed version of voicemail for IP Office. It builds on Voicemail Lite in a number of ways:
• Support for more than 4 simultaneous voicemail users (maximum 2 only on IP401) depending on licenses entered. See Number of Simultaneous Voicemail Users.
• Support for Intuity mode mailbox operation as default.
• Customization can be applied to the defaults for all or specific users and hunt groups and to access via custom short codes.
• The maximum recordable length of messages can be changed from the fixed 120 second limit of Voicemail Lite.
• Automatic call recording (Voice Recording) for selected Users, Hunt Groups and CLI's allows the automatic recording of calls. This is setup through the Manager application.
• Campaigns allow a sequence of messages to be played to a caller and the caller's response to those question (spoken and/or telephone key presses) are recorded. The sets of response can then be accessed and action by call agents.
• Integrated Messaging System (IMS) adds sophisticated voicemail to email integration.

Voicemail
Voicemail Pro Installation and Maintenance Page 14 IP Office 3.1 Issue 14f (28th September 2005)
Voicemail Pro Components Voicemail Pro consists of a number of software components listed below.
• Voicemail Pro CDs Voicemail Pro is supplied on CD.
• Voicemail Pro 3.0 is supplied on two CD's. The first CD contains the Voicemail Pro program. The second CD contains Avaya IP Office ContactStore.
• The standard Voicemail Pro 3.0 CD includes the software components for generic TTS. Voicemail Pro ScanSoft TTS is supplied on a separate set of 5 CD's.
• IP Office Licenses Entered into the configuration of the IP Office system. Required to activate Voicemail Pro, then number of ports available and various other features.
• IP Office Feature Key Dongle Licence keys are issued against and validated against the unique serial number of the feature key dongle installed with the IP Office.
• Feature Key Server For USB and parallel port feature key dongles, the dongle must be installed on a PC running the IP Office Feature Key Server application. This is not required for a serial port feature key dongle which plugs directly into the 9-pin serial port of suitable IP Office control unit.
• Voicemail Pro Server Runs on the Server PC and provide voicemail facilities to the IP Office.
• Voicemail Pro Service On Windows 2000/XP/2003 the Voicemail Pro Server installs as a Service. This provides greater reliability and resilience.
• Voicemail Pro Client This is the interface used to configure the Voicemail Pro server.
• IMS Server & Administration Tool IMS (Integrated Messaging System) provides sophisticated voicemail and email integration between the Voicemail Pro Server and Microsoft Exchange. IMS consists of a number of components.
• IMS Voice Service and Gateway Service These are installed onto the Voicemail Pro Server PC.
• IMS Administration Tool Installs onto the Voicemail Pro Server PC. Can be installed on another networked PC if required.
• IMS Client Package Each IMS user requires an IMS client installed on their PC.
• Campaign Web Component Allows agents to access campaign messages through Microsoft Internet Explorer 5 or higher (not Netscape).
Number of Simultaneous Voicemail Users
Voicemail Pro Installation and Maintenance Page 15 IP Office 3.1 Issue 14f (28th September 2005)
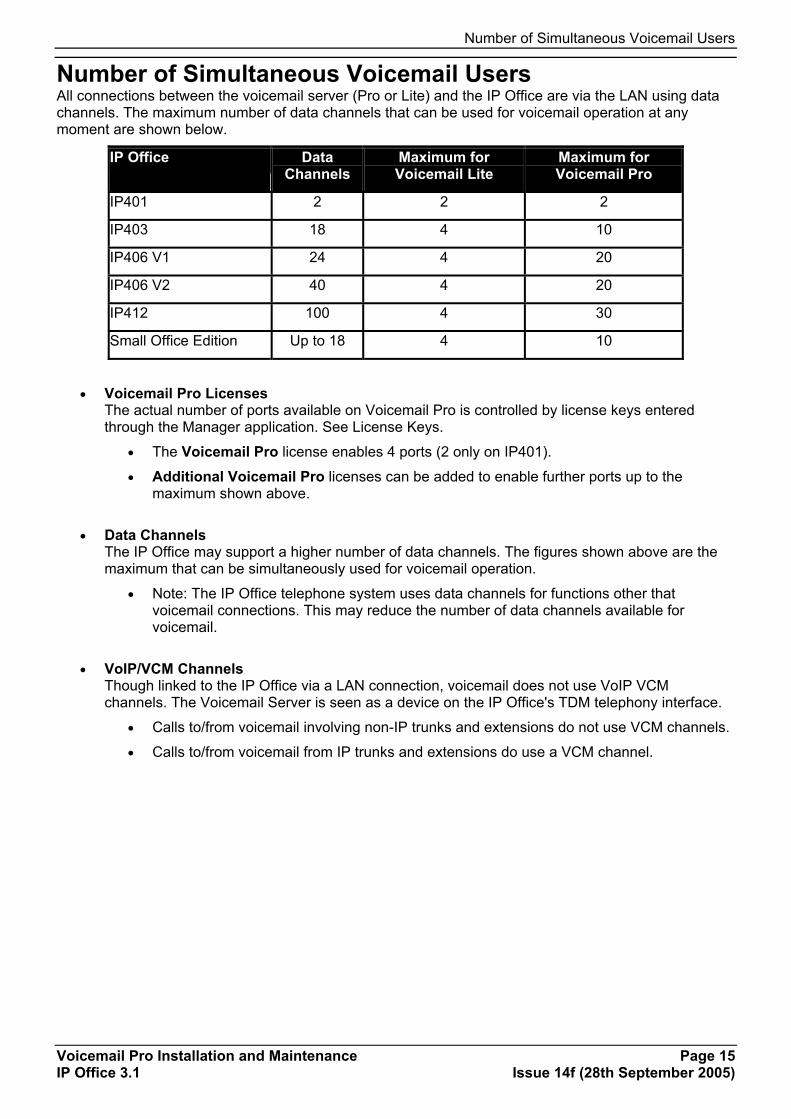
Number of Simultaneous Voicemail Users All connections between the voicemail server (Pro or Lite) and the IP Office are via the LAN using data channels. The maximum number of data channels that can be used for voicemail operation at any moment are shown below.
IP Office Data Channels
Maximum for Voicemail Lite
Maximum for Voicemail Pro
IP401 2 2 2
IP403 18 4 10
IP406 V1 24 4 20
IP406 V2 40 4 20
IP412 100 4 30
Small Office Edition Up to 18 4 10
• Voicemail Pro Licenses The actual number of ports available on Voicemail Pro is controlled by license keys entered through the Manager application. See License Keys.
• The Voicemail Pro license enables 4 ports (2 only on IP401).
• Additional Voicemail Pro licenses can be added to enable further ports up to the maximum shown above.
• Data Channels The IP Office may support a higher number of data channels. The figures shown above are the maximum that can be simultaneously used for voicemail operation.
• Note: The IP Office telephone system uses data channels for functions other that voicemail connections. This may reduce the number of data channels available for voicemail.
• VoIP/VCM Channels Though linked to the IP Office via a LAN connection, voicemail does not use VoIP VCM channels. The Voicemail Server is seen as a device on the IP Office's TDM telephony interface.
• Calls to/from voicemail involving non-IP trunks and extensions do not use VCM channels.
• Calls to/from voicemail from IP trunks and extensions do use a VCM channel.

Voicemail
Voicemail Pro Installation and Maintenance Page 16 IP Office 3.1 Issue 14f (28th September 2005)
User, Group and Mailbox Names The voicemail server creates mailboxes based on the user and hunt group names entered in the IP Office Manager application. Whenever either the voicemail server or the Control Unit restart, new mailboxes are created for any new names found.
This method of operation has the following consequences:
• WARNING: Mailboxes are based on names For all users and groups, if their name is changed, they may no longer be associated with their former mailbox and any associated Voicemail Pro start points.
• WARNING: Voicemail is case sensitive Voicemail is case sensitive. If a mailbox or start point name is entered incorrectly within a Manager or Voicemail Pro, the intended operation will not occur and the call may be disconnected.
• WARNING: Voicemail removes spaces at the end of mailbox names If spaces are left at the end of a mailbox user's name within Manager, when Voicemail creates the mailbox, the space at the end of the name is dropped. When this occurs the mailbox cannot be found as there is a mismatch between the user name and directory.

Language Support
Voicemail Pro Installation and Maintenance Page 17 IP Office 3.1 Issue 14f (28th September 2005)
Language Support The voicemail system will attempt to provide prompts to callers and mailbox users based on the Locale set in the IP Office Manager application's System form.
If the necessary set of language prompts are not available, the nearest available match is used. See Voicemail Pro Language Switching.
Individual users can have their own Locale setting. Voicemail will then provide them with appropriate language prompts if available. This is done either through the Manager application's User form or through the language choice on some telephones (refer to the appropriate telephone User Guides).
The following languages can be installed with Voicemail Pro:
• Chinese (Mandarin).
• Danish.
• Dutch.
• English (UK).
• English (US).
• Finnish.
• French.
• French (Canadian).
• German.
• Greek.
• Hungarian.
• Italian.
• Japanese.
• Korean.
• Norwegian.
• Polish.
• Portuguese.
• Portuguese Brazilian.
• Russian.
• Spanish.
• Spanish (Latin).
• Swedish.
• TTY (see below).
• Supported Languages and Countries
The availability of a language within voicemail does not necessarily indicate support for IP Office in a country that uses that language. Contact your local Avaya office for details of which countries support IP Office.
• TTY: TTY appears in the list of installable languages. TTY is a text based system used to provide service to the hearing impaired. See Voicemail Pro TTY Prompts
Voicemail
Voicemail Pro Installation and Maintenance Page 18 IP Office 3.1 Issue 14f (28th September 2005)
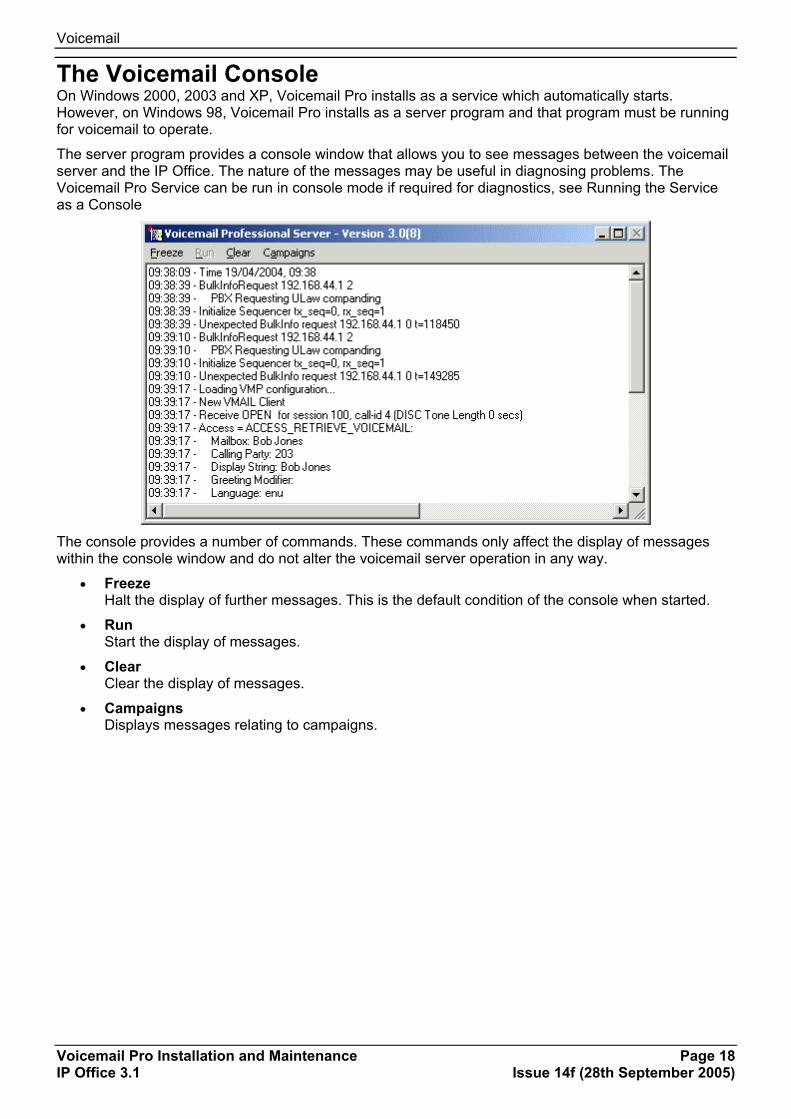
The Voicemail Console On Windows 2000, 2003 and XP, Voicemail Pro installs as a service which automatically starts. However, on Windows 98, Voicemail Pro installs as a server program and that program must be running for voicemail to operate.
The server program provides a console window that allows you to see messages between the voicemail server and the IP Office. The nature of the messages may be useful in diagnosing problems. The Voicemail Pro Service can be run in console mode if required for diagnostics, see Running the Service as a Console
The console provides a number of commands. These commands only affect the display of messages within the console window and do not alter the voicemail server operation in any way.
• Freeze Halt the display of further messages. This is the default condition of the console when started.
• Run Start the display of messages.
• Clear Clear the display of messages.
• Campaigns Displays messages relating to campaigns.

Planning Forms
Voicemail Pro Installation and Maintenance Page 19 IP Office 3.1 Issue 14f (28th September 2005)
Planning Forms System Planning Form Completing the details within this form will help ensure a successful installation and implementation of Voicemail Pro. It may be necessary for both the customer and the installer to go through this form several times before installation.
A. Contacts 1. Principal Customer Contact: ____________________
(This should be someone nominated by the customer able to approve installation decisions and choices).
• Telephone: ________________
• Fax: _________________
• Email: ________________________
2. Customer Technical Contact: _____________________ (This should be someone familiar with the existing data/telephony systems and able to arrange or authorize items such as PC User accounts, server reboots, etc).
• Telephone: ________________
• Fax: _________________
• Email: ________________________
3. Target Service Date: ________________________
B. General 1. Site Name: __________________________
2. Address: _________________________________________________________
3. Normal Business Hours: _____________________________________________
4. IP Office system type: • IP401 (2), Small Office Edition (10), IP403 (10), IP406 V1 (20), IP406 V2
(20), IP412 (30).
4. Number of Simultaneous Voicemail Accesses Required: _____ (Cannot exceed figure in brackets for the IP Office system type above).
5. Mailbox Operation Mode: Intuity emulation mode (default), IP Office mode. 6. Upgrading from existing Voicemail Lite? Yes / No
• Is existing VM Lite server PC being reused for VM Pro? Yes / No. PC Spec: __________________________________
7. Internal Fax Extension Number: ______________________ (Voicemail Pro can be set to forward fax calls to this number)
8. Play advice on call recording: Yes / No

Voicemail
Voicemail Pro Installation and Maintenance Page 20 IP Office 3.1 Issue 14f (28th September 2005)
C. Message Storage Required 1. Number of users: _____
2. Number of hunt groups: _______
3. Maximum Message Length in minutes: _______ (Default is 2 minutes)
4. Average number of messages per mailbox: _______
5. Minimum message storage space required ((1+2) x 3 x 4) = ___________ MB.
D. Housekeeping Settings 1. Delete new messages after: ____ Hours (Default 0 = Never).
2. Delete old messages after: ____ Hours (Default 720 = 30 days).
3. Delete saved messages after: ____ Hours (Default 0 = Never).
4. Delete unopened messages: ____ Hours (Default 0 = Never).
E. Language Support Required Note: By default the installation software will always install either English (UK) or English (US) in addition to the selected installation language.
1. Chinese, Danish, Dutch, English (UK), English (US), Finnish, French, French (Canadian), German, Greek, Hungarian, Italian, Japanese, Korean, Norwegian, Polish, Portuguese, Portuguese Brazilian, Russian, Spanish, Spanish (Latin), Swedish.
F. Installation Summary 1. IP Office: Already installed, New install.
2. IP Office Manager: Already installed, New install/Move to VMPro server.
3. Feature Key: Already installed, New install/Move to VMPro server.
4. Voicemail Pro Components: • Upgrade Voicemail Lite
• Web Campaigns
• Install Web Server on VM Pro server PC.
• Voicemail Email
• MAPI
• SMTP
• IMS
• TTS
• TTS Email Reading
• Networked Messaging
• Install SMTP Server on VM Pro server PC.
Planning Forms
Voicemail Pro Installation and Maintenance Page 21 IP Office 3.1 Issue 14f (28th September 2005)
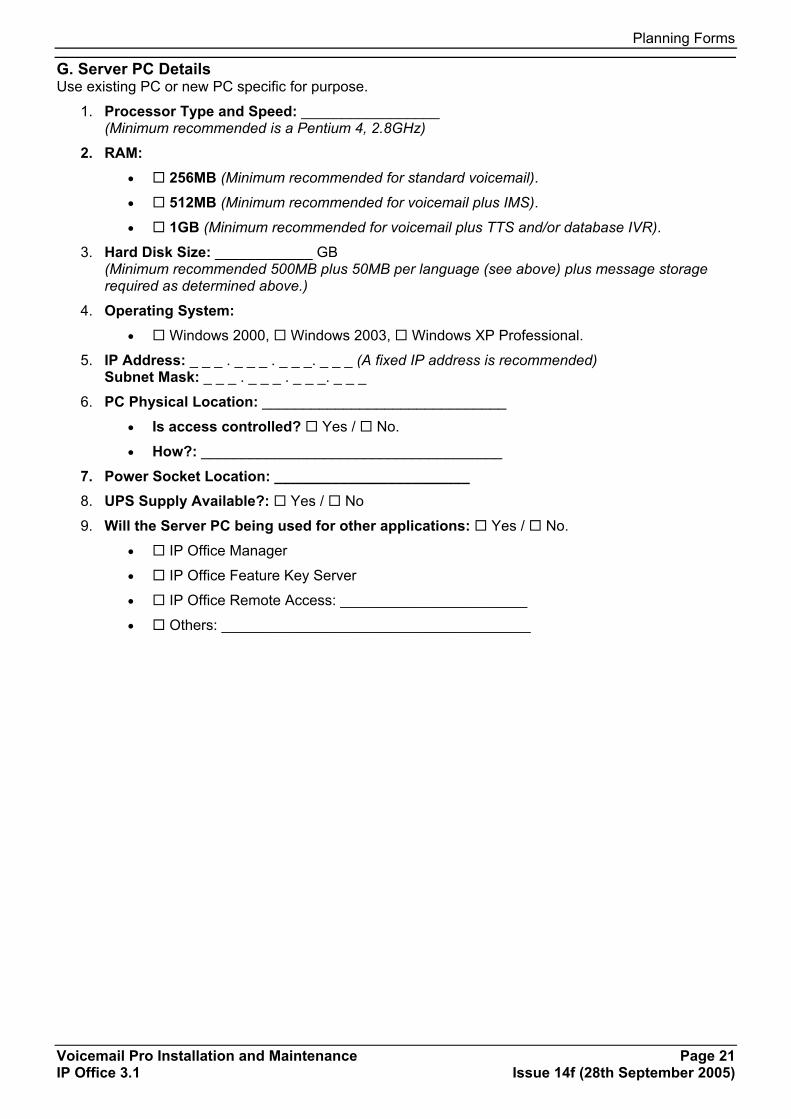
G. Server PC Details Use existing PC or new PC specific for purpose.
1. Processor Type and Speed: _________________ (Minimum recommended is a Pentium 4, 2.8GHz)
2. RAM: • 256MB (Minimum recommended for standard voicemail).
• 512MB (Minimum recommended for voicemail plus IMS).
• 1GB (Minimum recommended for voicemail plus TTS and/or database IVR).
3. Hard Disk Size: ____________ GB (Minimum recommended 500MB plus 50MB per language (see above) plus message storage required as determined above.)
4. Operating System: • Windows 2000, Windows 2003, Windows XP Professional.
5. IP Address: _ _ _ . _ _ _ . _ _ _. _ _ _ (A fixed IP address is recommended) Subnet Mask: _ _ _ . _ _ _ . _ _ _. _ _ _
6. PC Physical Location: ______________________________
• Is access controlled? Yes / No.
• How?: _____________________________________
7. Power Socket Location: ________________________ 8. UPS Supply Available?: Yes / No
9. Will the Server PC being used for other applications: Yes / No.
• IP Office Manager
• IP Office Feature Key Server
• IP Office Remote Access: _______________________
• Others: ______________________________________

Voicemail
Voicemail Pro Installation and Maintenance Page 22 IP Office 3.1 Issue 14f (28th September 2005)
H. License & Feature Keys 1. Does the site already have an IP Office Feature Key installed? Yes / No.
2. Feature Key Type: • Serial Port Key, Parallel Port Key, USB Port Key.
3. Feature Key Serial Number: ________________________
4. If Feature Key not already installed, is installation planned to be part of the Voicemail Pro installation? Yes / No.
• If not a Serial Port Feature Key, please detail PC for Feature Key Server operation if different from planned Voicemail Pro server PC: _____________________________
5. Licenses: • Voicemail Pro (4 ports): _________________________ (Mandatory)
• Additional 2 ports: __________________________
• Additional 4 ports: __________________________
• Additional 8 ports: __________________________
• Additional 16 ports: __________________________
• Integrated Messaging (IMS): ______________________
• VB Scripting: _______________________
• Database Interface: _____________________
• TTS Generic: ________________________ (per simultaneous usage)
• TTS Scansoft: ________________________ (per simultaneous usage)
• Networked Messaging: _______________________
• VRL Recording Administrators: ____________________
I. Installation/Service Account The Voicemail Pro should be installed using an account with full administrator rights to the server PC. It is also recommended that the service run using that same account. A new user account called Voicemail is recommended.
For installations where an exchange server is involved (MAPI Voicemail Email, IMS), configuration of a matching exchange service account is recommended.
1. Account Verification: Domain server, Local PC.
2. Account created: Yes.
3. User name: _________________
4. Password: __________________
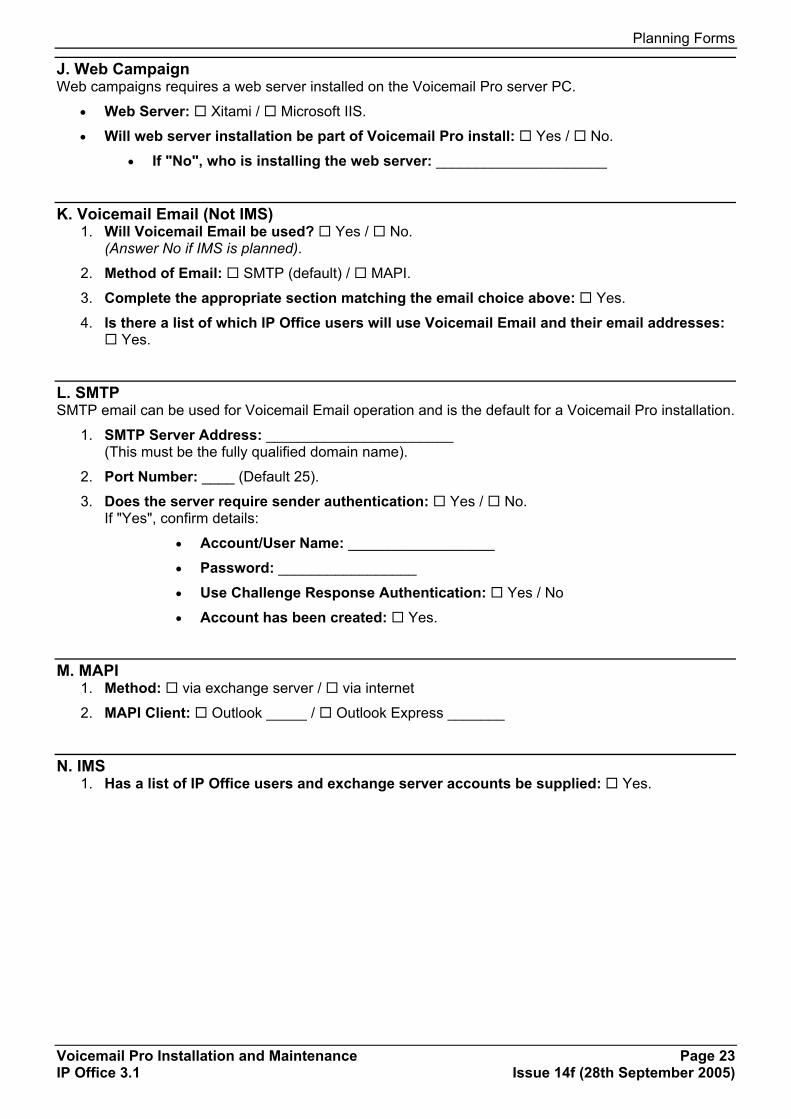
Planning Forms
Voicemail Pro Installation and Maintenance Page 23 IP Office 3.1 Issue 14f (28th September 2005)
J. Web Campaign Web campaigns requires a web server installed on the Voicemail Pro server PC.
• Web Server: Xitami / Microsoft IIS.
• Will web server installation be part of Voicemail Pro install: Yes / No.
• If "No", who is installing the web server: _____________________
K. Voicemail Email (Not IMS) 1. Will Voicemail Email be used? Yes / No.
(Answer No if IMS is planned).
2. Method of Email: SMTP (default) / MAPI.
3. Complete the appropriate section matching the email choice above: Yes.
4. Is there a list of which IP Office users will use Voicemail Email and their email addresses: Yes.
L. SMTP SMTP email can be used for Voicemail Email operation and is the default for a Voicemail Pro installation.
1. SMTP Server Address: _______________________ (This must be the fully qualified domain name).
2. Port Number: ____ (Default 25).
3. Does the server require sender authentication: Yes / No. If "Yes", confirm details:
• Account/User Name: __________________
• Password: _________________
• Use Challenge Response Authentication: Yes / No
• Account has been created: Yes.
M. MAPI 1. Method: via exchange server / via internet
2. MAPI Client: Outlook _____ / Outlook Express _______
N. IMS 1. Has a list of IP Office users and exchange server accounts be supplied: Yes.

Voicemail
Voicemail Pro Installation and Maintenance Page 24 IP Office 3.1 Issue 14f (28th September 2005)
O. TTS (Text to Speech) 1. TTS Required: Yes / No
2. TTS Languages Required: • Generic TTS: US English, Simplified Chinese
(These are installed by default as part of Voicemail Pro).
• Avaya ScanSoft TTS: Chinese, Dutch, English (UK), English (US), French, German, Italian, Japanese, Korean, Norwegian, Portuguese Brazilian, Russian, Spanish, Spanish (Latin).
3. Maximum Number of Simultaneous TTS Usages: ___________
4. Do the choices for item 2 (Generic or Avaya ScanSoft) and 3 match the type and number of licenses specified in the Licenses section? Yes.
P. VPNM (Voicemail Pro Networked Messaging) VPNM requires an SMTP server to be installed on the Voicemail Pro server PC.
1. Has a VMPro Networked Messaging license key been obtained: Yes. (Refer to section H).
2. SMTP Server Software: _____________________
3. Who will install the SMTP server onto the Voicemail Pro Server PC? ______________
4. What will be the Voicemail Pro server PC's fully qualified domain name? ________________
5. Is there a list of the following for each remote site: Yes.
• The fully qualified domain name of the remote sites Voicemail Pro server PC or Avaya Interchange server.
• The full name of each remote site user, their extension number and the full number to dial to reach that user from the local site.
Q. Customization Record details of any further customization and setup that the customer requires. For example any auto-attendant call flow creation and routing.

Voicemail Pro Installation and Maintenance Page 25 IP Office 3.1 Issue 14f (28th September 2005)
Voicemail Pro Installation Installation Requirements Check that the following requirements have been meet before proceeding with any installation.
General Requirements • If not already installed, an IP Office Feature Key Server must be installed. This can be installed
onto the same PC as the Voicemail Pro Server.
• License for Voicemail Pro and any additional ports required, see License Keys. If Voicemail Pro server is installed without a license it will run for 2 hours and then shutdown.
• License for all aspects of Voicemail Pro being installed.
• IP Office Voicemail Pro CD.
• Installation on the same PC as being used for IP Office Manager is recommended.
• Switch off any PC and hard disk sleep, power down, suspend, hibernation modes.
• The Voicemail Pro software needs to be installed using an account with full administrator rights on the PC and the service subsequently runs under that account. We recommend that an specific account is created for this purpose and set so that its password does not expire.
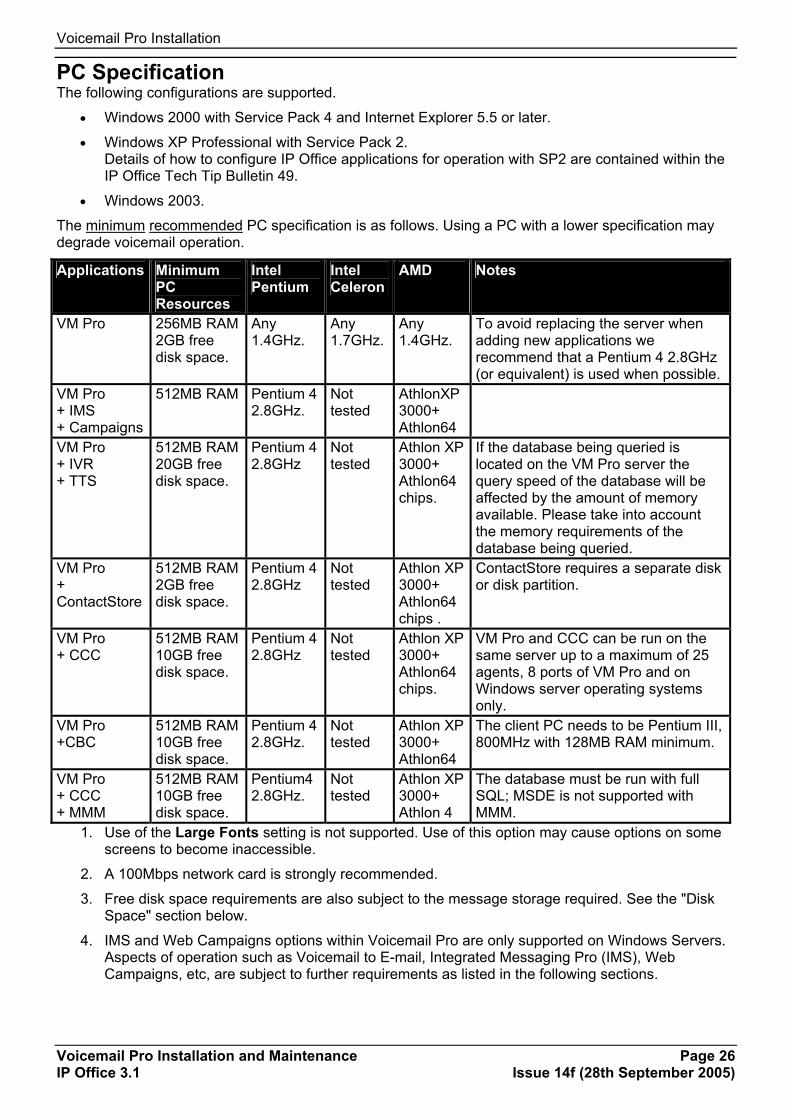
Voicemail Pro Installation
Voicemail Pro Installation and Maintenance Page 26 IP Office 3.1 Issue 14f (28th September 2005)
PC Specification The following configurations are supported.
• Windows 2000 with Service Pack 4 and Internet Explorer 5.5 or later.
• Windows XP Professional with Service Pack 2. Details of how to configure IP Office applications for operation with SP2 are contained within the IP Office Tech Tip Bulletin 49.
• Windows 2003.
The minimum recommended PC specification is as follows. Using a PC with a lower specification may degrade voicemail operation.
Applications Minimum PC Resources
Intel Pentium
Intel Celeron
AMD Notes
VM Pro 256MB RAM2GB free disk space.
Any 1.4GHz.
Any 1.7GHz.
Any 1.4GHz.
To avoid replacing the server when adding new applications we recommend that a Pentium 4 2.8GHz (or equivalent) is used when possible.
VM Pro + IMS + Campaigns
512MB RAM
Pentium 4 2.8GHz.
Not tested
AthlonXP 3000+ Athlon64
VM Pro + IVR + TTS
512MB RAM20GB free disk space.
Pentium 4 2.8GHz
Not tested
Athlon XP 3000+ Athlon64 chips.
If the database being queried is located on the VM Pro server the query speed of the database will be affected by the amount of memory available. Please take into account the memory requirements of the database being queried.
VM Pro + ContactStore
512MB RAM2GB free disk space.
Pentium 4 2.8GHz
Not tested
Athlon XP 3000+ Athlon64 chips .
ContactStore requires a separate disk or disk partition.
VM Pro + CCC
512MB RAM10GB free disk space.
Pentium 4 2.8GHz
Not tested
Athlon XP 3000+ Athlon64 chips.
VM Pro and CCC can be run on the same server up to a maximum of 25 agents, 8 ports of VM Pro and on Windows server operating systems only.
VM Pro +CBC
512MB RAM10GB free disk space.
Pentium 4 2.8GHz.
Not tested
Athlon XP 3000+ Athlon64
The client PC needs to be Pentium III, 800MHz with 128MB RAM minimum.
VM Pro + CCC + MMM
512MB RAM10GB free disk space.
Pentium4 2.8GHz.
Not tested
Athlon XP 3000+ Athlon 4
The database must be run with full SQL; MSDE is not supported with MMM.
1. Use of the Large Fonts setting is not supported. Use of this option may cause options on some screens to become inaccessible.
2. A 100Mbps network card is strongly recommended.
3. Free disk space requirements are also subject to the message storage required. See the "Disk Space" section below.
4. IMS and Web Campaigns options within Voicemail Pro are only supported on Windows Servers. Aspects of operation such as Voicemail to E-mail, Integrated Messaging Pro (IMS), Web Campaigns, etc, are subject to further requirements as listed in the following sections.

Installation Requirements
Voicemail Pro Installation and Maintenance Page 27 IP Office 3.1 Issue 14f (28th September 2005)
Network The PC should be configured and tested for TCP/IP networking.
• We strongly recommend that the voicemail server PC is connected to the IP Office Control Unit directly or via a LAN switch.
• If directly connected, changing the settings of the PC network card to match the IP Office control unit can resolve some issues. This should be done according to the PC or network card manufacturer's instructions. The options for IP Office LAN ports are:
• IP401, IP403 and IP406 (V1): Half duplex.
• IP412: Use LAN1 and half duplex.
• Small Office Edition and IP406 (V2): Full duplex.
• All IP Office LAN ports are 10Mbps/100Mbps auto sensing.
• If not directly connected, using any of the above settings must be supported and matched by the intervening network equipment.
• The PC should have a fixed IP address. Whilst PC's in a DHCP network may retain the same IP address between reboots this is not guaranteed.
• If the IP Office is acting as a DHCP server, it defaults to using 192.168.42.2 to 192.168.42.201 for DHCP clients. This leaves 192.168.42.202 to 192.168.42.254 for devices that require fixed IP addresses.
Disk Space A compact or typical installation requires 500MB for the Voicemail Pro software. A full installation requires up to 2GB of disk space. However prompts and recorded messages consume an additional 1MB of disk space per minute.
• For Avaya IP Office - Small Office Edition, you can expect to require at least 200 minutes of message recording space, that is 200MB.
• For a busy environment you can expect to require at least 1,000 minutes of message recording space, that is 1GB.
Web Server Operation If web browser access to campaigns is required, one of the following web servers must be installed on the server PC before Voicemail Pro. Note that both the Microsoft web server products run as services and require Voicemail Pro to also run as a service, that is on Windows 2000, 2003 or XP.
• Xitami Web Server.
• Microsoft IIS Web Server.
• Microsoft Personal Web Server.

Voicemail Pro Installation
Voicemail Pro Installation and Maintenance Page 28 IP Office 3.1 Issue 14f (28th September 2005)
Voicemail Email Connection Voicemail Email operation is supported using either MAPI or SMTP. MAPI requires the Voicemail Pro server PC to have a MAPI compliant email client install. See Voicemail Email Integration.
If Text to Speech is installed, email text to speech is supported using MAPI. See Email Reading.
In both cases above, full email sending from the server PC to users PC should be configured and tested before Voicemail Pro installation using the same PC user account under Voicemail Pro will be installed.
IMS Pro Connection IMS requires the Voicemail server to use MAPI.
• Integrated Messaging Pro (IMS) is supported on Microsoft Exchange 5.5, 2000 and 2003. The R3.0GA release of Voicemail Pro does not support IMS operation with Outlook 2003 operating in cache mode. The R3.0 maintenance release will provide this support.
• An Exchange User account for user 'IMSAdmin' will be needed to as part of IMS installation.
• Must be a member of the same Domain as Voicemail Pro Server.
• A list equating Exchange User account names with voicemail box users.
ContactStore (VRL) Operation The current IP Office Voice Recording Library (VRL) application is Avaya ContactStore for IP Office. This application and its installation are documented separately. However:
• Avaya ContactStore for IP Office should be installed after Voicemail Pro has been installed and its operation verified.
• Avaya ContactStore for IP Office must use a separate hard disk partition for its message archiving from that used by Voicemail Pro for current mailbox messages. Use of a separate hard disk or installation onto a separate server PC are alternatives.
• The use of RAID 1 or RAID 5 are recommended.
• The use of a DVD recorder for long-term archiving is recommended.
• A figure of 7.2MB per hour of archived recordings is given.
• The archived messages held by Avaya ContactStore for IP Office are accessed via web browser using the port address 8888. This port address is not configurable and so it is necessary to ensure that it does not conflict with any other web server service running on the same server PC.

Voicemail Pro Licenses
Voicemail Pro Installation and Maintenance Page 29 IP Office 3.1 Issue 14f (28th September 2005)
Voicemail Pro Licenses The following License Keys can be used with Voicemail Pro. The license keys are entered into the IP Office configuration using either the IP Office Manager application or the IP Office Wizard.
• Port Licenses These control the use of Voicemail Pro and the number of ports (simultaneously connected calls into/from the Voicemail Pro server). Note: The maximum number of ports supported for voicemail operation is set by the type of IP Office control unit, see Number of Simultaneous Voicemail Users. Multiple port licenses used to achieve the number of port required.
• Voicemail Pro (4 ports) - Enables Voicemail Pro for up to 4 ports.
• Additional Voicemail Pro (2 ports) - Enables 2 additional Voicemail Pro ports.
• Additional Voicemail Pro (4 ports) - Enables 4 additional Voicemail Pro ports.
• Additional Voicemail Pro (8 ports) - Enables 8 additional Voicemail Pro ports.
• Additional Voicemail Pro (16 ports) - Enables 16 additional Voicemail Pro ports.
• Voicemail Pro Feature Licenses These licenses enable the use of specific features within Voicemail Pro.
• Integrated Messaging - Enables operation of IMS with Voicemail Pro.
• VMPro VB Script - Enables use of VB Scripting through the VB Script action.
• VMPro Database Interface - Enables database integration within call flows.
• VMPro TTS (Generic) - Enables use of text to speech facilities using the default Windows and third party TTS engines. One license per simultaneous instance of TTS usage.
• VMPro TTS (ScanSoft) - Enables use of text to speech facilities using Avaya supplied TTS (ScanSoft) engines. One license per simultaneous instance of TTS usage.
• Networked Messaging - Enables the use of Voicemail Pro Network Messaging.
• VMPro Recording Administrators - Allows call recordings to be transferred to a VRL (Voice Recording Library) application.
Voicemail Pro Installation
Voicemail Pro Installation and Maintenance Page 30 IP Office 3.1 Issue 14f (28th September 2005)
Upgrading from Voicemail Lite The process below assumes that the Voicemail Pro is being installed onto the same PC as hosted Voicemail Lite.
1. Remove Voicemail Lite This stage will remove Voicemail Lite. It will not remove the existing mailbox messages and greetings. Those files and folders will need to be moved in a later step.
1. Start Control Panel and select Add/Remove Programs.
2. Select IP Office Admin Suite and click Change/Remove.
3. Once the InstallShield Wizard has started, select Modify and click Next >.
4. In the list of selected Features, untick Voice Mail. • Do not untick any other features as this will also remove those features.
5. When the update has completed, close the Add/Remove Programs window and the Control Panel.
6. Check that any shortcuts to VMLite.exe have been removed from Start | Programs | Startup.
2. Install Voicemail Pro Using the processes outline in this documentation, install Voicemail Pro.
3. Move the Voicemail Lite Folders This stage copies the existing Voicemail Lite messages and greetings over the newly installed Voicemail Pro set. This must be done before users start to actively use the Voicemail Pro.
1. Using Windows Explorer or My Computer, locate the folder C:\Program Files\Avaya\IP Office\Voicemail Server.
2. Highlight all the sub-folders and files within that folder. Right-click and select Copy.
3. Locate the folder C:\Program Files\Avaya\IP Office\Voicemail Pro\VM.
4. Right-click and select Paste.
5. A Confirm Folder Replace message will appear. Click Yes to All. 4. Select the Mailbox Mode
Voicemail Lite runs in IP Office mailbox mode. By default Voicemail Pro installs in Intuity mailbox mode. If required by the users, Voicemail Pro can be set back to IP Office mailbox mode.
1. Start the Voicemail Pro Client.
2. Click the preferences icon and select General. 3. On the General tab, change the Default Telephony Interface from Intuity to IP Office.
4. Click OK.
5. Click Save & Make Live.

Upgrading an Existing Voicemail Pro System
Voicemail Pro Installation and Maintenance Page 31 IP Office 3.1 Issue 14f (28th September 2005)
Upgrading an Existing Voicemail Pro System It is vitally important that the settings of an existing Voicemail Pro are exported before any upgrade. Whilst folders containing prompts and messages are not affected by the upgrade process, the editable version of the customers call flow is lost.
1. Export the Voicemail Pro Database Before removing Voicemail Pro, you should create a backup copy of the call flow database. This will contain any customizations made to the default call flow. You should also backup the registry settings specific to Voicemail Pro.
1. Start the Voicemail Pro GUI.
2. From the File menu, select the option Import or Export. 3. Select the option Export call flows and click Next. 4. Enter a file path and file name ending in .mdb, for example C:\temp\backup.mdb. Click Next. 5. Click Finish to start the export then click Close to complete the export procedure.
6. Close the program.
2. Backup the Voicemail Pro Registry 1. Insert the Voicemail Pro CD for the new Voicemail Pro and cancel the install wizard that auto
runs.
2. Right-click on the CD drive and select Open.
3. Locate the file backupreg.bat and double-click it to run the application. This backs up any registry settings associated with Voicemail Pro.
3. Uninstall Voicemail Pro 1. Open the Windows Control Panel.
2. Select Add/Remove Programs.
3. Select IP Office Voicemail Pro and click Add/Remove.
4. From the options offered select Remove and click Next. 5. Follow any prompts given during the removal process.
6. When the process has been completed select the option Yes, I want to restart my computer now and click Finish.
Voicemail Pro Installation
Voicemail Pro Installation and Maintenance Page 32 IP Office 3.1 Issue 14f (28th September 2005)
4. Restoring the Voicemail Pro Registry 1. Right-click on the CD drive containing the Voicemail Pro CD and select Open (reinsert the CD if
necessary and cancel the install wizard).
2. Locate the file restorereg.bat and double-click it to run the application. This restores the registry settings previously associated with Voicemail Pro.
3. Start the Voicemail Pro GUI.
4. From the File menu select the option Import or Export. 5. Select the option Import Call Flows and click Next. 6. Use the Browse button to locate the backup file then click Next. 7. Click Finish to start the import then click Close to complete the import procedure.
5. Upgrade Installation Refer to the sections appropriate to the type of Voicemail Pro installation being attempted.
6. Restoring the Voicemail Pro Database & Registry 1. Start the Voicemail Pro GUI.
2. From the File menu select the option Import or Export. 3. Select the option Import Call Flows and click Next. 4. Use the Browse button to locate the backup file then click Next. 5. Click Finish to start the import then click Close to complete the import procedure.

Voicemail Pro Installation Types
Voicemail Pro Installation and Maintenance Page 33 IP Office 3.1 Issue 14f (28th September 2005)
Voicemail Pro Installation Types When the Voicemail Pro installation CD is inserted, one of the first stages of the installation wizard is to determine the installation type.
The options are:
• ACM Gateway This mode is used to provide voicemail support for an Avaya G.150 unit being used as a branch office gateway to ACM with Modular Messaging. Documentation for the installation and setup for such a system, including the voicemail aspects, is covered in separate Avaya G.150 documentation.
• Compact This mode installs the minimum components for basic voicemail operation, that is the Voicemail Pro server or service, the Voicemail Pro Client application and the prompts appropriate to the selected installation language. See Basic Voicemail Pro (Compact) Software Installation.
• Typical This mode install the components for basic voicemail operation plus those required for web campaigns. It requires a suitable web server to be pre-installed on the Voicemail Pro Server PC. See Voicemail Pro with Web Campaigns (Typical) Software Installation.
• Custom This mode allows full selection of which components are installed. The only exception is the selection of Voicemail Pro server or service which will be overridden to match the Windows version. This mode is used for installation of IMS (see Integrated Messaging Service (IMS)) or Networked Messaging (see VPNM).
• Text to Speech (TTS) TTS is installed as a standard component of Voicemail Pro though it must be licensed before use. See Text to Speech

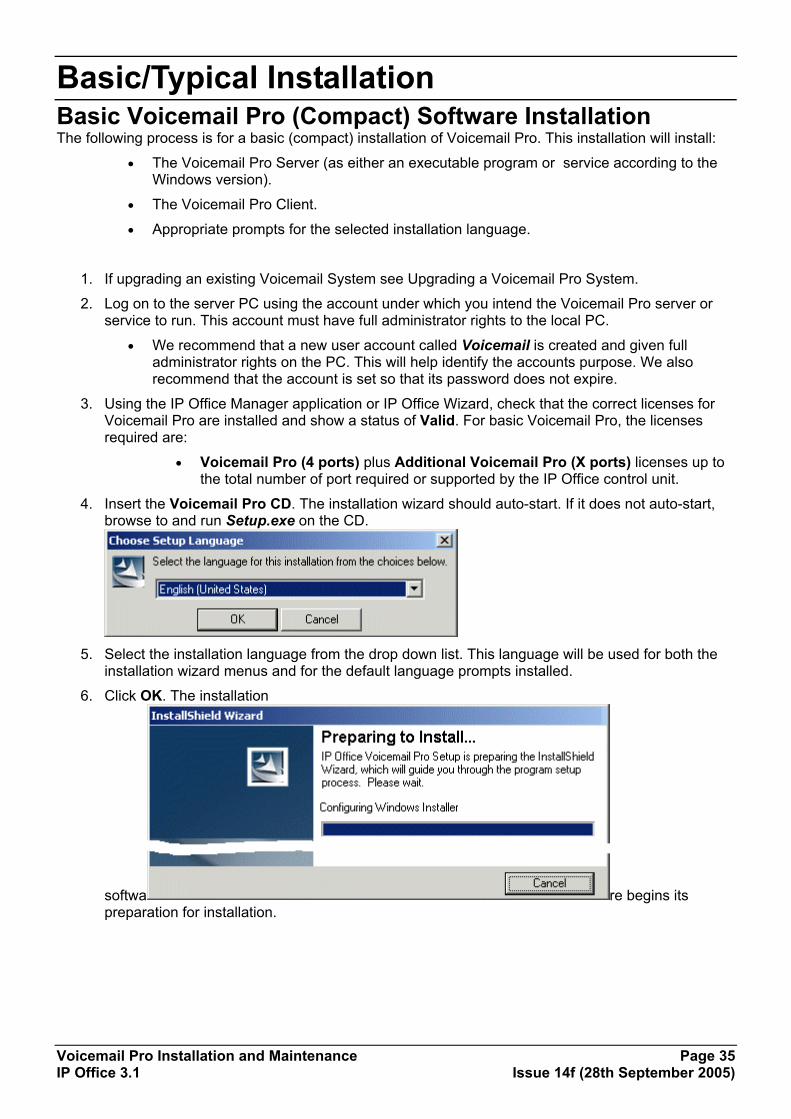
Voicemail Pro Installation and Maintenance Page 35 IP Office 3.1 Issue 14f (28th September 2005)
Basic/Typical Installation Basic Voicemail Pro (Compact) Software Installation The following process is for a basic (compact) installation of Voicemail Pro. This installation will install:
• The Voicemail Pro Server (as either an executable program or service according to the Windows version).
• The Voicemail Pro Client.
• Appropriate prompts for the selected installation language.
1. If upgrading an existing Voicemail System see Upgrading a Voicemail Pro System.
2. Log on to the server PC using the account under which you intend the Voicemail Pro server or service to run. This account must have full administrator rights to the local PC.
• We recommend that a new user account called Voicemail is created and given full administrator rights on the PC. This will help identify the accounts purpose. We also recommend that the account is set so that its password does not expire.
3. Using the IP Office Manager application or IP Office Wizard, check that the correct licenses for Voicemail Pro are installed and show a status of Valid. For basic Voicemail Pro, the licenses required are:
• Voicemail Pro (4 ports) plus Additional Voicemail Pro (X ports) licenses up to the total number of port required or supported by the IP Office control unit.
4. Insert the Voicemail Pro CD. The installation wizard should auto-start. If it does not auto-start, browse to and run Setup.exe on the CD.
5. Select the installation language from the drop down list. This language will be used for both the
installation wizard menus and for the default language prompts installed.
6. Click OK. The installation
softwa re begins its preparation for installation.

Basic/Typical Installation
Voicemail Pro Installation and Maintenance Page 36 IP Office 3.1 Issue 14f (28th September 2005)
7. If the following screen appears, then a Voicemail Pro is already installed. See Upgrading an Existing System.
8. Otherwise the InstallShield Wizard for IP Office Voicemail Pro will be started.
9. Click Next >.
10. Enter a user name and the company name. These settings do not affect the installed application.
11. Select who should be able to use the Voicemail Pro client after installation on the server PC. Selecting Anyone who uses this computer (all users) is recommended.

Basic Voicemail Pro (Compact) Software Installation
Voicemail Pro Installation and Maintenance Page 37 IP Office 3.1 Issue 14f (28th September 2005)
12. Click Next > to continue.
13. Select Compact. The use of the other options is discussed in other sections along with any other
installation and pre-installation actions appropriate to those installation types.
14. Click on Next >.
15. Enter the User name and Password for the user account under which the Voicemail Pro service should log on and run. This should be an account with full administrator rights to the local PC. The Browse button can be used to browse the available PC or network accounts.
16. Click Next >. The account details entered above are verified. Entering a new user name will result in prompts to create a new PC user account with that name.
17. Select the program folder into which icons for the Voicemail Pro components should be added.

Basic/Typical Installation
Voicemail Pro Installation and Maintenance Page 38 IP Office 3.1 Issue 14f (28th September 2005)
18. Click Next >.
19. A summary of the components that will be installed is shown. Check that this list is as expected. Under Speech Supported check that the languages required are shown. English is always listed in addition to the installation language selected.
20. Click Next > to begin installation of the software.
21. The progress of the software installation is shown until complete.
22. Following installation, a request to restart the server PC appears. Select Yes, I want to restart my computer now and click Finish.

Basic Voicemail Pro (Compact) Software Installation
Voicemail Pro Installation and Maintenance Page 39 IP Office 3.1 Issue 14f (28th September 2005)
23. Following the server PC's restart, the Voicemail Pro installation wizard appears to complete its installation.
24. The following screen will appear, requesting entry of email account for outgoing emails from the Voicemail Pro server. Click Next >.
25. This menu is used to set user names and passwords for applications that can access the Voicemail Pro server. See User Management for more details. Note: This tab is currently not used in Voicemail Pro 3.0 and may be hidden.
26. The next screen request details of the SMTP server to which the Voicemail Pro server should
send messages.

Basic/Typical Installation
Voicemail Pro Installation and Maintenance Page 40 IP Office 3.1 Issue 14f (28th September 2005)
27. Click Finish. The installation wizard will attempt to validate the email settings.
28. This will cause an error message when the wizard fails to connect with a SMTP server. Click OK.
29. The software installation stage is now complete. Continue to Starting the Voicemail Pro Server.

Voicemail Pro with Web Campaigns (Typical) Software Installation
Voicemail Pro Installation and Maintenance Page 41 IP Office 3.1 Issue 14f (28th September 2005)
Voicemail Pro with Web Campaigns (Typical) Software Installation The following process is for an installation of Voicemail Pro with support for Web Campaigns. It requires the server PC to have a web server (Xitami, IIS or Microsoft Personal Web Server (PWS)) already installed and operating.
This installation will install:
• The Voicemail Pro Server (as either an executable program or a service).
• The Voicemail Pro Client.
• Appropriate prompts for the selected installation language.
• Components required by the selected Web Server to allow web access to campaign messages.
Voicemail Pro Install 1. If upgrading an existing Voicemail System see Upgrading a Voicemail Pro System.
2. Log on to the server PC using the account under which you intend the Voicemail Pro server or service to run. This account must have full administrator rights to the local PC.
• We recommend that a new user account called Voicemail is created and given full administrator rights on the PC. This will help identify the accounts purpose. We also recommend that the account is set so that its password does not expire.
3. Check that the web server has been installed and is operating correctly. Test that its home page is browseable from other PC's on the customer's network, that is the PC's of users who will want to access campaign messages.
4. Using the IP Office Manager application or IP Office Wizard, check that the correct licenses for Voicemail Pro are installed and show a status of Valid. For Voicemail Pro with Web Campaigns, the licenses required are:
• Voicemail Pro (4 ports) plus Additional Voicemail Pro (X ports) licenses up to the total number of port required or supported by the IP Office control unit.
5. Insert the Voicemail Pro CD. The installation wizard should auto-start. If it does not auto-start, browse to and run Setup.exe on the CD.
6. Select the installation language from the drop down list. This language will be used for both the
installation wizard menus and for the default language prompts installed.

Basic/Typical Installation
Voicemail Pro Installation and Maintenance Page 42 IP Office 3.1 Issue 14f (28th September 2005)
7. Click OK. The installation software begins its preparation for installation.
8. If the following screen appears, then a Voicemail Pro is already installed. See Upgrading an
Existing System.
9. Otherwise the InstallShield Wizard for IP Office Voicemail Pro will be started.

Voicemail Pro with Web Campaigns (Typical) Software Installation
Voicemail Pro Installation and Maintenance Page 43 IP Office 3.1 Issue 14f (28th September 2005)
10. Click Next >.
11. Enter a user name and the company name. These settings do not affect the installed application.
12. Select who should be able to use the Voicemail Pro client after installation on the server PC. Selecting Anyone who uses this computer (all users) is recommended.
13. Click Next > to continue.
14. Select Typical. The use of the other options is discussed in other sections along with any other
installation and pre-installation actions appropriate to those installation types.
15. Click Next >.
16. Select the web server installed on the server PC.

Basic/Typical Installation
Voicemail Pro Installation and Maintenance Page 44 IP Office 3.1 Issue 14f (28th September 2005)
17. Click Next >.
18. Enter or browse to the location of the web servers root directory for web pages. For Xitami the
default is C:\Xitami\webpages. For IIS and PWS the default is C:\Inetpub\wwwroot. 19. Click Next >.
20. Enter or browse to the location of the web servers folder for executable script files. For Xitami the
default is C:\Xitami\cgi-bin.
21. Click Next >.
22. Enter the User name and Password for the user account under which the Voicemail Pro service should log on and run. This should be an account with full administrator rights to the local PC. The Browse button can be used to browse the available PC or network accounts.

Voicemail Pro with Web Campaigns (Typical) Software Installation
Voicemail Pro Installation and Maintenance Page 45 IP Office 3.1 Issue 14f (28th September 2005)
23. Click Next >. The account details entered above are verified. Entering a new user name will result in prompts to create a new PC user account with that name.
24. Select the program folder into which icons for the Voicemail Pro components should be added.
25. Click Next >.
26. A summary of the components that will be installed is shown. Check that this list is as expected. Under Speech Supported check that the languages required are shown. English is always listed in addition to the installation language selected.
27. Click Next > to begin installation of the software.

Basic/Typical Installation
Voicemail Pro Installation and Maintenance Page 46 IP Office 3.1 Issue 14f (28th September 2005)
28. The progress of the software installation is shown until complete.
29. Following installation, a request to restart the server PC appears. Select Yes, I want to restart my computer now and click Finish.
30. Following the server PC's restart, the Voicemail Pro installation wizard appears to complete its installation.
31. The following screen will appear, requesting entry of email account for outgoing SMTP emails
from the Voicemail Pro server. This is part of the Voicemail Email Installation. Click Next >.
32. This menu is used to set user names and passwords for applications that can access the
Voicemail Pro server. See User Management for more details. Note: This tab is currently not used in Voicemail Pro 3.0 and may be hidden.
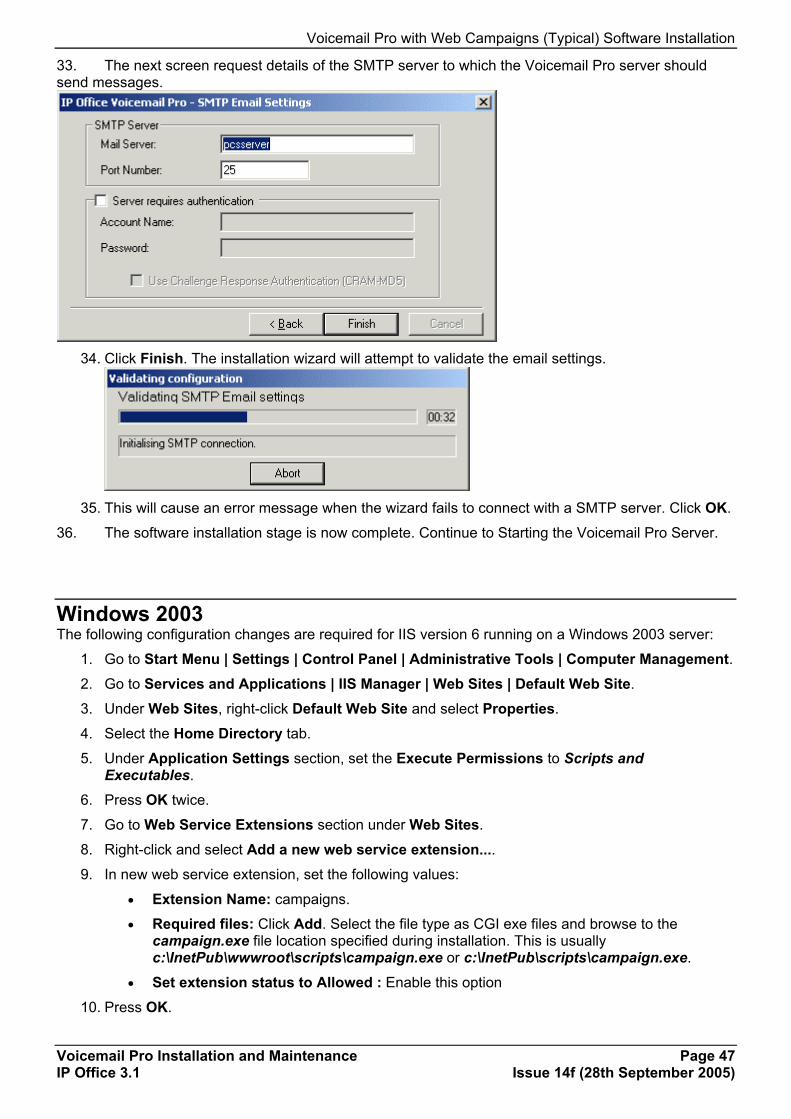
Voicemail Pro with Web Campaigns (Typical) Software Installation
Voicemail Pro Installation and Maintenance Page 47 IP Office 3.1 Issue 14f (28th September 2005)
33. The next screen request details of the SMTP server to which the Voicemail Pro server should send messages.
34. Click Finish. The installation wizard will attempt to validate the email settings.
35. This will cause an error message when the wizard fails to connect with a SMTP server. Click OK.
36. The software installation stage is now complete. Continue to Starting the Voicemail Pro Server.
Windows 2003 The following configuration changes are required for IIS version 6 running on a Windows 2003 server:
1. Go to Start Menu | Settings | Control Panel | Administrative Tools | Computer Management. 2. Go to Services and Applications | IIS Manager | Web Sites | Default Web Site.
3. Under Web Sites, right-click Default Web Site and select Properties.
4. Select the Home Directory tab.
5. Under Application Settings section, set the Execute Permissions to Scripts and Executables.
6. Press OK twice.
7. Go to Web Service Extensions section under Web Sites.
8. Right-click and select Add a new web service extension.... 9. In new web service extension, set the following values:
• Extension Name: campaigns.
• Required files: Click Add. Select the file type as CGI exe files and browse to the campaign.exe file location specified during installation. This is usually c:\InetPub\wwwroot\scripts\campaign.exe or c:\InetPub\scripts\campaign.exe.
• Set extension status to Allowed : Enable this option
10. Press OK.

Basic/Typical Installation
Voicemail Pro Installation and Maintenance Page 48 IP Office 3.1 Issue 14f (28th September 2005)
Starting the Voicemail Pro Server This process consists of two stages; ensuring that the Voicemail Pro server restarts automatically every time the server PC is restarted and loading the initial default call flow.
1. Windows NT4, 2000, XP and 2003 The Voicemail Pro server installs a service, using the user name and password of the account specified during installation. The service is set to automatically restart each time the PC restarts.
1. Select Start | Settings | Control Panel. 2. Select Administrative Tools.
3. Select Services.
4. The Voicemail Pro Server service should be visible. Its Status should be Started and the
Startup Type should be set to Automatic.
5. Close Services.

Starting the Voicemail Pro Server
Voicemail Pro Installation and Maintenance Page 49 IP Office 3.1 Issue 14f (28th September 2005)
2. Initializing the Voicemail Pro Call Flow 1. Select Start | Programs | IP Office | Voicemail Pro.
2. The Voicemail Pro Client is started.
3. Click the Save and Make Live icon.
4. Select Yes. The file root.vmp will be created and made available to the Voicemail Pro server. This is the compiled version of the editable call flow.
5. Voicemail operation can now be tested from an extension by dialing *17.

Basic/Typical Installation
Voicemail Pro Installation and Maintenance Page 50 IP Office 3.1 Issue 14f (28th September 2005)
Running the Service as a Console When installed as a service, the operation of Voicemail Pro on the server is largely invisible. For diagnostics purposes, the service can be run in Console mode which will show Voicemail Pro activity.
Note that IMS and MAPI email activity is not supported when running the Voicemail pro service in this way.
1. Open the Windows Control Panel and select Administrative tools.
2. Double-click on Services.
3. Locate the Voicemail Pro Service.
4. Double-click on the service to display its properties.
5. Click on the Log On tab.
6. Under Log on as:, select Local System Account and then tick Allow service to Interact with desktop.
7. Click OK.
8. Stop and restart the service using the icon.
9. Following the service restart the Voicemail Professional Server console window should appear.
10. Click on Run.
11. At an extension dial *17. Details of the Voicemail Pro activity should appear in the console window.
To return to normal operation, repeat the above process and set the Voicemail Pro Service back to its specific user account.
Voicemail Pro Installation and Maintenance Page 51 IP Office 3.1 Issue 14f (28th September 2005)
Voicemail Email Installation Overview of Voicemail Email Installation Voicemail Email sends mailbox users who have been configured with an email address, an email whenever their mailbox contains a new message. That email can contain an alert about the message or an attached copy of the message.
• Integrated Messaging System (IMS) Though similar in concept, Voicemail Email and IMS are two different components of Voicemail Pro and should not be mixed.
Voicemail Email requires the voicemail server to be running under a user account that has access to either a MAPI enabled email client program on the server PC or access to an SMTP email server.
• SMTP: Simple Mail Transfer Protocol This protocol allows the Voicemail Pro server to send outgoing emails to a specified SMTP server. Microsoft Exchange and most commercial email servers support SMTP to receive emails. SMTP for Voicemail Pro is therefore easy to implement in any business that has its own email server.
• MAPI: Microsoft Windows Messaging Application Program Interface This is a set of API's that allow MAPI applications to share information and messages. Until the addition of SMTP support in Voicemail Pro 2.0, it was the only method for doing Voicemail Email.
MAPI requires a MAPI compliant email client program to be installed on the Voicemail Pro server. It also requires the Voicemail Pro service to be run using a user account that is able to send emails via the MAPI client. Supported MAPI clients are:
• Outlook 97, 98 and 2000.
• Outlook Express.
• Eudora Note that Eudora installs its own MAPI drivers which replace the default Microsoft drivers. The Eudora MAPI drivers are not compatible with Phone Manager Pro's Pop Outlook functionality.
MAPI Voicemail Email can be used with Voicemail Lite and Voicemail Pro. For Voicemail Pro installed as a service (the default on Windows NT4/2000/XP professional/2003), emails can be sent without having to open and run the MAPI email client program. For Voicemail Pro installed as a server program, the email client program may have to be left open for mail transfers to occur.
The exact method of integration between the voicemail server and the MAPI email client depends on whether the voicemail server is part of a work group or a domain. This document contains examples for both approaches.
The MAPI processes described was based on Microsoft Windows 2000 Professional with Microsoft Outlook 2000 and Microsoft Outlook Express 5.5. Steps may differ depending on the version of Windows and email client used.

Voicemail Email Installation
Voicemail Pro Installation and Maintenance Page 52 IP Office 3.1 Issue 14f (28th September 2005)
Installing Voicemail Pro for SMTP Voicemail Email 1. Obtain details of an email account that the Voicemail pro service can use from whoever
administrates the customer's email server. The details required are:
• Email address.
• Server SMTP address.
• Account user name and password.
2. Install the Voicemail Pro software as outline in Basic Voicemail Pro (Compact) Software Installation ( or Voicemail Pro with Web Campaigns (Typical) Software Installation if campaigns web access is required.
3. Enter the Voicemail Pro SMTP email account settings when requested after the server PC restart.
4. Follow the process outlined in Starting the Voicemail Pro Server.
5. Appropriate user accounts can now be configured with the user's email address. See User and Group Configuration.
Installing Voicemail Pro for MAPI Voicemail Email as a Domain Member
Voicemail Pro Installation and Maintenance Page 53 IP Office 3.1 Issue 14f (28th September 2005)
Installing Voicemail Pro for MAPI Voicemail Email as a Domain Member The following should be done before the Voicemail Pro software is installed. The user name and password created are requested as part of the installation of the Voicemail Pro service. The process assumes that Outlook is installed on the Voicemail pro server PC but has not previously been used or configured.
Creating a Voicemail Domain Account 1. Make sure that the PC that will be running the Voicemail Server is a member of the domain.
Note: To join the domain you will need the use of a log on account with Administrative permissions on the domain as well as the server PC, consult the Domain Administrator.
• Windows NT Right-click Network Neighborhood and Select Properties.
• Windows 2000 Right-click My Computer and select Properties. Select the Network Identification tab.
2. On the Exchange server:
• Create an account called Voicemail on the domain and an associated mailbox.
• Provide a secure password.
• Check the User Cannot Change Password and Password Never Expires check boxes.
3. Log on to the Voicemail Server PC using a domain administrator account.
4. From the Control Panel, select Administrative Tools. 5. Select Computer Management | Local Users and Groups | Groups.
6. Double-click Administrators and select Add.
7. In the Look In drop-down list select the domain name.
8. In the Name window locate and highlight Voicemail. Click Add followed by OK and OK to close.

Voicemail Email Installation
Voicemail Pro Installation and Maintenance Page 54 IP Office 3.1 Issue 14f (28th September 2005)
Configuring Outlook 1. On the desktop, right-click on the Outlook icon and select Properties.
2. On the General tab select Add.
3. Tick Microsoft Exchange Server. Click Next >.
4. Enter the Exchange Server's name in the Server field and Voicemail in the Mailbox field. Click Next >.
5. Select No when asked if you travel with this computer. Click Next >.
6. Click Finish.
7. Highlight the MS Exchange Settings, Click Properties.
8. Highlight Microsoft Exchange Server. Click Properties.
9. Click Check name and ensure the name is resolved.
10. If the name is resolved, select Apply. Click OK, OK and Close to shut the mail settings.
11. Do not continue until the name has been resolved correctly with the Exchange Server. If the name is not resolved, check the account details with the Exchange Administrator.
12. Open Outlook and select Yes to register Outlook as the default email application.
13. Select Tools | Options.
14. Choose the Preferences tab. Click on Email Options.
15. Uncheck Save copies of messages in Sent Items folder. • Note: You may want this option selected during initial setup to aid troubleshooting.
However due to the size of wav file message attachments deselect it once installation testing is complete.
16. Log on to the Voicemail Pro server PC using the Voicemail account.
17. From Outlook, send a message direct to an extension user.
18. If this message is received correctly, continue with installing the Voicemail Pro software.

Installing Voicemail Pro for MAPI Voicemail Email as a Domain Member
Voicemail Pro Installation and Maintenance Page 55 IP Office 3.1 Issue 14f (28th September 2005)
Installing the Voicemail Pro Software 1. Log off and log back on using the Voicemail account and password.
2. Install the Voicemail Pro software as outline in Basic Voicemail Pro (Compact) Software Installation ( or Voicemail Pro with Web Campaigns (Typical) Software Installation if campaigns web access is required.
3. When the installation process request and User Name and Password for the Voicemail pro service, enter the Voicemail account details.
4. Restart the server PC when requested and log on using the Voicemail account.
5. When SMTP email details are requested, enter no values and ignore the error message following the SMTP check.
6. Follow the step in Starting the Voicemail Pro Server to check correct start and operation of basic voicemail services.
Switching the Voicemail Pro to MAPI Operation By default the Voicemail Pro is set to use SMTP for emails. This must be switched to SMTP.
1. Start the Voicemail Pro Client.
2. Click Preferences and select General. 3. Select the MAPI tab.
4. The Use Email Protocol settings allows you to switch the Voicemail Pro between either MAPI or
SMTP.
5. Select MAPI and enter the details of the
• If MAPI is selected, a valid MAPI profile and password must be entered in the fields above. That MAPI profile must exist within the MAPI email client on the server PC and be useable by the account under which the Voicemail Pro service is running.
• If SMTP is selected, the SMTP email account settings must be entered through the control panel preferences, see SMTP Email Settings.
6. Click OK.
7. Click Save and Make Live.
Voicemail Email Installation
Voicemail Pro Installation and Maintenance Page 56 IP Office 3.1 Issue 14f (28th September 2005)
Installing Voicemail Pro for MAPI Voicemail Email as a Work Group Member The following should be done before the Voicemail Pro software is installed. The user name and password created are requested as part of the installation of the Voicemail Pro service. The process assumes that Outlook is installed but has not been previously used or configured.
Create a Voicemail User Account 1. Log on to the server PC as the Local Administrator and create a new user. For this example the
name of the user account created used is Voicemail. 2. Set a secure password
3. Uncheck User must change password at next logon and check Password never expires.
4. Click Create and then Close.
5. Right-click on the New Account, and select Properties.
6. Select the Member Of tab.
7. Click Add.
8. In the Select Groups window, highlight Administrators and click on Add. Click OK.
9. Continue with one of the following as appropriate to the installed MAPI client and method for email sending.
Configuring Outlook Express for Internet Mail 1. Click on the Outlook Express icon to start the Configuration wizard
2. In the Display name enter Voicemail and click Next >.
3. Select I already have an e-mail address that I'd like to use and enter the address in E-mail address, eg. voicemail@your_domain_name. Click Next >.
4. Enter the name or address of the Incoming mail server and the Outgoing mail server. Note: If you enter the name, you must ensure that the Voicemail PC has the correct IP address of the DNS Server configured. Click Next >.
5. Enter the email account name and password, ie. Voicemail. Tick Remember password. Click Next >.
6. Click Finish to complete the wizard
7. Open Outlook Express and select Tools | Options.
8. Select the General tab:
• Untick Send and Receive messages at Start up.
• Untick Check for new messages every.
9. Select the Send tab.
• Untick Save copy of sent messages in the 'Sent Items' folder. • Tick Send messages immediately.
• Under Mail Sending Format select Plain Text. 10. Click OK.
11. Log on to the server PC using the account that will be used for the Voicemail pro server.
12. From Outlook or Outlook Express, send a message direct to an extension user.
13. If this message is received correctly, continue with installing the Voicemail Pro software.

Installing Voicemail Pro for MAPI Voicemail Email as a Work Group Member
Voicemail Pro Installation and Maintenance Page 57 IP Office 3.1 Issue 14f (28th September 2005)
Configuring Outlook for Internet Mail Please note that for the installation of Outlook to work correctly, the following set-up process must be followed. Outlook can be configured in two methods. Using the Wizard, prior to completing the steps below will cause Outlook not to send the messages correctly.
1. Right-click on the Outlook icon on the desktop and select Properties.
2. Select Add.
3. Select Internet E-mail and click on OK.
4. For the Mail Account enter Voicemail. 5. For User Information enter Voicemail as the Name and for the E-mail address enter your
address, eg. voicemail@your_domain_name.
6. Select the Servers tab. Enter the name or IP address of the Outgoing mail server and Incoming mail server.
7. The Incoming Mail Server details can be left blank as Outlook does not need to check for mail. Otherwise enter the account name and password, ie. Voicemail. Tick Remember password.
8. Select the Connection tab. Select Connect using my local area network (LAN). Click Next >.
9. Click OK.
10. Click Next >.
11. Accept the default path for file creation.
12. Select Next >, then Finish and then Close.
13. Open Outlook. 14. On the Email Service Option Screen, select Internet Only. Click Next >. 15. Select Yes to register Outlook as the default email application.
16. Select Tools | Options.
17. Choose the Preferences tab. Click on Email Options.
18. Uncheck Save copies of messages in Sent Items folder. (Note: You may want this option selected during initial setup and troubleshooting. Due to the size of wav file message attachments deselect it once installation is complete.)
19. Log on to the server PC using the account that will be used for the Voicemail pro server.
20. From Outlook or Outlook Express, send a message direct to an extension user.
21. If this message is received correctly, continue with installing the Voicemail Pro software.
Voicemail Email Installation
Voicemail Pro Installation and Maintenance Page 58 IP Office 3.1 Issue 14f (28th September 2005)
Configuring Outlook for Exchange Server This option may be configured if Outlook is to be configured to connect to the Exchange Server, using a valid user name and password, while the Voicemail PC remains a member of a work group.
1. Create a new mailbox on the Exchange Server, eg. Voicemail, and assign it the same password as has been configured on the Voicemail PC.
2. Untick User must Change password at Next Logon and tick Password Never Expires.
3. On the Voicemail PC, logon with the Voicemail account.
4. Right-click on the Outlook icon on the desktop and select Properties.
5. Select Add.
6. Highlight Microsoft Exchange Server and click OK.
7. Type in the Microsoft Exchange Server name and enter Voicemail in the Mailbox field.
8. Highlight the MS Exchange Settings, Click Properties.
9. Highlight Microsoft Exchange Server. Click Properties.
10. Click Check name and ensure the name is resolved.
11. If the name is resolved, select Apply. Click OK, OK and Close to shut the Mail settings.
12. Do not continue until the name has been resolved correctly with the Exchange Server. If the name is not resolved, check the account details with the Exchange Administrator.
13. Open Outlook and select Yes to register Outlook as the default email application.
14. Select Tools | Options.
15. Choose the Preferences tab. Click on Email Options.
16. Uncheck Save copies of messages in Sent Items folder. (Note: You may want this option selected during initial setup and troubleshooting. Due to the size of wav file message attachments deselect it once installation is complete.)
17. Log on to the server PC using the account that will be used for the Voicemail pro server.
18. From Outlook or Outlook Express, send a message direct to an extension user.
19. If this message is received correctly, continue with installing the Voicemail Pro software.
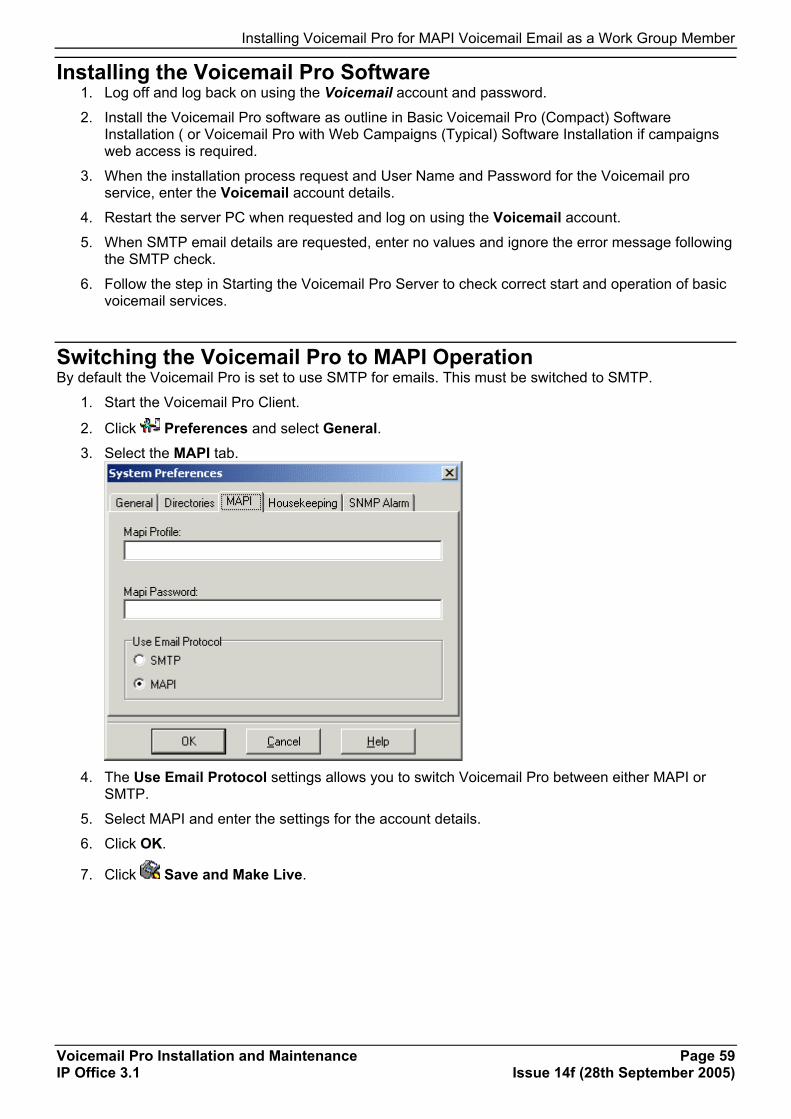
Installing Voicemail Pro for MAPI Voicemail Email as a Work Group Member
Voicemail Pro Installation and Maintenance Page 59 IP Office 3.1 Issue 14f (28th September 2005)
Installing the Voicemail Pro Software 1. Log off and log back on using the Voicemail account and password.
2. Install the Voicemail Pro software as outline in Basic Voicemail Pro (Compact) Software Installation ( or Voicemail Pro with Web Campaigns (Typical) Software Installation if campaigns web access is required.
3. When the installation process request and User Name and Password for the Voicemail pro service, enter the Voicemail account details.
4. Restart the server PC when requested and log on using the Voicemail account.
5. When SMTP email details are requested, enter no values and ignore the error message following the SMTP check.
6. Follow the step in Starting the Voicemail Pro Server to check correct start and operation of basic voicemail services.
Switching the Voicemail Pro to MAPI Operation By default the Voicemail Pro is set to use SMTP for emails. This must be switched to SMTP.
1. Start the Voicemail Pro Client.
2. Click Preferences and select General. 3. Select the MAPI tab.
4. The Use Email Protocol settings allows you to switch Voicemail Pro between either MAPI or
SMTP.
5. Select MAPI and enter the settings for the account details.
6. Click OK.
7. Click Save and Make Live.
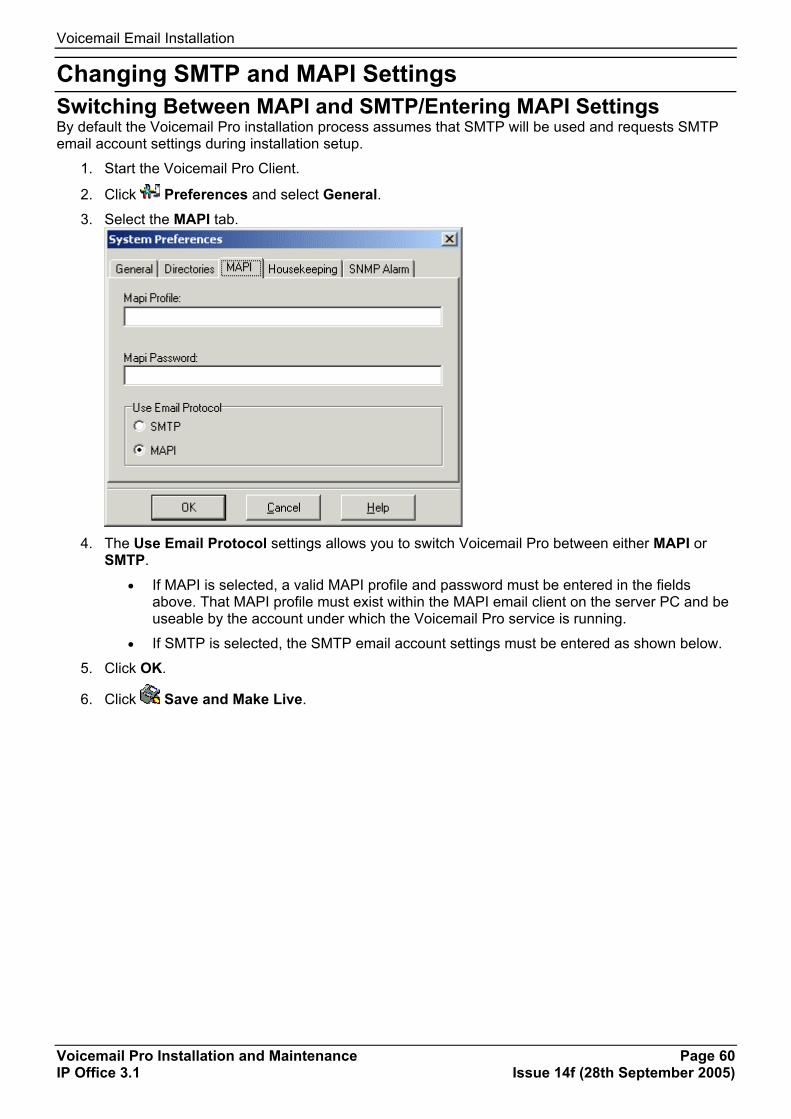
Voicemail Email Installation
Voicemail Pro Installation and Maintenance Page 60 IP Office 3.1 Issue 14f (28th September 2005)
Changing SMTP and MAPI Settings Switching Between MAPI and SMTP/Entering MAPI Settings By default the Voicemail Pro installation process assumes that SMTP will be used and requests SMTP email account settings during installation setup.
1. Start the Voicemail Pro Client.
2. Click Preferences and select General. 3. Select the MAPI tab.
4. The Use Email Protocol settings allows you to switch Voicemail Pro between either MAPI or
SMTP.
• If MAPI is selected, a valid MAPI profile and password must be entered in the fields above. That MAPI profile must exist within the MAPI email client on the server PC and be useable by the account under which the Voicemail Pro service is running.
• If SMTP is selected, the SMTP email account settings must be entered as shown below.
5. Click OK.
6. Click Save and Make Live.
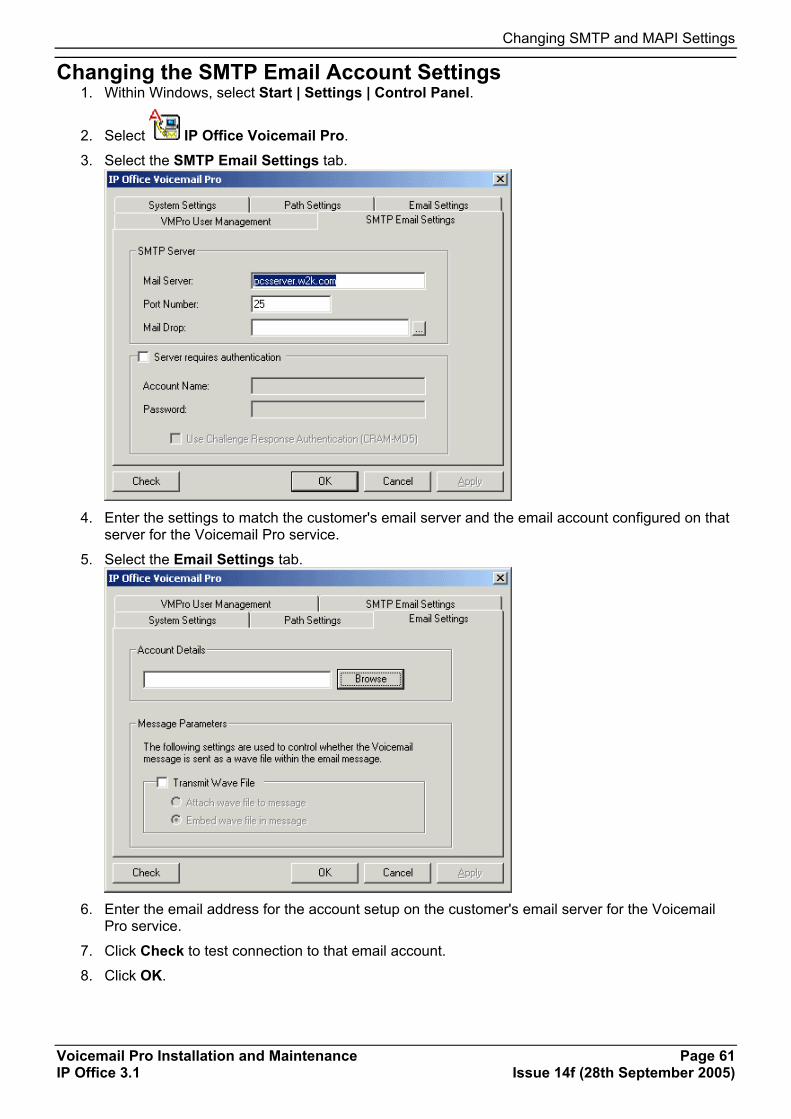
Changing SMTP and MAPI Settings
Voicemail Pro Installation and Maintenance Page 61 IP Office 3.1 Issue 14f (28th September 2005)
Changing the SMTP Email Account Settings 1. Within Windows, select Start | Settings | Control Panel.
2. Select IP Office Voicemail Pro.
3. Select the SMTP Email Settings tab.
4. Enter the settings to match the customer's email server and the email account configured on that
server for the Voicemail Pro service.
5. Select the Email Settings tab.
6. Enter the email address for the account setup on the customer's email server for the Voicemail
Pro service.
7. Click Check to test connection to that email account.
8. Click OK.
Voicemail Email Installation
Voicemail Pro Installation and Maintenance Page 62 IP Office 3.1 Issue 14f (28th September 2005)
Voicemail Email User and Group Configuration Voicemail Email can be used with both user mailboxes and hunt group mailboxes.
Setting of the user or group's email address can only be done through IP Office Manager. The remaining settings, that is the type of alert, can be set using any of the following methods:
• Through IP Office Manager.
• Through mailbox access if running in IP Office mailbox mode.
• Through a Voicemail Pro call flow using a Play Configuration Menu action.
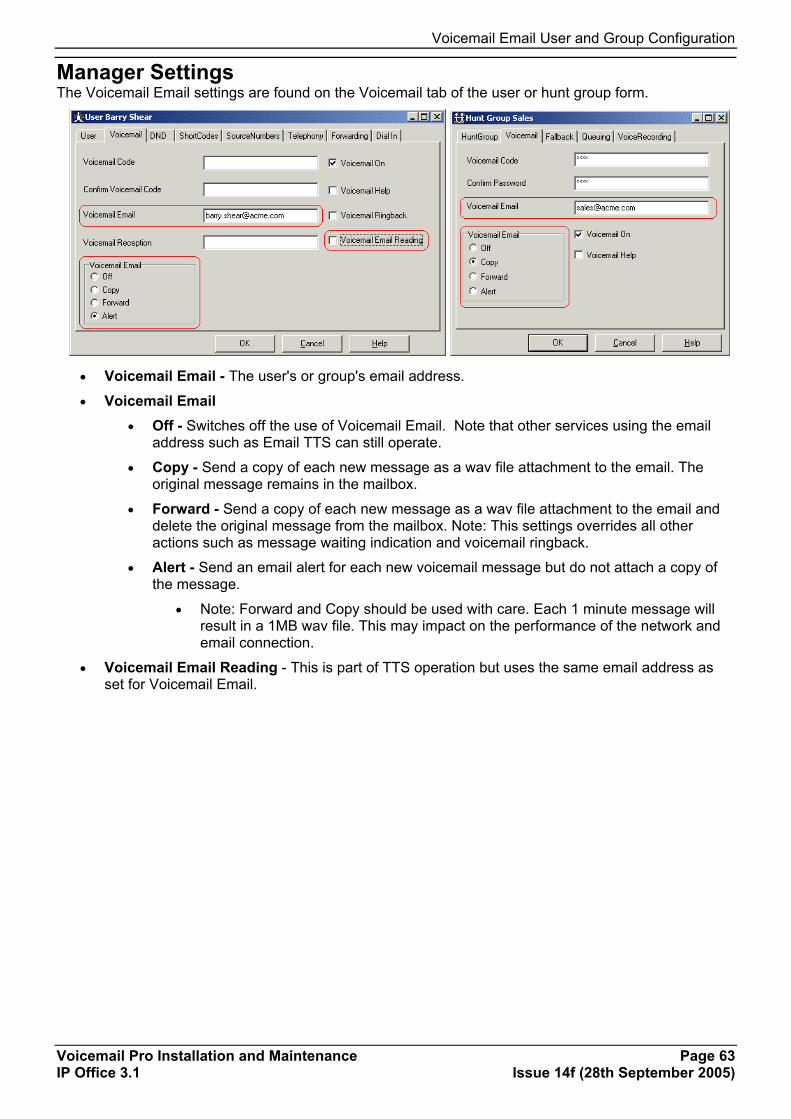
Voicemail Email User and Group Configuration
Voicemail Pro Installation and Maintenance Page 63 IP Office 3.1 Issue 14f (28th September 2005)
Manager Settings The Voicemail Email settings are found on the Voicemail tab of the user or hunt group form.
• Voicemail Email - The user's or group's email address.
• Voicemail Email • Off - Switches off the use of Voicemail Email. Note that other services using the email
address such as Email TTS can still operate.
• Copy - Send a copy of each new message as a wav file attachment to the email. The original message remains in the mailbox.
• Forward - Send a copy of each new message as a wav file attachment to the email and delete the original message from the mailbox. Note: This settings overrides all other actions such as message waiting indication and voicemail ringback.
• Alert - Send an email alert for each new voicemail message but do not attach a copy of the message.
• Note: Forward and Copy should be used with care. Each 1 minute message will result in a 1MB wav file. This may impact on the performance of the network and email connection.
• Voicemail Email Reading - This is part of TTS operation but uses the same email address as set for Voicemail Email.
Voicemail Email Installation
Voicemail Pro Installation and Maintenance Page 64 IP Office 3.1 Issue 14f (28th September 2005)
User Configuration Users on Voicemail Lite or Voicemail Pro running in IP Office mailbox mode, can switch Voicemail Email on/off and select the mode of Voicemail Email operation.
The method for doing this depend on the type of phone being used.
Other Phone Types and External Call Access If no email address has been set for the user or group then the voicemail server will respond "Email is not enabled for this mailbox".
Having entered the mailbox, user the following:
• *01 - Sets the Voicemail Email mode to Forward.
• *02 - Sets the Voicemail Email mode to Alert.
• *03 - Sets the Voicemail Email mode to Off.
Play Configuration Menu Action For Voicemail Pro systems, the Play Configuration Menu action can be used to allow a caller set a user or group's Voicemail Email alert mode. Note however that this action is not aware whether the user or group has an email address set for the service.
What Voicemail Email Messages Look Like
Voicemail Pro Installation and Maintenance Page 65 IP Office 3.1 Issue 14f (28th September 2005)
What Voicemail Email Messages Look Like Messages sent by a user or groups Voicemail Email settings will contain the following:
• To - The user/group email address.
• From - The name and address setting of the email client account.
• Subject - Voicemail Message ('calling number' > 'user name') From:'calling number'
• Body - If the user or group's Voicemail Email mode is set to Copy or Forward, the message body will contain "IP Office Voicemail redirected message"
• Attachment - When using Copy or Forward mode, the message is attached as a wav file.
The text parts of the message are set through registry settings and so can only be changed at the System Administrator's own risk. Messages sent via a Voicemail Pro eMail action are configurable, see The Voicemail Pro Email Action.
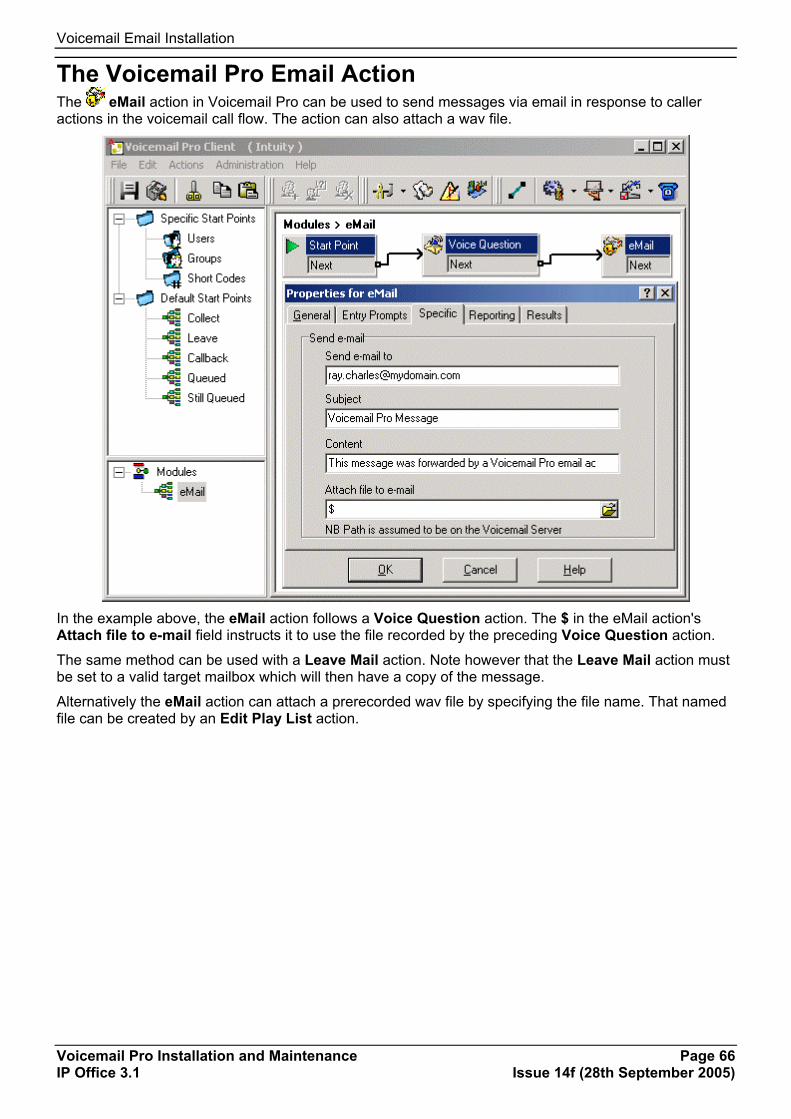
Voicemail Email Installation
Voicemail Pro Installation and Maintenance Page 66 IP Office 3.1 Issue 14f (28th September 2005)
The Voicemail Pro Email Action The eMail action in Voicemail Pro can be used to send messages via email in response to caller actions in the voicemail call flow. The action can also attach a wav file.
In the example above, the eMail action follows a Voice Question action. The $ in the eMail action's Attach file to e-mail field instructs it to use the file recorded by the preceding Voice Question action.
The same method can be used with a Leave Mail action. Note however that the Leave Mail action must be set to a valid target mailbox which will then have a copy of the message.
Alternatively the eMail action can attach a prerecorded wav file by specifying the file name. That named file can be created by an Edit Play List action.
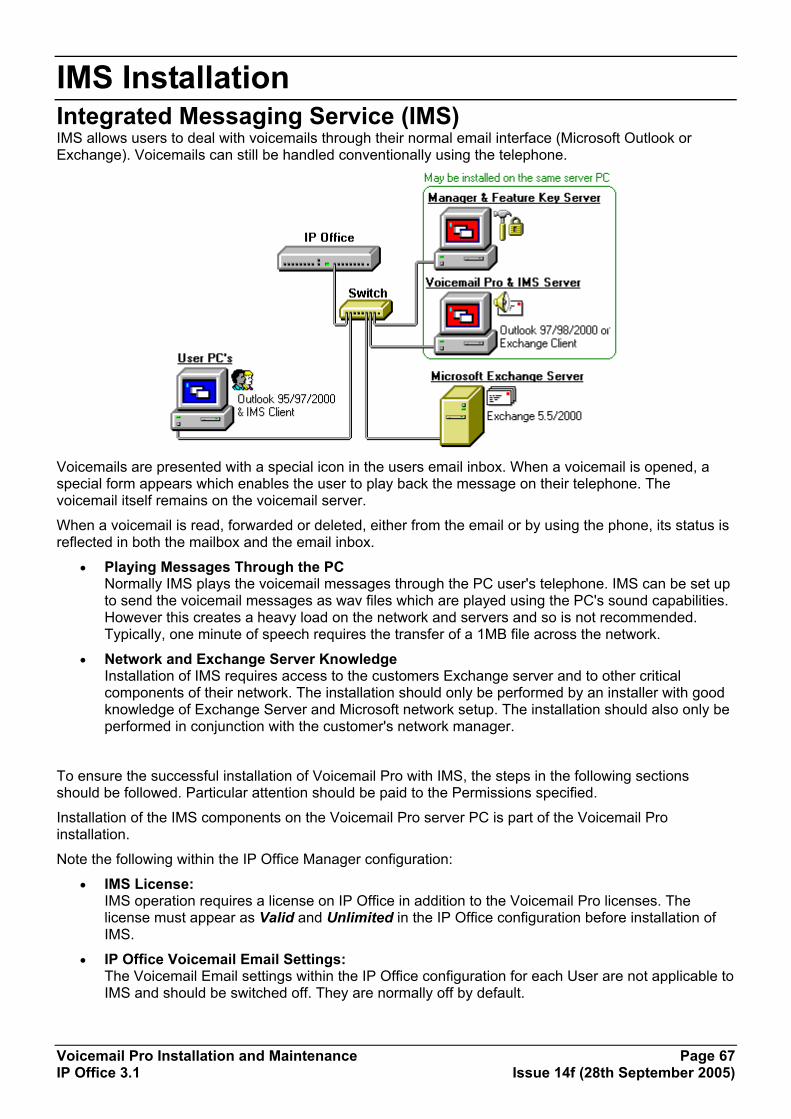
Voicemail Pro Installation and Maintenance Page 67 IP Office 3.1 Issue 14f (28th September 2005)
IMS Installation Integrated Messaging Service (IMS) IMS allows users to deal with voicemails through their normal email interface (Microsoft Outlook or Exchange). Voicemails can still be handled conventionally using the telephone.
Voicemails are presented with a special icon in the users email inbox. When a voicemail is opened, a special form appears which enables the user to play back the message on their telephone. The voicemail itself remains on the voicemail server.
When a voicemail is read, forwarded or deleted, either from the email or by using the phone, its status is reflected in both the mailbox and the email inbox.
• Playing Messages Through the PC Normally IMS plays the voicemail messages through the PC user's telephone. IMS can be set up to send the voicemail messages as wav files which are played using the PC's sound capabilities. However this creates a heavy load on the network and servers and so is not recommended. Typically, one minute of speech requires the transfer of a 1MB file across the network.
• Network and Exchange Server Knowledge Installation of IMS requires access to the customers Exchange server and to other critical components of their network. The installation should only be performed by an installer with good knowledge of Exchange Server and Microsoft network setup. The installation should also only be performed in conjunction with the customer's network manager.
To ensure the successful installation of Voicemail Pro with IMS, the steps in the following sections should be followed. Particular attention should be paid to the Permissions specified.
Installation of the IMS components on the Voicemail Pro server PC is part of the Voicemail Pro installation.
Note the following within the IP Office Manager configuration:
• IMS License: IMS operation requires a license on IP Office in addition to the Voicemail Pro licenses. The license must appear as Valid and Unlimited in the IP Office configuration before installation of IMS.
• IP Office Voicemail Email Settings: The Voicemail Email settings within the IP Office configuration for each User are not applicable to IMS and should be switched off. They are normally off by default.

IMS Installation
Voicemail Pro Installation and Maintenance Page 68 IP Office 3.1 Issue 14f (28th September 2005)
IMS Limitations IMS is designed to work in a system that comprises one IP Office and one Microsoft Exchange Server. It can be used in a system with more than one telephone systems so long as that system has centralized voicemail using just one voicemail server.
IMS cannot be used to:
• Save a voicemail.
• Compose a new voicemail.
• Reply to a voicemail.
• Add comments to a forwarded voicemail.
• Mark a voicemail as urgent.
Voicemails should not be placed in Public Folders.
Windows 98 client PC's must connect to the IMS Server PC using TCP/IP. Clients that do not use TCP/IP are not supported.
IMS Components IMS comprises of the following components.
• IP Office One of the IP400 Office series of telephone systems.
• Voicemail Pro Provides voicemail services to the IP Office extension users.
• IMS Server This actually consists of two services installed on the Voicemail Pro Server PC:
• IMS Voice Service
• IMS Gateway Service Interacts with the Voicemail Pro Server, the Exchange Server and the IMS Clients. Stores the current known status of voicemail messages and mirrors that status in both user's email and voicemail mailboxes.
• Microsoft Exchange Server The customers MS Exchange server.
• IMS Administration Tool This tool is used to maintain the association of voicemail mailboxes to email mailboxes.
The following additional components are required on the user PC's.
• Microsoft Exchange or Outlook Microsoft Exchange Client or Outlook 97 or higher.
• IMS Client Installed on each email user's PC. This provides a voicemail interface within the user's Microsoft Exchange or Outlook program.
Integrated Messaging Service (IMS)
Voicemail Pro Installation and Maintenance Page 69 IP Office 3.1 Issue 14f (28th September 2005)
IMS Installation Alternatives The IMS Server actually consists of two components:
• IMS Gateway Service. • IMS Voice Service.
These components can be installed separately if required. However the following rules must be followed:
• The IMS Voice Service must be installed on the Voicemail Pro server PC.
• The IMS Gateway Service can be installed on either the Voicemail Pro server PC or the Exchange Server PC. Installation of the IMS Gateway Service onto the Exchange Server PC requires more installation steps but may improve performance in some systems.

IMS Installation
Voicemail Pro Installation and Maintenance Page 70 IP Office 3.1 Issue 14f (28th September 2005)
1. Before Installing IMS In this part of the installation we will create a domain user and mailbox account called IMS. We will then configure the Outlook or Exchange client on the server PC to use that same account.
1. Make sure that the PC that will be running the Integrated Messaging Server, normally the Voicemail Pro server PC, is a member of the same domain as the Exchange server.
• Windows 2000/2003 Right-click My Computer. Select Properties and select the Network Identification Tab.
• Note: To join the domain you will need to use a log on account with administrative permissions on the domain.
2. Create an account called IMS on the domain and an associated Mailbox. Provide a secure password and ensure User Cannot Change Password and Password Never Expires are ticked.
3. On the Voicemail Pro PC, select Administrative Tools | Computer Management | Groups.
4. Select Add. In the Look In drop-down select the domain name.
5. In the Name window highlight the IMS account and click Add. Click on OK twice.
6. On the desktop, right-click on the Outlook icon and select Properties to configure the IMS Account.
7. On the Mail Properties | General Screen, click Add.
8. Check the Microsoft Exchange checkbox followed by Next >.
9. Type in the Exchange servers name in the Server field, and IMS account in the Mailbox field. Click Next >.
10. Select No when asked if you travel with this computer. Click Next >.
11. Click Finish.
12. Highlight the MS Exchange Settings and click Properties.
13. Highlight Microsoft Exchange Server and click Properties.
14. Click Check name and ensure the name is resolved.
15. If the name is resolved, select Apply. Click OK twice and then Close.
16. Do not continue until the name has been correctly resolved with the Exchange Server. If the name is not correctly resolved, check the Exchange and Mail account details with the Exchange Administrator.
17. Open Outlook and select Yes to register Outlook as the Default eMail application.

2. Installing the IMS & Voicemail Pro Software
Voicemail Pro Installation and Maintenance Page 71 IP Office 3.1 Issue 14f (28th September 2005)
2. Installing the IMS & Voicemail Pro Software Having completed the steps in 1. Before Installing IMS, we can now install the Voicemail Pro software including the IMS components.
• If you have already installed basic Voicemail Pro onto the PC, the instructions are the same, except when prompted to Modify, Repair, or Remove, select Modify and tick the Integrated Messaging check box (do not untick any other boxes as this will remove that component).
1. Using the IP Office Manager application or IP Office Wizard, check that the correct licenses for Voicemail Pro and IMS are installed and show a status of Valid. The licenses required are:
• Voicemail Pro (4 ports) plus Additional Voicemail Pro (X ports) licenses up to the total number of port required or supported by the IP Office control unit.
• Integrated Messaging - Enables operation of IMS with Voicemail Pro.
2. Insert the Voicemail Pro CD. The installation wizard should auto-start. If it does not auto-start, browse to and run Setup.exe on the CD.
3. Select the installation language from the drop down list. This language will be used for both the
installation wizard menus and for the default language prompts installed.
4. Click OK. The installation software begins its preparation for installation.
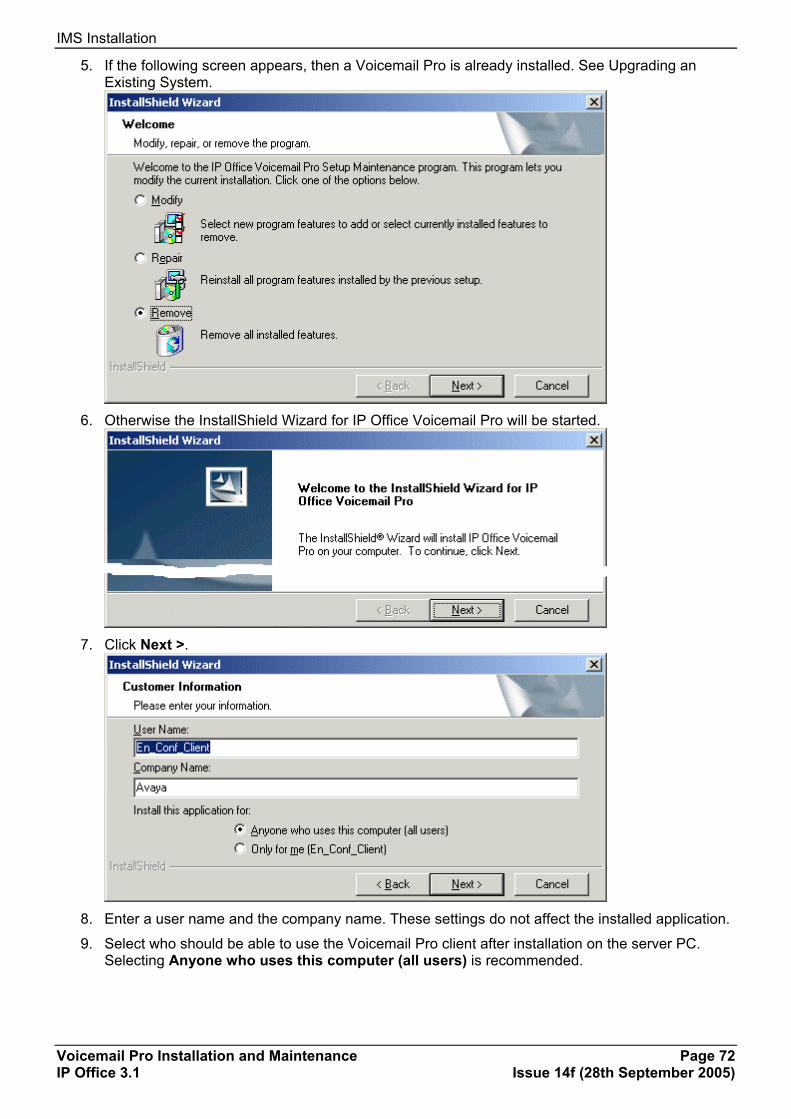
IMS Installation
Voicemail Pro Installation and Maintenance Page 72 IP Office 3.1 Issue 14f (28th September 2005)
5. If the following screen appears, then a Voicemail Pro is already installed. See Upgrading an Existing System.
6. Otherwise the InstallShield Wizard for IP Office Voicemail Pro will be started.
7. Click Next >.
8. Enter a user name and the company name. These settings do not affect the installed application.
9. Select who should be able to use the Voicemail Pro client after installation on the server PC. Selecting Anyone who uses this computer (all users) is recommended.

2. Installing the IMS & Voicemail Pro Software
Voicemail Pro Installation and Maintenance Page 73 IP Office 3.1 Issue 14f (28th September 2005)
10. Click Next > to continue.
11. Select Custom. The use of the other options is discussed in other sections along with any other
installation and pre-installation actions appropriate to those installation types.
12. Click Next >.
13. The menu shown allows you to select where the software is installed. We recommend that his is
left at the default setting shown unless there are specific reasons for changing the install location.
14. Click Next >.

IMS Installation
Voicemail Pro Installation and Maintenance Page 74 IP Office 3.1 Issue 14f (28th September 2005)
15. The menu shown allows you to select which Voicemail Pro components to install. For IMS ensure the following are selected:
a. Deselect Voicemail Pro Campaign Web Component unless it is required and the web server has already been installed (see Voicemail Pro with Web Campaigns (Typical) Software Installation).
b. Click the + icon next to Voicemail Pro.
c. Voicemail Pro and Voicemail Pro Server Service should be already selected.
d. Click the + icon next to Speech Supported.
e. Select the languages required. We recommend that either English or English US is always selected in addition to the customer's required languages.
f. Scroll down and select Integrated Messaging Service.
16. Click on Next >.
17. Enter the User name and Password for the user account under which the Voicemail Pro service
should log on and run. The Browse button can be used to browse the available PC or network accounts. This should be the IMS account created previously on the domain and Exchange server.
18. Click Next >. The account details entered above are verified.
19. Select the program folder into which icons for the Voicemail Pro components should be added.
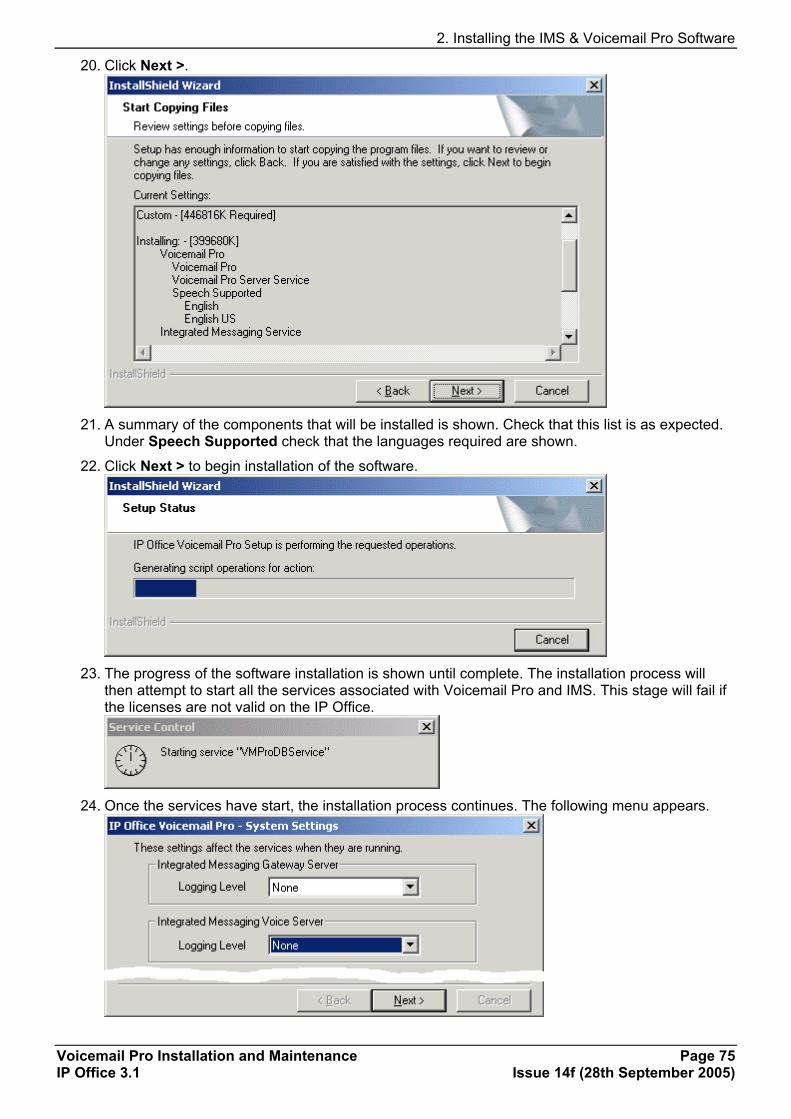
2. Installing the IMS & Voicemail Pro Software
Voicemail Pro Installation and Maintenance Page 75 IP Office 3.1 Issue 14f (28th September 2005)
20. Click Next >.
21. A summary of the components that will be installed is shown. Check that this list is as expected.
Under Speech Supported check that the languages required are shown.
22. Click Next > to begin installation of the software.
23. The progress of the software installation is shown until complete. The installation process will
then attempt to start all the services associated with Voicemail Pro and IMS. This stage will fail if the licenses are not valid on the IP Office.
24. Once the services have start, the installation process continues. The following menu appears.
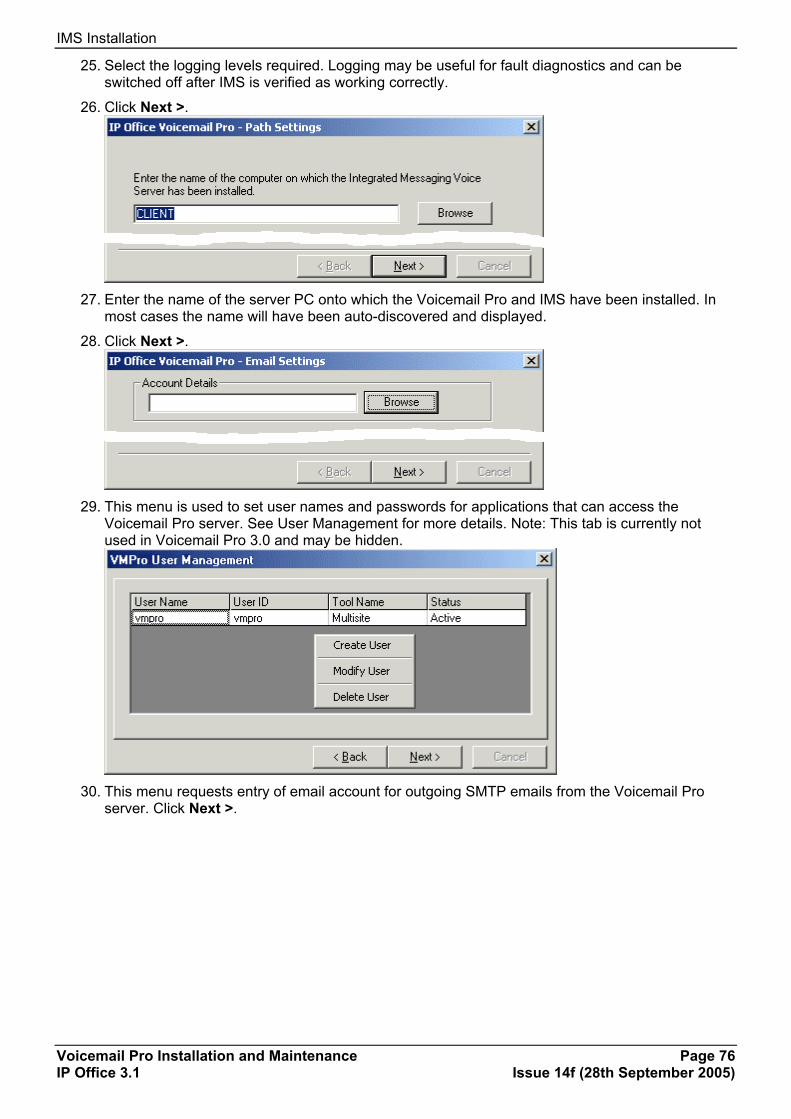
IMS Installation
Voicemail Pro Installation and Maintenance Page 76 IP Office 3.1 Issue 14f (28th September 2005)
25. Select the logging levels required. Logging may be useful for fault diagnostics and can be switched off after IMS is verified as working correctly.
26. Click Next >.
27. Enter the name of the server PC onto which the Voicemail Pro and IMS have been installed. In
most cases the name will have been auto-discovered and displayed.
28. Click Next >.
29. This menu is used to set user names and passwords for applications that can access the
Voicemail Pro server. See User Management for more details. Note: This tab is currently not used in Voicemail Pro 3.0 and may be hidden.
30. This menu requests entry of email account for outgoing SMTP emails from the Voicemail Pro
server. Click Next >.
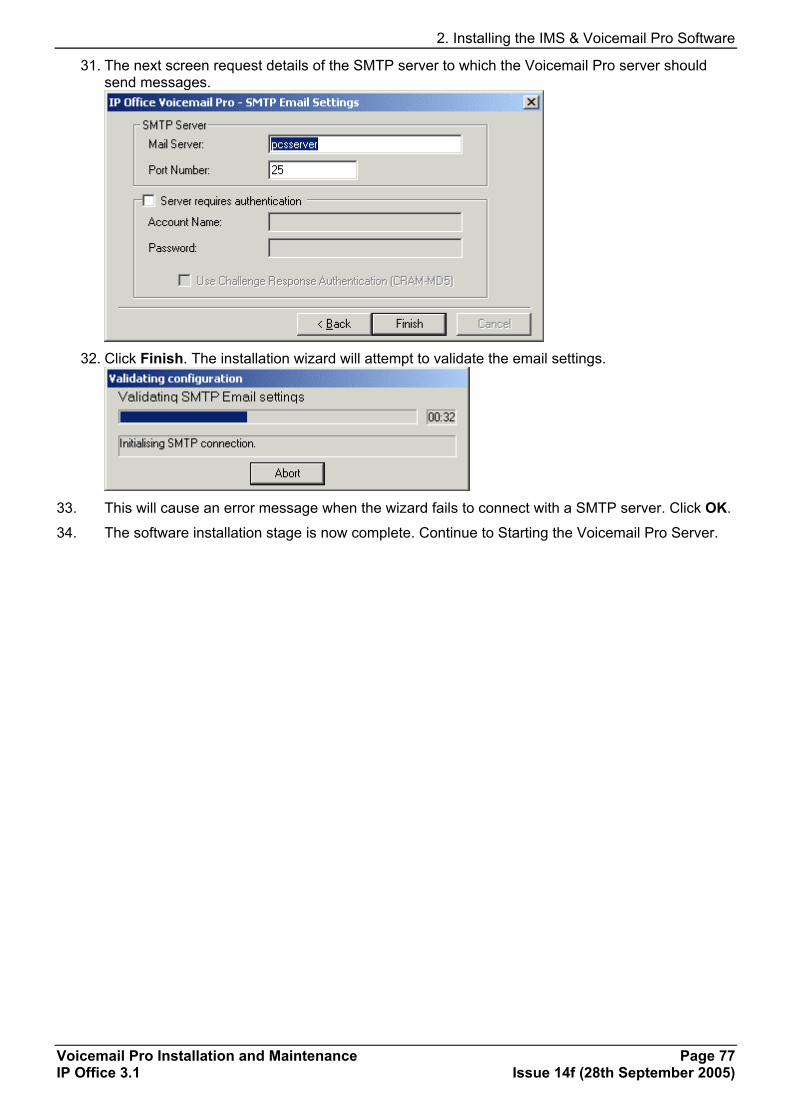
2. Installing the IMS & Voicemail Pro Software
Voicemail Pro Installation and Maintenance Page 77 IP Office 3.1 Issue 14f (28th September 2005)
31. The next screen request details of the SMTP server to which the Voicemail Pro server should send messages.
32. Click Finish. The installation wizard will attempt to validate the email settings.
33. This will cause an error message when the wizard fails to connect with a SMTP server. Click OK.
34. The software installation stage is now complete. Continue to Starting the Voicemail Pro Server.

IMS Installation
Voicemail Pro Installation and Maintenance Page 78 IP Office 3.1 Issue 14f (28th September 2005)
3. Switching Voicemail Pro to MAPI By default the Voicemail Pro installation process assumes that SMTP will be used and requests SMTP email account settings during installation setup. IMS uses MAPI and so the Voicemail pro must be switched to MAPI operation using the IMS account previously created.
1. Start the Voicemail Pro Client.
2. Click Preferences and select General. 3. Select the MAPI tab.
4. Under Use Email Protocol select MAPI. 5. In Mapi Profile and Mapi Password, enter the IMS user account details.
6. Click OK.
7. Click Save and Make Live.

4. Associating Voice Mailboxes to Email Addresses
Voicemail Pro Installation and Maintenance Page 79 IP Office 3.1 Issue 14f (28th September 2005)
4. Associating Voice Mailboxes to Email Addresses With IMS installed, user voicemail mailboxes can now be associated with email mailboxes on the Exchange Server. This is done using the IMS Administration tool.
1. Select Start | Programs | IP Office | IMS Administration Tool. 2. On the menu bar, select Server and Add and enter the IMS Server name or browse for the
server.
3. Once the server is added, the name will appear in the left hand Window with a [+] plus icon. Expand the [+] icon to show configurable options.
4. Highlight Integrated Messaging Associations. After a few moments the voice mailboxes will appear in the right-hand window.
5. Select a voice mailbox to configure and double-click it to see it properties.
6. In the Associated Email Address field, select Change and select the relevant email address of the associated user.
7. If the mail settings need to be different from the default settings, select the User Properties tab and configure as applicable and select OK.
8. Once complete, synchronize the Mailboxes by selecting on the Synchronize Mailboxes Icon, or Selecting Mailboxes and Synchronize on the menu bar.
9. Close the IMS Administration tool.
10. Make a call to one of the users just associated and leave a message in their voicemail mailbox. A short while after hanging up a message should appear in their user’s mailbox.

IMS Installation
Voicemail Pro Installation and Maintenance Page 80 IP Office 3.1 Issue 14f (28th September 2005)
5. Installing the IMS Client Software The IMS client is supported by Microsoft Outlook 95/97/2000/2003. In order to install the client:
• IMPORTANT NOTE: Do not install the IMS Client on the same PC as the Voicemail Pro / IMS Server.
• You must log on to the user's PC as a user with administrator rights for that PC. Attempting to install the software without having administrator rights for the PC will cause a number of errors.
• Outlook should already be installed and configured on the users PC. Test this by using Outlook to send a test message.
• The Integrated Messaging Server should already be installed and running.
5a. IMS Client PC Requirements • Hardware:
The minimum recommended hardware for NT/2000 is a Pentium 100 with 32 MB RAM. For Windows 9x/ME it is a Pentium 100 with 24MB RAM.
• Operating system: Either;
• Windows NT4 with Service packs 6a, Windows 2000 or Windows XP with SP2.
• Where a PC is outside of the Exchange server's domain it will need NT4 Service Pack 6a or Windows 2000.
• Clients must use TCP/IP networking.
• Network configuration: Users must be members of an NT Domain.
• Email Client: MS Exchange Client, Outlook 97, 98 or 2000.

5. Installing the IMS Client Software
Voicemail Pro Installation and Maintenance Page 81 IP Office 3.1 Issue 14f (28th September 2005)
5b. Installation Process During installation of the IMS Server, the IMS Client Installer package is copied to C:\Program Files\Avaya\IP Office\Voicemail Pro\IMS\Client directory and is automatically shared as IMSClient. The installer, called IMSClient.exe is approximately 10.1MB is size.
1. Copy the IMS Client installer package to a CD or map a network drive to the folder as follows \\servername\imsclient.
2. Log on to the users PC using an account that has local administrative rights.
3. Save and close all other applications prior to installing as a reboot will be required..
4. Depending on where it is located, double-click on the IMSClient.exe file.
5. Choose the preferred Language and select OK.
6. Select Next > until the Personalize IMS Client Setup screen appears.
7. Enter the following information:
• Voicemail Mailbox This is the entry as it appears in the Username field of the IP Office User Profile Screen. This is case sensitive. If this information is entered incorrectly, the IMS client will not connect to the IMS Server.
• IMS Server This is the name of the IMS / Voicemail Pro Server. For maximum reliability we recommend that a fully qualified domain name is used.
8. When prompted to Restart the PC select Finish to restart the PC. Please note that if you attempt to open Outlook without restarting you will receive an error that a component has not been installed correctly. It is therefore recommended that you restart the PC when prompted.
If the above details have been followed, after the User has logged back onto their PC workstation and opened Outlook, select the following to verify that the IMS Client has connected to the IMS Server correctly.
Typically when starting Outlook if there is a connection error, a message should be received while Outlook is starting, asking for a user name and password.
1. In Outlook select Tools | Integrated Messaging. If the IMS Client has connected you should only have the option to Disconnect. If this is the case you have successfully installed the IMS Client on the workstation.
2. A further indication will be a Telephone Icon in the mail message. If the Client has not been installed, this icon will not be displayed.

IMS Installation
Voicemail Pro Installation and Maintenance Page 82 IP Office 3.1 Issue 14f (28th September 2005)
6. Checking & Observing IMS Operation If may be useful to check that the IMS Account has logged onto the Exchange Server correctly.
1. On the Exchange server, open the Exchange Administration Manager. 2. Expand the Server Name and Mailbox Store.
3. Select Logons and locate the IMS account name. Only logged on accounts will be displayed.
4. Selecting Mailboxes allows you to view IMS messages being received and sent.
5. Leave a voicemail message in an IMS user’s voice mailbox.
6. After hanging up you should notice that for a brief time the Total Items field for the IMS mailbox increases by 1. The message is then sent from the IMS mailbox to the user’s mailbox, who’s Total Items increases by 1.
7. By default there should be no messages left in the IMS mailbox.

Voicemail Pro Installation and Maintenance Page 83 IP Office 3.1 Issue 14f (28th September 2005)
Networked Messaging Install (VPNM) Voicemail Pro Networked Messaging Voicemail Pro Networked Messaging (VPNM) allows users to forward voicemails mailboxes on remote voicemail systems This is done by adding a VPNM component to the Voicemail Pro installation.
The messages are transferred between systems using an SMTP/MIME mail format to encode both the voice part of the message and additional message details. The
Below is a diagram of VPNM between two IP Office systems.
Below is a diagram of a sample VPNM configuration between an IP Office and Avaya Interchange. Depending on how your IP Network is set-up, the configuration will alter slightly.
Up to 2000 mailboxes are supported per VPNM server and there is no constraint on the number of VPNM servers. However, to distinguish between dial plans you may need to allocate a dial pre-fix to each server. There are a maximum of 99 pre-fixes available.
This section summarizes the steps required in installing VPNM between two IP Office systems and between an IP Office system and an Intuity Audix system through Avaya Interchange.
This document should be used in conjunction with the other Avaya manuals, for example "Avaya Interchange Release 5.4, Adding a VPIM System to Your Network" (the setup for Interchange VPIM is the same as for VPNM).
Networked Messaging Install (VPNM)
Voicemail Pro Installation and Maintenance Page 84 IP Office 3.1 Issue 14f (28th September 2005)
Requirements for VPNM Check the following requirements before attempting to install VPNM
• A Voicemail Pro server with VPNM installed connected to each IP Office system. Each system will need a license for both Voicemail Pro and VPNM.
• All systems in the VPNM network need to be tested to ensure that they can communicate across the IP network. It is suggested that you test the following:
• Ping the IP Addresses
• Ping the computer names. If in a domain, ping the fully qualified domain name.
• The VMPro Servers must have an SMTP server installed. This can be done using the SMTP component of Internet Information Service (IIS).
• To test type "Telnet <the name of the SMTP server> 25".
• Server names, where entered, must be fully qualified domain names.
• Voicemail Pro should not be installed on the same server as Exchange and/or the domain controller.

Installing Voicemail Pro Software with VPNM Support
Voicemail Pro Installation and Maintenance Page 85 IP Office 3.1 Issue 14f (28th September 2005)
Installing Voicemail Pro Software with VPNM Support This section installs the Voicemail Pro software with its VPNM component onto the Voicemail pro server PC.
• If you have already installed basic Voicemail Pro onto the PC, the instructions are the same, except when prompted to Modify, Repair, or Remove, select Modify and tick the Integrated Messaging check box (do not untick any other boxes as this will remove that component).
1. Using the IP Office Manager application or IP Office Wizard, check that the correct licenses for Voicemail Pro and IMS are installed and show a status of Valid. The licenses required are:
• Voicemail Pro (4 ports) plus Additional Voicemail Pro (X ports) licenses up to the total number of port required or supported by the IP Office control unit.
• Networked Messaging - Enables operation of VPNM with Voicemail Pro.
2. Insert the Voicemail Pro CD. The installation wizard should auto-start. If it does not auto-start, browse to and run Setup.exe on the CD.
3. Select the installation language from the drop down list. This language will be used for both the
installation wizard menus and for the default language prompts installed.
4. Click OK. The installation software begins its preparation for installation.

Networked Messaging Install (VPNM)
Voicemail Pro Installation and Maintenance Page 86 IP Office 3.1 Issue 14f (28th September 2005)
5. If the following screen appears, then a Voicemail Pro is already installed. See Upgrading an Existing System.
6. Otherwise the InstallShield Wizard for IP Office Voicemail Pro will be started.
7. Click Next >.
8. Enter a user name and the company name. These settings do not affect the installed application.
9. Select who should be able to use the Voicemail Pro client after installation on the server PC. Selecting Anyone who uses this computer (all users) is recommended.
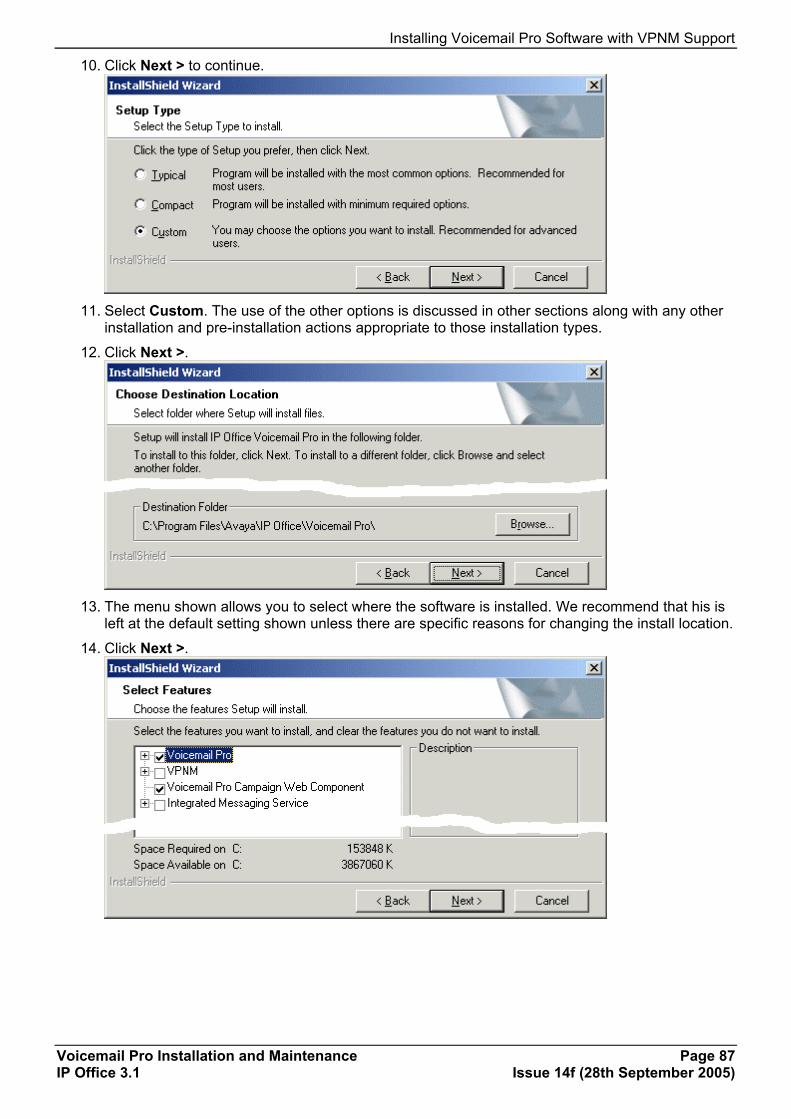
Installing Voicemail Pro Software with VPNM Support
Voicemail Pro Installation and Maintenance Page 87 IP Office 3.1 Issue 14f (28th September 2005)
10. Click Next > to continue.
11. Select Custom. The use of the other options is discussed in other sections along with any other
installation and pre-installation actions appropriate to those installation types.
12. Click Next >.
13. The menu shown allows you to select where the software is installed. We recommend that his is
left at the default setting shown unless there are specific reasons for changing the install location.
14. Click Next >.

Networked Messaging Install (VPNM)
Voicemail Pro Installation and Maintenance Page 88 IP Office 3.1 Issue 14f (28th September 2005)
15. The menu shown allows you to select which Voicemail Pro components to install. For IMS ensure the following are selected:
a. Deselect Voicemail Pro Campaign Web Component unless it is required and the web server has already been installed (see Voicemail Pro with Web Campaigns (Typical) Software Installation).
b. Click the + icon next to Voicemail Pro.
c. Voicemail Pro and Voicemail Pro Server Service should be already selected.
d. Click the + icon next to Speech Supported.
e. Select the languages required. We recommend that either English or English US is always selected in addition to the customer's required languages.
f. Scroll down and select VPNM.
16. Click on Next >.
17. Enter the User name and Password for the user account under which the Voicemail Pro service should log on and run. The Browse button can be used to browse the available PC or network accounts. This should be the IMS account created previously on the domain and Exchange server.
18. Click Next >. The account details entered above are verified.
19. Select the program folder into which icons for the Voicemail Pro components should be added.

Installing Voicemail Pro Software with VPNM Support
Voicemail Pro Installation and Maintenance Page 89 IP Office 3.1 Issue 14f (28th September 2005)
20. Click Next >.
21. A summary of the components that will be installed is shown. Check that this list is as expected. Under Speech Supported check that the languages required are shown.
22. Click Next > to begin installation of the software.
23. The progress of the software installation is shown until complete.
24. Following installation, a request to restart the server PC appears. Select Yes, I want to restart my computer now and click Finish.
25. Following the server PC's restart, the Voicemail Pro installation wizard appears to complete its installation.
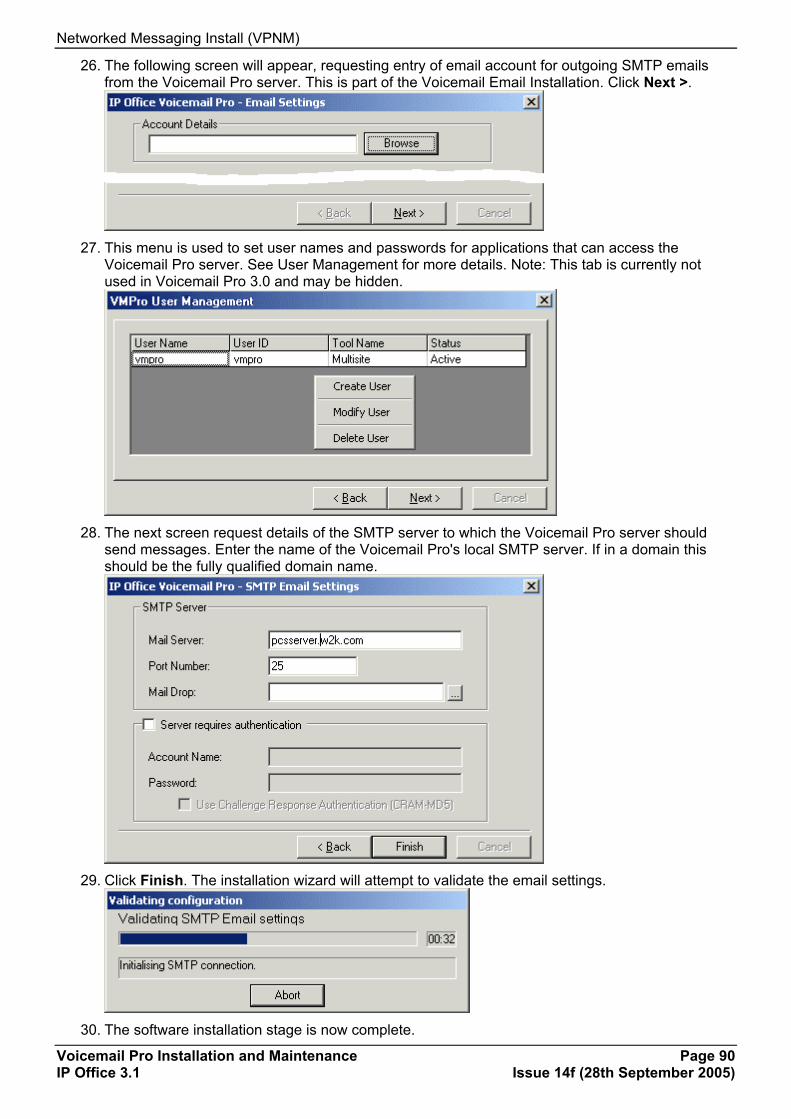
Networked Messaging Install (VPNM)
Voicemail Pro Installation and Maintenance Page 90 IP Office 3.1 Issue 14f (28th September 2005)
26. The following screen will appear, requesting entry of email account for outgoing SMTP emails from the Voicemail Pro server. This is part of the Voicemail Email Installation. Click Next >.
27. This menu is used to set user names and passwords for applications that can access the
Voicemail Pro server. See User Management for more details. Note: This tab is currently not used in Voicemail Pro 3.0 and may be hidden.
28. The next screen request details of the SMTP server to which the Voicemail Pro server should
send messages. Enter the name of the Voicemail Pro's local SMTP server. If in a domain this should be the fully qualified domain name.
29. Click Finish. The installation wizard will attempt to validate the email settings.
30. The software installation stage is now complete.

Configuring VPNM Accounts on Voicemail Pro
Voicemail Pro Installation and Maintenance Page 91 IP Office 3.1 Issue 14f (28th September 2005)
Configuring VPNM Accounts on Voicemail Pro The following process is used to add details of remote users within the VPNM network.
1. Start the Voicemail Pro Client.
2. Click Preferences and select VPNM.
3. Under VPNM select Add.
4. Enter the fully qualified domain name of the remote VPNM destination (the remote Voicemail Pro server PC or Avaya Interchange). Enter the Access Prefix if these are being used. Click OK.
5. Under Users for VPNM Server(s) click Add.

Networked Messaging Install (VPNM)
Voicemail Pro Installation and Maintenance Page 92 IP Office 3.1 Issue 14f (28th September 2005)
6. Enters details for the user, starting with which VPNM system hosts their mailbox.
• The user's full name is used by the local Voicemail Pro's dial by name features.
• The local extension number is used as the local mailbox number and so should not conflict with any existing local number.
• The remote extension number should be the user's real extension number. Typically this and the 'local extension number' are kept the same using a unique extension number dial plan for the linked systems.
• The full telephone number should be a dialable number that is routed to the user's extension or mailbox.
Note: The Add Range option can be used to add a group of users on the same server based on the first local extension number and number of users. The full name and telephone number for those user will then need to be added by modifying each entry.
Test Setup The VPNM setup can be tested using the following steps.
1. Dial into Voicemail from one of the systems and record a message.
2. When selecting the target extension, enter an extension from the other system as specified in the VPNM Preferences screen.
3. The message should be delivered to the other systems Voicemail Pro server into C:\\Inetpub\mailroot\Drop.
4. The VPNMreceiver Service checks the Drop directory approximately every 30 seconds. When it finds a message in the Drop directory, it will send the message to the relevant extension's voicemail box on the remote system.

IP Office to Avaya Interchange
Voicemail Pro Installation and Maintenance Page 93 IP Office 3.1 Issue 14f (28th September 2005)
IP Office to Avaya Interchange Configure the Avaya Intuity Audix This section is based upon the S8100/G600 Intuity Audix. It is assumed that the IP address of the S8100 processor is known. A browser should be available and the Avaya Terminal Emulator or the equivalent to do the necessary configuration.
1. telnet to the S8100/G600, login and enter "audix" to reach the audix command prompt.
2. Enter list configuration and verify that the TCP/IP value is set to at least 1. If not, these ports must be activated through the license process before proceeding.
3. From a PC browser, access the S8100 processor IP address and login.
• At the S8100 main page select Administer System | Audix Networking | Administrative Menu | Network Channel Administration.
• Enable each channel in the Channel Configuration Column.
• Select Save when finished.
4. Return to the Audix command prompt screen. Inspect the system for the list of mailboxes that will be eligible to receive messages.
• Type change machine. Note the range of local extensions. List subscribers will provide a more specific list. It is best to distinguish mailboxes that are eligible to receive messages i.e. call answer mailboxes.
• On page 2 of the change machine form, ensure that all the update settings are set to y.
• Make sure that Network Turnaround is set to y. Select Enter. 5. To administer the password for message exchange:
• From the S8100 home page select Administer System | Audix Networking | Administrative Menu | Local Machine Administration.
• Enter the password to be used for transfer of messages between this system and the Avaya interchange. Select Change.
6. To enter the information for connecting to the Interchange:
• From the S8100 home page select Administer System | Audix Networking | Administrative Menu | Remote Machine Administration | Digital Machine Administration.
• Select Add New Machine.
• Enter the Avaya interchange name, IP address and networking password.
• Define the schedule for exchanging messages.
• Select Add to complete.
7. To administer the parameters associated with the Interchange:
• Type change machine <machine name> from the AUDIX command prompt. Note If all extensions that are not on the Intuity Audix are configured to be on the Interchange and "Send to non-Administered Recipients" is set to yes, errant messages may be sent. This will waste bandwidth and processing time.
• The extension Length setting is the dial plan length that has been configured in the Avaya Interchange.
• Set all the parameters of page 2 to y. (Send to non-administered recipients, Updates In, Updates Out and Network Turnaround.)
• Select F3 to Add the remote machine.

Networked Messaging Install (VPNM)
Voicemail Pro Installation and Maintenance Page 94 IP Office 3.1 Issue 14f (28th September 2005)
Configure the Avaya Interchange Configure the Interchange Intuity Interface Refer to [INT-AUDIX] for a fuller description of the options detailed in this section.
1. Login to the Intuity interchange.
• To verify that the system is optioned for TCP/IP digital ports select Customer/Service Administration from the Interchange Main Menu.
• The VPNM ports will also be required for interfacing to the Voicemail Pro.
2. Ensure that the TCP/IP networking is setup so that the machine can communicate to and from the Intuity Audix.
• From the Main Menu select Networking Administration | TCP/IP Administration.
• Make a note of the IP Address, Subnet Mask and default Gateway IP Address. The information will be required later in the setup.
3. Make sure that an entry exists with the data that corresponds to the information entered for connecting to the Interchange.
• From the Main Menu select Networking Administration | Local Machine Administration.
4. To verify that there are equipped TCP/IP ports for the networking to Intuity Audix and to voicemail Pro:
• From the Main Menu select Networking Administration | Networking Channel Administration. The status should be Idle.
5. Information corresponding to the Intuity Audix information entered in Step 4 when configuring the Audix needs to be entered under Digital Networking Machine Administration.
• From the Main Menu select Networking Administration | Remote Machine Administration | Audix Digital networking Machine Administration.
• Enter the transmission schedule for sending messages to the Audix System. Select Chg-Keys and then the Add key to enter the form.
6. Administer The Intuity Audix parameters in the Interchange.
• Select Interchange Administration | Remote Machine Administration | Remote Machine Parameters.
• Select Choices then the system to be updated
• Ensure that the address range corresponds to the mailboxes on the Intuity Audix system that are eligible to receive messages. Set the parameters as shown.
• Avaya Interchange? = n
• Mailbox ID Length = 5
• Default Language = us-eng
• Failed Msg. Notification Priority = n
• Msg ID? = y
• Send Message for Warning? = n
• Default NameNet type = u
• Select the Details key to enter the following details:
• Subscriber Updates Type = dynamic
• Updates In? = y
• Updates Out? = y
IP Office to Avaya Interchange
Voicemail Pro Installation and Maintenance Page 95 IP Office 3.1 Issue 14f (28th September 2005)
• Voiced Names for Dynamic? = y
• Network Turnaround? = y
• Provide Local Mapped Addresses = n
• Dynamic Sub Expiration Days = 90
• Select Save, Continue and then Save again.
7. If both systems are set for 5 digit dialing this step can be omitted. If both systems are not then Dial Plan Mapping needs to be used to map the mailbox identification from the Interchange Dial Plan to the Intuity Audix Dial Plan.
• Select Interchange Administration | Remote Machine | Administration | Dial Plan Mapping. Update the form as required.

Networked Messaging Install (VPNM)
Voicemail Pro Installation and Maintenance Page 96 IP Office 3.1 Issue 14f (28th September 2005)
Configure the Interchange VPIM Interface to Voicemail Pro These steps follow [INT-VPNM] which should be referenced for greater detail on Interchange configuration steps and options.
1. Check that Interchange has available VPNM ports
• From the Interchange Main Menu, select Customer/Service Administration | Feature Options. Check that there are sufficient current entries for the Maximum Number of Digital Nodes and VPNM ports.
2. Set the Interchange General Parameters.
• From the Interchange Main Menu, select System Parameters | General Parameters. Ensure that the VPNM Port Field is set to 25.
3. Identify the Avaya Voicemail Pro to the interchange system.
• From the Interchange Main Menu, select Networking Administration | Remote Machine Administration | VPIM Machine Administration.
• Select the name of the machine by telnet to the SMTP port of the Voicemail Pro to see how it identifies itself.
4. Set the IP Office parameters.
• From the Interchange Main Menu, select Interchange Administration | Remote Machine Administration | Remote Machine Parameters.
• Select Choices. Select the Voicemail Pro name as the Remote Machine Name then enter the values as shown.
• Machine Type = VPIM
• Avaya Interchange? = n
• Mailbox ID Length = 5
• Failed Msg. Notification Priority = n
• Msg ID? = y
• Send Message for Warning? = n
• Select the Details key to enter the following details:
• Subscriber Updates Type = dynamic
• Voiced Names for Dynamic? = y
• Use DNS? = n
• Domain Name = Enter the domain name.
5. If the Voicemail Pro Dial Plan length is shorter than the Interchange Dial Plan, select Interchange Administration | Remote Machine Administration | Dial Plan Mapping. Follow the instructions of [INT-VPNM] to map from the shorter length to the longer length dial plan.
6. Add the subscribers for Voicemail Pro. The following is one of several ways that this can be done.
• Select Interchange Administration | Remote Machine Administration | Dial Plan Mapping.
• Select the Voicemail Pro as the Remote Machine and then select Options.
• Select Add Subscribers from range. Only mailboxes that are eligible to receive messages should be included.
• Subscriber entries can be checked from interchange Administration | Subscriber Administration | Subscriber Lists | By Remote Machine Name. From Choices select the Voicemail Pro PC name to see the list of known subscribers.

IP Office to Avaya Interchange
Voicemail Pro Installation and Maintenance Page 97 IP Office 3.1 Issue 14f (28th September 2005)
Directory View in Interchange for Intuity Audix and Voicemail Pro Setting the directory view specifies which other messaging machines can provide subscriber updates to a particular messaging machine. Each machine listed is associated with a range of mailboxes from which updates can be accepted and whether a voiced name can be accepted.
1. Select Interchange Administration | Remote Machine Administration | Directory Views.
2. At the Machine Name prompt, select the Voicemail Pro.
3. Select the Options key and then Add all entries.
4. Select Save.
5. Repeat these steps for the Avaya Intuity Audix.
Avaya Interchange Enterprise List Administration This section describes how to configure a list of endpoints in the Interchange. Interchange-based lists are an efficient way to send messages to stable lists of mailboxes. Only one copy of the message is sent from the originating system to the interchange, which takes care of distributing that message to the destination machines and mailboxes.
1. From the Interchange Main Menu, select Interchange Administration | Enterprise List Administration | System Parameters. Set or check the address range of the interchange Dial Plan that can be used for lists.
2. From the Interchange Main Menu, select Interchange Administration | Enterprise List Administration | List Definition.
• Choose a unique list id from the list range and assign an owner.
• In the 'Network Address' grid, enter the list of destination addresses from the Interchange Dial Plan.
• The 'Remote Address' grid should contain the systems where those destinations reside.
• The range of mailboxes that have permissions to send through the list is set in the 'permissions' grid.
Configure a DNS Server A Domain Name Service Server is not required for the messaging systems, but may be a highly desirable way to centralize the mapping of names to IP addresses. This section briefly describes the setup of DNS server used in this type of configuration.
1. From the Start menu of the PC running Microsoft Exchange Server, select Programs | Administrative Tools | DNS. If DNS is not available, DNS needs to be installed from the Operating System CD.
2. Check that there is an entry within the domain for each messaging hosts involved.
3. Configure each PC to use the DNS server to resolve names. This is done in the Internet protocol (TCP/IP Properties form of each LAN interface).

Networked Messaging Install (VPNM)
Voicemail Pro Installation and Maintenance Page 98 IP Office 3.1 Issue 14f (28th September 2005)
Verification & Troubleshooting The configuration can be tested by creating a message and forwarding it to the far end of the system. Check that the message is received at the correct destination.
If the test fails, one of the following procedures may isolate the problem.
Ping Test Make sure that you can ping all end points. If DNS is used, ping using the machine name. See step 5 to ping from the Interchange.
SMTP Service Test and Name Determination Test that the SMTP service of a messaging system is working by using telnet command as follows.
1. From a DOS or UNIX prompt type telnet ip-address 25
2. At the response type Helo
3. At the response type Quit. 4. If the response is not as shown below, then the SMTP service is not running on the machine and
incoming VPNM messages will not be processed. Check that the required PC services are running.
telnet 172.16.254.197 25 220 avaya-8ccy2i4d3 Microsoft ESMTP MAIL Service, Version 5.0.2195.6713 ready a t, Wed, 22 Oct 2003 08:45:03 -0400 Helo 250 avaya-8ccy2i4d3 Hello [172.16.254.197] Quit 221 2.0.0 avaya-8ccy2i4d3 Service closing transmission channel Connection t
Check That the Required PC Services are Running From the Control Panel, select Administrative Tools | Services. Check that the following services are Started with a Startup type of Automatic
• SMTP.
• Voicemail Pro Service.
• VPNM Database Service.
• VPNM Server.
• VPNM Receiver.
Check the Voicemail Pro SMTP Settings From the PC Control Panel, select the Avaya Voicemail Pro icon.
1. Select the SMTP name.
2. Ensure that the Mail Server name is exactly the name of the Voicemail Pro server PC.
3. Select 'Check' to make sure that a successful connection to the SMTP service can be made.

IP Office to Avaya Interchange
Voicemail Pro Installation and Maintenance Page 99 IP Office 3.1 Issue 14f (28th September 2005)
Interchange Basic Tests From the Interchange Main Menu, select Customer/Services Administration | Diagnostics. Perform the following basic checks.
• TCP/IP Diagnostics. Send and receive Test Packets - ping the IP address. View Packet Statistics - look for any interface issues e.g. collisions
• Display Message Queue - monitors the contents of the outgoing message queue. If messages cannot be sent e.g. due to administrative errors, then this queue is likely to contain the unsent messages.
• Remote Connection Test - test the basic connection to a remote Audix system.
Audix Browser Status Test • From the Browser interface to the S8100, select System Administration | AUDIX Networking |
Maintenance Menu | Network Snapshot. See the status of connectivity to the Interchange.
S8100 Ping Test • From the Avaya Terminal Emulator interface to the S8100, select cmd at the Enter Command
prompt.
• At the DOS prompt, enter ipconfig to verify the IP address and gateway.
• Ping to test the connection.
Check the Status Through the Intuity Audix Command Line Interface • To update the Audix with reachable subscribers through the interchange, from the audix
command line prompt type get remote-updates machine and Enter where the machine is the name of the interchange system.
• Repeat the command periodically (and cancel out) until the 'Status of Last Update' entry is completed.
• From the command line prompt type display administrator's-log where message delivery failures and reasons can be found.
Message Exchange Test In general the following capabilities are supported and can be verified.
• Sending Messages to lists or individuals, preserving any combination of Priority and Privacy.
• Replying to the sender
• Forwarding.
Couldn't Send Message! Warning The following warning is normally associated with not having specified a fully qualified domain name for the local SMTP server address. " <CVPIM::bSendMessage>Couldn't send message!Response:550 5.7.1 Unable to relay for [email protected] "

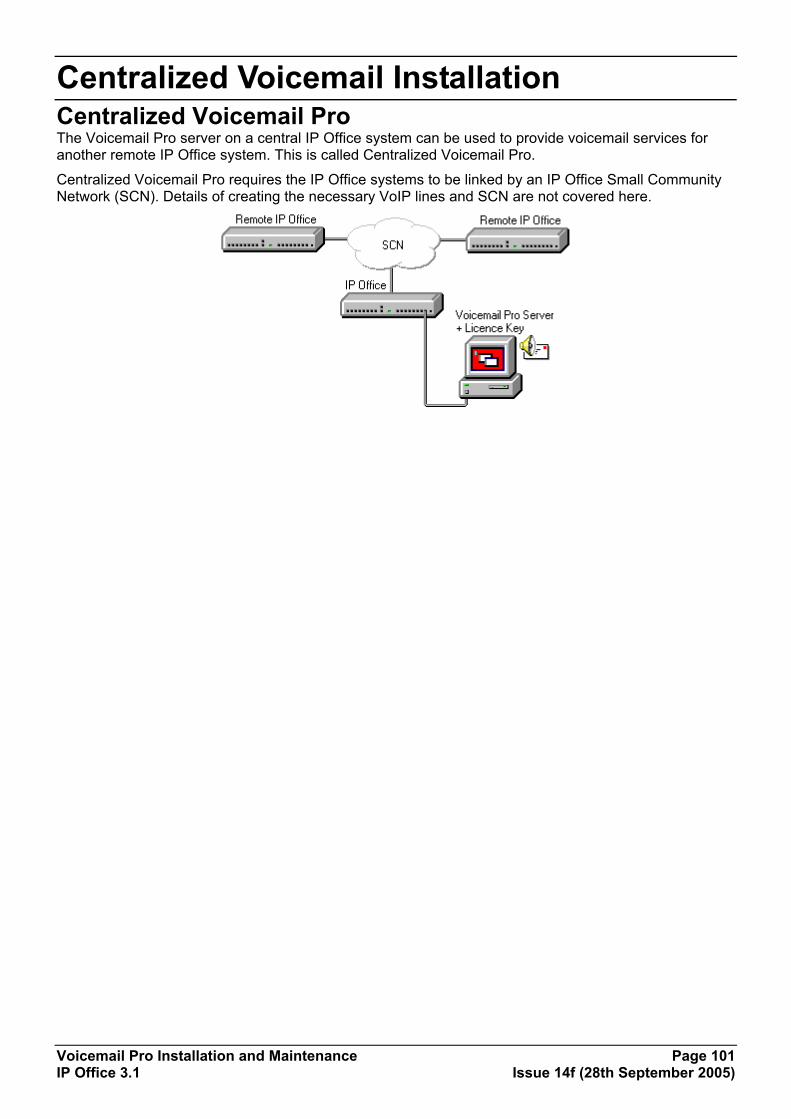
Voicemail Pro Installation and Maintenance Page 101 IP Office 3.1 Issue 14f (28th September 2005)
Centralized Voicemail Installation Centralized Voicemail Pro The Voicemail Pro server on a central IP Office system can be used to provide voicemail services for another remote IP Office system. This is called Centralized Voicemail Pro.
Centralized Voicemail Pro requires the IP Office systems to be linked by an IP Office Small Community Network (SCN). Details of creating the necessary VoIP lines and SCN are not covered here.

Centralized Voicemail Installation
Voicemail Pro Installation and Maintenance Page 102 IP Office 3.1 Issue 14f (28th September 2005)
Planning Requirements The following factors must be remembered during planning of the centralized Voicemail Pro system:
• The Voicemail Server PC is attached to the central system.
• A Feature key and Voicemail Pro license key are required for the central system hosting the Voicemail Pro.
• Small Community Networking is required between the central system and remote systems. This document assumes that this has already been setup and tested.
• On networked IP Office systems it is possible for centralized voicemail to appear operational without Small Community Networking. However this operation tends to be unpredictable and so we only support centralized Voicemail Pro when using Small Community Networking.
• VCM modules or VoIP channels are required in the remote and central systems.
• The extension and group numbering on all systems must be unique.
• The extension and group names on all systems must be unique.
• We also recommend that all names and numbers (groups, line, services, etc) on the separate IP Office systems are kept as unique as possible. This will reduce potential maintenance confusion.
Restrictions • The number of simultaneous voicemail users is restricted by the Voicemail Pro license on the
central system, up to the maximum number of data channels for voicemail supported by the central system's control unit.
• For extensions on the remote system, access is also restricted by the number of available VoIP and VCM channels on that system.
• Though technically possible, centralized voicemail is not recommended or supported for Voicemail Lite or Integrated Voicemail.
• Supported Remote IP Office Voicemail Features: Not all Voicemail Pro features are available on the remote IP Office systems, for example hunt group queuing messages are not supported. Currently, the only features supported for remote sites are:
• Automated Attendant.
• Call Answer (Voice Messaging, ie. basic mailbox operation).
• Call Recording.
• Dial by Name Directory.

Centralized Voicemail Pro
Voicemail Pro Installation and Maintenance Page 103 IP Office 3.1 Issue 14f (28th September 2005)
Licensing The most commonly seen problem in Centralized Voicemail Pro is misunderstanding of the licensing requirements.
• The voicemail licenses are entered on the central IP Office and validated against its Feature Key.
• The remote IP Office systems do not need any voicemail licenses.
• By default each IP Office uses a broadcast address to locate a Feature Key Server PC and validate its licenses.
• Once a Feature Key Server has validated licenses with one IP Office it will not do validation for another IP Office unless rebooted.
Given the above, we strongly recommend that in any multiple IP Office network, the License Server IP Address (System form | System tab) on each IP Office is set to the specific address of its Feature Key server or balnk if using a serial port Feature Key. If a remote IP Office does not have a Feature Key Server (because it isn't using any licenses) enter 0.0.0.0.
It is important to note also that the Voicemail Pro server will operate for 2 hours without license validation. This can cause Voicemail Pro and centralized Voicemail Pro to appear operational following installation and to then stop.
Additional Notes By default each IP Office is set to use a broadcast IP address to locate a voicemail server. Due to this is can appear that centralized voicemail is operating before the remote system is set to the Voicemail Type of Line.
Leaving the system's in this arrangement rather than setting the remote system's Voicemail Type to Line can cause problems and is not supported.

Centralized Voicemail Installation
Voicemail Pro Installation and Maintenance Page 104 IP Office 3.1 Issue 14f (28th September 2005)
Setting Up Centralized Voicemail Pro Install the Central and Remote IP Office Systems
1. Install and test IP Office Small Community Networking. Refer to the Job Aid "Small Community Networking".
Install Voicemail Pro at the Central System
1. Using IP Office Manager, receive the configuration of the central system.
2. Set the License Server IP Address to the address of the PC acting as the central system's Feature Key Server PC.
3. Install Voicemail Pro on the Voicemail Server PC attached to the central system. Refer to the Voicemail Installation & Administration Manual.
• The installation process is the same as for normal non-centralized voicemail operation.
• Test and confirm the voicemail installation by dialing *17 at an extension on the central system.
Configure the Remote Systems Voicemail Settings 1. Receive the configuration of the remote system.
2. Set the License Server IP Address to the address of the PC acting as the remote system's Feature Key Server PC.
• WARNING: This cannot be the same PC as the central system's Feature Key Server PC.
• If the remote system doesn't use any licenses, enter 0.0.0.0.
3. Double-click on the System icon.
4. Select the Voicemail tab and set the following:
• Set the Voicemail Type to Line.
• Set the Voicemail Destination to the Outgoing Group ID set on the VPN line to the central system.
5. Load the configuration and reboot the remote IP Office.
6. Dial *17 at an extension on the remote IP Office. The call should ring the Voicemail Pro server and then access the extensions mailbox.

Voicemail Pro Installation and Maintenance Page 105 IP Office 3.1 Issue 14f (28th September 2005)
Text to Speech Installation Text to Speech The Voicemail Pro server is able to use the Text to Speech (TTS) to:
• Speak text within call flows using the Speak Text action. The text can include variables passed from other actions including database actions.
• Support Email Text to Speech. This requires MAPI based Voicemail Email to have been setup and tested.
Voicemail Pro TTS requires the server PC to have a Microsoft SAPI 5 compatible TTS engine installed and entry of a license. Two IP Office licenses exist to enable Voicemail Pro support for TTS operation.
• VM Pro Generic TTS This licence enables the Voicemail Pro server to use either Microsoft's own SAPI5 TTS engines or third-party SAPI 5 compatible TTS engines. The Microsoft TTS engines (Microsoft Sam, Mike, Mary and Simplified Chinese) are installed by default as part of the Voicemail Pro installation. One license per simultaneous instance of TTS usage.
• VM Pro ScanSoft TTS This licence enables the Voicemail Pro server to use Avaya supplied TTS engines. These engines provide better voice quality than the Microsoft TTS engines and support a range of languages. They are supplied on a set of 5 CD's separate from the Voicemail Pro software CD. One license per simultaneous instance of TTS usage.
• The language supported by the Avaya TTS engines are:
• Chinese
• Dutch
• English (UK)
• English (US)
• French
• German
• Italian
• Japanese
• Korean
• Norwegian
• Brazilian Portuguese
• Russian
• Spanish
• Latin Spanish.
• Multiple Language TTS Support More than one language can be installed. A Select System Prompt Language action can then be used to switch TTS to a different language from the selected default.
• Email Reading When installed in parallel with voicemail email, Voicemail Pro TTS can be used to provide email reading to selected mailbox users.

Text to Speech Installation
Voicemail Pro Installation and Maintenance Page 106 IP Office 3.1 Issue 14f (28th September 2005)
Installing Generic Text to Speech 1. Install and test Voicemail Pro as normal.
2. Using IP Office Manager or the IP Office Wizard, add the VM Pro TTS (Generic) license into the IP Office configuration. Send the new configuration to the IP Office system.
3. Reload the IP Office configuration into IP Office Manager and check that the status of the license has changed to Valid.
4. The Voicemail Pro installation includes the default Microsoft TTS engines (Microsoft Sam, Mike, Mary and Simplified Chinese) as standard. If another third-party SAPI 5 compatible TTS engine is going to be used, install that software.
5. Open the Control Panel and click on Speech.
6. Select the Text to Speech tab.
7. The installed TTS engines should be listed. Adjust and test the setting to obtain the speech required.
Installing Avaya Text to Speech The Avaya TTS engine for Voicemail Pro is supplied on a set of 5 CD's. Each CD contains a different set of languages. However in each case CD 1 is required to start the TTS engine installation process.
1. Install and test Voicemail Pro as normal.
2. Using IP Office Manager or the IP Office Wizard, add the VM Pro TTS (ScanSoft) license into the IP Office configuration. Send the new configuration to the IP Office system.
3. Reload the IP Office configuration into IP Office Manager and check that the status of the license has changed to Valid.
4. Insert the first Avaya TTS CD. The installation wizard should auto-start.
5. Follow the installation wizard prompts and install the languages required. Depending on the languages selected, instructions to insert the other CD's in the set may occur.
6. Open the Control Panel and click on Speech.
7. Select the Text to Speech tab.
8. The installed TTS engines should be listed. Adjust and test the setting to obtain the speech required.
Configuring TTS Speech 1. Start the Windows Control Panel.
2. Select Speech.
3. Select the Text to Speech tab.
4. The Voice Selection box shows which TTS engine is currently being used by Windows. This is the same TTS engine that will be used by the Voicemail Pro server.
Using the Speak Text Action
Voicemail Pro Installation and Maintenance Page 107 IP Office 3.1 Issue 14f (28th September 2005)
Using the Speak Text Action Once method of employing TTS is through adding a Speak Text action to a call flow. The text to be spoken is entered in the action's Specific tab. This text can include combinations of:
• Typed text sentences.
• Voicemail Pro System Variables. For example:
• Entering $KEY would be replaced when spoken by the last digits dialed within the call flow by the caller.
• If using database interaction, entering $DBD[x] would be replaced by the current value of that database field.
• Entering $CLI would speak the caller's CLI, if available, back to them.
• SAPI 5 XML tags can be added to alter how the text is spoken. For example:
• When 123 needs to be spoken as one two three rather than "one hundred and twenty-three", enter <spell>123</spell>.

Text to Speech Installation
Voicemail Pro Installation and Maintenance Page 108 IP Office 3.1 Issue 14f (28th September 2005)
TTS SAPI Controls Windows TTS engines use Microsoft's SAPI (Speech Application Program Interface). This includes the use of XML tags within the text to change how the text is spoken.
For example in the text This is the <volume level="90">text</volume> to speak the items within < > brackets are XML tags used to alter how the speech is spoken.
The following are a sample of the SAPI XML controls supported by Voicemail Pro TTS. Further information on SAPI 5 can be obtained from Microsoft's support websites.
• Volume - Alter the speech volume.
• Rate - Alter the speech rate.
• Pitch - Alter the speech pitch.
• Emph - Add emphasis to words.
• Spell - Spell out words and numbers literally.
• Silence - Add a period of silence.
• Partofsp - Change a words usage.
Entering XML Tags XML tags can be used in two ways, either "nested" or "empty".
• Nest Tags: Example = <volume level="90">text</volume> Nested tags consist of
• An opening XML tag, in the example above <volume level="90">
• The text to which the opening tag command should be applied.
• A closing XML tag. The closing tag use the same command as the opening tag, prefixed with / and no other settings. In the example above this is </volume>.
• Empty Tags: Example = <volume level="90"/>All following text
An empty tag is not nested, its command and settings apply to all the following text. Empty tags are recognizable by the / before the tags closing >.

TTS SAPI Controls
Voicemail Pro Installation and Maintenance Page 109 IP Office 3.1 Issue 14f (28th September 2005)
Example SAPI XML Tags Volume Controls the volume of the speech. This tag can be nested or empty.
• Attributes: • level=
Supports values between 0 and 100, being percentages of the system's set volume.
• Examples: • <volume level="50"/>Speak allow following text at level 50.
• <volume level="50">Speak this text at level 50</volume> and this as normal.
Rate Controls the speed at which the text is spoken. This tag can be empty or nested.
• Attributes: Only one attribute may be applied within a tag.
• absspeed= Sets the absolute speed for the speech in a range between -10 and 10 with 0 being normal speech.
• speed= Sets a speed change that is added to the current speed.
• Examples: • <rate absspeed="5">Speak this text at rate 5</rate> and this text as normal.
• <rate absspeed="5"/>Speak all following text at rate 5.
• <rate speed="-5"/>Drop the current speech speed by 5.
Pitch Controls the pitch at which the text is spoken. This tag can be empty or nested.
• Attributes: Only one attribute may be applied within a tag.
• absmiddle= Sets the absolute pitch for the speech in a range between -10 and 10 with 0 being normal speech.
• middle= Sets a pitch change that is added to the current speed.
• Examples: • <rate absmiddle="5">Speak this text at pitch 5</rate> and this text as normal.
• <rate absmiddle="5"/>Speak all following text at pitch 5.
• <rate middle="-5"/>Drop the current speech pitch by 5.
Emph Applies emphasis to a word or section of text. This tag must be nested.
• Attributes: This tag has no attributes.
• Example: • Say <emph>boo</emph>.

Text to Speech Installation
Voicemail Pro Installation and Maintenance Page 110 IP Office 3.1 Issue 14f (28th September 2005)
Spell Spell forces the engine to speak any nested text literally rather than applying any speech rules. This is useful for numbers where rather that than saying 3001 as three thousand and one for 3001, the speech required is three zero zero one. This tag must be nested.
• Attributes: This tag has no attributes.
• Example: • The telephone number is <spell>555 3468</spell>.
Silence Inserts a period of silence. This tag must be empty.
• Attributes: • msec= Sets the duration in milliseconds.
• Example: • A short silence <silence msec="500"/> of half a second.
Partofsp Forces the pronunciation of a word according to it usage if not correctly determined by the TTS speech engine or to override the engine. This tag must be nested.
• Attributes: • part= Takes a value from noun, verb, modifier, function or interjection.
• Example: • To <partofsp part="verb">record</partofsp> that <partofsp part="noun">record</partofsp>
press 1.

Email Reading
Voicemail Pro Installation and Maintenance Page 111 IP Office 3.1 Issue 14f (28th September 2005)
Email Reading In conjunction with MAPI email clients and Exchange server, TTS can be used to read new emails in a user's email inbox when they access their voicemail mailbox.
This feature is only supported for Intuity mode. Users hear their new voicemail messages and then the number of "Messages with text". Before each email is spoken, details of who it is from, when and the size are given. This allows large or non-urgent emails to be skipped.
• Email reading cannot be used for emails in HTML formatting. If HTML messages are received then all the code will be read out as a message.
1. Install and test Voicemail Pro for MAPI based Voicemail Email operation with an Exchange Server. See Voicemail Email.
2. To perform email reading, the Voicemail account created on the Exchange server for Voicemail Email must able to access the individual users email mailboxes. This can be achieved by either:
• On the Exchange Server, ensure that Voicemail user account is granted rights to access all user email boxes, or;
• Within each user's Outlook:
1. Select Tools | Options.
2. Select Delegates.
3. Add the Voicemail account as a delegate.
3. If not already done, install and test TTS operation using a Speak Text action.
4. Using IP Office Manager, load the IP Office configuration and open the settings for each user.
5. In Voicemail Email enter the user's email address. The same address is used for both Voicemail
Email and Email Reading services.
6. Tick Voicemail Email Reading.
• For systems upgraded from 2.0, where a + sign was used in front of the users email address to indicate Email TTS usage, the + sign is automatically removed and the tick box ticked.
7. Voicemail Email alerting is a separate option.
8. Click OK and merge the new configuration back to the IP Office system.
9. Send the user a test email. Then access the user's voicemail mailbox and check whether following the voice messages a new "message with text" is announced.


Voicemail Pro Installation and Maintenance Page 113 IP Office 3.1 Issue 14f (28th September 2005)
Voicemail Pro Configuration System Preferences There are two main areas through which Voicemail Pro system preferences are set and configured. These are within the Voicemail Pro Client and through the server PC's Windows Control Panel.
Within the Voicemail Pro Client To set the Voicemail Pro preferences:
• Click the preferences icon or
• From the Administration menu, select Preferences and then choose General or VPNM.
• General
• Directories
• Housekeeping
• MAPI
• SNMP Alarm
• VPNM
Within the Windows Control Panel A number of Voicemail Pro server options are set through the Windows Control Panel.
1. Open the Windows Control Panel.
2. Select IP Office Voicemail Pro.
3. The tabs and options within the tabs will vary according to the installed Voicemail Pro components. Possible tabs are:
• Email Settings
• Path Setting
• SMTP Email Settings
• System Settings
• User Management
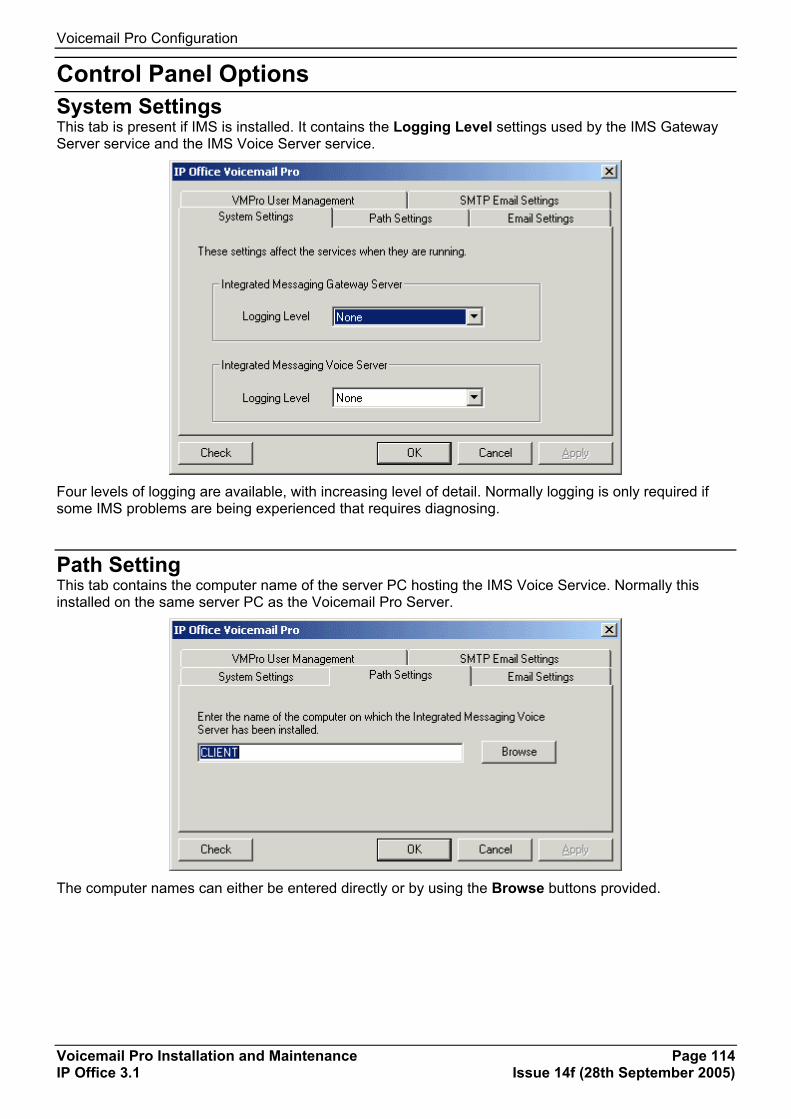
Voicemail Pro Configuration
Voicemail Pro Installation and Maintenance Page 114 IP Office 3.1 Issue 14f (28th September 2005)
Control Panel Options System Settings This tab is present if IMS is installed. It contains the Logging Level settings used by the IMS Gateway Server service and the IMS Voice Server service.
Four levels of logging are available, with increasing level of detail. Normally logging is only required if some IMS problems are being experienced that requires diagnosing.
Path Setting This tab contains the computer name of the server PC hosting the IMS Voice Service. Normally this installed on the same server PC as the Voicemail Pro Server.
The computer names can either be entered directly or by using the Browse buttons provided.
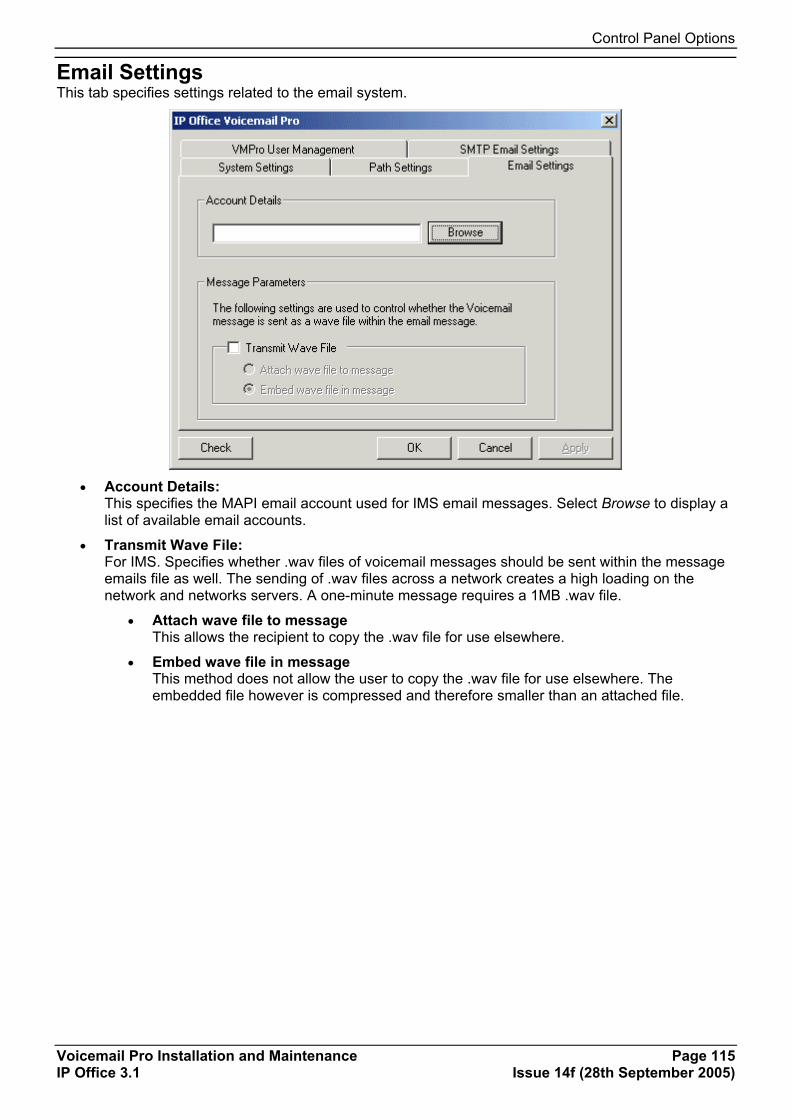
Control Panel Options
Voicemail Pro Installation and Maintenance Page 115 IP Office 3.1 Issue 14f (28th September 2005)
Email Settings This tab specifies settings related to the email system.
• Account Details:
This specifies the MAPI email account used for IMS email messages. Select Browse to display a list of available email accounts.
• Transmit Wave File: For IMS. Specifies whether .wav files of voicemail messages should be sent within the message emails file as well. The sending of .wav files across a network creates a high loading on the network and networks servers. A one-minute message requires a 1MB .wav file.
• Attach wave file to message This allows the recipient to copy the .wav file for use elsewhere.
• Embed wave file in message This method does not allow the user to copy the .wav file for use elsewhere. The embedded file however is compressed and therefore smaller than an attached file.
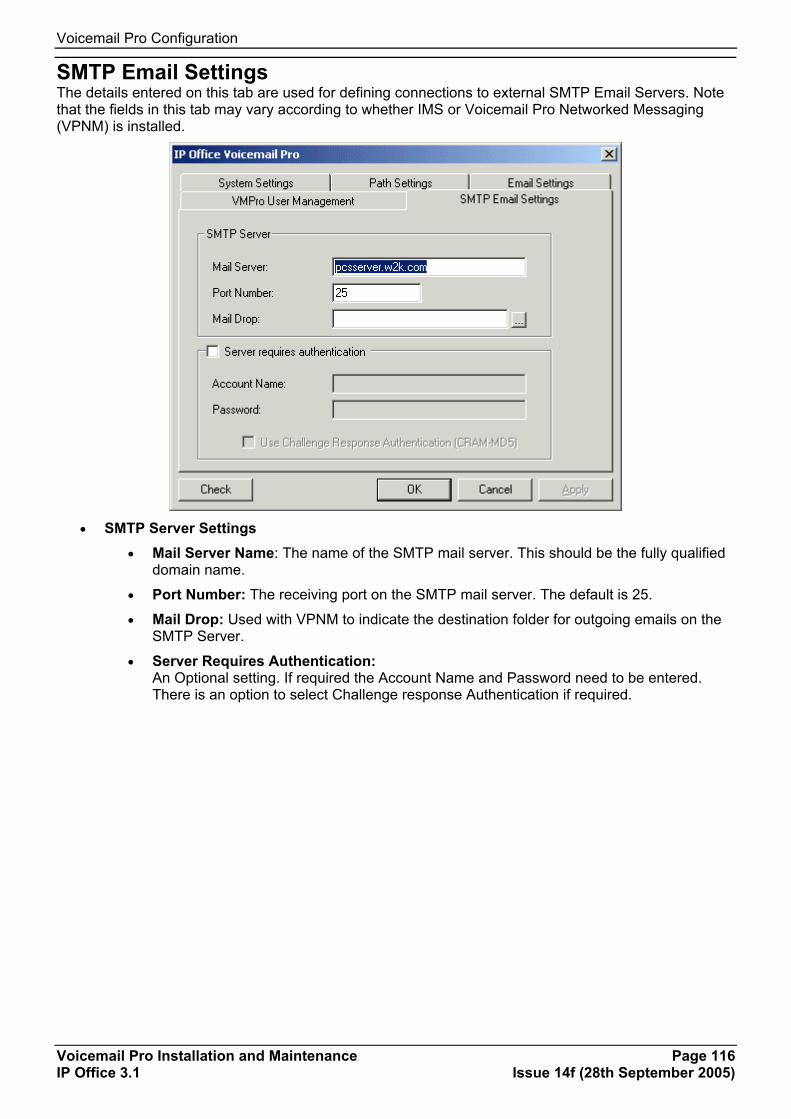
Voicemail Pro Configuration
Voicemail Pro Installation and Maintenance Page 116 IP Office 3.1 Issue 14f (28th September 2005)
SMTP Email Settings The details entered on this tab are used for defining connections to external SMTP Email Servers. Note that the fields in this tab may vary according to whether IMS or Voicemail Pro Networked Messaging (VPNM) is installed.
• SMTP Server Settings
• Mail Server Name: The name of the SMTP mail server. This should be the fully qualified domain name.
• Port Number: The receiving port on the SMTP mail server. The default is 25.
• Mail Drop: Used with VPNM to indicate the destination folder for outgoing emails on the SMTP Server.
• Server Requires Authentication: An Optional setting. If required the Account Name and Password need to be entered. There is an option to select Challenge response Authentication if required.

Control Panel Options
Voicemail Pro Installation and Maintenance Page 117 IP Office 3.1 Issue 14f (28th September 2005)
User Management Note: This tab is currently not used in Voicemail Pro 3.0 and may be hidden.
This tab is used to define user names and passwords for remote applications allowed to add to or modify the Voicemail Pro server call flows. This is not necessary for the Voicemail Pro Client application being run on the Voicemail Pro server PC.
Right-click on the panel to select Create User, Modify User or Delete User. Selecting Create User or Modify User displays an additional menu.
• User ID: This field must be matched by the application logging in to the Voicemail Pro.
• New Password: This field must be matched by the application logging in to the Voicemail Pro. • User Name: This field is description used for display only.
• Tool Name: This selector must be set to match the application sending data to the Voicemail Pro server. Currently within IP Office 3.0 only Wizard is supported. Multisite and VMPro are for future usage.
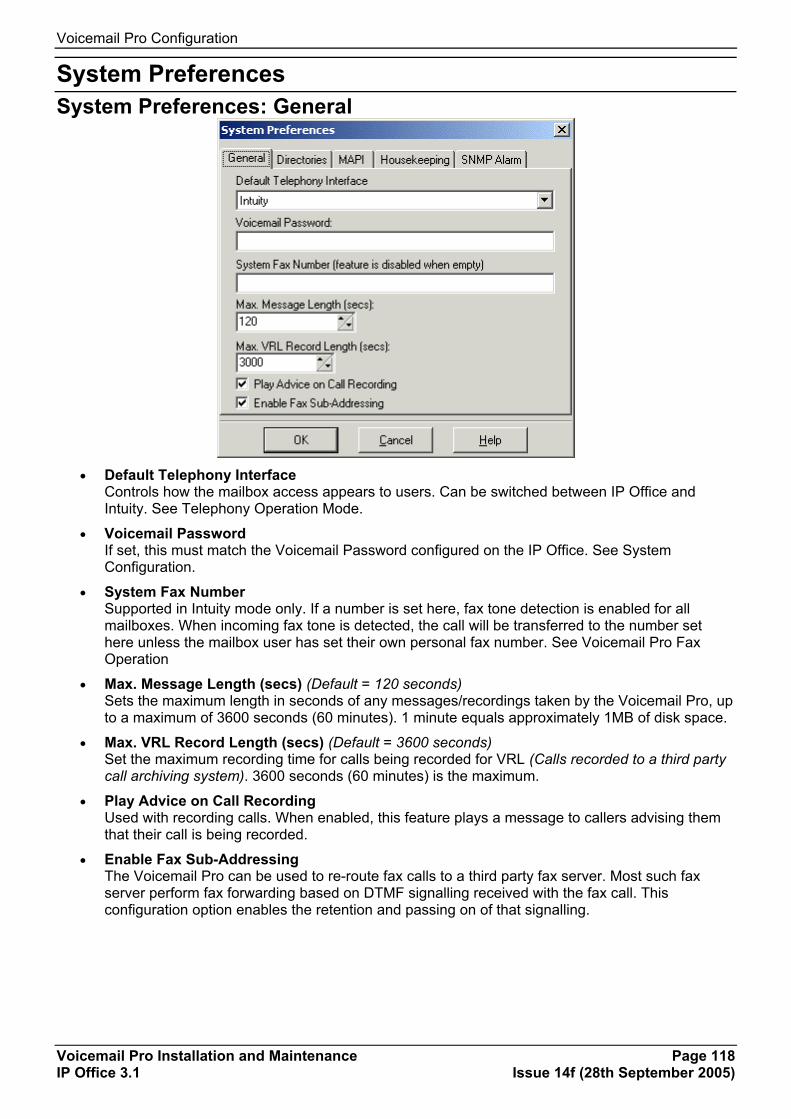
Voicemail Pro Configuration
Voicemail Pro Installation and Maintenance Page 118 IP Office 3.1 Issue 14f (28th September 2005)
System Preferences System Preferences: General
• Default Telephony Interface
Controls how the mailbox access appears to users. Can be switched between IP Office and Intuity. See Telephony Operation Mode.
• Voicemail Password If set, this must match the Voicemail Password configured on the IP Office. See System Configuration.
• System Fax Number Supported in Intuity mode only. If a number is set here, fax tone detection is enabled for all mailboxes. When incoming fax tone is detected, the call will be transferred to the number set here unless the mailbox user has set their own personal fax number. See Voicemail Pro Fax Operation
• Max. Message Length (secs) (Default = 120 seconds) Sets the maximum length in seconds of any messages/recordings taken by the Voicemail Pro, up to a maximum of 3600 seconds (60 minutes). 1 minute equals approximately 1MB of disk space.
• Max. VRL Record Length (secs) (Default = 3600 seconds) Set the maximum recording time for calls being recorded for VRL (Calls recorded to a third party call archiving system). 3600 seconds (60 minutes) is the maximum.
• Play Advice on Call Recording Used with recording calls. When enabled, this feature plays a message to callers advising them that their call is being recorded.
• Enable Fax Sub-Addressing The Voicemail Pro can be used to re-route fax calls to a third party fax server. Most such fax server perform fax forwarding based on DTMF signalling received with the fax call. This configuration option enables the retention and passing on of that signalling.

System Preferences
Voicemail Pro Installation and Maintenance Page 119 IP Office 3.1 Issue 14f (28th September 2005)
System Preferences: Directories This tab is used to indicate where various folders used are located.
• Voicemail Server Directory
Indicates the location of the voicemail server program. This is the folder to which the file Root.vmp is saved when the Save & Make Live command is used.
• Voicemail Server Speech Directory Indicates the location of the folders containing the libraries of speech prompts.
• Remote Campaign Directory Use this field to browse for the directory in which campaign files should be stored.

Voicemail Pro Configuration
Voicemail Pro Installation and Maintenance Page 120 IP Office 3.1 Issue 14f (28th September 2005)
MAPI System Preferences. This tab allows the selection of either MAPI or SMTP operation for the sending of emails. Emails services are used for voicemail email, IMS and email text to speech. Therefore the settings here should not be adjusted without first confirming that all other steps appropriate to which ever of those service is being used have been followed. See also Server Configuration.
• MAPI Profile
Allows the voicemail server to sign on to MAPI using a particular profile name if necessary.
• MAPI Password This is the password for the profile specified above.
• Use Email Protocol Allows the selection of SMTP (send voicemail email alerts only) or MAPI (voicemail email, email TTS). Requires further email configuration and setup, see Voicemail Email. If the protocol is changed, the Voicemail Pro service must be stopped and restarted.

System Preferences
Voicemail Pro Installation and Maintenance Page 121 IP Office 3.1 Issue 14f (28th September 2005)
System Preferences: Housekeeping Housekeeping is used to automatically deletion different types of messages after a set period. The default settings are shown below. The system initiates housekeeping after any two hour period of no call activity. See Automatic Message Deletion - Housekeeping.
All the settings can be changed to suit the users preferences.

Voicemail Pro Configuration
Voicemail Pro Installation and Maintenance Page 122 IP Office 3.1 Issue 14f (28th September 2005)
SNMP Alarm The IP Office system can be configured to send SNMP (Simple Network Management Protocol) alarms. When this is configured, the Voicemail Pro server can tell the IP Office system when to send SNMP alarms about its available disk space.
• Alarm Threshold Unit
Allows the alarm level to be defined in either Disk Space Left (MB) or Recording Time left (min).
• Alarm Threshold Level Sets the number of units (minutes or MB) left at which SNMP alarms are triggered. The minimum is 11. This value also sets two further SNMP alarms levels:
• Space OK Alarm : This alarm is triggered when the available space returns to above a level set at Alarm Threshold Level plus 30.
• Critical Alarm : This alarm is set at 30 or, when the Alarm Threshold Level is less than 40, at Alarm Threshold Level minus 10. Currently the critical alarm value will increment downwards in accordance to the above rule. Note however that it does not increment upwards when the Alarm Threshold is increased again. To reset the critical alarm back to 30, the Default Settings button must be used.
• Default Settings Returns the Alarm Threshold Level to 60, the Space OK level to 90 and Critical Alarm level to 30.

System Preferences
Voicemail Pro Installation and Maintenance Page 123 IP Office 3.1 Issue 14f (28th September 2005)
VPNM Preferences This option will only be active if VPNM was selected during installation and is licensed. VPNM servers can be added and then users added to the servers.
• VPNM Server Section.
• To add a server, click the Add button. Enter the server's fully qualified domain name and the two digit access prefix. Click OK.
• To delete a server, select the server in the listing and then click on the Delete button. When a server is removed all the users associated with the server are also deleted.
• Users for VPNM Servers Section.
• To Add a user for a server select the VPNM server then click on the Add button. A form will appear. The user's full name, local extension number, remote extension number and full telephone number MUST be completed before the user can be added.
• To Modify a user select the user then click the Modify button. You are only able to change the user's full name, the local extension number and the full telephone number.


Voicemail Pro Installation and Maintenance Page 125 IP Office 3.1 Issue 14f (28th September 2005)
IP Office Configuration IP Office Configuration The default IP Office configuration settings allow almost immediate voicemail operation once a voicemail server is running on the LAN. Those default settings are:
• Voicemail running on a PC accessible using a broadcast address of 255.255.255.255.
• Voicemail on for each user and hunt group on.
• No Voicemail Code set for any mailboxes. Until a code is entered for a mailbox, it can only be accessed from the user's own extension.
• No Voicemail Email or Voicemail Help operation.
• No Voicemail Reception numbers set for user mailboxes.
• Whilst hunt group mailboxes are created and used by default, there is no default message waiting indication or method for collecting messages. A method for accessing each hunt group mailbox should be programmed. See Hunt Group Voicemail.
A range of settings and controls are accessible through the IP Office Manager application to configure the voicemail operation. The following sections detail those settings and controls.

IP Office Configuration
Voicemail Pro Installation and Maintenance Page 126 IP Office 3.1 Issue 14f (28th September 2005)
System Configuration The IP Office must be configured to recognize which PC is acting as its Voicemail Server.
The IP Office is configured via the Manager application and these settings can be found in the Voicemail tab of the System configuration form.
• Voicemail Type: Default = PC
For Voicemail Pro operation select PC. • Voicemail Destination: Default = Blank
Not used with Voicemail Pro.
• Voicemail IP Address: Default = 255.255.255.255 Enter the IP address of the PC on which the voicemail server is running. This can be left set to 255.255.255.255 (a broadcast address) if there is only one voicemail server on the network.
• Voicemail Password/Confirm Password : Default = Blank If you set a password here, the same password must be entered in the Voicemail System Preference, see Voicemail System Preferences.
IP Office Configuration
Voicemail Pro Installation and Maintenance Page 127 IP Office 3.1 Issue 14f (28th September 2005)
Using Voicemail to Give Error Messages Voicemail can be used to give out messages when certain numbers are dialed. For example, if users are barred from making international calls, rather than giving users the busy tone a recording similar to "International calls are not permitted" could be played instead. The following example could be used:
1. Create a user that will allow you to record the message and give this user a Voicemail Code, e.g.
• Name: Barred
• Full Name: Internal calls error message
• Extension: 403
2. Use a short code to access the user's voicemail to enable you to record the message, e.g.
• Short Code: *95
• Telephone Number: "?Barred" (include quote marks)
• Line Group ID: 0
• Feature: VoicemailCollect
3. Record a new greeting message for the above user, e.g. "International calls are not permitted" and save as a Continuous Loop.
4. Create a short code so that when a user dials an international call they will be played the error message, e.g.
• Short Code: 00N
• Telephone Number: "#Barred" (include quote marks)
• Line Group ID: 0
• Feature: VoicemailCollect


Voicemail Pro Installation and Maintenance Page 129 IP Office 3.1 Issue 14f (28th September 2005)
User Configuration User Configuration Within IP Office Manager, the following options are configurable via the Voicemail tab for each User. For details of the Voice Recording tab refer to Recording Calls.
• Voicemail Code: Default = Blank
A code (1-15 digits) used by the voicemail server to validate access to this user's voicemail box. This is required when users retrieve voicemail messages remotely, ie. from another user's extension or from an external telephone, e.g. a mobile. If remote access is attempted and a Voicemail Code has not been configured, the message "Remote access is not configured on this mailbox" will be played.
• Confirm Voicemail Code: The Voicemail Code must be retyped to ensure it has been correctly entered.
• Voicemail Email: Default = Blank An email address can be used for sending email alerts about new messages. See Voicemail Email. Also used for email reading.
• Voicemail Reception: Default = Blank The number to which callers leaving messages in the mailbox can be transferred. See Voicemail Reception/Operator.
• Voicemail On: Default = On When on, the mailbox is used to answer the user's unanswered or busy calls.
• Voicemail Help: Default = Off Controls whether, for IP Office mailbox mode, users retrieving messages are given an additional prompt "For help at any time press 8". This option does not affect Intuity emulation mailbox mode (Voicemail Pro) where the prompt "For help at any time press *H" is played.
• Voicemail Ringback: Default = Off If enabled and a new message has been received, the voicemail server will call the user's extension whenever it returns from off-hook to on-hook. The voicemail server will not ring the extension more than once every 30 seconds.
• Voicemail Email Mode: Default = Off Controls the method of operation of Voicemail Email above.
• Off: Voicemail email mode not used.
• Copy: A copy of the message is sent to the email account.
• Forward: Messages are sent to the email account and deleted from the Voicemail server.
• Alert: Notification that a new message has been received is sent to the email account.
• Voicemail Email Reading: Sets whether the Voicemail Email address can be used for email reading. See Email Reading
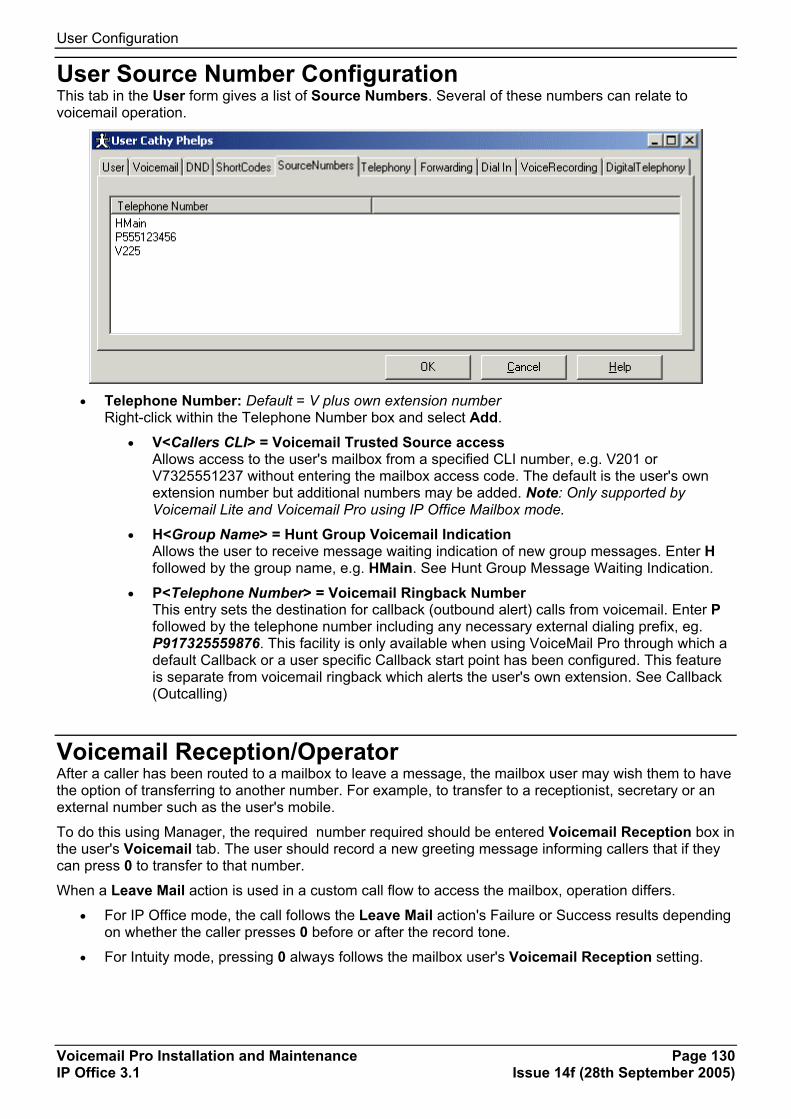
User Configuration
Voicemail Pro Installation and Maintenance Page 130 IP Office 3.1 Issue 14f (28th September 2005)
User Source Number Configuration This tab in the User form gives a list of Source Numbers. Several of these numbers can relate to voicemail operation.
• Telephone Number: Default = V plus own extension number
Right-click within the Telephone Number box and select Add.
• V<Callers CLI> = Voicemail Trusted Source access Allows access to the user's mailbox from a specified CLI number, e.g. V201 or V7325551237 without entering the mailbox access code. The default is the user's own extension number but additional numbers may be added. Note: Only supported by Voicemail Lite and Voicemail Pro using IP Office Mailbox mode.
• H<Group Name> = Hunt Group Voicemail Indication Allows the user to receive message waiting indication of new group messages. Enter H followed by the group name, e.g. HMain. See Hunt Group Message Waiting Indication.
• P<Telephone Number> = Voicemail Ringback Number This entry sets the destination for callback (outbound alert) calls from voicemail. Enter P followed by the telephone number including any necessary external dialing prefix, eg. P917325559876. This facility is only available when using VoiceMail Pro through which a default Callback or a user specific Callback start point has been configured. This feature is separate from voicemail ringback which alerts the user's own extension. See Callback (Outcalling)
Voicemail Reception/Operator After a caller has been routed to a mailbox to leave a message, the mailbox user may wish them to have the option of transferring to another number. For example, to transfer to a receptionist, secretary or an external number such as the user's mobile.
To do this using Manager, the required number required should be entered Voicemail Reception box in the user's Voicemail tab. The user should record a new greeting message informing callers that if they can press 0 to transfer to that number.
When a Leave Mail action is used in a custom call flow to access the mailbox, operation differs.
• For IP Office mode, the call follows the Leave Mail action's Failure or Success results depending on whether the caller presses 0 before or after the record tone.
• For Intuity mode, pressing 0 always follows the mailbox user's Voicemail Reception setting.

Voicemail Pro Installation and Maintenance Page 131 IP Office 3.1 Issue 14f (28th September 2005)
Routing Calls to Voicemail Transferring Callers to Voicemail This document shows the different methods by which callers can be transferred to voicemail. The transfer can be used to route the caller to a specific mailbox to leave or collect messages or to a particular Voicemail Pro start point.
Details cover the use of Voicemail Collect short codes and VM: paths as telephone numbers. These can then be applied to dialing, DSS keys, SoftConsole and Phone Manager buttons.
An example Voicemail Pro module is included which allows the transferred caller to select the extension to which they want to talk or leave a message.
Routing User Calls to Voicemail If a user has voicemail switched on, calls will be automatically routed to Voicemail if either:
1. The extension is busy and Call Waiting has not been enabled.
2. The user has Do Not Disturb set or the extension is not answered within the No Answer Time as set in the Manager program (default 15 seconds).
The caller will hear the standard greeting message. A user can record their own standard greeting message if required.
When new messages are received, the user's telephone call display or IP Office PC application will be updated to show the number of new messages waiting.
If Voicemail Ringback is enabled, the Voicemail Server will ring the user's extension to attempt to deliver new messages after the user next uses the telephone.
All messages are stored until they have been listened to and then are automatically deleted after a set time (default 36 hours if installed in IP Office mode, 30 days if installed in Intuity mode). IP Office mode supports the ability for users to indicate a message as saved and so exempt from automatic deletion.
At any stage whilst listening to Voicemail messages the user can ask for online help by pressing 8.
A user can turn Voicemail and Voicemail Ringback on or off via Phone Manager or using the default short codes as follows:
• *18 - To turn Voicemail on.
• *19 - To turn Voicemail off.
• *48 - To turn Voicemail ring back on.
• *49 - To turn Voicemail ring back off.

Routing Calls to Voicemail
Voicemail Pro Installation and Maintenance Page 132 IP Office 3.1 Issue 14f (28th September 2005)
Transfer Calls to Voicemail The facility to transfer a call directly to a user's voicemail is available using the SoftConsole or Phone Manager applications. For users not using these applications a short code can be created.
For example:
• Short Code: *201
• Telephone Number: "#Extn201" (include quote marks)
• Line Group ID: 0
• Feature: VoicemailCollect
• Note: When creating short codes for use with Voicemail, the ? indicates "collect Voicemail" and the # indicates "deposit Voicemail". The telephone number entry must also be enclosed by quote marks as shown above.

IP Office Configuration
Voicemail Pro Installation and Maintenance Page 133 IP Office 3.1 Issue 14f (28th September 2005)
Using Short Codes to Access Voicemail The short code VoicemailCollect feature can be used to route callers to voicemail. The service they receive is set by the Telephone Number field.
Note: In these examples we have used *80 but any available short code could be used.
• Example 1: Access to the Mailbox Main The following short code will access the mailbox for Main.
• Example 2: Access a Voicemail Pro Module If a Voicemail Pro module has been created and called TimeCheck, the following short code could be used to access it.

Routing Calls to Voicemail
Voicemail Pro Installation and Maintenance Page 134 IP Office 3.1 Issue 14f (28th September 2005)
Using VM: to Access Voicemail Another method to access voicemail is the VM: option where VM: is followed by the name of the mailbox or Voicemail Pro start point required.
This can be used in the telephone number field of IP Office applications such as SoftConsole, PhoneManager and Manager.
• Example 1: SoftConsole access to the mailbox Main From their eConsole the user wants single click access to check for messages in the hunt group mail box Main (extension ID 200).
1. Start the SoftConsole.
2. Right-click on one of the BLF panel tabs.
3. Select New and then BLF Group Member.
4. Enter a Name, for example Messages.
5. Enter a Number, in this case enter VM:?Main or VM:?200.
6. Click on OK.
7. The operator can now check for messages in that groups mailbox with a single click.
• Example 2: Accessing a Module from Phone Manager The user want to access a particular Voicemail Pro module, for this example one called TimeCheck.
1. Start Phone Manager.
2. Click on the Speed Dials tab.
3. Right-click and select New.
4. Enter a Name, for example Time Check.
5. Enter a Number, in this case enter VM:TimeCheck.
6. Click on OK.
• Example 3: Incoming Call Routing The VM notation can be used in the Destination field of a Manager Incoming Call Route. This will allow you to route calls that match the Incoming Call Route's criteria to a particular mailbox or Voicemail Pro module.
VM: versus Short Codes? The VM: method is easier to deploy. In fact for SoftConsole and Phone Manager it can be used without having to access and alter the Manager configuration. However VM: obviously cannot be dialed from a physical phone.
Short codes have the advantage that they can be dialed at any extension once setup through Manager.

IP Office Configuration
Voicemail Pro Installation and Maintenance Page 135 IP Office 3.1 Issue 14f (28th September 2005)
Voicemail Telephone Numbers This section details the options that can be used with VoicemailCollect short codes and with VM: in order to access a mailbox or Voicemail Pro start point.
Voicemail Lite and Pro In these example we have used a mailbox called Main with extension number 200.
Note: User attempting to collect mail from user mailboxes will be prompted for the voicemail PIN code is not accessing from a trusted source.
Short Code Application Number Field ?200 VM:?200 Collect Messages "?Main" VM:?Main #200 VM:#200 Leave Messages "#Main" VM:#Main
Voicemail Pro Start Points The following only apply when a matching start point has been setup.
If a short burst of ringing is required then # should be inserted before the start point name. This is useful if transferring callers as it allows the transfer to be completed before the voicemail prompts begin.
Short Code Application Number Field User Start Points for examples a user called Extn205. - Collect "Extn205.Collect" VM:Extn205.Collect - Leave "Extn205.Leave" VM:Extn205.Leave - Callback "Extn205.Callback" VM:Extn205.Callback Group Start Points for example a group called Main. - Collect "Main.Collect" VM:Main.Collect - Leave "Main.Leave" VM:Main.Leave - Queued – – - Still Queued – – Default Start Points - Collect "Default.Collect" VM:Default.Collect - Leave "Default.Leave" VM:Default.Leave - Queued – VM:Default.Queued" - Still Queued – VM:Default.Still Queued" Shortcode Start Points for example a shortcode start point called DVM. "Short Codes.DVM" VM:Short Codes.DVM Module Start Points for these examples a module called Attend… "Attend" VM:Attend Campaigns for example a campaign called Catalogue. - Leave – VM:Catalogue - Collect – VM:Catalogue.Collect
The Voicemail Node short code feature can also be used to access short code start points. It uses the short code start point name as the telephone number without surrounding brackets.

Routing Calls to Voicemail
Voicemail Pro Installation and Maintenance Page 136 IP Office 3.1 Issue 14f (28th September 2005)
Example Call Flow: SelfSelect Module In this example we will create a Voicemail Pro module that allows callers to select to which extension they want. If that extension is busy or doesn't answer they can then leave a message in the targets mailbox.
Note: A copy of this module can be found in Voicemail Pro Samples within the help pages.
The Voicemail Pro Module 1. In Voicemail Pro, we added a module which we named SelfSelect.
2. First we added a Menu action and set its properties as follows:
• On the Touch Tones tab we set the Wait for a key press for option to 5 seconds. This gives the action a Timeout result which can be used if the caller does nothing or doesn't has DTMF dialing.
• Our IP Office has extensions and groups numbered in the 200 to 299 range. So we added the touch tone sequence 2?? to match any dialing in that range.
• In Entry Prompts we recorded a prompt along the line of "Dial the number you want or wait for reception".
3. We added a Transfer action. In its properties, on the Specific tab we set the Destination to Main, the hunt group containing our receptionists.
4. We then added a connection from the Menu action's Timeout result to the Transfer action.
5. We added an Assisted Transfer action. In its properties, on the Specific tab we entered $KEY in the Mailbox field.
6. We then added a connection from the Menu action's 2?? result to the Assisted Transfer action.
7. We added a Leave Mail action. In its properties, on the Specific tab we again entered $KEY in the Mailbox field.
8. We then added connections from the Assisted Transfer action's No Answer and Busy result to this action.
9. We then added connections from the Assisted Transfer action's Next result and the Leave Mail action's Success and Failure results back to the Menu action.
• Note: The Success and Failure results in a Leave Mail action are only used if the caller presses 0 when in the mailbox.
10. The call flow was then saved and made live.

IP Office Configuration
Voicemail Pro Installation and Maintenance Page 137 IP Office 3.1 Issue 14f (28th September 2005)
Creating a Matching Short Code We now need a short code that can be used to route callers to the SelfSelect module.
1. Start IP Office Manager and receive the configuration.
2. We added a new system short code so that it would be available to all callers.
3. We chose to use *80 and set it as shown below:
• The entry “#SelfSelect” indicates name of the Voicemail start point for the call, in this
case the Voicemail Pro module SelfSelect.
• For a module start point the # is optional. Using it provides a short period of ringing before the module actions start. This is useful if manually transferring a caller as otherwise they may miss the start of the module's entry prompts.
4. We then merged the new configuration.
5. At any extension we can now test the routing by dialing *80. We can then wait to be transferred to reception or dial the extension or group that we want.
Using the Module We can now assign the short code *80 or the path VM:SelfSelect to a whichever method by which the user wants to transfer callers to the voicemail service.
A further suggestion is to provide a system short code to deal callers who dial an invalid extension number. For our example above, a short code 2??/./"SelfSelect"/VoicemailCollect would reroute such callers back to the SelfSelect module.

Voicemail Pro Installation and Maintenance Page 139 IP Office 3.1 Issue 14f (28th September 2005)
Accessing Voicemail Remotely Overview of Remote Access By default a user can access voicemail from their own extension (using *17).
User's mailboxes cannot be accessed from any other location (internal or external) until a Voicemail Code has been set for the mailbox. This is done through the User's configuration form in the Manager program.
Once a Voicemail Code has been set, the mailbox can be accessed from other locations (see following sections) and the caller will be prompted to enter Voicemail Code.
If direct access is required the location can be setup as a 'trusted location' (Not supported by Voicemail Pro using Intuity Mailbox mode) . The caller will then not be required to enter the Voicemail Code.
• Note: This requires that the incoming call provides a matching CLI.
Access Voicemail from Another Extension 1. Dial the extension whose mailbox is required.
2. When diverted to voicemail, press 8 during the voicemail greeting.
3. If not calling from a 'trusted location', enter the Voicemail Code when requested.
Access from Any Extension for All Users To use this facility a short code must be created.
For example:
• Short Code: *98
• Telephone Number: ?Anonymous (note no quote marks)
• Line Group ID: 0
• Feature: VoicemailCollect
Any user can now dial *98 from any extension. They will be prompted for their mailbox number (extension number) and Voicemail Code.
Accessing Voicemail Remotely
Voicemail Pro Installation and Maintenance Page 140 IP Office 3.1 Issue 14f (28th September 2005)
Access from Any Extension for a Specific User To use this facility a short code must be created.
For example:
• Short Code: *90
• Telephone Number: "?Extn201" (include quote marks)
• Line Group ID: 0
• Feature: VoicemailCollect
The user ('Extn201' in this example) can now dial *90 from any extension and then enter their Voicemail Code to access their voicemail messages.
Access from a Trusted Extension If a user regularly accesses their voicemail messages from another extension, this extension number can be set up as a "trusted location". (Not supported by Voicemail Pro using Intuity Mailbox mode) For example in the Source Numbers tab of the User's form for extension 214, add an entry V204. Now when the user, Extn214, dials *90 from extension 204 they will not be prompted for their Voicemail Code.
Accessing Voicemail from an External Location If users wish to access their Voicemail messages when away from the office an Incoming Call Route can be used for this facility. The Incoming Call Route must be set up with the destination as Voicemail.
Direct Access from a Trusted External Location If a user regularly accesses their mailbox from the same external location, that number can be set up as a "trusted location" (Not supported by Voicemail Pro using Intuity Mailbox mode). In the Source Numbers tab of the User form in the Manager program add an entry V followed by the telephone number, e.g. V01923 383838.
When the user dials the number set up as the Incoming Call Route to Voicemail from the "trusted location", they will not be prompted for their mailbox number or Voicemail Code. See User Source Number Configuration.
• Note: This requires that the incoming call provides a matching CLI.

IP Office Configuration
Voicemail Pro Installation and Maintenance Page 141 IP Office 3.1 Issue 14f (28th September 2005)
Voicemail Pro Callback (Outbound Alert) Voicemail callback is a service whereby the Voicemail Pro will call a specified number whenever the user receives a new voicemail message. When the callback is answer, the system announces the outbound alert and waits for a key press for confirmation before continuing with the associate call flow.
To use this service requires configuration of a callback start point on the Voicemail Pro and entry of a callback number through IP Office Manager.
Note: This feature is separate from voicemail ringback which alerts the user's own extension.
1. Setting Up the Callback Call Flow The call flow we have created below is a very simple example. In practice we could also include a menu that allows the user access to other features. For example access to a Play Configuration Menu action would allow the user to remotely change various mailbox settings including their callback number, see Using a Play Configuration Menu Action.
1. Under Specific Start Points, right-click on Users and select Add.
2. In the Name field enter the user's mailbox name. Select the Callback entry point and select OK.
3. Within select Callback.
4. Add a Get Mail action and under the Specific tab, in Mailbox enter the user's name again or extension number.
• IMPORTANT Record an entry prompt for the first action in the callback call flow. Experience with connection to some cell phone systems has revealed that this entry prompt may need to be up to 20 seconds in length.
5. Connect the Start Point and the Get Mail action.
6. Save and make live.
The Default Callback Start Point In the example above we created a callback call flow for the individual users. The Default Callback start point can be used to create a default callback call flow for all users.
If the Default Callback start point is used, it must be designed so that users have to indicate which mailbox they are accessing. In the simple call flow used above, this can be done by entering ? in the Mailbox field of the Get Mail action.
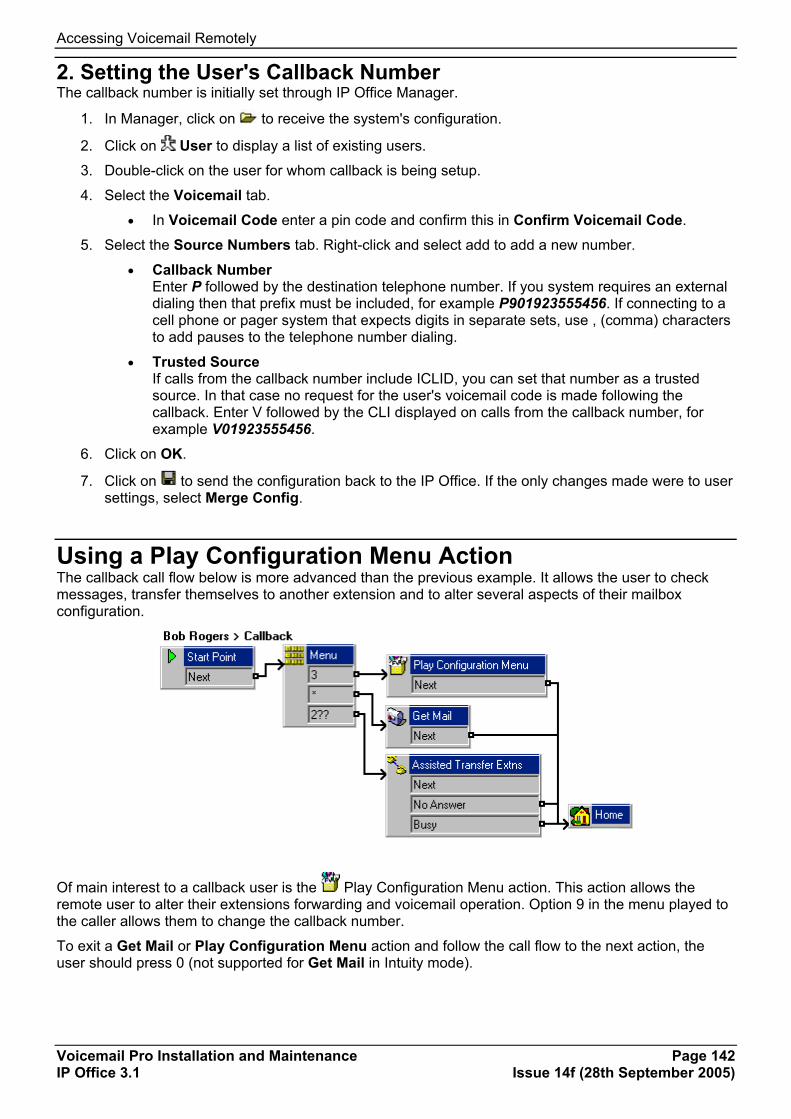
Accessing Voicemail Remotely
Voicemail Pro Installation and Maintenance Page 142 IP Office 3.1 Issue 14f (28th September 2005)
2. Setting the User's Callback Number The callback number is initially set through IP Office Manager.
1. In Manager, click on to receive the system's configuration.
2. Click on User to display a list of existing users.
3. Double-click on the user for whom callback is being setup.
4. Select the Voicemail tab.
• In Voicemail Code enter a pin code and confirm this in Confirm Voicemail Code.
5. Select the Source Numbers tab. Right-click and select add to add a new number.
• Callback Number Enter P followed by the destination telephone number. If you system requires an external dialing then that prefix must be included, for example P901923555456. If connecting to a cell phone or pager system that expects digits in separate sets, use , (comma) characters to add pauses to the telephone number dialing.
• Trusted Source If calls from the callback number include ICLID, you can set that number as a trusted source. In that case no request for the user's voicemail code is made following the callback. Enter V followed by the CLI displayed on calls from the callback number, for example V01923555456.
6. Click on OK.
7. Click on to send the configuration back to the IP Office. If the only changes made were to user settings, select Merge Config.
Using a Play Configuration Menu Action The callback call flow below is more advanced than the previous example. It allows the user to check messages, transfer themselves to another extension and to alter several aspects of their mailbox configuration.
Of main interest to a callback user is the Play Configuration Menu action. This action allows the remote user to alter their extensions forwarding and voicemail operation. Option 9 in the menu played to the caller allows them to change the callback number.
To exit a Get Mail or Play Configuration Menu action and follow the call flow to the next action, the user should press 0 (not supported for Get Mail in Intuity mode).

Voicemail Pro Installation and Maintenance Page 143 IP Office 3.1 Issue 14f (28th September 2005)
Hunt Groups Hunt Group Voicemail Voicemail provides a number of services for hunt groups.
• Queuing & Out of Hours Greetings If the hunt group is using queuing or is in out-of-hours mode, the voicemail server provides appropriate greetings to callers. These greetings can be altered through the normal mailbox controls.
• Voicemail Pro allows the actions available to a queued caller to be customized in addition to the greetings.
• Note that the Voicemail Pro does not control the queuing of calls. That is performed by the IP Office switch which presents queued and still queued calls at the appropriate times and provides the queue position and ETA data.
• Messaging If voicemail for a hunt group is on (the IP Office default), calls to the hunt group are automatically routed to voicemail if all available extensions have been rung for the number of seconds defined in the IP Office's Allocated Answer Interval (No Answer Time) parameter (default 15 seconds).
IMPORTANT: Access to Hunt Group Messages By default there is no indication when a hunt group mailbox contains messages and no direct access method to a hunt group's mailbox.
• For message indication, a user with an appropriate H source number entry must be setup. See Displaying and Accessing Hunt Group Messages.
• For access by other users an access short code can be used. See Accessing Hunt Group Voicemail Using a Short Code.

Hunt Groups
Voicemail Pro Installation and Maintenance Page 144 IP Office 3.1 Issue 14f (28th September 2005)
Hunt Group Configuration Using IP Office Manager, the following options can be configured via the Voicemail tab of the Hunt Group form. For details of the Voice Recording tab see Recording Calls.
• Voicemail Code: Default = Blank
A security code (1 to 15 digits) used by the voicemail server. This is required by users retrieving messages for this hunt group remotely; ie. from an extension that is not a member of the hunt group or from an external telephone.
• Confirm Password: The Voicemail Code must be retyped to ensure that it has been entered correctly.
• Voicemail Email: Default = Blank This address can be used to provide email notification of new messages, see Voicemail Email Integration.
• Voicemail On: Default = On Each Hunt Group can use Voicemail to collect group related messages. Use this option to turn this feature on or off.
• Broadcast: Default = Off When off, message waiting indication is only sent to specifically configured users. When on, messages are forwarded to the individual mailboxes of the hunt group members.
• Voicemail Help: Default = Off When retrieving Voicemail messages users can be given a recorded message helping them to use the Voicemail facility - "For help at any time press 8." This option will turn this facility on or off.
• Voicemail Email mode: Default = Off If a Voicemail Email address has been entered above, select one of the following modes:
• Off: Voicemail messages or notifications are not automatically sent.
• Copy: A copy of the message is sent to the email account.
• Forward: Voicemail messages are sent to the email account and deleted from the Voicemail server.
• Alert: Notification that a new Voicemail message has been received is sent to the email account.
IP Office Configuration
Voicemail Pro Installation and Maintenance Page 145 IP Office 3.1 Issue 14f (28th September 2005)
Hunt Group Message Waiting Indication By default no message waiting indication (MWI) is provided for hunt group. where required indication can be enabled for specific users. Those users don't not need to be members of the hunt group.
Users receiving hunt group message waiting indication are also provided with methods to access the mailbox. The method depend on the type of phone or IP Office application they are using.
• Phone Manager: If the user uses Phone Manager, the group name and number of new messages appears in the Messages tab. This can be clicked to access the group's mailbox.
• 4400, 4600 and 6400 Series Phones: On phones with a Menu button, press Menu | Menu | Msgs | Voice. The group name is shown along with the number of new messages. Press the display button to access the group mailbox.
• Voicemail Ringback: If the user has voicemail ringback enabled, ringback will occur for new group messages as well as new personal messages. Note: Ringback for personal messages will take place before any ringback for new group messages.
• Voicemail Code: If the user is not a member of the hunt group, a voicemail code is also required. This is entered through the Voicemail Code field on the Hunt Group | Voicemail tab in the IP Office's configuration.
• Alternatively the user can be made and member or the group but have their membership set to disabled. This allows them to access the group's mailbox without receiving group calls.

Hunt Groups
Voicemail Pro Installation and Maintenance Page 146 IP Office 3.1 Issue 14f (28th September 2005)
Hunt Group Message Waiting Indication This method of configuring hunt group message waiting indication allows individuals, including users who are not member of the group, to receive hunt group message waiting indication.
1. Using IP Office Manager, use to receive the IP Office system's configuration.
2. Click on User to display the existing users.
3. Double-click on the entry for the user requiring hunt group message waiting indication.
4. The user settings are displayed. Click on the Source Numbers tab.
5. Right-click on the white area and select Add.
6. In the Telephone Number field enter H followed by the hunt group name. For example, to receive message waiting indication from the hunt group main enter HMain.
7. Click OK.
8. Click OK.
9. Click to merge the configuration change back to the IP Office.
IP Office Configuration
Voicemail Pro Installation and Maintenance Page 147 IP Office 3.1 Issue 14f (28th September 2005)
Configuring Group Broadcast Enabling group broadcast forwards copies of new hunt group messages to the individual user mailboxes of hunt group members.
1. Using IP Office Manager, use to receive the IP Office system's configuration.
2. Click on Hunt Group and then double-click on the hunt group required.
3. Click on the Voicemail tab.
4. Click on Broadcast to select that option.
5. Click OK.
6. Click to merge the configuration change back to the IP Office.

Hunt Groups
Voicemail Pro Installation and Maintenance Page 148 IP Office 3.1 Issue 14f (28th September 2005)
Accessing Hunt Group Voicemail Using a Short Code To access messages for a Hunt Group, a short code can be created:
For example, for a group called Main:
• Short Code: *99
• Telephone Number: "?Main" (include quote marks)
• Line Group ID: 0
• Feature: VoicemailCollect
For system running in Intuity mode, the above will only work if the user is a member of the group and a custom call flow has also been setup for that hunt groups collect start point.
Members of the Main hunt group can now dial *99 from their own extensions to access hunt group messages.
In IP Office mode, to use this short code for access from an extension that is not a member of the hunt group, a Voicemail Code should be configured for the group.
IP Office Configuration
Voicemail Pro Installation and Maintenance Page 149 IP Office 3.1 Issue 14f (28th September 2005)
Out of Hours Operation Voicemail provides a number of greetings for groups. One of these is an Out of Hours Greeting.
Through Manager or using short code a hunt group can be taken in or out of service. When the group is Out of Service, callers are played the group's "Out of Hours" greeting and can then leave a message.
• Note: Alternatively if an Out of Service Fallback Group has been configured then callers are passed to that group.
Similarly a group can be taken in or out of Night Service by using Manager, short codes or an associated time profile. When the group is in Night Service, callers are played the group's "Out of Hours" greeting and can then leave a message.
• Note: Alternatively if an Out of Hours Fallback Group has been configured then callers are passed to that group.

Hunt Groups
Voicemail Pro Installation and Maintenance Page 150 IP Office 3.1 Issue 14f (28th September 2005)
Hunt Group Queuing If enabled, a call will be held in a queue when all available extensions in the Hunt Group are busy.
• A fault in operation between the IP Office switch and Voicemail Pro server means that the Still Queued message is not played if the hunt group name exceeds 13 characters.
The Queue Ring Time defines the number of seconds the caller will hear the ringing tone before being played the "You are in a queue greeting". The caller will then be placed on hold for 20 seconds and then played the "You are still in a queue greeting". The caller is then placed on hold again and played the still queued message every 20 seconds.
This is the default queuing sequence used for Voicemail Lite and Voicemail Pro. Using Voicemail Pro you can define custom actions and prompts for the queuing sequence. See Using Queued and Still Queued Start Points.
• Queuing On : Default = On If selected, queuing will be available for the hunt group.
• Queuing Limit: Default = Blank This feature sets the number of calls that will be held in the queue at any one time. If this number is exceeded the caller will receive the busy tone or be passed to voicemail.
• Queue Ring Time: Default = 10 seconds This facility defines the time (in seconds) before the caller is placed in the queue.
An additional option in the Hunt Group tab controls the interaction of queuing and the hunt group's overflow group.
• Overflow Time: The Overflow Time will allow the use of both the queuing and overflow facilities. This feature defines the time (in seconds) the caller will be held in the queue before being passed to the Overflow Group. If all extensions in the Overflow Group are also busy the caller will be returned to the queue. If an Overflow Time is not specified calls will be passed directly to the Overflow Group and the queuing facility will not be used.

IP Office Configuration
Voicemail Pro Installation and Maintenance Page 151 IP Office 3.1 Issue 14f (28th September 2005)
Customizing Queuing With Voicemail Pro, the greetings and actions provided to a caller held in a group's queue can be customized using the Queued and Still Queued start points for that group.
• The Queued start point replaces the default "You are in a queue" greeting.
• The Still Queued start point replaces the default "You are still in a queue" greeting.
It is important to note that unconnected results in Queued and Still Queued call flows will return the caller to the queue rather than disconnect them. Attempting to return the caller using a Transfer or similar action will place the caller at the back of the queue as a new call.
Changing the Greetings If the voicemail system is operating in IP Office mailbox mode, the hunt group mailbox users can change the queued and still queued greetings themselves. To do this they should access the hunt group mailbox and press 3.
Call Flow Customization The Voicemail Pro allows for customization of queuing operation through the use of Queued and Still Queued start points, either specific to a particular hunt group or default for all groups.
The Queue ETA and Queue Position actions can be used to provide callers with queue information and then place them back in the queue. Within a Queue or Still Queued start points call flow, the default action for any unlinked results is to place the caller back in to the queue rather than disconnect the caller.
• Note in Incoming Call Route 'Priority' The IP Office supports a configurable Priority setting (1, 2 or 3) on Incoming Call Routes. Calls assigned a high priority are moved up any call queue ahead of those with a lower priority. The use of this feature is not compatible with Queue ETA and Queue Position messages as the spoken queue positions and ETA are for some callers may be overridden by calls with a higher priority.
Further customization can be applied using actions such as a Menu action to let the caller select, for example, to leave a message, be transferred to another number or return to the queue.
The two Voicemail Pro variables, $ETA and $POS, can be used to further customize the Queued and Still Queued call flows.
• $ETA: Queued Callers Estimated Time to Answer If used in a prompt list, will speak the callers ETA, eg. "Your estimated time to answer is 5 minutes." If used elsewhere, such as in a condition, returns the ETA in minutes as a numeric value.
• $POS: Queued Callers Queue Position If used in a prompt list, will speak the caller's queue position, eg. "You are in queue position 2." If used elsewhere, such as in a condition, returns the caller's queue position as a numeric value.
The importance of these two variables is that, instead of or in addition to customizing the queue call flow for all queued callers, you can customize the actions for callers whose ETA or position match selected criteria.

Hunt Groups
Voicemail Pro Installation and Maintenance Page 152 IP Office 3.1 Issue 14f (28th September 2005)
Example Call Flow Using $POS The screen shot below shows a Queued call flow which uses a condition to test the value of $POS for the queued caller.
• When the caller is in queue positions 1 to 4, they are passed to a Queue Position action and
hear their queue position before returning to the queue.
• When the caller is queue position 5, they are asked to leave a message.
• As alternates to a Leave Mail action, the caller could be taken through a Voice Question or Campaign action to collect required information and saving the caller's responses as a message.

Voicemail Pro Installation and Maintenance Page 153 IP Office 3.1 Issue 14f (28th September 2005)
Using the Voicemail Pro Client Overview of Voicemail Pro This section details using the Voicemail Pro client to customize the operation of the Voicemail Pro sever.
• Default Operation The default operation for Voicemail Mail Pro is to provide voicemail for all users and hunt groups and so essentially emulate Voicemail Lite operation.
• Customized Operation Voicemail Pro is used to program alternative actions for those users and hunt groups who require facilities differing from those provided by a standard mailbox. It can also be used to program a series of voicemail actions triggered by the dialing of a short code.
Relevant Sections:
• Using Voicemail Pro Covers general usage of the Voicemail Pro client.
• Voicemail Pro Actions Covers the individual actions that can be used within a Voicemail Pro call flow. See Voicemail Pro Actions.
• Voicemail Pro Modules Covers how pre-programmed sequences of actions can be used to simplify Voicemail Pro programming. See Voicemail Pro Modules.
• Conditions Editor Covers the Conditions Editor which allows voicemail operation to alter according to factors such as time, date, day, etc. See Conditions Editor.
• Voicemail Pro Campaigns Covers the creation and operation of Voicemail Pro Campaigns. See Voicemail Pro Campaigns.

Using the Voicemail Pro Client
Voicemail Pro Installation and Maintenance Page 154 IP Office 3.1 Issue 14f (28th September 2005)
The Voicemail Pro Screen Voicemail Pro Client is a windows interface used to program the Voicemail Pro Server.
• The title bar indicates which telephony interface is being used e.g. IP Office or Intuity. To change
the interface see General Preferences.
• The toolbar across the top of the screen provides access to a range of icons. See Toolbar Icons.
• The top left-hand panel contains an expandable/contractible list of customizable voicemail start points. See Start Points.
• The bottom left-hand panel contains a library of voicemail modules. See Voicemail Pro Modules.
• The right-hand panel contains information relevant to whatever is currently selected in either of the left-hand panels.
Starting Voicemail Pro 1. From the Start menu, select Programs.
2. Select IP Office
3. Select Voicemail Pro.
4. When Voicemail Pro is started, it loads the call flow database file Vmdata.mdb.
5. Once this file has been edited in any way, click on Save & Make Live. This saves the database and also compiles it into a Root.vmp file which is used by the Voicemail Pro server.

IP Office Configuration
Voicemail Pro Installation and Maintenance Page 155 IP Office 3.1 Issue 14f (28th September 2005)
Toolbar Icons The Voicemail Pro screen provides the following icons. Note that these may be grayed out according to which area of the Voicemail pro screen is currently active.
• Save as: See Saving and Making Live.
• Save & Make Live: See Saving and Making Live.
• Cut: Removes currently highlighted text and copies it to the Windows clipboard.
• Copy: Copies currently highlighted text to the Windows clipboard.
• Paste: Pastes the contents of the Windows clipboard to the current cursor position if appropriate.
• Add Start Point: See Adding a Start Point.
• Edit Start Point: See Editing a Start Point.
• Delete Start Point: See Deleting a Start Point.
• Preferences: See System Preferences.
• User Defined Variables: See User Defined Variables.
• Conditions Editor: See Conditions.
• Campaigns: See Introduction to Campaigns.
• Connection: See Connections.
• Basic Actions.
• Mailbox Actions.
• Configuration Actions.
• Telephony Actions.
• Miscellaneous Actions.
• Condition Actions.
• Database Actions.
• Queue Actions.
Using the Voicemail Pro Client
Voicemail Pro Installation and Maintenance Page 156 IP Office 3.1 Issue 14f (28th September 2005)
Start Points Voicemail Pro consists of a number of start points. When the Voicemail Server receives a call, it looks for a matching start point and if it finds one it then provides a series of actions linked to that start point. If no match is found then it provides standard voicemail functions to the call.
The left-hand panel contains an expandable and collapsible list of start points. These can be start points for individual users, hunt groups, short codes and defaults start points.
• Specific Start Points: This folder contains the start points for users, groups and short codes.
• Users: This folder contains start points setup for individual users.
• This is a user who has one or more start points configured. It can be expanded to show the different start points.
• Collect: Used when the user rings voicemail.
• Leave: Used for calls to the user that are redirected to voicemail
• Callback: Used when voicemail rings a user to inform them of messages in the user's mailbox, see Callback (Outcalling).
• Groups: This folder contains start points setup for hunt groups.
• This is a group that has one or more start points configured. It can be expanded to show the different start points.
• Collect: Used when someone accesses the group's mailbox.
• Leave: Used when calls to the hunt group are redirected to voicemail.
• Queued & Still Queued: Used when calls to the group are queued. See Voicemail Pro Queuing.
• Short Codes: This folder contains any start points setup for particular short codes.
• An individual short code on the IP Office. Note that this requires a matching special Short Code to be setup in Manager, see Short Code Start Points.
• Default Start Points: Rather than set up individual start points for every user and group, you can also program actions against the default start points. These will then be used for all calls received by the Voicemail Server that don't match a specific start point. See Default Start Points.
• Modules: Modules are reusable sets of actions. They allow you to create a sequence of actions that you can then use within any other start point's call flow. Any changes to the module will affect all the start points using that module. This simplifies the programming of actions if a number of start points use the same sequence of actions. Using modules also reduces the size of the call flow. See Voicemail Pro Modules.

IP Office Configuration
Voicemail Pro Installation and Maintenance Page 157 IP Office 3.1 Issue 14f (28th September 2005)
Adding a Start Point 1. Either click Users, Groups or Short Codes and then , or right-click the mouse on Users,
Groups or Short Codes and select Add.
2. Select the name that matches the user or group on the telephone system or enter the short code (see additional short code note below).
3. For users and groups select the types of start points required.
Short Code Start Points Short code start points require the Telephone Number entry of the matching short code in the Manager application to be set up in a particular way.
For example, if a Start Point for short code *88 is setup, the settings for short code *88 in the Manager application must be as follows:
• Short Code: *88
• Telephone Number: *88
• Feature: Voicemail Node.
The above will allow internal callers to access the start point. To allow external callers access, an Incoming Call Route should be setup with the destination *88.
Editing a Start Point 1. In the left-hand panel, either select the start point to edit and click or right-click the start point
and select Edit. 2. You can now change the types of start points.
• Note: Deselecting an existing start point will delete all actions associated with it.
Deleting a Start Point 1. In the left-hand panel, either select the start point to delete and click or right-click the start
point and then select Delete.
Renaming a User, Group or Short Code 1. In the left-hand panel, right-click the user, group or short code and select Rename.
Using the Voicemail Pro Client
Voicemail Pro Installation and Maintenance Page 158 IP Office 3.1 Issue 14f (28th September 2005)
Default Start Points The default start points can be used to create a sequence of actions that will be applied to all suitable calls unless a specific start point exists.
• Collect: Used when a caller attempts to access a mailbox.
• Leave: Used when a caller is redirected to voicemail.
• Callback: Used when the voicemail calls a user to inform them about messages in a mailbox. See Callback (Outcalling).
• Queued & Still Queued: Used for callers queuing for a hunt group. See Voicemail Pro Queuing.
When a default start point is used, the following actions can attempt to recognize who the presumed user is (the internal user calling or being called) and access the matching mailbox for that user (unless the action specifies another mailbox):
• Get Mail Action
• Leave Mail Action
• Play Configuration Menu
• Listen Action
• Record Name Action
• Edit Play List Action
The following actions will automatically recognize who the presumed user is and then use that user's Voicemail Reception settings (unless the action specifies another mailbox):
• Transfer Action
• Assisted Transfer Action • Whisper Action

IP Office Configuration
Voicemail Pro Installation and Maintenance Page 159 IP Office 3.1 Issue 14f (28th September 2005)
Actions Once a start point has been created, you can add actions to it and create connections between the actions. The sequence of actions associated with a start point is shown in the right-hand panel when you click the start point.
• Results & Connections: Each action can have a number of results (true, false, no answer, busy). The types of results depend of the type of action, most actions having just a 'Next' result. Each result can be used as a connection point to another action, see Connections.
• Modules: A set of actions and connections can be combined and reused as a module, see Voicemail Pro Modules.
• Available Actions: For a list of actions and their function see Voicemail Pro Actions.
Adding an Action 1. Select the start point to which you want to add an action and then click the right-hand panel.
2. Either:
• From the menu bar select Action, then the action type required and then the action required.
• From the toolbar, click the icon for the action type required and then on the action required.
3. The cursor changes to show that you have selected an action to add.
4. Click the point in the right-hand panel where you want the action added.
5. You can now edit the action and add connections to the action.
Editing an Action 1. Double-click the action in the right-hand panel or right-click it and select Properties.
2. The action's properties appear as a number of tabs. See Standard Action Tabs.
Deleting an Action 1. Click the action to delete.
2. Either select Edit and then Delete or right-click and then select Delete.
Using the Voicemail Pro Client
Voicemail Pro Installation and Maintenance Page 160 IP Office 3.1 Issue 14f (28th September 2005)
Connections To use the actions added to a start point they must be connected. The sequence of the connections determines how the call is routed through voicemail.
Each action can have a number of results (True, False, No Answer, Busy). The types of results depend of the type of action. For each result, a connection can be added.
• Most actions only have a Next result, i.e. a single connection to the next action.
• Other actions may have two results, for example True or False. Each of these results represents a connection point for different following actions.
• Some actions may have multiple results. For example the Assisted Transfer action has results for Next, No Answer and Busy. Each of these results represents a connection point for different following actions.
• If a result occurs, for which no connection to a following action has been set, either the call is disconnected or, if it came from a hunt group queue, it is transferred back to the queue.
• Within modules, all connections should end in another action or in a Module Return action.
Adding a Connection 1. Click the icon. Click and drag the cursor from action's result that triggers the connection to the
action that should follow the connection.
Deleting a Connection • Note: Deleting an action will also delete any connections attached to that action.
1. Click the connection to delete. It should display as red.
2. Either select Edit and then Delete or right-click and then select Delete.

IP Office Configuration
Voicemail Pro Installation and Maintenance Page 161 IP Office 3.1 Issue 14f (28th September 2005)
Saving and Making Live The settings edited by Voicemail Pro are stored in a database file (Vmdata.mdb). In order to be used by the Voicemail Server they must be saved as a Root.vmp in the voicemail server folder.
• Save as: Saves the database as a .vmp file with the name you specify. That file can then be copied to other systems.
• Save & Make Live: Saves the settings as Root.vmp in the voicemail server folder. The folder location is set through Preferences, see Voicemail System Preferences.
Importing and Exporting The File | Import or Export command allows you to import or export of all the Voicemail Pro settings or just individual modules.
This process involves two types of file. A database file (.mdb) contains a full set of Voicemail Pro settings. A module file (.mod) contains one or several modules.
When exporting modules to a module file, you will be prompted to select which modules to export. Similarly when importing modules from a module file, you are prompted for which modules to import. Note that if a module of the same name already exists it is overwritten.
When importing a database file, following the import you must use Save & Make Live before closing the Voicemail Pro client, otherwise the import will be removed. The existing database is overwritten and a backup copy of is saved in the folder DB Backup.
• Note: Importing and exporting does not include prompts. These must be moved as separate items or re-recorded.
Including Other Files In some special circumstances it may be necessary to include the settings of a existing .vmp file into the Voicemail Pro settings. This is done using the File | Include option. After changing the included file settings ensure that you select Update.
• Note: If included files are used, the Voicemail Pro database contains only a pointer to the name and location of the files and not the actual files. Therefore the included file should not be moved or renamed. We strongly recommend that any file to be included is placed in the same folder as Root.vmp before being included.
Viewing As Text The File | View as Text option display the Voicemail Pro Modules and Start Points as a text file. This may be necessary for support calls and diagnostics.

Using the Voicemail Pro Client
Voicemail Pro Installation and Maintenance Page 162 IP Office 3.1 Issue 14f (28th September 2005)
User Defined Variables Pressing F8 or clicking on the icon display the User Defined Variables menu.
You can create user variables, the value of which can be set using a Set User Variable action within a call flow.
The options presented to a caller can also be branched using a Test User Variable action to check the current value of the variable
Example: • Using the User Defined Variables menu, create a variable called reception.
• Create a short code start point that connects to a Set User Variable action that sets the variable reception to open. Create another short code start point to set reception to closed. Create the matching short codes on the telephone system.
• For calls using another start point, you can now use the Test User Variable action to test whether the value of reception is open. The action has true and false results which you can link to the appropriate following actions, for example transferring calls to the reception desk or to a mailbox.

IP Office Configuration
Voicemail Pro Installation and Maintenance Page 163 IP Office 3.1 Issue 14f (28th September 2005)
System Variables A number of system variables exist which can be used to perform tasks. For example, $NAM can be used to speak the user's name within an actions entry prompt. System variables can also be checked by Compare element in a condition and thus branch the call flow according to the variables value.
Note that unless otherwise stated, variables are session based, ie. the data is specific to a particular call within voicemail pro and does not persist between calls.
• $CLI Holds the CLI of the caller if available.
• $CP The 16 variables $CP0 to $CP15 are used to store values (call parameters) for the duration of a call. Values can be written into these variable the Generic action command CPx:<value> where x is 0 to 15 and <value> is the value to be stored.
• $DBD A set of 6 system variables $DBD[0] to $DBD[5]. These represent the fields of the currently selected database record in a call flow where database actions are being used.
• $ETA Holds the expected time to answer in minutes for a queued caller. Can be used to speak the value as a prompt or to test the value in a condition. Only available when using Queued and Still Queued start points. See $POS below.
• $KEY Holds the last DTMF key series entered. See Example Call Flow: SelfSelect Module.
• $LOC Holds the current locale setting of the IP Office system or the user if different. See Switching Custom Prompts - Using $LOC.
• $NAM Holds the name of the mailbox user (blank for short codes).
• $RES Holds the value of the result of the previous action. For example when a call flow has been branched by an action that has True and False results, on one branch the value of $RES is "True", on the other "False".
• $POS Holds the position of a queued caller. Can be used to speak the position as a prompt or test the value in a condition. Only available when using Queued and Still Queued start points. See Example Call flow Using $POS.
• $SAV Holds the last saved result. This can be entered using the following entry in a Generic action, Save:<value>, for example Save:$KEY or Save:1234.
• $UUI Available when a recording is triggered by auto-recording. Hold the user name, hunt group name or account code that triggered the auto-recording process. See Customizing Auto Recording.
• $VAR A general variable which can hold amongst other things DTMF key sequences.
Using Variables • Speaking Variables to Callers
System variables can be entered in the place of wav file name in the Wav Editor. The value of the system variable will then be spoken. This applies to $NAM, $POS and $ETA in queuing call flows and to any variable that contains numeric values. Numbers are spoken as a series of single digits, for example 123 is spoken as "one two three". To speak 123 as "one hundred and twenty-three" requires TTS to be installed and a Speak Text action used.

Using the Voicemail Pro Client
Voicemail Pro Installation and Maintenance Page 164 IP Office 3.1 Issue 14f (28th September 2005)
Recording Prompts Recording Prompts The Entry Prompts tab of each call flow action allows prompts to be played before the action performs its main role. Multiple prompts can be added and the order in which they are played adjusted.
Clicking or double-clicking an existing listed prompt starts the Voicemail Pro Wave Editor. This tool allows you to record and play prompts through the Voicemail Pro server PC or through an extension on the IP Office system.
Each action also uses a number of standard prompts once it is invoked. For a sample listing of these prompts see US English Intuity Prompts and English Non-Intuity Prompts.
The Edit Play List action can be used in call flows to re-record a specified prompt. This allows the creation of call flow options where the voicemail user can record prompts themselves to reflect changes in operation.
Wave Editor The Wave Editor is used by Voicemail Pro to select, record and play prompts. It can be used to select existing prompts or to record new prompts.
From any Entry Prompt tab you can:
Record a new prompt: 1. Select the media device to use, either Telephony Handset or PC Multimedia.
• If Telephony Handset is selected, enter the extension of the telephone to be used.
2. Enter a file name for the recording.
3. Click the record button to record the message. If the media type selected is Telephony Handset, the telephone extension will ring. When the handset is picked up a message will be heard saying Record at the tone.
4. Speak the message, click stop button when finished.
5. To listen to the recording press the play button. If there is no Media device attached, the recorded message will be heard from the telephone extension.
Select a prompt: Enter the name of the prompt or use the button to browse to the required file. Useful files are:
• en\MC_00 - Plays a bleep.
• en\MC_01 - Plays 1 second of silence.
• Entering 1234.wav will play "one two three four" (unless a file called 1234.wav has been recorded).
Using system variables: Some system variable can be played as prompts. For example,
• $NAM - Plays the user name.
• $CLI - Speaks the caller's CLI.
• $RES - Plays the current result if it is a .wav file.
• $VAR - Plays the variable as a list of digits.

Voicemail Pro Installation and Maintenance Page 165 IP Office 3.1 Issue 14f (28th September 2005)
Voicemail Pro Actions Overview of Actions Once a Start point has been added, it can be linked to an action. Each action can have one or several results, depending on the type of action, and each result can be linked to a subsequent action. In this way you can build up a call flow.
Double-clicking an action displays its properties as a series of tabbed menus. Many actions share the same standard tabs (General, Entry Prompts, Reporting and Results) but each usually also has a Specific tab that contains options unique to that Action's function.
• Using Modules Modules are reusable sets of actions. They allow you to create a sequence of actions that you can then use within any other start point's call flow. Changes to the module will affect all start points using that module. This simplifies the programming if a number of start points need the same sequence of actions.

Voicemail Pro Actions
Voicemail Pro Installation and Maintenance Page 166 IP Office 3.1 Issue 14f (28th September 2005)
Available Actions The available actions are:
• Start Point Action - The first action in any sequence.
• Module Action - An inserted module of actions.
Basic Actions These actions are chiefly used to control the routing of a call between actions.
• Generic Action - Direct entry of text commands.
• Speak Text Action - Allows text to entered and then played to the caller. Requires TTS to be installed and licensed.
• Menu Action - Branch according to touch tone selection.
• Goto Action - Go to another start point.
• Disconnect Action - Disconnect the call.
• Home Action - Return to the start point.
• Module Return Action - Return to the start of a module.
Mailbox Actions These actions relate to the leaving and collecting of messages from a mailbox.
• Get Mail Action - Collect messages in a mailbox.
• Leave Mail Action - Leave message in a mailbox.
• Listen Action - Record to a mailbox.
• Voice Question Action - Record response to a prompt.
• Campaign Action - Access a campaign to read or leave messages.
Configuration Actions These actions allow the caller to alter the settings of a user or hunt group mailbox.
• Edit Play List Action - Re-record a prompt.
• Record Name Action - Re-record a mailbox name.
• Play Configuration Menu Action - Alter user or group settings.
• Select System Prompt Language Action - Alter prompt language.

IP Office Configuration
Voicemail Pro Installation and Maintenance Page 167 IP Office 3.1 Issue 14f (28th September 2005)
Telephony Actions These actions relate to telephony functions such as call transfers.
• CLI Routing Action - Route on a CLI match.
• Route Incoming Call Action
• Route by Call Status
• Transfer Action - A blind transfer.
• Whisper Action - Screened transfer.
• Call List Action - Transfer to a user selected choice.
• Dial by Name Action - Select user/group by keypad letters.
• Conferencing Center
• Assisted Transfer Action - A non-blind transfer.
• Alphanumeric Action
Miscellaneous Actions
• eMail Action - Email a recording.
• Open Door Action - Open and/or close a door relay.
• Alarm Set Action - Set an alarm call time.
• Clock Action - Play the time to the caller.
• Post Dial Action - Play a recording to an extension.
• VB Script Action - Allows Visual Basic to be used to script call flow events.
• Remote Call Flow - Allows call flows developed elsewhere to be included in an existing call flow.
Condition Actions These actions are used to create branches in the call routing according to whether a value is true or false.
• Test Condition Action - Test whether a condition is true or false.
• Set User Variable Action - Set a variable to a particular value.
• Test User Variable Action - Test the value of a variable.
• Check Digits Action - Check if user dialing matches set digits.
Voicemail Pro Actions
Voicemail Pro Installation and Maintenance Page 168 IP Office 3.1 Issue 14f (28th September 2005)
Database Actions These actions relate to retrieving and adding data to a database. The use of databases with Voicemail Pro requires entry of an appropriate IP Office license key.
• Database Open Action- Open a database.
• Database Execute Action - Perform an action on a database.
• Database Get Data Action - Get information from a database.
• Database Close Action - Close a database.
Queue Actions These actions are associated with hunt group queues and so are not available to user and short code start points.
• Queue ETA Action - Speak the caller's expected time to answer.
• Queue Position Action - Speak the caller's queue position.

IP Office Configuration
Voicemail Pro Installation and Maintenance Page 169 IP Office 3.1 Issue 14f (28th September 2005)
Standard Action Tabs General Tab The General tab provides the following options:
• Token Name: The name to display within the sequence of actions.
• Description: Use this field to enter a brief description or notes about why the action is being used or other information that may be needed.
• Pin: Each action can be protected by a PIN number entered here.
• The PIN number can be the voicemail code of the presumed user. To do this enter a $ symbol. For example, entering $ would force the caller to dial their voicemail code, entering 104$ would force the caller to dial 104 followed by their voicemail code.
Entry Prompts Tab The Entry Prompts tab allows you to create a message that will be played to the caller when they reach this action. The message can consist of several prompts.
• Add Prompt: Add a prompt to the play list. The dialogue that appears allows the selection of an existing prompt or the ability to specify a new file name and then record the new prompt. See Wave Editor.
• Edit Prompt: Edit the details of the currently highlighted prompt.
• Delete Prompt: Delete the currently highlighted prompt from the play list. Note that the actual prompt file is not deleted from the server.
• Move Prompt: Move the position of the currently highlighted prompt in the play list.
• Allow prompts to be interrupted by Tones: Allow the caller to press tone keys to make selections during the playing of the actions entry prompts.
Specific Tab The contents of this tab vary according to the type of action. In some cases this tab may have a different name, for example Touch Tones for the Menu action.
Voicemail Pro Actions
Voicemail Pro Installation and Maintenance Page 170 IP Office 3.1 Issue 14f (28th September 2005)
Reporting Tab The Reporting tab provides information that is then used to classify the call details within the reports produced by the CCC products (a separate product from Voicemail Pro).
• Flag the current call has been answered by Voice Mail: The system user may not want the CCC to report a call as answered until it has reached a certain action within the sequence of actions. For example, to not regard a call as answered until the caller has left a message, made a selection from a menu or has been transferred to a user or group.
• Request to call back the current caller: If this option is selected, the CCC will keep a record of the caller's CLI if provided. This is then used within the CCC product to arrange a callback call by an agent.
• Send reporting information: If selected, this option allows various bits of information to be associated with the call. The information is set in the Group name, Topic and Annotation fields. The CCC product uses that information within its call reports.
Results Tab This tab shows the results available from an action. For the majority of actions the results are fixed and appear grayed out, i.e. they cannot be changed.
For some actions the results are variable.

IP Office Configuration
Voicemail Pro Installation and Maintenance Page 171 IP Office 3.1 Issue 14f (28th September 2005)
Basic Actions Generic Action
This action can be used to simply play a prompt to the caller through its Entry Prompts tab. For details of the default tabs see Standard Action Tabs.
This action can be used to enter custom commands for the voicemail server. The maximum length for the string is 128 characters.
One example is using the command FWD:201#202#203#204#205## to forward a message to multiple mailboxes, the message being recorded by a preceding Voice Question or Edit Play List Action. The 128 character length limit restricts a single generic action to 31 three-digits extensions, 24 four-digits extensions and so on. However multiple generic actions can be connected in a chain to bypass this limitation.
Speak Text Action This action allows any text to be spoken to the caller. Use of the Speak Text action requires TTS
(Text to Speech) to be installed and licensed, see Text to Speech.
Specific Tab
• Text to Speak: Enter the text to be spoken.
• The text can include System Variables such as $CLI and variables obtained by database actions such as $DBD[1].
• The text can include SAPI XML tags to modify how it is spoken, see TTS SAPI Controls.
Voicemail Pro Actions
Voicemail Pro Installation and Maintenance Page 172 IP Office 3.1 Issue 14f (28th September 2005)
Menu Action This action allows you to specify DTMF tones for which you want to create connections to following
actions.
For details of the default tabs see Standard Action Tabs, this section details only tabs and settings specific to this type of action.
Specific Tab: • Touch Tones:
Use the check boxes to indicate the DTMF tones for which connections are required. Note that each Menu Action supports a maximum of 15 branch options.
• Add a Sequence of Tones: You can add a sequence of tones to the menu. If a sequence is added, ensure that the associated tick box is ticked before selecting OK. Note that the sequence must be unique, is 5 is selected then no other sequence beginning with 5 can be used.
• ? = Any Digit: The ? character can be used to represent any digit (except * and #). For example 123??? can be used for any six digit string starting with 123. See Example Call Flow: SelfSelect Module.
• $ = Any Sequence of Digits: The $ character can be used to match any sequence of digits for which there is no other match. Key press entry is ended either by the caller pressing # or 5 seconds after the last digit dialed.
• F = For Fax Calls The F letter can be used to automatically detect any incoming fax calls. Once detected the calls can be routed to another number. See Routing Fax Calls Using a Menu Action.
• Wait for a key press for up to: This option can be used to perform a timeout action if no suitable key match is entered.
Goto Action Takes the caller to another start point. Note: Though you can connect this action to a following action,
the connection will not be used.
For details of the default tabs see Standard Action Tabs, this section details only tabs and settings specific to this type of action.
Specific Tab:
• Please Select a node to go to: Click to browse for the start point. You can also browse the available call variables. You can also type the name of the start point directly.
• For short codes the browse method does not work. Instead enter "Short Code.xxx" where xxx is the short code key sequence.
Disconnect Action This action disconnects the caller.
For details of the default tabs see Standard Action Tabs, this section details only tabs and settings specific to this type of action.
IP Office Configuration
Voicemail Pro Installation and Maintenance Page 173 IP Office 3.1 Issue 14f (28th September 2005)
Home Action Returns the caller to the start point of the calls entry into voicemail.
For details of the default tabs see Standard Action Tabs, this section details only tabs and settings specific to this type of action.
• General Tab: The PIN option is not used for this action.
Module Return Action This action is used within modules only. It creates a connection point from the module to subsequent
actions within any call flow that uses the module. A module can use several Module Return actions if necessary.
This action has no properties.

Voicemail Pro Actions
Voicemail Pro Installation and Maintenance Page 174 IP Office 3.1 Issue 14f (28th September 2005)
Mailbox Actions Get Mail Action
Access the messages in the caller's mailbox or a specified mailbox. The caller then has access to the standard mailbox features setup for that mailbox.
For details of the default tabs see Standard Action Tabs, this section details only tabs and settings specific to this type of action.
• This action has a Next result. However the following conditions apply, based on which mailbox mode the Voicemail Pro server is using.
• IP Office mode: Users who press 0 whilst in their mailbox will be routed to the Next result.
• Intuity mode: Users who press *0 whilst in their mailbox will be routed to their Voicemail Reception number if set. The Next result is not used.
Specific Tab:
• Caller's mailbox: The mailbox matching the start point of the call.
• Mailbox: Select or enter the name of the target mailbox. If ? is entered, Voicemail will prompt caller's to enter the mailbox number required.
Leave Mail Action Allows the caller to leave a message in the start point's mailbox or in a specified mailbox.
For details of the default tabs see Standard Action Tabs, this section details only tabs and settings specific to this type of action.
• The Leave Mail action Success and Failure results. The use of these depend on which mailbox mode the Voicemail Pro server is using.
• IP Office mode: Callers in the mailbox follow the Failure or Success results depending on whether they press 0 before or after the leave a message tone respectively. This overrides the mailbox user's Voicemail Reception setting set in the IP Office configuration.
• Intuity mode: The results cannot be accessed. Callers pressing 0 will always follow the mailbox user's Voicemail Reception setting set in the IP Office configuration.
Specific Tab: • Caller's Mailbox:
The mailbox matching the start point of the call.
• Mailbox: Select or enter the name of the target mailbox.
• VRL: If selected, specifies that the message should be transferred to a third-party Voice Recording Library (VRL) application. See Voice Recording Library.
IP Office Configuration
Voicemail Pro Installation and Maintenance Page 175 IP Office 3.1 Issue 14f (28th September 2005)
Listen Action Allows the caller to leave a message in the start point's mailbox or in a specified mailbox. The caller
can only leave a message and cannot access any other mailbox features.
For details of the default tabs see Standard Action Tabs, this section details only tabs and settings specific to this type of action.
Specific Tab:
• Caller's Mailbox: The mailbox matching the start point of the call.
• Mailbox: Select or enter the name of the target mailbox.
Voice Question Action This action allows you to create a play list where the caller hears a sequence of prompts and their
responses are recorded.
If the play list is completed, a single file containing the recorded responses is created. That file can then be placed into a specified mailbox or passed to an eMail action.
For details of the default tabs see Standard Action Tabs, this section details only tabs and settings specific to this type of action.
Specific Tab:
• Add a Prompt: Add a prompt to the play list. The dialogue that appears allows the selection of an existing prompt or the ability to specify a new file name and then record the new prompt. See Wave Editor.
• Record a Response: Specify the length of the recorded response. The caller also needs to know that they need to speak after the tone.
• Edit: Edit the settings of the currently highlighted item.
• Delete: Deletes the currently highlighted item from the play list. This does not delete the actual prompt file.
• Shuffle: Move the currently highlighted item within the play list.
• Send recording to mailbox: Specifies a mailbox into which the recorded file of responses it placed. If no mailbox is specified the file can be passed to an eMail Action.

Voicemail Pro Actions
Voicemail Pro Installation and Maintenance Page 176 IP Office 3.1 Issue 14f (28th September 2005)
Campaign Action This action can be used to either route a caller into a campaign or to allow an agent to access any
messages left for a campaign. See Voicemail Pro Campaigns.
For details of the default tabs see Standard Action Tabs, this section details only tabs and settings specific to this type of action.
Specific Tab:
• Please select a campaign: Displays a list of the available campaigns from which a selection can be made.
• Leave campaign information: Select if the action should start the campaign to collect the caller's responses.
• Pick up campaign information: Select if the action should start playing back the response left by callers to the campaign.
[break]
Configuration Actions Edit Play List Action
This action allows the caller to record a specified prompt file held on the voicemail server PC. This allows users to re-record prompts other than those for their own mailbox.
For details of the default tabs see Standard Action Tabs, this section details only tabs and settings specific to this type of action.
Specific Tab:
• File path: Specifies which prompt file the action accesses for re-recording.
Record Name Action This action allows the caller to record the mailbox name of their mailbox or a specified mailbox. See
Adding a Record Name Module.
For details of the default tabs see Standard Action Tabs, this section details only tabs and settings specific to this type of action.
Specific Tab:
• Caller's mailbox: The mailbox matching the start point of the call.
• Mailbox: Select or enter the name of the target mailbox.

IP Office Configuration
Voicemail Pro Installation and Maintenance Page 177 IP Office 3.1 Issue 14f (28th September 2005)
Play Configuration Menu Action This action allows various user or hunt group settings to be altered. Because of the nature of this
action it should always be protected by a PIN code in its General tab. See Using a Play Configuration Menu Action.
The options given when a caller accesses this action are:
For a user: 1. Edit forwarding number.
2. Edit follow me number.
3. Set call forwarding.
4. Set voicemail on/off.
5. Set do not disturb.
6. Edit voicemail code.
7. Edit voicemail reception.
8. Set voicemail email mode.
9. Edit voicemail callback number.
For a hunt group: 1. Set voicemail on/off.
2. Edit voicemail code.
3. Set voicemail email mode.
4. Set service mode.
For details of the default tabs see Standard Action Tabs, this section details only tabs and settings specific to this type of action.
Specific Tab:
• Caller's mailbox: The mailbox matching the start point of the call.
• Mailbox: Select or enter the name of the target mailbox.
Any changes made using this type of action are written to a file called "AuditTrail.txt" on the Voicemail Server PC. The file includes the time, date, details of the change and the CLI of the caller making the change.
Select System Prompt Language Action This action is supported on Voicemail Pro 1.2.6 or higher. It allows the system to alter the language
spoken during a call flow. For an example see Using the Select System Prompt.
For details of the default tabs see Standard Action Tabs, this section details only tabs and settings specific to this type of action.
Specific Tab:
• Possible system prompts: List of all prompt languages that could be installed on the system.
• Installed on the Server: Displays if the prompts for a particular language are installed on the server. If a language is selected which is not loaded on the Server, the system will automatically select the most appropriate language.

Voicemail Pro Actions
Voicemail Pro Installation and Maintenance Page 178 IP Office 3.1 Issue 14f (28th September 2005)
Telephony Actions CLI Routing Action
This action has two results for which connections to following actions can be made. The results are True and False, based on whether the caller's CLI matches that specified by the action.
For details of the default tabs see Standard Action Tabs, this section details only tabs and settings specific to this type of action.
Specific Tab:
• Does the current CLI match the following number: Enter the required CLI number against which the caller's CLI is checked.
Route Incoming Call Action This action has two results for which connections to following actions can be made. The results are
Internal or External. For details of the default tabs see Standard Action Tabs.
Route by Call Status This action has four results for which connections to following actions can be made. The results are
No Answer, Busy, Out of Hours and Default. The result route used is determined by why the reason the call was routed to voicemail. For example, calls to a hunt group follow either the No Answer route or, when in night service, the Out of Hours route. Calls to users would follow either the No Answer or Busy routes.
Where the cause for the call being routed to voicemail cannot be determined or does not fit the criteria above, the Default route is used.
For details of the default tabs see Standard Action Tabs.
Transfer Action This action transfers the caller to the extension that matches the mailbox selected. This is a blind
transfer; if the call returns to the voicemail server again (for example if unanswered) it will be treated as a new call.
More advanced transfers are done using either a Call List Action or Assisted Transfer Action.
For details of the default tabs see Standard Action Tabs, this section details only tabs and settings specific to this type of action.
Specific Tab:
• Mailbox: Enter or select the target extension or group you want to ring.
IP Office Configuration
Voicemail Pro Installation and Maintenance Page 179 IP Office 3.1 Issue 14f (28th September 2005)
Whisper Action This action plays a recording to an extension. That extension can then either accept or reject the call.
Normally the recording played is the result of a preceding Voice Question action though a Listen action can also be used.
The Whisper action can be connected to a number of following actions according to whether the call is answered, rejected, gets busy or gets no answer.
For details of the default tabs see Standard Action Tabs, this section details only tabs and settings specific to this type of action.
Specific Tab:
• Play recording to: The extension that is rung with the caller's recording.
• Source of transfer: Select the number to display on the target phone.
• Description: Enter a call description to display on the target phone.
• No answer timeout: Sets how long the voice mail server should wait for an answer before following the No Answer connection. The whisper action will not go to the target extension voicemail.
• Prompts played before the recording/Prompts played after the recording: These prompts are played to the target extension when they answer the call. The prompts played after the caller's recording should include the instruction "Press 1 to accept or hang up to reject".
Call List Action This action allows the caller to indicate to whom they want to be transferred. If selected the caller can
be restricted to selecting an extension within a particular group. The transfer in this case is not blind, if unanswered the action can link to actions for no answer, busy and no answer timeout.
For details of the default tabs see Standard Action Tabs, this section details only tabs and settings specific to this type of action.
Specific Tab:
• Transfer to group: If you want to restrict the caller to a particular group you can enter the group here.
• Prompt user with a list of group members: Select if you want the voicemail server to list the group members for the caller.
• Source of transfer: Select the number to display on the target phone.
• Description: Enter a call description to display on the target phone.
• No answer timeout: Sets how long the voice mail server should wait for an answer before following the No Answer connection.

Voicemail Pro Actions
Voicemail Pro Installation and Maintenance Page 180 IP Office 3.1 Issue 14f (28th September 2005)
Dial by Name Action This action is supported on Voicemail Pro 1.2.6 or higher. It allows callers to enter, by dialing on a
keypad with ITU standard alphabet markings, the name of the person and/or group they want to contact. The caller is then played a list of available name matches from which they can select. See Example Dial by Name Call Flow
• Note: For a user to be included in the dial by name list, they must:
• Have recorded a mailbox name.
• Not be marked as ex-directory.
The action should prompt the caller to dial the name they require and then press #. Callers can also press *# to exit without making a selection.
• If no matches are found, the caller is given the option to retry.
• If 10 or less matches are found, the matching mailbox name greetings are played as part of a selection list, i.e. "Press 1 for …, press 2 for …, …".
• If more then 10 matches are found, the caller is prompted to either press # to hear the first 10 or to dial more characters in order to reduce the number of matches. If they select to play the list, after each set of 10 matches they can either make a selection or follow the prompts for other options.
The action has True and False connection results. If the caller does not make a selection, the False result connection is used. If the caller does make a selection, the selection is stored as the $KEY variable and the True result connection is used. $KEY should be entered in the mailbox field of the following action. This method allows a Dial by Name action to be used to set the destination for a following action such as Get Mail, Leave Mail, Listen, etc.
For details of the default tabs see Standard Action Tabs, this section details only tabs and settings specific to this type of action.
Specific Tab:
• Which names will be included in the list?: Has options for Only users, Only groups or Both users and groups. Users set to ex-directory through the Manager application are not included.
• How will the names be sorted?: Has options for By last name or By first name.

IP Office Configuration
Voicemail Pro Installation and Maintenance Page 181 IP Office 3.1 Issue 14f (28th September 2005)
Conferencing Center Action This action is used in conjunction with the Avaya IP Office Conferencing Center if installed. It
provides a route for callers to enter the conference ID and their conference PIN code.
The action also provides a number of results which act as failure options if conference access is unsuccessful. These are Invalid Conference or Password, Conference Not Started, Conference Finished, Conference Full, and Failure.
Specific Tab
• Gather conference and pin information before validation: If this option is selected, the caller will be asked for the conference ID and then the pin number. The results are collected and then verified. If either entry is invalid the caller is notified but not told which entry is incorrect. If this option is not selected then the entries are validated as they are entered.
• Allow the delegate to try and enter the conference ID a total of ? times: The number of times that a conference ID can be entered is controlled in this section. Up to 10 re-tries can be set. If the ID is entered incorrectly the result Failure is returned.
Assisted Transfer Action This action transfers the caller to a specific mailbox's extension. The caller hears either silence or
music on hold if installed. The transfer is not blind, if the call receives busy or no answer then it returns to follow the appropriate connection.
For details of the default tabs see Standard Action Tabs., this section details only tabs and settings specific to this type of action.
Specific Tab:
• Mailbox: Enter or select the target mailbox whose extension you want rung.
• Source of transfer: Select the number to display on the target phone.
• Description: Enter a call description to display on the target phone.
• No answer timeout: Sets how long the voice mail server should wait for an answer before following the No Answer connection.
MS-CRM Call Data Tagging The Assisted Transfer action can be used to pass data to MS-CRM users and pop matching MS-CRM records based on that data. This is done by entering <MSRM-ACT>=, followed by a Voicemail Pro system variable, in the action's Description field. By default this will be matched against the MS-CRM account number field
For example, a preceding Menu action could be used to ask the caller to enter a number. The string <MSCRM-ACT>=$KEY in the Assisted Transfer action would pop MS-CRM records with an account code matching the number dialed by the caller.
Matching against other custom fields in the MS-CRM database can also be specified. For example if the database contains a field called Pager, <MSCRM-ACT=Pager>$KEY can be used to match call data to that field.
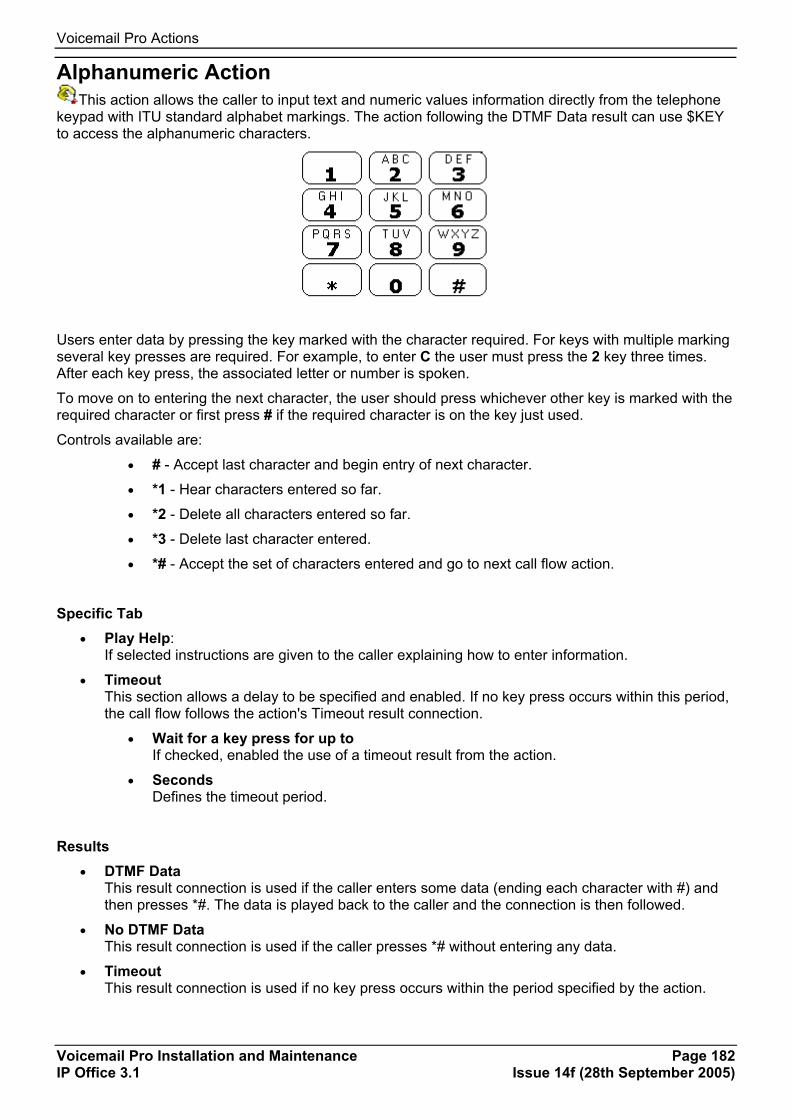
Voicemail Pro Actions
Voicemail Pro Installation and Maintenance Page 182 IP Office 3.1 Issue 14f (28th September 2005)
Alphanumeric Action This action allows the caller to input text and numeric values information directly from the telephone
keypad with ITU standard alphabet markings. The action following the DTMF Data result can use $KEY to access the alphanumeric characters.
Users enter data by pressing the key marked with the character required. For keys with multiple marking several key presses are required. For example, to enter C the user must press the 2 key three times. After each key press, the associated letter or number is spoken.
To move on to entering the next character, the user should press whichever other key is marked with the required character or first press # if the required character is on the key just used.
Controls available are:
• # - Accept last character and begin entry of next character.
• *1 - Hear characters entered so far.
• *2 - Delete all characters entered so far.
• *3 - Delete last character entered.
• *# - Accept the set of characters entered and go to next call flow action.
Specific Tab
• Play Help: If selected instructions are given to the caller explaining how to enter information.
• Timeout This section allows a delay to be specified and enabled. If no key press occurs within this period, the call flow follows the action's Timeout result connection.
• Wait for a key press for up to If checked, enabled the use of a timeout result from the action.
• Seconds Defines the timeout period.
Results • DTMF Data
This result connection is used if the caller enters some data (ending each character with #) and then presses *#. The data is played back to the caller and the connection is then followed.
• No DTMF Data This result connection is used if the caller presses *# without entering any data.
• Timeout This result connection is used if no key press occurs within the period specified by the action.

IP Office Configuration
Voicemail Pro Installation and Maintenance Page 183 IP Office 3.1 Issue 14f (28th September 2005)
Miscellaneous Actions eMail Action
This action is used to send a recording to a specific email address.
For details of the default tabs see Standard Action Tabs, this section details only tabs and settings specific to this type of action.
Specific Tab:
• Send email to: The email address of the recipient.
• Subject: The subject line for the email.
• Content: Text to be placed in the email.
• Attach file to email: The recorded file to be attached to the email. If just $ is entered then the action will use the recording collected by a preceding Leave Mail action (see Leave Mail Action) or Voice Question action (see Voice Question Action).
Open Door Action This action activates either of the door entry relays provided on the IP Office Control Unit.
For details of the default tabs see Standard Action Tabs, this section details only tabs and settings specific to this type of action.
Specific Tab: • Contains the door relay options.
Alarm Set Action This action prompts the caller to specify the time at which they want an alarm call and to record a
message for the alarm call. The voicemail server will then call the user at that time. A user can setup multiple alarms to occur at different times. Once an alarm has occurred it is deleted.
For details of the default tabs see Standard Action Tabs, this section details only tabs and settings specific to this type of action.
Clock Action This action plays the current time on the Voicemail Server PC. A short code can then be used to have
this action replace users making external calls to a 'speaking clock' service.
For details of the default tabs see Standard Action Tabs, this section details only tabs and settings specific to this type of action.
Voicemail Pro Actions
Voicemail Pro Installation and Maintenance Page 184 IP Office 3.1 Issue 14f (28th September 2005)
Post Dial Action This action can be used to connect another extension to a specified call flow start point or to play a
recording to that extension.
For details of the default tabs see Standard Action Tabs, this section details only tabs and settings specific to this type of action.
Specific Tab:
• Post wave file: Plays a selected wav file. When Post wave file is selected there are two options which can be selected.
• Play out a looped wave file: The wav file will be played in a continuous loop.
• Delete the wave file after completion: The wav file will be deleted after it has been played.
• Post the following action: Enter the name of the required start point or use the browse button to select the start point. To play a recording, enter c:\mywavs\hello.wav (substitute the appropriate file path and file name for the .wav file you want played).
• To extension: Enter or select the extension to which the call should be made. The voicemail server will attempt to make the call every 5 minutes for the next hour until successful.
• Page Calls IP Office 3.0 in conjunction with IP Office 3.0 allows Post Dial to be used to page a .wav file to an extension number. This includes group extension numbers. This is done by entering PAGE: followed by the target extension number. In this case the wav file will not loop if selected.
VB Script Action This action allows an administrator to construct additional call flow logic using VBScript commands. A
number of predefined methods and system variables are available. Any scripting added can be verified by pressing the Syntax Check button.
This action has two results (Success or Failure) for which connections to following actions can be made. The results are based on the Scripting entered in the Specific tab.
• Use of VBScript requires entry of a valid VM Pro VBScript license in the IP Office configuration.
Specific Tab: • Enter VBScript:
In the Script area enter the VBScript as required. Details of the System variables and COM methods that are supported are accessible by right clicking in the VBScript area. This script can contain a maximum of 1000 characters.

IP Office Configuration
Voicemail Pro Installation and Maintenance Page 185 IP Office 3.1 Issue 14f (28th September 2005)
Remote Call Flow This action is supported in Voicemail Pro 3.0 and higher. It allows a call flow, in the form of a .vmp file,
developed elsewhere to be included in an existing call flow.
The aim of this action is to allow call flows developed by other applications, such as the IP Office Wizard, to be placed on the Voicemail Pro server and included in its customized call flows.
This action has no results, any follow on call handling is determined by the actions in the remote call flow.
Specific Tab:
• Remote Call Flow This drop down list will show a list of remote call flow files downloaded to the Voicemail Pro server.

Voicemail Pro Actions
Voicemail Pro Installation and Maintenance Page 186 IP Office 3.1 Issue 14f (28th September 2005)
Condition Actions Test Condition Action
This action has following connections for true and false. Conditions are set through the Conditions Editor, see Conditions Editor.
Specific Tab: • Return the results of the following condition:
Allows a selection to be made from the conditions currently setup.
Set User Variable Action This action sets a variable to a particular value. Other call flows may then use the Test User Variable
action to check whether the variable has a particular value.
• Note: The variable must first be created using the User Defined Variable menu, see User Defined Variables.
For details of the default tabs see Standard Action Tabs, this section details only tabs and settings specific to this type of action.
Specific Tab:
• Assign the following user variable: The name for the user variable.
• With the following value: The value of the variable.
We strongly recommend that this action type is followed by another action (if necessary a Disconnect action), whose entry prompt confirms to the caller that the value has been set. In some situations, such as where the Set User Variable action is accessed by the user dialing a short code, if the user hangs-up too quickly the variable may not actually be set. Having a following action with a confirmation message encourages users not to hang up too quickly.
Test User Variable Action This action has true and false connections that are followed according to whether a user variable
matches a particular value. The Set User Variable action can be used in other calls to set the value of the variable.
Specific Tab:
• This action will return "TRUE" if the following variable: The name of the user variable to be checked.
• Matches the value below: The value of the variable that will return a true result.

IP Office Configuration
Voicemail Pro Installation and Maintenance Page 187 IP Office 3.1 Issue 14f (28th September 2005)
Check Digits Action This action is supported on Voicemail Pro 1.2.6 or higher. It requires the caller to enter a specific
sequence of DTMF digits.
The action has True, False and Timeout results. The True result connection is used if the caller dials the matching key sequence. The False result connection is used if the callers dials a non-matching digit. The Timeout result connection is used if the caller does not complete dialing the matching key sequence within the set timeout period.
For details of the default tabs see Standard Action Tabs, this section details only tabs and settings specific to this type of action.
Specific Tab:
• What key sequence will the caller have to match?: Enter the key sequence that callers must dial to follow the true result connection. The user's entry should be followed by pressing # to indicate completion. This should be mentioned in the entry prompt.
• Timeout after: Used when a caller doesn't enter any digits or doesn't complete entering matching digits within a set time. When this occurs the action's Timeout result connection is used.
Voicemail Pro Actions
Voicemail Pro Installation and Maintenance Page 188 IP Office 3.1 Issue 14f (28th September 2005)
Database Actions Database Open Action
This action opens a link to a third party database. If connection to the database succeeds, the result is OK, otherwise the result is FAIL. If there is a connection to the database already then the current connection is closed and the new one requested will be opened.
• Note: The use of database actions with Voicemail Pro requires entry of a VMPro Database Interface license in the IP Office configuration.
Specific Tab:
• The connection string to open the database can be entered directly into the field. For help on constructing the connection string use the browse button to open the Data Link Properties form.
• Provider Tab: Select the OLE DB Provider of the data that is to be connected to. Click Next to move to the Connection Tab.
• Connection Tab: Specific information relating the Database provider needs to be completed. Help of the information required for each of the fields can be obtained by clicking the Help button. Fields available will be dependant on the type of provider. Test that the information entered will allow entry into the database, click the Test Connection button. A message Test Connection Succeeded will show if successfully connected to the database.
• Advanced Tab: Network Settings & other settings e.g. Access permissions. Fields showing will be dependant on the type of provider selected. Click help for specific information about any of the fields.
• All: The properties that have been selected on the previous tabs are shown in the All Tab. Amendments can be made as required by selecting the Name and click Edit Value.
IP Office Configuration
Voicemail Pro Installation and Maintenance Page 189 IP Office 3.1 Issue 14f (28th September 2005)
Database Execute Action This action performs an SQL query on a database opened a preceding Database Open action.
• Note: The use of database actions with Voicemail Pro requires entry of a VMPro Database Interface license in the IP Office configuration.
Specific Tab • Command to Execute
This box will contain the SQL query. This can either be entered directly or constructed using the SQL Wizard option.
Database Get Data Action Once a query has been made against a database (see Database Execute Action), either a single
result or a set of results are returned. This action will allow access to the data items if a set of results are returned.
• Note: The use of database actions with Voicemail Pro requires entry of a VMPro Database Interface license in the IP Office configuration.
Specific Tab
• There are four options on how the data can be retrieved.
• Retrieve the next item in the list: Allows the call flow to facilitate the stepping through of a list of results returned by the Database Execute action
• Retrieve the previous item in the list: Allows the call flow to facilitate the stepping through of a list of results returned by the Database Execute action
• Retrieve the first item in the list: Allows the call flow to facilitate jumping to the start of the list therefore returning all the items in the list.
• Retrieve the last item in the list: Allows the call flow to facilitate jumping to the end of the list therefore returning all the items in the list.
The Database Get Data action has the following possible results:
• Success: The current record has successfully been assigned to the $DBD variable.
• At End: You have reached the end of the list, the $DBD variable contains no information.
• Empty: The execute method returned no data, the $DBD variable contains no information.
• Failure: There was a problem trying to retrieve the next data record, the $DBD variable contains no information.

Voicemail Pro Actions
Voicemail Pro Installation and Maintenance Page 190 IP Office 3.1 Issue 14f (28th September 2005)
Database Close Action This action will close the current database connection. If the database is open when a call terminates
then a Database Close action is run automatically.
• Note: The use of database actions with Voicemail Pro requires entry of a VMPro Database Interface license in the IP Office configuration.

IP Office Configuration
Voicemail Pro Installation and Maintenance Page 191 IP Office 3.1 Issue 14f (28th September 2005)
Queue Actions Queue ETA Action
This action plays the estimated time to answer (ETA) to a queued caller. The ETA is calculated based on the queued time of the last 5 queued and answered calls. The ETA is always rounded up to the nearest minute. For an example see Customizing Queuing.
Note that the ETA is calculated and supplied by the IP Office when it requests a queue or still queued message is played to a caller.
• Note in Incoming Call Route 'Priority' The IP Office supports a configurable Priority setting (1, 2 or 3) on Incoming Call Routes. Calls assigned a high priority are moved up any call queue ahead of those with a lower priority. The use of this feature is not compatible with Queue ETA and Queue Position messages as the spoken queue positions and ETA are for some callers may be overridden by calls with a higher priority.
For details of the default tabs see Standard Action Tabs, this section details only tabs and settings specific to this type of action.
• Entry Prompts Tab: This tab should include any prompts to play to the caller before they hear their ETA. See Entry Prompts Tab.
• Specific Tab: This tab may include any further prompts to be played to the caller after they hear their ETA.
Queue Position Action This action plays the caller their position within the queue of calls for the group. For an example see
Customizing Queuing.
Note that the queue position is supplied by the IP Office when it requests a queue or still queued message is played to a caller.
• Note in Incoming Call Route 'Priority' The IP Office supports a configurable Priority setting (1, 2 or 3) on Incoming Call Routes. Calls assigned a high priority are moved up any call queue ahead of those with a lower priority. The use of this feature is not compatible with Queue ETA and Queue Position messages as the spoken queue positions and ETA are for some callers may be overridden by calls with a higher priority.
For details of the default tabs see Standard Action Tabs, this section details only tabs and settings specific to this type of action.
• Entry Prompts Tab: This tab should include any prompts to play to the caller before they hear their position. See Entry Prompts Tab.
• Specific Tab: This tab may include any further prompts to be played to the caller after they hear their position.

Voicemail Pro Installation and Maintenance Page 193 IP Office 3.1 Issue 14f (28th September 2005)
Using Modules Introduction to Modules Modules are reusable sets of actions. They allow you to create a sequence of actions that can be reused within any other start point's call flow.
Any changes to a module will affect all other start points that are using that module. This simplifies the programming of actions if a number of start points use the same sequence of actions. Using modules also reduces the size of the call flow.
• In order to create connections from results within a module, to other actions within the start point using the module, you must add and connection Module Return actions to those results in the module.
Creating a Module 1. Click Modules and then , or right-click Modules and select Add.
2. Enter a name. This should not match any user or group name on the IP Office.
3. You can now add actions and connections to the module in the same way as for any start point.
4. In order to create connections from a module to other actions you must use the Module Return action within the module, see Module Return Action.
Adding a Module to a Start Point 1. Select the start point to which you want to add the module action and then click the right-hand
panel.
2. Click and drag the module required from the left-hand panel to the right-hand panel.
Importing and Exporting Modules Modules can be imported and exported. See Importing and Exporting.

Using Modules
Voicemail Pro Installation and Maintenance Page 194 IP Office 3.1 Issue 14f (28th September 2005)
Running a Module Directly from a Short Code You can use Modules directly in conjunction with short codes. The short code must call the name of the module.
For example, the short code below will run the module named Special when the user dials *97. The service that the user receives will depend upon the actions within the module.
• Short Code: *97
• Telephone Number: "Special" (include quote marks)
• Line Group ID: 0
• Feature: VoicemailCollect
Running a Module Directly from an External Call A module can applied be directly to an incoming (external) call. This is done within the Manager application. Within the appropriate IncomingCallRoute entry, set the Destination to the module name prefixed with "VM:".
For example, entering VM:AutoAttend would route the call to a module called AutoAttend. Note that the maximum entry length is 15 characters, thus limiting the module name to 12 characters.
• If there is a hunt group on the system whose name matches the module's name, calls will be routed to that group when the voicemail server is not running.

Voicemail Pro Installation and Maintenance Page 195 IP Office 3.1 Issue 14f (28th September 2005)
Conditions Editor Conditions Pressing F6 displays the Conditions Editor.
Conditions are constructed from a set of basic elements. These elements can be combined within a single condition to create complex rules. For example the Week Planner can be used to define a companies standard working hours, and then combined with the calendar to define exception days such as public holidays.
Within the voicemail call flow, conditions can be checked by a Test Condition action and, according to whether the condition is currently true or false, callers can be routed to different actions. See Test Condition Action.
Logic settings can be applied to both the whole condition and to the elements in a condition. These can alter when a condition is true or false.
• AND The condition is true when all the elements are true, i.e. both A and B are true.
• OR The condition is true when either A or B is true.
• NOT This logic element can be used to reverse the value (e.g. return false when true) of individual elements or of the whole condition.
Conditions Editor
Voicemail Pro Installation and Maintenance Page 196 IP Office 3.1 Issue 14f (28th September 2005)
Using the Conditions Editor Either:
• From the toolbar click the icon.
• Press F6.
• From the menu bar select Administration and then Conditions Editor.
Adding a Condition 1. Click the icon.
2. Enter the name for the condition and then click OK.
3. You can now add elements to the condition and alter the properties of those elements.
Adding Elements to a Condition A condition can consist of multiple elements, including several elements of the same type.
1. Click the element drop-down list (shown as , , or in the toolbar).
2. Click the type of element required.
3. Click the condition to which you want to add the element.
4. You can now edit the element's settings.
• Note: By default the logical AND X+ setting is applied to new condition elements. For the week planner and calendar elements, if more than one day is set this will never return true. Therefore we recommend that the OR X|| logical setting is applied to all week planner and calendar elements.
Editing Elements and Conditions 1. Click the Condition or Element and then on .
2. Alternatively for elements you can double-click the element.
3. The elements or condition's properties are displayed for you to edit.
Changing a Condition's Logical Setting 1. Click the logic setting drop-down list, shown as x+ (AND), x|| (OR) or x! (NOT) in the toolbar.
2. Click the logic setting required.
3. Click the condition or element to which the logic setting should be applied.
Deleting Elements and Conditions 1. Click the condition or element you want to delete and then on .

Conditions Editor
Voicemail Pro Installation and Maintenance Page 197 IP Office 3.1 Issue 14f (28th September 2005)
Available Condition Elements Calendar
The Calendar element is used to indicate which days of the year return true. Double-clicking on a particular day will either select or deselect it.
Selected days are shown with a shaded background, e.g. . Note that indicates weekend days but not whether the day is selected.
The element returns 'true' if the current day is a selected day.
• Note: Apply Logical OR X|| if more than one day selected By default the logical AND X= is applied to this condition element. If more than one day is selected then element cannot return true. For example it cannot be the 3rd March and the 4th March at the same time. When multiple days are selected the OR X|| settings should be applied. In our example the element will then be true if it is the 3rd March or 4th March.
Week Planner The Week Planner element is used to set which time periods during a normal week return 'true'. It
consists of an entry for each day of the week and a start and end time for the 'true' period on each day.
• Note: Apply Logical OR X|| if more than one day selected By default the logical AND X= is applied to this condition element. If more than one day is selected then element cannot return true. For example it cannot be the Monday and Tuesday at the same time. When multiple days are selected the OR X|| settings should be applied. In our example the element will then be true if it is Monday or Tuesday.
Condition The Condition element is used to combine the value of an already existing condition. When selected
the element displays a list of the other conditions from which to select.
Compare The Compare element is used to compare Voicemail Pro system variables, for example $POS or
$ETA, against each other or against a value you enter.


Voicemail Pro Installation and Maintenance Page 199 IP Office 3.1 Issue 14f (28th September 2005)
Campaigns Introduction to Campaigns Campaigns are a series of questions and answers. Callers to a campaign hear the questions and give their response, either spoken or through the telephone keypad.
Call processing agents accessing the campaign hear the caller's answers which they can then transcribe into a database or other records.
Campaign Web Access If the Voicemail Server PC is also a web server, then during installation of Voicemail Pro it is possible to also install a Campaign Web Component. This allows access to play and change the status of campaign messages through a web browser.
• Browser Requirements:
The user must have Microsoft Internet Explorer 5.0 or higher (not Netscape). Their PC must also have multimedia sound capabilities. The user must also have a mailbox on the voicemail system. The name of their mailbox is requested when the user browses the campaign messages.
• Browsing Address: During installation of the Campaign Web Component, the root address of the web server is requested. A folder called "campaign" is then added to that root. The web address for browsing will normally be set up as a link from a page within a company intranet rather than typed directly by users.
• http://<server address>/campaign/campcgi.html Note that access must be via http: and not network file routing.

Campaigns
Voicemail Pro Installation and Maintenance Page 200 IP Office 3.1 Issue 14f (28th September 2005)
Adding, Modifying & Deleting Campaigns Pressing F7 or clicking on displays the Campaign Wizard. This allows you to select the required activity.
• Create a new Campaign: This option takes you through a series of campaign wizard menus to set the campaigns settings.
• Modify an existing Campaign: This option displays a list of existing campaigns from which you can select the one you wish to modify. You will then be taken through the campaign wizard menus for the campaign settings.
• Delete an Existing Campaign: This option displays a list of existing campaign from which you can then select the campaign to delete.
Customer Prompts This menu is used to set the sequence of questions played to callers and to record their responses.
• Add action: Add a new campaign action. The options for a campaign action are then displayed.
• Edit action: Edit the currently highlighted campaign action.
• Delete action: Deletes the currently highlighted campaign action
• Move action: Moves the position of an action in the sequence of campaign actions.
The and commands give you access to the options for a campaign action.
• Play a prompt to the customer: If selected this option indicates that the action is a prompt played to the caller. You can then specify which prompt to play or create a new prompt.
• Allow the customer to input information: If selected, this option indicates that the action should record the caller's response.
• What type of input do you want: This option sets whether the voicemail server should Record voice or Record key presses.
• Please enter the maximum recording length: Sets the maximum length of recording before the next action.
• Please enter the maximum number of key presses: Sets the maximum number of key presses to record before the next action.
• Please enter a unique name that will describe the input: A name to associate with the action. Note: The name should be a single word with no spaces.
• The following prompt will be played to an agent when the above data is reviewed: This option allows you to select or create a prompt that is played to agents before hearing the caller's response.

Campaigns
Voicemail Pro Installation and Maintenance Page 201 IP Office 3.1 Issue 14f (28th September 2005)
Customer Menu After completing the sequence of questions and responses, the caller can be offered a menu of options.
• Please select the prompt to be played after the customer has made their recordings: You can select or create a prompt that is then played to callers after completing the sequence of questions and answers. The prompt should inform the customer of which actions selected from the list below they can use.
• Please select which options will be available to the customer after the above prompt has been played: Click the tick boxes to select which options will be available to the customer. The customer then needs to press the corresponding key.
• Save the Campaign (and then quit): Saves the callers responses and then disconnects the caller.
• Play back response to the Campaign: Plays back the customers responses to them and then repeats this customer menu.
• Restart the whole Campaign: Delete the customers responses and restarts the sequence of questions and answers.
• Quit the Campaign (without saving): Disconnects the customer without saving their responses.
• Move options: You can move the currently highlighted option so that the key presses associated with the options differ.
• Timeout: Sets how long the voice mail server should wait for an answer before following the No Answer connection.
Campaign Identification This menu is used to set a park location for the campaign and to name the campaign.
• Where should this Campaign be parked…: This field can be used to enter a park slot number for the campaign. This number can be programmed under a DSS key. That key can then be used by agents to access the campaign. If the DSS key also incorporates a BLF lamp, that lamp is lit when new campaign messages are left.
• The name of the Campaign is: This is the name of the campaign.
Campaigns
Voicemail Pro Installation and Maintenance Page 202 IP Office 3.1 Issue 14f (28th September 2005)
Accessing a Campaign A campaign can be accessed in a number of ways:
• Using the Campaign Action: The Campaign action is used to route calls into a campaign after those calls have been routed to an appropriate start point on the voicemail server. The actions properties set whether the call is treated as a caller to the campaign or an agent processing the campaign messages. See Campaign Action.
• Using the Park Slot Number: Set through the Campaign Identification menu, this number can be programmed under a DSS key. That key can then be used by agents to access the campaign. If the DSS key also incorporates a BLF lamp, that lamp is lit when new campaign messages are left.
• Note: Phone Manager park slot keys cannot be used for this function.
• Through a Web Browser: See Campaign Web Access.
Using the first two methods above, when an agent accesses the messages waiting in a campaign, they have a number of telephone controls:
• 1 - Go to the start of the call.
• 2 - Rewind.
• 3 - Stop processing the message.
• 4 - Mark call as processed and delete.
• 5 - Mark call as processed and save. (Currently save/processed messages can only be accessed via the web interface).
• 7 - Previous response.
• 8 - Start of response.
• 9 - Next response.
• # - Fast forward.
• 0 - Pause
• * - Rewind.
Voicemail Pro Installation and Maintenance Page 203 IP Office 3.1 Issue 14f (28th September 2005)
Recording Calls Recording Calls As well as providing messaging services, Voicemail pro can also provide call recording service.
• Manual Call Recording Users can trigger call recording by a number of methods. By default the recording is placed in their own mailbox but this can be changed.
• Automatic Call Recording The IP Office system can be configured to record particular users, hunt groups or calls associate with a particular account code.
• For hunt group calls only incoming calls can be recorded.
• Account codes can be associated with an incoming CLI and so provide call recording based on the caller's CLI.
• A time profile can be used to set when automatic call recording is used.
• For inbound calls, recording will not take place if the call also goes to normal voicemail.
• Different frequency settings, set in percentage terms, can be applied to the automatic recording of inbound calls and outbound calls.
• A mandatory settings can be used to return busy tone when call recording is required but not available.
• Where calls have been answered using a Line appearance button, the call recording goes to the mailbox setting of the original call route destination.
• Voice Recording Library (VRL) Recordings are normally placed into standard mailboxes. VRL operation allows recordings to be transferred to a specialist archiving application. This allows both longer recording and the sorting and searching of recordings. See Voice Recording Library (VRL).
• Call Recording Warning In many locations, it is a local or national requirement to warn those involved in a call that they are being recorded. The Voicemail Pro does this by playing an Advice of Call Recording prompt which can be switched off. On automatically recorded call, some phone may also display a recording symbol.
• Conference Capacity: Call recording uses conferencing capacity and so is subject to the available conferencing capacity of the IP Office system.
• Recording Duration: Call recording is limited to the maximum length of 1 hour.
• Recording Auto End: Recording is automatically stopped if the call being recorded is parked or put on hold. If a conference call is being recorded, recording automatically stops when a new party joins the conference.
• IP Trunks and Extensions When the direct media path option is used with IP trunks and or extension, it is not possible to guarantee call recording.

Recording Calls
Voicemail Pro Installation and Maintenance Page 204 IP Office 3.1 Issue 14f (28th September 2005)
Switching the Recording Warning On/Off In many locations, it is a local or national requirement to warn those involved in a call that they are being recorded. One method to do this is to enable the AOCR message provided by the Voicemail Pro server.
• The Advice of Call Recording Prompt This prompt is provided by the file aor_00.wav. A copy is located in the sub-folders of c:\Program Files\Avaya\IP Office\Voicemail Server\WAVS for each language installed on the Voicemail Pro server.
2. Within the Voicemail Pro Client, click on or select Administration | Preferences | General. 3. Click on Play Advice on Call Recording to switch this option on (ticked) or off (unticked).
4. Click on OK.
5. Click Save & Make Live.
Changing the Maximum Recording Length 1. Within the Voicemail Pro Client, click on or select Administration | Preferences | General. 2. For recordings being placed into a Voicemail Pro mailbox, the maximum recording time is 1 hour.
3. The Max. VRL Record Length (secs) setting is only used for calls being recorded to VRL. The maximum record length is 3600 seconds (60 minutes).
4. Click on OK.
5. Click Save & Make Live.

Recording Calls
Voicemail Pro Installation and Maintenance Page 205 IP Office 3.1 Issue 14f (28th September 2005)
Manual Call Recording Setting the Destination for User Recordings The IP Office Manager can be used to specify where recordings triggered by a user are placed:
1. Within IP Office Manager, click on to receive the IP Office's configuration.
2. Click on User to display the current entries.
3. Select and double-click on the entry for which you want to alter the manual recording destination.
4. Select the Voice Recording tab.
5. In Manual Recording Mailbox, use the drop-down list to select which mailbox should be used to
contain recordings triggered by the user.
• The Voice Recording Library options can only be used if a VRL application has been installed and licensed. See Voice Recording Library.
6. Click on OK.
7. Click on to send the configuration back to the IP Office. If user, hunt group and/or account codes were the only changes made, select Merge Config.

Recording Calls
Voicemail Pro Installation and Maintenance Page 206 IP Office 3.1 Issue 14f (28th September 2005)
Triggering Manual Call Recording Phone Manager Pro Users can trigger call recording using Phone Manager Pro.
When on a call, press F5 to start recording or select Function | Start Recording.
To end recording select Function | Stop Recording.
For Phone Manager Pro users working in Agent mode, the and actions are also shown as buttons on the Phone Manager Pro toolbar when a call is connected.
SoftConsole SoftConsole users can manually trigger recording using the button on the toolbar or by selecting Action | Start Recording.
This action toggles and so is also used to stop recording.
4400 and 6400 Series Phones Phones in these series with a Menu key can manually trigger call recording by selecting Menu | Menu | Func | Recor.
Using DSS Keys The call record function can be programmed against a DSS key.
To set a DSS key for manual recording: 1. Open Manager and select the user.
2. On the Button Programming tab, select the required DSS key and for the Action select Advanced | Call | CallRecord.
3. Merge the new settings back to the system.
To use the DSS key: 1. Place the current call on hold and then press the DSS key.
2. The held call is reconnected and recording is started.

Recording Calls
Voicemail Pro Installation and Maintenance Page 207 IP Office 3.1 Issue 14f (28th September 2005)
Using Short Codes The shortcode feature "CallRecord" can be used to trigger recording of calls to Voicemail Pro.
To Record Your Own Calls The following example shortcode can be setup as a user shortcode or a system shortcode. In either case it will trigger recording into the user's designated mailbox.
To use the shortcode, place the call on hold and dial *95. The call is automatically reconnected and recording begins.
• Shortcode: *95
• Telephone Number: Blank
• Line Group ID: 0
• Feature: CallRecord
To Record Other Calls The following is an example shortcode for recording a call involving a specific extension. You do not have to be in conference with or part of the call in order to use this shortcode - therefore this shortcode should only be setup as a user shortcode for trusted users.
• Shortcode: *96*N#
• Telephone Number: N
• Line Group ID: 0
• Feature: CallRecord

Recording Calls
Voicemail Pro Installation and Maintenance Page 208 IP Office 3.1 Issue 14f (28th September 2005)
Customizing Manual Recording Normally recording is performed by the Voicemail Pro server as a default task. However, a module named Record can be used to customize the operation of auto-recording.
• Note If a Record module is created, it overrides the default record operation. Therefore it must at minimum emulate the default manual recording process of placing recordings into the mailbox of the user who triggered recording. For example, in the module call flow shown below, the Listen action is set to $UUI.
• The $UUI Variable The $UUI variable is supported from Voicemail Pro 1.3.15 onwards. Whenever recording is triggered, $UUI contains the user name of the user who that triggered the recording process.

Recording Calls
Voicemail Pro Installation and Maintenance Page 209 IP Office 3.1 Issue 14f (28th September 2005)
Automatic Call Recording Setting the Record Times, Frequency and Destination Which users, hunt groups and account codes are auto-recorded are selected through IP Office Manager.
1. Within IP Office Manager, click on to receive the IP Office's configuration.
2. Click on either User, Hunt Group or Account Code to display the current entries.
3. Select and double-click on the entry for which you want automatic recording.
4. Select the Voice Recording tab.
5. From the Record Inbound and Record Outbound drop-down lists select the recording
frequency required (Note: Record Outbound is not available for hunt groups).
• None: Do not record.
• On: Record all calls if possible.
• Mandatory: Record all calls. If recording is not possible, return busy tone to the caller.
• xx%: Record calls at intervals matching the set percentage, eg. for every other call for 50%.
• For inbound calls, recording will not take place if the call also goes to normal voicemail.
6. For users, you can also specify the destination for the recordings. By default this is the users own mailbox.
• The Voice Recording Library options can only be used if a VRL application has been installed and licensed. See Voice Recording Library.
7. Click on OK.
8. Click on to send the configuration back to the IP Office. If user, hunt group and/or account codes were the only changes made, select Merge Config.

Recording Calls
Voicemail Pro Installation and Maintenance Page 210 IP Office 3.1 Issue 14f (28th September 2005)
Hide Auto Record Indication In addition to the audible advice of call recording prompt (see Switching the Recording Warning On/Off), some phones may also display recording indication when automatic call recording occurs. This can be switched on/off through the IP Office configuration.
1. Note that this change requires a reboot of the IP Office system.
2. Using Manager load the IP Office configuration.
3. On the System tab of the System form, check or un-check Hide auto recording as required.
4. Save the configuration back to the IP Office system.

Recording Calls
Voicemail Pro Installation and Maintenance Page 211 IP Office 3.1 Issue 14f (28th September 2005)
Customizing Auto Recording Normally auto-recording is performed by the Voicemail Pro server as a default task. However, a module named AutoRecord can be used to customize the operation of auto-recording.
• Note: If an AutoRecord module is created, it overrides the default auto-record operation.
• The $UUI Variable: The $UUI variable is supported from Voicemail Pro 1.3.15 onwards. Whenever auto recording is triggered, $UUI contains either the account code, user name or hunt group name that triggered the auto recording.
• Note: A copy of this module can be found in Voicemail Pro Samples within the help pages.
• The value of condition Account1 is checked using a Test Condition action.
• If found True, the call is recorded using a Listen action, which specifies the mailbox for the recording.
• If found False, the next condition test is tried.
• The conditions, created within the Condition Editor, compare the variable $UUI against possible account code values.
• The final Listen action, used if none of the condition tests are True, has its Mailbox set to $UUI. If $UUI hasn't matched any account code being used for auto recording, then its value will be either the user name or hunt group name that triggered the auto recording.

Recording Calls
Voicemail Pro Installation and Maintenance Page 212 IP Office 3.1 Issue 14f (28th September 2005)
Voice Recording Library (VRL) Voice Recording Library (VRL) operation allows the Voicemail Pro to transfer specific users automatic and/or manually recording calls to a third-party application. It can also be selected as the destination for calls recorded via a Leave Mail action in a call flow.
Currently this mode of operation is only supported with the Contact Store for IP Office application from Witness Systems. This application provides tools to sort, search and playback recordings. It also supports the archiving of recordings to DVD.
• Installation and configuration of VRL with Contact Stories for IP Office is documented separately. This section provides an overview only.
• VRL is a licensed feature. It requires entry of a valid Voice Recording Administrators license into the IP Office configuration.
• The VRL application must be configured to store recording on a separate partition, drive or PC from the Voicemail Pro. This is necessary to ensure that the long term storage or recording archives and space available for mailbox messages do not conflict.

Voicemail Pro Installation and Maintenance Page 213 IP Office 3.1 Issue 14f (28th September 2005)
Fax Operation Voicemail Pro Fax Operation The Voicemail Pro server can detect and handle incoming fax calls in the following ways:
• Redirect Fax Calls to a System Fax Number When set, this number is used as the transfer destination for any fax calls received at user or hunt group mailboxes. This operation is supported in IP Office and Intuity Mailbox mode. See Setting the Voicemail Pro System Fax Number.
• Redirect Fax Calls to a Mailbox Fax Number When a system fax number is set, Intuity mailbox users can set a different fax transfer destination for their own mailbox. See Setting a Mailbox Fax Number.
• Redirect Fax Calls Using a Menu Action The F character can be used within the touch tone choices of a Menu action to set what actions should be applied to fax calls. See Routing Fax Calls Using a Menu Action.
Setting the Voicemail Pro System Fax Number The System Fax Number is used as the default destination for any fax calls received in a mailbox.
For systems running in Intuity mode, once a system fax number is set, mailbox users can also set an alternate fax destination number for their mailbox, see Setting a Mailbox Fax Number.
1. Click on Preferences and select General.
2. Enter the fax destination in System Fax Number. 3. Click OK.
4. Click Save and Make Live.
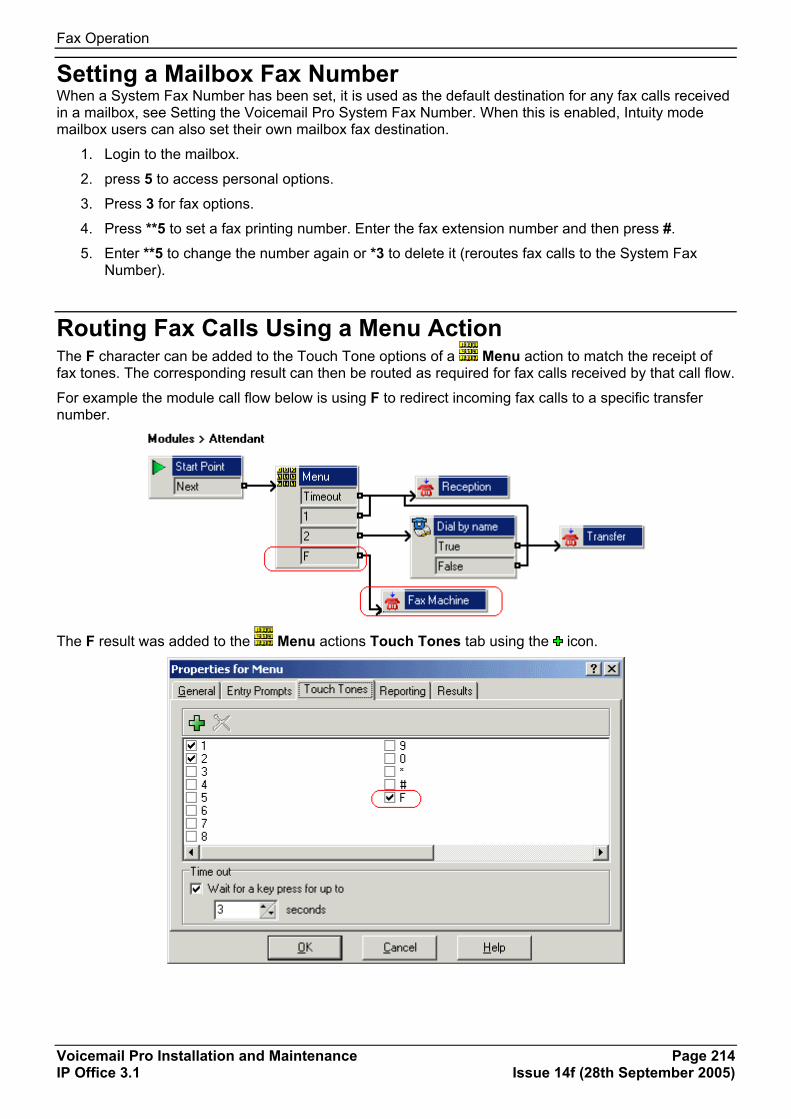
Fax Operation
Voicemail Pro Installation and Maintenance Page 214 IP Office 3.1 Issue 14f (28th September 2005)
Setting a Mailbox Fax Number When a System Fax Number has been set, it is used as the default destination for any fax calls received in a mailbox, see Setting the Voicemail Pro System Fax Number. When this is enabled, Intuity mode mailbox users can also set their own mailbox fax destination.
1. Login to the mailbox.
2. press 5 to access personal options.
3. Press 3 for fax options.
4. Press **5 to set a fax printing number. Enter the fax extension number and then press #.
5. Enter **5 to change the number again or *3 to delete it (reroutes fax calls to the System Fax Number).
Routing Fax Calls Using a Menu Action The F character can be added to the Touch Tone options of a Menu action to match the receipt of fax tones. The corresponding result can then be routed as required for fax calls received by that call flow.
For example the module call flow below is using F to redirect incoming fax calls to a specific transfer number.
The F result was added to the Menu actions Touch Tones tab using the icon.
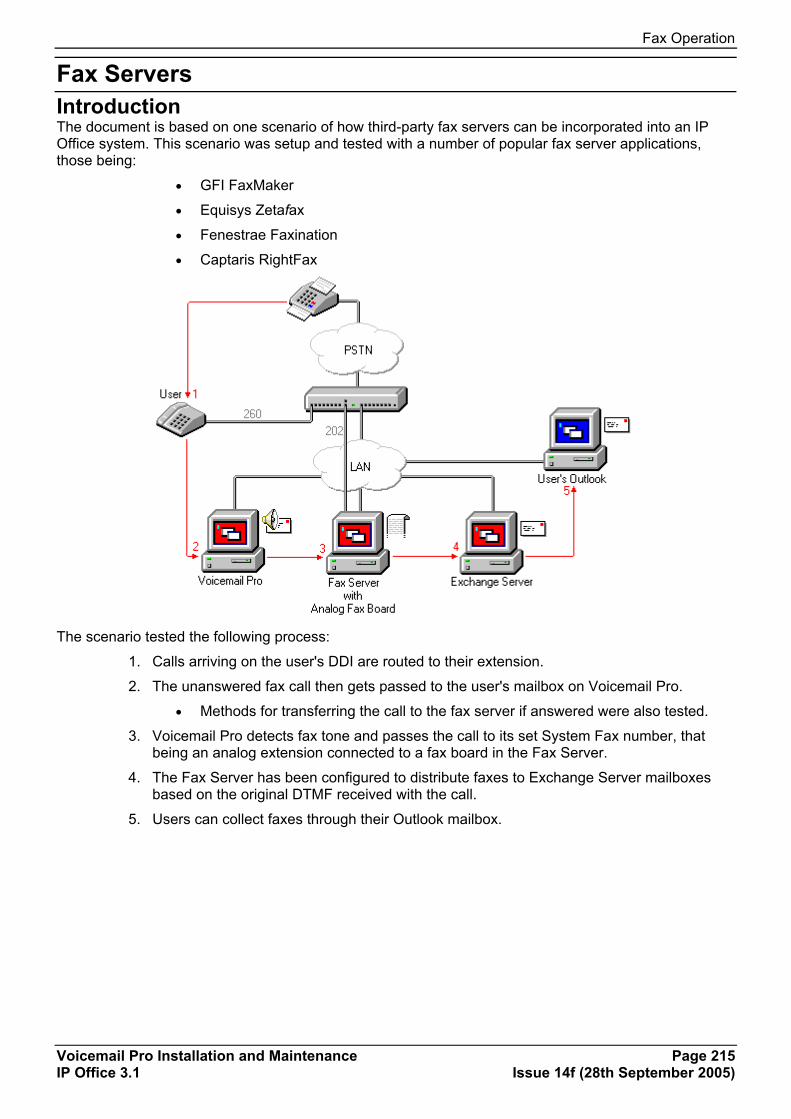
Fax Operation
Voicemail Pro Installation and Maintenance Page 215 IP Office 3.1 Issue 14f (28th September 2005)
Fax Servers Introduction The document is based on one scenario of how third-party fax servers can be incorporated into an IP Office system. This scenario was setup and tested with a number of popular fax server applications, those being:
• GFI FaxMaker
• Equisys Zetafax
• Fenestrae Faxination
• Captaris RightFax
The scenario tested the following process:
1. Calls arriving on the user's DDI are routed to their extension.
2. The unanswered fax call then gets passed to the user's mailbox on Voicemail Pro.
• Methods for transferring the call to the fax server if answered were also tested.
3. Voicemail Pro detects fax tone and passes the call to its set System Fax number, that being an analog extension connected to a fax board in the Fax Server.
4. The Fax Server has been configured to distribute faxes to Exchange Server mailboxes based on the original DTMF received with the call.
5. Users can collect faxes through their Outlook mailbox.
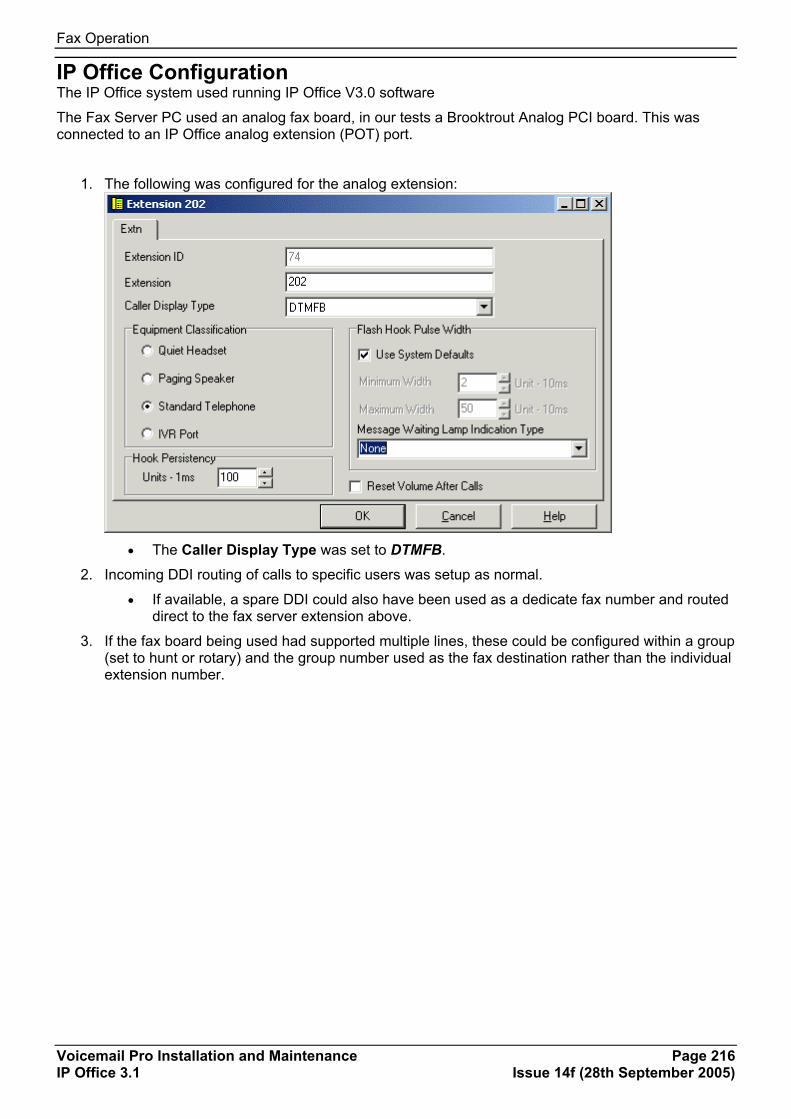
Fax Operation
Voicemail Pro Installation and Maintenance Page 216 IP Office 3.1 Issue 14f (28th September 2005)
IP Office Configuration The IP Office system used running IP Office V3.0 software
The Fax Server PC used an analog fax board, in our tests a Brooktrout Analog PCI board. This was connected to an IP Office analog extension (POT) port.
1. The following was configured for the analog extension:
• The Caller Display Type was set to DTMFB.
2. Incoming DDI routing of calls to specific users was setup as normal.
• If available, a spare DDI could also have been used as a dedicate fax number and routed direct to the fax server extension above.
3. If the fax board being used had supported multiple lines, these could be configured within a group (set to hunt or rotary) and the group number used as the fax destination rather than the individual extension number.

Fax Operation
Voicemail Pro Installation and Maintenance Page 217 IP Office 3.1 Issue 14f (28th September 2005)
Voicemail Pro Configuration The voicemail system used was running Voicemail Pro 3.0 software. The Voicemail Pro had already been setup and tested for MAPI based Voicemail Email operation.
For the Fax Server scenario the following additional options were configured within the Voicemail Pro Client
1. Start the Voicemail Pro Client.
2. Select Administration | Preferences | General.
• The System Fax Number was set to match the analog extension connected to the Fax
Server PC's fax board. This number is ten used as the destination for any fax calls received by individual user mailboxes. For systems in Intuity emulation mode, the individual mailbox users can override this number through the mailbox user interface if required.
• The Enable Fax Sub-Addressing option was selected.
3. Click OK and save and make live.

Fax Operation
Voicemail Pro Installation and Maintenance Page 218 IP Office 3.1 Issue 14f (28th September 2005)
Domain User Account Requirements For the fax server and voicemail to interact, specific user rights are needed as follows:
• The Voicemail Pro service requires sufficient log on permissions to access user mailboxes if email reading is to be used.
• The Exchange Connector service requires the following log on permissions:
o Domain Admin.
o Schema Admin.
o Enterprise Admin.
• The fax server service requires a user account to log on with the following permissions:
o Domain Admin.
o Schema Admin.
o Enterprise Admin.
• Domain users will need to be configured with email accounts in order for the fax software to route incoming faxes to individual Outlook inboxes.

Fax Operation
Voicemail Pro Installation and Maintenance Page 219 IP Office 3.1 Issue 14f (28th September 2005)
GFI FaxMaker GFI Fax System Requirements
• A Windows 2000 or 2003 server machine with at least 256 Mbytes of RAM and an 800 MHZ processor.
• A professional fax device: A Brooktrout TR 114, TR 1034 or Trufax fax board, an EICON DIVA PRO/SERVER fax card or an AVM active fax card. You can use class 2 or 2.0 fax modems using either the Microsoft or the GFI fax modem drivers. For a complete list go to http://kbase.gfi.com/showarticle.asp?id=KBID001220
• If you are installing GFI FAXmaker on a separate machine, the IIS SMTP service will need to be installed. The IIS SMTP service is included in every Windows distribution, including Windows professional. To verify the Installation of the SMTP Service: In Control Panel, open Add/Remove Programs, click Add/Remove Windows Components. Click the Internet Information Services (IIS) component, click Details, and then verify that the SMTP Service check box is selected. If it is not selected, click to select it, click OK, and then follow the installation directions that are displayed.
• If you are using Microsoft Exchange Server, and are not installing the fax server on the Exchange server machine, you must install Microsoft Outlook on the fax server machine and configure it to connect to a mailbox (via mapi) on the Microsoft Exchange server machine. This is needed for conversion of TNEF to MIME.
• If using Windows 2000, ensure you have Service Pack 3 or later installed.
• IMPORTANT: Disable Anti Virus software from scanning the GFI FAXmaker & other relevant directories! AV products are known to both interfere with normal operation as well as slow down any software which requires file access. In fact Microsoft does not recommend running file based anti virus software on the Exchange Server. For more information: http://kbase.gfi.com/showarticle.asp?id=KBID001523
• Make sure that backup software is not backing up any of the GFI FAXmaker directories at any point.
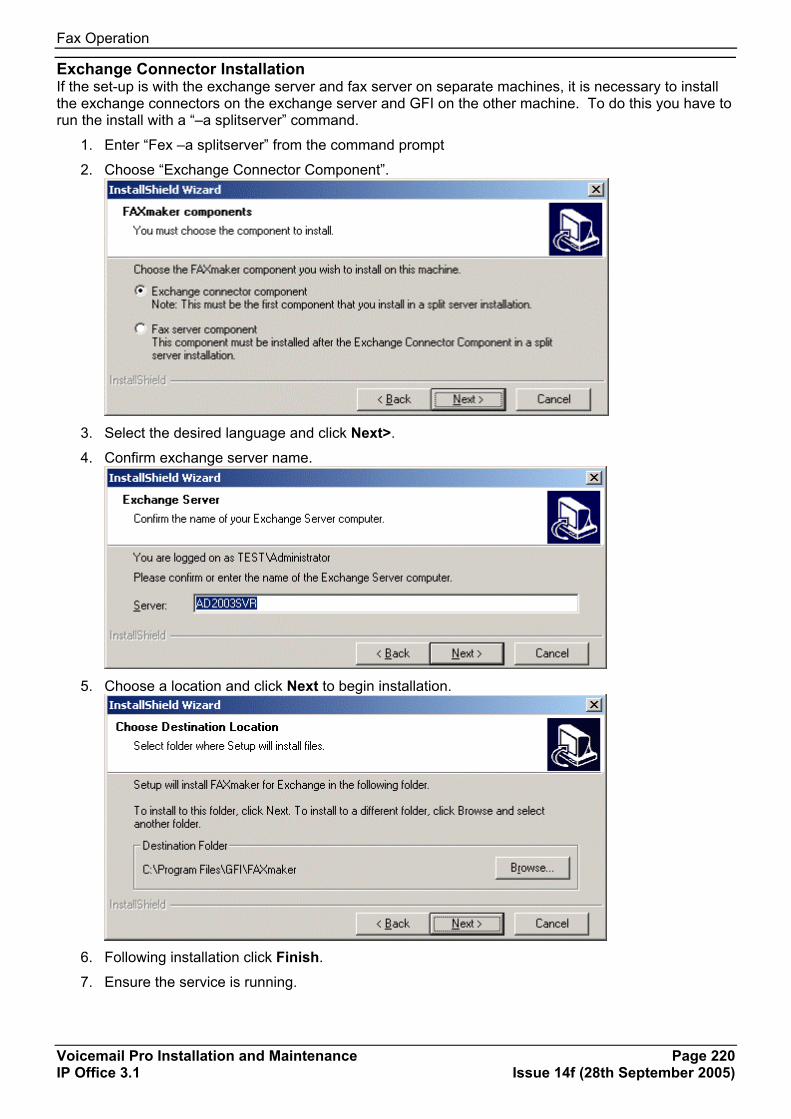
Fax Operation
Voicemail Pro Installation and Maintenance Page 220 IP Office 3.1 Issue 14f (28th September 2005)
Exchange Connector Installation If the set-up is with the exchange server and fax server on separate machines, it is necessary to install the exchange connectors on the exchange server and GFI on the other machine. To do this you have to run the install with a “–a splitserver” command.
1. Enter “Fex –a splitserver” from the command prompt
2. Choose “Exchange Connector Component”.
3. Select the desired language and click Next>.
4. Confirm exchange server name.
5. Choose a location and click Next to begin installation.
6. Following installation click Finish.
7. Ensure the service is running.

Fax Operation
Voicemail Pro Installation and Maintenance Page 221 IP Office 3.1 Issue 14f (28th September 2005)
GFI Server Installation 1. Run “fex - a splitserver” from the command prompt.
2. On the License Agreement screen select Yes.
3. Select Fax server component and click Next.
4. Enter the exchange server machine name and click Next.
5. Enter user and license information and click Next.
6. Choose the locale language and click Next.

Fax Operation
Voicemail Pro Installation and Maintenance Page 222 IP Office 3.1 Issue 14f (28th September 2005)
7. Specify an admin account for the service and click Next.
8. Select the installation destination and click Next>.
9. Choose whether to configure now and click Finish. For our example we will configure now.
10. The FAXmaker Configuration Wizard should start. Click Next>.

Fax Operation
Voicemail Pro Installation and Maintenance Page 223 IP Office 3.1 Issue 14f (28th September 2005)
11. Choose your fax device and click Next. We used a Brooktrout card.
12. Click Yes to install the necessary drivers if not already installed
13. Click Next>.

Fax Operation
Voicemail Pro Installation and Maintenance Page 224 IP Office 3.1 Issue 14f (28th September 2005)
14. Select the card type and click Next. Our test systems card was PCI based.
15. Click Start to start detection. The wizard should detect your device channels.
16. Click Next> and then click Finish.
17. You should arrive back at the fax configuration wizard.

Fax Operation
Voicemail Pro Installation and Maintenance Page 225 IP Office 3.1 Issue 14f (28th September 2005)
18. Click Configure lines … and add lines where necessary. Click OK.
19. Select DTMF and click OK.

Fax Operation
Voicemail Pro Installation and Maintenance Page 226 IP Office 3.1 Issue 14f (28th September 2005)
20. Select the number of DTMF digits to capture and click OK. This should match the IP Office extension number length.
21. Back at the main wizard, click Next.
22. If the following appears click OK.
23. Select a user for the default router & administrator and click OK.
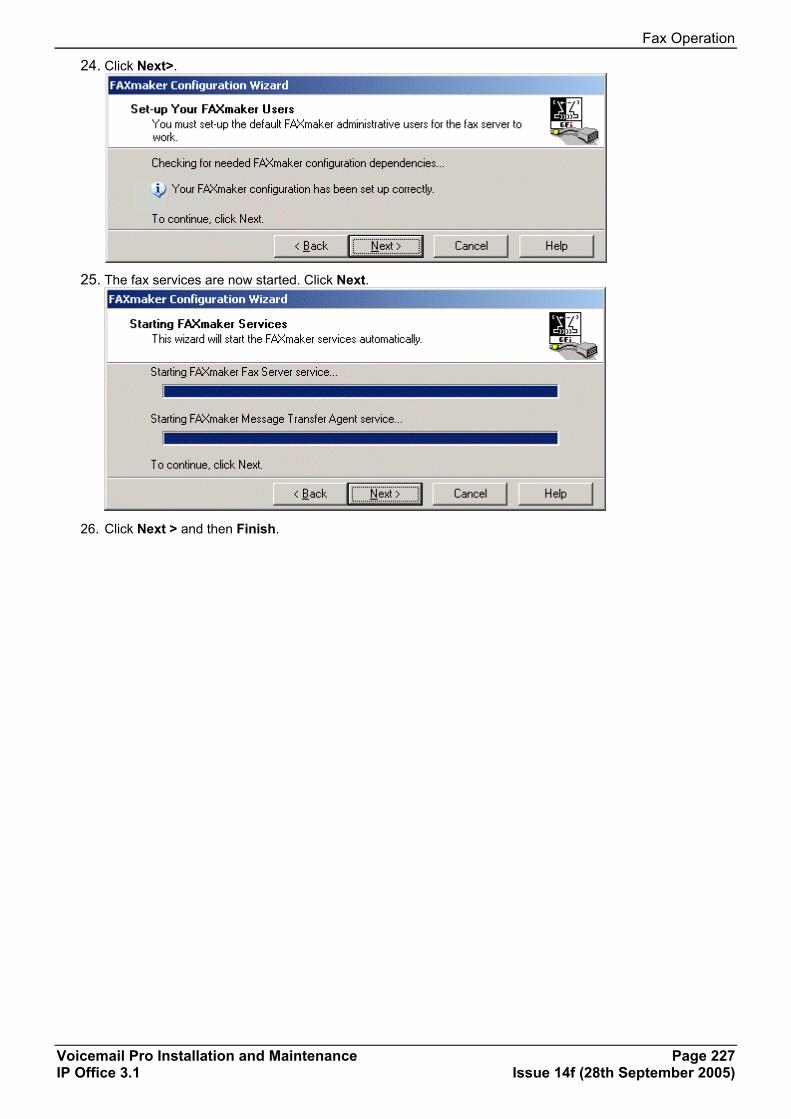
Fax Operation
Voicemail Pro Installation and Maintenance Page 227 IP Office 3.1 Issue 14f (28th September 2005)
24. Click Next>.
25. The fax services are now started. Click Next.
26. Click Next > and then Finish.

Fax Operation
Voicemail Pro Installation and Maintenance Page 228 IP Office 3.1 Issue 14f (28th September 2005)
GFI Fax Configuration 1. Open The GFI configuration application.
2. You have must create a default route for faxes that do not have a specific DTMF routing destination. 3. Right click Routing and open Properties.
4. Click Add and select a user. I selected a user called gfi. Then click OK.
5. You need to add users to the Licensed users list. Select Licensed users from the right-hand screen and
select New licensed user/group....
6. Select a user from the Select users or groups screen.
7. Now expand the Routing option and select DTMF/DID.
8. Right click and select New....
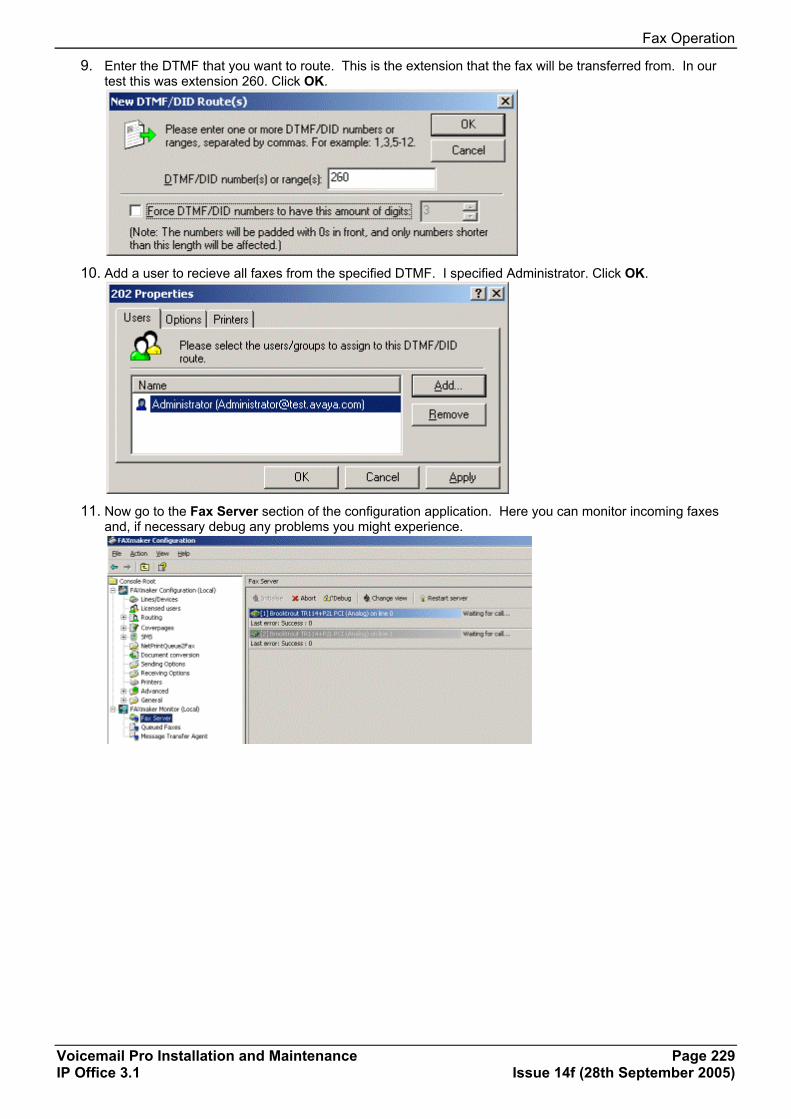
Fax Operation
Voicemail Pro Installation and Maintenance Page 229 IP Office 3.1 Issue 14f (28th September 2005)
9. Enter the DTMF that you want to route. This is the extension that the fax will be transferred from. In our test this was extension 260. Click OK.
10. Add a user to recieve all faxes from the specified DTMF. I specified Administrator. Click OK.
11. Now go to the Fax Server section of the configuration application. Here you can monitor incoming faxes
and, if necessary debug any problems you might experience.

Fax Operation
Voicemail Pro Installation and Maintenance Page 230 IP Office 3.1 Issue 14f (28th September 2005)
12. When a fax is transferred from the Voicemail Pro, you can see the fax server has received the DTMF. The little red person shows this with the DTMF digits displayed next to it.
13. When routed to a user’s Microsoft Outlook Inbox, the message looks something like this one:
Fax Operation
Voicemail Pro Installation and Maintenance Page 231 IP Office 3.1 Issue 14f (28th September 2005)
Faxination Faxination System Requirements Faxination Server for MS Exchange/FCS requires the following software to be installed on the local machine prior to running the Installation and Configuration process.
• A supported operating system: Windows XP Professional, Windows 2000 Professional or Server, or Windows 2003 Server.
• Active Directory Support features (automatically available on a Windows 2000 or 2003 Server Domain Controller). If you are installing on a machine that is not a Domain Controller, you must install the Active Directory Administration Tools (ADMINPAK.MSI).
• TCP/IP (required for Active Directory Services Interface).
• Microsoft Internet Explorer version 5.5 or higher.
• Microsoft Outlook (2000 recommended) with Collaboration Data Objects.
• NOTE: Collaboration Data Objects components are not selected by default in a Typical installation of Microsoft Office, therefore you MUST run a Custom installation of Microsoft Office and manually select CDO.
• NOTE: Microsoft Outlook is used for installing E-forms and address templates.
The Faxination MS Exchange Connector installation process will create a gateway within your Microsoft Exchange organization. One of the following versions of Microsoft Exchange server must therefore be running on the network:
• MS Exchange 2003,
• MS Exchange 2000,
• MS Exchange version 5.5,
Fenestrae software also needs the following components on the local machine. These components will be installed automatically during the Faxination for MS Exchange installation procedure (if they have not been previously installed).
• Active Directory Service Interface (ADSI) version 2.5.
• Microsoft Data Access Components (MDAC); including Active Data Objects (ADO) version 2.5.
• Visual Basic (VBScript) version 5.1.
• XML Parser version 3.0 or later.
NOTE Faxination Server and FCS install the Brooktrout and Dialogic board software during the installation.
Host connectors, and device connectors, can be installed on separate systems, that is, systems that do not have the Faxination kernel installed.
If you are installing host, or device, connectors on a separate (remote) system, see: ‘Fenestrae ‘Location Independent’ Connectors’ in the ‘Administrator’s Guide’ prior to running the Faxination for MS Exchange/FCS setup program.
Fax Operation
Voicemail Pro Installation and Maintenance Page 232 IP Office 3.1 Issue 14f (28th September 2005)
Fax Devices Fax devices currently supported by Faxination for MS Exchange/FCS include:
• Brooktrout including Analog, Basic Rate Interface (BRI) and Primary Rate Interface (PRI), E1 (30 lines) and T1 (24 lines)
• Brooktrout TRxStream, which has been updated using the Brooktrout SDK 3.1.0, and ships with the new Brooktrout System Software to support the latest boards (TR1000, TR1034 and TruFax) on Windows 2003 platforms.
• Intel Dialogic GammaLink including Analog, Basic Rate Interface (BRI) and Primary RateInterface (PRI),
• CAPI 2.0 fax devices (for example, EICON Diva server BRI, AVM),
• Ascom Digital Fax Router,
• Fax modems (Class 1, 2 and 2.0),
• Least Cost Routing (LCR) devices, such as: FaxSav and Graphnet.
An account named ‘Faxination’ is required. You must log-on with this account before:
• Installing Faxination Server for MS Exchange/FCS
• Adding or removing Faxination/FCS components.
• Running the Faxination Gateway Wizard.
NOTE: This account will run the Faxination services, and a MAPI profile will be created on its profile in order to communicate with the Faxination Exchange gateway. The Faxination for MS Exchange/FCS installation process updates the registry of the Microsoft Windows machine on which it is being installed. The Faxination account must therefore have ‘Local Administrator’ permissions.
Exchange Connector Installation The Exchange connector needs to be installed on the Exchange server machine. The fax server Kernel can be on another PC but they communicate using “Contracts”. If installing on separate machines, it is recommended that the fax server kernel is installed prior to starting the Exchange Connector installation.
During the Connector installation select the “Tools” applications as well as the Connector. This will allow you to troubleshoot any issues.

Fax Operation
Voicemail Pro Installation and Maintenance Page 233 IP Office 3.1 Issue 14f (28th September 2005)
Faxination Server Installation This section describes how to install the Faxination server and the MS Exchange Connector on the same PC. If you are installing on separate machines, the process is very similar.
1. Extend the schema:
2. Run setup.exe
3. On the Welcome screen click Next >.
4. On the Software Licence Agreement screen click Yes.
5. On the Setup Mode screen click on the required install option..
6. Click Custom.

Fax Operation
Voicemail Pro Installation and Maintenance Page 234 IP Office 3.1 Issue 14f (28th September 2005)
7. Choose Tools and Kernel Components and click Next>.
8. If the Exchange connector is going on another machine don't select any connectors. If it is then select
“Microsoft Exchange Connector”. Click Next>.
9. Choose your fax device. For our test systems we used a Brooktrout fax card. Click Next>.
10. Choose the install location and click Next>.

Fax Operation
Voicemail Pro Installation and Maintenance Page 235 IP Office 3.1 Issue 14f (28th September 2005)
11. Choose where to store fax logs and click Next>.
12. Select the line type and click Next.
13. Enter service routing ID information and click Next. Note: the Address field should read
“/o=AvayaEx/ou=First Administrative Group/cn=Recipients/cn=Administrator”.
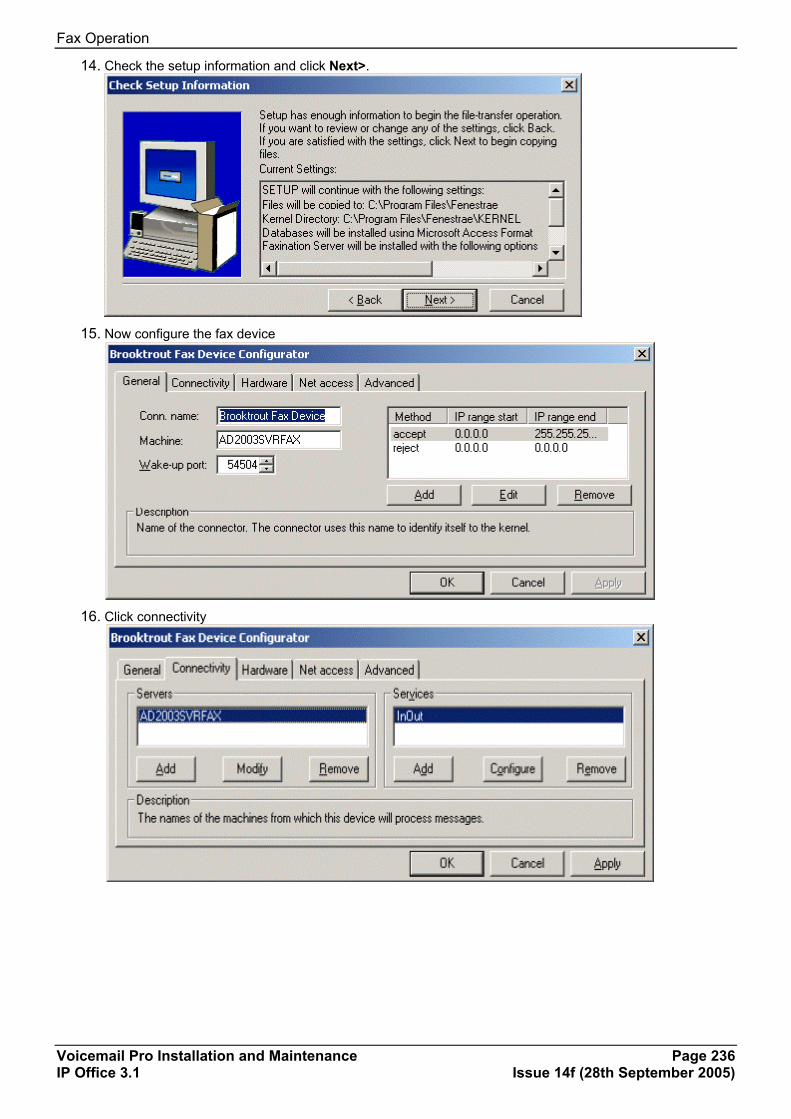
Fax Operation
Voicemail Pro Installation and Maintenance Page 236 IP Office 3.1 Issue 14f (28th September 2005)
14. Check the setup information and click Next>.
15. Now configure the fax device
16. Click connectivity

Fax Operation
Voicemail Pro Installation and Maintenance Page 237 IP Office 3.1 Issue 14f (28th September 2005)
17. Click Configure and check the General tab, then go to the Inbound tab.
18. Tick the Enable DTMF option and enter the number of digits and the timeout. Then Click OK.
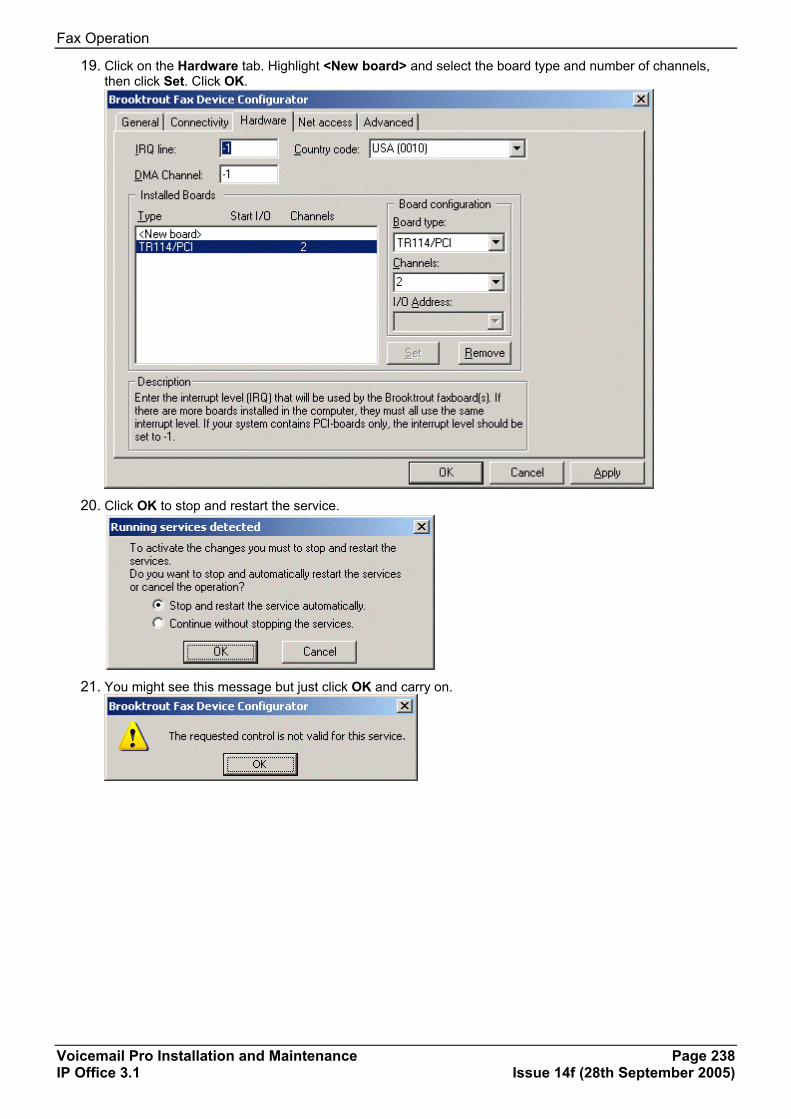
Fax Operation
Voicemail Pro Installation and Maintenance Page 238 IP Office 3.1 Issue 14f (28th September 2005)
19. Click on the Hardware tab. Highlight <New board> and select the board type and number of channels, then click Set. Click OK.
20. Click OK to stop and restart the service.
21. You might see this message but just click OK and carry on.

Fax Operation
Voicemail Pro Installation and Maintenance Page 239 IP Office 3.1 Issue 14f (28th September 2005)
22. Click Finish.
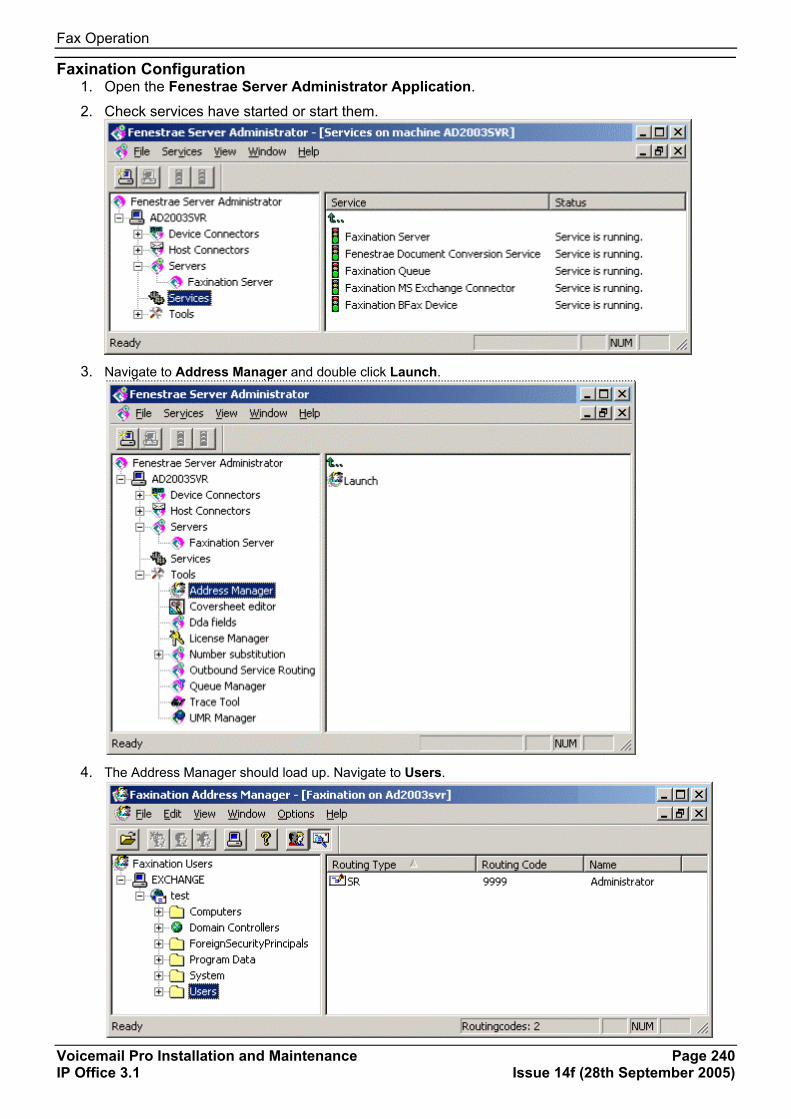
Fax Operation
Voicemail Pro Installation and Maintenance Page 240 IP Office 3.1 Issue 14f (28th September 2005)
Faxination Configuration 1. Open the Fenestrae Server Administrator Application.
2. Check services have started or start them.
3. Navigate to Address Manager and double click Launch.
4. The Address Manager should load up. Navigate to Users.

Fax Operation
Voicemail Pro Installation and Maintenance Page 241 IP Office 3.1 Issue 14f (28th September 2005)
5. Open the properties of a user. Configure any desired permissions.
6. From the Routing tab, select <New route>. Select DIR as the routing type. Enter the extension (i.e. the
DTMF you want to route by) into the “Code field. Click Set and then OK.
7. Send a fax to an IP Office extension (in this example we are using Extension 202).
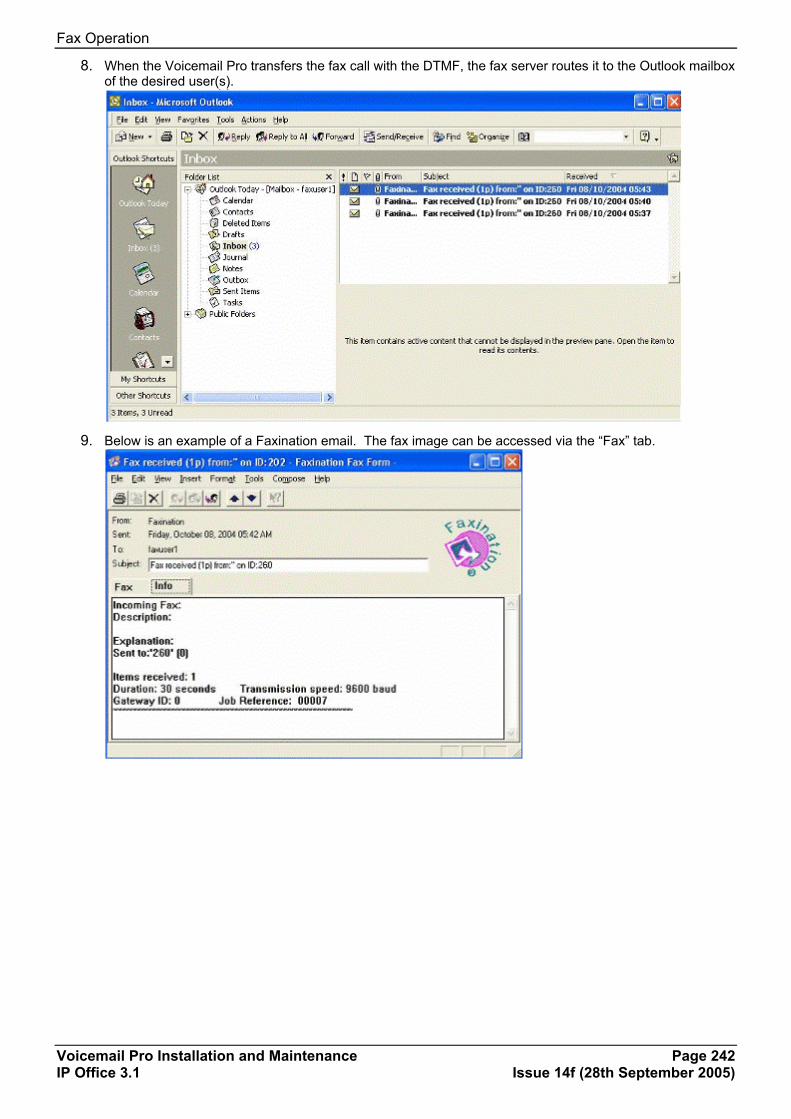
Fax Operation
Voicemail Pro Installation and Maintenance Page 242 IP Office 3.1 Issue 14f (28th September 2005)
8. When the Voicemail Pro transfers the fax call with the DTMF, the fax server routes it to the Outlook mailbox of the desired user(s).
9. Below is an example of a Faxination email. The fax image can be accessed via the “Fax” tab.

Fax Operation
Voicemail Pro Installation and Maintenance Page 243 IP Office 3.1 Issue 14f (28th September 2005)
Zetafax Zetafax System Requirements The Zetafax Server runs on these operating systems with the following requirements:
• Microsoft Windows Server 2003: • 550MHz Pentium-compatible CPU or faster
• 256MB RAM
• fax modem, active ISDN controller or intelligent fax board.
• Microsoft Windows XP Professional: • 300MHz Pentium-compatible CPU or faster
• 128MB RAM
• fax modem or intelligent fax board.
• Microsoft Windows 2000: • 300MHz Pentium-compatible CPU or faster
• 128MB RAM
• fax modem, active ISDN controller or intelligent fax board.
• Microsoft Small Business Server 2000: • Pentium-compatible CPU or faster
• 256MB RAM
• fax modem, active ISDN controller or intelligent fax board.
• Microsoft Windows NT 4.0: • Pentium-compatible CPU or faster
• 64MB RAM
• fax modem, active ISDN controller or intelligent fax board.
To support over 10 users, a server operating system is required e.g. Windows Server 2003.
To support over 25 users, multiple fax lines or when using the Email Gateway, we recommend you use a dedicated fax server.

Fax Operation
Voicemail Pro Installation and Maintenance Page 244 IP Office 3.1 Issue 14f (28th September 2005)
Email Gateway Option The Email Gateway requires one of these configurations:
• Microsoft Exchange 2000/2003 connector
• Microsoft Exchange 5.5 connector
• Lotus Domino R4.5 to R6.5 gateway
• SMTP Server.
Microsoft Outlook Zetafax supports these versions of Microsoft Outlook:
• Microsoft Outlook 2003
• Microsoft Outlook 2002
• Microsoft Outlook 2000
• Microsoft Outlook 98 (forms are not supported).
Fax Zetafax supports these fax types:
• Group III fax
• Standard mode (200x100 dpi), Fine mode (200x200 dpi)
• Brooktrout intelligent fax boards
• Intel Dialogic intelligent fax boards
• Class 1, Class 2, Class 2.0 and Class 2.1 fax modems
• Active CAPI 2.0 ISDN controllers (supporting T.30 protocol)
Fax Operation
Voicemail Pro Installation and Maintenance Page 245 IP Office 3.1 Issue 14f (28th September 2005)
Exchange Connector Installation • The Zetafax Exchange Connector needs should be installed on the Exchange server PC.
o Log on to Windows using an account with administrator privileges and member of the Schema Admin group.
o Run the Zetafax for Exchange 2000/2003 set-up program.
o Follow the instructions on screen to install the Zetafax on the Microsoft Exchange 2000/2003 server PC. Click the Next button to begin installation.
o If you need to remove the connector at a later date, it is important that you do so by using the Add/Remove programs control panel. Do not attempt to uninstall the manually.
o All the necessary programs to ensure correct operation of the email gateway including the Zetafax for this routing group, the extensions for the Microsoft Exchange System Manager program, and the client addressing templates, will be installed on this server.
• The Zetafax Exchange Connector service requires the following logon permissions:
o Domain Admin
o Schema Admin
o Enterprise Admin
Zetafax Server Installation • Ensure fax card is installed prior to installing the Zetafax server software.
• Run the Zetafax server installation. Ensure that you are logged on to the PC with sufficient permissions.
• The Zetafax server service requires a user account to logon with the following permissions:
o Domain Admin
o Schema Admin
o Enterprise Admin

Fax Operation
Voicemail Pro Installation and Maintenance Page 246 IP Office 3.1 Issue 14f (28th September 2005)
Configuring the Email Gateway 1. Open the Zetafax configuration tool. Open “Email Gateway” from the Server Settings section.
2. Ensure Email Gateway is set to “Enabled”. Click on “Add Email…” button.

Fax Operation
Voicemail Pro Installation and Maintenance Page 247 IP Office 3.1 Issue 14f (28th September 2005)
3. Add Microsoft Exchange and click OK.
4. Click “Configure” from the email gateway screen. Leave “Polling interval” set to 1 second. Highlight the
email system and click “Setup”.
5. Ensure “Driver enabled” is ticked.
6. Specify the path to the Exchange connector. The test system exchange connector was installed to C:\Program Files\Exchsrvr\CONNECT\ZETAFAX. I shared the folder and referenced the path as \\<server>\zetafax to make things simple.
7. Leave the “Connector Address type name” as “FAX”.
8. Click the “test connection” button to ensure the set-up is successful.

Fax Operation
Voicemail Pro Installation and Maintenance Page 248 IP Office 3.1 Issue 14f (28th September 2005)
Email Gateway Users
1. Right-click Email gateway users and select Refresh.
2. Click OK to allow the system to build a list of users.
3. Select the Exchange server version and click Export. This will populate the Zetafax tool with a list of
users.

Fax Operation
Voicemail Pro Installation and Maintenance Page 249 IP Office 3.1 Issue 14f (28th September 2005)
Email User Profiles 1. Right-click and add a new email user profile.
2. Fill in details.
3. Click the Routing button.

Fax Operation
Voicemail Pro Installation and Maintenance Page 250 IP Office 3.1 Issue 14f (28th September 2005)
4. Select Sub-address. I entered the number of the extension the incoming faxes are transferred from (260) and clicked add.
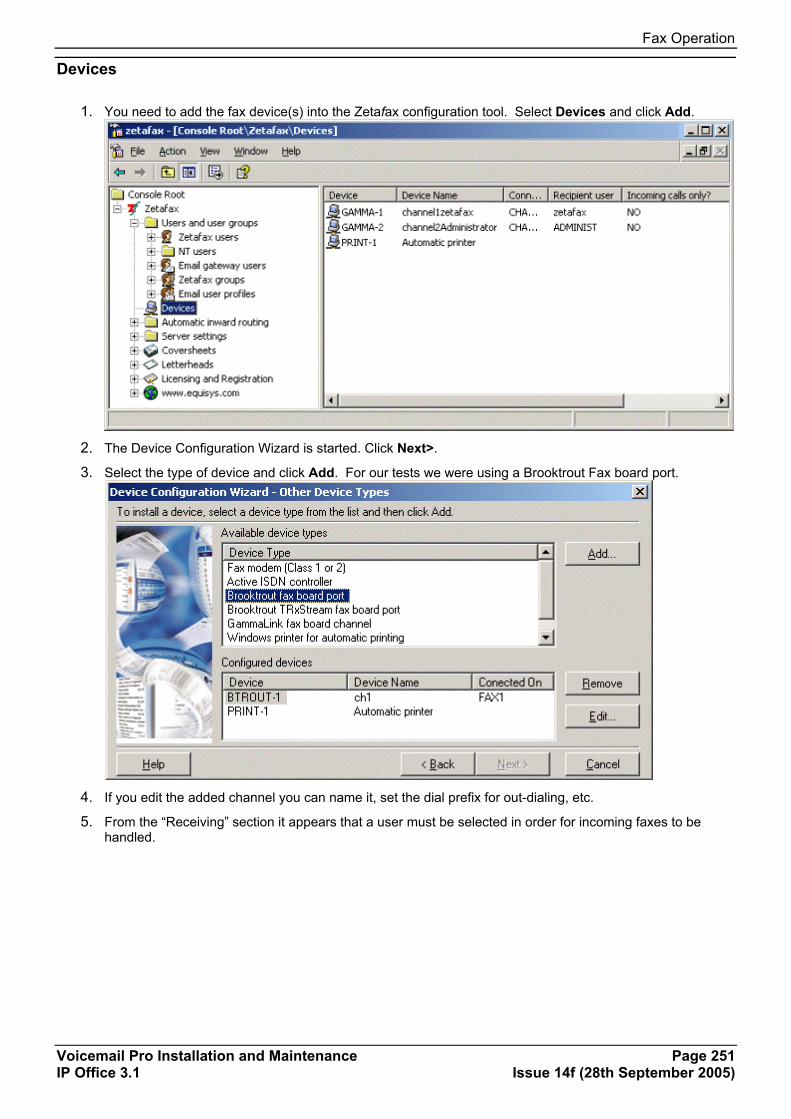
Fax Operation
Voicemail Pro Installation and Maintenance Page 251 IP Office 3.1 Issue 14f (28th September 2005)
Devices
1. You need to add the fax device(s) into the Zetafax configuration tool. Select Devices and click Add.
2. The Device Configuration Wizard is started. Click Next>.
3. Select the type of device and click Add. For our tests we were using a Brooktrout Fax board port.
4. If you edit the added channel you can name it, set the dial prefix for out-dialing, etc.
5. From the “Receiving” section it appears that a user must be selected in order for incoming faxes to be handled.
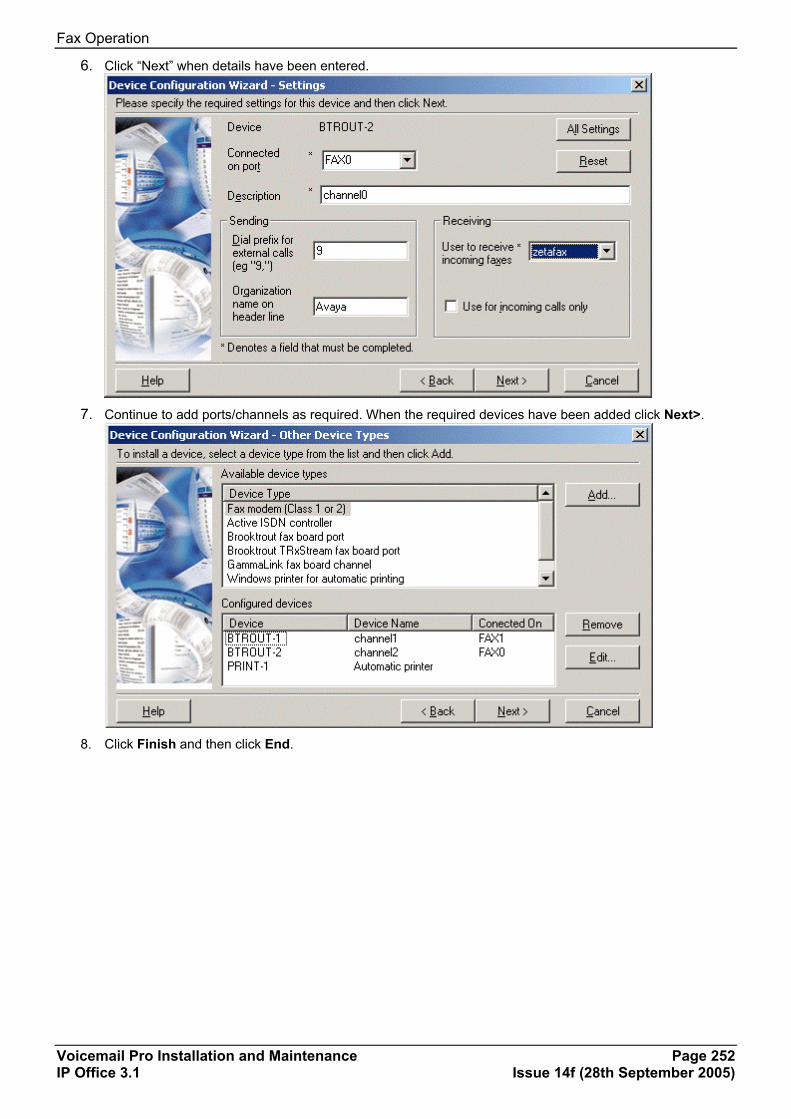
Fax Operation
Voicemail Pro Installation and Maintenance Page 252 IP Office 3.1 Issue 14f (28th September 2005)
6. Click “Next” when details have been entered.
7. Continue to add ports/channels as required. When the required devices have been added click Next>.
8. Click Finish and then click End.

Fax Operation
Voicemail Pro Installation and Maintenance Page 253 IP Office 3.1 Issue 14f (28th September 2005)
Automatic Inward Routing 1. Right-click Sub-addresses under Automatic inward routing and select option to Add.
2. Enter the Sub-address. This number is the same as the DTMF sent through by the Voicemail Pro server.
Select a user to route the fax to.
3. Alternatively Routing configuration can be done through “Active Directory Users and Computers”.
4. During the Zetafax Exchange Connector component installation the user is asked permission it update the Active Directory schema. If this update has been made, a Zetafax tab is visible through the properties of a domain user.
5. From the “Receiving to e-mail” section, select the “Allowed to receive faxes using direct dial (DID) number” field.

Fax Operation
Voicemail Pro Installation and Maintenance Page 254 IP Office 3.1 Issue 14f (28th September 2005)
6. Enter the extension number to route by (202 in the example) and apply the changes.

Fax Operation
Voicemail Pro Installation and Maintenance Page 255 IP Office 3.1 Issue 14f (28th September 2005)
RightFax RightFax Requirements RightFax server can be installed and run only on computers running the following operating systems:
• Microsoft Windows Server 2003 Standard Edition
• Microsoft Windows Server 2003 Enterprise Edition
• Microsoft Windows 2000 Advanced Server
• Microsoft Windows 2000 Server
The minimum hardware requirements for the fax server vary depending on the operating system you are running.
Minimum hardware requirements for Microsoft Windows Server 2003 Standard Edition • Computer/Processor 133 MHz or higher Pentium-compatible CPU (550 MHz recommended)
• Memory 128 MB RAM (256 MB recommended)
• Hard drive 1.5 GB
• CPU support Up to four CPUs on one computer
• Drive CD-ROM or DVD drive
• Display VGA or high resolution monitor running at a resolution of 800 x 600 or higher
Minimum hardware requirements for Microsoft Windows Server 2003 Enterprise Edition • Computer/Processor 133 MHz or higher
• Memory 128 MB RAM (256 MB recommended). 32 GB RAM maximum.
• Hard drive 1.5 GB or higher.
• CPU support Up to eight CPUs on one computer
• Drive CD-ROM or DVD drive
• Display VGA or high resolution monitor running at a resolution of 800 x 600 or higher
Minimum hardware requirements for Microsoft Windows 2000 Advanced Server • Computer/Processor 133 MHz or higher Pentium-compatible CPU
• Memory 128 MB RAM (256 MB recommended)
• Hard drive 2 GB with 1 GB free space
• CPU support Up to eight CPUs on one computer
• Drive CD-ROM or DVD drive
• Display VGA or high resolution monitor running at a resolution of 800 x 600 or higher
Minimum hardware requirements for Microsoft Windows 2000 Server • Computer/Processor 133 MHz or higher Pentium-compatible CPU
• Memory 128 MB RAM (256 MB recommended)
• Hard drive 2 GB with 1 GB free space
• CPU support Up to four CPUs on one computer
• Drive CD-ROM or DVD drive
• Display VGA or high resolution monitor running at a resolution of 800 x 600 or higher

Fax Operation
Voicemail Pro Installation and Maintenance Page 256 IP Office 3.1 Issue 14f (28th September 2005)
RightFax Installation & Config 1. Run the installation from the RightFax sever software CD. At the Welcome screen click Next. 2. Accept the license agreement and click Next. 3. Enter your customer information. The serial number is provided by Captaris after installation. To
progress the install, we entered “1111111111” as the serial number.
4. Select Custom and click Next.

Fax Operation
Voicemail Pro Installation and Maintenance Page 257 IP Office 3.1 Issue 14f (28th September 2005)
5. Select the features to be installed.
• If the Exchange server is on a separate machine, you would install the Exchange
Connector (Gateway) after the server software. I installed the RightFax software on the same machine as the Exchange server, therefore in this example the Exchange Connector (Gateway) was selected.
6. Specify an SMTP host and then click Next.
Or
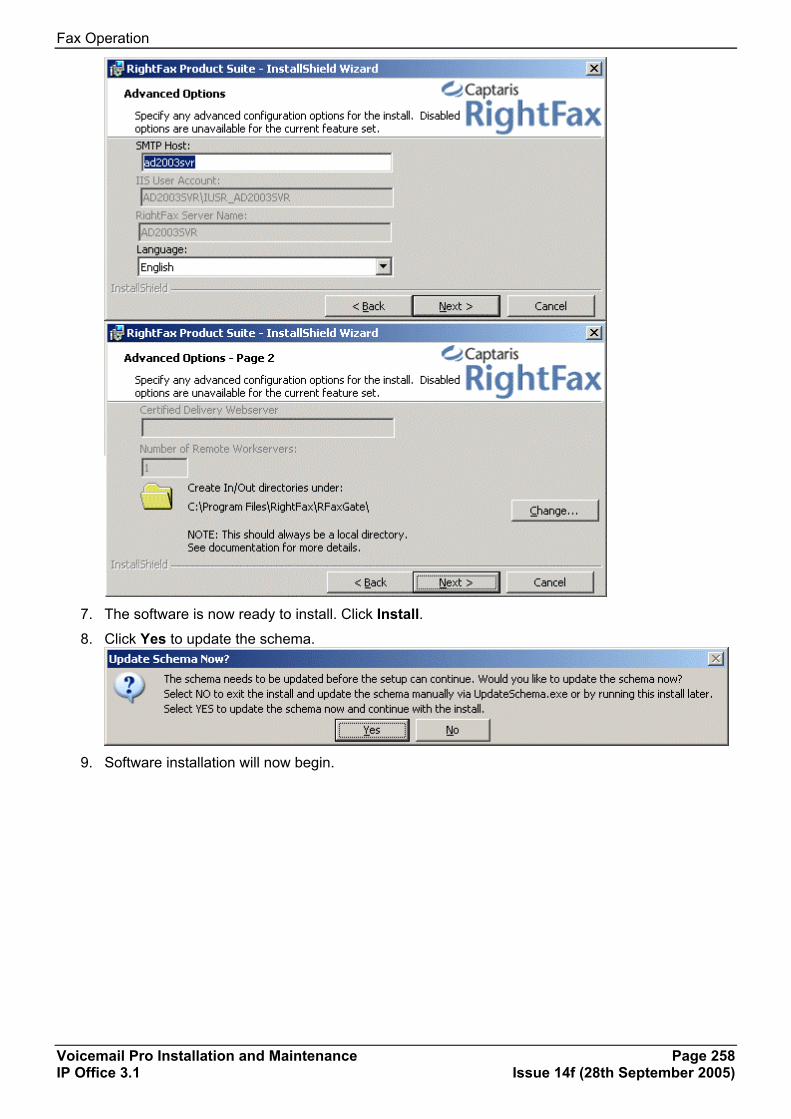
Fax Operation
Voicemail Pro Installation and Maintenance Page 258 IP Office 3.1 Issue 14f (28th September 2005)
7. The software is now ready to install. Click Install. 8. Click Yes to update the schema.
9. Software installation will now begin.

Fax Operation
Voicemail Pro Installation and Maintenance Page 259 IP Office 3.1 Issue 14f (28th September 2005)
10. Select account for the service.
11. Click Add Gateway.
12. Select Microsoft Exchange.
13. The location of mail files refers to the RFGATE shared folder on the PC with the exchange
gateway connector installed. You can redefine this after install so can leave default initially.
14. Fax board installation should now start. See Fax Board Installation.

Fax Operation
Voicemail Pro Installation and Maintenance Page 260 IP Office 3.1 Issue 14f (28th September 2005)
Fax Board Installation 1. Following RightFax software installation, the fax board installation process is started. Click Next. 2. Accept the license agreement and click Next. 3. Choose the fax board type and click Next. For our tests we used a Brooktrout analog PCI board.
4. Click Install to start the installation of the necessary software for the fax board..
5. Click Add Brooktrout Board.
6. Choose the board.
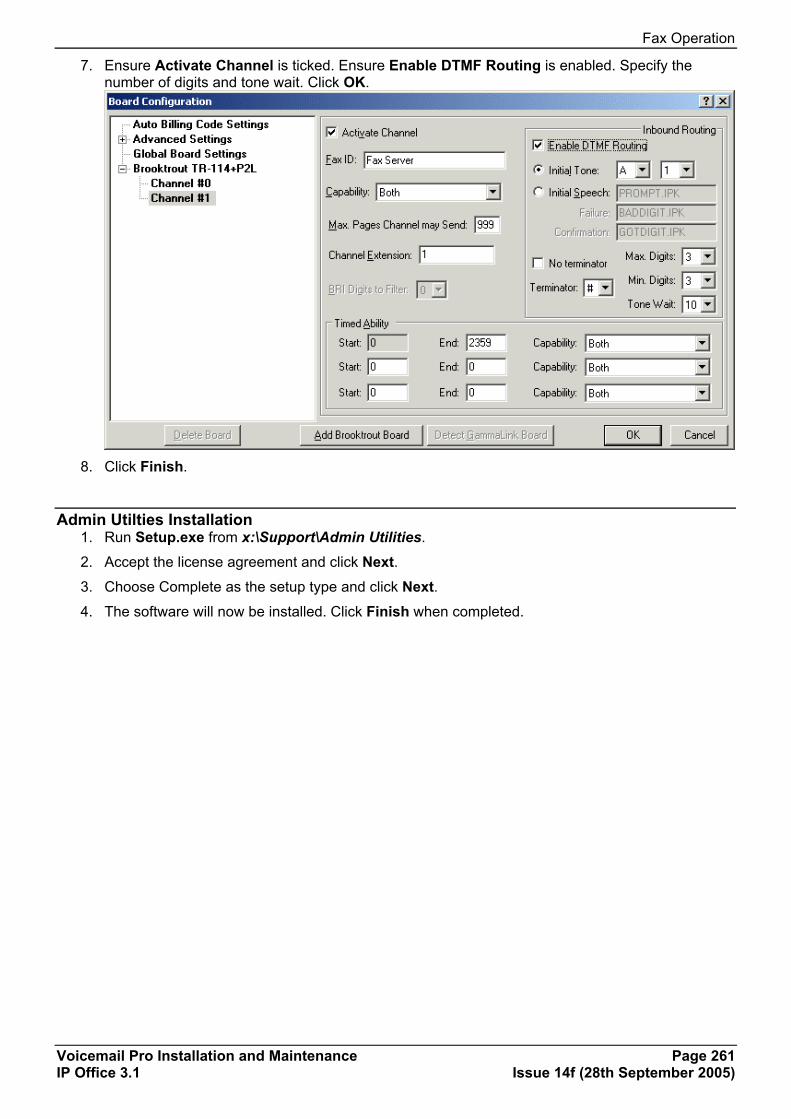
Fax Operation
Voicemail Pro Installation and Maintenance Page 261 IP Office 3.1 Issue 14f (28th September 2005)
7. Ensure Activate Channel is ticked. Ensure Enable DTMF Routing is enabled. Specify the number of digits and tone wait. Click OK.
8. Click Finish.
Admin Utilties Installation 1. Run Setup.exe from x:\Support\Admin Utilities.
2. Accept the license agreement and click Next. 3. Choose Complete as the setup type and click Next. 4. The software will now be installed. Click Finish when completed.

Fax Operation
Voicemail Pro Installation and Maintenance Page 262 IP Office 3.1 Issue 14f (28th September 2005)
Server Configuration 1. Open the RightFax Enterprise Fax Manager.
2. Right click Users and select Add new user(s). 3. Enter a user ID. Keep it the same as the domain users you will associate it to.
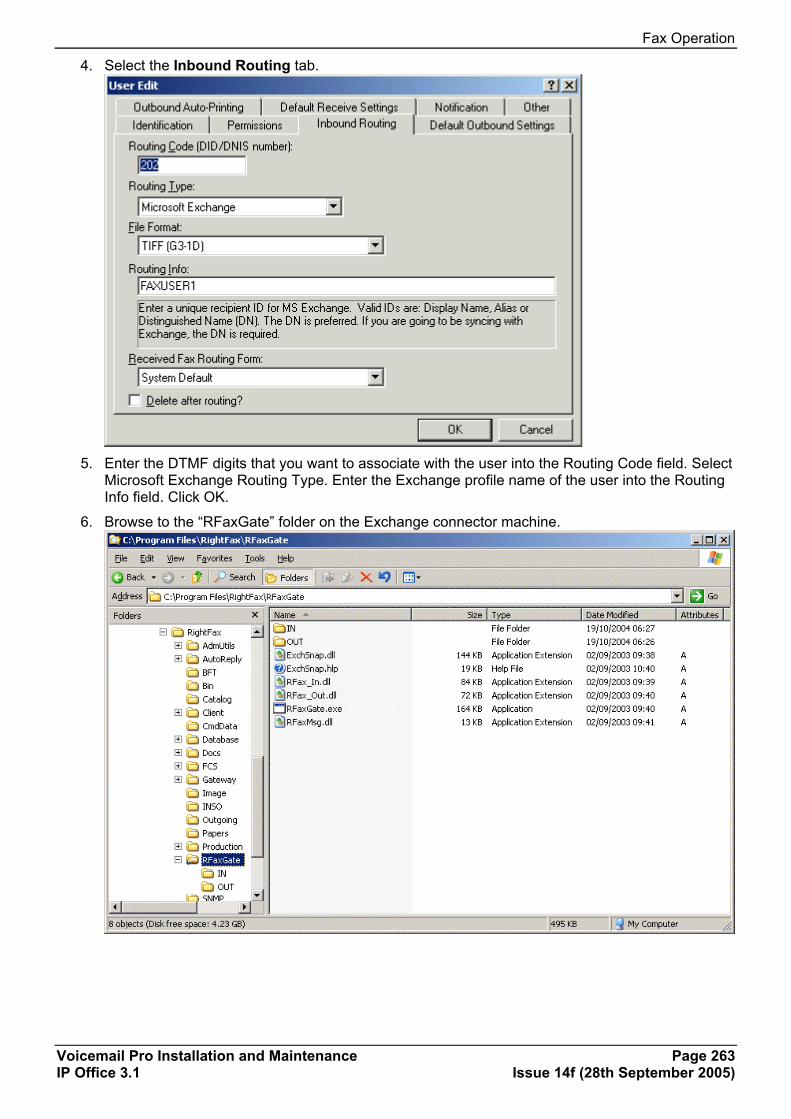
Fax Operation
Voicemail Pro Installation and Maintenance Page 263 IP Office 3.1 Issue 14f (28th September 2005)
4. Select the Inbound Routing tab.
5. Enter the DTMF digits that you want to associate with the user into the Routing Code field. Select
Microsoft Exchange Routing Type. Enter the Exchange profile name of the user into the Routing Info field. Click OK.
6. Browse to the “RFaxGate” folder on the Exchange connector machine.

Fax Operation
Voicemail Pro Installation and Maintenance Page 264 IP Office 3.1 Issue 14f (28th September 2005)
7. Share the directory as ‘RFAXGATE’ and go to the permissions and explicitly add the user account for the gateway, giving it full control.
8. Go to the security tab and add the account.

Fax Operation
Voicemail Pro Installation and Maintenance Page 265 IP Office 3.1 Issue 14f (28th September 2005)
9. Click Advanced and put a checkmark in the “Replace permission entries…”.


Voicemail Pro Installation and Maintenance Page 267 IP Office 3.1 Issue 14f (28th September 2005)
IVR Database Connection IVR: Connecting Voicemail Pro to a Database Voicemail Pro call flows can interact, read and write data, with almost any Windows database that supports ODBC (Open Database Connectivity) and SQL (Structured Query Language) format.
• Requirements for Voicemail Pro Database Operation To use the Database actions within Voicemail Pro, a VM Pro Database Interface must be added to the IP Office configuration.
The Database Actions that can be used in a call flow are:
• Database Open Opens the required database, including any necessary permissions and security options.
• Database Execute Defines a SQL query to either read matching records from the database or to write data to the database. Up to 6 fields can be defined to be returned in matching database records.
• Database Get Data Selects the current record from the matches returned by the preceding Database Execute action. The record fields are then placed into Voicemail pro variables DBD[0] to DBD[5]. The Database Get Data allows selection of the first, next, previous or last record.
• Database Close Closes the database connection. This also occurs automatically if the caller disconnects.

IVR Database Connection
Voicemail Pro Installation and Maintenance Page 268 IP Office 3.1 Issue 14f (28th September 2005)
Example Example Database Scenario In this call flow example an auto-attendant has been created to allow callers to order books. The book details are held within a Microsoft Access database, other databases can be used. Callers will be able to enter either the ISBN or Author's name. The title and cost of the item will be looked up allowing the caller to purchase the item if they wish to. If the caller purchases the book they will be able to enter their credit card details and a contact number.
Example of the database used in the call flow.
Note: A copy of this database, the Voicemail Pro database and the wav files used can be found in Voicemail Pro Samples within the help pages.

IVR Database Connection
Voicemail Pro Installation and Maintenance Page 269 IP Office 3.1 Issue 14f (28th September 2005)
1. Retrieving Data from the Database The Bookshop_Welcome module allows callers to choose to search the database by either the books ISBN number or the author's name. The screen below shows the call flow module used when a search by ISBN is selected. The database actions that have been used are shown below the call flow diagram, with details on the following pages.
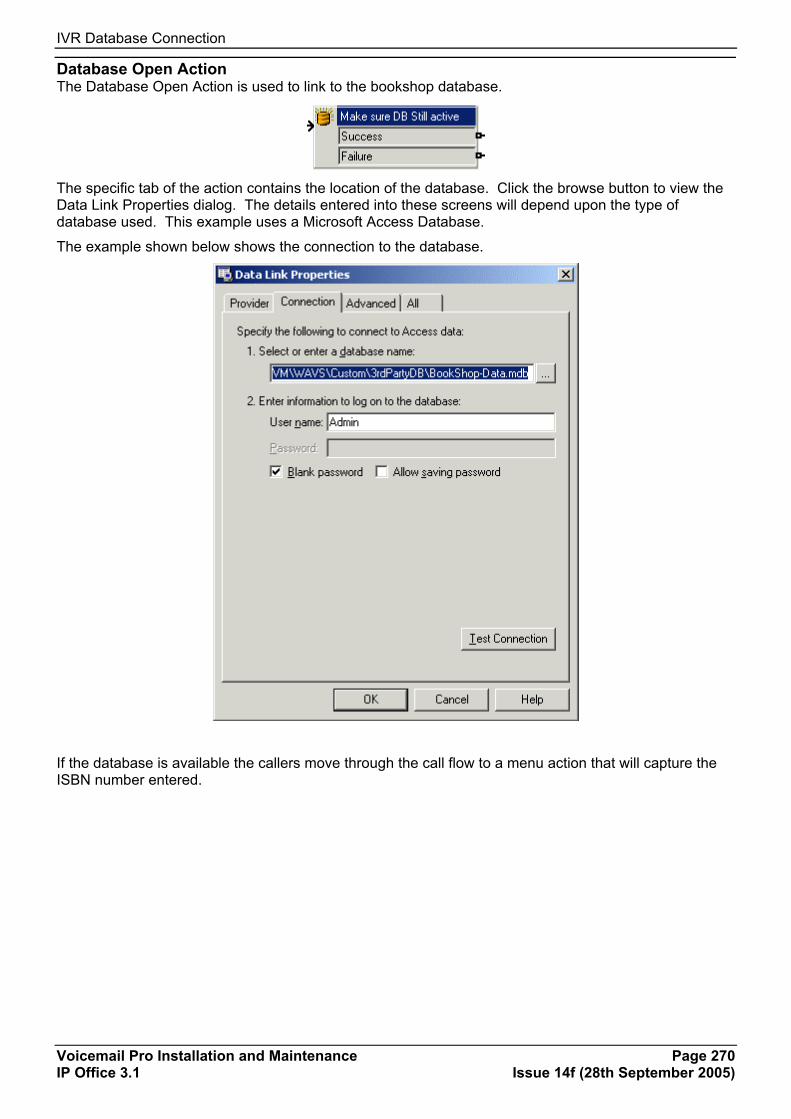
IVR Database Connection
Voicemail Pro Installation and Maintenance Page 270 IP Office 3.1 Issue 14f (28th September 2005)
Database Open Action The Database Open Action is used to link to the bookshop database.
The specific tab of the action contains the location of the database. Click the browse button to view the Data Link Properties dialog. The details entered into these screens will depend upon the type of database used. This example uses a Microsoft Access Database.
The example shown below shows the connection to the database.
If the database is available the callers move through the call flow to a menu action that will capture the ISBN number entered.

IVR Database Connection
Voicemail Pro Installation and Maintenance Page 271 IP Office 3.1 Issue 14f (28th September 2005)
Database Execute Action The Database Execute Action contains a query against the open database, in this example it concerns the ISBN captured in the previous menu action.
If the sequence of numbers entered by the caller matches an ISBN entry in the database, then the Author's name, cost, ISBN and book title details are captured. This query is entered into the Database Execute Action via the specific tab.
When entering information into the specific tab for the first time you will taken through a series of steps.
1. Select the Database Open Icon required. In this example the 'Make sure Database still active' icon was selected.
2. At the SQL Function window the option to 'Select …From' was chosen as information from the database is required.
3. Details are then entered into the SQL Wizard, as shown below.
4. When the query has been entered the SQL wizard is closed. The specific tab of the action will
contain the entered query, see example shown below.

IVR Database Connection
Voicemail Pro Installation and Maintenance Page 272 IP Office 3.1 Issue 14f (28th September 2005)
Database Get Data Action The Database Get Data Action is used to return details of any matching entries following a search against a database.
To retrieve the results an option is selected on the specific tab to select how the data is retrieved from the database. In this example the option 'retrieve the next item in the list' was selected to allow the caller to step through the results, if more that one match ISBN occurred.
If a matching ISBN has been found the call flow is routed to another module called 'Bookshop_CurrentBookSpeakDetails'.
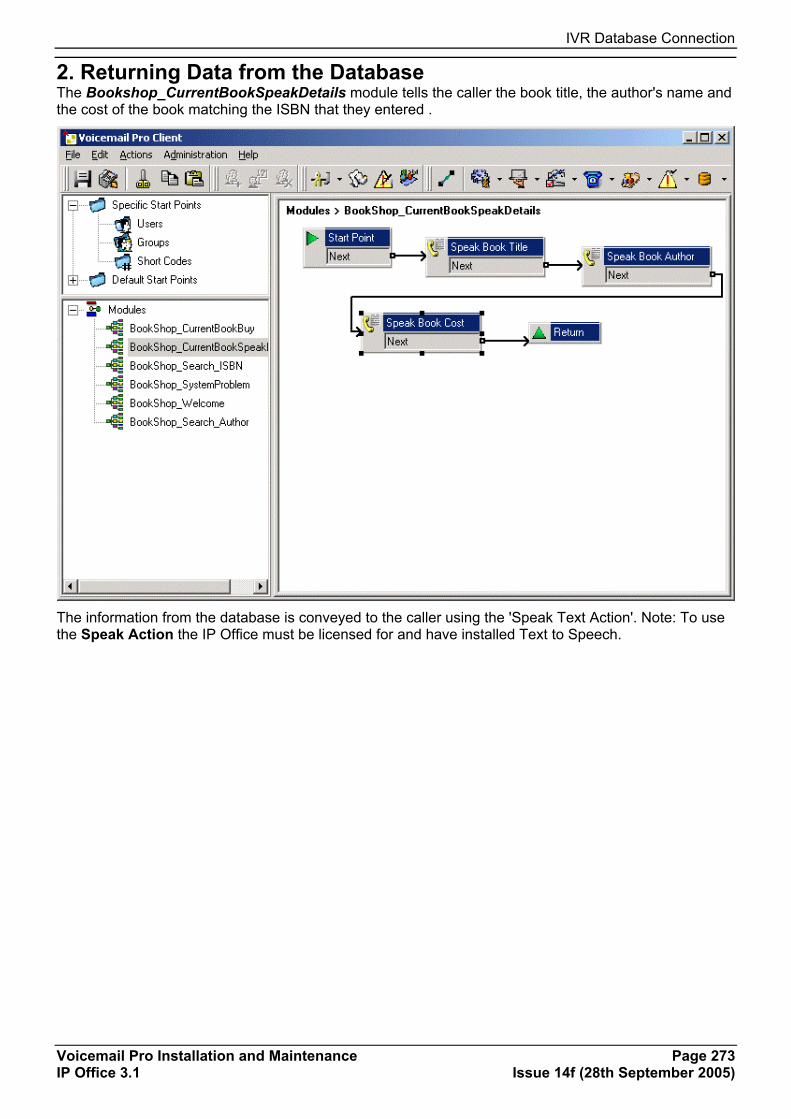
IVR Database Connection
Voicemail Pro Installation and Maintenance Page 273 IP Office 3.1 Issue 14f (28th September 2005)
2. Returning Data from the Database The Bookshop_CurrentBookSpeakDetails module tells the caller the book title, the author's name and the cost of the book matching the ISBN that they entered .
The information from the database is conveyed to the caller using the 'Speak Text Action'. Note: To use the Speak Action the IP Office must be licensed for and have installed Text to Speech.

IVR Database Connection
Voicemail Pro Installation and Maintenance Page 274 IP Office 3.1 Issue 14f (28th September 2005)
Speak Book Title The Speak Book Title action is used to tell the caller the book title associated with the ISBN that was entered.
The fields selected in the 'Request ISBN from DB' action contain the information retrieved from the bookshop database. The fields selected were Author, Cost, ISBN and Title.
Any fields selected in a query will appear in alphabetical order.
• $DBD[0] would return details from the field Author
• $DBD[1] would return details from the field Cost
• $DBD[2] would return details from the field ISBN
• $DBD[3] would return details from the field Title.
Each Speak Text action in the call flow returns the values from a different field selected within the database query. The 'Speak Book Cost' action has additional text added so that the currency can be spoken, in this example pounds are used. See below.
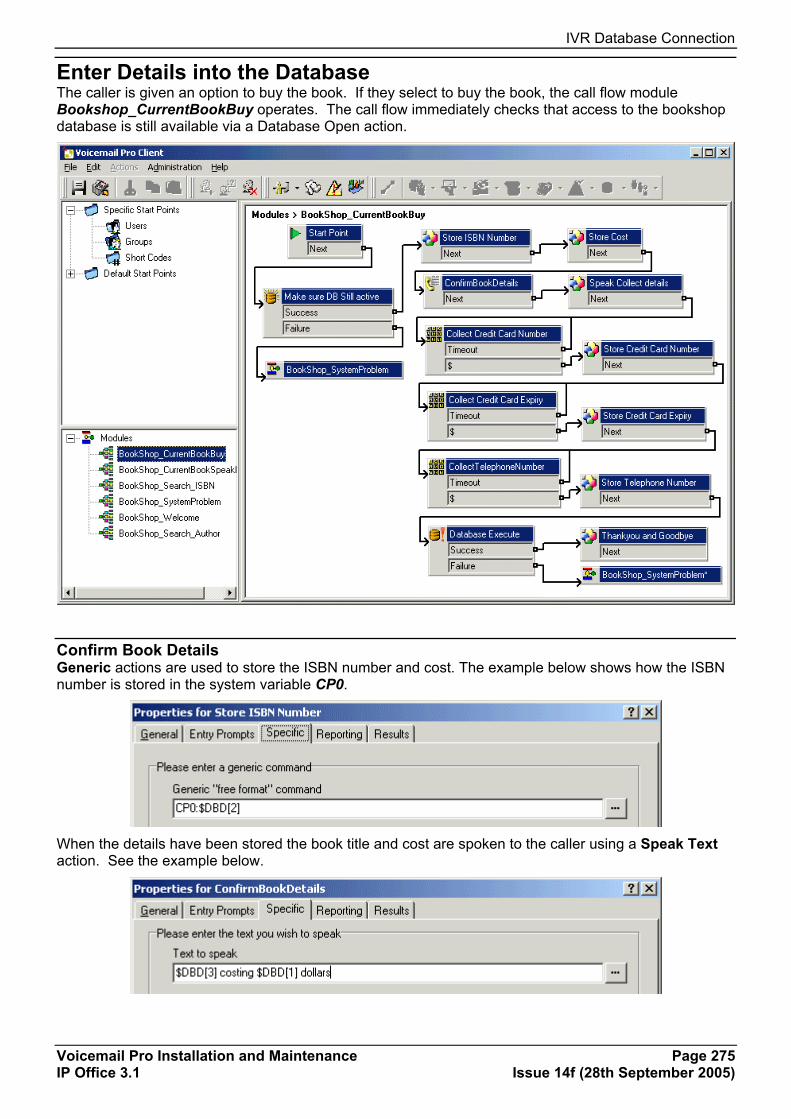
IVR Database Connection
Voicemail Pro Installation and Maintenance Page 275 IP Office 3.1 Issue 14f (28th September 2005)
Enter Details into the Database The caller is given an option to buy the book. If they select to buy the book, the call flow module Bookshop_CurrentBookBuy operates. The call flow immediately checks that access to the bookshop database is still available via a Database Open action.
Confirm Book Details Generic actions are used to store the ISBN number and cost. The example below shows how the ISBN number is stored in the system variable CP0.
When the details have been stored the book title and cost are spoken to the caller using a Speak Text action. See the example below.

IVR Database Connection
Voicemail Pro Installation and Maintenance Page 276 IP Office 3.1 Issue 14f (28th September 2005)
Collect Callers Details Details can be entered into a database by a caller. In this example we collect the callers credit card number, expiry date and telephone number. All these details are collected and then the database is updated.
The example below shows the Specific tab entry used to collected the callers telephone number and assign it to the system variable CP4.
When all the details have been collected, the database needs to be updated. The database Execute Action is used. When entering information into the specific tab for the first time you will taken through a series of steps.
1. Select the Database Execute icon.
2. At the SQL Function window the option to 'Insert …values' was chosen as information needs to be added to the database..
3. Details are then entered into the SQL Wizard, as shown below. When the Database table is selected, the list of fields contained within the table is inserted.
4. When the details have been entered the SQL wizard is closed. The specific tab of the action will
contain the command to execute, see example shown below.

Voicemail Pro Installation and Maintenance Page 277 IP Office 3.1 Issue 14f (28th September 2005)
Mailbox User Controls Mailbox User Controls The IP Office supports a number of methods for users to control their mailbox and messages once they have entered the mailbox.
• Standard IP Office Mailbox Mode This is the only mode for Voicemail Lite. The Voicemail Pro can also be set to run in this mode.
• Intuity Mailbox Mode This is the default mode for the Voicemail Pro. It provides an IP Office emulation of many of the Avaya Intuity features.
• Phone Manager The Phone Manager application allows a user to switch voicemail and voicemail ringback on/off. Phone Manager Pro also provides full visual access to the user's voicemail and allows messages to be played back and controlled through their PC. Refer to the Phone Manager Users Guide for details.
If a mailbox does not have a recorded name greeting, when that mailbox is accessed to collect messages, the caller is asked to record their name before proceeding to collect messages. The name greeting is used for functions such as Dial by Name actions and Intuity mode name lookup (**6).

Mailbox User Controls
Voicemail Pro Installation and Maintenance Page 278 IP Office 3.1 Issue 14f (28th September 2005)
Telephony Operation Mode All users should be made aware that messages are automatically deleted from the server after being played unless they set the message as saved (see Automatic Message Deletion).
All users can use the following default short codes:
• Access their mailbox from their own extension: *17
• Turn voicemail on: *18
• Turn voicemail off: *19
• Turn voicemail ringback on: *48
• Turn voicemail ringback off: *49
Once a user has entered their mailbox, the Voicemail Pro Server supports two sets of mailbox controls.
• IP Office This is the default mode used and matches the features of Voicemail Lite.
• Intuity This is IP Office Intuity emulation mode. Intuity is a mailbox interface used on a range of Avaya voicemail systems. In Intuity emulation mode, the Voicemail Pro support a range of Intuity features but not all Intuity features. For full details of those Intuity features supported by Voicemail Pro, refer to the "IP Office Intuity Mailbox Users Guide".
The prompts provided to a mailbox user are determined by the user's Locale setting as set through the Manager application. Note that on some phones the user can change their language setting themselves (refer to the appropriate User Guide). For languages supported see Language Support.
To select the mailbox operation mode: Note: If the Regional Setting of the server onto which Voicemail Pro is installed is "English (United States)", then Voicemail Pro defaults to Intuity mailbox operation.
1. Start Voicemail Pro and select the current voicemail configuration file.
2. Select Administration and then Preferences.
3. Select Default Telephony Operation and set this to either IP Office or Intuity as required.
4. Select OK.
5. From the File menu use Save & Make Live to save the configuration change.

Mailbox User Controls
Voicemail Pro Installation and Maintenance Page 279 IP Office 3.1 Issue 14f (28th September 2005)
Automatic Message Deletion - Housekeeping Messages are automatically deleted from the voicemail server after being played (including those played via the users IMS email client) after a set delay. This delay can be adjusted for different message types.
The process of housekeeping is performed after any two hour idle period, that is a period with no call into or from the voicemail server.
1. Click the preferences icon or
2. From the Administration menu, select Preferences and then choose General. 3. Select the Housekeeping tab.
4. Adjust the settings as required for the different message types.
5. Click OK.
6. Click Save and Make Live and select Yes.

Mailbox User Controls
Voicemail Pro Installation and Maintenance Page 280 IP Office 3.1 Issue 14f (28th September 2005)
Personal Distribution Lists Personal distribution lists (also known as mailing lists) are available to mailbox users when the system is in Intuity mode.
Each mailbox user can create up to 20 lists, each containing up to 360 mailbox numbers. List can then be used when forwarding or sending messages from within the mailbox.
Each list can be marked as private or public. Public lists can be used by other mailbox users when forwarding or send messages. A user can also import the contents of a public list into one of their own lists.
If Voicemail Pro Networked Messaging (VPNM) is installed, lists can include mailboxes on remote systems. The only difference in presentation is that, where the mailbox user name is used to identify local mailboxes in a list, remote mailboxes are listed by number only.
List are maintained either through the mailbox or through Phone Manager Pro version 3.0 or higher. Lists cannot be viewed or controlled from within the Voicemail Pro Client. For full details of list operation refer to the Intuity Mailbox User Guide.

Voicemail Pro Installation and Maintenance Page 281 IP Office 3.1 Issue 14f (28th September 2005)
TTY Support Voicemail Pro TTY Prompts TTY is a method of sending and receiving text messages within the speech path of telephone calls. The text is entered and displayed through a TTY device connected in parallel with the user's normal phone. Due to its widespread usage and support it has become the standard used by devices for the hearing impaired.
Voicemail Pro 1.4 supports the addition of TTY prompts for Intuity mode mailbox access, that is leaving and collecting messages from a mailbox. Caller's with a TTY device can see the TTY prompts and leave TTY format messages. The mailbox user, also with a TTY device, can collect and display those messages by following TTY prompts.
The TTY device and associated analog phone (linked either by a pass-through port on the TTY device or a telephone splitter) are connected to an analog extension port (POT) on the IP Office system. During calls the TTY can be used to display and send TTY. The analog phone can be used to send dialing digits and provide a speech path during calls.
Installing Voicemail Pro TTY Prompts The required TTY prompts are now selectable from the list of Speech Supported language options during the installation of Voicemail Pro.

TTY Support
Voicemail Pro Installation and Maintenance Page 282 IP Office 3.1 Issue 14f (28th September 2005)
User Configuration Changing the User Locale This is the simplest method as it requires no customization of the user's mailbox operation.
1. In IP Office Manager, click on to receive the system's current configuration.
2. Click on User to display the list of users.
3. Double-click on the user for whom you are setting up TTY mailbox operation.
4. On the User tab, enter TTY in the Locale field.
5. Click on OK.
6. Click on to send the configuration back to the system. If user locale was the only change made, then select a Merge Config.
The locale setting tty is not actually recognized by Manager. Therefore all aspects of the user's telephony operation on the IP Office will default to the system's locale setting (System | System | Locale). However, the user locale setting is transferred to the Voicemail Pro server during mailbox access and so will alter the prompts provided.
Mailbox Access In order to access their mailbox, the user should dial *17 and then take the analogue telephone handset off hook. Once connected, they will see TTY prompts on the TTY display.
TTY requests such as "Press 1 for …" should be handled by dialing from the keypad of the telephone. TTY messages followed by GA (go ahead) require text typed from the TTY device.
For further information, refer to the document "User Guide for Audix TTY Interface" (555-300-710).

TTY Support
Voicemail Pro Installation and Maintenance Page 283 IP Office 3.1 Issue 14f (28th September 2005)
Voicemail Pro Customization An alternative to setting the user locale as TTY is to change the users language setting within the Voicemail Pro call flows for that user.
Simple Mailbox Customization The Select System Prompt Language action can be used to change the prompt language used by subsequent actions in a call flow. Once the TTY Maintenance Patch has been installed, TTY is one of the selectable languages provided by the action.
In the simplest form, a Select System Prompt Language action set to TTY, would be added to the user's Collect start point and followed by a Get Mail action.
Similarly a Select System Prompt Language action set to TTY, would be added to the user's Leave start point and followed by a Leave Mail action.

TTY Support
Voicemail Pro Installation and Maintenance Page 284 IP Office 3.1 Issue 14f (28th September 2005)
Complex Mailbox Customization If required, more complex call flows can be configured. For example, the call flow below allows callers to press * to receive spoken language prompts or to wait a few seconds for the timeout and then receive TTY prompts.
In this case messages are left in the same mailbox, but callers can select to have spoken prompts or default to TTY prompts.
For hearing impaired users who cannot handle spoken messages, the call flow for callers who select spoken prompts could have place those messages into an alternate mailbox of a hearing user. These could then be collected and transcribed for the user.
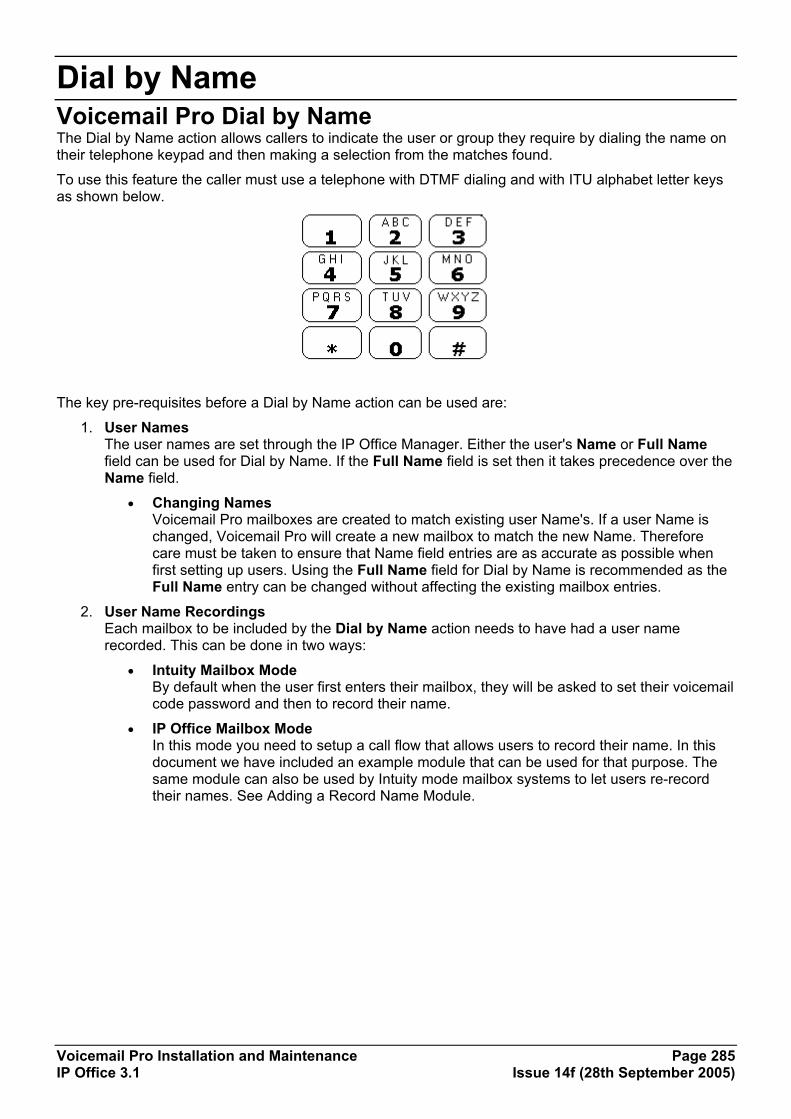
Voicemail Pro Installation and Maintenance Page 285 IP Office 3.1 Issue 14f (28th September 2005)
Dial by Name Voicemail Pro Dial by Name The Dial by Name action allows callers to indicate the user or group they require by dialing the name on their telephone keypad and then making a selection from the matches found.
To use this feature the caller must use a telephone with DTMF dialing and with ITU alphabet letter keys as shown below.
The key pre-requisites before a Dial by Name action can be used are:
1. User Names The user names are set through the IP Office Manager. Either the user's Name or Full Name field can be used for Dial by Name. If the Full Name field is set then it takes precedence over the Name field.
• Changing Names Voicemail Pro mailboxes are created to match existing user Name's. If a user Name is changed, Voicemail Pro will create a new mailbox to match the new Name. Therefore care must be taken to ensure that Name field entries are as accurate as possible when first setting up users. Using the Full Name field for Dial by Name is recommended as the Full Name entry can be changed without affecting the existing mailbox entries.
2. User Name Recordings Each mailbox to be included by the Dial by Name action needs to have had a user name recorded. This can be done in two ways:
• Intuity Mailbox Mode By default when the user first enters their mailbox, they will be asked to set their voicemail code password and then to record their name.
• IP Office Mailbox Mode In this mode you need to setup a call flow that allows users to record their name. In this document we have included an example module that can be used for that purpose. The same module can also be used by Intuity mode mailbox systems to let users re-record their names. See Adding a Record Name Module.
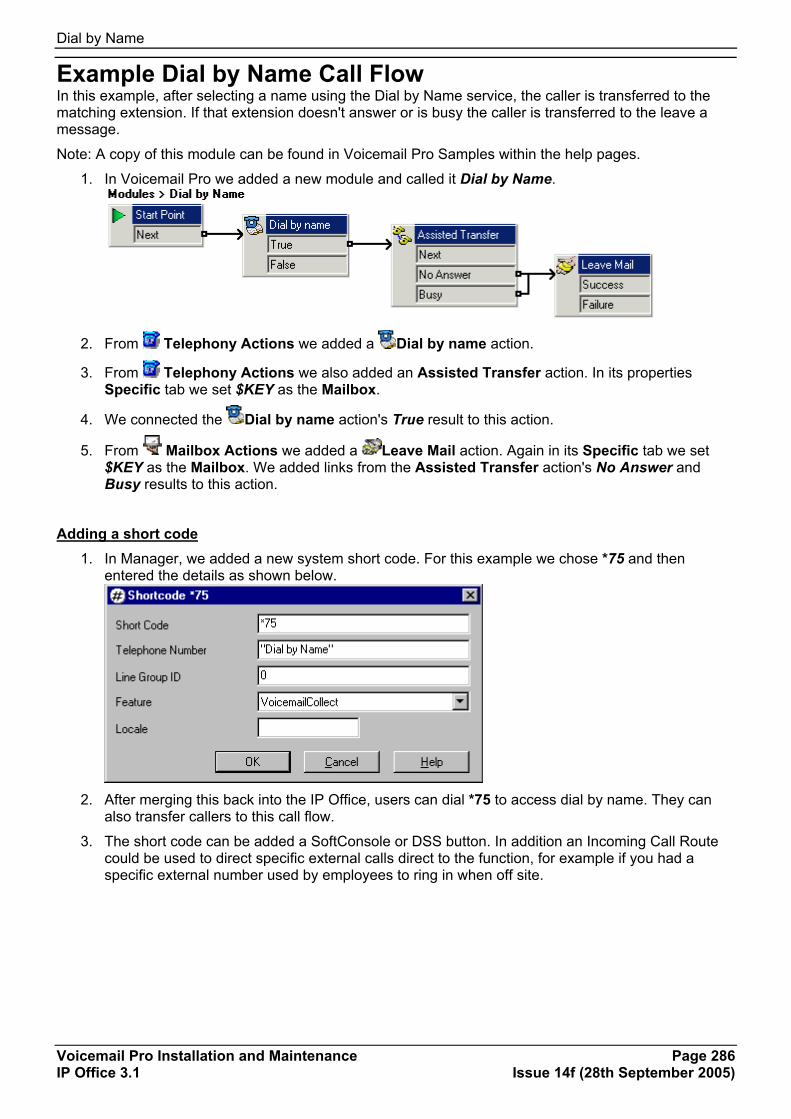
Dial by Name
Voicemail Pro Installation and Maintenance Page 286 IP Office 3.1 Issue 14f (28th September 2005)
Example Dial by Name Call Flow In this example, after selecting a name using the Dial by Name service, the caller is transferred to the matching extension. If that extension doesn't answer or is busy the caller is transferred to the leave a message.
Note: A copy of this module can be found in Voicemail Pro Samples within the help pages.
1. In Voicemail Pro we added a new module and called it Dial by Name.
2. From Telephony Actions we added a Dial by name action.
3. From Telephony Actions we also added an Assisted Transfer action. In its properties Specific tab we set $KEY as the Mailbox.
4. We connected the Dial by name action's True result to this action.
5. From Mailbox Actions we added a Leave Mail action. Again in its Specific tab we set $KEY as the Mailbox. We added links from the Assisted Transfer action's No Answer and Busy results to this action.
Adding a short code
1. In Manager, we added a new system short code. For this example we chose *75 and then entered the details as shown below.
2. After merging this back into the IP Office, users can dial *75 to access dial by name. They can
also transfer callers to this call flow.
3. The short code can be added a SoftConsole or DSS button. In addition an Incoming Call Route could be used to direct specific external calls direct to the function, for example if you had a specific external number used by employees to ring in when off site.

Dial by Name
Voicemail Pro Installation and Maintenance Page 287 IP Office 3.1 Issue 14f (28th September 2005)
Adding a Record Name Module This module allows users to record/re-record their mailbox name. This, or a similar module, is necessary if the Voicemail Pro is using IP Office mailbox mode. However it is still useful if the Voicemail Pro is using Intuity mailbox mode as it gives users quick access to re-record their name.
1. In Voicemail Pro, we added a new module and called it Record Name.
2. We added a Record Name action.
• In the General tab of the Record Name action's properties we set the Pin as $. The $
means that caller's must enter their Voicemail Code in order to use the action.
• We left the Specific tab set to Caller's Mailbox.
3. We then used Save and Make Live.
Adding a Shortcode: 1. In Manager, we added a new system short code. For this example we chose *74 and then
entered the details as shown below.
2. After merging this back into the IP Office, users can dial *74 at their extension in order to record
their mailbox name.
Dial by Name
Voicemail Pro Installation and Maintenance Page 288 IP Office 3.1 Issue 14f (28th September 2005)
Using the Name Table It is possible to create a service that will allow access to re-record the name of any mailbox. The NameWavsTable does this by requesting an extension number and then allowing you to play, re-record and submit a name recording for that extension. It then allows another extension number to be entered and so on.
Naturally if this option is used it should be behind suitable PIN code and other security protection as it allows the recording of names for any mailbox.
1. In Voicemail Pro, create a new module.
2. Add a Goto action and open its properties.
3. In the General tab, enter a unique number in the Pin.
4. In the Specific tab, in Please select a node to go to enter NameWavsTable.
5. Click on OK.
6. Using a short code or other method, create a route to the new module.
Changing Full Names Users with DS port display phones can set and change their Full Name through their telephone. This name will then be used for the text matching part of Dial by Name.
4400, 4600 and 6400 Phones with a Menu Key
1. Press Menu twice.
2. Press and select ProgA.
3. Press and select Name.
4. Enter the new name. Use the dialing keys and Rotat to enter characters. For example, to enter an L, press the 5 key and then press Rotat until an L is displayed. You can use the top-left display key to backspace.
5. When the text is as you require press Done.
6. Press Exit .
Note: As of IP Office 3.0 DT phones (20 Series) are no longer supported.
Voicemail Pro Installation and Maintenance Page 289 IP Office 3.1 Issue 14f (28th September 2005)
Language Switching Voicemail Pro Language Switching Voicemail Pro supports a wide range of languages.
• ? What languages are supported. See Language Support.
• ? Which language is played to callers. For external callers the Voicemail Pro will play try to match the Locale setting of the IP Office system. For internal callers, if they have a different user locale in their user setting, Voicemail Pro will try to match that language.
• If using centralized Voicemail Pro, the default locale is that of the central IP Office. If users on the remote IP Office want different language prompts, their user locale must be individually changed.
• ? What if prompts for the language required aren't installed. The Voicemail Pro has a set of rules which is follows in order to find the best alternate language. A table showing these rules has been included, see Automatic Fallback Language Selection.
• Example: For user with their Locale set to French Canadian, if prompts for that language were not available, the Voicemail Pro would look for French prompts instead, then English US and finally English UK.
• ? Can the language played to a caller be changed during a call. Yes, this can be done using a Select System Prompt action. See Using the Select System Prompt.
• ? I've used Select System Prompt, it changes the default language prompts but not my custom prompts. You need to use the $LOC variable in the path to your custom prompt files, see the example in Switching Custom Prompts - Using $LOC.

Language Switching
Voicemail Pro Installation and Maintenance Page 290 IP Office 3.1 Issue 14f (28th September 2005)
Automatic Fallback Language Selection The following table shows various Locales that might be set in an IP Office configuration. It then shows the first choice language prompts that voicemail will try to use, then the second choice and so on.
• Example For users with their Locale set to French Canadian, if prompts for that language were not available, the Voicemail Pro would look for French prompts instead, then English US and finally English UK.
• The ( ) brackets indicate the Locale setting in the IP Office configuration. The following abbreviations are the language prompt folders used by Voicemail Pro in order of preference.
• Danish (dan): da, en.
• Dutch (nlb, nld): nl, en.
• English UK (eng, ena, enz): en.
• English US (enu, enc): enu, en.
• Finnish (fin): fi, en.
• French (fra): fr, frc, en.
• German (deu): de, en.
• Greek (ell): el, en.
• Hungarian (hun): hu, en.
• Italian (ita): it, en.
• Japanese (jpn): jp, en.
• Korean (kor): ko, en.
• Norwegian (nor): no, en.
• Polish (plk): pl, en.
• Portuguese (ptg): pt, ptb, en.
• Brazilian Portuguese (ptb): ptb, pt, en.
• Spanish (esp): es, eso, en.
• Latin Spanish (esm): eso, es, enu, en.
• Swedish (sve): sv, en.
• French Canadian (frc): frc, fr, enu, en.

Language Switching
Voicemail Pro Installation and Maintenance Page 291 IP Office 3.1 Issue 14f (28th September 2005)
Using the Select System Prompt The Select System Prompt action (Voicemail Pro 1.2.6 or higher) allows the language used within a call flow to be changed from that of the IP Office system or the mailbox user's locale.
Example: In a small hotel, Voicemail Pro is providing mailboxes for rooms. To assist the room users, we want to start message collection by letting them indicate their preferred language for voicemail prompts.
Note: A copy of this module can be found in Voicemail Pro Samples within the help pages.
1. First we created a module for language selection.
• The module contains a Menu action with a Select System Prompt action set to the
required language for each key press.
• For the Menu action we recorded an Entry Prompt asking the user to indicate their language choice; "Press 1 for English, 2 por Español, 3 pour Français".
• The Select System Prompt actions were all connected Module Return actions.
2. Next we altered the default start point for message collection. We inserted the Language Select module and a Get Mail action.
3. Yes, we could have inserted the actions for language selection directly into the call flow.
However, by doing it as a module we can reuse the language selection process in other start points.

Language Switching
Voicemail Pro Installation and Maintenance Page 292 IP Office 3.1 Issue 14f (28th September 2005)
Switching Custom Prompts - Using $LOC "The previous example shows me how to let the user indicate the language they want. That applies to the default prompts of following call flow actions. ? But how do I switch my custom Entry Prompts for different languages as well" Rather than have multiple return points from the Language Select module, one for each language, linking to separate Get Mail actions, each with an Entry Prompt in the right language we can still do it all with the one Get Mail action. This keeps our call flow creation and maintenance a lot simpler.
Through the Get Mail action's properties we recorded an Entry Prompt for US English users which we saved as enu\custom\getmail.wav. We then recorded similar prompt for French Canadian users and Latin Spanish users. Note how the file name was kept the same each time and only the language folder in which we save the file was changed.
We then deleted all except one of the entry prompt entries. Doing this doesn't actually delete the recorded prompts. For the remaining entry we changed the file path by inserting $LOC in place of the language folder name, ie. $LOC\custom\getmail.wav.

Voicemail Pro Installation and Maintenance Page 293 IP Office 3.1 Issue 14f (28th September 2005)
VBScript VB Script Action
This action allows an administrator to construct call flow logic via VB-Scripting. A number of predefined methods and system variables are available. Any scripting added can be verified by pressing the Syntax Check button.
This action has two results (Success or Failure) for which connections to following actions can be made. The results are based on the Scripting entered in the Specific tab.
Specific Tab: • Enter VBScript
In the Script area enter the VB-Script as required. Details of the System variables and COM methods that are supported are accessible by right clicking in the VB Script area.

VBScript
Voicemail Pro Installation and Maintenance Page 294 IP Office 3.1 Issue 14f (28th September 2005)
Properties The following properties can be accessed within VBScripts. Note that unless otherwise stated they as session based, ie. the data is specific to a particular call within voicemail pro and does not persist between calls.
Voicemail contains various state variables that are associated with a specific interaction with voicemail. These include the caller id, name of the mailbox, etc. The following system variables map to properties associated with the object:
• $CLI – CallingParty Property (read-only).
• $LOC – Locale Property (read-write).
• $NAM – Name Property (read-only).
• $RES – Result Property (read-write).
• $SAV – SavedResult Property (read-write).
• $VAR – Variable Property (read-write).
The following properties specific to queued and still queued call flows only, ffor example main.Queued and main.StillQueued.
• $QPOS – PositionInQueue Property (read-only).
• $QTIM – EstimatedAnswer Property (read-only).
The following properties are related to the messages within the mailbox.
• NewMsgs Property – Returns the count of new messages within the session’s mailbox.
• OldMsgs Property – Returns the count of old messages within the session’s mailbox.
• SavedMsgs Property – Returns the count of saved messages within the session’s mailbox.
• LastAccessedMsg Property – Returns the name of the last recorded or accessed message.
Note: VB Scripting will only support variant types.
Internal Variables Some of the variables that exist within Voicemail Pro can be split into smaller sections using a delimiter.
Example: A CLI contains the number 01707364143. If the call flow references the variable as CLI@0,4 then the value 01707 will be returned i.e. the first five numbers.

VBScript
Voicemail Pro Installation and Maintenance Page 295 IP Office 3.1 Issue 14f (28th September 2005)
VBScript Properties CallingParty Property The CallingParty property returns the caller id associated with the voicemail session used for VBS interaction with Voicemail (equivalent to $CLI system variable).
• Owning object: vmprov5.voicescript
• String: • Set: This property is read-only.
• Get: A String object containing the name of the calling party (or $CLI). For example:
• String = Voice.CallingParty
• Remarks: The CallingParty property is only valid for the current session to Voicemail. • Example
Sub Main (dlgid) dim registration Set Voice = CreateObject("vmprov5.voicescript") registration = Voice.Register(dlgid) if registration Then dim callerid callerid = Voice.CallingParty end if End Sub
EstimatedAnswer Property The EstimatedAnswer property returns the $QTIM voicemail system variable. This is the user’s estimated time to answer within the queue in seconds and is only available for queued and still queued call flows.
• Owning object: vmprov5.voicescript
• String: • Set: This property is read-only.
• Get: A long containing the current value for $QTIM. For example:
• Long = Voice.EstimatedAnswer
LastAccessedMsg Property The LastAccessedMsg property returns the name of the last recorded message. If the IP Office TUI is used then this will also contain the name of the last played message.
• Owning object: vmprov5.voicescript
• String: • Set: This property is read-only.
• Get: A string object containing the fully qualified name of the last played or recorded message. For example:
• String = Voice.LastAccessedMsg
VBScript
Voicemail Pro Installation and Maintenance Page 296 IP Office 3.1 Issue 14f (28th September 2005)
Locale Property The Locale property gets and sets the $LOC voicemail system variable.
• Owning object: vmprov5.voicescript
• String: • Set: A string object that contains the new value for the $LOC variable. For example:
• Voice.Locale = String
• Get: A string object containing the current value for $ LOC. For example:
• String = Voice.Locale
• Example Sub Main (dlgid) dim registration Set Voice = CreateObject("vmprov5.voicescript") registration = Voice.Register(dlgid) if registration Then dim locale DO SOME PROCESSING. locale = Voice.Locale Rem NOW SET LOCALE TO FRENCH Voice.Locale = “fr” DO SOME PROCESSING. Rem NOW SET LOCALE BACK TO WHAT IT WAS Voice.Locale = locale end if End Sub
Name Property The Name property returns the name of the mailbox associated with the voicemail session used for VBScript interaction with Voicemail (equivalent to $NAM system variable).
• Owning object: vmprov5.voicescript
• String: • Set: This property is read-only.
• Get: A String object containing the name of the associated voice mailbox. for example:
• String = Voice.Name
NewMsgs Property The NewMsgs property returns the number of new messages contained within the session mailbox.
• Owning object: vmprov5.voicescript
• String: • Set: This property is read-only.
• Get: The number of new messages within the mailbox. For example:
• Number = Voice.NewMsgs
VBScript
Voicemail Pro Installation and Maintenance Page 297 IP Office 3.1 Issue 14f (28th September 2005)
OldMsgs Property The OldMsgs property returns the number of old messages contained within the session mailbox.
• Owning object: vmprov5.voicescript
• String: • Set: This property is read-only.
• Get: The number of old messages within the mailbox. For example:
• Number = Voice.OldMsgs
PositionInQueue Property The PositionInQueue property returns the $QPOS voicemail system variable. This is the user’s current position in the queue and is only available for queued and still queued call flows.
• Owning object: vmprov5.voicescript
• String: • Set: This property is read-only.
• Get: A string object containing the current value for $QPOS. For example:
• String = Voice.PositionInQueue
Result Property The Result property gets and sets the $RES voicemail system variable.
• Owning object: vmprov5.voicescript
• String: • Set: A string object that contains the new value for the $RES variable. For example:
• Voice.Result = String
• Get: A string object containing the current value for $RES. For example:
• String = Voice.Result
• Example Sub Main (dlgid) dim registration Set Voice = CreateObject("vmprov5.voicescript") registration = Voice.Register(dlgid) if registration Then dim result dim success DO SOME PROCESSING. if success Then Voice.Result = TRUE else Voice.Result = FALSE end if End Sub

VBScript
Voicemail Pro Installation and Maintenance Page 298 IP Office 3.1 Issue 14f (28th September 2005)
SavedMsgs Property The SavedMsgs property returns the number of saved messages contained within the session mailbox.
• Owning object: vmprov5.voicescript
• String: • Set: This property is read-only.
• Get: The number of saved messages within the mailbox. For example:
• Number = Voice.SavedMsgs
SavedResult Property The SavedResult property gets and sets the $SAV voicemail system variable.
• Owning object: vmprov5.voicescript
• String: • Set: A string object that contains the new value for the $SAV variable. For example:
• Voice.SavedResult = String
• Get: A string object containing the current value for $SAV. For example:
• String = Voice.SavedResult
Variable Property The Variable property gets and sets the $VAR voicemail system variable.
• Owning object: vmprov5.voicescript
• String: • Set: A string object that contains the new value for the $VAR variable. For example:
• Voice.Variable = String
• Get: A string object containing the current value for $VAR. For example:
• String = Voice.Variable
VBScript
Voicemail Pro Installation and Maintenance Page 299 IP Office 3.1 Issue 14f (28th September 2005)
VBScript Methods ForwardMsg Method The ForwardMsg method is used to forward a file or message to other mailboxes.
Voice.ForwardMsg( file As String, mailboxes As String, ident As String )
• Parameters • file - This contains the name of the message file to be forwarded. The following formats
are allowable:
• [GREETINGS]\greeting Forwards the greeting stored within the greetings directory (the .WAV extension is automatically appended).
• [ACCOUNTS]\mailbox\message Forwards the message stored within the specified mailbox (the .WAV extension is automatically appended).
• [CAMPAIGNS]\campaign\message Forwards a campaign message stored within the specified campaign (the .WAV extension is automatically appended).
• If the fully qualified path is specified (drive:\path\file) then the full specified pathname is used otherwise the file is relative to the WAVS directory.
• mailboxes - The list of mailboxes to forward the message to (separated by non digits, e.g. 202 203 204).
• ident - The CLI to be associated with the message.
• Return Value This method does not return a value.

VBScript
Voicemail Pro Installation and Maintenance Page 300 IP Office 3.1 Issue 14f (28th September 2005)
ForwardMsgToMailbox Method The ForwardMsgToMailbox method is used to forward a file or message to another mailbox.
Voice.ForwardMsgToMailbox( file As String, mailbox As String, ident As String ) As String
• Parameters • file - This contains the name of the message file to be forwarded. The following formats
are allowable: • [GREETINGS]\greeting
Forwards the greeting stored within the greetings directory (the .WAV extension is automatically appended).
• [ACCOUNTS]\mailbox\message Forwards the message stored within the specified mailbox (the .WAV extension is automatically appended).
• [CAMPAIGNS]\campaign\message Forwards a campaign message stored within the specified campaign (the .WAV extension is automatically appended).
• If the fully qualified path is specified (drive:\path\file) then the full specified pathname is used otherwise the file is relative to the WAVS directory.
• mailbox - The mailbox to forward the message to.
• ident - The CLI to be associated with the message.
• Return Value The name of the new message.
FullFilename Method The FullFilename method is used to translate the shortcut filename to the equivalent fully qualified pathname for the file.
Voice.FullFilename( file As String ) As String
• Parameters • file - This contains the name of the file to be translated:
• [GREETINGS]\greeting The file is relative to the greetings directory.
• [ACCOUNTS]\mailbox\message The file is relative to the accounts directory.
• [CAMPAIGNS]\campaign\message The file is relative to the campaigns directory.
• If the fully qualified path is specified (drive:\path\file) then the full specified path name is used otherwise the file is relative to the specified locale within the WAVS directory.
• Return Value The equivalent fully qualified path name for the specified file.

VBScript
Voicemail Pro Installation and Maintenance Page 301 IP Office 3.1 Issue 14f (28th September 2005)
GetCallingParty Method The GetCallingParty method is used to obtain the $CLI session variable.
Voice.GetCallingParty( [dlgid As Long = 0] ) As String
• Parameters • dlgid - The connection ID as passed in to the script.
• Return Value The value of the $CLI session variable associated with the specified voicemail session.
GetDTMF Method The GetDTMF method is used to return user’s DTMF input.
Voice.GetDTMF( [digits As Long = 1], [timeout As Long = 30], [dlgid As Long = 0] ) As String
• Parameters • digits - The maximum number of DTMF digits to capture.
• timeout - The maximum time to wait for DTMF input.
• dlgid - The connection ID as passed in to the script.
• Return Value The DTMF keys that were pressed.
GetEstimatedAnswer Method The GetEstimatedAnswer method is used to obtain the $QTIM session variable.
Voice. GetEstimatedAnswer ( [dlgid As Long = 0] ) As String
• Parameters • dlgid - The connection ID as passed in to the script.
• Return Value The value of the $QTIM session variable associated with the specified voicemail session.
VBScript
Voicemail Pro Installation and Maintenance Page 302 IP Office 3.1 Issue 14f (28th September 2005)
GetExtension Method The GetExtension method is used to obtain an extension.
Voice.GetExtension( index As Long, ) As String
• Parameters • index - The extension to return. Note: The actual extension number should not be
entered as index refers to the offset number of the extension in the listing.
• Return Value The extension at that position within the list (an empty string if end of list).
• Example Sub Main (dlgid) dim registration Set Voice = CreateObject("vmprov5.voicescript") registration = Voice.Register(dlgid) if registration Then dim index dim ext index = 0 Do ext = Voice.GetExtension(index) index = index + 1 Loop Until Len(ext) = 0 end if End Sub
GetLocale Method The GetLocale method is used to obtain the $LOC session variable.
Voice.GetLocale( [dlgid As Long = 0] ) As String
• Parameters • dlgid - The connection ID as passed in to the script.
• Return Value The value of the $LOC session variable associated with the specified voicemail session.
GetMailbox Method The GetMailbox method is used to obtain a mailbox.
Voice.GetMailbox( index As Long, ) As String
• Parameters • index - The mailbox to return. Note: The actual mailbox number should not be entered as
index refers to the offset number of the mailbox in the listing.
• Return Value The mailbox at that position within the list (an empty string if end of list).

VBScript
Voicemail Pro Installation and Maintenance Page 303 IP Office 3.1 Issue 14f (28th September 2005)
GetMailboxMessage Method The GetMailboxMessage method is used to obtain a message within a mailbox.
Voice.GetMailboxMessage( mailbox As String, msgtype As String, index As Long, ) As String
• Parameters
• mailbox - The mailbox to return messages for.
• msgtype - The type of messages to return. This can start with an N for new messages, O for old messages and S for saved messages.
• index - The message to return.
• Return Value The message at that position within the list (an empty string if end of list).
GetMailboxMessages Method The GetMailboxMessages method is used to obtain the count of specific messages within a mailbox.
Voice.GetMailboxMessages( mailbox As String, msgtype As String ) As Long
• Parameters • mailbox - The mailbox to return message counts for.
• msgtype - The type of messages to return counts for. This can start with an N to obtain the number of new messages, O for old messages and S for saved messages.
• Return Value The number of messages of a particular type within the mailbox.
GetMessagePriority Method The GetMessagePriority method is used to determine whether the message was left with priority.
Voice.GetMessagePriority( mailbox As String, message As String ) As Boolean
• Parameters • mailbox - The mailbox that the message belongs to.
• message - The message to query.
• Return Value True if the message was left with priority, otherwise False.

VBScript
Voicemail Pro Installation and Maintenance Page 304 IP Office 3.1 Issue 14f (28th September 2005)
GetMessagePrivate Method The GetMessagePrivate method is used to determine whether the message was left with privacy.
Voice.GetMessagePrivate( mailbox As String, message As String ) As Boolean
• Parameters • mailbox - The mailbox that the message belongs to.
• message - The message to query.
• Return Value True if the message was left with privacy, otherwise False.
GetMessageStatus Method The GetMessageStatus method is used to obtain the state of the message within a mailbox.
Voice.GetMessageStatus( mailbox As String, message As String ) As String
• Parameters • mailbox - The mailbox that the message belongs to.
• message - The message to query. Note: The message name format should be [Accounts]\mailbox\message. e.g. [Accounts]\Extn247\MSG00004.
• Return Value The state of the message within the mailbox. N for new, O for old, S for saved.
GetName Method The GetName method is used to obtain the $NAM session variable.
Voice.GetName( [dlgid As Long = 0] ) As String
• Parameters • dlgid - The connection ID as passed in to the script.
• Return Value The value of the $NAM session variable associated with the specified voicemail session.
VBScript
Voicemail Pro Installation and Maintenance Page 305 IP Office 3.1 Issue 14f (28th September 2005)
GetNewMsgs Method The GetNewMsgs method is used to obtain the number of new messages contained within the session’s mailbox.
Voice.GetNewMsgs ( [dlgid As Long = 0] ) As Long
• Parameters • dlgid - The connection ID as passed in to the script.
• Return Value The number of new messages contained within the session’s mailbox.
GetOldMsgs Method The GetOldMsgs method is used to obtain the number of old messages contained within the session’s mailbox.
Voice.GetOldMsgs ( [dlgid As Long = 0] ) As Long
• Parameters • dlgid - The connection ID as passed in to the script.
• Return Value The number of old messages contained within the session’s mailbox.
GetPositionInQueue Method The GetPositionInQueue method is used to obtain the $QPOS session variable.
Voice. GetPositionInQueue ( [dlgid As Long = 0] ) As String
• Parameters • dlgid - The connection ID as passed in to the script.
• Return Value The value of the $QPOS session variable associated with the specified voicemail session.
GetRegister Method The GetRegister method is used to retrieve a string stored in one of the session sixteen data variables. ($CP0 to $CP15).
Voice.GetRegister( regnum As Long, [dlgid As Long = 0] ) As String
• Parameters
• regnum - Data register to use for storage (0-15).
• dlgid - The connection ID as passed in to the script.
• Return Value The data stored within the specified register.

VBScript
Voicemail Pro Installation and Maintenance Page 306 IP Office 3.1 Issue 14f (28th September 2005)
GetResult Method The GetResult method is used to obtain the $RES session variable.
Voice.GetResult( [dlgid As Long = 0] ) As String
• Parameters
• dlgid - The connection ID as passed in to the script.
• Return Value The value of the $RES session variable associated with the specified voicemail session.
GetSavedMsgs Method The GetSavedMsgs method is used to obtain the number of saved messages contained within the session’s mailbox.
Voice.GetSavedMsgs ( [dlgid As Long = 0] ) As Long
• Parameters • dlgid - The connection ID as passed in to the script.
• Return Value The number of saved messages contained within the session’s mailbox.
GetSavedResult Method The GetSavedResult method is used to obtain the $SAV session variable.
Voice.GetSavedResult( [dlgid As Long = 0] ) As String
• Parameters
• dlgid - The connection ID as passed in to the script.
• Return Value The value of the $SAV session variable associated with the specified voicemail session.
GetVariable Method The GetVariable method is used to obtain the $VAR session variable.
Voice.GetVariable( [dlgid As Long = 0] ) As String
• Parameters • dlgid - The connection ID as passed in to the script.
• Return Value The value of the $VAR session variable associated with the specified voicemail session.

VBScript
Voicemail Pro Installation and Maintenance Page 307 IP Office 3.1 Issue 14f (28th September 2005)
MessageCLI Method The MessageCLI method is used to obtain the CLI of the caller that left the message within a mailbox.
Voice.MessageCLI( mailbox As String, message As String ) As String
• Parameters • mailbox - The mailbox that the message belongs to.
• message - The message to query.
• Return Value The CLI of the caller that left the message.
MessageDisplay Method The MessageDisplay method is used to obtain the display field associated with the message within a mailbox.
Voice.MessageDisplay( mailbox As String, message As String ) As String
• Parameters
• mailbox - The mailbox that the message belongs to.
• message - The message to query.
• Return Value The display string associated with the message.
MessageLength Method The MessageLength method is used to obtain the length of a message within a mailbox.
Voice.MessageLength( mailbox As String, message As String ) As Long
• Parameters
• mailbox - The mailbox that the message belongs to.
• message - The message to query.
• Return Value The length of the message in milliseconds.

VBScript
Voicemail Pro Installation and Maintenance Page 308 IP Office 3.1 Issue 14f (28th September 2005)
MessageTime Method The MessageTime method is used to obtain the date and time the message was left within a mailbox.
Voice.MessageTime( mailbox As String, message As String ) As String
• Parameters • mailbox - The mailbox that the message belongs to.
• message - The message to query.
• Return Value The time the message was left in the format: YEAR/MONTH/DAY HOUR:MINUTE. For example 2003/09/23 13:26.
PlayDigits Method The PlayDigits method is used to play the digits specified through voicemail to the active connection.
Voice.PlayDigits( digits As String, [wait As Boolean = True], [interruptables As String = “Any”], [dlgid As Long = 0] ) As String
• Parameters
• digits - This contains the digits to be played (e.g. “12345” plays “one two three four five”).
• wait - This is an optional parameter specifying whether voicemail should return immediately or wait until the digits have been played first.
• interruptables - This is for future development and should be left as default.
• dlgid - The connection ID as passed in to the script.
• Return Value The key press that was used to terminate the playback.
• Example Sub Main (dlgid) dim registration Set Voice = CreateObject("vmprov5.voicescript") registration = Voice.Register(dlgid) if registration Then dim key key = Voice.PlayDigits(“12345”); end if End Sub

VBScript
Voicemail Pro Installation and Maintenance Page 309 IP Office 3.1 Issue 14f (28th September 2005)
PlayLocaleWav Method The PlayLocaleWav method is used to play a wave file through voicemail to the active connection taking into account the system locale.
Voice.PlayLocaleWav( wav As String, [wait As Boolean = True], [interruptables As String = “Any”], [dlgid As Long = 0] ) As String
• Parameters
• wav - This contains the name of the wave file to be played and is of the following format:
• [GREETINGS]\greeting Plays out the greeting stored within the greetings directory (the .WAV extension is automatically appended).
• [ACCOUNTS]\mailbox\message Plays out the message stored within the specified mailbox (the .WAV extension is automatically appended).
• [CAMPAIGNS]\campaign\message Plays out a campaign message stored within the specified campaign (the .WAV extension is automatically appended).
• If the fully qualified path is specified (drive:\path\file) then the full specified path name is used otherwise the file is relative to the specified locale within the WAVS directory.
• wait - This is an optional parameter specifying whether voicemail should return immediately or wait until the wave file has been played first.
• interruptables - This is for future development and should be left as default.
• dlgid - The connection ID as passed in to the script.
• Return Value The key press that was used to terminate the playback.
VBScript
Voicemail Pro Installation and Maintenance Page 310 IP Office 3.1 Issue 14f (28th September 2005)
PlayWav Method The PlayWav method is used to play a wave file through voicemail to the active connection.
Voice.PlayWav( wav As String, [wait As Boolean = True], [interruptables As String = “Any”], [dlgid As Long = 0] ) As String
• Parameters • wav - This contains the name of the wave file to be played or the name of a system
parameter to be spoken. The following formats are allowable:
• $NAM Plays the recorded name for the mailbox if one has been recorded. If a name has not been recorded then optional TTS can be used (providing it has been licensed).
• $TIME:hh[:mm[:ss] [ Y][ dd[/mm[/yy]]]] Plays out the specified time and date. The hours to speak must always be specified and optional the number of minutes, seconds, day, month and year. For example:
• $TIME:11 Speaks AT ELEVEN HOUR HUNDRED
• $TIME:11:55 Speaks AT ELEVEN HOUR FIFTY FIVE
• $TIME:11:55:13 Speaks AT ELEVEN HOUR FIFTY FIVE
• $TIME:11:55 Y Speaks YESTERDAY AT ELEVEN HOUR FIFTY FIVE
• $TIME:11:55:13 Y Speaks YESTERDAY AT ELEVEN HOUR FIFTY FIVE
• $TIME:11:55 21/09/03 Speaks AT ELEVEN HOUR FIFTY FIVE [1SEC PAUSE] DATE TWENTY FIRST SEPTEMBER
• $QPOS [:position] This plays out “You are at queue position” position “in the queue”.
• $QTIM [:eta] This plays out “Estimated time to answer is” eta “minutes”.
• $MSGN:msgs Plays out the specified number of old messages (e.g. $MSGN:10 = “You have ten new messages”.
• $MSGO:msgs Plays out the specified number of old messages (e.g. $MSGN:0 = “You have no old messages”.
• $MSGS:msgs Plays out the specified number of old messages (e.g. $MSGS:5 = “You have five saved messages”.
• $CID, $CLI, $CP, $DATE, $DBD, $DLG, $ETA, $KEY, $LOC, $POS, $SAV, $TIME, $UUI, $VAR Plays out the contents on one of the system variables.
• If the string just contains numbers, then the digits are played, for example 12345 plays "one two three four five".

VBScript
Voicemail Pro Installation and Maintenance Page 311 IP Office 3.1 Issue 14f (28th September 2005)
• [GREETINGS]\greeting Plays out the greeting stored within the greetings directory (the .WAV extension is automatically appended).
• [ACCOUNTS]\mailbox\message Plays out the message stored within the specified mailbox (the .WAV extension is automatically appended).
• [CAMPAIGNS]\campaign\message Plays out a campaign message stored within the specified campaign (the .WAV extension is automatically appended).
• If the fully qualified path is specified (drive:\path\file) then the full specified pathname is used otherwise the file is relative to the WAVS directory.
• wait - This is an optional parameter specifying whether voicemail should return immediately or wait until the wave file has been played first.
• interruptables - This is for future development and should be left as default.
• dlgid - The connection ID as passed in to the script.
• Return Value The key press that was used to terminate the playback.
• Example Sub Main (dlgid) dim registration Set Voice = CreateObject("vmprov5.voicescript") registration = Voice.Register(dlgid) if registration Then dim key key = Voice.PlayWav(“test”, True, “Any”, dlgid); end if End Sub

VBScript
Voicemail Pro Installation and Maintenance Page 312 IP Office 3.1 Issue 14f (28th September 2005)
RecordMsg Method The RecordMsg method is used to record a user’s speech input to the specified file.
Voice.RecordMsg( recording As String, maxtime As long, [interruptables As String = “Any”], [appendtofile As Boolean = False], [dlgid As Long = 0], [playbeep As Boolean = False] ) As String
• Parameters
• recording - This contains the name of the file for the recording to be stored to and can be in the following formats:
• [GREETINGS]\greeting Stores the recording in the specified file within the greetings directory.
• [ACCOUNTS]\mailbox\message Stores to the specified message within the specified mailbox.
• [CAMPAIGNS]\campaign\message Stores to the specified message within the specified campaign.
• If the fully qualified path is specified (drive:\path\file) then the full specified pathname is used otherwise the file is relative to the specified locale within the WAVS directory.
• maxtime - The maximum recording length specified in seconds.
• interruptables - This is for future development and should be left as default.
• appendtofile - Set to true if the recording should be appended to the file, false to clear the file first.
• dlgid - The connection ID as passed in to the script.
• playbeep - This flag sets whether a beep is played before the start of recording.
• Return Value The key press that was used to terminate the recording.

VBScript
Voicemail Pro Installation and Maintenance Page 313 IP Office 3.1 Issue 14f (28th September 2005)
RecordRegister Method The RecordRegister method is used to record a user’s speech input to the specified file stored in the specified register.
Voice.RecordRegister( regnum As Long, [maxtime As Long = 60], [interruptables As String = “-1”], [dlgid As Long = 0], [playbeep As boolean = False] ) As String
• Parameters • regnum - Data register containing file to store recording to.
• maxtime - The maximum recording length specified in seconds.
• interruptables - This is for future development and should be left as default.
• dlgid - The connection ID as passed in to the script.
• playbeep - This flag sets whether a beep is played before the start of recording.
• Return Value The key press that was used to terminate the recording.
VBScript
Voicemail Pro Installation and Maintenance Page 314 IP Office 3.1 Issue 14f (28th September 2005)
Register Method The Register method is used to determine whether the voicemail session that was used to launch the VB script is still active.
Voice.Register( dlgid As Long ) As Boolean
• Parameters
• dlgid - An ID that is associated with the Voicemail connection. This is passed as a parameter to the VB script.
• Return Value A Boolean variable indicating whether the specified voicemail session is still active.
• Example Sub Main (dlgid) dim registration Set Voice = CreateObject("vmprov5.voicescript") registration = Voice.Register(dlgid) if registration Then do something. end if End Sub

VBScript
Voicemail Pro Installation and Maintenance Page 315 IP Office 3.1 Issue 14f (28th September 2005)
SetLocale Method The SetLocale method is used to set the $LOC session variable.
Voice.SetLocale( locale As String, [dlgid As Long = 0] )
• Parameters
• locale - The new value for the $LOC variable.
• dlgid - The connection ID as passed in to the script.
• Return Value This method does not return a value.
SetMailboxMessage Method The SetMailboxMessage method is used to modify a message within a mailbox.
Voice.SetMailboxMessage( mailbox As String, message As String, msgtype As String, )
• Parameters • mailbox - The mailbox that the return message belongs to.
• message - The message to modify. The message name format should be [Accounts]\mailbox\message. For example [Accounts]\Extn247\MSG00004.
• msgtype - The new statue type for the message. This can start with an N for new, O for old and S for saved.
• Return Value This method does not return a value.

VBScript
Voicemail Pro Installation and Maintenance Page 316 IP Office 3.1 Issue 14f (28th September 2005)
SetRegister Method The SetRegister method is used to store a string in one of the sixteen session data variables ($CP0 to $CP15).
Voice.SetRegister( regnum As Long, data As String, [dlgid As Long = 0] )
• Parameters • regnum - Data register to use for storage (0-15).
• data - The data to store within this register.
• dlgid - The connection ID as passed in to the script.
• Return Value This method does not return a value.
SetResult Method The SetResult method is used to set the $RES session variable.
Voice.SetResult( result As String, [dlgid As Long = 0] )
• Parameters • result - The new value for the $RES variable.
• dlgid - The connection ID as passed in to the script.
• Return Value This method does not return a value.
SetSavedResult Method The SetSavedResult method is used to set the $SAV session variable.
Voice.SetSavedResult( result As String, [dlgid As Long = 0] )
• Parameters • result - The new value for the $SAV variable.
• dlgid - The connection ID as passed in to the script.
• Return Value This method does not return a value.
VBScript
Voicemail Pro Installation and Maintenance Page 317 IP Office 3.1 Issue 14f (28th September 2005)
SetVariable Method The SetVariable method is used to set the $VAR session variable.
Voice.SetVariable( variable As String, [dlgid As Long = 0] )
• Parameters • variable - The new value for the $VAR variable.
• dlgid - The connection ID as passed in to the script.
• Return Value This method does not return a value.
Speak Method The Speak method is used to speak out the specified speech provided TTS has been licensed.
Voice.Speak( text As String, [wait As Boolean = True], [interruptables As String = “Any”], [dlgid As Long = 0] ) As String
• Parameters • text - This contains the text to be spoken.
• wait - This is an optional parameter specifying whether voicemail should return immediately or wait until the wave file has been played first.
• interruptables - This is for future development and should be left as default.
• dlgid - The connection ID as passed in to the script.
• Return Value The key press that was used to terminate the playback.


Voicemail Pro Installation and Maintenance Page 319 IP Office 3.1 Issue 14f (28th September 2005)
Appendix A: Prompts US English Intuity Prompts The following a list of the numbered .wav files used by Voicemail Pro for US English. These are predominately, though not exclusively, used for Intuity mailbox features.
All files are Microsoft WAVE file format (.wav) 8kHz, 16 bit mono.
IMPORTANT: It is important to note that the corresponding .wav file in other languages is not the same prompt.
• 4.wav: "Not private".
• 8.wav: "To record a new message press 4".
• 13.wav: "To record press 1 after recording press 1 again".
• 14.wav: "To make private press 1, to make public press 2".
• 15.wav: "And is".
• 18.wav: "To forward with comments press 2".
• 19.wav: "To review from beginning press *1, if finished press *#".
• 21.wav: "To listen press 0".
• 24.wav: "To delete press *D".
• 27.wav: "To attach original, press y for yes or n for no".
• 35.wav: "Login incorrect".
• 41.wav: "To forward message with comment at beginning, press 2".
• 43.wav: "Your call is being answered by IP Office".
• 44.wav: "Is not available to leave a message wait for the tone".
• 45.wav: "Is busy to leave a message wait for the tone".
• 46.wav: "To access your mailbox press *R".
• 49.wav: "No operator defined".
• 56.wav: "Thank you for leaving your message".
• 58.wav: "For name addressing press *A".
• 60.wav: "Changed".
• 61.wav: "To modify status, press 9 for yes, or 6 for no".
• 63.wav: "New".
• 65.wav: "Contains".
• 67.wav: "To create another list".
• 70.wav: "Unopened".
• 71.wav: "To leave a message wait for the tone".
• 73.wav: "You have".
• 74.wav: "Deleted".
• 75.wav: "To skip press # to delete press *D".
• 77.wav: "Deleted".
• 80.wav: "To have system wait press *W if finished please hang up or to disconnected IP Office press **X".
• 84.wav: "entry".

Appendix A: Prompts
Voicemail Pro Installation and Maintenance Page 320 IP Office 3.1 Issue 14f (28th September 2005)
• 85.wav: "Erased".
• 86.wav: "Extension".
• 87.wav: "This call is experiencing difficulties".
• 88.wav: "Cannot use the guest password".
• 89.wav: "First message".
• 91.wav: "At end".
• 94.wav: "Goodbye".
• 95.wav: "Please disconnect".
• 96.wav: "For help press *H".
• 97.wav: "For help at anytime press *H".
• 100.wav: "Invalid Entry".
• 105.wav: "To restart at the activity menu press *R".
• 108.wav: "You are recording a message".
• 109.wav: "Later".
• 110.wav: "List".
• 111.wav: "Please enter list ID".
• 112.wav: "Otherwise for assistance press Zero now".
• 113.wav: "You already have a list".
• 114.wav: "To replace list renter ID and # sign, to create a new list enter new list ID".
• 115.wav: "To transfer using names instead press *2".
• 117.wav: "To reach the covering extension press *Zero".
• 118.wav: "Enter last name".
• 119.wav: "You wish to call".
• 120.wav: "Too large to include".
• 124.wav: "No more list space".
• 125.wav: "Must be six or fewer numerals".
• 126.wav: "To forward message with comment at end press 3".
• 127.wav: "Returned to previous activity".
• 130.wav: "Because there were no entries".
• 134.wav: "You can store your list or delete members but you cannot add members".
• 141.wav: "No more lists".
• 142.wav: "To listen to the header press 3".
• 143.wav: "To set back again press 2".
• 145.wav: "List has no entries".
• 146.wav: "To continue press #".
• 147.wav: "Review completed".
• 148.wav: "For extension addressing press *2".
• 150.wav: "Members".
• 156.wav: "Maximum length recorded".
• 159.wav: "Member".

Appendix A: Prompts
Voicemail Pro Installation and Maintenance Page 321 IP Office 3.1 Issue 14f (28th September 2005)
• 160.wav: "Message".
• 161.wav: "Midnight".
• 163.wav: "To call sender press zero".
• 164.wav: "Category".
• 165.wav: "Returned to getting messages".
• 166.wav: "At end to play back press 23".
• 167.wav: "To approve press #, to record from here press 1, to play back press 23".
• 168.wav: "Messages".
• 170.wav: "Delivery scheduled".
• 173.wav: "Please enter new password".
• 175.wav: "Please note only IP Office subscribers can be specified by name".
• 178.wav: "No addresses identified".
• 180.wav: "Nothing to approve".
• 182.wav: "Nothing to delete".
• 185.wav: "Not found".
• 188.wav: "Passwords do not match please enter new password".
• 191.wav: "No more messages".
• 192.wav: "No messages".
• 193.wav: "No name recorded".
• 194.wav: "No new messages".
• 197.wav: "Cannot step back".
• 198.wav: "Partial name deleted".
• 201.wav: "Noon".
• 202.wav: "Not valid".
• 208.wav: "Is not a public list".
• 209.wav: "Cannot modify another subscriber's list".
• 210.wav: "Please enter a new password".
• 211.wav: "To 15 digits".
• 212.wav: "Please password enter again for confirmation, to delete the password you just entered press *D".
• 213.wav: "Re-enter password".
• 214.wav: "Approved".
• 219.wav: "Owned by".
• 220.wav: "Enter password".
• 223.wav: "Please enter extension".
• 224.wav: "And # sign".
• 226.wav: "Private".
• 227.wav: "Public".
• 228.wav: "Record at the tone".
• 232.wav: "Recording stopped".
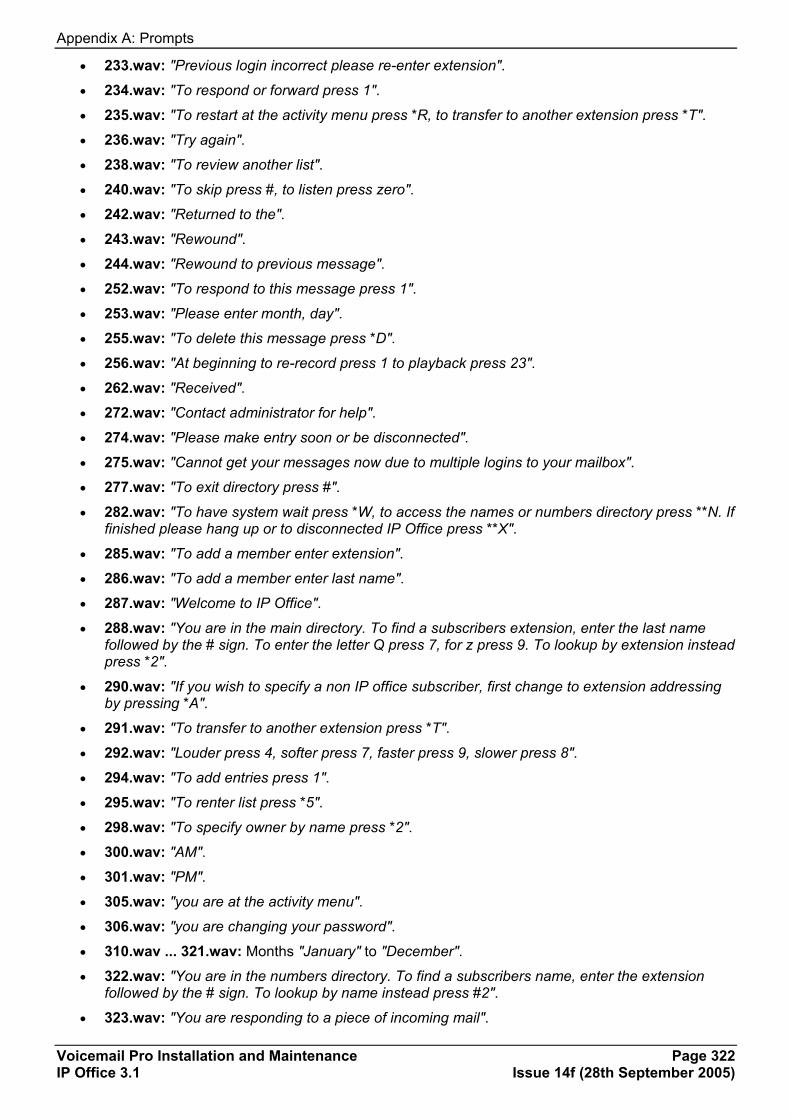
Appendix A: Prompts
Voicemail Pro Installation and Maintenance Page 322 IP Office 3.1 Issue 14f (28th September 2005)
• 233.wav: "Previous login incorrect please re-enter extension".
• 234.wav: "To respond or forward press 1".
• 235.wav: "To restart at the activity menu press *R, to transfer to another extension press *T".
• 236.wav: "Try again".
• 238.wav: "To review another list".
• 240.wav: "To skip press #, to listen press zero".
• 242.wav: "Returned to the".
• 243.wav: "Rewound".
• 244.wav: "Rewound to previous message".
• 252.wav: "To respond to this message press 1".
• 253.wav: "Please enter month, day".
• 255.wav: "To delete this message press *D".
• 256.wav: "At beginning to re-record press 1 to playback press 23".
• 262.wav: "Received".
• 272.wav: "Contact administrator for help".
• 274.wav: "Please make entry soon or be disconnected".
• 275.wav: "Cannot get your messages now due to multiple logins to your mailbox".
• 277.wav: "To exit directory press #".
• 282.wav: "To have system wait press *W, to access the names or numbers directory press **N. If finished please hang up or to disconnected IP Office press **X".
• 285.wav: "To add a member enter extension".
• 286.wav: "To add a member enter last name".
• 287.wav: "Welcome to IP Office".
• 288.wav: "You are in the main directory. To find a subscribers extension, enter the last name followed by the # sign. To enter the letter Q press 7, for z press 9. To lookup by extension instead press *2".
• 290.wav: "If you wish to specify a non IP office subscriber, first change to extension addressing by pressing *A".
• 291.wav: "To transfer to another extension press *T".
• 292.wav: "Louder press 4, softer press 7, faster press 9, slower press 8".
• 294.wav: "To add entries press 1".
• 295.wav: "To renter list press *5".
• 298.wav: "To specify owner by name press *2".
• 300.wav: "AM".
• 301.wav: "PM".
• 305.wav: "you are at the activity menu".
• 306.wav: "you are changing your password".
• 310.wav ... 321.wav: Months "January" to "December".
• 322.wav: "You are in the numbers directory. To find a subscribers name, enter the extension followed by the # sign. To lookup by name instead press #2".
• 323.wav: "You are responding to a piece of incoming mail".

Appendix A: Prompts
Voicemail Pro Installation and Maintenance Page 323 IP Office 3.1 Issue 14f (28th September 2005)
• 325.wav: "You are administering your lists. To create a mailing list press 1, to play a summary of all your lists press 2, to review a particular list press 3".
• 327.wav: "You are creating a mailing list".
• 328.wav: "To delete the previous entry, press *D. To approve the list you are creating and move on to the next step press #".
• 329.wav: "You have not yet entered enough characters to identify a specific subscriber. To enter the letter Q press 7, for Z press 9".
• 330.wav: "Or enter just the # sign if it is your phone".
• 332.wav: "System greeting used".
• 333.wav: "To add entries to the list or to change status of the list press 1".
• 334.wav: "When finished addressing press #".
• 335.wav: "When finished press #".
• 339.wav: "To replay the last few seconds press 5 to advance a few seconds press 6".
• 347.wav: "You are adding a list".
• 348.wav: "You are specifying a mailing list to review".
• 350.wav ... 356.wav: Days "Sunday" to "Saturday".
• 357.wav: "You are choosing between subscribers whose names match your entry. To indicate no subscribers match, delete entry by pressing *3. To change to extension addressing and delete your entry press *2".
• 358.wav: "You are identifying a list as private or public".
• 360.wav: "You are scanning mailing lists, to review list members press 0, to rewind to previous list press 2, to continue scanning lists press 3".
• 361.wav: "To skip to next list press #, to delete list press *3".
• 362.wav: "If you own the list press #, if some else owns the list".
• 363.wav: "To approve the list you are creating press #".
• 364.wav: "Enter owner's extension".
• 367.wav: "To specify a different owner by name press *3".
• 368.wav: "You are entering the number for a new list. Please enter a number up to 6 digits long".
• 369.wav: "To replace an existing list, enter that list's number".
• 370.wav: "These are entries in your list".
• 371.wav: "To rewind to current entry press 2, to rewind to previous entry press 2 as many times as necessary, to continue playback of list press 3".
• 372.wav: "To skip to next entry press #, to delete current entry press *D".
• 373.wav: "You are choosing whether to attach a copy of original message to your reply. To include the original press y for yes, to send only your reply press n for no".
• 376.wav: "To skip the next header press the # sign to listen to the header rewind by pressing 2 then play by pressing 3 to skip to the next category press *#".
• 377.wav: "To delete message press *D".
• 380.wav: "Please wait".
• 381.wav: "To listen to the message press 0, to re record message before delivery press 1".
• 388.wav: "To skip press the # key".
• 390.wav: "O" (Oh).
• 391.wav ... 450.wav: Numbers "One" to "Sixty". For zero see 585.wav.
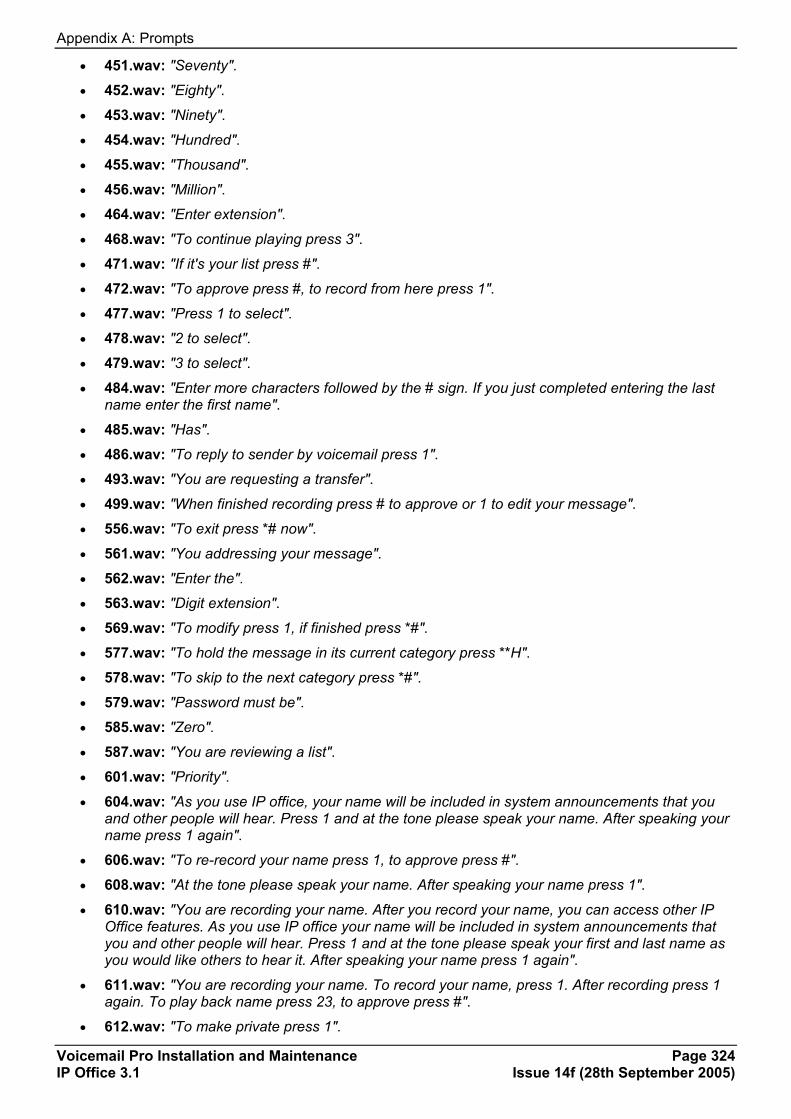
Appendix A: Prompts
Voicemail Pro Installation and Maintenance Page 324 IP Office 3.1 Issue 14f (28th September 2005)
• 451.wav: "Seventy".
• 452.wav: "Eighty".
• 453.wav: "Ninety".
• 454.wav: "Hundred".
• 455.wav: "Thousand".
• 456.wav: "Million".
• 464.wav: "Enter extension".
• 468.wav: "To continue playing press 3".
• 471.wav: "If it's your list press #".
• 472.wav: "To approve press #, to record from here press 1".
• 477.wav: "Press 1 to select".
• 478.wav: "2 to select".
• 479.wav: "3 to select".
• 484.wav: "Enter more characters followed by the # sign. If you just completed entering the last name enter the first name".
• 485.wav: "Has". • 486.wav: "To reply to sender by voicemail press 1".
• 493.wav: "You are requesting a transfer".
• 499.wav: "When finished recording press # to approve or 1 to edit your message".
• 556.wav: "To exit press *# now".
• 561.wav: "You addressing your message".
• 562.wav: "Enter the".
• 563.wav: "Digit extension".
• 569.wav: "To modify press 1, if finished press *#".
• 577.wav: "To hold the message in its current category press **H".
• 578.wav: "To skip to the next category press *#".
• 579.wav: "Password must be".
• 585.wav: "Zero".
• 587.wav: "You are reviewing a list".
• 601.wav: "Priority".
• 604.wav: "As you use IP office, your name will be included in system announcements that you and other people will hear. Press 1 and at the tone please speak your name. After speaking your name press 1 again".
• 606.wav: "To re-record your name press 1, to approve press #".
• 608.wav: "At the tone please speak your name. After speaking your name press 1".
• 610.wav: "You are recording your name. After you record your name, you can access other IP Office features. As you use IP office your name will be included in system announcements that you and other people will hear. Press 1 and at the tone please speak your first and last name as you would like others to hear it. After speaking your name press 1 again".
• 611.wav: "You are recording your name. To record your name, press 1. After recording press 1 again. To play back name press 23, to approve press #".
• 612.wav: "To make private press 1".

Appendix A: Prompts
Voicemail Pro Installation and Maintenance Page 325 IP Office 3.1 Issue 14f (28th September 2005)
• 613.wav: "To make priority press 2".
• 617.wav: "To remove private status press 1".
• 618.wav: "To remove priority status press 2".
• 622.wav: "Not priority".
• 643.wav: "You are choosing options for this message there are currently no options set".
• 644.wav: "You are choosing options for this message with the current settings".
• 645.wav: "Private messages cannot be forwarded by the recipients".
• 646.wav: "A priority message will be delivered before other messages and will be flagged for special attention in the recipients mailbox".
• 647.wav: "The message will be private".
• 648.wav: "The message will be priority".
• 651.wav: "The message will be private and priority".
• 681.wav: "Sorry cannot leave a message now because this users mailbox is full".
• 700.wav: "To administer mailing lists press 1, to administer personal directory press 2".
• 701.wav: "To change your password press 4".
• 702.wav: "To record your name press 5".
• 703.wav: "You are at subscriber administration".
• 704.wav: "To create lists press 1, to scan lists press 2, to review and modify lists press 3".
• 707.wav: "If finished press *#".
• 708.wav: "If finished adding entries press #".
• 736.wav: "You are recording your name. As you use IP office your name will be included in system announcements that you and other people will hear".
• 744.wav: "For all calls".
• 745.wav: "Active".
• 747.wav: "For internal calls".
• 748.wav: "To external calls".
• 749.wav: "For busy calls".
• 750.wav: "For no answer calls".
• 751.wav: "For out of hours calls".
• 752.wav: "To listen to a greeting press 0, to create change or delete a greeting press 1, to scan all your greetings press 2, to activate a greeting press 3, to administer call types press 4, if finished press #".
• 753.wav: "Enter greeting number".
• 754.wav: "Greeting".
• 755.wav: "Not recorded".
• 756.wav: "To listen to greeting".
• 757.wav: "To re-record, press 1".
• 759.wav: "To review status, press 2".
• 760.wav: "Press 0".
• 764.wav: "To use this greeting for all calls press 0, for internal calls press 1, for external calls press 2".

Appendix A: Prompts
Voicemail Pro Installation and Maintenance Page 326 IP Office 3.1 Issue 14f (28th September 2005)
• 765.wav: "Recorded but not active".
• 766.wav: "To use this greeting for all calls press 1".
• 767.wav: "To use this greeting for all calls press 0, for busy calls press 1, for no answer calls press 2".
• 770.wav: "Recorded and active".
• 771.wav: "Approved and active".
• 772.wav: "Again".
• 773.wav: "To activate for out of hours call press 3".
• 775.wav: "To record messages press 1 to get messages press 2 to administer personal greetings press 3".
• 776.wav: "The system greeting".
• 777.wav: "Cannot listen to system greeting".
• 778.wav: "Cannot modify system greeting".
• 779.wav: "No greetings recorded".
• 780.wav: "Personal greetings review completed".
• 781.wav: "To skip to the next greeting press the # sign".
• 782.wav: "To activate a greeting enter greeting number to de-activate a greeting activate a different greeting in its place".
• 783.wav: "To activate another greeting enter greeting number to de-activate a greeting activate a different greeting in its place".
• 784.wav: "To activate system greeting enter 0".
• 785.wav: "Same greeting used for all calls".
• 786.wav: "To identify calls as internal and external press 1".
• 787.wav: "To identify calls as busy and no answer press 2".
• 788.wav: "To identify calls as out of hours press 3".
• 790.wav: "Calls identified as internal and external".
• 791.wav: "Calls identified as busy and no answer".
• 792.wav: "Calls identified as out of hours".
• 793.wav: "Calls not identified as out of hours".
• 797.wav: "To use same greeting for all calls press 5".
• 814.wav: "Calls".
• 815.wav: "You are administering your personal greetings".
• 816.wav: "You are listening to a personal greeting".
• 817.wav: "You are recording a personal greeting".
• 818.wav: "You have just recorded".
• 819.wav: "You are scanning your personal greetings".
• 820.wav: "You are selecting which greeting to activate".
• 821.wav: "You administering call types".
• 822.wav: "As you use IP office, your name will be included in system announcements that you and other people will hear. At the tone please speak your name, after speaking your name press 1".
• 823.wav: "For all calls".
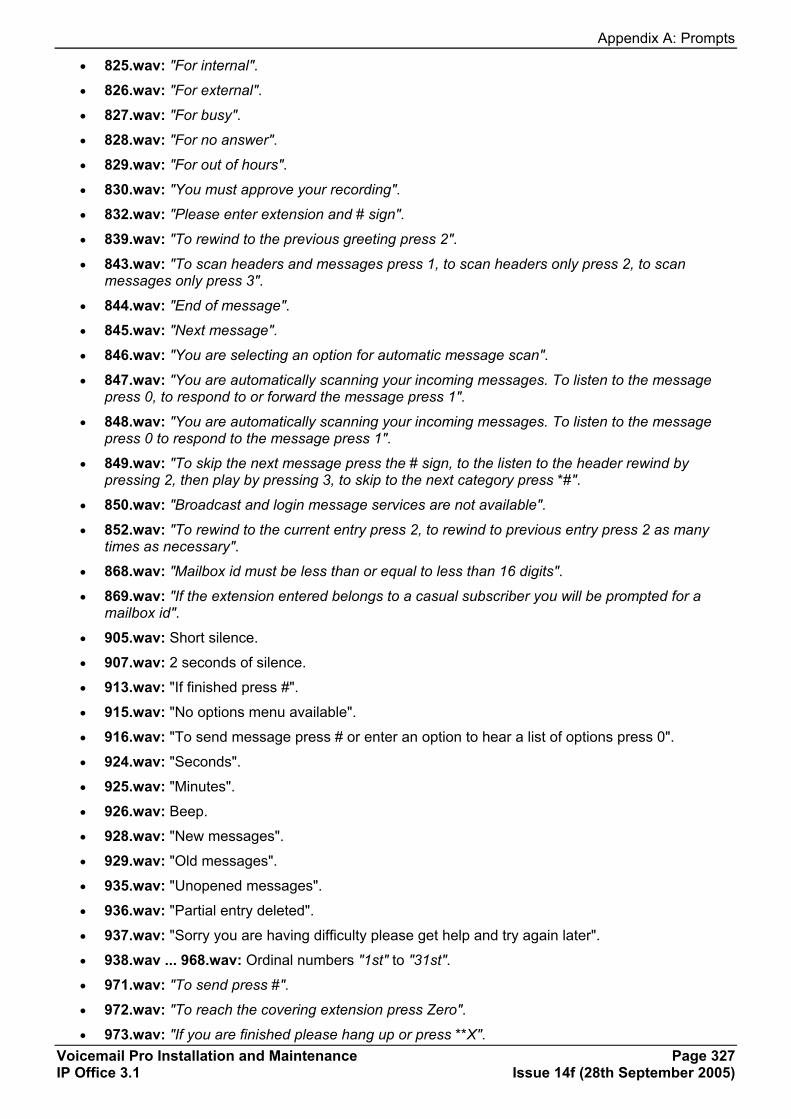
Appendix A: Prompts
Voicemail Pro Installation and Maintenance Page 327 IP Office 3.1 Issue 14f (28th September 2005)
• 825.wav: "For internal".
• 826.wav: "For external".
• 827.wav: "For busy".
• 828.wav: "For no answer".
• 829.wav: "For out of hours".
• 830.wav: "You must approve your recording".
• 832.wav: "Please enter extension and # sign".
• 839.wav: "To rewind to the previous greeting press 2".
• 843.wav: "To scan headers and messages press 1, to scan headers only press 2, to scan messages only press 3".
• 844.wav: "End of message".
• 845.wav: "Next message".
• 846.wav: "You are selecting an option for automatic message scan".
• 847.wav: "You are automatically scanning your incoming messages. To listen to the message press 0, to respond to or forward the message press 1".
• 848.wav: "You are automatically scanning your incoming messages. To listen to the message press 0 to respond to the message press 1".
• 849.wav: "To skip the next message press the # sign, to the listen to the header rewind by pressing 2, then play by pressing 3, to skip to the next category press *#".
• 850.wav: "Broadcast and login message services are not available".
• 852.wav: "To rewind to the current entry press 2, to rewind to previous entry press 2 as many times as necessary".
• 868.wav: "Mailbox id must be less than or equal to less than 16 digits".
• 869.wav: "If the extension entered belongs to a casual subscriber you will be prompted for a mailbox id".
• 905.wav: Short silence.
• 907.wav: 2 seconds of silence.
• 913.wav: "If finished press #".
• 915.wav: "No options menu available".
• 916.wav: "To send message press # or enter an option to hear a list of options press 0".
• 924.wav: "Seconds".
• 925.wav: "Minutes".
• 926.wav: Beep.
• 928.wav: "New messages".
• 929.wav: "Old messages".
• 935.wav: "Unopened messages".
• 936.wav: "Partial entry deleted".
• 937.wav: "Sorry you are having difficulty please get help and try again later".
• 938.wav ... 968.wav: Ordinal numbers "1st" to "31st".
• 971.wav: "To send press #".
• 972.wav: "To reach the covering extension press Zero".
• 973.wav: "If you are finished please hang up or press **X".

Appendix A: Prompts
Voicemail Pro Installation and Maintenance Page 328 IP Office 3.1 Issue 14f (28th September 2005)
• 977.wav: "Name not found".
• 987.wav: "Enter last name of the person".
• 990.wav: "To record and send voicemail messages press 1".
• 992.wav: "To get messages press 2".
• 1001.wav: "To scan incoming messages automatically press 7, to relogon press **R".
• 1006.wav: "To record or change the greeting heard by callers press 3".
• 1010.wav: "With priority".
• 1011.wav: "With fax".
• 1020.wav: "No message to send".
• 1048.wav: "Nothing to print".
• 1052.wav: "To specify your fax preferences press 3".
• 1061.wav: "Your default print destination is...".
• 1075.wav: "To change the default print destination press 1".
• 1092.wav: "A default print destination has not been assigned".
• 1118.wav: "You are specifying the default print destination for fax items". • 1141.wav: "When finished recording press # for more options".
• 1144.wav: "To specify whether a message can be addressed before it is recorded press 6".
• 1145.wav: "To administer call answer options press 7".
• 1152.wav: "Address before record turned on".
• 1153.wav: "To turn off press 1".
• 1154.wav: "Address before record turned off".
• 1155.wav: "To turn on press 1".
• 1157.wav: "You are administering addressing options".
• 1158.wav: "To prevent callers from leaving messages press 1".
• 1159.wav: "Call answer messages will not be accepted".
• 1160.wav: "To allow callers to leave messages press 1".
• 1161.wav: "You are administering call answer options".
• 1162.wav: "Sorry the mailbox you have reached is not accepting messages at this time".
• 1163.wav: "Is not available".
• 1164.wav: "Call answer messages will be accepted".
• 1219.wav: "To review or change your reach options press 7".
• 1305.wav: "Please enter an outcalling option to hear a list of options press 0".
• 1430.wav: "To following message was restored".
• 1431.wav: "No message to restore".
• 1432.wav: "To undelete last deleted message press **U".
• 1434.wav: "To return to getting messages press #".
• 1440.wav: Beep.
• 1443.wav: "Voice file system is out of space".
• 1444.wav: "Please contact the administrator".
• 1457.wav: "Old and new passwords cannot be the same".

Appendix A: Prompts
Voicemail Pro Installation and Maintenance Page 329 IP Office 3.1 Issue 14f (28th September 2005)
• 1461.wav: "You are getting your incoming messages".
• 1462.wav: "To listen to the message press Zero".
• 1463.wav: "To reply to sender by voicemail press 17".
• 1464.wav: "To forward with comments press 12".
• 1465.wav: "To record a new message press 14".
• 1466.wav: "To respond to or forward the message press 1".
• 1467.wav: "The return address for this message is not a mailbox on this system".
• 1469.wav: "To reply to sender by voicemail press 7".
• 1964.wav: "The ability for callers to leave messages in your mailbox is turned off".
• 1965.wav: "To allow callers to leave messages press 571".
• 1970.wav: "Invalid password please enter new password and # sign".
• 2007.wav: "with text".
• 2008.wav: "with other media".
• 2010.wav: "zero".
• 2011.wav: "bytes".
• 2012.wav: "byte".
• 2013.wav: "kilobyte".
• 2014.wav: "kilobytes".
• 2015.wav: "megabyte".
• 2016.wav: "megabytes".
• 2018.wav: "and".
• 2019.wav: "message from".
• 2021.wav: "private".
• 2022.wav: "private priority".
• 2023.wav: "priority".
• 2025.wav: "call from".
• 2026.wav: "call received".
• 2030.wav: "voice".
• 2031.wav: "fax".
• 2032.wav: "text".
• 2033.wav: "attached file".
• 2035.wav: "to advance to the end of the message press *6".
• 2038.wav: "rewound".
• 2039.wav: "component".
• 2040.wav: "to listen press 3".
• 2041.wav: "To customize your mailbox, for example to create or edit your mailing lists or change your password, press 5".
• 2051.wav: "your password cannot be the same as your extension number consecutive digits or a single repeated digit please enter new password and the # key".
• 2052.wav: "at beginning of message to step back to previous message press *2 to listen press Zero".

Appendix A: Prompts
Voicemail Pro Installation and Maintenance Page 330 IP Office 3.1 Issue 14f (28th September 2005)
• 2053.wav: "approximately".
• 2057.wav: "at beginning of message".
• 2061.wav: "To enter the telephone number of a fax machine press **5".
• 2063.wav: "Enter the telephone number of a fax machine followed by the # sign".
• 4409.WAV ... 4434.wav: Alphabetic characters "A" to "Z".

Appendix A: Prompts
Voicemail Pro Installation and Maintenance Page 331 IP Office 3.1 Issue 14f (28th September 2005)
English Non-Intuity Prompts The following a list of the named .wav files used by Voicemail Lite and Voicemail Pro for US and UK English. These are predominately, though not exclusively, used for IP Office mode mailbox features and Voicemail Pro custom call flow actions.
All files are Microsoft WAVE file format (.wav) 8kHz, 16 bit mono.
• aa_01.wav: "Good morning and thank you for calling. Please key in the required extension number or hold the line for other options".
• aa_02.wav: "Good afternoon and thank you for calling. Please key in the required extension number or hold the line for other options".
• aa_03.wav: "Good evening and thank you for calling. Please key in the required extension number or hold the line for other options".
• aa_04.wav: "Please hold while we try to connect you".
• aa_05.wav: "An operator is currently unavailable".
• aa_06.wav: "Please key in the extension number you would like to leave a message for".
• aa_07.wav: "Good bye and thank you for calling".
• alpha_01.wav: "Press # to accepted data, *1 to hear the data, *2 to delete the data, *3 to delete the last character, *# to accept the data and continue".
• alpha_02.wav: "Data has been deleted".
• alrm_1.wav: "you have an alarm call set for".
• alrm_2.wav: "alarm has been deleted press 1 to continue or * to quit".
• alrm_3.wav: "please enter the time for the alarm call in 24 hour clock notation".
• alrm_4.wav: "you have set an alarm call for".
• alrm_5.wav: "press 1 to validate press 2 to add a message to the end press # to cancel".
• alrm_6.wav: "your alarm has now been set".
• alrm_7.wav: "press 1 to verify this alarm or press 2 to delete it".
• alrm_8.wav: "this time is invalid please try again".
• alrm_9.wav: "this is an alarm call please hang up".
• AM.wav: "AM".
• aor_00.wav: "Warning: your call is being recorded".
• cmp_01.wav: "the current campaign message has been marked as deleted".
• cmp_02.wav: "the current campaign message has been marked as completed".
• cmp_03.wav: "the current campaign message has been abandoned".
• cmp_04.wav: "press 1 to start again press 2 to rewind press 3 to abandon press 4 to delete press 5 to complete press 7 for previous field press 8 for start of current field press 9 for next field press # to forward press 0 to pause press * to rewind".
• conf_01.wav: "A conference is not currently scheduled".
• conf_02.wav: "There was a problem transferring you into the conference".
• conf_03.wav: "Please enter your conference id and press # to finish".
• conf_04.wav: "Please enter your PIN and press # to finish".
• conf_05.wav: "Your conference ID or PIN is not valid".
• conf_06.wav: "Your conference ID is not valid".
• conf_07.wav: "Your PIN is not valid".

Appendix A: Prompts
Voicemail Pro Installation and Maintenance Page 332 IP Office 3.1 Issue 14f (28th September 2005)
• conf_08.wav: "Please try again".
• conf_09.wav: "To be announced into the conference please speak your name and press # when you have finished".
• conf_10.wav: "Your name is too short please try again".
• conf_11.wav: "Has invited".
• conf_12.wav: "To join them in an immediate conference press 1 to accept 2 to decline and 3 if the delegate is not available".
• conf_13.wav: "Has requested".
• conf_14.wav: "To join in an ad-hoc conference press 1 to accept 2 to decline and 3 if the delegate is not available".
• conf_15.wav: "Has declined the offer to attend the conference".
• conf_16.wav: "Is not available".
• conf_17.wav: "Has just entered the conference".
• conf_18.wav: "Has just left the conference".
• conf_19.wav: "An unknown caller".
• conf_20.wav: "Has been invited".
• conf_21.wav: "No conference selected, thank you and good bye".
• conf_22.wav: "Transferring you to the conference now".
• conf_23.wav: "Conference not accessible".
• conf_24.wav: "You have been invited to a conference".
• dbn_01.wav: "There are".
• dbn_02.wav: "Press # to play list".
• dbn_03.wav: "To select".
• dbn_04.wav: "# for next".
• dbn_05.wav: "*# for previous".
• dbn_06.wav: "And #".
• dbn_07.wav: "Press **2".
• dbn_10.wav: "For selection by group".
• dbn_11.wav: "For selection by first name".
• dbn_12.wav: "For selection by last name".
• dbn_13.wav: "For selection by extension".
• dbn_14.wav: "Entries that match your selection".
• dbn_15.wav: "*3 to clear the list and restart".
• dbn_16.wav: "Or enter more character followed by a # to reduce the size of the list".
• dbn_17.wav: "To change name format entry to".
• dbn_18.wav: "First name last name".
• dbn_19.wav: "Last name first name".
• dbn_20.wav: "Enter group name".
• dbn_21.wav: "Enter first name".
• dbn_22.wav: "Enter last name".
• dbn_23.wav: "Enter extension".

Appendix A: Prompts
Voicemail Pro Installation and Maintenance Page 333 IP Office 3.1 Issue 14f (28th September 2005)
• dom_01.wav ... dom_31.wav: Day of month ordinal numbers "1st" to "31st".
• dow_01.wav ... dow_07.wav: Day of week names "Sunday" to "Saturday".
• EOC_1.wav: "Warning, your conference will end in".
• EOC_2.wav: "Your conference will end in".
• int_na.wav: "service not supported".
• ivr_01.wav: "the time according to the IVR server is".
• ivr_02.wav: "directory wave table enter the number of the caller you want to edit".
• ivr_03.wav: "name wave table enter the number of the extension you want to edit".
• ivr_04.wav: "enter form entries with the # sign to terminate each line press # at the end to complete the form".
• ivr_05.wav: "form verified".
• ivr_06.wav: "form entry is complete".
• ivr_07.wav: "press * to abort # to accept or 0 to listen again".
• ivr_08.wav: "do not disturb".
• ivr_09.wav: "voicemail mode".
• ivr_10.wav: "call forwarding".
• ivr_11.wav: "forward number is set to".
• ivr_12.wav: "follow me number is set to".
• ivr_13.wav: "voicemail reception number is set to".
• ivr_15.wav: "parameter is set to".
• ivr_16.wav: "parameter is enabled".
• ivr_17.wav: "parameter is disabled press 1 to enable".
• ivr_18.wav: "parameter is disabled".
• ivr_19.wav: "parameter is enabled press 2 to disable".
• ivr_20.wav: "press 1 to change press # to cancel".
• ivr_21.wav: "enter new number after the tone".
• ivr_22.wav: "repeat new number after the tone".
• ivr_23.wav: "sorry the numbers you have entered are different".
• ivr_24.wav: "email options".
• ivr_25.wav: "alert email on incoming message".
• ivr_26.wav: "copy messages to email".
• ivr_27.wav: "forward messages to email".
• ivr_28.wav: "email turned off".
• ivr_29.wav: "service mode".
• ivr_30.wav: "in service".
• ivr_31.wav: "out of service".
• ivr_32.wav: "night service".
• mc_00.wav: Beep.
• mc_01.wav: Short silence.
• mc_02.wav: One seconds silence.

Appendix A: Prompts
Voicemail Pro Installation and Maintenance Page 334 IP Office 3.1 Issue 14f (28th September 2005)
• misc_24.wav: "Is on holiday until".
• misc_25.wav: "Is unavailable until".
• misc_26.wav: "Is at lunch until".
• misc_27.wav: "Is away on business until".
• misc_28.wav: "And will be picking up messages regularly".
• misc_29.wav: "And will not be contactable until their return".
• misc_30.wav: "List length exceeded".
• misc_31.wav: "*, cannot access private list".
• misc_32.wav: "*, list length exceeded".
• mnu_1.wav: "You have four greeting options. For standard greeting press 1, for after hours greeting press 2, for you are in a queue greeting press 3, for you are still in a queue greeting press 4".
• mnu_2.wav: "To hear your greeting message press 1, to change your greeting message press 2, to save your greeting message press 3, to save your message for playing as a continuous loop press 4".
• mnu_2a.wav: "To hear your greeting message press 1, to change your greeting message press 2, to save your greeting message press 3, to save your message for playing as a continuous loop press 4, to return to the previous menu press 8".
• mnu_3.wav: "When playing a message to delete the message press 4, to save the message press 5, to forward the message to email press 6, to repeat the message press 7, to skip the message press 9, at the end of your messages to play old messages press 1, to play saved messages press 2, to edit your greeting press 3, to direct all messages to email *01, to turn off email redirection press *02".
• mnu_4.wav: "When playing a message to delete the message press 4, to save the message press 5, for forwarding options press 6, to repeat the message press 7, to skip the message press 9, to call back the sender press ** at the end of your messages, to play old messages press 1, to play saved messages press 2, to edit your greeting press 3, to direct all messages to email press *01, to send email notifications press *02, to turn off email functions press *03, to change your access code press *04".
• mnu_5.wav: "To forward message to email press 1, to forward message to other extensions press 2, to add a header message press 3, to send message into your saved messages list press 4, to skip this forwarding press #".
• mnu_6.wav: "User configure options to edit forwarding number press 1, to edit follow me number press 2, to set call forwarding press 3, to set voicemail press 4, to set do not disturb press 5, to edit voice mail access code press 6, to edit voicemail reception press 7, to set voicemail email mode press 8, to edit voicemail call back number press 9".
• mnu_7.wav: "Hunt group configure options to set voicemail press 1, to edit voicemail access code press 2, to set voicemail email mode press 3, to set service mode press 4".
• mnu_8.wav: "Invalid entry please try again".
• mnu_9.wav: "That destination is unavailable".
• mnu_10.wav: "List length exceeded".
• mo_01.wav ... mo_12: Months "January" to "December".
• no_.wav: "Number".
• no_00.wav ... no_59.wav: Numbers "Zero" to "Fifty-nine".
• no_24p.wav: "More than 24".
• noon.wav: "Noon".

Appendix A: Prompts
Voicemail Pro Installation and Maintenance Page 335 IP Office 3.1 Issue 14f (28th September 2005)
• out_01.wav: "To administer Outlook based greetings, press 5".
• out_02.wav: "You are administering Outlook based greetings".
• out_03.wav: "Outlook based greetings are active for all calls".
• out_04.wav: "Outlook based greetings are used for the following call types".
• out_05.wav: "Outlook based greetings are currently inactive".
• out_06.wav: "To deactivate Outlook based greetings".
• out_07.wav: "To activate Outlook based greetings".
• out_08.wav: "They will be out of the office until".
• out_09.wav: "They will be busy until".
• out_10.wav: "Due to".
• outb_01.wav: "This is an IP Office outbound alert".
• outb_04.wav: "Press any key to accept".
• pg_0001.wav: "To use this greeting for all calls press 1".
• pg_0002.wav: "To use this greeting for all calls press 0".
• pg_0003.wav: "For internal calls press 1".
• pg_0004.wav: "For external calls press 2".
• pg_0005.wav: "To activate for out of hours call press 3".
• pg_0006.wav: "If the number is busy press 4".
• pg_0007.wav: "For no reply calls press 5".
• pin_01.wav: "Enter your current access code after the tone".
• pin_02.wav: "Now enter your new access code after the tone".
• pin_03.wav: "Now repeat your new access code after the tone".
• pin_04.wav: "Your access code has now been changed".
• pin_05.wav: "It has been possible to change your access code at this time".
• pin_06.wav: "Press # when you have finished".
• pin_07.wav: "Access code must contain 4 or more digits".
• PM.wav: "PM".
• que_01.wav: "You are at queue position".
• que_02.wav: "In the queue".
• que_03.wav: "Call per".
• que_04.wav: "Estimated time to answer is".
• que_05.wav: "you call will be answered in".
• rec_01.wav: "warning: this call is being recorded".
• RECNAM_01.wav: "As you use IP office, your name will be included in system announcements that you and other people will hear. At the tone please say your name. After saying your name, press 1".
• RECNAM_02.wav: "to re-record your name press 1, to confirm press #".
• RECNAM_03.wav: "record at the tone".
• sac_01.wav: "cannot retrieve your messages now due to multiple logins to your mailbox".
• sac_02.wav: "please disconnect".

Appendix A: Prompts
Voicemail Pro Installation and Maintenance Page 336 IP Office 3.1 Issue 14f (28th September 2005)
• seconds.wav: "seconds".
• ssb_00.wav: "O" (Oh).
• ssb_01.wav: "O'Clock".
• ssb_02.wav: "No".
• ssb_03.wav: "None".
• ssb_04.wav: "Midnight".
• ssb_05.wav: "And".
• ssb_06.wav: "Date".
• ssb_07.wav: "Deleted".
• ssb_08.wav: "T number".
• ssb_09.wav: "For".
• ssb_10.wav: "Forwarded".
• ssb_11.wav: "Item".
• ssb_12.wav: "Press".
• ssb_13.wav: "Quantity".
• ssb_14.wav: "Saved".
• ssb_15.wav: "Yesterday".
• ssb_16.wav: "Hundred".
• ssb_17.wav: "Hour".
• ssb_18.wav: "O" (oh).
• ssb_19.wav: "At".
• ssb_20.wav: "1" (Down tone).
• ssb_21.wav: "1" (Up Tone).
• ssb_22.wav: "1" (Level Tone).
• ssb_23.wav: "Function failed to complete".
• ssb_29.wav: "Minutes".
• svm_02.wav: "Calls have been forwarded to email. New calls will also be forwarded to email until turned off".
• svm_03.wav: "Caller was".
• svm_04.wav: "Thank you for leaving a message. Mailbox has now stopped recording".
• svm_05.wav: "Please enter your mailbox number".
• svm_06.wav: "Please enter your access code".
• svm_07.wav: "There is no one available to take your call at the moment so please leave a message after the tone".
• svm_08.wav: "For help at anytime press 8".
• svm_09.wav: "That was the last message".
• svm_10.wav: "New message".
• svm_11.wav: "New messages".
• svm_12.wav: "Old message".
• svm_13.wav: "Old messages".

Appendix A: Prompts
Voicemail Pro Installation and Maintenance Page 337 IP Office 3.1 Issue 14f (28th September 2005)
• svm_14.wav: "Saved message".
• svm_15.wav: "Saved messages".
• svm_16.wav: "Remote access is not configured on this mailbox".
• svm_17.wav: "Email is not enabled on this mailbox".
• svm_18.wav: "I am afraid all the operators are busy at the moment but please hold and you will be transferred when somebody becomes available".
• svm_19.wav: "Message was recorded".
• svm_20.wav: "You're being transferred".
• svm_21.wav: "You have".
• svm_22.wav: "Unknown caller".
• svm_23.wav: "Forwarding to email is now turned off".
• svm_24.wav: "Start speaking after the tone and your message will be inserted before the message prior to forwarding".
• svm_25.wav: "To hear the recording press 1, to change the recording press 2, to save the recording press 3".
• svm_26.wav: "Enter the extension to which you wish this message to be forwarded, separating each extension using the # sign. Press # at the end to complete the list".
• svm_27.wav: "Message has not yet been recorded".
• svm_28.wav: "Start speaking after the tone and press 2 when you have finished recording".
• svm_29.wav: "There are no messages".
• tim_m00.wav: "Minute".
• tim_m01.wav: "One minute".
• tim_m02.wav: "Minutes".


Voicemail Pro Installation and Maintenance Page 339 IP Office 3.1 Issue 14f (28th September 2005)
Index $ $CLI 13, 107, 130, 139, 140, 141, 163, 164, 166, 170, 171, 177, 178, 184, 203, 294, 295, 299, 300, 301, 307, 310 $KEY 107, 136, 163, 180, 181, 182, 286, 310 $NAM 163 $RES 163 $SAV 163, 294, 298, 306, 310, 316 $VAR 163, 317 2 20CC 62, 145, 288 A Absmiddle 108 Absspeed 108 Access a campaign
Access a campaign 166
Access a campaign 166, 202 Access Code 130, 177, 331 Access from a Trusted Extension 140 Access from Any Extension for a Specific User 140 Access from Any Extension for All Users 139 Access Prefix
Enter 91 Access Prefix 91 Access Voicemail from Another Extension 139 Accessing
Campaign 202 Mailbox Main 133 Microsoft Exchange Server 14 S8100 93 SMTP Server 14
Accessing 14, 93, 123, 133, 139, 140, 145, 202 Accessing a Campaign 202 Accessing Hunt Group Voicemail Using
Short Code 148
Accessing Hunt Group Voicemail Using 148 Accessing Hunt Group Voicemail Using a Short Code 148 Accessing Voicemail
Group 148 Remote Access 139
Accessing Voicemail 133, 134, 139, 140, 148 Accessing Voicemail from
External Location 140
Accessing Voicemail from 139, 140 Accessing Voicemail from an External Location 140 Account Code 163, 181, 203, 209, 211 Account code matching 181 Account Details 115 Account Name 56, 82, 116 Account/User Name 19 ACCOUNTS 299, 300, 309, 310, 312 ACM 33 ACM Gateway 33 Action
Adding 159 Call List 179 Editing 159
Action 12, 66, 150, 151, 173, 178, 179, 181, 183, 186, 190, 191, 200, 269, 277, 283 Action accesses 176 Action allows 166, 176, 179, 182, 184, 189 Action disconnects
caller 172 Action disconnects 172 Action following 182 Action opens 188 Action plays 179, 183, 191 Action sets
variable 186 Action sets 186, 291 Action transfers
caller 178, 181
Action transfers 178, 181 Actioning campaign messages 202 Actions
Assisted Transfer 181 Campaign 176 Check Digits 187 CLI Routing 178 Clock 183 Configuration Menu 177 Deleting 159, 160 Description 169 Dial by Name 180 Disconnect 172 Edit Play List 176 eMail 183 General tab 169 Generic 171 Get Mail 174 Goto 172 Home 173 Leave Mail 174 Listen 175 Menu 172 Module Return 173 Name 176 Open Door 183 Pin 169 Play Configuration Menu 177 Play List 176 Post Dial 184 Prompts tab 169 Question 175 Queue ETA 191 Queue Position 191 Record Name 176 Reporting tab 170 Results tab 170 Select System Prompt Language 177 Set User Variable 186 Test Condition 186 Test User Variable 186 Transfer 178 Voice Question 175 Voicemail Pro allows 143 Whisper 179
Actions according 179 Actions having 159
Actions relate leaving 166
Actions relate 166 Actions share 165 Action's Success 136 Active CAPI 2.0 ISDN 243 Active Directory 253 Active Directory Administration Tools 231 Active Directory Services Interface 231 Active Directory Support 231 Active Directory Users 253 Add
Action 159 Condition 196 Conditions 196 Connection 136, 160 Prompt 164 Start Points 155, 156 VMP files 161
Add comments 67 Add Gateway 256 Add New Machine 93 Add pauses 141 Add ports/channels 251 Add Range option 91 Add Subscribers 94 Add/Remove 30, 31, 219, 245 Adding
Condition 196 Modifying & Deleting Campaigns 200
Adding a Condition 196 Adding a Connection 136, 160 Adding a Module to a Start Point 193 Adding a Start Point 155, 156 Adding an Action 159 Additional 15, 19, 25, 29, 35, 41, 67, 71, 83, 85, 101, 117, 129, 130, 150, 156, 184, 217, 273 Additional 1MB 25 Additional Notes 101 Address
Browsing 199

Index
Voicemail Pro Installation and Maintenance Page 340 IP Office 3.1 Issue 14f (28th September 2005)
Address 19, 25, 52, 56, 65, 79, 84, 94, 97, 101, 104, 111, 125, 126, 129, 144, 199, 231, 233, 240, 245, 246, 319 Addressing press 319 Admin
Specify 221 Admin 221 Admin Utilties Installation 261 Administration 11, 14, 82, 93, 94, 98, 104, 113, 130, 135, 196, 231, 279 Administration Manual 104, 130 Administration menu 113, 279 Administration Tool 14 Administrative 48, 50, 53, 70, 80, 93, 97, 98, 233 Administrative Menu 93 Administrative Tools 48, 53, 70, 97, 98 Administrator Application 240 Administrator rights 19, 35, 41, 80 Administrators 19, 29, 35, 41, 53, 56, 65, 80, 212, 221, 228, 240, 245, 293, 319 Advanced 262 Advanced Tab 188 Advice 203, 204, 210 Advice on Call Recording 118 After uninstalling 31 Agent 12, 13, 14, 25, 170, 176, 199, 200, 201, 202, 206 Agent accesses 202 Agent processing 202 Alarm Set 183 Alarm Set Action 183 Alarm Threshold Level 122 Alarm Threshold Unit 122 Alert 11, 51, 62, 111, 120, 129, 144, 331 All
Yes 30 All 12, 13, 15, 16, 25, 30, 35, 41, 62, 71, 80, 84, 85, 93, 94, 98, 101, 108, 111, 118, 120, 121, 123,
131, 136, 139, 141, 143, 150, 151, 153, 156, 158, 160, 161, 165, 177, 182, 188, 189, 193, 195, 196, 209, 228, 245, 275, 278, 282, 288, 291, 292, 319, 331 All following text 108 All Tab 188 All Users
Any Extension 139
All Users 111, 139 Allow access
play 199 user's 130
Allow access 130, 189, 199, 288 Allows
callflow 189 Allows Visual 166 Alphanumeric Action 182 Alternatively Routing configuration 253 Analogue
take 282 Analogue 282 Annotation 170 Answer 19, 129, 131, 136, 143, 151, 163, 166, 170, 179, 181, 191, 199, 201, 215, 286, 295, 310, 319, 331 Answer No 19 Any Extension
All Users 139 Any Extension 134, 136, 139, 140 AOCR 204 Aor_00.wav 204, 331 API's 51 Apply Logical OR 197 April 29 135 As Boolean 303, 304, 308, 309, 310, 314, 317 As Long 302, 303, 305, 306, 307 As String 299, 300, 303, 304, 307, 308, 315, 316 Ask
online 131 Ask 53, 70, 80, 131, 152, 181, 253, 277, 285, 291 Assisted Transfer 136, 158, 160, 181, 286
Assisted Transfer Action 136, 158, 160, 181, 286 Associating
Voice 79 Voice Mailboxes 79
Associating 79 Attachment - When 65 AuditTrail.txt 177 Audix 29, 93, 94, 98, 282 Audix Browser Status Test 98 Audix Digital 94 Audix Digital networking 94 Audix Intuity 278 Audix needs 94 AUDIX Networking 93, 98 Audix TTY Interface 282 Audix Voicemail 29 Authentication 19, 116 Author 268, 269, 273 Author's name 268, 269, 273 Auto
Customizing 211 Auto 25, 48, 211 Auto sensing 25 AutoAttend 194 Auto-discovered 71 Automated Attendant 101 Automatic 12, 13, 48, 98, 131, 203, 209, 210, 212, 253, 279, 290, 319 Automatic Fallback Language Selection 290 Automatic Inward Routing 253 Automatic Message Deletion 279 AutoRecord module 211 AV 219 Available Actions 166 Avaya 11, 15, 17, 19, 25, 29, 33, 62, 83, 91, 93, 94, 98, 105, 106, 135, 171, 181, 205, 277, 278 Avaya ContactStore 19, 25 Avaya G.150
voicemail support 33
Avaya G.150 33
Avaya Interchange Configure 94
Avaya Interchange 19, 83, 91, 93, 94 Avaya Interchange Enterprise List Administration 94 Avaya Interchange Release 5.4 83 Avaya Intuity Audix 11, 93, 94 Avaya Terminal Emulator 93, 98 Avaya TTS 29, 105, 106 Avaya TTS CD 106 Avaya voicemail 94, 98, 278 Avaya Voicemail Pro 94, 98 Avaya Voicemail Pro icon 98 AvayaEx/ou 233 AVM 219, 231 B Back button
use 41 Back button 41 Backing
Up 31 Backing 31 Basic 33, 35, 53, 56, 71, 85, 98, 101, 155, 166, 195, 231 Basic Rate Interface 231 Basic Tests 98 Between
Switching 60 Between 14, 15, 16, 18, 25, 51, 53, 56, 60, 62, 83, 93, 101, 108, 118, 150, 159, 166, 319 Between ALERT 62 BLF
incorporates 201, 202
BLF 134, 201, 202 Body - If
user 65 Body - If 65 Book 273 Book matching
ISBN 273 Book matching 273 Books
caller purchases 268
Books 268, 269, 273, 275 Bookshop 269, 273, 275

Index
Voicemail Pro Installation and Maintenance Page 341 IP Office 3.1 Issue 14f (28th September 2005)
Bookshop_CurrentBookSpeakDetails 269, 273 Bookshop_Welcome 269 Boolean 303, 304, 314 Both users 62, 180 Branch
callflow 163 Branch 33, 162, 163, 166, 172 Branch according 166 Brazilian 17, 19, 105, 290 BRI 231 Brooktrout 221, 231, 243, 260 Brooktrout Analog PCI
tests 216 Brooktrout Analog PCI 216 Brooktrout fax 233, 251 Brooktrout including Analog 231 Brooktrout SDK 3.1.0 231 Brooktrout System Software 231 Brooktrout TR 114 219 Brooktrout TRxStream 231 Browse 31, 35, 41, 71, 79, 85, 114, 119, 164, 172, 184, 188, 199, 262, 269 Browse button
Use 31 Browse button 31, 35, 41, 71, 85, 184, 188, 269 Browseable 41 Browser 19, 93, 98, 199 Browser Requirements 199 Browsing
Address 199 Campaign 199
Browsing 199 BSTR 184 BSTR interruptable 184 BSTR interruptables 184 BSTR msg_name 184 BSTR speechstr 184 BSTR Value 184 BSTR wav1 184
BSTR wavname 184 Busy 25, 127, 129, 131, 136, 150, 159, 160, 178, 179, 181, 203, 209, 286, 319, 331 Button Programming 206 By Remote Machine Name 94 C C 19, 30, 31, 41, 48, 80, 92, 182, 184, 204, 246 Calendar 195, 196, 197 Calendar element 197 Call Access 62 Call Answer 93, 101, 319 Call archiving system 118 Call back 170, 331 Call display 131 Call flow
callers 283 Call flow 11, 12, 19, 31, 48, 62, 107, 130, 136, 141, 142, 148, 151, 152, 153, 154, 156, 162, 163, 164, 165, 166, 173, 177, 182, 184, 185, 189, 193, 208, 212, 214, 267, 268, 269, 273, 275, 283, 285, 286, 291, 292, 293, 294, 331 Call flow according 163 Call Flow Customization 151 Call follows
Success 130 Call follows 130 Call Forwarding 177 Call handling 185 Call involving 206 Call List Action 179 Call processing 199 Call processing agents 199 Call returns 178 Call routing 166 Call Status 178 Call Waiting 131 Callback 130, 135, 141, 142, 156, 158, 170, 177 Callback Number 141, 142, 177 Callback Start Point 130, 141
Called 1234.wav 164 Called Attend… 135 Called Catalogue 135 Called Centralized 101 Called DVM 135 Called Extn205 135 Called gfi 228 Called IMSClient.exe 80 Called Main 135, 148 Called Pager 181 Called TimeCheck 133, 134 Caller attempts 158 Caller explaining 182 Caller hears
sequence 175 Caller hears 175 Caller making 177 Caller matches
ISBN entry 269 Caller matches 269 Caller pressing 172, 174 Caller purchases
book 268 Caller purchases 268 Callerid 295 Callers
action disconnects 172 action transfers 178, 181 call flow 283 module tells 273 prompt confirms 186
Callers access 156 Callers advising 118 Callers Details 275 Callers Estimated 151 Caller's Mailbox 174, 175, 176, 177, 287 Callers pressing 172, 174 Callflow
Allows 189 branch 163 copy 31 during 177
Callflow 31, 156, 163, 165, 173, 177, 184, 189, 193, 291 Callflows 31, 295, 297 CallingParty Property 294, 295 CallRecord 206 Calls
Voicemail 131 voicemail functions 156
Voicemail Server receives 156
Calls arriving 215 Calls direct 286 Calls into/from 29 Calls to/from voicemail 15 Calls to/from voicemail involving non-IP 15 Campaign
Accessing 202 Action messages 202 Calls to 202 Customer Menu 201 Customer Prompts 200 Introduction 199 Name 201 Park Slot 201 Web access 199
Campaign Action 152, 176, 200, 202 Campaign Directory 119, 300 Campaign hear 199 Campaign Identification 201, 202 Campaign System Preferences 119 Campaign System Preferences. 119 Campaign Web 14, 35, 52, 53, 56, 71, 85, 199 Campaign Web Access 52, 53, 56, 199 Campaign Web Component 14, 71, 85, 199 Campaign Wizard 200 Campaign/message 299, 300, 309, 310, 312 Campaigns
Campaign Action 176 messages relating 18 web browser access 25
Campaigns 14, 18, 25, 56, 119, 135, 176, 201, 299, 300, 309, 310, 312 Campaigns allow 13 Canadian 17, 19, 289, 290, 292

Index
Voicemail Pro Installation and Maintenance Page 342 IP Office 3.1 Issue 14f (28th September 2005)
Cannot Change Password 53 CAPI 2.0 fax 231 Captaris 256 Captaris RightFax 215 Capture
ISBN 269 Capture 221, 269, 301 Catalogue.Collect 135 CCC
want 170 CCC 12, 25, 170 CCC Operation 25 CD 33, 35, 41, 71, 80, 85, 105, 106, 256 CD's 105, 106 Central 101, 104, 289 Central America 277 Central System 101, 104 Central system hosting 101 Centralized 11, 67, 97, 101, 104, 289 Centralized QSIG Audix Voicemail 11 Challenge 19, 116 Challenge Response Authentication 19, 41, 116 CHANGE 62 Change password 56 Change/Remove 30 Changing
Full 288 Greetings 151
Changing 108, 151, 288 Channel Configuration Column 93 Check
Status Through 98 Check Digits Action 187 Check name 53, 56, 70 Check That 25, 30, 35, 41, 71, 82, 85, 94, 97, 98, 106, 275 Checks that access 275 China 277 Chinese 17, 19, 105, 106 Choices 17, 19, 94, 213, 290, 291 Choose Complete 261 Choose Setup Language 106
Choose Tools 233 CID 310 Class 243 Class 2.0 243 Class 2.1 fax 243 Clear 18, 48, 312, 331 CLI match 178 CLI matching 166, 178 CLI Routing Action 178 CLI@0,4 294 Click Add Brooktrout Board 260 Click Custom 233 Click OK 233 Click Properties 53, 56 Client 11, 25, 51, 67, 70, 80, 111, 245, 279 Client PC's 67 Clock Action 183 Close 30, 31, 41, 48, 53, 56, 70, 79, 80, 98, 108, 162, 166, 188, 190, 267, 269, 275 Closing XML 108 Code 240 Collaboration Data Objects 231 Collecting Messages
Group 148 Remote Access 139
Collecting Messages 139, 148 COM 184 COM Methods Supported 184 Combined CCC/Voicemail 12 Command
Execute 189 Command 18, 48, 93, 98, 108, 119, 161, 163, 166, 171, 184, 189, 200, 220, 221, 275 Compare 163, 197, 211 Complex Mailbox Customization 283 Computer Management 70 Computer/Processor 133 MHz 255 Computers 253 Condition 197 Condition Account1 211 Condition Action 186
Condition element 197 Conditions
Calendar element 197 Compare element 197 Condition element 197 Test Condition Action 186 Week Planner element 197
Conditions 18, 151, 152, 153, 155, 163, 166, 174, 186, 195, 196, 197, 211 Conditions Editor 153, 155, 186, 195, 196, 211 Conference 181, 203, 206, 331 Conference Capacity 203 Conference Finished 181 Conference Full 181 Conference Not 181, 331 Conference Not Started 181 Conference PIN 181 Conferencing Center 181 Conferencing Center Action 181 Config 256 Configuration
PBX 126 Source Number 130 User 129
Configuration back 111, 141, 205, 209, 210, 282 Configuration Menu 158 Configuration Menu Action 177 Configure
Avaya Interchange 94 DNS Server 97 VPNM Accounts 91
Confirm 19, 30, 104, 120, 129, 141, 144, 186, 220, 275, 331 Confirm Book Details 275 Confirm Folder Replace message 30 Connect
wizard fails 35, 41, 71
Connect 25, 29, 35, 41, 56, 67, 71, 80, 84, 93, 94, 141, 160, 162, 172, 179, 184, 188, 206, 215, 216, 217, 219, 267, 281, 282, 286, 291, 331 Connection point 159, 160, 173 Connection string
open 188 Connection string 188 Connection Tab 56, 188 Connection taking 309 Connection Test 98 Connections
Adding 136, 160 Delete 160 on constructing 188 Results 160 results represents 160
Connections 11, 15, 25, 56, 60, 62, 80, 98, 116, 136, 141, 155, 159, 160, 172, 173, 178, 179, 180, 181, 182, 184, 186, 187, 188, 190, 193, 201, 267, 269, 301, 302, 304, 305, 306, 308, 309, 310, 312, 313, 314, 315, 316, 317 Connector
During 232 Connector 232, 246, 253 Console 18, 48, 50 Console provides
number 18 Console provides 18 Consult
Domain Administrator 53
Consult 53 Contact 12, 17, 19, 180, 212, 268, 319 Contact Stories 212 Contains
expandable/contractible list 154
Continue 35, 41, 53, 56, 70, 71, 85, 94, 251, 319, 331 Continue scanning 319
Index
Voicemail Pro Installation and Maintenance Page 343 IP Office 3.1 Issue 14f (28th September 2005)
Continuous Loop 127, 184, 331 Control Panel 30, 48, 53, 60, 98, 106, 219, 245 Control Unit 16, 101 Copy
callflow 31 Send 62
Copy 12, 30, 31, 51, 53, 56, 62, 65, 66, 80, 94, 115, 129, 136, 144, 147, 155, 161, 204, 211, 268, 286, 291, 319, 331 Cost 231, 268, 269, 273, 275 Cost Routing 231 Countries 17 CP 163, 184, 310 CP0 163, 305, 316 CP15 163, 305, 316 CP3 189 CPU 255 CPUs on 255 CPx 163 CreateObject 295, 296, 297, 302, 308, 310, 314 Creating
Matching 136 Creating 56, 136, 193, 291 Creating a Module 193, 291 Criteria Section 189 Currently save/processed messages 202 Custom
Switching 292 Custom 13, 33, 130, 148, 150, 171, 181, 231, 233, 289, 292, 331 Custom Install 35 Customer
Enter 106 Customer 11, 19, 31, 41, 52, 60, 67, 71, 85, 106, 200, 201, 256 Customer Contact 19 Customer Menu 201 Customer Prompts 200 Customer Technical Contact 19 Customised Operation 153 Customize Auto-Record 211 Customized Operation 153
Customizing Auto 211 Manual 208
Customizing 208, 211 D Danish 17, 19, 290 Data
Retrieving 269 Returning 273 view 269
Data 11, 15, 94, 101, 117, 143, 166, 181, 182, 188, 189, 200, 231, 267, 269, 273, 305, 313, 316, 331 Data Access Components 231 Data As String 316 Data Channels
voicemail 101 Data Channels 15, 101 Data Link Properties
open 188 Data Link Properties 188 Data Objects 231 Data Tagging 181 Data/telephony
existing 19 Data/telephony 19 Database
Details into 275 Enter Details into 275 Export 161 Import 161
Database 11, 14, 19, 25, 29, 31, 98, 105, 107, 114, 154, 155, 161, 163, 166, 171, 181, 184, 188, 189, 190, 199, 267, 268, 269, 273, 275 Database Close Action 190 Database Connectivity 267 Database Execute 189, 267, 269, 275 Database Execute Action 189, 267, 269, 275 Database Get Data 189, 267, 269 Database Get Data Action 189, 269 Database Get Data allows 267 Database Interface 19, 267 Database IVR 19, 25 Database needs 275
Database Open Action 188, 189, 269, 275 Database Open Icon 189, 269, 275 Database Operation 11, 267 Database Service 14 Database succeeds 188 Date 19, 35, 153, 177, 189, 245, 275, 308, 310, 331 DATE TWENTY FIRST SEPTEMBER 310 Days 319 DB 161, 273 DB Backup 161 DBD 107, 163, 171, 189, 267, 273, 310 DBData variable 189 Default Gateway 94 Default Language 35, 41, 71, 85, 94, 289 Default NameNet type 94 Default No Answer Time 126 Default Operation 153 Default Start Points 156, 158, 291 Default Telephony Interface 30, 118 Default Telephony Operation 278 Default.Collect 135 Default.Leave 135 Default.Queued 135 Default.Still Queued 135 Defaultvalue 184 Delete
Action 159, 160 Connection 160 Start Point 155, 156
Deleted after… 121 Deleting a Connection 160 Deleting a Start Point 155, 156 Deleting an Action 159, 160 Description 29, 94, 117, 169, 179, 181, 184 Deselect 53, 56, 71, 85, 197 Deselecting 156 Details cover
use 131 Details cover 131
Details into Database 275
Details into 275 Details key 94 Deu 290 Devices 251 DHCP 25 Diagnostics 18, 50, 71, 98, 161 Dial
number 136 Dial by Name 91, 101, 180, 277, 285, 286, 288 Dial by Name Action 180, 285, 286 Dial by Name action needs 285 Dial by Name Directory 101 Dial In Source Numbers 130 Dial Plan 91, 93, 94 Dial Plan Mapping 94 Dialable number 91 Dialogic 231 DID 253 Digit
Sequence 172 Digit 94, 107, 123, 129, 141, 144, 163, 164, 166, 172, 187, 221, 228, 233, 260, 262, 281, 299, 301, 308, 310, 319 Digit Access 123 Digit dialing 94 Digit string starting 172 Digital Machine Administration 93 Digital Networking 94 Digital Networking Machine Administration 94 Digital Nodes 94 Digits As Long 301 Digits As String 308 Direct Access 139, 140, 143 Direct Access from a Trusted External Location 140 Directory 41 Directory View 94 Disable Anti Virus 219 Disconnect 16, 80, 151, 160, 166, 172, 186, 201, 267, 319, 331 Disconnect Action 172, 186

Index
Voicemail Pro Installation and Maintenance Page 344 IP Office 3.1 Issue 14f (28th September 2005)
Disk Space 12, 25, 118, 122 Disk Space Left 122 Display
REC 205 Display 13, 18, 48, 50, 56, 62, 71, 80, 82, 98, 115, 117, 131, 141, 145, 160, 161, 165, 169, 176, 177, 179, 181, 195, 196, 197, 200, 203, 205, 209, 210, 216, 219, 228, 255, 277, 281, 282, 288, 307 Display administrator's-log 98 Display name 56 Display Phone Indication 145 Display string 307 Display VGA 255 Displaying and Accessing Hunt Group Messages 145 DLG 310 Dlgid As Long 301, 302, 304, 305, 306, 308, 309, 310, 312, 313, 314, 315, 316, 317 DNS 56, 97, 98 DNS needs 97 DNS Server
Configure 97 DNS Server 56, 97 DO 296, 297 Do Not Distrub 177 Do Not Disturb 131, 177, 331 DO SOME PROCESSING 296, 297 Dom_01.wav 331 Dom_31.wav 331 Domain 19, 25, 51, 53, 70, 71, 80, 84, 85, 91, 94, 97, 116, 123, 218, 231, 245, 253, 262 Domain Account 53 Domain Admin 218, 245 Domain Administrator
consult 53 Domain Administrator 53 Domain Controller 84, 231 Domain Member 53 Done 17, 25, 30, 53, 56, 62, 79, 83, 84, 94, 97, 111, 139, 141, 161, 171, 178,
181, 184, 194, 253, 285, 288, 289 Done according
PC 25 Done according 25 DOS 98 DOS prompt 98 Double-click Administrators 53 Dow_01.wav 331 Dow_07.wav 331 Drive CD-ROM 255 Drop 16, 35, 41, 71, 85, 92, 116, 185 Dropdown list 189 DS 288 DS/DT 15 DSS 131, 201, 202, 206, 286 DSS button 286 DSS key 201, 202, 206 DT port 288 DTMF
indicate 172 sequence 187
DTMF 118, 136, 163, 172, 182, 187, 189, 215, 221, 228, 233, 240, 253, 260, 262, 285, 301 DTMF Data 182 DTMF dialing 136, 285 DTMF key 163 DTMF Routing 260 DTMF routing destination 228 DTMF signalling 118 DTMFB 216 During
Connector 232 Faxination 231 Zetafax 253
During 231, 232, 253 Dutch 17, 19, 105, 290 DVD 12, 19, 25, 212, 255 Dynamic 94 Dynamic Sub Expiration Days 94 E E1 231 EConsole
user 134 EConsole 132, 134 Edit
Action 159 Start Point 155, 156 Voicemail Pro GUI 31
Edit Play List Action 66, 158, 164, 176 Edit Value 188 Editing a Start Point 155, 156 Editing an Action 159 EICON DIVA PRO/SERVER fax 219 EICON Diva server BRI 231 Element displays
list 197 Element displays 197 Elements 163, 195, 196, 197 Email 11, 13, 14, 19, 25, 35, 41, 50, 51, 52, 53, 56, 60, 62, 65, 66, 67, 71, 78, 79, 80, 85, 105, 111, 115, 116, 120, 129, 144, 166, 183, 218, 240, 243, 245, 246, 248, 249, 279, 331 E-mail 56, 66 Email account 35, 41, 52, 53, 56, 60, 71, 78, 85, 115, 129, 144 Email Account Settings 60 eMail Action 65, 66, 175, 183 EMail action follows 66 EMail action's Attach 66 Email address 51, 52, 60, 62, 65, 79, 111, 129, 183 E-mail address 56 Email Client 25, 51, 53, 60, 65, 80 Email Gateway 246 Email Gateway 243, 246 Email Gateway Option 243 Email Gateway requires 243 Email Gateway Users 248 Email inbox 67, 111 Email Mode 177 Email Options 53, 56 Email Protocol 53, 56, 60, 78, 120 Email reading 105, 111, 129, 218 Email Reading services 111 Email running 14 Email sending 25, 56
Email Server 25, 51, 52, 60 Email Settings 115 Email Settings dialog 41 Emails 35, 41, 51, 53, 56, 71, 85, 111, 115, 116, 120 Emails file 115 Embedded Voicemail 11, 15 Emph 108 Empty Tags 108 En/MC_00 164 En/MC_01 164 Ena 290 Enable
use 29 Enable 15, 29, 51, 62, 67, 71, 85, 93, 105, 118, 127, 129, 130, 131, 145, 147, 150, 204, 214, 217, 233, 260, 331 Enables database 29 Enc 290 End 16, 31, 98, 160, 172, 189, 197, 206, 251, 295, 296, 297, 302, 303, 308, 310, 314, 319, 331 End press 319, 331 End Sub 295, 296, 297, 302, 308, 310, 314 Eng 290 English 17, 19, 35, 41, 71, 85, 105, 278, 289, 290, 291, 292, 319, 331 English Non-Intuity Prompts 331 Ensure 246 Ensure Activate Channel 260 Estimated 151, 191, 295, 310, 331 EstimatedAnswer Property 294, 295 ETA 143, 151, 163, 191, 197, 310 Eudora 51 Eudora installs 51 Eudora MAPI 51 Example access 141 Example Call Flow 136, 152 Example Database Scenario 268 Example P901923555456 141 Example SAPI XML Tags 108

Index
Voicemail Pro Installation and Maintenance Page 345 IP Office 3.1 Issue 14f (28th September 2005)
Example V01923555456 141 Exchange
equating 25 Exchange 19, 25, 53, 56, 67, 70, 71, 79, 80, 82, 84, 85, 93, 98, 111, 215, 218, 219, 220, 221, 231, 233, 246, 248, 253, 256, 262 Exchange Administrator 53, 56, 70 Exchange Connector 218, 256 Exchange Connector Component 220 Exchange Connector Installation 220 Exchange Server 14, 19, 53, 56, 67, 70, 71, 79, 82, 85, 111, 215, 219, 220, 221, 248, 256 Exchange Server Knowledge 67 Exchange Test 98 Exchange User 25 Exchange User account 25 Executables 41 Execute
Command 189 Execute 41, 189, 275 Existing
data/telephony 19 TTS 106 Upgrading 31
Existing 19, 31, 106 Existing Campaign 200 Existing System
Upgrading 31 Existing System 31 Expand 79, 82, 156, 228 Expandable/contractible list
contains 154 Expandable/contractible list 154 Expiry date 275 Export 31, 154, 161, 193, 248 Express
Internet Mail 56 Express 56 Ext 302 External 62, 116, 129, 130, 139, 140, 141, 144, 156, 178, 183, 194, 286, 289, 319, 331
External dialing 130, 141 External Location
Accessing Voicemail from 140
External Location 140 Extn201 132, 140 Extn205.Callback 135 Extn205.Collect 135 Extn205.Leave 135 Extn214 140 Extn247/MSG00004 304, 315 F Failure
mailbox follow 174 the mailbox follow 174
Failure 98, 130, 136, 174, 181, 184, 189 False 160, 162, 163, 166, 178, 180, 186, 187, 195, 211, 303, 304, 312 Fax
Routing 214 Fax 19, 118, 172, 213, 214, 215, 216, 217, 218, 219, 220, 221, 228, 231, 233, 240, 243, 245, 249, 251, 253, 255, 256, 260, 262, 319 FAX 240, 246 Fax Board Installation 260 Fax Calls 118, 172, 215, 240 Fax Devices 231 Fax Extension Number 19, 214 Fax printing number 214 Fax Sub-Addressing 118 Fax Sub-Addressing option 217 Faxination
during 231 MS Exchange/FCS 231 MS Exchange/FCS include 231 running 231
Faxination 231, 233 Faxination Configuration 240 Faxination email 240 Faxination Exchange 231
Faxination Gateway Running 231
Faxination Gateway 231 Faxination server 233 Faxination’ 231 FAXmaker 221 FaxSav 231 FCS 231 Feature key
locate 101 Feature key 19, 25, 101 Feature Key Serial Number 19 Feature Key server 19, 25, 101 Feature Options 94 Fenestrae 231, 240 Fenestrae Faxination 215 Fi 290 Fifty-nine 331 Figure
7.2MB 25 Figure 15, 19, 25 File
Import or Export 161 Include 161 pathname 300 Save & Make Live 161 Save as 161 View as Text 161
File As String 299, 300 File contains 31, 154, 175 File routing 199 File VMData.mdb 31 Files
.WAV 67 Files 31, 56, 66, 67, 80, 115, 135, 161, 169, 176, 177, 184, 268, 310, 312, 313 Finish
start 31 Finish 31, 35, 41, 53, 56, 70, 71, 80, 85, 93, 164, 181, 220, 221, 233, 251, 260, 261, 319, 331 Finnish 17, 19, 290 Five 308 Follow Me Number 177, 331 Following
License Keys 29 No Answer 179, 181, 201 RightFax 260 TTY 281
Following 29, 179, 181, 201, 260, 281 For help 129, 144, 188, 319, 331 For help press 319 Forward 12, 19, 62, 65, 67, 83, 98, 118, 129, 142, 144, 147, 177, 202, 280, 299, 300, 319, 331 Forwarding Number 177, 331 ForwardMsg 299 ForwardMsg Method 299 ForwardMsgToMailbox 300 ForwardMsgToMailbox Method 300 Fr 296 Fr 290 Fra 290 Français 291 Frc 290 Fred 163 Freeze 18, 48 French
look 289, 290 French 17, 19, 105, 289, 290, 292 French Canadian 289, 290, 292 Frequency 203, 209 Full
Changing 288 Full 13, 19, 25, 33, 35, 41, 91, 123, 127, 161, 262, 277, 278, 280, 285, 288, 299, 300, 309, 310, 312, 319 Full Name 19, 91, 123, 127, 285, 288 FullFilename 300 FullFilename Method 300 Func 206 FWD 62 G GA 282 Gateway Service 14 GB 19, 255 General 12, 19, 25, 30, 53, 56, 60, 70, 78, 94, 98, 113, 118, 153, 154, 163, 165, 169, 173, 177, 204, 213, 217, 233, 279, 287, 288 General Parameters 94 General Requirements 25 General Screen 70
Index
Voicemail Pro Installation and Maintenance Page 346 IP Office 3.1 Issue 14f (28th September 2005)
General Tab 12, 30, 53, 56, 169, 173, 177, 233, 287, 288 General tab provides 169 Generic Action 163, 171, 275 German 17, 19, 105, 290 Get 98, 141, 142, 158, 166, 174, 179, 180, 215, 283, 291, 292, 295, 296, 297, 298, 319 Get Mail 141, 142, 158, 174, 180, 283, 291, 292 Get Mail Action 141, 158, 174, 283, 291, 292 GetCallingParty 184, 301 GetCallingParty Method 301 GetDTMF 184, 301 GetDTMF Method 301 GetEstimatedAnswer 184, 301 GetEstimatedAnswer Method 301 GetExtension 302 GetExtension Method 302 GetLocale 184, 302 GetLocale Method 302 GetMailbox 302 GetMailbox Method 302 GetMailboxMessage 303 GetMailboxMessage Method 303 GetMailboxMessages 303 GetMailboxMessages Method 303 GetMessagePriority 303 GetMessagePriority Method 303 GetMessagePrivate 304 GetMessagePrivate Method 304 GetMessageStatus 304 GetMessageStatus Method 304 GetName 304 GetName Method 304 GetNewMsgs 305
GetNewMsgs Method 305 GetOldMsgs 305 GetOldMsgs Method 305 GetPositionInQueue 184, 305 GetPositionInQueue Method 305 GetRegister 184, 305 GetRegister Method 305 GetResult 184, 306 GetResult Method 306 GetSavedMsgs 306 GetSavedMsgs Method 306 GetSavedResult 306 GetSavedResult Method 306 GetVariable 184, 306 GetVariable Method 306 GFI 219, 220, 221, 228 GFI fax 219 GFI FAXmaker
scanning 219 GFI FAXmaker 215, 219 Give Error Messages 127 Goodbye 319 Goto Action 172, 288 Graphnet 231 Greek 17, 19, 290 GREETINGS
Changing 151 GREETINGS 151, 299, 300, 309, 310, 312 Group
Service Mode 177 Voice Recording 13
Group Broadcast 12, 147 Group Broadcast Messaging 12 Group ID 104, 127, 132, 139, 140, 148, 194, 206 Group III fax 243 Group Member 134 Group Page 12 Group Ringback 130 Groups 16, 56, 136, 140, 143, 145, 147, 150, 156, 178, 179, 228 Groups select 156 Guide 17, 277
H Hangup Action 172 Hard Disk Size 19 Hardware 233 Hear 17, 111, 131, 150, 152, 175, 180, 181, 182, 191, 200, 281, 283, 319, 331 Helo 98 Help 19, 35, 41, 129, 131, 136, 144, 182, 188, 211, 268, 286, 291, 319 Help ensure 19 Help identify 35, 41 Hh 310 Hide 205, 210 Hide Auto 210 Highlight <New 233 Highlight Integrated Messaging Associations 79 HMain 130, 145 Home Action 173 Hours
Out 149, 178 Hours 11, 19, 25, 101, 121, 131, 143, 149, 178, 184, 195, 279, 310, 319, 331 Hours Fallback Group
Out 149 Hours Fallback Group 149 Hours Greeting
Out 149 Hours Greeting 149 Hours Greetings
Out 143 Hours Greetings 143, 149, 331 Hours Operation 149 Housekeeping
Automatic Message Deletion 279
Housekeeping 279 Housekeeping Preferences 121 HRESULT 184 HTML 111 HTML formatting 111 Hu 290 Hun 290 Hungarian 17, 19, 290 Hunt Group
Service Mode 177 Voice Recording 13
Hunt Group 13, 177 Hunt Group Configuration 144
Hunt Group Messages 143, 145 Hunt Group Queuing 150 Hunt Group Voicemail 130, 143, 145 Hunt Group Voicemail Indication 130 Hunt Groups 12, 13, 16, 62, 101, 125, 130, 134, 136, 143, 144, 145, 147, 148, 149, 150, 151, 156, 158, 160, 163, 166, 177, 194, 203, 205, 209, 211, 213, 331 I Icon display
User Defined Variables menu 162
Icon display 162 Icons 30, 35, 41, 48, 50, 53, 56, 67, 70, 71, 79, 80, 85, 98, 104, 113, 154, 155, 159, 160, 162, 171, 189, 196, 214, 269, 275, 279 ID 94, 117, 134, 181, 233, 262, 301, 302, 304, 305, 306, 308, 309, 310, 312, 313, 314, 315, 316, 317, 319, 331 ID Length 94 Ident 299, 300 Ident As String 299, 300 Idle 94, 279, 288 IIS 41, 84, 219 IIS running 41 Import 31, 154, 161, 193, 280 Import Call Flows 31 IMPORTANT 80, 141, 143, 219, 319 IMPORTANT NOTE 80 Importing and Exporting 161 IMS
License 25 part 25
IMS 11, 13, 14, 19, 25, 29, 33, 50, 51, 67, 70, 71, 78, 79, 80, 82, 85, 114, 115, 116, 120 IMS Account 70, 71, 78, 82, 85
Index
Voicemail Pro Installation and Maintenance Page 347 IP Office 3.1 Issue 14f (28th September 2005)
IMS Administration Tool 14, 67, 79 IMS and/or Campaigns 25 IMS Client Installer 80 IMS Client Package 14 IMS Client Setup 80 IMS Client Software 80 IMS Clients 14, 67, 80 IMS Components 67 IMS comprises 67 IMS Database Service 67, 114 IMS email 115 IMS ensure 71, 85 IMS Gateway 67, 114 IMS Gateway Service 67, 114 IMS Installation 25, 67 IMS Installation Alternatives 67 IMS Limitations 67 IMS Pro 25 IMS Server 14, 67, 79, 80 IMS user 14, 78 IMS user’s 82 IMS Voice 14, 67, 114 IMS Voice Service 14, 67, 114 IMSAdmin 25 Inbound 233 Inbound Routing 262 Include ICLID 141 Include SAPI XML 171 Include SAPI XML tags
modify 171 Include SAPI XML tags 171 Including Active Data Objects 231 Including Other Files 161 Incoming
DDI 216 match 134 VPNM 98
Incoming 56, 98, 134, 216 Incoming Call Route
Voicemail 140 Incoming Call Route 134, 140, 156, 286 Incoming Mail Server 56
IncomingCallRoute 194 Incorporates
BLF 201, 202 Incorporates 201, 202, 215 Indicate
DTMF 172 Indicate 17, 111, 116, 119, 131, 132, 136, 141, 154, 172, 179, 187, 197, 200, 205, 285, 290, 291, 292, 314, 319 Indicate support 17 Inetpub/mailroot/Drop 92 Inetpub/wwwroot 41 INSERT 189, 275 Insert Disk 106 INSERT….VALUES 189 Install VPNM 83, 84 Installable 17 Installation
installed during 35 options during 281
Installation Process 53, 56, 71, 80, 104, 106, 231, 260 Installation Requirements 25 Installation Summary 19 Installation testing 53 Installation/Service Account 19 Installed during
installation 35 Installed during 31, 35 Installed TTS 106 Installing
on screen 245 Installing E-forms 231 Installing Faxination 231 Installing Generic 106 Installing GFI FAXmaker 219 Installing host 231 Installing IMS 70 InstallShield Wizard 30, 35, 41, 71, 85 Int_na.wav 331 INT-AUDIX 94 Integral 126 Integrated
running 70 Integrated 11, 13, 14, 19, 29, 51, 67, 70, 71, 79, 80, 85, 101 Integrated Messaging 29, 71, 80, 85
Integrated Messaging - Enables 29, 71 Integrated Messaging Service 67 Integrated Messaging Service (IMS) 67 Integrated Messaging System 11, 13, 14 Integrated Voicemail 101 Intel Dialogic 243 Intel Dialogic GammaLink including Analog 231 Interact 11, 50, 67, 218, 267 Interchange 93, 94, 98 Interchange Basic Tests 98 Interchange Dial Plan 94 Interchange General Parameters 94 Interchange Intuity Interface 94 Interchange Main Menu 94, 98 Interchange VPIM Interface 94 Interchange-based 94 Internal 19, 127, 139, 156, 158, 178, 289, 294, 319, 331 International 127 Internet 19, 25, 41, 56, 84, 97, 219 Internet Explorer 5.01 25 Internet Explorer 5.5 25 Internet Information Service 41, 84, 219 Internet Mail
Express 56 Internet Mail 56 Interrupt_key 184 Interruptables 308, 309, 310, 312, 313, 317 Interruptables As String 308, 309, 310, 312, 313, 317 Interruptkey 184 Interruptkeys 184 Intranet 199 Introduction
Campaigns 199 Modules 193
Introduction 193, 199, 215 Introduction to Campaigns 199
Introduction to Modules 193 Intuity
Login 94 Voicemail Pro defaults 278
Intuity 11, 12, 13, 17, 19, 29, 30, 83, 93, 94, 98, 111, 118, 129, 130, 131, 139, 140, 142, 148, 154, 174, 213, 214, 217, 277, 278, 279, 280, 281, 285, 287, 319 Intuity Audix 29, 83, 93, 94, 98 Intuity Audix Command Line Interface 98 Intuity Audix Dial Plan 94 Intuity Mailbox 13, 30, 139, 140, 213, 277, 278, 280, 285, 287, 319 Intuity Mailbox Mode 13, 30, 139, 140, 213, 277, 285, 287 Intuity Mode 12, 13, 17, 111, 118, 129, 130, 131, 142, 148, 174, 213, 214, 277, 280, 281, 285 INT-VPNM 94 Invalid Conference 181 IP Address 19, 25, 56, 93, 94, 98, 101, 104, 126 IP Network 83, 84 ISBN
book matching 273 capture 269 matching 269
ISBN 268, 269, 273, 275 ISBN entry
caller matches 269
ISBN entry 269 ISBN number 269, 275 ISDN 243 ISMClient.exe file 80 Ita 290 Italian 17, 19, 105, 290 Its Status 48 ITU 180, 182, 285 IVR 11, 267, 331 J Japanese 17, 19, 105, 290
Index
Voicemail Pro Installation and Maintenance Page 348 IP Office 3.1 Issue 14f (28th September 2005)
Job Aid 104, 151 Jp 290 Jpn 290 K Kernel Components 233 Key press
option 136 record 200
Key press 136, 172, 182, 200, 291, 308, 309, 310, 312, 313, 317 Ko 290 Kor 290 Korean 17, 19, 105, 290 L LAN
switching 25 LAN 15, 25, 56, 97, 125 Language 17, 19, 33, 35, 41, 71, 80, 85, 105, 106, 166, 177, 204, 220, 221, 278, 283, 289, 290, 291, 292, 319 Language Support 17, 19 Language Switching 289 Last
Status 98 Last 98, 107, 163, 172, 180, 182, 189, 191, 267, 294, 295, 319, 331 LastAccessedMsg Property 294, 295 Latin 17, 19, 105, 290, 292 Launch
VB 314 Launch 240, 314 LCR 231 LDONE 288 Leave
actions relate 166 VMAIL 131
Leaving Messages 166 LEdit 288 Length setting 93 Licence Key 11, 29 License
IMS 25 License 11, 12, 13, 14, 15, 19, 25, 29, 33, 35, 41, 67, 71, 84, 85, 93, 101, 104, 105, 106, 123, 166, 171, 184, 188, 189,
190, 205, 209, 212, 221, 228, 256, 260, 261, 273, 310, 317 License Agreement 221 License Keys
following 29 License Keys 11, 19, 29, 166 Licensed user/group 228 Licenses enable
use 29 Licenses enable 29 Licenses exist 105 Line 98, 101, 104, 126, 127, 132, 136, 139, 140, 148, 183, 194, 206, 216, 221, 231, 233, 243, 331 Linked 15, 91, 101, 156, 162, 165, 179, 184, 188, 199, 269, 281, 286, 292 List Definition 94 Listen 131, 158, 164, 175, 179, 180, 208, 211, 319, 331 Listen Action 158, 175, 179, 208, 211 Lite 15, 19 LOC 163, 184, 289, 292, 294, 296, 302, 310, 315 LOC/custom/getmail.wav 292 Local Administrator 56 Local Administrator’ permissions 231 Local Machine Administration 93, 94 Local PC 19, 35, 41 Local Users 53 Locale 17, 91, 163, 221, 282, 283, 289, 290, 294, 296, 300, 309, 312, 315 Locale As String 315 Locate
Feature Key 101 Locate 25, 30, 31, 41, 50, 53, 80, 82, 101, 119, 204 Location Independent’ Connectors’ 231 Log On 35, 41, 50, 53, 56, 70, 71, 80, 82, 85, 218, 245 Logging Levels 114 Logic Settings 195, 196 Logical Setting 196
Login Intuity 94
Login 93, 94, 214, 319 Logins 319, 331 Logon 56, 245 Long 67, 179, 181, 201, 212, 295, 303, 305, 306, 307 Look
French 289, 290 Look 53, 70, 98, 151, 156, 228, 268, 289, 290 Look In 53, 70 Loop Until Len 302 Lotus Domino R4.5
R6.5 243 Lotus Domino R4.5 243 LROTATE
enter 288 LROTATE 288 LVOICE
pressing 145 LVOICE 145 M Machine 93, 94, 98, 219, 220, 221, 231, 233, 256, 262, 319 Machine Administration 94 Mail
shut 56 Mail 12, 51, 53, 56, 70, 79, 80, 83, 98, 116, 134, 135, 256, 280, 319 Mail Account 56, 70 Mail Server Name 98, 116 Mailbox
synchronize 79 The list 299 Voicemail creates 16
Mailbox Access 62, 118, 130, 281, 282 Mailbox access appears
users 118 Mailbox access appears 118 Mailbox Actions 286 Mailbox As String 299, 300, 303, 304, 307, 308, 315 Mailbox Code 177 Mailbox enter 141 Mailbox Fax Number 213, 214 Mailbox follow
Failure 174 Mailbox follow 174
Mailbox Main Access 133
Mailbox Main 133, 134 Mailbox matching 174, 175, 176, 177 Mailbox Modes 11, 30, 174 Mailbox Names 16, 141, 166, 176, 180, 287 Mailbox Operation Mode 19 Mailbox press 319 Mailbox receives 12 Mailbox Store 82 Mailbox/message 299, 300, 304, 309, 310, 312, 315 Mailing Lists 12, 319 Main 93, 94, 113, 133, 134, 135, 136, 142, 145, 148, 164, 221, 319 Main Menu select Networking 94 Main Menu select Networking Administration 94 Main.Collect 135 Main.Leave 135 Main.Queued 294 Main.StillQueued 294 Maintenance Menu 98 Make
server>/zetafax 246
Make 53, 70, 79, 93, 94, 98, 127, 161, 169, 177, 180, 183, 184, 219, 246, 269, 275, 285, 319 Make Live 31, 118, 161, 278 Manual
Customizing 208 Triggering 206
Manual 12, 83, 203, 205, 206, 208 Manual Recording 205 Manual Recording Mailbox 205 MAPI 11, 14, 19, 25, 50, 51, 53, 56, 60, 78, 105, 111, 115, 120, 144, 217, 219, 231 MAPI Client 14, 19, 51, 56 MAPI Operation 53, 56, 78

Index
Voicemail Pro Installation and Maintenance Page 349 IP Office 3.1 Issue 14f (28th September 2005)
MAPI Password 78, 120 MAPI Profile 53, 60, 78, 120, 231 MAPI System Preferences 120 MAPI System Preferences. 120 Mary 105, 106 Matching
Creating 136 Incoming 134 ISBN 269 MS-CRM 181
Matching 134, 136, 181, 269 Max 12, 118, 204 Max Message Time 118 Maximum
Menu Action supports 172
Maximum 12, 13, 15, 19, 25, 29, 83, 94, 101, 118, 172, 184, 194, 200, 203, 204, 255, 301, 312, 313, 319 Maximum Message Length 19, 203, 204 Maxtime 184, 312, 313 Maxtime As 312, 313 Maxtime As Long 312, 313 MB 19, 25, 80, 122, 255 MB RAM 80, 255 Mbytes
RAM 219 Mbytes 219 MDAC 231 Mdb 31, 161 mdb files 161 Media 164, 319 Member Of 25, 53, 56, 70, 80, 144, 145, 148, 245 Menu Action 136, 151, 169, 172, 181, 213, 214, 269, 291 Menu Action supports
maximum 172 Menu Action supports 172 Menu actions Touch Tones 214 Menu button 145 Menu key 206, 288 Merge Config 282 Message archiving 25
Message As String 303, 304, 307, 308, 315 Message counts 303 Message direct 53, 56 Message following
SMTP 53, 56 Message following 53, 56 Message Length 118 Message press 319, 331 Message storage 19, 131 Message Test Connection Succeeded 188 Message Time 118, 204 Message waiting 62, 125, 130, 131, 145 Message Waiting Lamp 145 MessageCLI 184, 307 MessageCLI Method 307 MessageDisplay 307 MessageDisplay Method 307 MessageLength 184, 307 MessageLength Method 307 Messages 310 Messages consume 25 Messages Look Like 65 Messages relating
campaigns 18 Messages relating 18 Messages Through
Playing 67 Messages Through 14, 67, 199 Messages/recordings 118 MessageTime 308 MessageTime Method 308 Messaging Application Program Interface 51 Messaging Associations 79 MHZ 219, 255 Microsoft 11, 14, 19, 25, 41, 51, 53, 56, 67, 70, 80, 97, 98, 105, 106, 108, 199, 219, 228, 231, 233, 243, 245, 246, 255,
256, 262, 268, 269, 319, 331 Microsoft Access database 268, 269 Microsoft Exchange 11, 14, 51, 53, 56, 67, 70, 97, 219, 231, 233, 243, 245, 246, 256, 262 Microsoft Exchange checkbox 70 Microsoft Exchange Client 67 Microsoft Exchange Connector 233 Microsoft Exchange Routing Type 262 Microsoft Exchange Server
access 14 Microsoft Exchange Server 11, 14, 53, 56, 67, 70, 97, 219, 231 Microsoft IIS 14, 19, 25 Microsoft IIS Web Server 25, 41 Microsoft Internet Explorer 14, 199, 231 Microsoft Internet Explorer 5.0 199 Microsoft Office 231 Microsoft Outlook 51, 67, 80, 219, 228, 231, 243 Microsoft Outlook Express 5.5. 51 Microsoft Outlook Inbox 228 Microsoft Personal Web Server 25, 41 Microsoft Sam 105, 106 Microsoft SAPI 105, 108 Microsoft Small Business Server 2000 243 Microsoft WAVE file 319, 331 Microsoft Web Server 25, 199 Mike 105, 106 Millennium Edition 48 MIME
TNEF 219 MIME 219 Min 122 MINUTE 308 Minutes 310 mod files 161 Modify
include SAPI XML tags 171
user 123 Modify 71, 85, 91, 117, 123, 171, 200, 315, 319 Modify button 123 Modular Messaging 33 Module Bookshop_CurrentBookBuy 275 Module Return 160, 173, 193, 291 Module Return Action 160, 173, 193, 291 Module SelfSelect 136 Module tells
caller 273 Module tells 273 Modules
created 193, 291 Creating 193, 291 Export 161 Import 161 Introduction 193 Module Return Action 173
Modules 11, 29, 101, 131, 133, 134, 135, 136, 153, 154, 156, 159, 160, 161, 163, 165, 166, 173, 193, 194, 208, 211, 214, 269, 273, 275, 285, 286, 287, 288, 291, 292 Months 319, 331 MS Exchange 25, 53, 56, 67, 70, 80, 231, 233 MS Exchange Client 80 MS Exchange Connector 231, 233 MS Exchange/FCS
Faxination 231 MS Exchange/FCS 231 MS Exchange/FCS include
Faxination 231 MS Exchange/FCS include 231 MS-CRM
matching 181 MS-CRM 181 MS-CRM database 181 MS-CRM records 181 MS-CRM users 181 MSCRM-ACT 181 Msec 108 Msg ID 94 Msg_cli 184

Index
Voicemail Pro Installation and Maintenance Page 350 IP Office 3.1 Issue 14f (28th September 2005)
Msg_length 184 MSGN 310 MSGO 310 Msgs 145, 310 Msgtype 303, 315 Msgtype As String 303, 315 MSRM-ACT 181 Multisite 117 MUST 123, 231 MUST run 231 MWI 145 My Computer 30, 31, 35, 41, 85 Mywavs/hello.wav 184 N N 19, 94, 206, 303, 304, 315, 319 NAM 163, 164, 294, 296, 304, 310 Name
Action 169 Campaign 201 property returns 296 Returns 294 Token 169
Name Action 176 Name Determination 98 Name ending 31 Name enter 319 Name greeting 277 Name matches 194, 319 Name Recordings 285, 288 Name Table 288 Named AutoRecord 211 Named SelfSelect 136 Named Special 194 NameWavsTable 288 Nest Tags 108 Net Runtime 1.1 35 Netscape 14, 199 Network Address 94 Network Identification 53, 70 Network Identification Tab 53, 70 Network Settings 188 Network Snapshot 98 Network Turnaround 93, 94 Networked Messaging 29, 33 Networked Messaging - Enables 85 Networking Channel Administration 93, 94
New Account 56 New messages 12, 51, 62, 111, 121, 129, 131, 144, 300, 319, 331 NewMsgs Property 294, 296 Next logon 56 Next result 136, 159, 160, 174 Night Service 149, 331 Nl 290 Nlb 290 Nld 290 No Answer
following 179, 181, 201
No Answer 131, 136, 143, 159, 160, 178, 179, 181, 201, 286, 319 No Answer Time 131, 143 No DTMF Data 182 No_.wav 331 No_00.wav 331 No_24p.wav 331 No_59.wav 331 Non-administered
Send 93 Non-administered 93 Non-Administered Recipients
Send 93 Non-Administered Recipients 93 Non-centralized voicemail 104 None 114, 209, 211, 331 Non-IP 15 Noon.wav 331 Normal Business Hours 19 Normally IMS 67 North 277 Norwegian 17, 19, 105, 290 NOT 195, 196 NOTE 231 NOTE Faxination Server 231 Notification Priority 94 Noun 108 NT 18, 25, 53, 70, 80, 243 NT Domain 25, 80 NT/2000 80 NT4 25, 80 NT4 Service Pack 6a 80 Number 253
console provides 18 Dial 136 IP Office supports 277 Queue Ring Time defines 150 ScanSoft 106 Simultaneous 15 Voicemail provides 143, 149
Number Field 135, 181 Number of Simultaneous Voicemail Users 15 O Observing IMS Operation 82 ODBC 267 Office's configuration 145, 205, 209 Old Messages 121, 331 OldMsgs Property 294, 297 OLE DB Provider
Select 188 OLE DB Provider 188 Open
connection string 188 Data Link Properties 188 Speech 171 Windows Control Panel 31
Open 31, 41, 50, 51, 53, 56, 67, 70, 80, 82, 106, 108, 111, 113, 162, 166, 171, 183, 188, 189, 190, 206, 219, 228, 240, 246, 262, 267, 269, 288 Open and/or 166 Open Door Action 183 Open The GFI configuration application 228 Opening XML 108 Operating System 19, 25, 48, 80, 97, 231, 243, 255 Operating System CD 97 Option Yes 31 Optional 116, 136, 308, 309, 310, 317 Options key 94 OR 189, 195, 196, 197
Other Phone Types 62 Out
Hours 149, 178 Hours Fallback Group 149 Hours Greeting 149 Hours Greetings 143 Service 149 Service Fallback Group 149
Out 93, 94, 98, 108, 111, 127, 143, 149, 155, 170, 178, 184, 309, 310, 317, 319, 331 Out according 155 Out of Hours Operation 149 Outb_01.wav 331 Outb_04.wav 331 Outcalling
enter 319 Outcalling 141, 319 Outgoing 56, 104 Outlook 19, 51, 53, 56, 67, 70, 80, 111, 215, 218, 240 Outlook 97 51, 67, 80 Outlook 97/98/2000, Outlook Express 14 Outlook Express 19, 51, 56 Outlook inboxes 218 Overflow Group 150 Overflow Time 150 Overview
Remote Access 139 Voicemail Pro 11, 153
Overview 11, 51, 139, 153, 165, 212, 277 Overview of Actions 165 Overview of Remote Access 139 Overview of Voicemail Pro 11, 153 P P 19 PAGE
entering 184 PAGE 184 Park Slot 201, 202 Park Slot Number 201, 202 Parked… 201 Part
IMS 25

Index
Voicemail Pro Installation and Maintenance Page 351 IP Office 3.1 Issue 14f (28th September 2005)
Part 19, 25, 41, 51, 53, 56, 62, 65, 67, 70, 83, 85, 105, 108, 180, 206, 288 Partofsp 108 Partofsp part 108 Path Setting 114 Path/file 299, 300, 309, 310, 312 Pathname
file 300 Pathname 299, 300, 310, 312 PBX 126 PC
done according 25 PC 11, 12, 14, 19, 25, 30, 31, 35, 41, 48, 53, 56, 67, 70, 71, 80, 85, 93, 94, 97, 98, 101, 104, 114, 120, 125, 126, 131, 164, 176, 177, 183, 199, 212, 232, 233, 245, 256, 277 PC acting 104 PC Multimedia 164 PC Physical Location 19 PC Requirements 12, 80 PC running 97 PC Spec 19 PC Specification 25 PCI 221, 260 PC's
Program Files/Avaya/IP Office/Voicemail Pro/Vm/vmprov5.exe 41 users 41
PC's 35, 41, 48, 67, 85 Pentium 12, 19, 25, 80 Pentium 100 80 Pentium 200 25 Pentium-compatible CPU 243, 255 Perform
timeout 172 Perform 67, 98, 111, 118, 143, 163, 164, 166, 172, 189, 208, 211, 279 Permissions 41, 53, 67, 70, 94, 188, 218, 231, 240, 245, 253, 262, 267 Personal Distribution Lists 12, 280 Personalize 80
Phone Manager 51, 130, 131, 132, 134, 145, 202, 206, 280 Phone Manager Pro 206, 280 Phone Manager Pro toolbar 206 Phone Manager Pro users 206 Phone Manager Pro's Pop Outlook 51 PhoneManager
Refer 277 PhoneManager 134, 277 PhoneManager application 277 PhoneManager Pro 277 Phones 51, 62, 67, 131, 132, 134, 141, 145, 179, 181, 202, 203, 206, 210, 278, 280, 281, 288, 319 Pin
Voicemail Code enter 141
Pin 141, 169, 173, 177, 181, 287, 288, 331 PIN option 173 Ping Test 98 Pitch - Alter
speech 108 Pitch - Alter 108 Pl 290 Planning
Requirements 101 Planning 101 Play Advice 19, 118, 204 Play advice on Call Recording 118 Play button
recording press 164
Play button 164 Play Configuration Menu Action 62, 141, 142, 177 Play List Action 176 Play try 289 PlayDigits 184, 308 PlayDigits Method 308 Playing back
response 176 Playing back 67, 176, 201, 277, 319 PlayLocaleWav 184, 309 PlayLocaleWav Method 309 PlayMsg 184
Plays allows access 199 Messages Through 67 variable 164 WAV 184
Plays 12, 13, 19, 62, 67, 118, 127, 129, 141, 142, 149, 150, 158, 164, 166, 169, 171, 175, 176, 177, 179, 180, 182, 183, 184, 191, 199, 200, 201, 203, 204, 277, 278, 279, 288, 289, 295, 308, 309, 310, 317, 319, 331 PlayWav 184, 310 PlayWav Method 310 Please Select 172, 176, 201, 288 Plk 290 PM 319, 331 PM.wav 331 Polish 17, 19, 290 Polling interval 246 Populate
Zetafax tool 248 Populate 248 Port 12, 14, 15, 19, 25, 29, 35, 41, 71, 85, 93, 94, 101, 116, 216, 251, 281, 288 Port Number 19, 116 Portuguese 17, 19, 105, 290 POS 151, 152, 163, 197, 310 Position 143, 151, 152, 155, 163, 166, 169, 184, 191, 200, 297, 302, 303, 310, 331 PositionInQueue Property 294, 297 Post 12, 184 Post Dial Action 12, 184 POT 216, 281 Power Conferencing Action 181 Power Socket Location 19 Preferences
MAPI 120 Remote Campaign Directory 119 Voicemail 118
Pre-installation actions 35, 41, 71, 85 Pre-Installation Requirements
Refer 35
Pre-Installation Requirements 35 Press Exit 288 Press F6 195, 196 Press Menu 145, 288 Pressing
F6 195 F7 200 F8 162 lVOICE 145 Syntax Check button 184 VOICE 145
Pressing 145, 162, 179, 184, 195, 200, 282, 291 Pressing F6 displays 195 PRI 231 Primary Rate Interface 231 Primary RateInterface 231 Priority 98, 303, 319 Privacy 98, 304 Pro 12, 15, 51, 85, 91, 135 Procedure. 31, 98, 231 Profile 78, 80, 120, 149, 203, 231, 249, 262 Profile Screen 80 Prompt Availability 17 Prompt confirms
caller 186 Prompt confirms 186 Prompt played 200 Prompts appropriate 33 Prompts tab 169, 171, 182, 191 Properties form 97, 188 Property returns
name 296 Property returns 296 Pro's Pop Outlook 51 Provide Local Mapped Addresses 94 Provider Tab 188 Ptb 290 Ptg 290 Public Folders 67 PWS 14, 41 Q QPOS 184, 294, 297, 305, 310 QSIG 11 QTIM 184, 294, 295, 301, 310 Question Action 175 Queue 310

Index
Voicemail Pro Installation and Maintenance Page 352 IP Office 3.1 Issue 14f (28th September 2005)
Queue ETA Action 191 Queue greeting 150, 331 Queue Position Action 152, 191 Queue Ring Time 150 Queue Ring Time defines
number 150 Queue Ring Time defines 150 Queued 98, 150, 156, 158, 191, 294, 295 Queued Start Point 151 Queued start point replaces
default 151 Queued start point replaces 151 Queuing
transferred back 160
Queuing 101, 129, 135, 143, 150, 151, 152, 155, 156, 158, 160, 163, 166, 184, 191, 297, 310, 331 Queuing Limit 150 R R6.5
Lotus Domino R4.5 243
R6.5 243 RAID 25 RAM
Mbytes 219 RAM 19, 219, 243, 255 Rate - Alter
speech 108 Rate - Alter 108 REC
displaying 205 REC 205 Rec_01.wav 331 Receive 228 Receive messages 56, 130, 145 Receiving 251
e-mail 253 Receiving 253 Reception 129, 130, 136, 162 Recipients/cn 233 Recor 206 Record
key presses 200 Response 175 saying 164 shortcode 206
Record Inbound 209
Record key 200 Record Key Press 200 Record Name Action 158, 176, 287 Record Other Calls 206 Record Outbound 209 Record Voice 200 Record Your Own Calls 206 Record/re-record 287 Recording As String 312 Recording Auto End 203 Recording Duration 203 Recording Frequency 209 Recording Indication 205, 210 Recording Length 118, 200, 204, 312, 313 Recording Library 12, 29, 174, 203, 205, 209, 212 Recording press
play button 164 Recording press 164, 319, 331 Recording Warning 203 Recording/Prompts 179 RecordMsg 184, 312 RecordMsg Method 312 RecordRegister 184, 313 RecordRegister Method 313 Redirect Fax 213 Refer
PhoneManager 277 Pre-Installation Requirements 35
Refer 17, 19, 31, 35, 94, 104, 130, 256, 277, 278, 280, 282, 302 Reference 94, 246, 294 Regid 184 Regional 278 Regional Setting 278 Register 53, 56, 70, 305, 313, 314, 316 Register Method 314 Regnum 184, 305, 313, 316
Regnum As Long 305, 313, 316 Relevant Sections 153 Relogon 319 Relogon press 319 Rem NOW SET LOCALE BACK TO WHAT IT WAS 296 Rem NOW SET LOCALE TO FRENCH 296 Remote 11, 19, 83, 91, 92, 93, 94, 98, 101, 104, 117, 119, 123, 129, 142, 185, 231, 280, 289, 331 Remote Access
Overview 139 Remote Access 19, 129, 139, 331 Remote Address 94 Remote Campaign Directory 119 Remote Machine 93, 94 Remote Machine Administration 93, 94 Remote Machine Name 94 Remote Machine Parameters 94 Remove 16, 30, 31, 71, 85, 111, 123, 155, 231, 245, 319 Removing Faxination/FCS 231 Renaming
User 156 Renaming 156 Renaming a User 156 Repair 71, 85 Replace permission entries… 262 Reporting 165 Reporting Tab 170 Request ISBN 273 Required following installation 204 Required TTY prompts 281 Requirements
Planning 101 VPNM 84
Requirements 25, 80, 84, 101, 199, 203, 204, 218, 219, 231, 243, 255, 267 RES 163, 164, 184, 294, 297, 306, 316 Response
playing back 176 Record 175
Response 13, 66, 98, 152, 166, 175, 176, 199, 200, 201, 202 Restart 16, 31, 35, 41, 48, 50, 52, 53, 56, 80, 85, 120, 201, 233, 319, 331 Result As String 316 Result Failure 181 Result occurs 160 Retrieving
Data 269 Retrieving 269 Return Action 173 Return counts 303 Retval 184 Reuslt 188 RFA 29 RFaxGate 262 RFAXGATE’ 262 RFGATE 256 Right-click My Computer 53, 70 Right-click Network Neighborhood 53 Right-click Network Neighbourhood 70 Right-click Sub-addresses 253 RightFax
Following 260 RightFax 256, 260 RightFax Enterprise 262 RightFax Installation 256 RightFax Requirements 255 RightFax server 255 Ringback
Group 130 Ringback 129, 130, 145 Root.vmp 31, 48, 118, 119, 154, 161 Rotat 288 Route 131, 133, 134, 136, 166, 176, 178, 181, 194, 202, 218, 228, 240, 253, 288 Route by Call Status 178 Route calls to a campaign 202 Route Incoming 178, 218 Route Incoming Call Action 178 Routing
Fax 214 Routing 134, 214, 228, 240 Routing button 249 Routing Code 262

Index
Voicemail Pro Installation and Maintenance Page 353 IP Office 3.1 Issue 14f (28th September 2005)
Routing Info 262 Routing option 228 Routing User Calls to Voicemail 131 Run 221 Run Manager 35 Running
Faxination 231 Faxination Gateway 231 Integrated 70 Zetafax 245
Running 48, 70, 98, 231, 245 Running a Module Directly from a Short Code 194 Running a Module Directly from an External Call 194 Russian 17, 19, 105 S S8100
access 93 S8100 93, 98 S8100 Ping Test 98 S8100/G600
telnet 93 S8100/G600 93 Sales 148 Sample
SAPI XML 108 Sample 83, 108, 164 Sample listing 164 SAPI 105, 106, 107, 108 SAPI XML
sample 108 SAPI XML 108 SAPI XML Tags 108 SAPI5 TTS 105 Save
S 304, 315 Save 19, 30, 31, 48, 53, 56, 60, 67, 78, 80, 93, 94, 118, 119, 127, 131, 136, 141, 152, 154, 155, 161, 163, 201, 202, 204, 210, 213, 217, 278, 279, 287, 292, 294, 298, 303, 304, 306, 310, 315, 331 Save & Make Live 30, 31, 119, 154, 155, 161, 204, 278 Saved messages 310 Saved Messages 121, 331 SavedMsgs Property 294, 298 SavedResult Property 294, 298
Saving and Making Live 48, 53, 56, 60, 78, 141, 161, 213, 217, 279, 287 Saving messages 131 Say <emph>boo</emph 108 Saying
3001 108 Record 164
Saying 108, 164 Scanning
GFI FAXmaker 219
Scanning 219 ScanSoft
number 106 ScanSoft 19, 29, 105, 106 ScanSoft Speech 106, 171 Schema Admin 218, 245 Schema Admin group 245 SCN 11, 101 Script 41, 293 Scripting 184 Scripting entered 293 SCROLL 62, 206 Seconds.wav 331 Sequence beginning 172 Serial 19, 101, 256 Series 67, 131, 145, 153, 156, 163, 165, 199, 200, 206, 269, 275 Series Phones 145, 206 Server address>/campaign/campcgi.html 199 Server Configuration 262 Server Directory 118 Server Kernel 232 Server operating system 25 Server Operation 12 Server OS 12 Server PC 14, 19, 25, 35, 41, 48, 51, 52, 53, 56, 60, 70, 71, 85, 101, 104, 105, 114, 216, 245 Server PC hosting 114 Server PC's 113 Server PC's fax 217
Server Requires Authentication 41, 116 Server>/zetafax
make 246 Server>/zetafax 246 Server>25 84 Servers 11, 12, 14, 18, 19, 25, 30, 35, 41, 48, 50, 51, 52, 53, 56, 60, 67, 70, 71, 79, 80, 82, 83, 84, 85, 91, 97, 98, 101, 104, 105, 113, 114, 115, 116, 118, 123, 169, 177, 179, 181, 199, 201, 215, 216, 217, 218, 219, 220, 221, 228, 231, 233, 240, 243, 245, 246, 255, 256, 262, 278, 331 Servers Section 123, 228 Service
Out 149 Select account 256
Service 11, 14, 17, 18, 19, 25, 33, 35, 41, 48, 50, 51, 53, 56, 62, 67, 71, 80, 84, 85, 92, 97, 98, 101, 111, 114, 120, 133, 136, 141, 143, 149, 177, 183, 194, 203, 218, 219, 220, 221, 231, 233, 240, 245, 256, 286, 288, 319, 331 Service according
Windows 35 Service according 35 Service Fallback Group
Out 149 Service Fallback Group 149 Service Mode 177, 331 Service Option Screen 56 Service Pack 25, 219 Service routing ID 233 Service running 25 Service Test 98 Session’s 294, 305, 306 Set
10 180 255.255.255.255 126
Set 12, 13, 17, 19, 29, 30, 35, 41, 48, 50, 51, 53, 56, 62, 65, 66, 67, 71, 85, 93, 94, 101, 104, 105, 106, 108, 113, 114, 116, 117, 118, 121, 122, 125, 126, 130, 131, 133, 136, 139, 140, 141, 145, 150, 156, 159, 160, 161, 162, 163, 165, 166, 170, 174, 177, 179, 180, 181, 182, 186, 187, 189, 193, 194, 195, 196, 197, 199, 200, 201, 202, 203, 204, 205, 206, 208, 209, 211, 213, 214, 215, 216, 217, 233, 240, 246, 251, 277, 278, 279, 282, 283, 285, 286, 287, 288, 289, 290, 295, 296, 297, 298, 302, 308, 310, 312, 314, 315, 316, 317, 319, 331 Set back 30, 319 Set User Variable 162, 186 Set User Variable Action 162, 186 Set Voice 295, 296, 297, 302, 308, 310, 314 SetLocale 315 SetLocale Method 315 SetMailboxMessage 315 SetMailboxMessage Method 315 SetRegister 184, 316 SetRegister Method 316 SetResult 184, 316 SetResult Method 316 SetSavedResult 316 SetSavedResult Method 316 Setting tty 282 Setting Up 67, 104, 140, 141, 156, 199, 282, 285 Setting Up Centralized 104 Settings 19, 25, 31, 35, 41, 48, 52, 53, 56, 60, 62, 65, 67, 70, 71, 78, 79, 85, 93, 98, 104, 108, 111, 114, 115, 116,

Index
Voicemail Pro Installation and Maintenance Page 354 IP Office 3.1 Issue 14f (28th September 2005)
120, 121, 125, 126, 141, 145, 156, 158, 161, 166, 172, 173, 174, 175, 176, 177, 178, 179, 180, 181, 183, 184, 186, 187, 188, 191, 195, 196, 197, 200, 203, 206, 246, 279, 319 Settings back
system 206 Settings back 206 Settings during installation 60, 78 Settings need 79 Setup 246 Setup Mode 233 Setup.exe 35, 41, 71, 85, 233, 261 SetVariable 184, 317 SetVariable Method 317 Short Code Start Points 162 Short Code.xxx 172 Short Codes
Accessing Hunt Group Voicemail Using 148
Short Codes 127, 132, 133, 134, 135, 136, 139, 140, 143, 148, 149, 153, 156, 162, 166, 172, 183, 186, 194, 286, 287, 288 Short Codes.*88 156 Short Codes.DVM 135 Shortcode
recording 206 Shortcode 135, 206, 287 Shortcode Start Points 135 Shut
Mail 56 Shut 53, 56 Simple Mail Transfer Protocol 51 Simple Mailbox Customization 283 Simple Network Management Protocol 122 Simplified Chinese 19, 105, 106 Simultaneous
Number 15 Simultaneous 13, 15, 19, 29, 101, 105 Sixty 319 Sleep/power 25
Small Community Networking 101, 104 Small Office Edition 11, 15, 19, 25 SMTP
Enter 41 message following 53, 56
SMTP 11, 19, 25, 35, 41, 51, 52, 53, 56, 60, 71, 78, 84, 85, 94, 98, 116, 120, 219, 243, 256 SMTP Email Servers 51, 116 SMTP Email Settings 116 SMTP Server
access 14 SMTP Server 14, 19, 35, 41, 51, 71, 84, 85, 116, 243 SMTP Server Settings 116 SMTP Server Software 19 SMTP/Entering 60 SMTP/MIME 83 SNMP Alarm 12, 122 SoftConsole 131, 132, 134, 206, 286 SoftConsole access 134 SoftConsole users 206 Software Licence Agreement 233 Source Number Configuration 130 Source Numbers 130, 140, 141, 143, 145 South 277 SP6 25 Spanish 17, 19, 105, 290, 292 Speak Book Cost 273 Speak Book Title 273 Speak Book Title action 273 Speak Method 317 Speak Text Action 105, 107, 111, 163, 171, 273, 275 Speaker 288 Speaks 11, 105, 107, 108, 111, 151, 163, 164, 166, 171, 175, 183, 273, 275, 310, 317, 319, 331 Speaks AT ELEVEN HOUR FIFTY FIVE 310
Speaks AT ELEVEN HOUR HUNDRED 310 Speaks YESTERDAY AT ELEVEN HOUR FIFTY FIVE 310 Specific Start Points 156, 158 Specify
admin 221 Specify 221 Speech
open 171 Pitch - Alter 108 Rate - Alter 108 Text 171 Volume - Alter 108
Speech Application Program Interface 108 Speech Directory 118 Speech Supported 35, 41, 71, 85 Speed 19, 108, 134 Speed Dials 134 Spell - Spell out 108 SQL 189, 267, 269, 275 SQL Function 189, 269, 275 SQL Wizard 189, 269, 275 SQL Wizard Interface 189 Standard Action Tabs 171, 172, 173, 174, 175, 176, 177, 178, 179, 180, 181, 183, 184, 186, 187, 191 Standard Edition 255 Start
Finish 31 Voicemail Pro 154
Start playing 176 Start Point Action 166 Start Points
Adding 155, 156 Default Start Points 158 Deleting 155, 156 Editing 155, 156
Starting Voicemail Pro 48, 154, 278 Startup 30, 48, 98 StartUp Folder 41, 48 Startup Type 48, 98 Status
Last 98 Status 35, 41, 48, 67, 71, 85, 94, 98, 106, 178, 199, 315, 319 Status Test 98 Status Through
Check 98
Status Through 98 Stdcall GetCallingParty 184 Stdcall GetDTMF 184 Stdcall GetEstimatedAnswer 184 Stdcall GetLocale 184 Stdcall GetPositionInQueue 184 Stdcall GetRegister 184 Stdcall GetResult 184 Stdcall GetVariable 184 Stdcall MessageCLI 184 Stdcall MessageLength 184 Stdcall PlayDigits 184 Stdcall PlayLocaleWav 184 Stdcall PlayMsg 184 Stdcall PlayWav 184 Stdcall RecordMsg 184 Stdcall RecordRegister 184 Stdcall SetRegister 184 Stdcall SetResult 184 Stdcall SetVariable 184 Stdcall Speak 184 Stdcall Stop 184 Step 30, 51, 53, 56, 67, 71, 83, 92, 94, 98, 120, 269, 275, 319 Step back 319 Steps appropriate 120 Still 62, 67, 135, 143, 150, 151, 156, 158, 163, 269, 275, 287, 292, 314, 331 Still Queued 156, 158, 163 Stop Recording 206 Store
Web 41 Store 12, 31, 41, 67, 82, 119, 131, 161, 163, 180, 212, 233, 275, 299, 300, 305, 309, 310, 312, 313, 316, 319 Store ISBN number 275 Storing messages 131

Index
Voicemail Pro Installation and Maintenance Page 355 IP Office 3.1 Issue 14f (28th September 2005)
String 189, 295, 296, 300, 301, 302, 303, 304, 305, 306, 307, 308, 309, 310, 312, 313, 317 Structured Query Language 267 Sub Main 295, 296, 297, 302, 308, 310, 314 Sub-address 253 Subnet Mask 19, 94 Subscriber Administration 94, 319 Subscriber Lists 94, 319 Success
call follows 130 Success 130, 136, 174, 189, 293, 297 Success results 174 Success Then 297 Support/Admin Utilities 261 Supported Languages 17, 281 Supported Remote 101 Supporting
T.30 243 Supporting 243 Sv 290 Sve 290 System
settings back 206 System Administrator 11 System Administrator's 65 System Configuration 62, 126, 141, 145, 147 System Fax Number 118, 213, 214, 215, 217 System greeting 319 System greeting enter 319 System hosting 101 System Parameters 94, 310 System Planning Form 19 System Preferences
MAPI 120 Remote Campaign Directory 119 Voicemail 118
System Preferences 113, 118, 119, 120 System running 148, 213
System Settings 114 System shortcode 206 System variable CP0 275 System variable CP4 275 System Variables
Playing as prompts 164
System Variables 163, 164, 184, 197, 275, 295, 296, 297, 298 System's Feature Key 104 Systems running 213 Systems This 83 T T.30
supporting 243 T.30 243 T1 231 Tags 107, 108, 171, 181 Take
analogue 282 Take 94, 108, 145, 172, 200, 282, 285, 309, 331 Takes care 94 TCP/IP
optioned 94 TCP/IP 25, 67, 80, 93, 94, 97, 98, 231 TCP/IP Diagnostics 98 TCP/IP networking 25, 80, 94 Telephone Icon 80 Telephone Number 91, 108, 123, 127, 130, 132, 133, 134, 139, 140, 141, 145, 148, 156, 194, 206, 275, 319 Telephone number dialing 141 Telephones 13, 15, 17, 19, 62, 67, 80, 91, 108, 123, 127, 130, 131, 132, 133, 134, 135, 139, 140, 141, 144, 145, 148, 156, 162, 164, 182, 194, 199, 202, 206, 275, 277, 281, 282, 285, 288, 319 Telephony Actions 286 Telephony Handset 164 Telephony Interface 15, 118, 154
Telephony Operation Mode 278 Telnet
S8100/G600 93 Telnet 93, 94, 98 Telnet 172.16.254.197 25 98 Telnet<the 84 Temp/backup.mdb 31 Test 310 Test Condition Action 186, 195, 211 Test Connection button 188 Test Connection Succeeded 188 Test Packets 98 Test Setup 92 Test User Variable 162, 186 Test User Variable Action 162, 186 Tests
Brooktrout Analog PCI 216
Tests 216 Text
Speech 171 Text 11, 17, 19, 25, 29, 33, 56, 65, 105, 106, 107, 108, 111, 120, 155, 161, 166, 171, 182, 183, 273, 281, 282, 288, 317, 319 Text As String 317 Text file 161 Text matching 288 Text This 108, 317 The list
mailboxes 299 The list 17, 30, 93, 94, 180, 189, 201, 269, 275, 281, 282, 299, 302, 303, 319, 331 The mailbox 16, 30, 53, 56, 62, 67, 70, 94, 118, 129, 130, 133, 134, 136, 139, 141, 145, 163, 174, 175, 176, 177, 178, 180, 208, 211, 214, 217, 277, 278, 280, 281, 286, 291, 294, 296, 297, 298, 300, 302, 303, 304, 307, 308, 310, 315, 319 The mailbox follow
Failure 174 The mailbox follow 174
The mailbox matching 174, 175, 176, 177 The Mailbox Mode 30 The name 16, 53, 56, 65, 70, 71, 79, 80, 85, 94, 98, 116, 134, 141, 156, 161, 163, 164, 169, 172, 174, 175, 176, 177, 180, 184, 186, 188, 194, 196, 199, 200, 201, 277, 285, 288, 294, 295, 296, 299, 300, 309, 310, 312 The name greeting 277 The Name Table 288 The user access 141 The user account 262 The User Defined Variables menu 162, 186 The user PC's 67 The user receives 141 The user wants 134, 136 The user/group 65 The user's 16, 35, 41, 48, 53, 56, 62, 65, 67, 71, 79, 80, 85, 91, 111, 115, 123, 130, 131, 134, 136, 140, 141, 142, 145, 148, 156, 162, 163, 164, 182, 183, 186, 194, 199, 205, 206, 208, 211, 253, 262, 278, 282, 283, 285, 291, 292 The Voicemail Console 18 The Voicemail Pro Screen 154, 155 The Voicemail Pro screen provides 155 This option 53, 56, 62, 123, 144, 170, 172, 181, 200, 204, 288 Through Manager 134, 149 Time according 331 Time Check 134 TimeCheck 134 Timeout
perform 172 Timeout 136, 172, 179, 181, 184, 187, 201, 233, 283, 301 Timeout As Long 301 Timeout results 136, 187
Index
Voicemail Pro Installation and Maintenance Page 356 IP Office 3.1 Issue 14f (28th September 2005)
Title 154, 268, 269, 273, 275 TNEF
MIME 219 TNEF 219 Token Name 169 Tones
Sequence 172 Tones 118, 127, 130, 136, 150, 164, 169, 172, 174, 175, 203, 209, 214, 215, 260, 319, 331 Toolbar Icons 155 Toolbars 155 Tools 232 Topic 170 Total Items 82 Touch 136, 166, 169, 172, 213, 214 Touch Tones 136, 166, 172, 213, 214 TR 1034 219 TR1000 231 TR1034 231 Transfer
Voicemail Pro supports 12
Transfer 12, 29, 51, 67, 83, 93, 118, 130, 131, 132, 135, 136, 142, 151, 158, 160, 162, 166, 170, 174, 178, 179, 181, 203, 212, 213, 214, 215, 228, 240, 249, 282, 286, 319, 331 Transfer Action 136, 158, 178 Transfer Calls
Voicemail 132 Transfer Calls 132 Transfer Calls to Voicemail 132 Transferred back
queue 160 Transferred back 160 Triggering
Manual 206 Triggering 206 Troubleshooting 98 True 159, 160, 162, 163, 166, 178, 180, 186, 187, 195, 196, 197, 211, 286, 303, 304, 308, 309, 310, 312, 317 True, False 159, 160, 187 TruFax 231 Trufax fax 219 Trusted Extension 140
Trusted External Location 140 Trusted Locations 130, 139, 140 Trusted Source 130, 135, 141 TTS
existing 106 Voicemail Pro support 105
TTS 11, 19, 25, 29, 33, 62, 105, 106, 107, 108, 111, 120, 163, 166, 171, 184, 310, 317 TTS email 19, 129 TTS Email Reading 19 TTS Generic 19 TTS SAPI Controls 108 TTS Scansoft 19 TTS Support 105 TTS Usages 19, 29, 105, 111 TTY
following 281 see 281
TTY 17, 281, 282, 283 TTY Maintenance Patch 283 TTY messages 282 TTY prompts 283 Typical Installation 25, 41, 231 U Uncheck 53, 56 Uncheck User 56 Undelete 319 Under Log on 50 Under Mail Sending Format select Plain Text 56 Under Specific Start Points 141 Under VPNM 91 Uninstall 31, 245 Un-installation 31 Uninstalled 31 Uninstalling 31 United States 277, 278 UNIX 98 Unlimited 67 Unopened Messages 121 Untick 30, 56, 71, 85 Untick Check 56 Untick Send 56 Untick User 56 Unticked 204 Up
Backing 31
Up 12, 15, 25, 29, 31, 35, 41, 56, 71, 79, 82, 83, 85, 101, 141, 164, 165, 172, 176, 179, 181, 186, 191, 219, 240, 255, 267, 268, 280, 319, 331 Update 30, 93, 94, 98, 106, 131, 161, 189, 231, 253, 256, 275 Updates In 93, 94 Upgrading
Existing 31 Existing System 31
Upgrading 31 UPS Supply Available 19 US 17, 19, 71, 85, 105, 289, 290, 292, 319, 331 USB 19 Use
Back button 41 Browse button 31 Details cover 131 Enables 29 I'd like 56 licenses enable 29 VB Scripting 29
Use DNS 94 Use existing PC 19 Use LAN1 25 Us-eng 94 User Configuration 62, 129, 139 User Defined Variable menu
icon display 162 User Defined Variable menu 162, 186 User Defined Variables 155, 162 User Defined Variables menu 162 User dialing 166, 186 User form 17, 130, 140 User form gives
list 130 User form gives 130 User Information 56 User Management 117 User PC's 67 User receives 141 User Recordings 205 User shortcode 206 User Source Number Configuration 130 User Variable 186 Username Field 80
Using Databases 107, 184 Using DSS Keys 206 Using Extension 202 240 Using Max 204 Using Short Codes 133, 149, 206 Using Small Community Networking 101 Using telnet 98 Using the Conditions Editor 196 Using VBScript 184 Using Voicemail Pro 130, 150, 153 Using Voicemail to Give Error Messages 127 V Valid 35, 41, 53, 56, 60, 66, 67, 71, 85, 106, 184, 212, 295, 319, 331 Valid Voice 212 VAR 163, 164, 184, 294, 298, 306, 310, 317 Variable As String 317 VB
launch 314 VB 19, 29, 293, 294, 314 VB Script Action 29, 184 VB Scripting
use 29 VB Scripting 19, 29, 184, 294 VBS 295 VBScript
enter 184 VB-Script
enter 184 VBScript 184, 231, 296 VB-Script 184 VB-Scripting 184 VCM 15, 101 VCM Channels 11, 15 VCM modules 101 VCM5 module 11 Verb 108 Verification 19, 98 Version 12a 135 Version 5.0.2195.6713 98 View
Data 269 View 82, 94, 98, 161, 269, 280
Index
Voicemail Pro Installation and Maintenance Page 357 IP Office 3.1 Issue 14f (28th September 2005)
View as Text 161 View Packet Statistics 98 Viewing As Text 161 Visual Voice 13, 277 VM
entering 194 VM 19, 105, 106, 131, 134, 135, 136, 184, 194, 267 VM Pro 19, 105, 106, 184, 267 VM Pro Generic TTS 105 VM Pro VBScript license 184 VMAIL
leave 131 VMAIL 131 Vmdata.mdb 154, 161 VMLite.exe 30 Vmp 154, 161, 185 VMP files 161, 185 VMPro 19, 29, 84, 117, 188, 189, 190 VMPro Database Interface 29, 188, 189, 190 VMPro Networked 19 VMPro Servers 19, 84 VMPro TTS 29 VMPro VB Script 29 VMPRO VPIM 29 Vmprov5.voicescript 295, 296, 297, 298, 302, 308, 310, 314 Voice Question 66, 152, 175, 179, 183 Voice Question Action 66, 175, 179, 183 Voice Recording 13, 129, 144, 205, 209 Voice Recording Library options 205, 209 Voice Recording Service 13 Voice Selection 106 Voicemail Email 11, 14, 19, 25, 41, 51, 52, 53, 56, 62, 65, 67, 85, 105, 111, 120, 125, 129, 144, 177, 217, 279, 331 Voicemail Email Alerts 62 Voicemail Email enter 111 Voicemail email forwarding 14
Voicemail Email Integration 25, 144 Voicemail Email Mode 62, 65, 129, 144, 177, 331 Voicemail Email on/off 62 Voicemail Email Reading 62, 111, 129 Voicemail Email/IMS Lite 25 Voicemail Features 101 Voicemail functions
call 156 Voicemail functions 156 Voicemail Help 125, 129, 144 Voicemail Lite 11, 13, 15, 17, 18, 19, 30, 35, 41, 51, 62, 101, 126, 130, 135, 150, 153, 277, 278, 331 Voicemail Lite Folders 30 Voicemail Mail Pro 153 Voicemail Mailbox 79, 80, 111 Voicemail Node 156 Voicemail On 11, 53, 125, 129, 131, 144, 278 Voicemail on/off 177 Voicemail Only 25 Voicemail Password 118 Voicemail Password/Confirm Password 126 Voicemail PIN 135 Voicemail Pro allows
actions 143 Voicemail Pro allows 143 Voicemail Pro callflow 153 Voicemail Pro CD 25, 35, 41, 71, 85 Voicemail Pro Client 14, 30, 33, 35, 41, 48, 53, 56, 60, 71, 78, 85, 91, 113, 117, 153, 154, 204, 217, 280 Voicemail Pro Components 14, 19 Voicemail Pro Customization 283 Voicemail Pro defaults
Intuity 278
Voicemail Pro defaults 278 Voicemail Pro Dial Plan 94 Voicemail Pro Fax Operation 213 Voicemail Pro Feature Licenses 29 Voicemail Pro Features 13, 29 Voicemail Pro GUI
editing 31 Voicemail Pro GUI 31 Voicemail Pro Installation 19, 25, 31, 33, 35, 41, 60, 67, 78, 83, 85, 105, 106 Voicemail Pro Language Switching 289 Voicemail Pro Licenses 15, 101 Voicemail Pro Networked Messaging 19, 29, 83, 116, 280 Voicemail Pro programming 153 Voicemail Pro RFA 29 Voicemail Pro RFA 16 29 Voicemail Pro running 62 Voicemail Pro Service 14, 18, 35, 41, 50, 51, 52, 53, 56, 60, 71, 85, 98, 120, 218 Voicemail Pro Service back 50 Voicemail Pro Software 11, 25, 52, 53, 56, 71, 85, 105 Voicemail Pro support
TTS 105 Voicemail Pro support 105, 278, 289 Voicemail Pro supports
transfer 12 Voicemail Pro supports 12, 105 Voicemail Pro TTY Prompts 281 Voicemail Pro Web campaign 41 Voicemail Professional Server 50 Voicemail provides
number 143, 149 Voicemail provides 143, 149 Voicemail Reception 125, 129, 130, 158, 174, 177, 331 Voicemail Reception/Operator 130 Voicemail Ringback 62, 129, 130, 131, 145, 277, 278 Voicemail Ringback Number 130 Voicemail ringback on/off 277 Voicemail rings
user 156 Voicemail rings 131, 156 Voicemail running 125 Voicemail Server Directory 118, 119 Voicemail Server PC 25, 53, 101, 104, 176, 177, 183, 199 Voicemail Server receives
call 156 Voicemail Server receives 156 Voicemail Server Speech Directory 118, 119 Voicemail support
Avaya G.150 33 Voicemail support 33 Voicemail System Preferences 118, 126 Voicemail Tab 62, 104, 126, 129, 130, 141, 144, 147 Voicemail Telephone Numbers 135 Voicemail Trusted Source 130 Voicemail Type 101, 104, 126 VoicemailCollect 127, 132, 133, 135, 139, 140, 148, 156, 194 Voicemails 67, 83 VoIP 15, 101 VoIP lines 101 VoIP/VCM Channels 15 Volume - Alter
speech 108 Volume - Alter 108 VPIM 83, 94 VPIM Machine Administration 94 VPIM server 123

Index
Voicemail Pro Installation and Maintenance Page 358 IP Office 3.1 Issue 14f (28th September 2005)
VPN 104 VPNM
incoming 98 Requirements 84
VPNM 19, 83, 84, 85, 91, 92, 94, 98, 113, 116, 123, 280 VPNM Accounts
Configuring 91 VPNM Accounts 91 VPNM configuration 83 VPNM destination 91 VPNM Port Field 94 VPNM ports 94 VPNM Preferences 92, 123 VPNM Receiver 98 VPNM Server 83, 91, 98, 123 VPNM Server Section 123 VPNM Support 85 VPNM system 91 VPNMreceiver Service 92 VRL 12, 19, 25, 29, 118, 174, 203, 204, 205, 209, 212 VRL application 205, 209, 212 VRL Operation 25, 203 W Wait
key 136 Wait 62, 125, 130, 131, 136, 144, 145, 172, 179, 181, 201, 202, 260, 283, 301,
308, 309, 310, 317, 319 Waiting Indication 62, 125, 130, 144, 145 Warning 16, 94, 104 Warning On/Off 204 Wav
Plays 184 Wav 12, 53, 56, 62, 65, 66, 67, 115, 163, 164, 182, 184, 268, 299, 300, 309, 310, 319, 331 Wav As String 309, 310 Wav Editor 163 WAV file 129, 144, 164, 184 Wav files 12, 53, 56, 62, 65, 66, 67, 115, 129, 144, 163, 164, 184, 319 Wave Editor 164 Wave Files 115, 184, 309, 310, 317 WAVS 299, 300, 309, 310, 312 Web
store 41 Web 19, 25, 33, 41, 71, 85, 199, 202 Web access 41, 199 Web Browser 25, 199, 202 Web browser access
campaigns 25 Web browser access 25 Web Component 41
Web Server 14, 19, 25, 33, 41, 71, 85, 199 Web Server Operation 25 Websites 108 Wed 98 Week Planner 195, 196, 197 Week Planner element 197 Welcome 233, 256 What's New 12 Whilst PC's 25 Whisper Action 158, 179 Who’s Total Items 82 Windows Components 219 Windows Control Panel
Open 31 Windows Control Panel 31, 50, 106, 113 Windows Explorer 30 Windows Millennium Edition 25 Windows operating system 48 Windows XP 19, 25, 231, 243 Windows XP Professional 19, 25, 231, 243 Witness Systems 212 Wizard 12, 33, 35, 41, 56, 71, 85, 106, 117, 221, 231, 251 Wizard appears 35, 41, 85
Wizard fails connect 35, 41, 71
Wizard fails 35, 41, 71 Work Group Member 56 X Xitama Web Server 41 Xitami 14, 19, 25, 41 Xitami Web Server 25, 199 Xitami/cgi-bin 41 Xitami/webpages 41 XML 107, 108, 231 XML Parser 231 XML Tags
Entering 108 XML Tags 108 Y Y 93, 94, 310, 319 YEAR/MONTH/DAY HOUR 308 Z Zetafax
During 253 Run 245
Zetafax 243, 245, 253 Zetafax configuration tool 246, 251 Zetafax Exchange Connector 245 Zetafax Server 243, 245 Zetafax tool
populate 248 Zetafax tool 248


Index
Voicemail Pro Installation and Maintenance Page 360 IP Office 3.1 Issue 14f (28th September 2005)
Performance figures and data quoted in this document are typical, and must be specifically confirmed in writing by Avaya before they become applicable to any particular order or contract.
The company reserves the right to make alterations or amendments to the detailed specifications at its discretion. The publication of information in this document does not imply
freedom from patent or other protective rights of Avaya or others. Intellectual property related to this product (including trademarks) and registered to Lucent
Technologies have been transferred or licensed to Avaya. All trademarks identified by the ® or ™ are registered trademarks or trademarks, respectively,
of Avaya Inc. All other trademarks are the property of their respective owners. This document contains proprietary information of Avaya and is not to be disclosed or used
except in accordance with applicable agreements. Any comments or suggestions regarding this document should be sent to
"[email protected]". © 2004 Avaya Inc. All rights reserved.
Avaya Sterling Court
15 - 21 Mundells Welwyn Garden City
Hertfordshire AL7 1LZ England
Tel: +44 (0) 1707 392200 Fax: +44 (0) 1707 376933
Web: http://www.avaya.com