VNE Server Release Notes, 1 - Cisco · Cisco Configuration Assurance Solution Reference VNE Server...
86
Corporate Headquarters Cisco Systems, Inc. 170 West Tasman Drive San Jose, CA 95134-1706 USA http://www.cisco.com Tel: 408 526-4000 800 553-NETS (6387) Fax: 408 526-4100 Cisco Configuration Assurance Solution Reference VNE Server Release Notes Software Release 3.0 Text Part Number: OL-7557-01
-
Upload
truongnhan -
Category
Documents
-
view
247 -
download
0
Transcript of VNE Server Release Notes, 1 - Cisco · Cisco Configuration Assurance Solution Reference VNE Server...

Cisco Configuration Assurance SolutionReferenceVNE Server Release NotesSoftware Release 3.0
Corporate HeadquartersCisco Systems, Inc.170 West Tasman DriveSan Jose, CA 95134-1706 USAhttp://www.cisco.comTel: 408 526-4000
800 553-NETS (6387)Fax: 408 526-4100
Text Part Number: OL-7557-01

THE SPECIFICATIONS AND INFORMATION REGARDING THE PRODUCTS IN THIS MANUAL ARE SUBJECT TO CHANGE WITHOUT NOTICE. ALL STATEMENTS, INFORMATION, AND RECOMMENDATIONS IN THIS MANUAL ARE BELIEVED TO BE ACCURATE BUT ARE PRESENTED WITHOUT WARRANTY OF ANY KIND, EXPRESS OR IMPLIED. USERS MUST TAKE FULL RESPONSIBILITY FOR THEIR APPLICATION OF ANY PRODUCTS.
THE SOFTWARE LICENSE AND LIMITED WARRANTY FOR THE ACCOMPANYING PRODUCT ARE SET FORTH IN THE INFORMATION PACKET THAT SHIPPED WITH THE PRODUCT AND ARE INCORPORATED HEREIN BY THIS REFERENCE. IF YOU ARE UNABLE TO LOCATE THE SOFTWARE LICENSE OR LIMITED WARRANTY, CONTACT YOUR CISCO REPRESENTATIVE FOR A COPY.
The Cisco implementation of TCP header compression is an adaptation of a program developed by the University of California, Berkeley (UCB) as part of UCB’s public domain version of the UNIX operating system. All rights reserved. Copyright © 1981, Regents of the University of California.
NOTWITHSTANDING ANY OTHER WARRANTY HEREIN, ALL DOCUMENT FILES AND SOFTWARE OF THESE SUPPLIERS ARE PROVIDED “AS IS” WITH ALL FAULTS. CISCO AND THE ABOVE-NAMED SUPPLIERS DISCLAIM ALL WARRANTIES, EXPRESSED OR IMPLIED, INCLUDING, WITHOUT LIMITATION, THOSE OF MERCHANTABILITY, FITNESS FOR A PARTICULAR PURPOSE AND NONINFRINGEMENT OR ARISING FROM A COURSE OF DEALING, USAGE, OR TRADE PRACTICE.
IN NO EVENT SHALL CISCO OR ITS SUPPLIERS BE LIABLE FOR ANY INDIRECT, SPECIAL, CONSEQUENTIAL, OR INCIDENTAL DAMAGES, INCLUDING, WITHOUT LIMITATION, LOST PROFITS OR LOSS OR DAMAGE TO DATA ARISING OUT OF THE USE OR INABILITY TO USE THIS MANUAL, EVEN IF CISCO OR ITS SUPPLIERS HAVE BEEN ADVISED OF THE POSSIBILITY OF SUCH DAMAGES.
Cisco Configuration Assurance SolutionReferenceVNE Server Release NotesCopyright © 2005 Cisco Systems, Inc. All rights reserved.
CCSP, CCVP, the Cisco Square Bridge logo, Follow Me Browsing, and StackWise are trademarks of Cisco Systems, Inc.; Changing the Way We Work, Live, Play, and Learn, and iQuick Study are service marks of Cisco Systems, Inc.; and Access Registrar, Aironet, ASIST, BPX, Catalyst, CCDA, CCDP, CCIE, CCIP, CCNA, CCNP, Cisco, the Cisco Certified Internetwork Expert logo, Cisco IOS, Cisco Press, Cisco Systems, Cisco Systems Capital, the Cisco Systems logo, Cisco Unity, Empowering the Internet Generation, Enterprise/Solver, EtherChannel, EtherFast, EtherSwitch, Fast Step, FormShare, GigaDrive, GigaStack, HomeLink, Internet Quotient, IOS, IP/TV, iQ Expertise, the iQ logo, iQ Net Readiness Scorecard, LightStream, Linksys, MeetingPlace, MGX, the Networkers logo, Networking Academy, Network Registrar, Packet, PIX, Post-Routing, Pre-Routing, ProConnect, RateMUX, ScriptShare, SlideCast, SMARTnet, StrataView Plus, TeleRouter, The Fastest Way to Increase Your Internet Quotient, and TransPath are registered trademarks of Cisco Systems, Inc. and/or its affiliates in the United States and certain other countries.
All other trademarks mentioned in this document or Website are the property of their respective owners. The use of the word partner does not imply a partnership relationship between Cisco and any other company. (0502R)

OPNET VNE Server 3.0Release Notes
These release notes give an overview of the differences between OPNET VNE Server 3.0 and the previous release. If you are upgrading from a previous release, you should review this document.
Because release notes are sometimes updated after the product documentation is distributed, visit the OPNET website (www.opnet.com/support) often to check for the newest version of these release notes and notes for previous releases.
Contents
Release 3.0 Description . . . . . . . . . . . . . . . . . . . . . . . . . . . . . . . . . . . . . . . . . . . . . . . . . . . . . . RN-3.0-5Installation CD Contents . . . . . . . . . . . . . . . . . . . . . . . . . . . . . . . . . . . . . . . . . . . . . . . . . . . RN-3.0-6System Requirements. . . . . . . . . . . . . . . . . . . . . . . . . . . . . . . . . . . . . . . . . . . . . . . . . . . . . RN-3.0-6Changes to Supported Platforms and Products . . . . . . . . . . . . . . . . . . . . . . . . . . . . . . . . . RN-3.0-6Installing or Upgrading VNE Server . . . . . . . . . . . . . . . . . . . . . . . . . . . . . . . . . . . . . . . . . . RN-3.0-7Compatible Versions of OPNET Software . . . . . . . . . . . . . . . . . . . . . . . . . . . . . . . . . . . . . RN-3.0-7Licensing Changes . . . . . . . . . . . . . . . . . . . . . . . . . . . . . . . . . . . . . . . . . . . . . . . . . . . . . . . RN-3.0-7User Interface Changes . . . . . . . . . . . . . . . . . . . . . . . . . . . . . . . . . . . . . . . . . . . . . . . . . . . RN-3.0-9
New Features and Enhancements . . . . . . . . . . . . . . . . . . . . . . . . . . . . . . . . . . . . . . . . . . . . . RN-3.0-11VNE Server Runs as Windows Services . . . . . . . . . . . . . . . . . . . . . . . . . . . . . . . . . . . . . RN-3.0-11
Launching VNE Server . . . . . . . . . . . . . . . . . . . . . . . . . . . . . . . . . . . . . . . . . . . . . . . . RN-3.0-12Opening the VNE Server Management Console . . . . . . . . . . . . . . . . . . . . . . . . . . . . RN-3.0-12Starting and Stopping VNE Server Services. . . . . . . . . . . . . . . . . . . . . . . . . . . . . . . . RN-3.0-13Determining Status of VNE Server Services. . . . . . . . . . . . . . . . . . . . . . . . . . . . . . . . RN-3.0-13Running VNE Server in the Background. . . . . . . . . . . . . . . . . . . . . . . . . . . . . . . . . . . RN-3.0-14Opening the VNE Server Control Panel . . . . . . . . . . . . . . . . . . . . . . . . . . . . . . . . . . . RN-3.0-14Logging Off/Logging On the VNE Server Host . . . . . . . . . . . . . . . . . . . . . . . . . . . . . . RN-3.0-15Shutting Down VNE Server. . . . . . . . . . . . . . . . . . . . . . . . . . . . . . . . . . . . . . . . . . . . . RN-3.0-15Rebooting the VNE Server Host . . . . . . . . . . . . . . . . . . . . . . . . . . . . . . . . . . . . . . . . . RN-3.0-15
Upgrade Assistance . . . . . . . . . . . . . . . . . . . . . . . . . . . . . . . . . . . . . . . . . . . . . . . . . . . . . RN-3.0-16Migrating Settings . . . . . . . . . . . . . . . . . . . . . . . . . . . . . . . . . . . . . . . . . . . . . . . . . . . . RN-3.0-17Migrating Text Files. . . . . . . . . . . . . . . . . . . . . . . . . . . . . . . . . . . . . . . . . . . . . . . . . . . RN-3.0-19Migrating Groups. . . . . . . . . . . . . . . . . . . . . . . . . . . . . . . . . . . . . . . . . . . . . . . . . . . . . RN-3.0-20
Performance Enhancements . . . . . . . . . . . . . . . . . . . . . . . . . . . . . . . . . . . . . . . . . . . . . . RN-3.0-20
VNE Server>/Release 3.0 RN-3.0-1
VNE Server Release Notes
Support for Cisco Catalyst “show trunk” Command. . . . . . . . . . . . . . . . . . . . . . . . . . . . . .RN-3.0-21Support for CheckPoint FireWall-1 . . . . . . . . . . . . . . . . . . . . . . . . . . . . . . . . . . . . . . . . . .RN-3.0-21
Nokia IPSO Configuration Command Support. . . . . . . . . . . . . . . . . . . . . . . . . . . . . . .RN-3.0-22Support for Juniper ERX . . . . . . . . . . . . . . . . . . . . . . . . . . . . . . . . . . . . . . . . . . . . . . . . . .RN-3.0-23HP OpenView Performance Agent Import . . . . . . . . . . . . . . . . . . . . . . . . . . . . . . . . . . . . .RN-3.0-23SMARTS Import. . . . . . . . . . . . . . . . . . . . . . . . . . . . . . . . . . . . . . . . . . . . . . . . . . . . . . . . .RN-3.0-23Device Info File . . . . . . . . . . . . . . . . . . . . . . . . . . . . . . . . . . . . . . . . . . . . . . . . . . . . . . . . .RN-3.0-23Device and Platform Info Tab . . . . . . . . . . . . . . . . . . . . . . . . . . . . . . . . . . . . . . . . . . . . . .RN-3.0-24Additional Control Over Native Collection . . . . . . . . . . . . . . . . . . . . . . . . . . . . . . . . . . . . .RN-3.0-25Support for SNMPv3 . . . . . . . . . . . . . . . . . . . . . . . . . . . . . . . . . . . . . . . . . . . . . . . . . . . . .RN-3.0-26Archiving Configuration Data . . . . . . . . . . . . . . . . . . . . . . . . . . . . . . . . . . . . . . . . . . . . . . .RN-3.0-26
Reporting . . . . . . . . . . . . . . . . . . . . . . . . . . . . . . . . . . . . . . . . . . . . . . . . . . . . . . . . . . .RN-3.0-28Device Config File Collection . . . . . . . . . . . . . . . . . . . . . . . . . . . . . . . . . . . . . . . . . . . . . . .RN-3.0-30
Configuring Adapter Resources. . . . . . . . . . . . . . . . . . . . . . . . . . . . . . . . . . . . . . . . . .RN-3.0-30Device Config File Import. . . . . . . . . . . . . . . . . . . . . . . . . . . . . . . . . . . . . . . . . . . . . . . . . .RN-3.0-31
Expanded Command Support . . . . . . . . . . . . . . . . . . . . . . . . . . . . . . . . . . . . . . . . . . .RN-3.0-31Configuring Adapter Resources. . . . . . . . . . . . . . . . . . . . . . . . . . . . . . . . . . . . . . . . . .RN-3.0-32
Creating CDP Neighbors . . . . . . . . . . . . . . . . . . . . . . . . . . . . . . . . . . . . . . . . . . . . . . . . . .RN-3.0-33Device CDP Import . . . . . . . . . . . . . . . . . . . . . . . . . . . . . . . . . . . . . . . . . . . . . . . . . . .RN-3.0-34Device MIB Configuration Import . . . . . . . . . . . . . . . . . . . . . . . . . . . . . . . . . . . . . . . . .RN-3.0-34
Device MIB Configuration Import . . . . . . . . . . . . . . . . . . . . . . . . . . . . . . . . . . . . . . . . . . . .RN-3.0-34Adapter Configuration . . . . . . . . . . . . . . . . . . . . . . . . . . . . . . . . . . . . . . . . . . . . . . . . .RN-3.0-34
CiscoWorks ANI Database Import . . . . . . . . . . . . . . . . . . . . . . . . . . . . . . . . . . . . . . . . . . .RN-3.0-35Importing Connectivity . . . . . . . . . . . . . . . . . . . . . . . . . . . . . . . . . . . . . . . . . . . . . . . . .RN-3.0-35Importing Node Traffic Alias. . . . . . . . . . . . . . . . . . . . . . . . . . . . . . . . . . . . . . . . . . . . .RN-3.0-35
Link and Connection Inference . . . . . . . . . . . . . . . . . . . . . . . . . . . . . . . . . . . . . . . . . . . . .RN-3.0-35Configuring Adapter Resources. . . . . . . . . . . . . . . . . . . . . . . . . . . . . . . . . . . . . . . . . .RN-3.0-35Improved Layer-2 Inference. . . . . . . . . . . . . . . . . . . . . . . . . . . . . . . . . . . . . . . . . . . . .RN-3.0-36Inference of Aggregate Links . . . . . . . . . . . . . . . . . . . . . . . . . . . . . . . . . . . . . . . . . . . .RN-3.0-37Advanced Options . . . . . . . . . . . . . . . . . . . . . . . . . . . . . . . . . . . . . . . . . . . . . . . . . . . .RN-3.0-38
Utilization Import Adapters. . . . . . . . . . . . . . . . . . . . . . . . . . . . . . . . . . . . . . . . . . . . . . . . .RN-3.0-39MRTG Interface Utilization Import . . . . . . . . . . . . . . . . . . . . . . . . . . . . . . . . . . . . . . . .RN-3.0-39
Demand Import and Processing . . . . . . . . . . . . . . . . . . . . . . . . . . . . . . . . . . . . . . . . . . . .RN-3.0-40Traffic Mapping Using Node Traffic Alias. . . . . . . . . . . . . . . . . . . . . . . . . . . . . . . . . . .RN-3.0-40Improved Reporting . . . . . . . . . . . . . . . . . . . . . . . . . . . . . . . . . . . . . . . . . . . . . . . . . . .RN-3.0-43
Event Log Search . . . . . . . . . . . . . . . . . . . . . . . . . . . . . . . . . . . . . . . . . . . . . . . . . . . . . . .RN-3.0-43Group Wizard. . . . . . . . . . . . . . . . . . . . . . . . . . . . . . . . . . . . . . . . . . . . . . . . . . . . . . . . . . .RN-3.0-47Tracking Changes in VNE Server . . . . . . . . . . . . . . . . . . . . . . . . . . . . . . . . . . . . . . . . . . .RN-3.0-49
Incremental Import . . . . . . . . . . . . . . . . . . . . . . . . . . . . . . . . . . . . . . . . . . . . . . . . . . . .RN-3.0-49System Change Reporting. . . . . . . . . . . . . . . . . . . . . . . . . . . . . . . . . . . . . . . . . . . . . .RN-3.0-49
Report Export Service . . . . . . . . . . . . . . . . . . . . . . . . . . . . . . . . . . . . . . . . . . . . . . . . . . . .RN-3.0-50Adapter Configuration . . . . . . . . . . . . . . . . . . . . . . . . . . . . . . . . . . . . . . . . . . . . . . . . .RN-3.0-50Improved Navigation of Web Reports . . . . . . . . . . . . . . . . . . . . . . . . . . . . . . . . . . . . .RN-3.0-52Export of Detailed Reports. . . . . . . . . . . . . . . . . . . . . . . . . . . . . . . . . . . . . . . . . . . . . .RN-3.0-52Publishing to OPNET Report Server . . . . . . . . . . . . . . . . . . . . . . . . . . . . . . . . . . . . . .RN-3.0-53
System Change Reporting. . . . . . . . . . . . . . . . . . . . . . . . . . . . . . . . . . . . . . . . . . . . . . . . .RN-3.0-53External Adapter . . . . . . . . . . . . . . . . . . . . . . . . . . . . . . . . . . . . . . . . . . . . . . . . . . . . . . . .RN-3.0-55
RN-3.0-2 VNE Server>/Release 3.0
VNE Server Release Notes
VNE Server and Other OPNET Products . . . . . . . . . . . . . . . . . . . . . . . . . . . . . . . . . . . . .RN-3.0-56Specifying VNE Server . . . . . . . . . . . . . . . . . . . . . . . . . . . . . . . . . . . . . . . . . . . . . . . .RN-3.0-56Incremental Changes. . . . . . . . . . . . . . . . . . . . . . . . . . . . . . . . . . . . . . . . . . . . . . . . . .RN-3.0-56Source Configuration Data. . . . . . . . . . . . . . . . . . . . . . . . . . . . . . . . . . . . . . . . . . . . . .RN-3.0-57
Preparing to Collect Data Using VNE Server . . . . . . . . . . . . . . . . . . . . . . . . . . . . . . . . . . . . .RN-3.0-58
Tips for Using VNE Server. . . . . . . . . . . . . . . . . . . . . . . . . . . . . . . . . . . . . . . . . . . . . . . . . . . .RN-3.0-59
Restrictions and Limitations. . . . . . . . . . . . . . . . . . . . . . . . . . . . . . . . . . . . . . . . . . . . . . . . . . .RN-3.0-61Version of DirectX . . . . . . . . . . . . . . . . . . . . . . . . . . . . . . . . . . . . . . . . . . . . . . . . . . . . . . .RN-3.0-61VNE Server 3.0 Installer . . . . . . . . . . . . . . . . . . . . . . . . . . . . . . . . . . . . . . . . . . . . . . . . . .RN-3.0-61Installation Restrictions . . . . . . . . . . . . . . . . . . . . . . . . . . . . . . . . . . . . . . . . . . . . . . . . . . .RN-3.0-62Static Properties. . . . . . . . . . . . . . . . . . . . . . . . . . . . . . . . . . . . . . . . . . . . . . . . . . . . . . . . .RN-3.0-62Uninstalling Previous Versions of VNE Server . . . . . . . . . . . . . . . . . . . . . . . . . . . . . . . . .RN-3.0-62Migrating Product Configuration . . . . . . . . . . . . . . . . . . . . . . . . . . . . . . . . . . . . . . . . . . . .RN-3.0-62Launch of Control Panel . . . . . . . . . . . . . . . . . . . . . . . . . . . . . . . . . . . . . . . . . . . . . . . . . .RN-3.0-63User Interface Operation . . . . . . . . . . . . . . . . . . . . . . . . . . . . . . . . . . . . . . . . . . . . . . . . . .RN-3.0-63User Interface Look and Feel. . . . . . . . . . . . . . . . . . . . . . . . . . . . . . . . . . . . . . . . . . . . . . .RN-3.0-63Service Startup . . . . . . . . . . . . . . . . . . . . . . . . . . . . . . . . . . . . . . . . . . . . . . . . . . . . . . . . .RN-3.0-63Network Browser . . . . . . . . . . . . . . . . . . . . . . . . . . . . . . . . . . . . . . . . . . . . . . . . . . . . . . . .RN-3.0-64Data Collection. . . . . . . . . . . . . . . . . . . . . . . . . . . . . . . . . . . . . . . . . . . . . . . . . . . . . . . . . .RN-3.0-64Data Import . . . . . . . . . . . . . . . . . . . . . . . . . . . . . . . . . . . . . . . . . . . . . . . . . . . . . . . . . . . .RN-3.0-64
Hostname Changes . . . . . . . . . . . . . . . . . . . . . . . . . . . . . . . . . . . . . . . . . . . . . . . . . . .RN-3.0-64Naming Conventions . . . . . . . . . . . . . . . . . . . . . . . . . . . . . . . . . . . . . . . . . . . . . . . . . .RN-3.0-65Duplicate IP Addresses . . . . . . . . . . . . . . . . . . . . . . . . . . . . . . . . . . . . . . . . . . . . . . . .RN-3.0-66Duplicate MAC Addresses . . . . . . . . . . . . . . . . . . . . . . . . . . . . . . . . . . . . . . . . . . . . . .RN-3.0-66SysName Not Set . . . . . . . . . . . . . . . . . . . . . . . . . . . . . . . . . . . . . . . . . . . . . . . . . . . .RN-3.0-67SysName-Prompt Mismatch . . . . . . . . . . . . . . . . . . . . . . . . . . . . . . . . . . . . . . . . . . . .RN-3.0-67
Report Manager . . . . . . . . . . . . . . . . . . . . . . . . . . . . . . . . . . . . . . . . . . . . . . . . . . . . . . . . .RN-3.0-67Report Export Service . . . . . . . . . . . . . . . . . . . . . . . . . . . . . . . . . . . . . . . . . . . . . . . . . . . .RN-3.0-67Database Access . . . . . . . . . . . . . . . . . . . . . . . . . . . . . . . . . . . . . . . . . . . . . . . . . . . . . . . .RN-3.0-68Licensing . . . . . . . . . . . . . . . . . . . . . . . . . . . . . . . . . . . . . . . . . . . . . . . . . . . . . . . . . . . . . .RN-3.0-68
Procedures for Upgrading from 2.1PL2 . . . . . . . . . . . . . . . . . . . . . . . . . . . . . . . . . . . . . . . . . .RN-3.0-69Migrating settings. . . . . . . . . . . . . . . . . . . . . . . . . . . . . . . . . . . . . . . . . . . . . . . . . . . . . . . .RN-3.0-69Migrating Text Files . . . . . . . . . . . . . . . . . . . . . . . . . . . . . . . . . . . . . . . . . . . . . . . . . . . . . .RN-3.0-71Migrating Groups (Optional). . . . . . . . . . . . . . . . . . . . . . . . . . . . . . . . . . . . . . . . . . . . . . . .RN-3.0-72
Converting License File Using License Server Utility . . . . . . . . . . . . . . . . . . . . . . . . . . . . . . .RN-3.0-74
Report Export Service - Common Reports . . . . . . . . . . . . . . . . . . . . . . . . . . . . . . . . . . . . . . .RN-3.0-76
Device Info File Format for 3.0 . . . . . . . . . . . . . . . . . . . . . . . . . . . . . . . . . . . . . . . . . . . . . . . .RN-3.0-78Header . . . . . . . . . . . . . . . . . . . . . . . . . . . . . . . . . . . . . . . . . . . . . . . . . . . . . . . . . . . . . . . .RN-3.0-78Delimiter. . . . . . . . . . . . . . . . . . . . . . . . . . . . . . . . . . . . . . . . . . . . . . . . . . . . . . . . . . . . . . .RN-3.0-78Fields . . . . . . . . . . . . . . . . . . . . . . . . . . . . . . . . . . . . . . . . . . . . . . . . . . . . . . . . . . . . . . . . .RN-3.0-78Example . . . . . . . . . . . . . . . . . . . . . . . . . . . . . . . . . . . . . . . . . . . . . . . . . . . . . . . . . . . . . . .RN-3.0-79
VNE Server>/Release 3.0 RN-3.0-3
VNE Server Release Notes
Part number: D00284Version: 1© 2005 by OPNET Technologies, Inc. All rights reserved.
This information is subject to all restrictions set forth in the VNE Server> documentation.
RN-3.0-4 VNE Server>/Release 3.0
VNE Server Release Notes
Release 3.0 Description
VNE Server 3.0 is a significant software update to the VNE Server 2.1 software release. In this release, VNE Server processes start as Windows services. In addition, it contains many new features and enhancements to existing capabilities. This release also implements suggestions and fixes many software problems reported in earlier releases. Below is a list of notable enhancements that VNE Server 3.0 delivers.
• Runs as Windows services on all supported Windows operating systems
• Assistance upgrading from 2.1PL2
• Performance enhancements through optional Oracle database customization
• Enhanced Cisco Catalyst support
• Support for CheckPoint Firewall-1
• Support for Juniper ERX
• Extensions to supported configuration commands for all vendors
• SSH/SCP version 2 support
• Topology import from SMARTS
• Server metric import from HP OpenView Performance Agent Import
• Sentinel Launcher
• Ability to create “shell” nodes for CDP neighbors not found
• Additional control over VNE Server’s native collection adapters
• Archiving of configuration data
• Support for SNMPv3
• Enhanced Link and Connection Inference
• Enhanced traffic mapping using node aliases
• Advanced Grouping Wizard
• Event Log Search
• Expanded navigation and functionality of web reports
• Publishing to OPNET Report Server
• Support for incremental import into other OPNET software products
• Delivery of source configuration data to other OPNET software products
VNE Server>/Release 3.0 RN-3.0-5
VNE Server Release Notes
Installation CD Contents
The VNE Server version 3.0 installation CD contains the following:
• The VNE Server setup_Windows.exe installer executable for Windows
• The VNE Server Windows installation card PDF file: VNES_30a_install.pdf
Visit the OPNET website often to check for the newest version of release notes and available software updates:
https://secure.opnet.com/Lic_Priv/support/updates/home.html
System Requirements
The system requirements have been updated for version 3.0. Be sure to check for the latest system requirements on the OPNET support website.
Changes to Supported Platforms and Products
VNE Server 3.0 is supported on the following platforms:
• Windows—The supported Windows operating systems for VNE Server are Windows 2000 Server, Windows 2003 Server, Windows 2000 and Windows XP Professional. Windows NT 4.0 is no longer supported.
• Solaris—The initial release of VNE Server 3.0 does not provide Solaris support. Solaris support will follow.
RN-3.0-6 VNE Server>/Release 3.0
VNE Server Release Notes
Installing or Upgrading VNE Server
To install or upgrade VNE Server, follow the instructions on the installation card. The account used to install VNE Server on a Windows host must have the following properties:
• Full administrative privileges
• ORA_DBA privileges
• Full control access over the Oracle installation directory tree
Note—The 3.0PL1 release provides upgrade assistance to minimize configuration of VNE Server after upgrading from version 2.1PL2. Please see Upgrade Assistance on page RN-3.0-16 for additional information.
WARNING—When upgrading from an earlier VNE Server release, you must configure the Oracle database by running the setup accounts script (@setup_accounts.sql). This means that you must re-create the network database. Network models created by previous releases cannot be retained by this release.
Compatible Versions of OPNET Software
The term OPNET software is used in this section to refer to IT Guru, SP Guru, Modeler, IT Sentinel, and SP Sentinel. Visit the OPNET support website for information on the version of OPNET software that is compatible with VNE Server 3.0. Follow the product updates link to the VNE Server 3.0 section.
http://secure.opnet.com/Lic_Priv/support/updates/home.html
Licensing Changes
Release 3.0 requires the OPNET 11.0 license server and a license in the 11.0 format. Note the following considerations:
• When the local license server option is selected during installation of VNE Server 3.0, you must add a license or convert your license file to the 11.0 format before you can run VNE Server 3.0. If this is the first time the host machine will act as an OPNET license server for VNE Server, you must add the appropriate VNE Server license(s). If the host machine has previously been an OPNET license server and has a valid VNE Server license you must convert your license file to the 11.0 format.
• When the remote license server option is selected during installation of VNE Server 3.0, the specified license server must be an 11.0 version license server. (If you have not already done so, install the 11.0 license server on the remote license server host machine.) You must add a license or convert your license file to the 11.0 format before you can run VNE Server 3.0. If this is the first time the remote license server machine will act as an OPNET license
VNE Server>/Release 3.0 RN-3.0-7
VNE Server Release Notes
server for VNE Server, you must add the appropriate VNE Server license(s). If the remote license server machine has previously been an OPNET license server and has a valid VNE Server license you must convert your license file to the 11.0 format.
VNE Server provides a command line license server utility (LS_UTIL) for performing license operations using the Browser Method. If you prefer, you may use the License Manager user interface that is provided with OPNET 11.0 software; given that OPNET 11.0 is installed on a machine on the same IP network as your VNE Server host, and there are no access restrictions between the two machines.
Instructions for adding a license and converting a pre-11.0 license file using the OPNET License Manager are provided on the License Registration page of the OPNET support website. You may also perform these actions using VNE Server’s command line licensing utility (LS_UTIL) as described in Converting License File Using License Server Utility on page RN-3.0-74.
RN-3.0-8 VNE Server>/Release 3.0
VNE Server Release Notes
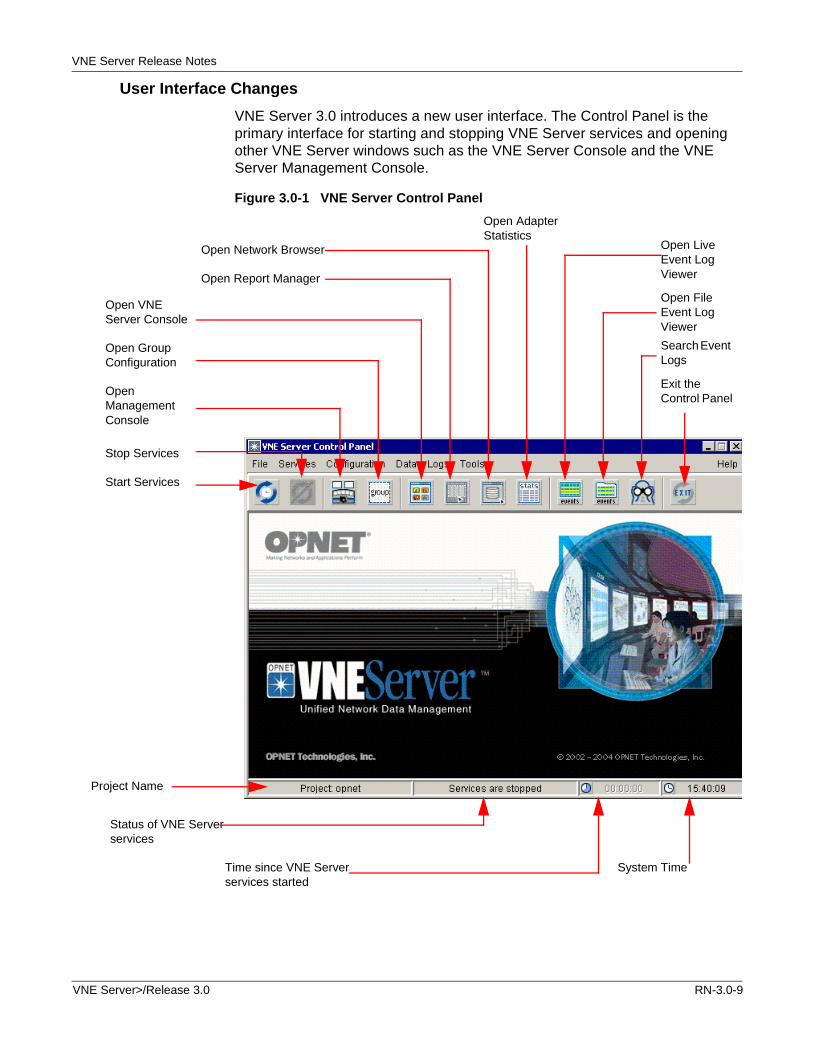
User Interface Changes
VNE Server 3.0 introduces a new user interface. The Control Panel is the primary interface for starting and stopping VNE Server services and opening other VNE Server windows such as the VNE Server Console and the VNE Server Management Console.
Figure 3.0-1 VNE Server Control Panel.
Start Services
Stop Services
Open Management Console
Open Group Configuration
Open VNE Server Console
Open Report Manager
Exit the Control Panel
Search Event Logs
Open File Event Log Viewer
Open Network Browser Open Live Event Log Viewer
Open Adapter Statistics
Project Name
Status of VNE Server services
Time since VNE Server services started
System Time
VNE Server>/Release 3.0 RN-3.0-9

VNE Server Release Notes
The Console still provides real-time status of VNE Server operation, however it is no longer the primary interface for opening other VNE Server windows. It is important to note, however, that the Control Panel can be opened from the Console using the toolbar button or View menu.
Figure 3.0-2 VNE Server Console
System TimeDouble-click to open the Live Event Log Viewer
Open Adapter Statistics
Launch Control Panel
RN-3.0-10 VNE Server>/Release 3.0
VNE Server Release Notes
New Features and Enhancements
VNE Server Runs as Windows Services
VNE Server 3.0 processes run as Windows services. This means that VNE Server no longer needs to be run by a logged-in user. It may continue to run in the background even after the user logs off. After the machine is rebooted, VNE Server will automatically launch and start VNE Server services. If the schedule has been configured so that an event chain is initiated by a time-scheduled adapter, this will occur as normal.
Note—We strongly recommend that you configure Windows Automatic Update service on the VNE Server host to notify you when updates are ready to install rather than permitting updates to be installed automatically. When Windows Automatic Update service installs updates automatically, the update service may reboot the machine following the update and interrupt VNE Server operation.
The Windows services installed by VNE Server 3.0 are:
• OPNET VNES Adapter Server
• OPNET VNES Bootstrap Service
• OPNET VNES Common Services
• OPNET VNES Export Server
• OPNET VNES Live Update Server
Since the user interface has changed in 3.0, this section provides instructions for performing typical user actions in VNE Server 3.0.
VNE Server>/Release 3.0 RN-3.0-11
VNE Server Release Notes
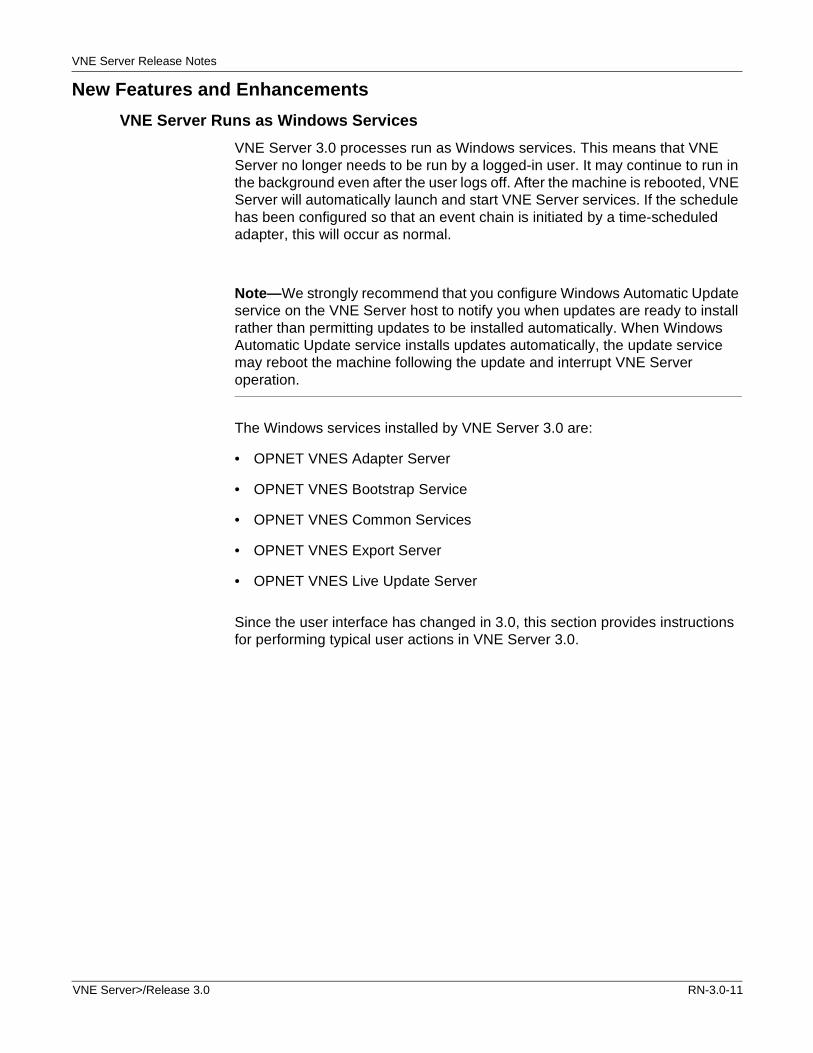
Launching VNE Server
Use the Windows Start menu shortcut or a desktop shortcut to launch VNE Server 3.0. When VNE Server launches, two of the Windows services (Bootstrap Service and Common Services) start and the VNE Server Console and Control Panel open.
Figure 3.0-3 VNES at Launch
Opening the VNE Server Management Console
The Management Console remains the primary interface for configuring VNE Server and starting adapters. Open the Management Console from the Control Panel by pressing the toolbar button or by selecting Open Management Console from the Configuration menu.
RN-3.0-12 VNE Server>/Release 3.0
VNE Server Release Notes
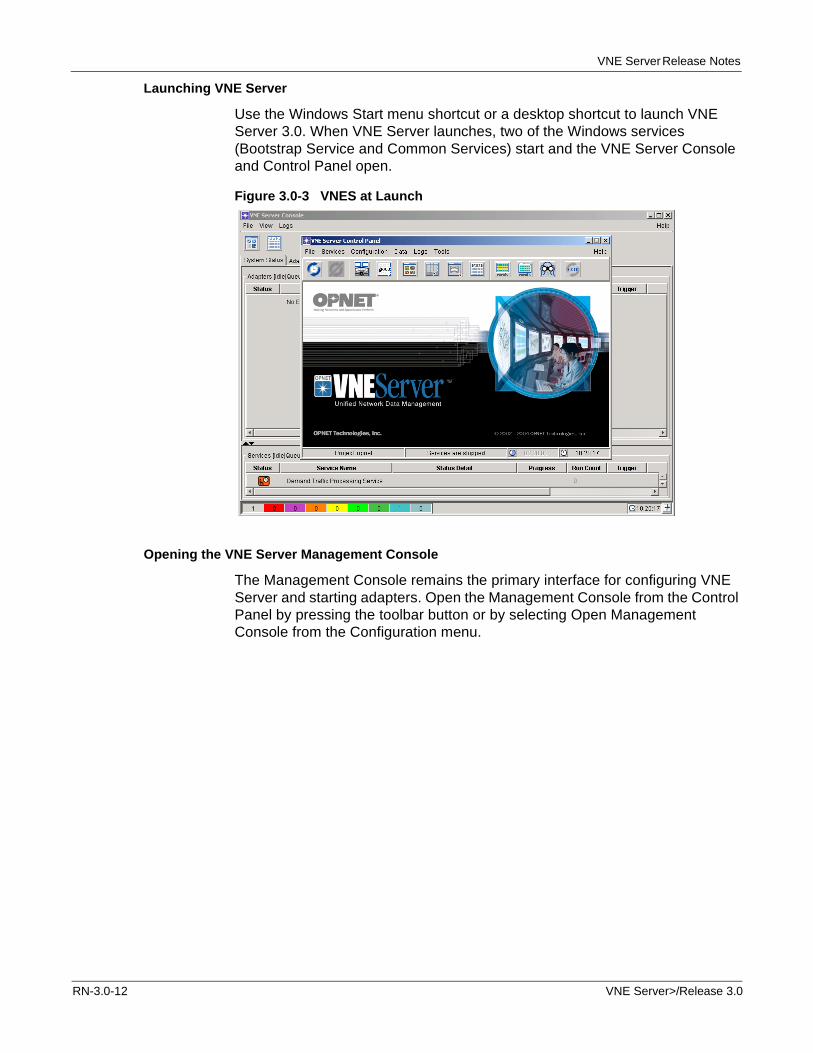
Starting and Stopping VNE Server Services
Start VNE Server services from the Control Panel by pressing the Start Services button or selecting Start Services from the Services menu. The impact on the Windows services is as follows: Common Services stops and restarts to pick up changes in the adapter schedule and adapter resources, then the Export Server, Live Update Server, and Adapter Server start.
Figure 3.0-4 VNE Server Services Starting
Stop VNE Server Services from the Control Panel by pressing the Stop Services button or selecting Stop Services from the Services menu. (The impact on the Windows services is as follows: Export Server, Live Update Server and Adapter Server stop.)
Determining Status of VNE Server Services
The Control Panel toolbar provides a visual cue as to the status of VNE Server services. When services are started, the Start Services button in the Control Panel is not operational. When services are stopped, the Stop Services button is not operational.
In addition, the status of VNE Server services (stopped or started) displays in the summary bar located at the bottom of the Control Panel window.
Figure 3.0-5 VNE Server Services Status
When you hold your mouse over the service status area, a tooltip displays the status of the supporting Windows services.
VNE Server>/Release 3.0 RN-3.0-13
VNE Server Release Notes
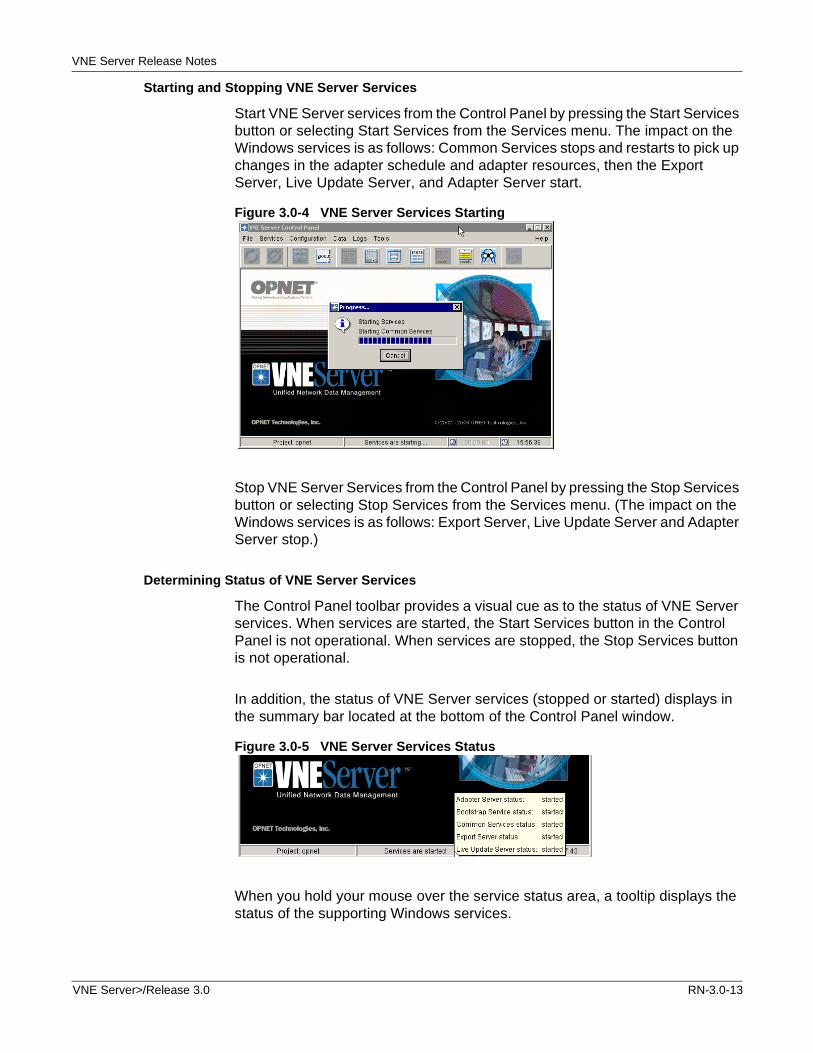
Running VNE Server in the Background
VNE Server can now run as a headless application. If you wish to close all open windows but continue to run VNE Server in the background, you must first make sure that services are started. Next, select Exit from the Control Panel File menu, or press the Exit button.
Figure 3.0-6 Running VNE Server in the Background
Opening the VNE Server Control Panel
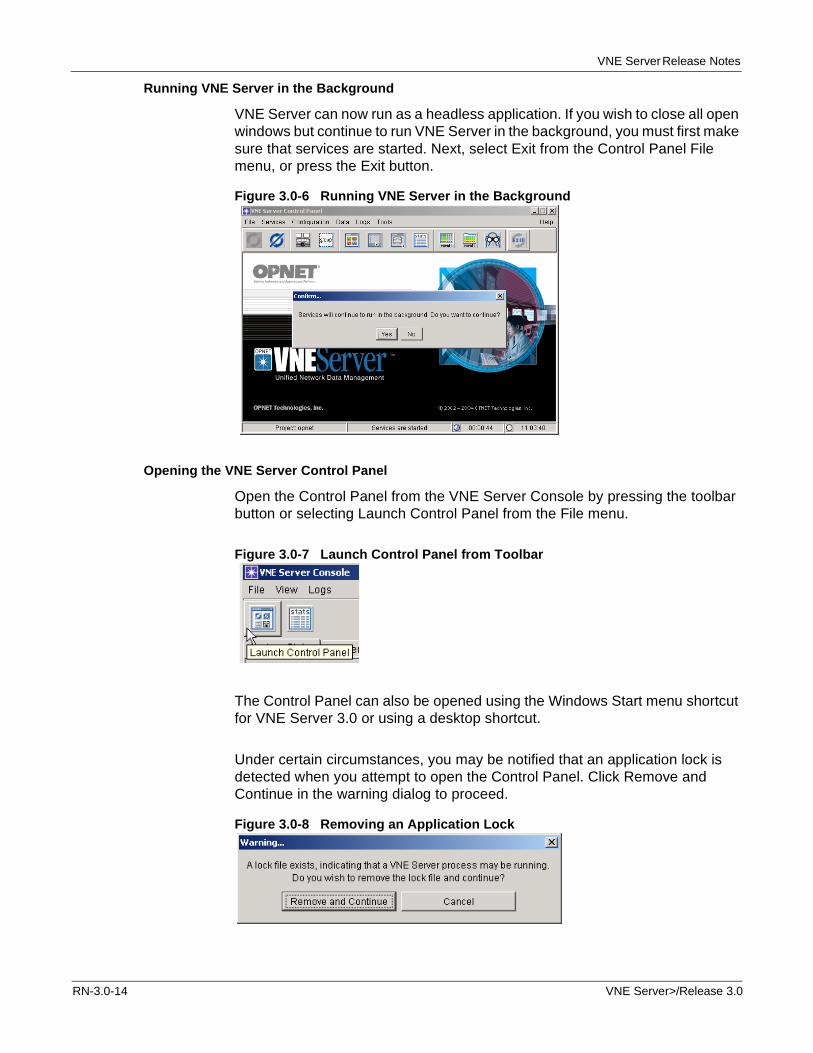
Open the Control Panel from the VNE Server Console by pressing the toolbar button or selecting Launch Control Panel from the File menu.
Figure 3.0-7 Launch Control Panel from Toolbar
The Control Panel can also be opened using the Windows Start menu shortcut for VNE Server 3.0 or using a desktop shortcut.
Under certain circumstances, you may be notified that an application lock is detected when you attempt to open the Control Panel. Click Remove and Continue in the warning dialog to proceed.
Figure 3.0-8 Removing an Application Lock
RN-3.0-14 VNE Server>/Release 3.0
VNE Server Release Notes
Logging Off/Logging On the VNE Server Host
A user that starts VNE Server can log off of the VNE Server host while still permitting VNE Server to run in the background. When the next user successfully logs on to the VNE Server host, the VNE Server Console window opens.
Shutting Down VNE Server
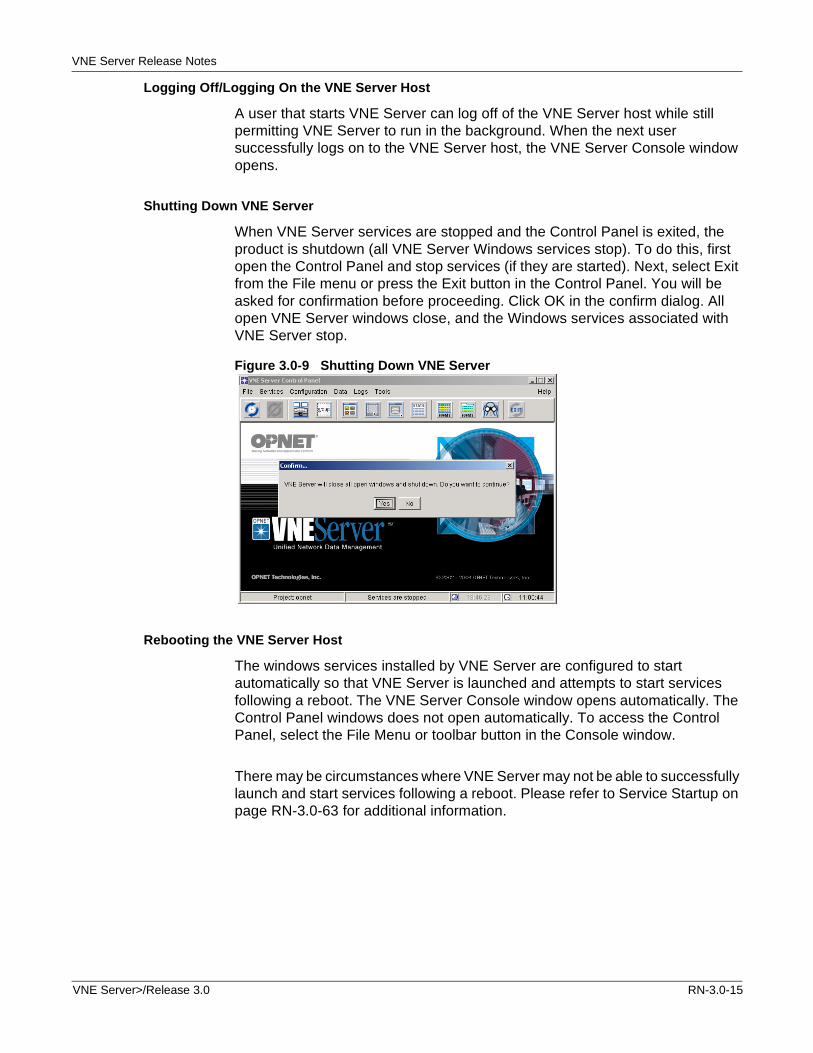
When VNE Server services are stopped and the Control Panel is exited, the product is shutdown (all VNE Server Windows services stop). To do this, first open the Control Panel and stop services (if they are started). Next, select Exit from the File menu or press the Exit button in the Control Panel. You will be asked for confirmation before proceeding. Click OK in the confirm dialog. All open VNE Server windows close, and the Windows services associated with VNE Server stop.
Figure 3.0-9 Shutting Down VNE Server
Rebooting the VNE Server Host
The windows services installed by VNE Server are configured to start automatically so that VNE Server is launched and attempts to start services following a reboot. The VNE Server Console window opens automatically. The Control Panel windows does not open automatically. To access the Control Panel, select the File Menu or toolbar button in the Console window.
There may be circumstances where VNE Server may not be able to successfully launch and start services following a reboot. Please refer to Service Startup on page RN-3.0-63 for additional information.
VNE Server>/Release 3.0 RN-3.0-15
VNE Server Release Notes
Upgrade Assistance
VNE Server 3.0PL1 provides upgrade assistance to minimize the configuration required after upgrading from version 2.1PL2.To take advantage of this, you must have a 2.1PL2 version of VNE Server installed and configured to run properly against your network devices and/or third party systems. Please review the restrictions and limitations for Migrating Product Configuration on page RN-3.0-62.
WARNING—If you wish to upgrade from a 2.1PL2 installation of VNE Server, either automatically as part of 3.0PL1 installation or manually after 3.0PL1 installation is complete, do not uninstall your 2.1PL2 version until after you have upgraded.
If the VNE Server 3.0PL1 installer detects an existing 2.1PL2 installation of VNE Server, you will be offered the opportunity to migrate VNE Server product configuration. When you upgrade during installation, the process is relatively transparent.
If you choose not to migrate VNE Server product configuration during 3.0PL1 installation, you may do it at a later time by performing each of the migration steps. Please see Procedures for Upgrading from 2.1PL2 on page RN-3.0-69 for further instructions.
Migration of VNE Server product configuration consists of the following steps:
1) Migrate settings (resource files).
Information such as adapter resources, adapter schedule, and adapter priority information (that is stored in XML *.res files) is migrated forward. Please note that not all values for adapter resources are intended to migrate from an older release to the current version.
2) Migrate text files.
In this second step, text files such as the device information file, feature control files (such as merge exclusion files), and input files for the ASCII Generic Data Import adapter are migrated forward.
3) Migrate device groups.
In this third step, device groups are exported from an existing 2.1PL2 database to ASCII text files. These can then be imported into VNE Server 3.0PL1 using the ASCII Generic Data Import adapter.
Note—Product migration can be viewed as a one-time activity. Once you have run product migration, there is no benefit to running it again.
RN-3.0-16 VNE Server>/Release 3.0
VNE Server Release Notes
After upgrade is complete, check your VNE Server 3.0PL1 configuration. Remember, some adapter resources may be set to the VNE Server 3.0PL1 default values, and VNE Server 3.0PL1 has additional and modified parameters for some adapters. Check the adapter schedule and priorities. Run each adapter one at a time to confirm that it is configured according to your needs.
The following sections contain important information about upgrading from 2.1PL2 to 3.0PL1.
Migrating Settings
• Merge rules are not included in product migration. If you wish to customize merge rules in 3.0PL1, you must manually configure this from the user interface.
• Product migration does not migrate adapter resources for all adapters and services. You must configure the following adapters after you install 3.0.PL1:
— External Adapter
— Report Export Service
• Locations of text files (for example Device Info File Location) are not migrated. During the second upgrade step, text files are migrated and copied into the default location specified in the new release. Please see Migrating Text Files on page RN-3.0-19.
• After product migration is complete, make sure that the status of persistChanges and persistArchiveChanges is set to false. These attributes are located in the Project Properties tab of the Management Console under VNESfeatures.
• Adapter resources for Link Inference have been reorganized in 3.0PL1, however 2.1PL2 values are migrated to the appropriate new value. The CAM inference engine has been enhanced in 3.0PL1. You may wish to enable it.
— To enable this, open the Management Console and select the Adapter Resources tab. Expand Link and Connection Inference > Inference Engines > Physical > CAM Engine, and set active=true.
• Additional servers configured for the following adapters in VNE Server 2.1PL2 are not properly migrated when you upgrade to 3.0PL1. Only the first server is properly migrated. The adapters to which this applies are:
— Remote File Collection
— Concord eHealth Network Utilization Import
— StatScout Interface Utilization Import
— MRTG Interface Utilization Import
VNE Server>/Release 3.0 RN-3.0-17
VNE Server Release Notes
To correct this, after product migration is complete, launch VNE Server 3.0PL1 and open the Management Console. In the Adapter Resources tab, delete any additional servers that migrated from your old VNE Server installation. Manually create the additional servers using the New Sibling button, and configure the servers to match their previous configuration.
• A new setting was added to the following adapters:
— Concord eHealth/Network Utilization Import
— StatScout Interface Utilization Import
— MRTG Interface Utilization Import
The new setting allows you to enable or disable the use of additionalParams in live collection. If you are using additionalParams for live collection on any of these adapters, you must set active=true after product migration to enable the property.
• If you specified a different installation directory or temporary directory for VNE Server 3.0PL1 than you did for your 2.1PL2 installation, check the following adapter settings to confirm proper migration after upgrade:
— Remote File Collection > SourceList > serverX > Remote Directory List > dir1 > Storage
— CiscoWorks Config File Collection > outputDir
— CiscoWorks Config File Collection > remote shell executables > WindowsPuTTY plink > executable
— CiscoWorks Config File Collection > Remote copy executable > Windows PuTTY pscp > executable
— CiscoWorks RME Database Import > outputDir
— CiscoWorks ANI Database Import > outputDir
— HP OpenView NNM Import > outputDir
— DNS Alias Import > outputDir
— Concord eHealth Network Utilization Import > sourceList > local files > inputFileDir
— StatScout Interface Utilization Import > sourceList > local files > inputFileDir
— MRTG Interface Utilization Import > inputFileDir
— MRTG Interface Utilization Import > outputFileDir
— VistaMart Interface Utilization Import > outputFileDir
RN-3.0-18 VNE Server>/Release 3.0
VNE Server Release Notes
Migrating Text Files
During text file migration, the files themselves are copied forward to the new installation and placed in the default directory for the new release. If you changed the input file directory in 2.1PL2, the file will be copied from that location into the location specified in the new release. When there is a sample file provided in the 3.0PL1 installation, the 3.0PL1 file is renamed by appending “_orig” to the filename.
Note—The format of the device information file is changed in 3.0. The device info file is converted to the 3.0 format during the text file migration step in the upgrade process, however you do not have to run text file migration in order to convert to the new format. See Device Info File on page RN-3.0-23 for more information.
The following files are migrated:
• Device Info File
• Community String File
• deviceMap
• Module types
• Chassis card types
• LAN port types
• Excluded port types
• IP subnet list
• IP address exclusion file
• MAC address exclusion file
• Interface/MAC address exclusion file
• Port number application mapping file
• Input files for the ASCII Generic Data Import adapter- location, ifc, ifcaddr, subIfc, subIfc_addr, linkinfo, PEchassis, nodeModuleCfg, NodeCustomCfgCreate, nodeDelete, and ifcDelete
VNE Server>/Release 3.0 RN-3.0-19
VNE Server Release Notes
Migrating Groups
Groups are migrated by exporting groups and group member lists from an existing VNE Server database and subsequently importing them into the new database after the topology has been recreated. The group migration script exports the groups data to ASCII files and copies the files to the input location specified for the ASCII Generic Data Import groupCreate and addNodeToGroup data categories. Device group migration does not handle sub-groups. If any device groups contained other groups, you must manually recreate the sub-groups.
WARNING—If you wish to migrate groups from a 2.1PL2 installation and you do not elect to do migration as part of 3.0PL1 installation, you must export the groups from the 2.1PL2 database before you configure the Oracle database for 3.0PL1. When you run the setup accounts script (@setup_accounts.sql), all projects are removed from the Oracle database and you will no longer be able to export group definitions.
Performance Enhancements
The setup accounts script (@setup_accounts.sql) that you use to configure the database following installation of VNE Server 3.0 has been enhanced to analyze Oracle 9i memory-related database parameters and recommend changes, when applicable, to improve VNE Server performance. The parameters that are examined are the Oracle SGA_MAX SIZE and DB_CACHE_SIZE parameters. After the setup accounts script completes, a recommendation may be made to run a database parameters change script (@dbparamchg.sql) to modify these parameters.
Note—Consult with your Oracle database administrator before making changes to the Oracle database.
Note—Ensure that there is at least 500 MB of physical memory available on the Oracle server host before making these changes.
If you choose to run the database parameters change script, the changes will apply to the database instance into which you are logged in when you run the setup accounts script.The database parameters change script increases the SGA_MAX SIZE from ~130 MB to ~560 MB and the DB_CACHE_SIZE from ~25 MB to ~85 MB. These changes increase the amount of memory used by Oracle and improve data import performance for large networks. The most significant performance changes are noted for import of data on very large networks (greater than 100,000 interfaces).
RN-3.0-20 VNE Server>/Release 3.0
VNE Server Release Notes
Refer to the sections on Configuring the Oracle Database and Modifying Database Parameters in the VNE Server 3.0 Windows Installation card for additional information and instructions.
Support for Cisco Catalyst “show trunk” Command
The Device Config File Collection adapter has been enhanced to collect the Cisco Catalyst “show trunk” command. The Device Trunk Import adapter has been added to import the collected trunk data.
Support for CheckPoint FireWall-1
The Device Config File Collection adapter has been enhanced to support collection of data via command line interface (CLI) from Checkpoint FireWall-1 running on the following operating systems: Nokia IPSO, Windows, and Solaris. The data files collected from each firewall depend on the operating system. Rules and objects files are collected from all CheckPoint FireWall-1 firewalls; this data is imported using the CheckPoint Rule&Object File Import adapter. Depending on the operating system, configuration or interface information may also be collected as follows:
• For a Nokia CheckPoint FireWall-1, a Nokia IPSO configuration file is collected. This file is collected by Device Config File Collection and imported by Device Config File Import. Please see Nokia IPSO Configuration Command Support on page RN-3.0-22 for additional information on the commands supported in this release.
• When the CheckPoint FireWall-1 is running on Solaris, the Device Config File Collection adapter collects interface information by running the 'hostname; ipconfig -a' command. The Device Interface Import adapter imports this data.
• When the firewall is running on Windows, the Device Config File Collection adapter collects interface information by running the 'ipconfig /all' command. The Device Interface Import adapter imports this data.
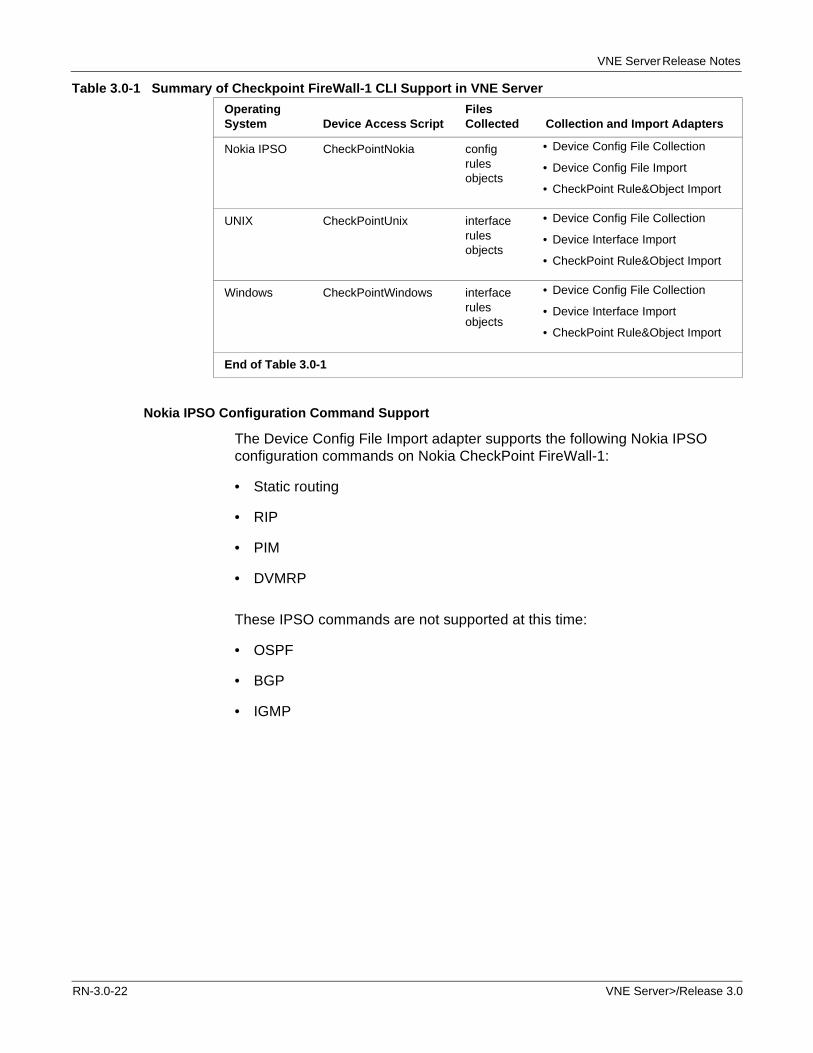
The following table summarizes support of CheckPoint FireWall-1 operating systems.
VNE Server>/Release 3.0 RN-3.0-21
VNE Server Release Notes
Table 3.0-1 Summary of Checkpoint FireWall-1 CLI Support in VNE Server
Nokia IPSO Configuration Command Support
The Device Config File Import adapter supports the following Nokia IPSO configuration commands on Nokia CheckPoint FireWall-1:
• Static routing
• RIP
• PIM
• DVMRP
These IPSO commands are not supported at this time:
• OSPF
• BGP
• IGMP
Operating System Device Access Script
Files Collected Collection and Import Adapters
Nokia IPSO CheckPointNokia configrulesobjects
• Device Config File Collection
• Device Config File Import
• CheckPoint Rule&Object Import
UNIX CheckPointUnix interfacerulesobjects
• Device Config File Collection
• Device Interface Import
• CheckPoint Rule&Object Import
Windows CheckPointWindows interfacerulesobjects
• Device Config File Collection
• Device Interface Import
• CheckPoint Rule&Object Import
End of Table 3.0-1
RN-3.0-22 VNE Server>/Release 3.0
VNE Server Release Notes
Support for Juniper ERX
The Device Config File Collection adapter has been enhanced to support collection of configuration files via command line interface (CLI) for Juniper ERX devices. Import the collected data using the Device Config File Import adapter. Please review the Restrictions and Limitations section on Duplicate IP Addresses on page RN-3.0-66.
WARNING—Please note that the Device MIB Configuration Import adapter does not yet provide support for Juniper ERX. When you configure VNE Server collection in the Management Console Device and Platform Info tab, do not make the Collect MIB column active for a Juniper ERX device.
HP OpenView Performance Agent Import
This adapter is designed to automatically collect server performance data from the HP OpenView Performance Agent software running on remote servers. This adapter uses information from the following data sets to compile the necessary network topology:
• HP OVPA log files
• XML files generated from HP OVPA
The adapter stores the collected server performance data in VNE Server, making it available for import into other OPNET products.
SMARTS Import
VNE Server can import network topology and configuration data provided by the SMARTS Service Assurance Manager (SAM) application that is part of the InCharge management suite.
The SMARTS Import adapter takes data that has been previously exported from SMARTS (using the inCharge XML adapter) and imports it into the VNE Server database. Before you run the SMARTS Import adapter, the data must first be exported from the SMARTS SAM. VNE Server provides an extraction script that specifies the network elements and data to be exported in XML format.
Device Info File
The 3.0 release introduces a new format for the device info file. Additional fields have been added to support 3.0 capabilities. A device info file in an older format cannot be read into the Device and Platform Info tab of the VNE Server Management Console. If you have a previous installation of VNE Server, you must convert the device info file to the 3.0 format.
VNE Server>/Release 3.0 RN-3.0-23
VNE Server Release Notes
The device info file can be converted to the 3.0 format by
• Upgrading from 2.1PL2.
• Using the Device and Platform Info tab in the Management Console. To convert the file, press the Add Devices From button in the Device and Platform Info tab. Select Device Info File (2.1PL2 and earlier). Select the appropriate pre-3.0 device info file, then press Apply. The old file is converted to the new format and copied to the location specified in the Device Info File tab.
It is a good practice to keep a backup copy of your device info file. After you convert your pre-3.0 device info file to the 3.0 format, we recommend that you back up the new file.
Please refer to Device Info File Format for 3.0 on page RN-3.0-78 for a complete description of the 3.0 file format.
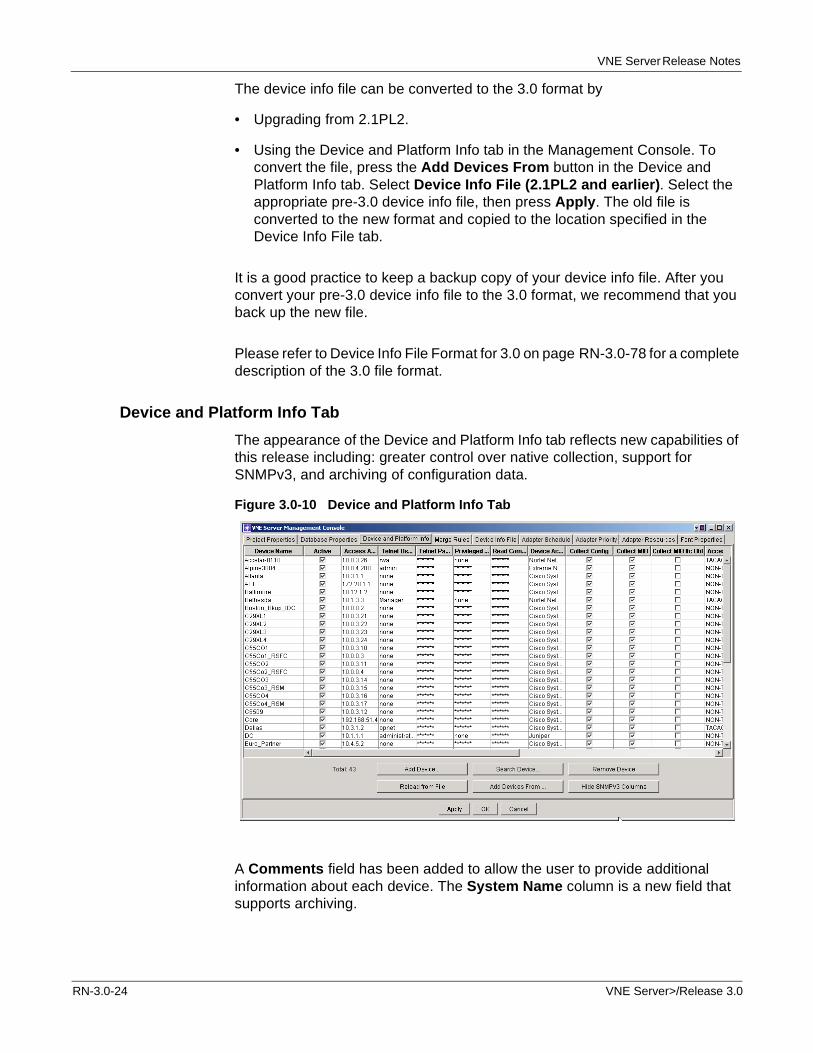
Device and Platform Info Tab
The appearance of the Device and Platform Info tab reflects new capabilities of this release including: greater control over native collection, support for SNMPv3, and archiving of configuration data.
Figure 3.0-10 Device and Platform Info Tab
A Comments field has been added to allow the user to provide additional information about each device. The System Name column is a new field that supports archiving.
RN-3.0-24 VNE Server>/Release 3.0
VNE Server Release Notes
Eight columns have been added for SNMPv3 parameters. If you do not need the SNMPv3 support, you can remove these columns from view by pressing the Hide SNMPV3 Columns button in the Device and Platform Info tab.
You can make changes to multiple entries in a single operation by selecting multiple rows and right-clicking to access the menu of available operations. You can drag the mouse to highlight a range of rows or use Ctrl+select. (Be careful that you do not click in a checkbox when you are selecting rows or you may inadvertently make a change.) Operations that you can perform on multiple devices include making devices active/inactive, setting username, setting password, setting privileged password, setting community string, and setting comments.
The Add Devices From function has been expanded to convert a device info file from a pre-3.0 format to the current format.
To search for a specific device in the Device and Platform Info tab, press the Search Device button. A search can be conducted using hostname or IP address.
Additional Control Over Native Collection
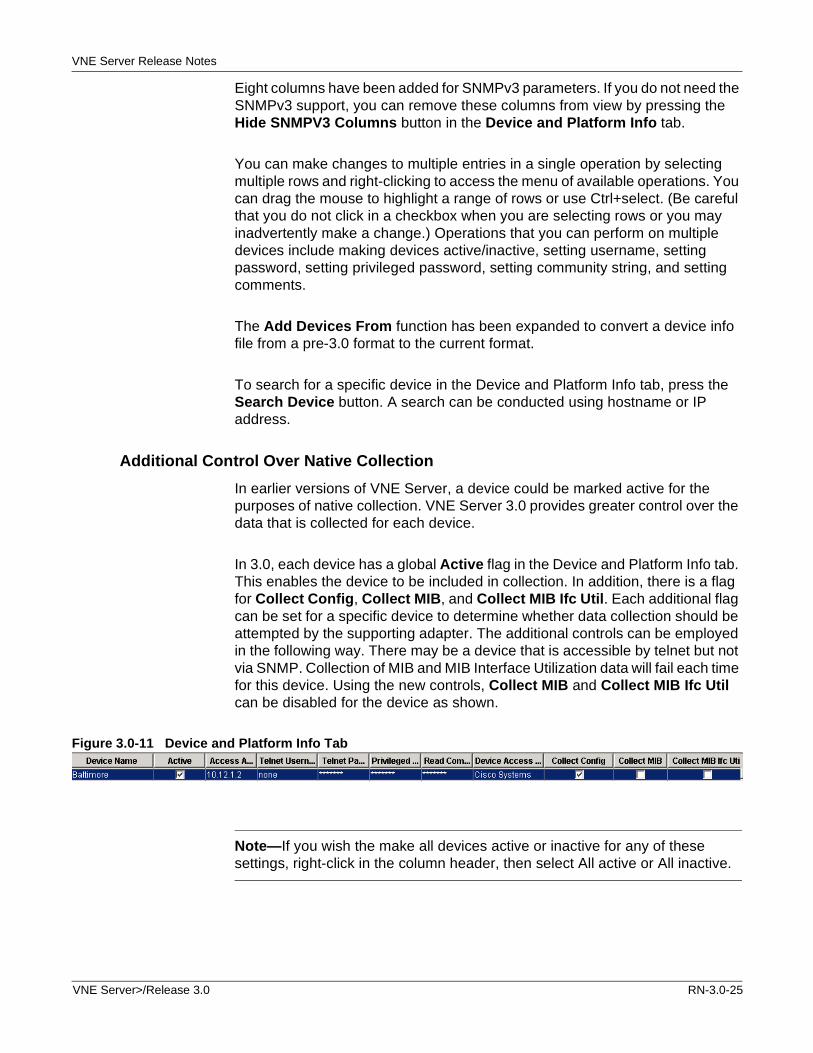
In earlier versions of VNE Server, a device could be marked active for the purposes of native collection. VNE Server 3.0 provides greater control over the data that is collected for each device.
In 3.0, each device has a global Active flag in the Device and Platform Info tab. This enables the device to be included in collection. In addition, there is a flag for Collect Config, Collect MIB, and Collect MIB Ifc Util. Each additional flag can be set for a specific device to determine whether data collection should be attempted by the supporting adapter. The additional controls can be employed in the following way. There may be a device that is accessible by telnet but not via SNMP. Collection of MIB and MIB Interface Utilization data will fail each time for this device. Using the new controls, Collect MIB and Collect MIB Ifc Util can be disabled for the device as shown.
Figure 3.0-11 Device and Platform Info Tab
Note—If you wish the make all devices active or inactive for any of these settings, right-click in the column header, then select All active or All inactive.
VNE Server>/Release 3.0 RN-3.0-25
VNE Server Release Notes
Support for SNMPv3
Device MIB Configuration Import and MIB Interface Utilization Import adapters provide support for SNMPv3. The following parameters are included in the Device Info file:
• SNMP v3 User Name
• SNMP v3 Context ID
• SNMP v3 Context Name
• SNMP v3 Authentication Protocol
• SNMP v3 Security Level
• SNMP v3 Authentication Password
• SNMP v3 Privacy Protocol
• SNMP v3 Privacy Password
When SNMP v3 User Name, Context ID, or Context Name is supplied in the device and platform info tab of the Management Console and Collect MIB is active for the device, the Device MIB Configuration Import adapter will first try to use SNMPv3 to collect MIB data from the device. If no data is collected, this adapter will attempt to collect using earlier versions of SNMP (v2c, v2, v1), however, the community string must be supplied in order for MIB collection to be successful using earlier versions of SNMP.
Archiving Configuration Data
VNE Server 3.0 provides the ability to store configuration data. The term "configuration data" is used generically to refer to show command output collected from a device via command line interface (CLI) and stored in a text file. As an example, the configuration data for a Cisco router may include configuration, version, CDP, and interface files containing the output of the ‘show running-config’, ‘show version’, ‘show cdp neighbors detail’, and ‘show interfaces’ commands, respectively. Since VNE Server now stores the source configuration data, it can be provided to other OPNET software.
VNE Server retains only the most recent configuration data. When new data is available for a device, it overwrites the data in the archive.
VNE Server adapters that collect configuration data are
• CiscoWorks Config File Collection
• Device Config File Collection
• Remote File Collection.
RN-3.0-26 VNE Server>/Release 3.0
VNE Server Release Notes
When the Device Config File Collection adapter runs, the configuration data is temporarily stored in the <vnes_tmp>\Collect\<data_type>\<process_num> directory. When collection is complete, the collected configuration data is copied to the archive, the <process_num> directory and files are appended with .ARCHIVED. When Device Config File Import runs, data is imported from the archive (not the Collect directory), and an association is made between the node in the VNE Server database and the archived configuration data. This relationship is stored in the NODE.CFA configuration. If VNE Server services are stopped before Device Config File Collection completes, the collection is terminated. Subsequent attempts to import the collected data using Device Config File Import adapter fails, because the collected data was not archived. If you wish to import the files from the partial collection, copy them to <vnes_temp>\Input\<config_data_type> and run the appropriate import adapter. For example, if you wish to import a partial collection of configuration files, copy the files to op_admin\tmp\vne\Input\Configs and run the Device Config File Import adapter.
The configuration data available from the CiscoWorks Config File Collection adapter is limited to configuration files only. For CiscoWorks Config File Collection, the files are temporarily stored in <vnes_tmp>\Collect\Configs_CiscoWorks directory. When the CiscoWorks Config File Import adapter runs, the collected configuration files are copied to the archive, and the files are appended with .ARCHIVED. The configuration files are then imported from the archive and the NODE.CFA configuration is created or updated.
Note—Files and folders that have been appended with .ARCHIVED are removed when you run the maintenance adapter. In previous versions of VNE Server, as Device Config File Collection adapter collected data it overwrote files collected previously. Now each time the Device Config File Collection adapter runs, files are written to a separate subdirectory. Remember to run the maintenance adapter on a regular basis to clean up disk space.
If you run the Remote File Collection adapter to copy configuration data to the VNE Server host, we recommend that you copy the data to <vnes_temp>\Input\<config_data_type> directory, and then run the appropriate import adapter for that data type. The workflow for Remote File Collection and import is similar to the CiscoWorks archiving workflow.
CiscoWorks Config File Import and other import adapters may add entries to the Device Info file as part of the archiving process. You may need to press Reload from File in the Device and Platform Info tab to see the entries. The Device Info file entries added during import are created with the global Active property enabled, but no data is provided except Device Name and SysName.
VNE Server>/Release 3.0 RN-3.0-27
VNE Server Release Notes
Collected configuration data can accumulate if multiple collections have been completed without the associated import adapter being run. If you run collection adapters, such as Device Config File Collection, run the associated import adapter, such as Device Config File Import, or manually delete files that are not archived.
WARNING—Do not rename the archive directory. Do not delete files from the archive directory. You may clear the archive in the following way. Stop VNE Server Services. Select Remove archives dir and records from current project from the Control Panel Tools menu. The archive directory will be deleted and the NODE.CFA configurations removed from the database.
Reporting
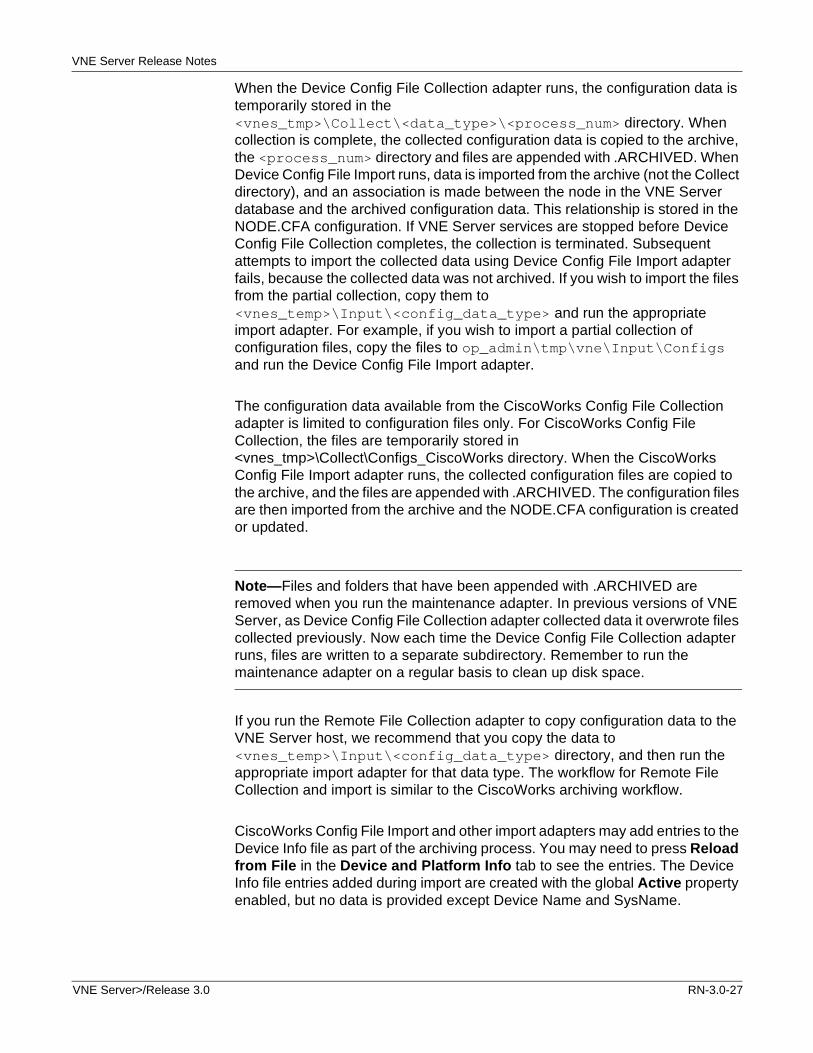
A new report has been added to provide access to stored configuration data. The Device Configuration Archives report lists all of the devices for which configuration data is stored. An example of this report is shown in Figure 3.0-12.
Figure 3.0-12 Device Configuration Archives Report
RN-3.0-28 VNE Server>/Release 3.0
VNE Server Release Notes
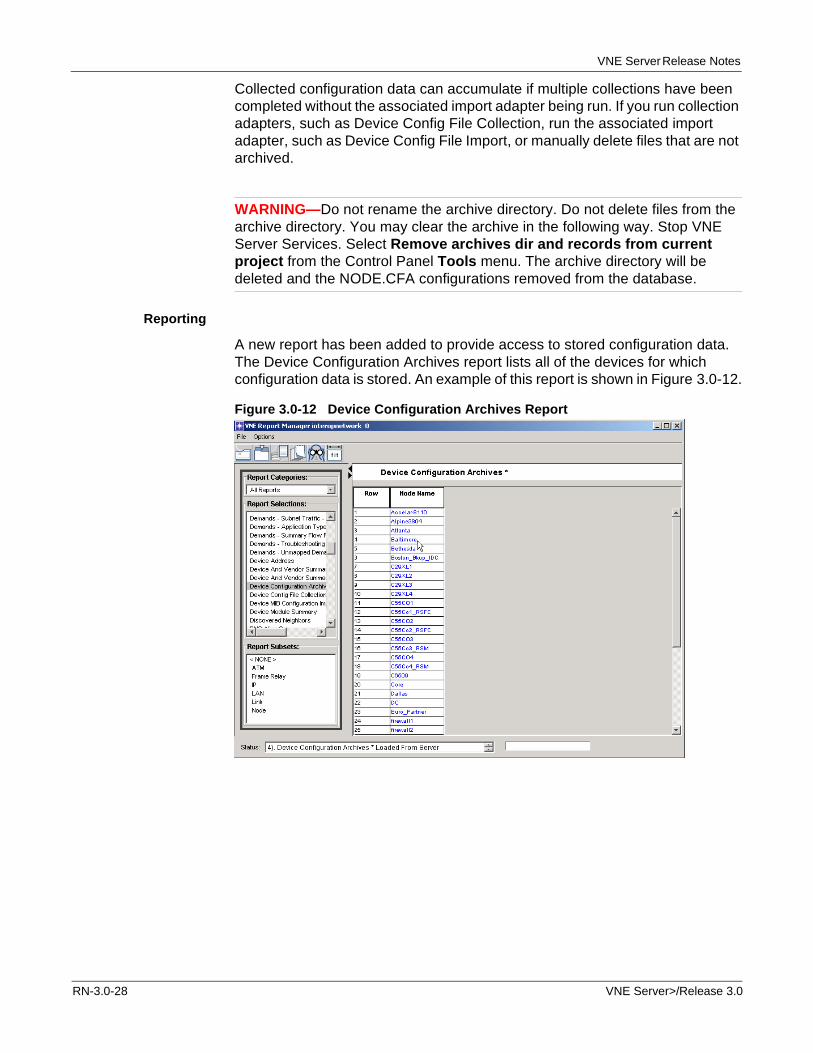
The node name column in the Device Configuration Archives report links to a more detailed report that shows the archived configuration data for that device.
Figure 3.0-13 Node Name Details
The File Name column in the Device Configuration Archive Details report filename links to archived configuration data.
Figure 3.0-14 Files Name Details
VNE Server>/Release 3.0 RN-3.0-29
VNE Server Release Notes
Device Config File Collection
The Device Config File Collection adapter collects configuration data; including config files, interface tables, interface index tables, software version, and other data; directly from network devices using command line interface (CLI). Collected data are stored for subsequent import by the appropriate import adapter. There is a separate import adapter for each data type collected: Device Config File Import, Device ifIndex Import, etc.
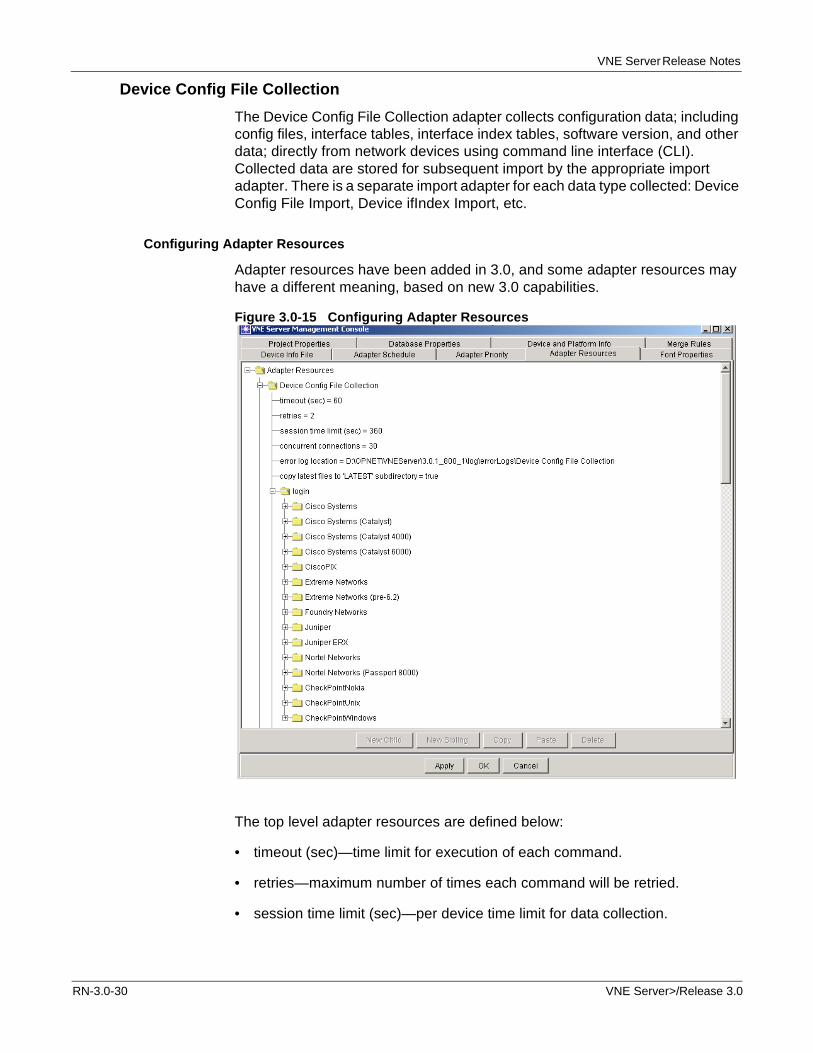
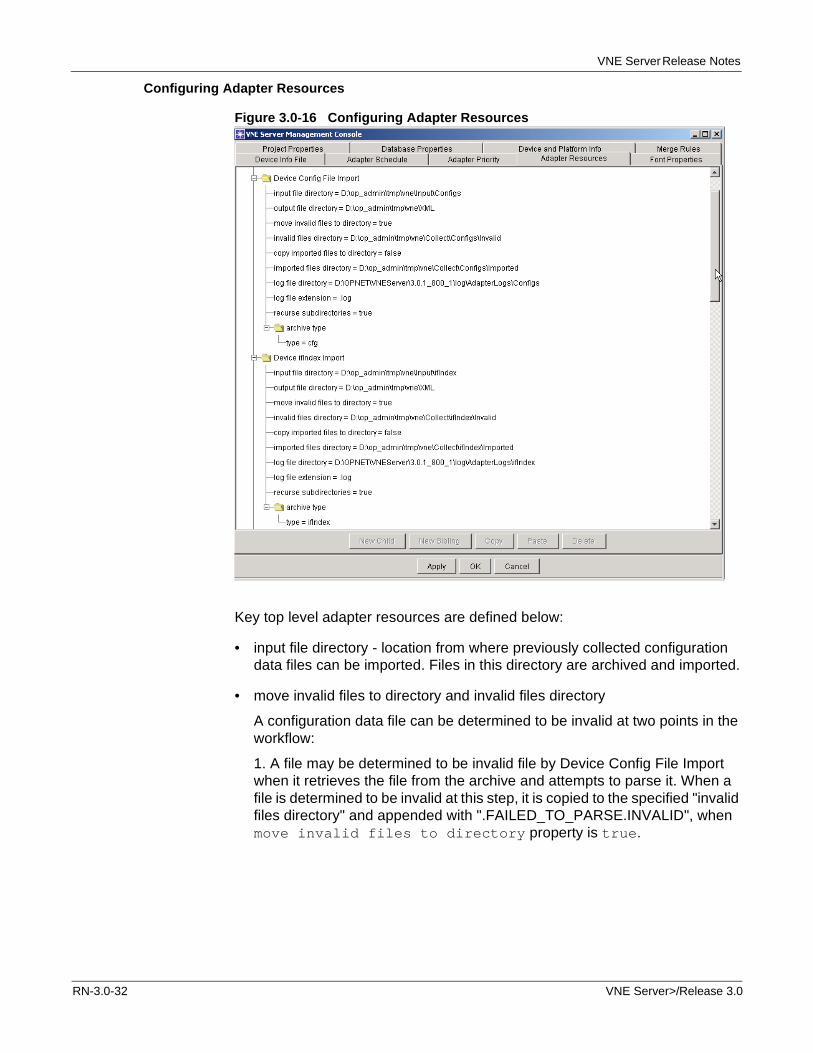
Configuring Adapter Resources
Adapter resources have been added in 3.0, and some adapter resources may have a different meaning, based on new 3.0 capabilities.
Figure 3.0-15 Configuring Adapter Resources
The top level adapter resources are defined below:
• timeout (sec)—time limit for execution of each command.
• retries—maximum number of times each command will be retried.
• session time limit (sec)—per device time limit for data collection.
RN-3.0-30 VNE Server>/Release 3.0
VNE Server Release Notes
• concurrent connections—maximum number of devices from which the adapter may attempt to simultaneously collect data.
• error log location—directory where error logs are stored.
• copy latest files to "LATEST" subdirectory
For each command in the Device Config File Collection adapter resources, a directory is specified into which files collected by that command are copied. By default, this directory is <vnes_tmp>\Collect\<command_name>\. As part of archiving, a numbered directory is created each time the Device Config File Collection adapter runs. The collected files are put in the numbered directory corresponding to the adapter run. When the copy files to ‘LATEST’ subdirectory attribute is enabled, a ‘LATEST’ subdirectory is created for each command under <vnes_tmp>\Collect\<command_name>\. A copy of each collected file is put in the LATEST directory when archiving occurs. If a previous file already exists, it is overwritten.
Device Config File Import
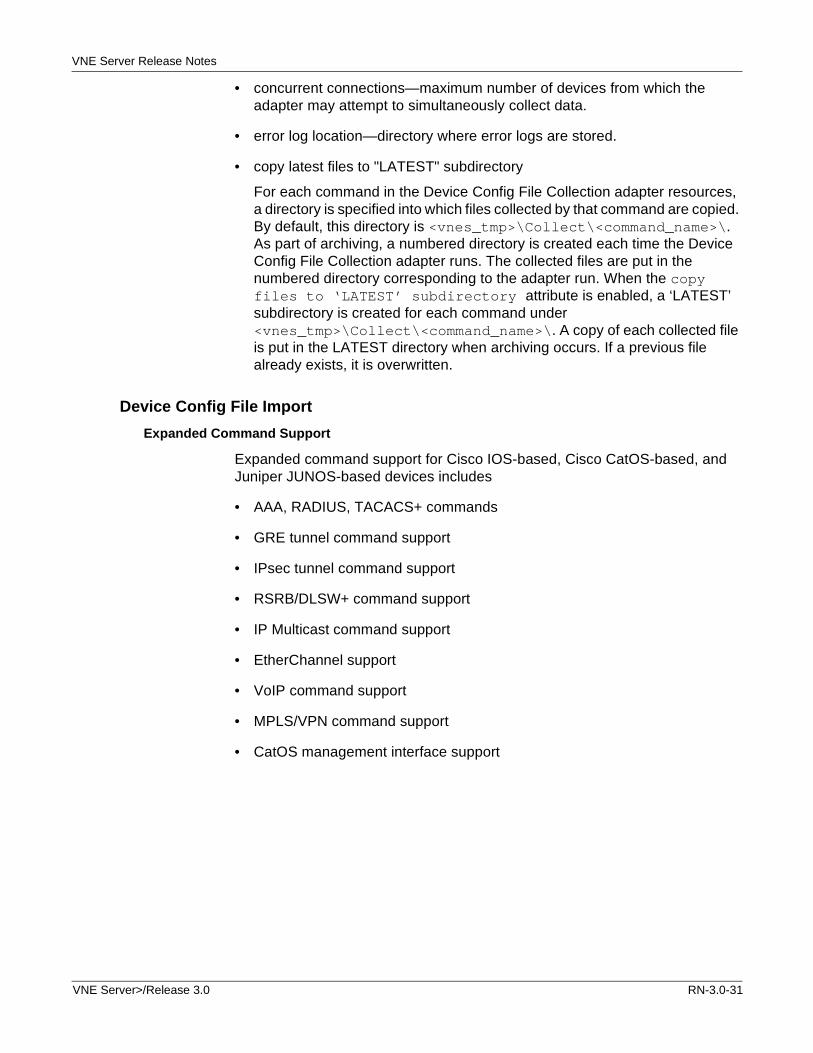
Expanded Command Support
Expanded command support for Cisco IOS-based, Cisco CatOS-based, and Juniper JUNOS-based devices includes
• AAA, RADIUS, TACACS+ commands
• GRE tunnel command support
• IPsec tunnel command support
• RSRB/DLSW+ command support
• IP Multicast command support
• EtherChannel support
• VoIP command support
• MPLS/VPN command support
• CatOS management interface support
VNE Server>/Release 3.0 RN-3.0-31
VNE Server Release Notes
Configuring Adapter Resources
Figure 3.0-16 Configuring Adapter Resources
Key top level adapter resources are defined below:
• input file directory - location from where previously collected configuration data files can be imported. Files in this directory are archived and imported.
• move invalid files to directory and invalid files directory
A configuration data file can be determined to be invalid at two points in the workflow:
1. A file may be determined to be invalid file by Device Config File Import when it retrieves the file from the archive and attempts to parse it. When a file is determined to be invalid at this step, it is copied to the specified "invalid files directory" and appended with ".FAILED_TO_PARSE.INVALID", when move invalid files to directory property is true.
RN-3.0-32 VNE Server>/Release 3.0
VNE Server Release Notes
2. Using pre-collected files, a file may be determined to be invalid during archiving. When move invalid files to directory property is true, the invalid file is moved to the specified "invalid files directory" and appended with ".FAILED_TO_FIND_DEVICE_ID.INVALID".
• recurse subdirectories—(relevant when importing pre-collected files from the input file directory.) When set to true, all files in the "input files directory" and its subdirectories will be archived and imported.
The following Device Config File Import attributes are no longer present in 3.0:
• rename DeviceConsoleConfigFiles
• renameExtension
• incompleteExtension
They are replaced by the following properties defined in Project Properties>VNESfeatures>versionControl.
• rename collected files after archiving—controls whether files are renamed as they are archived. This applies to files that are collected via Device Config File Collection and pre-collected files that are archived by the import adapters.
• renamed collected files with this extension—the extension that will be appended to archived files.
• do not import filter—A list of extensions. Files with these extensions will not be archived in the future. This allows users to specify that files in an "input files directory" that have already been renamed as archived, imported, invalid, or incomplete should not be archived again.
Creating CDP Neighbors
The Device CDP Import and Device MIB Configuration Import adapters have been enhanced in 3.0 to provide the ability to create shell nodes representing neighbor nodes that are reported in the CDP neighbor table but not found in the VNE Server database.
Devices may be added using this method to create a more connected topology however these devices do not contain any configuration data required for modeling. The only information that VNE Server has for these devices is provided by neighbor information tables and is, therefore, extremely limited. If the missing CDP neighbors are under your management control, we recommend that you create entries for them in the device info file (for VNE Server direct collection) so that configuration data can be collected and imported into the VNE Server database the next time the collection and import adapters run.
VNE Server>/Release 3.0 RN-3.0-33
VNE Server Release Notes
Device CDP Import
To enable this feature, open the Management Console and select the Adapter Resources tab. Expand Device CDP Import, and set createCdpNeighbors to true. This feature is disabled by default.
Device MIB Configuration Import
To enable this feature, open the Management Console and select the Adapter Resources tab. Expand Device MIB Configuration Import, and set createCdpNeighbors to true. This feature is disabled by default.
Device MIB Configuration Import
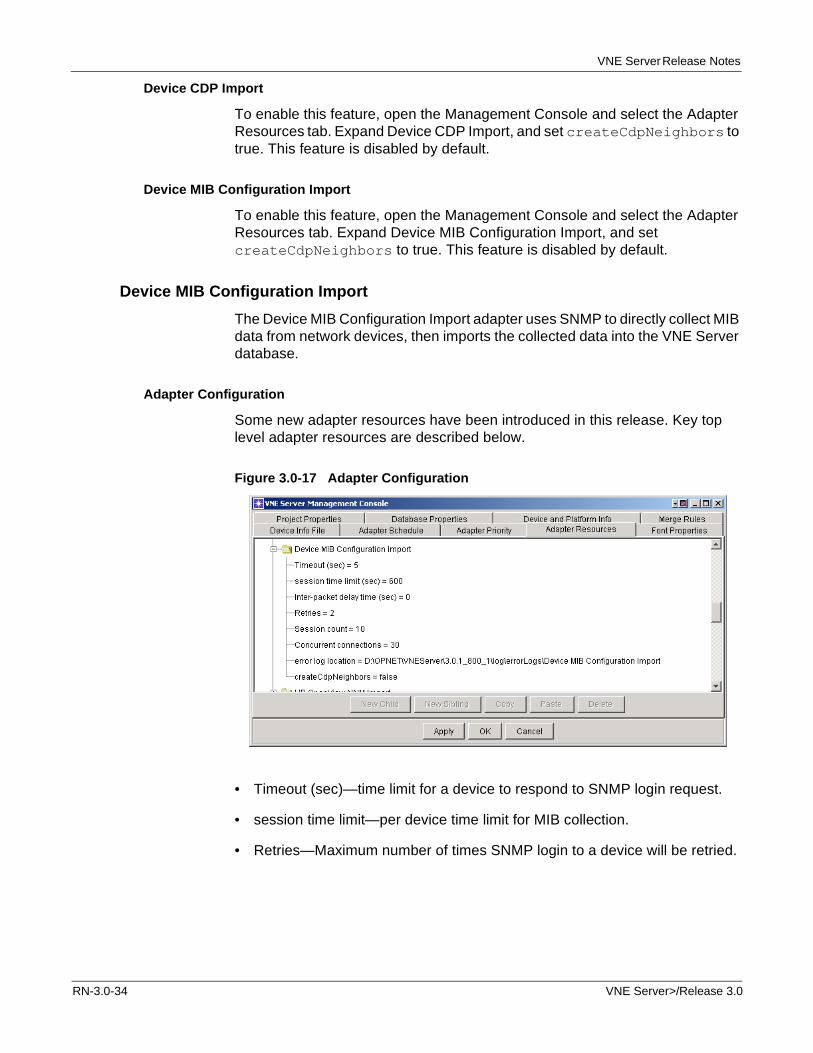
The Device MIB Configuration Import adapter uses SNMP to directly collect MIB data from network devices, then imports the collected data into the VNE Server database.
Adapter Configuration
Some new adapter resources have been introduced in this release. Key top level adapter resources are described below.
Figure 3.0-17 Adapter Configuration
• Timeout (sec)—time limit for a device to respond to SNMP login request.
• session time limit—per device time limit for MIB collection.
• Retries—Maximum number of times SNMP login to a device will be retried.
RN-3.0-34 VNE Server>/Release 3.0
VNE Server Release Notes
• Concurrent connections—maximum number of devices from which the adapter may attempt to collect data in parallel.
• createCdpNeighbors—see Creating CDP Neighbors on page RN-3.0-33.
WARNING—Inter-packet delay time (sec) and Session count are advanced options that should not be modified. Please contact OPNET technical support before modifying these values.
CiscoWorks ANI Database Import
Importing Connectivity
The default behavior for importing connectivity from the CiscoWorks ANI Database was changed to generate links directly from the CiscoWorks ANI topology data. When the connectivityOutputFormat option is set to Links, VNE Server uses the link list from the ANI database to generate links. When the CDP Config option is selected, VNE Server uses connection information from the ANI database to create pseudo-CDP information that is used to populate the CDP configuration in the VNE Server database, then the link and configuration inference adapter infers links using this information.
If you migrate adapter resource settings from 2.1PL2 to 3.0, you may wish to edit the configuration of this adapter and change the connectivityOutputFormat option to Links.
Importing Node Traffic Alias
This adapter has been enhanced to collect UserTracking information from the CiscoWorks ANI database when it is available. When imported into the VNE Server database, UserTracking information can be used to create node traffic aliases. To learn more about mapping demands using node traffic aliases, refer to Demand Import and Processing on page RN-3.0-40.
Link and Connection Inference
Link and Connection Inference contains several link inference engines for determining physical and logical network connections based on available data from the network devices. It also infers module containment relationship for routing modules that are managed separately from the switch chassis in which they are physically installed. Link and Connection Inference has notable enhancements in the 3.0 release.
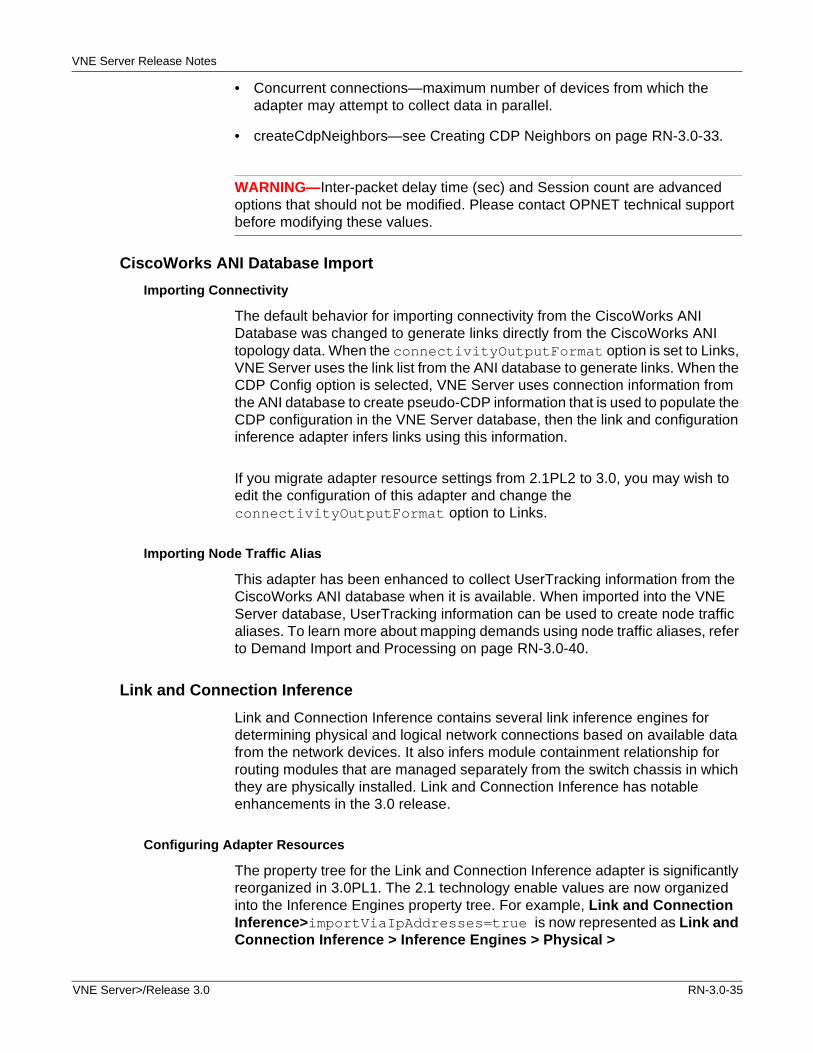
Configuring Adapter Resources
The property tree for the Link and Connection Inference adapter is significantly reorganized in 3.0PL1. The 2.1 technology enable values are now organized into the Inference Engines property tree. For example, Link and Connection Inference>importViaIpAddresses=true is now represented as Link and Connection Inference > Inference Engines > Physical >
VNE Server>/Release 3.0 RN-3.0-35
VNE Server Release Notes
IP Address Engine > active=true. Properties that can be adjusted to fine tune link inference are organized under Advanced Options. Properties that control message output for this adapter are organized under the Logging. Link Speed Mappings and are now visible to show the transmission rate (in bits per second) assigned to each link type.
Figure 3.0-18 Link and Connection Inference Adapter
Improved Layer-2 Inference
The CAM inference engine uses the MAC address forwarding tables to determine Layer-2 connections. This link inference engine has been enhanced to provide more accurate results when determining connections between Layer-2 devices and between Layer-2 and Layer-3 devices (when MAC address forwarding information is available for the devices).
The following reports have been added to provide additional insight into the MAC Address forwarding table information being used by the CAM inference engine:
• Interface MAC Address Intersection
• MAC Address Forwarding Table Neighbors
RN-3.0-36 VNE Server>/Release 3.0
VNE Server Release Notes
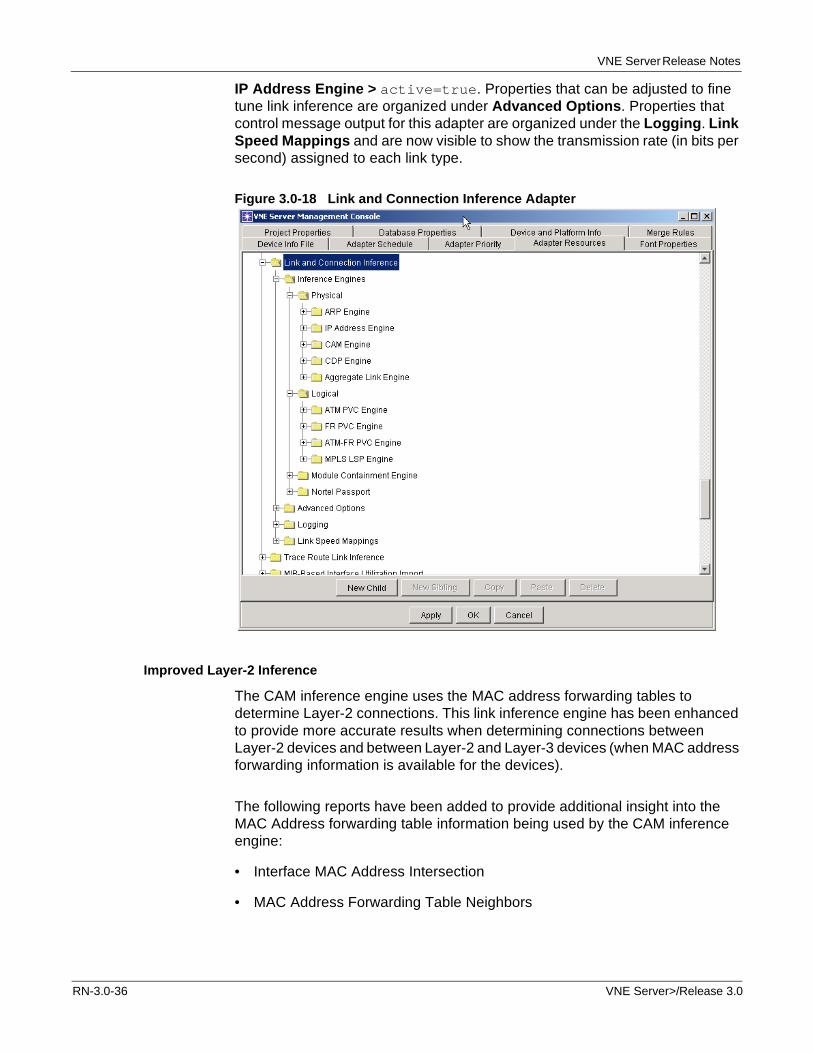
Inference of Aggregate Links
Link aggregation, also called trunking, is a way of combining multiple physical links into a single logical link. The logical (aggregate) interface is configured with an IP address, and the physical interfaces are configured as members of the aggregate interface.
Link and Connection Inference infers aggregate links in the following way. A logical link is inferred between the aggregate interfaces based on IP address, and physical links are created between physical interface pairs participating in the aggregate interface.
The Aggregate Link Engine utilizes IP addresses. Both the IP Address Engine and the Aggregate Link Engine must be enabled for aggregate links to be inferred by Link and Connection inference.
Figure 3.0-19 Aggregate Link Engine
VNE Server>/Release 3.0 RN-3.0-37
VNE Server Release Notes
Advanced Options
The Link and Connection Inference advanced options provide a great deal of control over a large number of settings. The default values for these options have been selected to address the most likely scenarios. You may wish to adjust these to address specific or unusual circumstances. Use caution when adjusting these settings, since a change in advanced options will have a ripple effect throughout the links inferred for a network database.
The advanced options for the Link and Connection Inference adapter are explained below (FAQ 1547):
• inferLinkTypeBasedOn (slowest link type by default)—The type of link is chosen based on the interfaces that attach to it. When the interfaces differ in their type, and therefore their default bit rate, this option indicates whether the fastest or slowest matching link type should be used.
• frameRelayFullMesh/atmFullMesh/atmFrameRelayFullMesh (false by default)—When more than two interfaces are configured with FR/ATM/ATM-FR and are in the same subnet, Link and Connection Inference does not always know how to place the PVCs between these interfaces. When available, multipoint and point-to-point information, or data from certain "show" commands can be used. If this information is not available, by default no PVCs are created. Enabling this option causes PVCs to be generated between all applicable interfaces.
• ignoreIfcOperStatus (true by default)—This option controls whether or not Link and Connection Inference will consider interfaces whose ifAdminStatus is down when inferring links by IP address.
• compareCamIfcType (true by default)—Enabling this options causes the interface type of the endpoints of a link inferred by CAM data to be compared. If they are not compatible interfaces, the link is not created.
• useMacExclusionFile (true by default)—MAC addresses listed in the exclusion file are not used during CAM based link inference if this option is enabled.
• useIpAddressExclusionFile (true by default)—IP addresses listed in the exclusion file are not used during IP address based link inference, if this option is enabled.
• filterIpLinksToVlanIfcs (false by default)—Enabling this option will cause IP address-based links to be removed, if they terminate on a VLAN interface. This option would be enabled in networks where we have sufficient data (CDP/EDP and CAM) for determining the layer-2 portion of the topology.
• mergeCdpLinksToIpLinks (true by default)—Normally, each inference engine overwrites the links inferred by previous engines. Enabling this option causes CDP-based inferred links to merge into links inferred by IP address rather than overwriting them. This option is useful in cases where neighbor discovery data is incomplete due to it not being enabled on all devices/interfaces.
RN-3.0-38 VNE Server>/Release 3.0
VNE Server Release Notes
• camPruneDupMacAddrs (false by default)—In networks that have switches who report the same MAC address for multiple interfaces, it is not always possible to determine which interface should by used as a link endpoint during CAM-based link inference. This is because the remote MAC address, pointed to in the source switch's CAM table, cannot be resolved to a single interface. When this attribute is enabled, if more than one interface on a device reports the same MAC address, VNE Server narrows that list of interfaces to a single interface using the following rules for each interface sharing that common MAC address:
— First, pick the interfaces that have a CAM entry pointing back to the source interface
— Next, choose the interface of the remaining interfaces that has the most CAM entries (most active interface)
— Finally, if there was a tie from the previous rule, choose the interface whose name is lexicographically shorter.
• camCompareEndpointEntries (false by default)—This option forces a link to be visible in both directions. In other words, both switch interface endpoints have CAM data that specifies the same link in each direction.
Utilization Import Adapters
This following adapters support telnet and SSH. When SSH is configured as the login connection type, VNE Server automatically detects the version (v.1 or v.2).
• Concord eHealth Network Utilization Import
• MRTG Interface Utilization Import
• StatScout Interface Utilization Import
MRTG Interface Utilization Import
In 3.0, the MRTG Interface Utilization Import adapter provides better compatibility with Windows FTP servers. On a Windows FTP server, the FTP file path is relative to the FTP server's root directory. In this release, the user specifies the FTP root directory on the FTP server so that VNE Server can resolve the MS-DOS path to the FTP file path. This attribute is configured in MRTG Interface Utilization Import > mrtgServerList > Regular MRTG Server > ftp > ftpRootDir or MRTG Interface Utilization Import > mrtgServerList > RRD Integrated MRTG Server > ftp > ftpRootDir. For additional information on how to configure the MRTG Interface Utilization adapter to work with a Windows IIS FTP Server, please see FAQ 1486.
VNE Server>/Release 3.0 RN-3.0-39
VNE Server Release Notes
In previous releases of VNE Server, the log directory for the MRTG Interface Utilization Import adapter was specified in adapter resources (MRTG Interface Utilization Import > mrtgServerList > Regular MRTG Server > logDir and MRTG Interface Utilization Import > mrtgServerList > RRD Integrated MRTG Server > logDir). In 3.0, this adapter automatically finds the appropriate directory from the MRTG configuration files. Notice that logDir is no longer a configurable attribute in adapter resources for this adapter.
Demand Import and Processing
The following adapters collect and import demand traffic flow data into the VNE Server database:
• Cisco Netflow Import
• NetScout nGenius Import
• Cflowd Import
The Demand Traffic Processing Service processes traffic flow data and maps flow endpoints to devices in the VNE Server network database. The Demand Traffic Rollup Service manages the amount of traffic flow data and deletes obsolete flow data.
Traffic mapping and reporting have been enhanced in VNE Server 3.0.
Traffic Mapping Using Node Traffic Alias
Traffic demands whose endpoints are outside the network topology cannot be mapped to endpoints based on IP subnets. To address this issue, the Demand Traffic Processing Service has been enhanced to use node traffic aliases for mapping flow endpoints. After a demand traffic import adapter finishes, flows exist in the VNE Server database separate from the topology. Demands in this state are referred to as “unmapped.” These traffic flows must then be associated with the network topology by mapping the endpoints. In previous releases, the Demand Traffic Processing Service performed this mapping by subnets using primary addresses. In 3.0 mapping by subnet has been expanded to use secondary IP addresses. It has also been enhanced to map demand traffic flows using node traffic aliases.
Node traffic aliases can be imported into VNE Server using the ASCII Generic Data Import adapter. If there is UserTracking data stored in the CiscoWorks ANI database, it can be used to create node traffic aliases in VNE Server.
After traffic flows have been imported into the VNE Server database, use these steps to map flows to endpoints using node traffic aliases:
1) Import node traffic aliases into VNE Server
a) Using the CiscoWorks ANI Database Import adapter
RN-3.0-40 VNE Server>/Release 3.0
VNE Server Release Notes
Open the Management Console, and select the Adapter Resources tab. Expand CiscoWorks ANI Database Import, and set includeUserTrackingInfo to yes (the default value is no). Run the CiscoWorks ANI Database Import adapter.
b) Using the ASCII Generic Data Import adapter
Figure 3.0-20 Node Traffic Alias
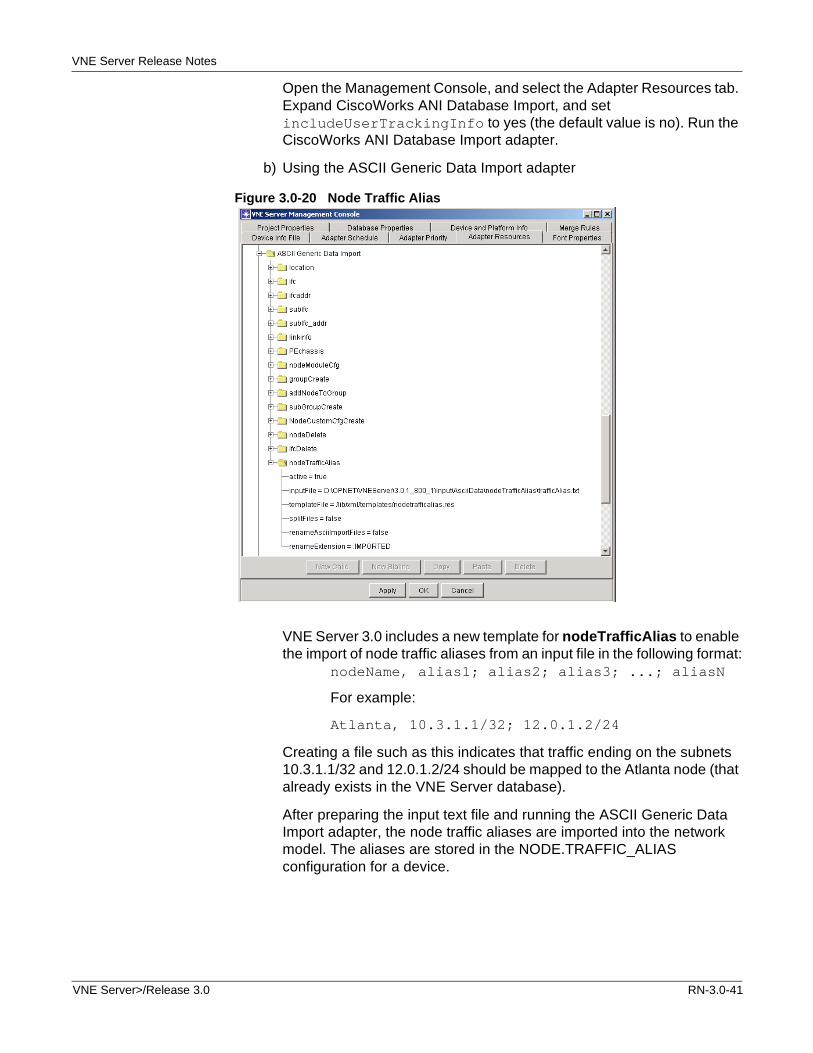
VNE Server 3.0 includes a new template for nodeTrafficAlias to enable the import of node traffic aliases from an input file in the following format:
nodeName, alias1; alias2; alias3; ...; aliasN
For example:
Atlanta, 10.3.1.1/32; 12.0.1.2/24
Creating a file such as this indicates that traffic ending on the subnets 10.3.1.1/32 and 12.0.1.2/24 should be mapped to the Atlanta node (that already exists in the VNE Server database).
After preparing the input text file and running the ASCII Generic Data Import adapter, the node traffic aliases are imported into the network model. The aliases are stored in the NODE.TRAFFIC_ALIAS configuration for a device.
VNE Server>/Release 3.0 RN-3.0-41
VNE Server Release Notes
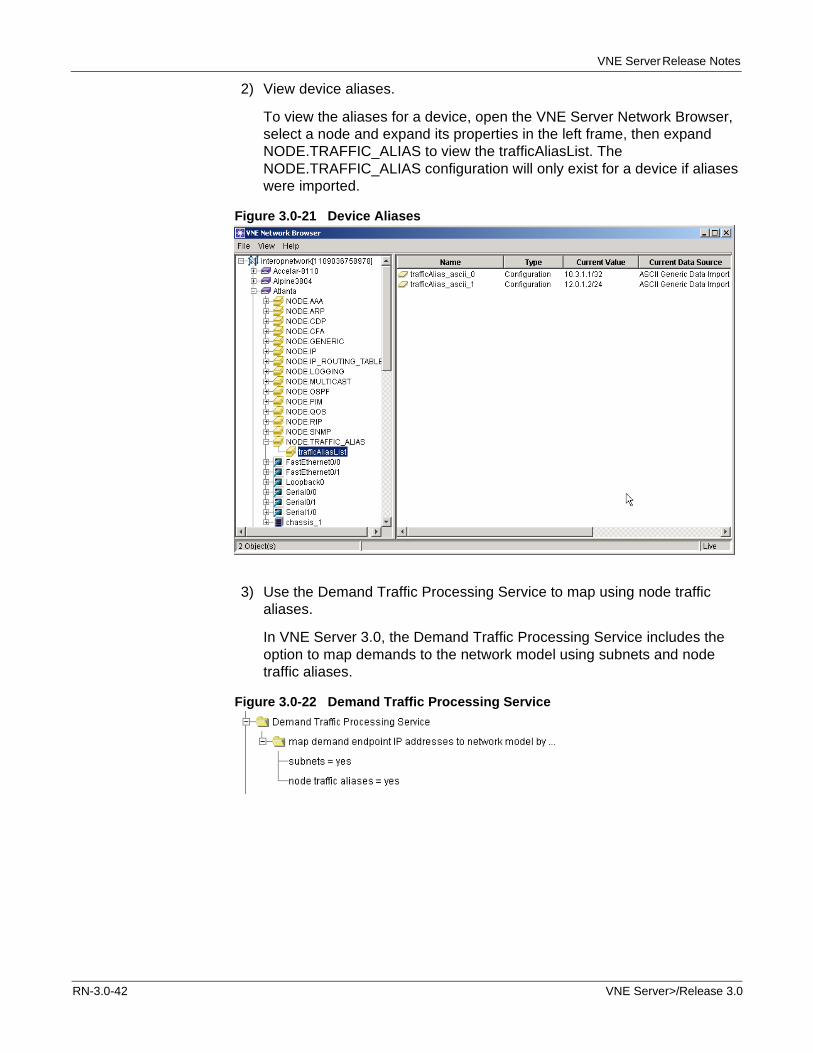
2) View device aliases.
To view the aliases for a device, open the VNE Server Network Browser, select a node and expand its properties in the left frame, then expand NODE.TRAFFIC_ALIAS to view the trafficAliasList. The NODE.TRAFFIC_ALIAS configuration will only exist for a device if aliases were imported.
Figure 3.0-21 Device Aliases
3) Use the Demand Traffic Processing Service to map using node traffic aliases.
In VNE Server 3.0, the Demand Traffic Processing Service includes the option to map demands to the network model using subnets and node traffic aliases.
Figure 3.0-22 Demand Traffic Processing Service
RN-3.0-42 VNE Server>/Release 3.0
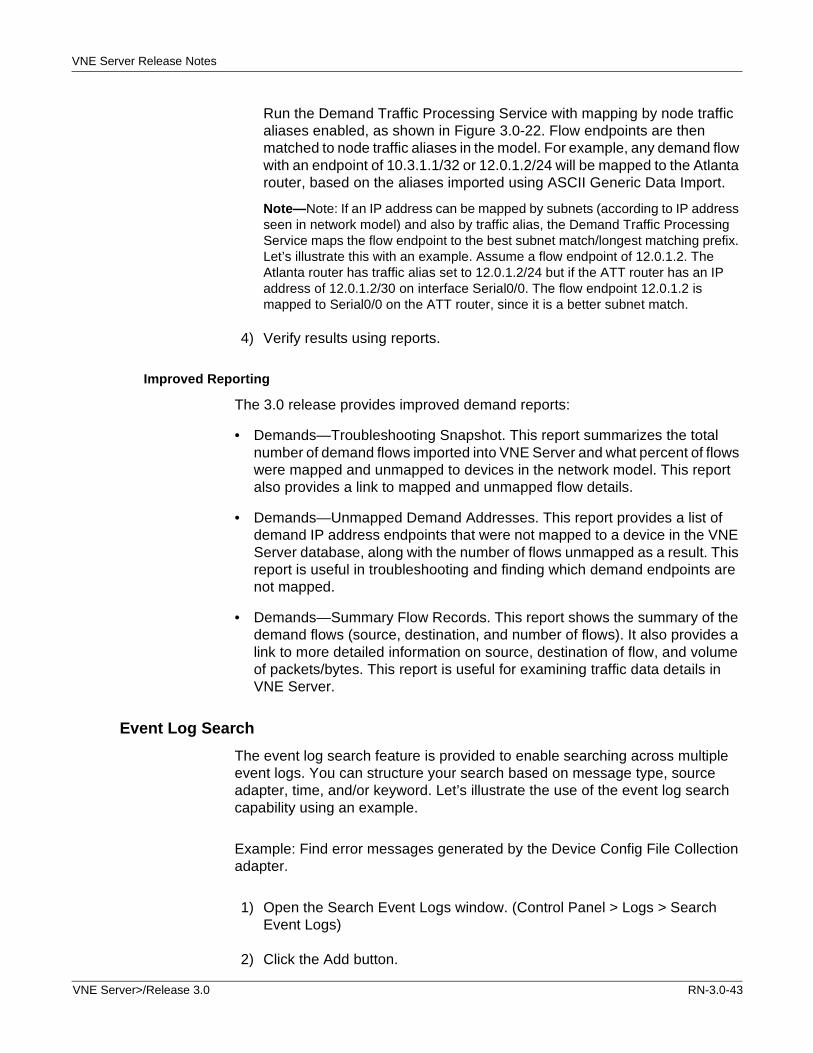
VNE Server Release Notes
Run the Demand Traffic Processing Service with mapping by node traffic aliases enabled, as shown in Figure 3.0-22. Flow endpoints are then matched to node traffic aliases in the model. For example, any demand flow with an endpoint of 10.3.1.1/32 or 12.0.1.2/24 will be mapped to the Atlanta router, based on the aliases imported using ASCII Generic Data Import.
Note—Note: If an IP address can be mapped by subnets (according to IP address seen in network model) and also by traffic alias, the Demand Traffic Processing Service maps the flow endpoint to the best subnet match/longest matching prefix. Let’s illustrate this with an example. Assume a flow endpoint of 12.0.1.2. The Atlanta router has traffic alias set to 12.0.1.2/24 but if the ATT router has an IP address of 12.0.1.2/30 on interface Serial0/0. The flow endpoint 12.0.1.2 is mapped to Serial0/0 on the ATT router, since it is a better subnet match.
4) Verify results using reports.
Improved Reporting
The 3.0 release provides improved demand reports:
• Demands—Troubleshooting Snapshot. This report summarizes the total number of demand flows imported into VNE Server and what percent of flows were mapped and unmapped to devices in the network model. This report also provides a link to mapped and unmapped flow details.
• Demands—Unmapped Demand Addresses. This report provides a list of demand IP address endpoints that were not mapped to a device in the VNE Server database, along with the number of flows unmapped as a result. This report is useful in troubleshooting and finding which demand endpoints are not mapped.
• Demands—Summary Flow Records. This report shows the summary of the demand flows (source, destination, and number of flows). It also provides a link to more detailed information on source, destination of flow, and volume of packets/bytes. This report is useful for examining traffic data details in VNE Server.
Event Log Search
The event log search feature is provided to enable searching across multiple event logs. You can structure your search based on message type, source adapter, time, and/or keyword. Let’s illustrate the use of the event log search capability using an example.
Example: Find error messages generated by the Device Config File Collection adapter.
1) Open the Search Event Logs window. (Control Panel > Logs > Search Event Logs)
2) Click the Add button.
VNE Server>/Release 3.0 RN-3.0-43
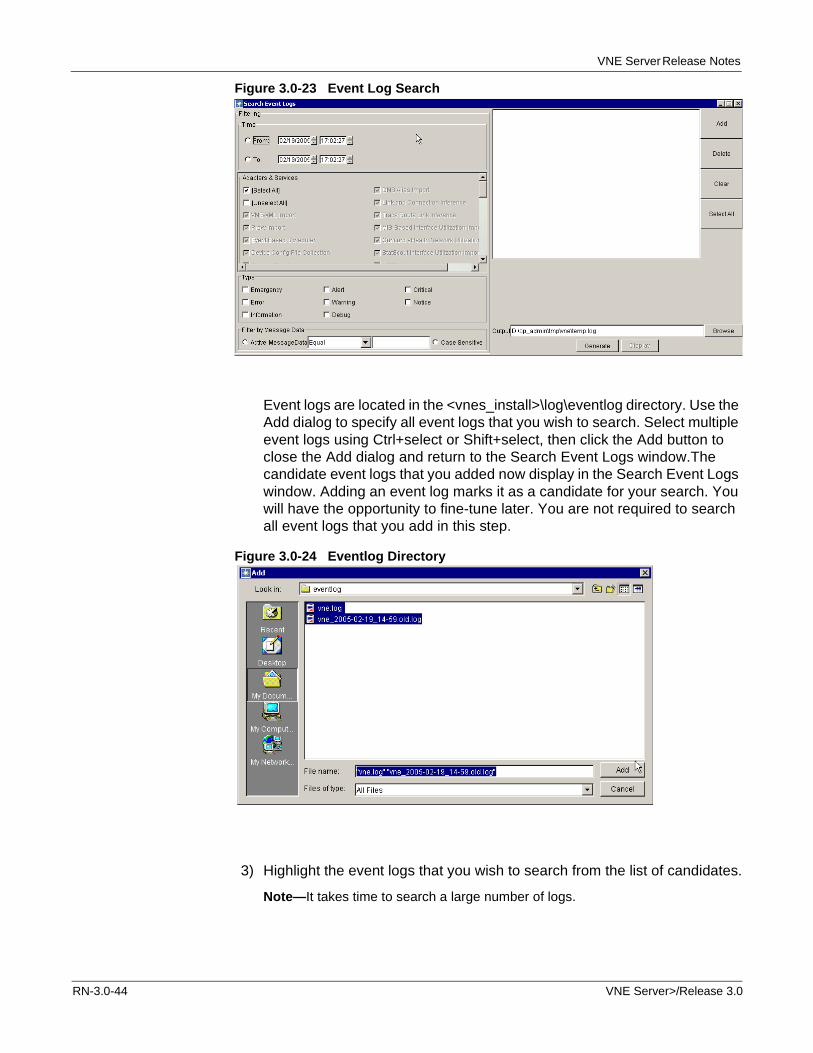
VNE Server Release Notes
Figure 3.0-23 Event Log Search
Event logs are located in the <vnes_install>\log\eventlog directory. Use the Add dialog to specify all event logs that you wish to search. Select multiple event logs using Ctrl+select or Shift+select, then click the Add button to close the Add dialog and return to the Search Event Logs window.The candidate event logs that you added now display in the Search Event Logs window. Adding an event log marks it as a candidate for your search. You will have the opportunity to fine-tune later. You are not required to search all event logs that you add in this step.
Figure 3.0-24 Eventlog Directory
3) Highlight the event logs that you wish to search from the list of candidates.
Note—It takes time to search a large number of logs.
RN-3.0-44 VNE Server>/Release 3.0
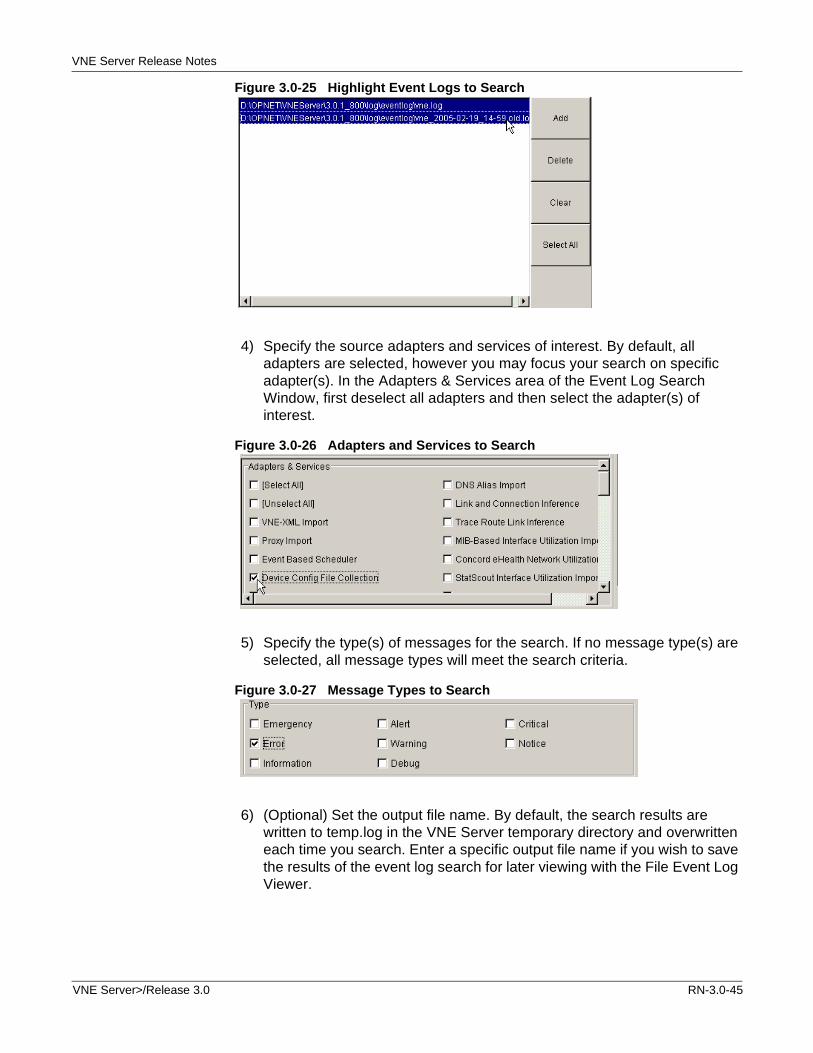
VNE Server Release Notes
Figure 3.0-25 Highlight Event Logs to Search
4) Specify the source adapters and services of interest. By default, all adapters are selected, however you may focus your search on specific adapter(s). In the Adapters & Services area of the Event Log Search Window, first deselect all adapters and then select the adapter(s) of interest.
Figure 3.0-26 Adapters and Services to Search
5) Specify the type(s) of messages for the search. If no message type(s) are selected, all message types will meet the search criteria.
Figure 3.0-27 Message Types to Search
6) (Optional) Set the output file name. By default, the search results are written to temp.log in the VNE Server temporary directory and overwritten each time you search. Enter a specific output file name if you wish to save the results of the event log search for later viewing with the File Event Log Viewer.
VNE Server>/Release 3.0 RN-3.0-45
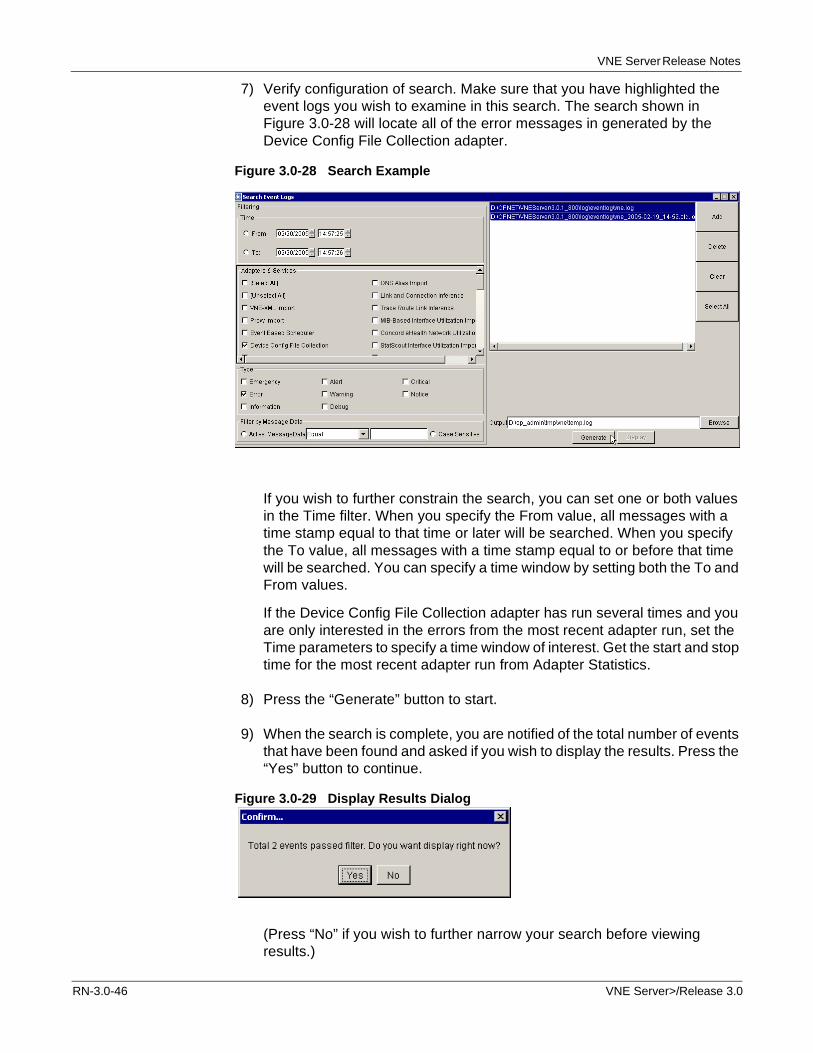
VNE Server Release Notes
7) Verify configuration of search. Make sure that you have highlighted the event logs you wish to examine in this search. The search shown in Figure 3.0-28 will locate all of the error messages in generated by the Device Config File Collection adapter.
Figure 3.0-28 Search Example
If you wish to further constrain the search, you can set one or both values in the Time filter. When you specify the From value, all messages with a time stamp equal to that time or later will be searched. When you specify the To value, all messages with a time stamp equal to or before that time will be searched. You can specify a time window by setting both the To and From values.
If the Device Config File Collection adapter has run several times and you are only interested in the errors from the most recent adapter run, set the Time parameters to specify a time window of interest. Get the start and stop time for the most recent adapter run from Adapter Statistics.
8) Press the “Generate” button to start.
9) When the search is complete, you are notified of the total number of events that have been found and asked if you wish to display the results. Press the “Yes” button to continue.
Figure 3.0-29 Display Results Dialog
(Press “No” if you wish to further narrow your search before viewing results.)
RN-3.0-46 VNE Server>/Release 3.0
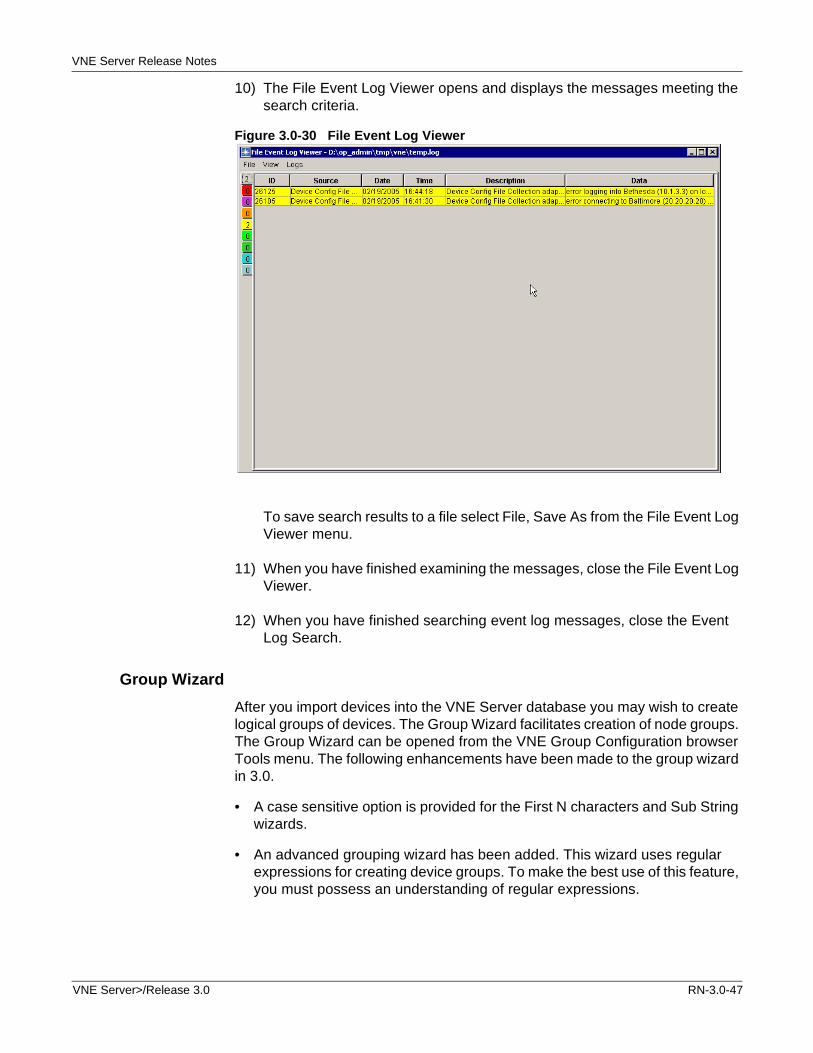
VNE Server Release Notes
10) The File Event Log Viewer opens and displays the messages meeting the search criteria.
Figure 3.0-30 File Event Log Viewer
To save search results to a file select File, Save As from the File Event Log Viewer menu.
11) When you have finished examining the messages, close the File Event Log Viewer.
12) When you have finished searching event log messages, close the Event Log Search.
Group Wizard
After you import devices into the VNE Server database you may wish to create logical groups of devices. The Group Wizard facilitates creation of node groups. The Group Wizard can be opened from the VNE Group Configuration browser Tools menu. The following enhancements have been made to the group wizard in 3.0.
• A case sensitive option is provided for the First N characters and Sub String wizards.
• An advanced grouping wizard has been added. This wizard uses regular expressions for creating device groups. To make the best use of this feature, you must possess an understanding of regular expressions.
VNE Server>/Release 3.0 RN-3.0-47
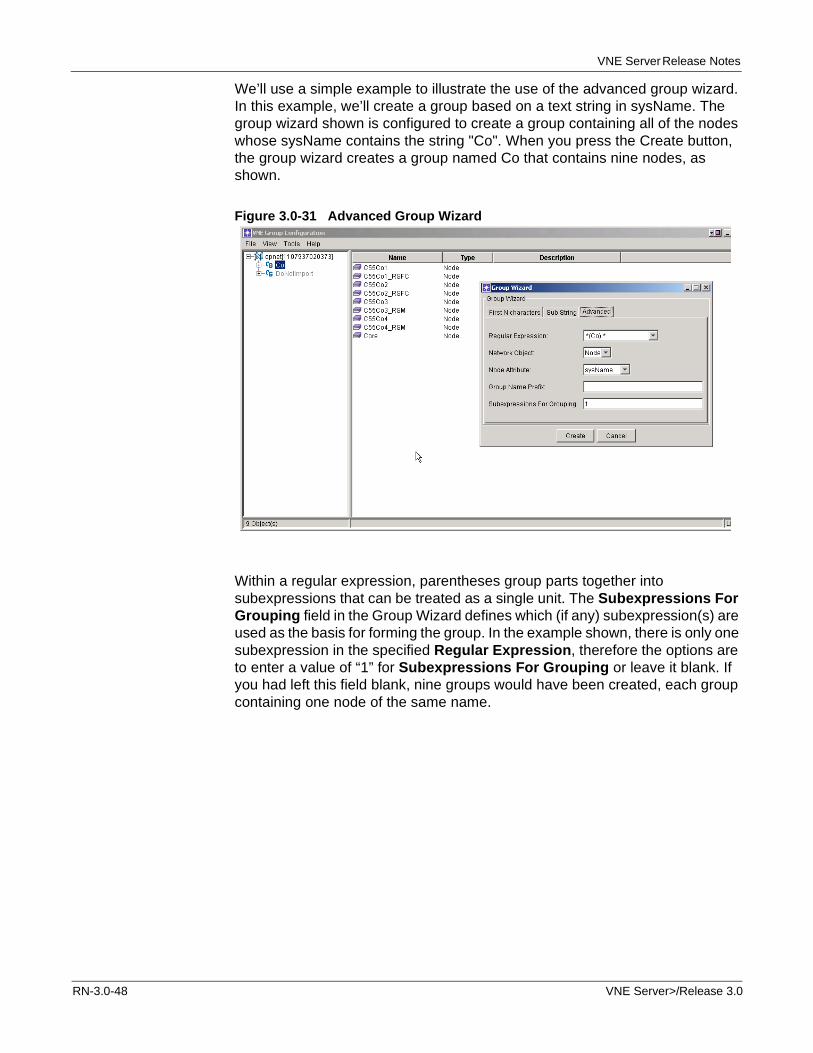
VNE Server Release Notes
We’ll use a simple example to illustrate the use of the advanced group wizard. In this example, we’ll create a group based on a text string in sysName. The group wizard shown is configured to create a group containing all of the nodes whose sysName contains the string "Co". When you press the Create button, the group wizard creates a group named Co that contains nine nodes, as shown.
Figure 3.0-31 Advanced Group Wizard
Within a regular expression, parentheses group parts together into subexpressions that can be treated as a single unit. The Subexpressions For Grouping field in the Group Wizard defines which (if any) subexpression(s) are used as the basis for forming the group. In the example shown, there is only one subexpression in the specified Regular Expression, therefore the options are to enter a value of “1” for Subexpressions For Grouping or leave it blank. If you had left this field blank, nine groups would have been created, each group containing one node of the same name.
RN-3.0-48 VNE Server>/Release 3.0
VNE Server Release Notes
Tracking Changes in VNE Server
VNE Server has properties that enable tracking of changes in the network database.
• persistChanges—enables tracking of detected network changes. When persistChanges is enabled, you can use the incremental import mode when importing from VNE Server into OPNET.
• persistArchiveChanges—complements persistChanges by recording the source adapter responsible for the change. When both persistChanges and persistArchiveChanges are enabled, detailed change reporting is provided and VNE Server's change reports are populated.
Note—When persistChanges is disabled, this property has no effect.
WARNING—These attributes should be enabled after building the initial network database baseline. This will prevent VNE Server from recording changes for the entire new network database as it is created. If you migrate resources from 2.1PL2 to 3.0PL1, check the state of these attributes in 3.0 before you begin initial import. Make sure both are set to false.
When you enable change tracking, make sure that you add the Change Records Maintenance Service to your schedule and run it on a regular basis. The Change Records Maintenance Service manages database growth that results when network change history is saved in the database.
Incremental Import
Before you enable change tracking in VNE Server, first build a baseline network topology by collecting and importing data into the VNE Server database. Import this baseline into OPNET. Next, enable change tracking in VNE Server. To enable change tracking, open the VNE Server Management Console. Expand Project Properties > VNESfeatures. Enable the “persistChanges” attribute by setting it to true. Stop and restart VNE Server services to apply this change. Run your selected collection and import adapters as usual. The next time you import from VNE Server into OPNET, you can employ the incremental import mode.
System Change Reporting
To use system change reporting, first build a baseline network topology by collecting and importing data into the VNE Server database. Next enable system change reporting. To enable system change reporting, open the VNE Server Management Console. In Project Properties tab, expand VNESfeatures, and enable both the persistChanges and persistArchiveChanges attributes by setting them to true. Stop and restart VNE Server services to apply this change, then run your selected collection and import adapters as usual. Changes from the baseline can be examined using the System Change reports.
VNE Server>/Release 3.0 RN-3.0-49
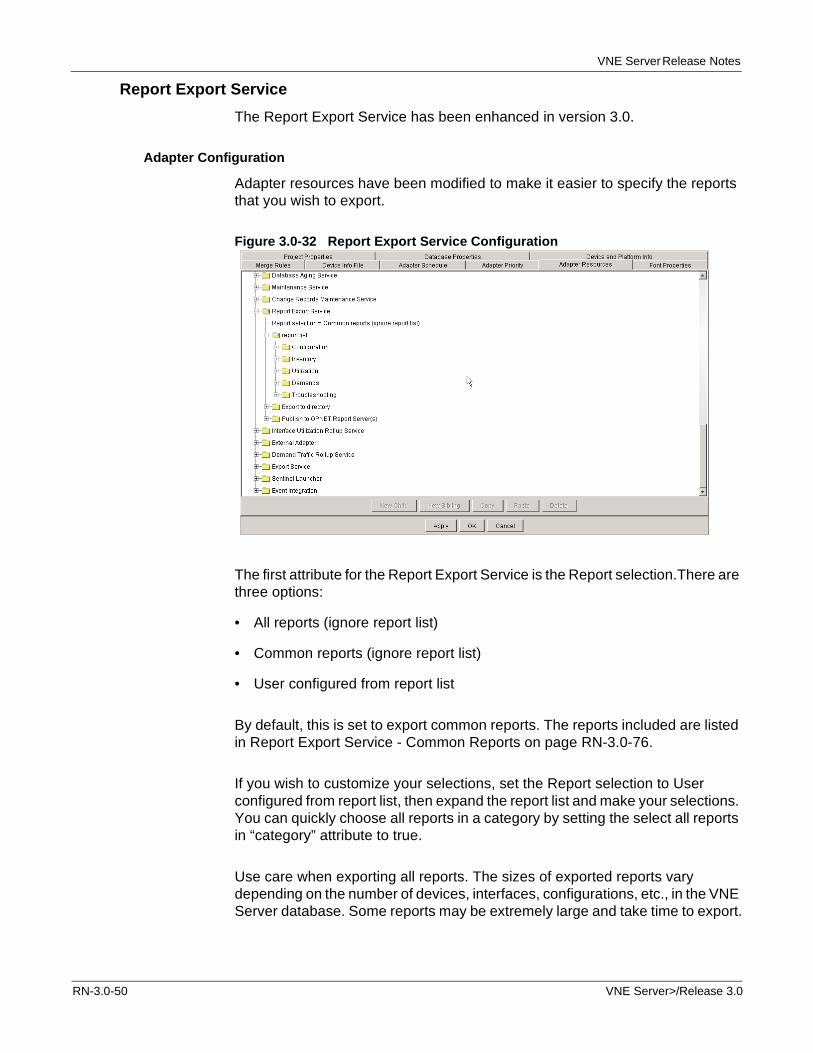
VNE Server Release Notes
Report Export Service
The Report Export Service has been enhanced in version 3.0.
Adapter Configuration
Adapter resources have been modified to make it easier to specify the reports that you wish to export.
Figure 3.0-32 Report Export Service Configuration
The first attribute for the Report Export Service is the Report selection.There are three options:
• All reports (ignore report list)
• Common reports (ignore report list)
• User configured from report list
By default, this is set to export common reports. The reports included are listed in Report Export Service - Common Reports on page RN-3.0-76.
If you wish to customize your selections, set the Report selection to User configured from report list, then expand the report list and make your selections. You can quickly choose all reports in a category by setting the select all reports in “category” attribute to true.
Use care when exporting all reports. The sizes of exported reports vary depending on the number of devices, interfaces, configurations, etc., in the VNE Server database. Some reports may be extremely large and take time to export.
RN-3.0-50 VNE Server>/Release 3.0
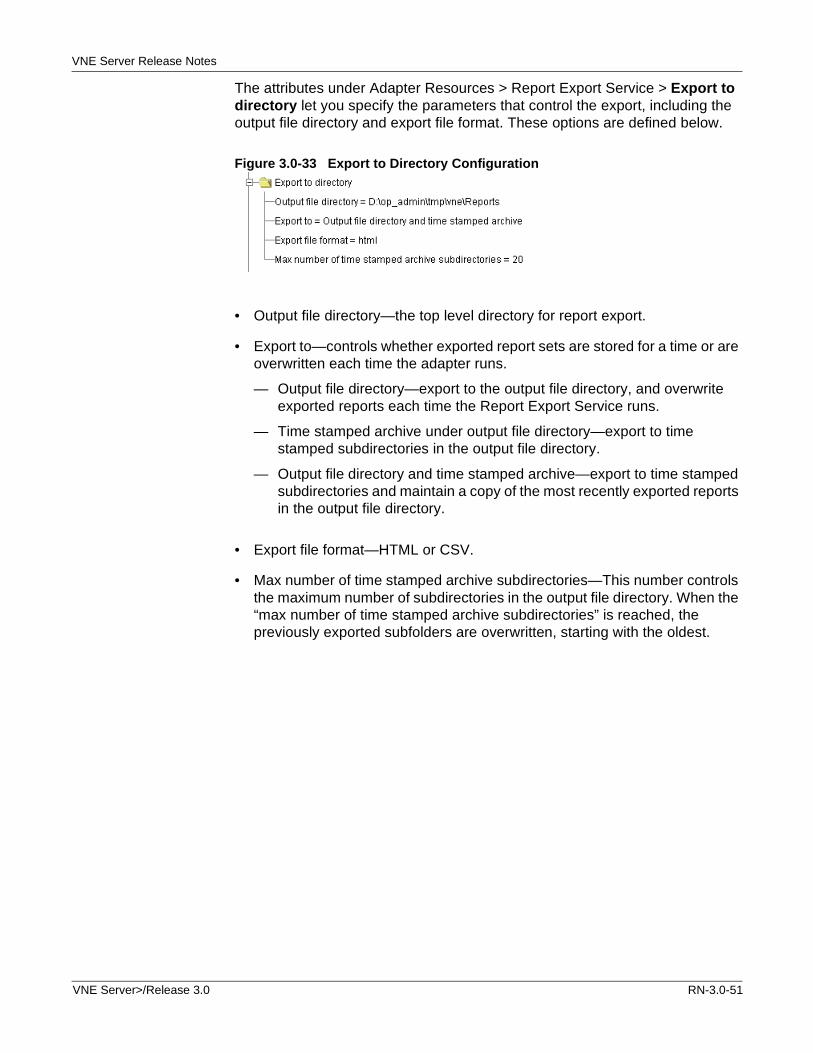
VNE Server Release Notes
The attributes under Adapter Resources > Report Export Service > Export to directory let you specify the parameters that control the export, including the output file directory and export file format. These options are defined below.
Figure 3.0-33 Export to Directory Configuration
• Output file directory—the top level directory for report export.
• Export to—controls whether exported report sets are stored for a time or are overwritten each time the adapter runs.
— Output file directory—export to the output file directory, and overwrite exported reports each time the Report Export Service runs.
— Time stamped archive under output file directory—export to time stamped subdirectories in the output file directory.
— Output file directory and time stamped archive—export to time stamped subdirectories and maintain a copy of the most recently exported reports in the output file directory.
• Export file format—HTML or CSV.
• Max number of time stamped archive subdirectories—This number controls the maximum number of subdirectories in the output file directory. When the “max number of time stamped archive subdirectories” is reached, the previously exported subfolders are overwritten, starting with the oldest.
VNE Server>/Release 3.0 RN-3.0-51
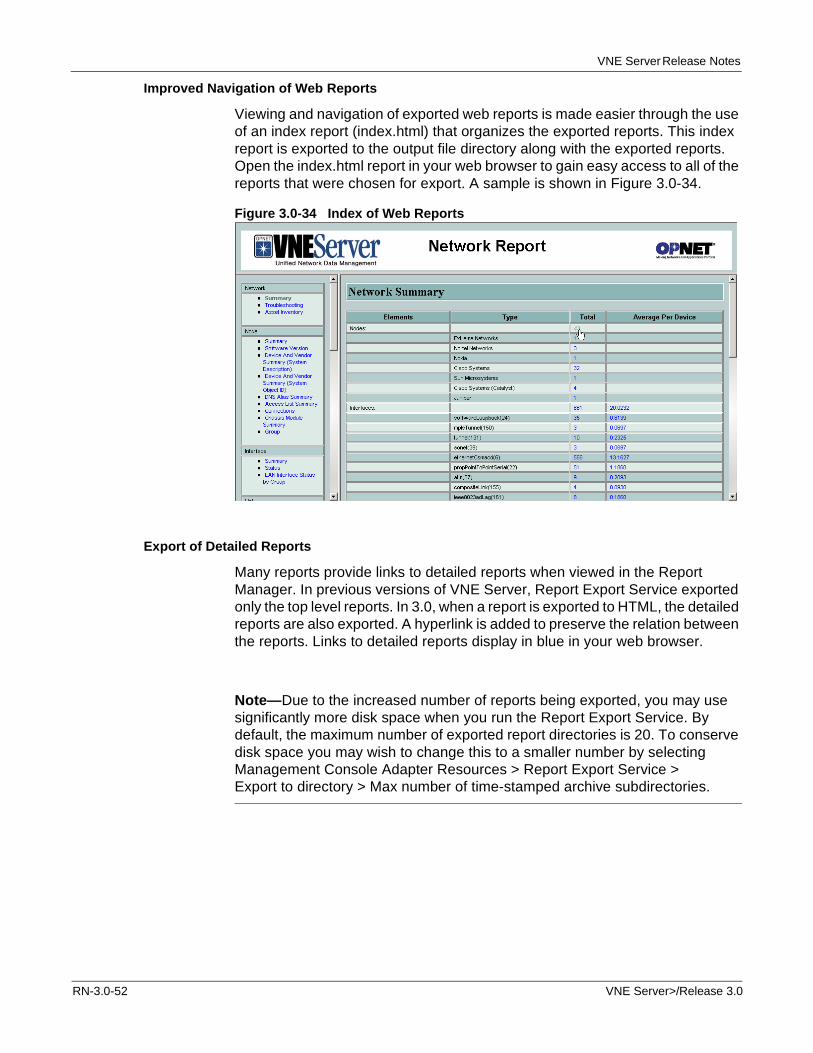
VNE Server Release Notes
Improved Navigation of Web Reports
Viewing and navigation of exported web reports is made easier through the use of an index report (index.html) that organizes the exported reports. This index report is exported to the output file directory along with the exported reports. Open the index.html report in your web browser to gain easy access to all of the reports that were chosen for export. A sample is shown in Figure 3.0-34.
Figure 3.0-34 Index of Web Reports
Export of Detailed Reports
Many reports provide links to detailed reports when viewed in the Report Manager. In previous versions of VNE Server, Report Export Service exported only the top level reports. In 3.0, when a report is exported to HTML, the detailed reports are also exported. A hyperlink is added to preserve the relation between the reports. Links to detailed reports display in blue in your web browser.
Note—Due to the increased number of reports being exported, you may use significantly more disk space when you run the Report Export Service. By default, the maximum number of exported report directories is 20. To conserve disk space you may wish to change this to a smaller number by selecting Management Console Adapter Resources > Report Export Service > Export to directory > Max number of time-stamped archive subdirectories.
RN-3.0-52 VNE Server>/Release 3.0
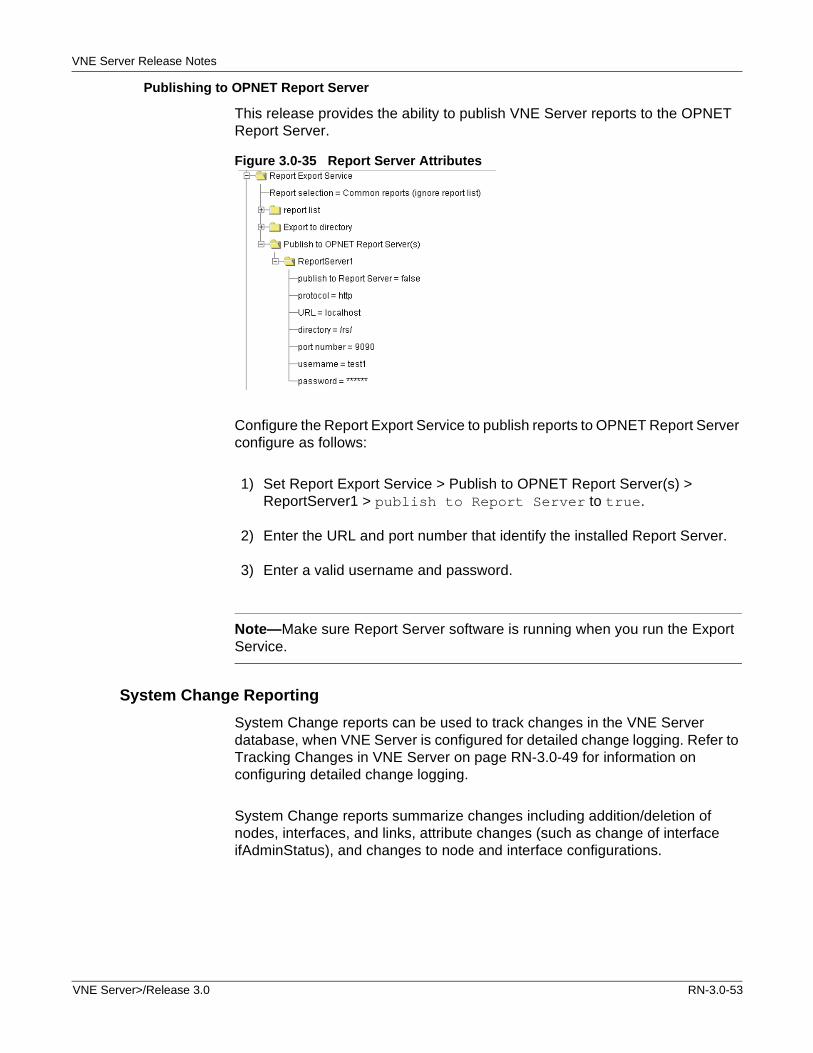
VNE Server Release Notes
Publishing to OPNET Report Server
This release provides the ability to publish VNE Server reports to the OPNET Report Server.
Figure 3.0-35 Report Server Attributes
Configure the Report Export Service to publish reports to OPNET Report Server configure as follows:
1) Set Report Export Service > Publish to OPNET Report Server(s) > ReportServer1 > publish to Report Server to true.
2) Enter the URL and port number that identify the installed Report Server.
3) Enter a valid username and password.
Note—Make sure Report Server software is running when you run the Export Service.
System Change Reporting
System Change reports can be used to track changes in the VNE Server database, when VNE Server is configured for detailed change logging. Refer to Tracking Changes in VNE Server on page RN-3.0-49 for information on configuring detailed change logging.
System Change reports summarize changes including addition/deletion of nodes, interfaces, and links, attribute changes (such as change of interface ifAdminStatus), and changes to node and interface configurations.
VNE Server>/Release 3.0 RN-3.0-53
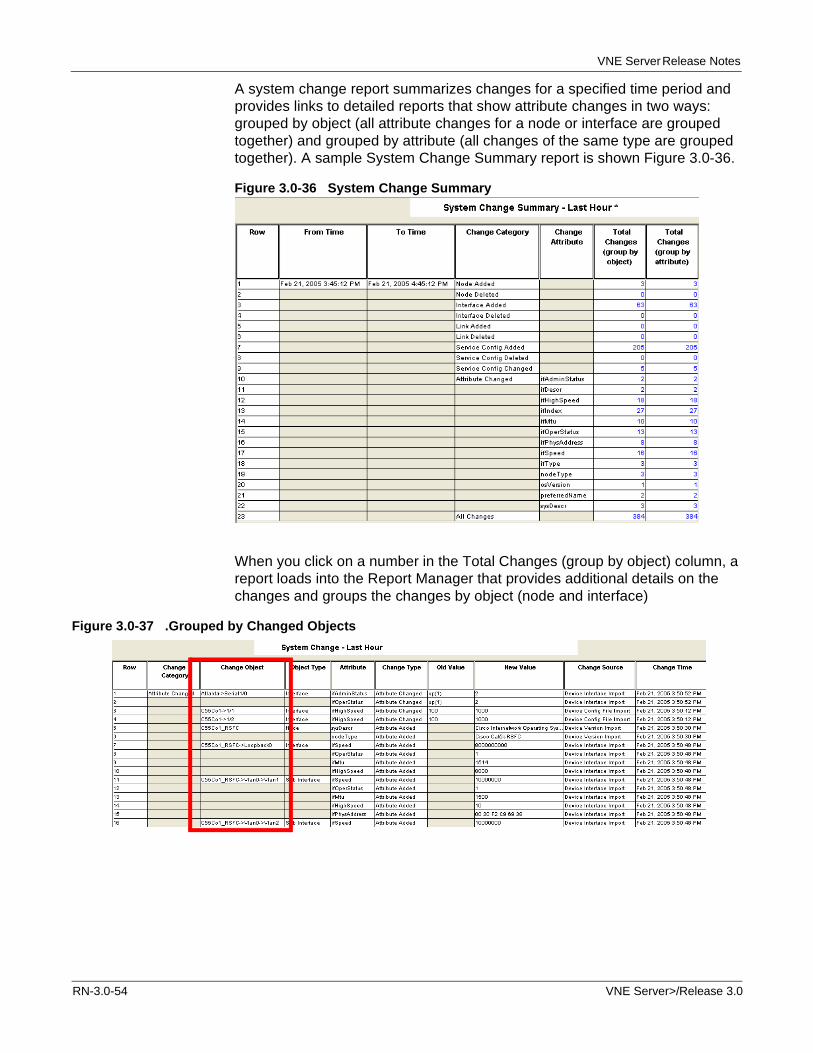
VNE Server Release Notes
A system change report summarizes changes for a specified time period and provides links to detailed reports that show attribute changes in two ways: grouped by object (all attribute changes for a node or interface are grouped together) and grouped by attribute (all changes of the same type are grouped together). A sample System Change Summary report is shown Figure 3.0-36.
Figure 3.0-36 System Change Summary
When you click on a number in the Total Changes (group by object) column, a report loads into the Report Manager that provides additional details on the changes and groups the changes by object (node and interface)
Figure 3.0-37 .Grouped by Changed Objects
RN-3.0-54 VNE Server>/Release 3.0
VNE Server Release Notes
Press the Report Manager Return button to return to the System Change Summary report. Next, click on a number in the Total Changes (group by attribute) column. A more detailed report loads in which the changes are grouped by attribute changes.
Figure 3.0-38 Grouped by Attribute Changes
For configuration changes, the system change reports notify you that there has been a change but do not provide a detailed description of the change. Changes to some configurations (NODE.CFA, NODE.CDP, NODE.CAM, NODE.ARP, NODE.IP_ROUTING_TABLE, and INTERFACE.DLC) are not reported in the System Change reports. Attributes that are expected to change frequently, such as Node "sysUpTime" and Interface "ifLastChanged", are not reported in system change reports.
Changes that do not result in a value change are no longer reported in system change reports. For example, if the adapter providing a value changes, but the value itself does not change, no change will be reported.
External Adapter
VNE Server provides an adapter that lets you schedule and run an executable that is not part of the VNE Server software. As an example, you can use this adapter to run a custom script that copies exported VNE Server reports to a web server, making them available to others within your organization.
VNE Server>/Release 3.0 RN-3.0-55
VNE Server Release Notes
The properties for this adapter have been reorganized in 3.0.
Figure 3.0-39 External Adapter Configuration
VNE Server and Other OPNET Products
VNE Server 3.0 includes enhancements that impact the end-to-end workflow when importing from VNE Server into other OPNET software. The term OPNET is used in this section to refer to IT Guru, SP Guru, Modeler, IT Sentinel, and SP Sentinel.
Specifying VNE Server
When importing from VNE Server into OPNET, you must specify the VNE Server from which you wish to import data. In previous versions, VNE Server generated a vneserver.ior file that was used for this purpose. As of version 3.0, a VNE Server may be identified by hostname or IP address.
Incremental Changes
VNE Server 3.0 can be configured to track changes in the network database. This enables the import of incremental changes from VNE Server into OPNET.
Please see Tracking Changes in VNE Server on page RN-3.0-49 for additional information on configuring VNE Server to track changes.
RN-3.0-56 VNE Server>/Release 3.0
VNE Server Release Notes
Source Configuration Data
VNE Server can provide source configuration data to an OPNET client during an import from VNE Server. Please note that although VNE Server may possess additional configuration data for a device, the configuration data that VNE Server 3.0PL1 provides to OPNET 11.0 is: config, version, and vlan.
Note—In this release, configuration data is not available for incremental import or import of a previously exported VNE Server archive.
VNE Server>/Release 3.0 RN-3.0-57
VNE Server Release Notes
Preparing to Collect Data Using VNE Server
VNE Server is designed to use many of the leading third-party network management products as sources of information about your network. Depending upon operational practice, however, many of these products may retain stale or inaccurate information. For example, when devices undergo a name change, data about the device, under its old name, may be retained. When this data is imported into VNE Server, you may notice obsolete devices in the network model. If you adequately prepare before importing data into VNE Server, you will ensure a smoother integration with your network management environment.
Before adding VNE Server to your Network Management environment, OPNET recommends the following actions:
• Inventory each 3rd party product to be used with VNE Server
— Ensure that data collection intervals support your requirements for a near real-time view of the network by VNE Server. Modify as necessary.
— Identify stale data. Consider refreshing all data in third-party products before the first import into VNE Server.
— Review operational procedures for your network management products. Modify as necessary to ensure that complete and current information about your network is available for use by VNE Server.
• Review device configuration practices
— Configure an identical system prompt for all devices in your network, if you intend to have VNE Server directly collect configuration files from the devices.
— Review the Restrictions and Limitations section on Data Import on page RN-3.0-64 for unsupported device naming conventions. Rename devices that have names violating these limitations.
RN-3.0-58 VNE Server>/Release 3.0
VNE Server Release Notes
Tips for Using VNE Server
The following sections describe useful practices.
• Do not stop VNE Server services during database export. This causes the export to abort. No useful data will be available.
VNE Server exports the database when the Export Service runs and when an OPNET software user imports from VNE Server into IT Guru, SP Guru, IT Sentinel, SP Sentinel, or Modeler. The latter is referred to as a “client-initiated” export from VNE Server.
— To check if an scheduled export is in progress, open the VNE Server Console. If the Export Service is running, a database export is ongoing.
— To check if a client-initiated export is in progress, use the Live Event Log Viewer as described below. (Note: The VNE Server Console does not indicate when a client-initiated database export is in progress.)
a) Open the Live Event Log Viewer and set to View > All Events. This includes debug events.
b) Look for recent and continuing events indicating that an export is ongoing:
Source= Export Service_VNE_EXPORT_SERVICE_2_4_a_0 Description= Export Service exported another chunk
c) When the export has completed, the following debug message appears, and it is safe to stop VNE services:
Source= VNE_EXPORT_SERVICE_2_4_a_0 Description= Export Service ends export Data= Completed processing the export request
d) Set the Live Event Log Viewer to the previous view by selecting View > Filter Events. Press the Apply button.
• Do not stop VNE Server services during scheduled export of reports. This terminates the export of the current report, and no further reports are exported. Reports that have already been exported are available, but the set of exported reports will not be complete. To check if a report export is running, open the VNE Server Console. If the Report Export Service is running, a report export is ongoing.
• Do not enable the tracking of database changes until after initial data import is complete and a baseline model is created.
• Run Database Aging Service to remove stale data from the database.
• Run Maintenance Service to remove collected data, logs and other temporary files.
• Run Change Records Maintenance Service whenever you enable tracking of database changes.
VNE Server>/Release 3.0 RN-3.0-59
VNE Server Release Notes
• Add Interface Utilization Rollup Service to your schedule, if you are importing utilization data into VNE Server.
• Add Demand Traffic Processing Service and Demand Traffic Rollup Server to your schedule, if you are importing demand flow data into VNE Server.
RN-3.0-60 VNE Server>/Release 3.0
VNE Server Release Notes
Restrictions and Limitations
This section covers restrictions and limitations of this VNE Server release.
Version of DirectX
Versions of DirectX older than 9.0.c are known to interfere with the correct operation of the VNE Server installer and VNE Server. Select Start > Run > dxdiag to determine the version of DirectX installed. If your DirectX version is older than 9.0c, upgrade your version (FAQ 1539).
VNE Server 3.0 Installer
The configuration of the host system may cause the installer to hang or abort around the time the splash screen would normally appear. If you see this happen, try the following steps (FAQ 1536):
1 Disable any virus scan software that may be running.
2 If you are running Dell OpenManager on the system, disable OpenManager.
3 If you are running PC Anywhere on the system, disable PC Anywhere.
4 If you are running another remote access application, disable the application.
5 If you are trying to remotely drive the installation, try running the installer while directly accessing the system. Do not try to run the installer via a remote access session.
6 Copy the installer executable (setup.exe) to the system's disk, and execute the installer locally. Verify that installer file size matches the original you copied.
7 Check the version of DirectX. In the Start > Run dialog, type dxdiag.A DirectX Diagnostic Tool windows opens. Check the DirectX Version near the bottom of the window. If the version is older than 9.0.c, upgrade DirectX to version 9.0.cor newer.
8 Disable hardware acceleration for your video card.
9 Reboot the system and try again. After installation completes, re-enable any applications you disabled to get through the installation. If none of these steps allow installation to proceed, do the following:
9.1 Take a screen shot of any output, if possible, and forward to OPNET Technical Support.
9.2 Start the installer and immediately press and hold the CTRL key. When the initial installer progress dialog reaches 100% completion, a console window will appear. Installer output messages are displayed to this window. Capture (cut and paste, screenshots) the output, and forward to OPNET Tech Support. You may need to do this twice. On the first try, set the console window properties to support 999 lines in the display buffer. Save and check the "Modify shortcut..." radio button. Run the installer again in debug mode. You should be able to capture all output now.
VNE Server>/Release 3.0 RN-3.0-61
VNE Server Release Notes
Installation Restrictions
• The installation path for VNE Server, and the path chosen for the temporary directory and the archive directory cannot contain embedded spaces.
• OPNET Report Server and VNE Server should not be installed to the same parent directory on the same host.
Static Properties
Although the VNE Server Management Console provides the ability to change many properties, some properties are set at install time and should not be changed thereafter. They are
• archive directory
• temporary directory (Project Properties panel > rootTempDir)
• lock directory (Project Properties panel > rootLockDir)
• export directory (Adapter Resources panel > Export Service, ScheduledExport, Full Export, exportDir)
WARNING—Do not change the value of these properties.
If you feel you must change one of these directory locations, please contact OPNET Technical Support for assistance.
Uninstalling Previous Versions of VNE Server
If you installed a local license server with VNE Server 2.1 and VNE Server 3.0PL1, do not uninstall VNE Server 2.1. Doing so will uninstall the 3.0PL1 license server.
Migrating Product Configuration
Please note the following considerations for this release of VNE Server:
• Product migration is provided to upgrade from VNE Server 2.1PL2 to 3.0PL1. Upgrading from any version other than 2.1PL2 is not currently supported.
• If you wish to migrate VNE Server product configuration from a 2.1PL2 installation of VNE Server, either automatically as part of 3.0PL1 installation or manually after 3.0PL1 installation is complete, do not uninstall your 2.1PL2 version until after you have performed product migration.
RN-3.0-62 VNE Server>/Release 3.0
VNE Server Release Notes
• If you wish to migrate groups from a 2.1PL2 installation and you do not elect to do product migration as part of 3.0PL1 installation, you must export the groups from the 2.1PL2 database before you configure the Oracle database for 3.0PL1. When you run the setup accounts script (@setup_accounts.sql), all projects are removed from the Oracle database and you will no longer be able to export group definitions.
• If you choose to automatically migrate VNE Server product configuration during 3.0PL1 installation and the installer cannot find the VNE Server 2.1PL2 installation directory, you will get an error message and migration will fail. Manually run through the steps to upgrade in order to migrate VNE Server product configuration. When you start VNE Server, if you are prompted to enter a VNE Server Database Password make sure that you use the same value as the Local Database Password you entered in the VNE Server 3.0PL1 installer.
Launch of Control Panel
See Version of DirectX on page RN-3.0-61.
User Interface Operation
See Version of DirectX on page RN-3.0-61.
User Interface Look and Feel
If you are running VNE Server on Windows XP and have a white menu bar in the application window, change the theme from Windows XP to Windows Classic. You can change the theme in the Display panel by opening the Windows OS Control Panel > Display.
Service Startup
When a VNE Server host running a local license server is rebooted, VNE Server may be unable to return the license to the license server. If, following a reboot, you are unable to start VNE Server services, exit VNE Server and revoke the license.
Note—Please visit the FAQs section of the OPNET support website for additional troubleshooting information related to startup of VNE Server services.
VNE Server>/Release 3.0 RN-3.0-63
VNE Server Release Notes
Network Browser
• Keep the Network Browser closed during initial data import. The Network Browser, when open, is informed of network changes as data collection occurs. The Network Browser, when open, is informed of changes to the VNE Server database. Leaving the Network Browser closed during initial import of your network will enhance performance.
• Opening network browser against a large network when VNE Server services are stopped may cause an out of memory exception.
Data Collection
Some data collection restrictions are listed here.
• The Remote File Collection adapter cannot retrieve files from a directory path that contains embedded spaces.
• On some Windows 2000 systems, the CiscoWorks Config File Collection adapter will not terminate after data is collected. This blocks further VNE Server operation. To continue VNE Server operation, press return, and exit the open rsh window. You can work around this problem by replacing the rsh.exe program in the Winnt\system32 directory with an rsh.exe program from a Windows NT system.
• If you are using Window PuTTY or Windows default rcp to perform remote operations (such as plink, pscp, or psftp) for the CiscoWorks Config File Collection or HP OpenView Performance Agent import adapter, you must set the “Log on as” property of the OPNET VNES Adapter Server to the Windows user running VNE Server. Failure to set this property correctly may result in error messages or timeouts. (FAQ 1529).
Data Import
The name of an aggregate interface on a Catalyst switch is generated at the time of the aggregate interface creation, rather than explicitly specified, and is not included in the device configuration file. The Device Config File Import adapter must therefore infer a name based on the member ports, as defined in the configuration. This inferred name may not match the CatOS-generated name contained in the interface MIB, and merge issues may result.
Hostname Changes
If a device hostname or system name is changed by a network administrator, it may affect VNE Server. This section describes how to manage these changes.
Device Duplication By default the VNE Server adapter priority used for the sysName model attribute is set to an equal value for all adapters. If you have changed the sysName adapter priority settings, and a hostname is changed, you may see duplicate representations of the same physical device in the network model.
RN-3.0-64 VNE Server>/Release 3.0
VNE Server Release Notes
When hostnames are changed in your network, VNE Server may produce the same device or portions of the device under both names, especially if you are using third-party network management products as data sources. You can recover from this scenario by using the Network Browser to delete the duplicate devices from your model. In your third-party data sources, remove the obsolete device data and re-import from that source.
As a last resort, you can block import of the device from the adapter that is a source for the device and delete the obsolete device from the database. Use the Network Browser for both operations.
Impact on Device Groups When device names change, any device groups that reference the device by the old name will no longer include the device. The old name will still appear in the device group, but the device no longer shows up in a model when its device group is imported into a Guru client. If the device is a member of any blocked import groups, data import from the blocked source will resume for the device.
Naming Conventions
VNE Server imposes few restrictions on the names given to devices in your network. Device names may contain spaces, slashes, backslashes, and punctuation marks. Some unusual combinations that are not currently supported are listed below.
Hostname and System Name Restrictions
• If the hostname of a device comprises a series of dots (one or more), no splitting is performed on the name to separate it into host.domain. If the hostname is “....foo.com”, the device is imported to VNE as “...”; the domain is ignored.
• Cisco devices with hostnames longer than 29 characters are imported as 2 devices.
• Devices with a hostname ending in a “\” character are imported into the network model with “\” missing from the name.
• Devices with hostnames that contain XML special character elements either fail to be imported or are imported incorrectly. Character strings such as “>” and “<” will be converted to “>” and “<“ respectively. Other XML elements may cause data import problems.
Interface Description Restrictions
Interface descriptions that contain XML special character elements fail to be imported or are imported incorrectly. Character strings such as “>” and “<” will be converted to “>” and “<“ respectively. Other XML elements may cause data import problems.
VNE Server>/Release 3.0 RN-3.0-65
VNE Server Release Notes
Duplicate IP Addresses
Duplication of IP addresses in network data may interfere with VNE Server’s ability to correctly merge objects and infer connections.There may be a valid reason why IP addresses are duplicated in your network. There may also be instances where duplicate IP addresses are being reported by the device operating system either as intended behavior for a particular configuration or as a result of a software problem.
• The Adapter Merge Warnings (Devices Merged) and Adapter Merge Warnings (Interfaces Merged) reports are provided to help determine if unexpected merging of devices and interfaces is occurring.
• In order to prevent interfaces with duplicate IP addresses from being matched and merged in the VNE Server database, create an IP Address Merge Exclusions text file listing the duplicated IP addresses. Open the Management Console and select the Project Properties tab. Set the “exclude from IP address merge rule” property to point to your created text file.
• For the purposes of link inference, if an interface is administratively down, the interface will not be considered as a link endpoint. However, if there are duplicate IP addresses for interfaces, and these interfaces are not administratively down, connections may not be inferred correctly. Consult the Duplicate IP Address report to determine if this may be problem.
Juniper ERX devices report the same IP address on interfaces that are configured on different virtual routers. For example:
virtual-router FOOinterface FastEthernet 1/0.1
ip address 10.1.1.1 255.255.255.0!virtual-router BARinterface FastEthernet 1/0.2
ip address 10.1.1.1 255.255.255.0!
This has implications for both interface merging and link inference. An IP Address Merge exclusions file can be used to prevent merging based on the duplicate IP address; however link inference will still infer links using this address.
Duplicate MAC Addresses
Some vendor devices report duplicate MAC addresses on interfaces. This may interfere with VNE Server’s ability to correctly merge objects and infer connections.
The Adapter Merge Warnings (Devices Merged) and Adapter Merge Warnings (Interfaces Merged) reports are provided to help determine if unexpected merging of devices and interfaces is occurring.
RN-3.0-66 VNE Server>/Release 3.0
VNE Server Release Notes
In order to prevent interfaces with duplicate MAC addresses from being matched and merged in the VNE Server database, create a text file that lists the duplicated MAC Addresses. Open the Management Console, and select the Project Properties tab. Set the exclude from MAC address merge rule property to point to your created text file.
When the CAM engine is enabled in Link and Connection Inference, MAC address forwarding tables are used to infer connections between Layer-2 devices. Duplicated MAC Addresses may lead to inference of extra links. Consult the Duplicate MAC Address report to determine if this may be a problem. A workaround is to use the CamPruneDupMacAddrs advanced option in Link and Connection Inference. When this feature is enabled and duplicate MAC addresses are encountered, only one of the interfaces with duplicate MAC address is chosen as a link endpoint. Please see Link and Connection Inference on page RN-3.0-35 for additional information.
SysName Not Set
VNE Server uses complex rules to match and merge devices in the VNE Server database during import. Some configuration data types have more identifying features than others. If a device does not have “sysname” set, some of the data for that device may not be matched and merged properly. Consult the “SysName Not Set” report to determine if there are any devices in your network that do not have sysname set. Address all issues, then collect and import data for these devices again.
SysName-Prompt Mismatch
VNE Server uses complex rules to match and merge devices in the VNE Server database during import. Some configuration data types have more identifying features than others. When a device has the sysname set to one value and the prompt set to another non matching value, some of the data for that device may not be matched and merged properly. Consult the “SysName-Prompt Mismatch” report to determine if there are any devices in your network for which sysname and prompt do not match. Address all issues, then collect and import data for these devices again.
Report Manager
Report Manager can experience an out of memory exception when attempting to open certain reports for a very large database (in terms of number of nodes and/or number of interfaces).
Report Export Service
Report Export Service can experience an out of memory exception when attempting to export certain reports for a very large database (in terms of number of nodes and/or number of interfaces).
VNE Server>/Release 3.0 RN-3.0-67
VNE Server Release Notes
Database Access
When VNE Server detects problems with database access, the service framework is automatically shut down, and Emergency level messages are displayed in the Event Viewer. This can happen if the network database is down, unreachable, or in a bad state. The service framework will also shut down if data that violates the underlying table schema is imported into the database. Some examples of this are type mismatches between data and table schema or a field overflow situation. Data problems may arise when receiving invalid or unexpected data from a 3rd party product or directly from a device polled by VNE Server. In either case, services will shut down when the invalid data item is encountered. Contact OPNET Technical Support for assistance when you encounter this situation. To work around this situation, open the VNE Server Management Console. Select the Project Properties panel, and expand VNESFeatures. Set the “stopServicesOnDatabaseFailures” property to false. Apply the change, and restart services.
Licensing
VNE Server has the following restrictions and limitations with respect to product licensing.
• VNE Server requires an OPNET 11.0 license server and a license file in the 11.0 format.
• Standalone licensing is not supported by VNE Server.
• Loanable licenses are not supported by VNE Server.
• Only one local license server may be installed on the VNE Server host.
• The OPNET licensing software deployed with VNE Server does not include the License Manager user interface. Instead, a command line utility, LS_UTIL, is provided.
• VNE Server’s command line licensing utility (LS_UTIL) cannot revoke a license managed by a remote license server.
RN-3.0-68 VNE Server>/Release 3.0
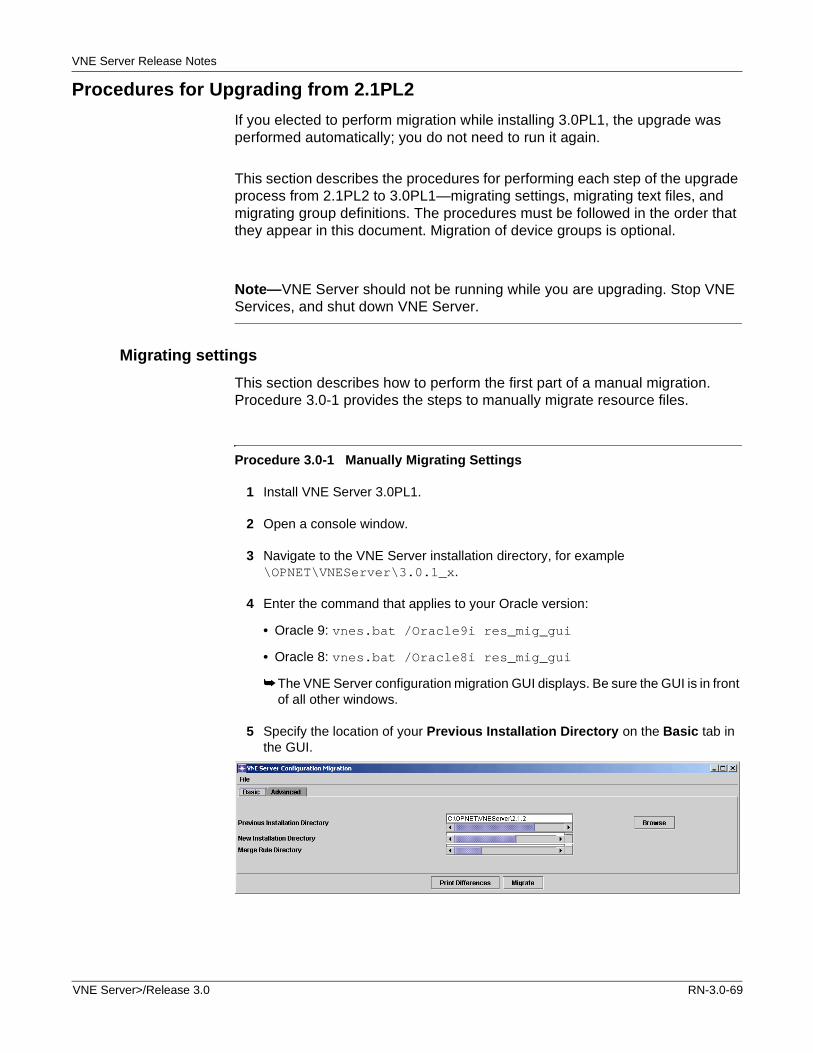
VNE Server Release Notes
Procedures for Upgrading from 2.1PL2
If you elected to perform migration while installing 3.0PL1, the upgrade was performed automatically; you do not need to run it again.
This section describes the procedures for performing each step of the upgrade process from 2.1PL2 to 3.0PL1—migrating settings, migrating text files, and migrating group definitions. The procedures must be followed in the order that they appear in this document. Migration of device groups is optional.
Note—VNE Server should not be running while you are upgrading. Stop VNE Services, and shut down VNE Server.
Migrating settings
This section describes how to perform the first part of a manual migration. Procedure 3.0-1 provides the steps to manually migrate resource files.
Procedure 3.0-1 Manually Migrating Settings
1 Install VNE Server 3.0PL1.
2 Open a console window.
3 Navigate to the VNE Server installation directory, for example \OPNET\VNEServer\3.0.1_x.
4 Enter the command that applies to your Oracle version:
• Oracle 9: vnes.bat /Oracle9i res_mig_gui
• Oracle 8: vnes.bat /Oracle8i res_mig_gui
➥ The VNE Server configuration migration GUI displays. Be sure the GUI is in front of all other windows.
5 Specify the location of your Previous Installation Directory on the Basic tab in the GUI.
VNE Server>/Release 3.0 RN-3.0-69
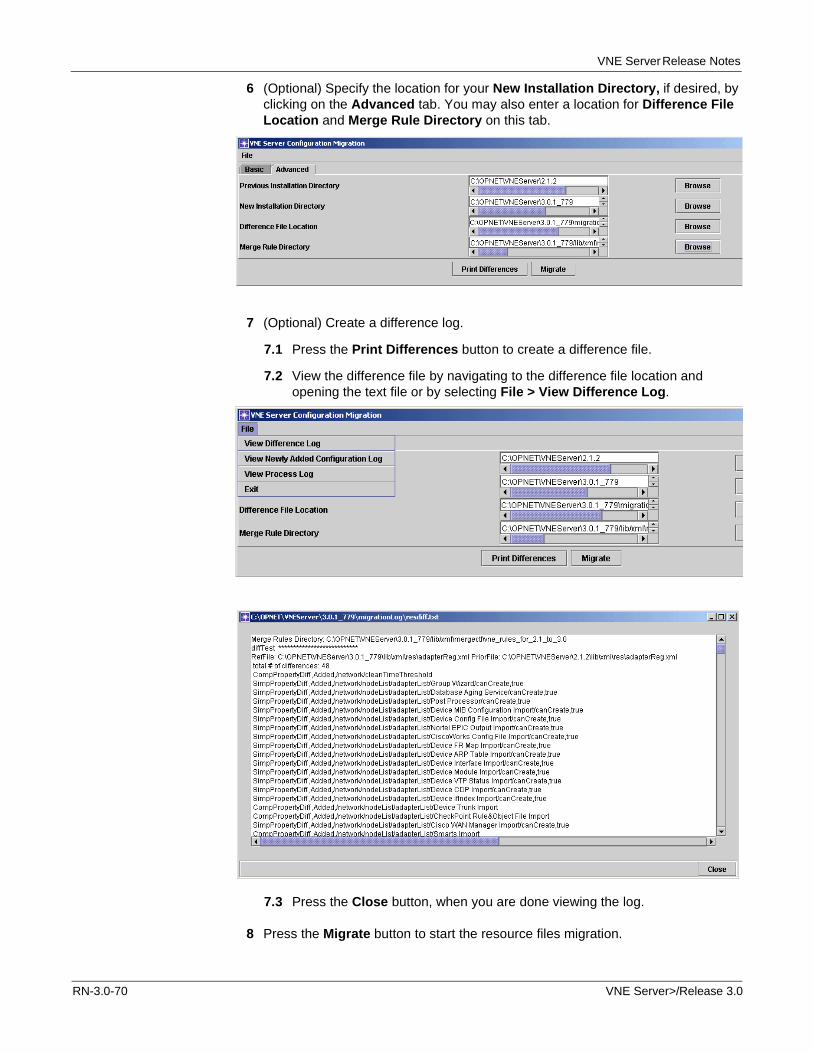
VNE Server Release Notes
6 (Optional) Specify the location for your New Installation Directory, if desired, by clicking on the Advanced tab. You may also enter a location for Difference File Location and Merge Rule Directory on this tab.
7 (Optional) Create a difference log.
7.1 Press the Print Differences button to create a difference file.
7.2 View the difference file by navigating to the difference file location and opening the text file or by selecting File > View Difference Log.
7.3 Press the Close button, when you are done viewing the log.
8 Press the Migrate button to start the resource files migration.
RN-3.0-70 VNE Server>/Release 3.0
VNE Server Release Notes
9 When the migration completes, start VNE Server 3.0PL1 and open the VNE Server Management Console. Verify that previous VNE Server configurations were migrated correctly.
End of Procedure 3.0-1
Note—If you encounter any problems during the migration, you can recover in the following way. Make sure that VNE Server is shut down. Copy one or more files from <vnes3.0_install>\lib\xml\res_orig to <vnes3.0_install>\lib\xml\res. If you wish to completely undo the results of this upgrade step (migration of settings) and restore the VNE Server 3.0PL1 default values for adapter resources, schedule, priorities, etc., delete all files from <vnes3.0_install>\lib\xml\res and replace them with the files from <vnes3.0_install>\lib\xml\res_orig.
Migrating Text Files
This section describes how to perform the second step of the upgrade process. Procedure 3.0-2 provides the steps to manually migrate user-created files.
Note—During the migration process, old files are renamed from filename to filename_orig. If there is any problem during migration, you can recover by changing the filenames back to their original names.
Note—The following procedure assumes that you have completed Procedure 3.0-1.
Procedure 3.0-2 Manual Migration of User-Created Files
1 Navigate to the VNE Server installation directory.
2 Enter the command that applies to your Oracle version:
• Oracle 9: vnes.bat /Oracle9i file_mig <old_install_dir> <new_install_dir>
• Oracle 8: vnes.bat /Oracle8i file_mig <old_install_dir> <new_install_dir>
3 Open VNE Server to verify the results.
End of Procedure 3.0-2
VNE Server>/Release 3.0 RN-3.0-71
VNE Server Release Notes
During the migration, a log file is created in <new_install_dir>\migration\oldVersion. After migration you can examine this file. The log file details what was executed during the file migration.
Migrating Groups (Optional)
If you have groups defined in a 2.1PL2 VNE Server project that you wish to migrate forward into VNE Server 3.0PL1 read this section.
Procedure 3.0-3 describes the steps to manually migrate device groups.
WARNING—If you wish to migrate groups from a 2.1PL2 installation, you must export the groups from the 2.1PL2 database before you configure the Oracle database for 3.0PL1. When you run the setup accounts script (@setup_accounts.sql), all projects are removed from the Oracle database and you will no longer be able to export group data.
Note—This procedure assumes that you have completed Procedure 3.0-2.
Procedure 3.0-3 Manually Migrating Device Groups
1 Navigate to the VNE Server 3.0PL1 installation directory.
2 Enter the command that applies to your Oracle version:
• Oracle 9: vnes.bat /Oracle9i grp_mig <old_install_dir> <new_install_dir> dbUser dbPwd
• Oracle 8: vnes.bat /Oracle8i grp_mig <old_install_dir> <new_install_dir> dbUser dbPwd
where dbUser and dbPwd are the VNE Server username and password.
3 Check the log file in <vnes3.0_install>\migration\oldVer\Groups to verify that device group migration executed. If no device groups exist in the 2.1PL2 database, no group migration is performed.
Note—When device group migration is complete, perform the following steps:
4 Run the collection and import adapters necessary to build network topology.
5 Import your device groups.
5.1 Open the VNE Server Management Console to verify that the “inputFile” of groupCreate and addNodeToGroup categories in the ASCII Generic Data Import adapter was updated to point to the migrated device group files.
5.2 Set the two data categories to active, and run the ASCII Generic Data Import adapter.
RN-3.0-72 VNE Server>/Release 3.0
VNE Server Release Notes
5.3 Run the ASCII Generic Data Import adapter.
End of Procedure 3.0-3
WARNING—Device group migration does not handle sub-groups. If any device groups contain other groups, the sub-groups will not be in the ASCII group files created. You must manually recreate the sub-groups using the Group Configuration tool or ASCII data files.
If you migrated device groups from the previous installation, and you wish to delete them, perform this procedure.
Procedure 3.0-4 Delete Imported Device Groups
1 From the Control Panel, select Configuration > Open Group Configuration.
➥ The VNE Group Configuration browser opens.
2 Click on the root node in the left navigation panel of the Group Browser.
➥ A list of groups defined for your project appears in the right panel.
3 Select a group that you wish to delete. Right-click and select Delete from the menu to delete the group. Repeat for each group you wish to delete.
End of Procedure 3.0-4
VNE Server>/Release 3.0 RN-3.0-73
VNE Server Release Notes
Converting License File Using License Server Utility
This section contains instructions for converting a pre-11.0 license file using the VNE Server command line license server utility (LS_UTIL).
Procedure 3.0-5
1 Make sure VNE Server is not running. If it is, stop VNE Server services and exit VNE Server completely.
2 Open a DOS Prompt/Console window, and navigate to the VNE Server installation directory.
3 Enter the following command and note the name of the computer, paying attention to case:
hostname
4 Start the license manager utility (LS_UTIL) on the computer where you want to add the license. The command to run the License Manager is
vnes.bat /<oracle_version> /lic_host <hostname> /lic_port <port> LS_UTIL
where: <oracle_version> is either Oracle8i or Oracle9i<hostname> is the hostname of the license server<port> is the port for the license server (default value is port_a)
5 At the manager> prompt, enter:
convert11_db
➥ Make note of the Transaction code that displays.
Note—IMPORTANT: Leave this session open until you receive the approval code from OPNET.
6 Open the OPNET Licensing Web Page, using the Start Menu on Windows.
7 Click on the link to Perform license operations.
8 Select the License Operation you wish to complete. Make sure Convert Pre-11.0 License File is selected, then click Next.
9 Enter the transaction code from the VNE Server license manager utility by copying it from the console window and pasting it into the browser window.
10 Enter the hostname of the computer on which you are installing the license (case-sensitive). Click the Next button.
11 Select the license you wish to convert.
12 Confirm that all of the information is correct in the License Operation Confirmation panel. After you have confirmed the information is correct, click on the Get Approval Code button.
RN-3.0-74 VNE Server>/Release 3.0
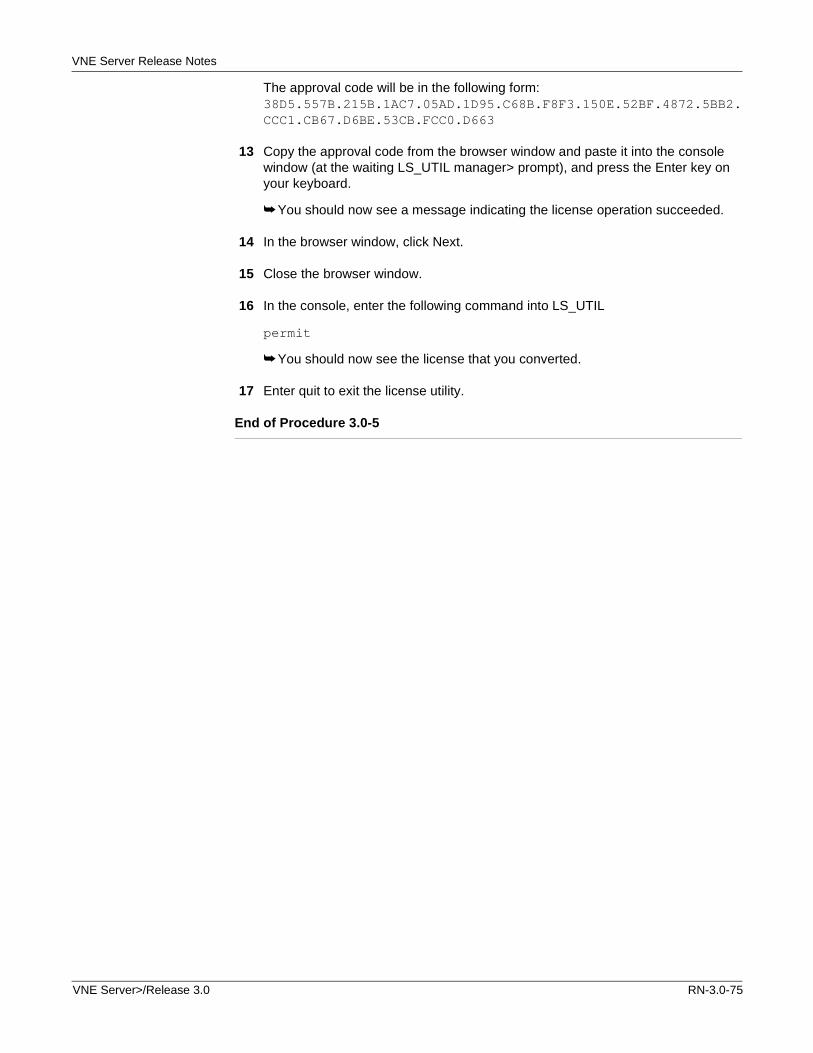
VNE Server Release Notes
The approval code will be in the following form: 38D5.557B.215B.1AC7.05AD.1D95.C68B.F8F3.150E.52BF.4872.5BB2.CCC1.CB67.D6BE.53CB.FCC0.D663
13 Copy the approval code from the browser window and paste it into the console window (at the waiting LS_UTIL manager> prompt), and press the Enter key on your keyboard.
➥ You should now see a message indicating the license operation succeeded.
14 In the browser window, click Next.
15 Close the browser window.
16 In the console, enter the following command into LS_UTIL
permit
➥ You should now see the license that you converted.
17 Enter quit to exit the license utility.
End of Procedure 3.0-5
VNE Server>/Release 3.0 RN-3.0-75
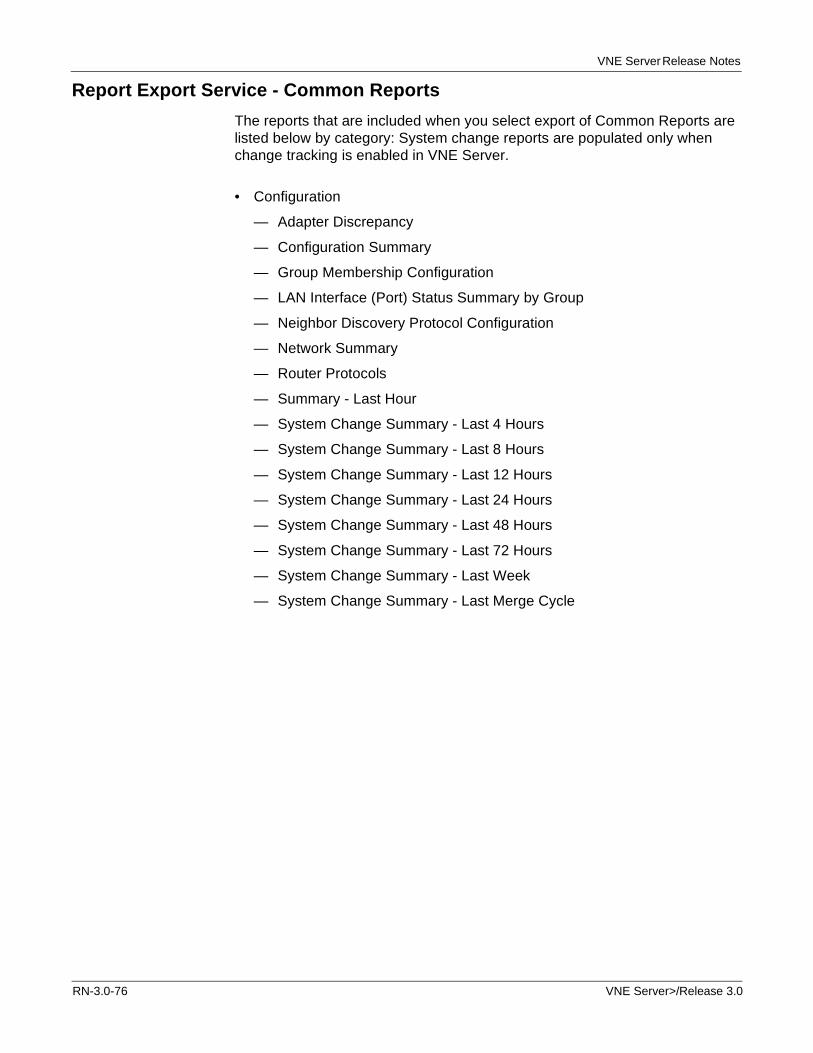
VNE Server Release Notes
Report Export Service - Common Reports
The reports that are included when you select export of Common Reports are listed below by category: System change reports are populated only when change tracking is enabled in VNE Server.
• Configuration
— Adapter Discrepancy
— Configuration Summary
— Group Membership Configuration
— LAN Interface (Port) Status Summary by Group
— Neighbor Discovery Protocol Configuration
— Network Summary
— Router Protocols
— Summary - Last Hour
— System Change Summary - Last 4 Hours
— System Change Summary - Last 8 Hours
— System Change Summary - Last 12 Hours
— System Change Summary - Last 24 Hours
— System Change Summary - Last 48 Hours
— System Change Summary - Last 72 Hours
— System Change Summary - Last Week
— System Change Summary - Last Merge Cycle
RN-3.0-76 VNE Server>/Release 3.0

VNE Server Release Notes
• Inventory
— Access List Summary
— ATM PVC Summary
— ATM SVC Summary
— ATM-FR PVC Summary
— Asset Inventory
— Chassis Module Summary
— Connected Components
— Device and Vendor Summary (System Object ID)
— Device and Vendor Summary (System Description)
— Discovered Neighbors
— DNS Alias Summary
— FR PVC Summary
— Interface (Port) Status
— Interface Summary
— IP Subnets
— IP Static Routes
— Node Connections
— Node Summary
— Physical Link Summary
— Software Version Summary
— VC Summary
• Utilization
— Interface Util Vol - Hourly
• Demands
— Demands - Subnet Traffic - Last Hour
• Troubleshooting
— Device Config File Collection Errors
— Invalid Files
— Neighbors Not Found in Model
— Network Troubleshooting Snapshot
VNE Server>/Release 3.0 RN-3.0-77
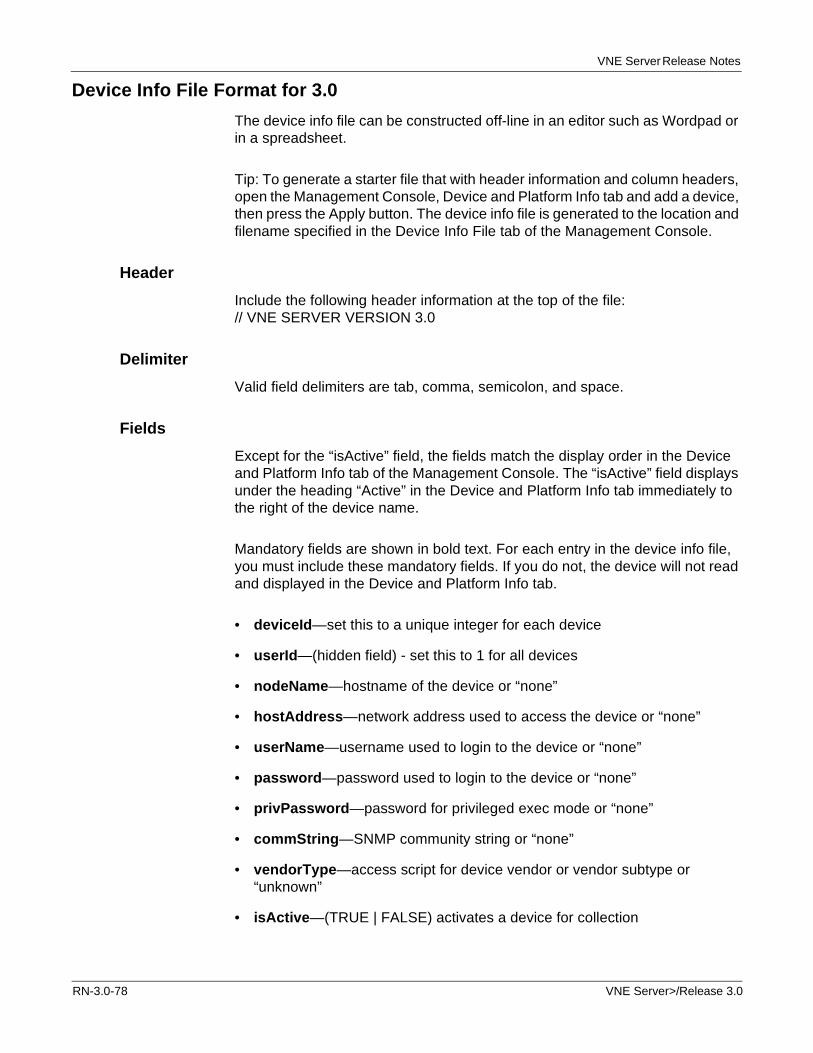
VNE Server Release Notes
Device Info File Format for 3.0
The device info file can be constructed off-line in an editor such as Wordpad or in a spreadsheet.
Tip: To generate a starter file that with header information and column headers, open the Management Console, Device and Platform Info tab and add a device, then press the Apply button. The device info file is generated to the location and filename specified in the Device Info File tab of the Management Console.
Header
Include the following header information at the top of the file: // VNE SERVER VERSION 3.0
Delimiter
Valid field delimiters are tab, comma, semicolon, and space.
Fields
Except for the “isActive” field, the fields match the display order in the Device and Platform Info tab of the Management Console. The “isActive” field displays under the heading “Active” in the Device and Platform Info tab immediately to the right of the device name.
Mandatory fields are shown in bold text. For each entry in the device info file, you must include these mandatory fields. If you do not, the device will not read and displayed in the Device and Platform Info tab.
• deviceId—set this to a unique integer for each device
• userId—(hidden field) - set this to 1 for all devices
• nodeName—hostname of the device or “none”
• hostAddress—network address used to access the device or “none”
• userName—username used to login to the device or “none”
• password—password used to login to the device or “none”
• privPassword—password for privileged exec mode or “none”
• commString—SNMP community string or “none”
• vendorType—access script for device vendor or vendor subtype or “unknown”
• isActive—(TRUE | FALSE) activates a device for collection
RN-3.0-78 VNE Server>/Release 3.0

VNE Server Release Notes
• isActiveDCFC—(TRUE | FALSE) activates a device for Device Config File Collection (isActive must be set for this flag to be read)
• isActiveDMCI—(TRUE | FALSE) activates a device for Device MIB Configuration Import (isActive must be set for this flag to be read)
• isActiveMIUI—(TRUE | FALSE) activates a device for MIB Interface Utilization Import (isActive must be set for this flag to be read)
• accessMethod—non-TACACS (1), TACACS (2), SSHv1(3) or SSHv2(4)
• sysName—System Name by which the device is known in the VNE Server database
• v3userName—SNMPv3 User Name
• contextID—SNMPv3 Context ID
• contextName—SNMPv3 Context Name
• v3AuthProt—SNMPv3 Authentication Protocol
• v3SecurityLevel—SNMPv3 Security Level
• v3AuthPassword—SNMPv3 Authentication Password
• v3PrivProt—SNMPv3 Privacy Protocol
• v3PrivPassword—SNMPv3 Privacy Password
• comments
Example
This example shows three entries in a device info file with valid data for all mandatory fields.
Figure 3.0-40 Device Info File Example
VNE Server>/Release 3.0 RN-3.0-79

VNE Server Release Notes
RN-3.0-80 VNE Server>/Release 3.0
VNE Server 3.0.1Release Notes for Software Update
These release notes provide content related to software updates to VNE Server 3.0.1.
Because release notes are sometimes updated after the product documentation is distributed, visit the OPNET website (www.opnet.com/support) often to check for the newest version of these release notes and notes for previous releases.
Part number:Version:© 2005 by OPNET Technologies, Inc. All rights reserved.This information is subject to all restrictions set forth in the VNE Server> documentation.
VNE Server>/Release 3.0 Software Update RN-3.0-1
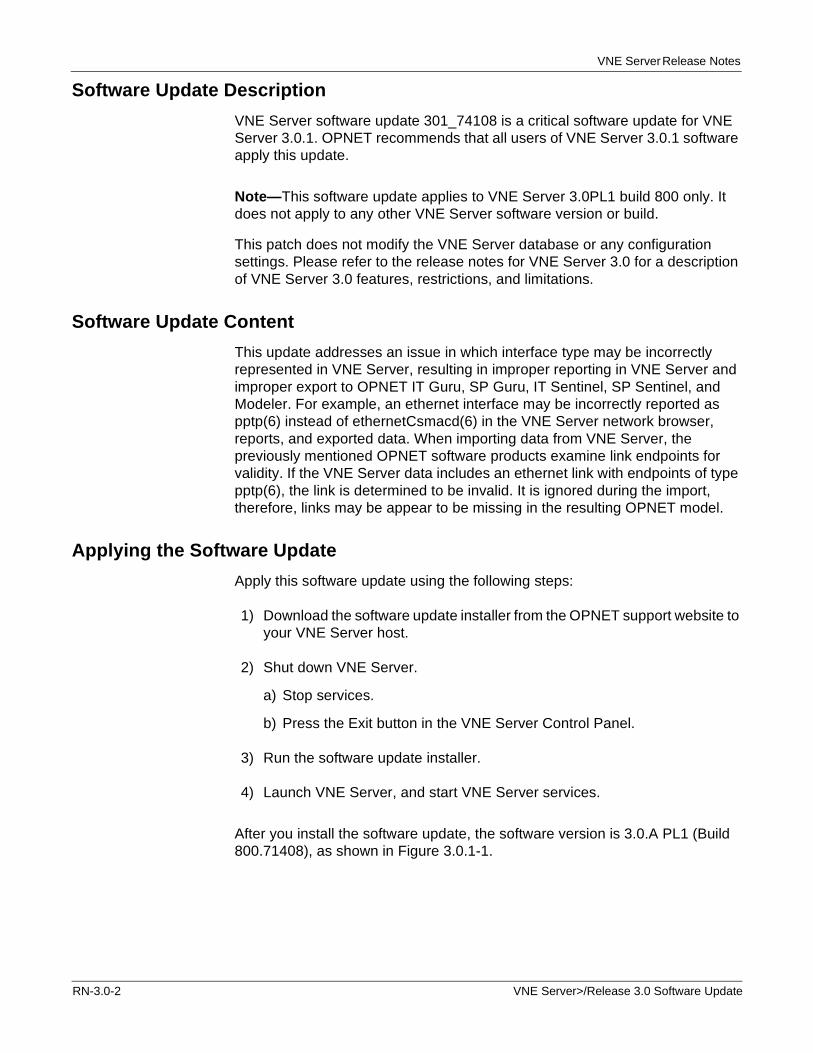
VNE Server Release Notes
Software Update Description
VNE Server software update 301_74108 is a critical software update for VNE Server 3.0.1. OPNET recommends that all users of VNE Server 3.0.1 software apply this update.
Note—This software update applies to VNE Server 3.0PL1 build 800 only. It does not apply to any other VNE Server software version or build.
This patch does not modify the VNE Server database or any configuration settings. Please refer to the release notes for VNE Server 3.0 for a description of VNE Server 3.0 features, restrictions, and limitations.
Software Update Content
This update addresses an issue in which interface type may be incorrectly represented in VNE Server, resulting in improper reporting in VNE Server and improper export to OPNET IT Guru, SP Guru, IT Sentinel, SP Sentinel, and Modeler. For example, an ethernet interface may be incorrectly reported as pptp(6) instead of ethernetCsmacd(6) in the VNE Server network browser, reports, and exported data. When importing data from VNE Server, the previously mentioned OPNET software products examine link endpoints for validity. If the VNE Server data includes an ethernet link with endpoints of type pptp(6), the link is determined to be invalid. It is ignored during the import, therefore, links may be appear to be missing in the resulting OPNET model.
Applying the Software Update
Apply this software update using the following steps:
1) Download the software update installer from the OPNET support website to your VNE Server host.
2) Shut down VNE Server.
a) Stop services.
b) Press the Exit button in the VNE Server Control Panel.
3) Run the software update installer.
4) Launch VNE Server, and start VNE Server services.
After you install the software update, the software version is 3.0.A PL1 (Build 800.71408), as shown in Figure 3.0.1-1.
RN-3.0-2 VNE Server>/Release 3.0 Software Update
VNE Server Release Notes
Figure 3.0.1-1VNE Server Version after Software Update
Impact on VNE Server Configuration Settings
This update does not impact VNE Server settings. No reconfiguration of VNE Server is required after installing this software update.
Impact on VNE Server Database
This update does not impact the VNE Server database. The existing VNE Server 3.0 database is retained.
Additional Software Update Notes
The contents of this software update are copied to the VNE Server installation directory into a patches\<updateID> directory tree. This patches directory tree has the following elements:
• <updateID>_applied directory—An empty directory to denote the update is active.
• files director—Contains the files that constitute this update.
• InstallLogs directory—Contains a log file from the patch installer.
• orig directory—Contains the original files replaced by this update.
• scripts directory—Contains applyPatch and removePatch scripts.
The Windows uninstaller for this software update is not supported. To remove this software update first shut down VNE Server. Next, run the removePatch script in the scripts directory. After the removePatch script runs, VNE Server is restored to its original state. The orig and
VNE Server>/Release 3.0 Software Update RN-3.0-3
VNE Server Release Notes
<updateID>_applied directories are removed. To re-apply the update, shut down VNE Server and run the applyPatch script in the scripts directory. If the patches\301_71408 directory is deleted or corrupted, the software update can no longer be removed.
RN-3.0-4 VNE Server>/Release 3.0 Software Update